If you’re having problems with users submitting invalid email addresses in your WordPress forms, the Gravity Forms QuickEmailVerification Add-On can help you solve the issue.
With the add-on, you can set up real-time Gravity Forms email validation using the QuickEmailVerification API. This lets you check whether an email address is “real” before allowing the user to submit the form.
It also offers other features, such as letting you create a custom email blocklist or block certain types of email addresses, such as emails from disposable email services.
In this post, we’ll introduce you to the QuickEmailVerification service and some of the benefits and use cases for the add-on. Then, we’ll show you step-by-step how to set up the add-on on your website.
Note: The Gravity Forms QuickEmailVerification Add-On is part of Gravity Labs — our home for experimental add-ons. It’s free with your Gravity Forms license, but it’s experimental and outside our official support. Labs is also how we learn what our community wants to see in the product, so if you try it, let us know what you think.
What is QuickEmailVerification?
As the name suggests, QuickEmailVerification is an email verification service that helps you confirm whether a user’s email address is real.
In addition to checking a single email address in real time, you can also use it for list cleaning and bulk email checking.
To determine whether a user’s email address is valid, it uses multiple verification checks including syntax, domain MX records, and SMTP-level handshakes.
It also supports further checking even for valid email addresses. For example, it lets you block disposable email services (such as Guerilla Mail), free email services, role-based services, and more.
QuickEmailVerification offers a free plan that lets you check 100 email addresses per day.
After that, you can choose between purchasing one-time credits that never expire or using a fixed monthly plan. We’ll detail pricing information below.
Why use the Gravity Forms QuickEmailVerification Add-On?
With the Gravity Forms QuickEmailVerification Add-On, you can connect to the QuickEmailVerification API to automatically verify the email address a user enters in the Email field before allowing them to submit the form.
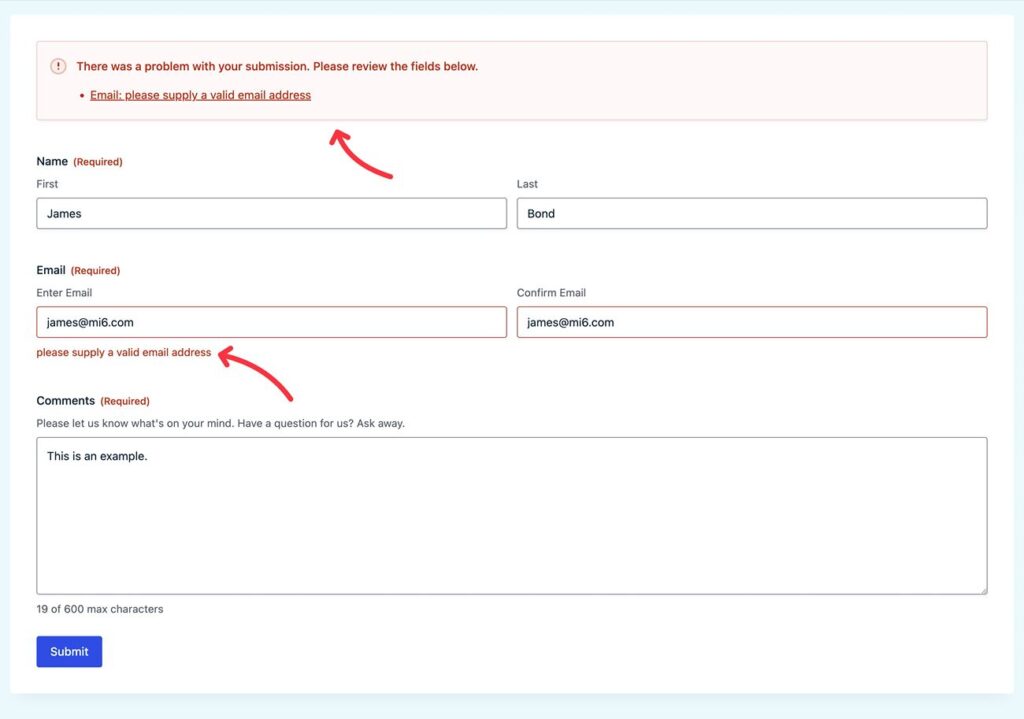
If a user tries to submit or save a form with an invalid email address, Gravity Forms will show an error message and the user will not be able to submit the form until they enter a valid email address.
Here are some specific features of the add-on:
- Enable email validation globally – Enable email validation for all of your forms with a single toggle.
- Enable/disable on a per-form basis – Manually override the global default to turn email validation on or off for a specific form.
- Create a custom domain blocklist – Manually block emails on certain domains, regardless of whether they’re real or not.
- Block unwanted email types – In addition to blocking specific domains, you can also block certain types of email addresses such as disposable emails, free email accounts, catch-all/wildcard emails, and generic role-based emails.
- Cache responses to limit API usage – Cache the results of an email validation to avoid spending multiple credits validating the same email address. You can fully customize the caching period or turn it off completely.
While the add-on can be useful for all different kinds of forms, here are some of the most notable form types that can benefit:
- Lead generation forms
- User registration forms, which makes it a great WordPress email verification plugin
- Application forms
- Gated content forms
- Quote forms
- Contact forms
- …any other form type where collecting a reliable email address is important
How to set up and use Gravity Forms QuickEmailVerification
Now, let’s get into the full tutorial on how you can use the Gravity Forms QuickEmailVerification Add-On to start validating emails in your form submissions.
1. Install the Gravity Forms QuickEmailVerification Add-On
To begin, you need to install the Gravity Forms QuickEmailVerification Add-On on your site.
As we mentioned earlier, the QuickEmailVerification Add-On is part of Gravity Labs. While these add-ons are free with any Gravity Forms license, they sit outside the normal suite of Gravity Forms add-ons.
First, you need to download the add-on from the Gravity Labs website:
- Go to the QuickEmailVerification Add-On page at Gravity Labs.
- Log in to your existing Gravity Forms account on Gravity Labs, if you haven’t done so already.
- Click the Download button.
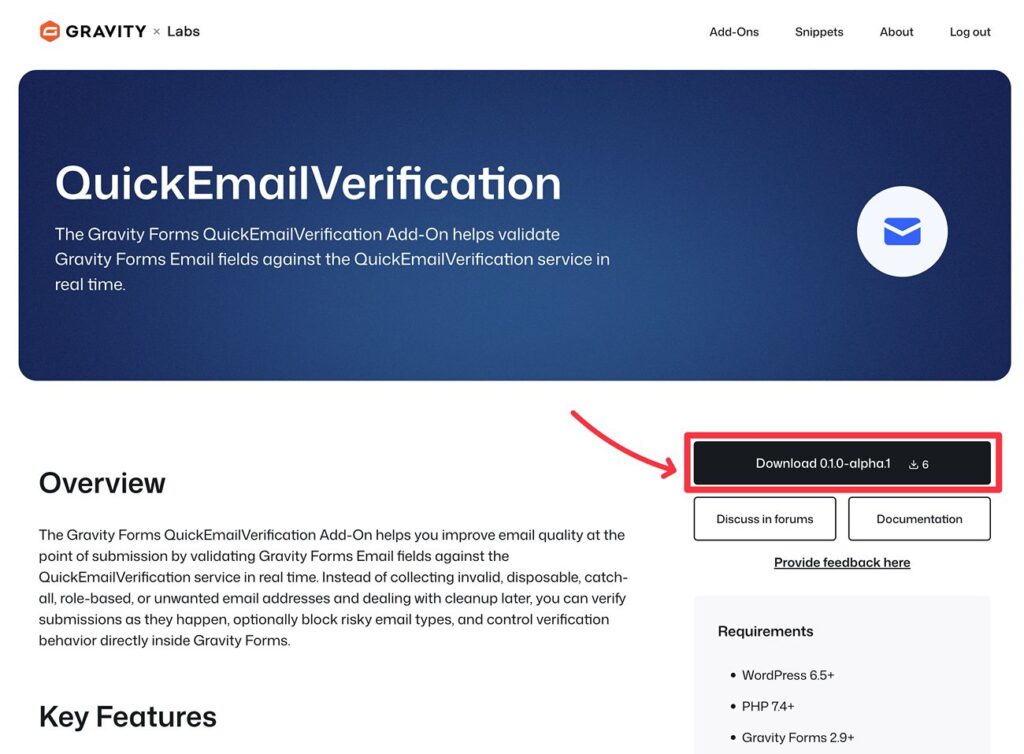
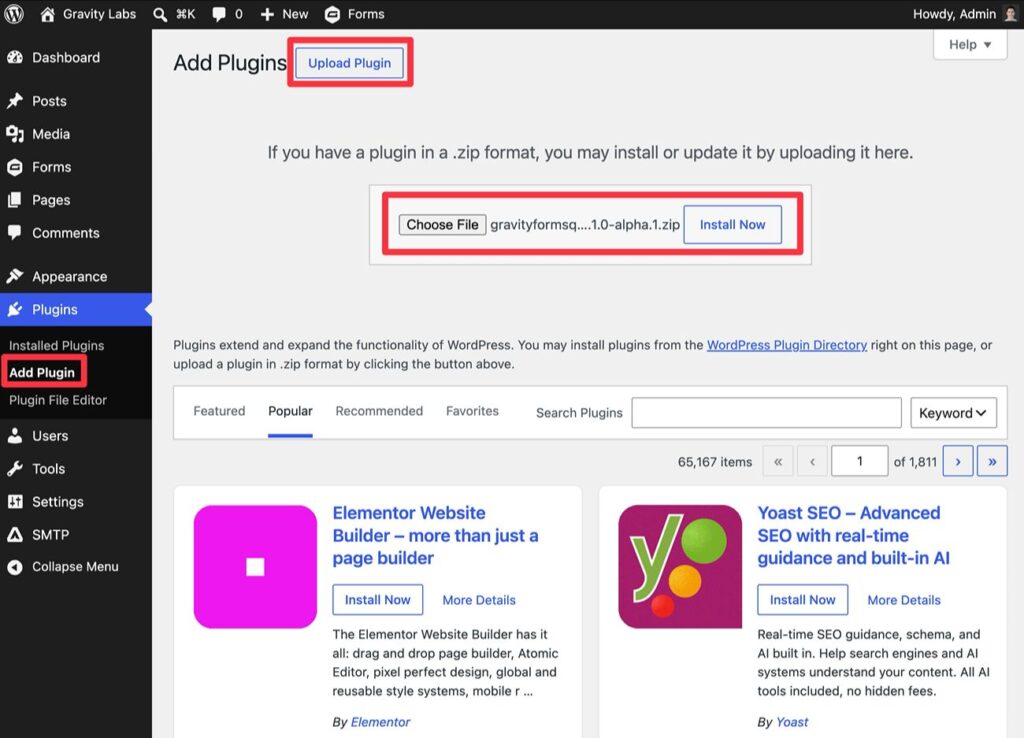
After you’ve downloaded the add-on’s ZIP file to your computer, you can upload and install it like any other WordPress plugin:
- Go to Plugins → Add Plugin in your WordPress dashboard.
- Click Upload Plugin.
- Select the ZIP file and click Install Now.
- On the next screen, make sure to activate the plugin.
2. Register for your QuickEmailVerification account
Next, you need to register for your QuickEmailVerification account, if you don’t already have one.
QuickEmailVerification has a free plan that lets you verify 100 email addresses per day (~3,000 per month). Essentially, this lets you verify 100 form submissions per day, which should be enough for a lot of WordPress websites. Potentially more with caching, depending on your use case.
You can sign up here and follow this tutorial using the free version.
If you ever need to exceed the free plan, you have two options:
- One-time credit purchases (pay as you go) – Pay anywhere from $4 for 500 credits all the way up to $3,500 for 5,000,000 credits (or even higher customer amounts). The credits never expire.
- Monthly plans – Pay a fixed monthly fee for a certain daily allocation, starting at $25 per month to verify up to 500 emails per day.
3. Create your QuickEmailVerification API key
Next, you need to create your QuickEmailVerification API key, which is what Gravity Forms will use to connect to QuickEmailVerification.
Inside the QuickEmailVerification dashboard, go to Verifications → API. Then, click Generate Your First API Key.
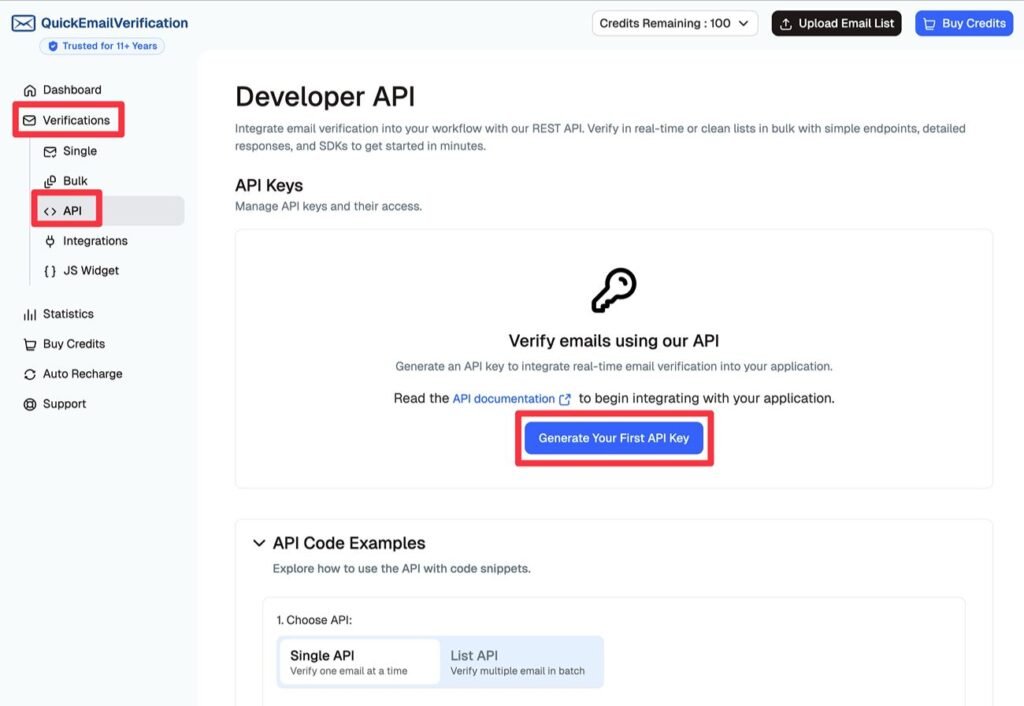
This will open a popup:
- Give your API key an internal name to help you remember it. For example, the name of your WordPress website.
- Enter your QuickEmailVerification account password in the Password box.
- Click Add.
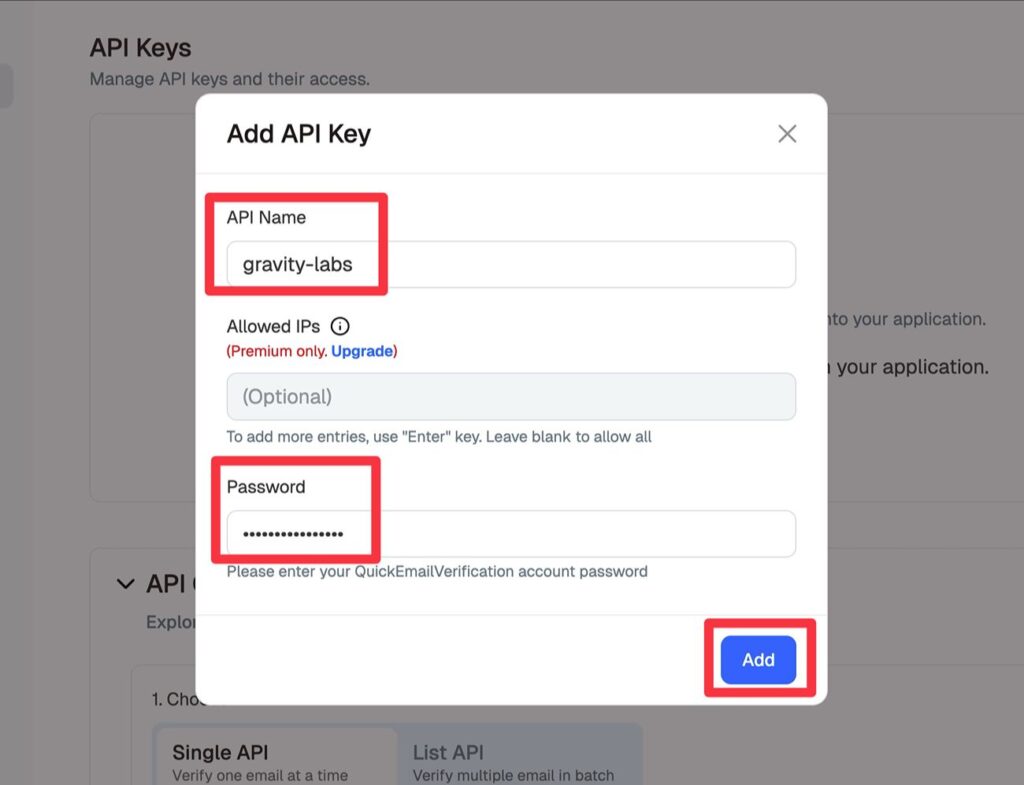
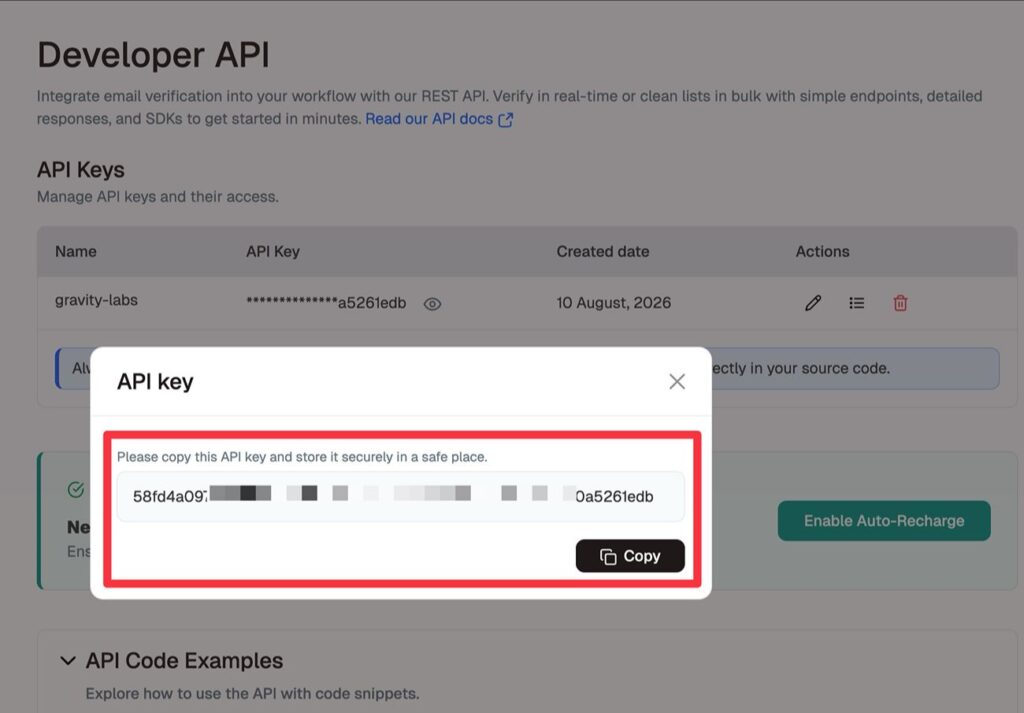
QuickEmailVerification will then display your API key in the popup. Copy the value to a safe place because you’ll need it in the next step.
4. Connect Gravity Forms to QuickEmailVerification
Once you have your QuickEmailVerification API key, you’re ready to connect Gravity Forms to QuickEmailVerification:
- Open your WordPress site’s dashboard.
- Go to Forms → Settings.
- Select the QuickEmailVerification tab inside the Gravity Forms settings area.
First, paste your QuickEmailVerification API key into the QuickEmailVerification API key box.
Then, you can configure a few additional settings.
First, you can choose whether or not to enable QuickEmailVerification by default for all of your forms. Regardless of whether you enable it as the default or not, you’ll also be able to turn it on/off for individual forms as needed, which lets you override the default setting when needed.
Then, in the QuickEmailVerification Advanced Settings box, you get a few settings to control QuickEmailVerification behavior:
- Domains Blocklist – Enter one or more domain names that you always want to block regardless of the result from QuickEmailVerification. For example, if you enter “outlook.com”, your site would block all email addresses that end in “@outlook.com”.
- Always block the following email types – You can choose to always block certain types of email addresses, including Free (Gmail, Outlook, etc.), Disposable (Guerilla Mail, Mailinator, etc.), Catch-all (AKA wildcard that accepts email addressed to any email on the domain), and Role ([email protected], [email protected], etc).
- Cache Expiration Time – Gravity Forms can cache email addresses to avoid wasting credits in situations where a person submits multiple forms with the same email address.
Once you’ve made your choices, click the Save Settings button at the bottom.
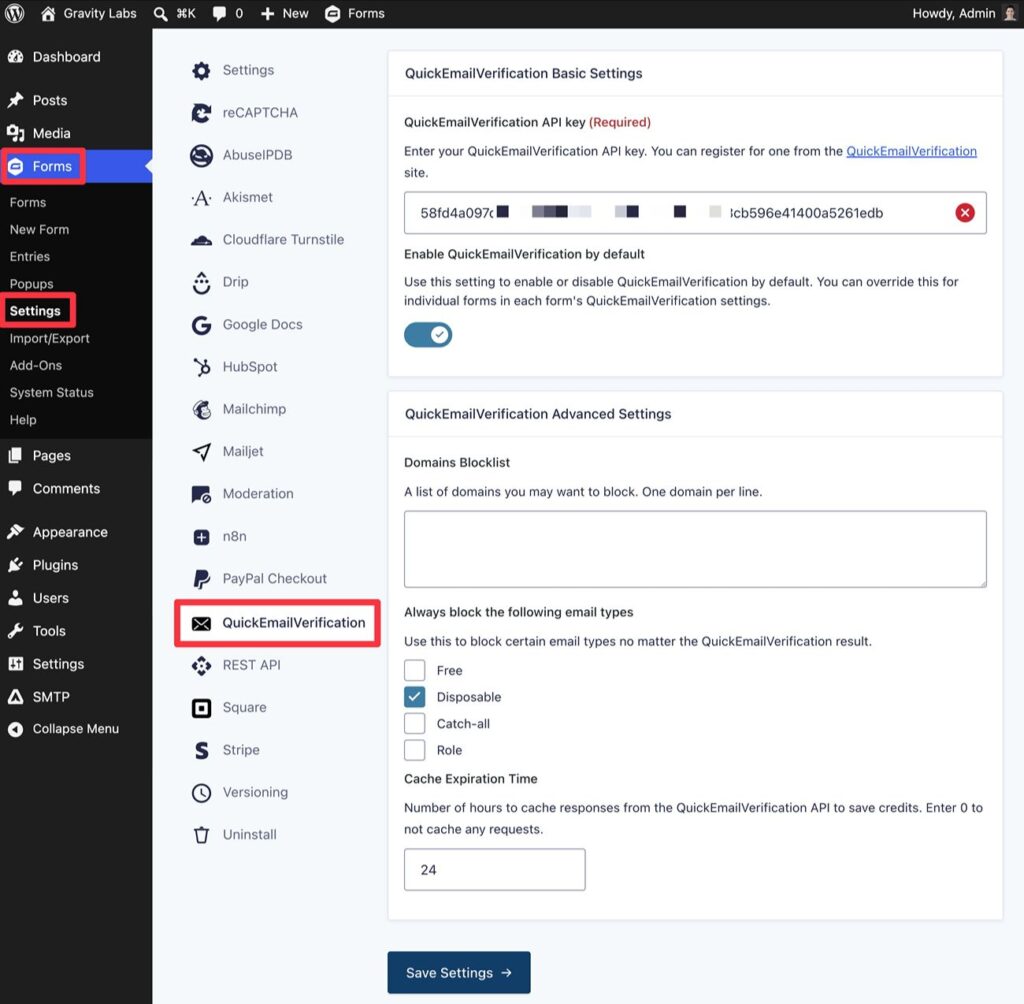
You should then see a green checkmark appear next to the API key, which shows that Gravity Forms was able to successfully connect to the QuickEmailVerification API.
5. Enable or disable QuickEmailVerification for individual forms as needed
If you enabled QuickEmailVerification by default, it will now start verifying emails for all of your forms. If you did not enable it by default, you’ll need to go in and manually enable it for forms where you want to verify users’ emails.
Here’s how to enable or disable QuickEmailVerification for an individual form:
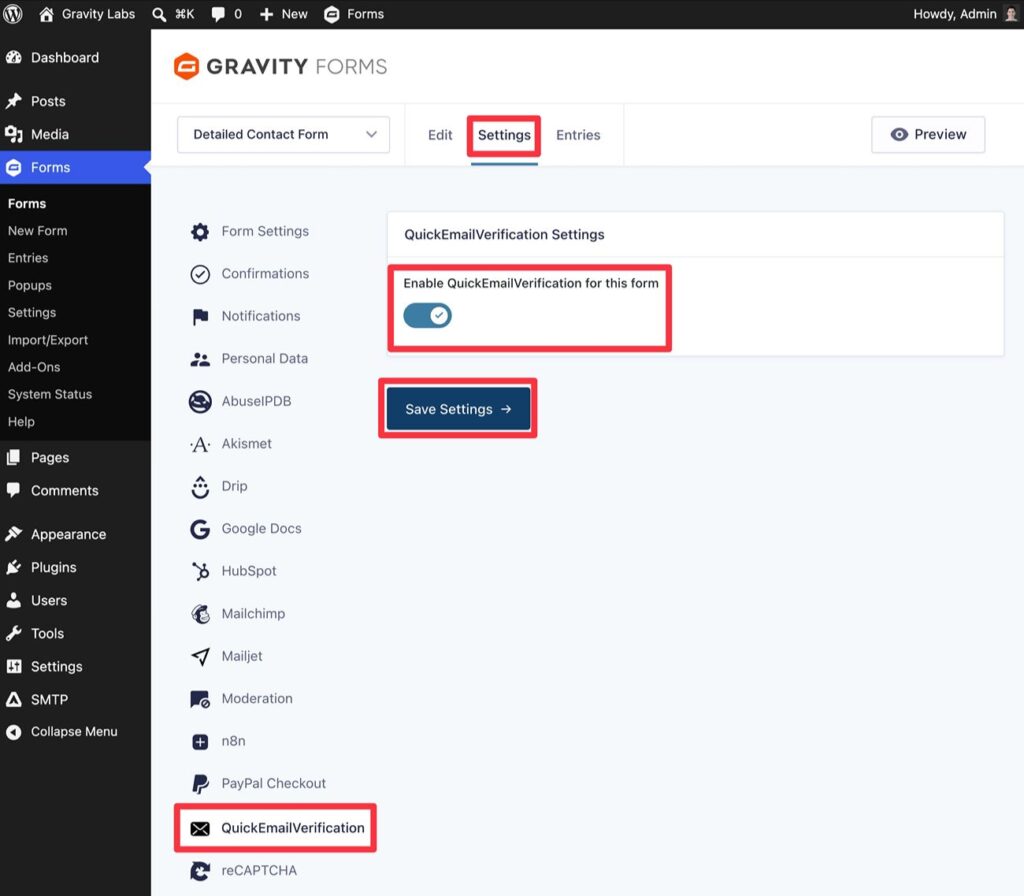
- Open the form editor for the form where you want to adjust behavior.
- Go to Settings → QuickEmailVerification inside the form editor.
- Turn the toggle on or off according to your preferences.
- Click Save Settings.
Note: Your form must have an Email field in order to work with QuickEmailVerification.
How email verification works
Once you’ve set everything up and enabled QuickEmailVerification for some or all of your forms, here’s how email verification works.
When someone submits the form, Gravity Forms will automatically check their email using QuickEmailVerification. This happens before the entry is processed.
If a user enters an invalid email address (or an email that meets one of your automatic blocking conditions), they’ll see an error message prompting them to supply a valid email address.
Here’s an example of what it looks like – these messages appear after the user hits the submit button.
If the email address isn’t valid, the entry will not be saved. The user will not be able to submit the form until they supply a valid email address.
If they do supply a valid email address, the form will be submitted and saved just like it normally would.
Try the Gravity Forms QuickEmailVerification Add-On today
If you’re ready to get started with Gravity Forms email validation, you can try the add-on today.
The Gravity Forms QuickEmailVerification Add-On is available now in Gravity Labs. It’s free with any Gravity Forms license. As a Labs add-on, it’s experimental and sits outside our standard support — and your feedback helps shape what we build next. If you give it a try, we’d love to hear how it works for you.

Newsletter
If you want to keep up-to-date with what’s happening on the blog sign up for the Gravity Forms newsletter!
"*" indicates required fields