WordPress to Google Drive: Send form file uploads with Zapier

Want to send files uploaded through your Gravity Forms to Google Drive?
Using Zapier and the Gravity Forms Zapier Add-On, you can easily pass files from form entries to third-party platforms and applications, including Google Drive.
In this article, we discuss why that’s a good idea and for which form types it makes the most sense. After that, you’ll find step-by-step instructions on how you can set this up on your own WordPress site.
Why send form files from WordPress to Google Drive?
Let’s first discuss reasons why you would want to save form file uploads in Google Drive:
- Preserve server resources – By outsourcing file storage, you don’t have to use space on your server. This can save you from having to upgrade to a more expensive plan, especially if your file uploads are larger. It also keeps your web infrastructure leaner, which can be good for performance.
- Collaboration and processing – When saved in Google Drive, files are much easier to share and work on with others, especially people who don’t and shouldn’t have an account on your website. In addition, you can directly comment on files or use and edit their data in Google Docs. This is much harder or impossible to do when they reside on a WordPress site.
- Security – When you send a copy of a file to external storage, you automatically have a backup if something goes wrong with the version on your server. Plus, you can take advantage of Google Drive’s security infrastructure with encryption, two-factor authentication, activity tracking, and version control.
- Organization and management – In WordPress, files either reside in the media library, mixed in with everything else, or wherever they are configured to be saved. In Google Drive, you not only have them all in a central location, you can also organize them however you want. This makes them much easier to find and work with.
What forms is this useful for?
With Gravity Forms, you can add a file upload field to any form you want. But there are certain form types where it makes the most sense and is most common, such as:
- Job application forms – Allow candidates to attach resumes, cover letters, portfolios, or certifications.
- Event registration forms – Registrants can submit documents such as consent forms, ticket proofs, or IDs for verification.
- Contact or support forms – Enable users to submit screenshots, error logs, or supporting documents when reaching out for support or inquiries.
- Ecommerce order forms – Customers can upload files for product customization, such as artwork, photos, or design specifications.
- Medical or legal service forms – Collect contracts, financial statements, tax forms, identification documents, medical history forms, prescriptions, insurance cards, or lab reports.
There are many more examples like this. File uploads are useful for freelance proposals, client onboarding, educational enrollment, and in many other cases.
It’s all possible with Zapier and Gravity Forms

The service that enables the connection between Gravity Forms and Google Drive is Zapier. Zapier gives you the ability to connect different applications and services and create automatic workflows between them, called “Zaps”.
Additionally, Zapier integrates with more than 8000 apps, including well-known names like:
- Google Sheets, Docs, and Gmail
- Facebook, Pinterest, LinkedIn, Instagram, and other social media networks
- Project management tools such as Asana and Trello
- Freshbooks and other accounting tools
We also have several use cases on the blog for using Gravity Forms and Zapier together, such as to connect your web forms to Zoom, Zendesk, Podio, Pipedrive, Brevo, or Excel.
To take advantage of the possibilities Zapier has to offer, you need the Gravity Forms Zapier Add-On, one of our most popular extensions. It is included with the Gravity Forms Pro, Elite, and Nonprofit licenses.
You can purchase or upgrade your license and only pay the difference. Alternatively, if you want to test drive Gravity Forms first, you can do so with a free demo site. It has all the necessary add-ons and functionality to follow the below tutorial.
How to send files from WordPress Forms to Google Drive
From here on out, we’ll go over step-by-step instructions for how to connect Gravity Forms to Google Drive. We’ll assume you already have a WordPress website with the main Gravity Forms plugin installed (instructions here).
1. Sign up to Google Drive and Zapier
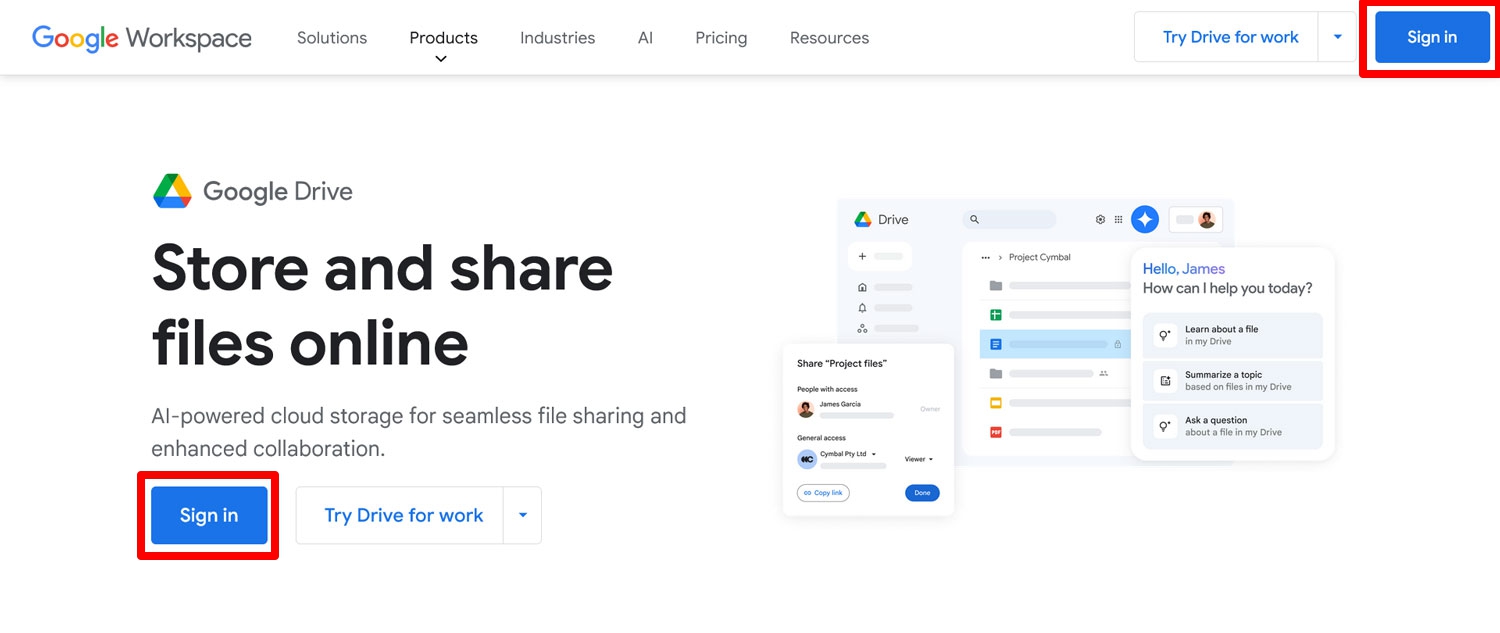
Firstly, you’ll need accounts for Google Drive and Zapier. If you already have a Google account of any sort, you are good in the first department. If not, go to the Google Drive homepage and click Sign in.
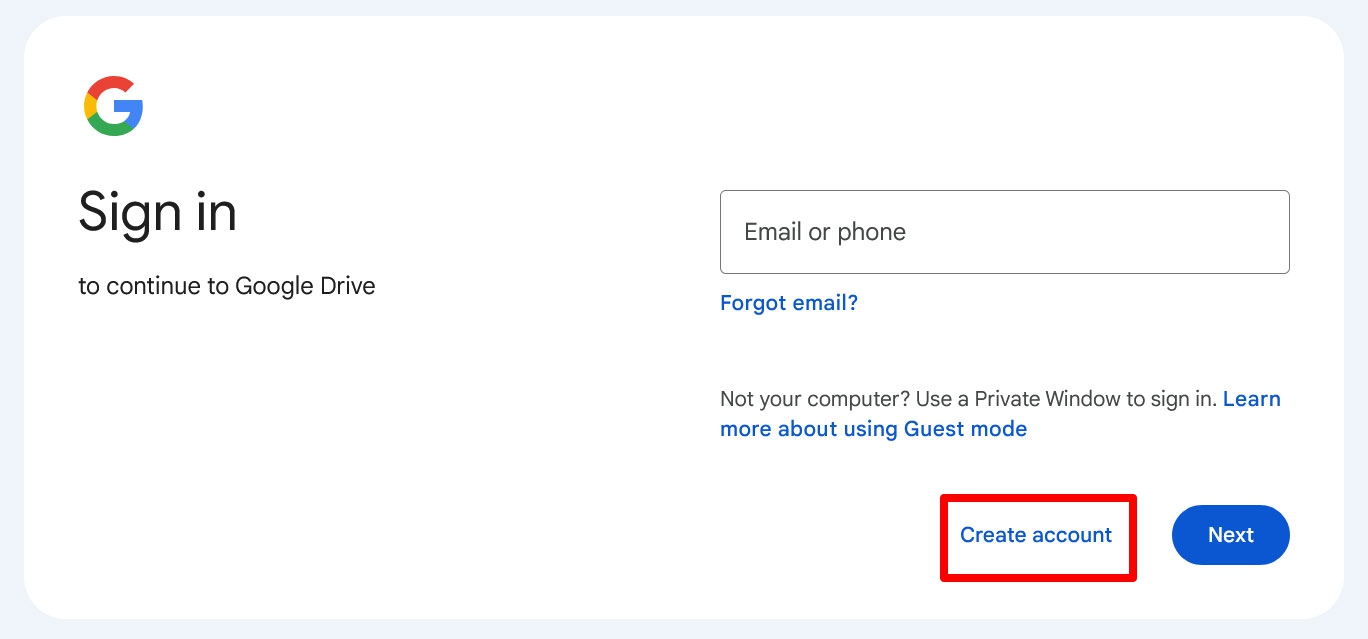
On the next screen, click Create account and complete the process.
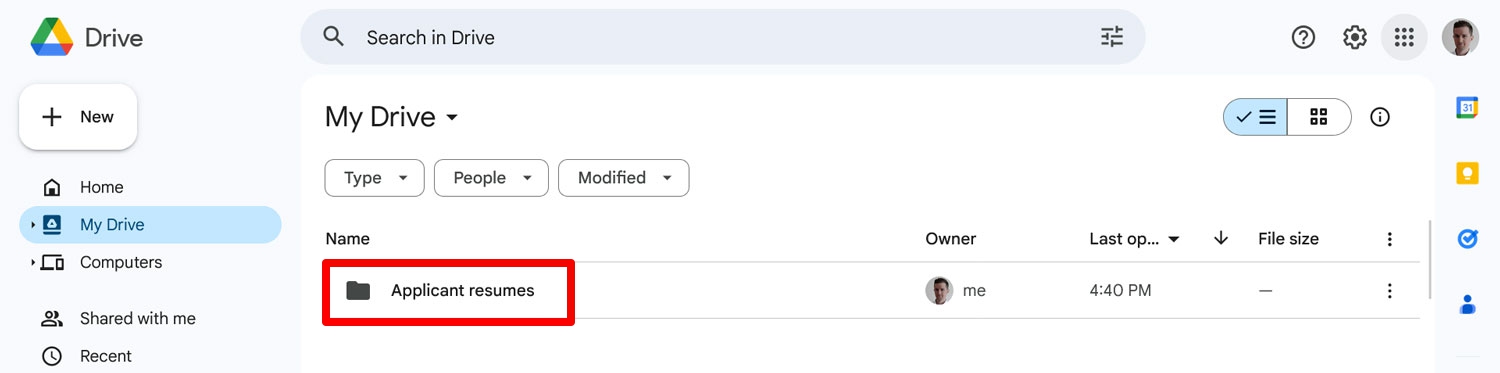
An optional step that might come in handy later is creating a folder in your Google Drive where you plan to save uploaded files.
Next, it’s time to create a Zapier account. For that, go to the Zapier homepage. There are plenty of buttons to choose from to start the sign-up process.
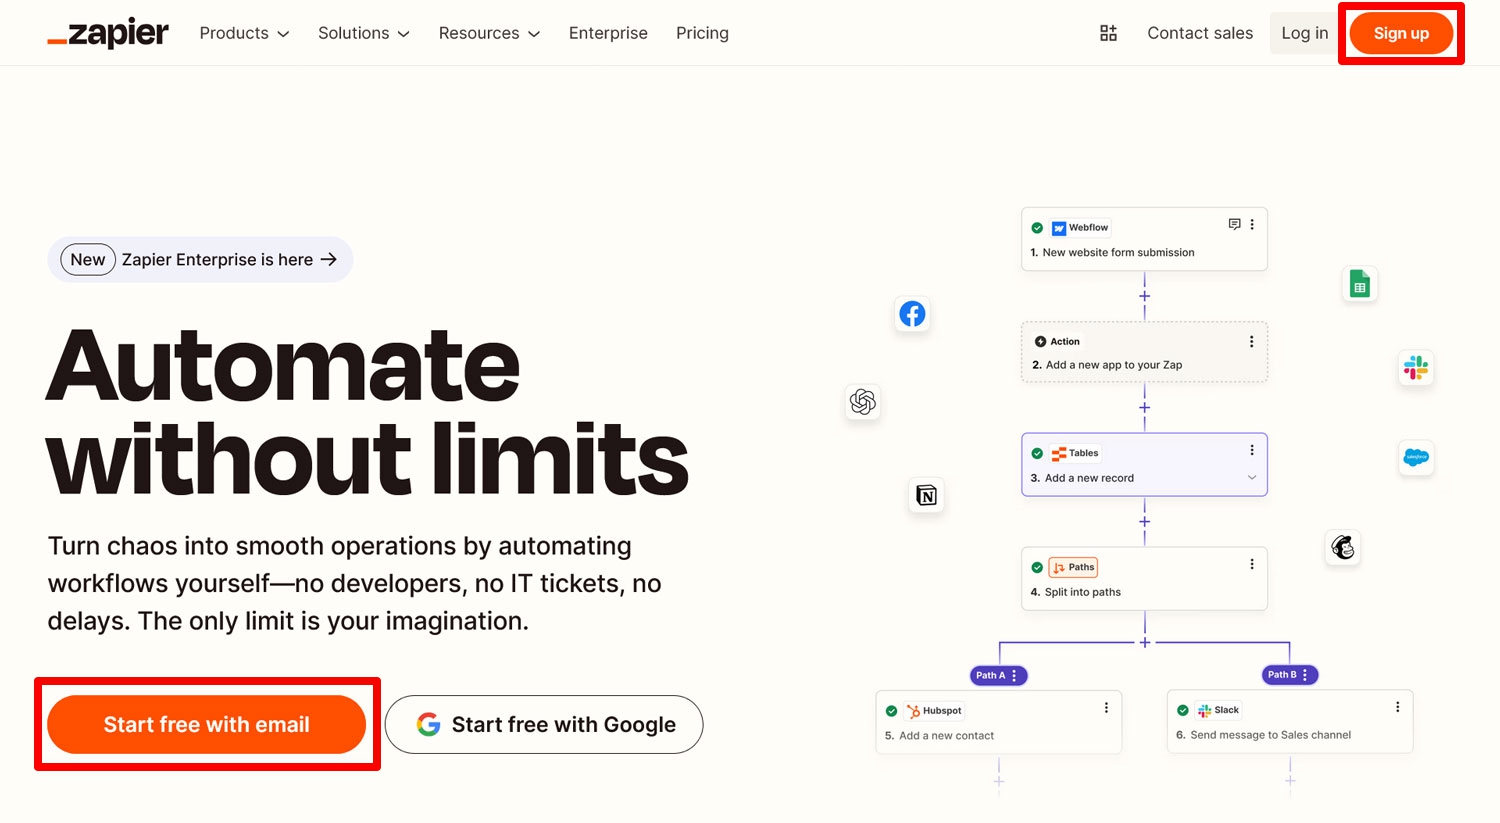
You can use an email address or your Facebook, Google, or Microsoft account. Once you are finished, it’s time to turn to your WordPress website.
2. Create and customize your form
The first thing you’ll need is a form. For this tutorial, we will create a job application form. Conveniently, Gravity Forms has an employment application form template in the template library you can use for this purpose. This makes the whole thing faster, and it even already contains a file upload field.
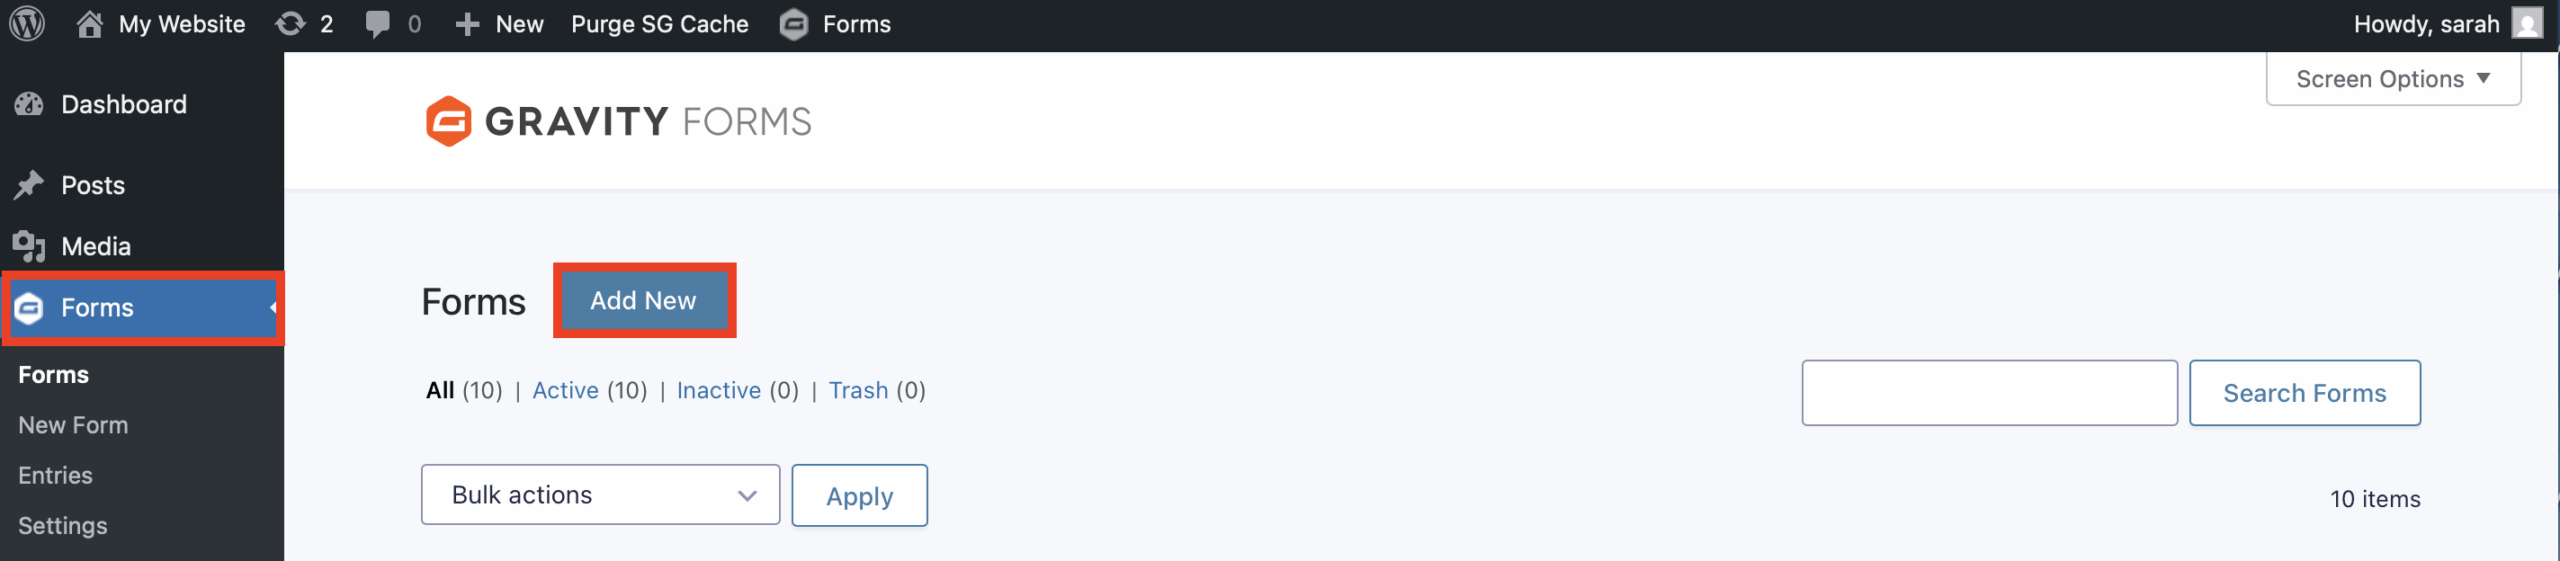
You create a form by going to Forms → New Form/Add New.
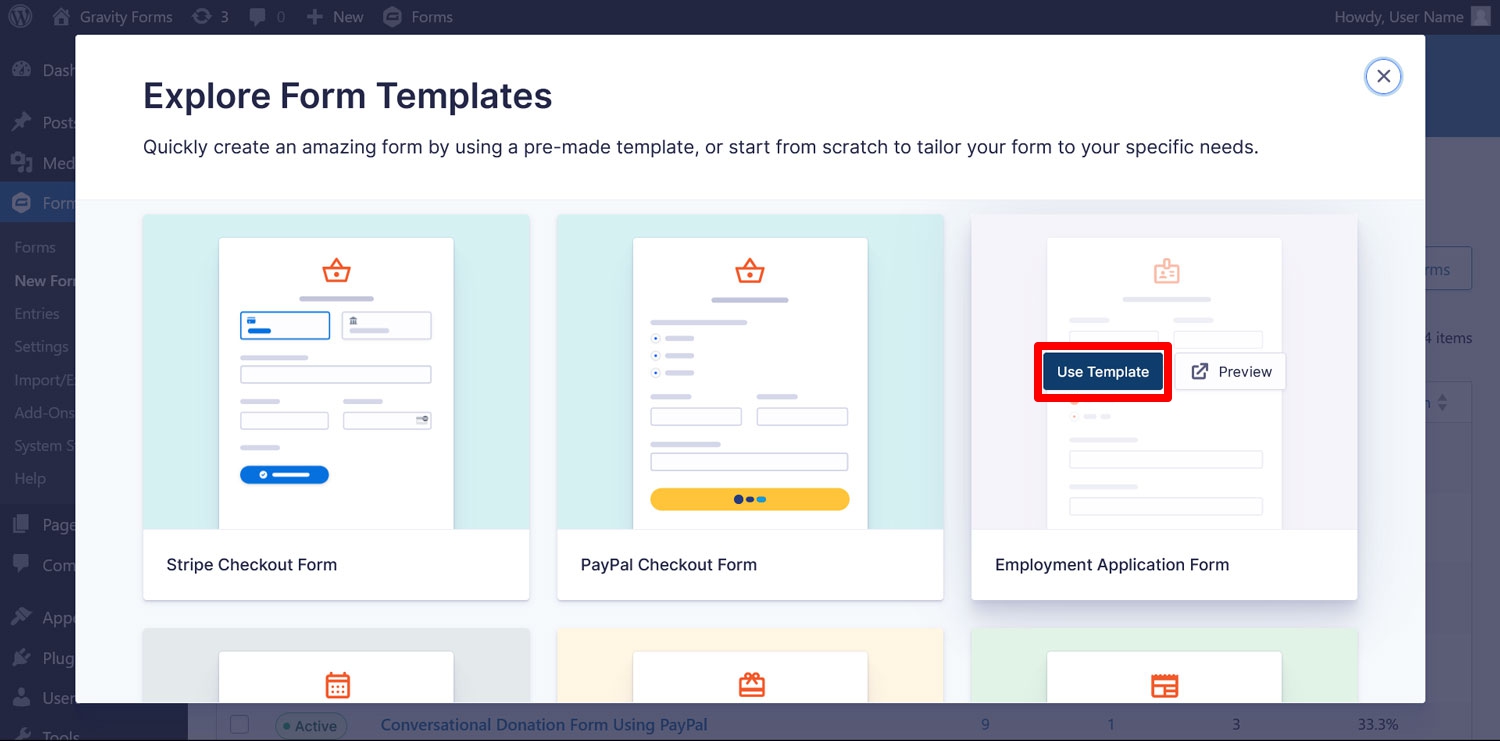
This opens up a window where you can choose templates. Find the job application form blueprint. Hover over it and click Use Template.
Then, give your form a name. After that, you will land in the drag-and-drop form builder.
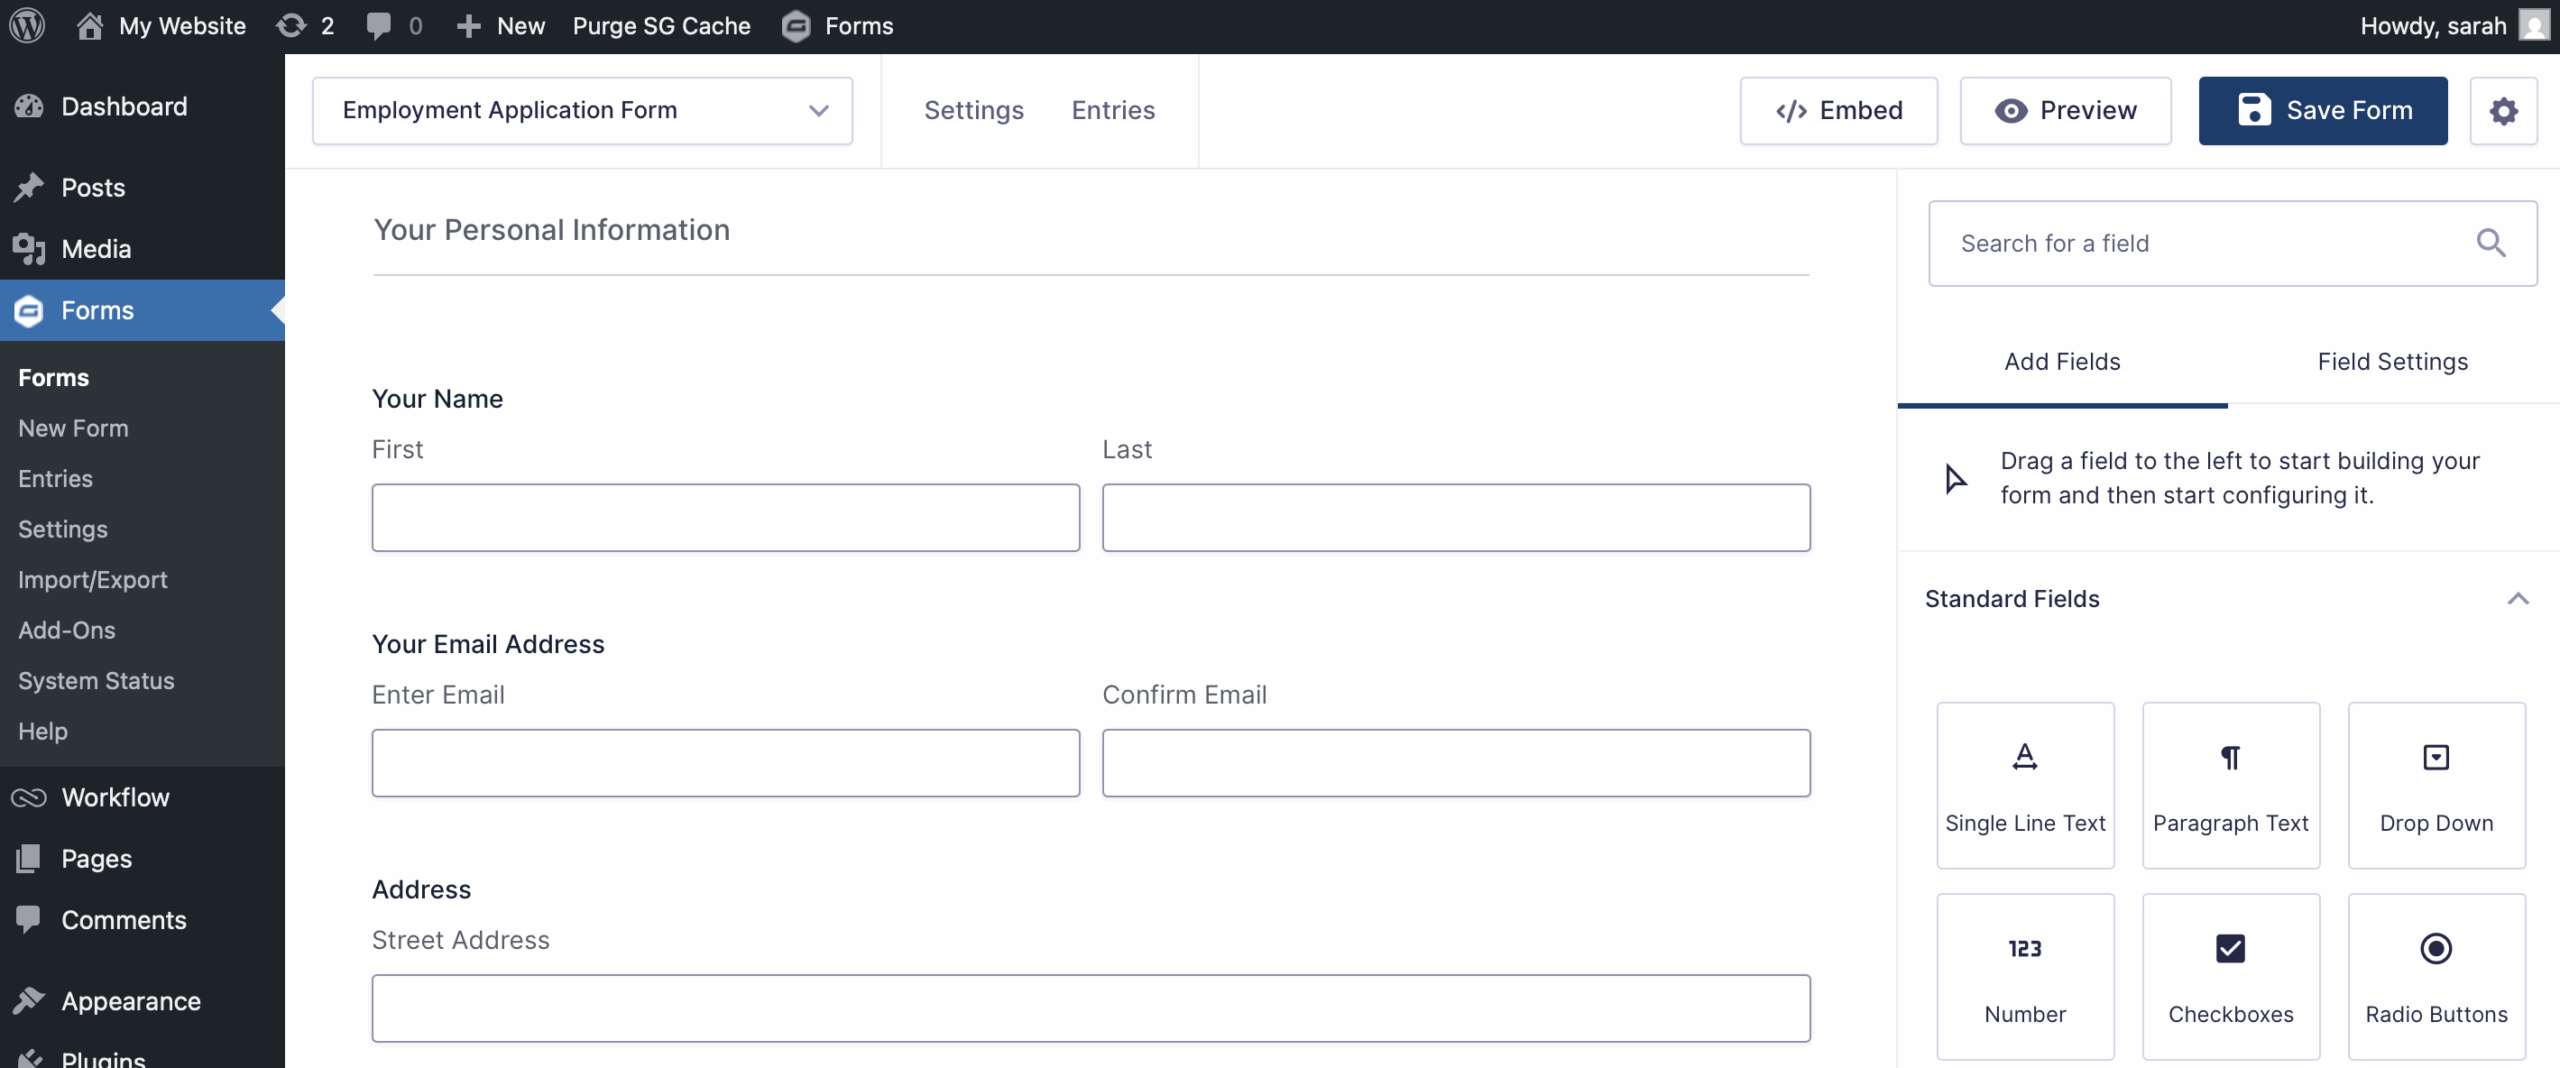
By default, it already contains form fields for collecting personal information and important application data. That includes a file upload field for resumes. You can also completely customize the content and layout of your form by:
- Adding new form fields — Simply drag them over from the sidebar on the right.
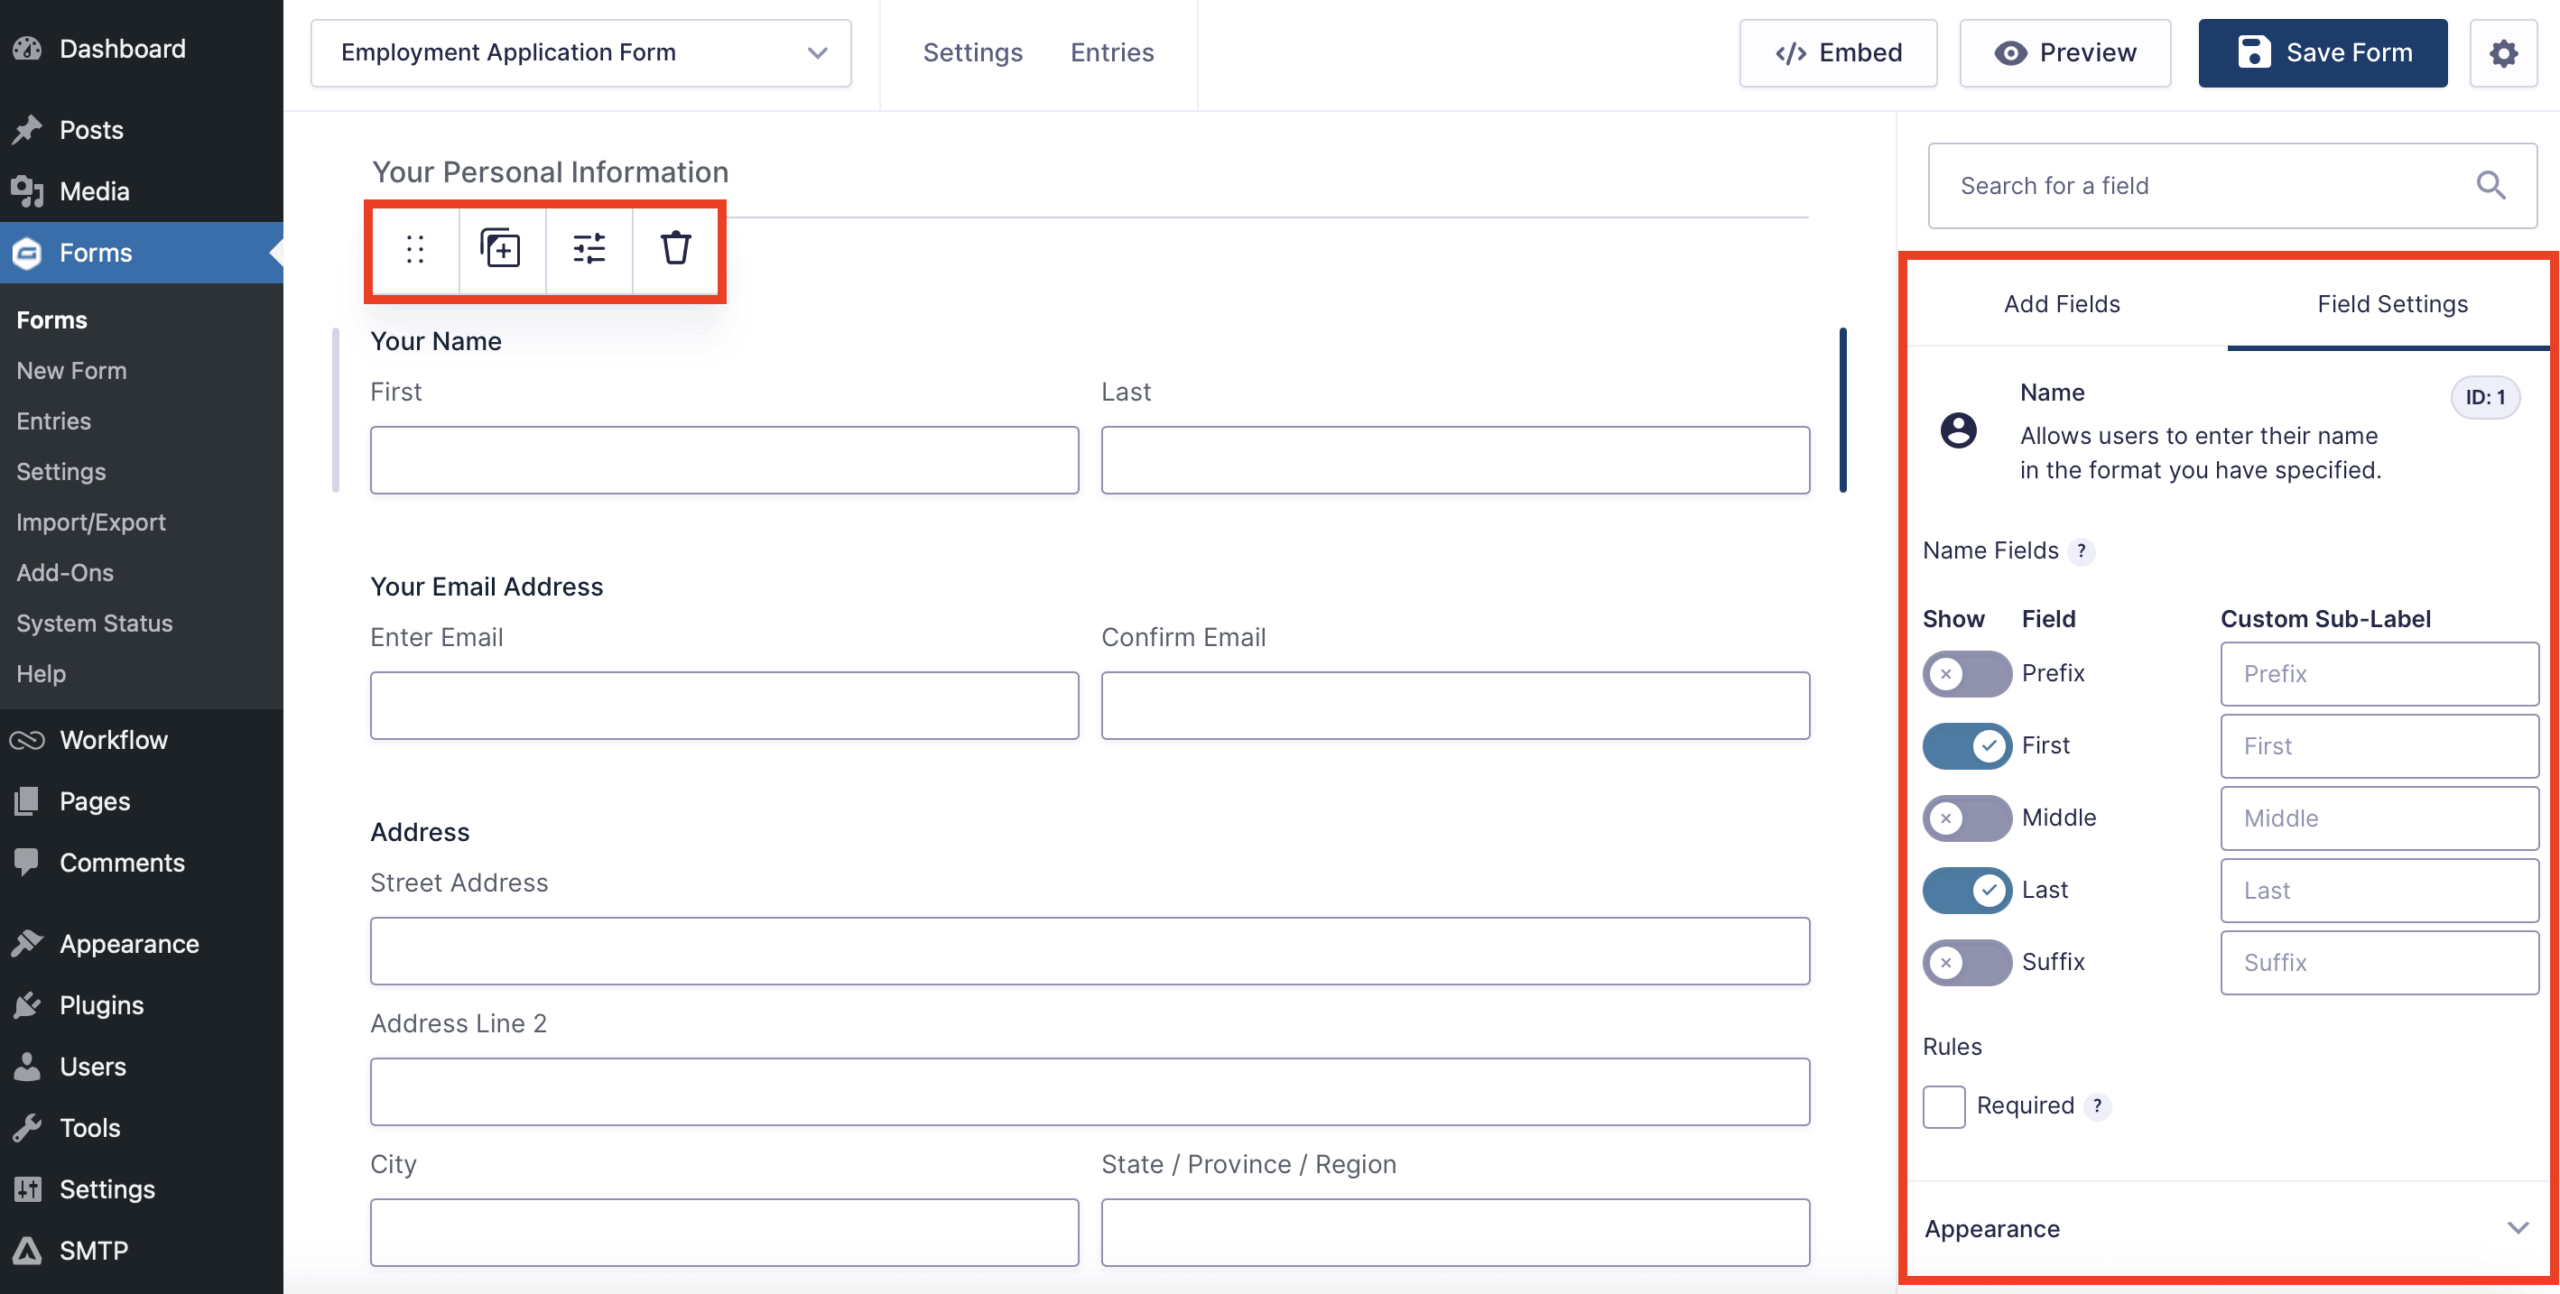
- Moving, deleting, and duplicating existing form fields — The top toolbar that appears when you hover over any form field allows you to perform these actions.
- Editing field settings — Click on a form field to access and adjust its settings.
Make any changes needed and then embed the form in a page or post using the Gravity Forms block or shortcode.
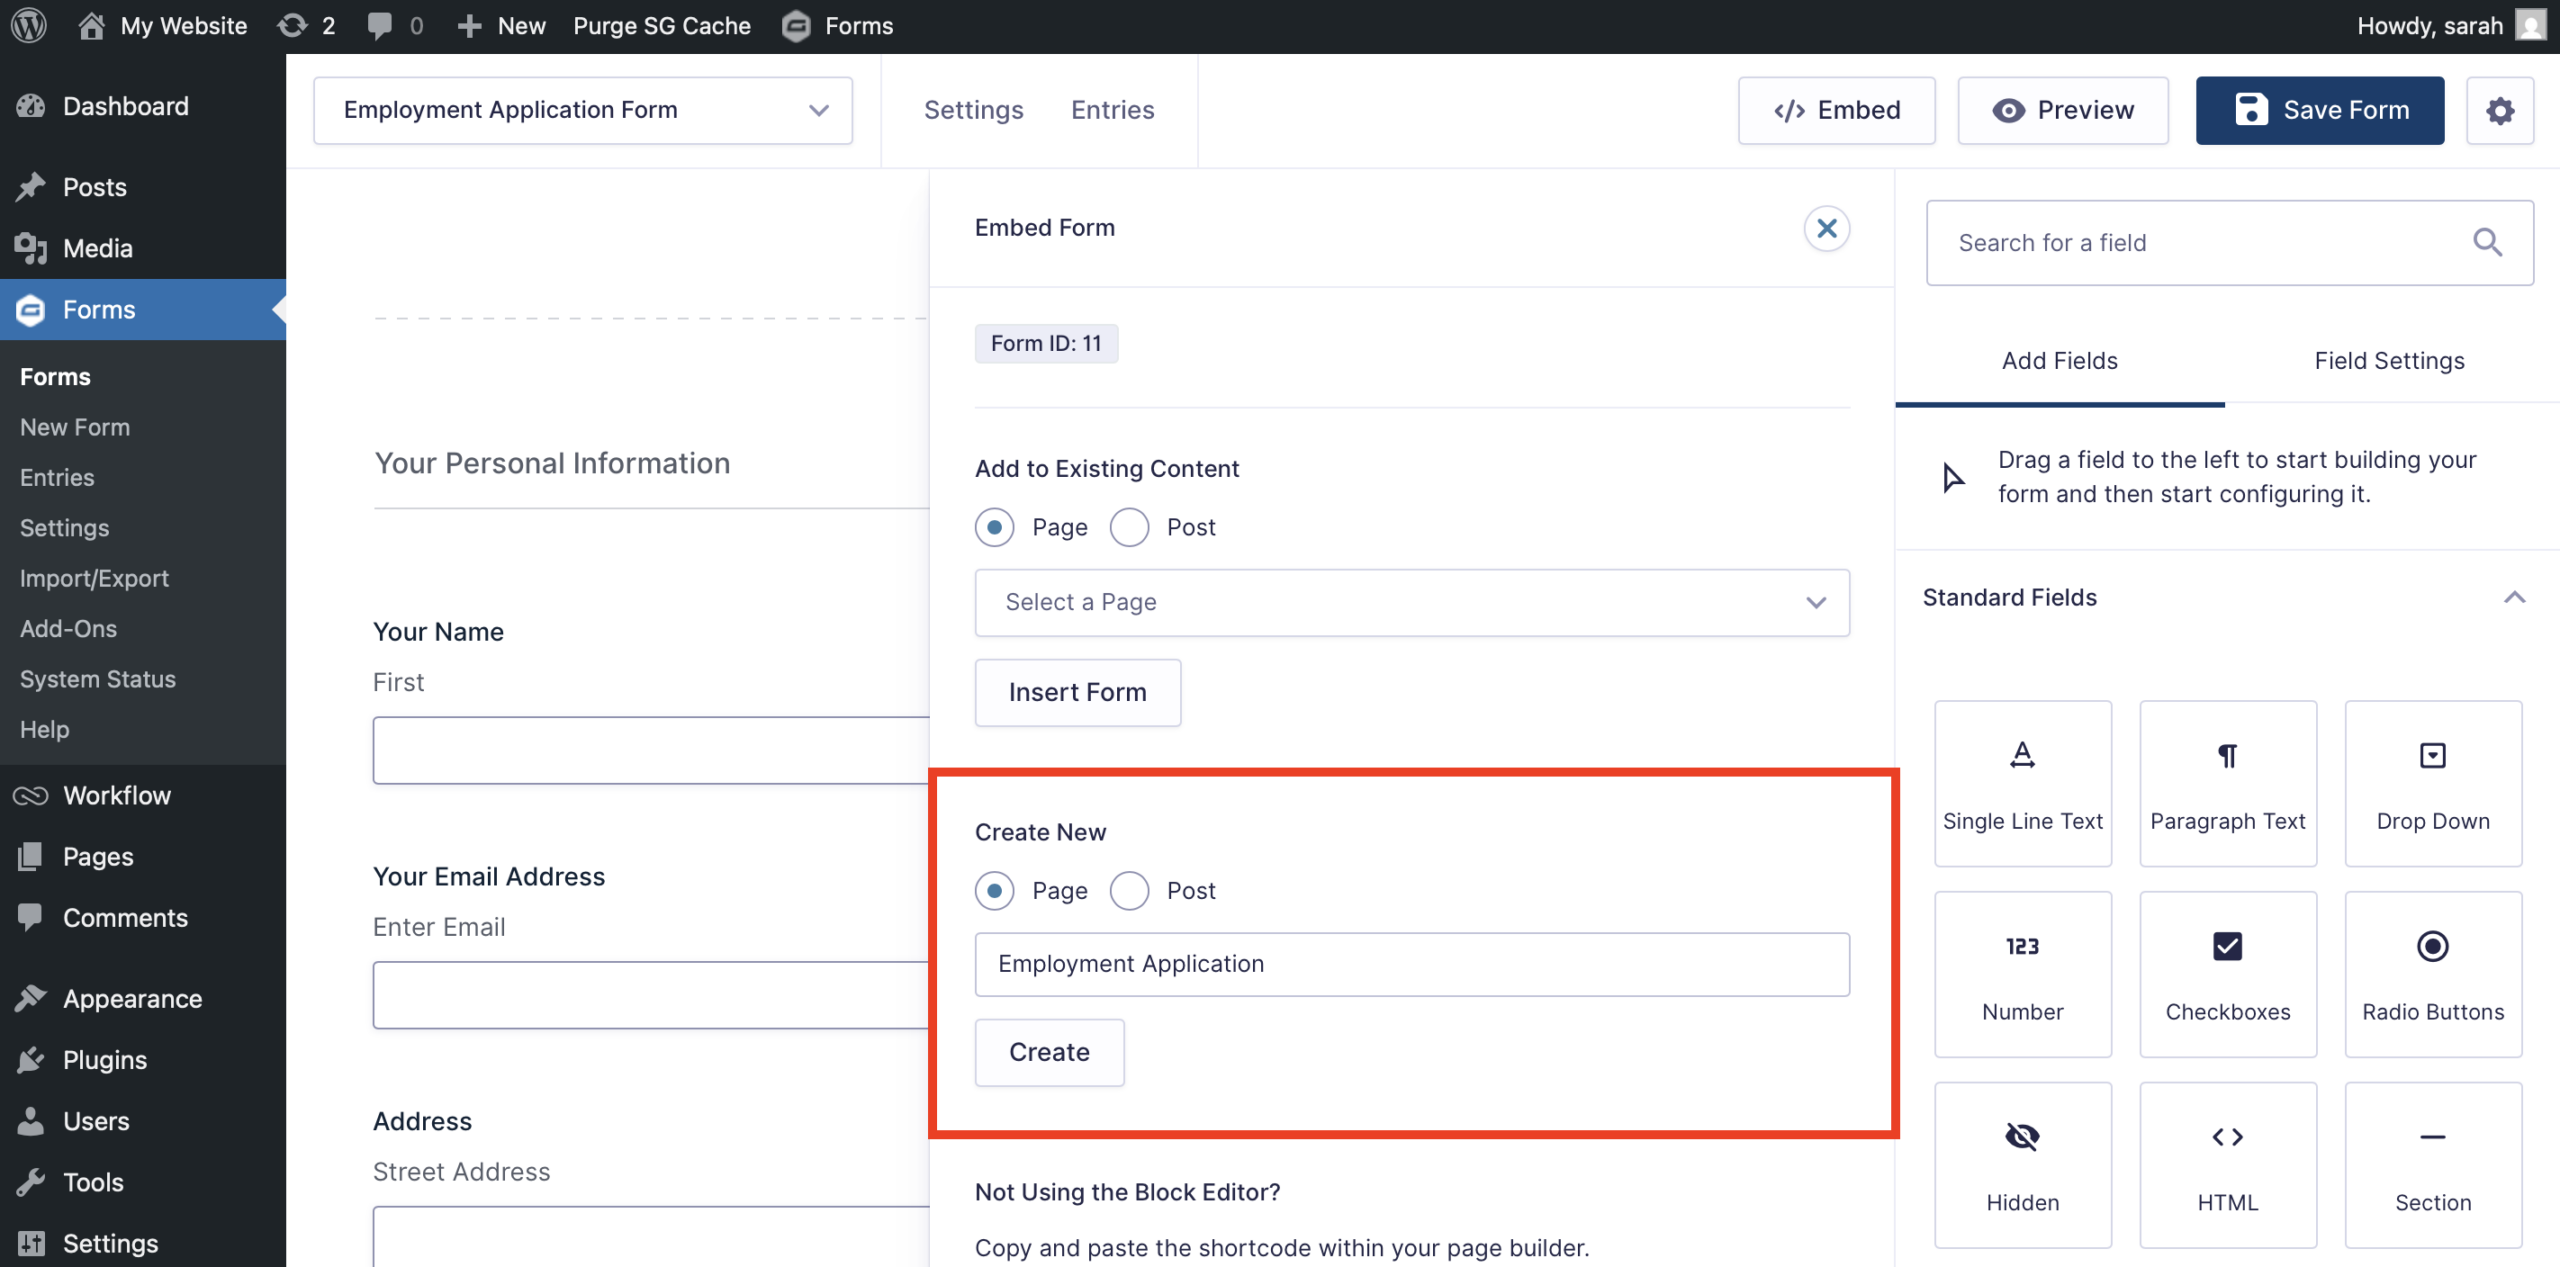
Preview the page, and if you are happy, hit Publish.
3. Install and configure the Zapier Add-On
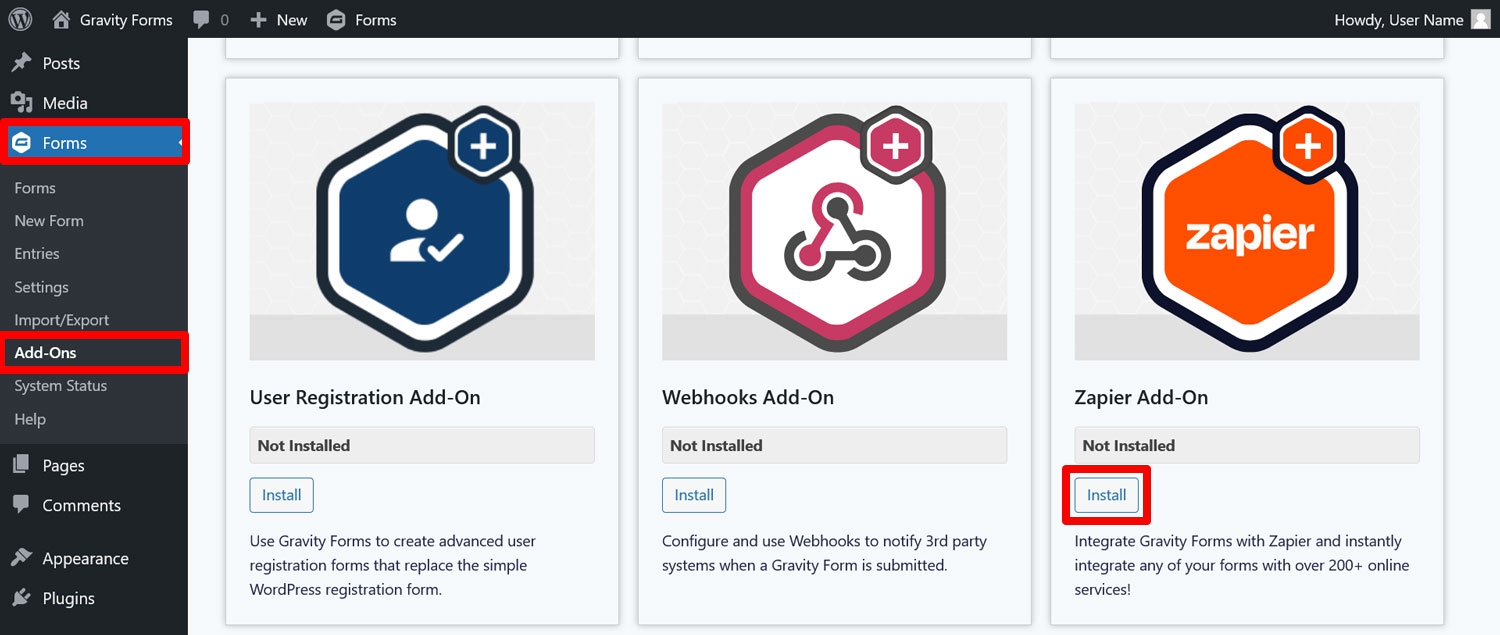
From here, it’s time to add the Gravity Forms Zapier Add-On to your site. You can do this under Forms → Add-ons in your WordPress dashboard. Find the add-on and click Install, then activate it.
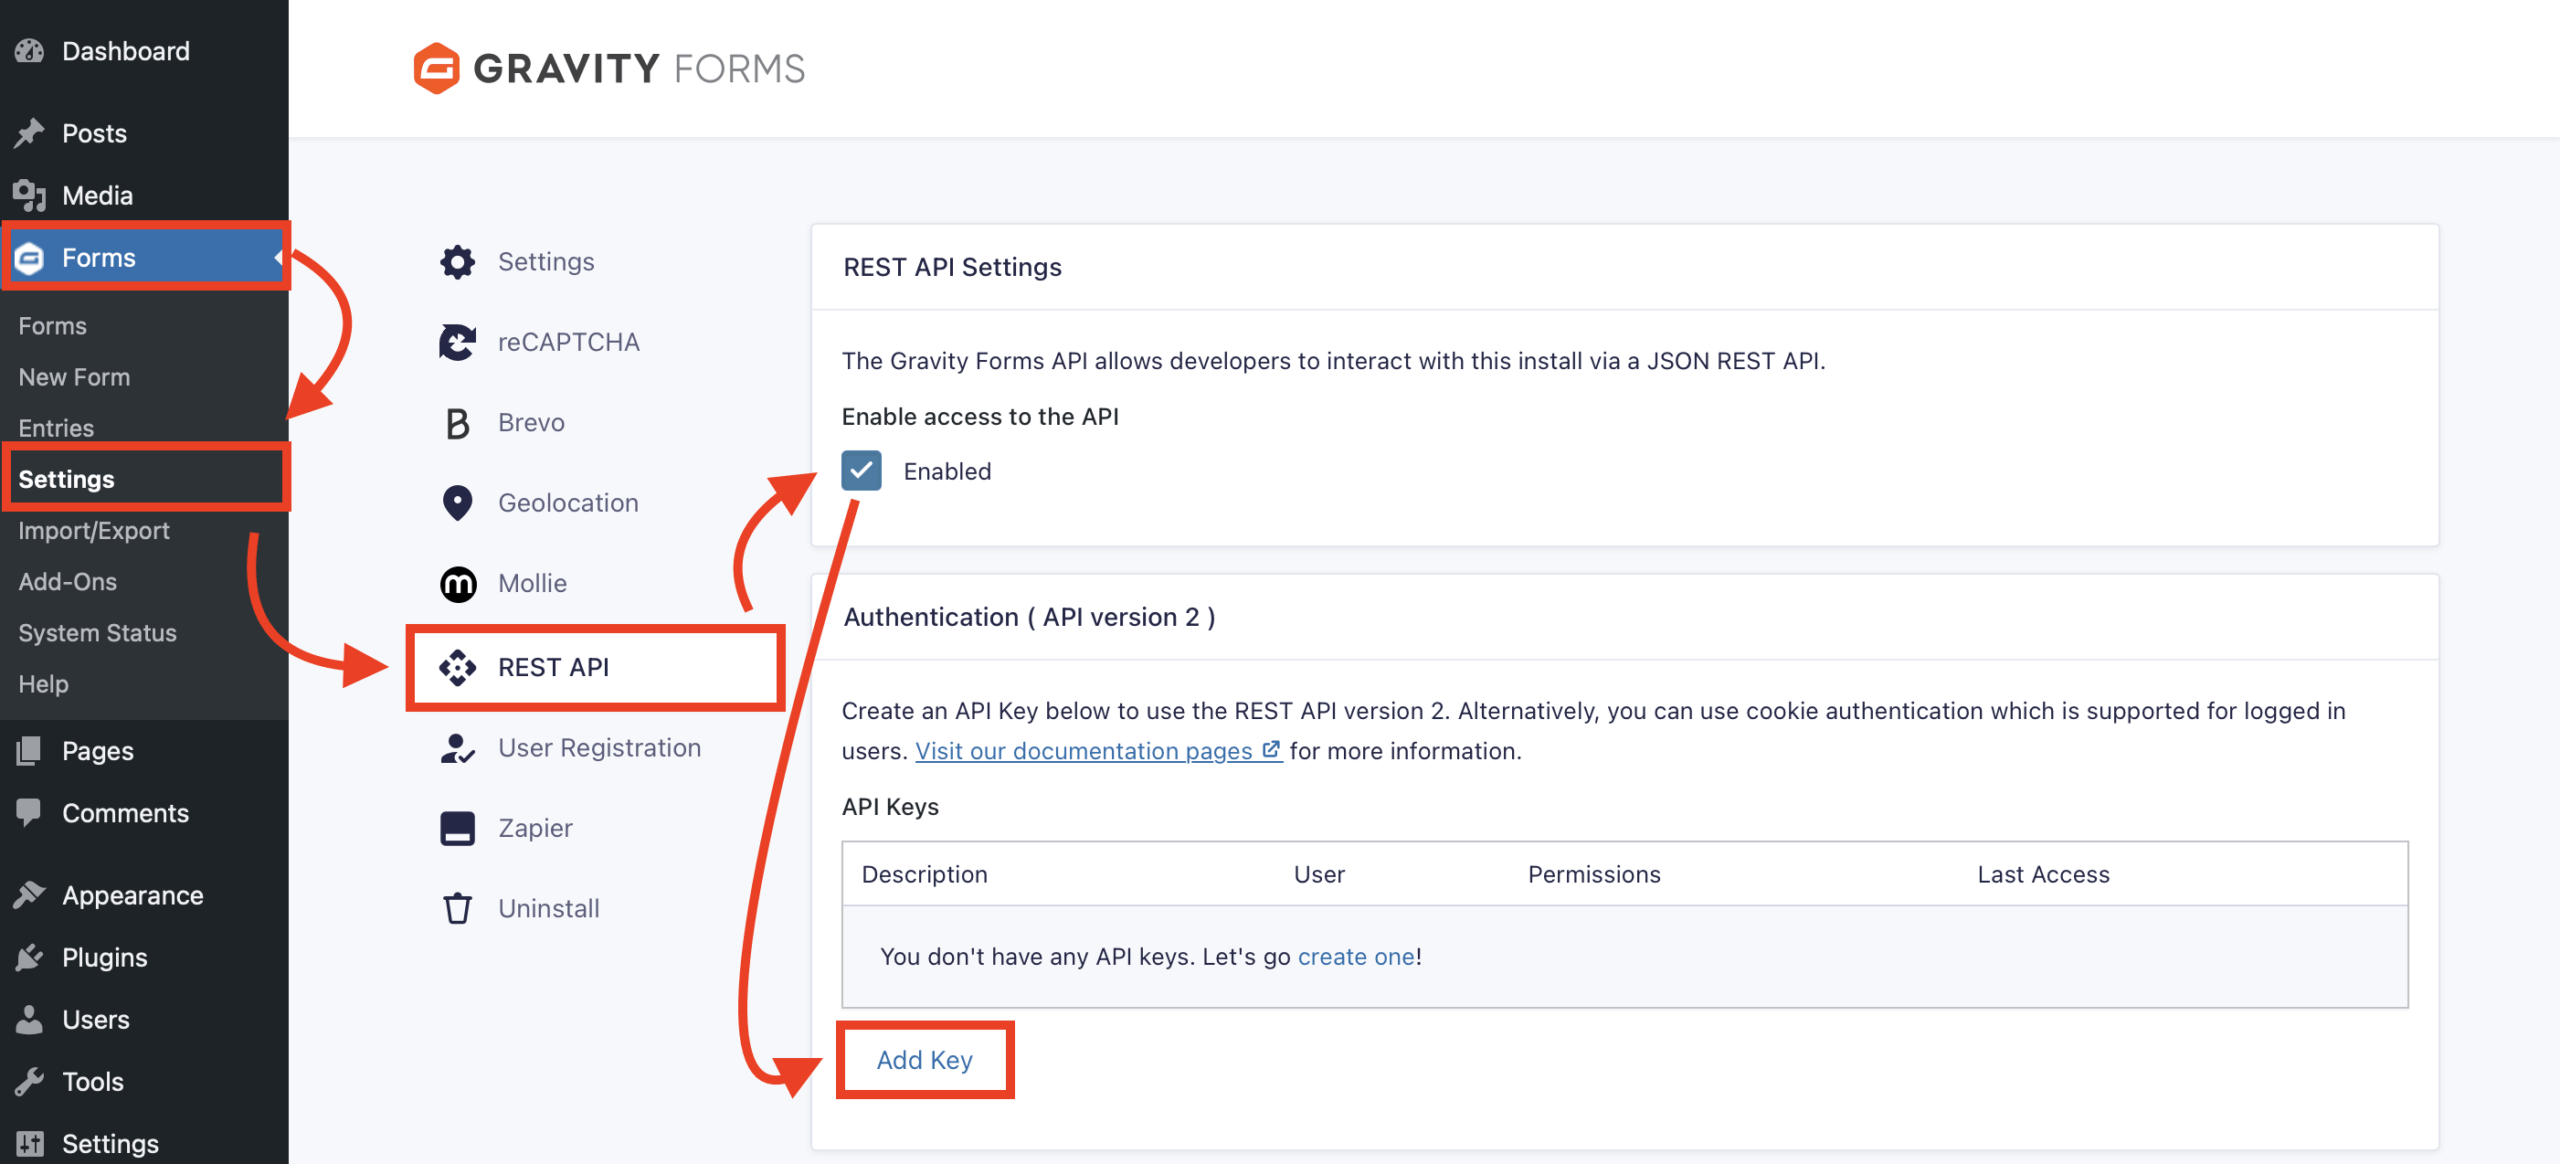
For the Zapier Add-On to work, you need to generate an API key for the Gravity Forms REST API. This happens under Forms → Settings → REST API. Check the box to enable the API, then click on Add Key under Authentication (API version 2). The version number matters, so be sure you select the right option.
A pop-up appears that you need to fill in as follows:
- Description – Helps you distinguish between different API keys if you have multiple.
- User – Select a user with the permission level to view and edit entries.
- Permissions – Choose Read/Write here.
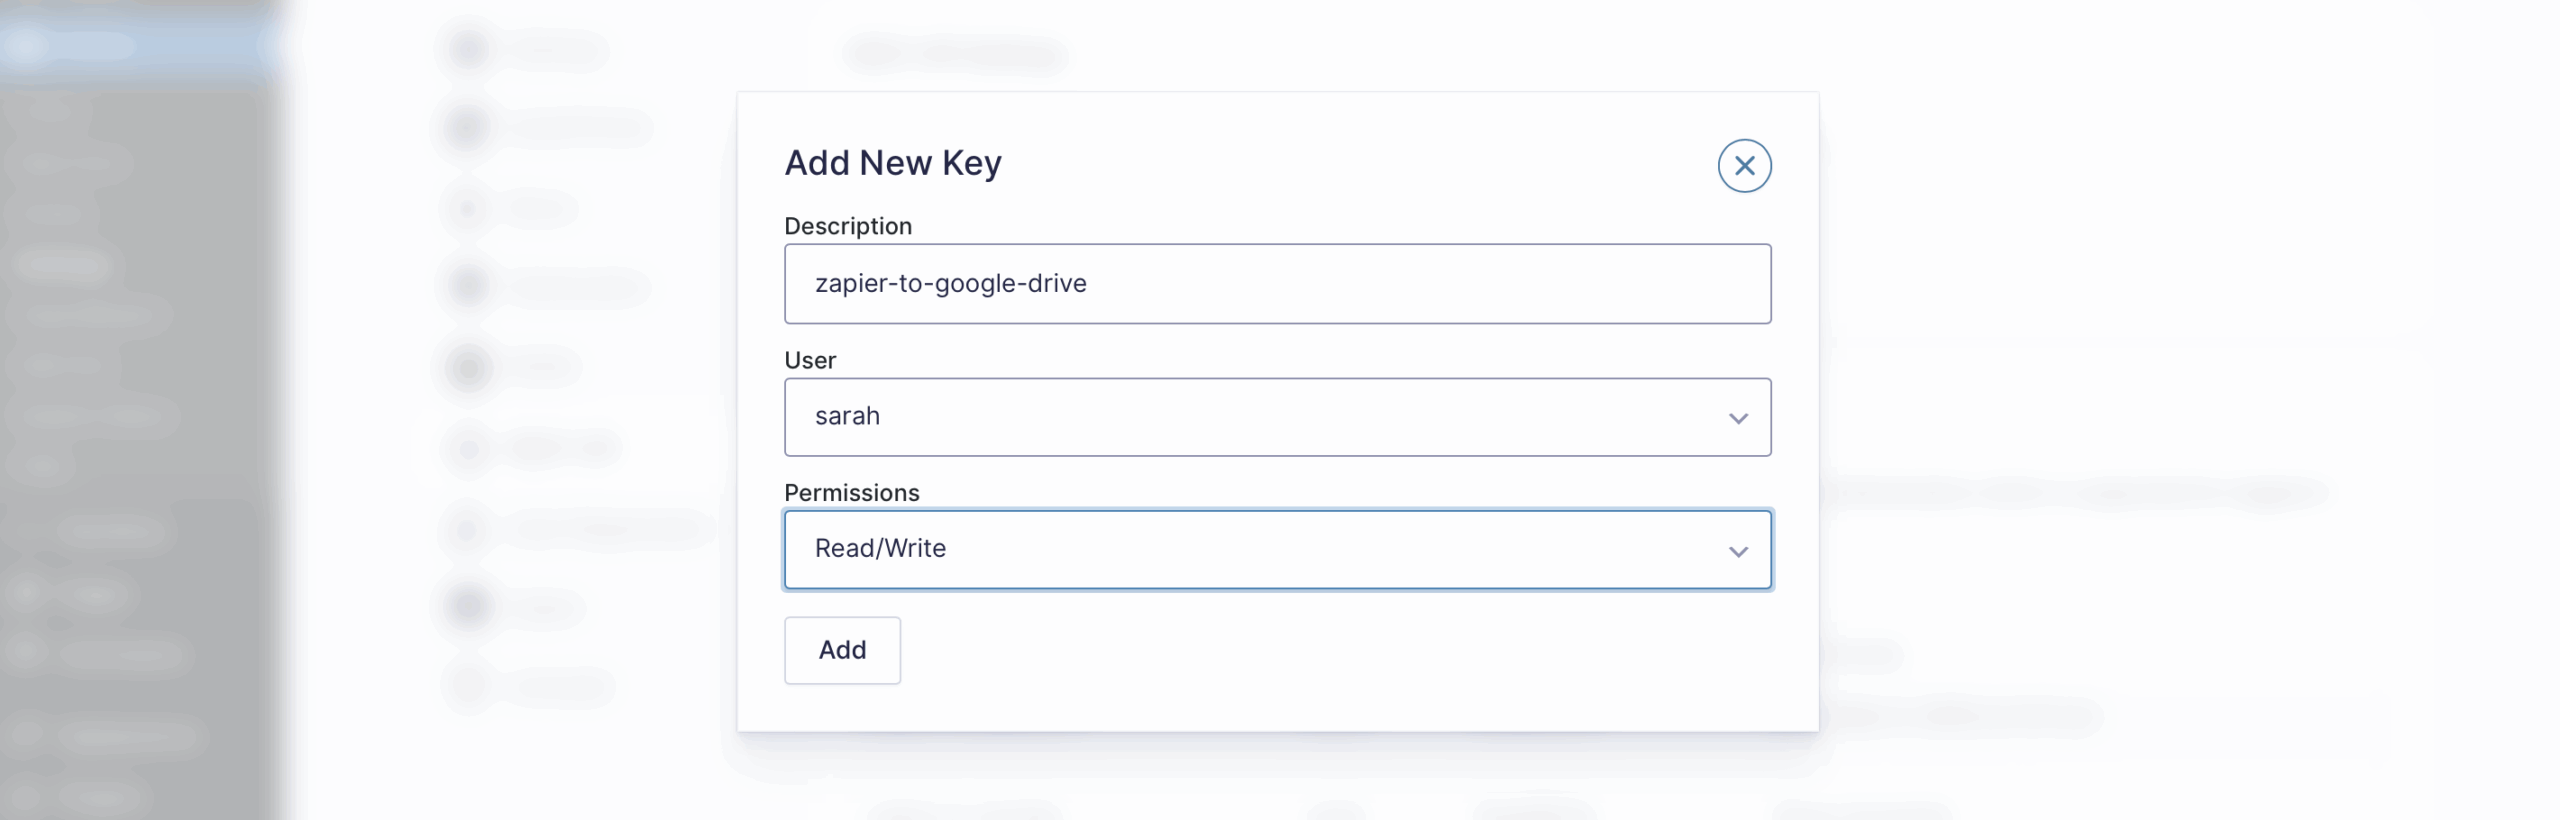
Once ready, click Add. It will reveal your consumer key and consumer secret.

Make sure to copy and store those somewhere safe, it’s the only time you will see them. When you have done so, click Update.
4. Create your Zap
From here, we’ll be working in Zapier. It’s time to create your workflow or Zap.
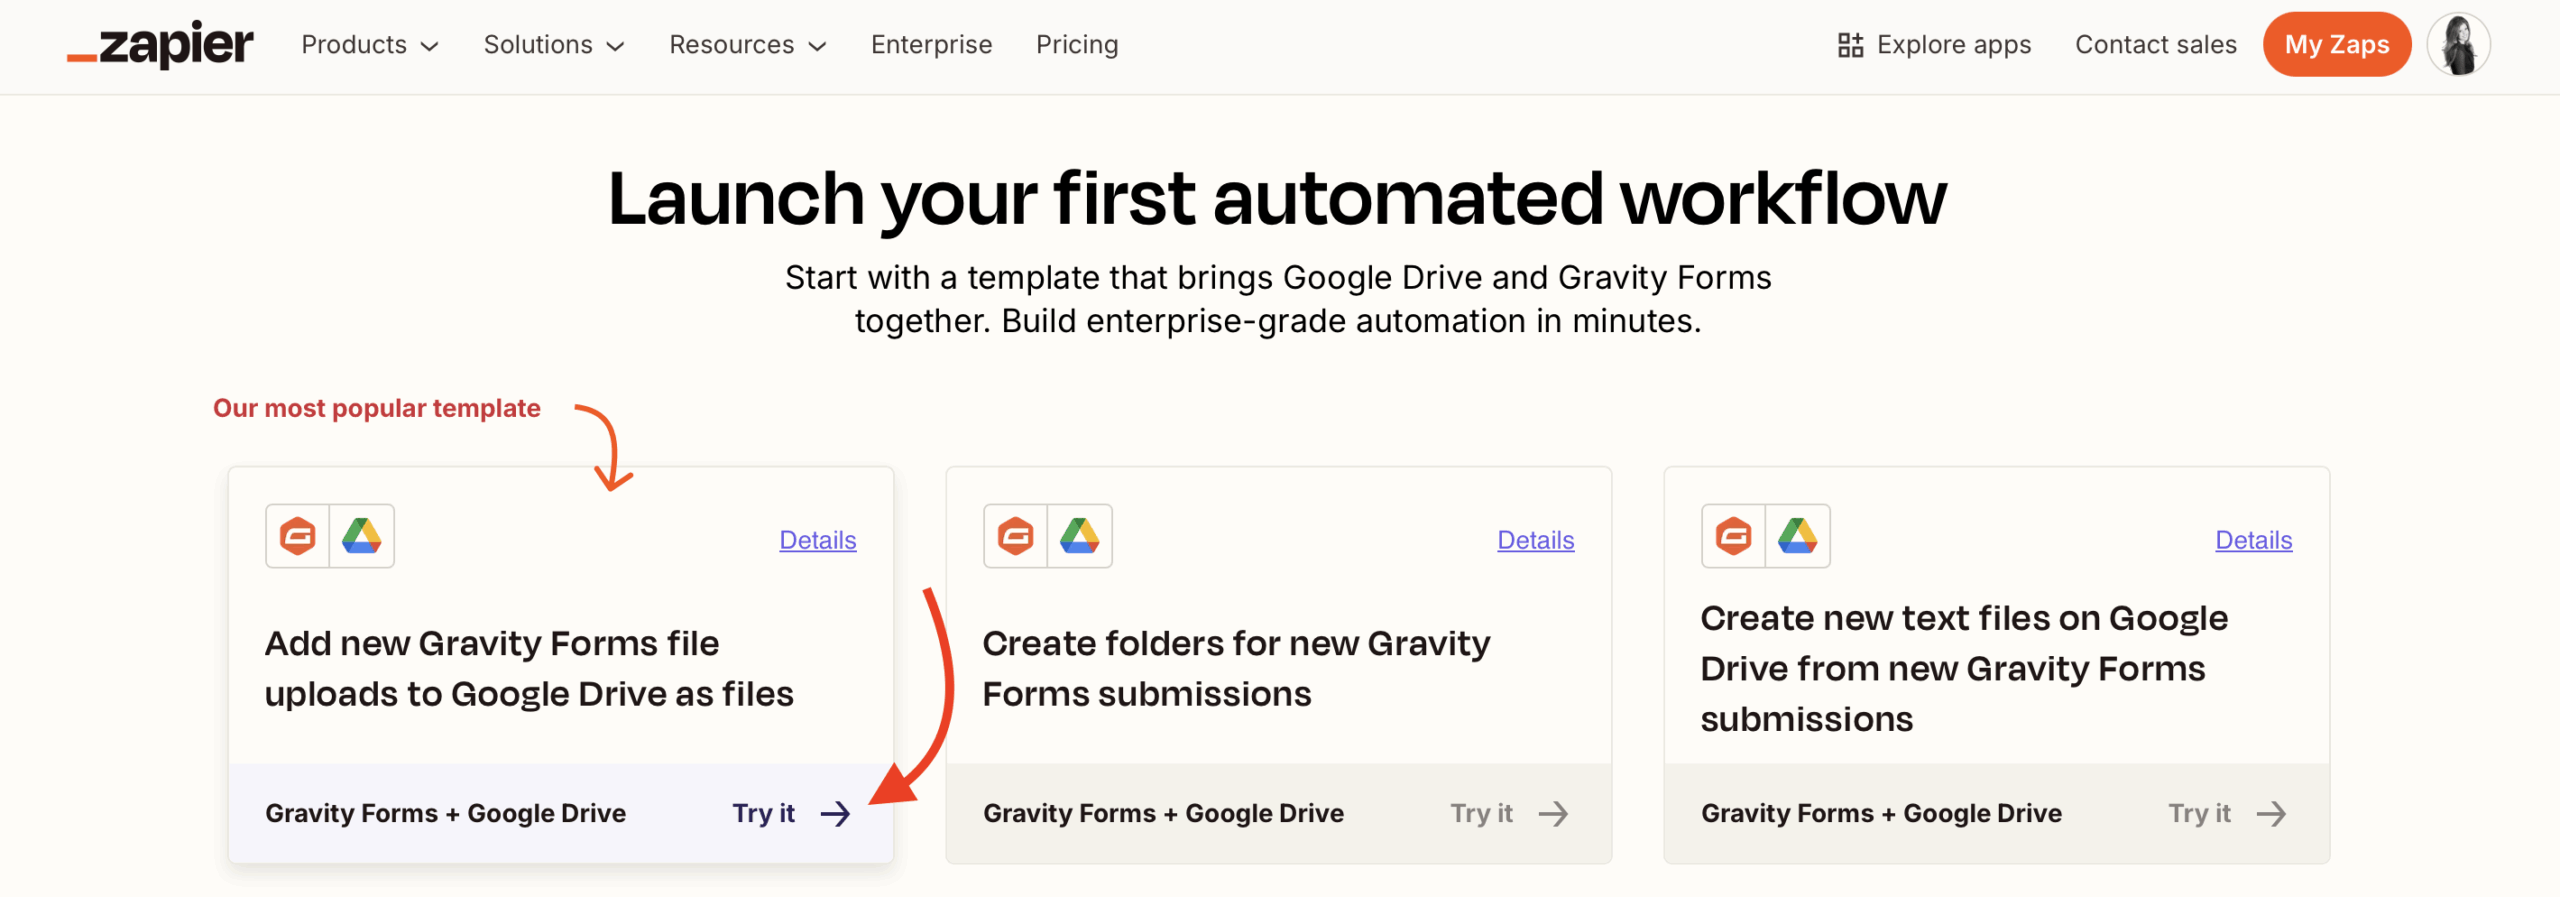
You can either use an existing one or create one from scratch. On the Gravity Forms integrations page, you can search for any app that works with the plugin or existing Zap templates.
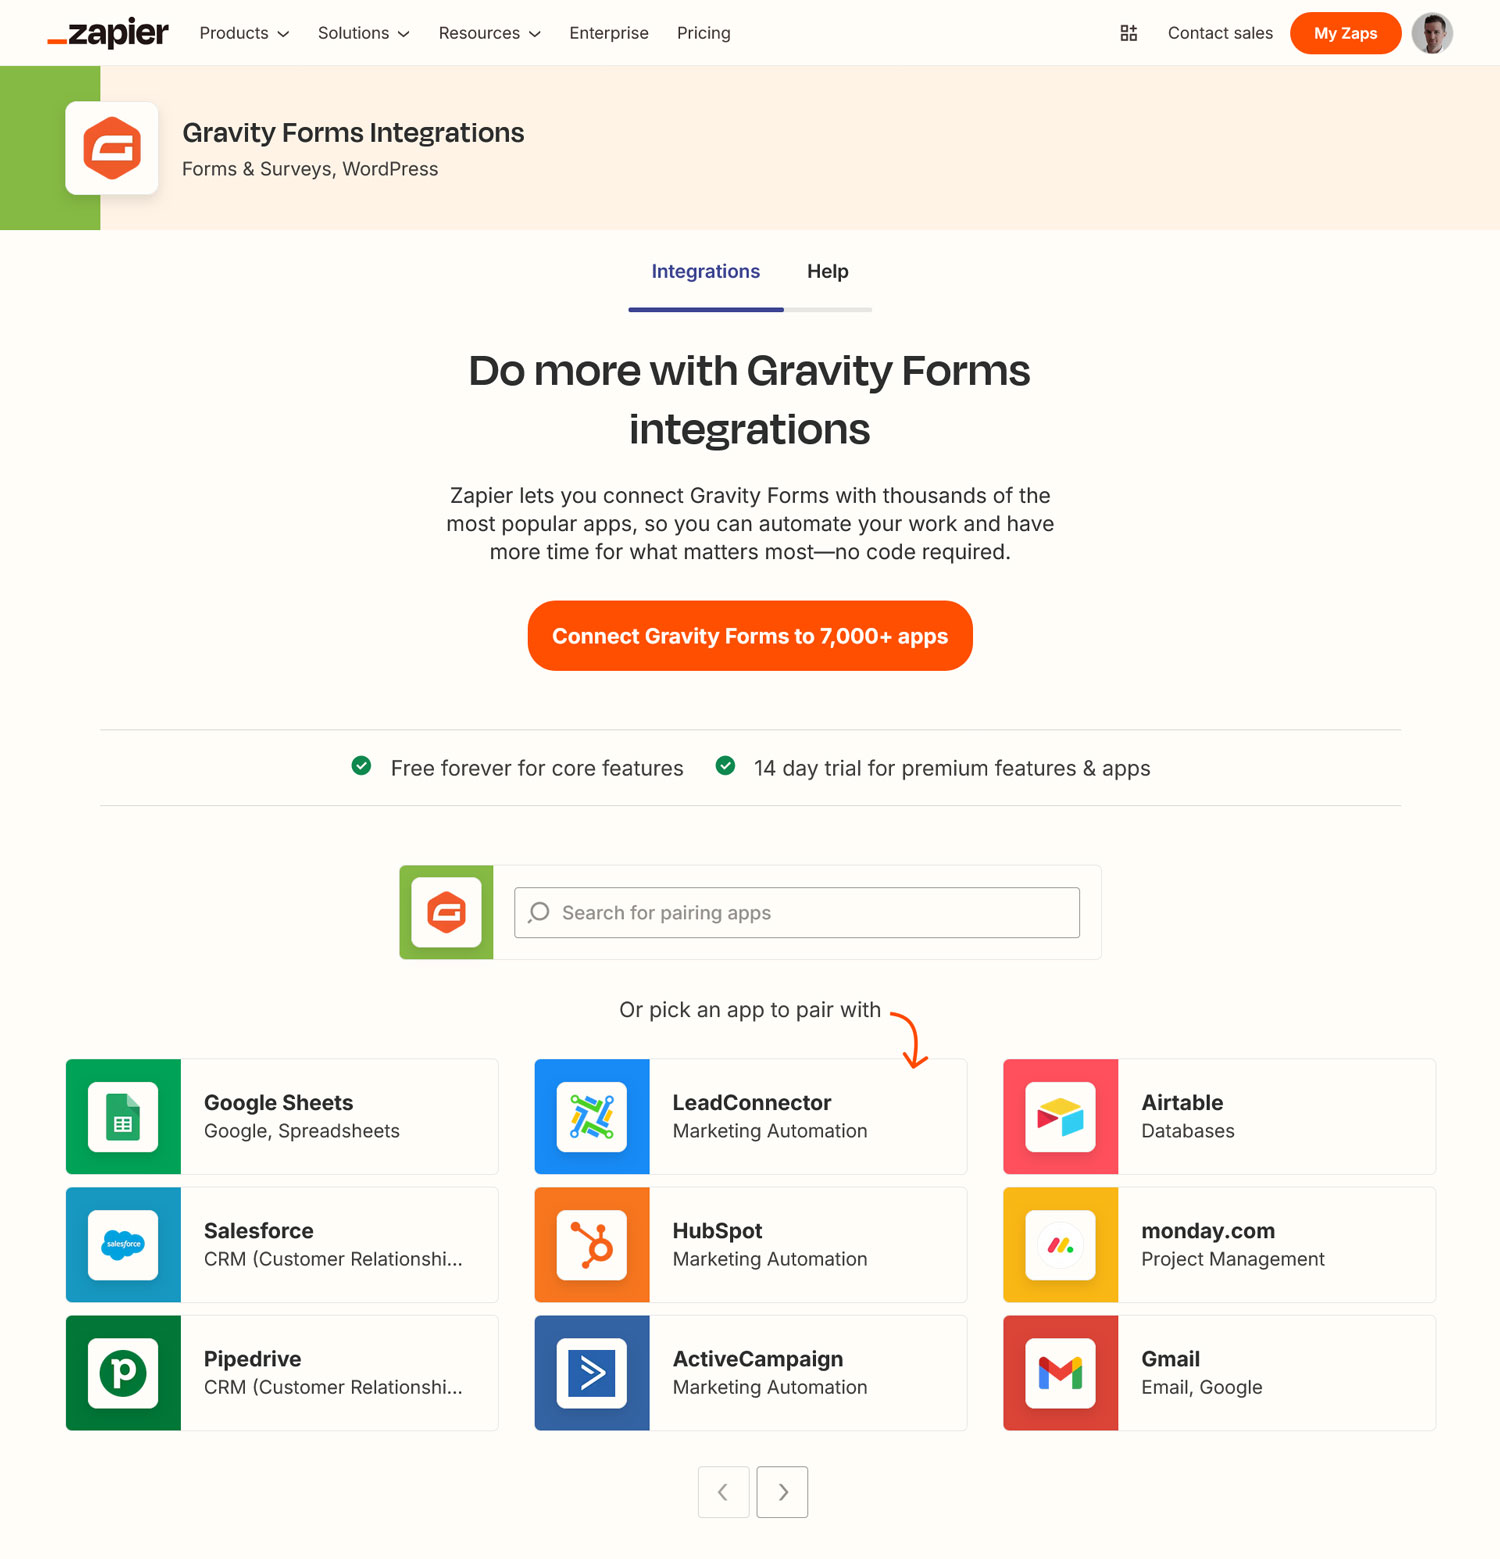
The most popular workflow is to Add new Gravity Forms file uploads to Google Drive as files.
Simply find the template and click Try it to start the process.
5. Connect to Gravity Forms and configure the Trigger
The next steps all happen in Zapier’s editor.
From here, your first task is to rename your Zap in the top bar.
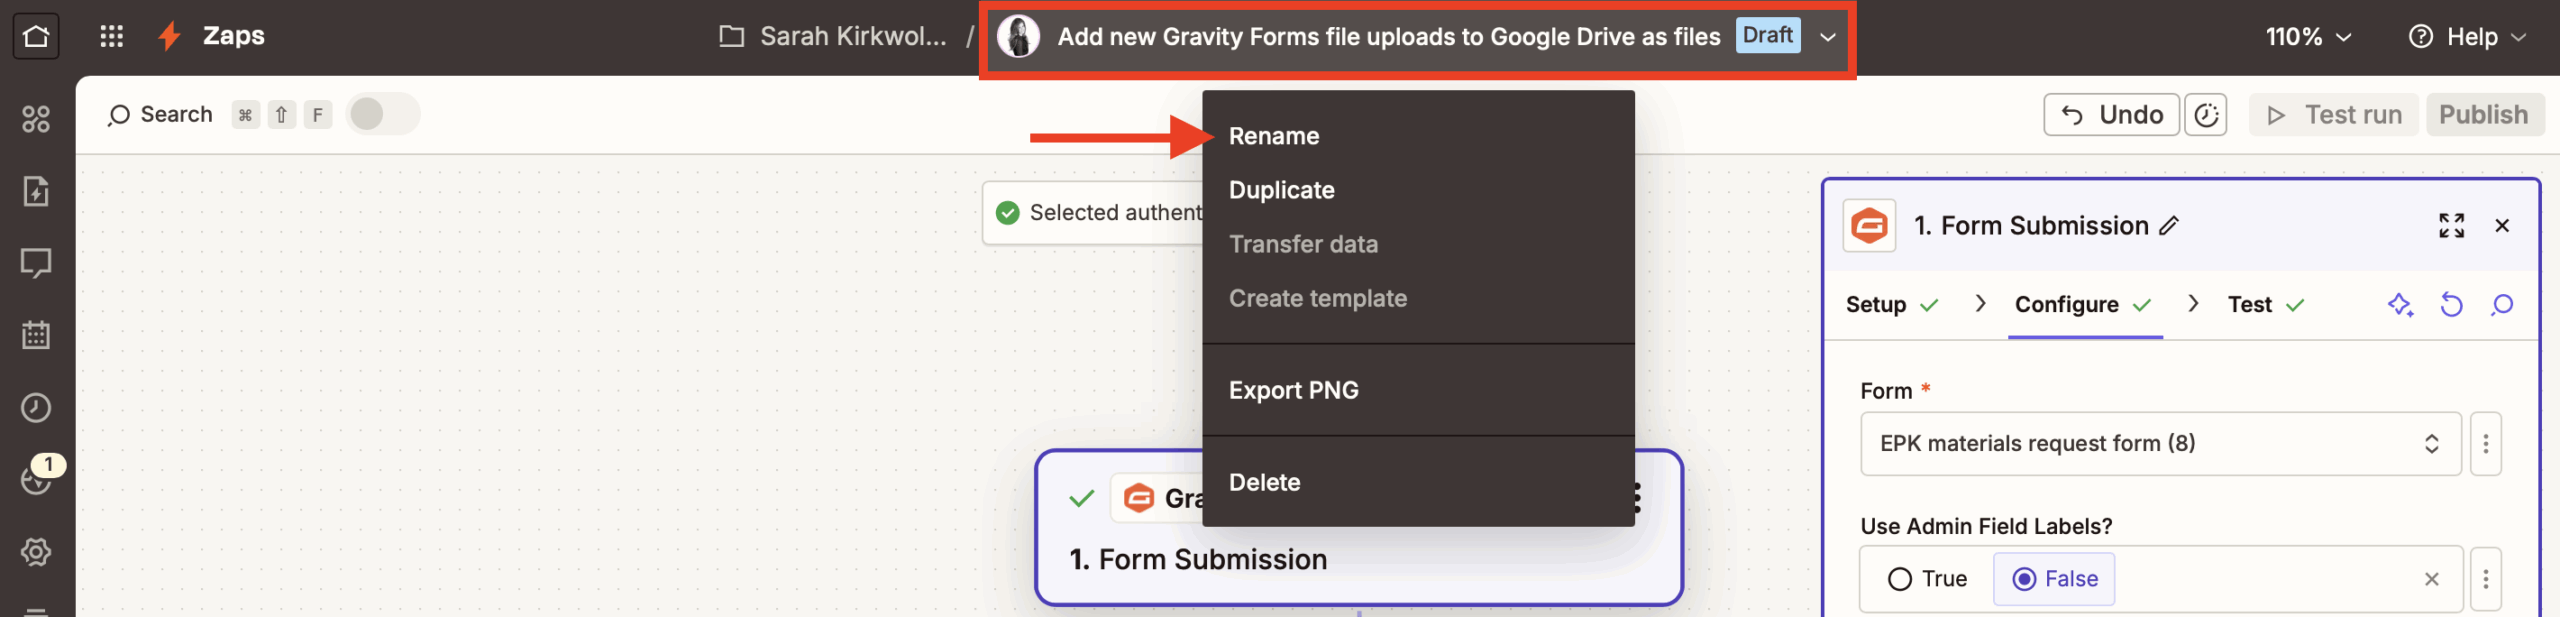
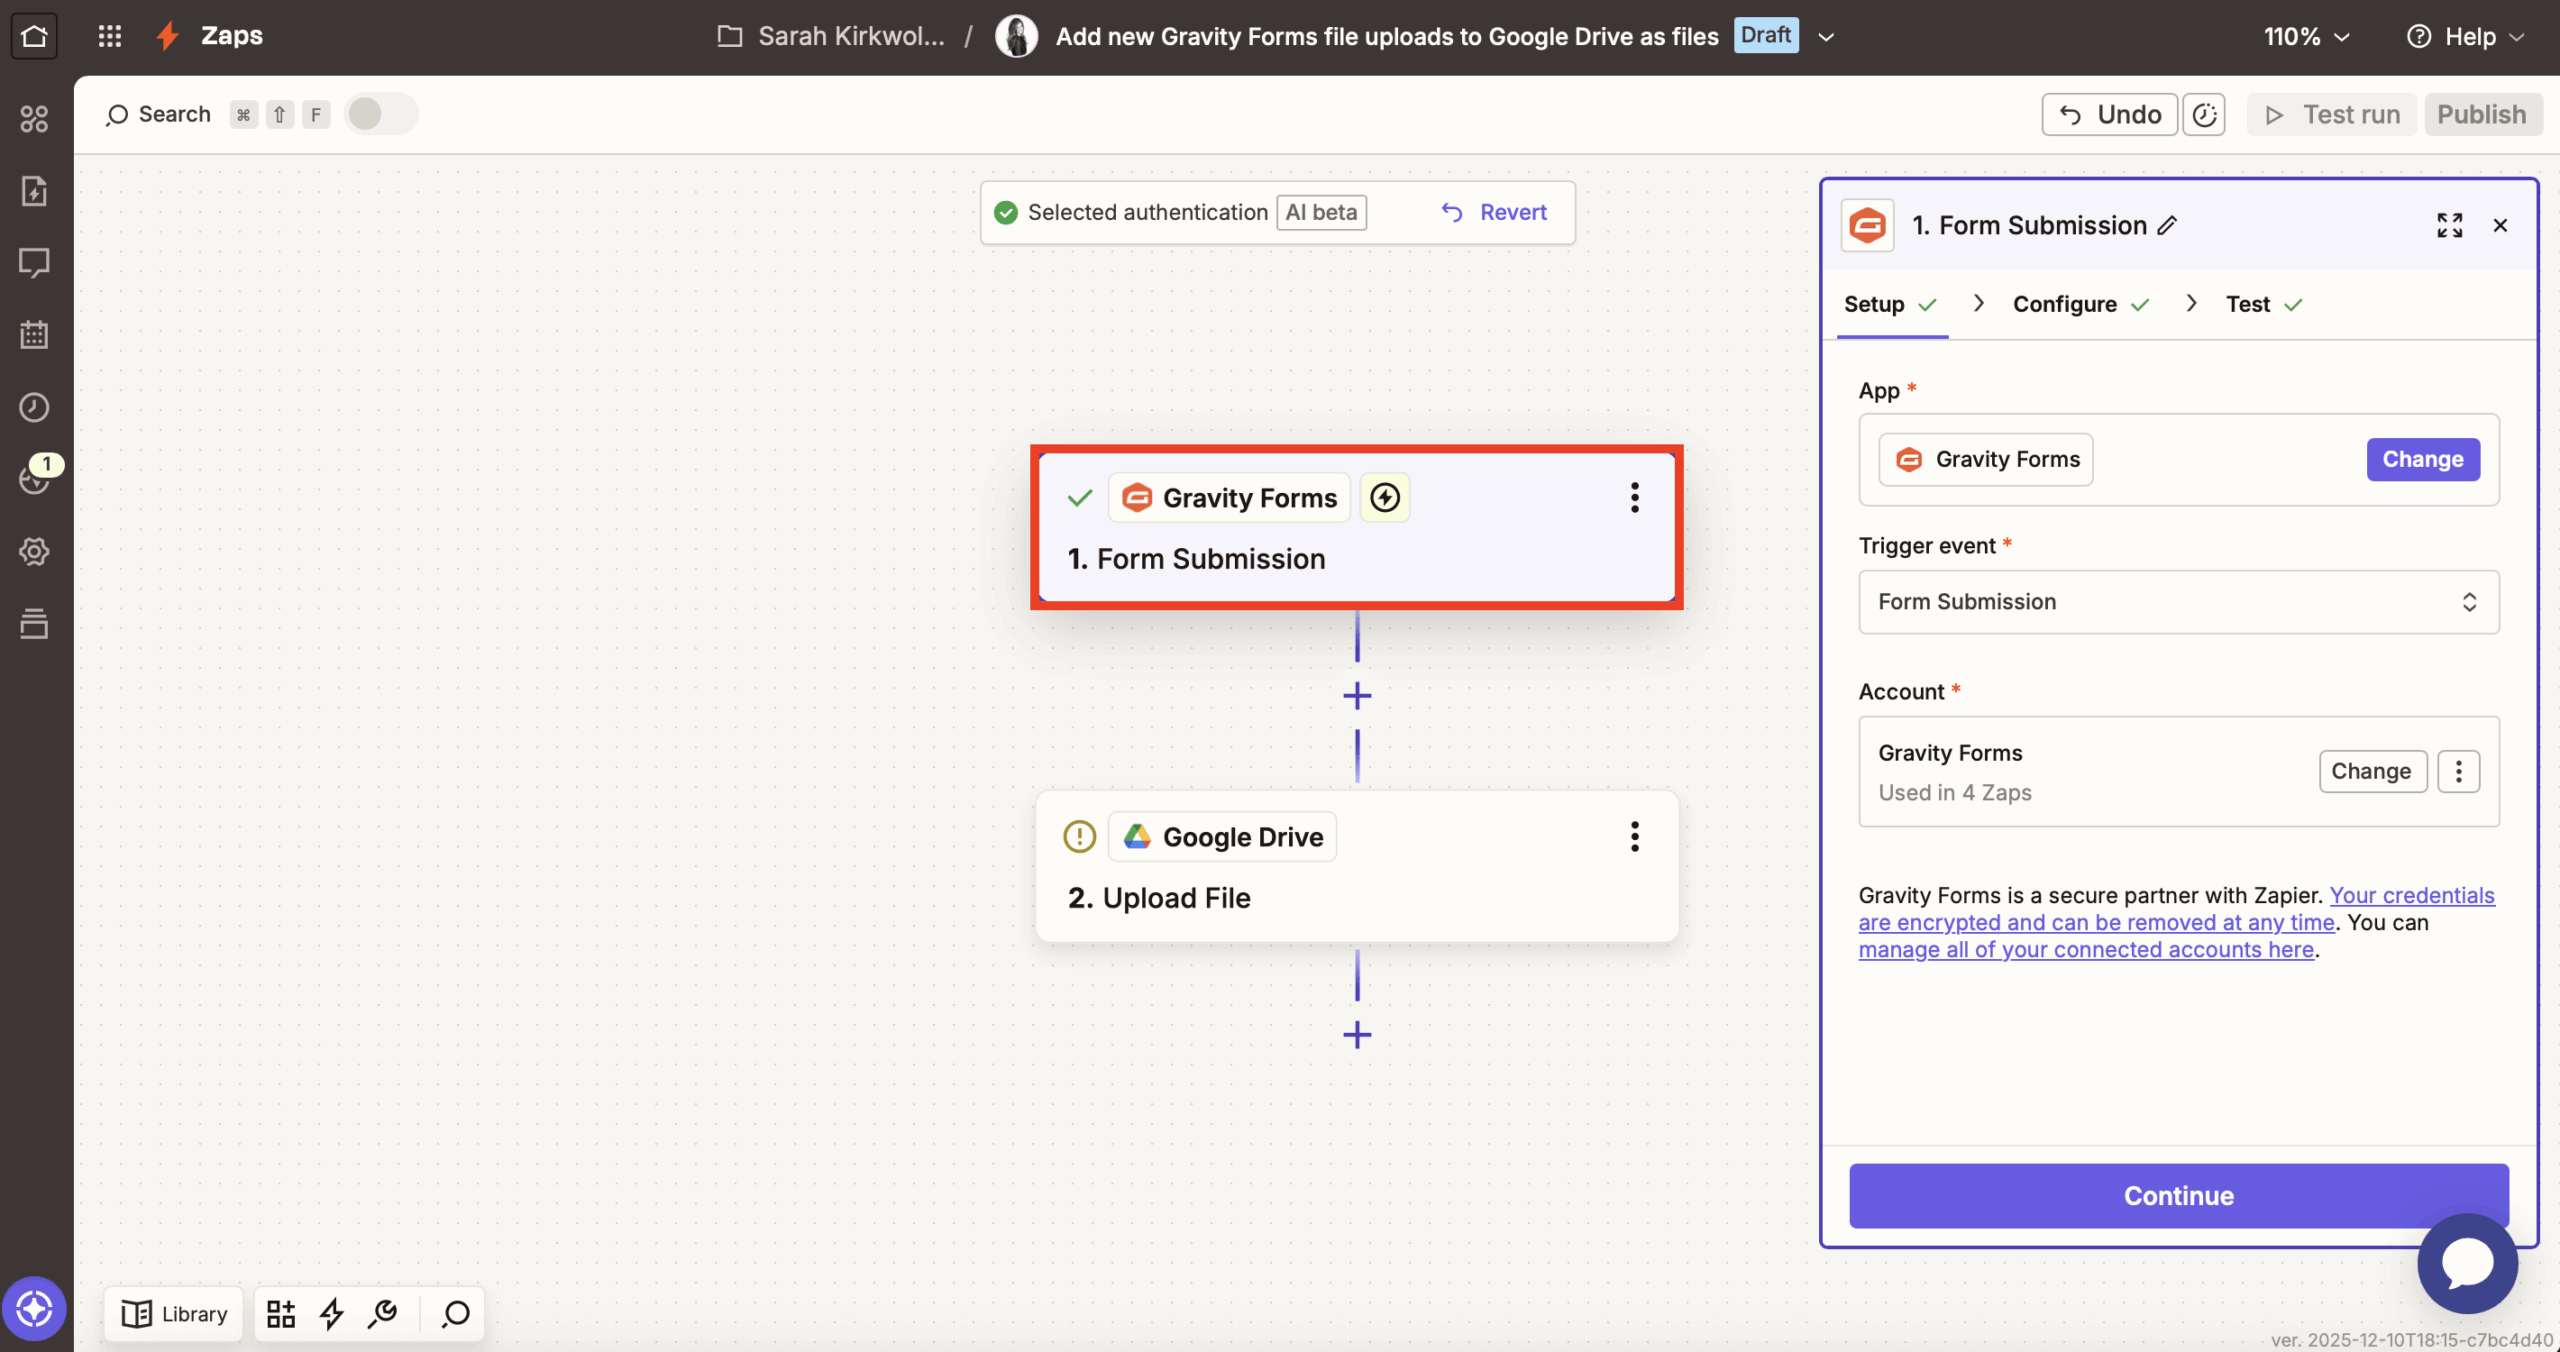
Then, check if the Trigger event is set to Form Submission. After that, click Sign in.
Note: If you’ve connected Zapier with Gravity Forms before, Zapier’s Copilot will log you in automatically and present you with your next-step action items.
Once you do, a new form appears prompting you to enter your site URL and the Consumer Key and Consumer Secret from earlier.
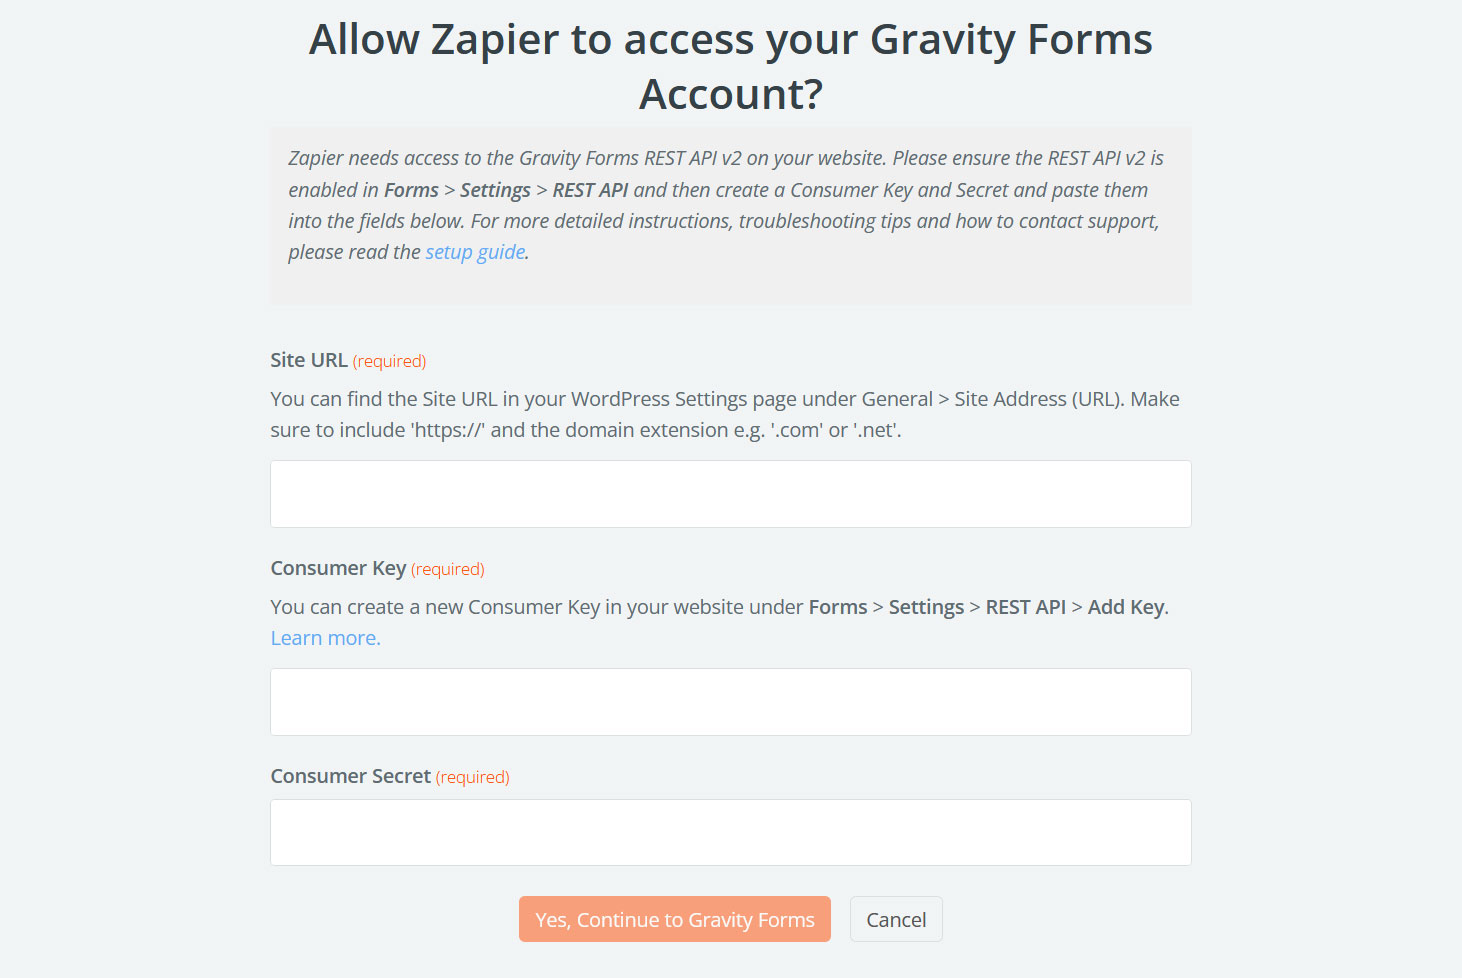
Click Yes, Continue to Gravity Forms to establish the connection. Next, click Continue to move on.

You should then see three fields.
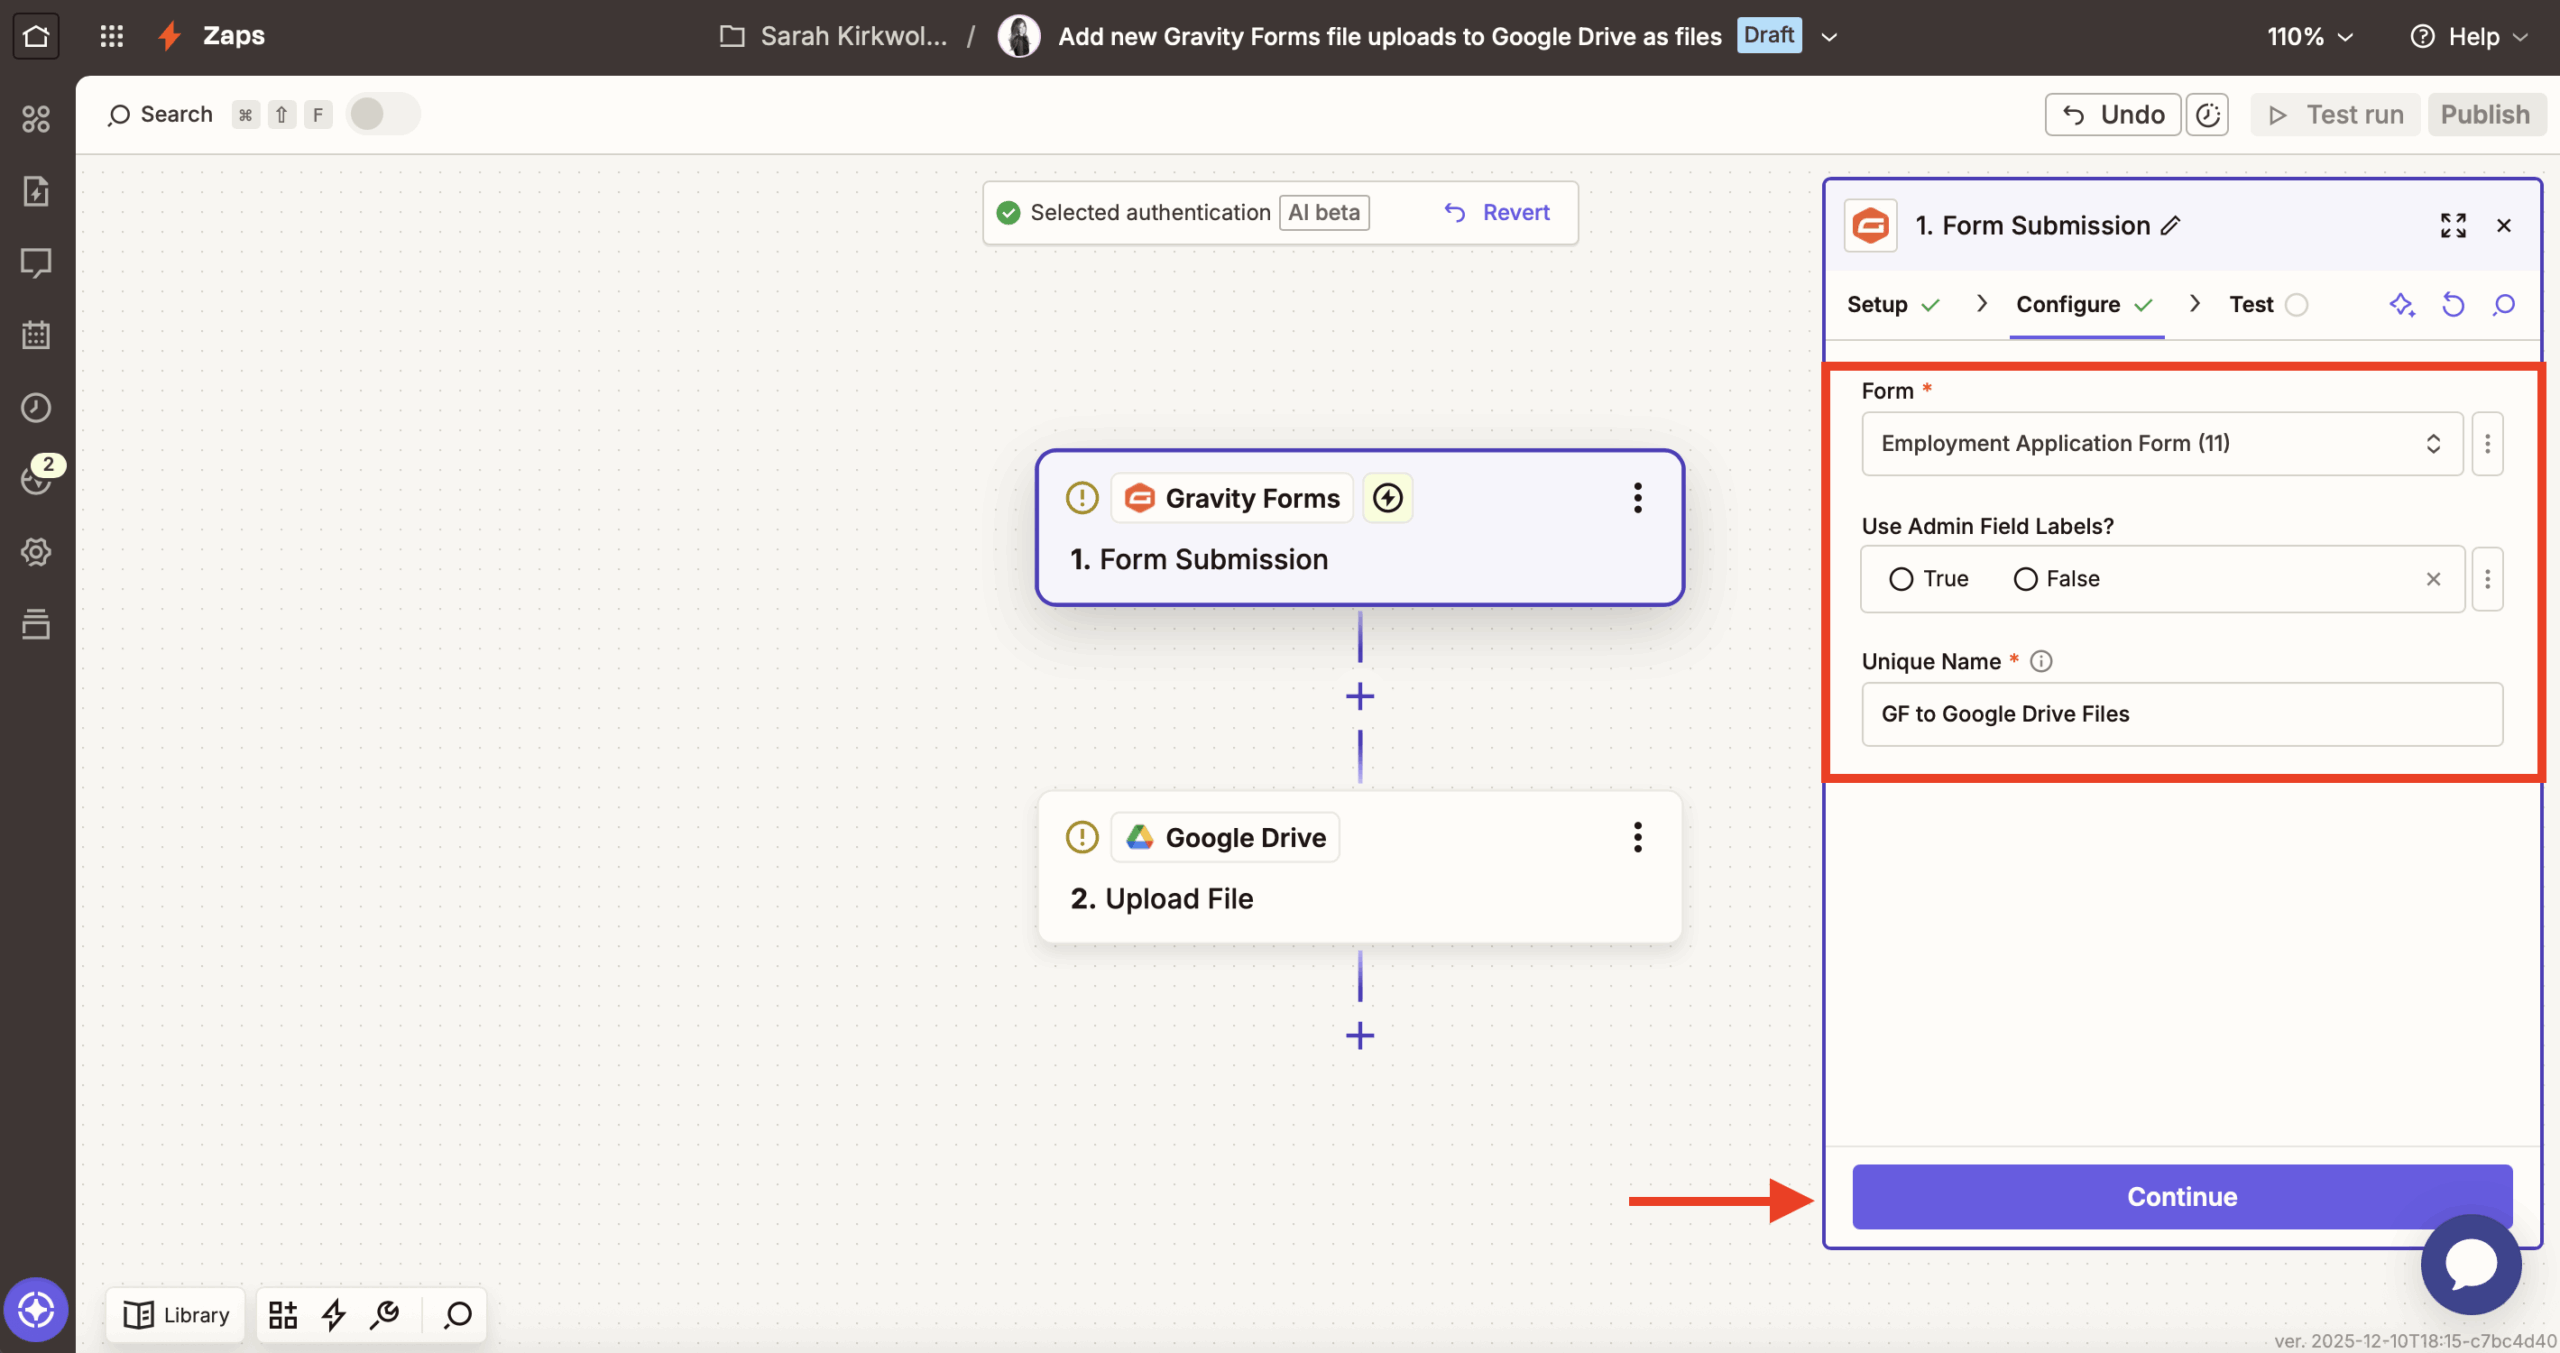
The first one asks you to choose the form you want to use. Click it and pick the one you created earlier (or any other form you want to connect to Google Drive).
The Use Admin Field Labels? section is not required, but you can fill it out if you have added Admin Labels.
That leaves Unique Name. Here, input a unique descriptor for this Zap and form. It’s important that it’s one-of-a-kind because Gravity Forms uses this to process the data. Check the example setup below if you are unsure how to fill this part in.
When you are ready, click Continue.
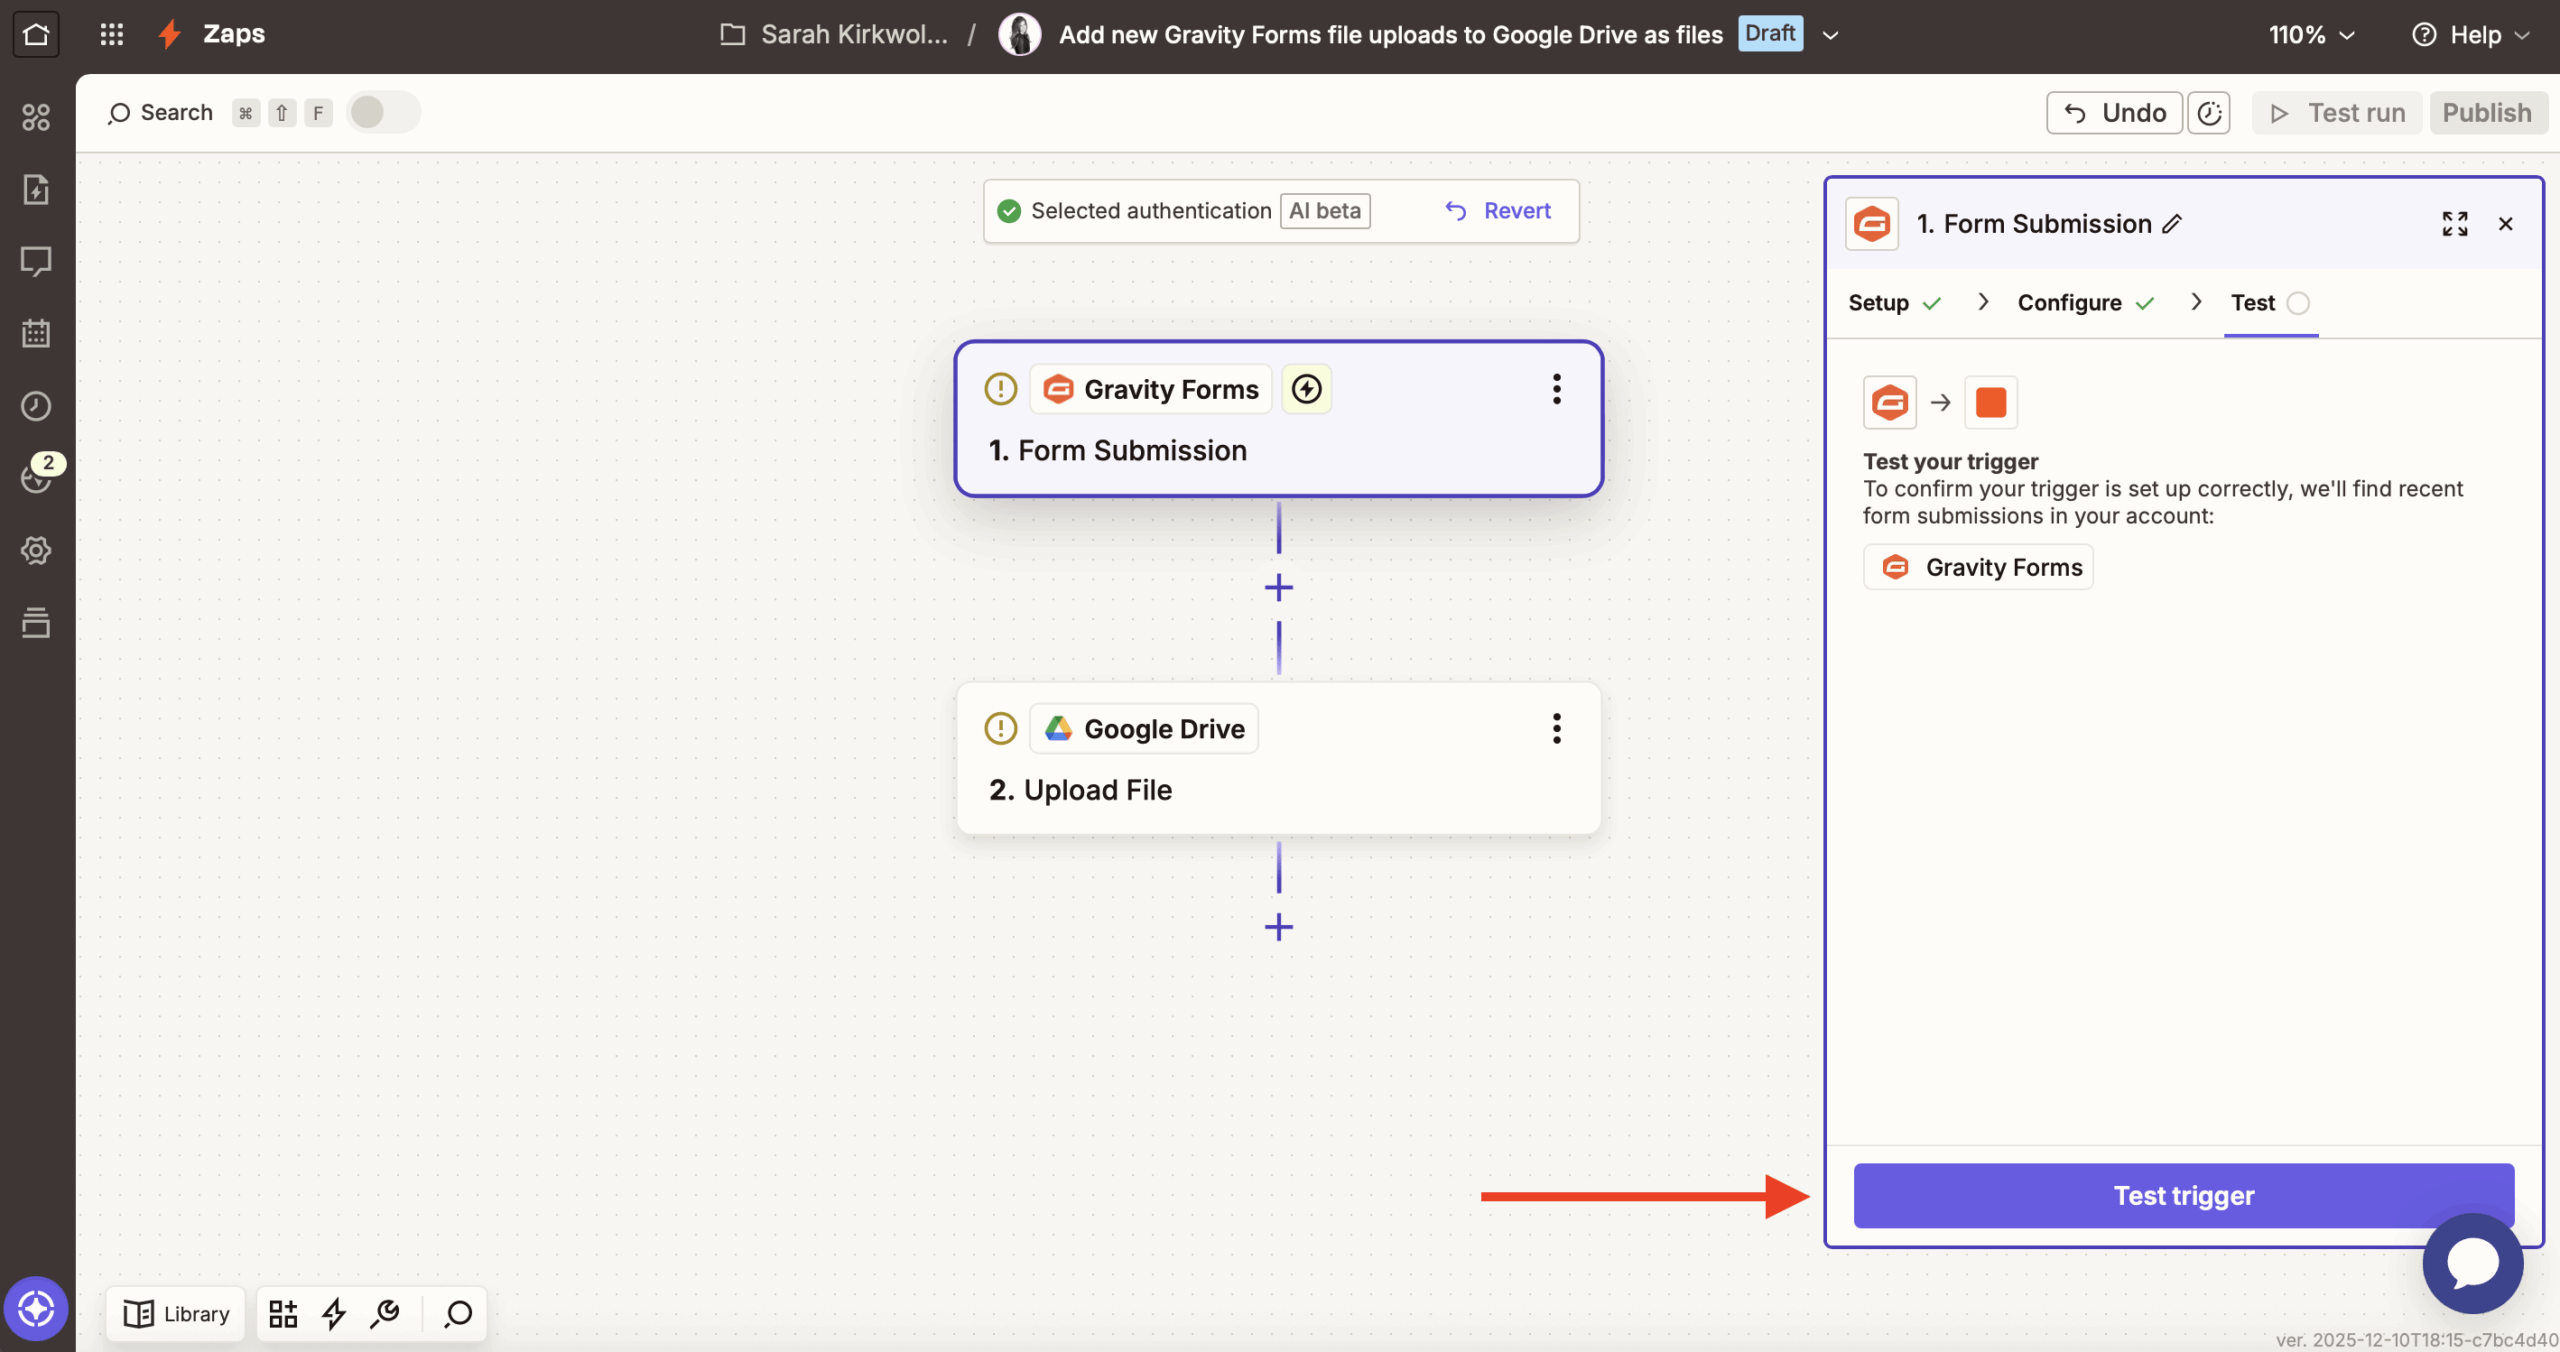
On the screen that follows, use the Test Trigger button to load example data from Gravity Forms. This ensures the connection works and becomes important when testing the Zap later.
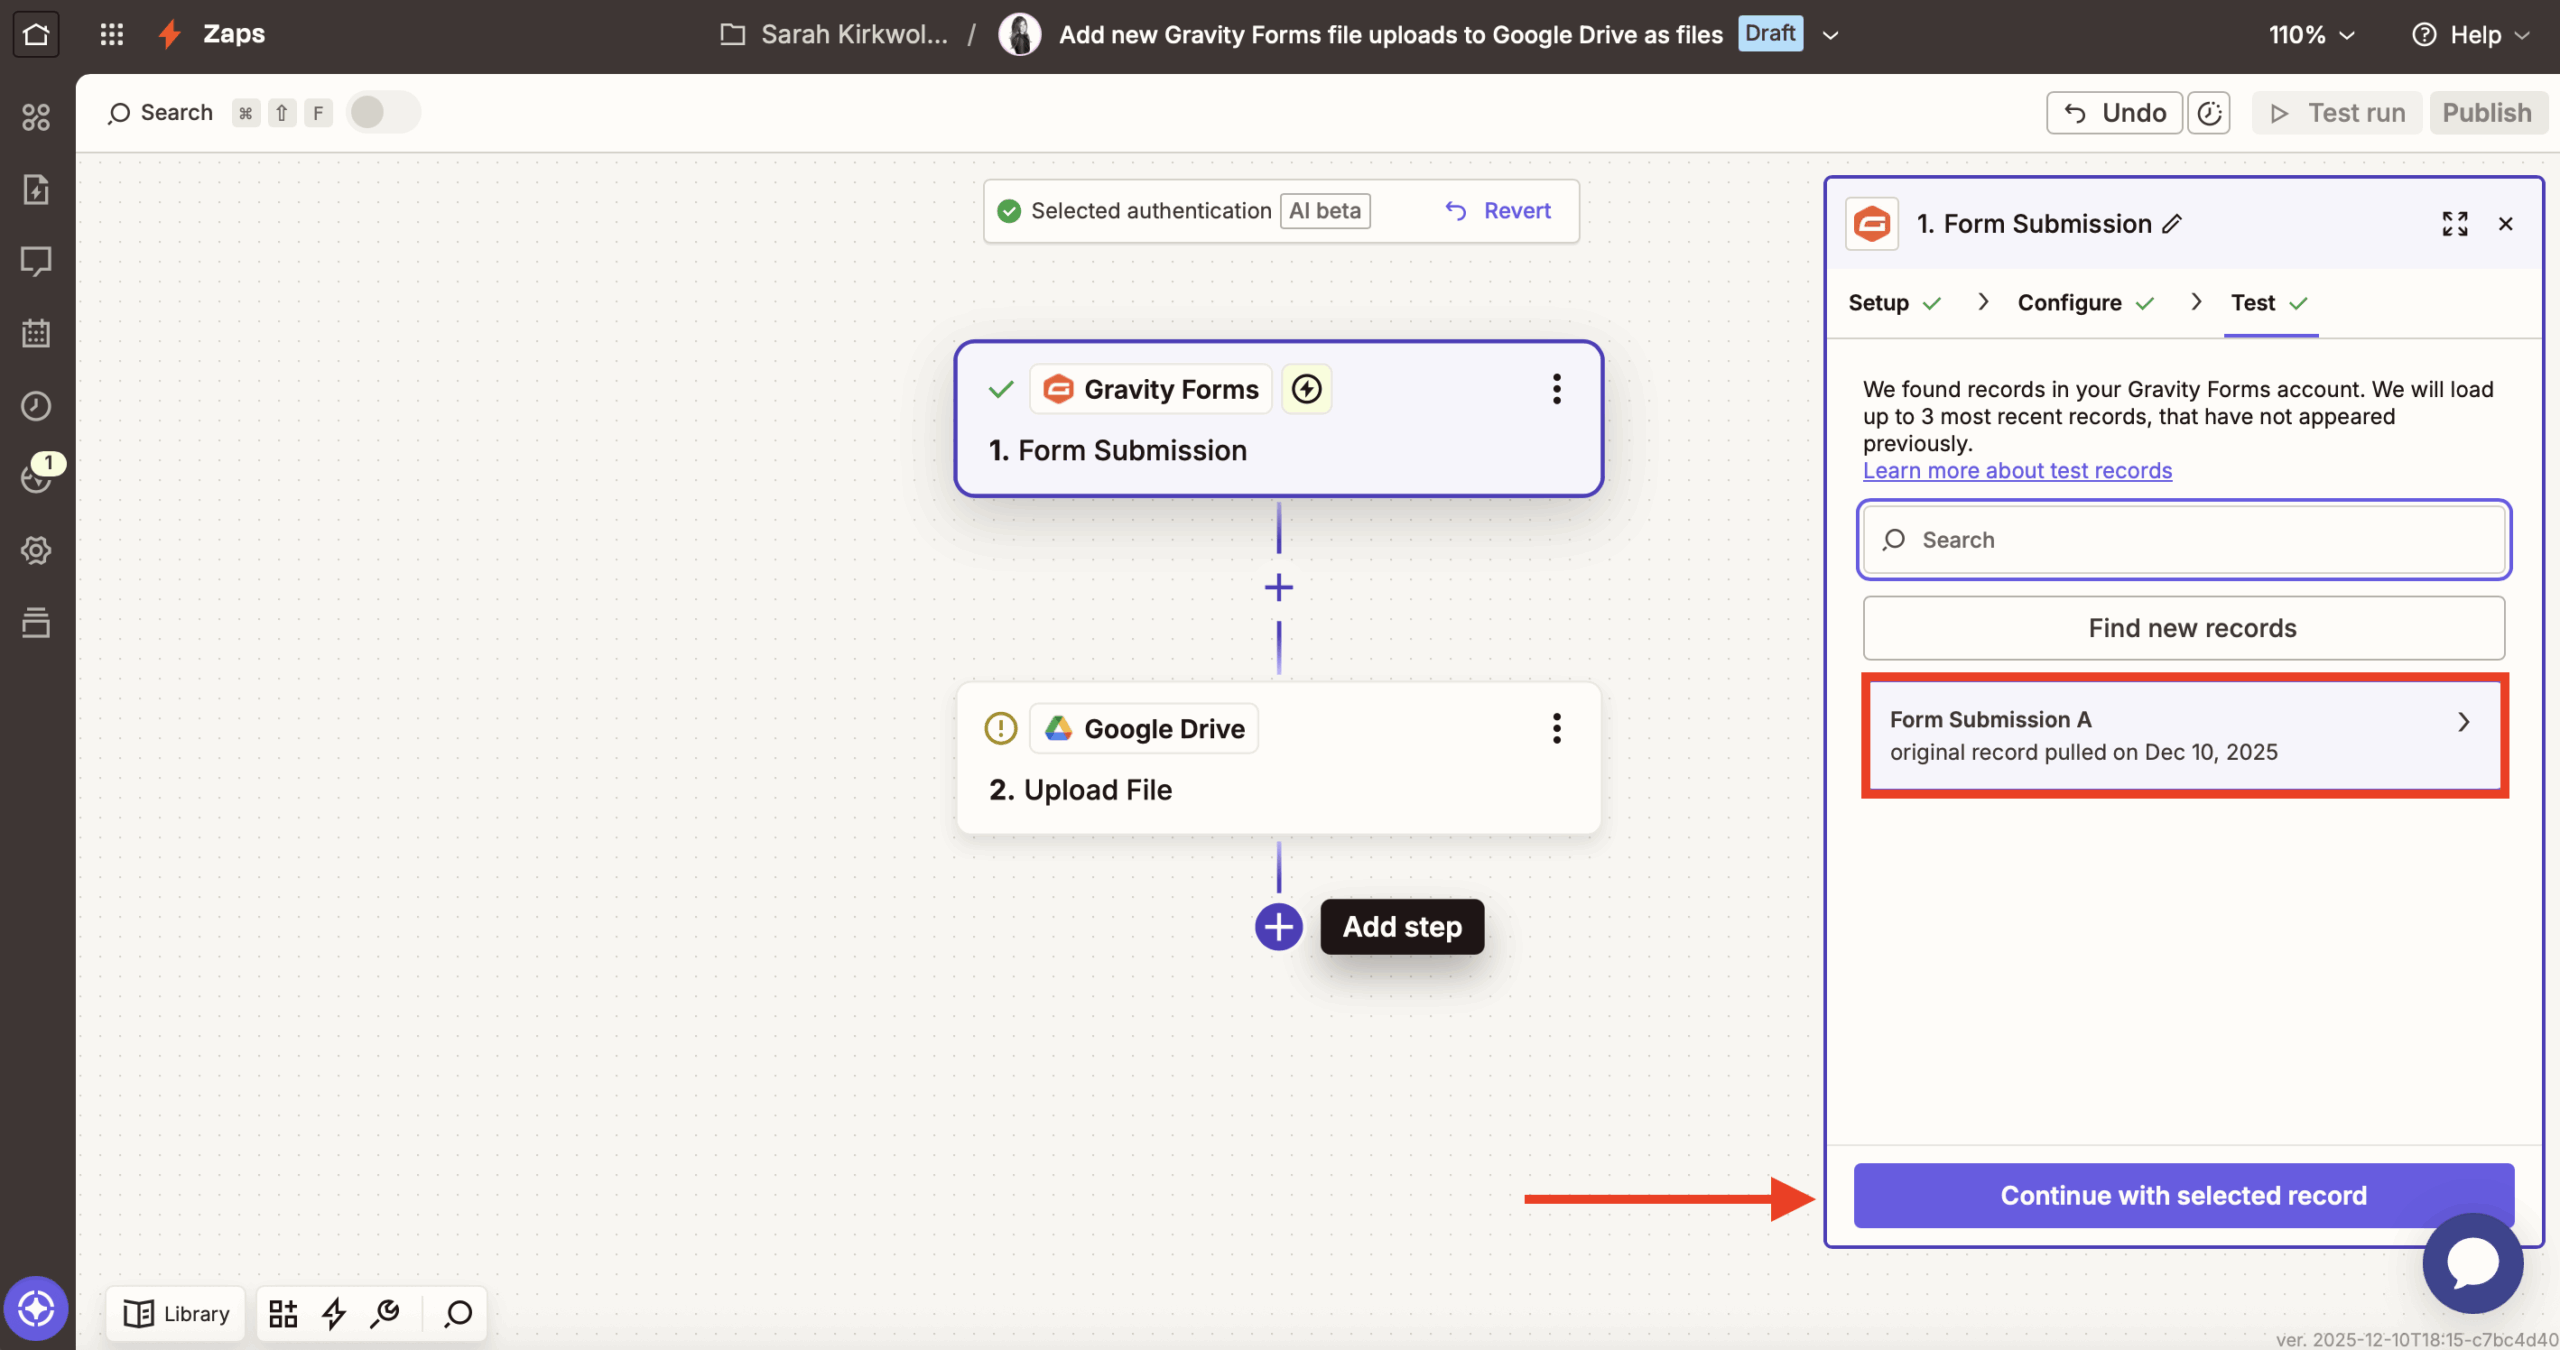
You should end up with a viewable submission record. Click Continue with selected record.
6. Establish a connection to Google Drive
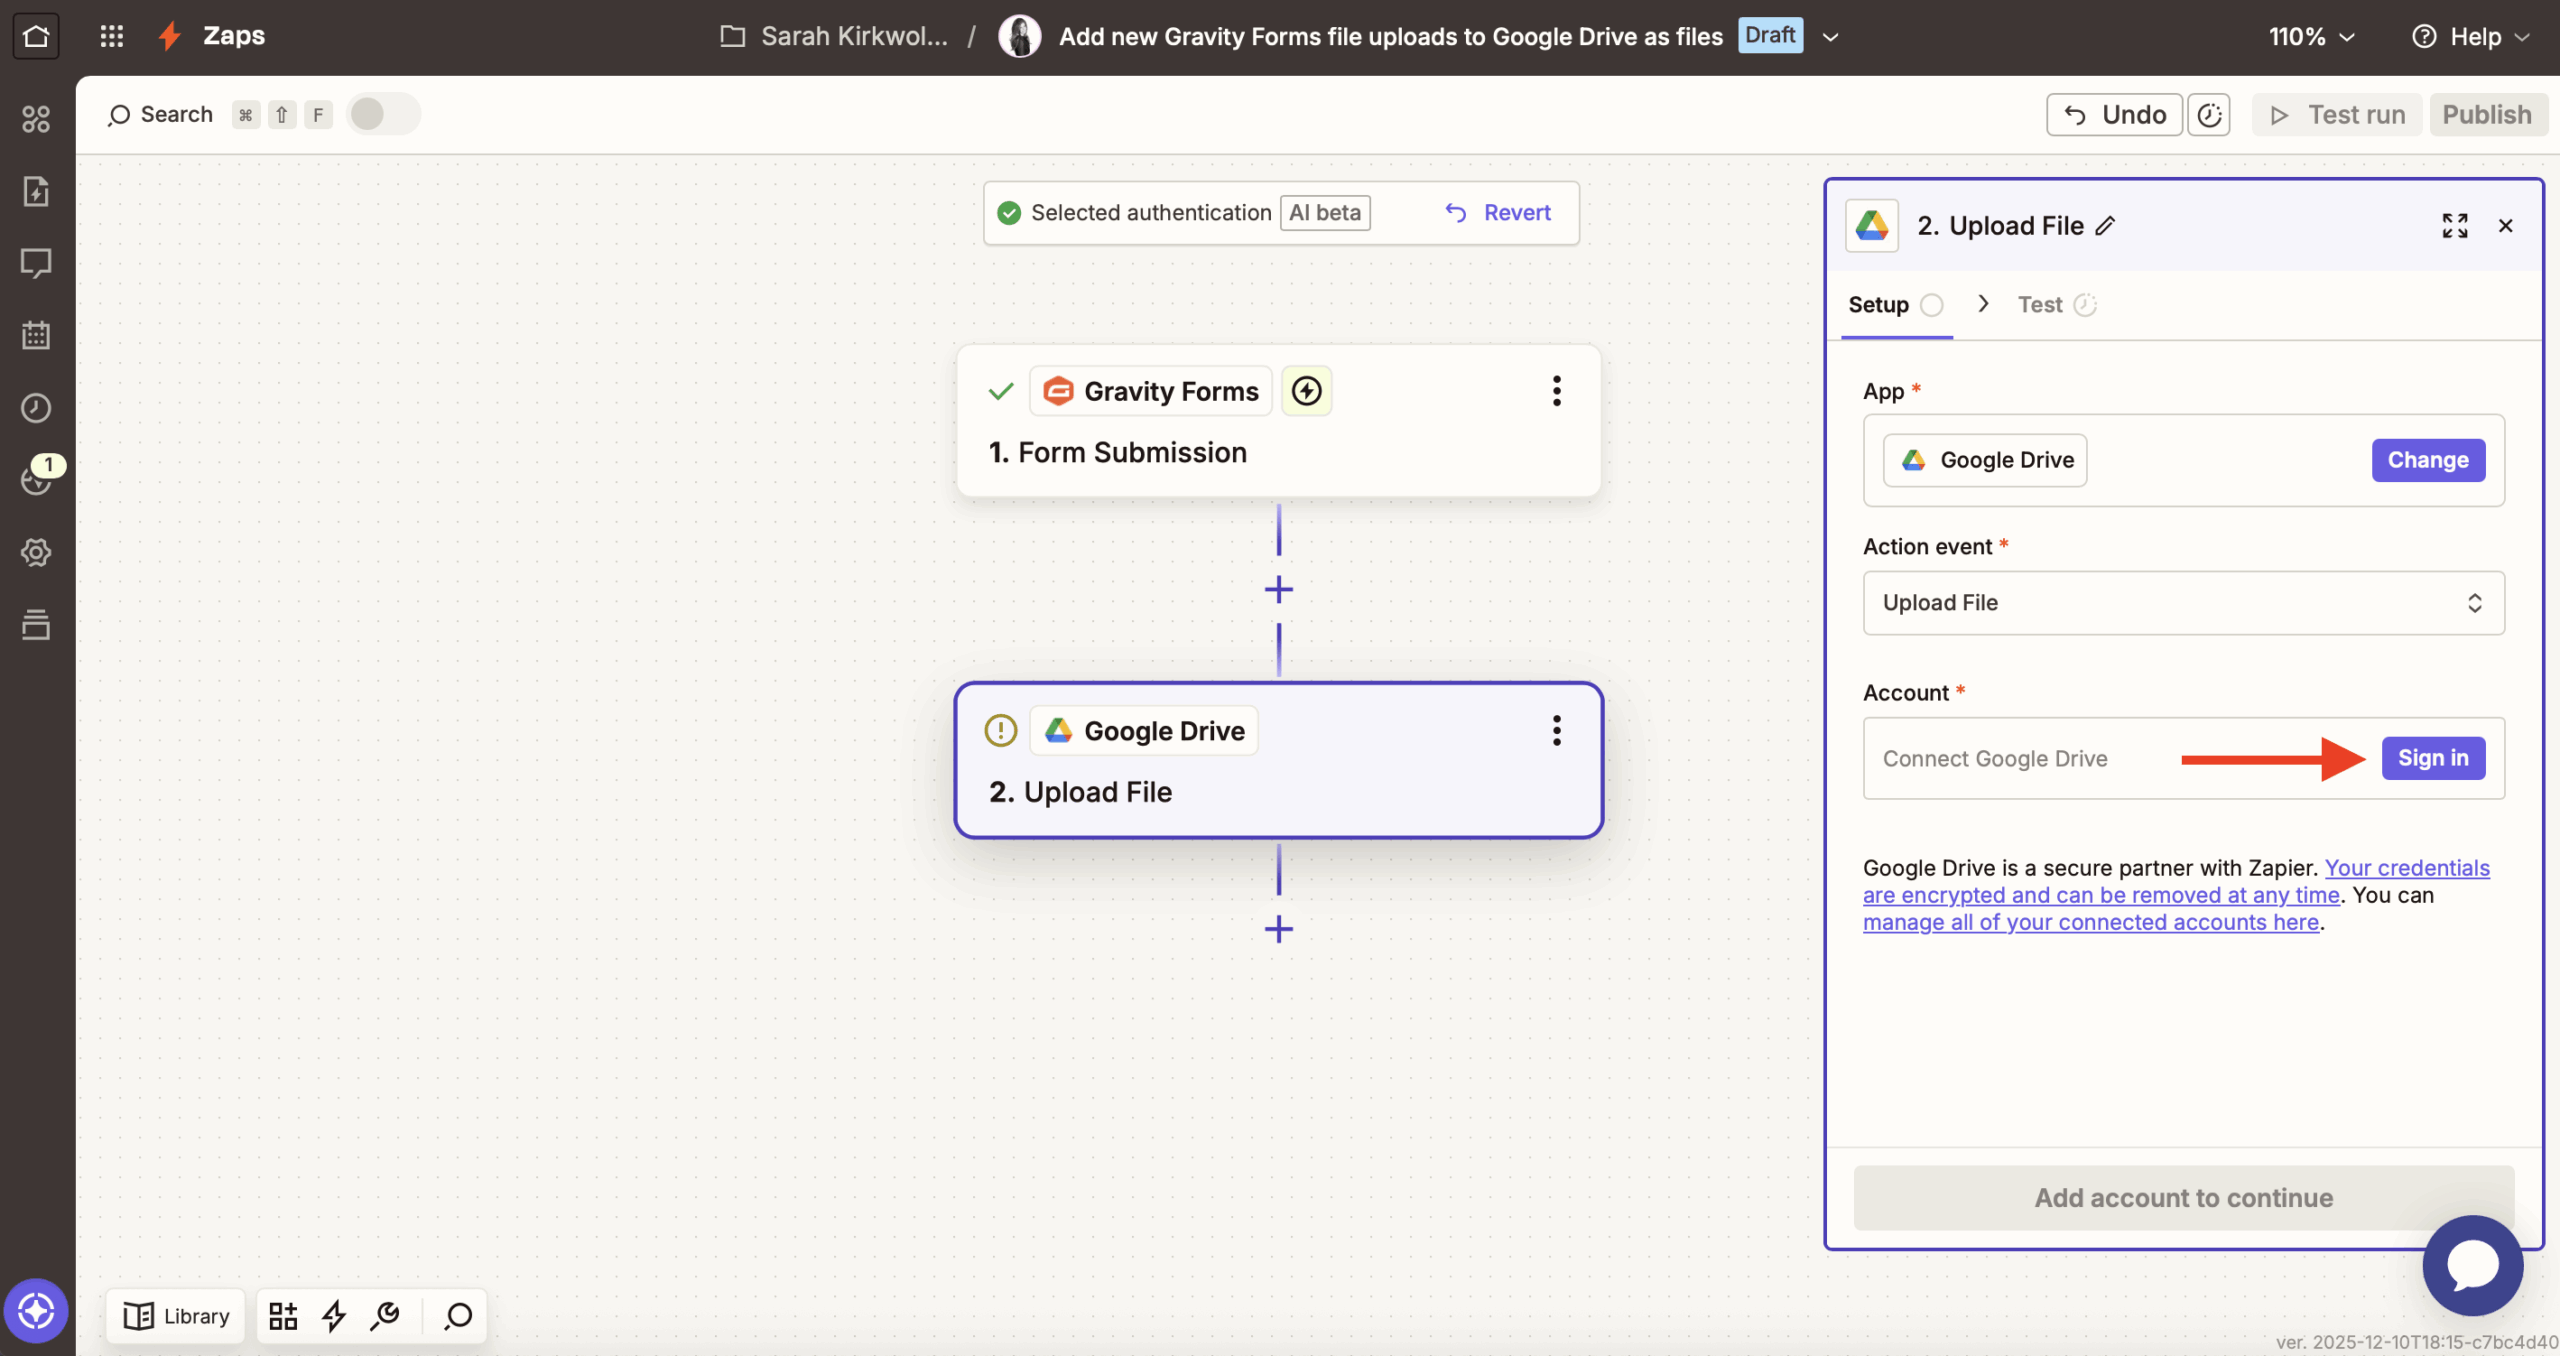
Next, we need to connect to Google Drive.
Check that the Action event has been set to Upload File. Finally, click Sign in to connect to your Google Drive account.
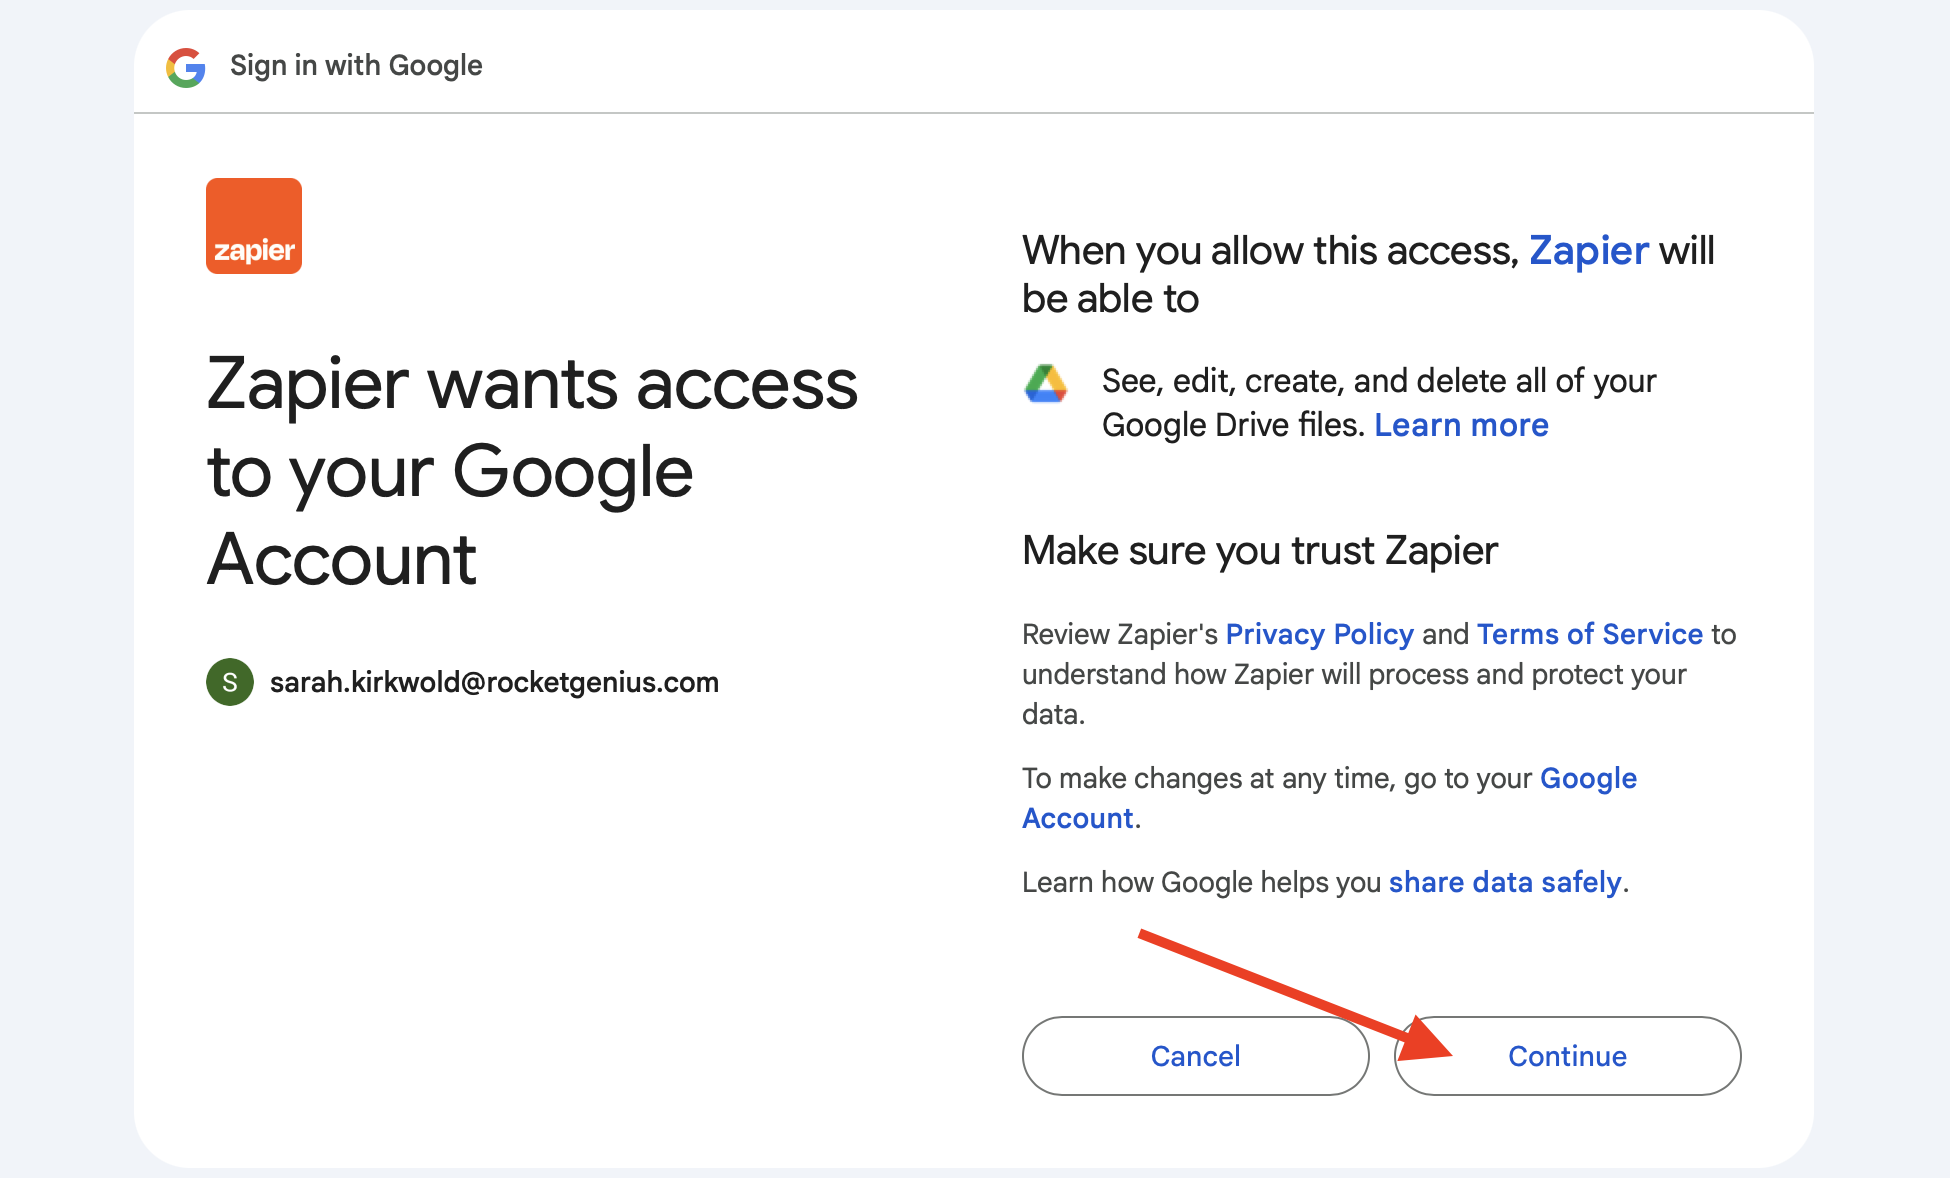
This should open a separate window where you can sign in to Google or, if you are already signed in, select the account you want to use.
Then, click Continue.
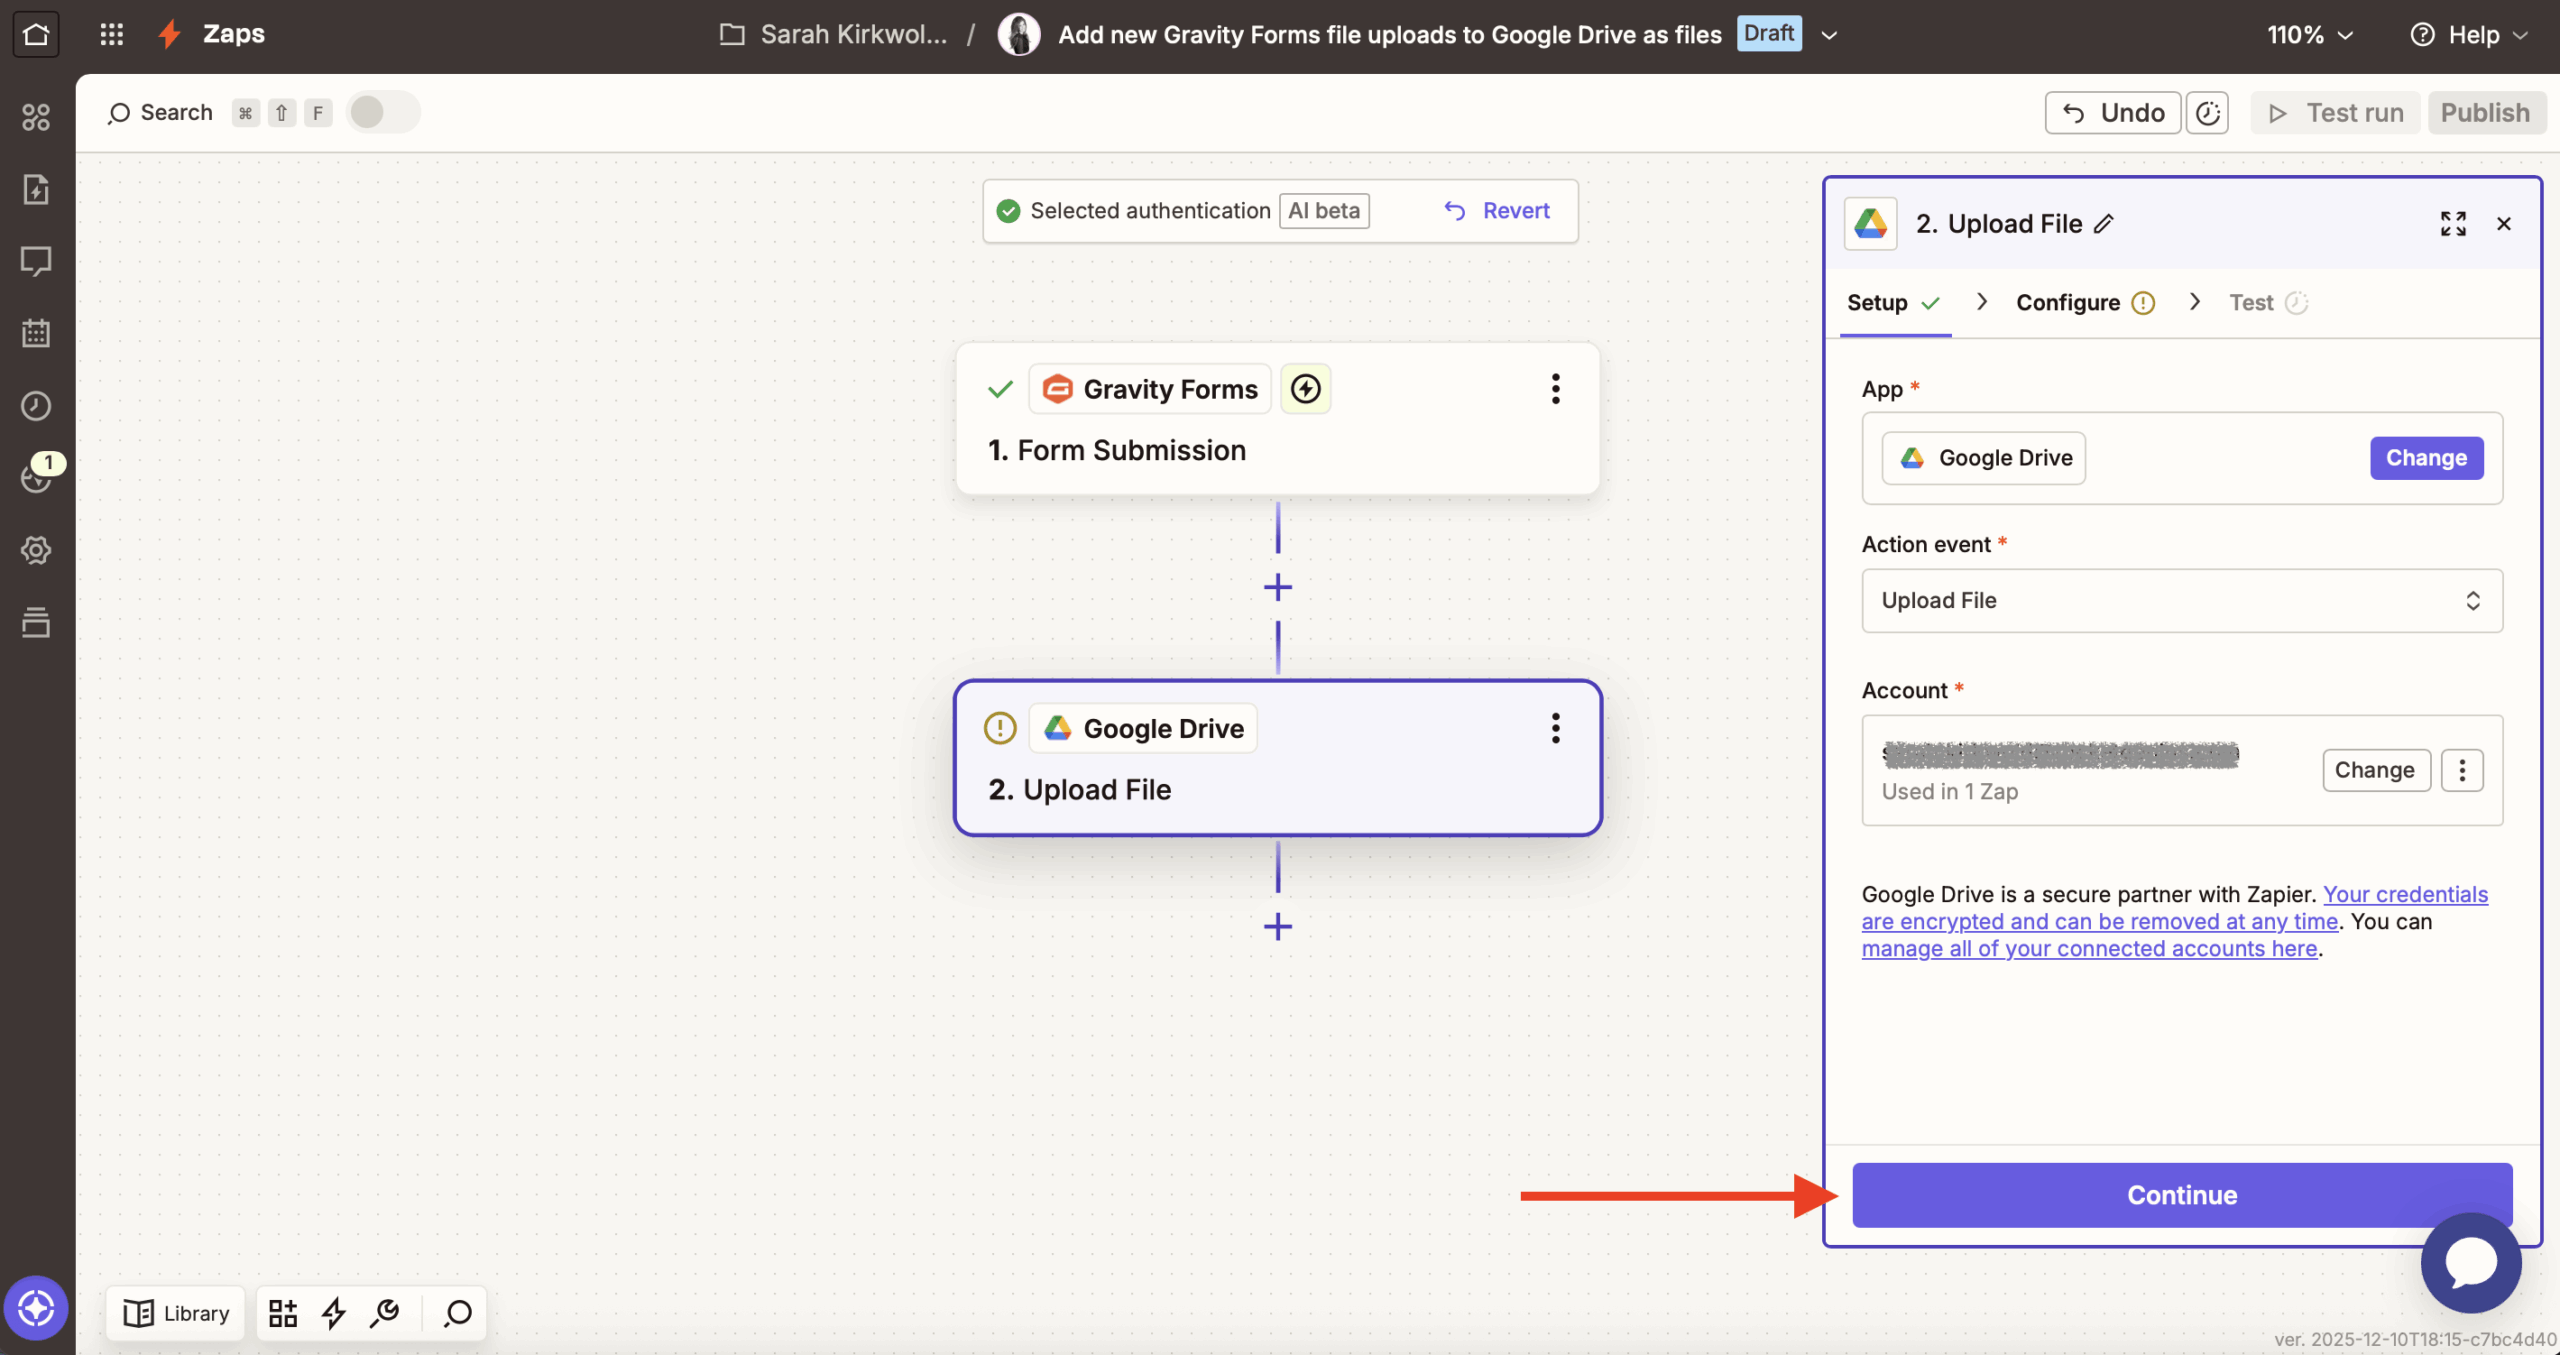
Once that step is successful, you can continue again.
7. Configure the Action
Now it’s time to configure the location where the files uploaded through Gravity Forms form will be saved within Google Drive.

If you leave Drive and Folder as is, the file will be saved to your personal Google Drive account and its root folder by default. If you are using a shared drive or want to select a particular folder, click the drop-down menus to choose a new destination.
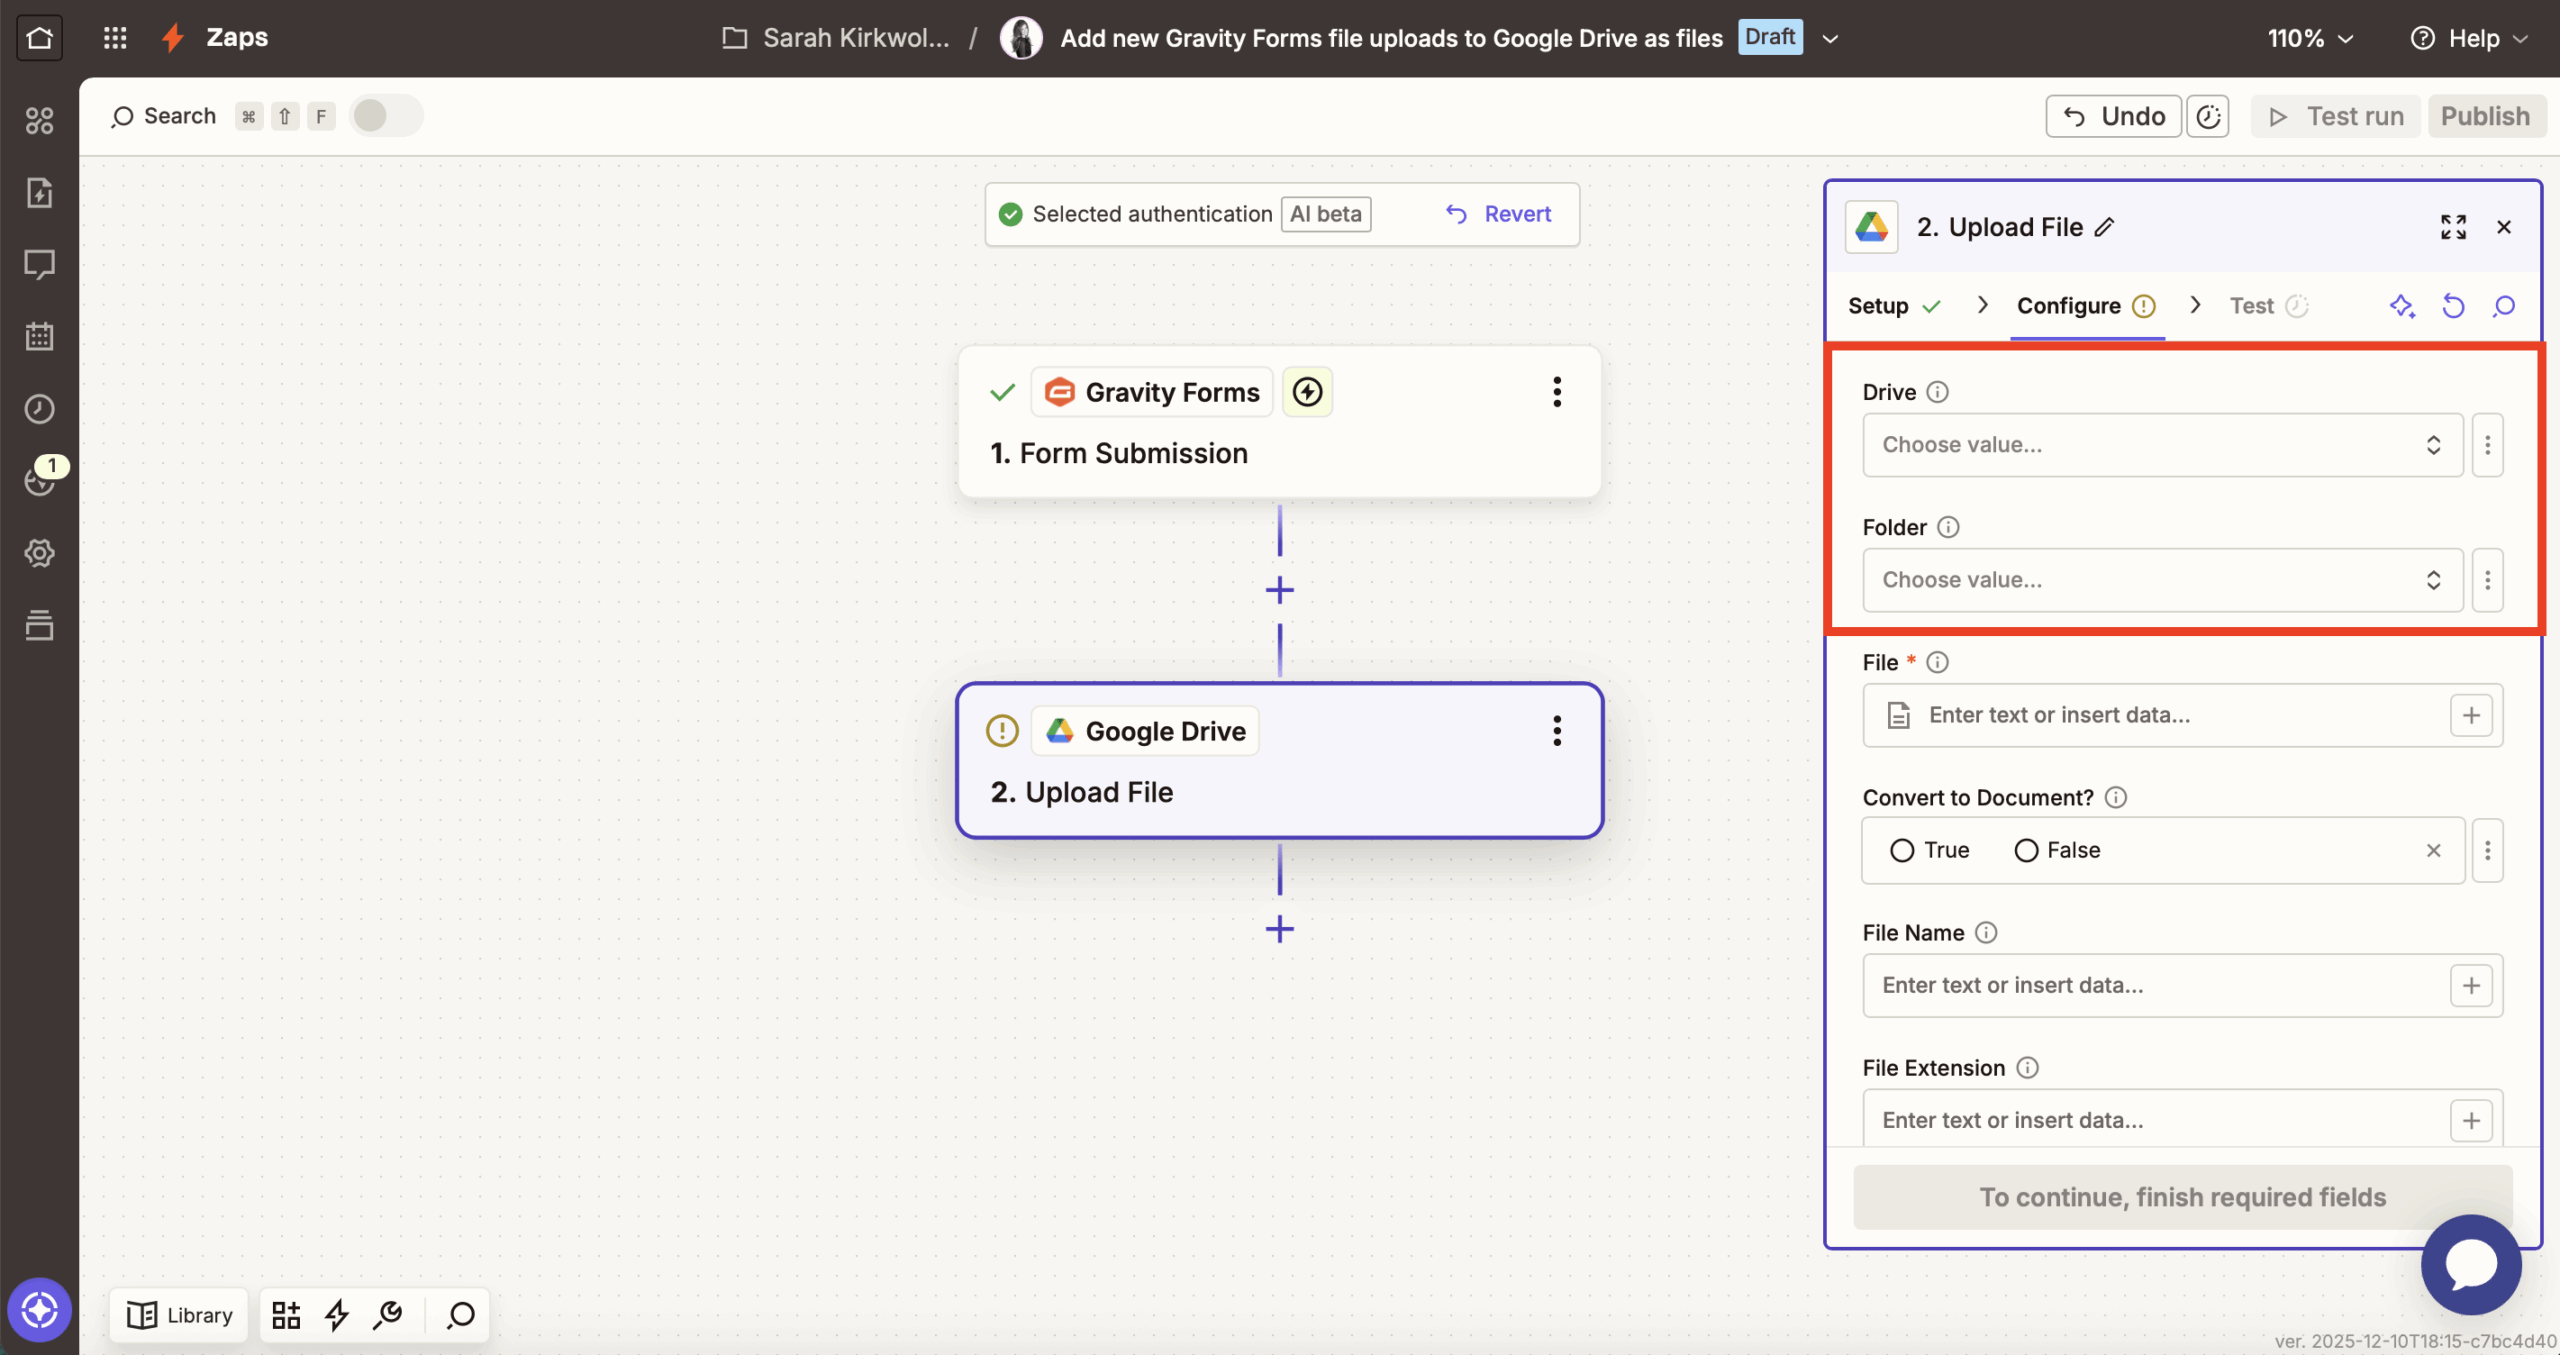
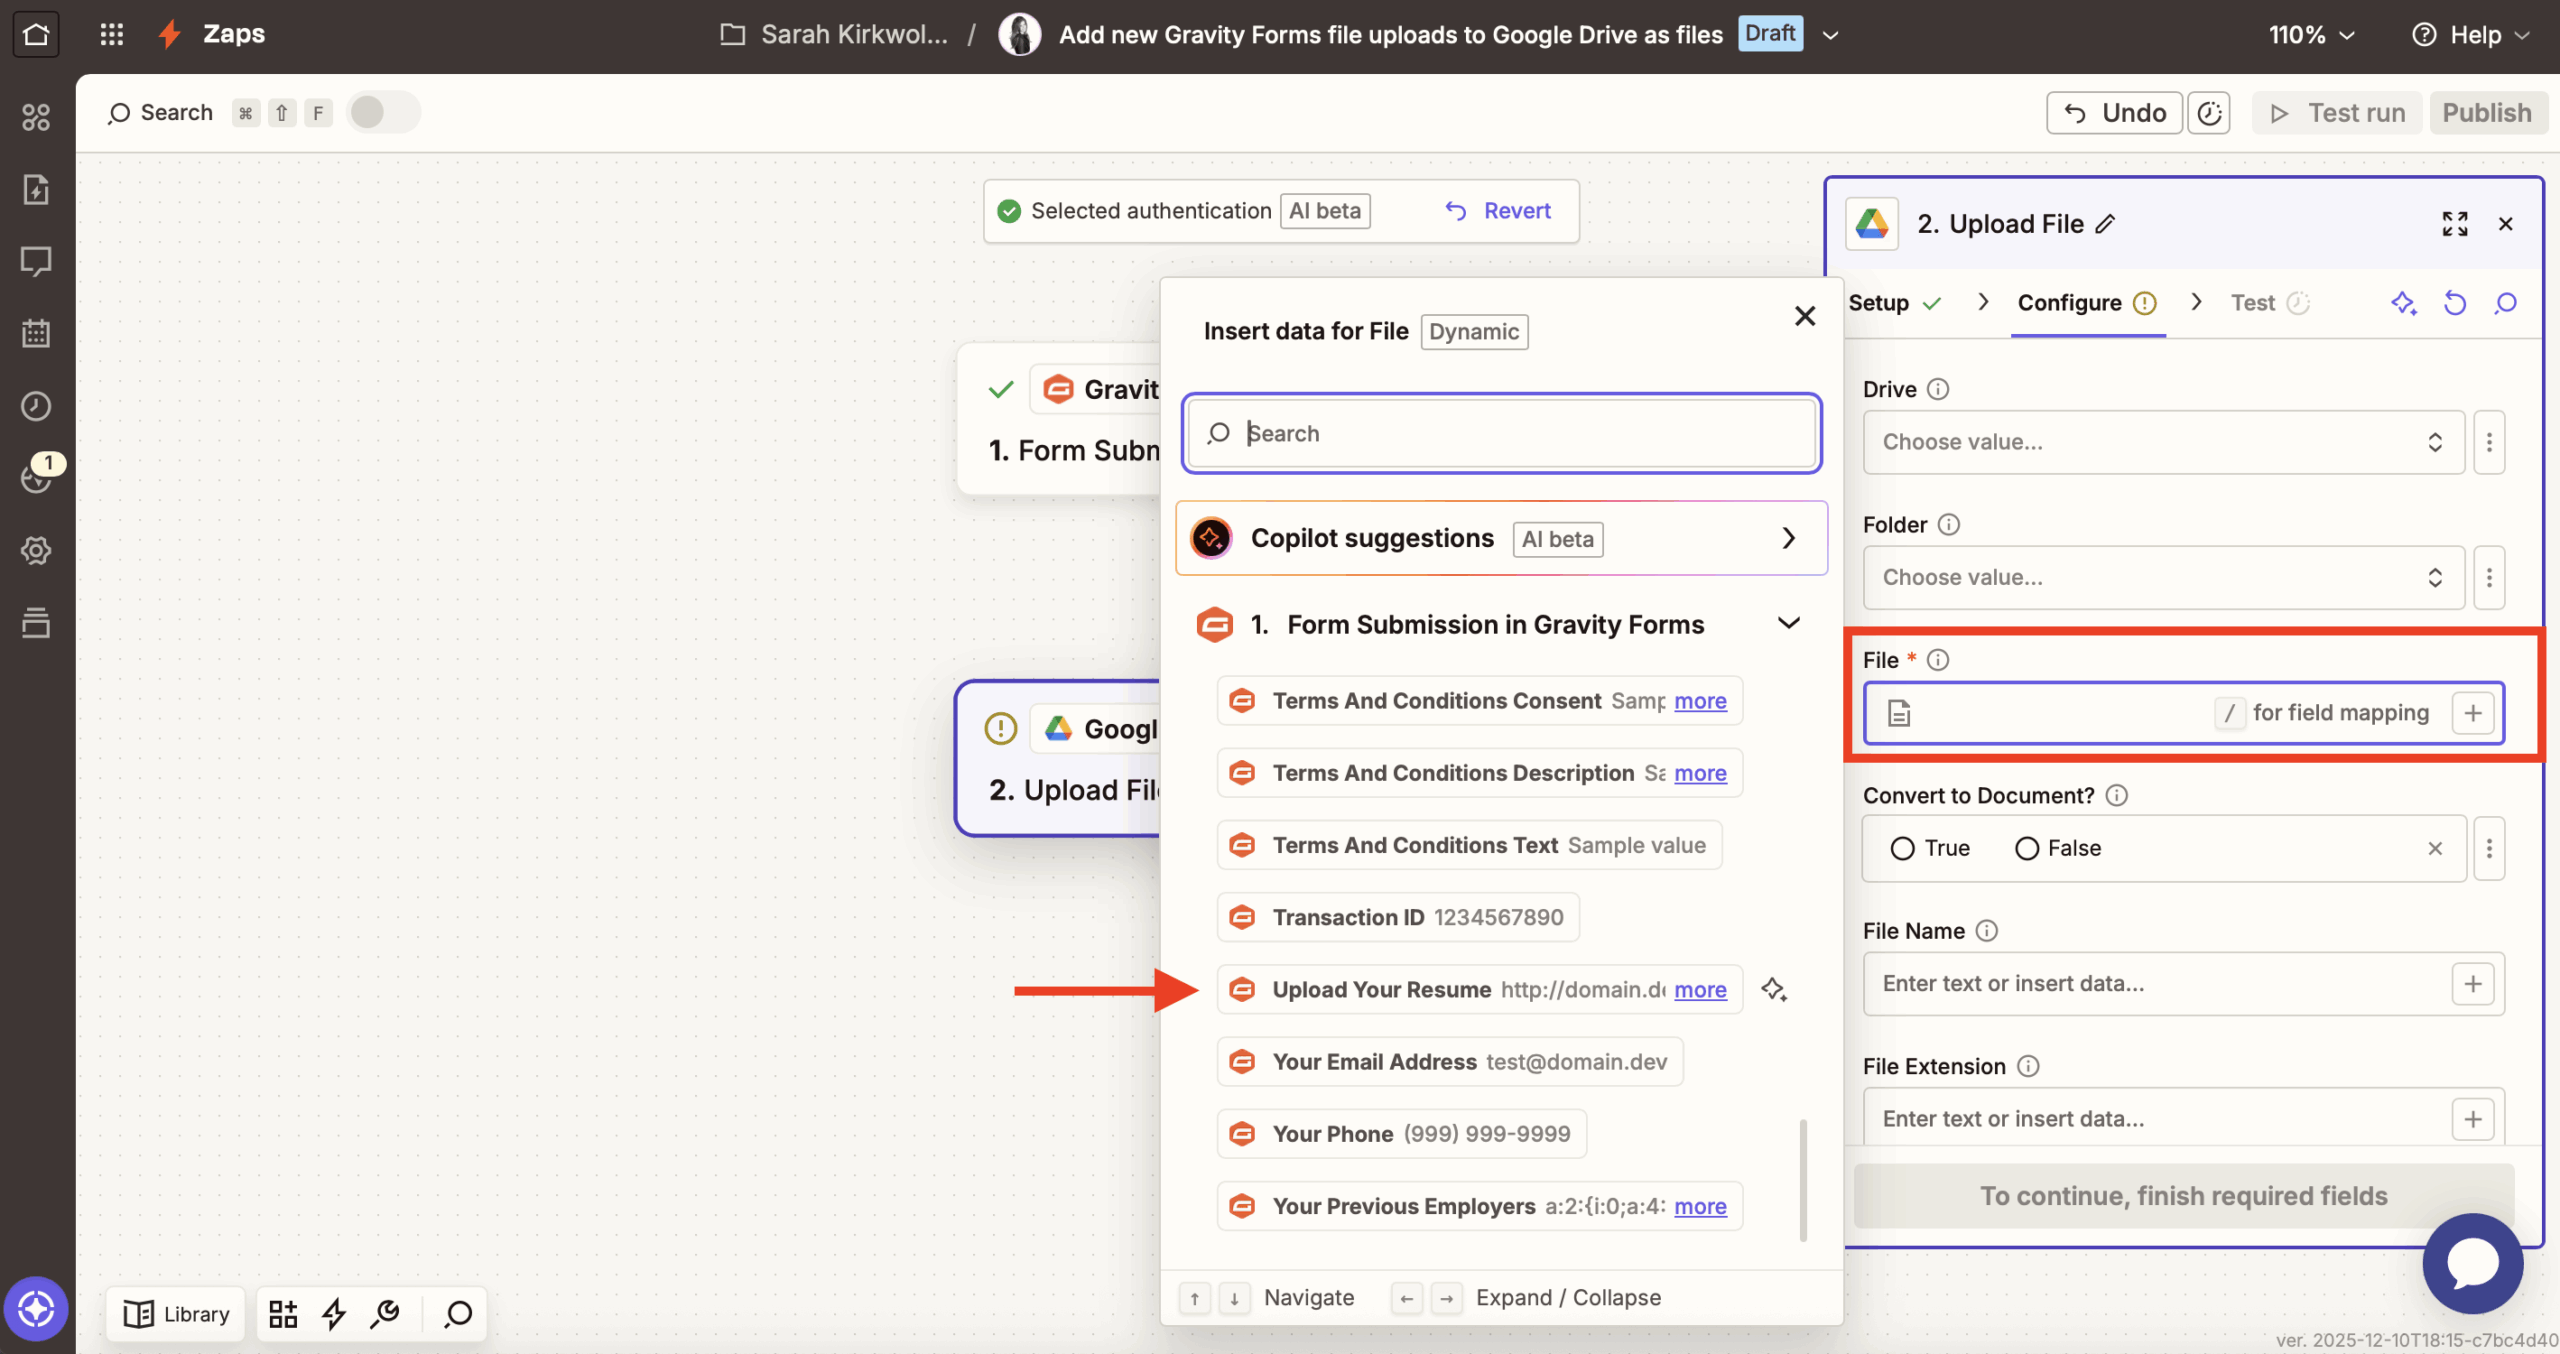
The only required field is File, where you need to choose the file upload field from your Gravity Forms form.
To do this, click the + icon, then scroll, or type to search for the Upload Your Resume field (which appears on your Gravity Forms employment application form template by default).
The last three settings are:
- Convert to Document? – Selecting True will automatically convert uploaded files to editable documents so you can work on them in Google Docs.
- File Name – Here you can specify a particular name for the uploaded file. You can use form field information and your own input for that. For example, you could have Zapier include applicants’ first and last names as part of the file name and put “Resume” in front.
- File Extension – This field allows you to save files with a particular file extension. Don’t enter a period in front if you use this option.
None of these fields are required. If left blank, the file will simply appear in Google Drive as uploaded on your WordPress site. Click Continue when ready.
8. Test and publish your Zap
The final step is to make sure everything works properly.
First, check the Zapier to Google Drive integration. To start, in Zapier, click Test step.
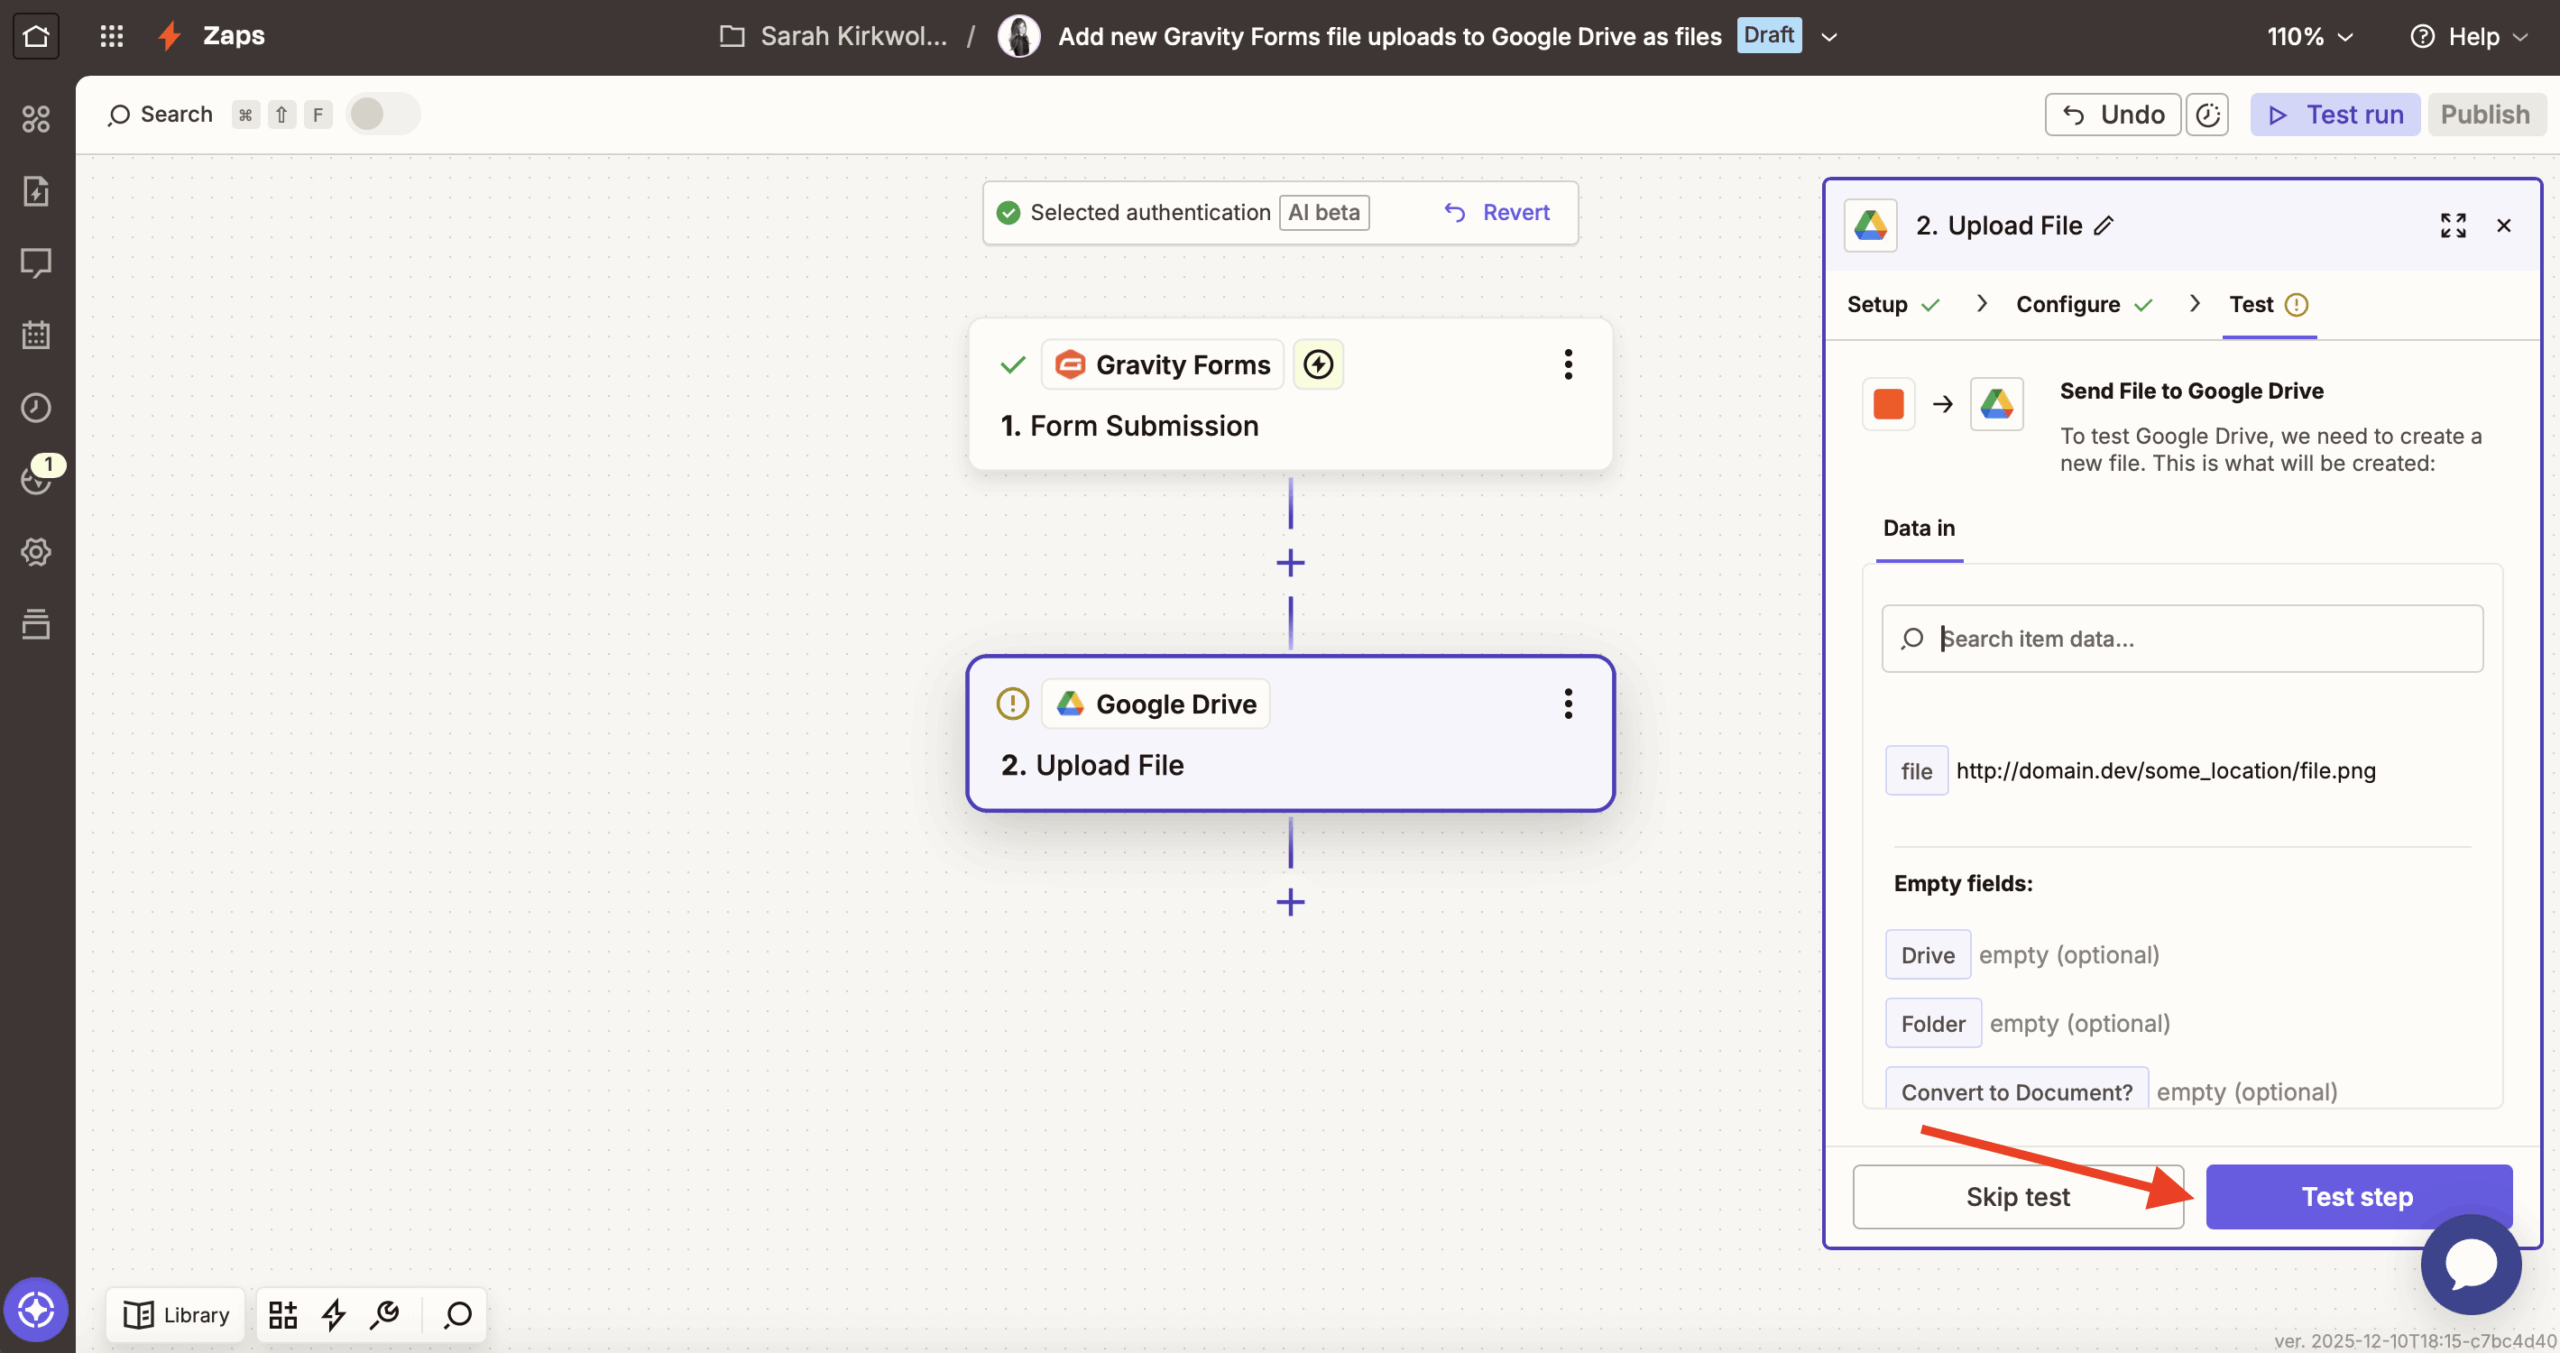
This should tell you that a file has been sent to Google Drive and you should find it there.
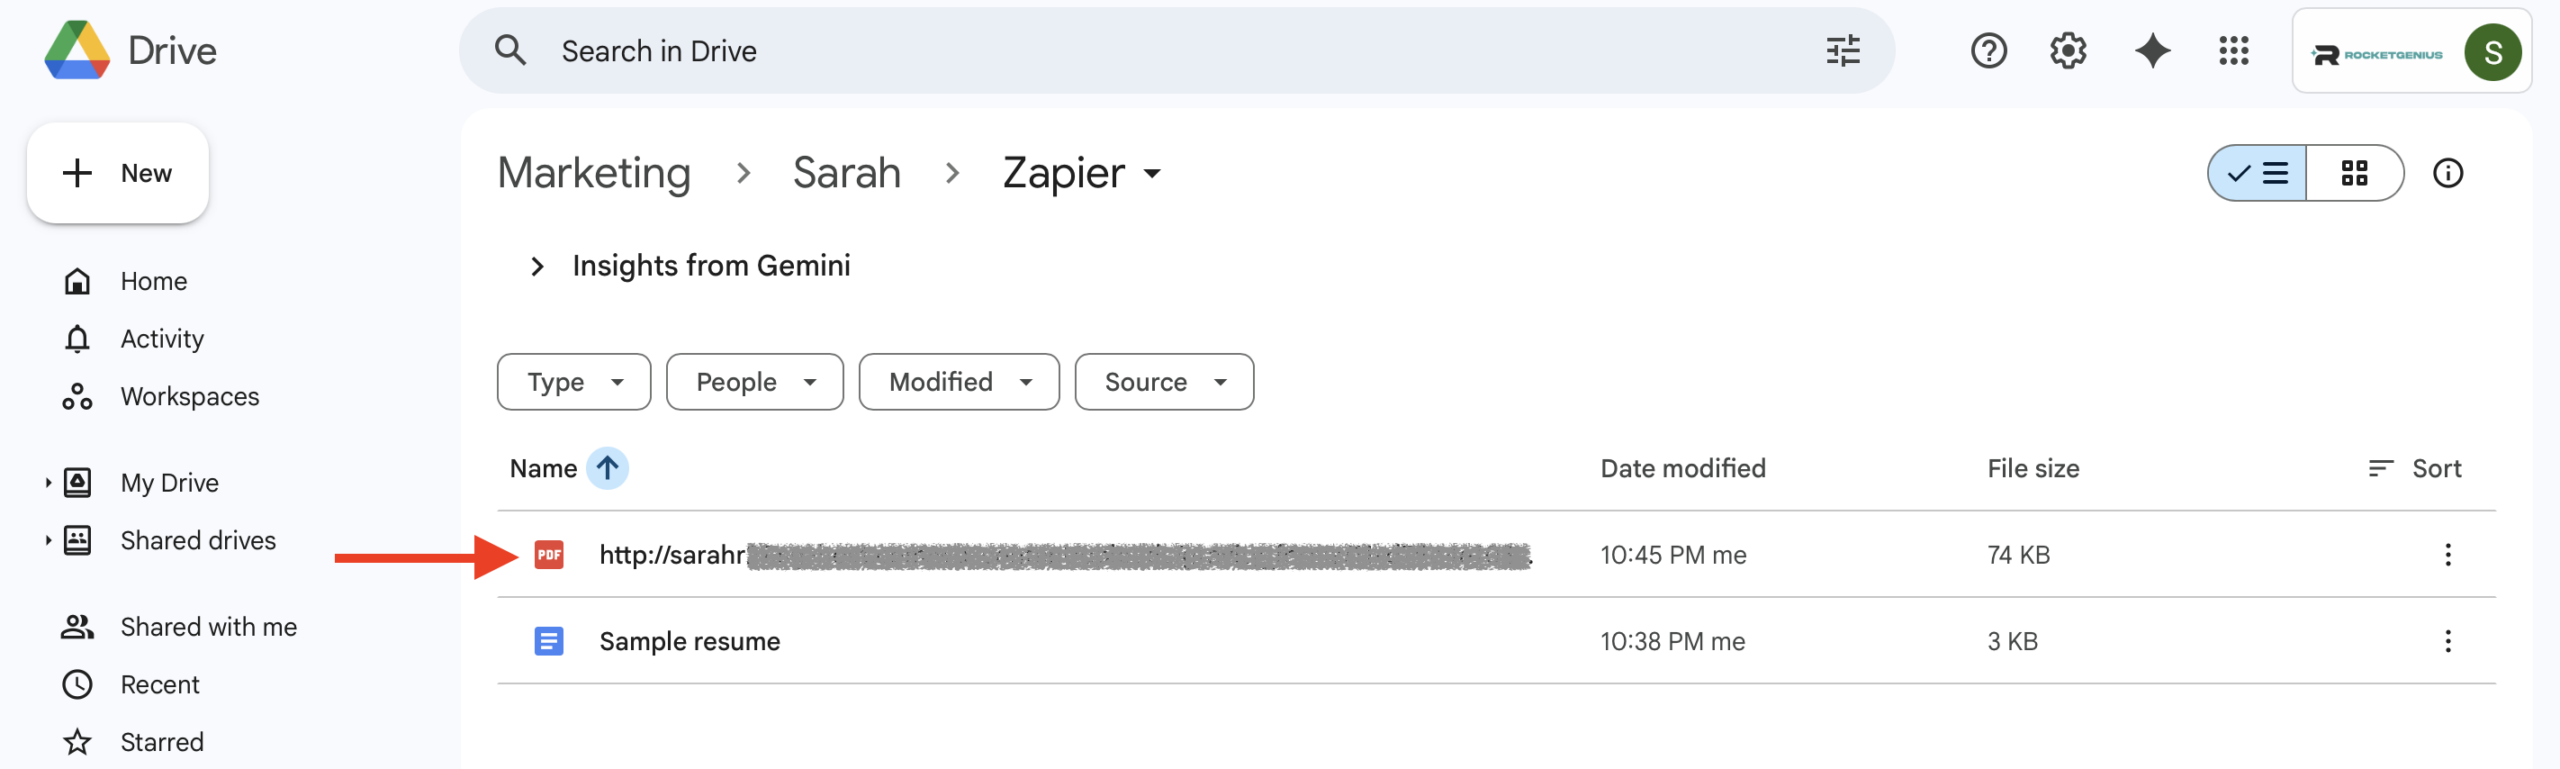
Note: If you used the standard Gravity Forms test record (the one mentioning Bilbo Baggins and using file.png as the uploaded file), you will most likely run into an error here.
That’s because that test file doesn’t really exist. Therefore, either use a different test record (e.g. submit a real test file to the form and then load another record in the trigger part of your Zap) or simply skip the test and run test it directly on your website as described below.
Next, click Publish to make the Zap usable.
Now it’s time to do a live test with your actual web form. Head on over to the form you created earlier on your site.

Fill in your form with some sample data, making sure to include a file to upload, and submit it.
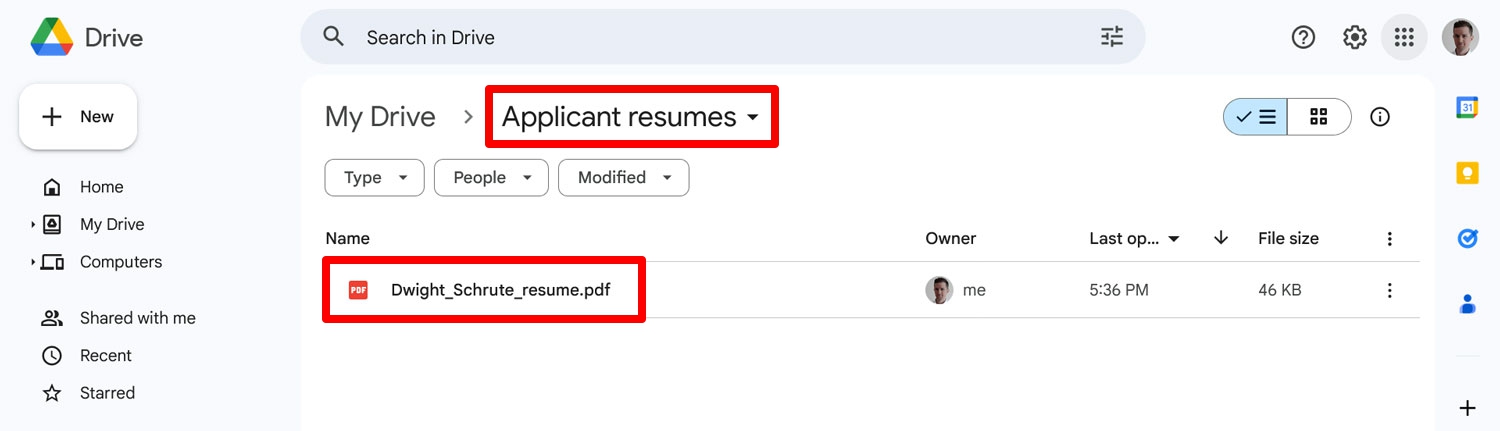
When you now go to the specified location in your Google Drive, it should show up there. That’s it, well done!
Send form file uploads from WordPress to Google Drive
Setting up your WordPress forms to automatically send file uploads to Google Drive is a smart way to streamline workflows, enhance collaboration, strengthen security, and optimize your website’s performance.
Whether you’re collecting resumes for job applications or supporting documents for legal or medical services, this setup simplifies file management and improves efficiency.
By following the steps outlined in this guide, you can easily integrate Gravity Forms with Google Drive using Zapier. When your forms are connected, you can enjoy the benefits of automated file handling and focus on what really matters.
To take advantage of this setup, purchase your Gravity Forms Pro or Elite license, or upgrade your existing license today.
New to Gravity Forms? Get to know the possibilities with a free demo site of your own!

If you want to keep up-to-date with what’s happening on the blog sign up for the Gravity Forms newsletter!