Searching for the best way to create a medical history form for your medical practice?
Understanding a patient’s medical history is an important part of providing quality care. However, a lot of medical practices are stuck still using pen and paper.
With a digital medical history form, you can easily collect, store, and access patients’ medical histories. You can also collect a patient’s medical history before they arrive at your practice, which saves you time and streamlines your in-person workflows.
Of course, privacy is paramount when it comes to medical history forms, so it’s important to process and store data in a safe and legally compliant manner. But with the right tools, you can get the job done.
In this post, you’ll learn step-by-step how to create a completely customizable medical history form with Gravity Forms and WordPress.
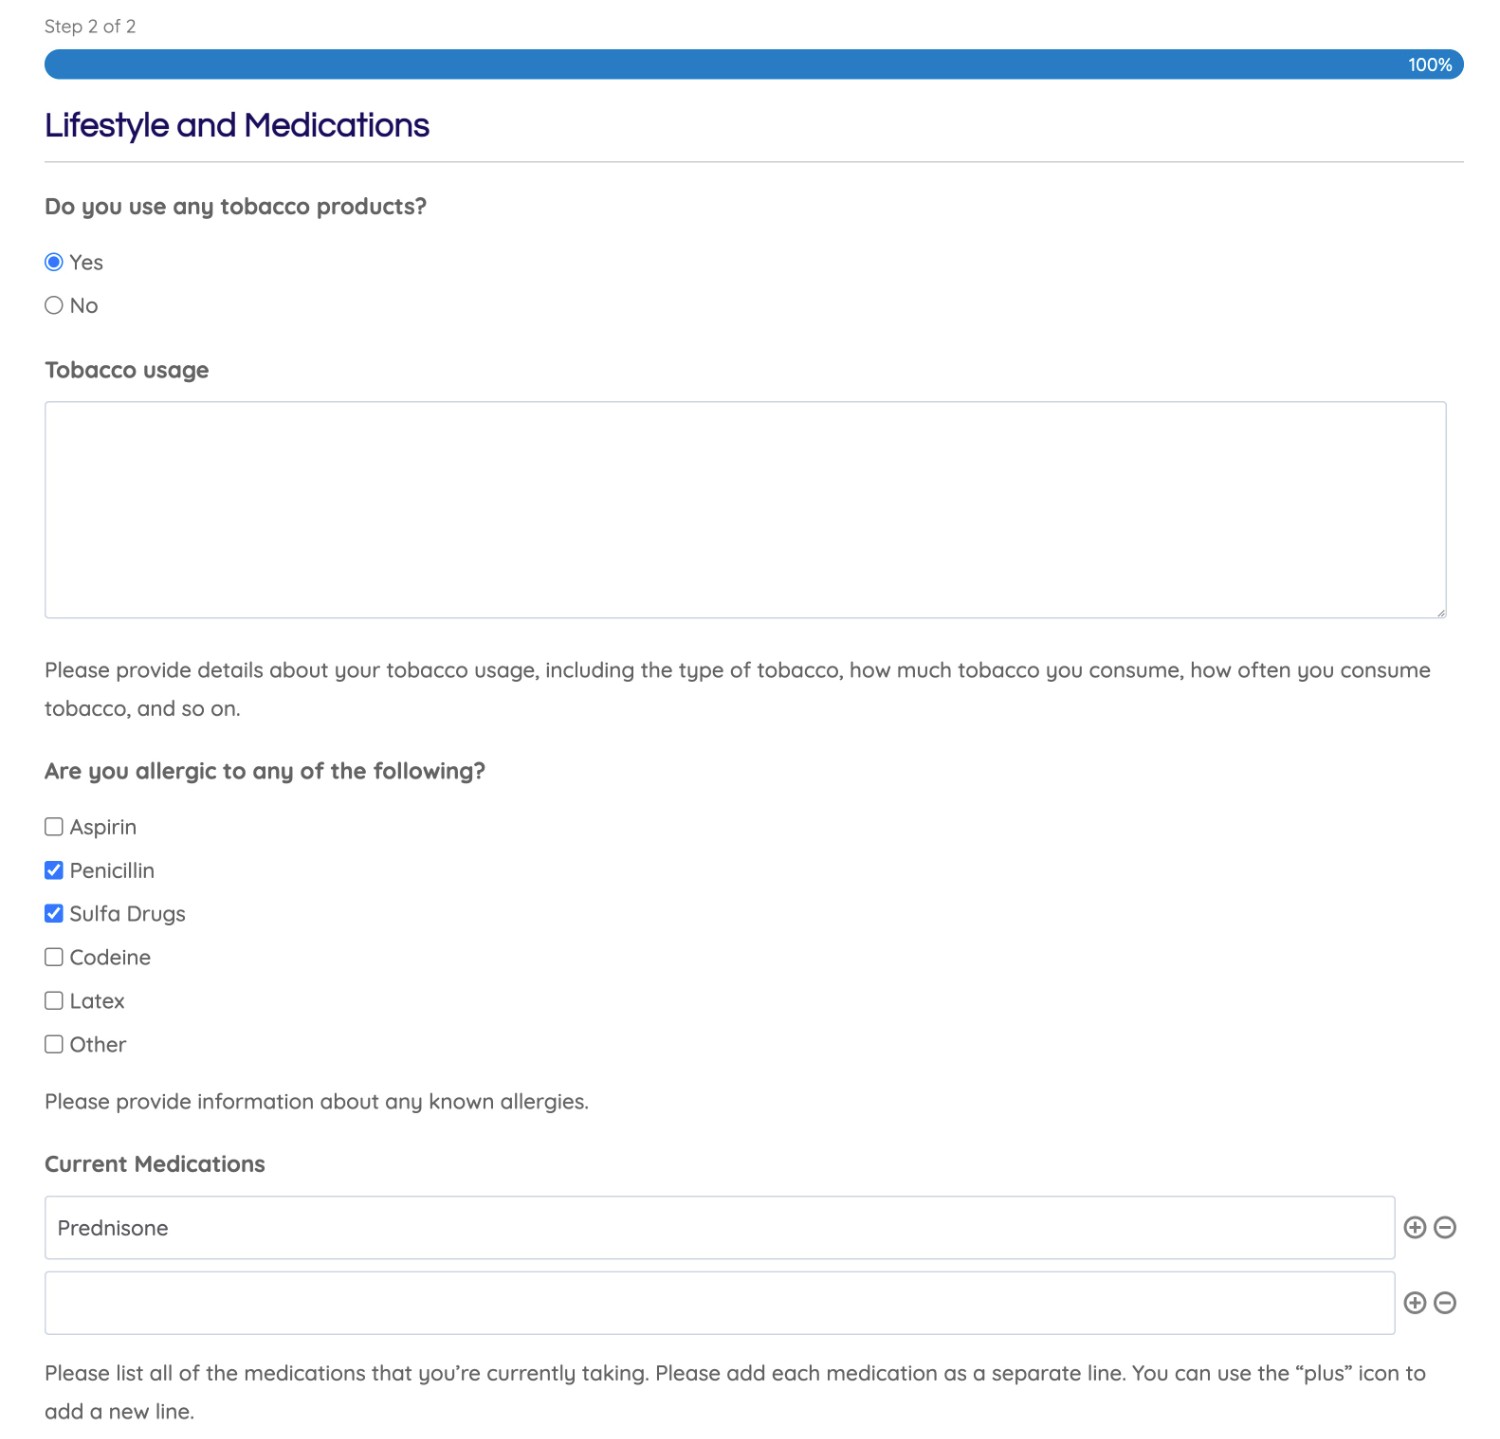
Here’s an example of what part of the form might look like – but you’re free to customize every part of the form:
Why Gravity Forms Works Well for a Medical History Form
While there are different ways to create a patient history form, here are some key reasons why we think Gravity Forms is the optimal solution for medical practices:
- Non-technical, drag-and-drop builder – you can create and edit your patient medical history form using a simple drag-and-drop builder, which means you don’t need to contact a technical team any time you need to make a change.
- Tons of field options – you can add unlimited fields using a variety of different field types, which lets you collect as much patient history as needed. You can ask “Yes/No” questions, multiple choice questions, open-ended text responses, and lots more.
- Conditional logic – you can use conditional logic to collect additional information from patients when needed while still keeping your form as streamlined as possible. For example, you could only ask for more information if a patient answers “Yes” to a question (see the tobacco example above).
- Multi-page forms and saved progress – if you want to collect a lengthy patient history, you can divide your form into multiple pages to create a better patient experience. You can also add a Save and Continue feature that lets patients save their progress and continue at a later time if needed.
- Full control over patient data – you have 100% control over your patient data and how it’s processed, which gives you the ability to comply with any local medical privacy laws. There are also third-party add-ons that can help you implement compliance with laws like HIPAA.
- Integrations with other tools – you can connect and automate important administrative tasks. For example, you could automatically assign a task in your admin software when a patient submits their medical history form. You can also automatically generate hard copy PDF versions (if doing so is compliant with your local privacy laws).
How to Create a Medical History Form With Gravity Forms
Now, let’s get into the step-by-step guide for how to create a patient medical history form with WordPress and Gravity Forms.
1. Understand Medical Privacy Laws In Your Local Jurisdiction
Before you set up any type of medical history form template, we highly recommend that you consult an expert in your local jurisdiction to understand whether or not you need to comply with any local medical privacy laws (and if so, what you need to do to comply).
We’ll specifically discuss HIPAA compliance within the USA later on.
Gravity Forms does not store or process any of your data on the Gravity Forms servers. Instead, your data stays entirely on your own site’s server, as well as any connected feeds that you’ve created.
As such, you’ll need to make sure that you’re processing and storing the data in a way that complies with your local laws. Depending on your local laws, this might require the use of some third-party add-ons – more on that later!
When in doubt, consult a professional.
2. Install Gravity Forms on Your WordPress Site
Next, you’ll want to purchase and install the Gravity Forms plugin on your WordPress site.
If you don’t have a WordPress site for your medical practice yet, you’ll also need to create one before you can install Gravity Forms.
You can purchase your own web hosting and install the WordPress software using your host’s installer tool. Or, if you want something even simpler, you can use the WordPress.com Business plan.
3. Create a New Form
Once you’ve installed the Gravity Forms plugin, you can go to Forms → New Form to create your first patient history form.
While Gravity Forms doesn’t have a dedicated medical history form template, you might be able to adapt one of the other templates to your needs. Or, you can just choose the Blank Form option to build your medical history form from scratch.
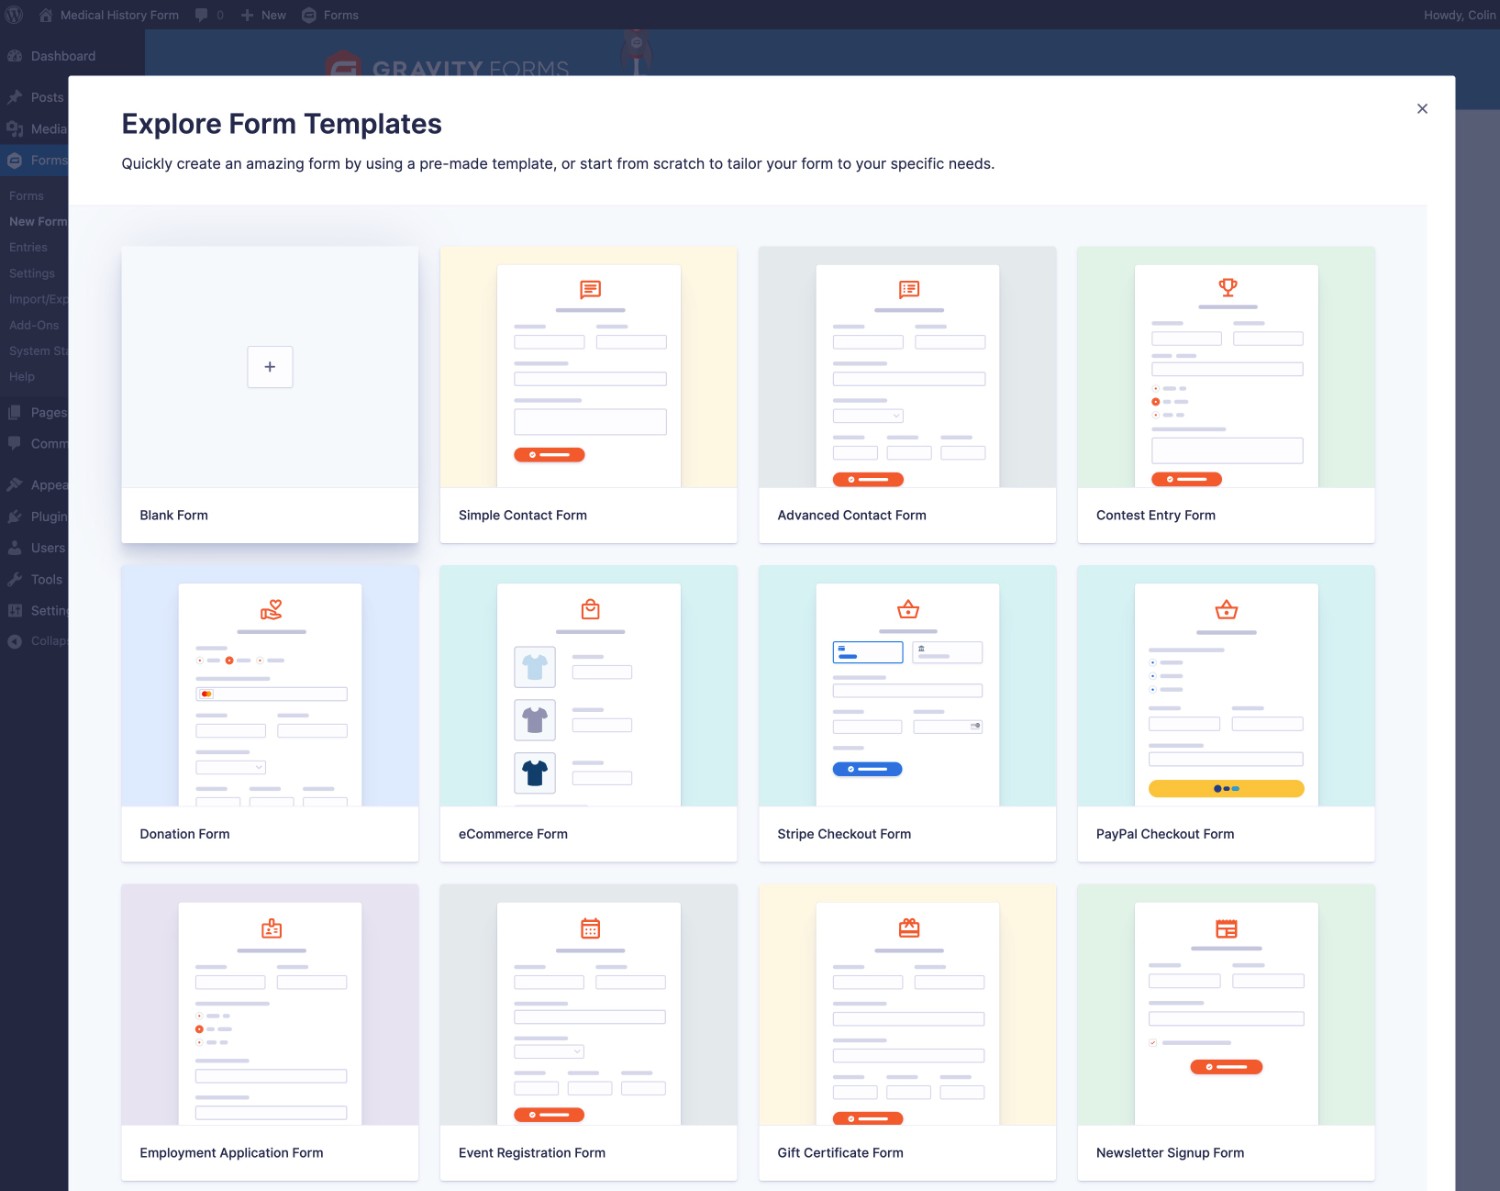
Once you choose your starting point, you’ll be automatically taken to the drag-and-drop form builder interface.
4. Add Form Fields to Collect Patient’s Medical History
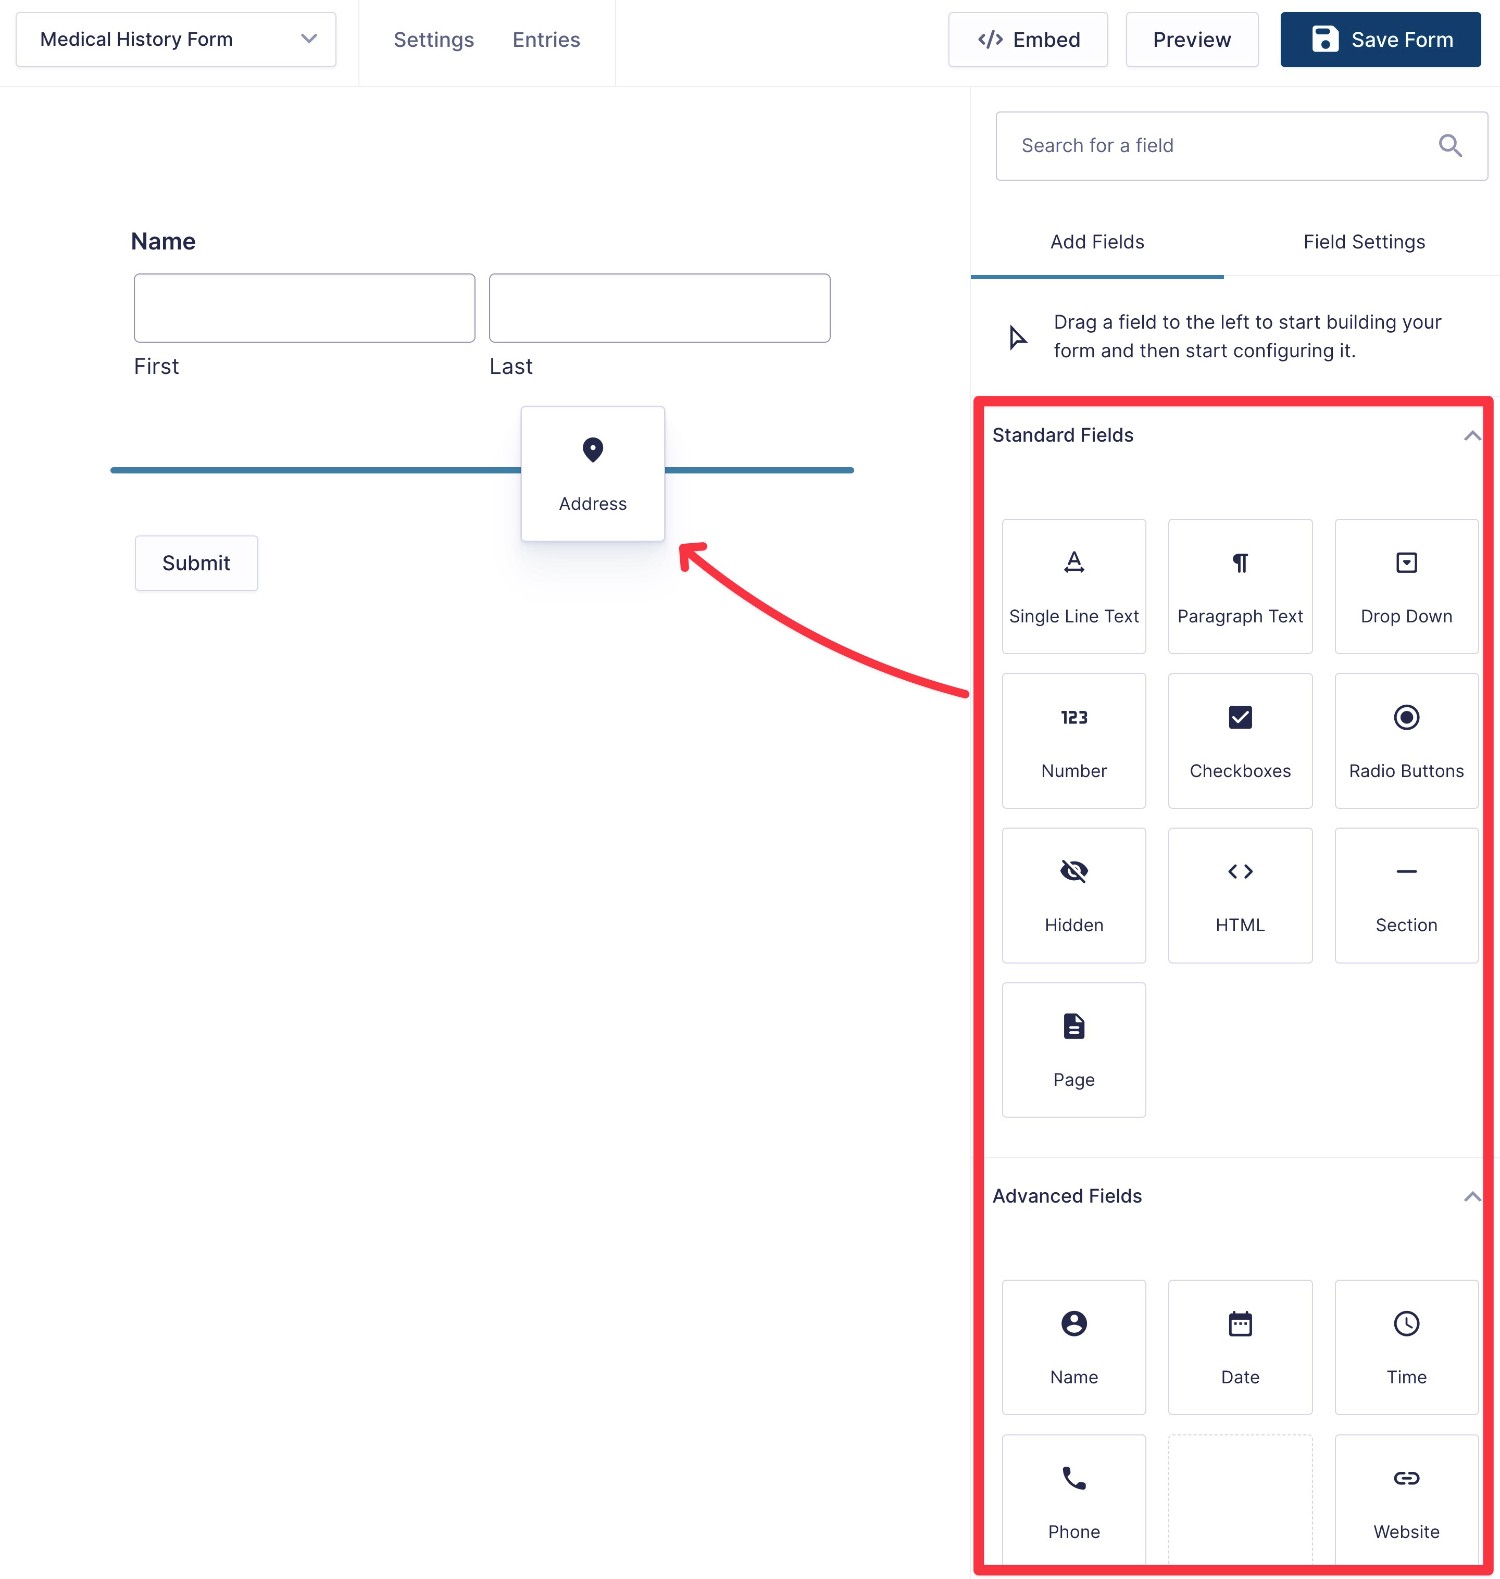
Now, it’s time to add the important fields that your medical history form needs.
You can add fields to your form by dragging them over from the right side of the interface:
Then, you can customize a field by selecting it in the live preview and clicking the Settings button. This will open that field’s settings in the right side of the interface:
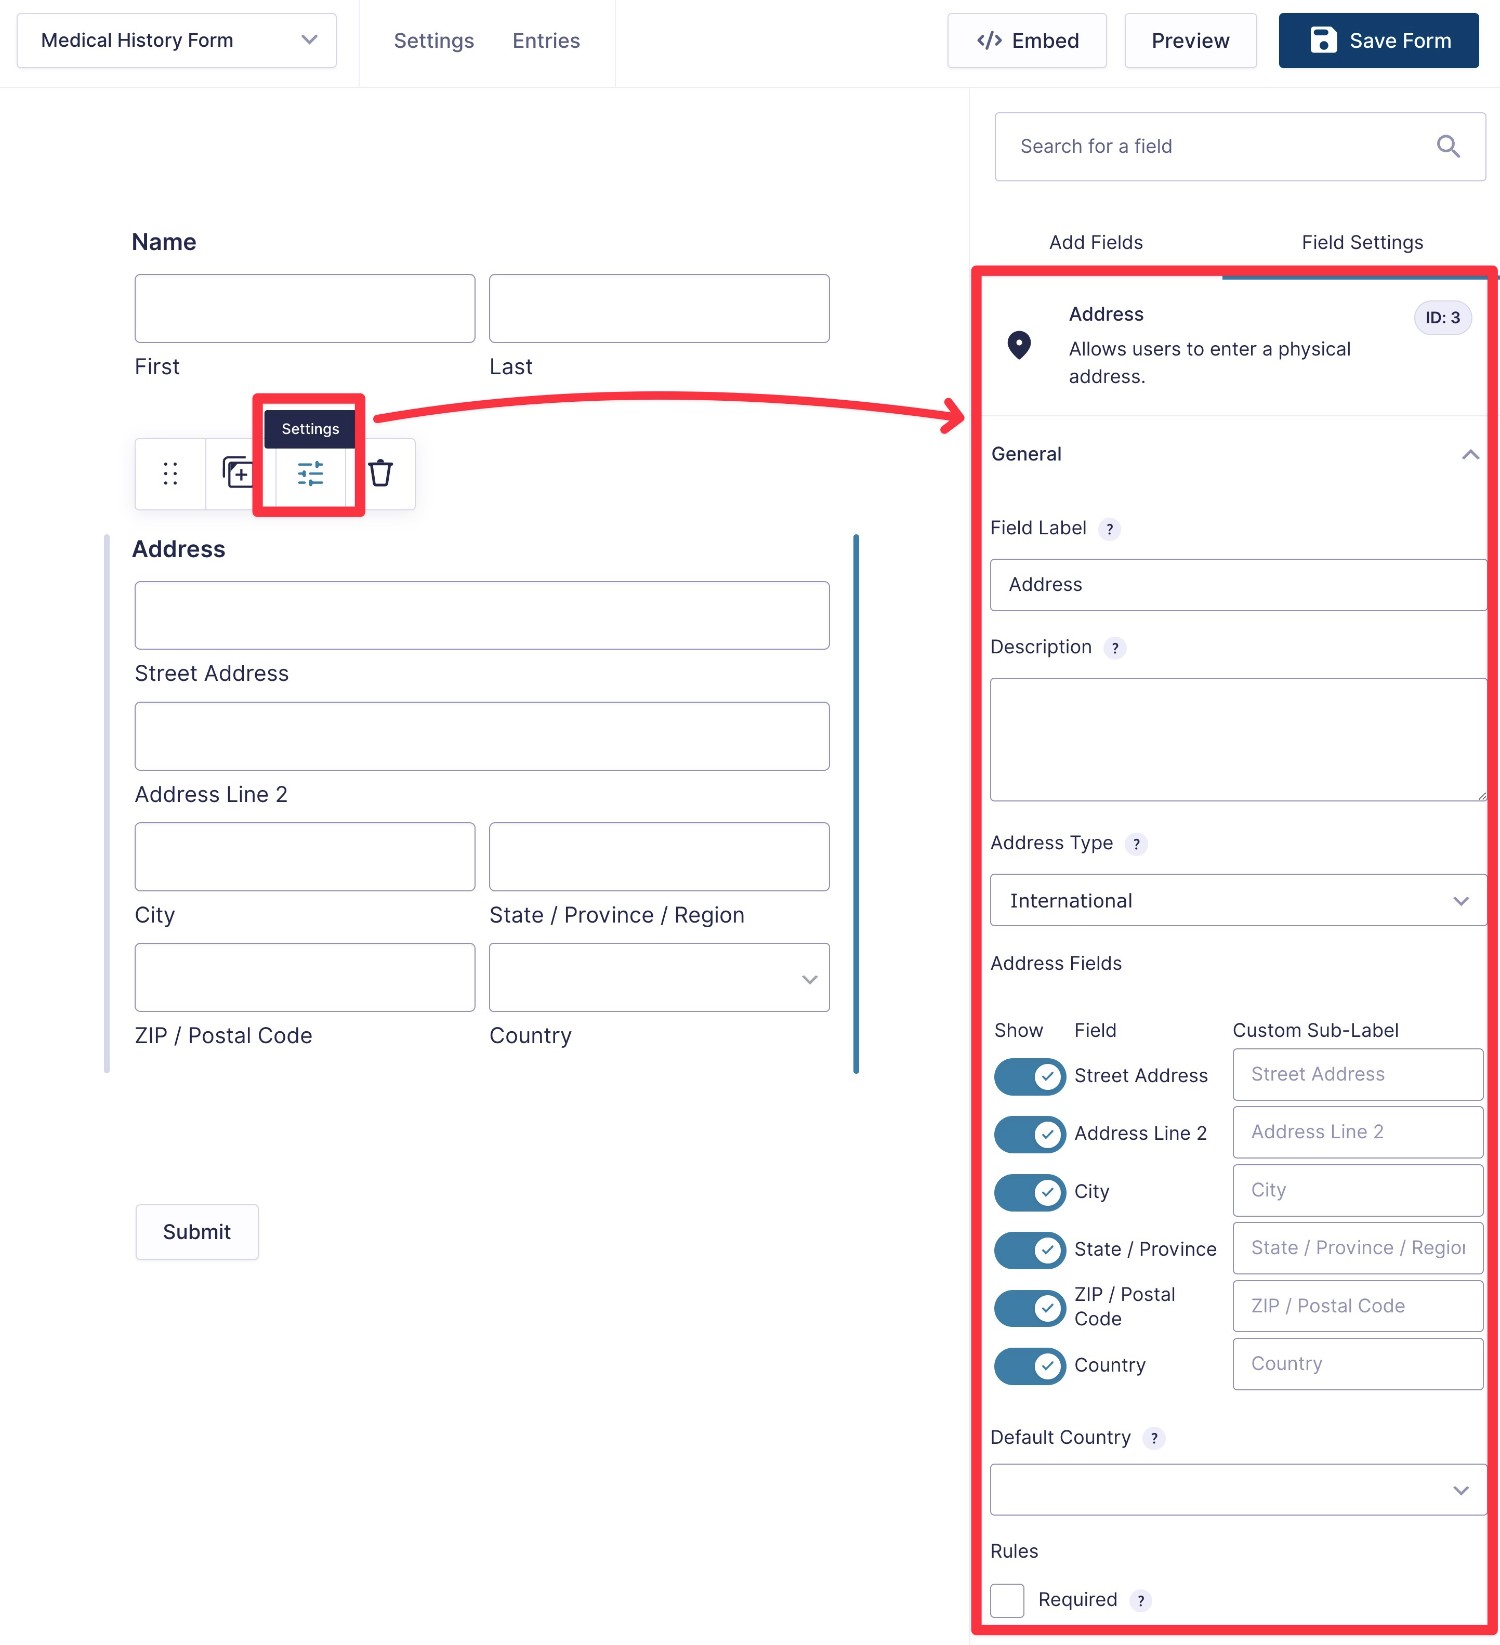
Let’s go through some of the most important types of fields that you might want for a patient medical history form.
Basic Patient Details
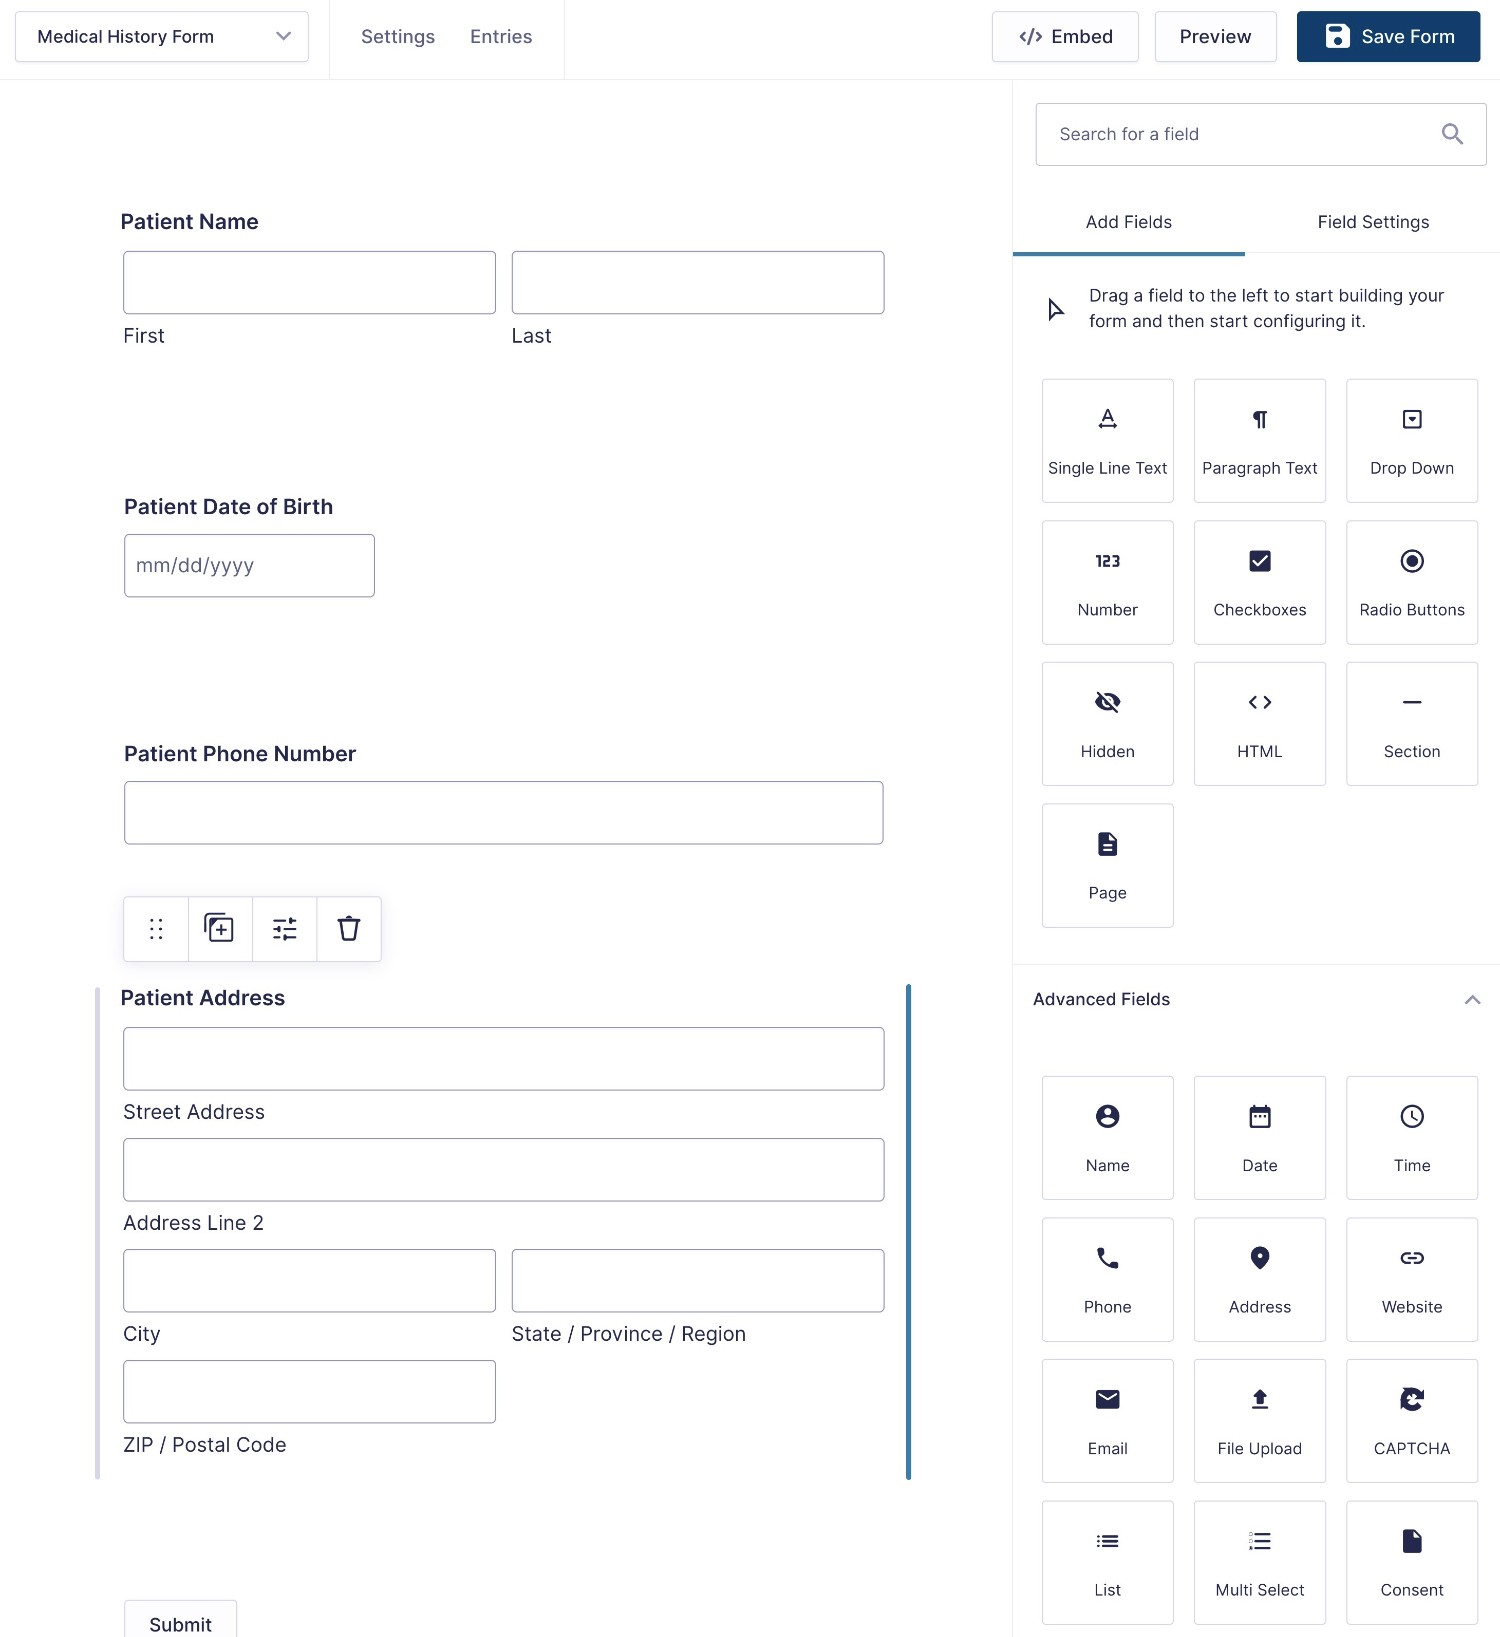
To start, you might want to collect basic details about your patient, such as their name, date of birth, contact details, emergency contacts, and so on.
You can find dedicated field types for many of these details in the Advanced Fields section.
Yes / No Questions
Yes / No questions are a common part of many medical history forms.
For example, you might have a question like “Do you have, or have you had, any of the following?” followed by a long list of Yes/No answers.
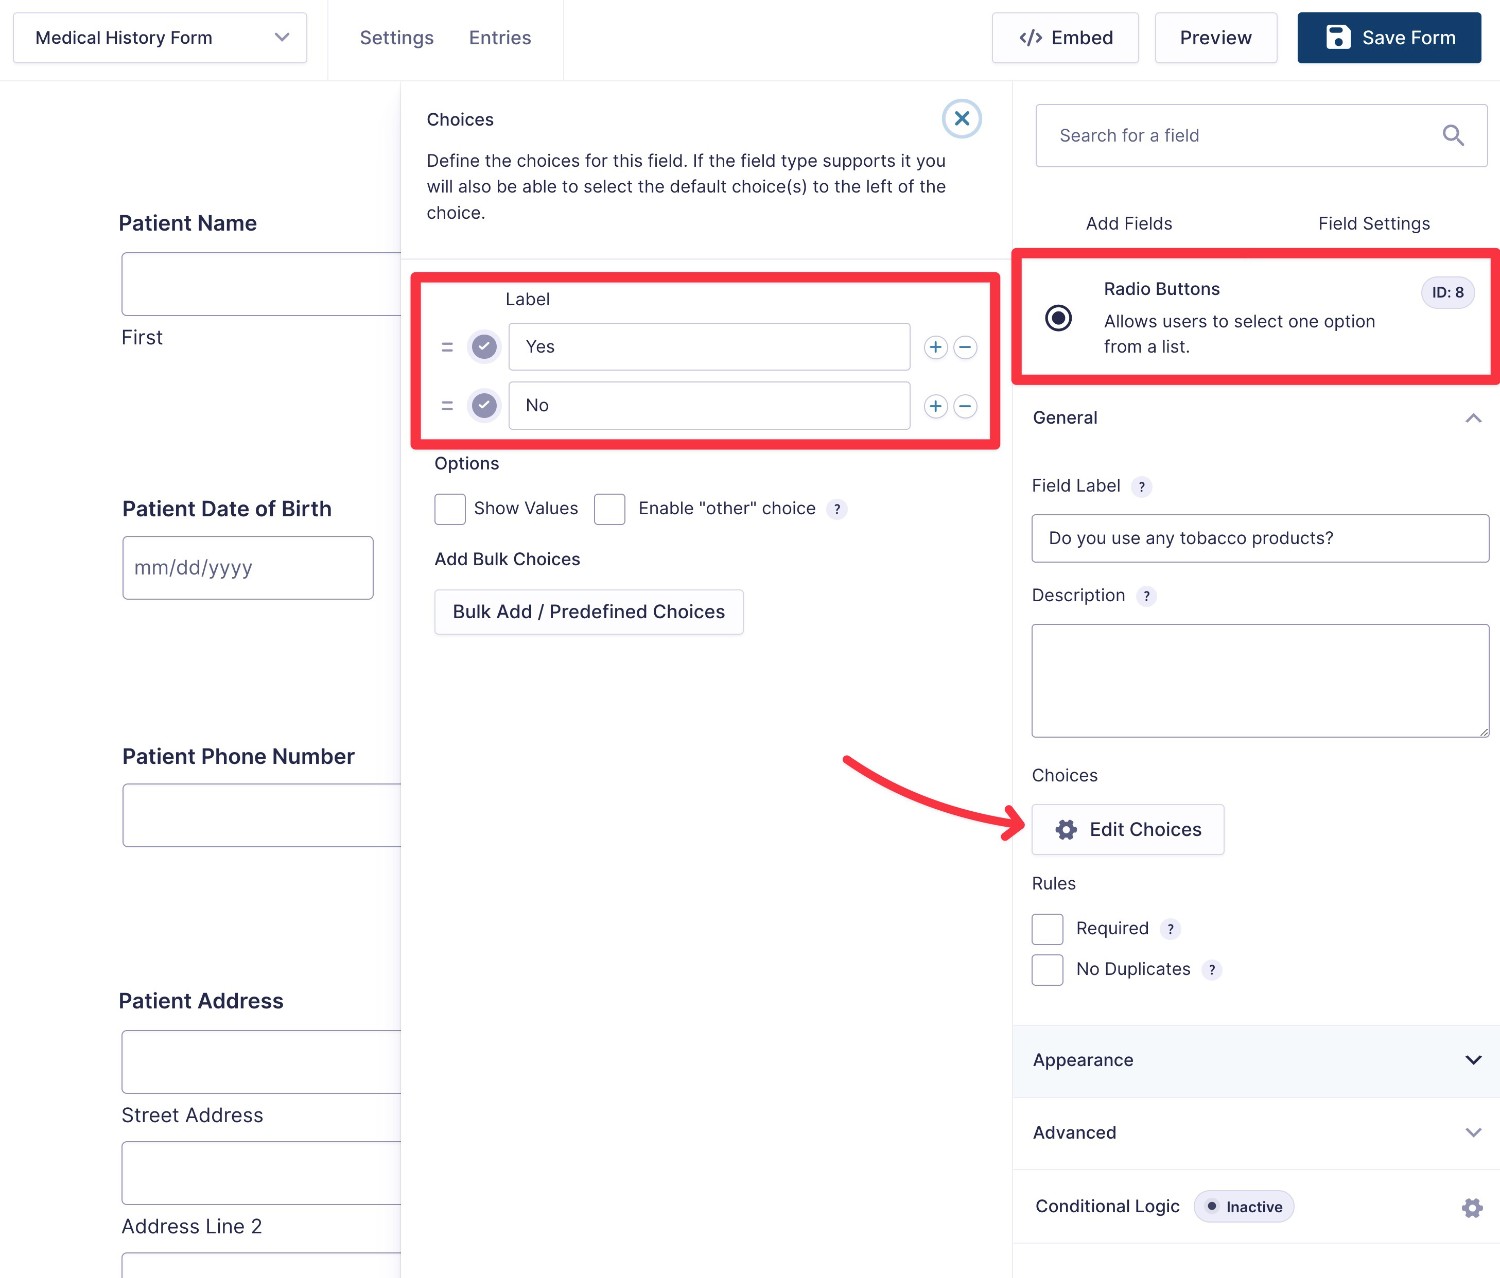
Or, you might ask “Do you use any tobacco products?”
To set this up, you can add a Radio Buttons field with two options – one for “Yes” and one for “No”.
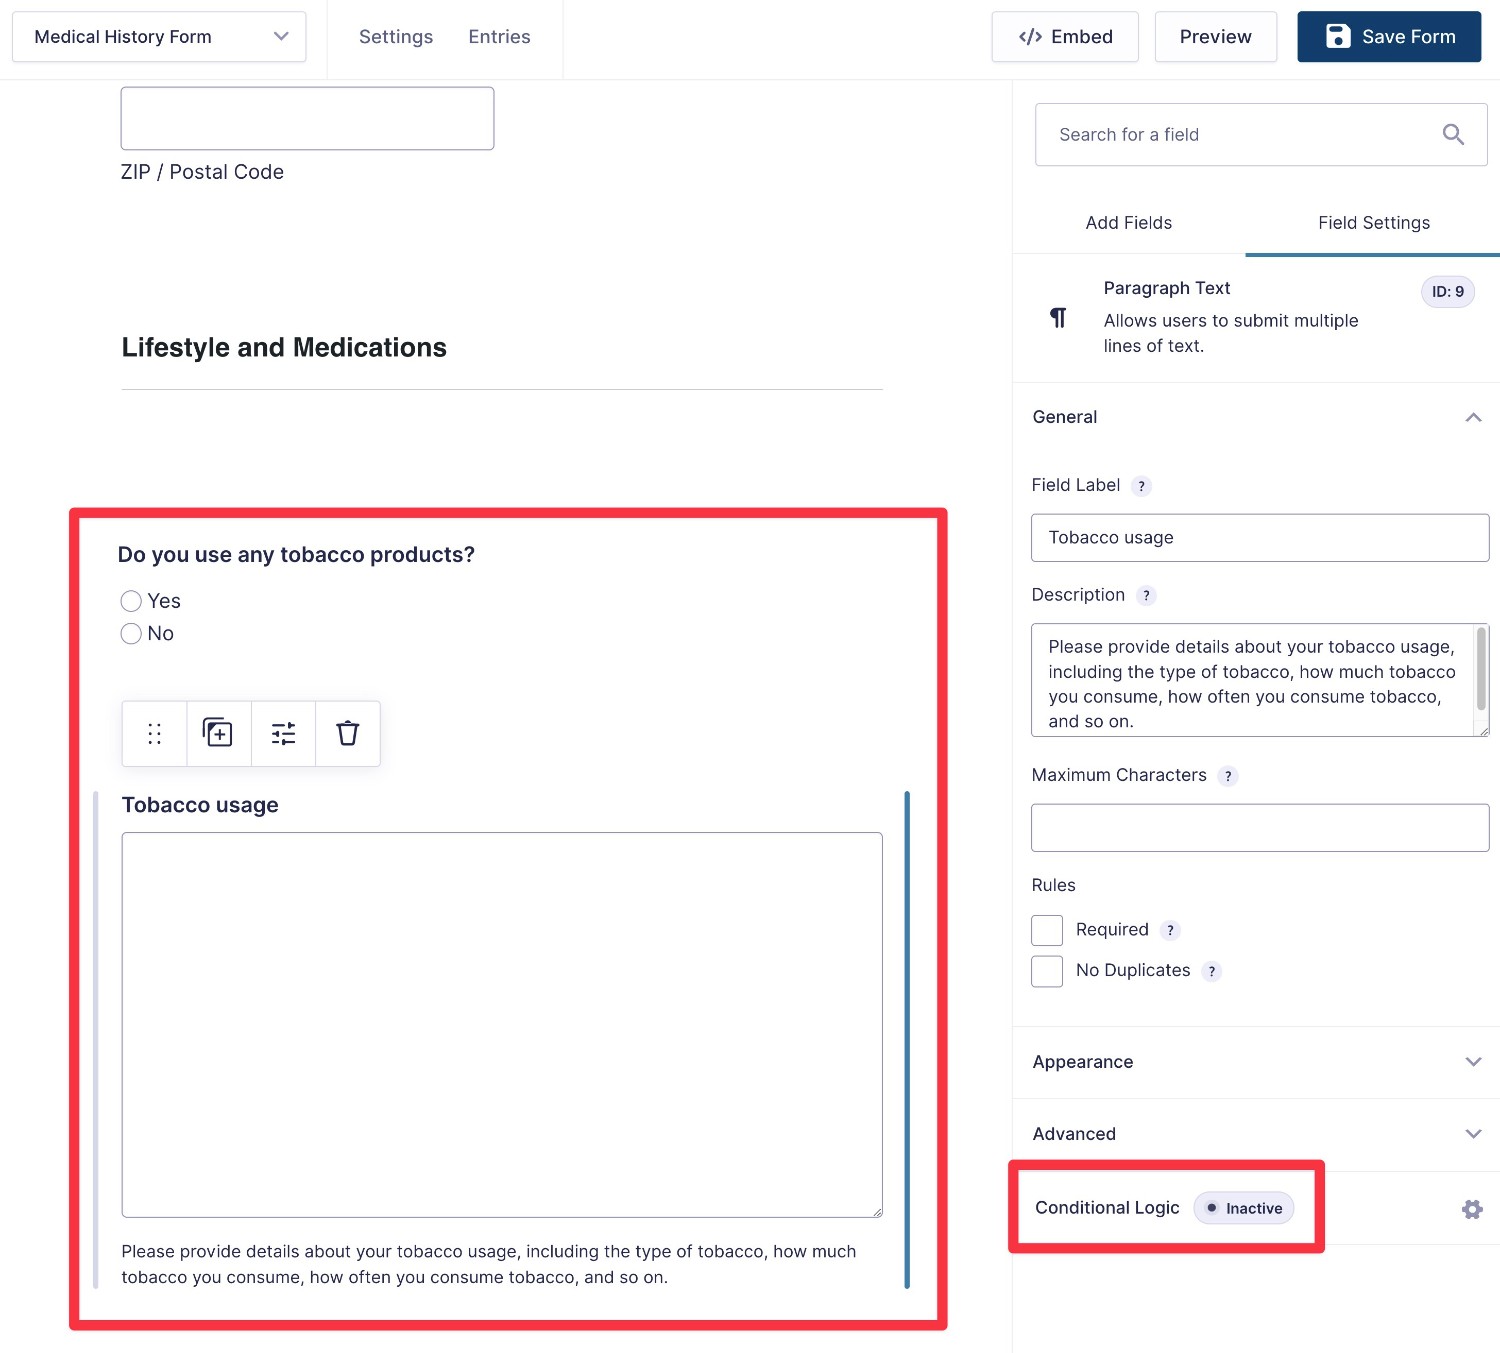
For some questions, you might want to collect additional information from your patients depending on how they answered.
If a patient says that they don’t consume tobacco, you probably don’t need any further information. But if they answer “Yes”, you might want to collect additional information about the type of tobacco, the quantity, the frequency, and so on.
To accomplish this, you can use the conditional logic feature in Gravity Forms.
Add a new Paragraph Text field under the relevant question. Then, select the Conditional Logic option in the field’s settings.
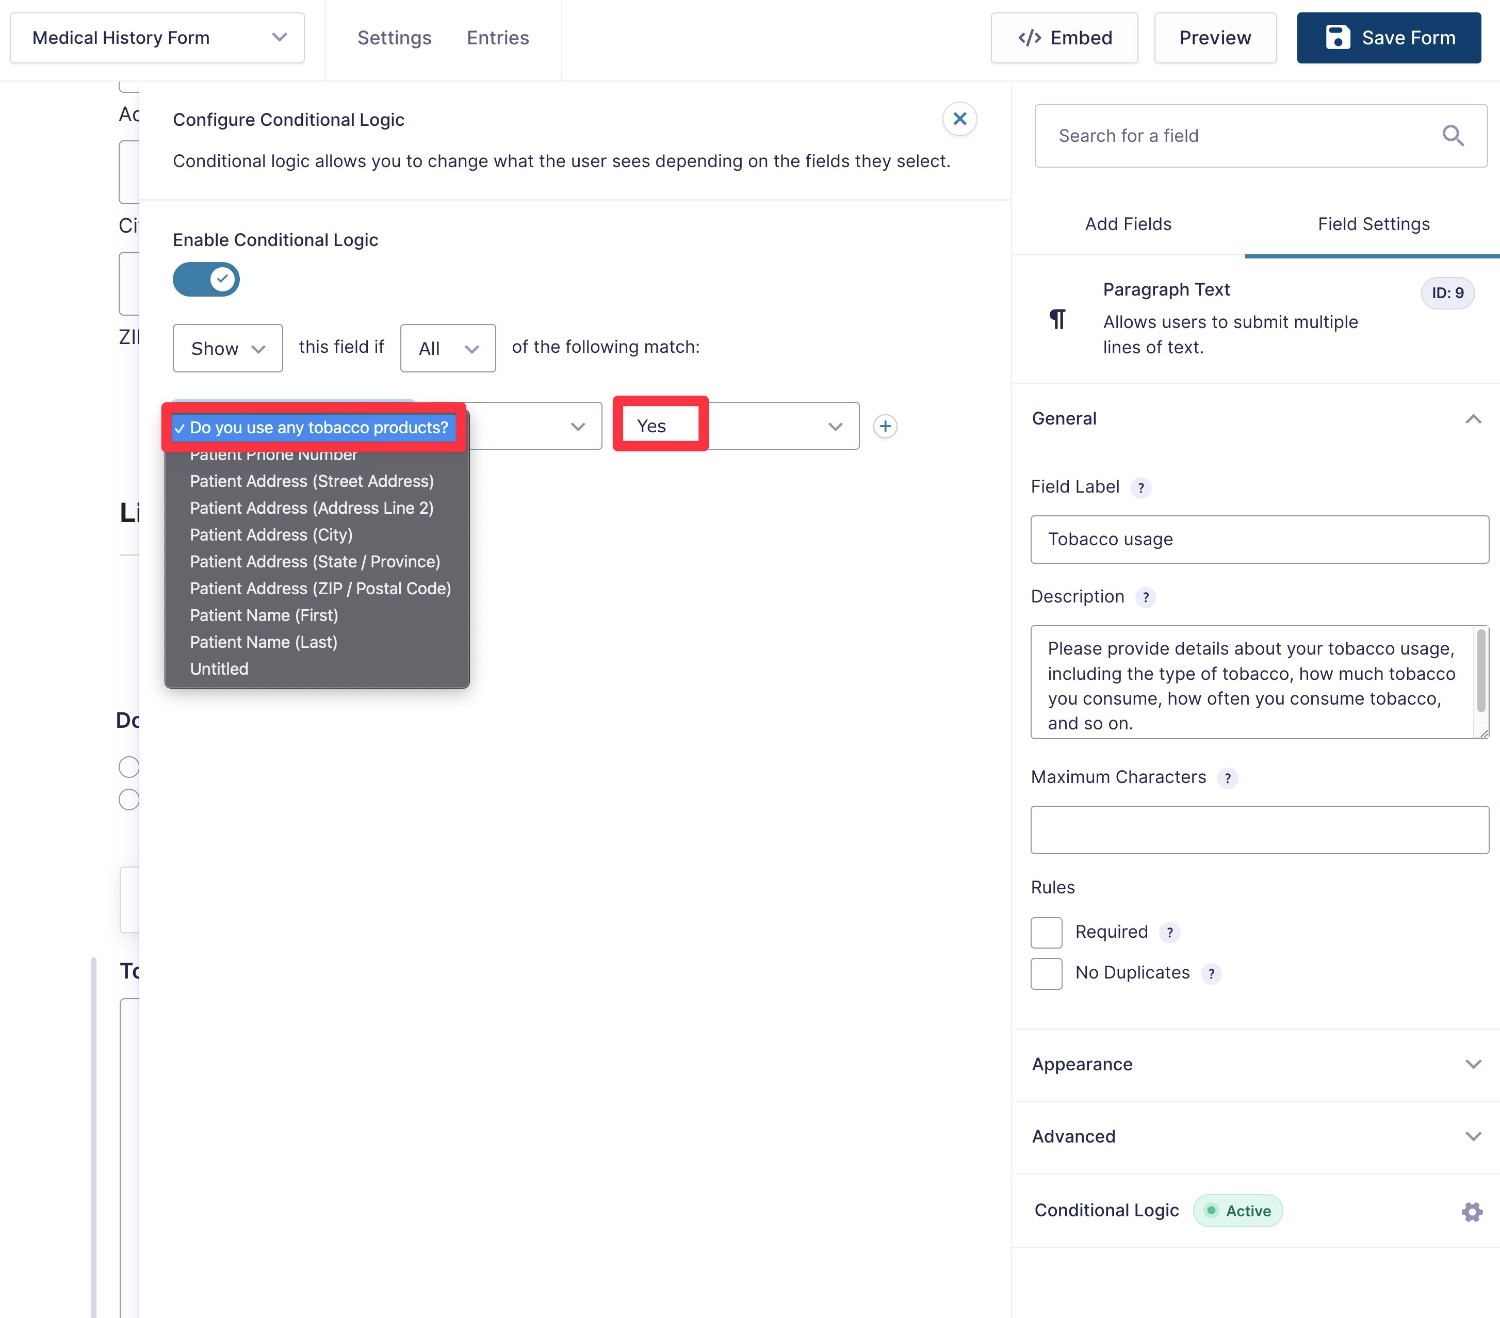
Enable conditional logic in the popup. Then, set the rule to only show this extra field if the patient answers “Yes” to your question about tobacco.
Multiple Choice Fields
In addition to Yes/No questions, you’ll also likely want to include multiple choice questions that let patients select multiple options.
For example, you might have a question like “Are you allergic to any of the following?” followed by common medications.
To implement this, you can add a Checkboxes field and then use the Edit Choices option to add as many options as needed.
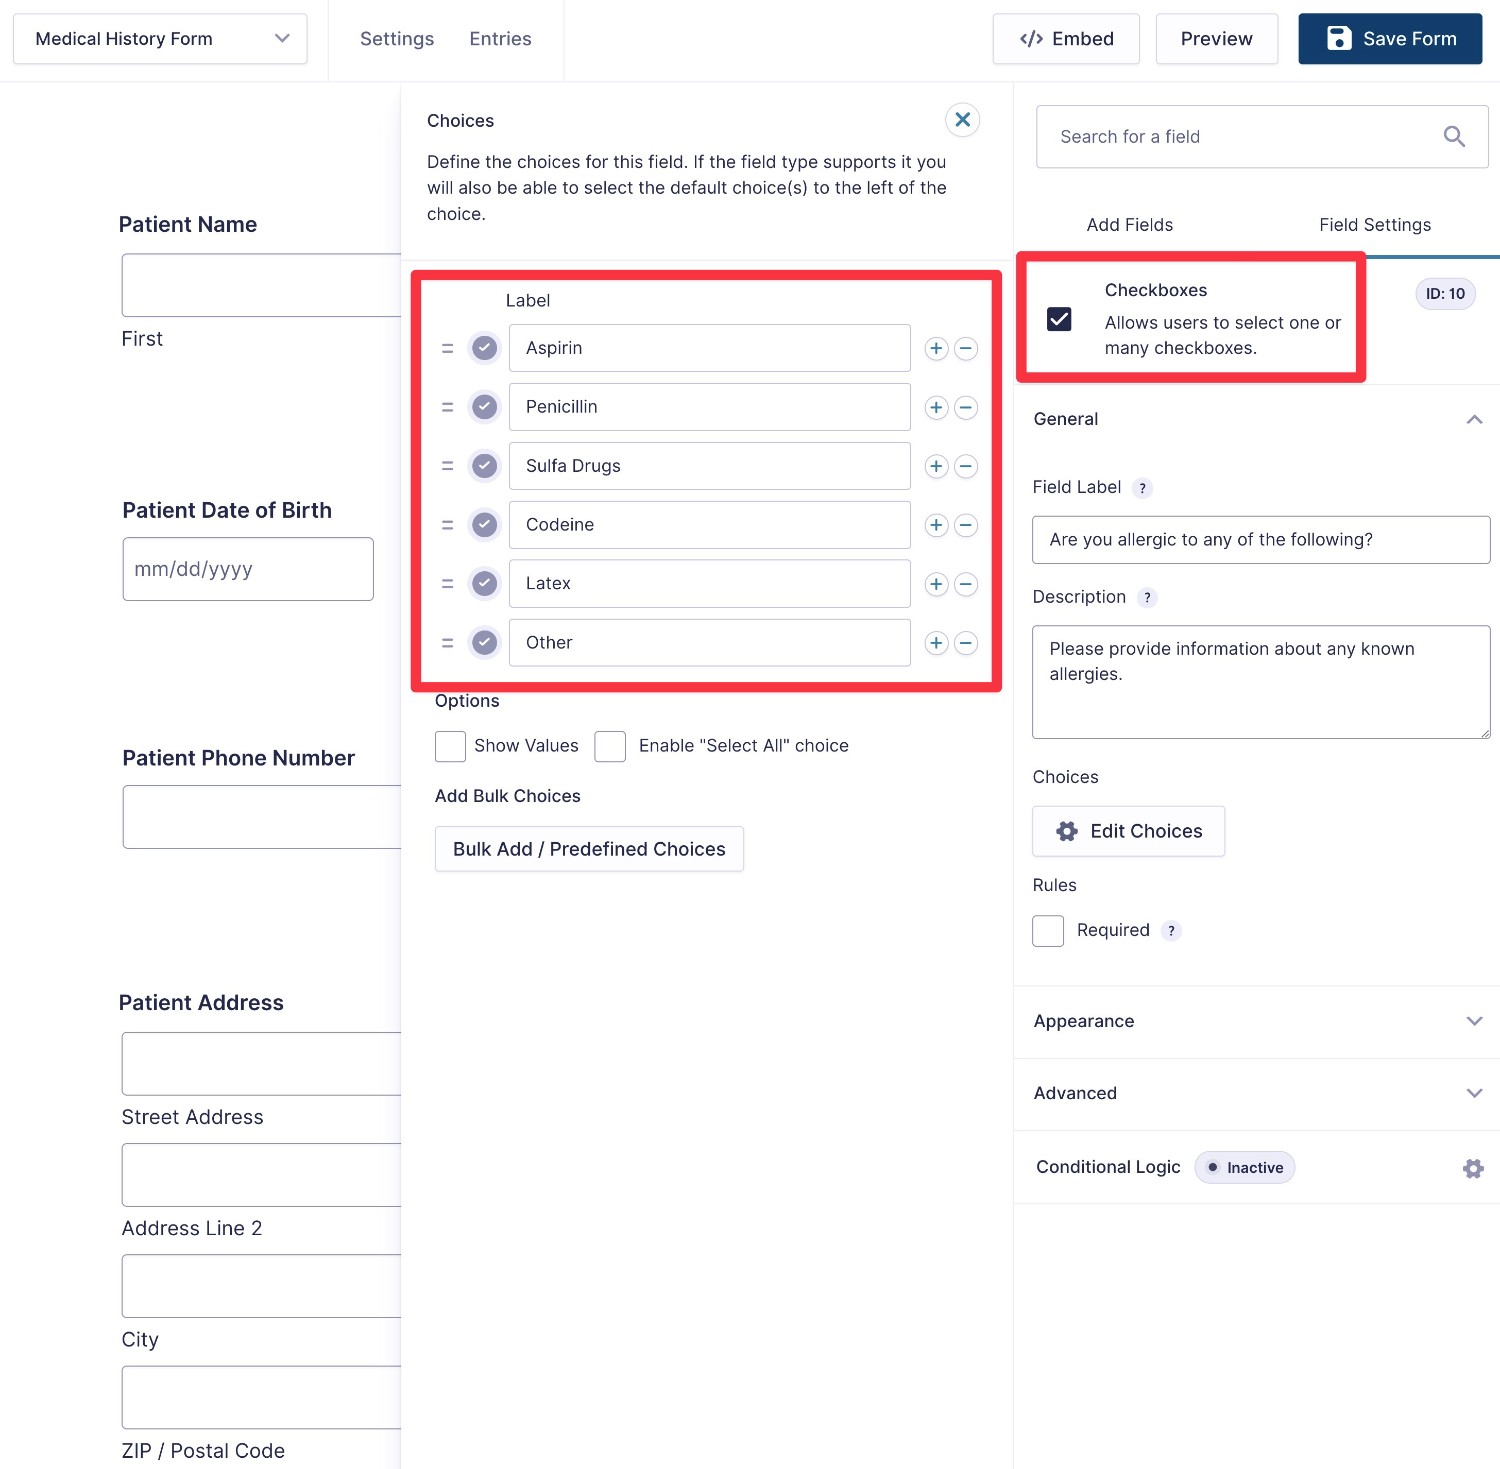
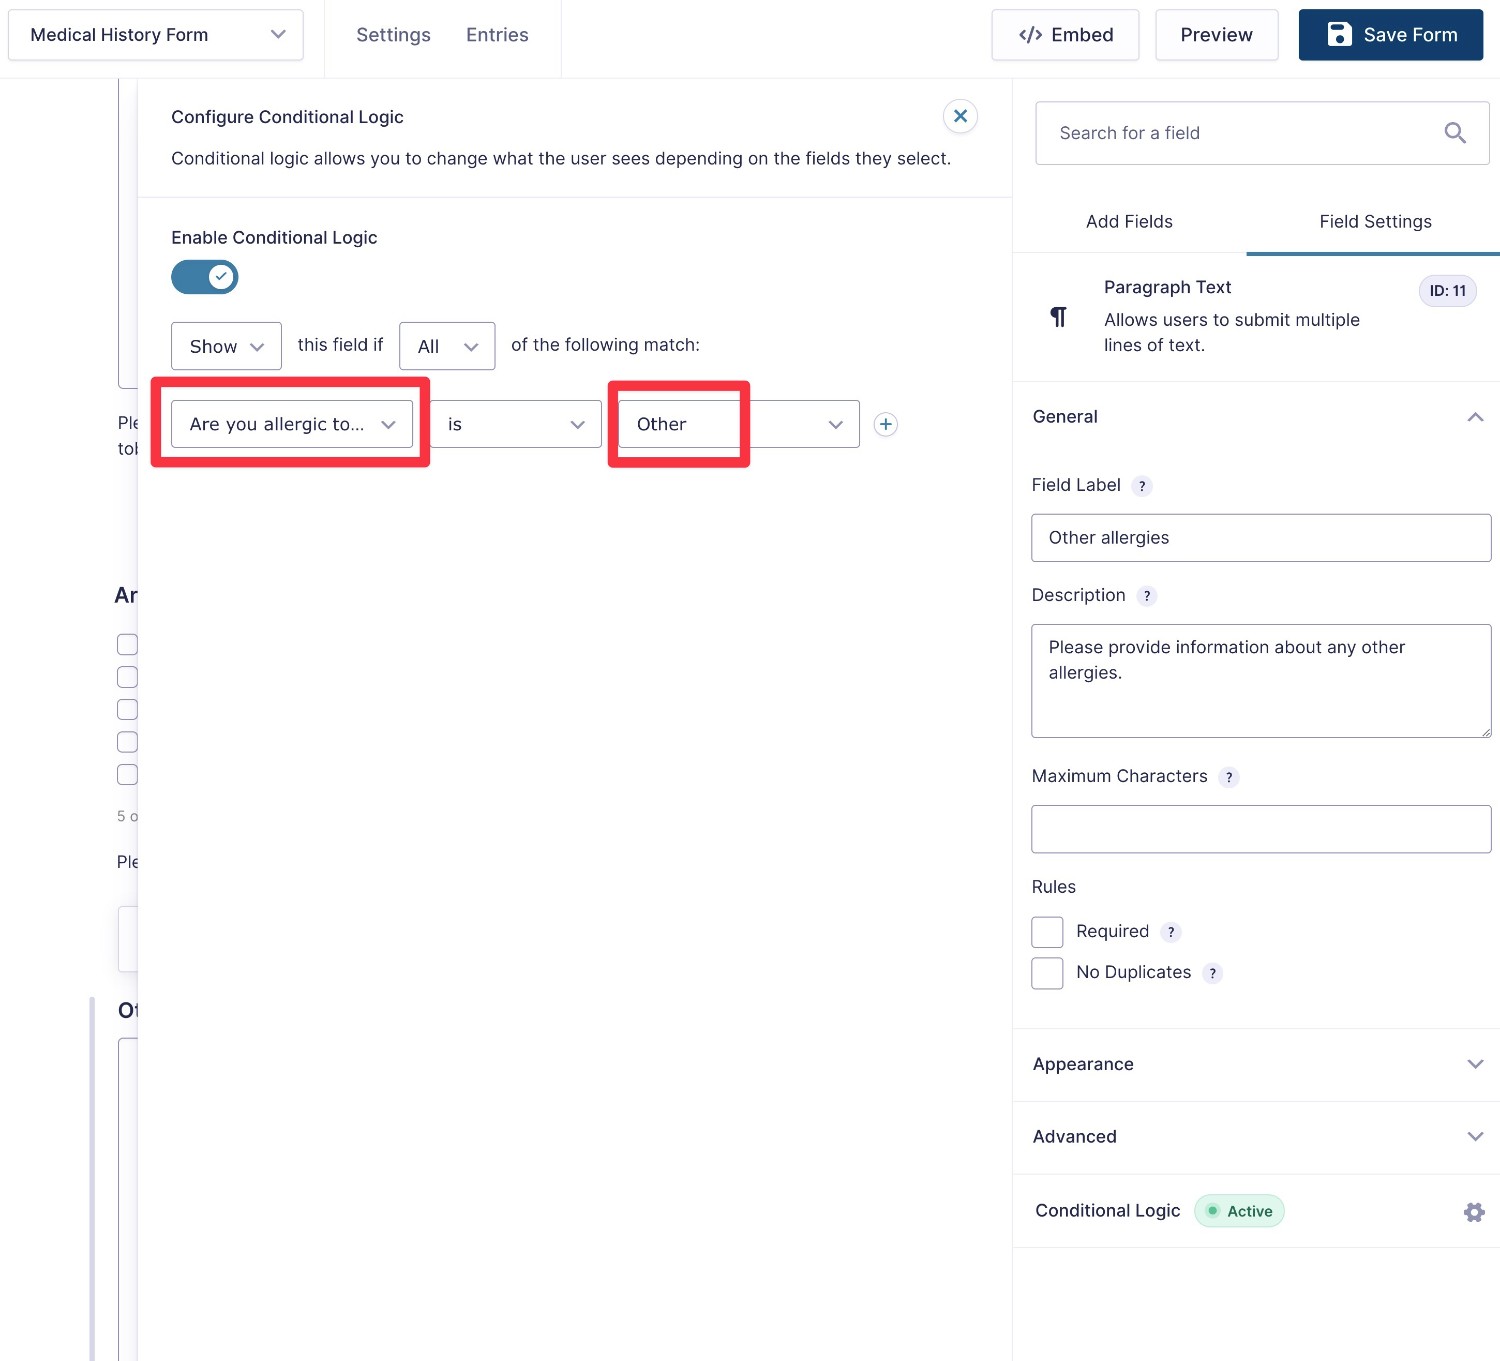
If you want to add an “Other” option that lets patients enter their own information, you can use conditional logic:
- Add a choice that says “Other”.
- Add a new Single Line Text or Paragraph Text field below the Checkboxes field.
- Add a conditional logic rule to the text field so that it only displays if the patient checks the box for “Other” in the Checkboxes field.
Use Other Field Types As Needed
While Yes/No radio buttons and multiple choice checkboxes will likely make up the bulk of your medical history form template, you’re also free to use the many other field types that Gravity Forms offers.
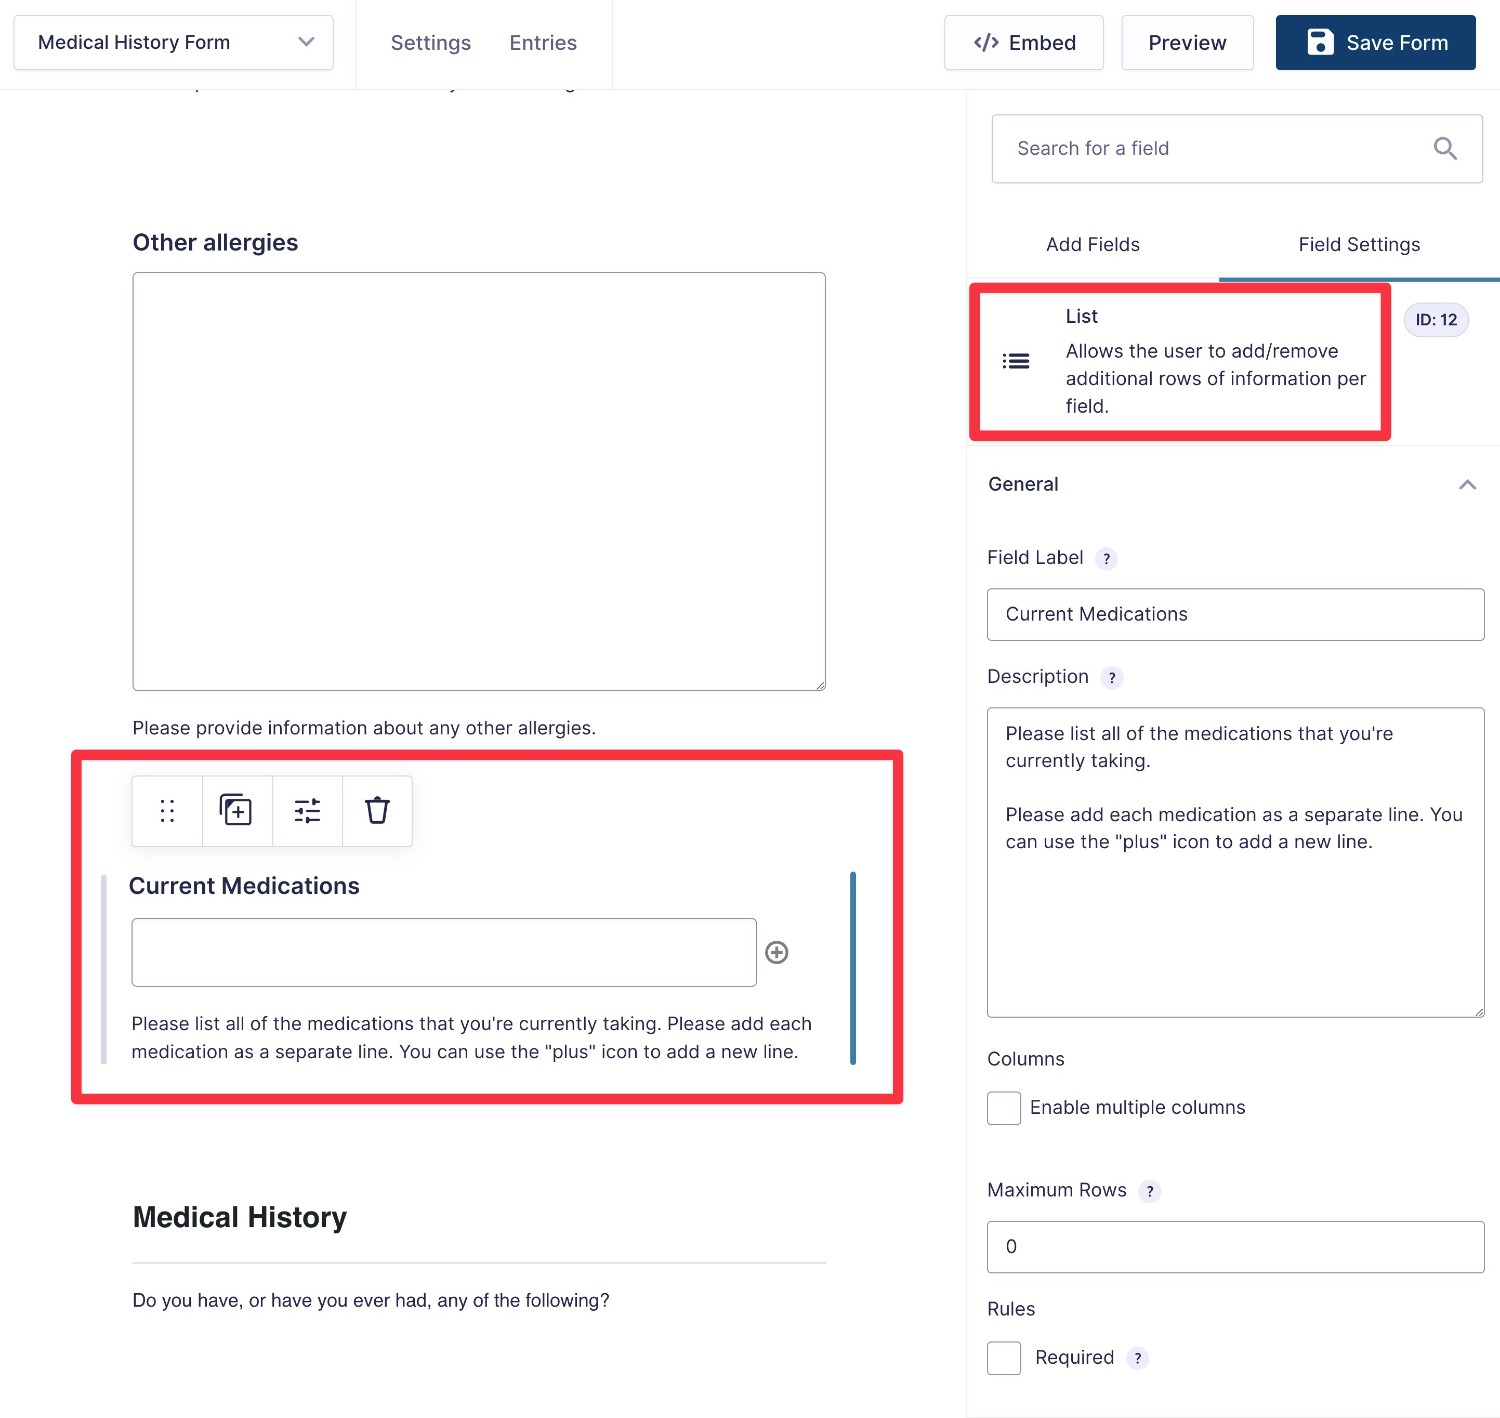
For example, you could use the List field type to let users enter any current medications that they’re taking.
The advantage of this field is that it lets users add as many options as needed, which gives them the ability to provide full details about their medication usage.
Break Your Medical History Form Into Multiple Pages
If you have a lengthy patient medical history form, you might want to break it into multiple pages so that it’s easier for patients to fill out.
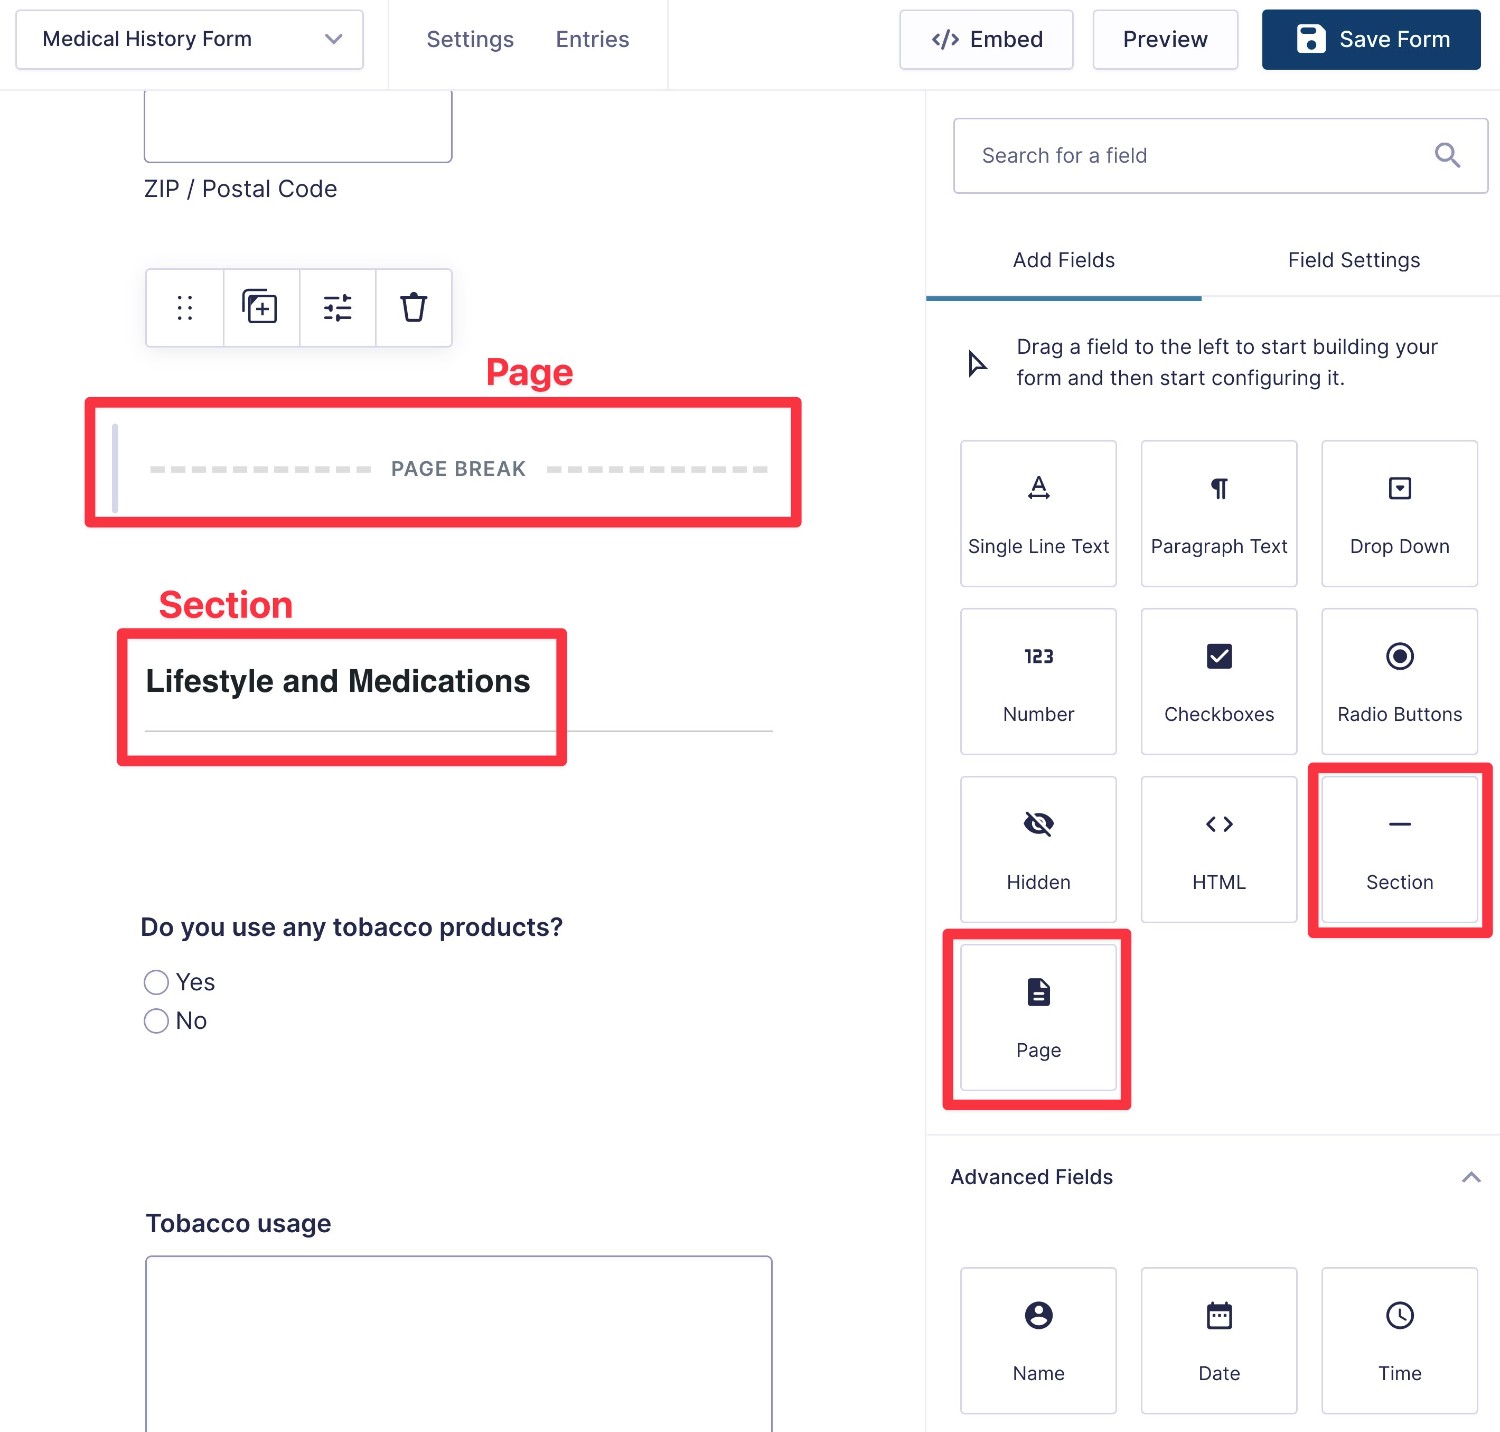
To do this, all you need to do is add the Page option wherever you want to break your form into a new page.
You can also use the Section field to add headings to break your form into different sections.
5. Set Up Additional Functionality As Needed
Once you’ve added all of the fields that your patient medical history form needs, make sure to click the Save Form button to save your changes.
Then, you can click the Settings option to configure confirmations and notifications:
- Confirmations – these display on your website immediately after the patient submits the form.
- Notifications – you can send these to anyone via email. For example, you could send an email to your staff that lets them know the patient has finished the medical history form.
In addition to these built-in features, you can also install Gravity Forms Add-Ons to add more functionality.
If you install Gravity Flow, you can also build multi-step workflows, such as sending a patient’s history to your staff for approval before performing additional actions, or generate a PDF version of a patient’s history so that you can print it out and have a hard copy.
Again, make sure that you’re complying with your local laws when it comes to processing patient data. For example, depending on where you’re located, you may or may not be able to send patient medical history details over email.
6. Embed Your Patient History Form
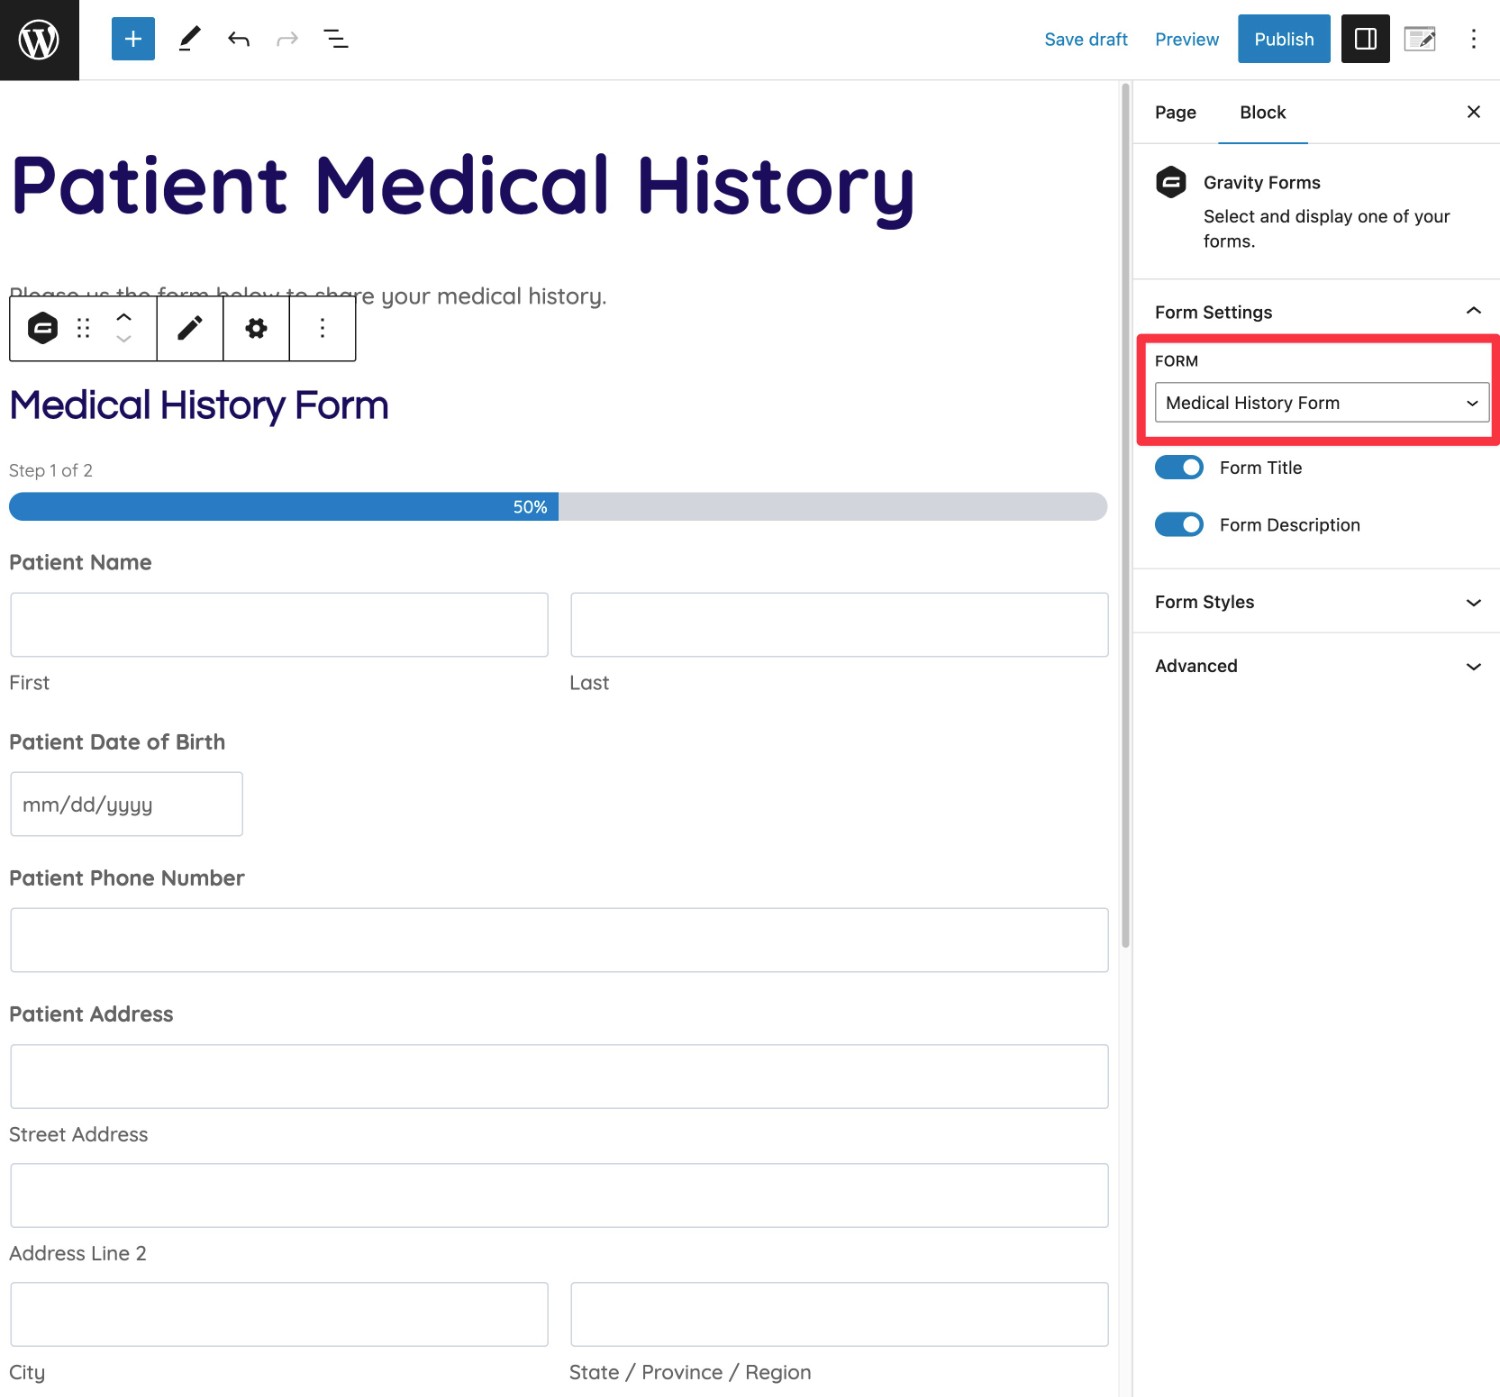
Once you’re finished setting up your form, the last step in the process is to embed the form so that your patients can access it.
To embed the form, you can use the Gravity Forms shortcode or block.
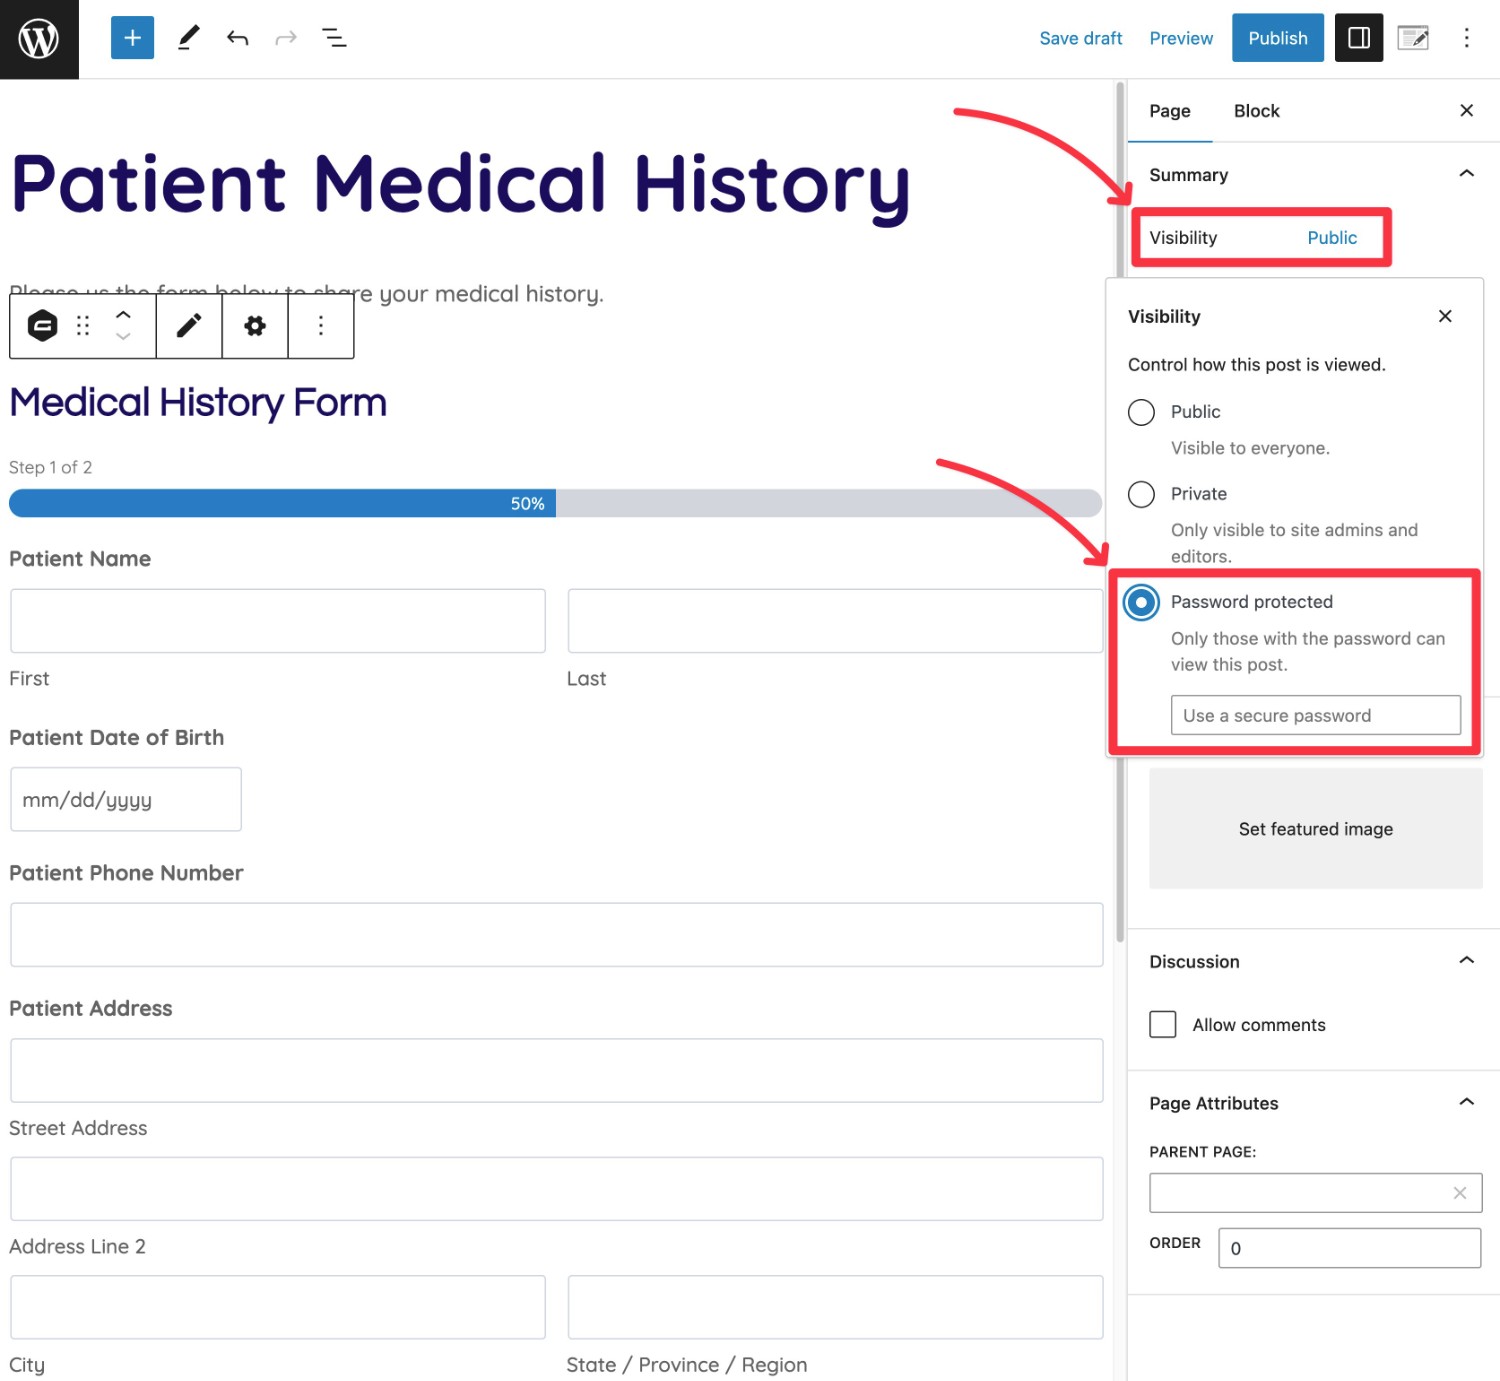
If you don’t want your medical history form to be publicly accessible, you have a couple of options for how to restrict access:
- You can use the built-in WordPress password protection feature to require users to enter a password to access the page. You can access this option by clicking the Visibility link in the editor sidebar (pictured below).
- If you require patients to register on your WordPress site, Gravity Forms offers a built-in option to require users to be logged in to submit a form. Go to the Form Settings and scroll down to Restrictions.
And that’s it! Patients will now be able to submit their medical history directly from your web form.
Does Gravity Forms Offer HIPAA Compliance?
If you’re creating a medical history form for a medical organization in the USA, you might be wondering if Gravity Forms is HIPAA compliant.
We have a full article on Gravity Forms and HIPAA here, but here’s the short version…
HIPAA compliance is a tricky subject because it can depend on a lot of factors including where your forms are hosted, who has access to your forms’ data, how you’re processing the data, and more.
There are ways to use Gravity Forms to create medical history forms that are HIPAA compliant, but you should not assume that your forms are compliant by default.
Here’s why:
Gravity Forms never processes or stores any of your form data on its own servers. By default, your data only “lives” on your WordPress site’s server, as well as in any connected services that you’ve chosen to integrate.
Because you have full control over your patient data, that means you’ll also be responsible for storing and processing that data in a way that complies with HIPAA.
To help you do this, you can find some relevant third-party Gravity Forms Add-Ons:
- HIPAA Forms – this plugin helps you integrate Gravity Forms with the HIPAA Compliant Web Forms service, which claims to offer a HIPAA-compliant solution for processing and storing form data.
- Gravity Forms Encrypted Fields – this plugin can help you encrypt the data that you collect via your forms.
Because these are third-party add-ons, we cannot guarantee that they will allow you to create a medical history form that complies with HIPAA. But they are a good spot to start your research.
If you’re ever unsure about whether or not the forms that you’re creating comply with HIPAA, we highly recommend speaking to a qualified professional.
Create Your Medical History Form Today
That wraps up our guide on how to create your own medical history form template with Gravity Forms and WordPress.
With a web form, your patients will be able to more easily provide comprehensive information about their medical histories, which will help you offer better care (and also streamline your admin processes).
Plus, by giving you full control over your own data, you have the ability to implement your forms in ways that comply with your local medical privacy laws.
If you’re ready to get started, purchase your Gravity Forms license today and follow this guide to create your first medical history form.
Or, if you’d rather test things first, you can spin up a free, fully functioning demo site.

If you want to keep up-to-date with what’s happening on the blog sign up for the Gravity Forms newsletter!
"*" indicates required fields