

Want to set up a Pipedrive WordPress integration?
With Gravity Forms, you can create your own custom web forms that feed information into the Pipedrive CRM.
You can collect as much information as needed, map custom information to custom fields in Pipedrive, and embed your forms anywhere on your WordPress site.
In this step-by-step tutorial, you’ll learn how to connect your WordPress site to Pipedrive via Gravity Forms and Zapier, the popular automation service that lets you connect your forms to over 8,000 apps (including Pipedrive!).
For this example, we’ll set up a WordPress form that creates a new deal in Pipedrive when someone submits the form.
However, you can use these same principles in other ways, such as creating or editing leads and organizations in Pipedrive (instead of deals), attaching files in Pipedrive, and more.
Basically, Gravity Forms and Zapier help you build a custom Pipedrive WordPress integration that meets your unique use case.
Let’s dig in!
Key takeaways
- You can create custom WordPress forms using Gravity Forms and automatically send form data to Pipedrive CRM via Zapier – no coding required.
- Beyond creating Pipedrive deals, the same setup can create or edit leads, attach files, update organizations, and more.
- The integration uses Gravity Forms’ secure REST API and supports advanced CRM workflows without exposing sensitive data.
- No developer skills needed – just a Gravity Forms Pro license, a Zapier account (often the free plan is enough), and your Pipedrive login.
Note: The Zapier Add-On is available on the Gravity Forms Pro, Elite, and Nonprofit licenses. For more information on the features and other add-ons that are available with these plans, check out the Pro License Plan, Elite License Plan, and Nonprofit License Plan pages.
What you need to set up a WordPress Pipedrive integration
To follow this tutorial and connect WordPress to Pipedrive, you’ll need a few things:
- The Pipedrive CRM – We’re assuming you’re already an active Pipedrive user given that you’re reading this post, but you’ll want to sign up for Pipedrive if you haven’t done so already.
- Gravity Forms – You need the core Gravity Forms plugin to create the web forms that will feed into Pipedrive.
- Gravity Forms Zapier Add-On – The Gravity Forms Zapier Add-On is what lets you connect WordPress to Pipedrive (via the Zapier service). It’s available on the Gravity Forms Pro license and above.
- Zapier account – It’s free to sign up for a Zapier account, but note that if you require Zaps with more than two steps you’ll need a premium account.
How to set up the Pipedrive WordPress integration with Gravity Forms
Now, let’s get into the step-by-step tutorial for how to connect WordPress to Pipedrive.
Before starting, we’ll assume a few things:
- You’ve already created your accounts for Pipedrive and Zapier.
- You’ve installed the Gravity Forms plugin and Zapier Add-On on your WordPress site. You’ll want to purchase at least the Pro license to get access to the Zapier Add-On.
We’ll cover everything else that you need to do below…
1. Create your form
To get started, you’ll want to use Gravity Forms to create the form that will appear on your WordPress site, i.e. the form that will pass data to Pipedrive.
You have two options to create your form:
- Build your form from scratch – you would go to Forms → Add New and use the drag-and-drop builder.
- Import a premade form template – you can download a template from the Gravity Forms template library and then import it by going to Forms → Import/Export → Import Forms in your WordPress dashboard. You can then fully customize that template, including adding, removing, or editing form fields as needed.
For this example, we created a simple “Request a Quote” form:
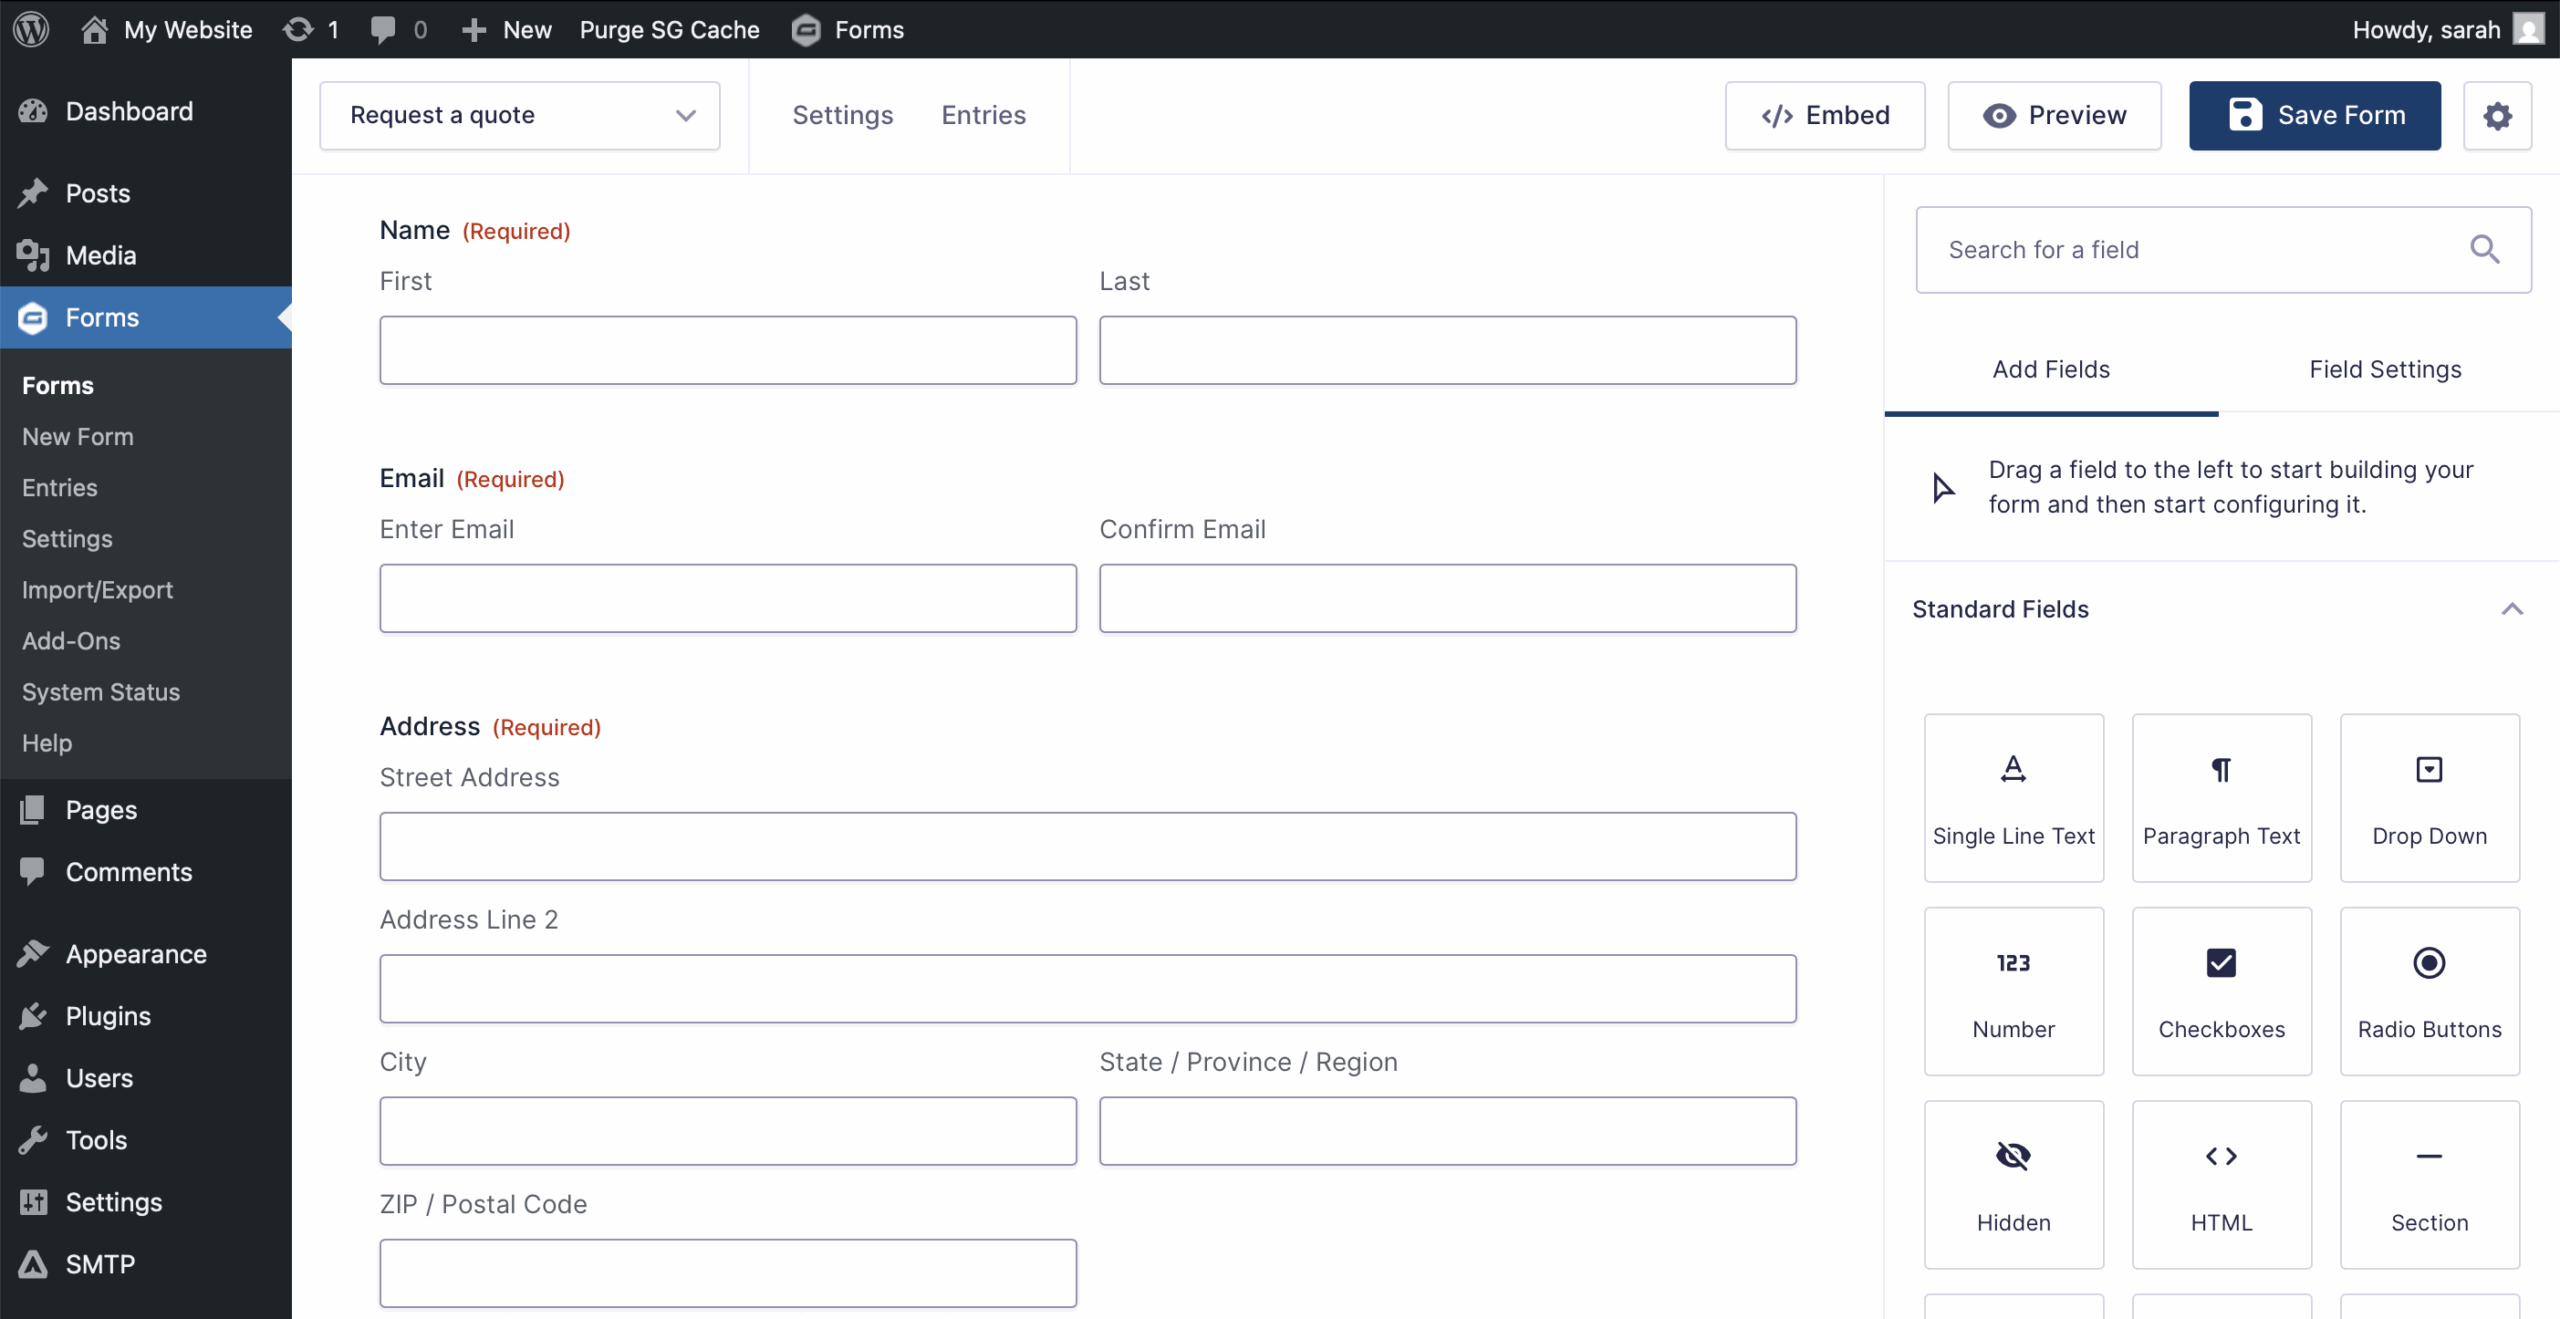
Beyond setting up the form fields, you might want to go to Settings to configure some basic settings for your form. Additionally, you might want to configure the Notifications and Confirmations.

Once you’re happy with your form’s configuration, you’re ready to move into the steps to connect it to Pipedrive.
2. Enable the Gravity Forms REST API and create API key
In order to connect your form to Pipedrive and Zapier, you need to enable Gravity Forms’ built-in REST API.
In a nutshell, this API lets Gravity Forms send and receive data from other sources, including Zapier and Pipedrive.
Here’s how to set it up:
- Go to Forms → Settings in your main WordPress dashboard.
- Select the REST API tab.
- Check the box to Enable access to the API. This will expand some additional options.
- Click Add Key under Authentication ( API version 2 ).
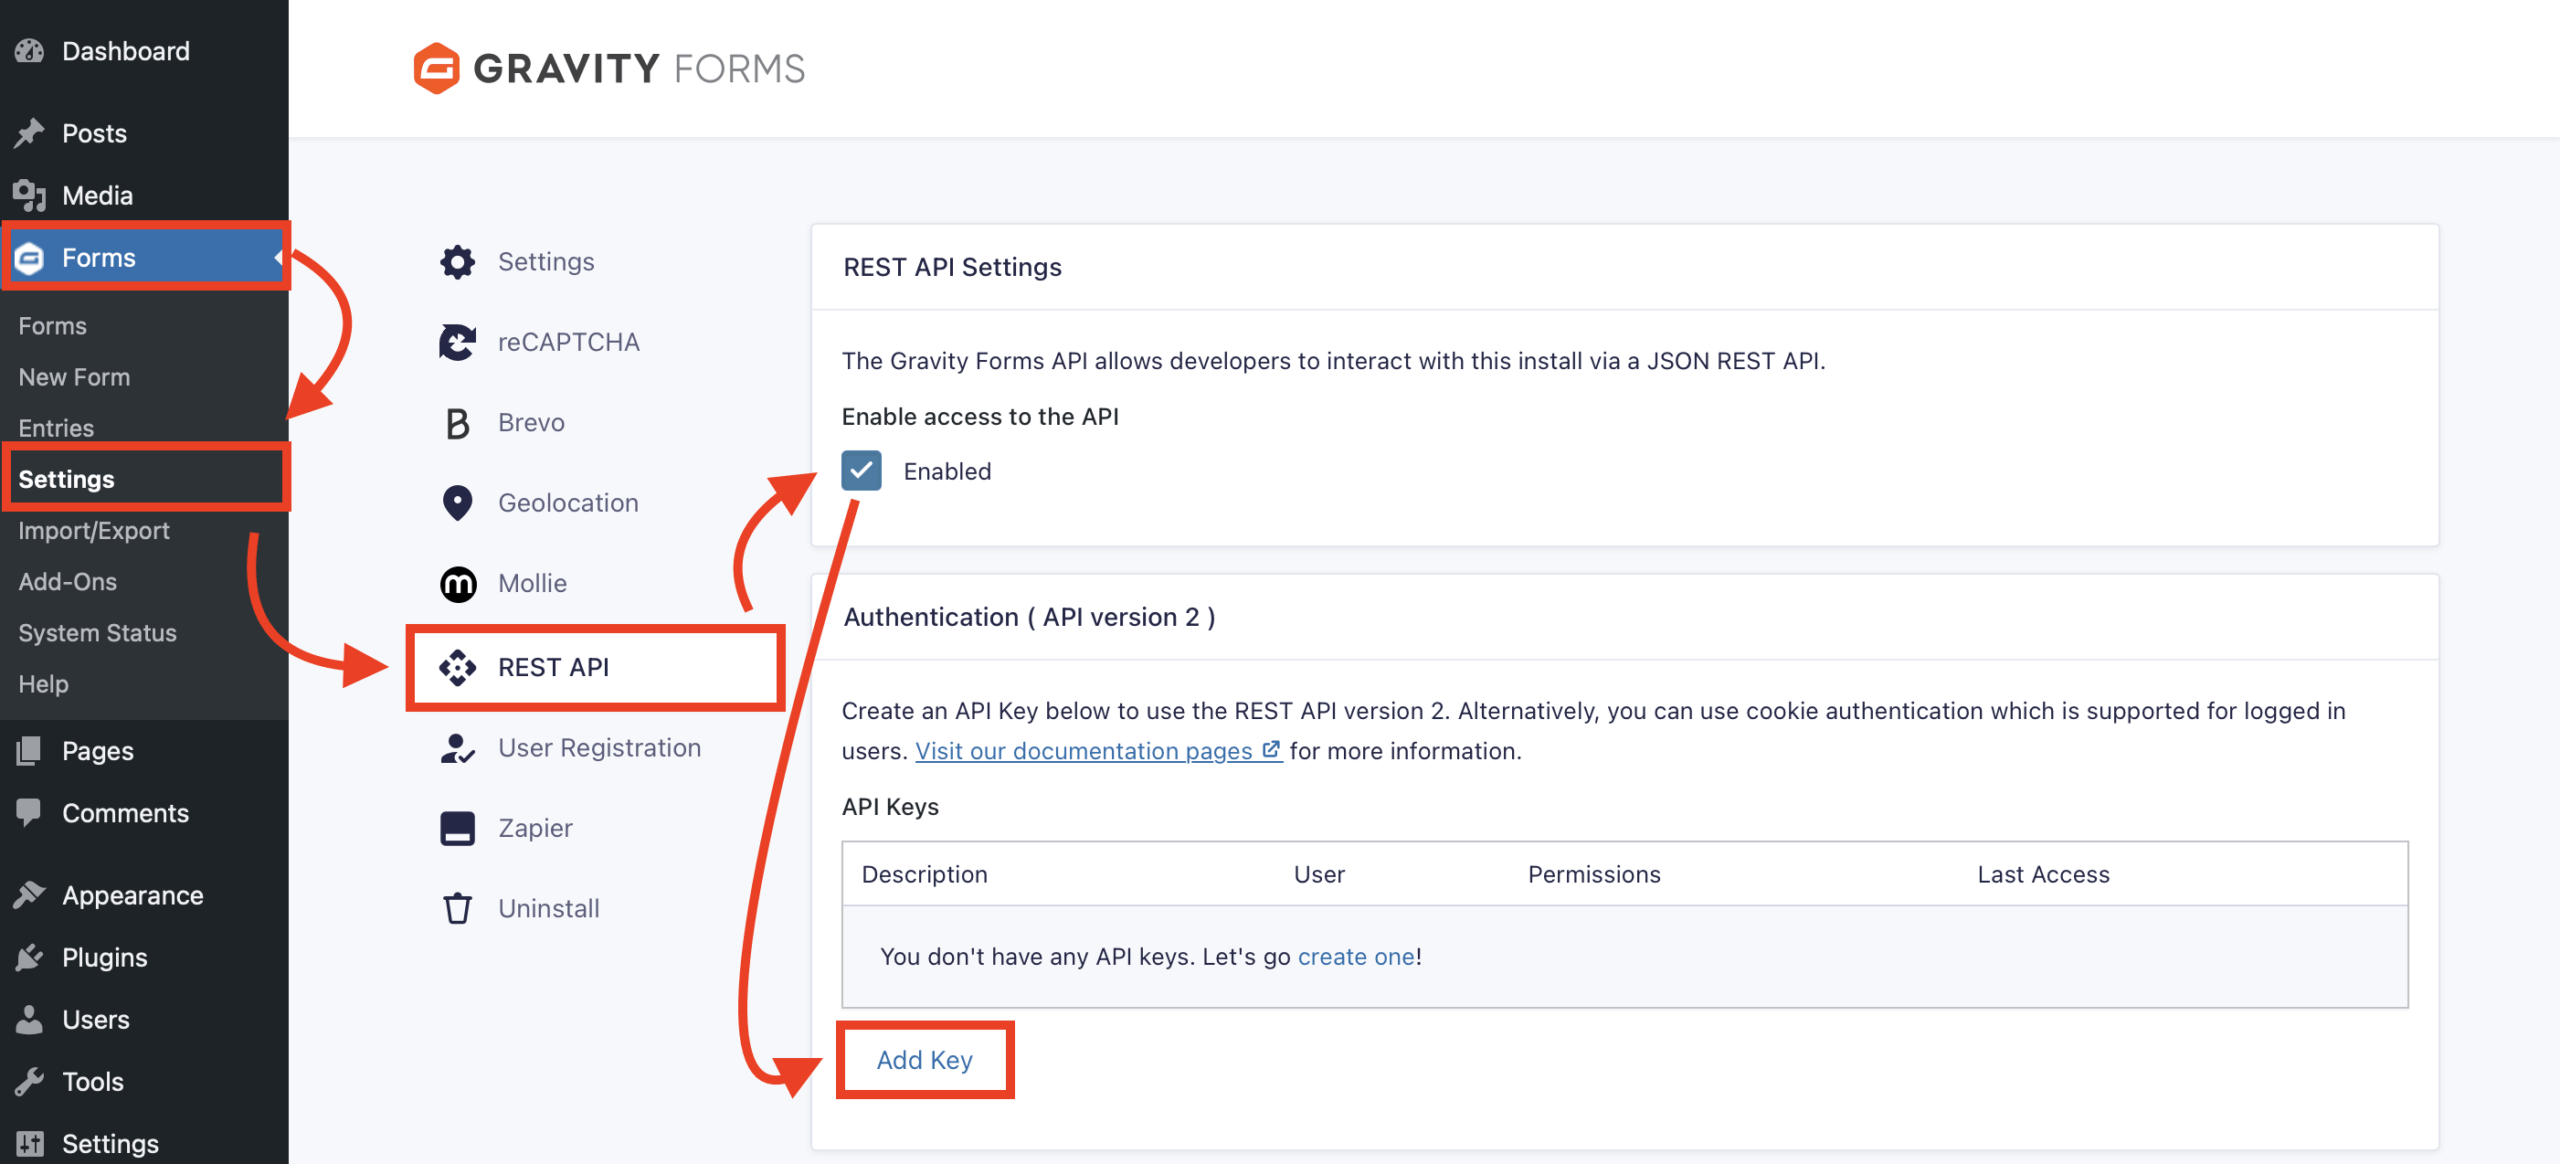
In the popup that appears, configure things as follows:
- Description – An internal name to help you remember.
- User – Choose your WordPress admin account.
- Permissions – Read/Write
Then, click Add.

Gravity Forms will now show you two pieces of information:
- Consumer Key
- Consumer Secret
Make sure you copy these keys to a safe location because you’ll need them in the next step and Gravity Forms won’t show them again. If you accidentally lose them, you can just create a new key – so don’t worry!

Finally, make sure to click Update at the bottom of the settings area to save your changes. You can then embed and publish the form on a page or post on your website.
For further information on this process and setting up the Zapier Add-On, check out this article in the Gravity Forms documentation.
3. Create a new Pipedrive WordPress integration Zap at Zapier
Now, you’ll do most of the rest of the work from the Zapier interface.
To connect WordPress to Pipedrive, you’ll use a “Zap”, which is Zapier’s term for an automation recipe.
You have two options:
- You can pick a premade Zap – Zapier lists a number of premade recipes on this page.
- You can build your own Zap from scratch by using the various actions.
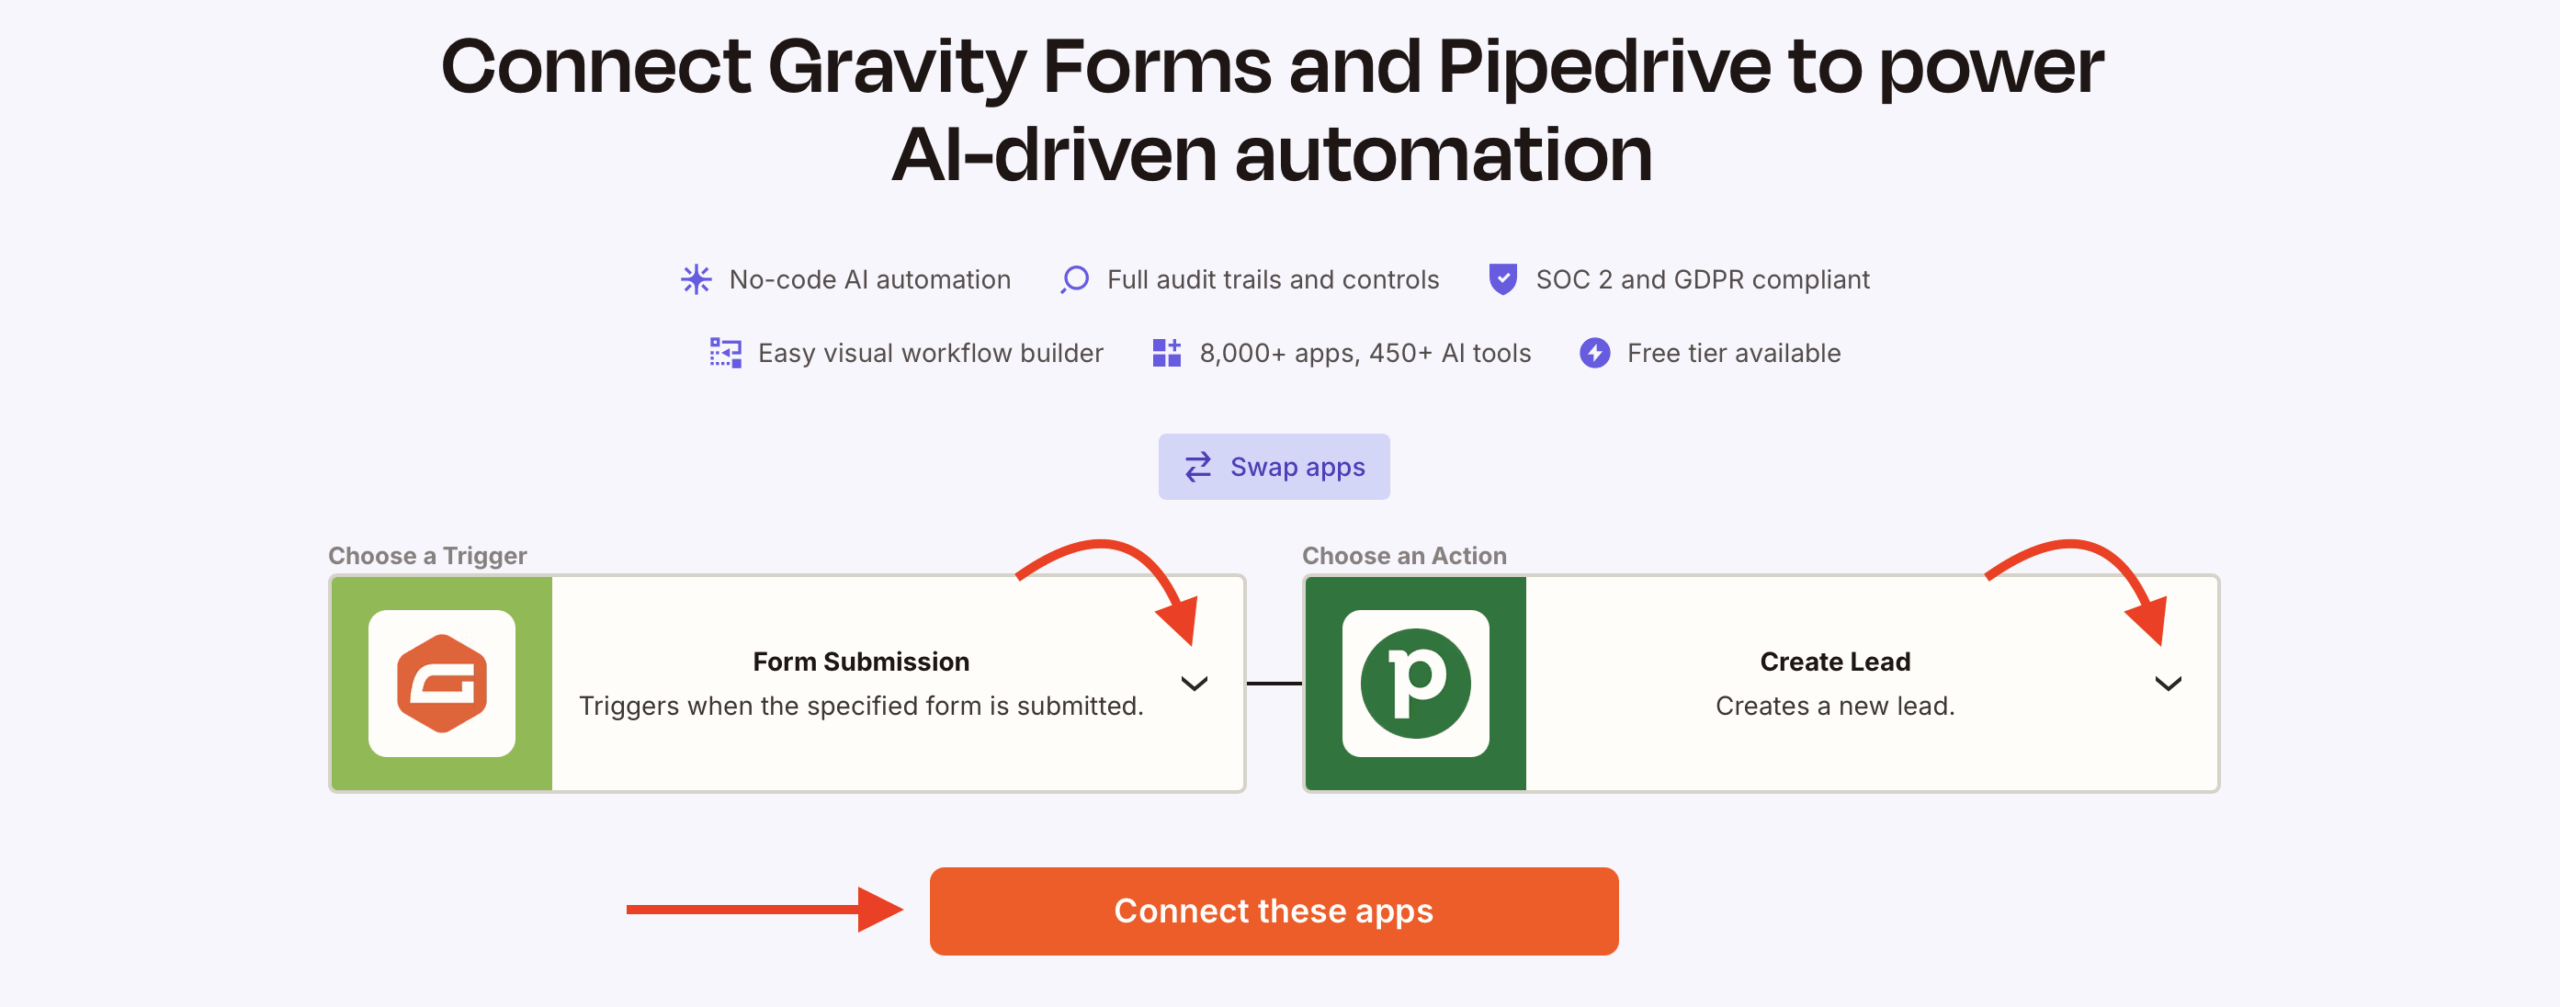
For this tutorial, we’ll use the premade Zap to create a new Pipedrive deal when someone submits our quote form.
However, you’re free to choose a different premade Zap or make your own. The general steps are the same either way, so you should be able to follow along even if you’re using a different Zap recipe.
For this example, select Form Submission as the Trigger, and Create Lead as the Action. Then, click Connect these apps.
4. Connect Gravity Forms to Zapier
The next steps will happen in the Zapier editor, where Zapier will walk you through the setup process.
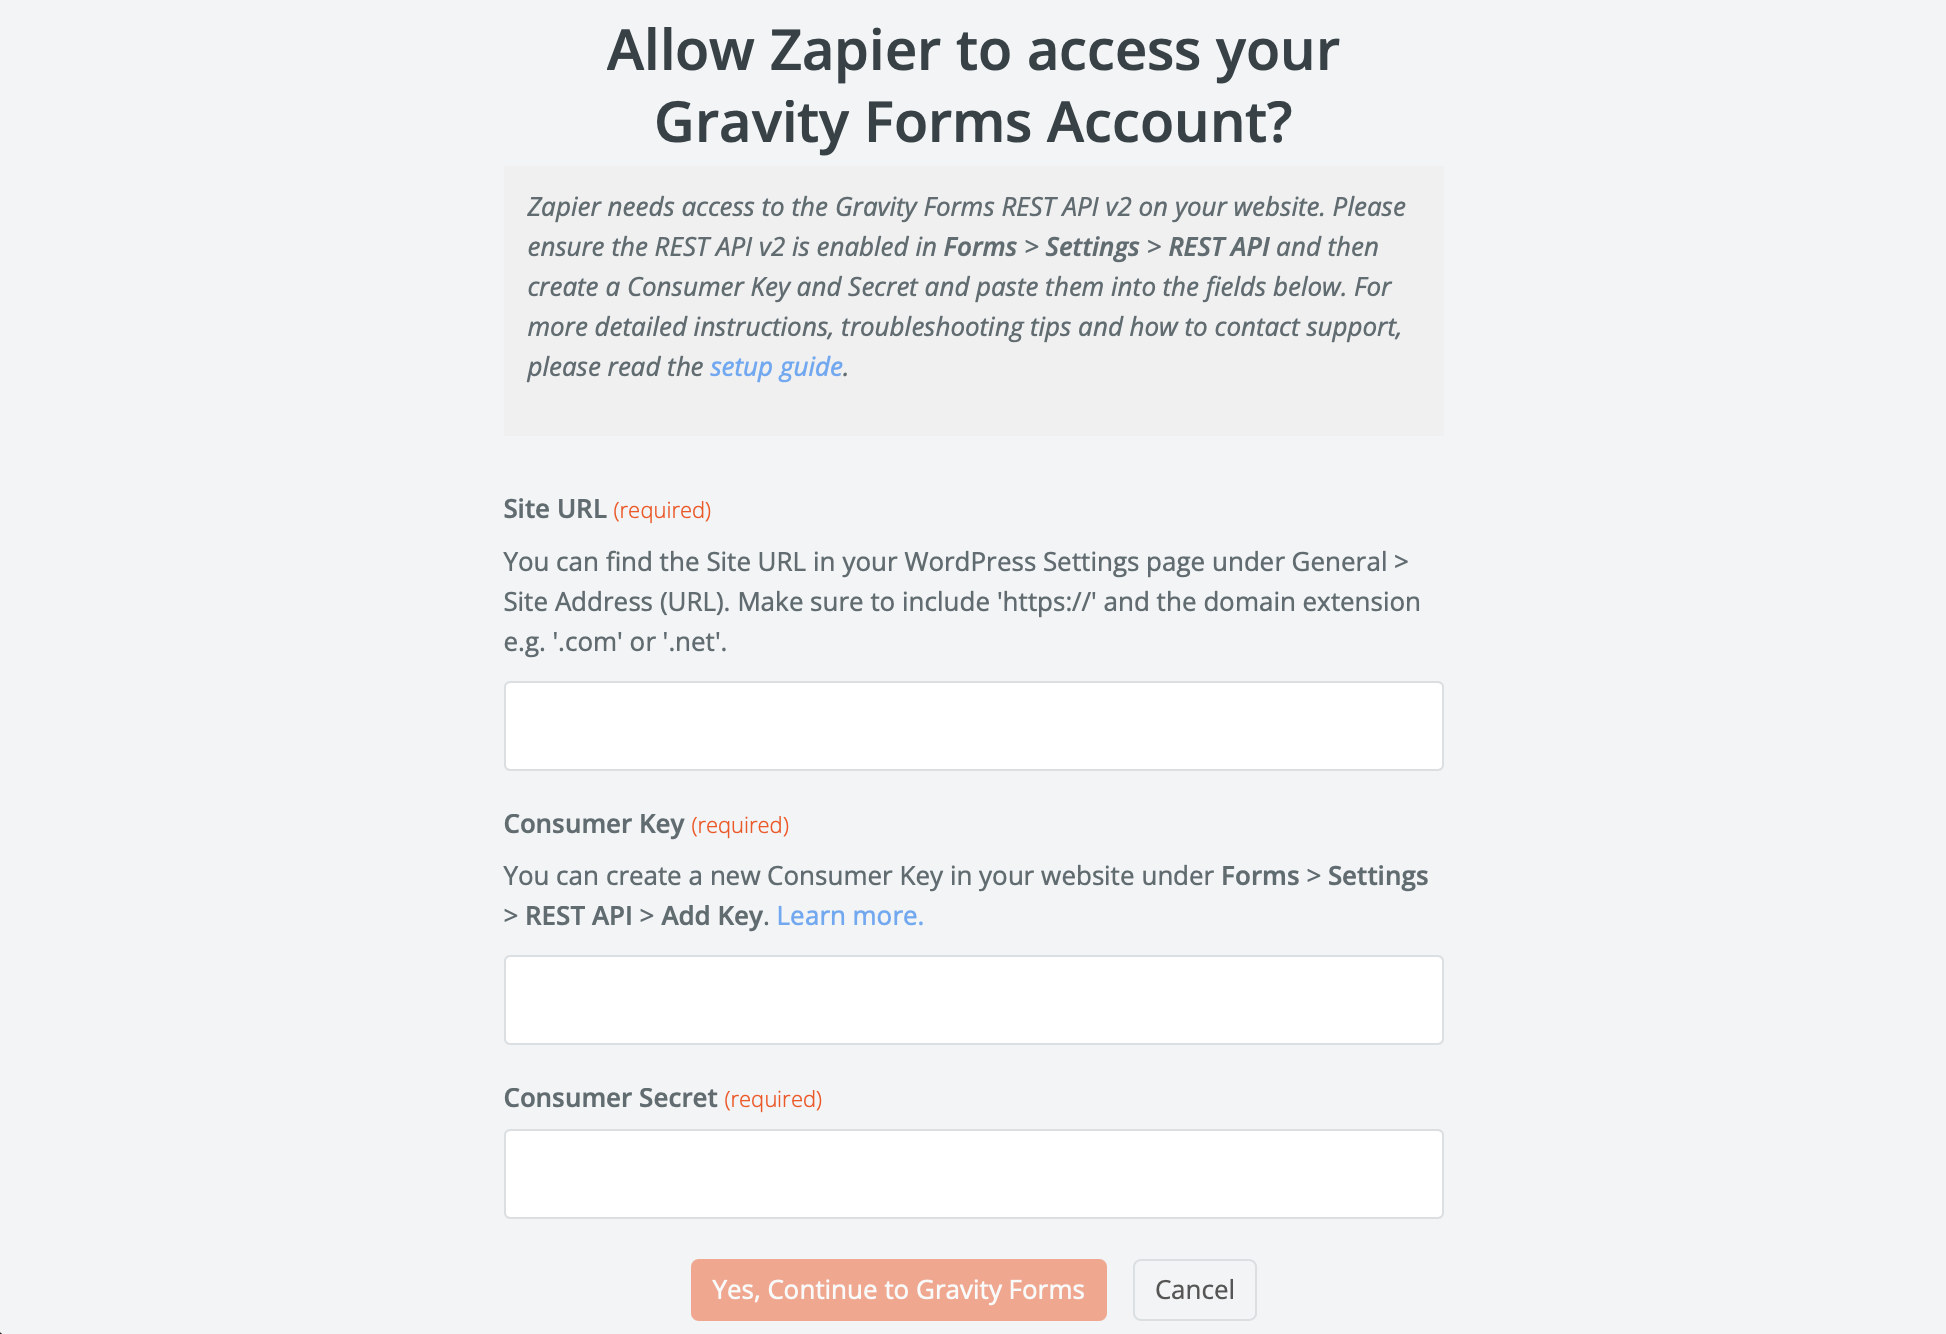
First, click the Gravity Forms step, then click Sign in.
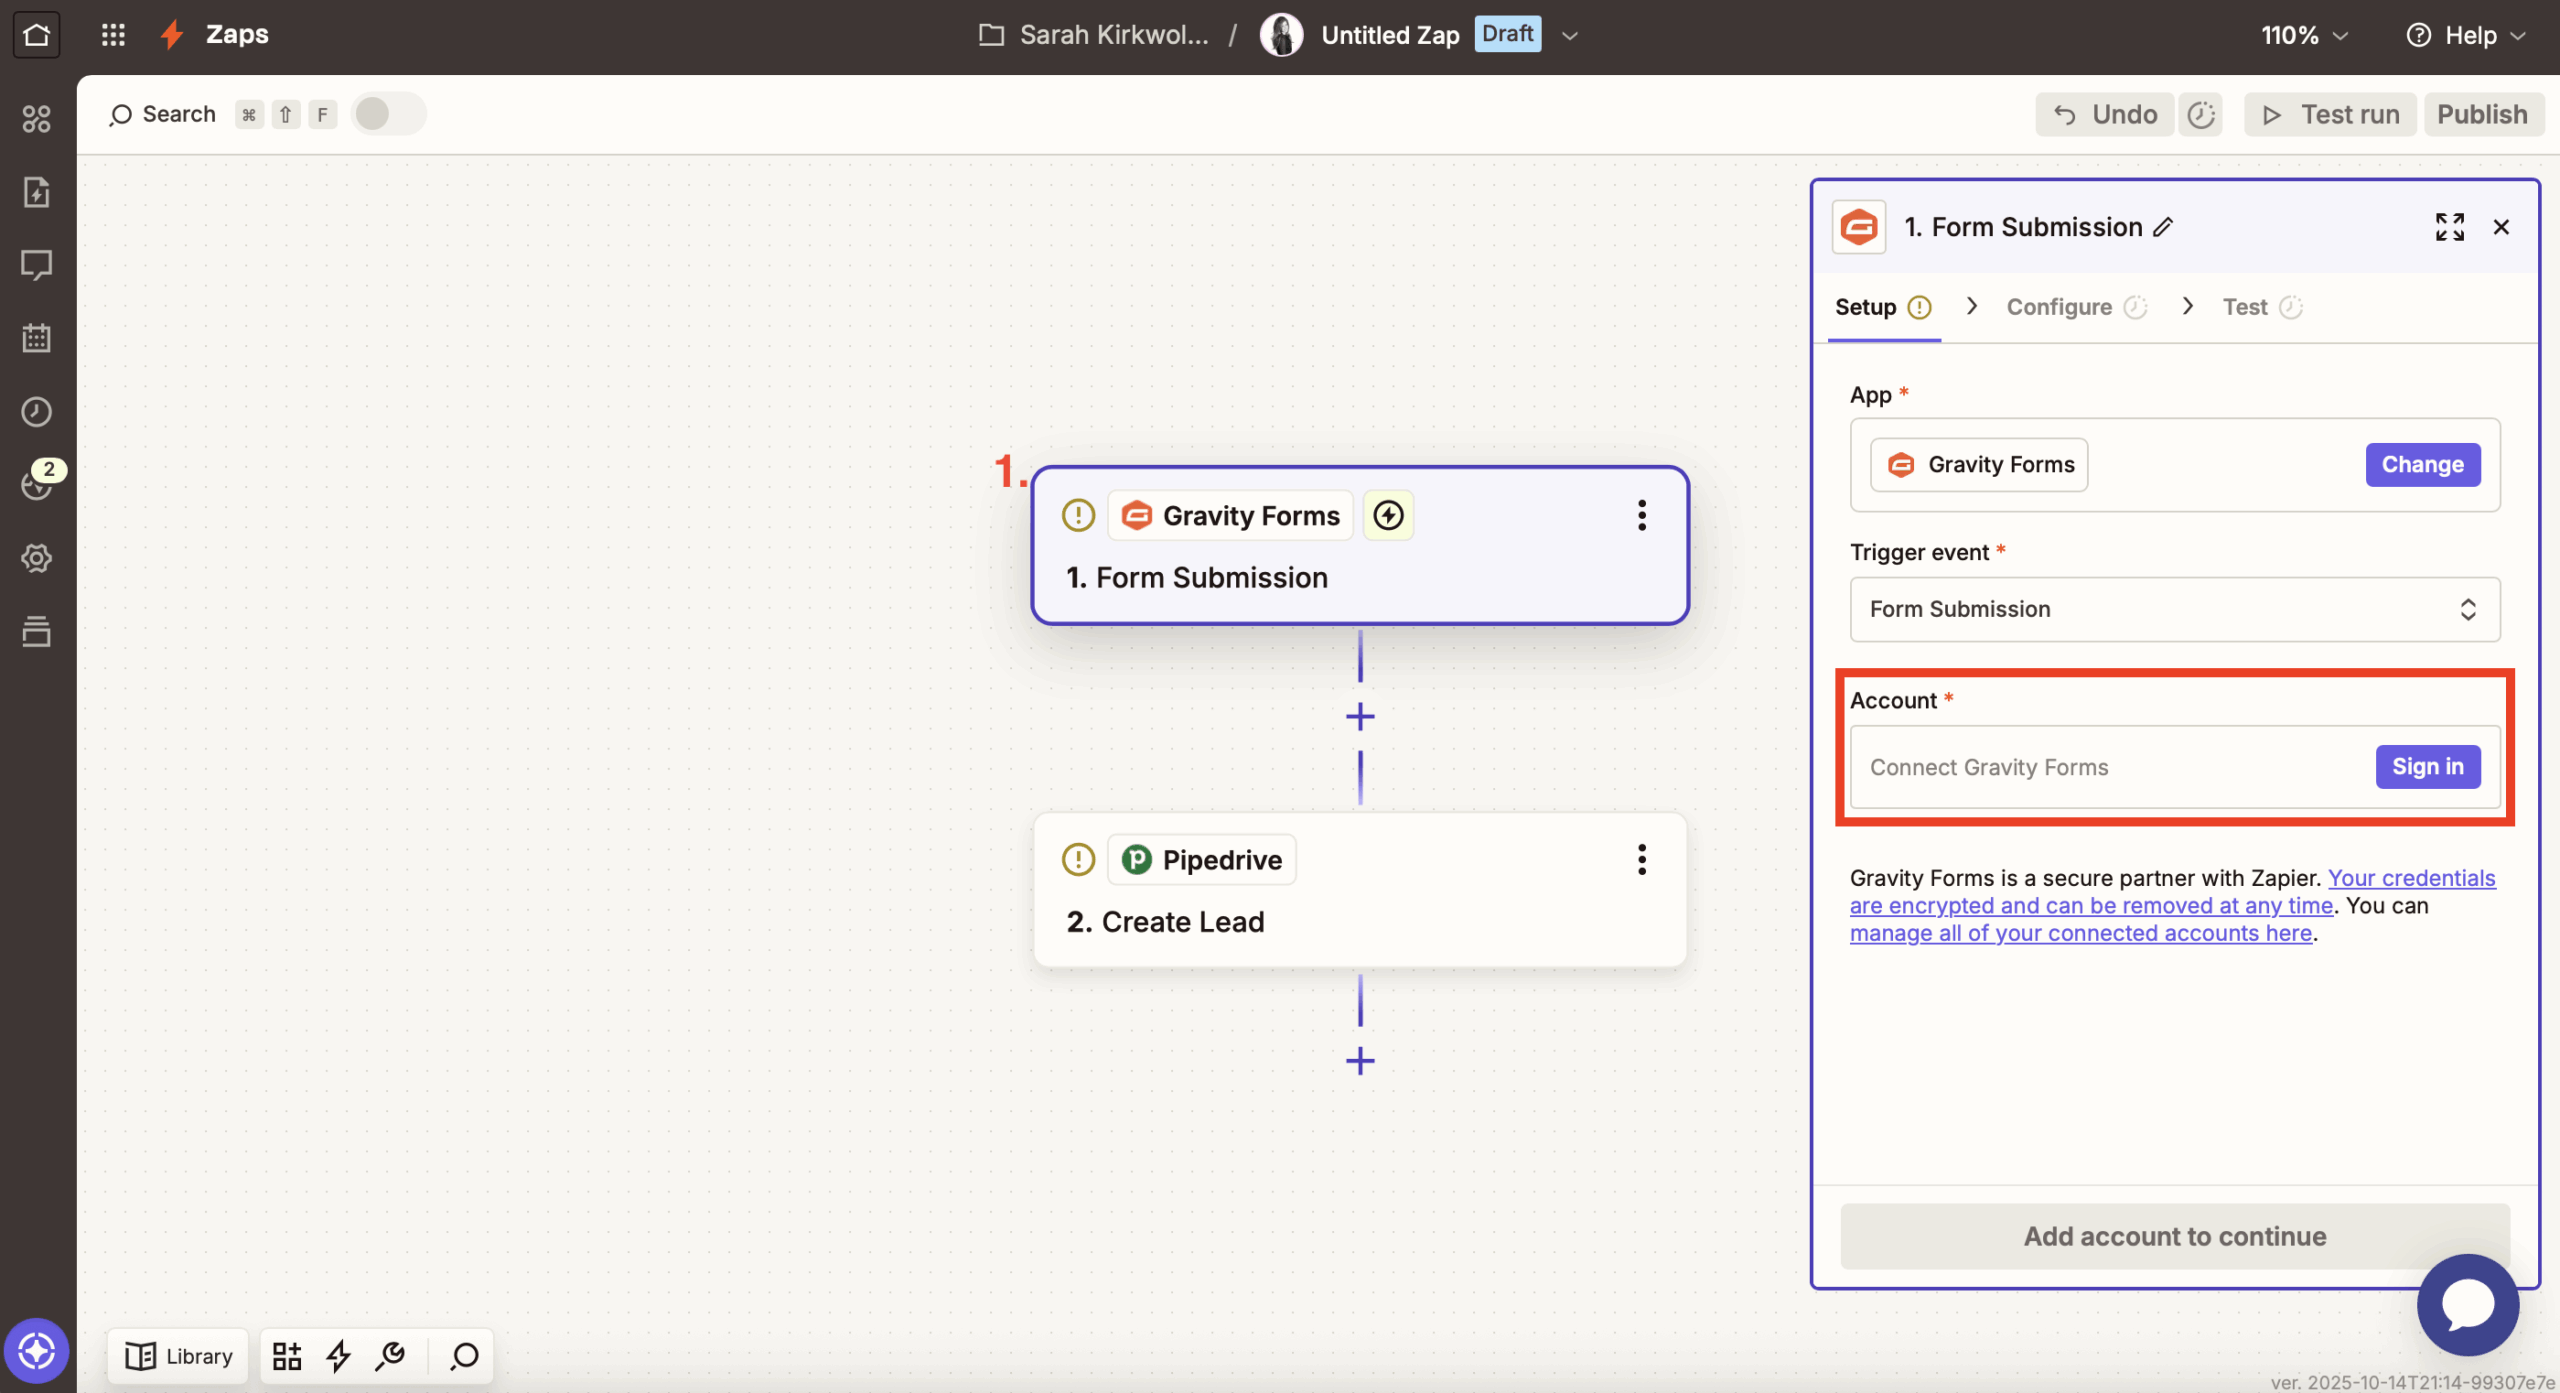
You’ll need to enter a few pieces of information:
- Site URL – The full URL of your WordPress site, including the HTTPS part. You can copy this exactly by going to Settings → General in your WordPress dashboard and copying the Site Address.
- Consumer Key – From Step #2 in this guide.
- Consumer Secret – From Step #2 in this guide.
Finally, click Yes, Continue to Gravity Forms.
Next, back in the Zapier editor, click Continue to be taken to the configuration step.
First, choose the form you want to send data from. Next, the Use Admin Field Labels? section is not required, but you can fill it out if you have added Admin Labels. Finally, add a Unique name and again click Continue.
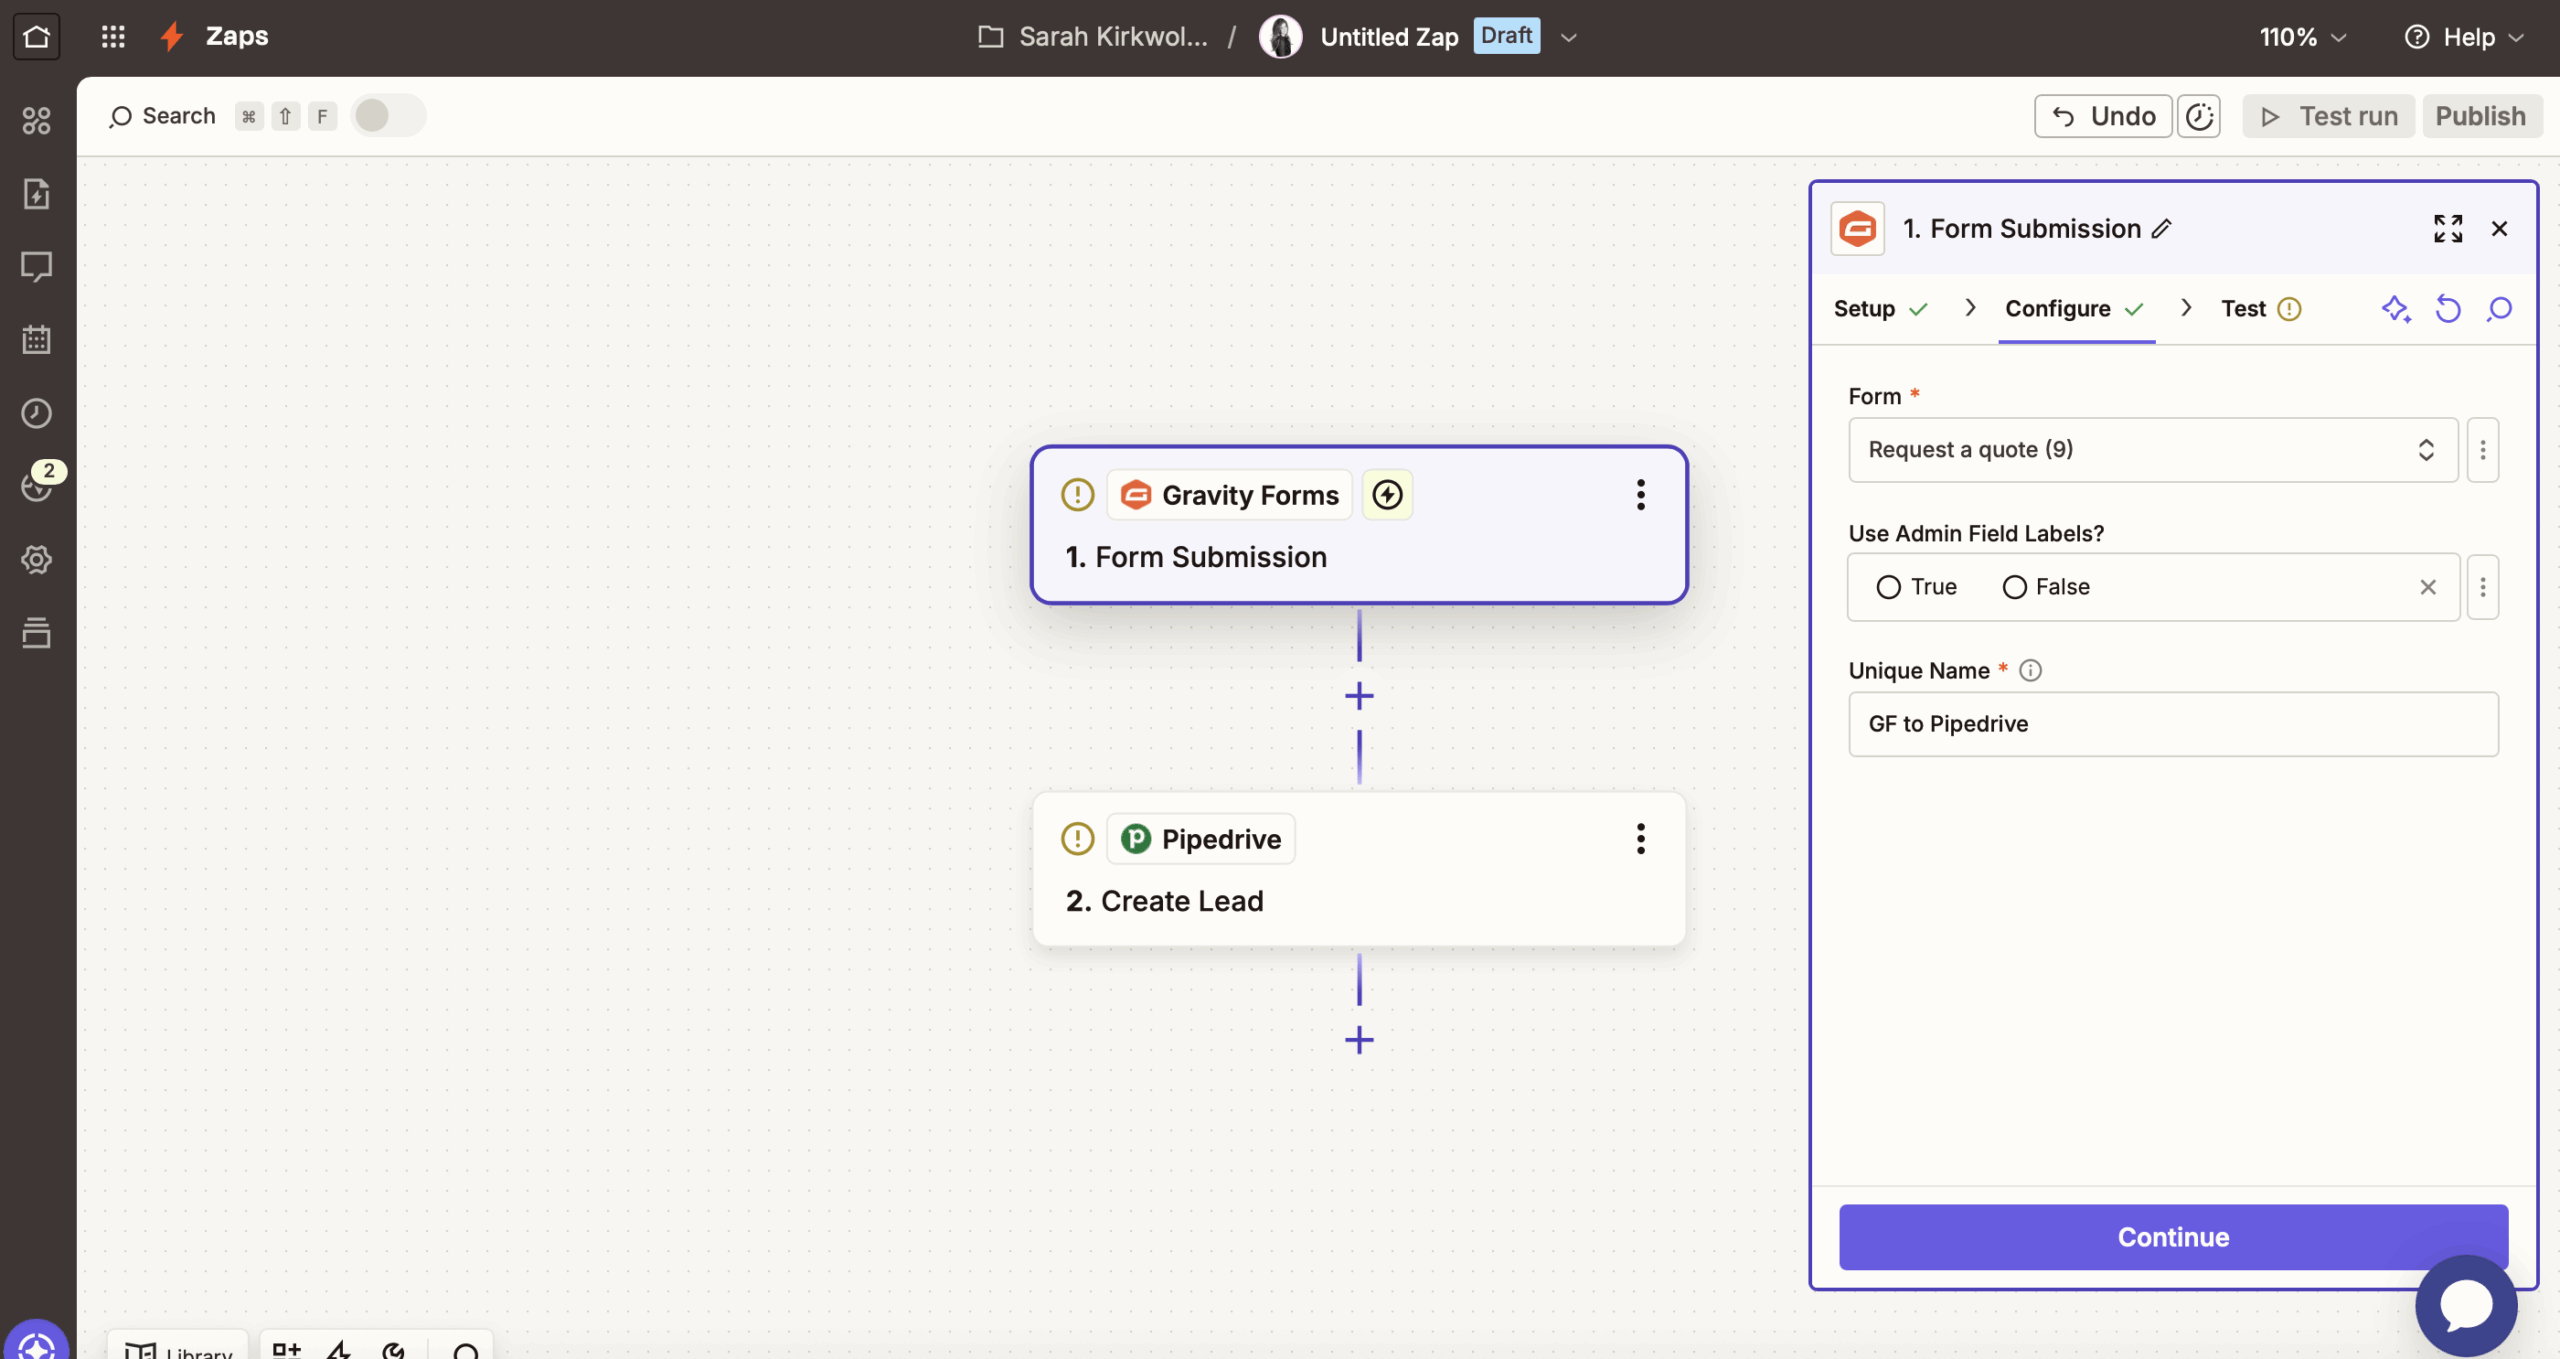
You should then see a green checkmark indicating that the connection was successful.
Click Continue to advance.
You’ll now be asked to Test what you’ve set up. Click Test Trigger to ensure the connection works. You should end up with a viewable example submission record. Click Continue with selected record.

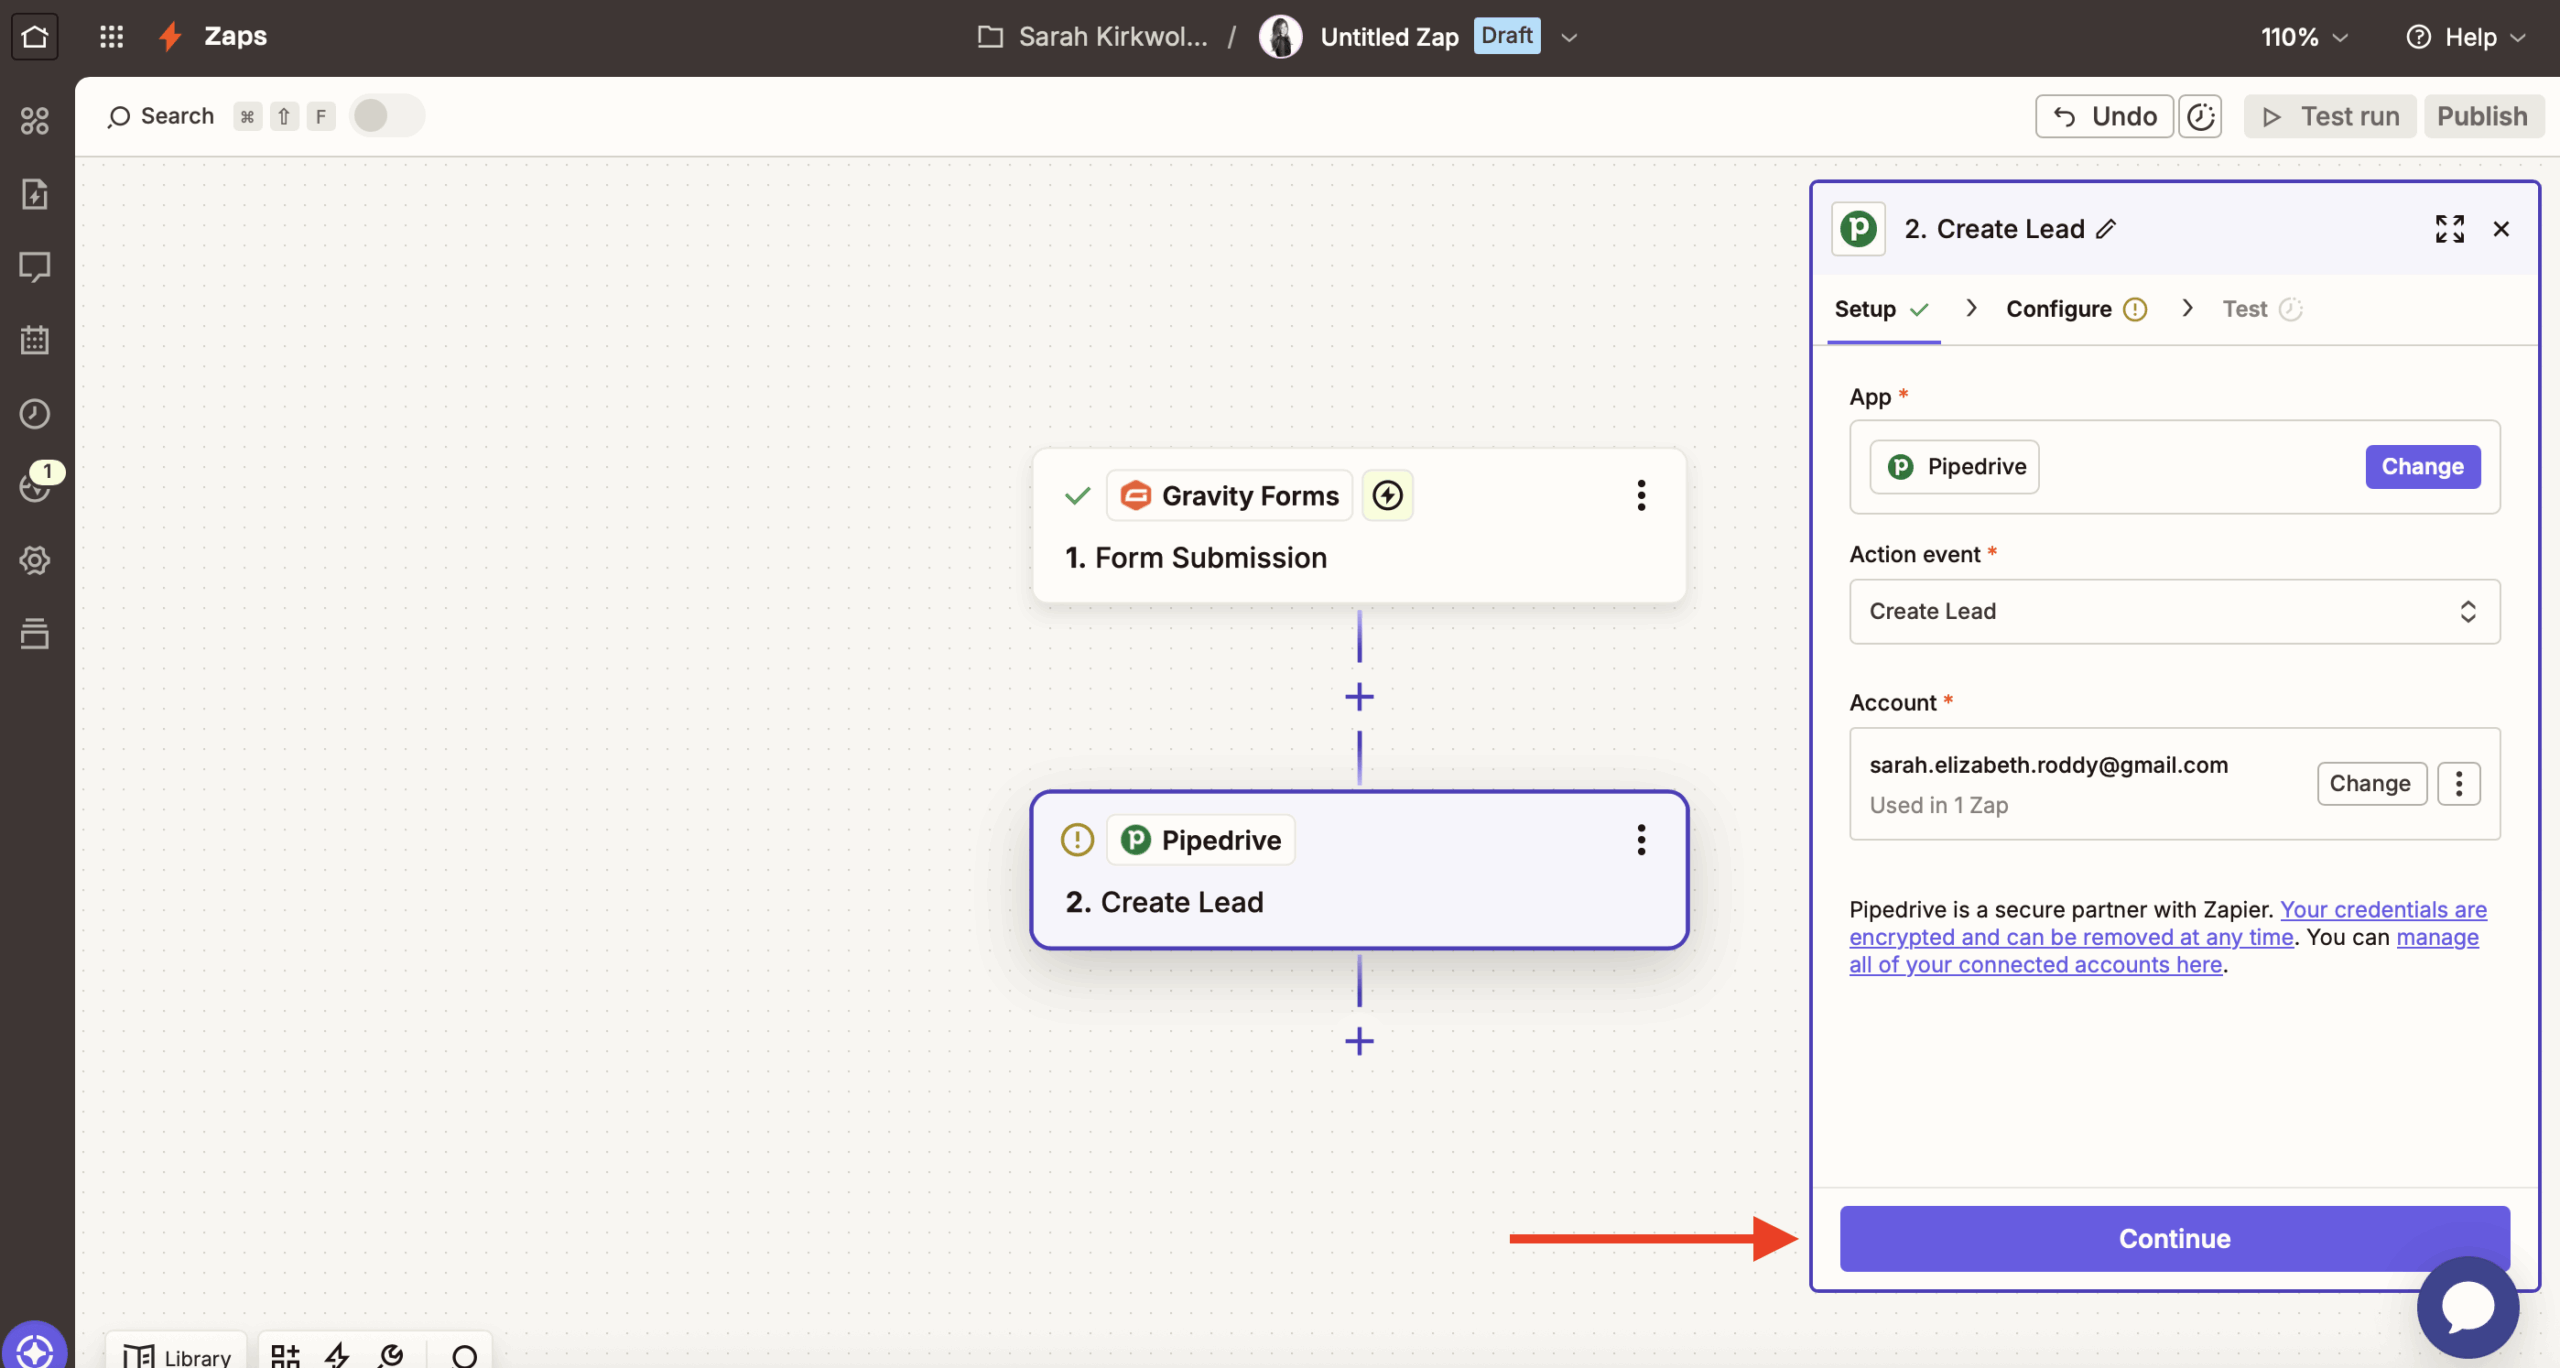
5. Connect Zapier to Pipedrive
You’ll now need to complete the same process to connect to Pipedrive. First, ensure the Action Event is set to Create Lead, and then follow the instructions to authorize your account:
- Click to connect your account. This will open an authorization prompt for Pipedrive (assuming you’re already logged into Pipedrive in another browser window or tab).
- Click Allow and Install on the following pop-up.
- Once connected, click Continue in Zapier.
6. Configure the Zap and enable
Now that you’ve connected Gravity Forms and Pipedrive, you’re ready to customize how you want to pass the data from Gravity Forms to Pipedrive.
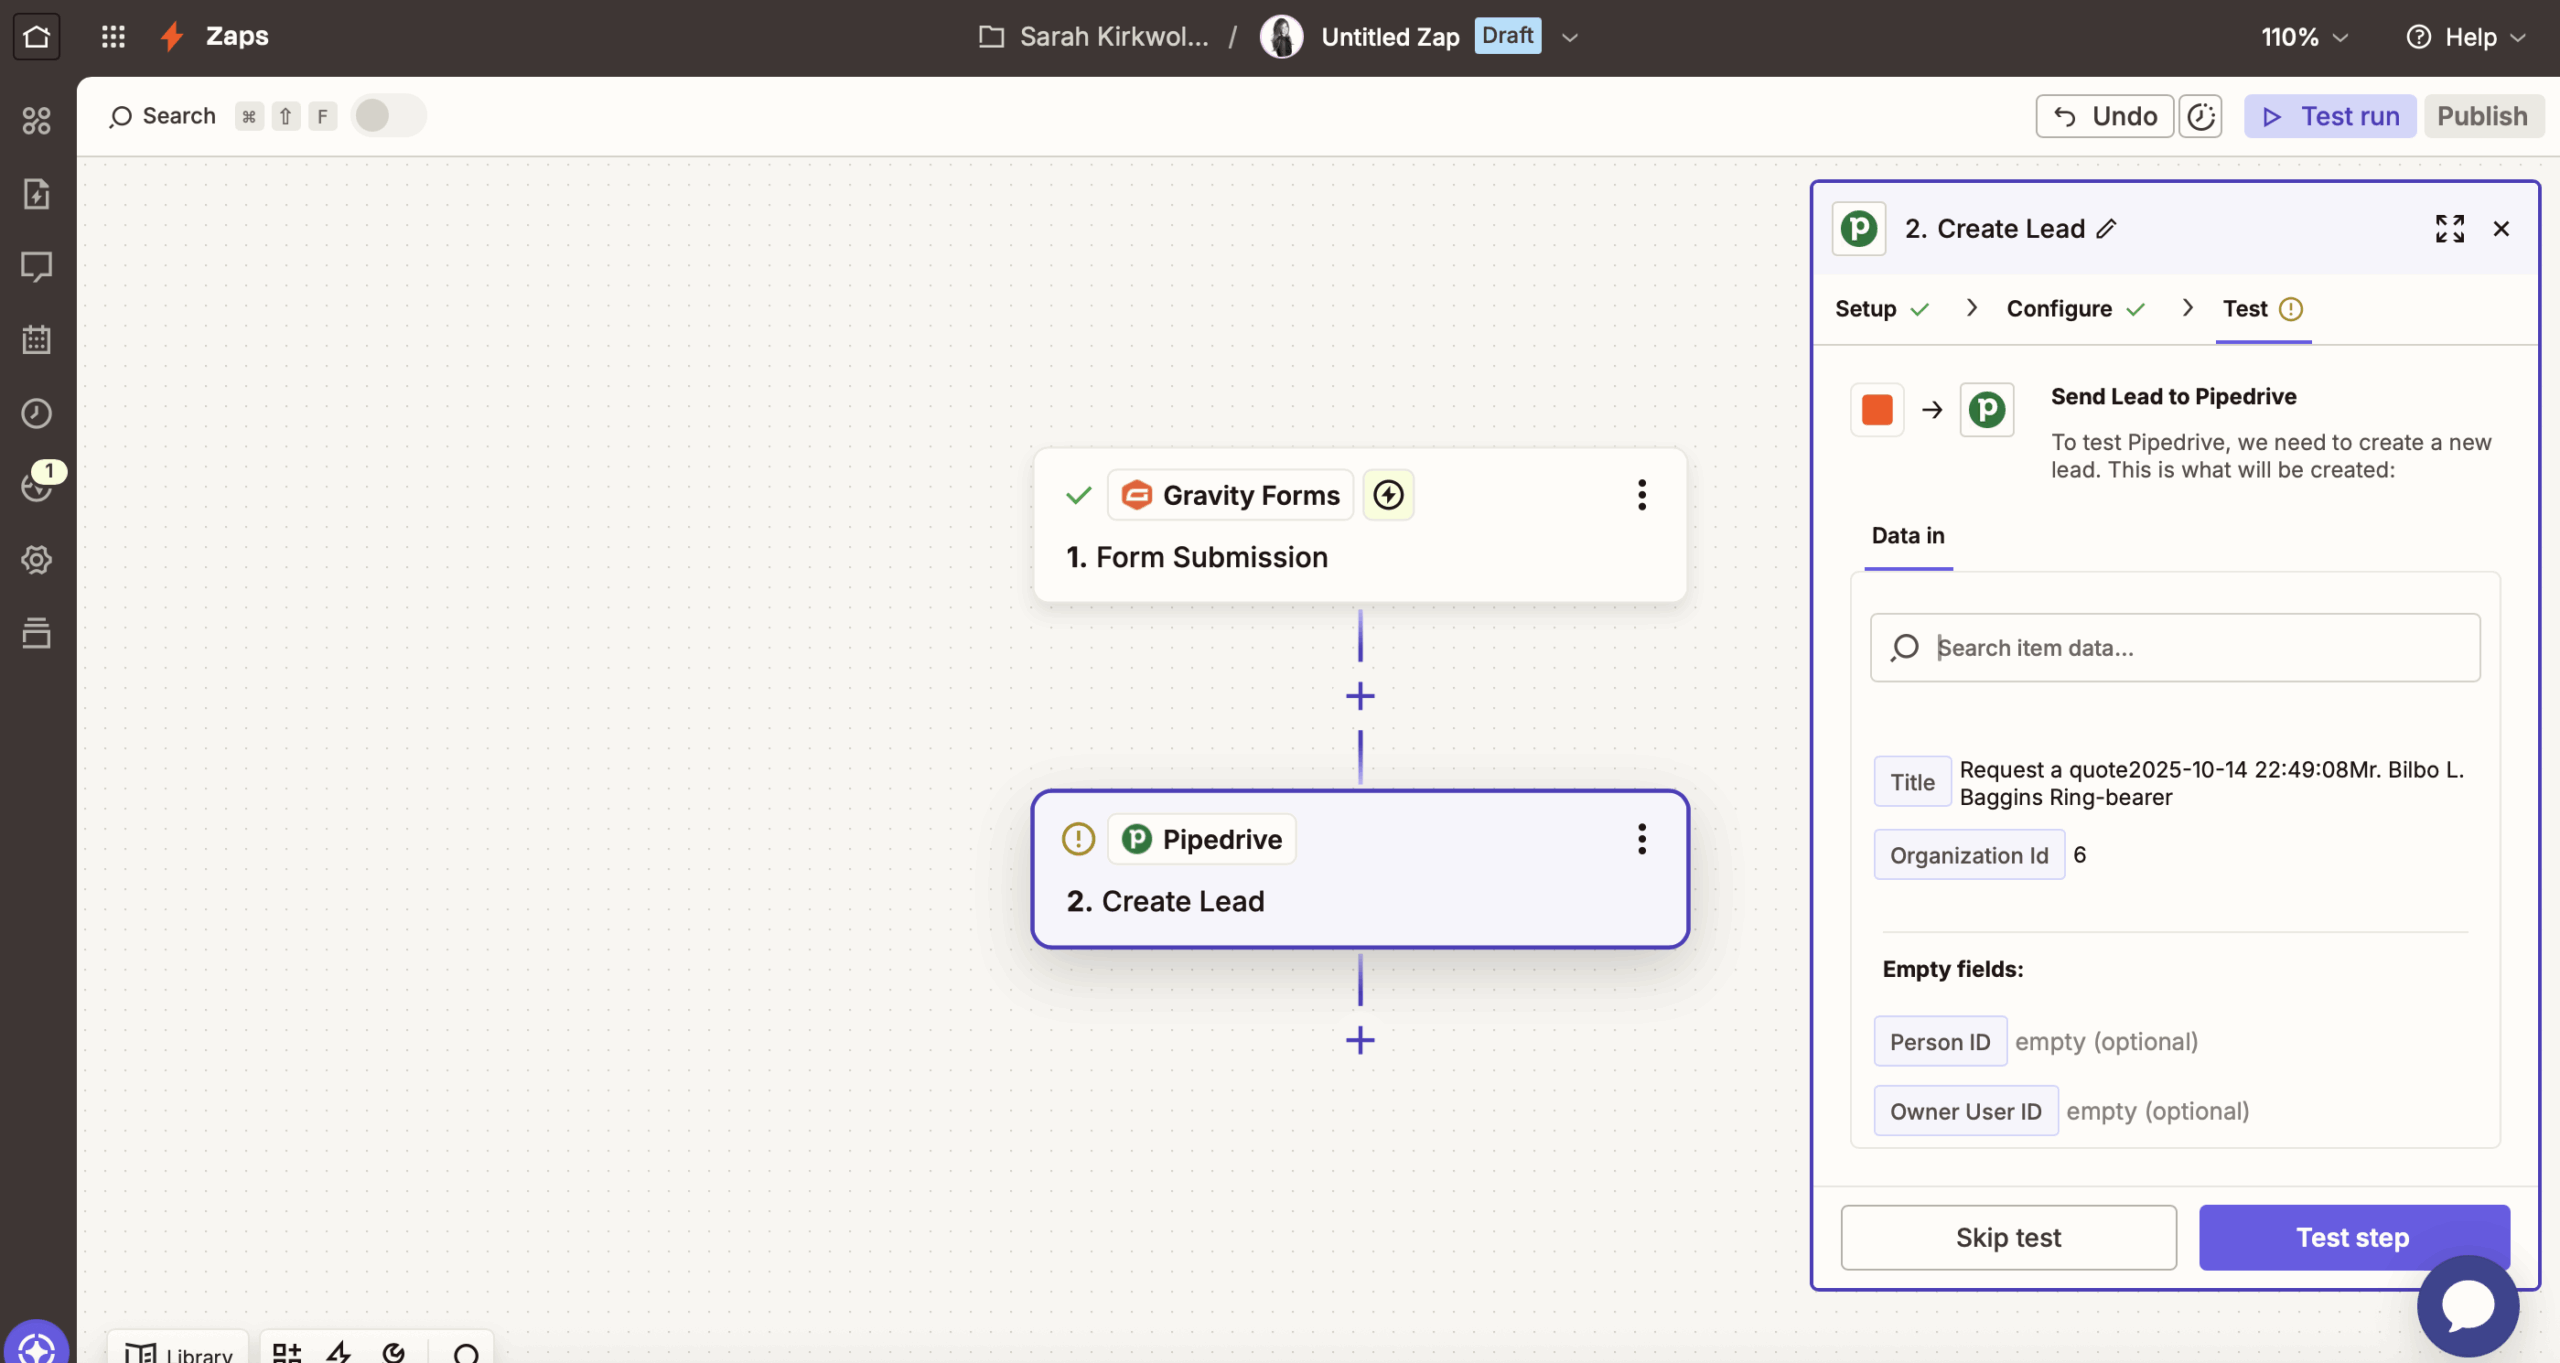
The main requirement here is to click Title and select the Gravity Forms values that will appear in the title of your Lead entry in Pipedrive.
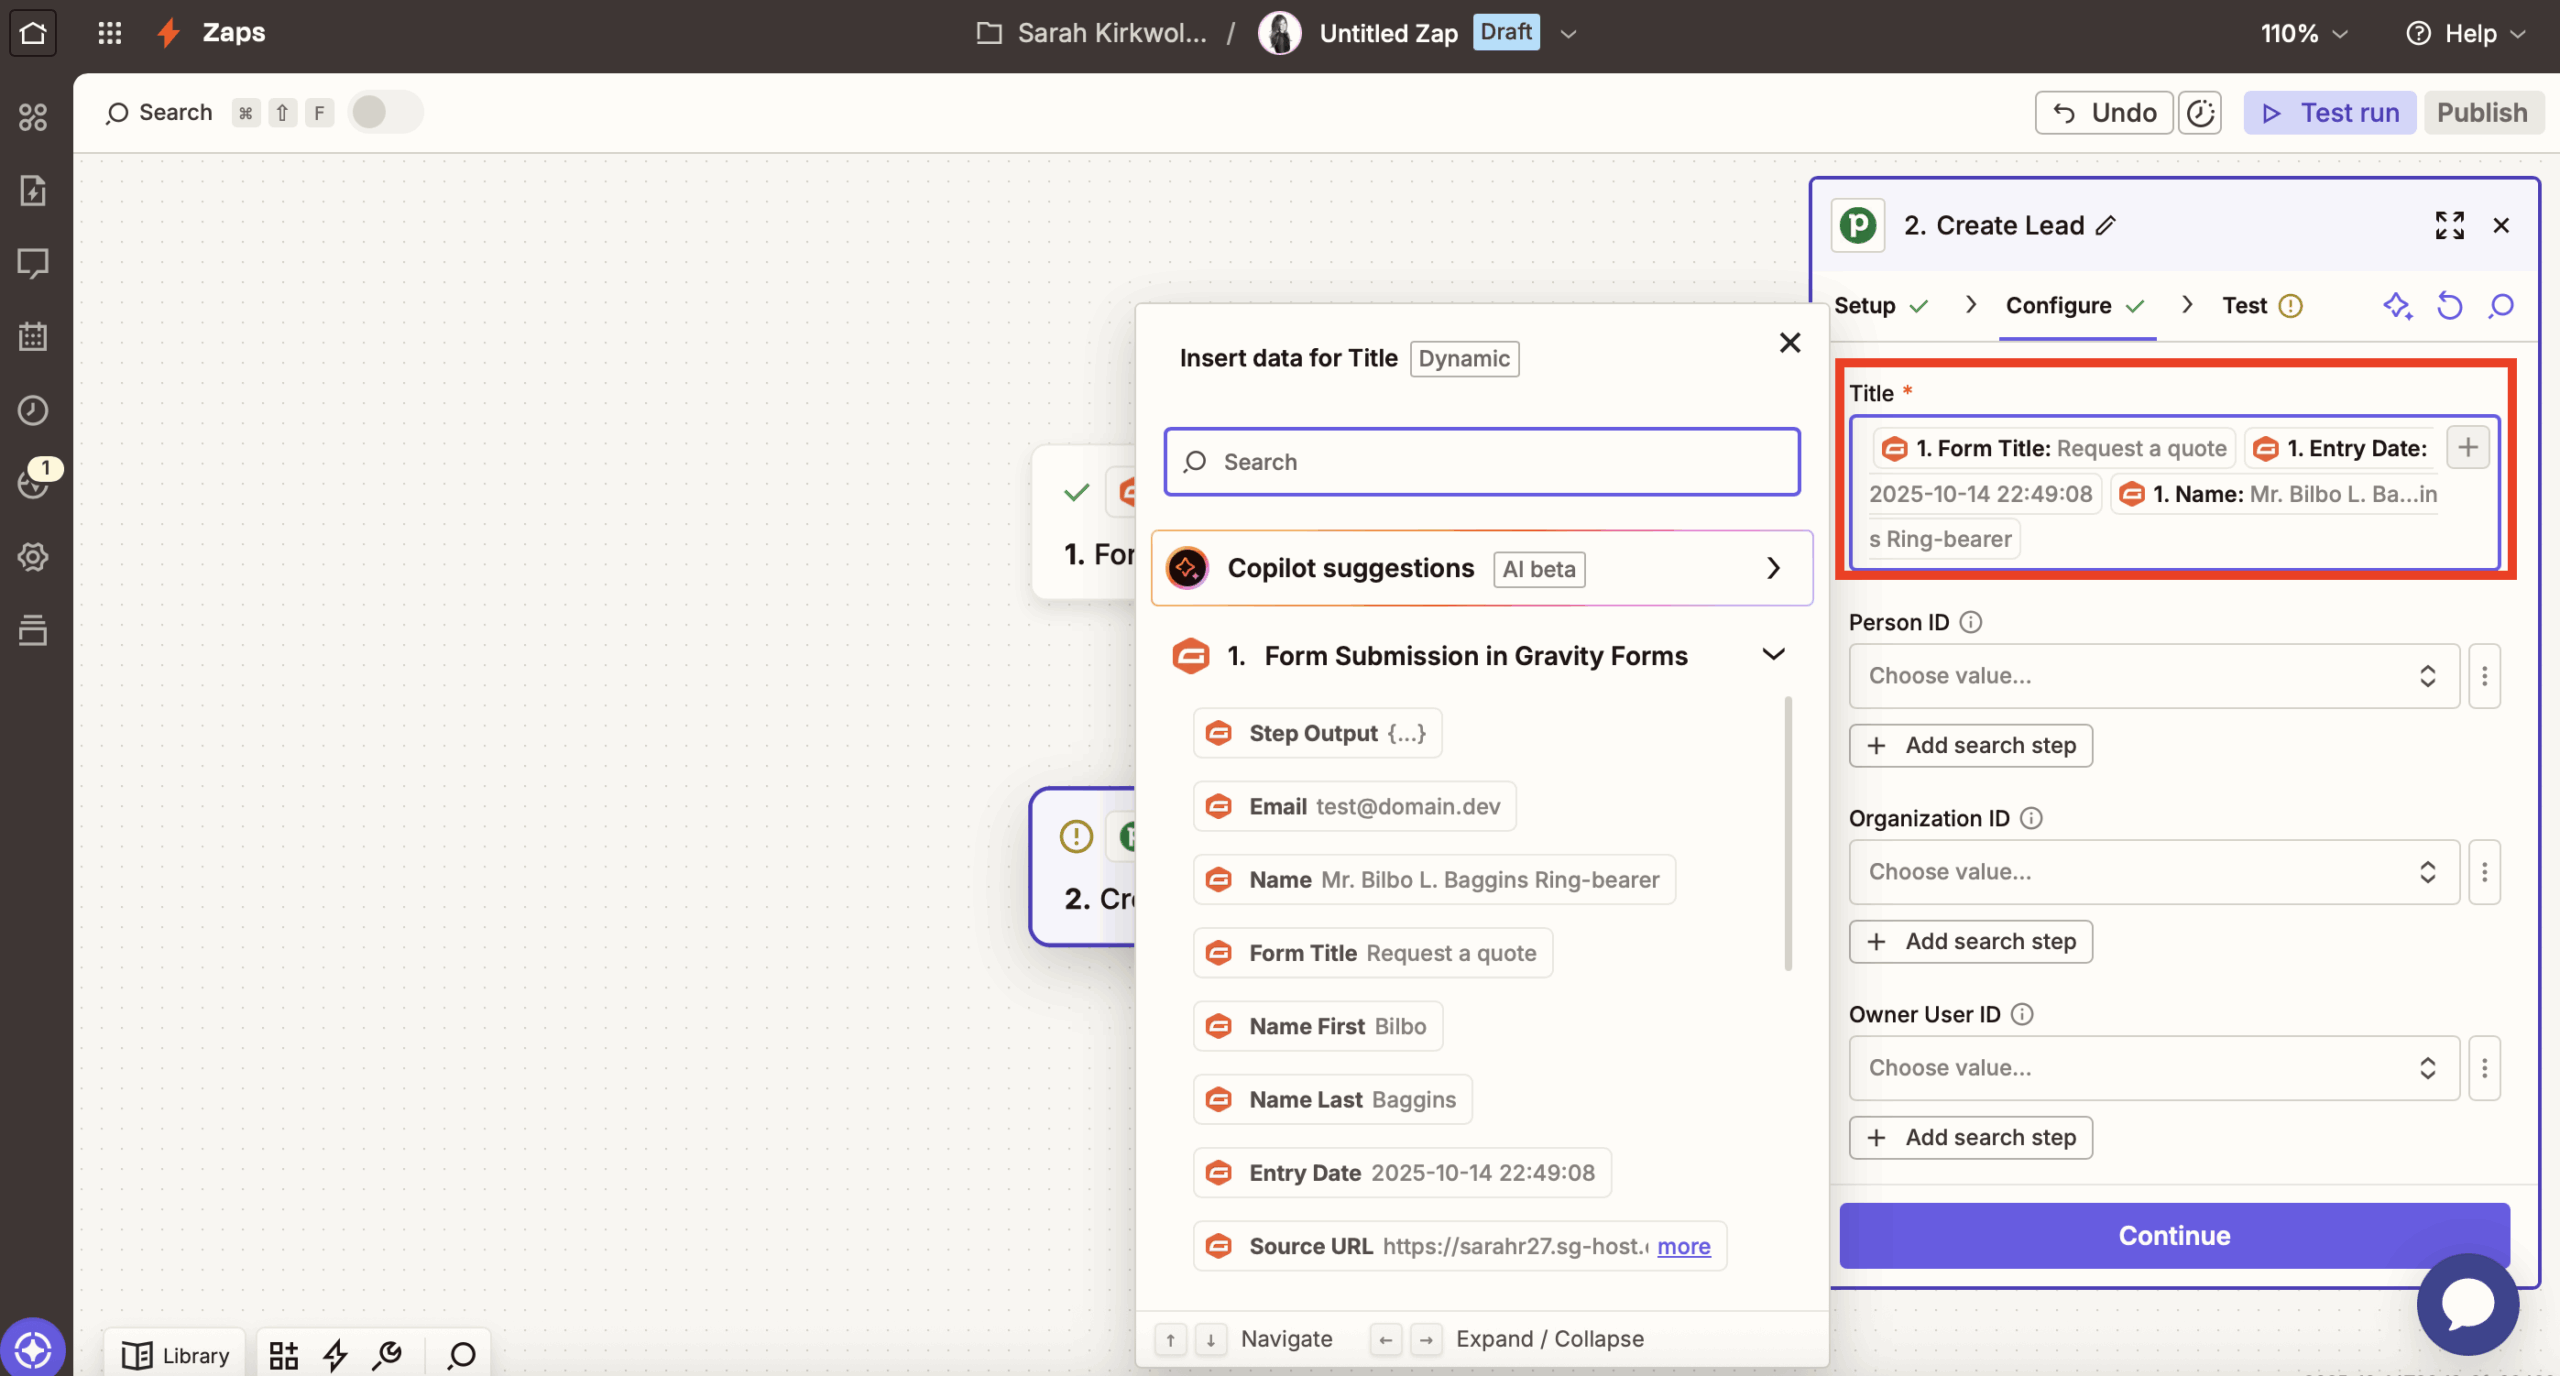
Note: If all of the submissions from this particular form should be associated with one Organization (i.e. your business), you’ll want to create that Organization in Pipedrive first and then come back and select it under Organization ID at this time, but this is optional.
Finally, you can submit a test to make sure the connection works:
Zapier will send some test data to your Pipedrive dashboard. In Pipedrive, you can confirm that the connection works because you’ll be able to see the test entries in your Leads Inbox.
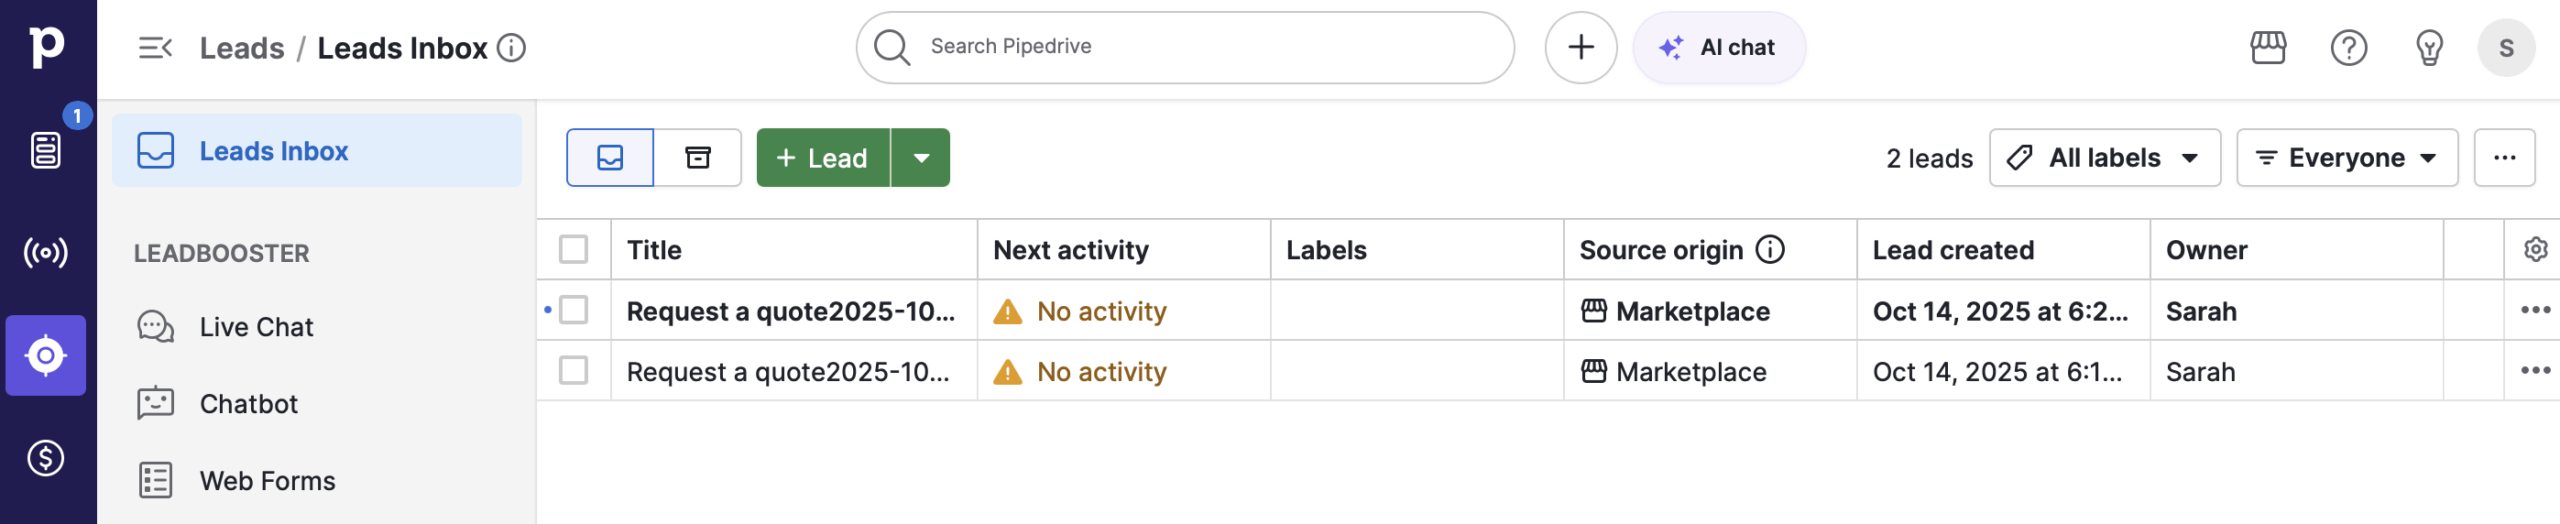
Note: If you’ve remained logged in to Pipedrive throughout the setup process, you may need to refresh your Pipedrive window in order to see the test entries.
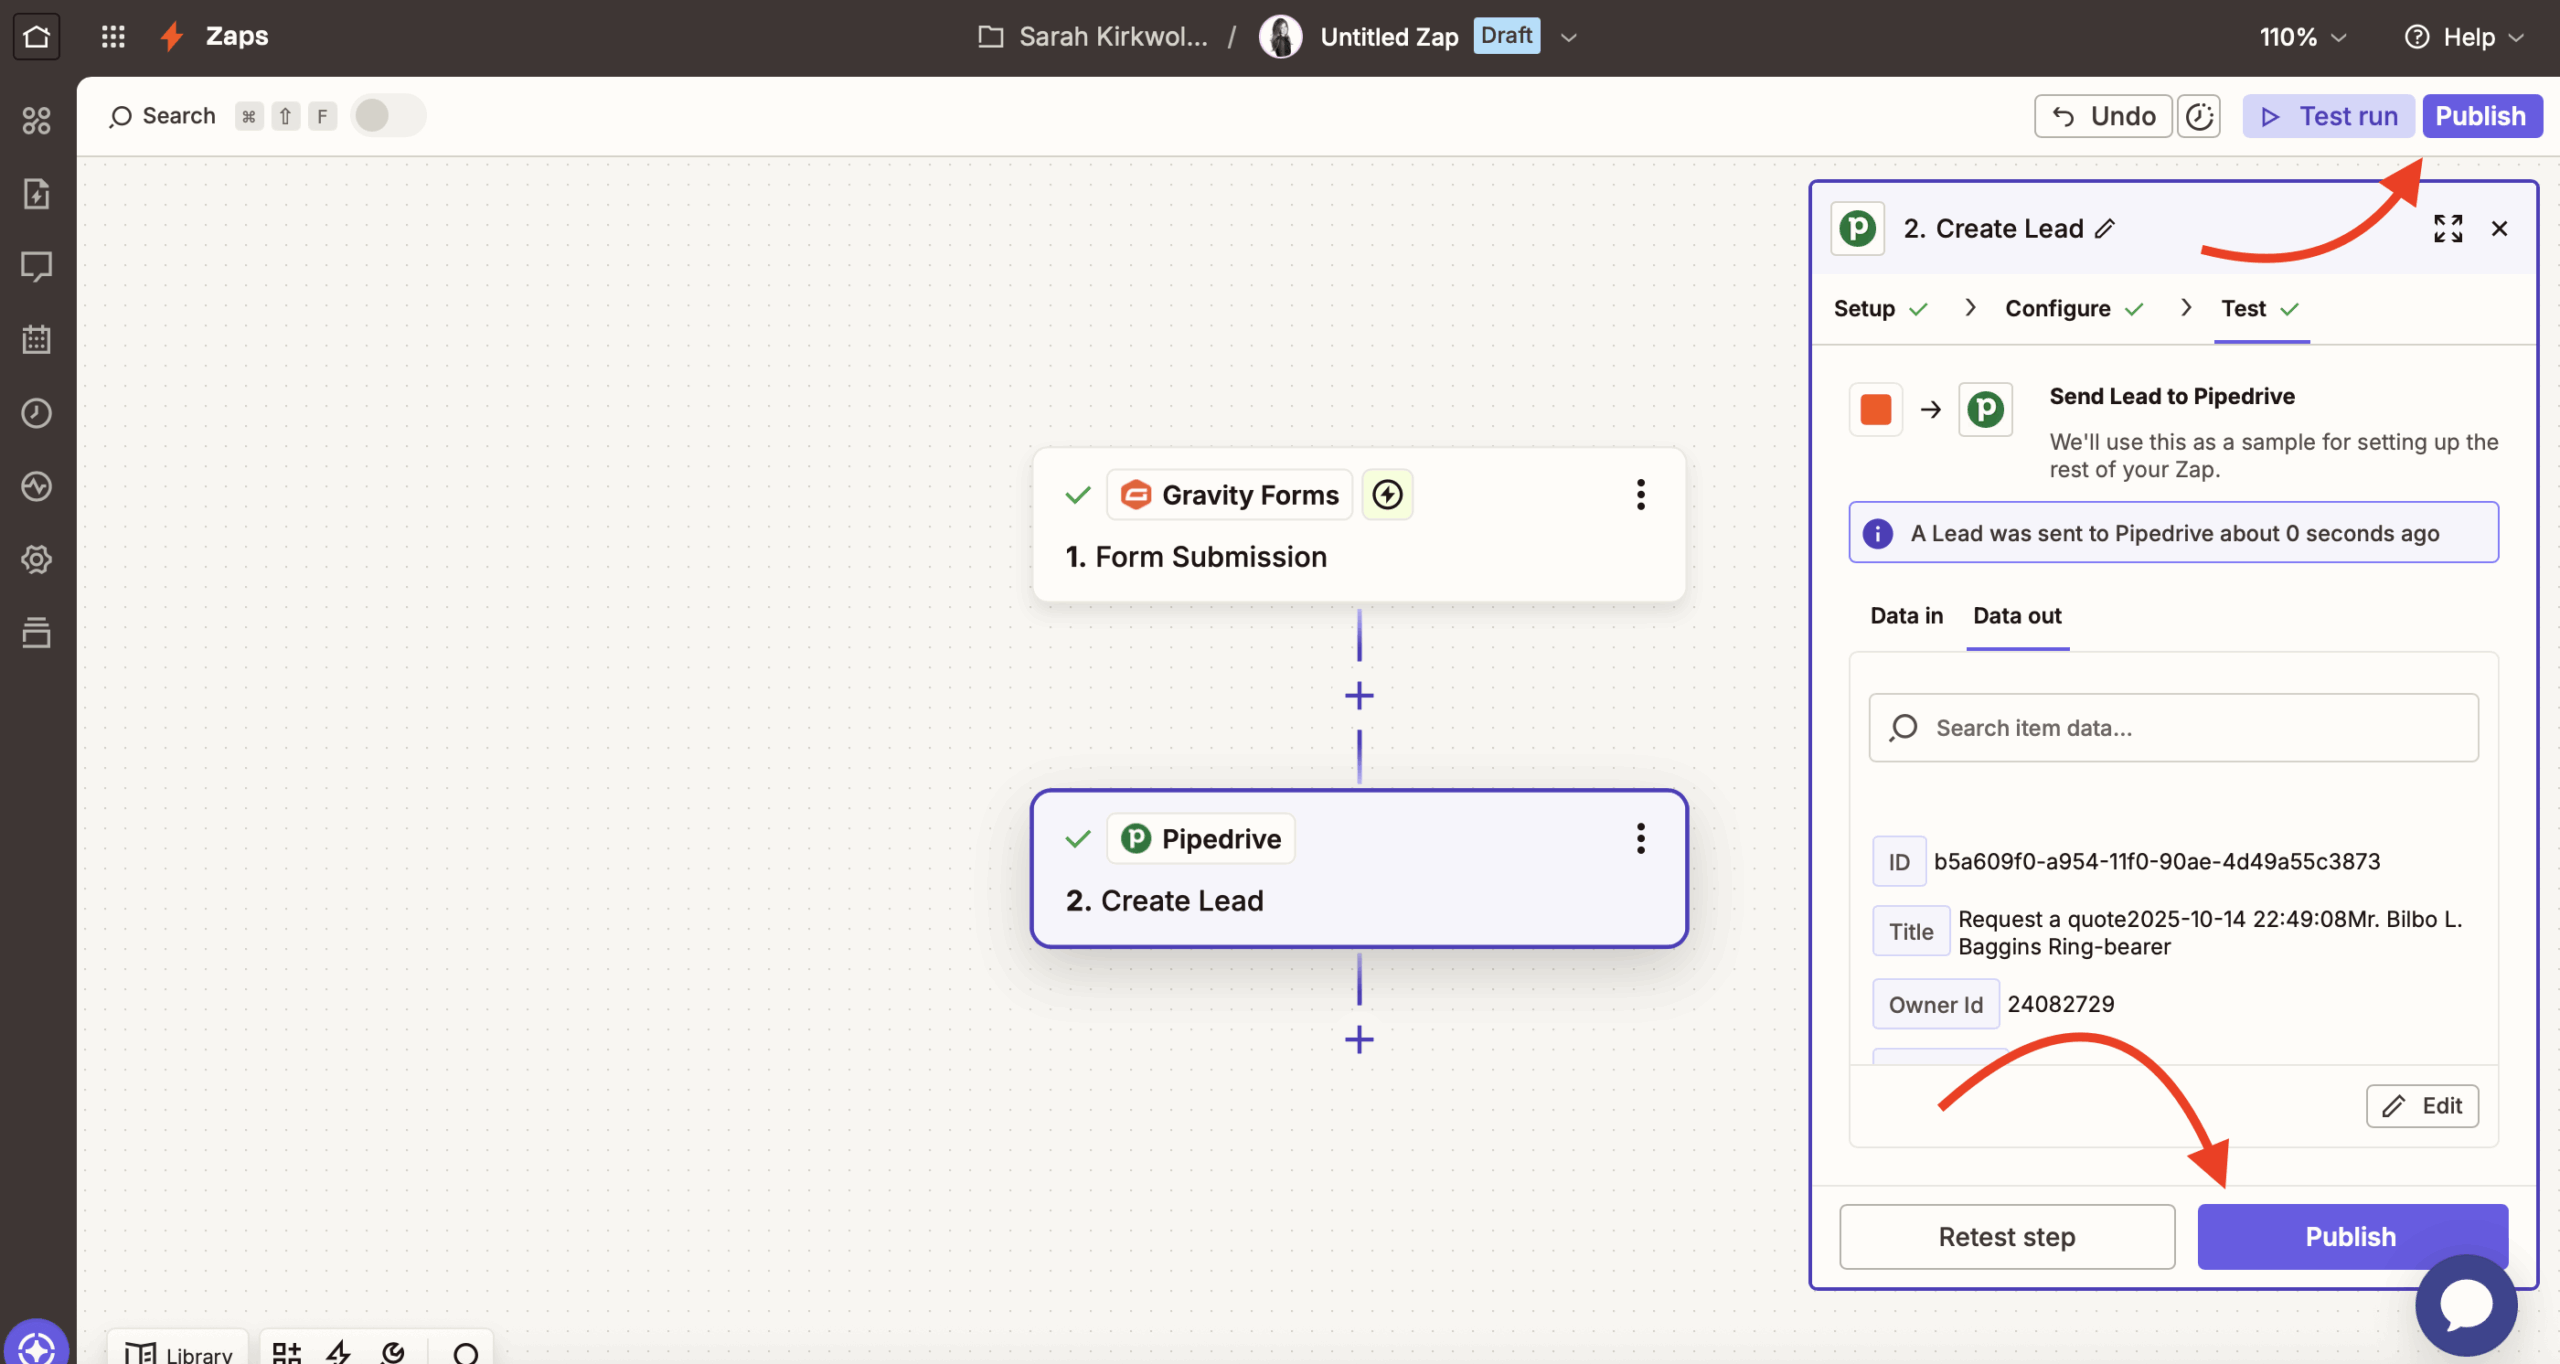
7. Publish your Zap
If everything looks good in Pipedrive, the last step is to enable the WordPress Pipedrive integration by clicking Publish.
Everything should work automatically from now on.
As people submit entries via your web form, Gravity Forms will automatically pass that information to Pipedrive according to the integration settings that you chose.
If you ever need to adjust or disable the integration in the future, you can do so from your Zapier dashboard.
Set up your Pipedrive WordPress integration today
With Gravity Forms and the official Gravity Forms Zapier Add-On, you can create customizable web forms that pass data to Pipedrive in a number of different ways.
You can create or edit deals, leads, organizations, and more. While we focused on creating a deal in this tutorial, you can easily adapt these same basic steps to other types of integrations, too.
If you’re ready to connect WordPress to Pipedrive, you have two options to get started:
- Purchase the Gravity Forms Pro, Elite, or Nonprofit license today to access the core Gravity Forms plugin, the official Zapier Add-On, and tons of other useful add-ons.
- Spin up a free, fully functioning Gravity Forms demo site to test this method before you buy. This demo site includes the Zapier Add-On, so you could use it to test out the Pipedrive integration before making your final decision.
Newsletter
If you want to keep up-to-date with what’s happening on the blog sign up for the Gravity Forms newsletter!
"*" indicates required fields


