

Need to create a quote request form for your agency, business, or freelance services?
With WordPress and Gravity Forms, you can easily create a custom request a quote form that meets your unique needs.
You can simply collect information from potential customers and then manually respond with a quote. Or, for more standardized work, you can use Gravity Forms’s calculation functionality and your own formulas to generate accurate real-time quotes.
Depending on what you’re looking for in your form, you could even accept payment right there from the quote form. That’s totally optional, though. Again, the advantage of using Gravity Forms for your request a quote form is that you can set up everything exactly as you want it.
In this post, you’ll learn step-by-step how to use Gravity Forms to set up your own customizable quote request form – zero code needed!
Why You Should Use WordPress and Gravity Forms for a Quote Request Form
The core advantage of using Gravity Forms to build your quote form is that it gives you the flexibility to set things up in the way that works best for your business, instead of trying to fit your business into a one-size-fits-all quote builder.
For example, you can choose whether you want to automatically calculate a quote based on the user’s inputs or manually reach out to them at a later date.
You can also integrate with all the other tools that you might be using, including customer relationship managers (CRM), project management software, email marketing services, and more.
Here are some of the specific reasons that Gravity Forms works great for all types of quote forms:
- Drag-and-drop builder – you can build your form without code using a simple drag-and-drop builder.
- Conditional logic – you can use conditional logic to show/hide fields based on how people have filled out your quote form. This helps you keep your form streamlined while still letting you collect all the information that you need to generate an accurate quote.
- Flexible calculations – you can perform simple or complex mathematical calculations to automatically generate an accurate quote based on the project details that the person entered in your form.
- CRM integrations – you can automatically save people’s information to your CRM when they request a quote, which makes it easy to follow up and convert them into paying customers.
- Online payments – if you want to accept payments as part of your form, you can easily process one-time or recurring payments using 6+ different payment providers.
- Tons of other integrations – Gravity Forms also offers dedicated integrations for tons of other tools including email marketing services, project management tools, Slack, and more.
- Zapier and webhook support – if you can’t find a dedicated integration, Gravity Forms also supports Zapier and webhooks so that you can connect to pretty much any tool that your business is using.
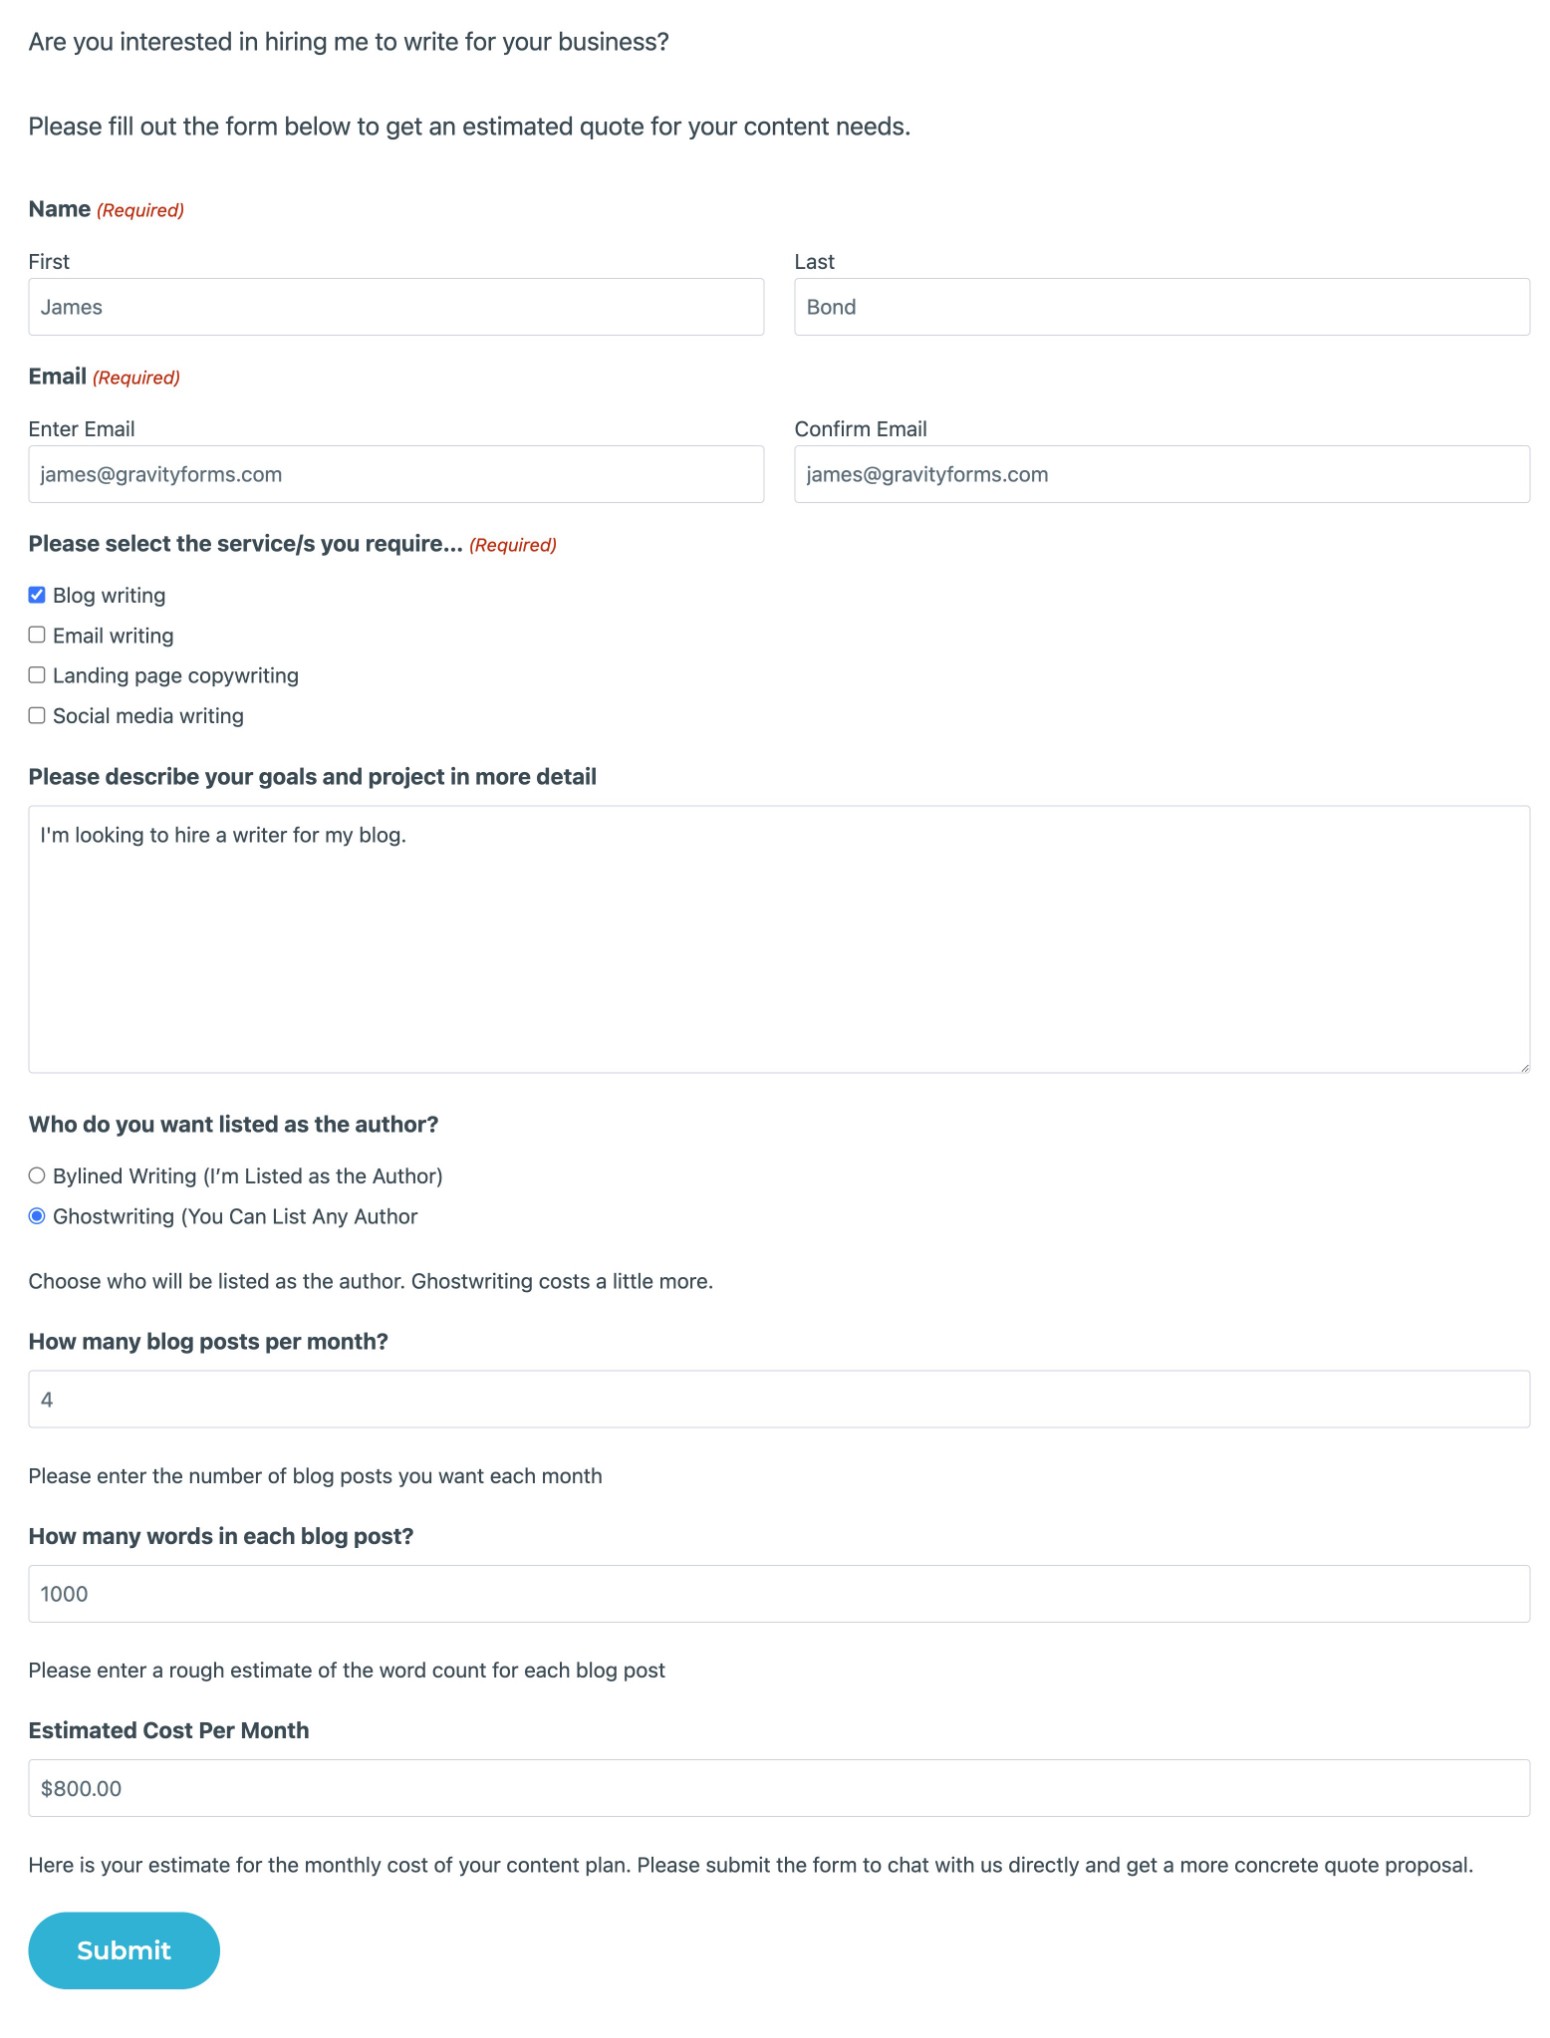
Here’s an example of using real-time calculations to calculate an accurate quote for a freelance writing project:
Gravity Forms can also work for all different types of businesses:
- Freelancers – if you’re a solo freelancer, creating a request a quote form can help you streamline your interactions with potential new clients and make it easy for them to get information about your pricing.
- Agencies – you can easily create a form to provide potential clients with pricing information and onboard them into your systems. And because Gravity Forms has so many integrations, you can easily connect your quote form to other services that your agency relies on including your CRM, project management tools, Slack, and so on. Learn how Gravity Forms can help agencies grow.
- Brick-and-mortar businesses – these types of quote forms can also work great for local service providers in industries such as plumbing, electrical, pool cleaning, and so on. Customers can easily request pricing information about your services and you can also connect to other services that your business is using (like your CRM).
How to Create a Request a Quote Form on WordPress
Now, let’s get into the actual step-by-step guide for how to set up your own quote form.
To make this guide as useful as possible, we’ll include some optional steps to give you more flexibility for setting up your form.
For example, if you want to accept online payments right from your form, we’ll show you how to do that. We’ll also show you how to use calculations and your own custom formulas to generate real-time custom quotes.
However, you’re never forced into making these configurations. If there’s a certain feature that you don’t need, you’re free to skip it.
1. Set Up Your WordPress Site and Install Gravity Forms (If You Haven’t Done So Already)
If you already have a WordPress site, you can skip ahead to the next step.
If you don’t have a WordPress site yet, however, you’ll need to set one up before you can create your quote request form. You can use any self-hosted WordPress site or you’re also free to use the WordPress.com Creator plan.
Once you have your WordPress site, you’ll also want to install the core Gravity Forms plugin. You can purchase your Gravity Forms license here.
For a simple request a quote form, you’ll probably be fine with the Gravity Forms Basic license. However, if you want to accept online payments, you’ll want to purchase at least the Pro license.
2. Create a New Form
Once you’ve installed Gravity Forms, you can jump straight into creating your quote request form.
To begin, go to Forms → New Form in your WordPress dashboard.
To save time, you can choose the premade Request a Quote Form template that Gravity Forms offers – you’re still free to 100% customize everything to your needs.
Or, you’re always free to choose the Blank Form template to start from scratch
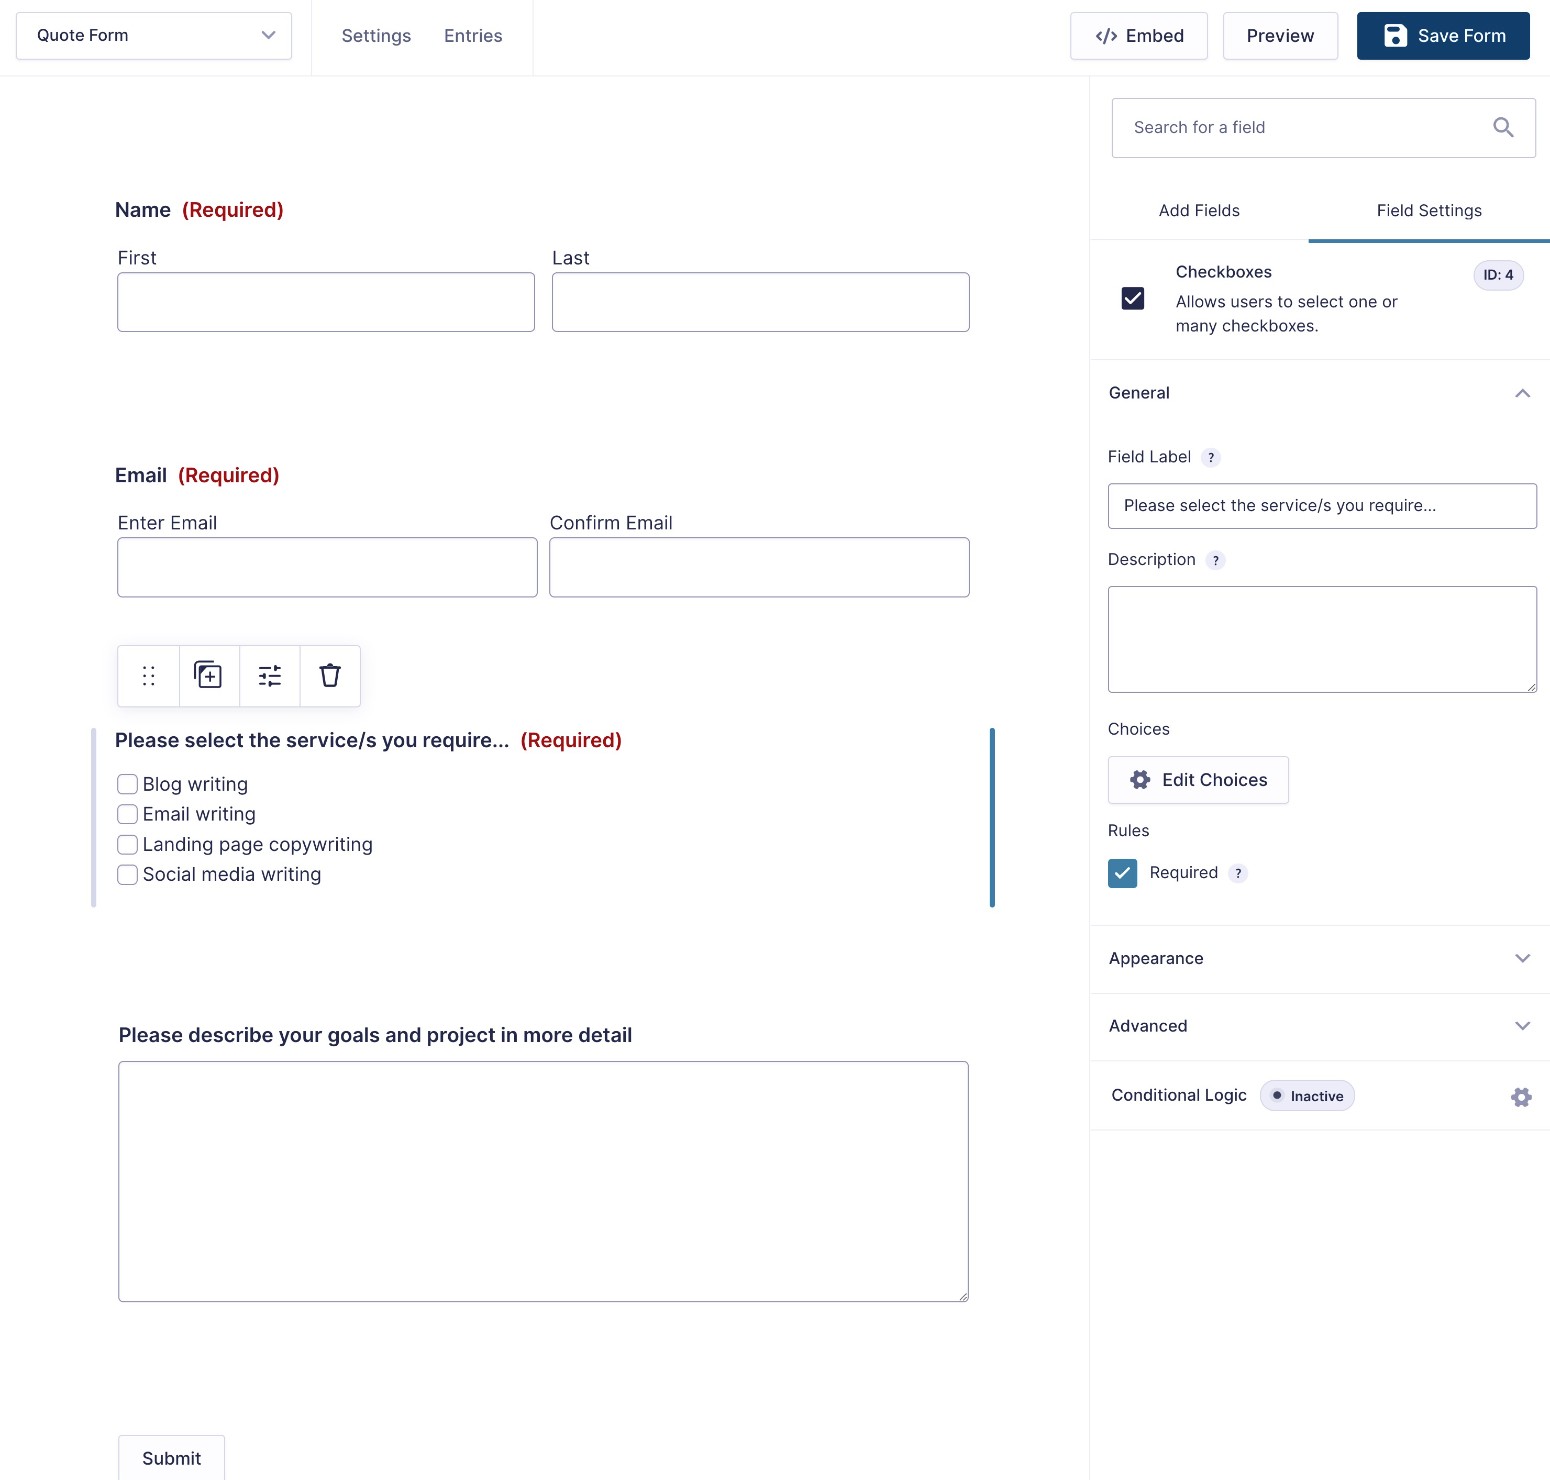
3. Add Form Fields for All the Important Information That You Want to Collect
Now, you can use the drag-and-drop form builder to set up all of the form fields that you need to generate your quote.
You’ll want to collect basic contact information (name, email, phone number, etc.) as well as more specific information that you need to generate the quote.
For in-person services, you’ll also probably want to collect the person’s address information. However, you’ll probably want to delete the Address field from the template if you only offer digital services.
You could use Number fields to collect specific quantitative information.
For example, if you have a pool cleaning service, you could ask people to enter the dimensions of their pools. Or, if you’re a freelance blog writer, you could collect information about the number of blog posts the person wants per month and the word count of each blog.
Or, it could be more qualitative information, such as adding a Paragraph Text field that lets users describe their projects.
Or, it could be a mix of both! That’s probably the case for most quote forms, as you’ll want to get a full picture of what the person is looking for.
4. Set Up Calculations and Formulas for Real-Time Quotes (Optional)
If your plan is to manually reach out to customers with a custom quote after they submit the form, you probably don’t need to use calculations and you can skip ahead.
However, if you want to generate a real-time quote based on how someone filled out the form, Gravity Forms’s calculation functionality gives you a lot of flexibility to set that up.
You could display the final quote number directly in the form. Or, you could automatically send it in a notification email after the person submits the form.
If you want to explore this in detail, we have a whole Gravity Forms calculations tutorial. Here are the highlights, though…
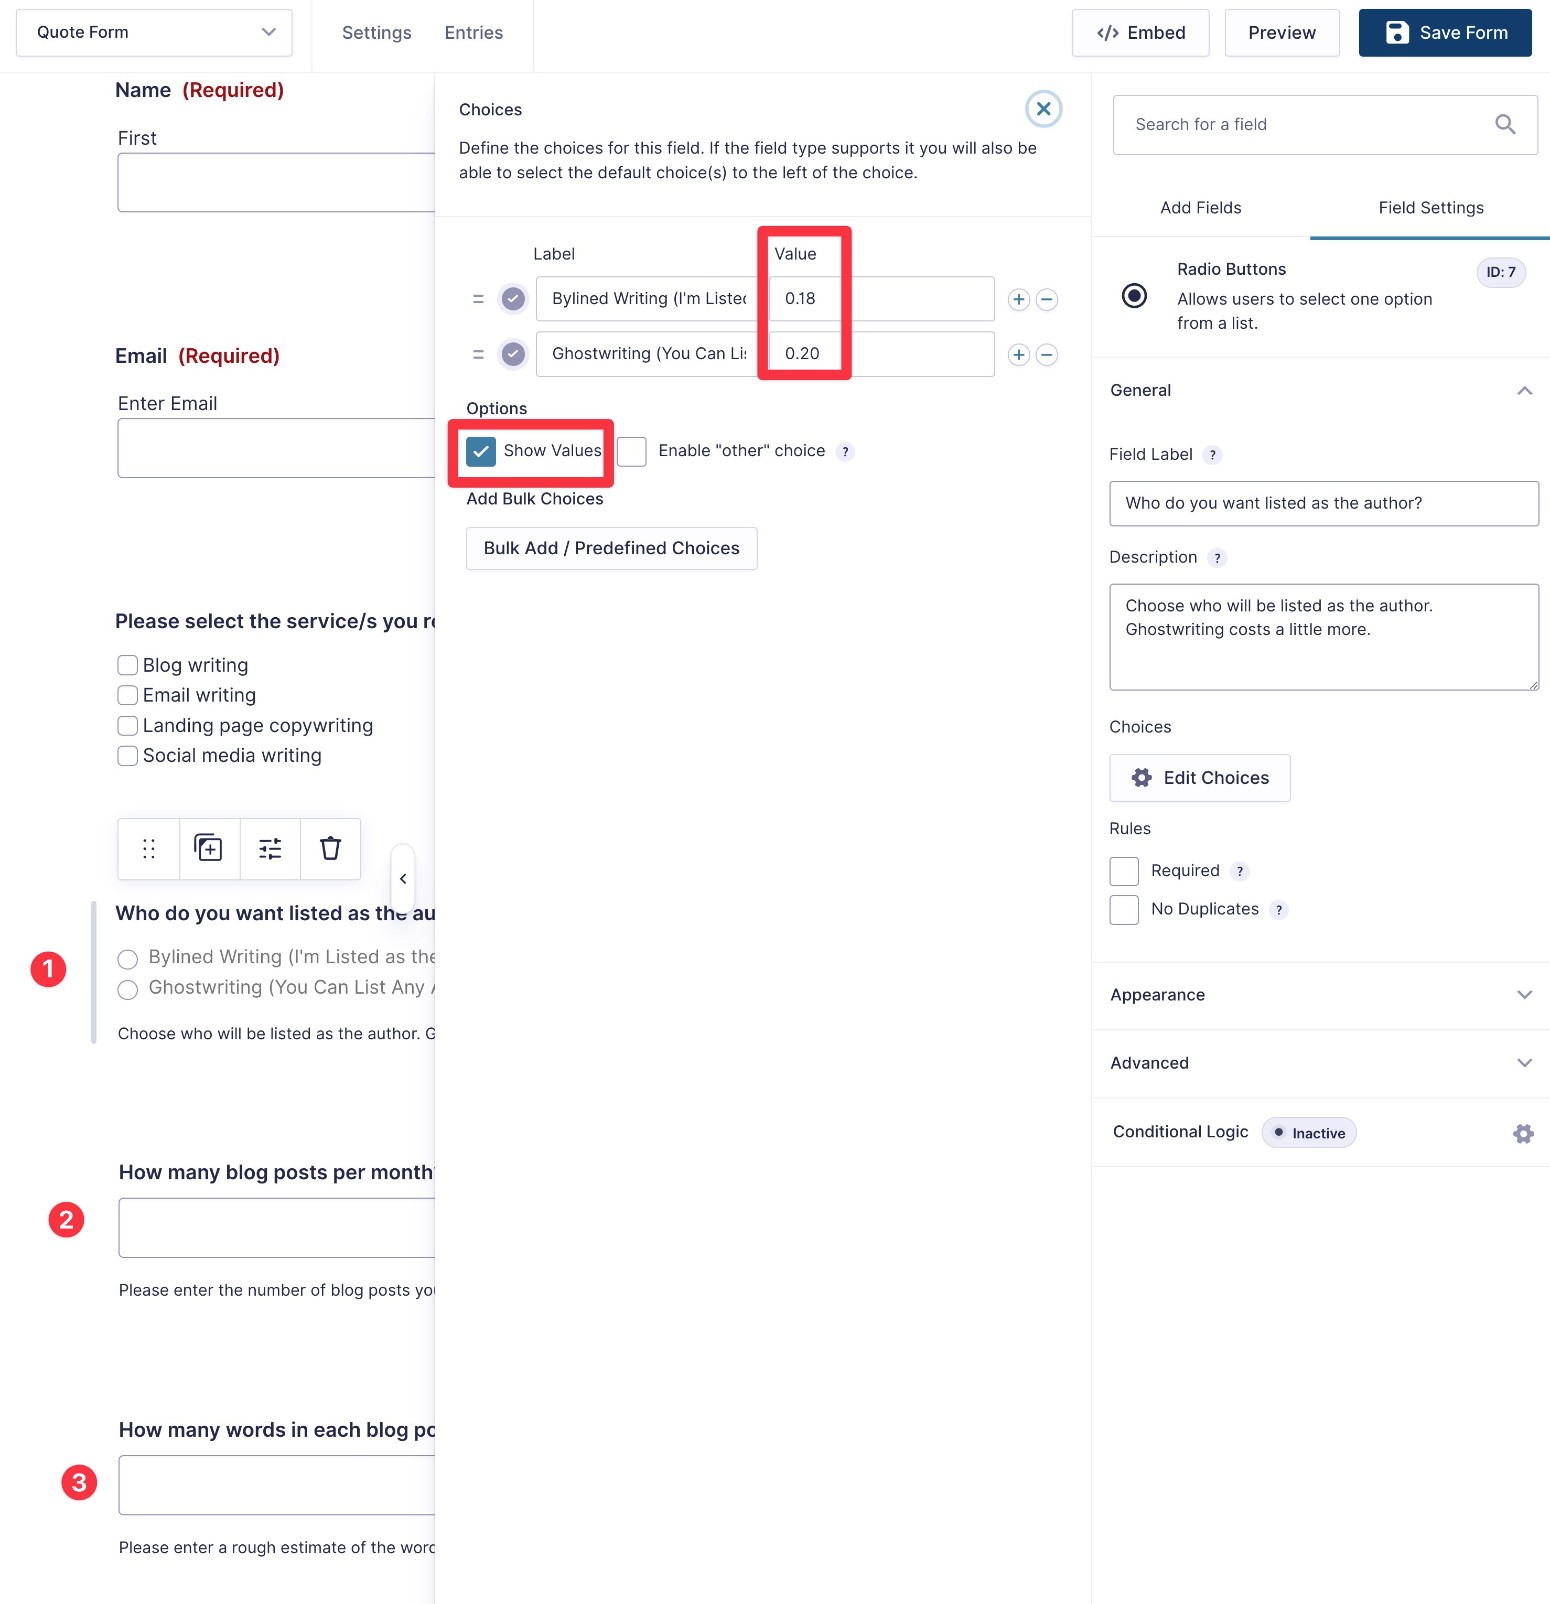
First, you’d want to create form fields to collect all of the information that you need to calculate the quote.
For example, let’s use the example from our calculation guide and say that you’re a freelance writer creating a quote form that generates a quote price based on three variables:
- Whether the person wants the content to be ghostwritten ($0.20/word) or show the byline of the author ($0.18/word).
- The number of blog posts a customer wants to order.
- The estimated word count of those blog posts.
You would first need to add form fields to collect that information:
- Type of writing – use a Radio Buttons field and assign the per-word rate for each type as the value.
- Number of blog posts – Number field.
- Estimated word count – Number field.
Once you’ve added those fields, you can create another Number field to show the final results:
- Add the Number field to your form.
- Set the Number Format equal to Currency.
- Check the Enable Calculation box.
- Enter the formula to calculate the final price.
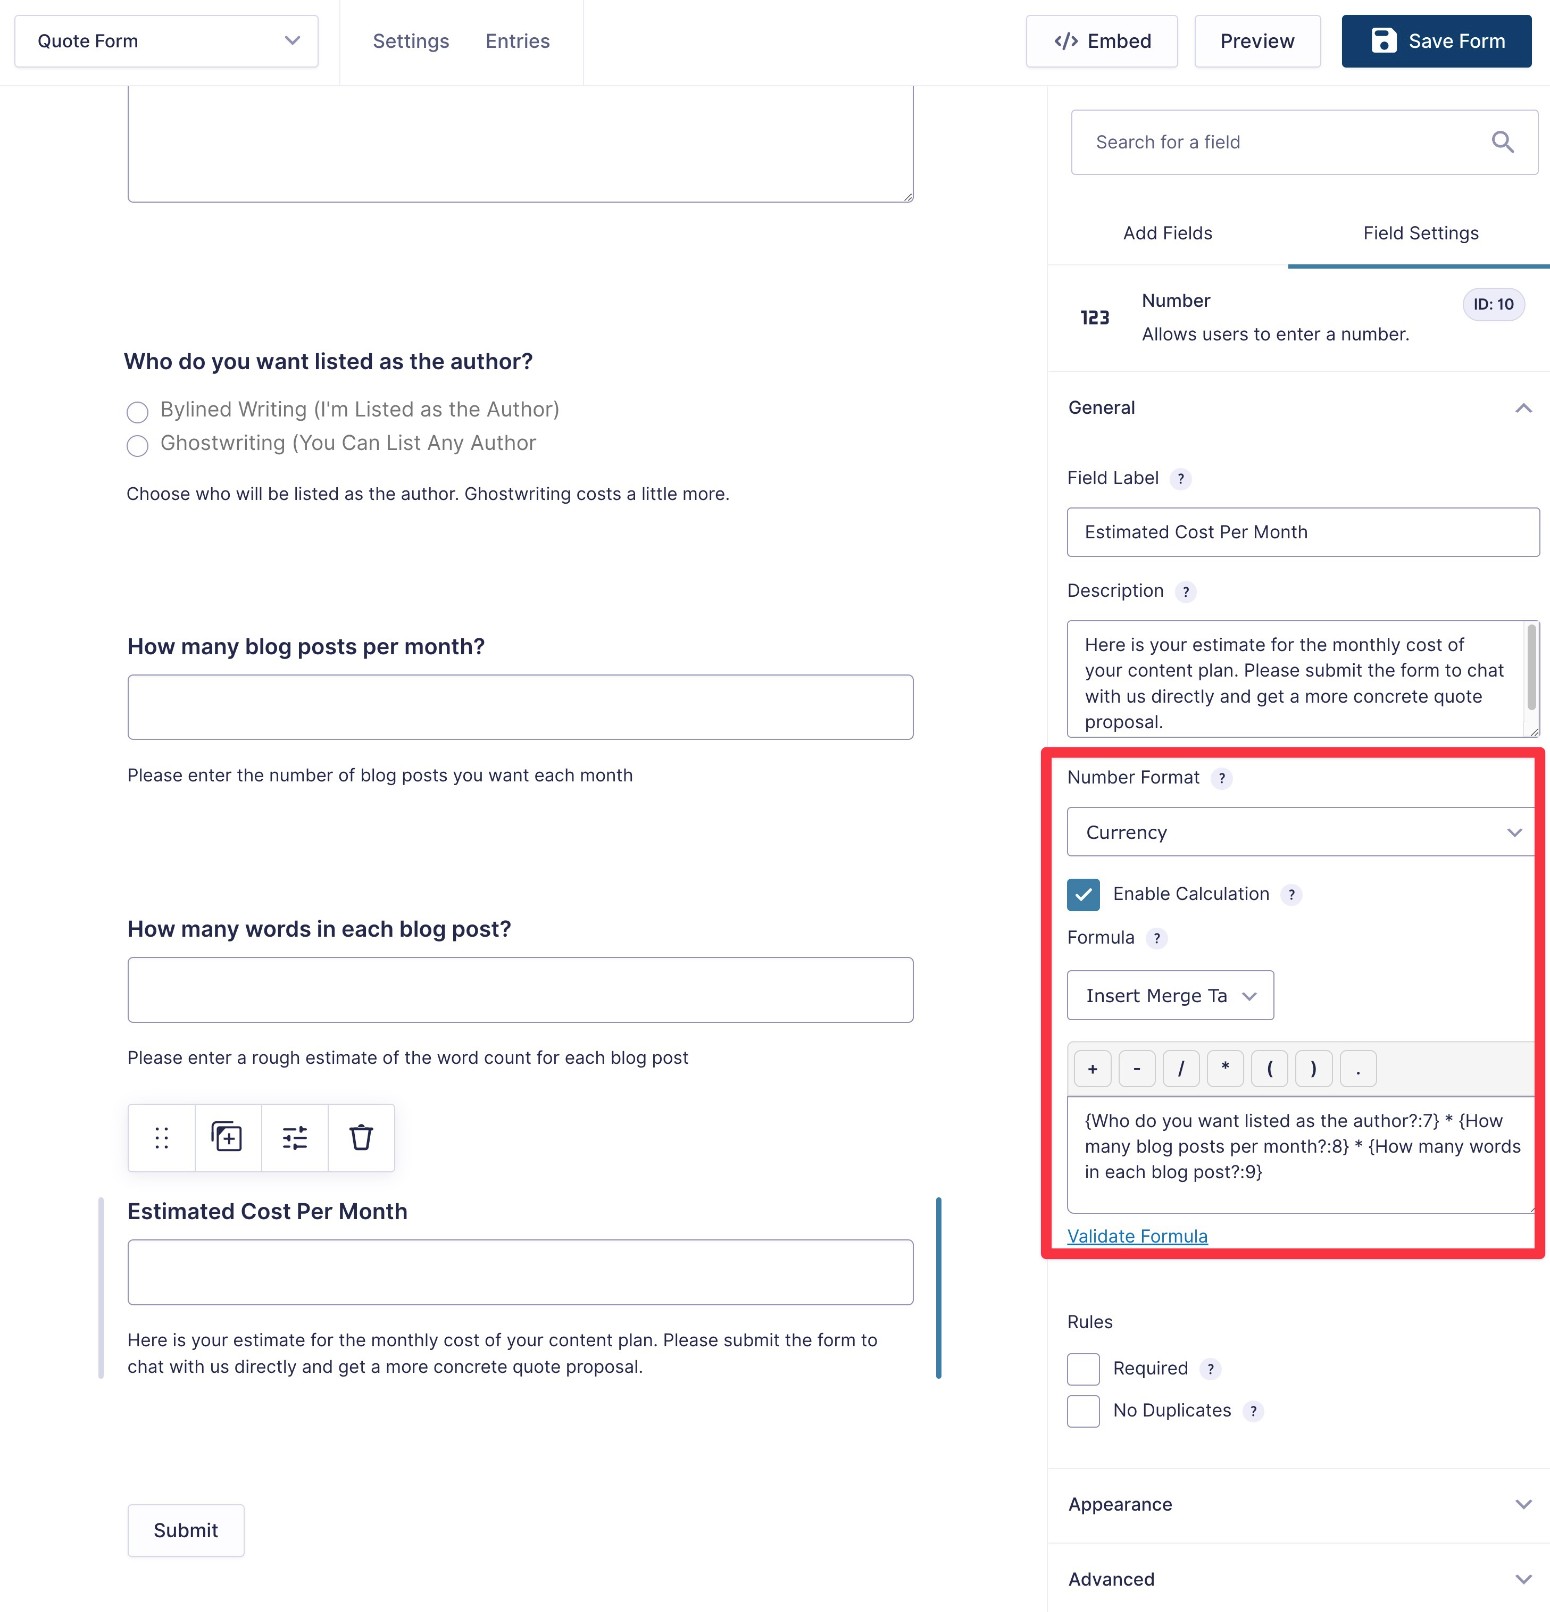
Once users enter the first three pieces of information, they’ll automatically see an accurate price in the box:
You could also make the calculated price field hidden on the form. You could then include the quoted price as part of an email notification that you send after the person submits the form.
5. Set Up Online Payments Functionality (Optional)
If you want to accept online payments as part of your quote form, you can do so using one of the 6+ payment processor add-ons that Gravity Forms offers.
This includes Stripe, PayPal, Square, and others – here’s a full breakdown of the different payment processors.
If you do want to accept online payments, we have several detailed posts that can help:
- Ultimate Guide to Gravity Forms Payments
- Gravity Forms and Stripe: Ultimate Guide to WordPress Payments
- Grow Your Business With Gravity Forms and Square: The Perfect Combination
- PayPal Checkout Featured Add-On Guide
You can also browse the documentation for the various payment providers that Gravity Forms supports:
- PayPal documentation
- Stripe documentation
- Square documentation
- Mollie documentation
- Authorize.net documentation
- 2Checkout documentation
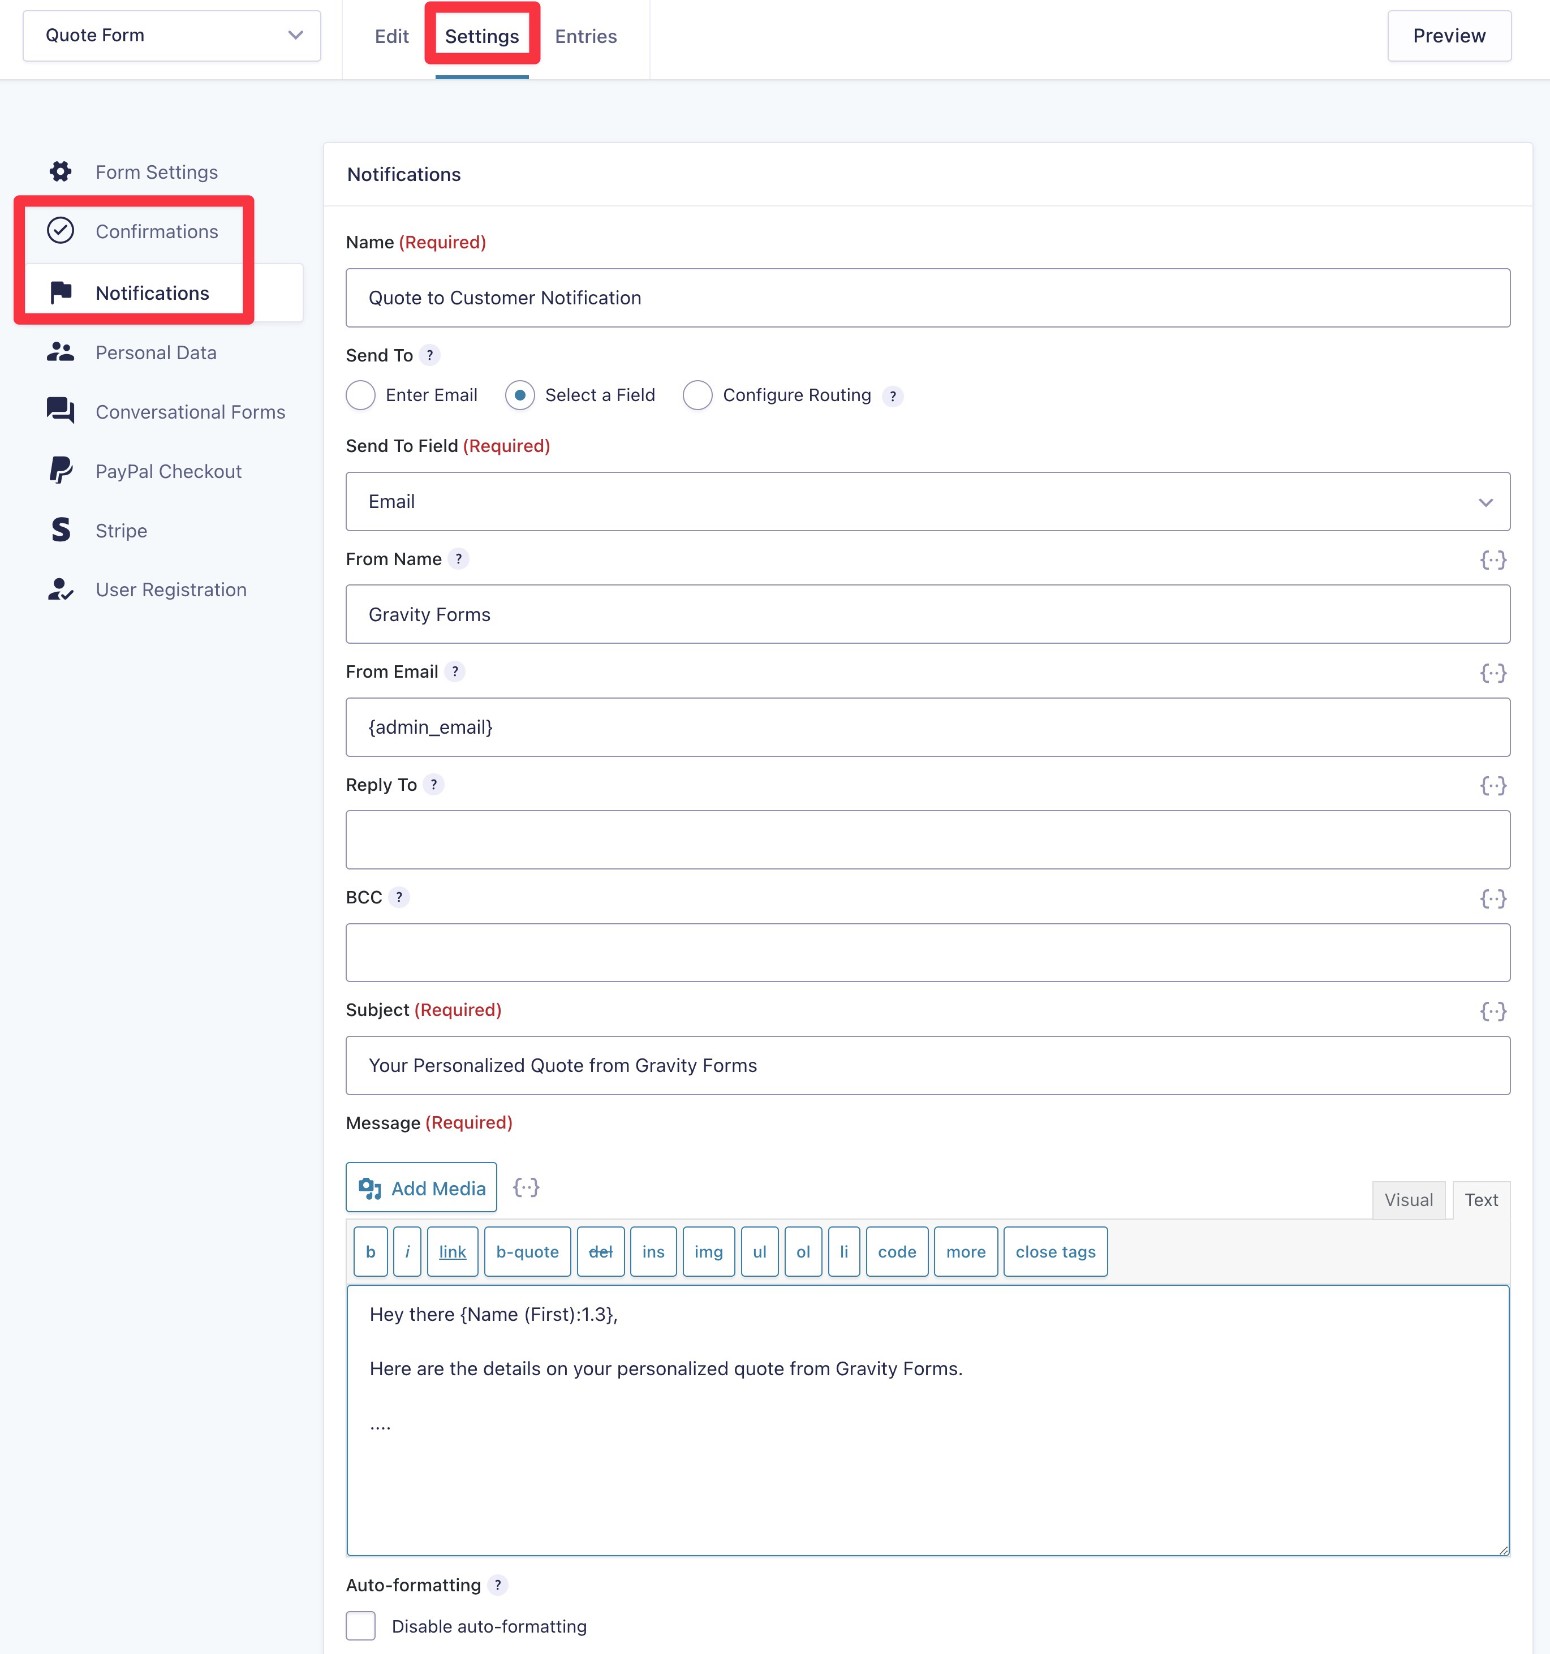
6. Set Up Notifications and Confirmations
After someone submits your quote form, you can utilize two types of content to further engage them:
- Notifications – these are emails that you can send to yourself, the person who submitted the form, and/or anyone else. For example, if you’re using calculations, you could include the customized quote amount in the email.
- Confirmations – this is a message that appears on your site after the person requests a quote.
You can set up both of these from the form settings area.
For example, you can manage your notifications by going to Settings → Notifications.
Beyond these built-in options, you can also use Gravity Forms add-ons to set up other types of notifications. For example, you could send yourself a Slack message or an SMS whenever someone requests a quote.
7. Set Up Other Integrations As Needed (Optional)
Another nice thing about using Gravity Forms for your quote request form is that you can also set up other types of integrations using the many available Gravity Forms Add-Ons.
Setting up additional integrations is totally optional. However, doing so can help you streamline your workflows and create a better experience for your potential customers.
Here are some examples of what you might want to set up:
- Add people who request a quote to your customer relationship manager (CRM). You could also apply different tags to customers based on the potential value of their projects.
- Create a task in your project management software (e.g. Trello). For example, if you need to manually create the quote, you could create a task so that you can stay organized.
- Subscribe people to your email newsletter. This gives you another way to connect with them after they request a form.
- Generate a PDF version of the quote. You could also automatically send this to people via email.
- Connect to apps via Zapier. If Gravity Forms doesn’t have a dedicated integration, you can use the catch-all Zapier Add-On to connect to other tools via Zapier.
You can also use Gravity Flow to build multi-step business process workflows on top of your quote request form. This can help you automate the entire process of creating quotes and onboarding new clients.
To get some ideas for what you can set up, you can browse all of the Gravity Forms Add-Ons here.
8. Embed Your Request a Quote Form and Test
At this point, you’re ready to embed your request a quote form on your site so that people can start reaching out to you.
To do this, you can edit an existing page or create a dedicated quote request page. Then, add the form using the Gravity Forms block or shortcode.
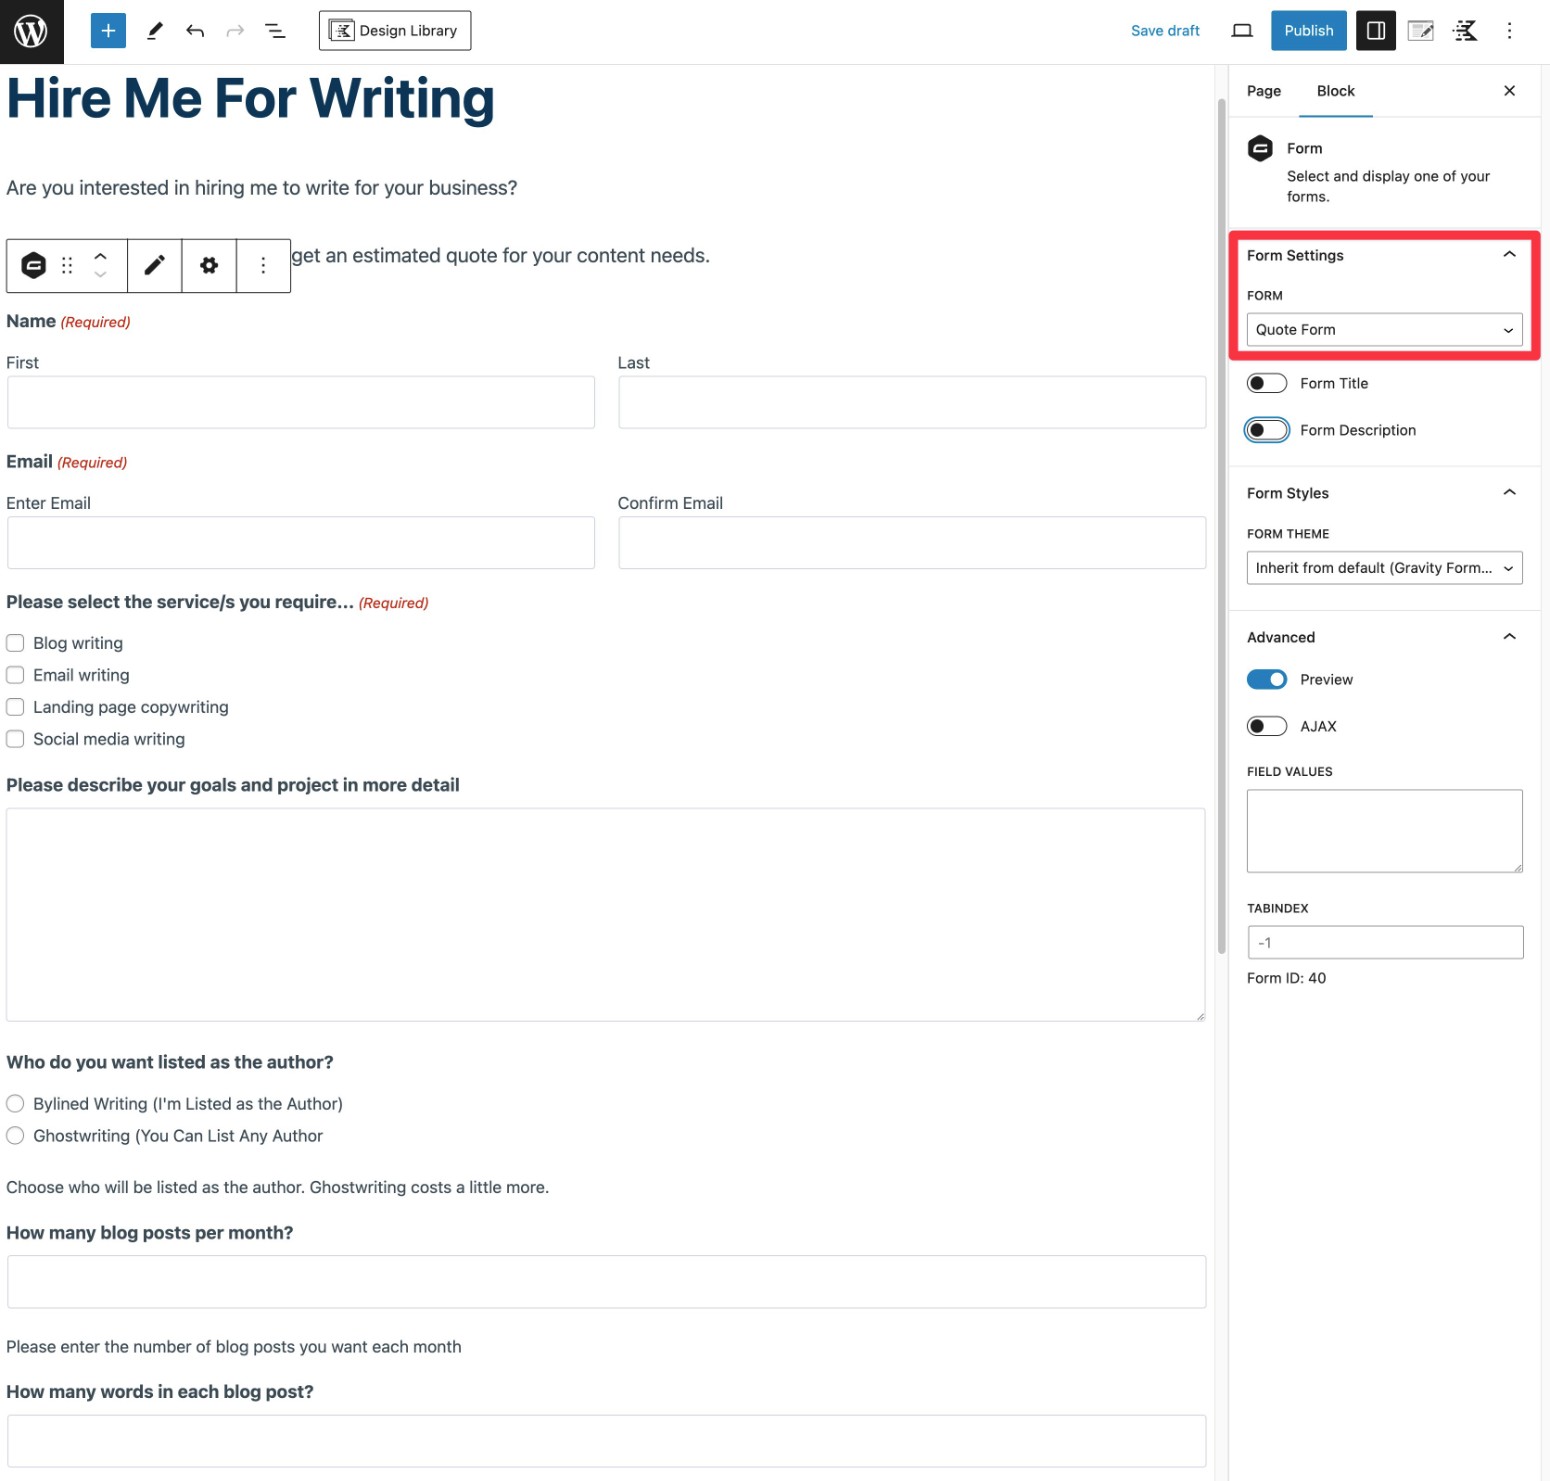
To ensure your form looks as you want on your web page or post, you can style the form directly within the block editor. For more information on how to do this, check out this article – How to Style Forms in Gravity Forms: Ultimate Guide.
Once you’ve published your form, we recommend testing it to make sure everything is working properly.
This is especially important if you’re using calculations to generate real-time quotes, as you’ll want to make sure your formulas are working properly.
Create Your Quote Request Form Today
That wraps up our guide on how to use Gravity Forms to create a quote request form for your business.
Whether you want to provide real-time quotes or follow up at a later time, Gravity Forms can help you get the job done – all while also integrating with the other apps and workflows that your business relies on.
If you’re ready to get started, purchase your Gravity Forms license today.
If you want to test out all this functionality before you make your purchase, you can also spin up a free, fully functioning demo site to try it out.

If you want to keep up-to-date with what’s happening on the blog sign up for the Gravity Forms newsletter!
"*" indicates required fields


