If you have a medical practice, creating a digital medical consent form can help you more easily collect consent from your patients, while also simplifying your own recordkeeping.
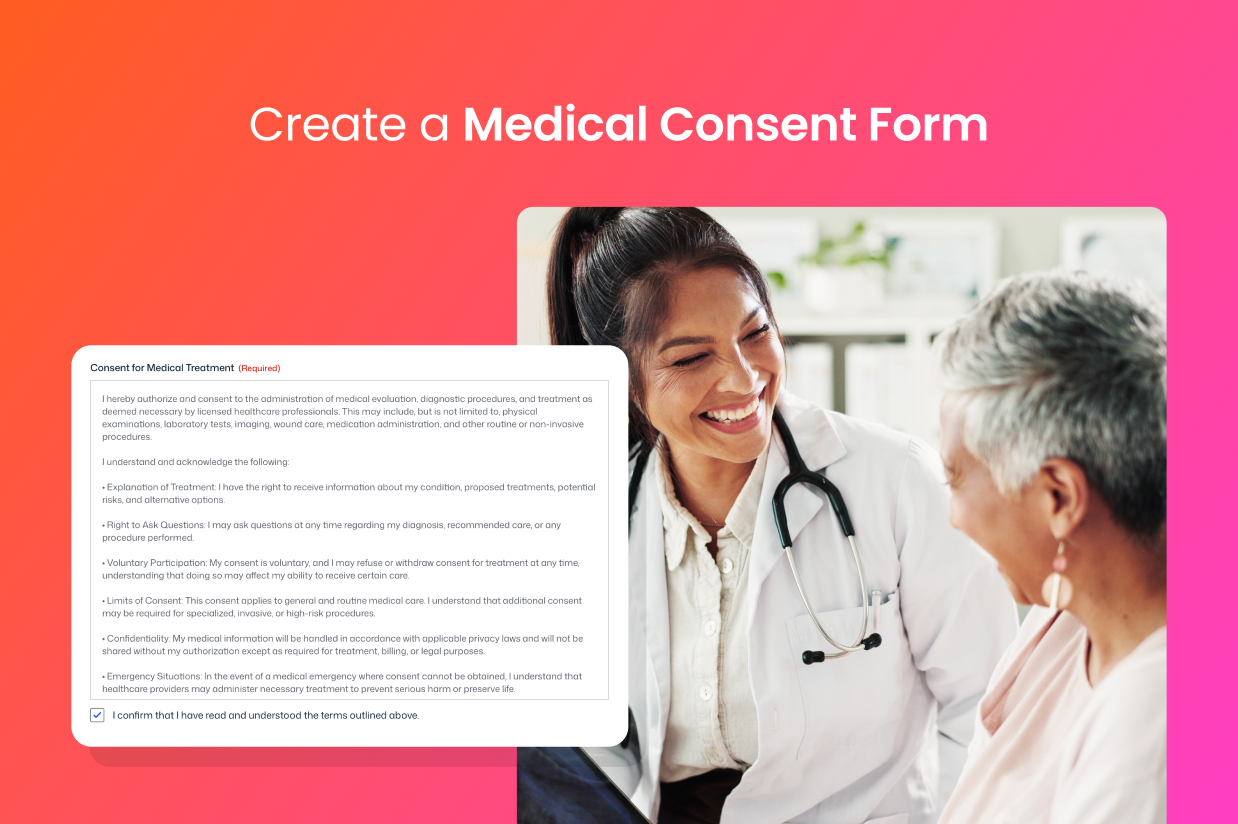
With the medical consent form template in Gravity Forms, you can easily set up your own medical consent form powered by your WordPress website.
You’ll be able to collect real patient signatures, store a copy of the exact consent agreement that each patient agreed to, and just generally customize the consent form to meet the needs of your medical practice.
In this post, we’ll show you step-by-step how to set up everything and start collecting digital patient consent.
If needed, you can also find other Gravity Forms Add-Ons to help you comply with medical privacy laws such as HIPAA, which we’ll also discuss at the end of this post.
Why use a digital medical consent form template?
Offering a digital medical consent form can have several benefits over paper consent forms:
- More information for patients – A digital consent form gives you more space to provide information to patients, which can improve clarity and help them understand what they’re agreeing to.
- Improved access – Patients can access consent forms from a patient portal or mobile device, which might be more convenient for them. With a paper consent form, they usually have to be in the office to access the form.
- Easier recordkeeping – having a digital record of a patient’s consent can simplify your recordkeeping. At the same time, you can still generate printable PDF versions if you need a hard copy of patient consent.
Medical consent forms can work well for all kinds of practices, including the following:
- Doctors
- Hospitals
- Dentists
- Med spas
- …any other organization that needs to collect medical consent
In addition to consent, digital forms can also work great for collecting patient medical history.
It’s easy to create a medical consent form on WordPress
On WordPress, you can easily create a medical consent form using the Gravity Forms plugin and its signature consent form template.
Here are some of the benefits of using Gravity Forms to create a consent form for your medical practice:
- Drag-and-drop form builder – Customize the medical consent form template using a non-technical drag-and-drop builder.
- Dedicated consent field – The Consent field stores a full record of the consent agreement that each patient agreed to. Even if you change the consent text in the future, you’ll still have a record of the exact text that each patient agreed to at the time that they submitted the form.
- Real patient signature field – You can collect a patient’s actual signature, with support for mouse input or touch-based input.
- Conditional logic – If needed, you can use conditional logic to adjust the form based on how a patient answers.
- Full control over patient data – You have 100% control of all of your patient data. If you need to store or process this data in certain ways to comply with local medical privacy laws (like HIPAA), you can use add-ons to help you do that.
- Large library of add-ons – Use official and third-party add-ons to extend your consent form in useful ways, such as automating administrative workflows, generating PDF documents, and lots more.
How to create a medical consent form
Now, let’s get into the full step-by-step guide on how to create a digital medical consent form.
To set up everything, you can use the Gravity Forms plugin, the Gravity Forms Signature Add-On, and the medical consent form template.
Keep reading for the full tutorial…
1. Install Gravity Forms and the Signature Add-On
To get started, you’ll want to install the core Gravity Forms plugin on your site, if you haven’t done so already.
In addition to the core plugin, you’ll also want to install at least the Signature Add-On, which is what will allow you to collect real patient signatures as part of your medical consent form.
The Gravity Forms Signature Add-On is available on the Elite and Nonprofit licenses. If you’re not holding one of those licenses yet, you can purchase a new license here or upgrade your existing license and only pay the prorated difference.
Once you’ve installed the core Gravity Forms plugin and added your license key, here’s how to install the Signature Add-On:
- Open your WordPress dashboard.
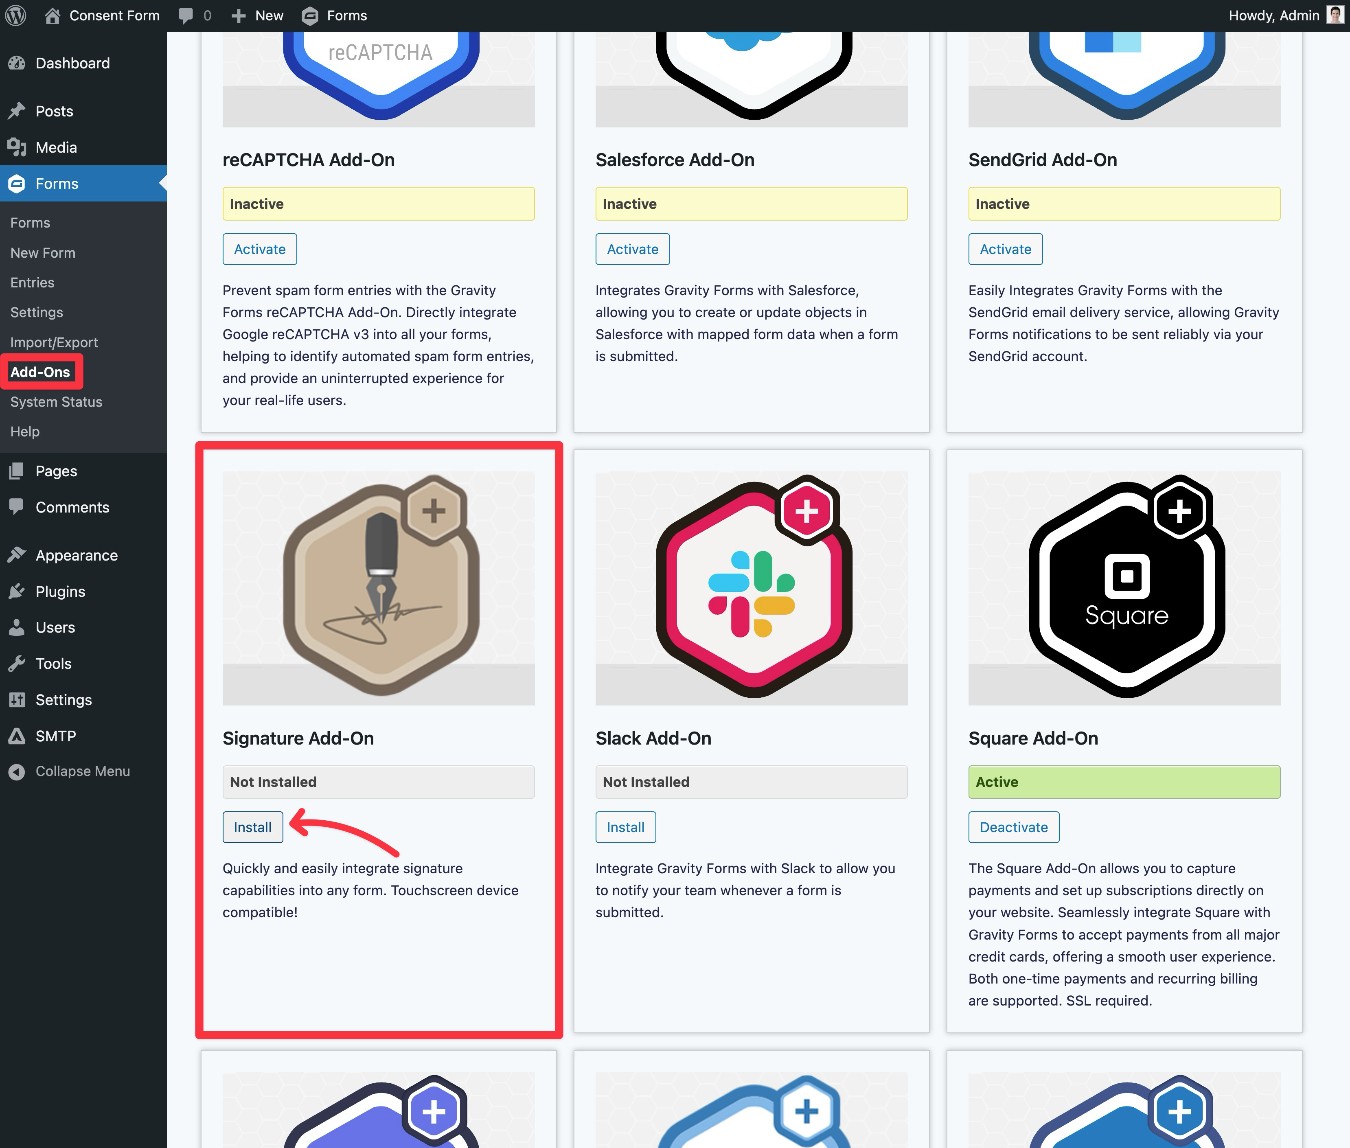
- Go to Forms → Add-Ons in the dashboard sidebar.
- Find the Signature Add-On in the list of available add-ons.
- Click Install for the Signature Add-On.
- Once the installation finishes, make sure to click the Activate Plugin button.
2. Create a new form using the Consent Form template
Now, you’re ready to create your medical consent form.
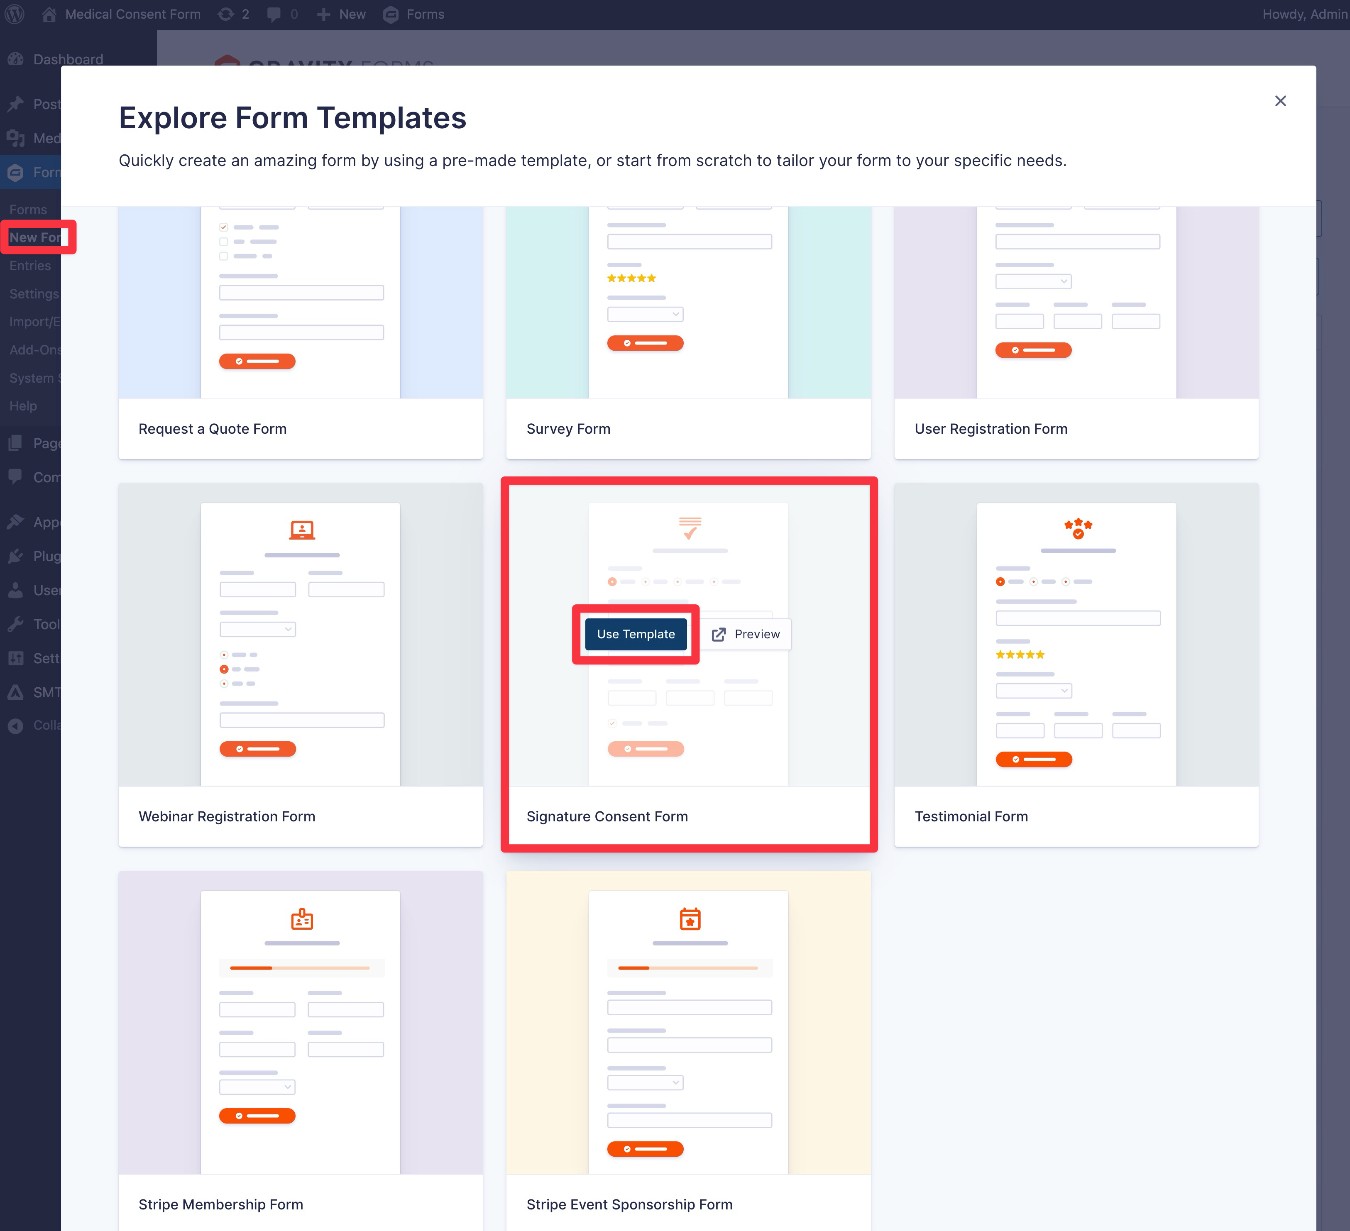
To begin, go to Forms → New Form. In the popup that appears, find the Signature Consent Form template and choose Use Template.
You can also create your form from a blank canvas, but using the pre-made template will save you some time.
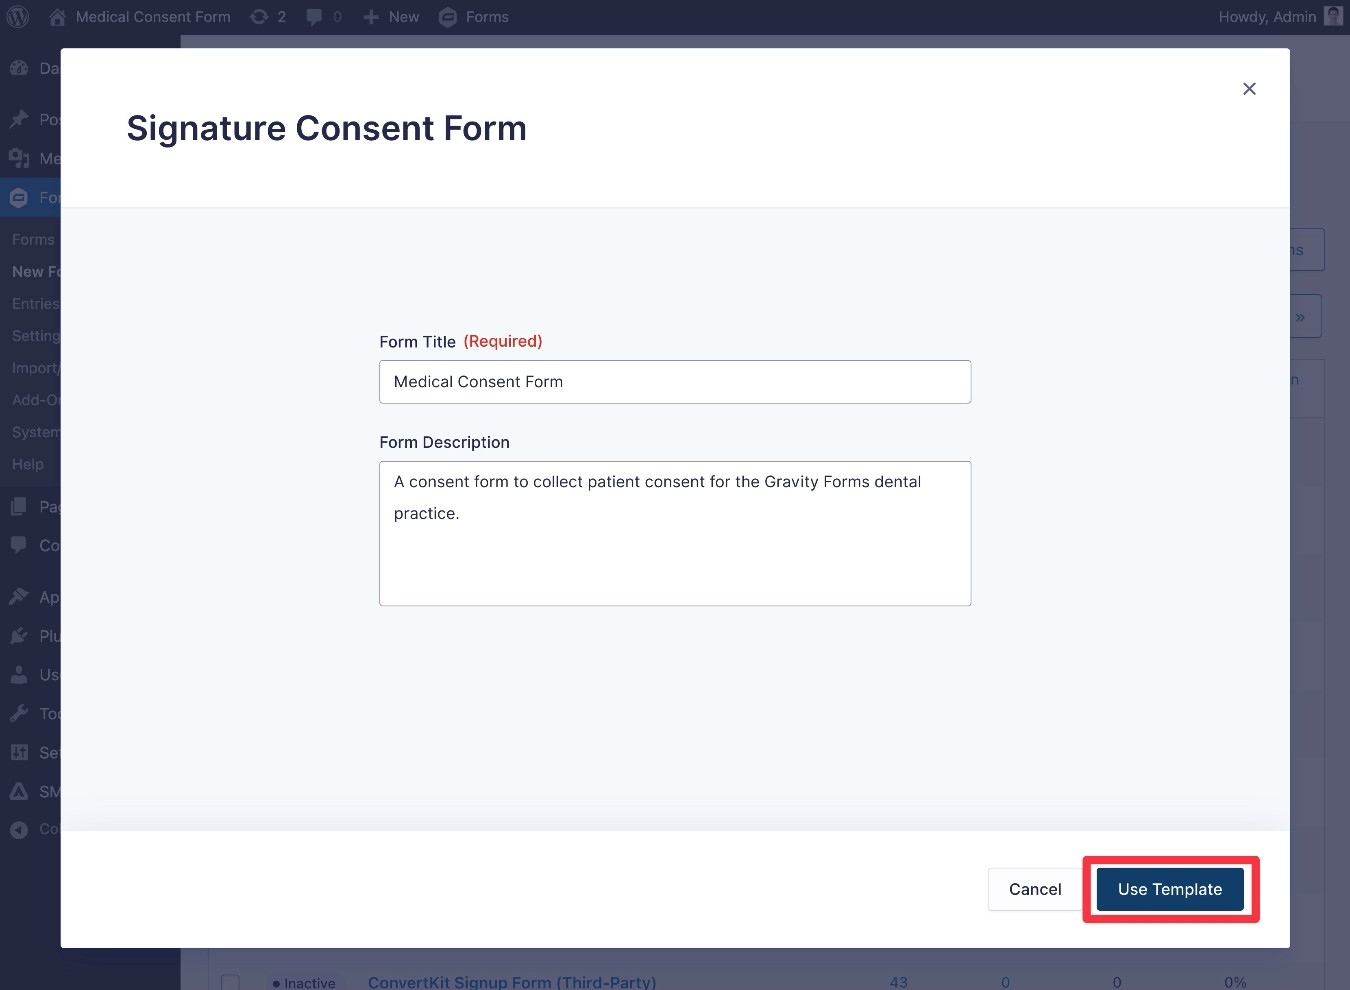
You can give your form a title and an optional description. Then, click Use Template again to advance to the form editor.
3. Customize your medical consent form as needed
The Signature Consent Form template includes essential fields that all medical consent forms require, as we discussed earlier in this post.
However, you might want to include additional fields or information that are specific to your medical practice. Additionally, you must edit the Consent field to include the actual consent agreement for your practice, as the included text is just a placeholder.
To add new fields, you can drag them over from the sidebar. For example, you could use the Radio Buttons field to add some “Yes/No” questions, which are common in medical consent forms.

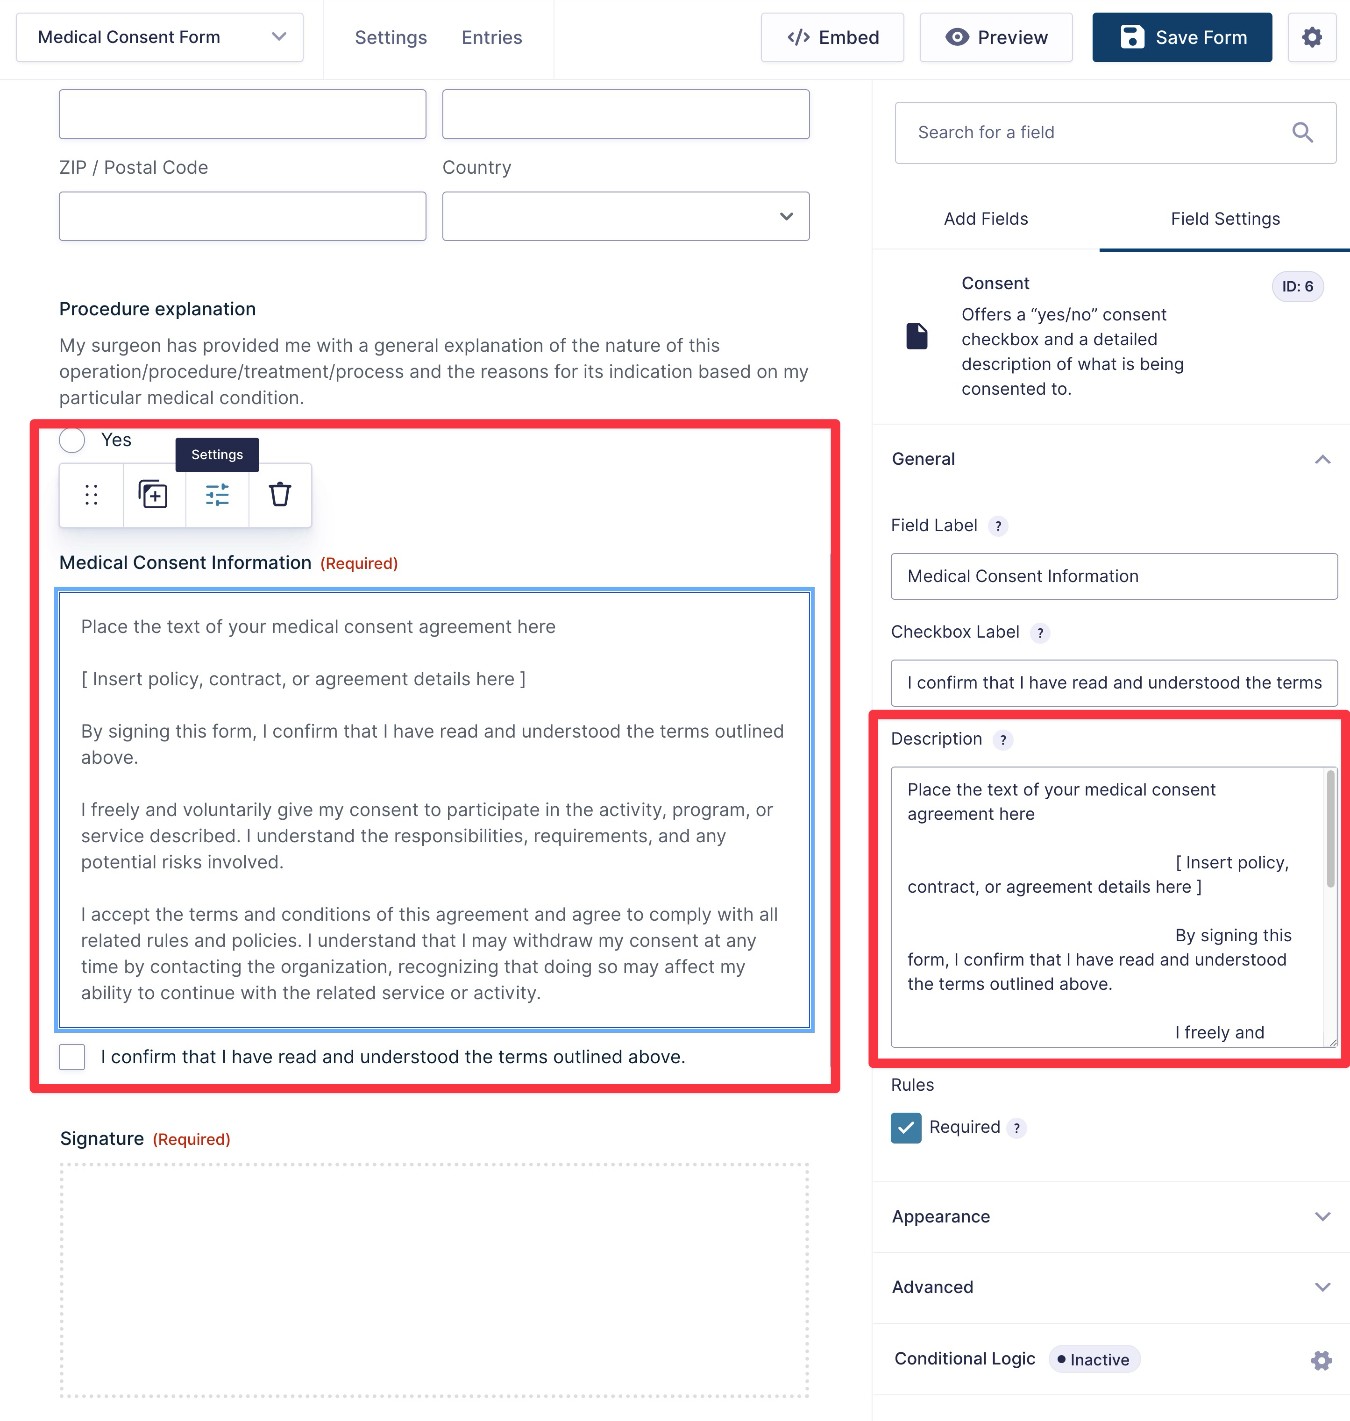
To edit the actual Consent field text, you can select the field and use the text box in the sidebar to make changes to the consent agreement.
As we mentioned earlier, Gravity Forms will save the full text of the consent field every time the form is submitted. So, even if you were to update this text in the future, you would still have a record of the exact text that a patient agreed to when they submitted the consent form.
Once you’re happy with all of the fields in your form, make sure to click Save Form in the top right corner.
4. Set up confirmation messages and email notifications
Once you’ve set up the fields in your medical consent form, you can advance to some important backend settings.
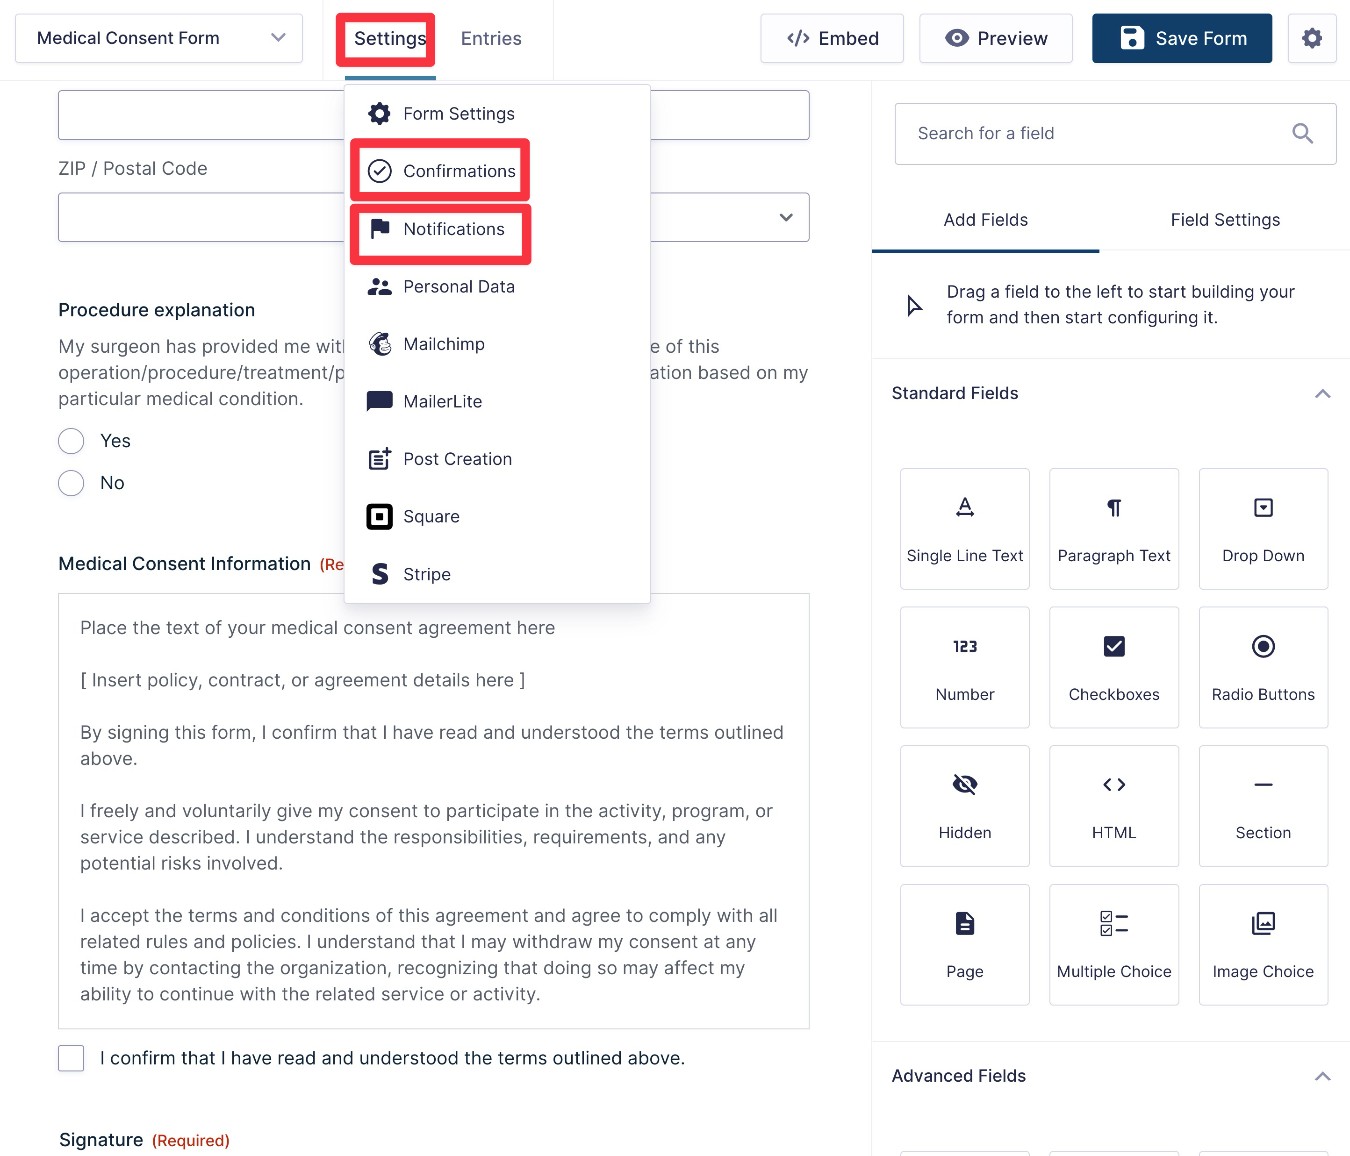
While we’ll discuss some additional options below, two core settings to configure are confirmations and notifications:
- Confirmation – This lets you display a message on your site after a patient submits the form. Or, you could redirect them to a different page that provides more information.
- Notifications – These let you send one or more emails when a patient provides consent. You could send an email to yourself, the patient, an administrator, etc. You can send as many emails as you need and each can have its own unique settings.
To access these options, go to Settings → Confirmations and Settings → Notifications in the form editor interface:
5. Enhance your medical consent form with automations, PDFs, etc. (optional)
Another reason to use Gravity Forms for your medical consent form is that it gives you a lot of additional options for enhancing your forms using official or third-party add-ons.
You can use add-ons in lots of different ways, but here are some notable ways in which you might want to enhance your medical consent form template:
- Generate PDF documents – Automatically create PDF documents that contain a record of the person’s consent. You could use these for digital recordkeeping, creating printed documents for hardcopy recordkeeping, attaching PDFs to emails, and more. You can create basic PDF records using Gravity Flow or more customizable fillable PDFs with third-party add-ons like Fillable PDFs and Gravity PDF.
- Build business process workflows (such as assigning tasks to a person) – If you have additional administrative tasks that must be performed after a patient provides consent, you could use Gravity Flow to build automated process workflows, including elements such as assigning a task to a person after a patient submits the form.
- Save patient details – If a patient provides consent, you could save their contact information to a CRM or some other type of contact storage software. Gravity Forms integrates directly with most popular CRMs and you can also use the Gravity Forms Zapier Add-On to connect to any service via Zapier.
- Comply with HIPAA or other privacy regulations – Add-ons can also help you ensure that your patient consent form complies with medical privacy regulations such as HIPAA in the USA. We’ll discuss this in more detail in a dedicated section at the end of this post.
To get some more ideas, here’s where you can find additional add-ons:
- All official Gravity Forms add-ons
- Gravity Forms Certified Add-Ons – These add-ons come from third-party developers, but have been certified by Gravity Forms.
6. Embed and publish your form
Once you’ve set up any additional add-ons that you want to use, the last step is to embed your medical consent form somewhere on your site so that patients can access it.
Depending on your preferred setup, you could embed the form on a private, unlisted page. Or, you could add it to a page that’s publicly accessible on your website.
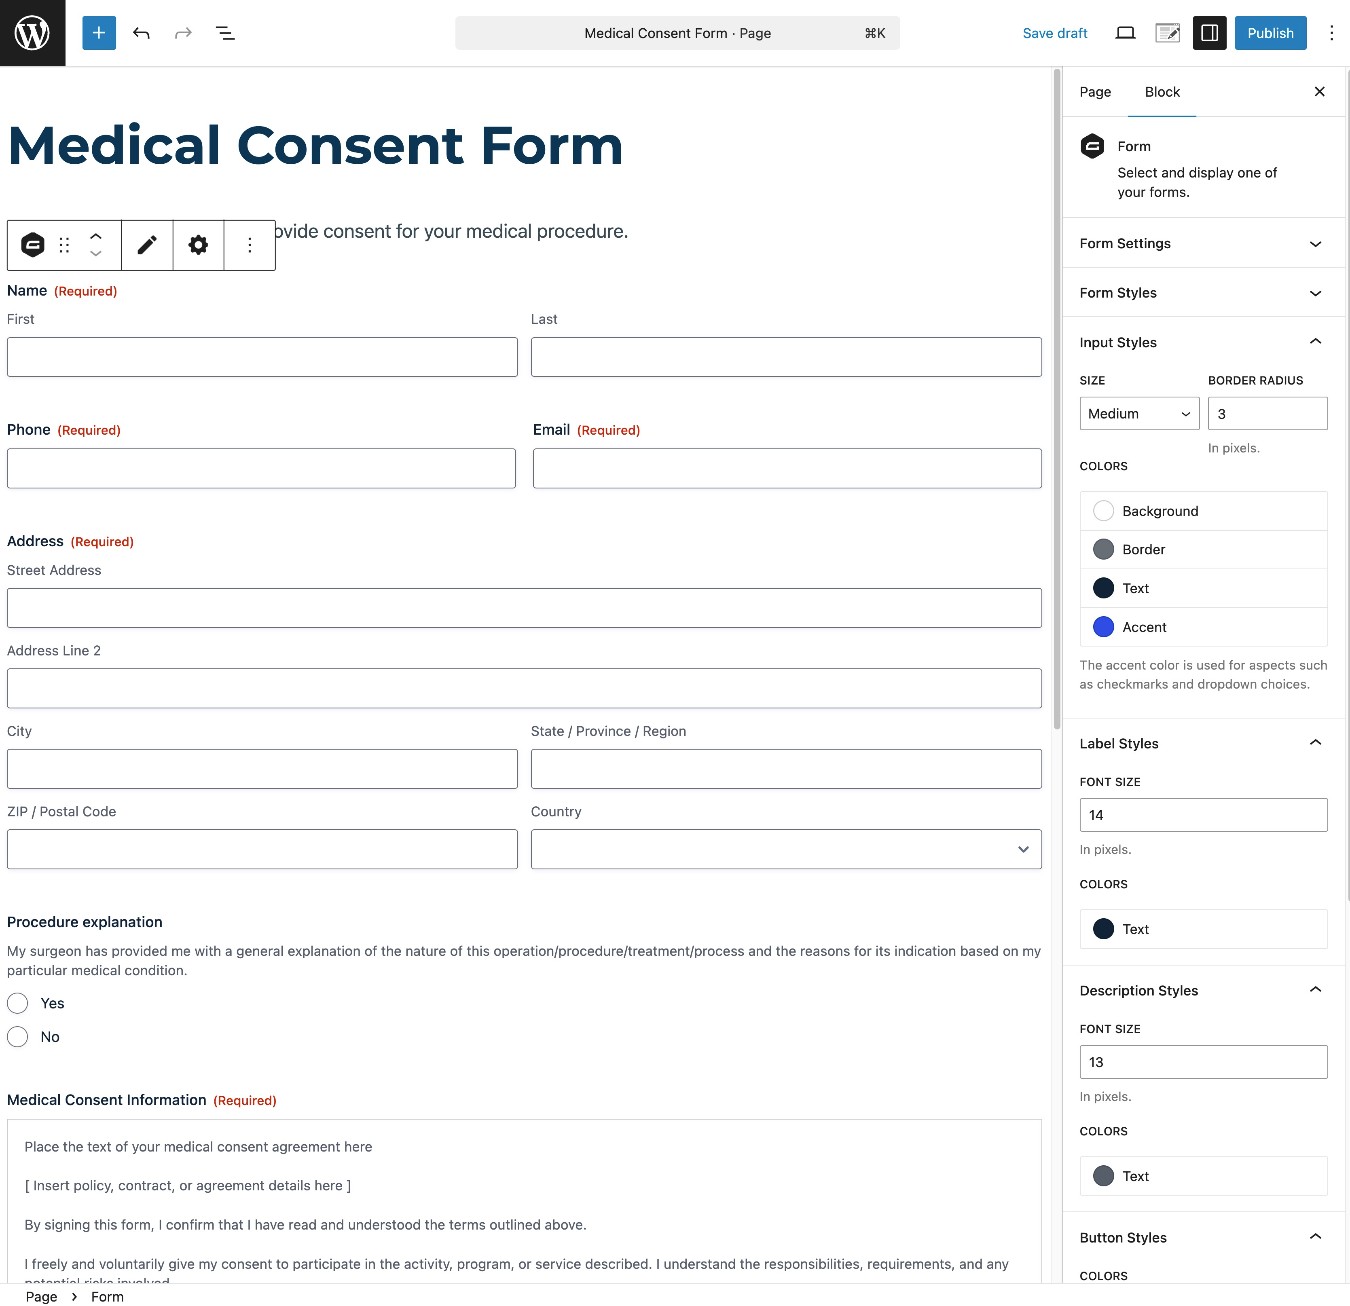
To actually embed the form, you can use the Gravity Forms block, shortcode, or PHP function.
If you use the block, you’ll also be able to style your consent form directly from the editor.
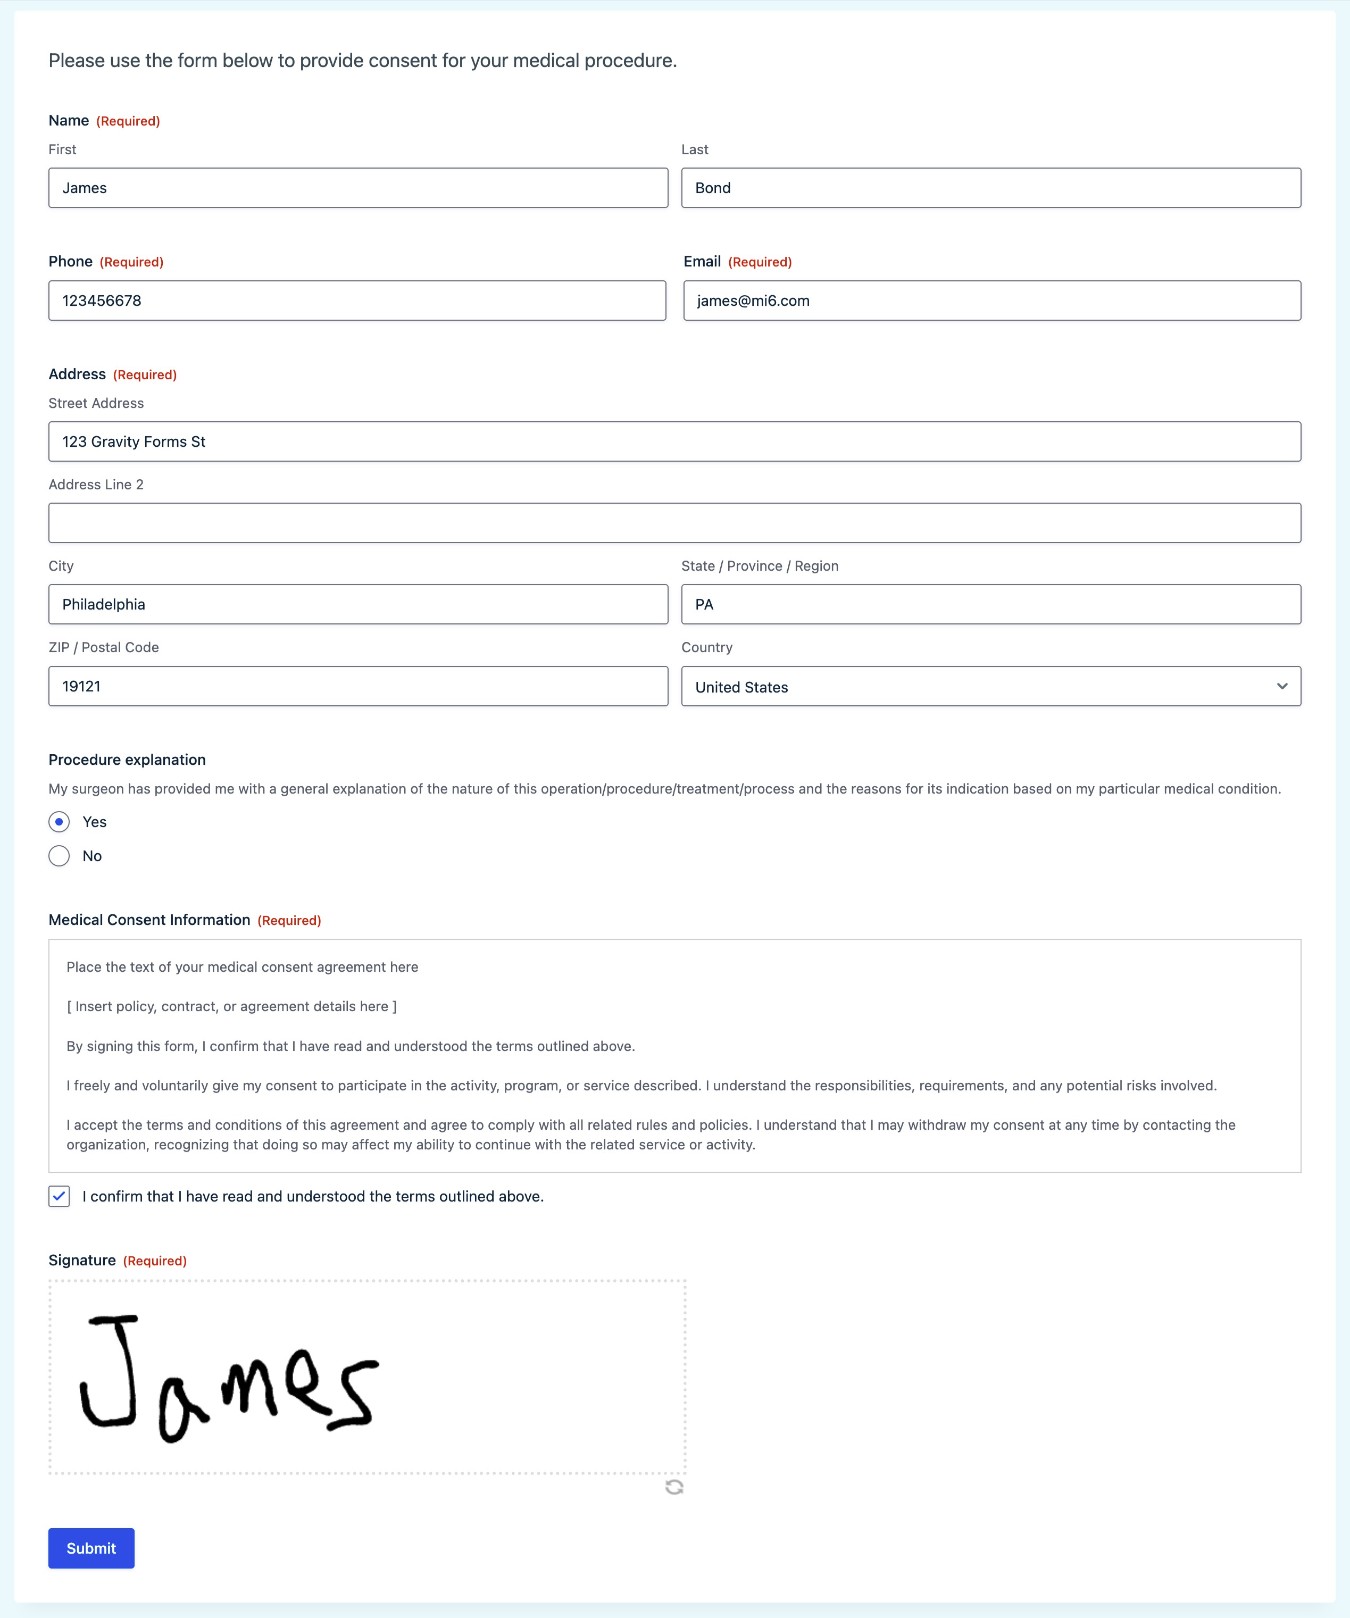
Once you embed your form, we recommend submitting a test entry to make sure that it’s working exactly as you want it to.
How to view patient consent submissions
Once patients start using your digital consent form, you’ll be able to view their submissions from your WordPress dashboard by default. Below, we’ll discuss some ways to restrict access to these entries, which you might need to do to comply with medical privacy laws in your local area (such as HIPAA in the USA).
You can access these submissions by going to Forms → Entries in your WordPress dashboard and selecting your medical consent form from the drop-down:

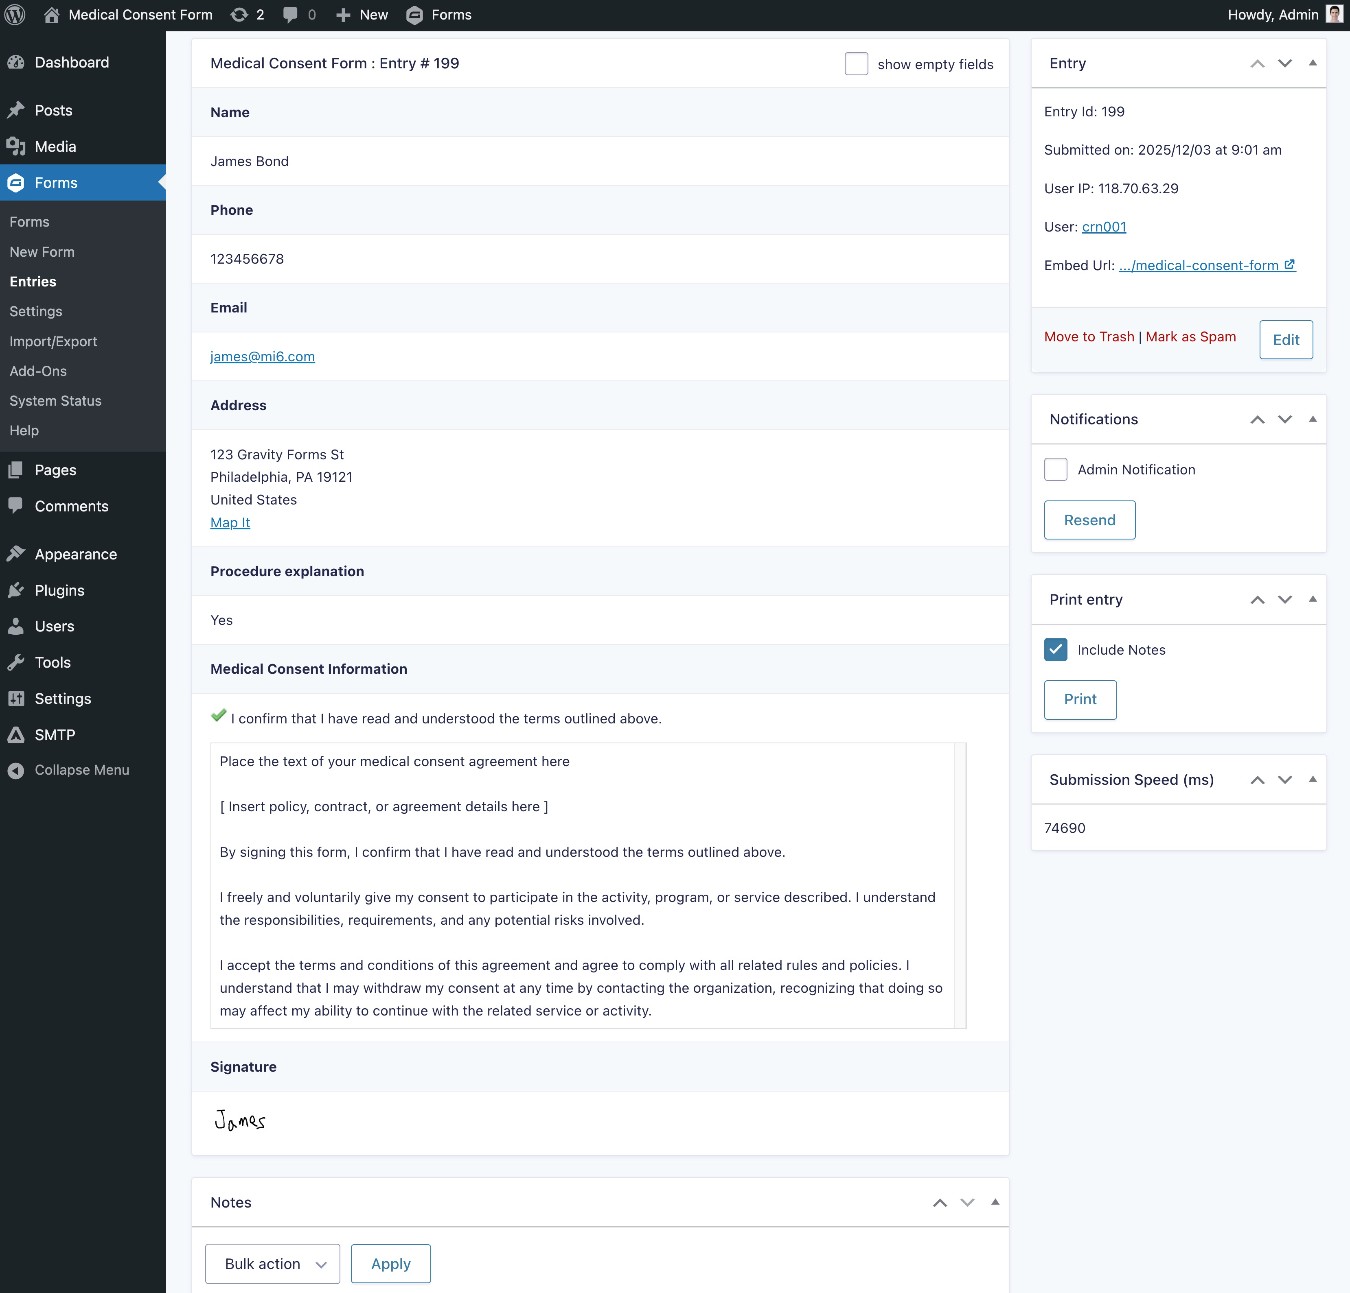
If you click on an individual consent submission, you’ll be able to view more details about that record, including the person’s signature and the full text of the consent agreement.
As we mentioned earlier, Gravity Forms will log the consent agreement exactly as it was when the person submitted the form. So, even if you update the consent agreement at some point in the future, you’ll still have a record of the exact text that the person agreed to when submitting your medical consent form.
If you need a paper record of a patient’s consent, there are also Gravity Forms Add-Ons that can help you generate PDF documents from consent submissions. Gravity Flow (from the same team behind Gravity Forms) can generate basic PDF summaries, while third-party certified add-ons like Fillable PDFs or Gravity PDF can help you create fillable PDF documents.
Note – As we’ll discuss in the next section, you might need to adjust the default behavior to limit who can view patient data to comply with medical privacy regulations. Third-party add-ons like Advanced Permissions can help you control access to form entries.
What about HIPAA or other regulations?
As part of creating a medical consent form, you might need to consider local regulations for medical privacy, such as HIPAA, if you’re in the USA.
If needed, you can use Gravity Forms to create medical consent forms that comply with privacy regulations such as HIPAA. However, doing so will usually require installing some additional add-ons to ensure that you’re processing and storing data in a way that meets HIPAA requirements.
One of the benefits of using Gravity Forms is that it gives you full control and ownership of your data. All of the data that you collect with your forms is stored on your own server and fully under your own control during the entire process.
However, because you have full control over your data, that also means that you’ll be the one responsible for storing and processing that data in a way that complies with medical privacy regulations.
To help with that, you can consider third-party add-ons such as the HIPAA FORMS plugin or Gravity Forms Encrypted Fields. You can also use an add-on like Advanced Permissions to control who can access patient data inside the WordPress dashboard.
For more details, we have a help article that covers Gravity Forms and HIPAA, which will also be useful for complying with many other patient privacy regulations.
Create your medical consent form today
With Gravity Forms and the medical consent form template, you can easily create your own digital medical consent form on WordPress.
You can customize the form according to the needs of your medical practice, store a record of the consent agreement, and collect real signatures from your patients.
Plus, you can access a large library of official and third-party add-ons to help you extend your forms with new features, comply with privacy regulations, and more.
If you’re ready to get started, purchase the Gravity Forms Elite or Nonprofit licenses today.
Or, you can create a free, fully functioning demo website to try the medical consent form template for yourself.

If you want to keep up-to-date with what’s happening on the blog sign up for the Gravity Forms newsletter!
"*" indicates required fields