

While Gravity Forms gives you all of the features that you need to create great experiences for users filling out your forms, your users’ experiences don’t always end when they click the Submit button.
For many forms, you’ll also want to send users email notifications after they submit the form. You can use these to confirm receipt, provide information about next steps, encourage the user to take a certain action, and more.
Gravity Forms can also help you send those emails. But if you want your users to actually open and engage with those emails, there are some best practices that you’ll want to follow.
In this post, we’ll cover five helpful tips that you can use to create better WordPress form notification emails.
Let’s dig in!
The Different Types of Form Notification Emails
Before we get to the tips, we think it’ll be helpful to quickly run through some of the most common types of form notification emails that you might send.
Understanding the purpose of an email is important for optimizing that email. For example, you might get creative with a notification email confirming that someone has been registered for an event, but you might keep things more straightforward for a receipt.
Here’s a partial list of some different types of form notification emails that you might send:
- Successful submission confirmation – you can use your form notifications to confirm that you received a user’s submission.
- Private information for form submitters – for example, if you have a webinar registration form, you might send the actual link to the webinar event in the email.
- Information on next steps – you can share details about what happens next. For example, if you created a job application form, you might give them an estimate for when they should hear back.
- Receipts/invoices – if you have a payment form, you can send users an invoice/receipt after they make their payments.
- PDF documents – you can generate a PDF document based on the form submission and attach it to a notification email.
- Quotes – you could send users an accurate quote based on the information in your form. With Gravity Forms calculations, you can even calculate the quote automatically based on a user’s input.
Again – this is just a partial list to give you an idea of the different functions that form email notifications can handle.
Beyond the form notification emails that you send to users, you also might send additional notification emails to yourself or other administrators involved in your business. However, because these emails aren’t public-facing, you generally don’t need to worry about optimizing them.
How to Write Better Form Notification Emails
Once you’ve narrowed down the purpose of your email notification, here are five tips that you can apply to create better email notifications.
Write a Great Subject Line to Grab Users’ Attention
Creating quality form notification emails starts with the subject line. After all, it doesn’t matter what’s in the body of your email if a user never opens it.
A good subject line helps your notification email stand out in people’s crowded inboxes and encourages them to open the email.
So – what makes a good subject line?
Here are a few tips:
- Keep it short. Try to keep your subject lines under 40 characters if possible, with an absolute max of 60 characters. Most mobile devices will cut off email subjects around the 33-43 character range.
- Include some personalization. For example, including someone’s first name in the subject can help your email stand out from non-personalized spam. More on this next.
- Use “power” words. Power words evoke emotional responses in your users, which makes your emails more impactful. Drip has a great collection of 100+ power words.
- Add urgency (if relevant). If you need people to take additional actions after receiving the email, try to add some urgency with a deadline or date cutoff.
- Avoid spammy words. These can turn users off and cause issues with deliverability. HubSpot has a list of spam trigger words to avoid.
- Test using emojis. There’s data suggesting emojis can both help and hurt your open rates (depending on the specific usage), so it’s worth testing it yourself to see the results.
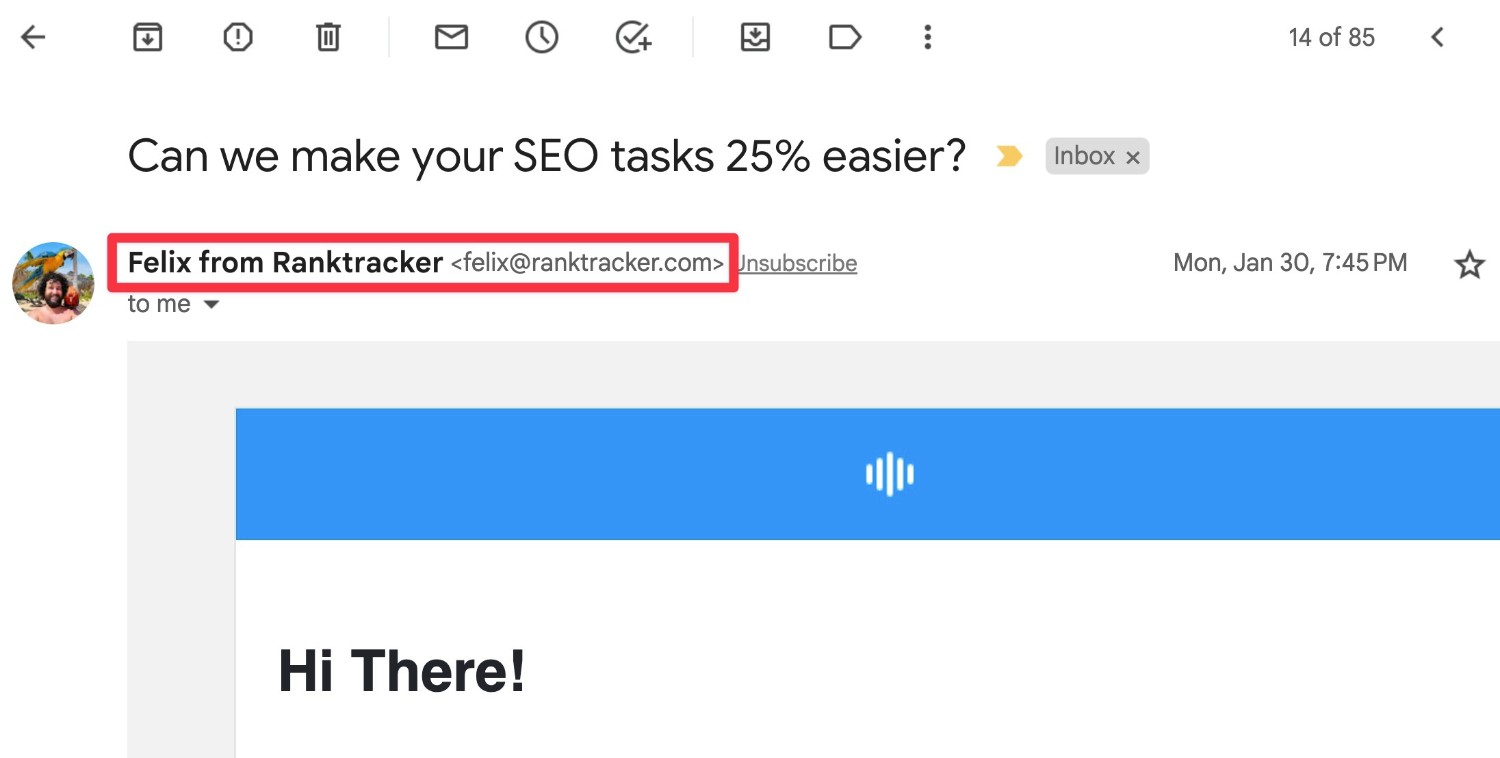
Use a Familiar Sender Name and Domain
Your email’s “From” name and domain name are another important part of avoiding the spam folder and convincing users to open your emails.
Most email clients will show both of these pieces of information next to your email subject line.
If users recognize them, that can encourage them to open the email. However, if a user doesn’t recognize them, they might just skip it.
Here are two tips:
- Send directly from your site domain name – you want to use the same domain name on which people filled out the form. If you’re using a dedicated email sending service, you might need to set up domain verification to do this.
- Use your website name – make sure to include your actual website name in the From field, rather than just your personal name. The one exception is for personal blogs, in which case your personal name might be the same as your website name.
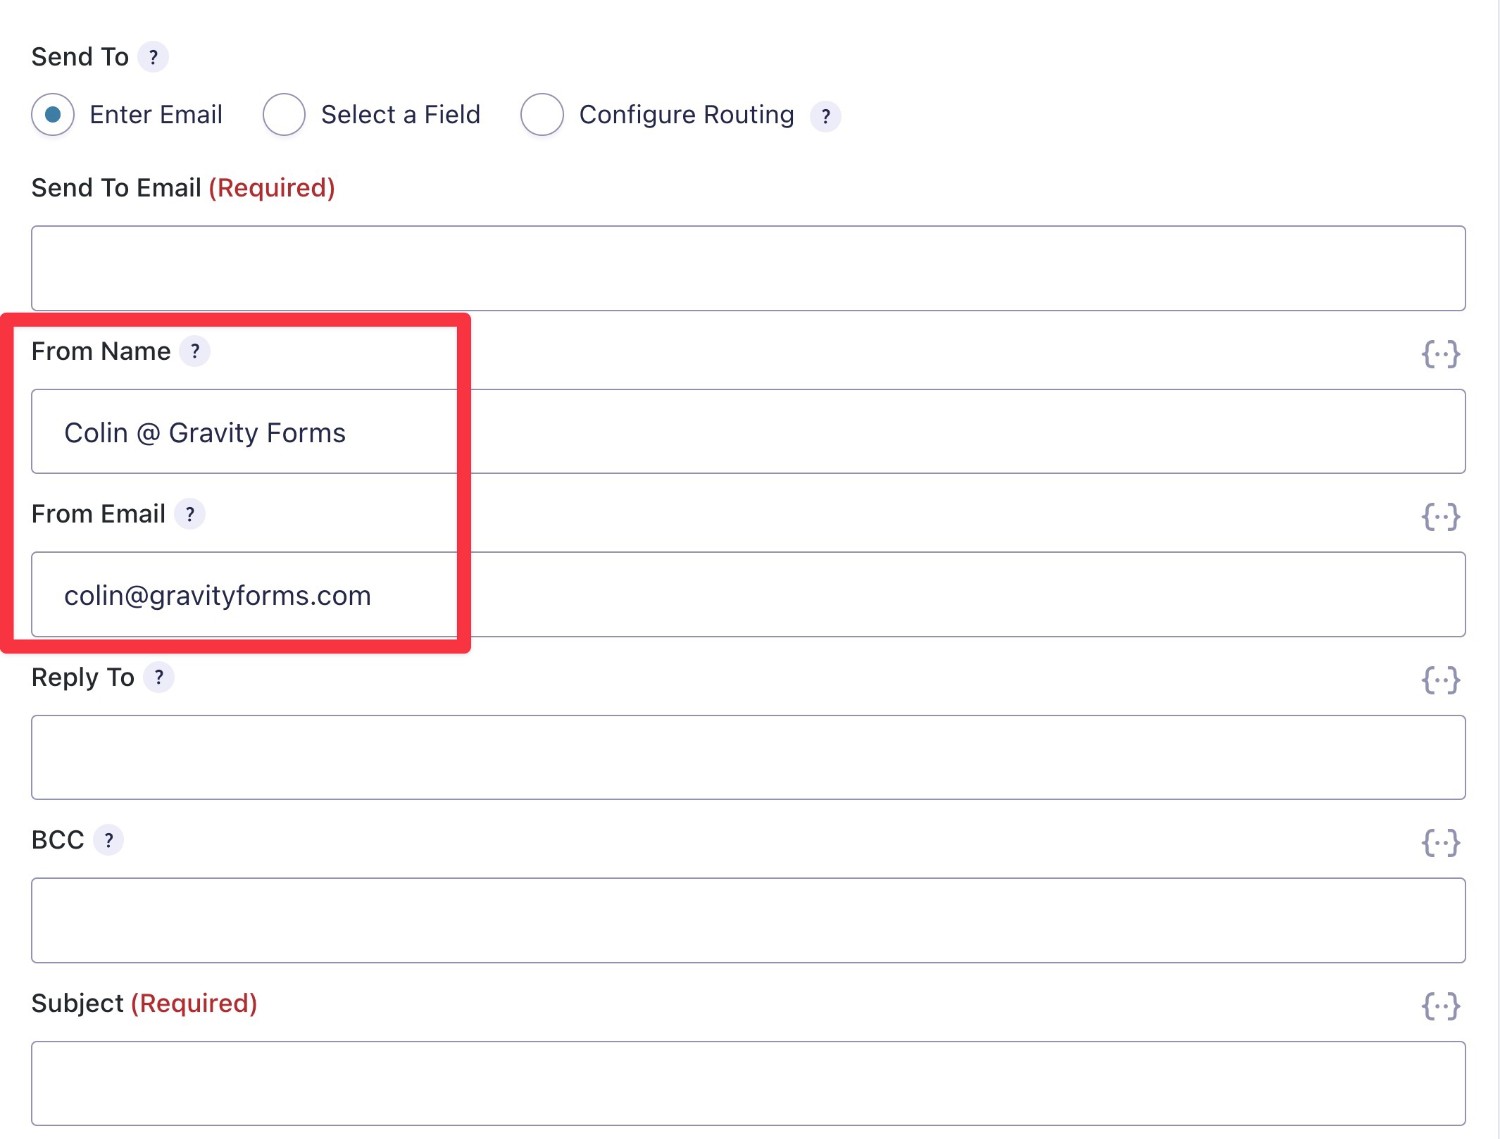
If you do want to include a personal name in the From field, you can combine it with your website name, which is an approach that you’ll see at a lot of sites. For example, “Colin at Gravity Forms”.
Here’s an example of this hybrid approach:
With Gravity Forms, you can control your “From” name and email address when you’re setting up each notification email.
This gives you the opportunity to use different details for different emails, such as adding in different personal names based on how a user filled out the form.
Personalize Your Form Notification Emails
Personalization is another excellent tactic for improving your notification emails and convincing people to open them.
Instead of sending the same static email to every person that submits the form, you can adjust your emails to create a unique, optimized experience for each person.
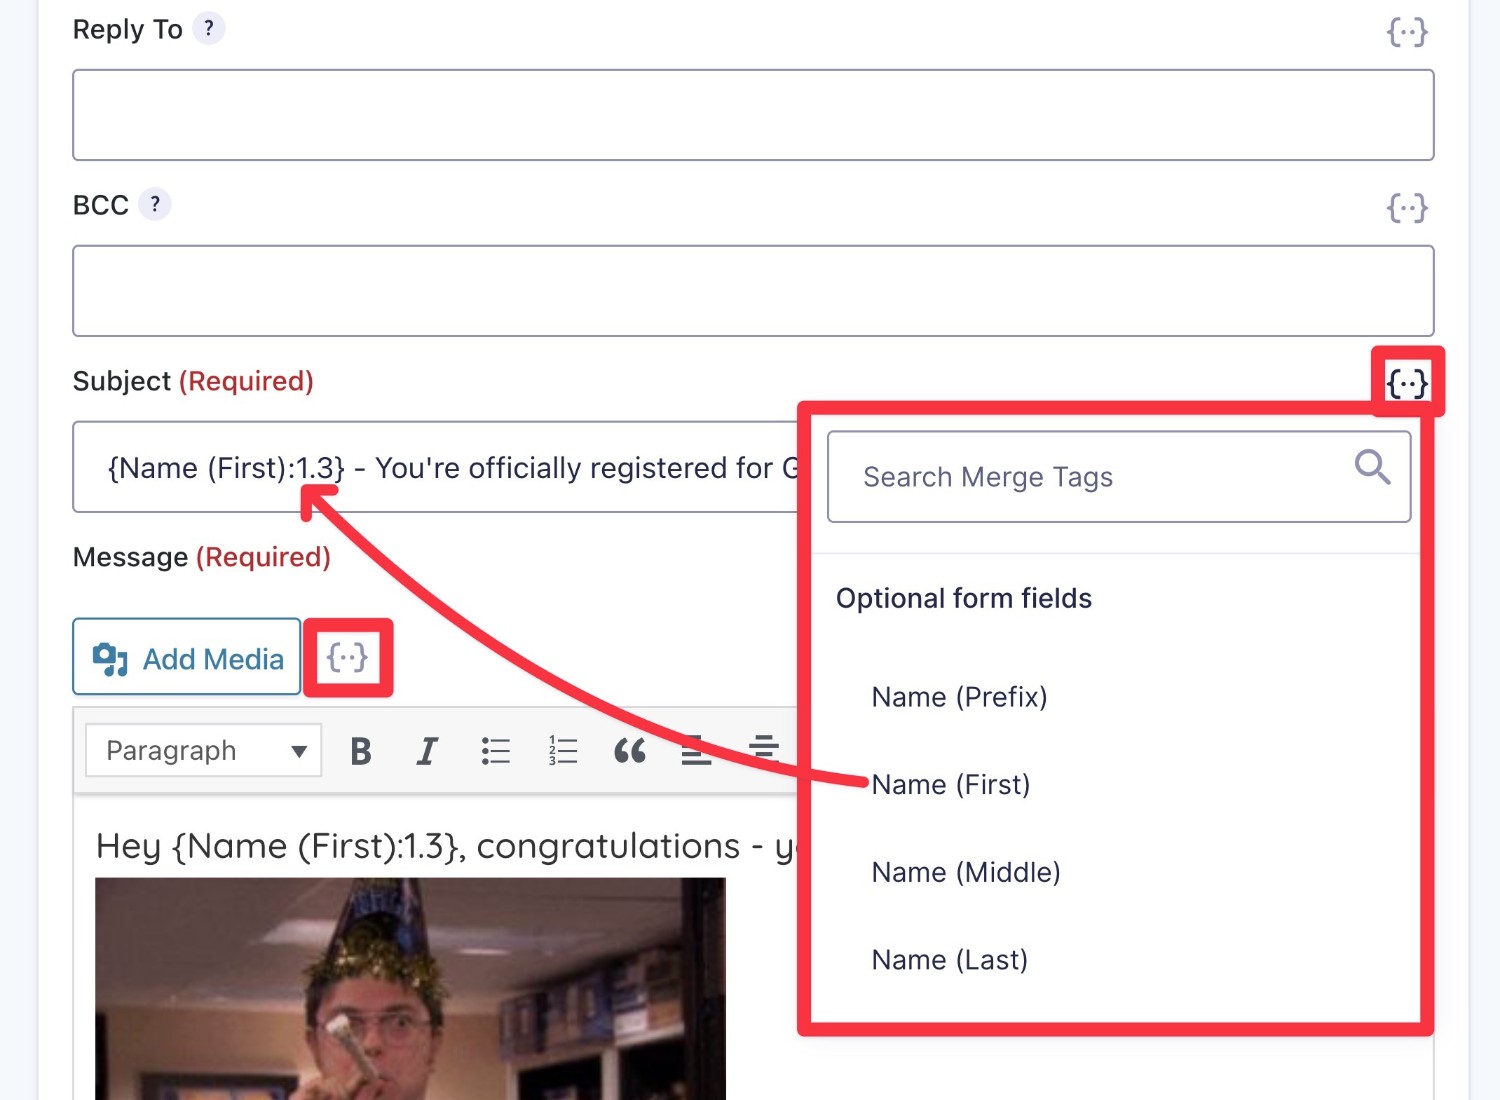
With Gravity Forms, you can easily set up email personalization using merge tags.
Merge tags let you dynamically insert information from any field in your form (as well as some general form metadata, such as the date/time when the user submitted the form).
For example, if you have a form field that asks for a person’s name, you could address people by their actual names when you’re sending them form notification emails.
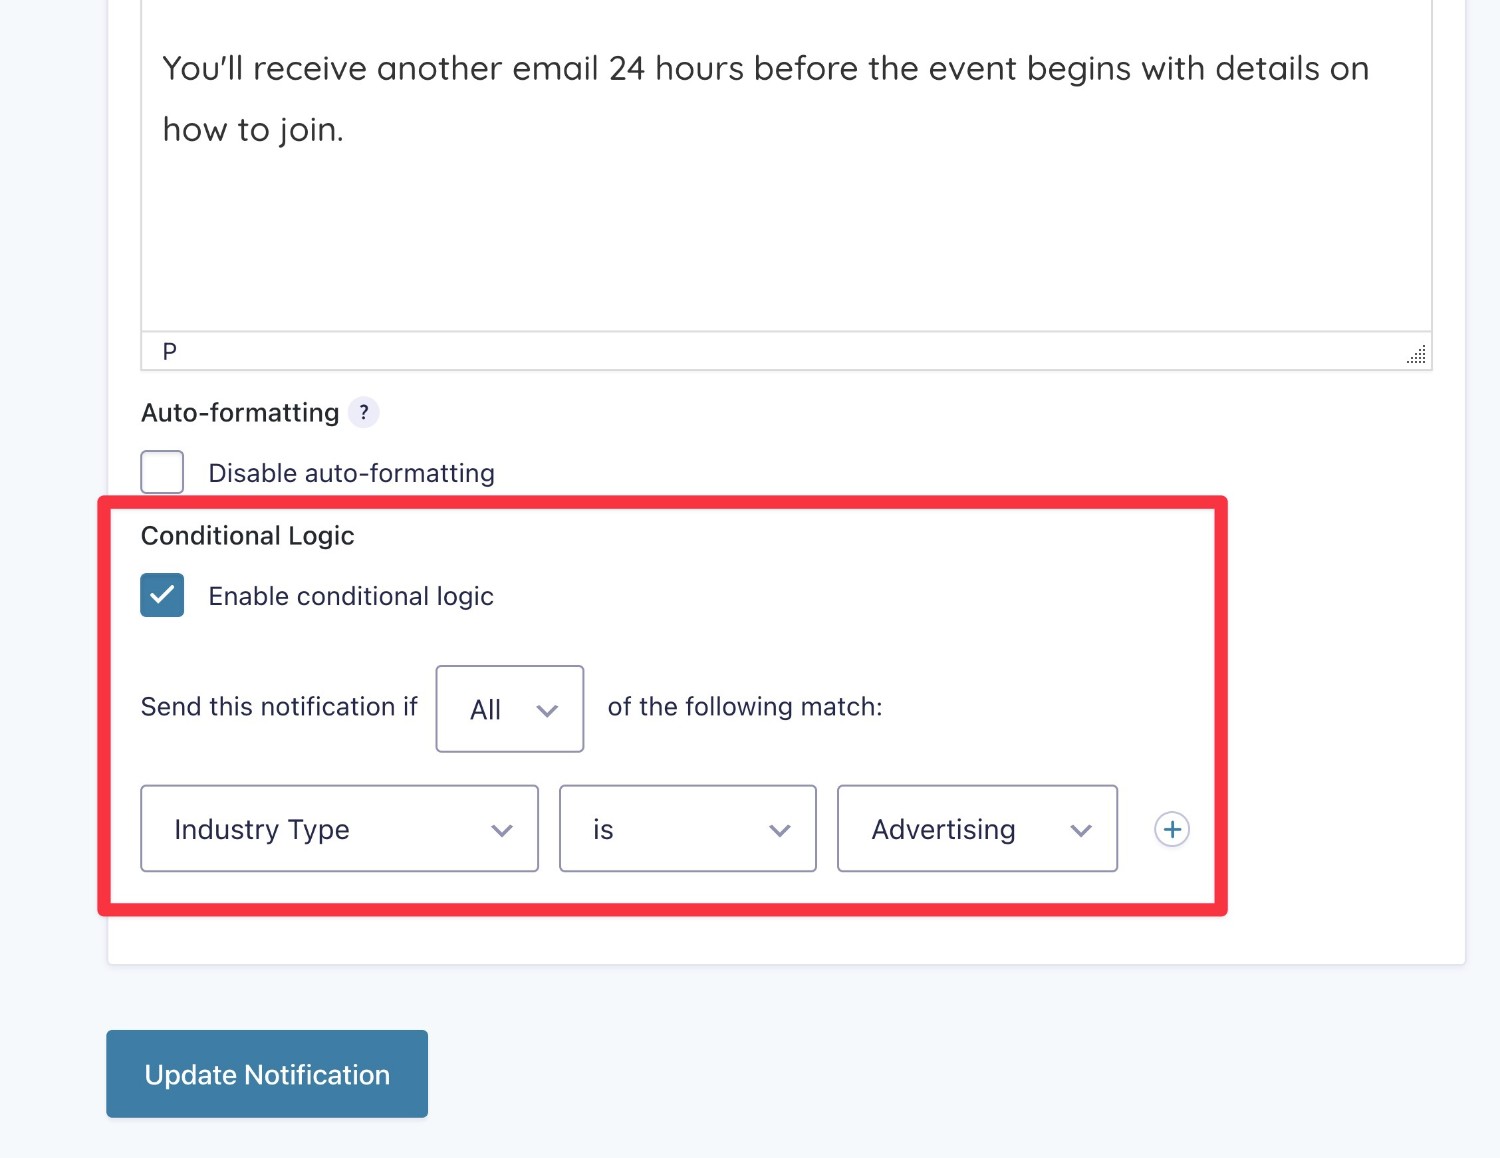
In addition to merge tags, you can also personalize your form notification emails using conditional logic. Essentially, conditional logic lets you send different form notification emails based on how someone filled out the form.
While it does take a little more time to set up multiple versions of your form notification emails, the benefit is that you’re able to optimize each email for how that user answered your form.
You can set up conditional logic from the bottom of the form notification editor:
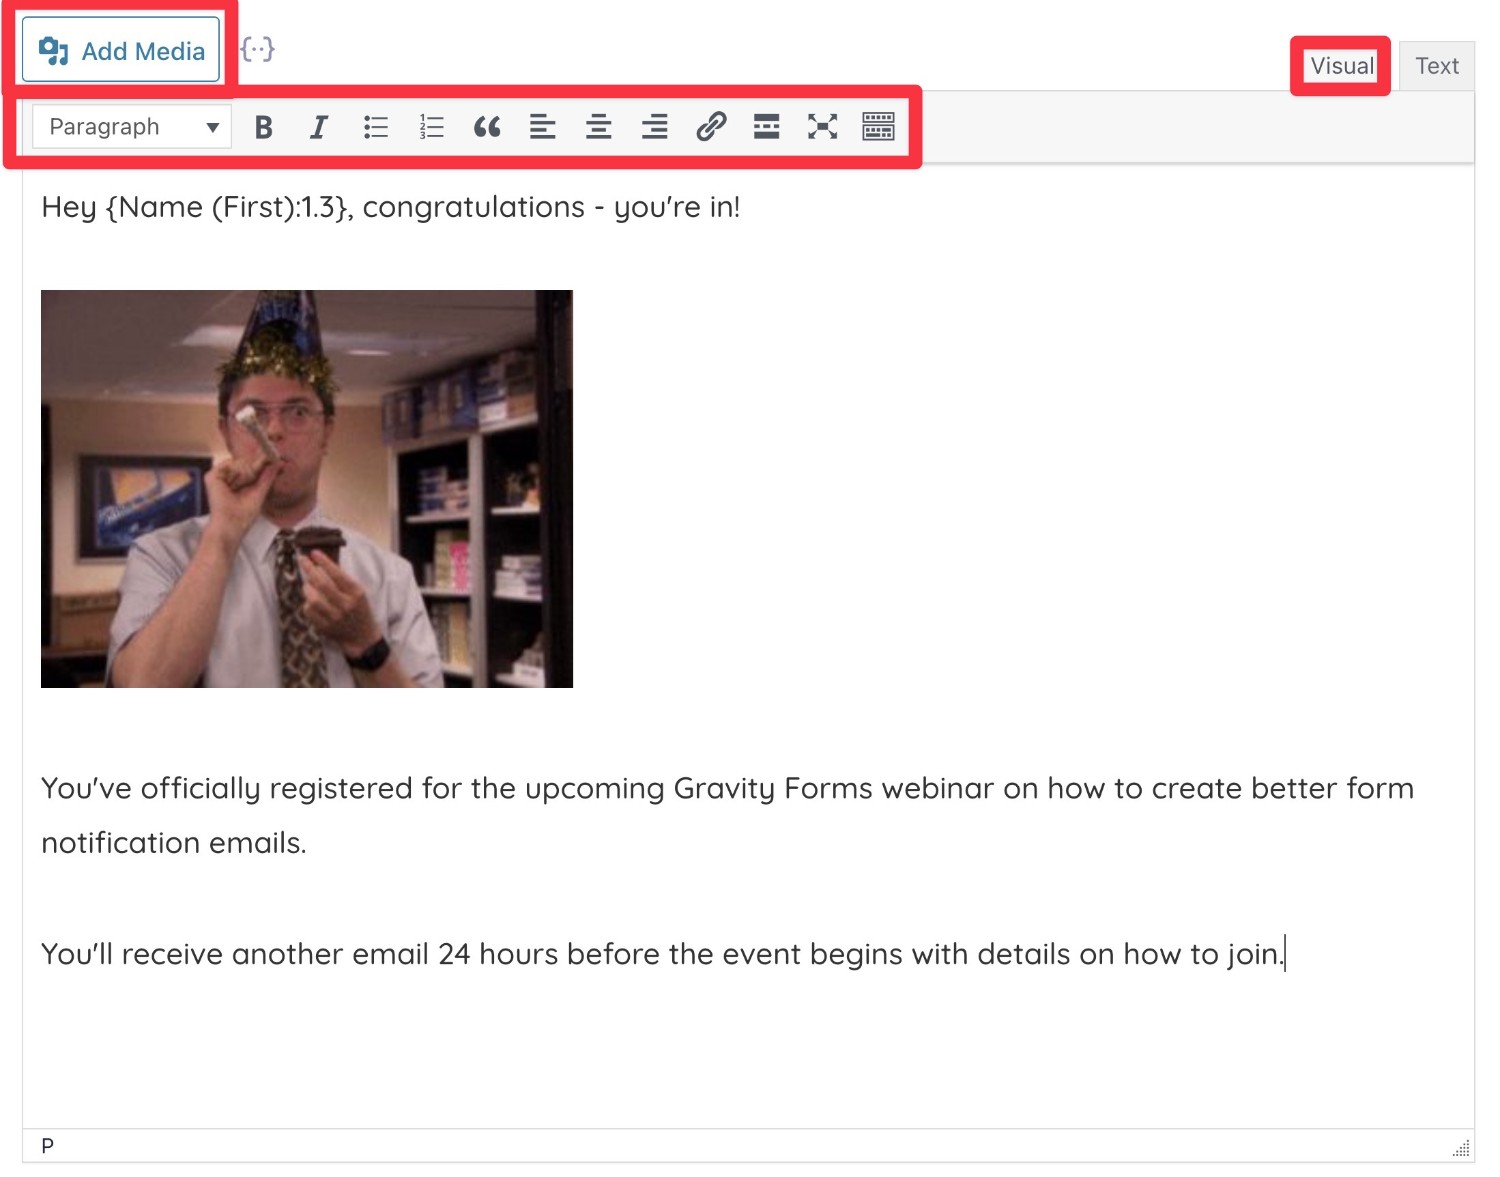
Include Branding and Imagery to Make Your Email Stand Out
While text-only emails can work fine for basic transactional use cases, you should consider including imagery or other branding elements for certain types of emails.
For example, if you’re sending a notification email to someone who subscribes to your webinar, you might want to include some images or branding related to the content of the webinar.
Gravity Forms gives you two ways to include images and branding in your emails.
First off, you can use the Visual tab of the email editor to manage everything using a WYSIWYG interface. You can adjust formatting using the toolbar and insert images by clicking the Add Media button:
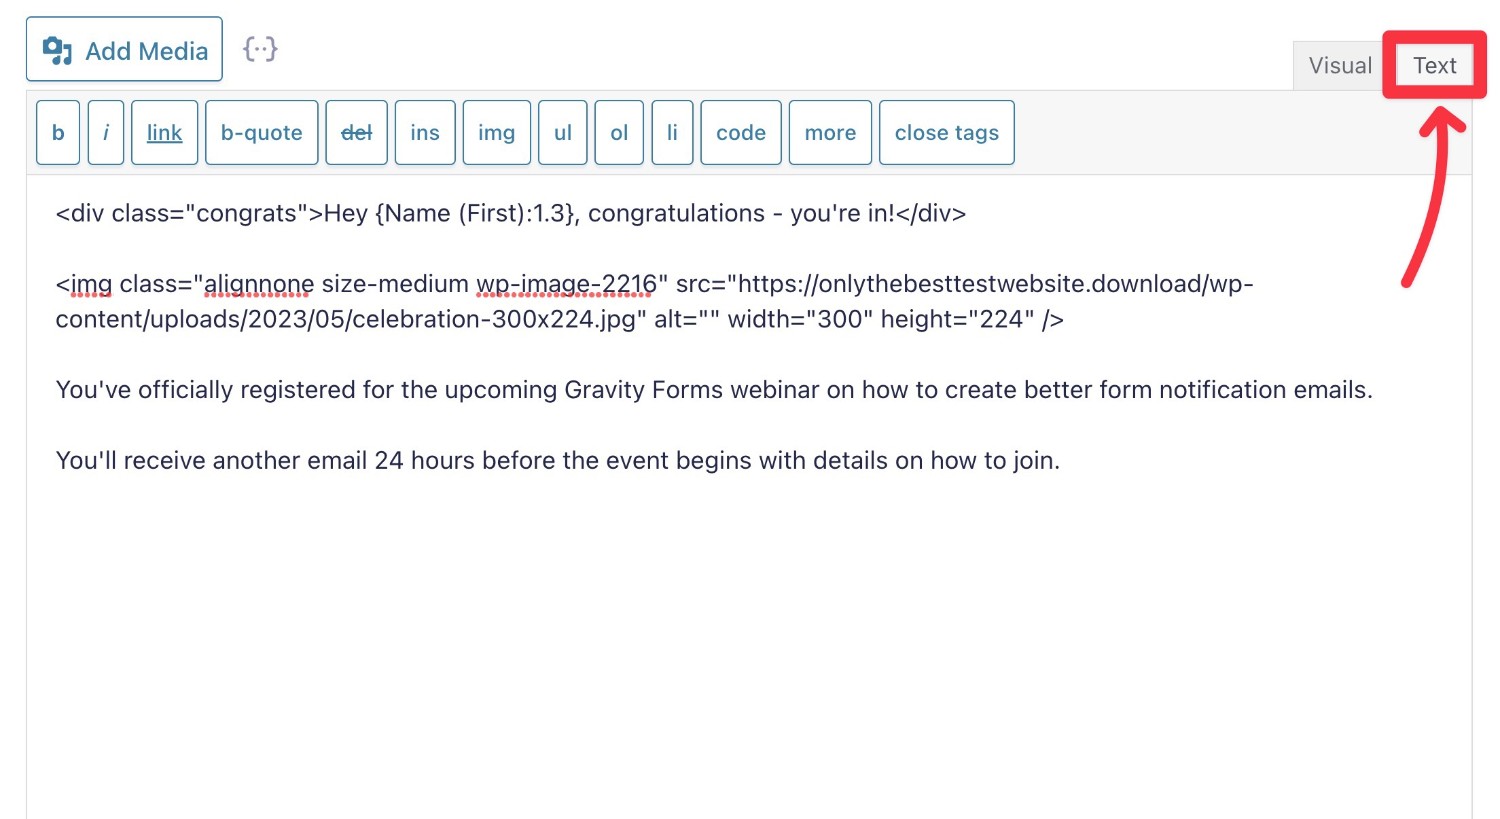
If you prefer working directly with HTML, you can switch to the Text tab of the editor.
If you’re adding custom HTML to the Text tab, we recommend not switching back to the Visual tab. Doing so can strip some HTML elements, which is why it’s safer to just stay in the Text tab.
Set Up Multiple Emails or Drip Campaigns When It Makes Sense
For a lot of forms, you might only send a single email notification immediately after the user submits the form. That’s totally fine to do if it makes sense for your form.
However, you also might have some forms where it makes sense to send multiple emails after someone submits the form.
For example, maybe you’ve created an event registration form for an upcoming event. You might want to send one form notification email immediately after someone registers and then another 24 hours before the event to remind people.
Or, you might want to set up some type of drip campaign. For example, if you created a user registration form, you might want to send multiple emails in a drip campaign to educate users about your website/offering.
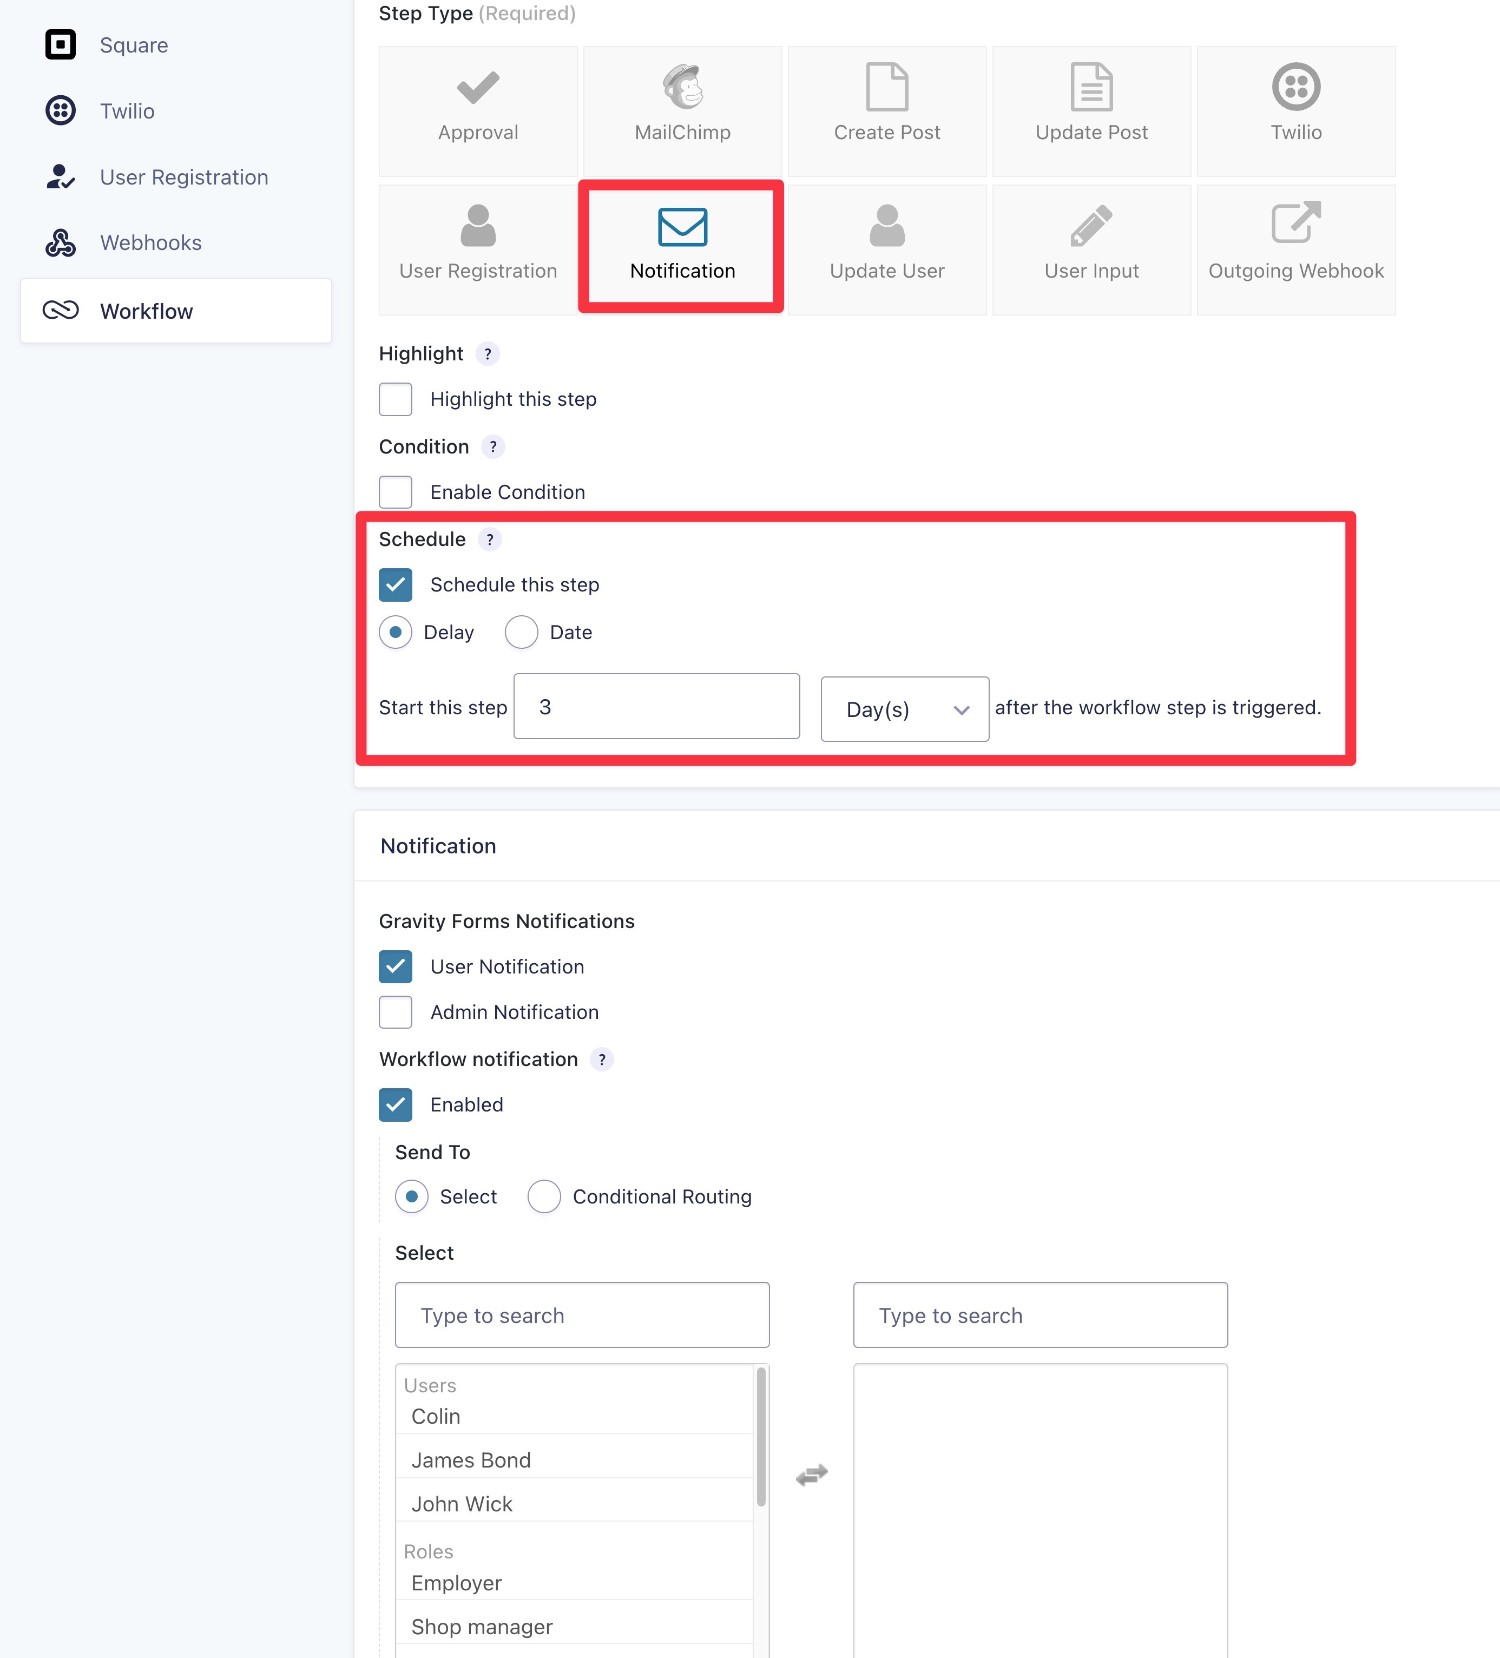
The simplest way to set up these types of sequences is to use Gravity Flow, a Gravity Forms Add-On that’s part of the official Gravity Forms family.
With Gravity Flow, you can set up custom workflows that include multiple email notifications (as well as other workflow steps, if needed).
You can schedule your emails in a few different ways:
- Based on the time the user submitted the form – e.g. send one email immediately, another three days after submission, another five days after submission, and so on. The timing will be unique for each recipient, which makes it great for drip campaigns.
- Based on another step in your workflow – e.g. send an email 24 hours after an admin approves the submission.
- Based on fixed dates/times – e.g. send an email to all form recipients on Friday, April 21 at 12 PM. This type of timing is great for reminder emails, such as reminding people 24 hours before your webinar event starts.
To set this up, you can follow our guide on how to create an email drip campaign with Gravity Flow.
If you’re comfortable working outside your WordPress dashboard, another way to set up these types of multiple email campaigns would be to use an email marketing service such as Mailchimp or Campaign Monitor.
Here’s how it might work:
- Install a Gravity Forms email add-on for your preferred service. E.g. if you’re using Mailchimp, you would install the Gravity Forms Mailchimp Add-On.
- Once you configure the add-on, Gravity Forms will automatically add users to your Mailchimp list.
- You can send emails and set up drip campaigns using Mailchimp’s interface.
How to Set Up Form Notification Emails in Gravity Forms
Ready to get started with your form notification emails?
Here’s a quick run-down on how to set them up…
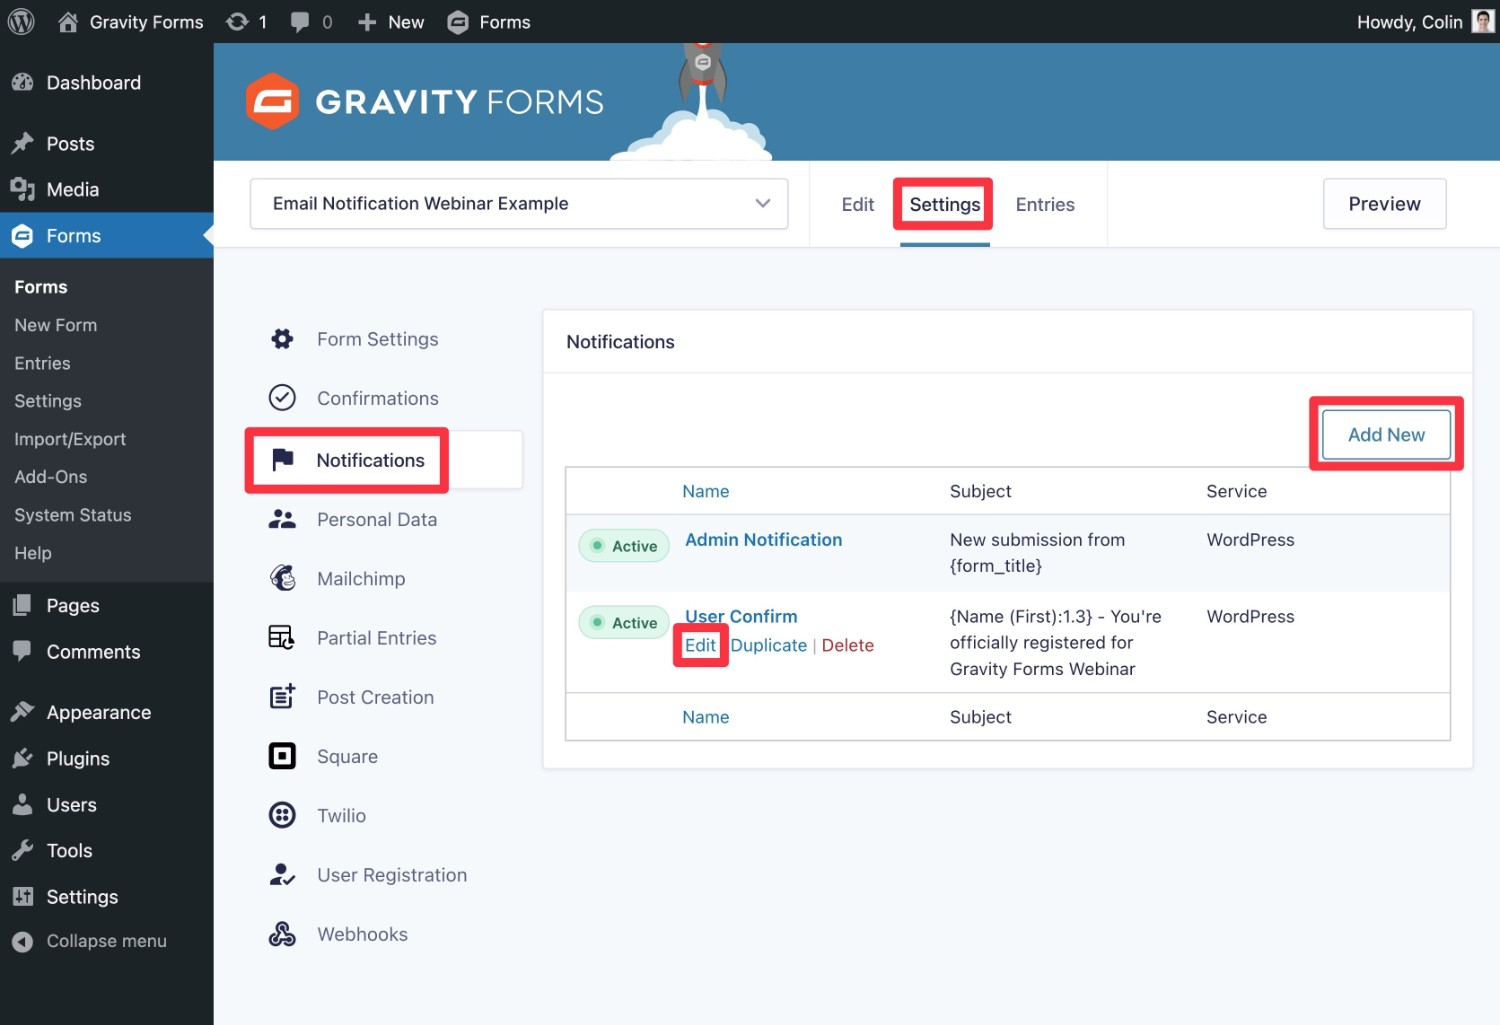
To get started:
- Open the form editor for the form for which you want to create email notifications.
- Go to Settings → Notifications.
- Edit the default form notification or click Add New to create a new notification.
Once you’re in the notification feed interface, here’s what to do:
- Set up the details
- Add a subject line – remember our tips from above.
- Add the body of the email using the WYSIWYG text editor, or the Text tab if you want to use your own HTML.
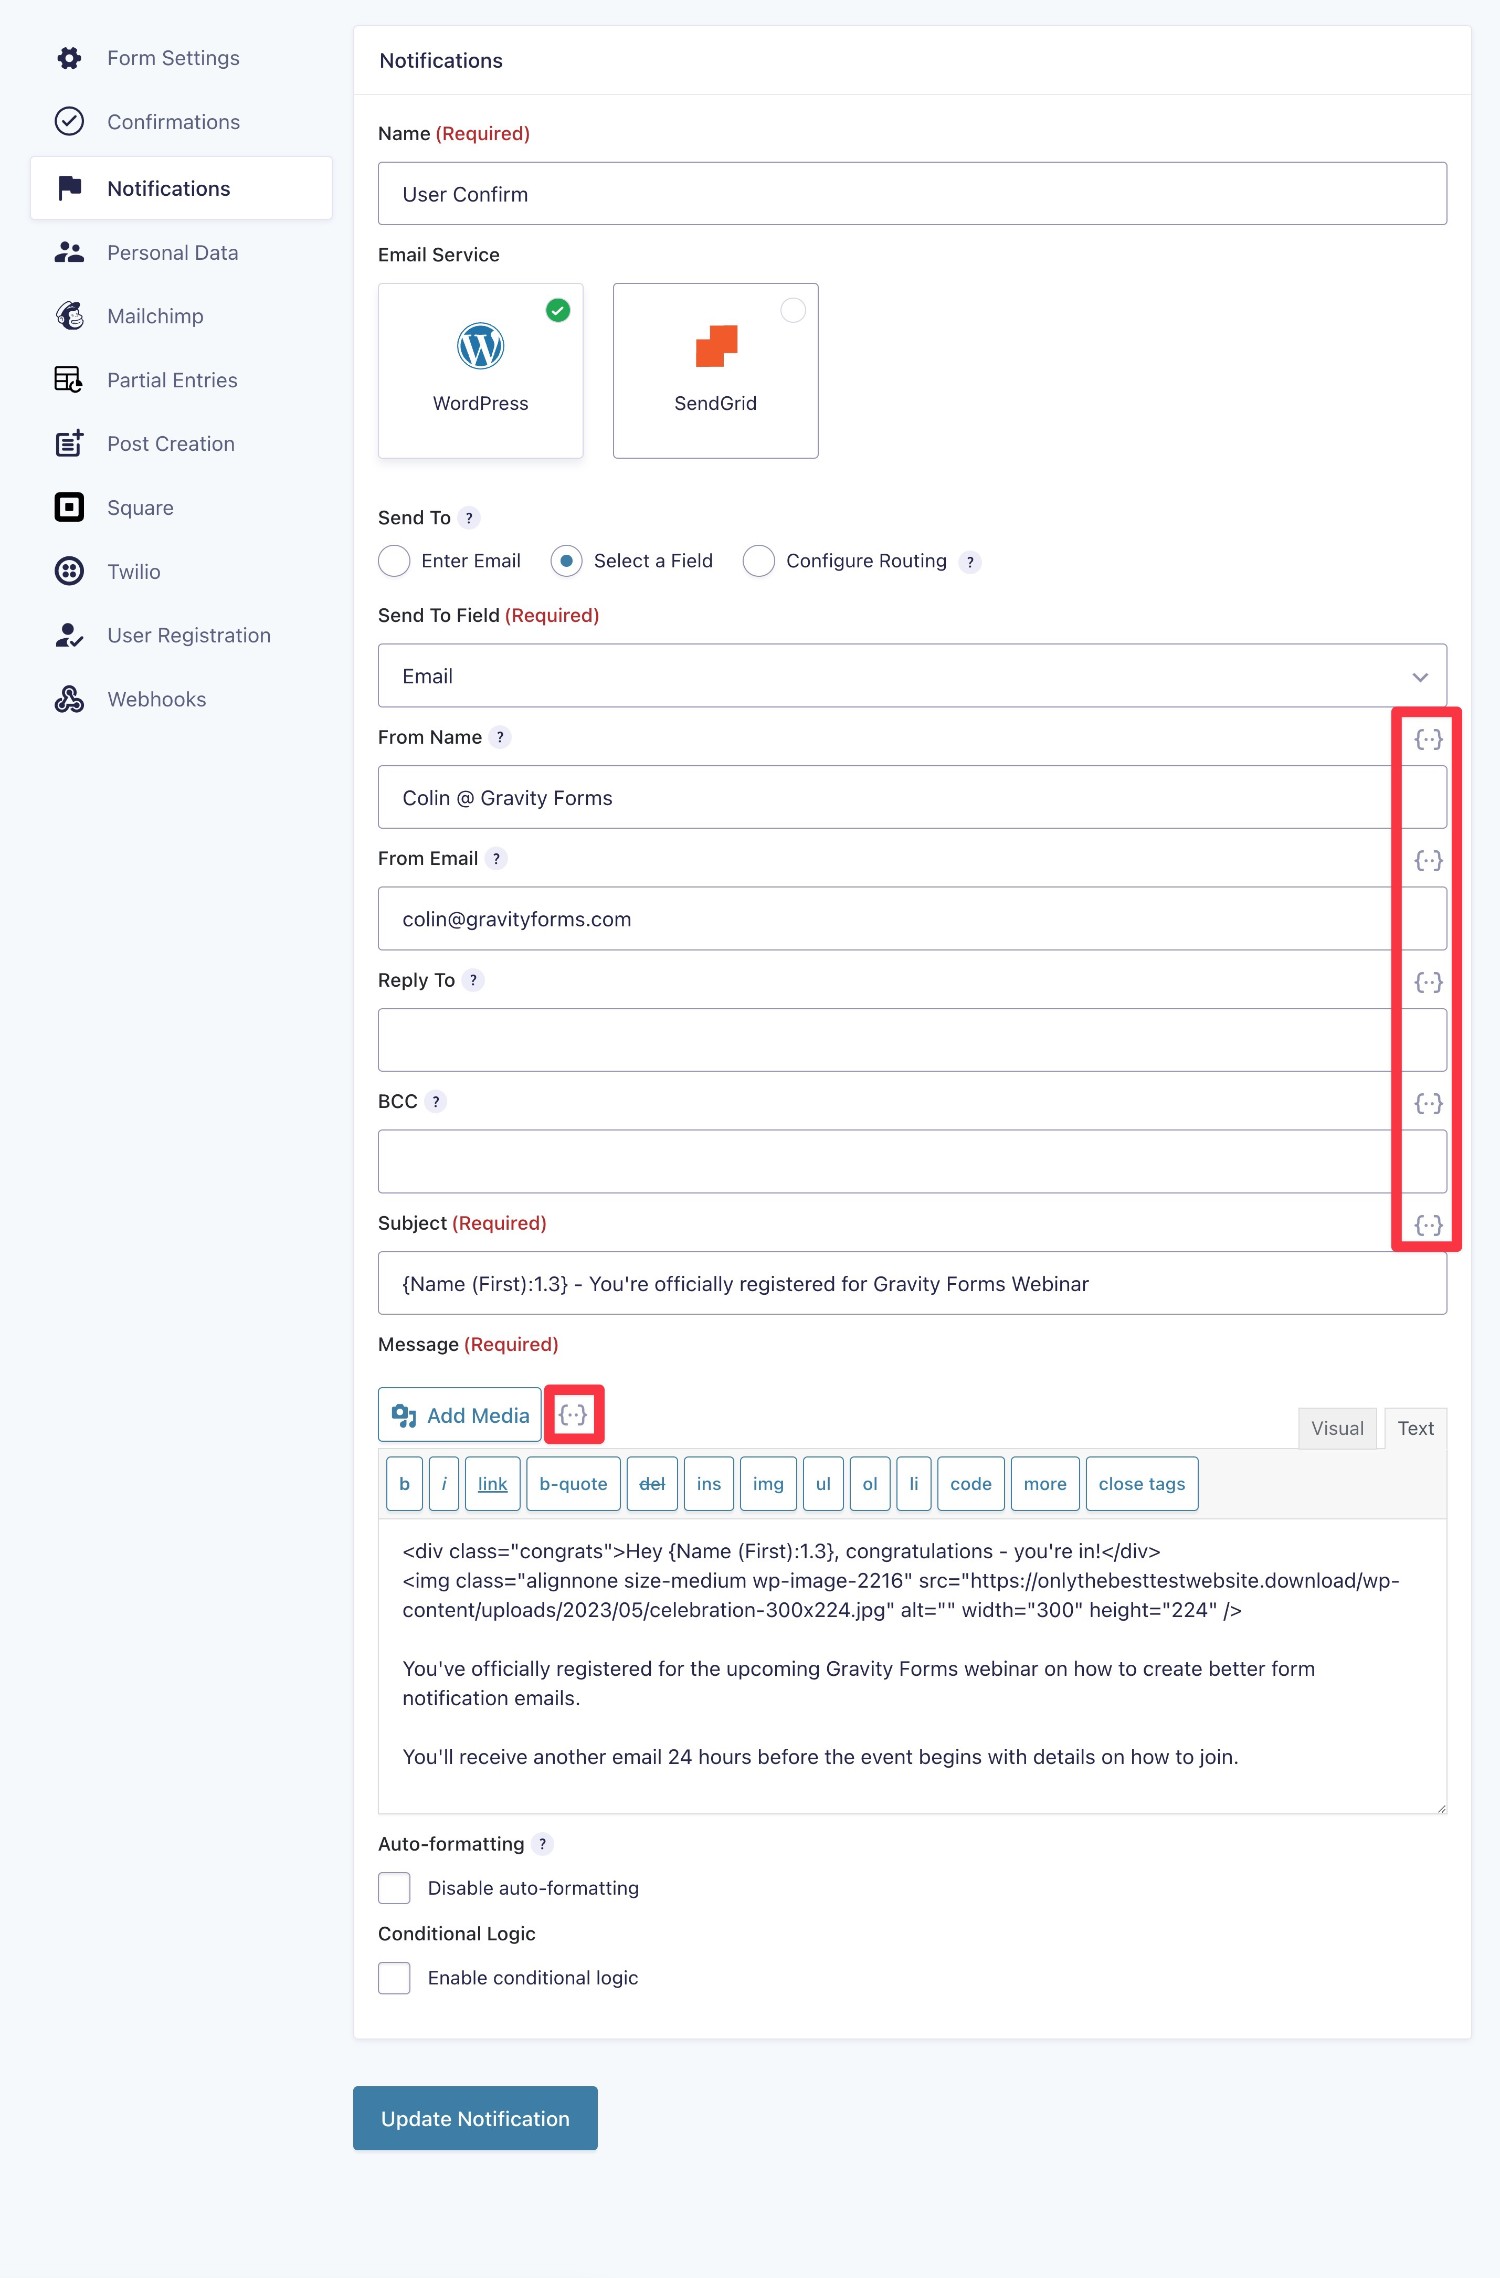
If you want to insert dynamic information to personalize your form notification emails, you can click on the merge tags icon to show all of the available merge tags for that form (annotated below).
You can additionally add conditional logic, as we discussed earlier, to send notification emails based on a users input.
Don’t forget to save your notification settings once you’re finished.
How to Help Your Form Notification Emails Make It into Users’ Inboxes
You could have the best form notification emails in the world, but that’s not going to matter if your users never actually see your emails because your emails end up in users’ spam folders.
Unfortunately, the default way that WordPress sends all of its emails (including form notifications) is prone to being flagged as spam.
If you want to help improve the delivery rate of your form notifications, you should consider using a dedicated transactional email sending service.
To set this up, Gravity Forms offers a number of official add-ons for popular transactional email services:
To learn more, check out our full guide on how to send form notifications using a transactional email service.
Start Writing Better Form Notification Emails Today
If you want to create a great experience for all of your users, it’s important to get your form notification emails right.
With Gravity Forms, you get access to all of the tools that you need to craft great form notification emails.
If you’re ready to get started, purchase Gravity Forms today and set up your first form and notification email.
Or, if you want to test the notification functionality for yourself, you can spin up a free, fully functioning demo site to play around with the email notification editor.

If you want to keep up-to-date with what’s happening on the blog sign up for the Gravity Forms newsletter!
"*" indicates required fields


