Starter guide: How to create an event sponsorship form on WordPress

If you’re trying to attract sponsors for your event, creating an online event sponsorship form is a great strategy.
With an online form, you can collect all of the details that you need from sponsors (including file attachments) and process their payments directly from the form.
With the Gravity Forms event sponsorship form template, you can easily set up this functionality on WordPress.
In this post, we’ll show you step-by-step how to create an event sponsorship form on WordPress, including accepting sponsors’ payments as part of the form.
Key features of the Gravity Forms event sponsorship form template
To help you quickly get up and running, the Gravity Forms plugin includes a premade event sponsorship form template, which you can preview here.
Here are some of the main reasons why this template can be a great solution for your event:
- Full customization – While the template comes with all of the essential fields that an event sponsorship form requires, you can still fully customize it to your needs. This includes adding, editing, and removing form fields as needed.
- Unlimited sponsorship levels – If you offer multiple sponsorship levels, you can easily add as many levels as needed, each with its own price.
- Built-in payment functionality – The template includes everything you need to accept payment directly from your sponsorship form. The template uses Stripe for payments by default, but you could easily swap in other payment processors such as PayPal, Square, Mollie, and others.
- File uploads – You can let sponsors upload files, which can be useful for letting them upload their logos, marketing materials, or any other files that you need as part of their sponsorship.
- Conditional logic – You can use conditional logic rules to customize your form based on a sponsor’s input, such as displaying different form fields or processing their payment in a different way.
- Multipage layout – The template uses a multi-page layout to make it easier for sponsors to submit the form (though you can easily change this to a single long form if you prefer that approach).
How to create a WordPress event sponsorship form with Gravity Forms
Now, we’ll go over the full step-by-step guide on how to set up your own event sponsorship form using Gravity Forms and its event sponsorship form template.
1. Install Gravity Forms and add-ons
To use the event sponsorship form template, you’ll need the following:
- The core Gravity Forms plugin – You’ll want to install the core plugin and add your license key, if you haven’t already done so.
- One of the official Gravity Forms payment add-ons – This is what allows you to accept payments directly from your form. The template uses Stripe by default, but you could use a different payment processor if you prefer.
- Optional add-ons for other features – While these aren’t required to use the template, you might want to install other add-ons based on your specific use case. We’ll discuss some common options in the tutorial below.
To access the Gravity Forms Stripe Add-On (as well as most of the other payment add-ons), you’ll need at least the Gravity Forms Pro license. You can also access them on the Elite and Nonprofit licenses.
If you don’t have that license yet, you can purchase your license here or upgrade your existing Basic license and only pay the prorated difference.
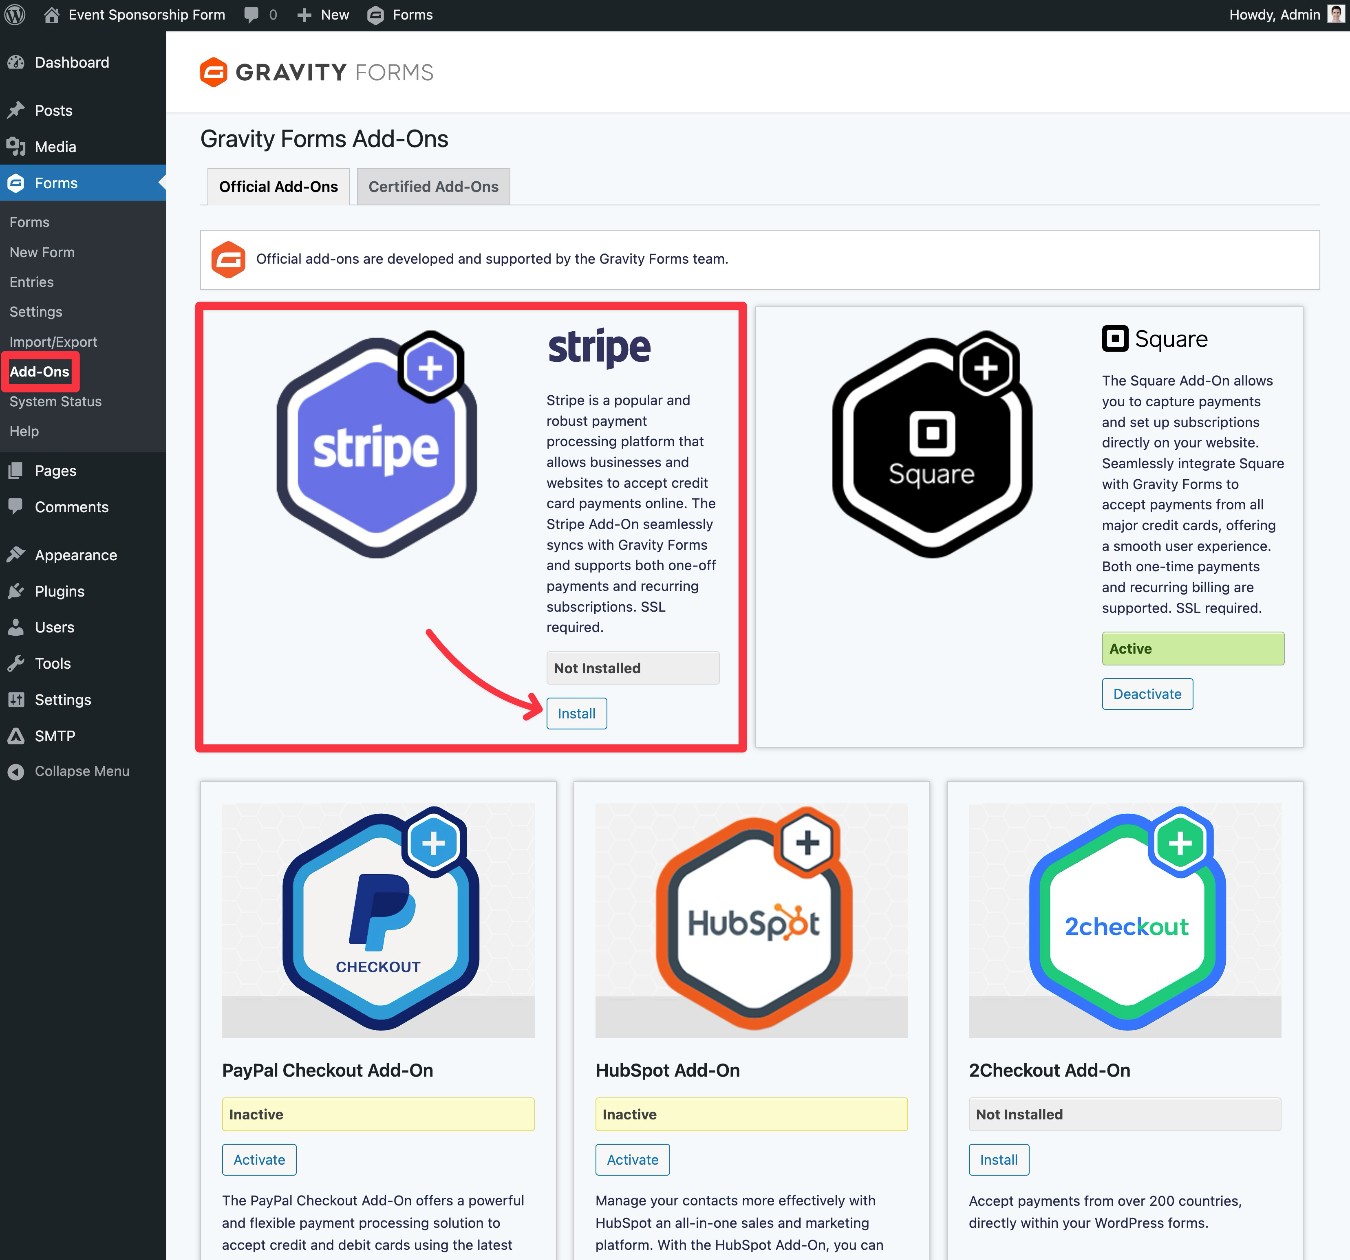
Once you’ve installed the core Gravity Forms plugin and added your license key, here’s how to install add-ons:
- Go to Forms → Add-Ons in the WordPress dashboard sidebar.
- Find the add-on that you want to install in the list – e.g. the Stripe Add-On for this tutorial.
- Click Install.
- Once the installation finishes, make sure to click Activate Plugin.
2. Connect Gravity Forms to Stripe (or other payment gateway)
Next, you’ll need to connect Gravity Forms to the payment processor that you want to use to collect money from event sponsors.
For this guide, we’re going to show you how to do everything using Stripe. However, the same basic principles will apply to any of the other payment processors that Gravity Forms supports.
We’ll cover the quick version below, but here are links to the official documentation for some of the popular gateways:
Our ultimate guide to Gravity Forms and Stripe also covers the setup process in full detail.
Register for a free Stripe account
If you haven’t already done so, the first step is to register for a free Stripe account.
Connect Gravity Forms to Stripe
Once you have a Stripe account, the next step is to connect the Gravity Forms plugin to your Stripe account.
Here’s how to get started:
- Open your WordPress dashboard.
- Go to Forms → Settings to open the Gravity Forms settings area.
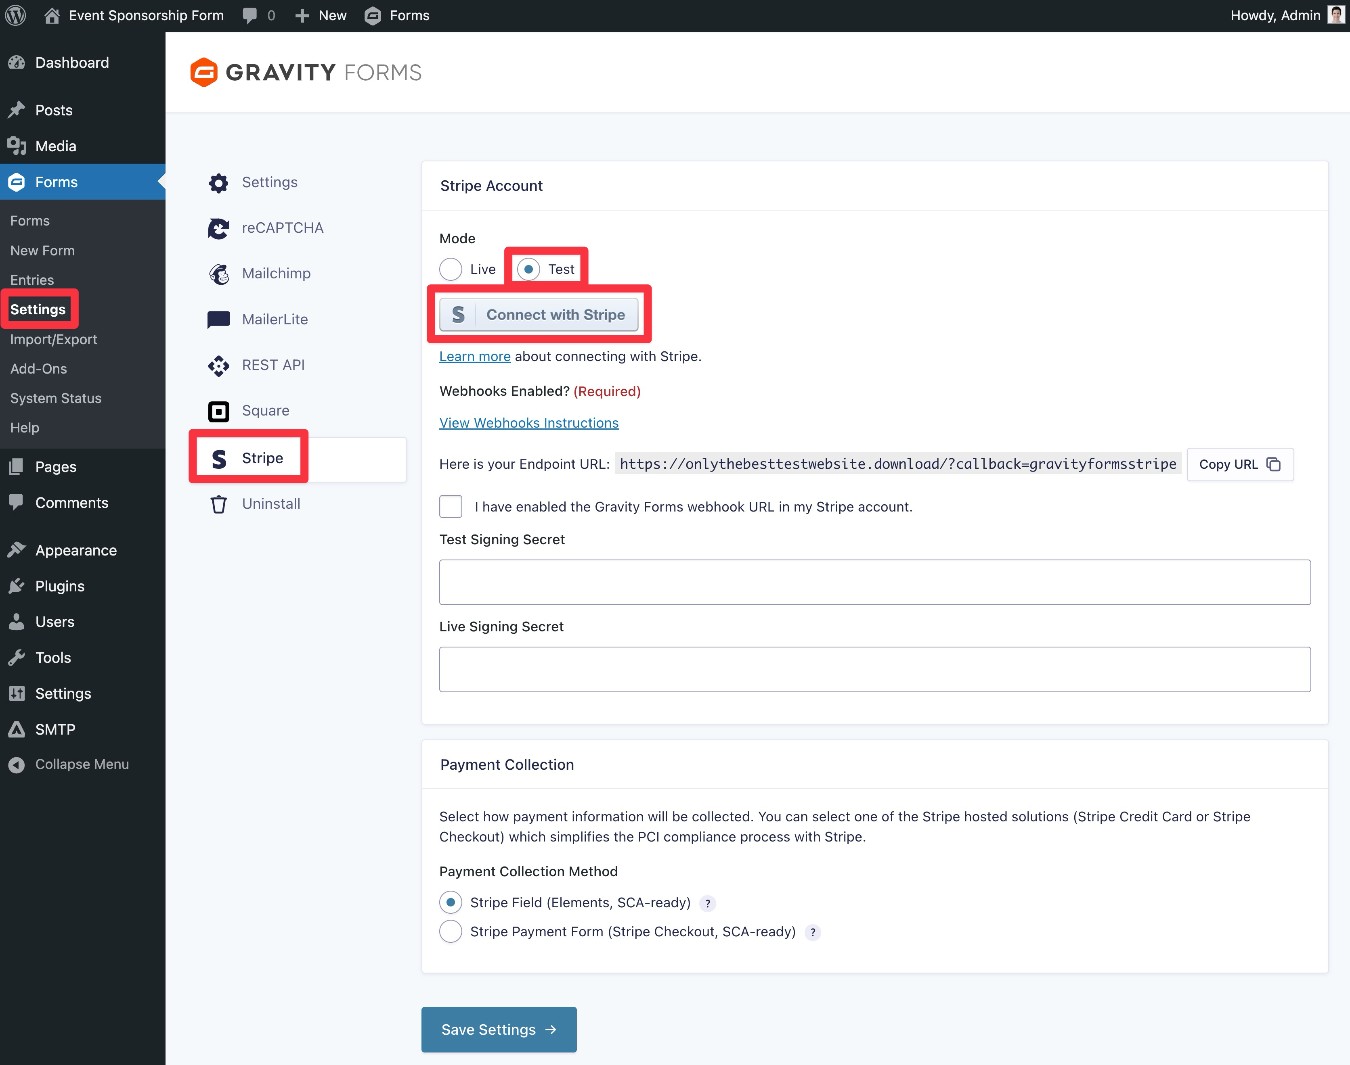
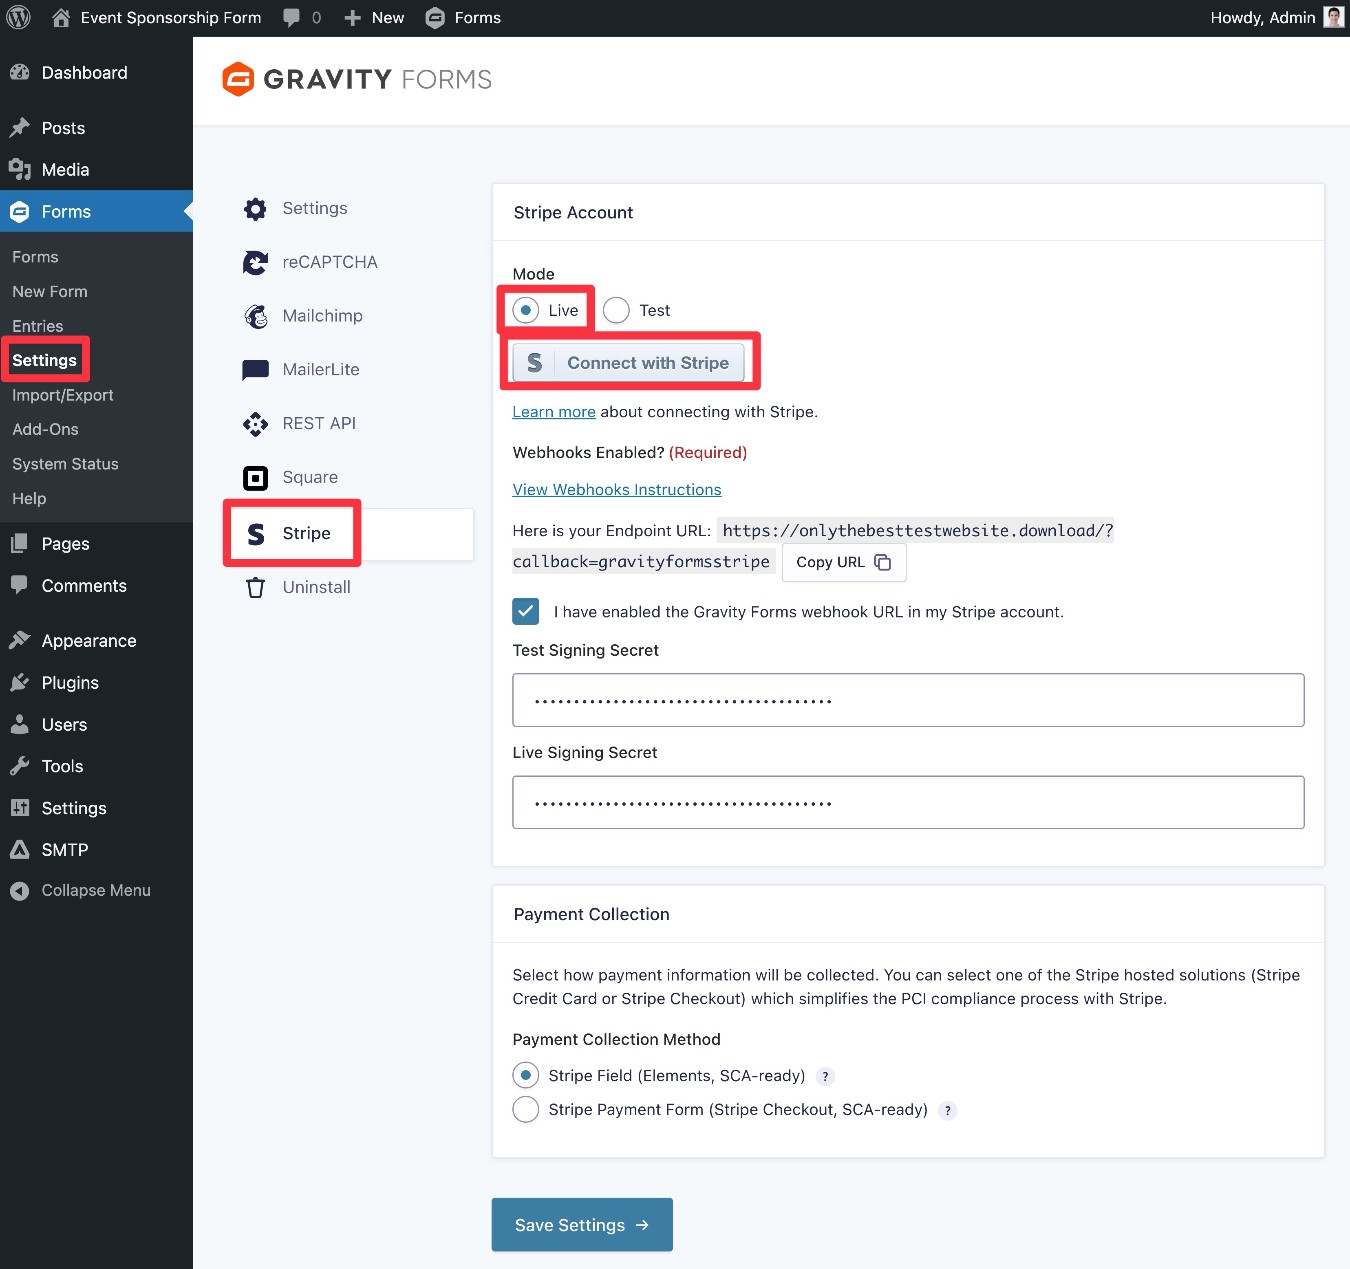
- Select the Stripe tab in the settings area.
In the Stripe settings, you can choose between connecting to Stripe in Live or Test mode. We recommend starting with Test mode, as it will let you test your sponsorship form with dummy payments.
When you’re ready to accept real payments from sponsors, you can just come back and connect in Live mode, which we’ll cover later in the guide.
To do this, select the Test radio button and then click Connect with Stripe.
You should be taken to the Stripe authorization flow – log in to your Stripe account and click Connect.
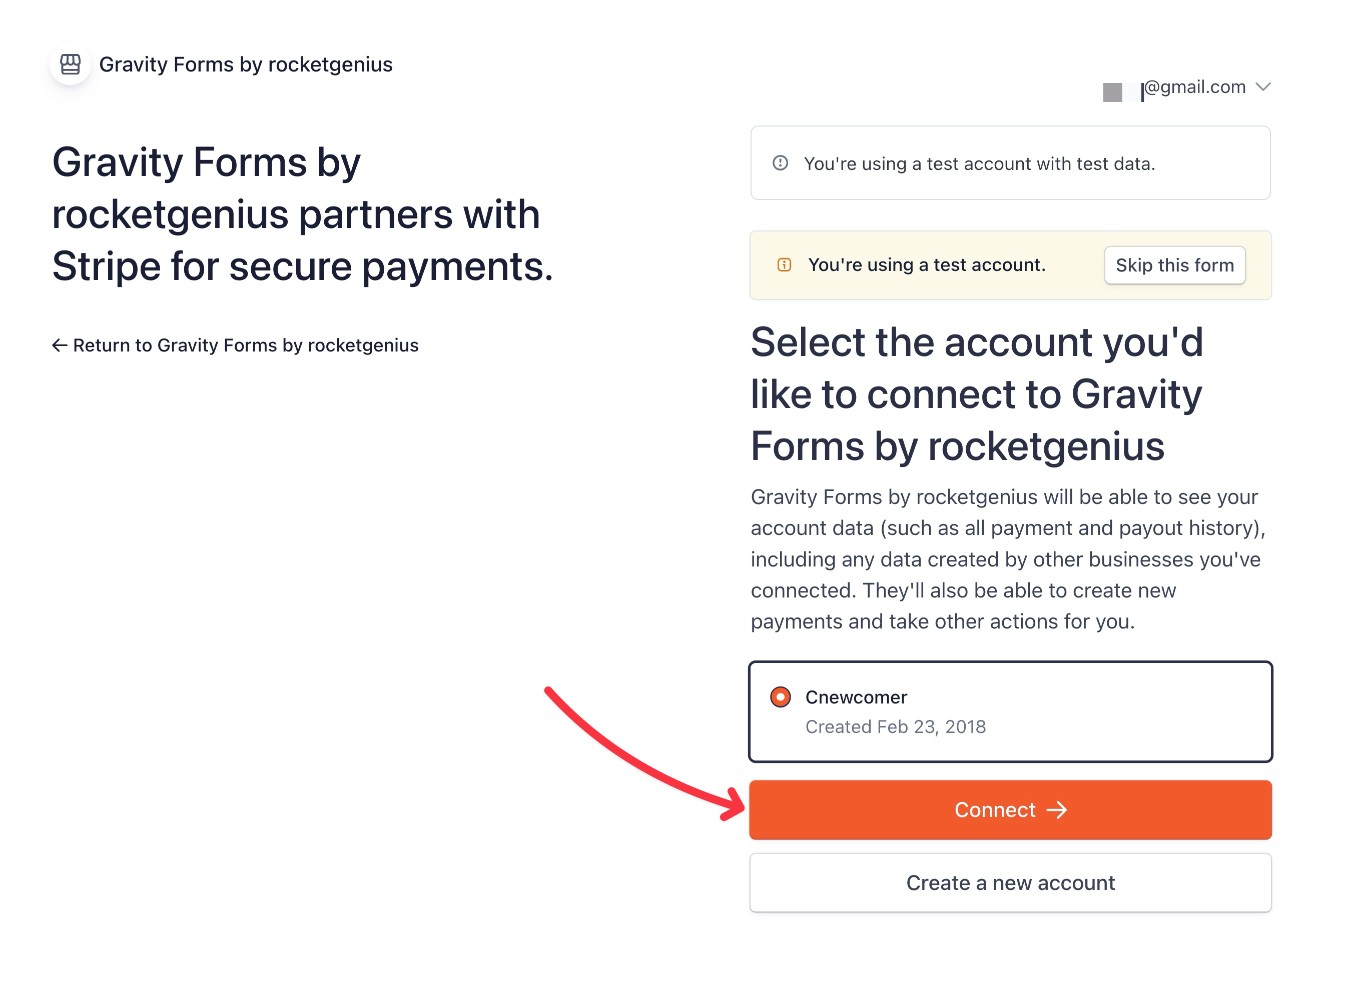
You should then be taken back to your WordPress dashboard.
Enable webhooks and add keys
Next, you need to set up webhook endpoints in Stripe and then add the webhook signing keys to the Gravity Forms settings.
For a full tutorial on how to do this, you can read the documentation article here or our ultimate guide to Stripe and Gravity Forms.
You can do this using Stripe Workbench – here are the relevant links for Test and Live mode:
Note: You must add the webhook endpoint in both modes.
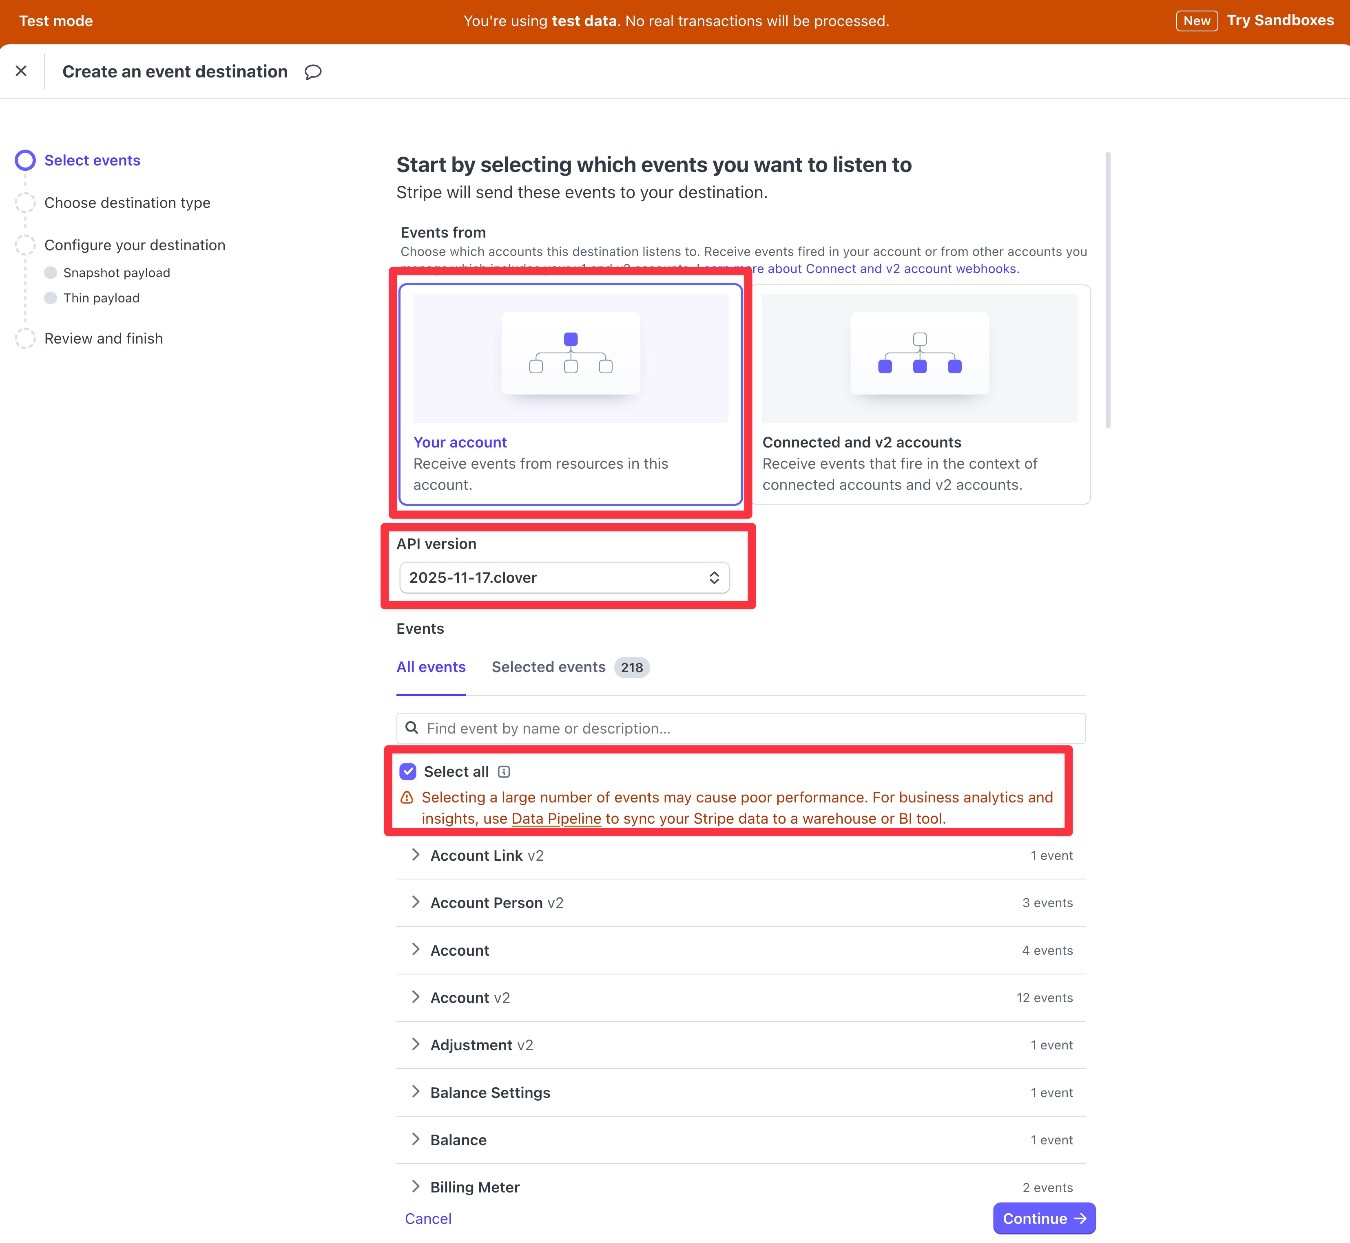
When you get to the Snapshot payloads and Thin payloads interfaces, paste in the endpoint URL from the Gravity Forms settings in your WordPress dashboard.

On the final screen, click Add destinations.
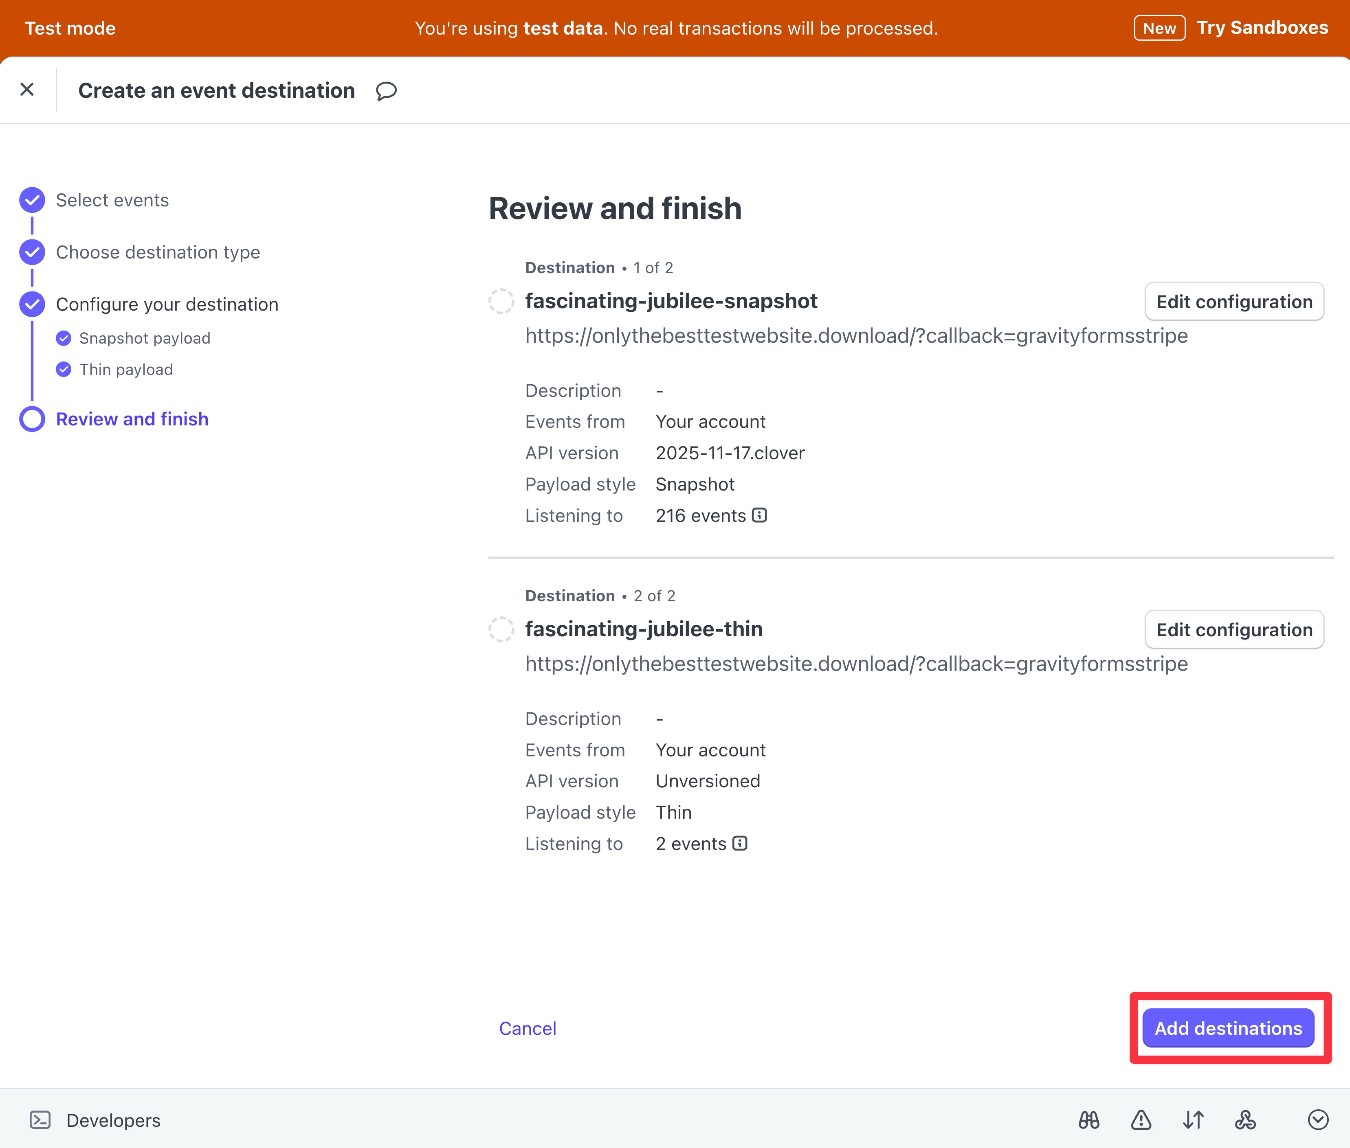
Stripe will then provide you with your Signing secret. Copy the value from the first destination at the top.
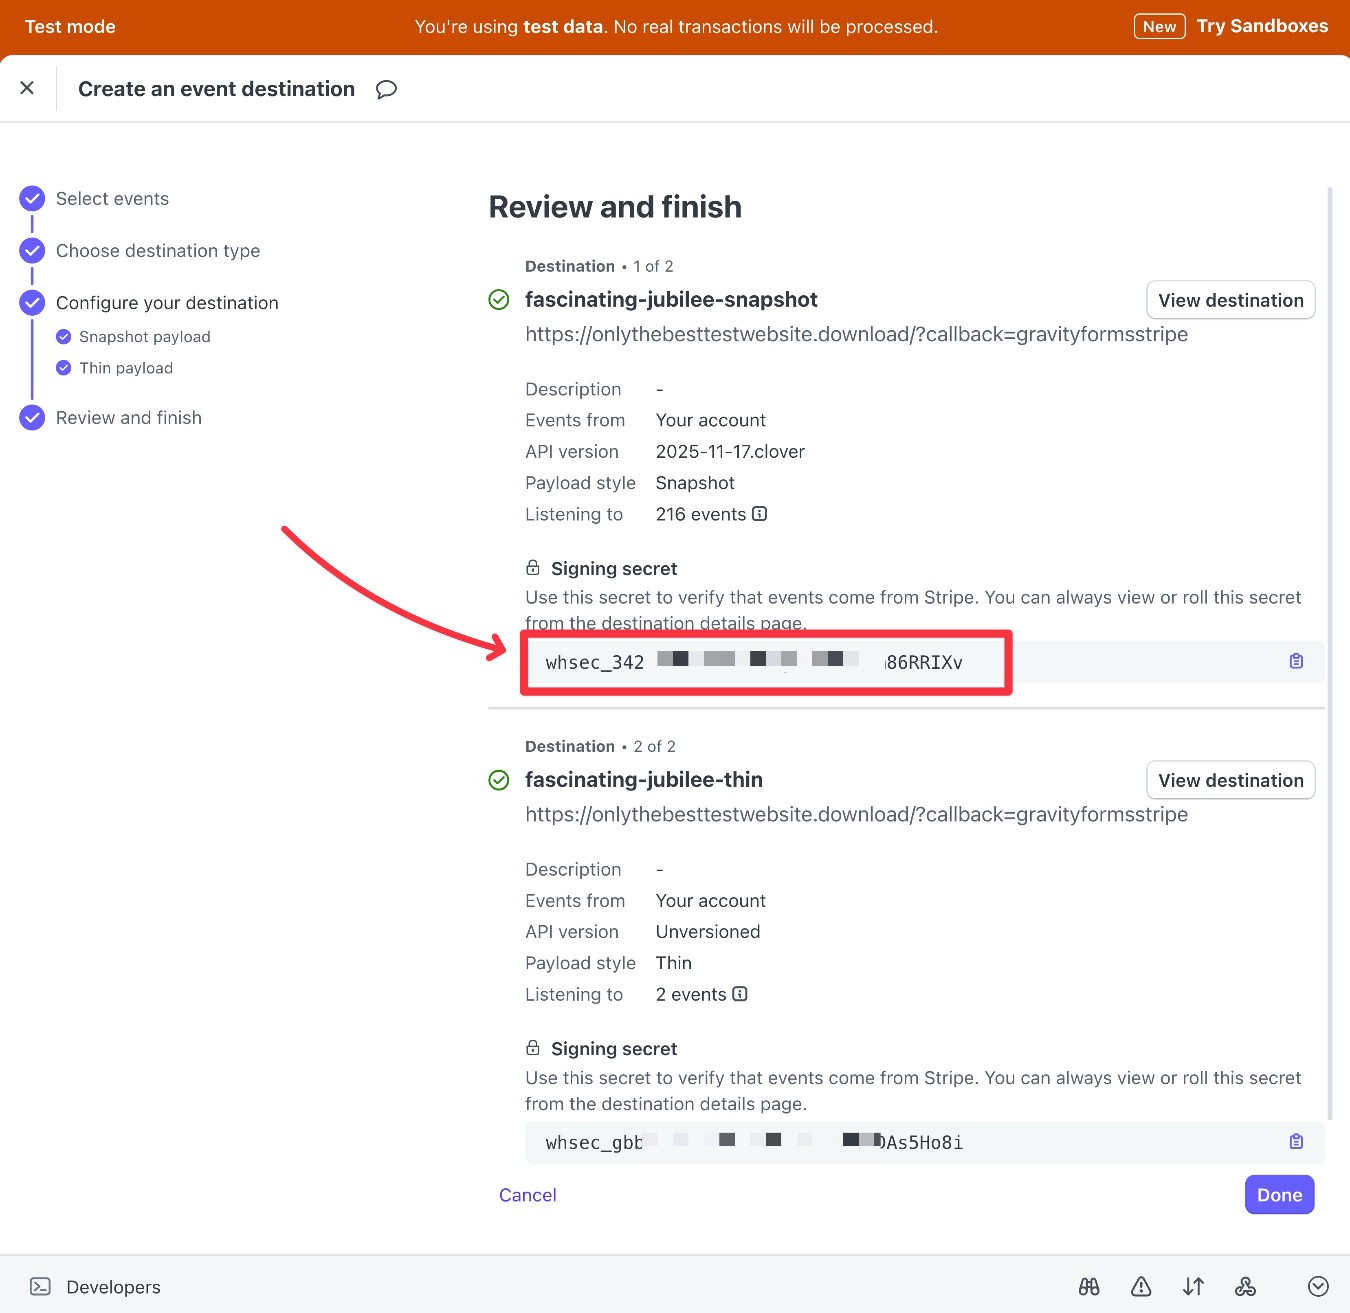
Then, paste this value into the relevant box in the Gravity Forms settings area. Because we set up this webhook endpoint in Test mode, we pasted the Secret key into the Test Signing Secret box.
Now, repeat the exact same steps but for Live mode:
- You can use this link to add a webhook endpoint in Live mode, and all of the steps are exactly the same.
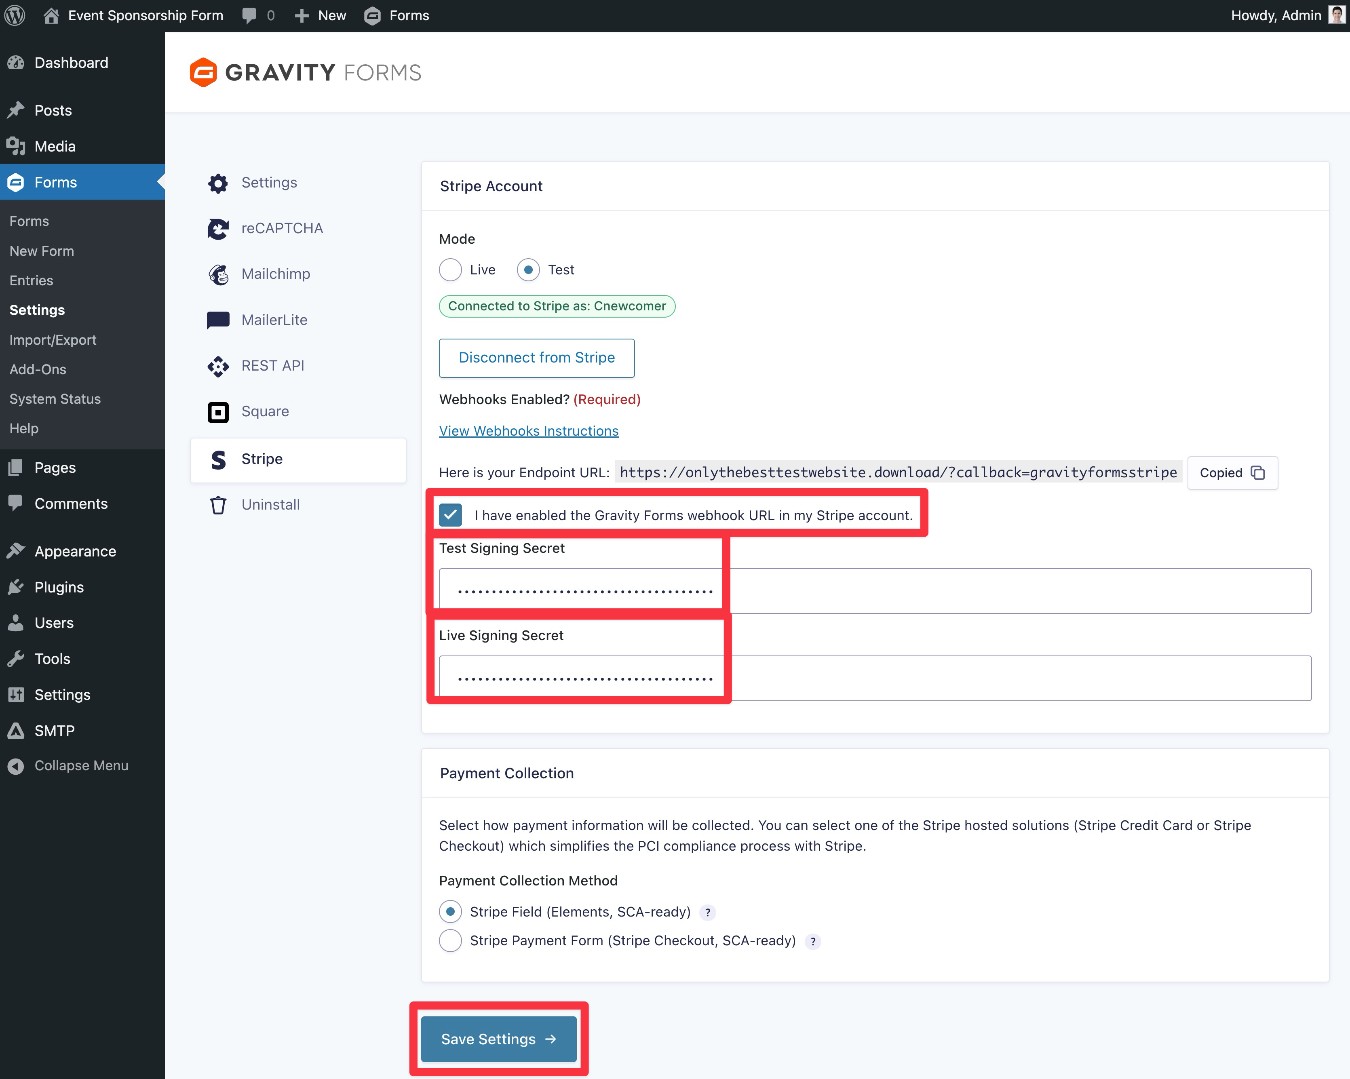
- Once you’ve added the live webhook endpoint, paste the Live mode Signing secret into the Live Signing Secret box in Gravity Forms.
- Check the box for I have enabled the Gravity Forms webhook URL in my Stripe account.
- Click Save Settings at the bottom.
3. Create a form using the event sponsorship form template
Once you’ve connected Gravity Forms to your payment processor, you’re ready to set up your actual sponsorship form:
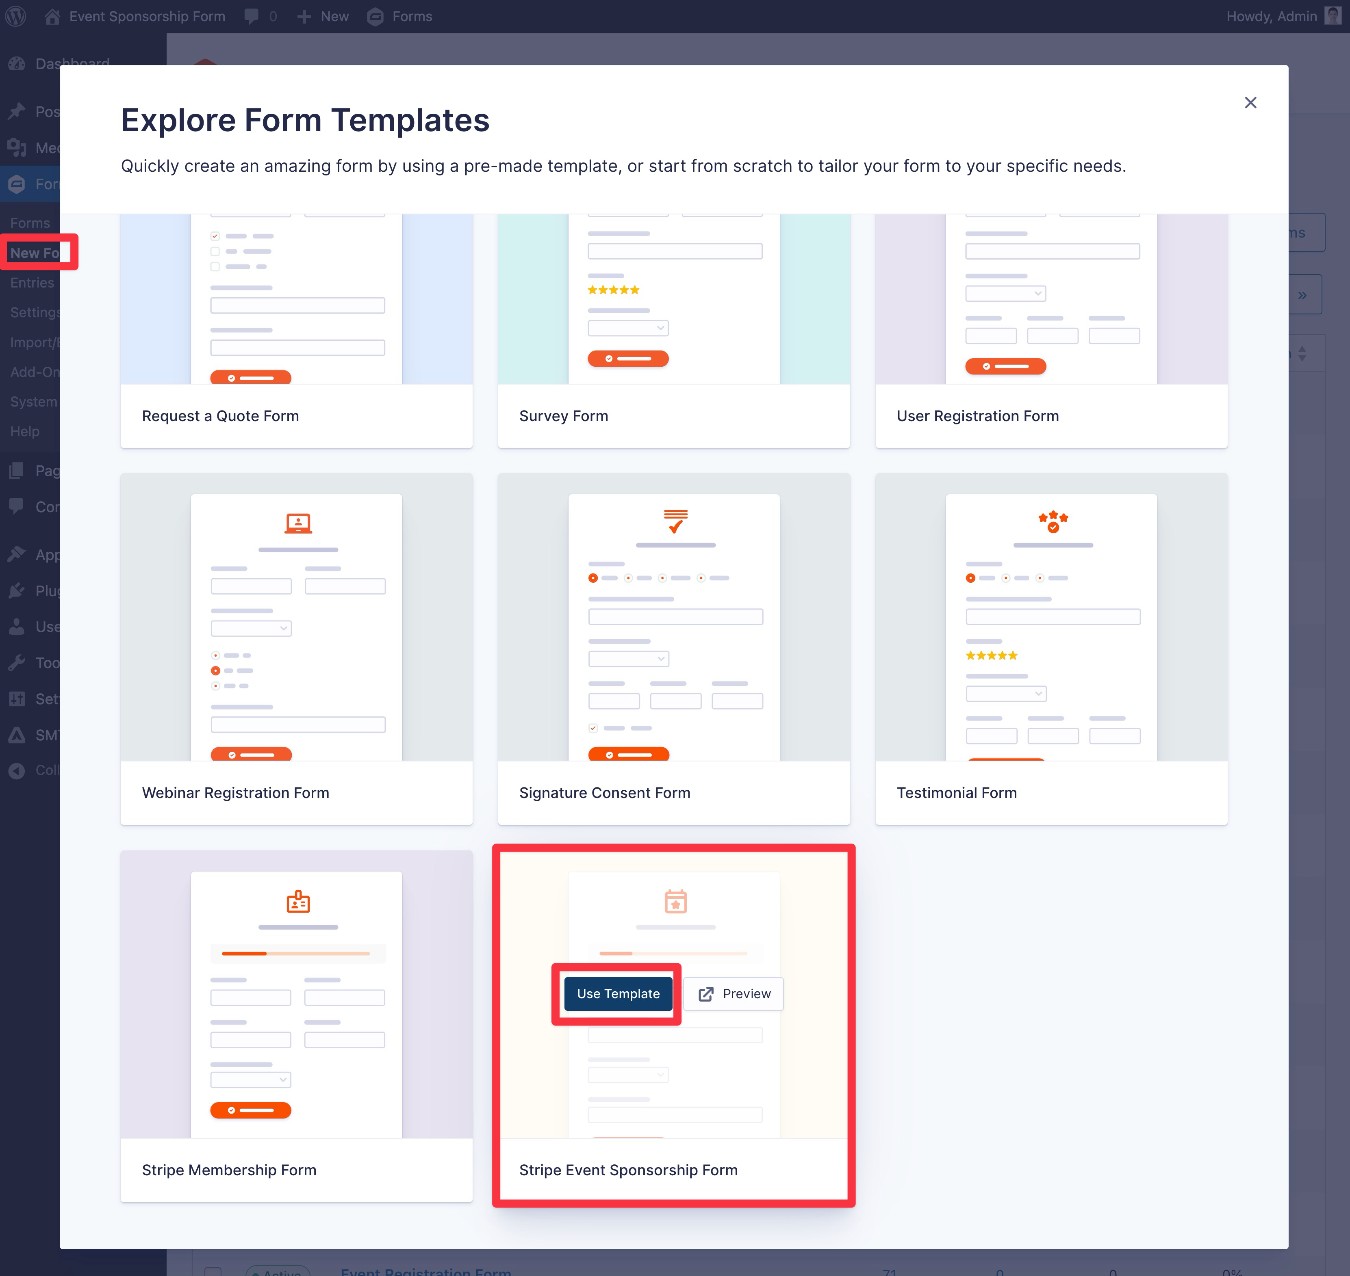
- Go to Forms → New Form in your WordPress dashboard.
- Find the Stripe Event Sponsorship Form template in the list of available templates.
- Hover over the template and select Use Template.
- In the popup that appears, give your form a name and an optional description. Then, click Use Template again to continue to the Gravity Forms editor.
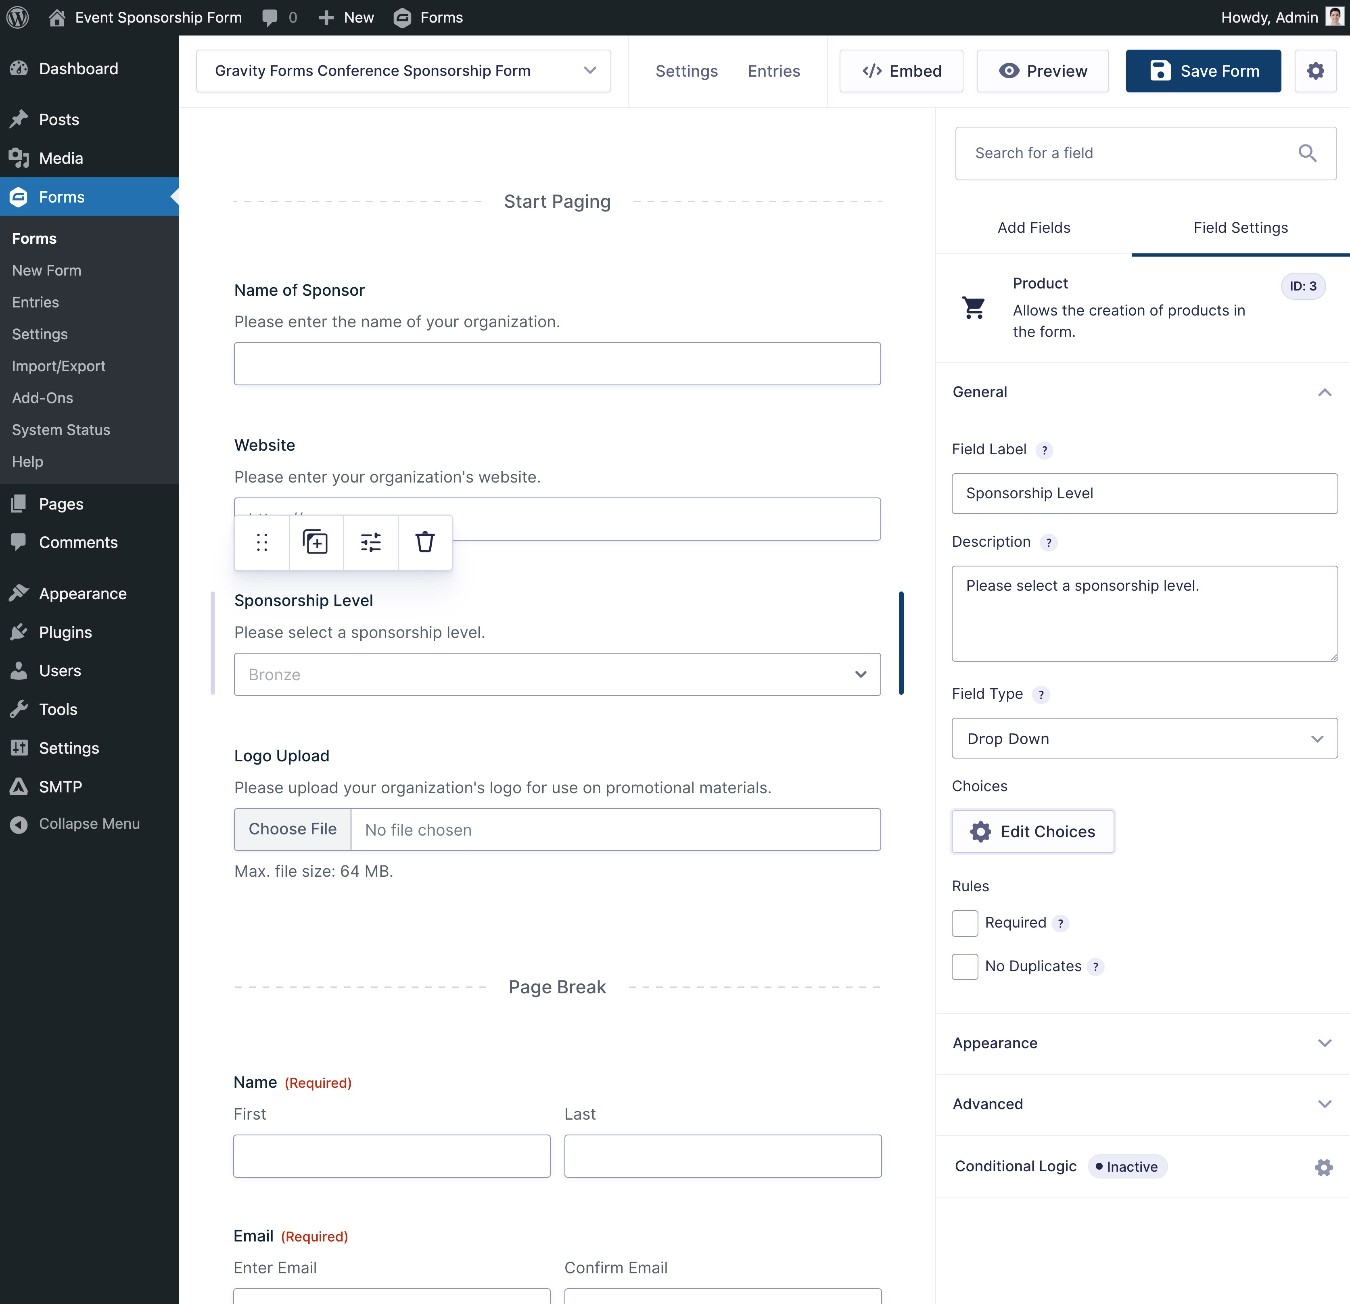
4. Customize your event sponsorship form
Now, you should be in the drag-and-drop form editor.
Here, you can customize the template to match your unique use case. You can…
- Add new fields to collect additional information from your sponsors.
- Edit the existing fields in the event sponsorship form template to adjust them to your use case.
- Delete any fields from the template that don’t apply to your use case.
- Add new pages to the multi-page layout, if you want to divide your form into additional pages (just add the Page field where you want the page break to be).
One field to focus on is the “Sponsorship Level” Product field, which lets you control the different levels that are available to sponsors (and the price of each).
The event sponsorship form template also includes the Consent field, which lets you add your sponsorship agreement. The field will store the full value of the agreement, which means you’ll have a record of both the sponsor agreeing to the terms and what the terms were at the time that the sponsor submitted the form.
You also might want to customize the Stripe field at the bottom. However, you’ll need to wait to do this until you’ve created a Stripe feed in the next step. This would let you set up additional payment methods beyond credit and debit cards, such as various bank transfer methods.
Once you’ve finished customizing the fields in your form, make sure to click the Save Form button in the top-right corner.
5. Create a Stripe feed to properly process sponsor payments
Once you’re happy with the form fields in your form, the next step is to create a Stripe feed (or a feed for whichever payment processor you’ve chosen to use).
The Stripe feed lets you control the connection between your form and Stripe, including details such as:
- How much to charge sponsors – e.g. which field should Gravity Forms use to calculate the payment amount.
- Whether to charge customers one time or set up a recurring subscription.
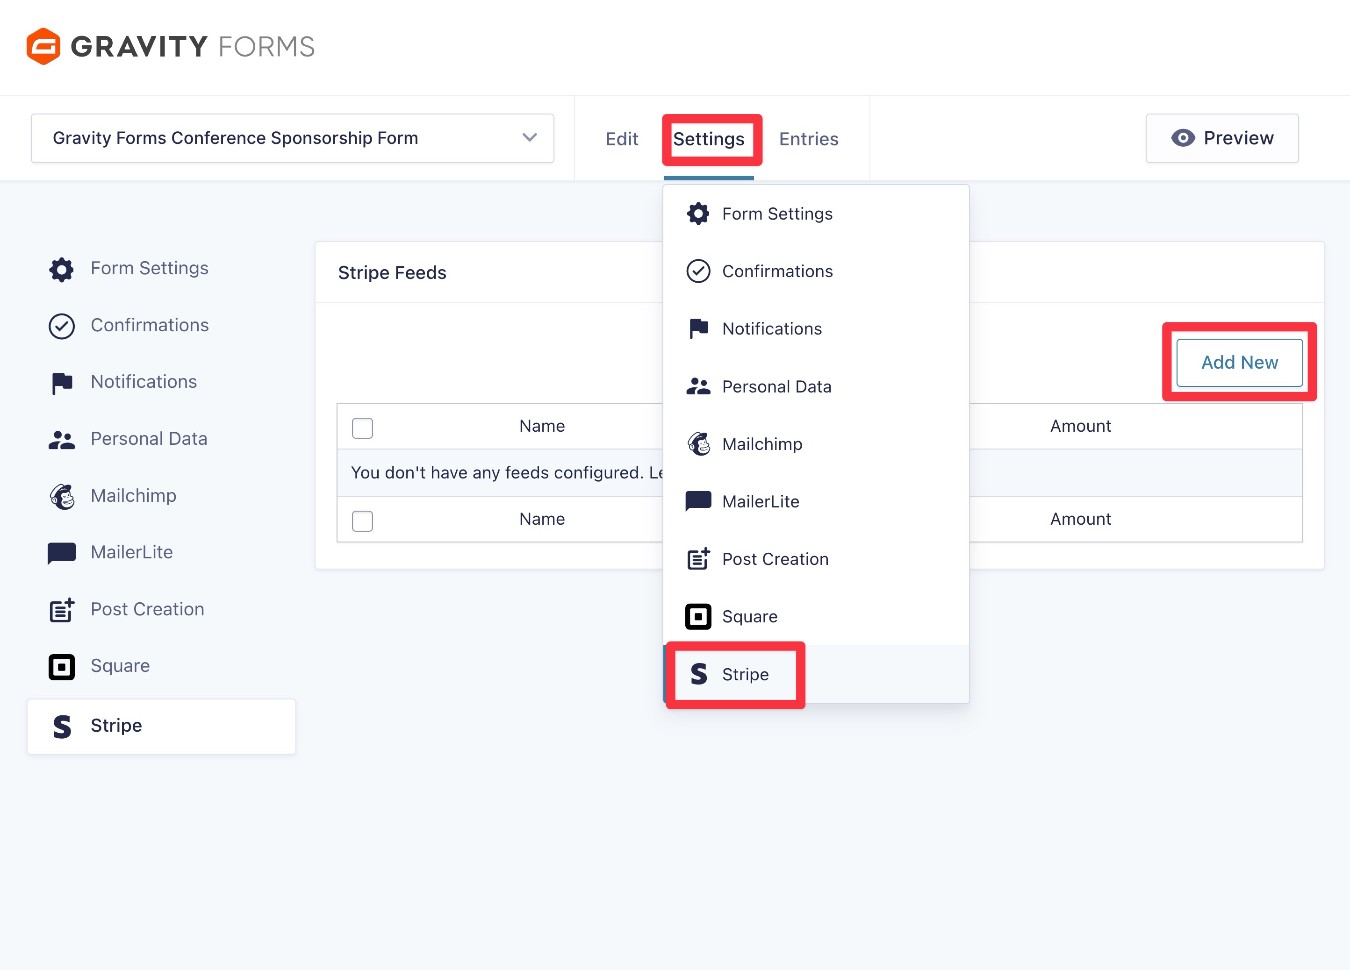
To create a feed, go to Settings → Stripe in the form editor interface. Then, click the Add New button to create a new feed.
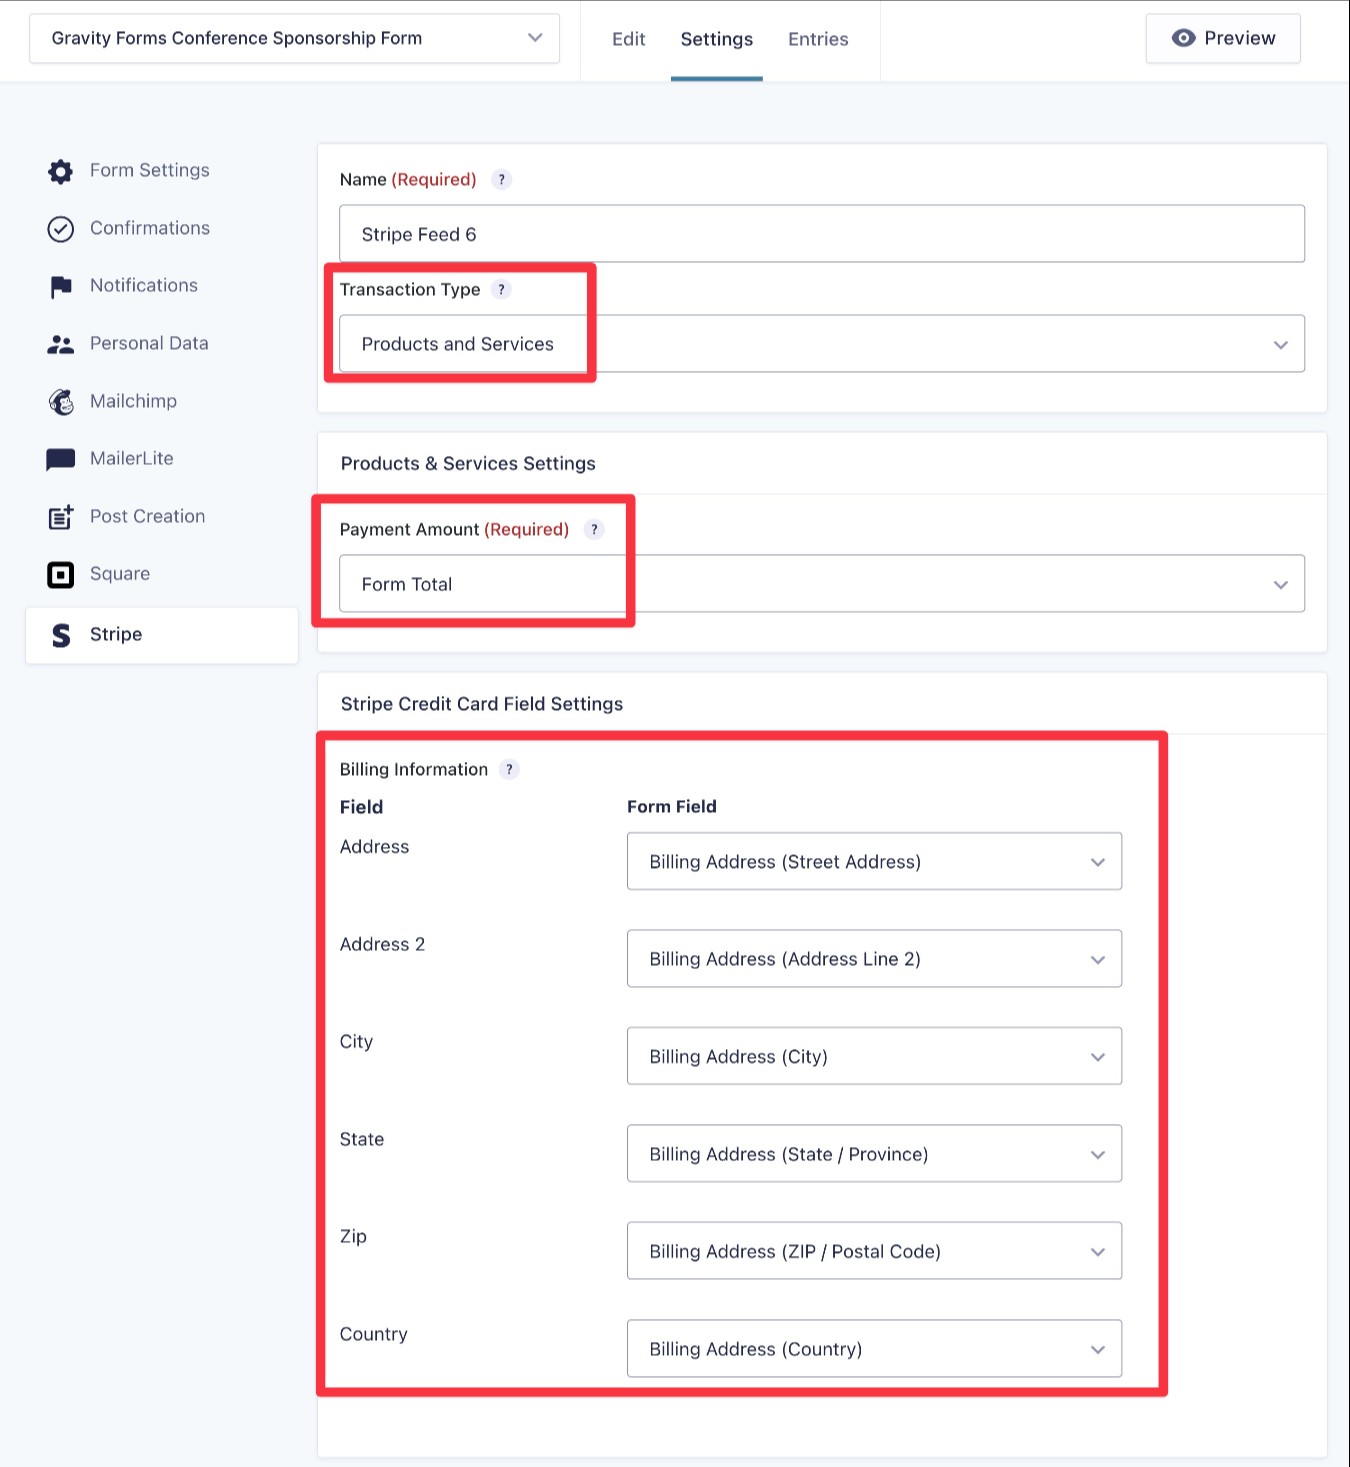
Then, you’ll be in an interface where you can customize the feed.
First, choose the Transaction Type:
- Products and Services – Use this to collect a one-time payment.
- Subscription – Use this to set up a recurring subscription.
For the screenshots below, we’ll assume that you’re collecting a one-time payment. However, the same basic principles also apply to subscriptions – you just get a few additional options.
Once you’ve chosen the transaction type, you’ll see some new options to configure the feed.
First, choose which form field you want to use as the Payment Amount, which controls the amount that customers will be charged.
Most of the time, you’ll want to choose the Form Total field, but you could choose a different option if it fits your use case.
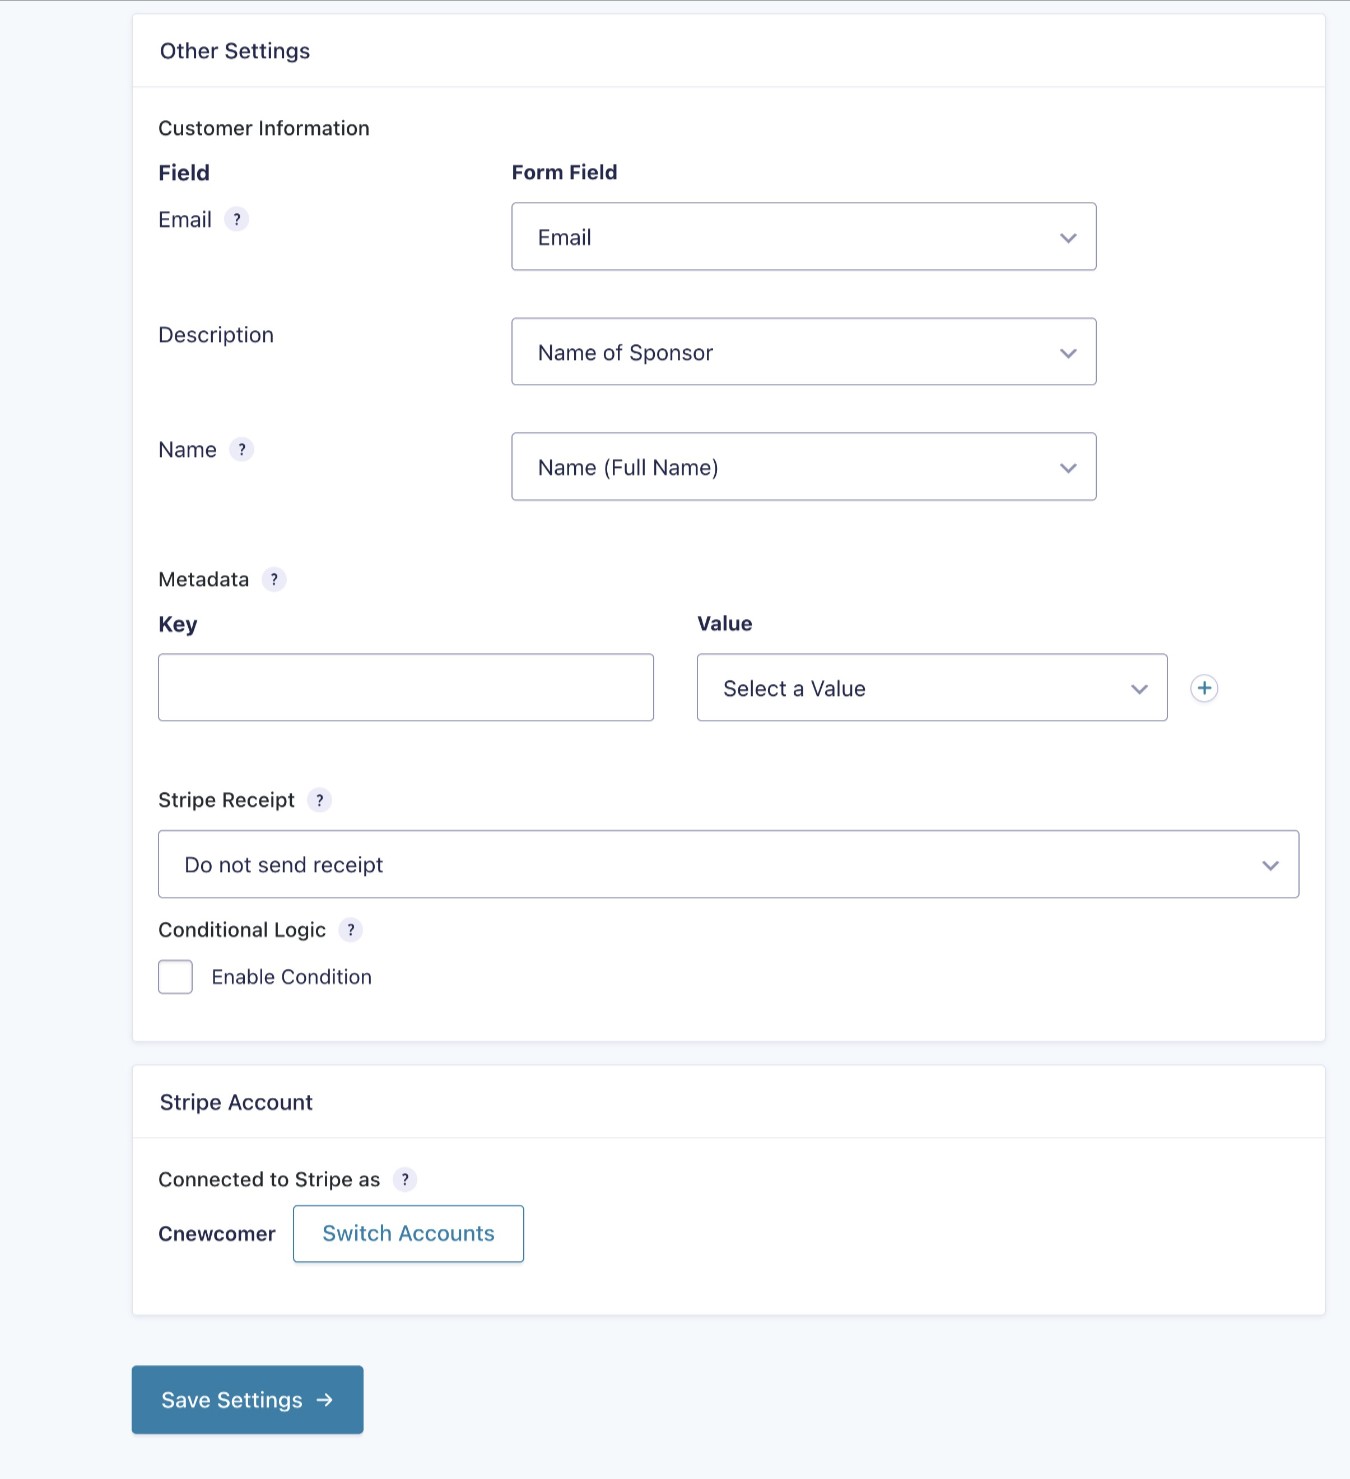
Below that, you can map the customer data fields from your form to the applicable fields in Stripe, such as a sponsor’s address, email, and name. If needed, you can also map custom data to Stripe using the Metadata option.
Further down, you can also choose whether to send a Stripe receipt after a sponsor makes the payment. If you do want to send a receipt, you can choose which email address to send it to.
Finally, you also have the option to set up conditional logic rules. These let you choose to only process a payment with these settings if certain conditions are met.
You probably don’t need to use conditional logic for a basic event sponsorship form. However, it does open up some interesting options, such as giving sponsors a choice between making a one-time payment upfront or setting up a payment plan.
If you wanted to set this up, you could do it something like this:
- Add a field to the form that lets sponsors choose between a one-time payment or a subscription/payment plan.
- Create two Stripe feeds – one configured for one-time payments and another configured for subscription payments.
- Add conditional logic rules to both feeds so that only one feed will execute, based on how sponsors answer the field that you added to the form.
Once you’ve made all of your choices, click the Save Settings button at the bottom.
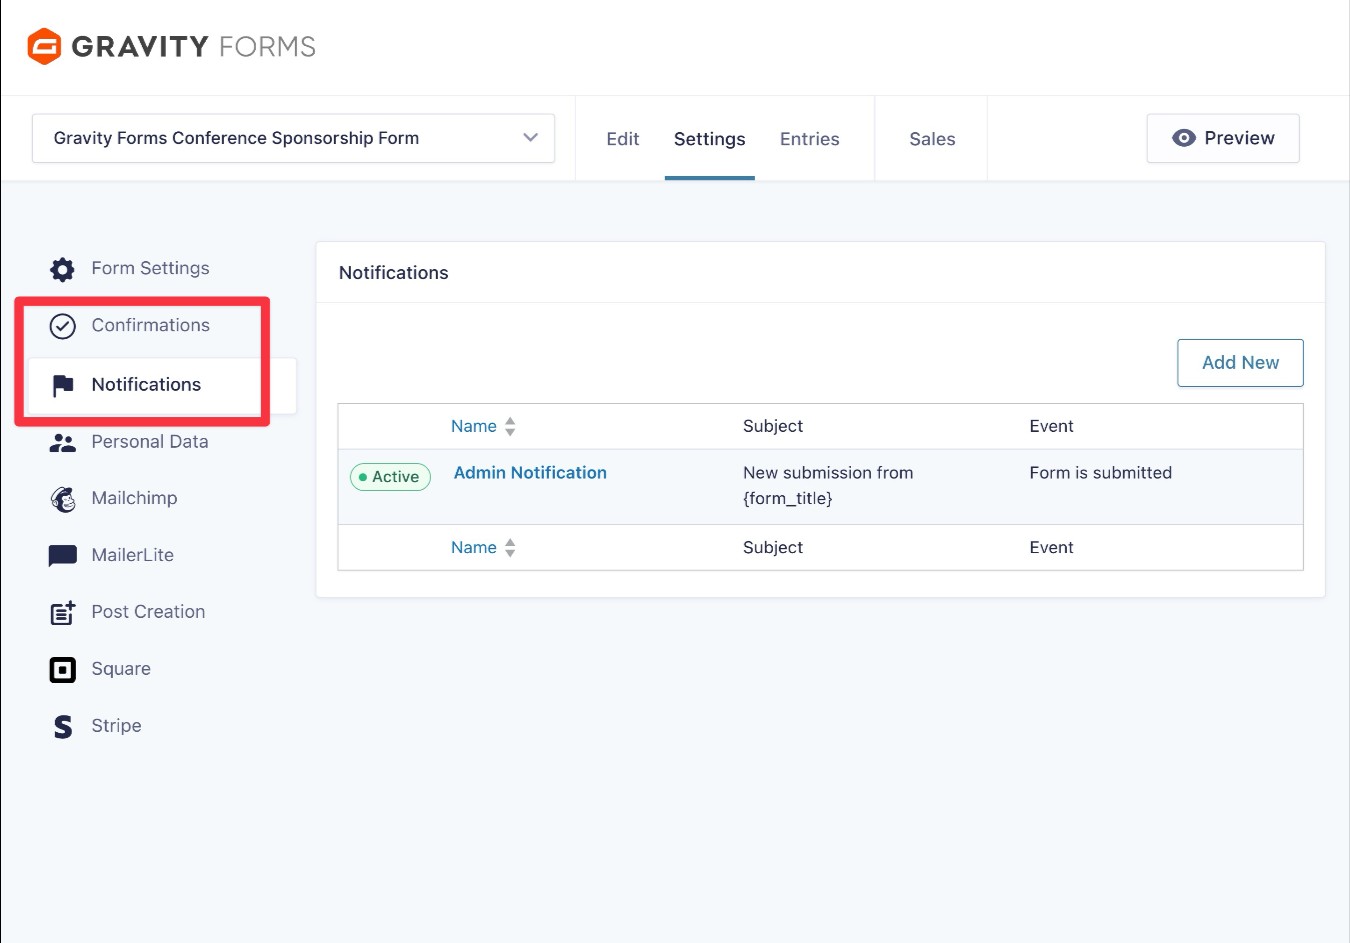
6. Set up confirmations and email notifications
In addition to setting up a payment feed for your form, you’ll also want to configure two core features – confirmations and notifications:
- Confirmation – Display a message or redirect sponsors to another page after they submit the form. You could use this to thank your sponsors and provide them with more information about their sponsorship.
- Notifications – Send emails to any email address. You can create multiple email notifications, which would let you send separate emails to yourself, your team, the sponsor, etc.
You’ll get dedicated areas in the form settings area to control these details: Settings → Confirmations and Settings → Notifications, respectively.
7. Extend your form with add-ons (optional)
This step is 100% optional.
However, another advantage of using Gravity Forms for your event sponsorship form is the ability to leverage Gravity Forms’s large collection of official and third-party add-ons.
These add-ons open up a lot of possibilities for simplifying your administration workflows and connecting with sponsors.
Here are just a few examples, though this is by no means a complete list:
- Save sponsors’ contact details to your CRM – Sync contact details to popular CRMs like Salesforce, HubSpot, and others.
- Subscribe sponsors to an email newsletter – Subscribe them to your regular event newsletter or create a special newsletter just for sponsors. Gravity Forms integrates directly with most popular email marketing services.
- Build business process workflows – Set up entire business process workflows, including steps like task assignments, approvals, PDF generation, etc. You can do this using Gravity Flow, which comes from the same team behind Gravity Forms.
- Upload files to cloud storage services – Automatically upload sponsors’ files to services like Google Drive or Dropbox, which could simplify your workflows for integrating sponsors’ materials into your event.
To get some more ideas, here are some places to find Gravity Forms add-ons:
- Official Add-Ons – All of these come directly from the Gravity Forms team.
- Certified Add-Ons – While these add-ons come from third-party developers, their quality has still been verified by the Gravity Forms team.
- Community Add-Ons – These are third-party add-ons that have not been verified by the Gravity Forms team. While you can still find many quality add-ons here, we encourage you to do your own due diligence before installing them.
8. Embed your form
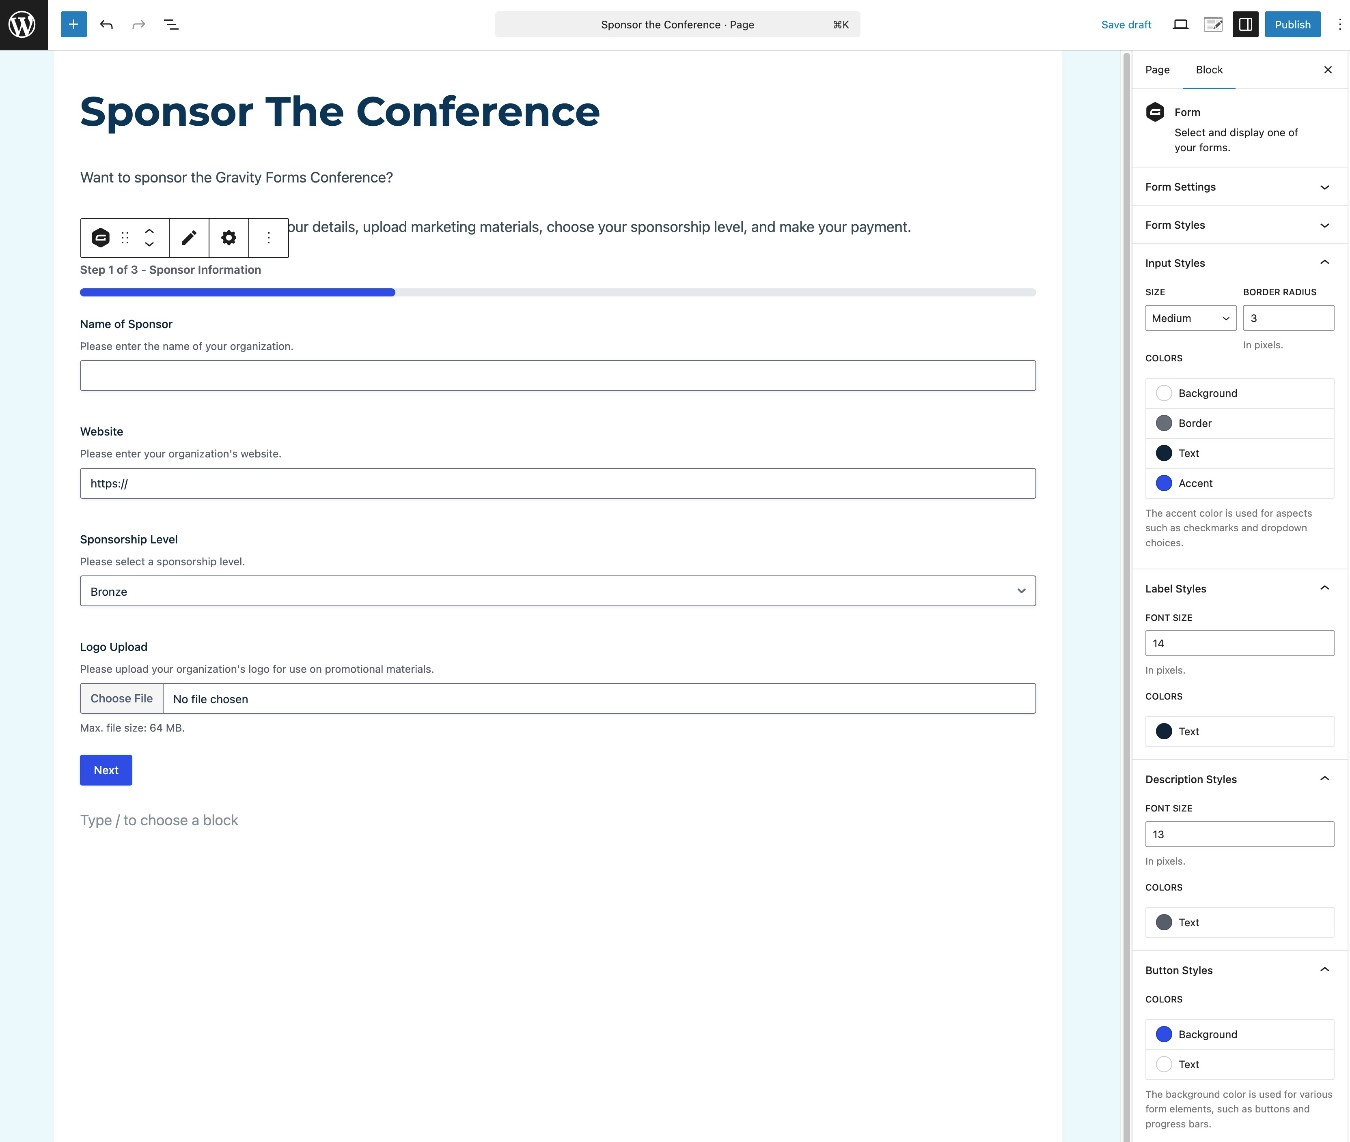
Once you’ve set up any add-ons that you want to use, you need to embed your event sponsorship form on the frontend of your site so that sponsors can access it. Typically, you’ll want to include the form directly on the page with your sponsorship information.
You can embed the form anywhere on your site using the Gravity Forms block, shortcode, or PHP function.
If you use the block, you’ll also be able to style your form directly from the editor using code-free controls.
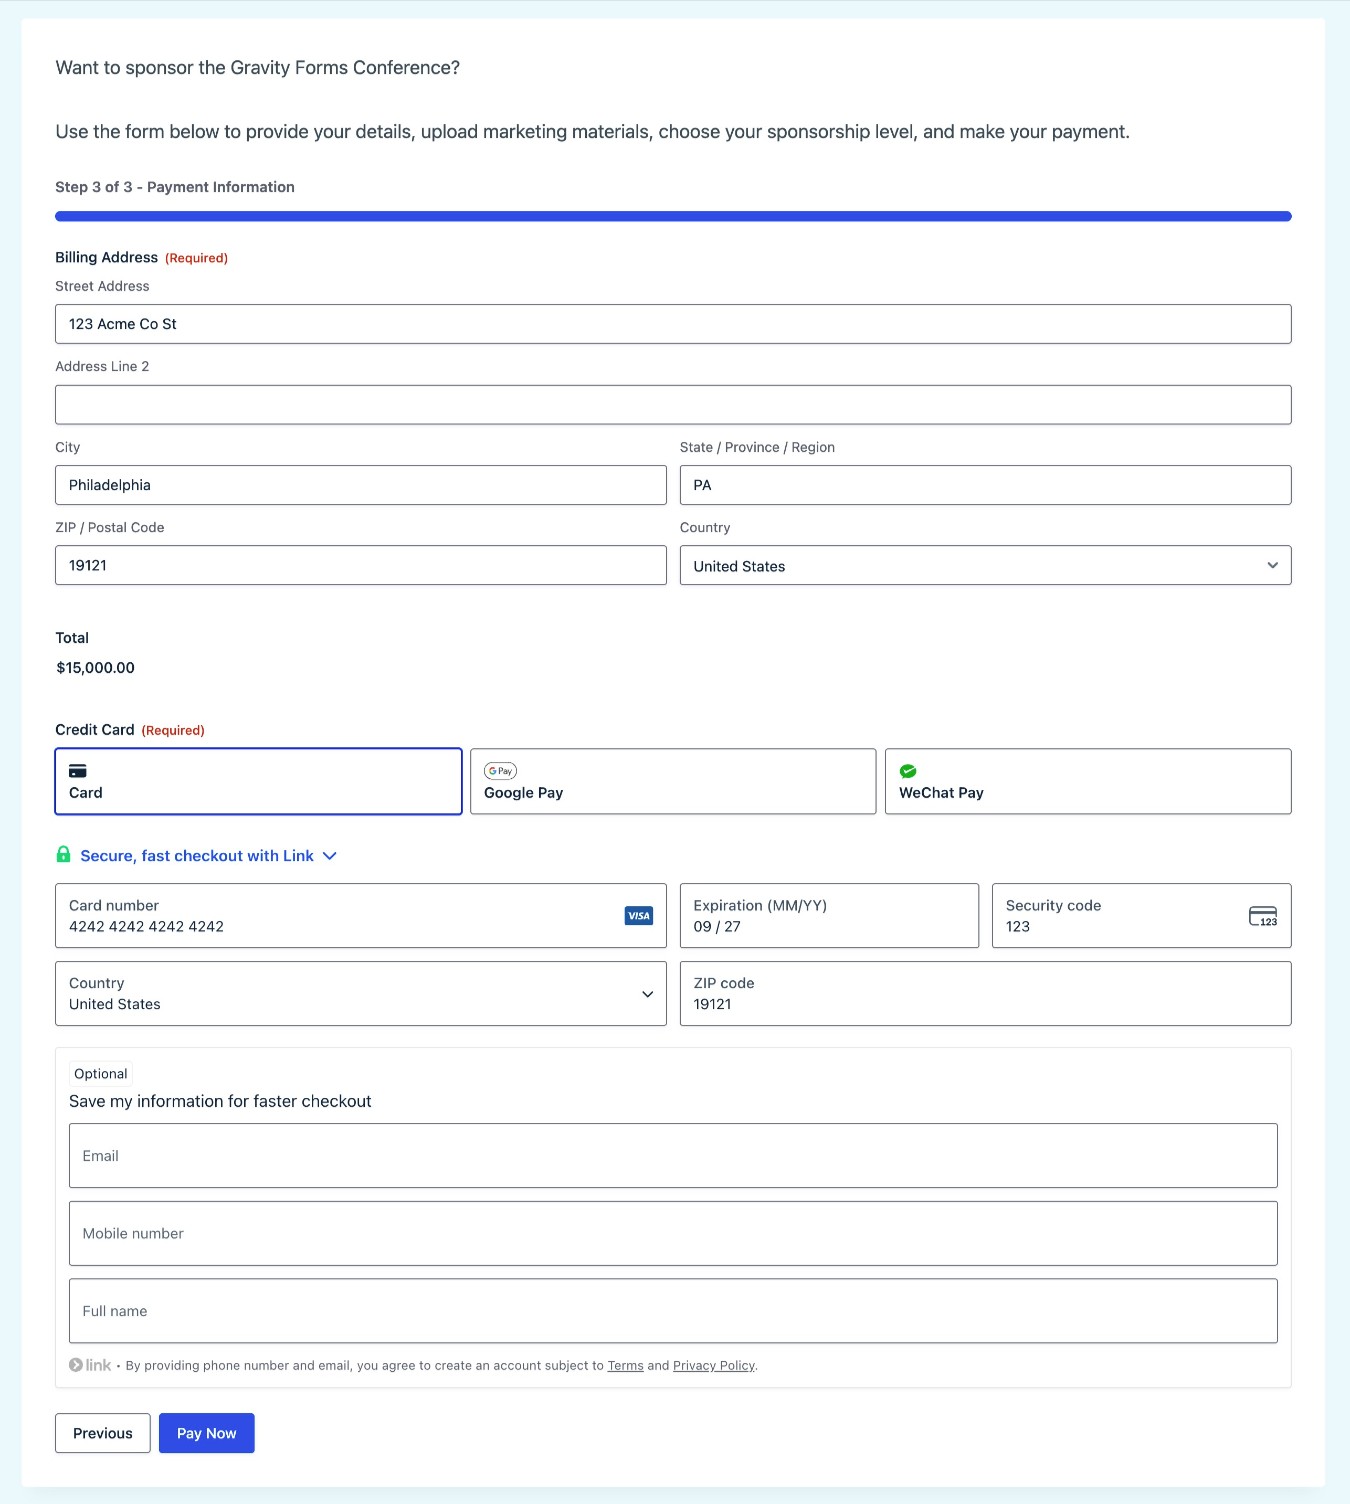
9. Submit a test payment and enable live payments
Once you’ve embedded your form, we recommend submitting a test payment to verify that everything is working as you want it to.
Because we had you configure Stripe in Test mode, you can do this without needing to make a real payment.
When you fill out the form, all you need to do is use one of Stripe’s card testing numbers, which you can find here.
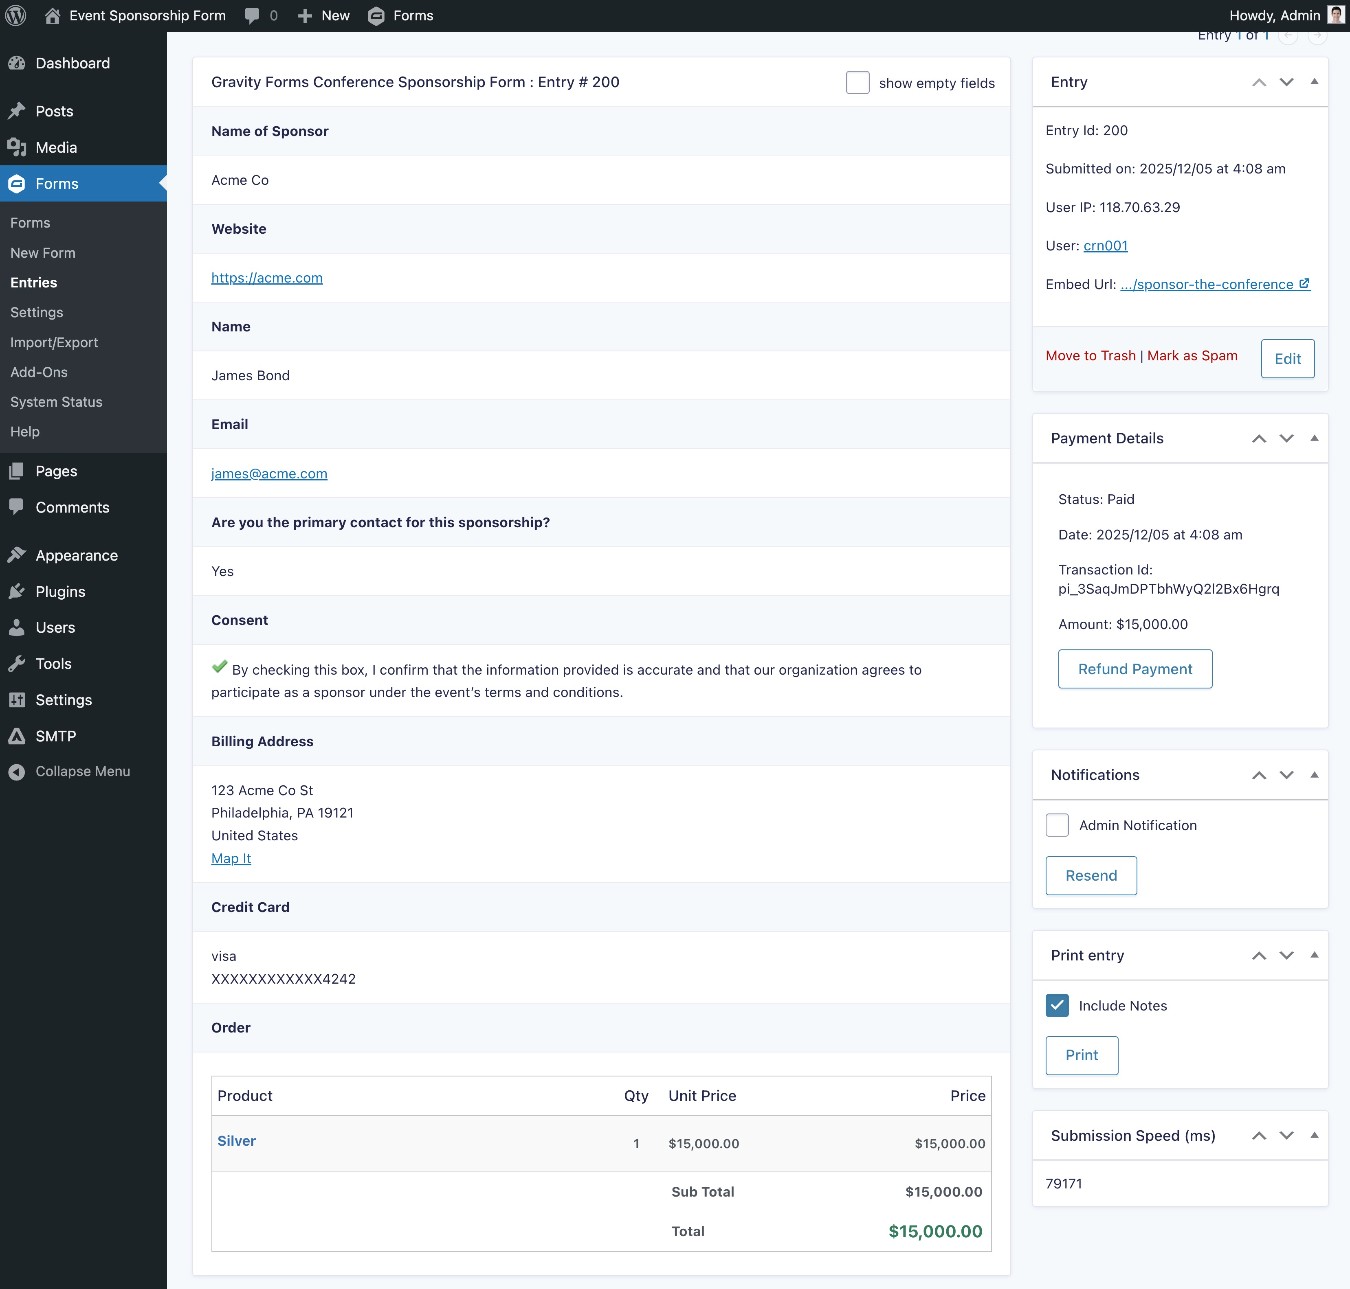
Once you submit the form, you should see a new entry appear in your WordPress dashboard (go to the Entries tab in the form editor), along with a payment in the Test mode of your Stripe dashboard.
If everything is working as you want it to, the last step in the process is to enable live payments in the Gravity Forms Stripe Add-On settings:
- Go to Settings → Forms → Stripe in your WordPress dashboard.
- Choose Live mode.
- Connect your site to Stripe, just like you did for Test mode.
Create your event sponsorship form today
If you want to create a great experience for your event sponsors and make it easier to collect and manage sponsor payments, creating an online event sponsorship form is a great decision.
You can set up your form to provide important information to sponsors and collect all of the details and files that you need to process their sponsorships. Then, you can also accept payment directly from your form using payment processors like Stripe, PayPal, Square, and others.
Gravity Forms doesn’t stop with the form submission, though. You can also set up other workflows and integrations that trigger after a sponsor submits the form and makes their payment. You can add tasks to your project management software, store sponsors’ details in your CRM, send emails, and much more.
If you’re ready to get started and create your first event sponsorship form, purchase a Pro, Elite, or Nonprofit license today.
Or, if you want to try the template before you make your purchase, you can spin up a free, fully functioning demo site here.

If you want to keep up-to-date with what’s happening on the blog sign up for the Gravity Forms newsletter!