Starter guide: How to create a WordPress membership form (template included)

If you’re creating a WordPress membership website, you can use the Gravity Forms membership form template to create a customizable registration form for your site.
Even if you’re using a membership plugin that already has a registration form feature, Gravity Forms can unlock additional flexibility for setting up a membership form. Here are just some of the features that you can access:
- Collect as much or as little information as you need from each member. You can fully customize the fields in your form.
- Assign users to different membership levels based on the options they choose in your form.
- Charge users for access to your site, with support for one-time payments and recurring subscriptions.
- Integrate with tons of other tools/services, including CRMs, email marketing services, task managers, Zapier, and lots more.
You can use the membership form template for any type of membership website, including the following:
- Online courses
- Restricted content websites
- Private communities
- Forums/discussion boards
- Coaching communities
- …any other type of site that requires a user account
In this detailed, step-by-step guide, we’ll show you how to set up everything that you need to create a functioning membership form and website with Gravity Forms.
How to create a WordPress membership form with Gravity Forms (and your favorite membership plugin)
To easily get started, you can use the premade Gravity Forms membership form template. You can preview the membership form template here, but here are some of the key features that you get access to (though this is not a complete list):
- Fully customizable form fields – Add new fields and customize all of the existing fields using Gravity Forms’s drag-and-drop editor.
- Unlimited membership levels – Offer as many different membership levels as needed. Users will be assigned to the correct level based on how they fill out the form.
- Integrated payments – Charge one-time payments or set up automatic recurring subscriptions. Gravity Forms will only create a user account if the payment was successful.
- Freemium model support – Offer both free and paid membership options if needed.
- Multi-page layout – Divide your form into multiple pages to make it easier for users to fill out.
- Support for most membership plugins – Gravity Forms should work with most WordPress membership plugins, as long as they’re based on core WordPress user roles (which most are).
- Integrations with other tools/services – Easily integrate with customer relationship managers (CRMs), email marketing services, Zapier, and lots more.
As we take you through the tutorial below, you’ll see more of the different options that are available to you.
1. Install Gravity Forms and required add-ons
To get started, you’ll need to install the core Gravity Forms plugin, along with some official add-ons:
- User Registration – This add-on lets you register user accounts for people who submit the form, including assigning a different role to each user’s account based on how they filled out the form. Note – the User Registration Add-On will not create user roles by itself – you’ll need to set up roles separately using your membership plugin.
- Payment processor add-on – If you want to accept payments as part of your membership form, you’ll need to install one of Gravity Forms’s payment add-ons, which lets you integrate your form with popular payment processors. We’ll use Stripe and the Stripe Add-On for this tutorial, but you can use any of the other payment processors if you don’t want to use Stripe.
To access the User Registration Add-On, you’ll need the Gravity Forms Elite or Nonprofit licenses (both of which also give you access to every single add-on, including all of the payment processor add-ons).
If you’re not holding one of those licenses yet, you can purchase a new license here or upgrade your existing license and only pay the prorated difference.
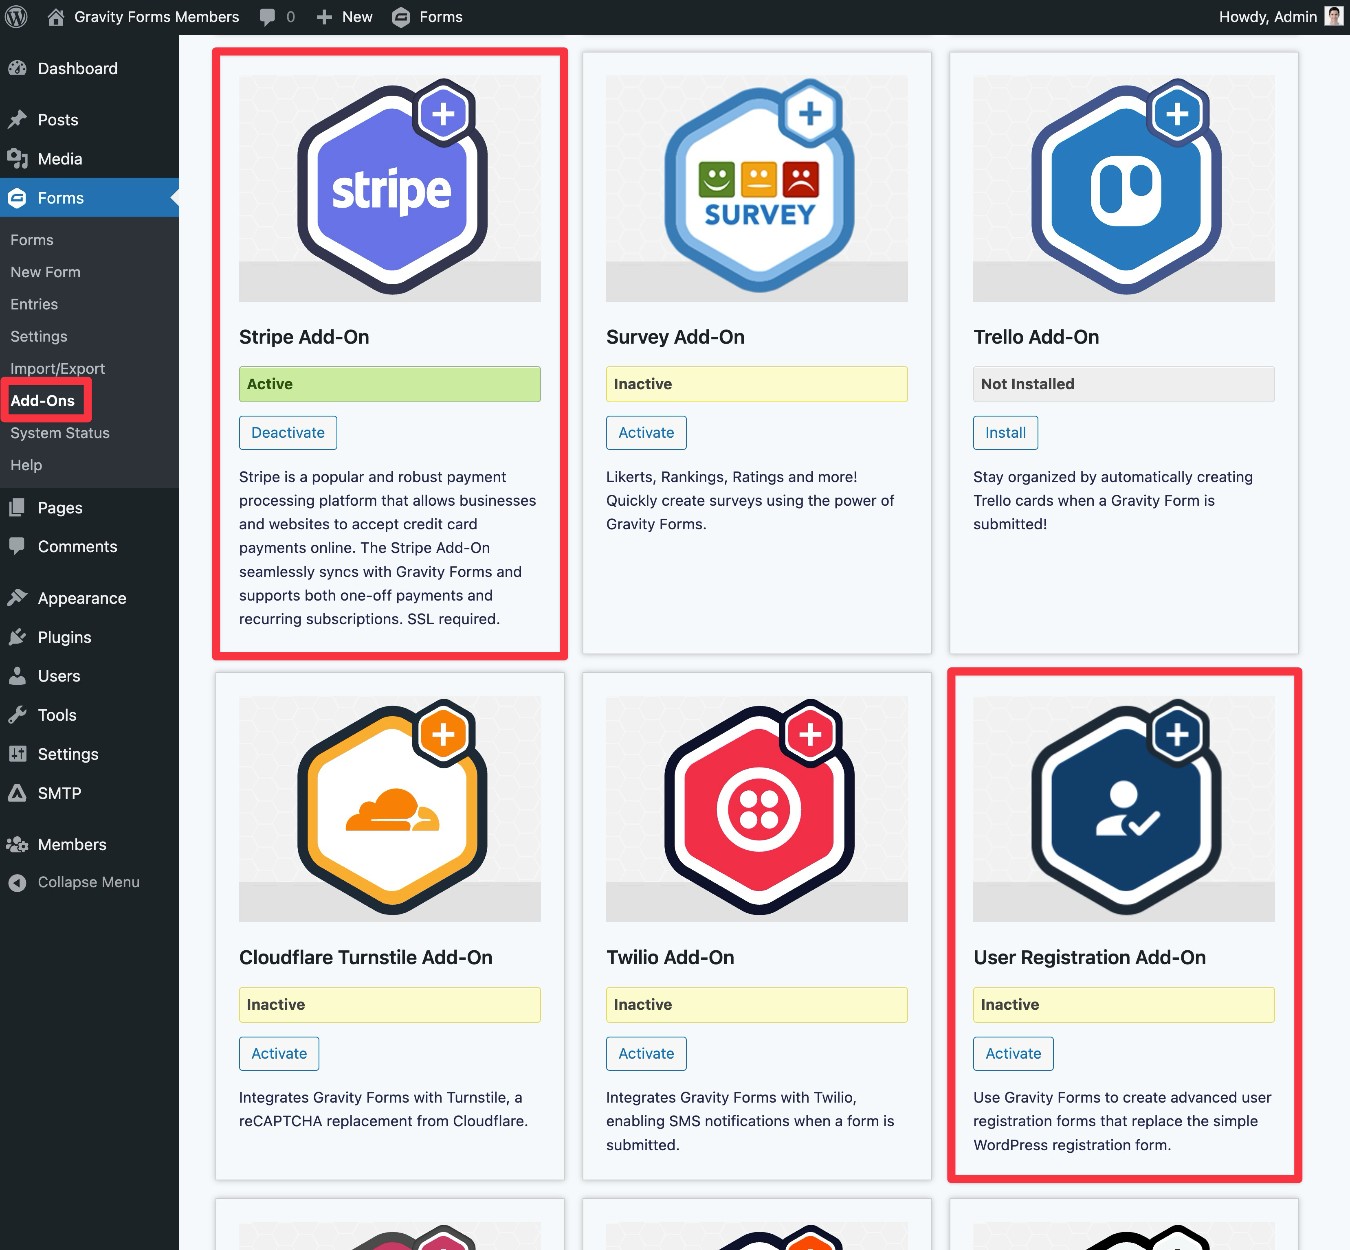
Once you’ve installed the core Gravity Forms plugin and added your license key, here’s how you can install add-ons:
- Open your WordPress dashboard.
- Go to Forms → Add-Ons in the dashboard sidebar.
- Find the add-on that you want to install. Again, for this guide, you’ll need to install the User Registration and Stripe add-ons.
- Click Install for the add-on.
- Once the installation finishes, make sure to click Activate Plugin.
2. Connect Gravity Forms to Stripe (or whatever payment processor you want to use)
If you don’t want to charge people for access to your membership website, you can skip this step.
However, if you do want to accept payment as part of the membership registration form, you’ll first need to connect Gravity Forms to the payment processor that you want to use.
We’re going to use Stripe for this tutorial, which supports both one-time payments and recurring subscriptions. However, the basic steps will be the same for any of the other payment processors that Gravity Forms integrates with.
We’re just going to cover the high-level steps in this post. For full details, you can read the full documentation:
For Stripe, here’s a quick overview of what you’ll need to do:
- Register for a free Stripe account, if you don’t already have one.
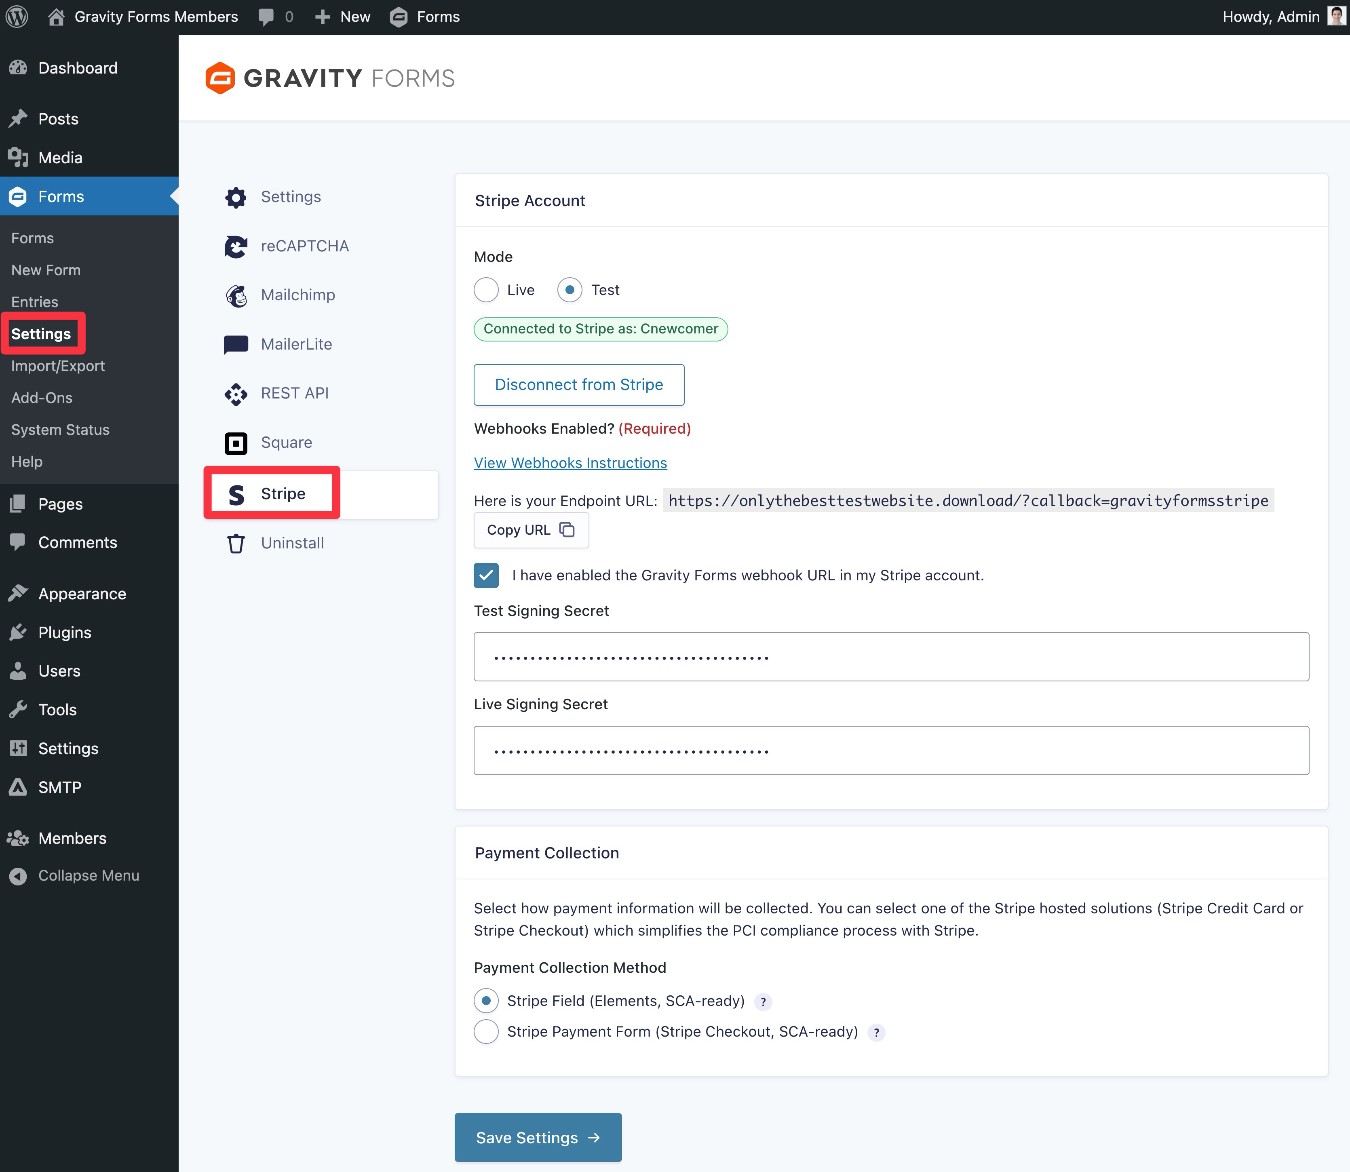
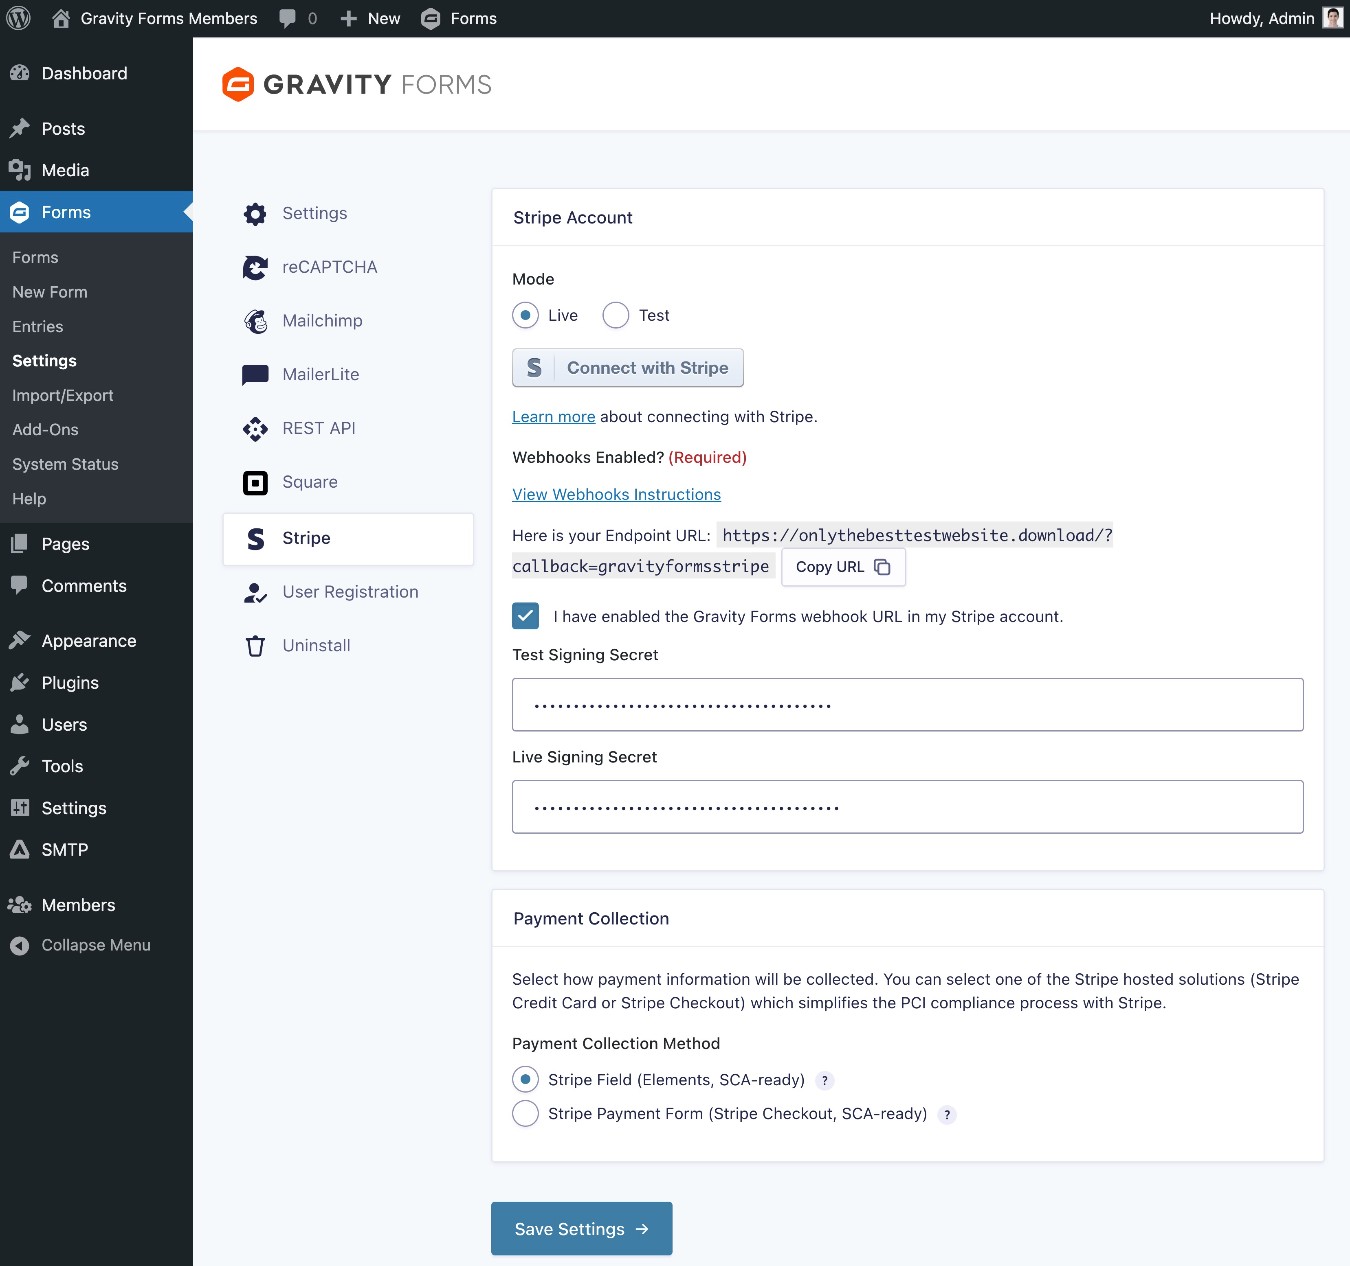
- Connect Gravity Forms to Stripe using the Stripe authorization flow (Forms → Settings → Stripe → Connect with Stripe). We recommend connecting your site in Test mode to start so that you can test your membership form using dummy payments. Once you’re ready to accept real payments from members, you can change to Live mode. This article has the full instructions.
- Set up the Gravity Forms webhook endpoint in Stripe. You can do this using Stripe Workbench. You’ll need to add the webhook endpoint in both the Live and Test dashboards in Stripe – these links will let you add a Test webhook endpoint and add a Live webhook endpoint. Read this documentation article for full instructions.
- When you add the webhook endpoints, Stripe will give you a Signing Secret key for both Test and Live modes. Add each key to the respective box in the Gravity Forms Stripe settings. Then, check the box for I have enabled the Gravity Forms webhook URL in my Stripe account and click Save Settings at the bottom of the Gravity Forms settings area.
3. Set up your membership plugin (if you haven’t done so already)
Next, you’ll want to set up whichever WordPress membership plugin you’re using, if you haven’t already done so.
Again, while the Gravity Forms User Registration Add-On lets you assign new users to existing roles, you will need a different plugin to actually create those user roles (assuming you want to offer multiple membership roles).
For this example, we’ll use the free Members plugin from WordPress.org, but the same basic principles will apply to most WordPress membership plugins.
Setting up a membership site requires a whole post of its own, so we won’t go into too much detail here.
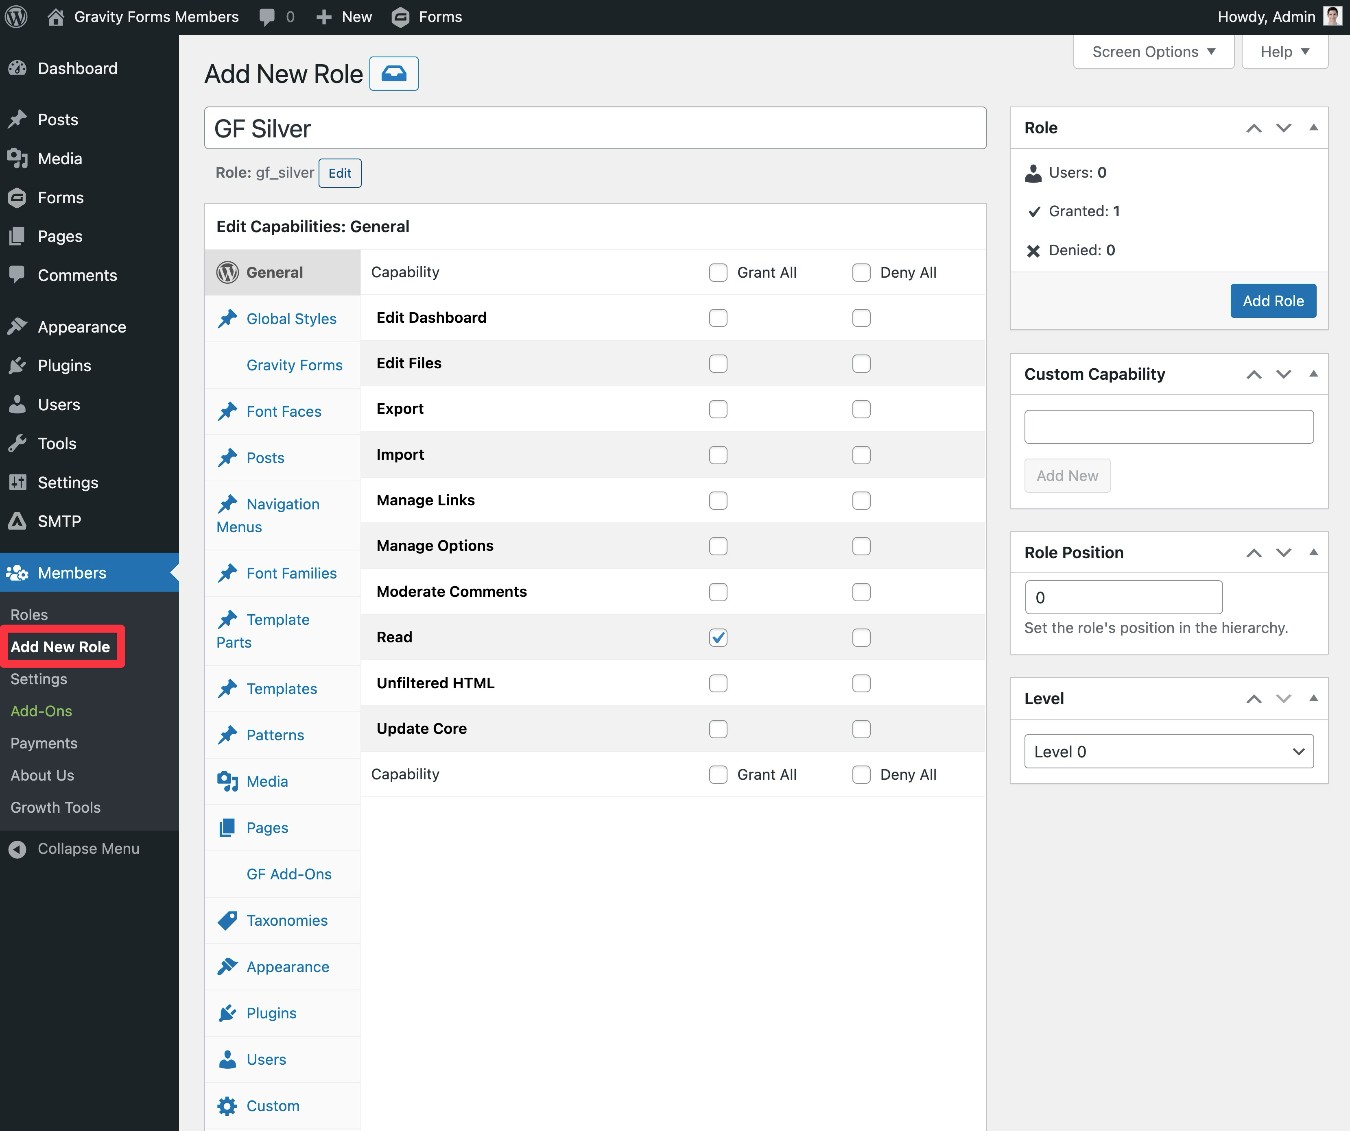
With the Members plugin, you can create membership levels by adding user roles – Members → Add New Role in your WordPress dashboard. You can also clone existing roles, which can be helpful for quickly duplicating capabilities.
There are also free add-ons that let you apply levels to roles or rank them in a hierarchy (Members → Add-Ons).
You can then use your roles to restrict access to your content as needed. You’ll get a new metabox in the editor that lets you apply these restriction rules.
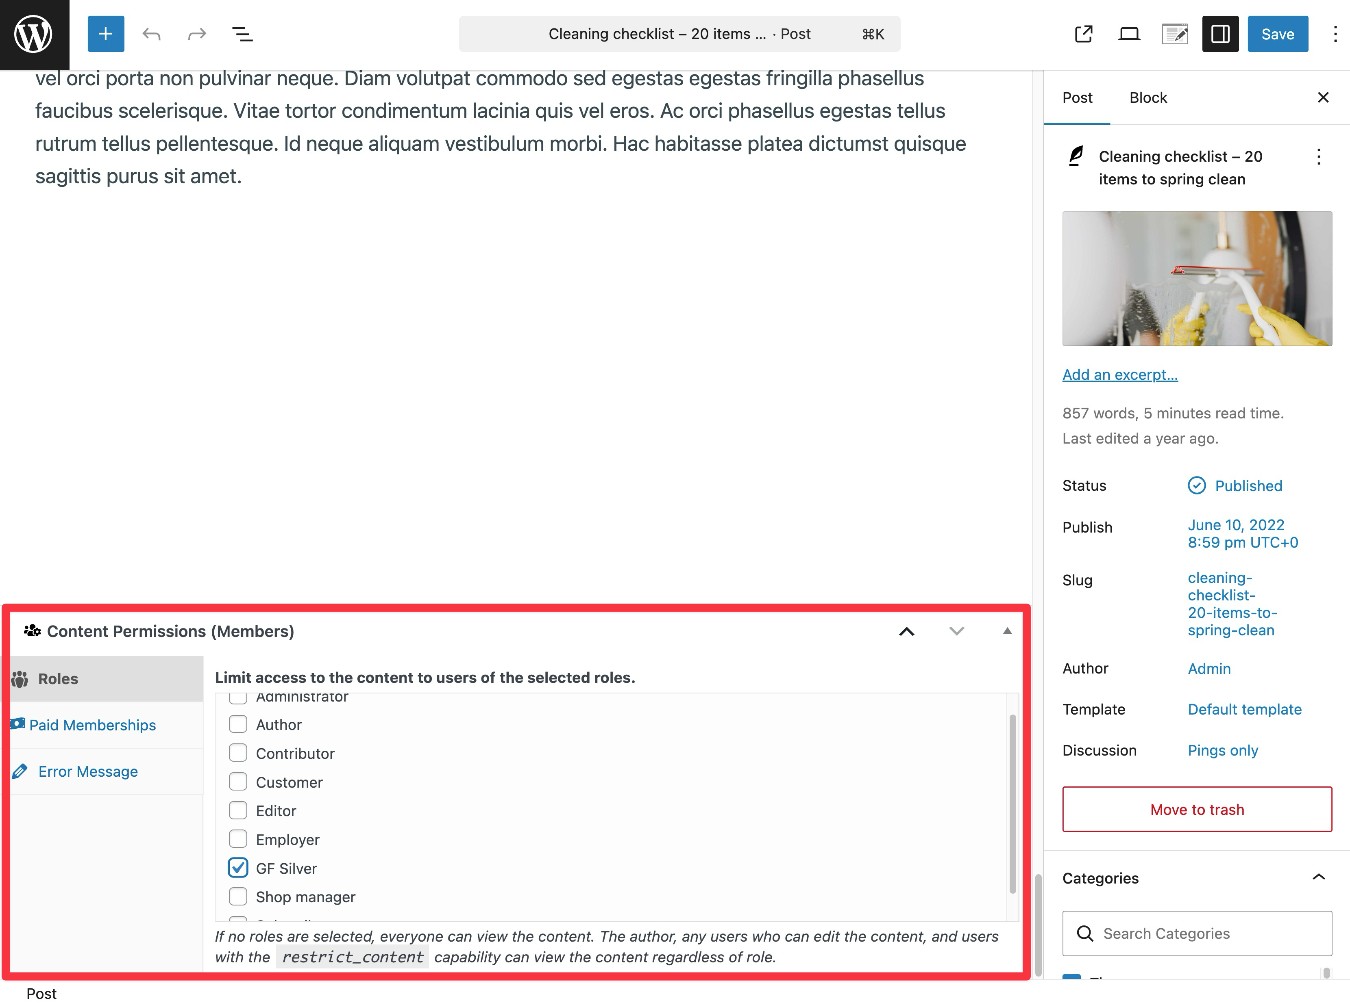
If you want more details on using the plugin, you can check out the Members plugin documentation here.
4. Create your registration form using the membership form template
Now, you’re ready to set up your actual membership form.
To get started, go to Forms → New Form. Find the Stripe Membership Form template in the list and choose Use Template.
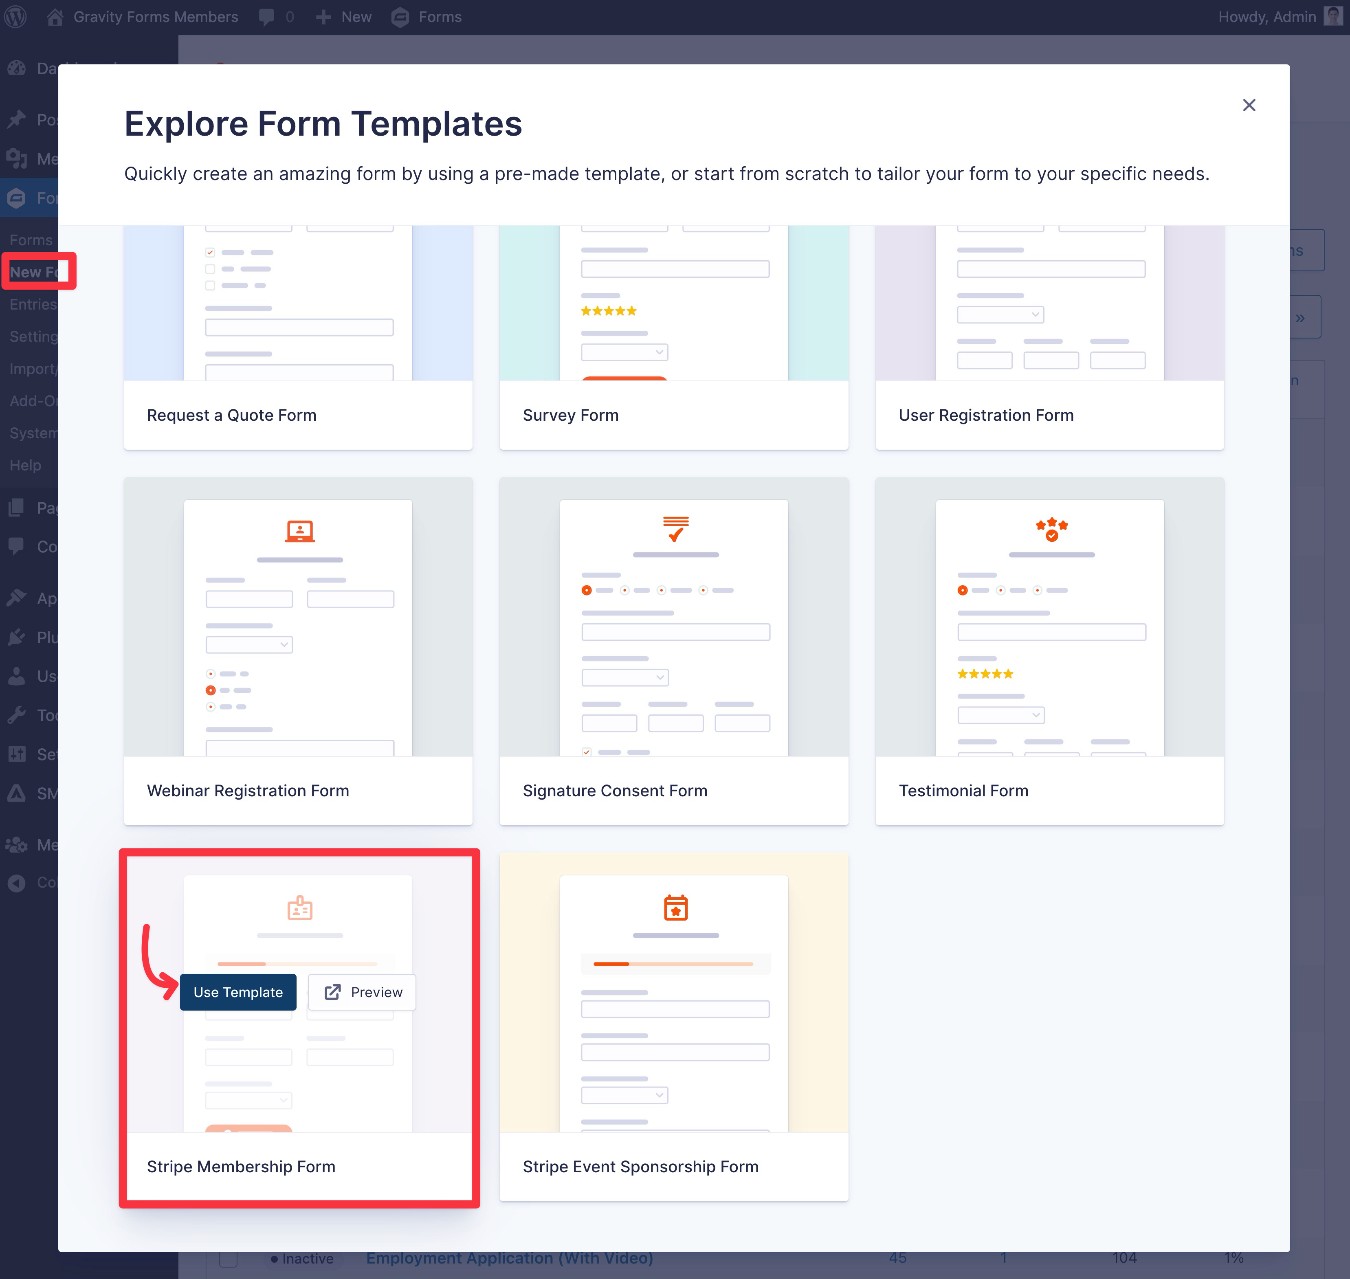
Give your form a name and an optional description. Then, click Use Template again to launch the form editor.
In the editor, you’re free to customize the form however you want. For example, you might want to add more fields if you want to collect additional information from members as part of the registration process.
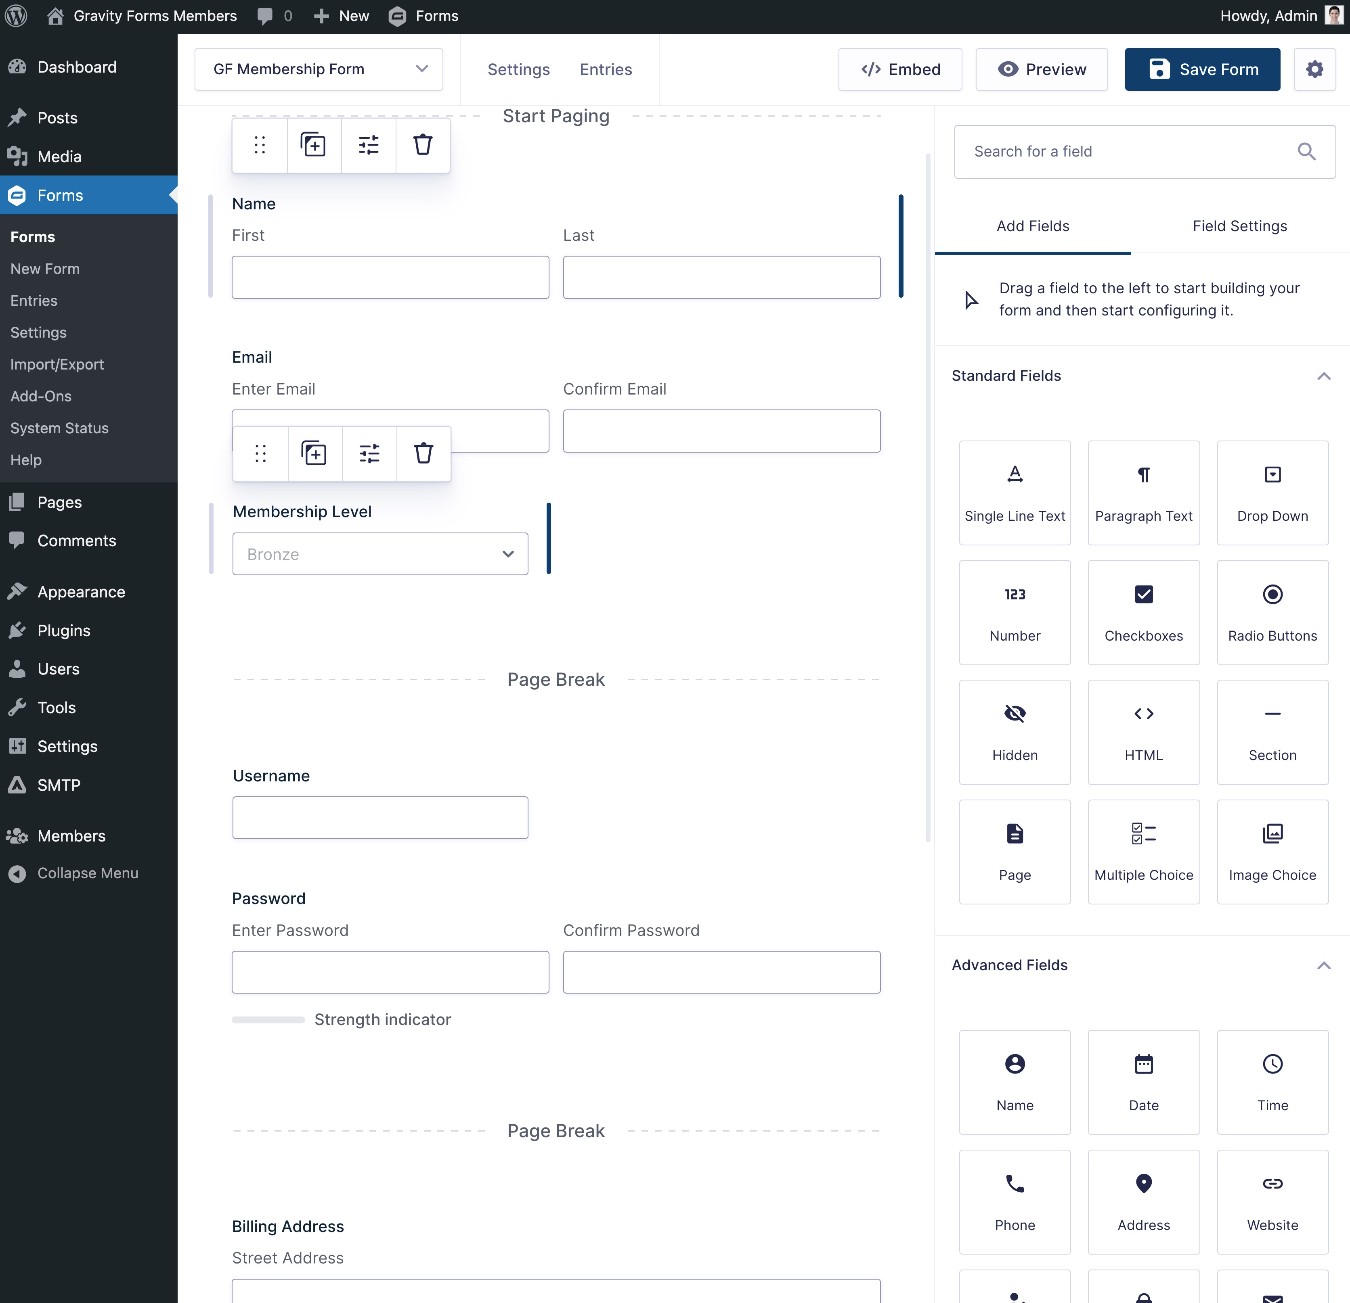
One important field to edit is the Membership Level Product field. This lets you define the different membership levels that people can choose from, along with the price of each membership level. When you create a payment feed in the next step, you can also choose whether this price will be a one-time payment or a recurring subscription.
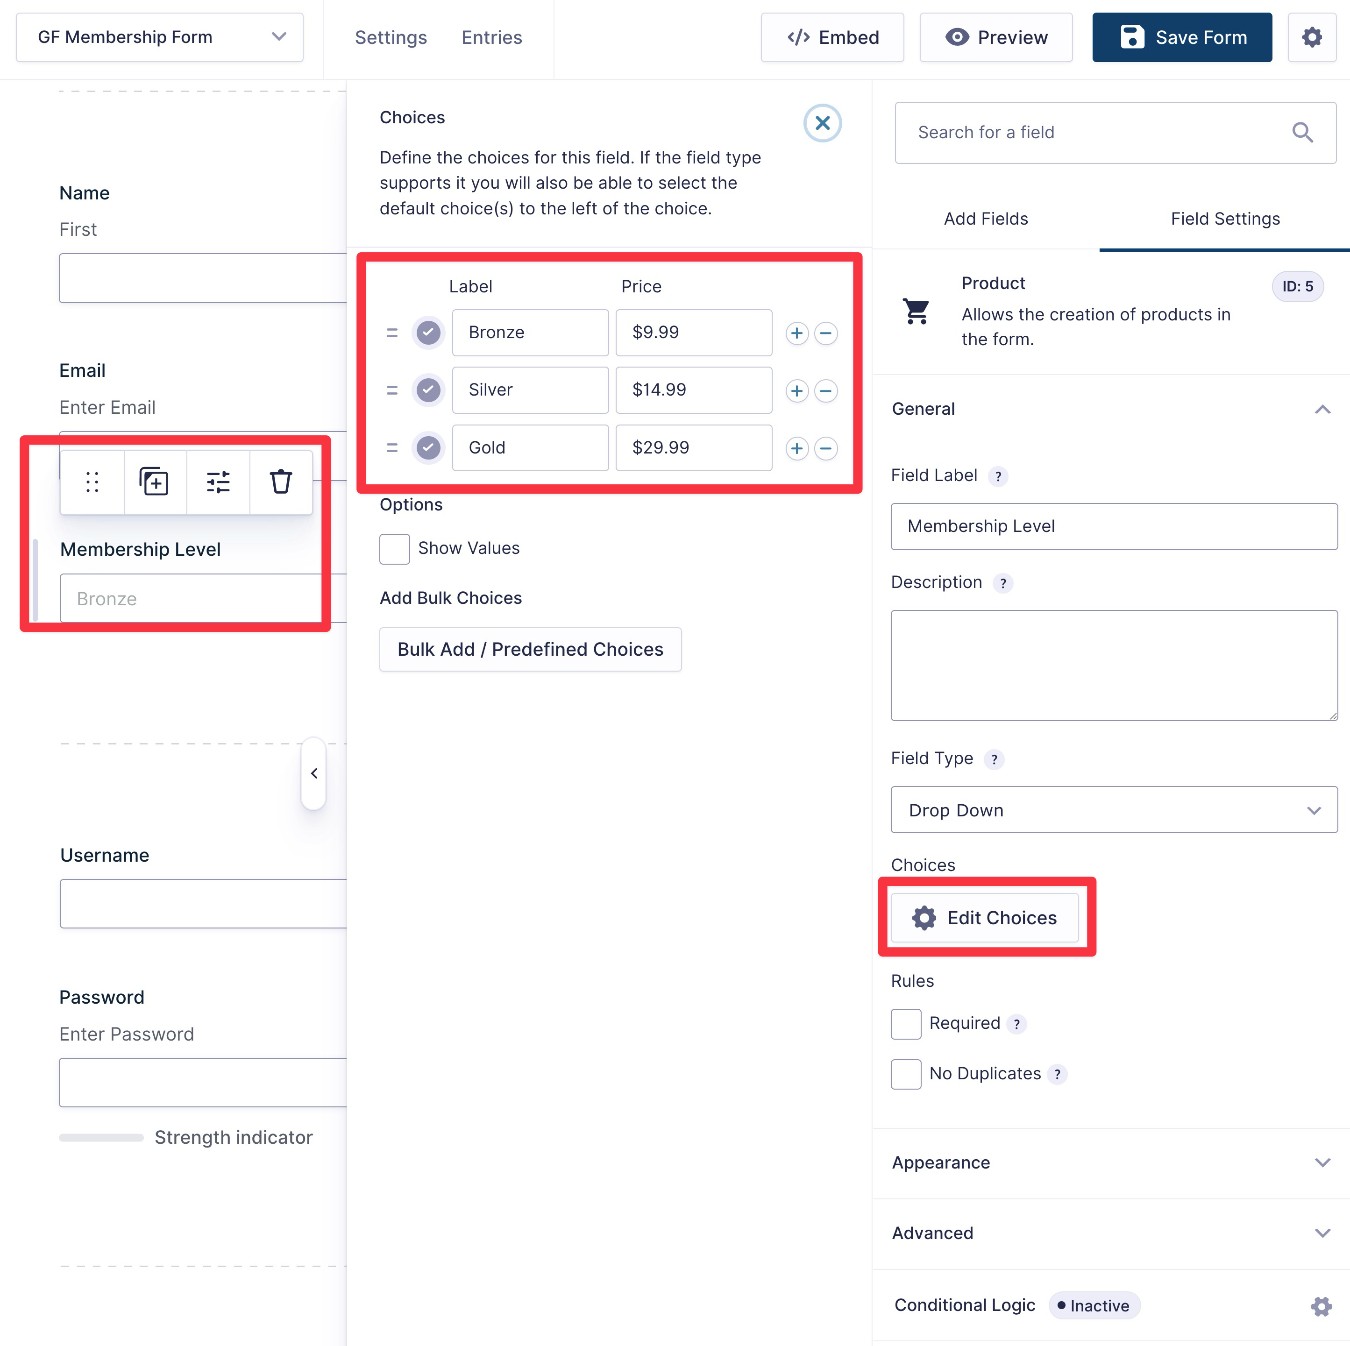
You should make the options in this field match the membership levels that you set up in your membership plugin. You can adjust the options by clicking Edit Choices in the field’s settings.
If you only have a single membership level, you can change the Field Type to Single Product. Or, you could remove this field if you’re creating a free membership website.
Once you’re happy with all of the fields in your form, make sure to click the Save Form button in the top-right corner.
5. Set up “feeds” for user registration and payments
Once you’ve finished setting up the fields in your form, you’ll need to create some “feeds”.
In Gravity Forms, a “feed” lets you perform some action after a person submits the form. For a membership form, there are two essential feeds:
- Payment feed – This lets you control how your payment processor will process the payment. For example, how much to charge the person and whether to make it a one-time payment or set up a recurring subscription.
- User Registration feed – This lets you control how to create a user account for a person who submits the form, such as which user role to assign them.
We’ll go through both below…
Set up a payment processor feed (for paid registrations)
If you’re creating a 100% free membership form, this won’t apply.
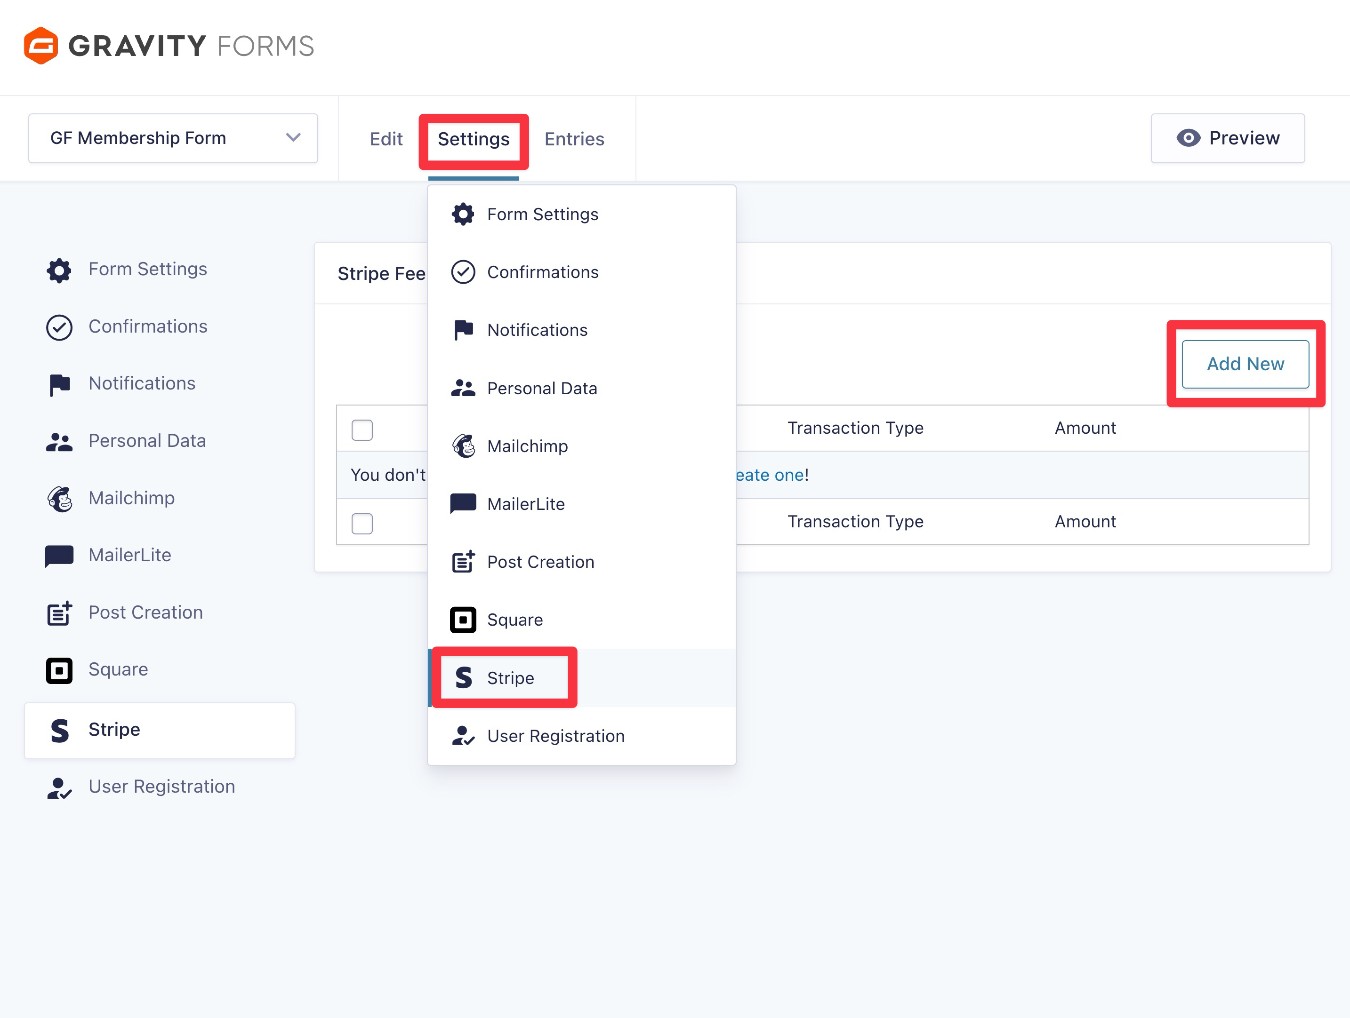
However, if you want to charge people money in exchange for creating an account, you’ll need to set up a payment feed for whichever payment processor you’re using. Here is the full documentation for Stripe, but we’ll cover the basics below.
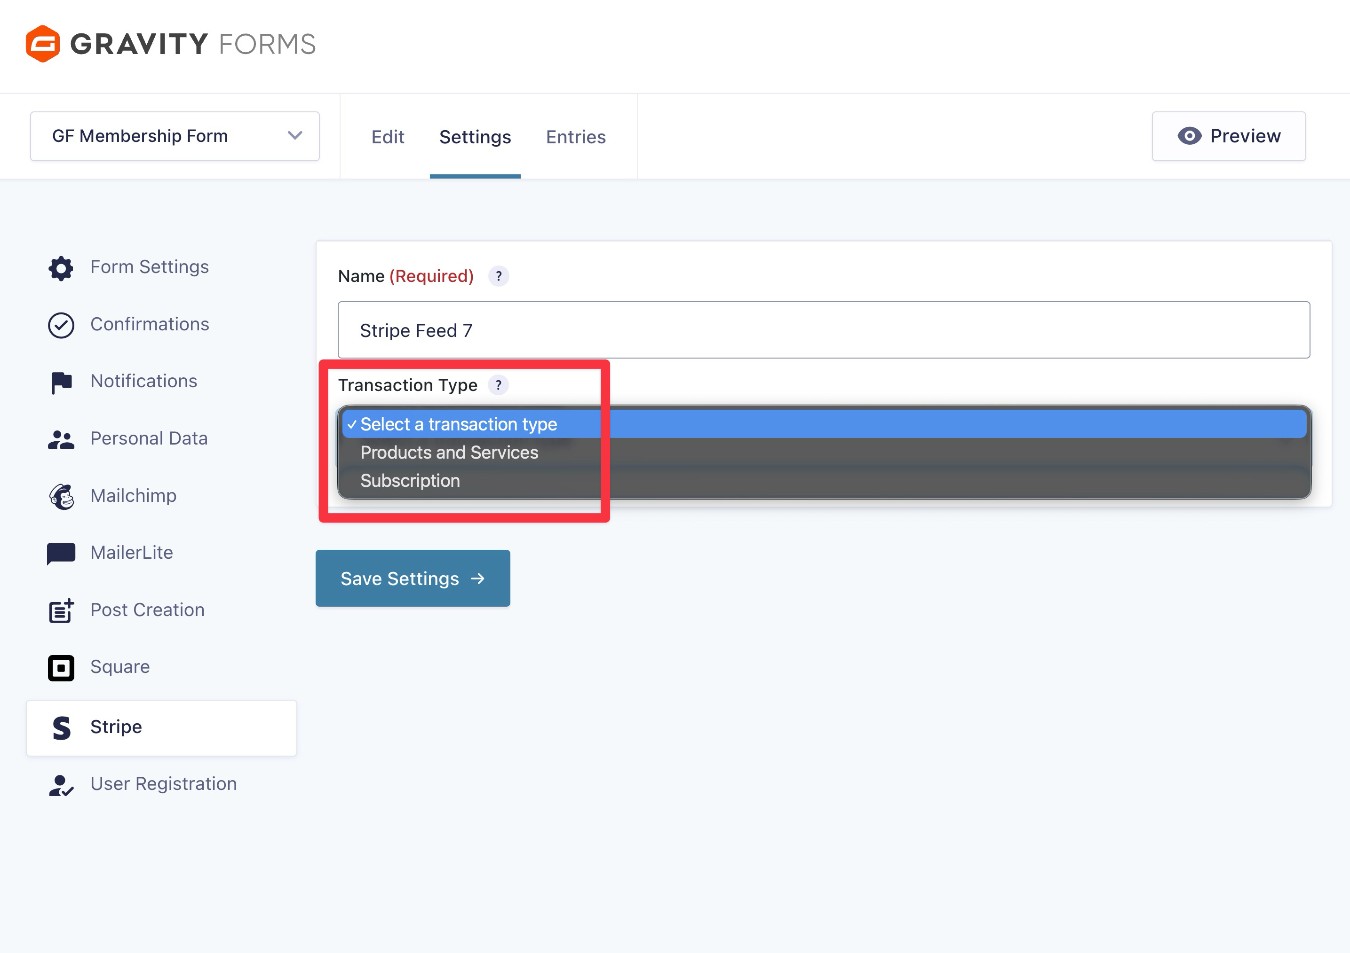
To create a feed, go to Settings → Stripe → Add New in the form editor interface.
On the next screen, first choose the Transaction Type:
- Products and Services – Use this for one-time payments. Members will pay once when they sign up, and then they’ll never be charged again.
- Subscription – Use this if you want to set up an automatic recurring subscription. Members will be automatically charged at the interval that you specify until their subscription is cancelled. You can create a frontend area for members to manage their subscription, or you can also manually cancel a subscription from the WordPress dashboard.
For this example, we’ll use Subscription, but the same basic principles apply to one-time payments.
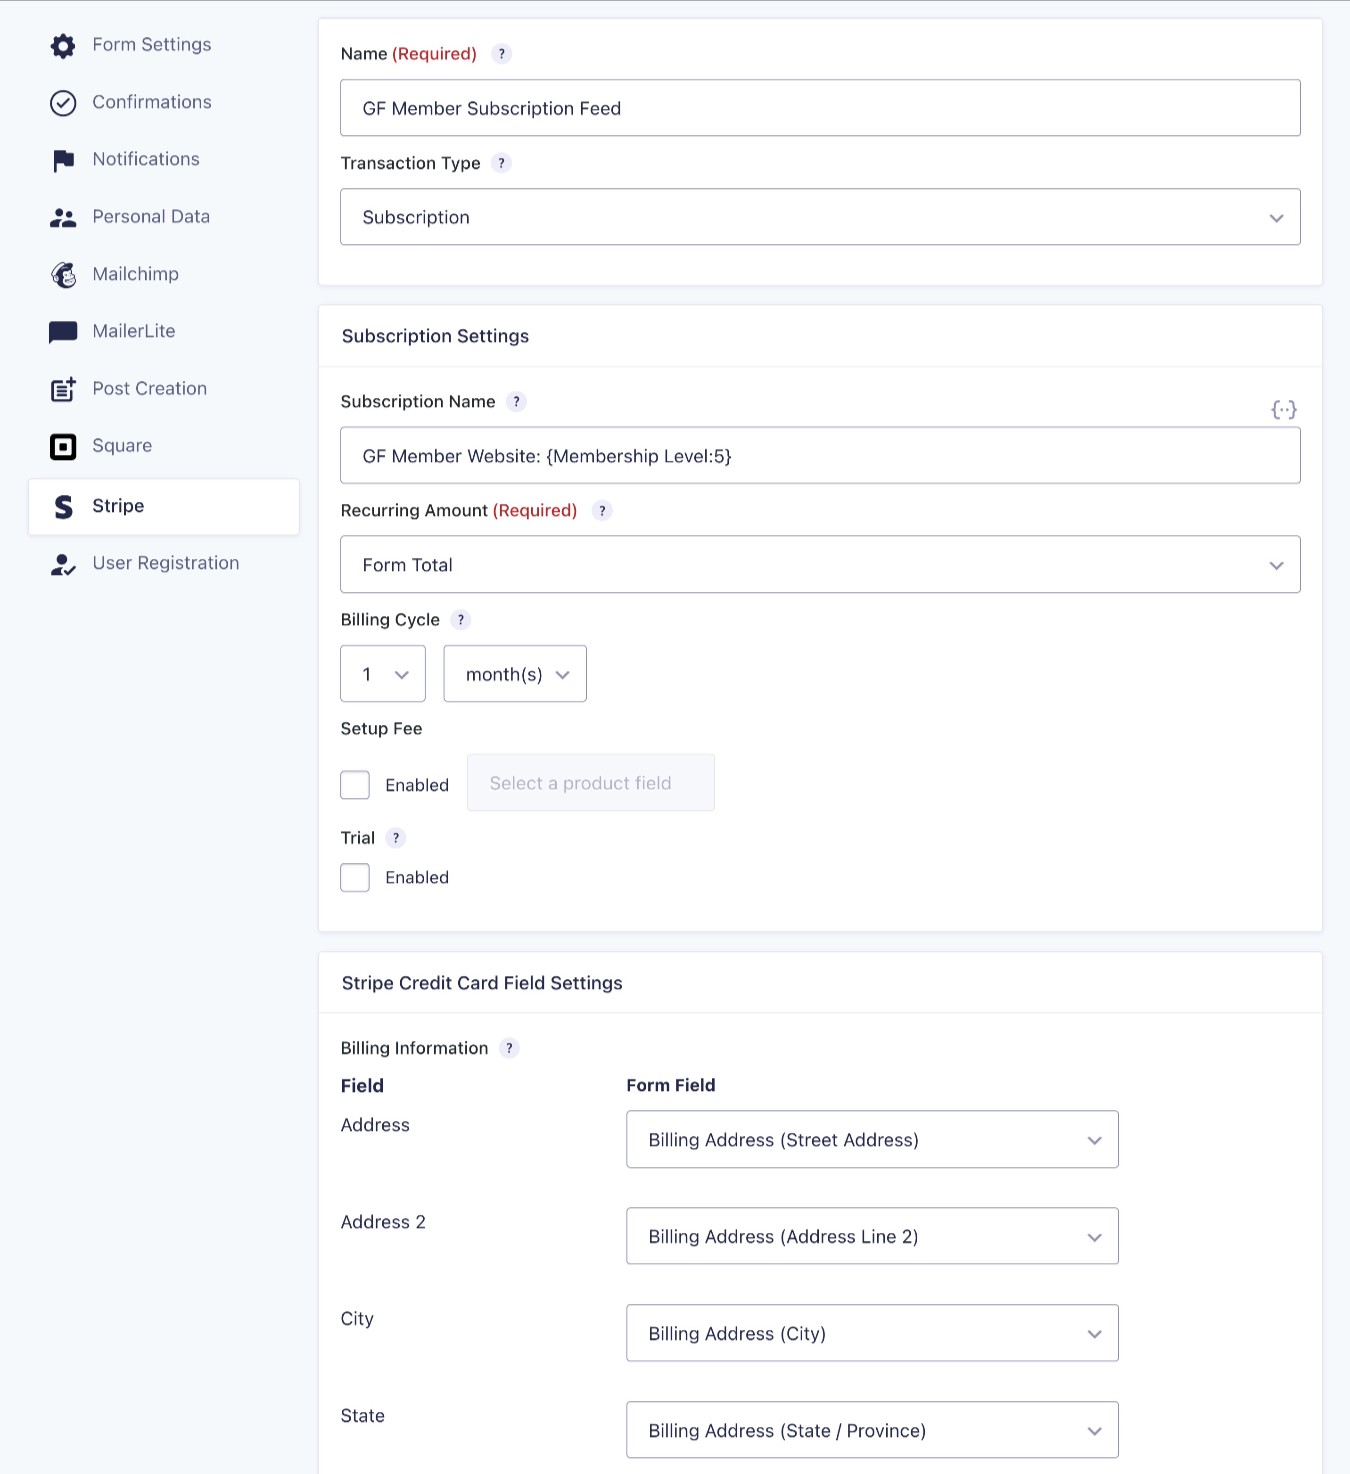
Once you choose the transaction type, you’ll see some additional options.
Here’s a quick guide on how to configure some of the most important settings:
- Recurring Amount – Set this equal to the Form Total. Each user will be charged the correct amount based on the membership role that they select.
- Billing Cycle – Adjust this for how long each subscription period is. E.g. if it’s a monthly subscription, set it equal to one month.
- Setup Fee – You have the option to add an extra one-time setup fee that only applies to the first payment.
- Trial – you can offer a free trial period before the user is charged.
Below those options, you can map the fields from your form to fields in Stripe.
At the bottom, you also have the option to apply conditional logic rules. This could be useful if you want to offer a free tier in addition to the paid options. For example, you could add a rule so that the form only processes a payment if the user chooses one of the paid membership levels. If the user chooses the free level, you could configure the feed not to execute.
Once you’ve made your choices, make sure to click Save Settings at the bottom.
Set up a User Registration feed to create user accounts
Your form’s user registration feed lets you control how to go about creating an account for users after they submit your membership form.
If you have multiple membership levels, it’s also what allows you to ensure that each user gets assigned to the membership level that they chose when filling out the form. To do this, you’ll need to create multiple user registration feeds and use conditional logic to control when to execute each one.
You can read the full documentation here, but we’ll cover the basics below.
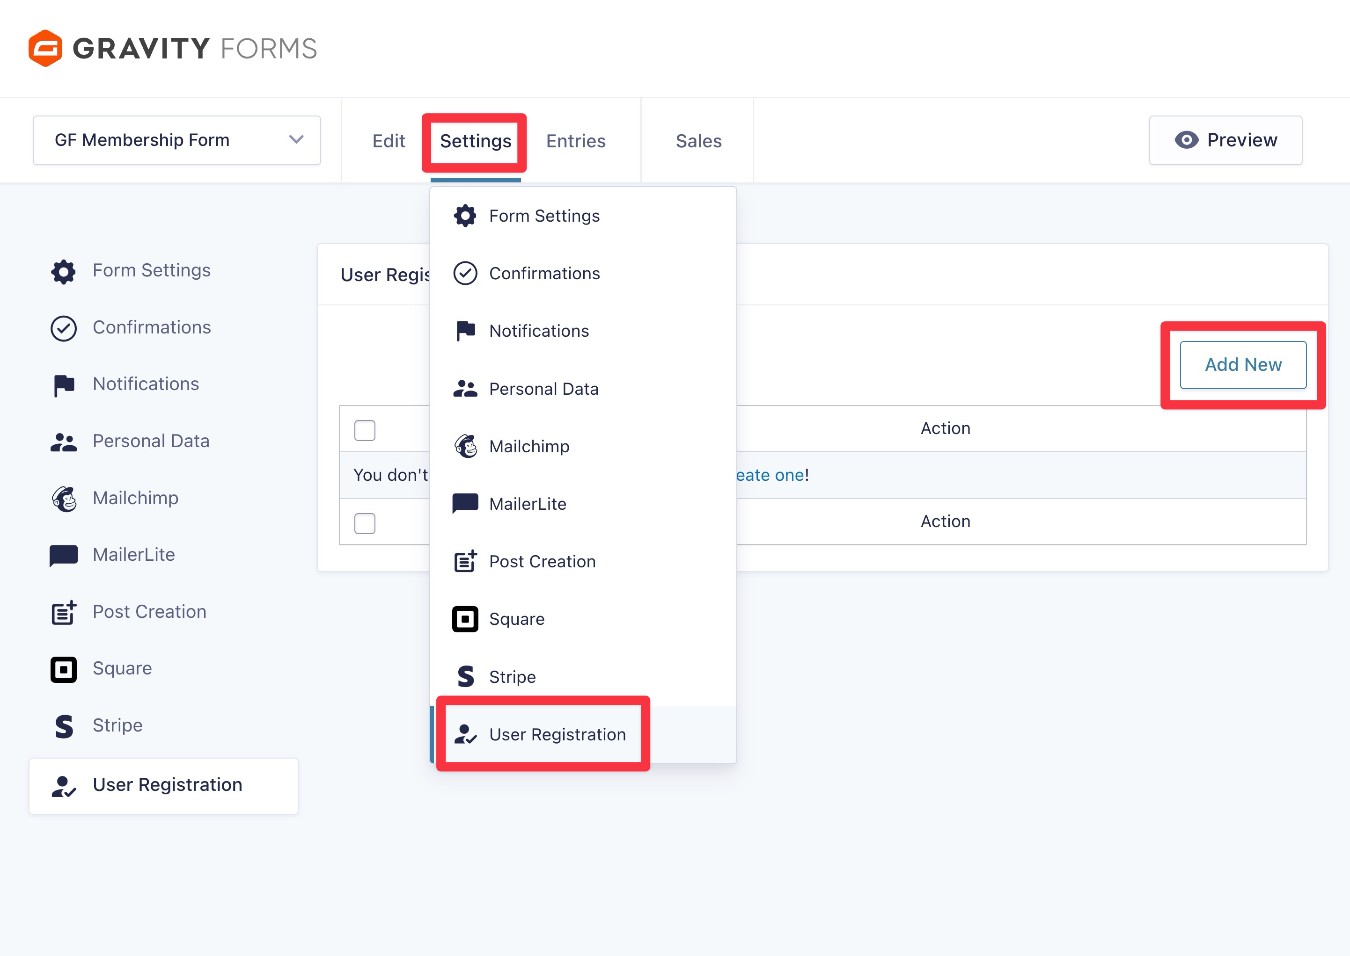
To create your first feed, go to Settings → User Registration → Add New in the form editor.
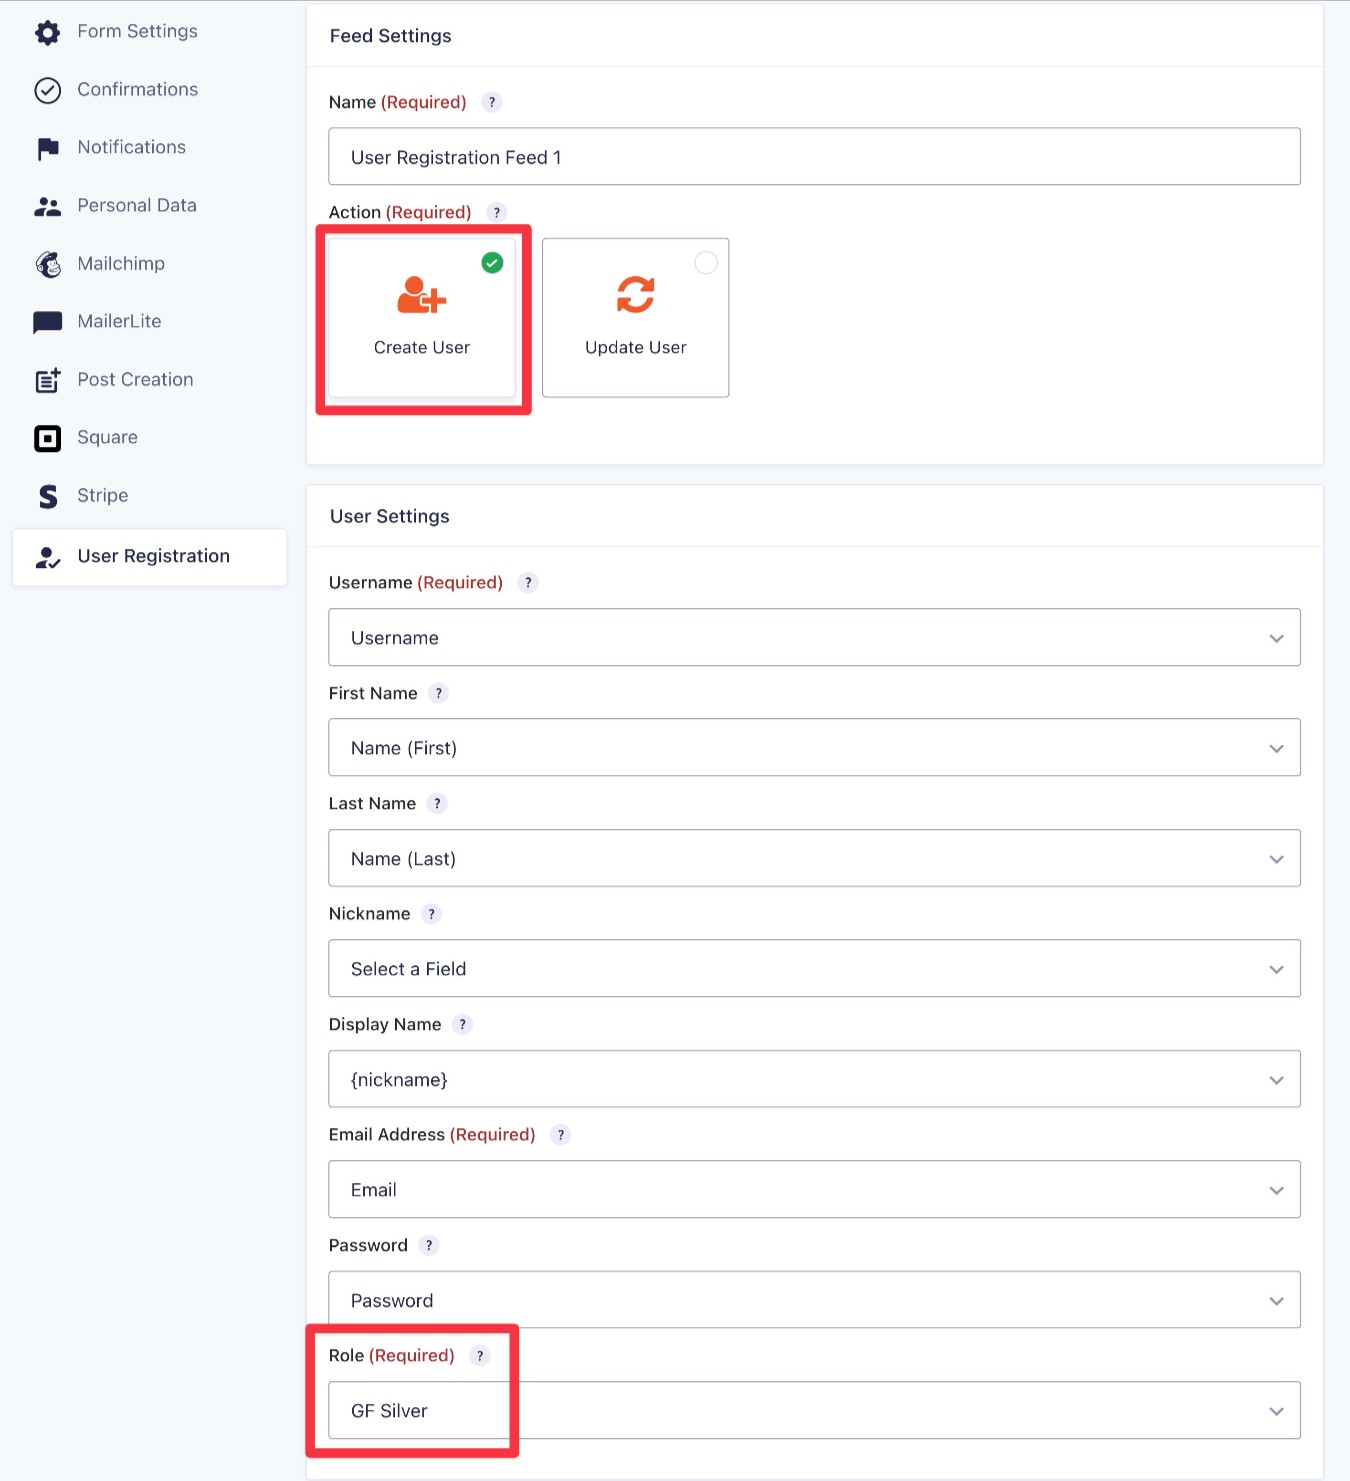
Under Action, choose the Create User option.
This will expand some additional options to map the fields from your form to the WordPress user profile fields.
The most important choice here is Role. Make sure to select one of the roles associated with your membership levels. Again, you will need to create a separate feed for each membership level. For this example, we’re creating the feed for the “Silver” role.
Further down, you can configure some basic settings about whether to send users emails and how to activate their accounts.
Then, you must use the Registration Condition options to set up two important rules:
- For paid membership levels, add a Payment Status rule. This will make sure the person only gets an account if their payment was successful and/or if their subscription is active. For a membership subscription, you could set the Payment Status condition to Active Subscription.
- Create another rule based on the membership level that the user selected in the form. For example, because we’re assigning users to the “Silver” role, we want to make sure they choose the “Silver” level in the form.
Click Save Settings at the bottom when you’re done.

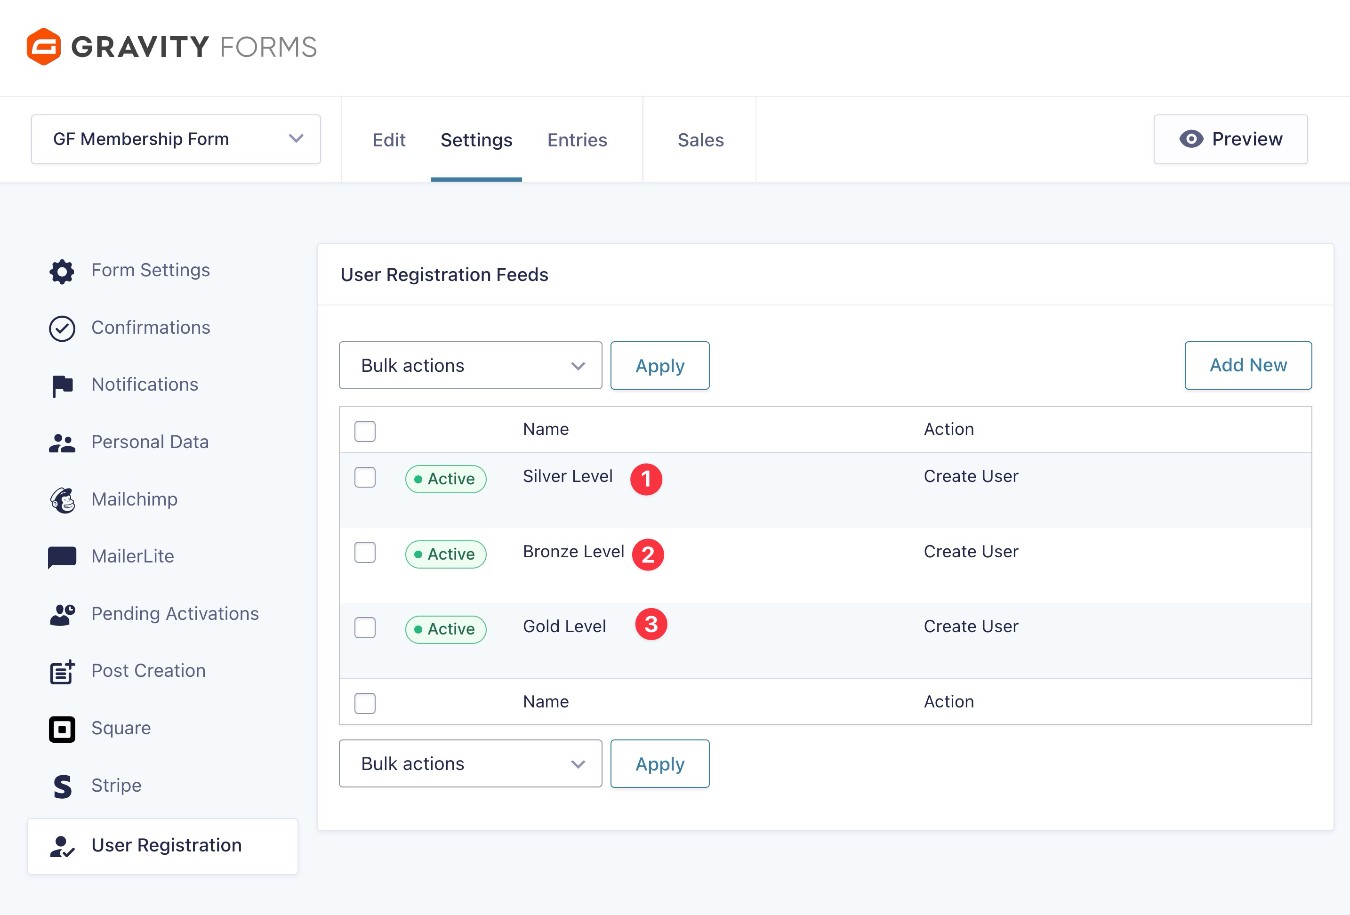
Then, repeat the same steps to create a feed for each membership level, making sure to add a Registration Condition to each feed so that it only executes if the person selects that membership level.
Because our example site has three different membership levels, we ended up with three different user registration feeds.
7. Use other add-ons to further enhance your membership form (optional)
This step is 100% optional.
Gravity Forms’s large ecosystem of official and third-party add-ons is another one of the notable advantages of using Gravity Forms for your membership form instead of whatever built-in form solution your membership plugin offers.
Using other add-ons, you can enhance your membership form in all kinds of meaningful ways, including improving your marketing and simplifying your administration process.
Here are a few examples of the ways that you can enhance your form, though this is by no means a complete list:
- Add members to your CRM when they join your site – Gravity Forms integrates directly with popular CRMs like HubSpot and Salesforce. Or, you could use Zapier as an intermediary for other CRMs (or look for third-party add-ons).
- Subscribe people to your email newsletter (if they opt-in) – Gravity Forms integrates directly with a variety of popular email marketing services, including Mailchimp, MailerLite, Kit, and many others.
- Improve your analytics – You can find add-ons that let you track form conversion rates and other details, which can help you optimize your membership registration flows. For example, the official Gravity Forms Google Analytics Add-On.
- Build business process workflows – Use Gravity Flow to build customized business process workflows that simplify the process of managing your membership website.
Again, these are just a few ideas of what you can do. To get even more ideas, you can browse all of the Gravity Forms add-ons here.
In addition to using more add-ons, you can also set up some important core functions:
- Confirmations – These let you display a message or redirect members after they submit the form. Go to Settings → Notifications in the form editor.
- Notifications – These let you send one or more emails to any address, including the member, admins, etc. Go to Settings → Notifications in the form editor.
8. Embed your membership form and test everything
Once you’ve finished setting up the membership form template, the next step is to embed the form somewhere on your site so that people can use it to join your membership website.
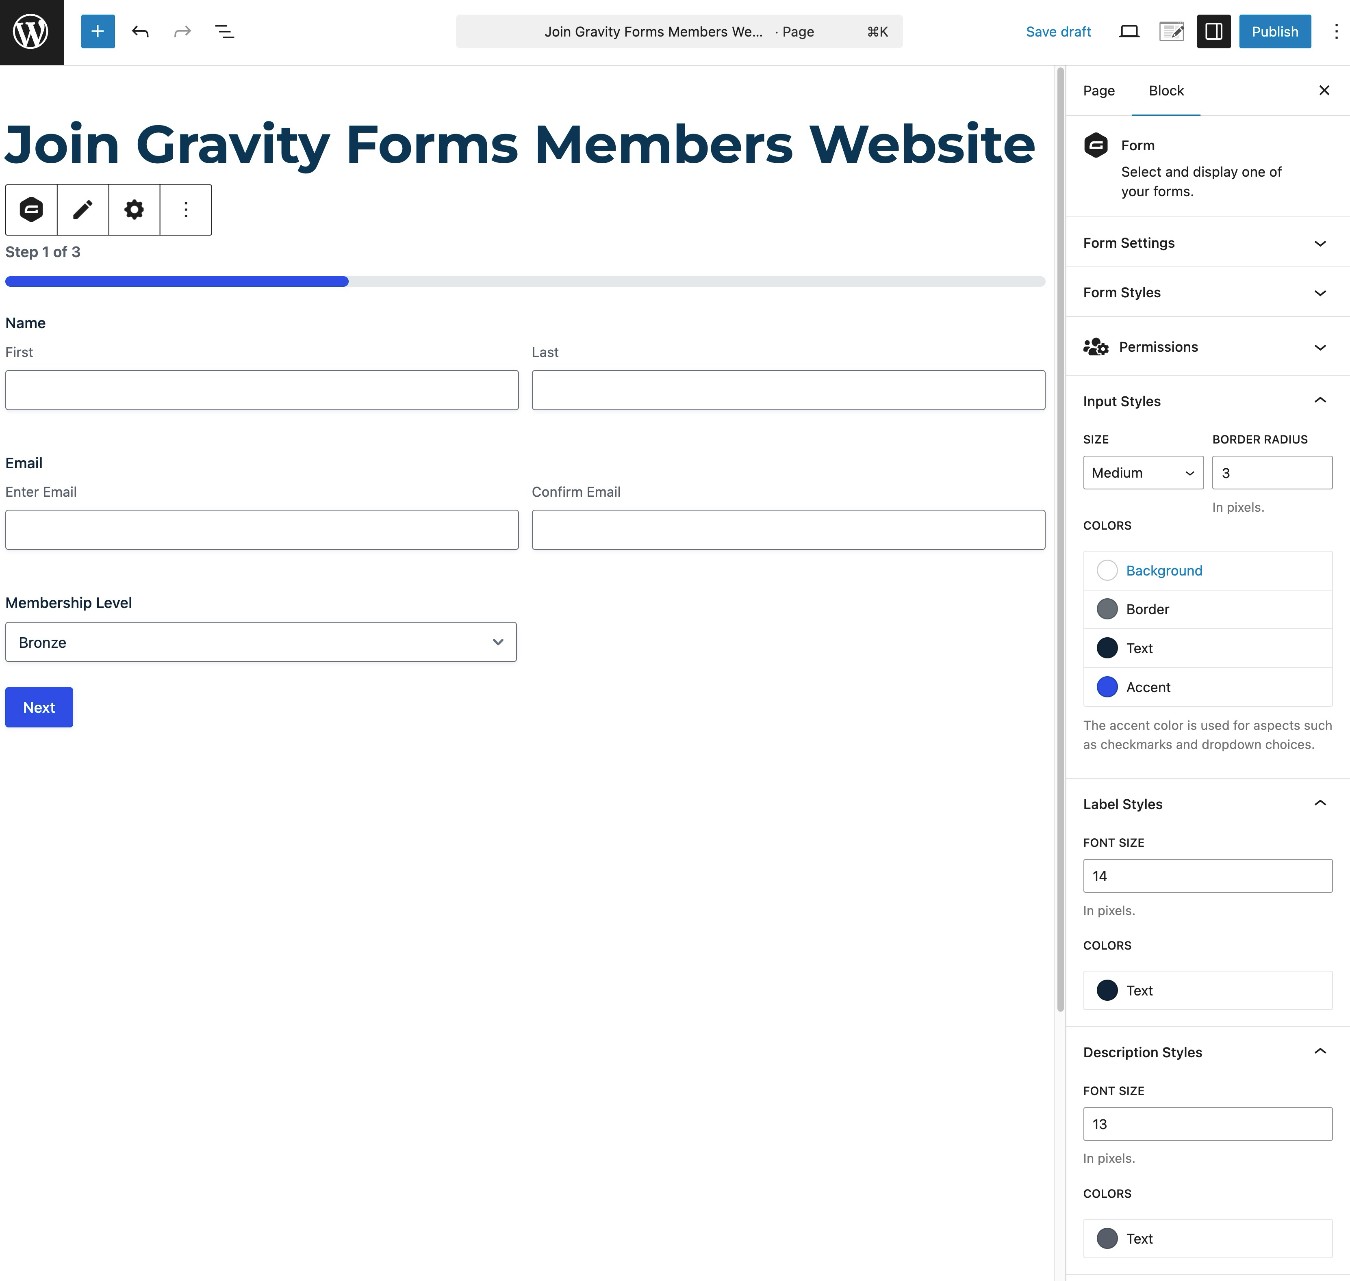
You can embed the form using the Gravity Forms block, shortcode, or PHP function.
If you use the block, you’ll be able to style your form directly from the editor using code-free style controls.
Once you embed the form, we recommend testing it. Because you set up the Stripe connection in Test mode for now, you can pay for a test membership using one of Stripe’s dummy card testing numbers.
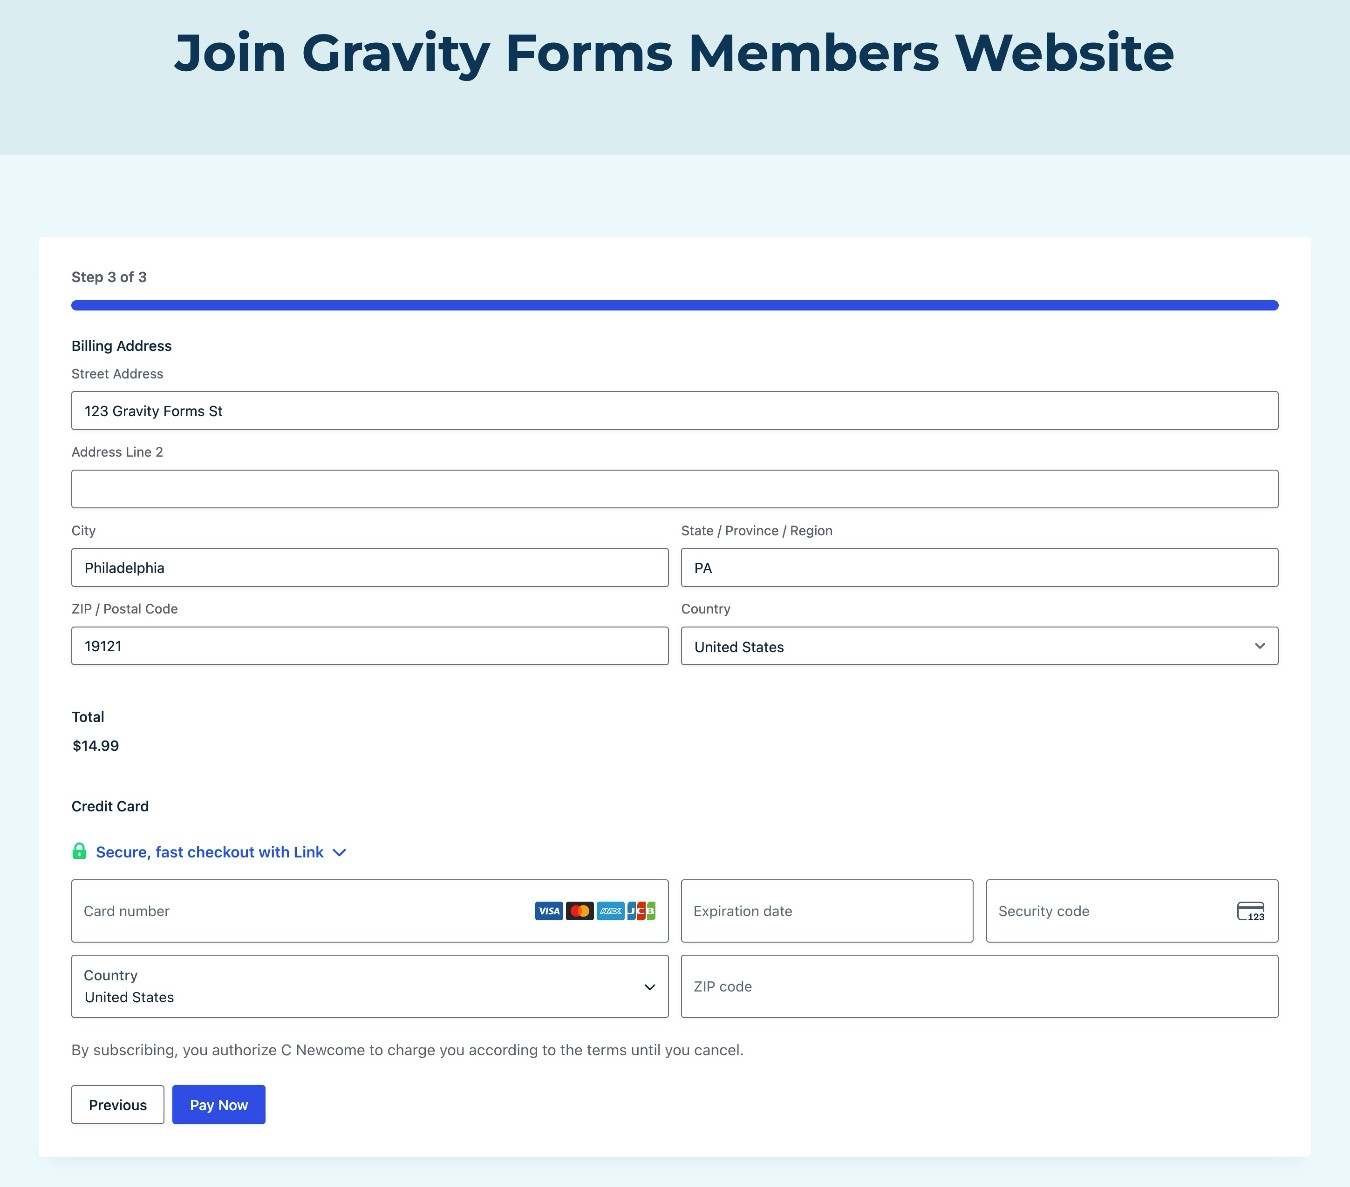
After submitting a test payment, a few things happen.
First, if you go to Forms → Entries and select your form, you can see the details for that member. You’ll also get options to manually activate the user or cancel their subscription (if applicable).
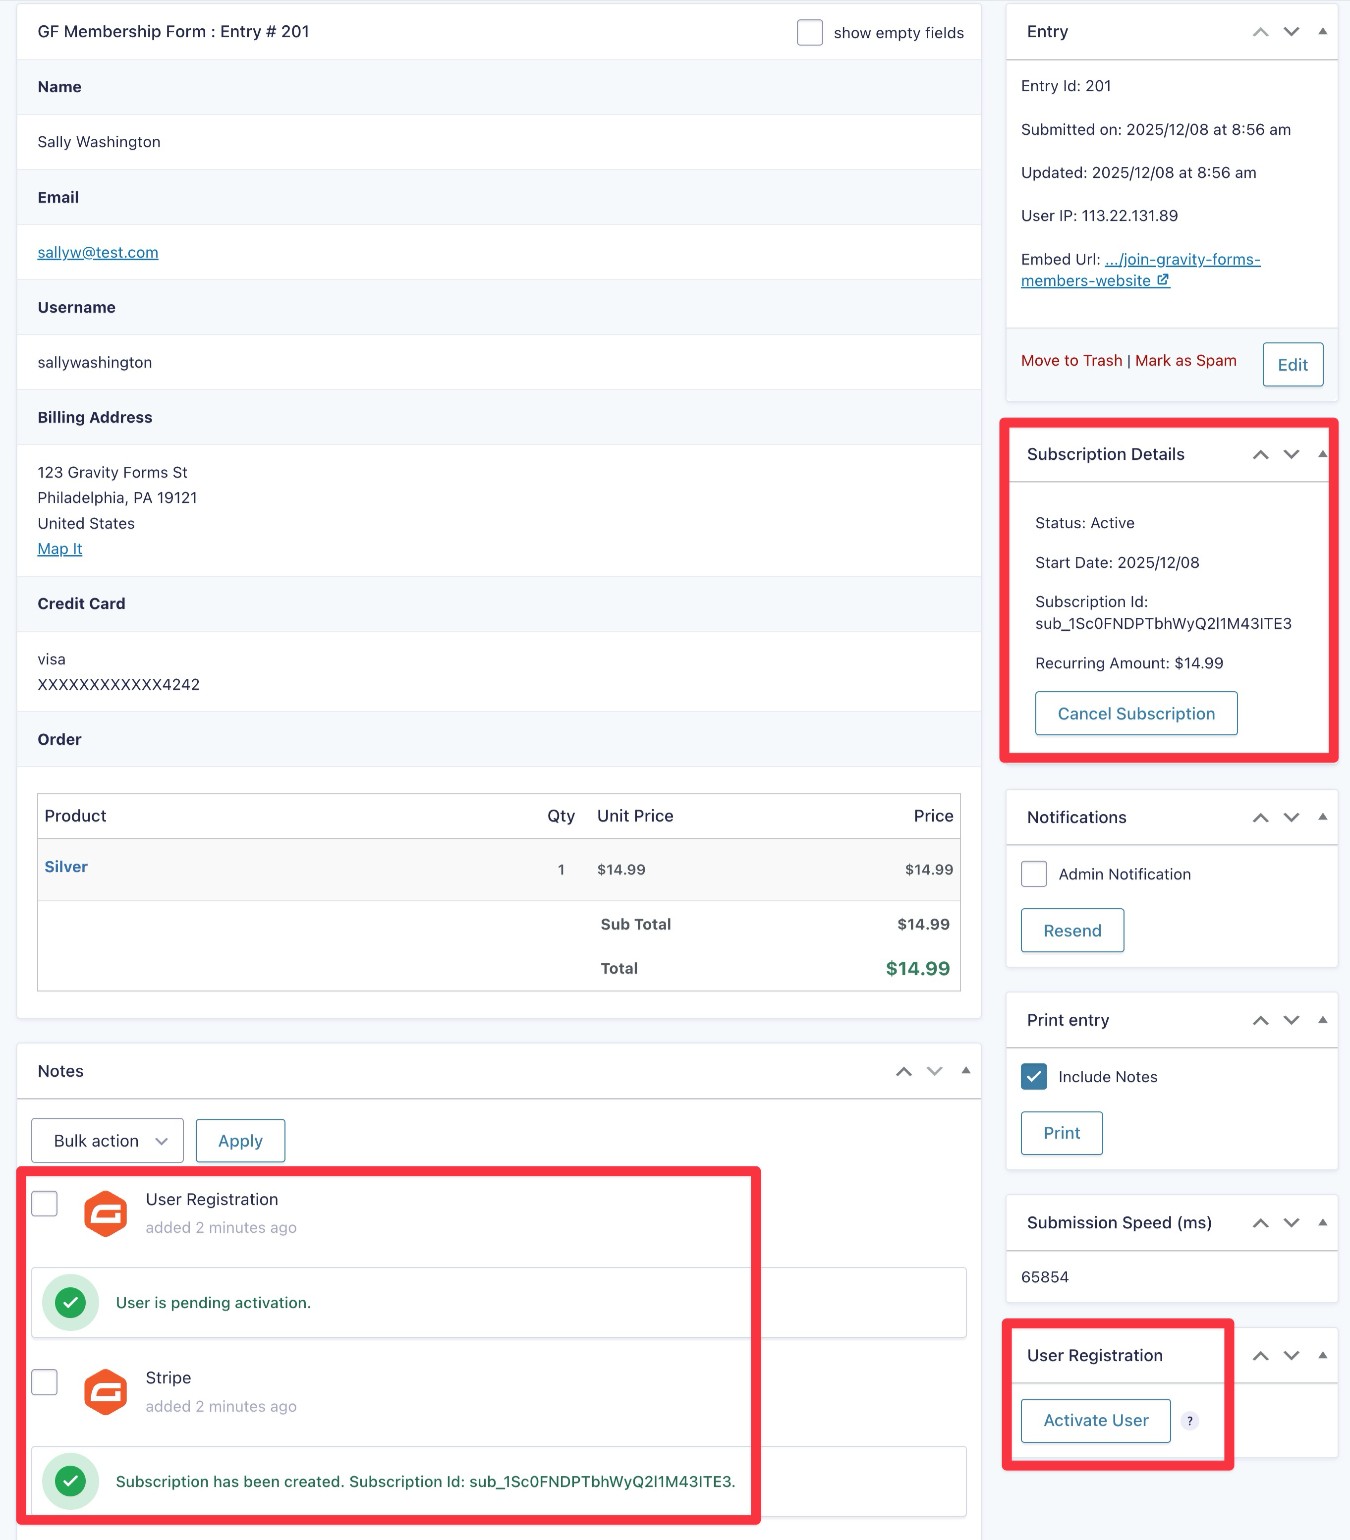
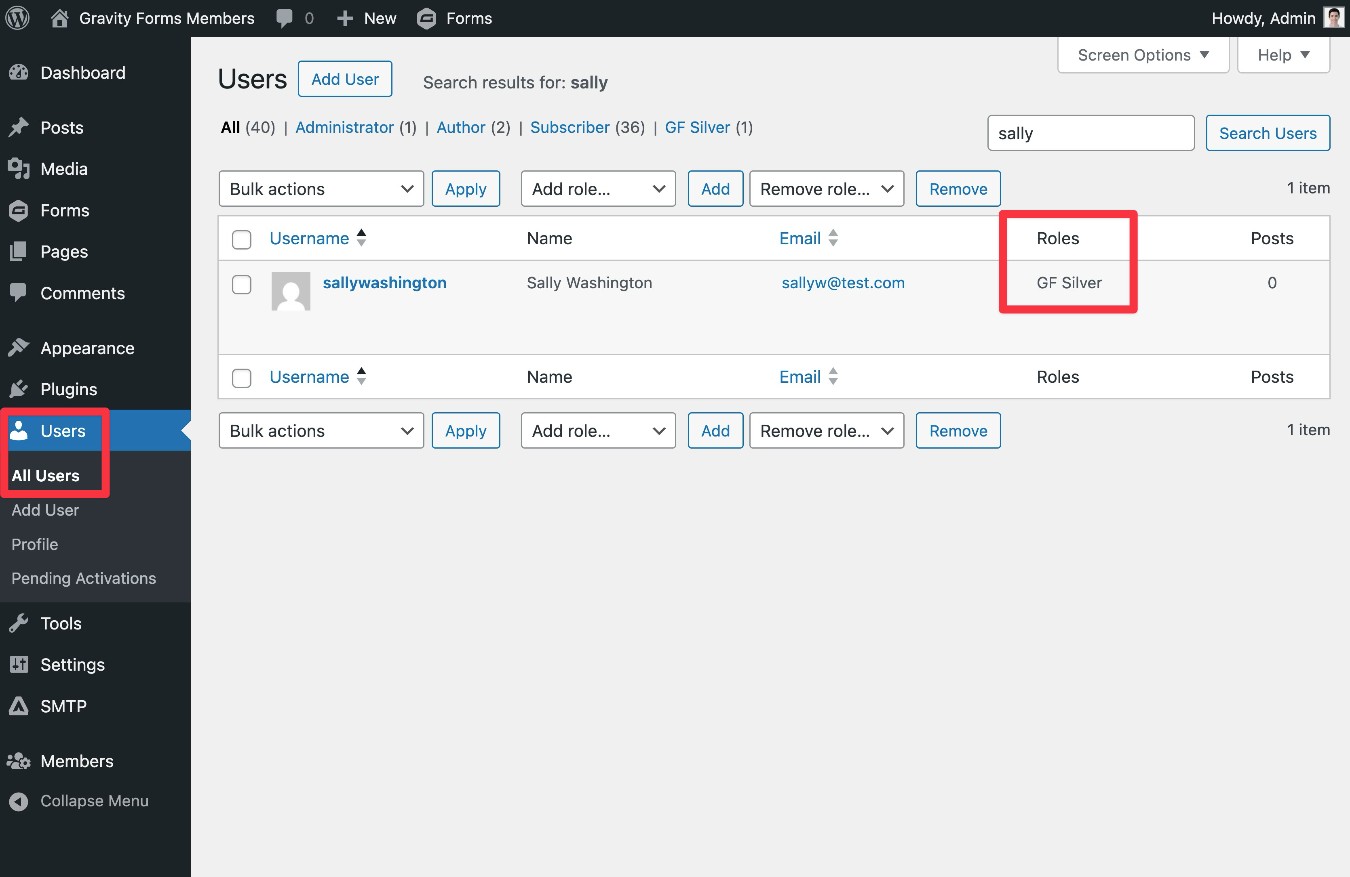
If you look at the user in the WordPress Users list, you should see that they have the correct user role/membership level based on the option they chose in the form.
If you have multiple membership levels, we recommend testing the form with different choices to make sure you have properly configured your registration conditions.
9. Enable live payments
If, after testing your form, you’re happy with how everything is working, the last step is to enable live payments so that you can start collecting real money when people join your site.
To do this, go to Forms → Settings → Stripe. Change the Mode from Test to Live, and then repeat the same steps to connect to Stripe in live payments mode.
Create your WordPress membership form today
With the Gravity Forms membership form template, you can easily create a free or paid membership signup form on your site.
You can collect as much information as needed from your members, assign them to the correct role/membership level, and accept one-time payments or set up recurring subscriptions in exchange for creating an account.
In addition to working with the core WordPress user role system, Gravity Forms should work with any membership plugin that uses user roles (which most do).
If you’re ready to get started, purchase the Gravity Forms Elite or Nonprofit license today to be able to access the User Registration Add-On, along with every other add-on that Gravity Forms offers.
Or, if you’d rather try it before you buy, you can create a free, fully functioning demo website.

If you want to keep up-to-date with what’s happening on the blog sign up for the Gravity Forms newsletter!