
Are you struggling to choose between Ninja Forms vs Gravity Forms as the form builder plugin for your WordPress site(s)?
Gravity Forms and Ninja Forms are both two of the most popular WordPress form plugins, so both of them are capable of helping you implement reliable forms on your site.
However, there are also some differences between Gravity Forms and Ninja Forms that might make one plugin better than the other for your personal websites, your business, and/or your agency.
In our Gravity Forms vs Ninja Forms comparison, we’re not going to pick a single “winner”. Instead, we’ll try to highlight the similarities and differences between these two plugins so that you can make the right choice for your specific situation.
Obviously, we make Gravity Forms, so we think it’s a great option for a lot of situations. However, we’re going to try to keep things objective here, including situations when Ninja Forms has an advantage.
To make that happen, here’s everything that we’ll cover:
- What types of forms you can build
- Form builder experience
- Form embed and styling options
- Integrations with other services
- Automation options
- Spam protection
- Pricing
- Support
- Third-party add-on marketplaces
- Developer extensibility
What Types of Forms Can You Build?
To start off our comparison, let’s take a look at the types of forms that you can build with Gravity Forms and Ninja Forms.
Both plugins are full-service form building and data capture tools, with support for everything from basic contact forms to payment forms, registration forms, and more.
Here’s a comparison of some common form types that you might want to build, though this table is by no means a complete list of everything that you can build with either plugin.
| Gravity Forms | Ninja Forms | |
| Contact form | ✅ | ✅ |
| Email opt-in form (connects to email marketing service) | ✅ | ✅ |
| Lead generation form (connects to CRM) | ✅ | ✅ |
| One-time payment form (or donation) | ✅ | ✅ |
| Recurring payment form (or donation) | ✅ | ✅ |
| WordPress user registration form | ✅ | ✅ |
| Legal signing form (real signature) | ✅ | ❌ |
| Job application form | ✅ | ✅ |
| Frontend content creation | ✅ | ✅ |
| Dedicated survey forms | ✅ | ❌* |
| Dedicated quizzes | ✅ | ❌* |
| Dedicated polls | ✅ | ❌* |
* There are ways to create surveys, quizzes, and polls with Ninja Forms. However, Ninja Forms lacks dedicated features for these use cases. For example, Ninja Forms doesn’t have in-dashboard analysis areas for surveys, quizzes, or polls, which are features that Gravity Forms offers. For something like quizzes, you’d also need to manually set up your own mathematical grading rules using the regular calculation functionality.
While there are a lot of high-level similarities, there are smaller differences that could push you in one direction or the other, which we’ll try to highlight below.
For example, while both plugins let you create payment forms, they integrate with different payment processors. If you want to, say, use Square for payments, Gravity Forms offers an official Square integration while Ninja Forms doesn’t (and, to be objective, Ninja Forms also supports some unique gateways that Gravity Forms doesn’t).
To help you build those forms, both Gravity Forms and Ninja Forms offer a number of essential features:
| Gravity Forms | Ninja Forms | |
| Email notifications | ✅ | ✅ |
| Conditional logic | ✅ | ✅ |
| In-dashboard entry management | ✅ | ✅ |
| Calculations | ✅ | ✅ |
| Multi-page forms | ✅ | ✅ |
| File uploads | ✅ | ✅ |
| Geolocation | ✅ | ❌ |
| Partial entries | ✅ | ✅ |
| Conversational form interface | ✅ | ❌ |
| Display form data on frontend | ✅ | ✅ |
Form Builder Experience (Templates, Form Builder, Etc.)
Next, let’s take a look at the basic experience of building a form in Gravity Forms vs Ninja Forms.
In general, both plugins are non-technical and easy to use. You can create your forms using simple drag-and-drop editors and access built-in settings to control how each field works.
In terms of which is “better”, it really just comes down to your preferences.
The interfaces are a little different but, in all honesty, most people will probably be happy using either plugin.
Let’s go through it…
Ninja Forms Form Building Experience
To create a new form, you can go to Ninja Forms → Add new.
You can then choose between starting from a blank slate or using one of the 15+ pre-made templates.
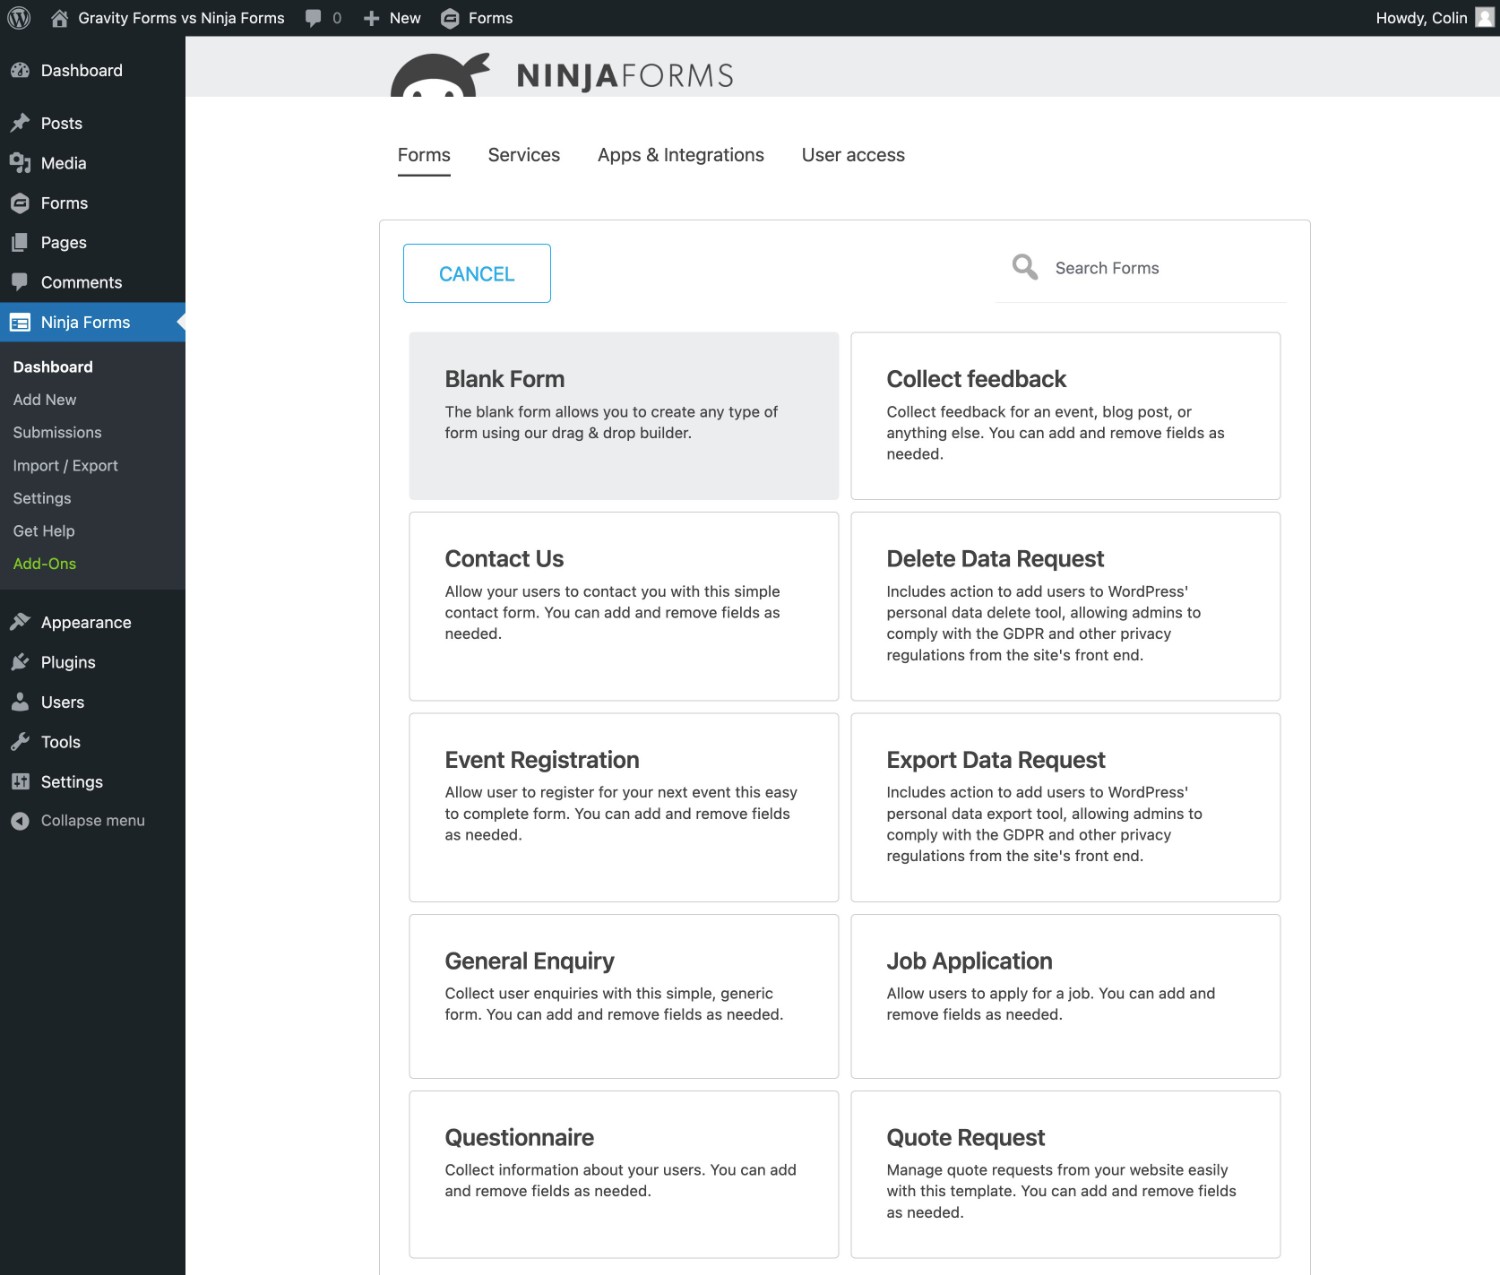
After choosing your starting point, you’ll be launched into the drag-and-drop Ninja Forms editor.
Ninja Forms uses a full-screen interface, opting to put the interfaces to add and edit fields into hidden interfaces that are only visible when you open them.
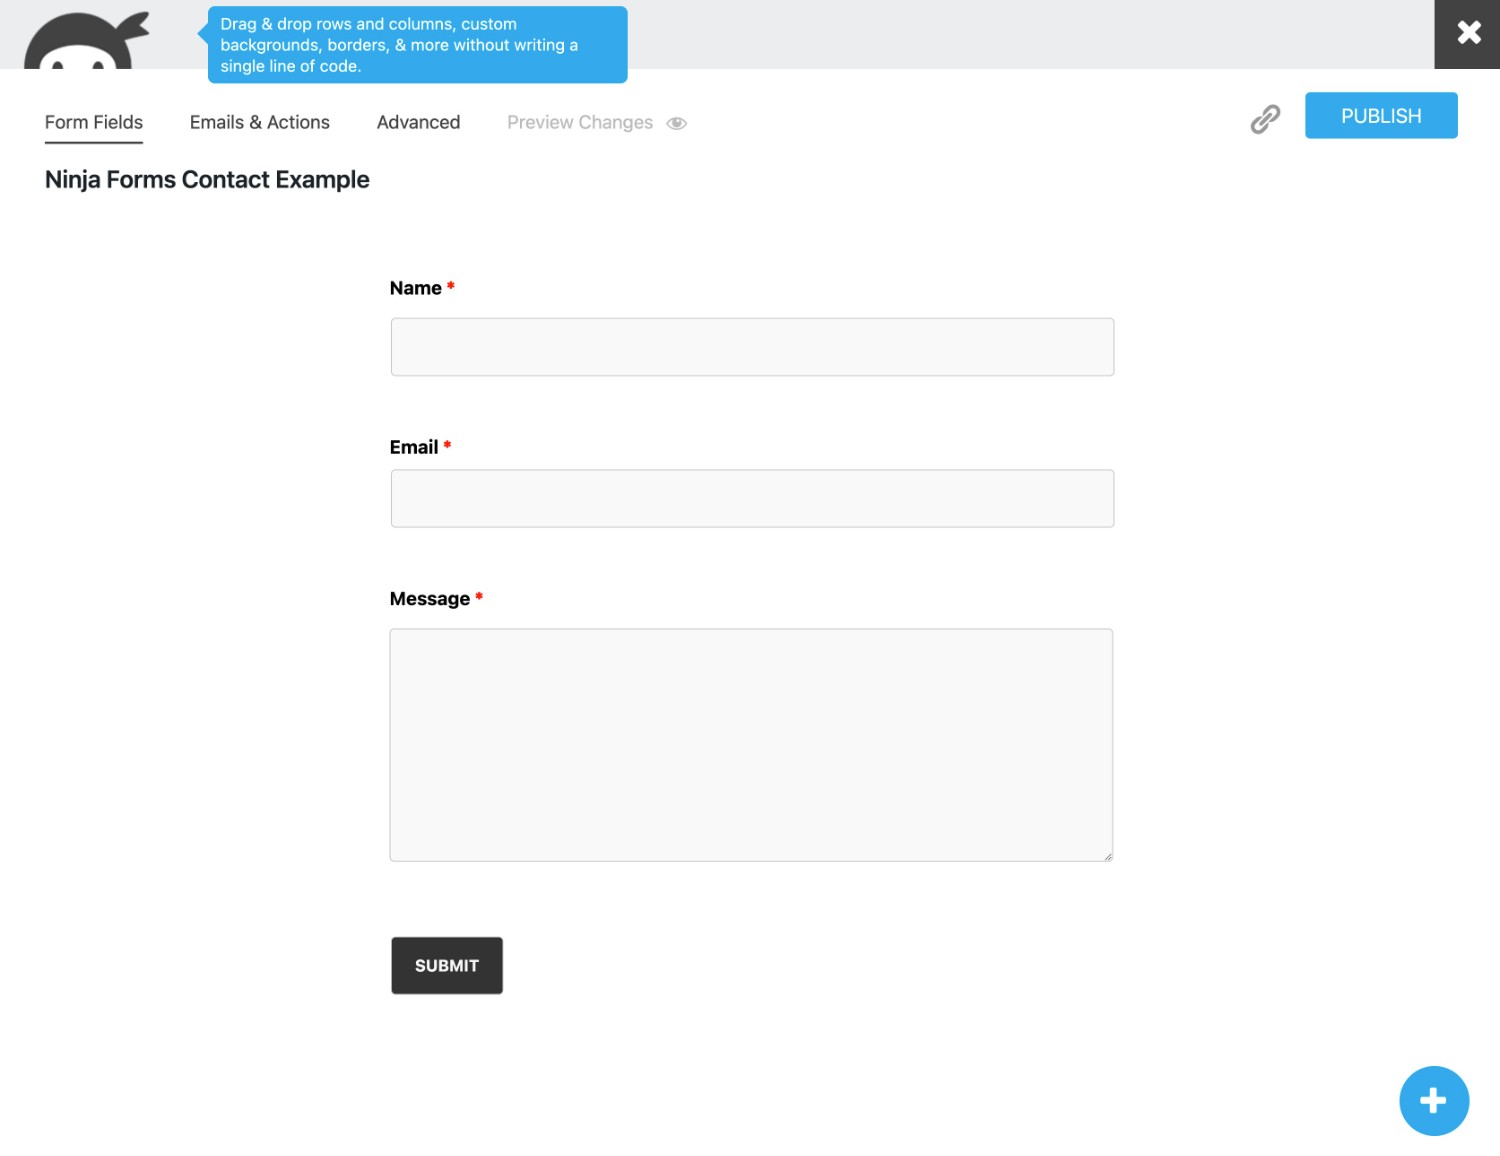
To add new fields, you can click the plus icon in the bottom-right corner and then drag them onto the preview.
You can also use drag and drop to rearrange existing fields.
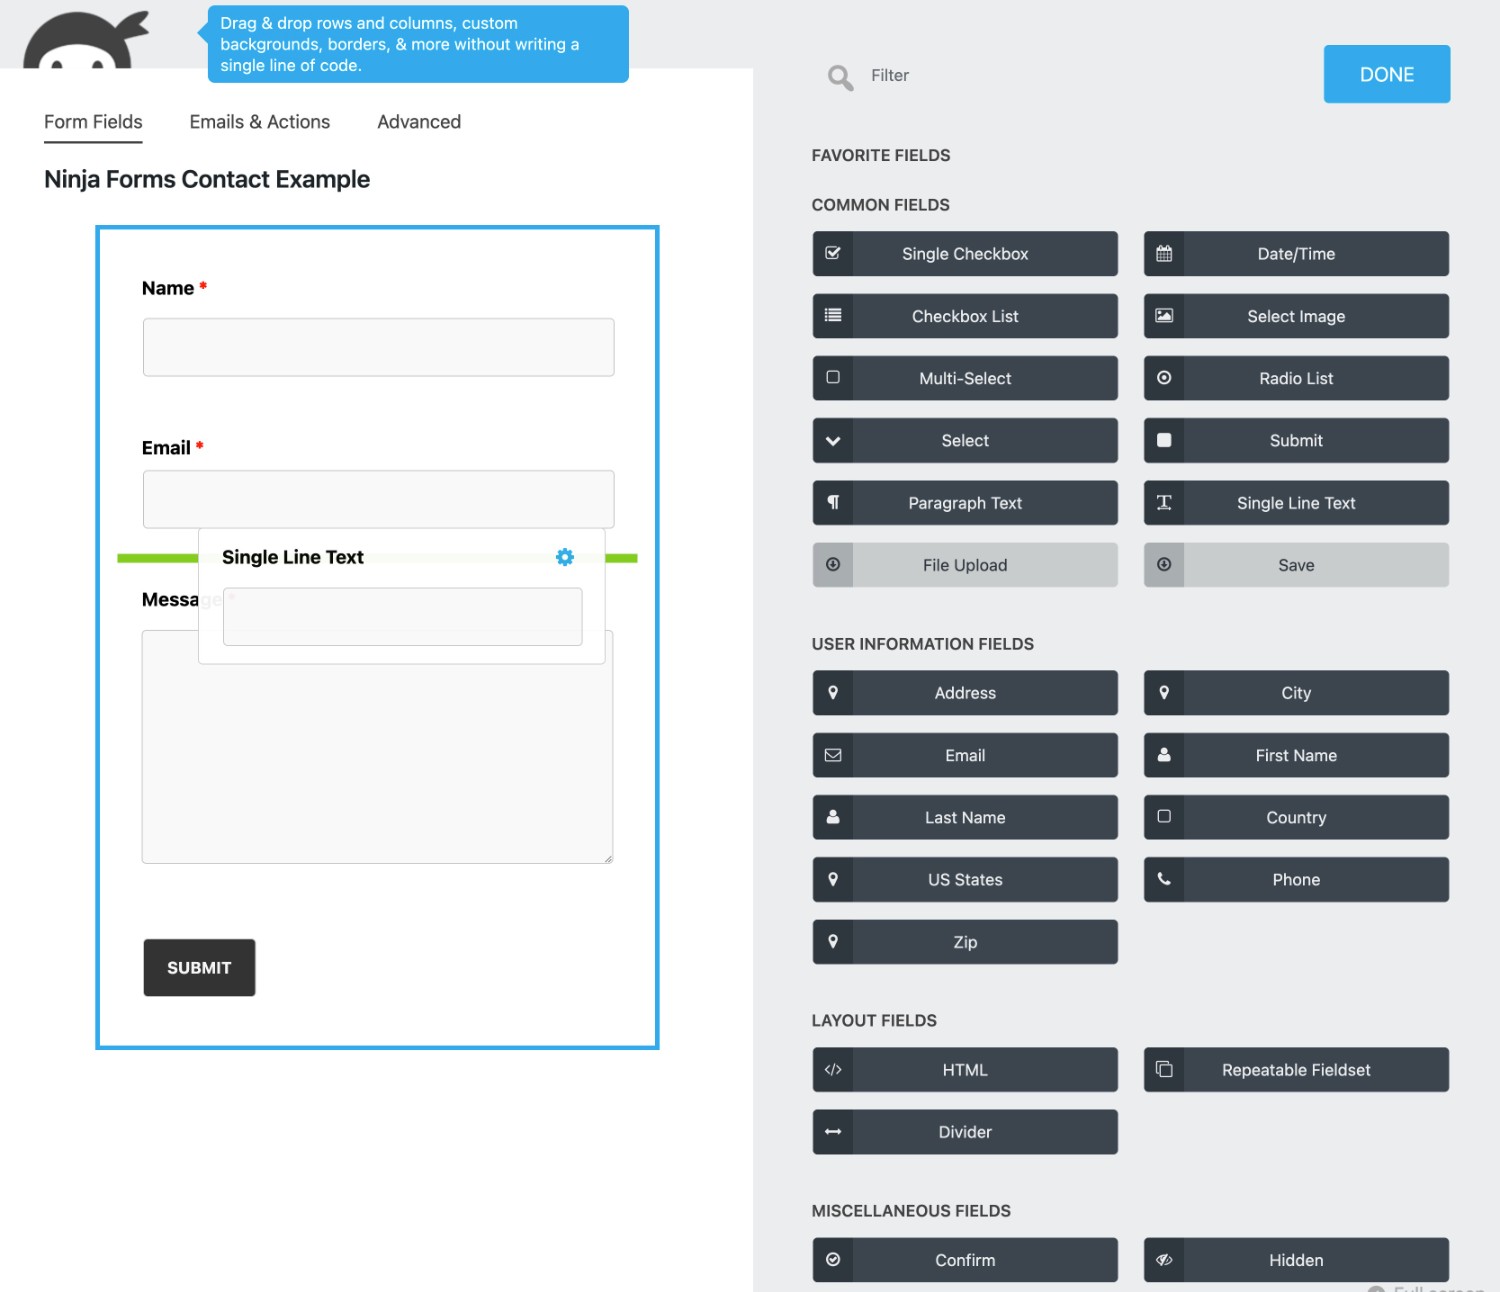
If you want to create a multi-column form, you’ll need the Layout and Styles Add-On, which lets you build multi-column designs by dragging a field next to another field.
To edit an individual field, you can hover over it and click the gear icon.
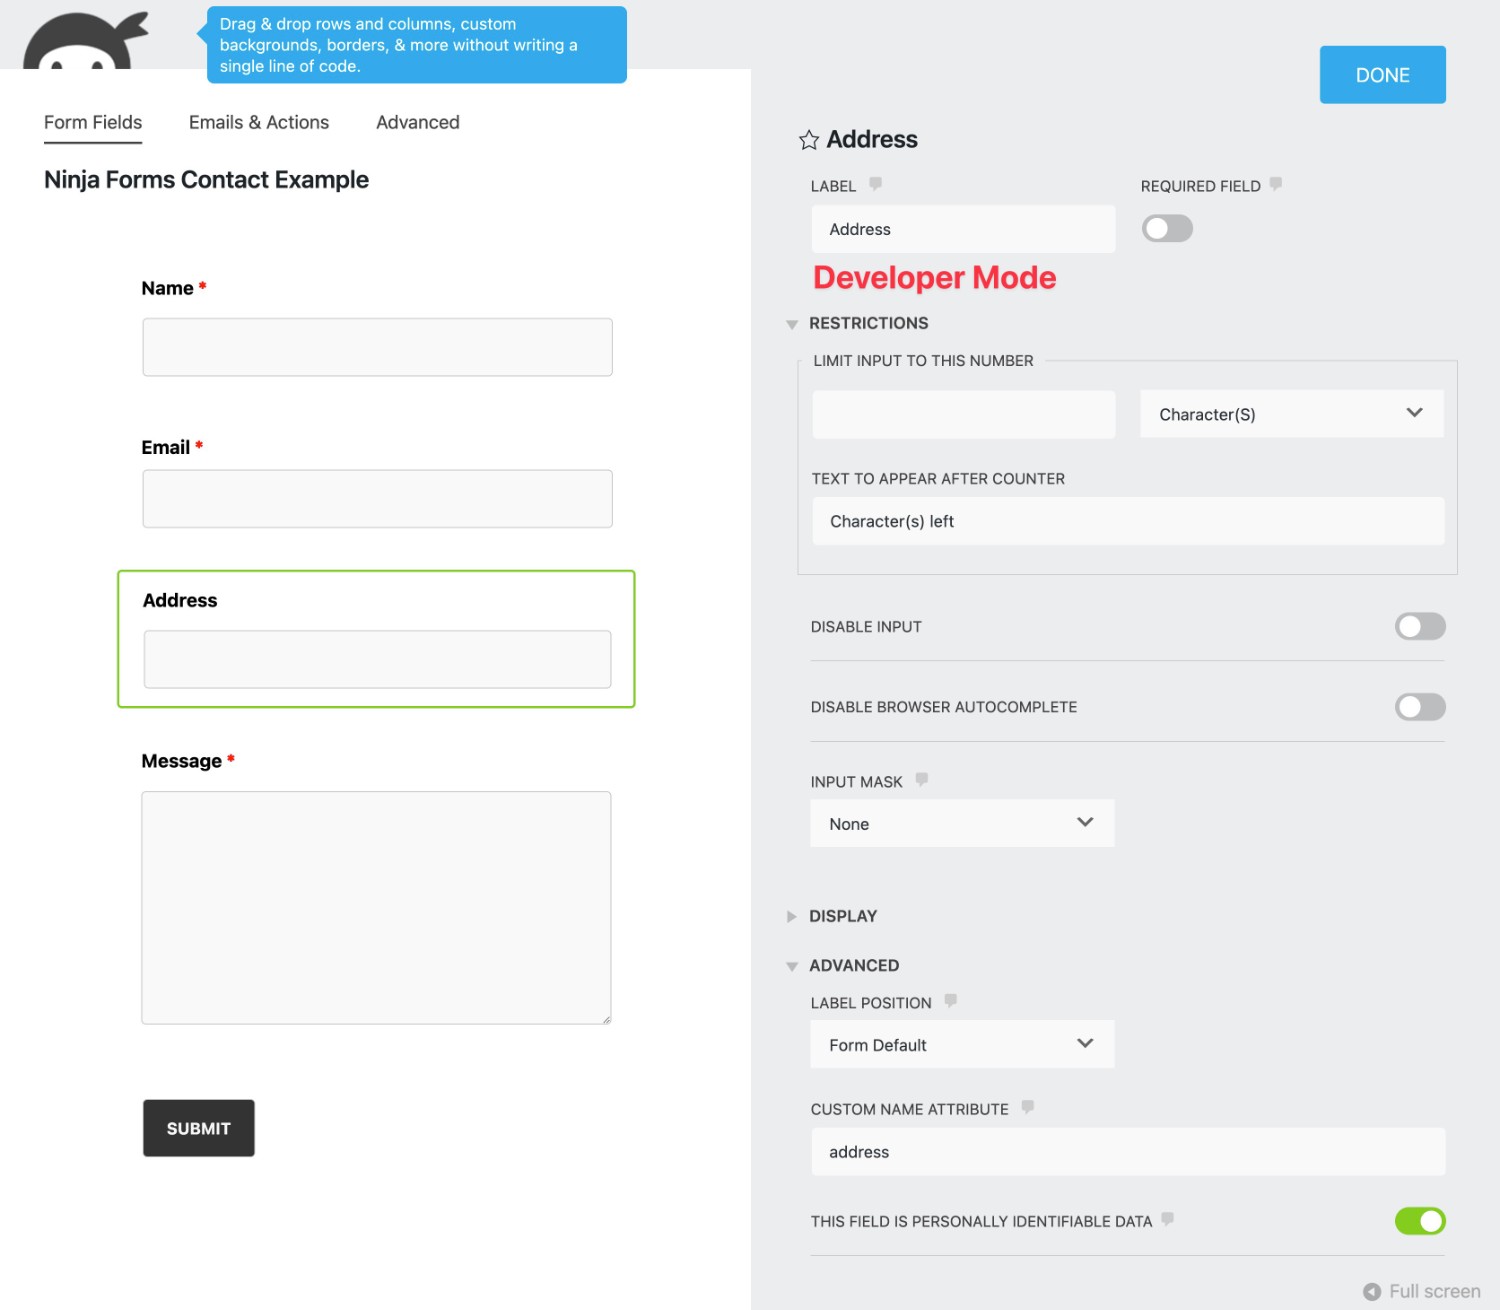
By default, you only get a few configuration options.
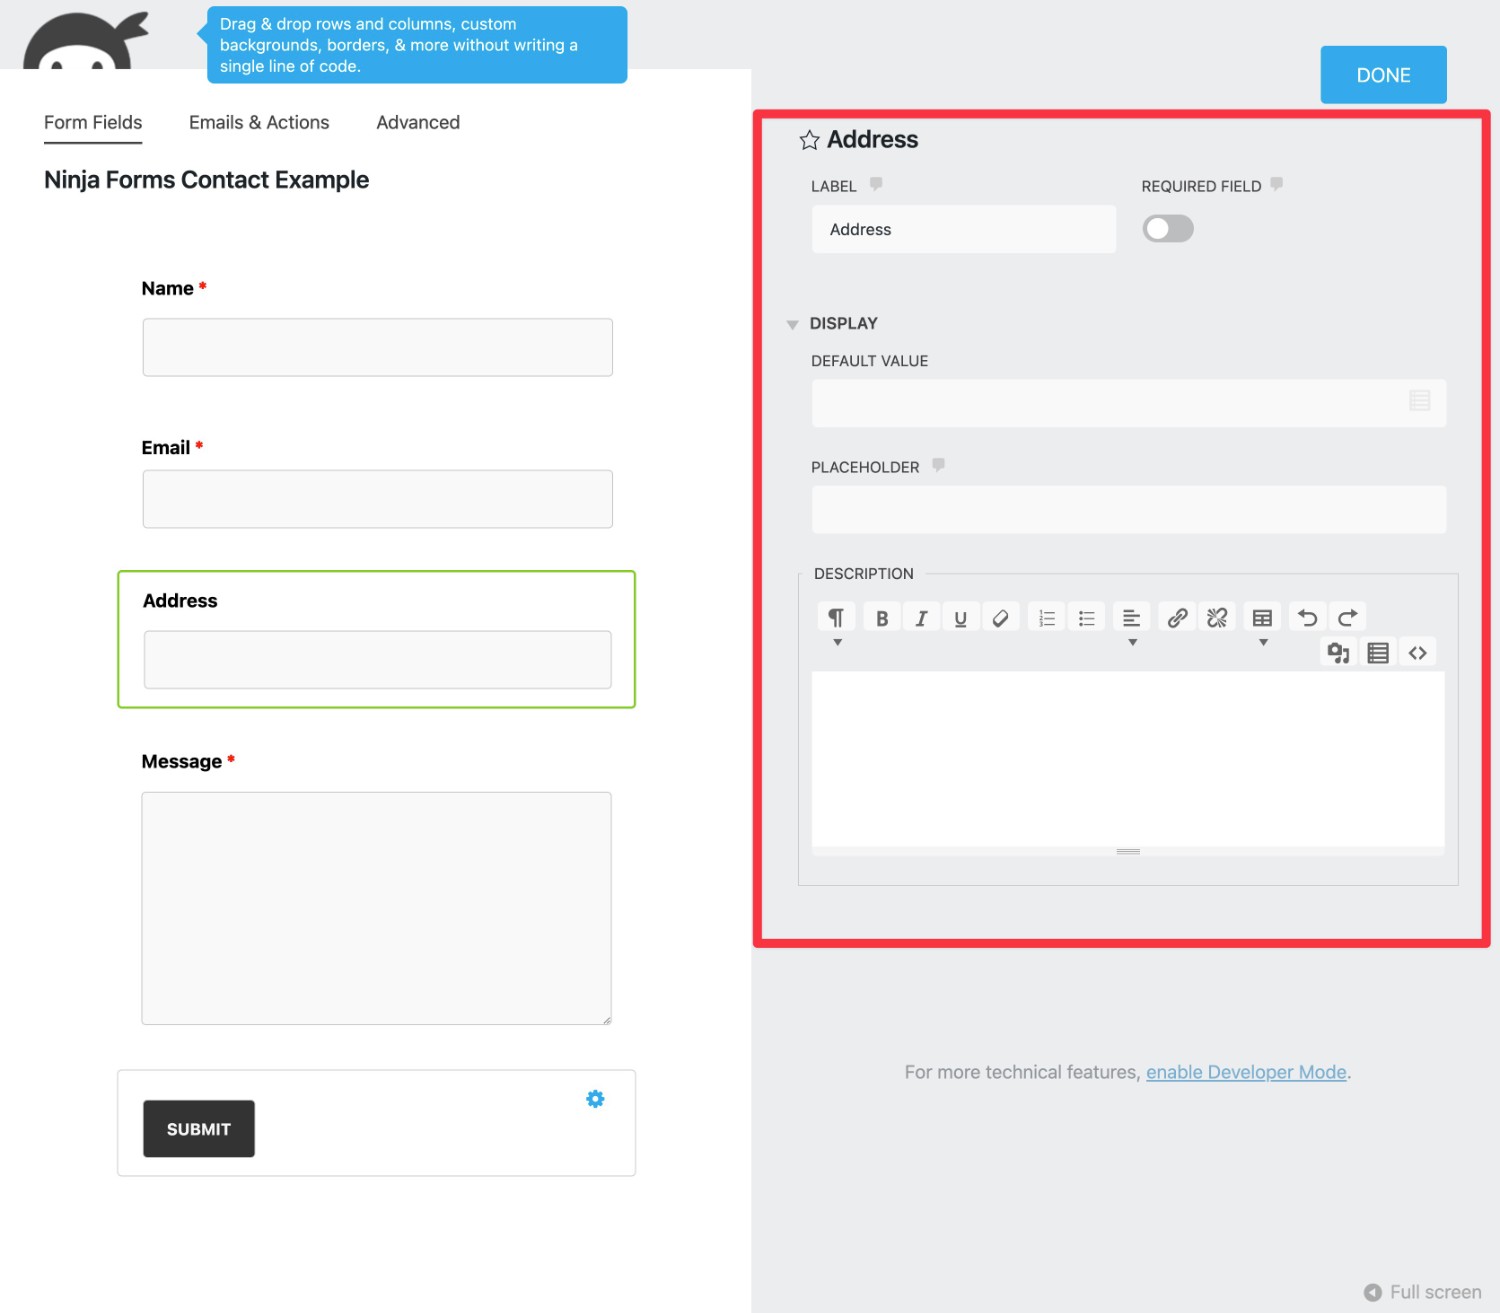
However, you can access more detailed options by enabling developer mode. You’ll also be able to access more features by installing add-ons, such as adding conditional logic options.
Gravity Forms Form Building Experience
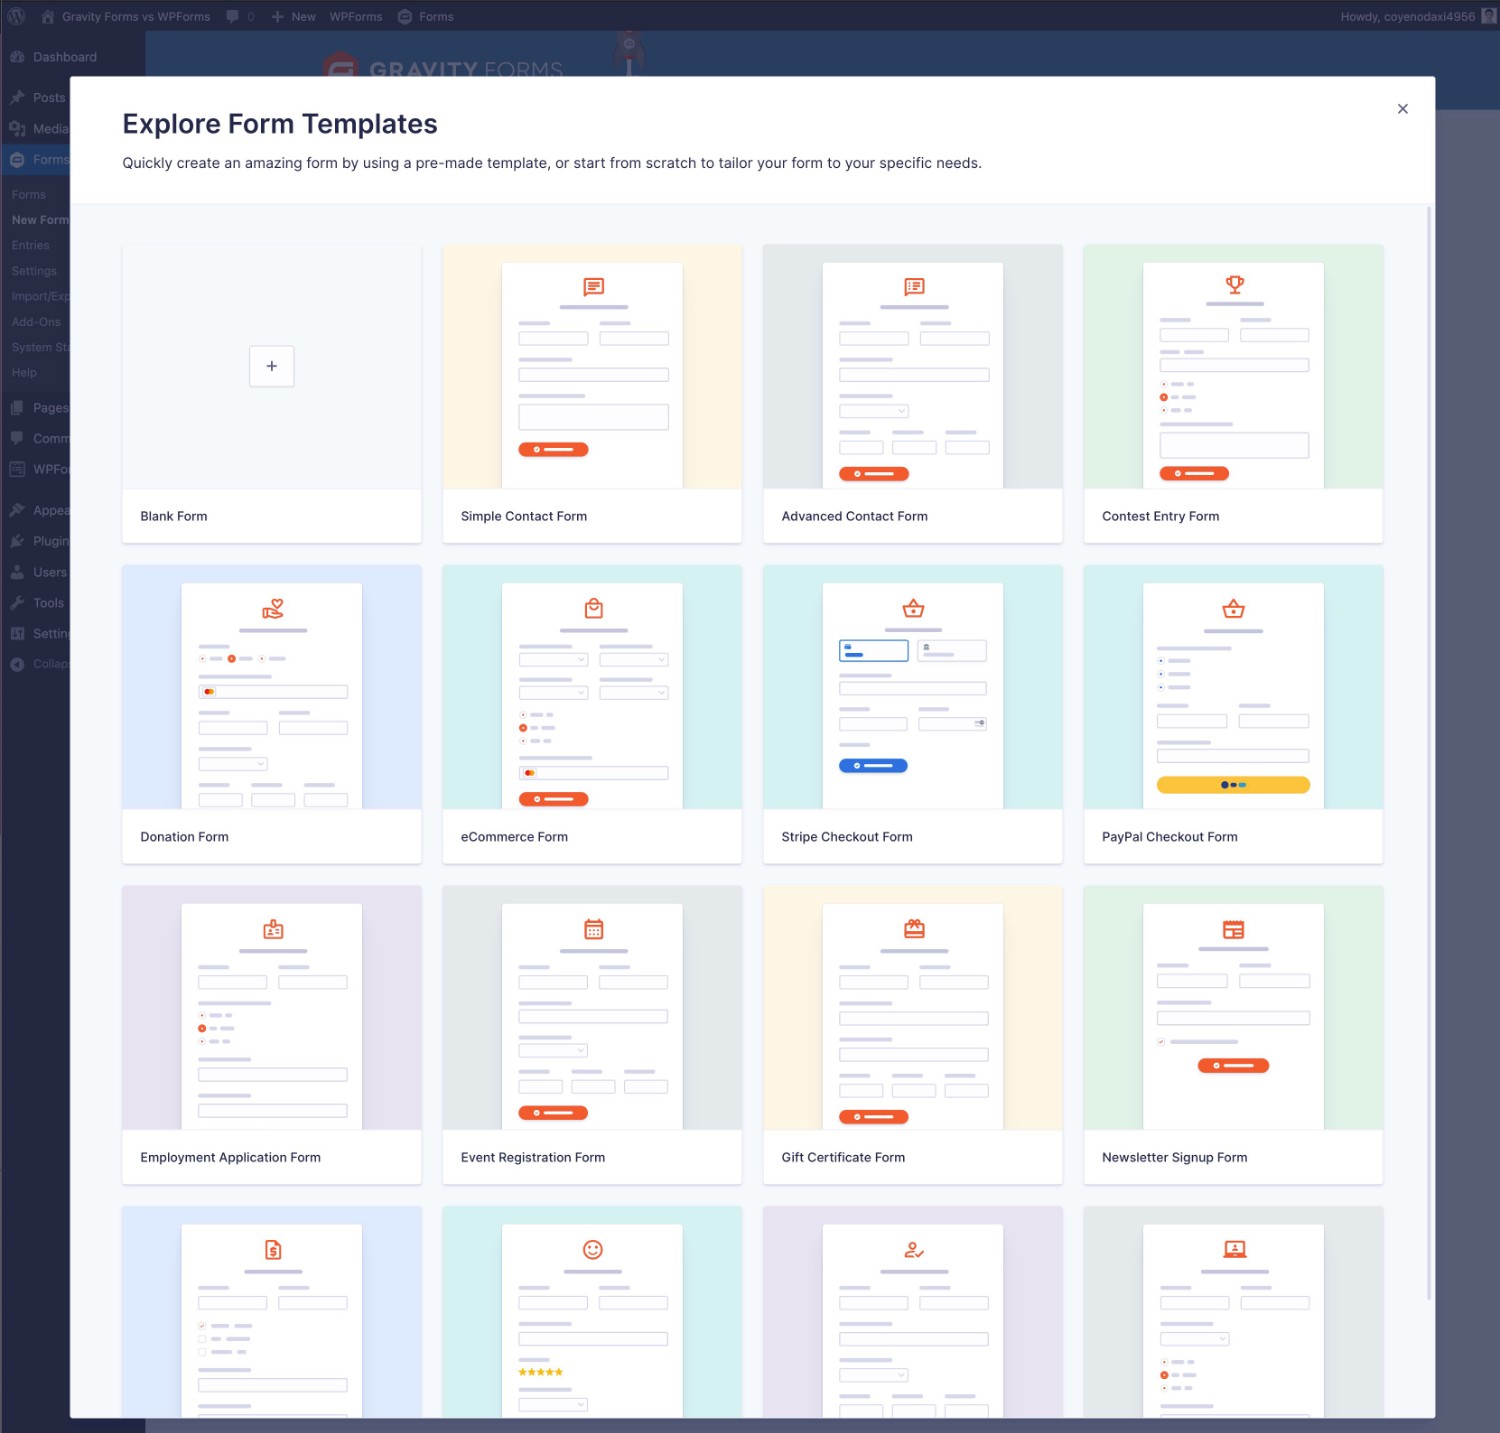
To create a new form, you can go to Forms → New Form.
You can then choose a blank canvas or one of the 15+ pre-made form templates, which is a similar number to what Ninja Forms offers.
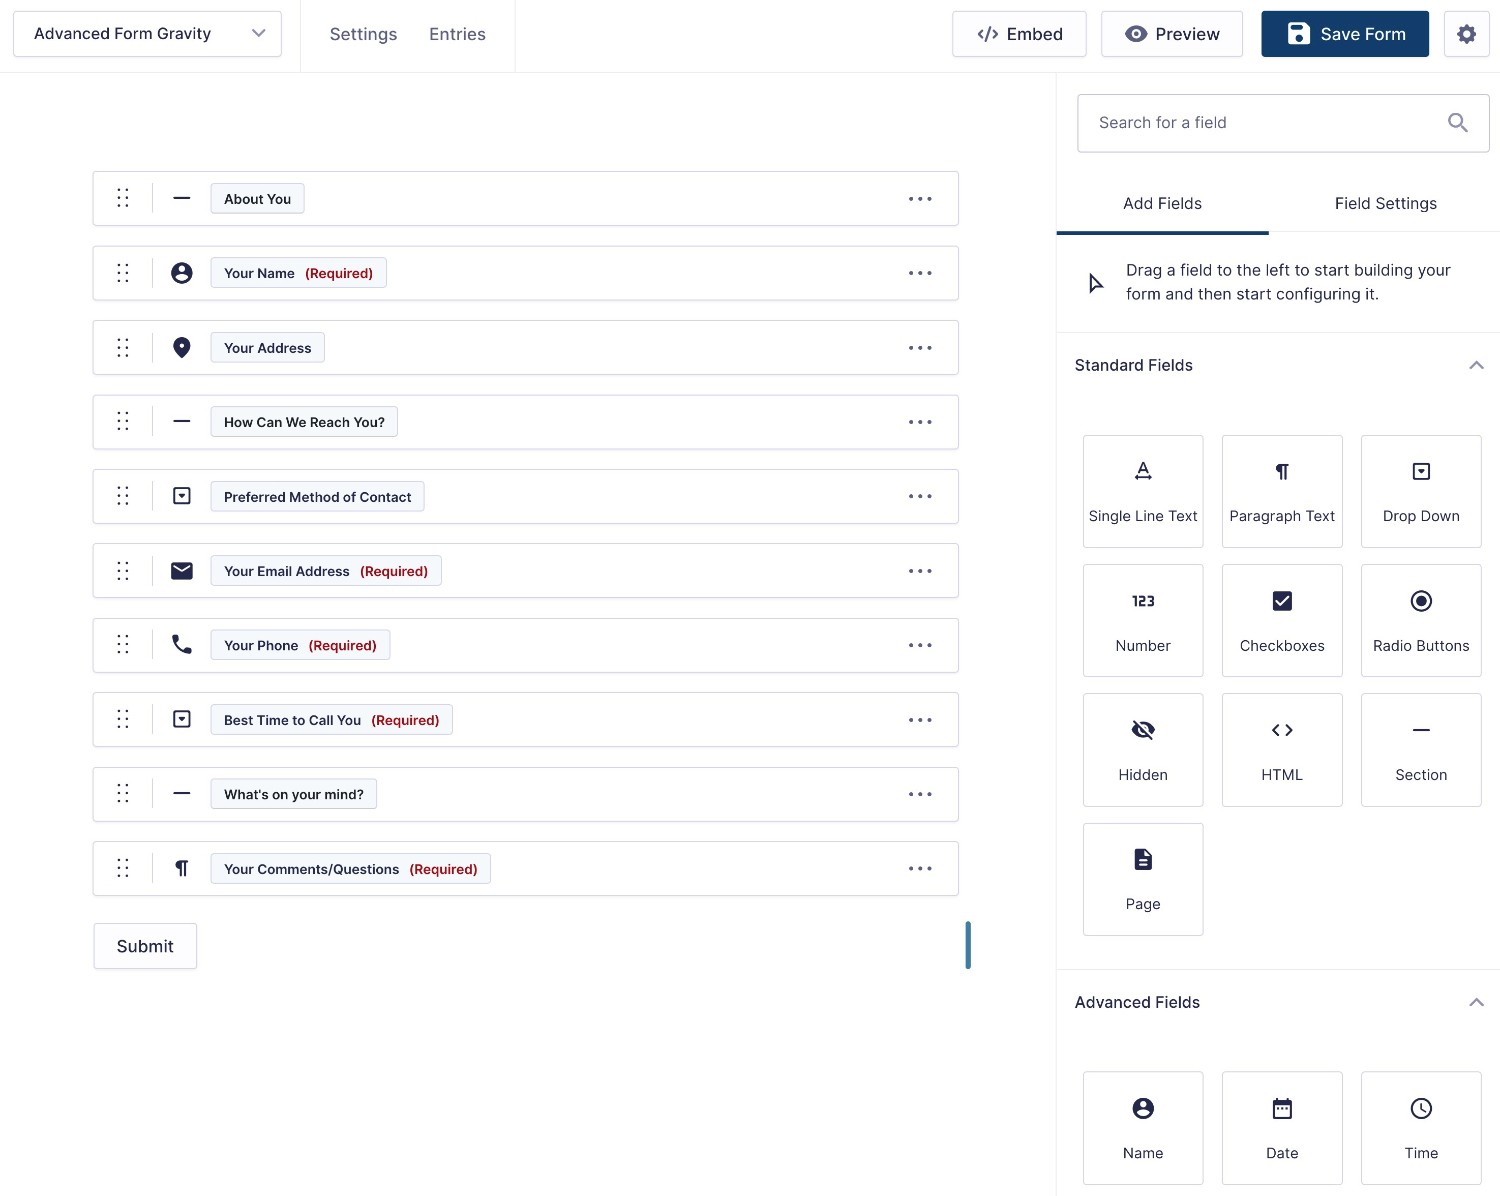
Once you give your form a name, Gravity Forms will take you straight to the drag-and-drop builder.
You’ll see a preview of your form on the left and a fixed sidebar on the right where you can add and edit fields.
To add a field to your form, you can just drag it over from the sidebar. You can also use drag and drop to rearrange existing fields.
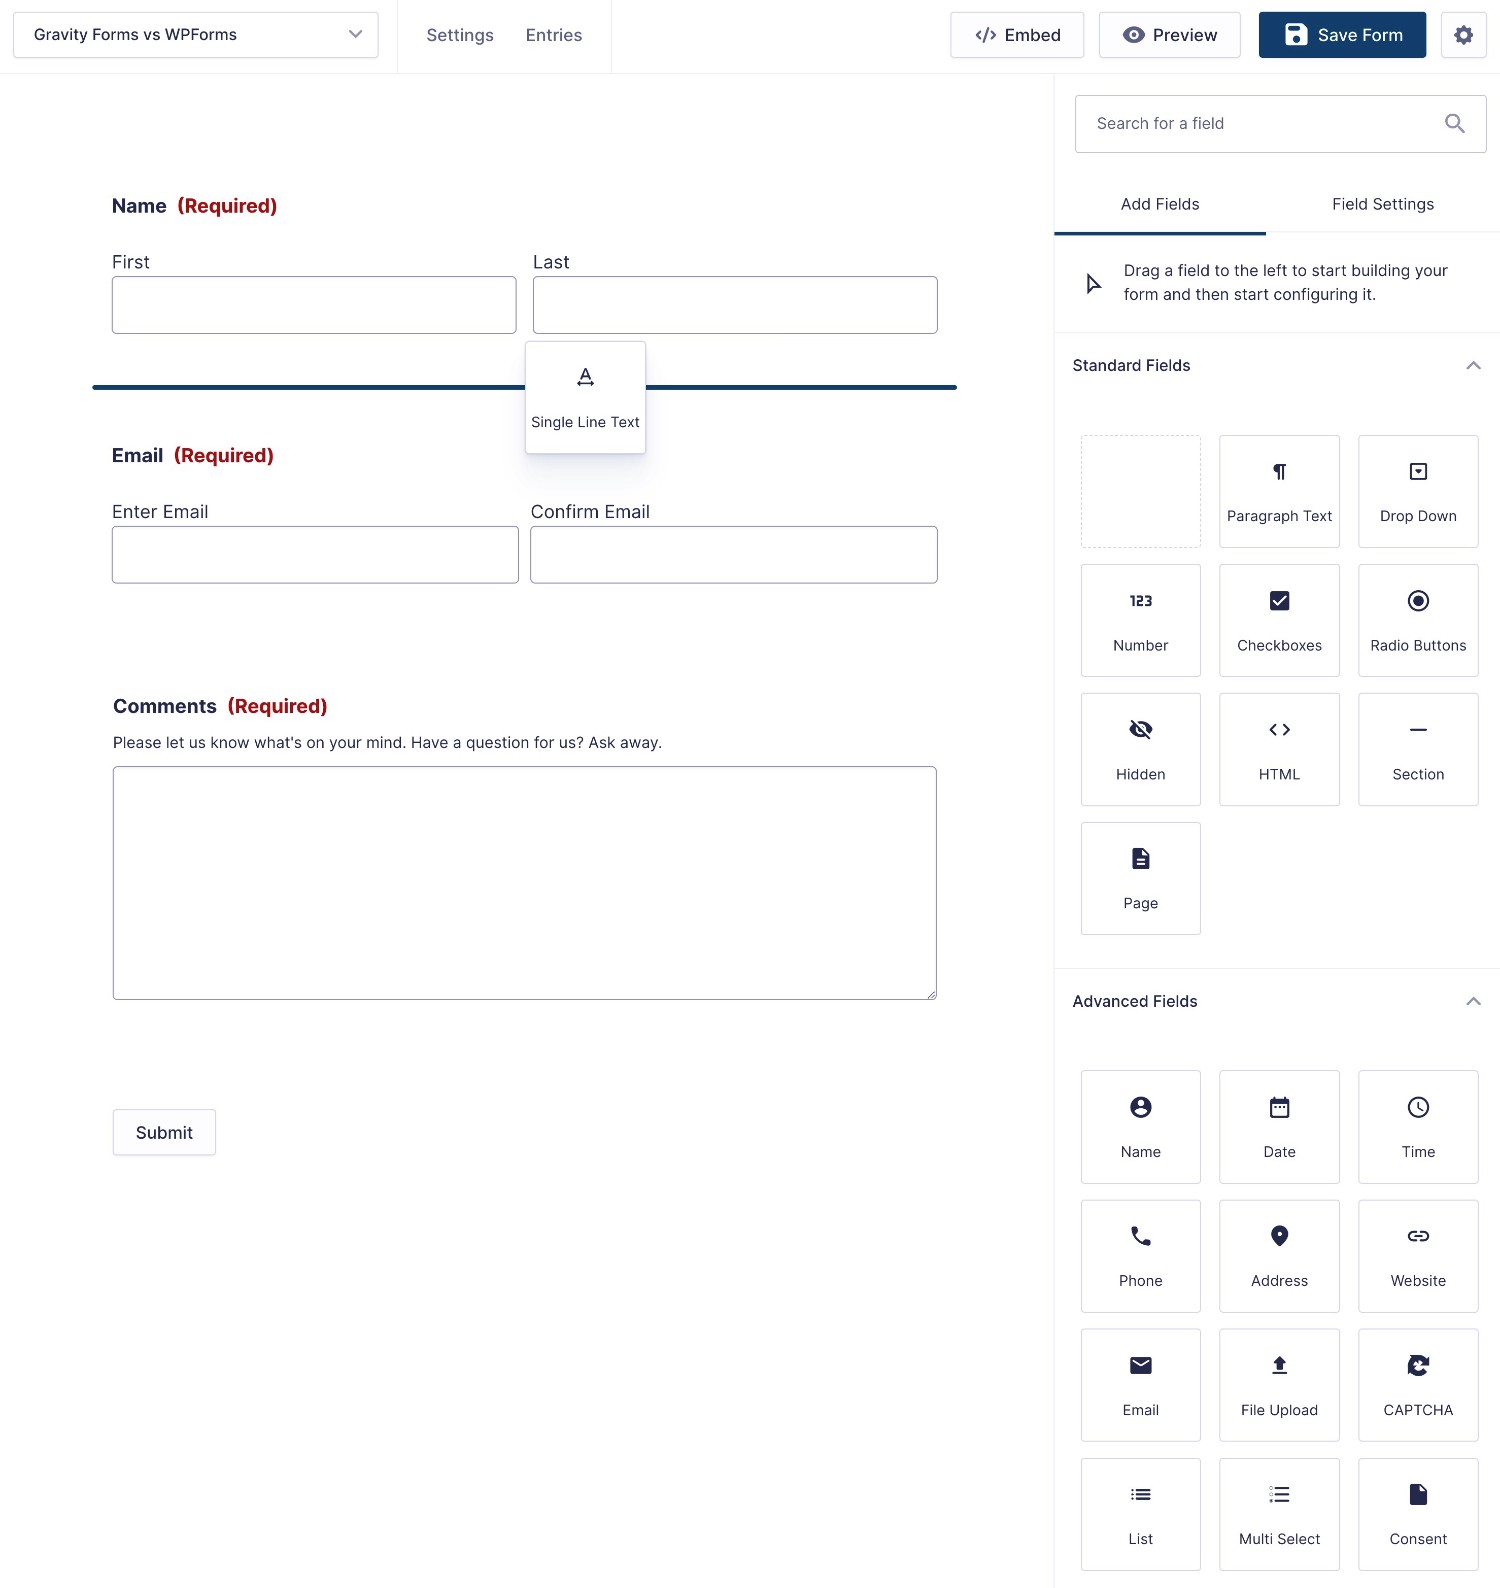
If you want to create multi-column layouts, you can just drag a field next to another one.
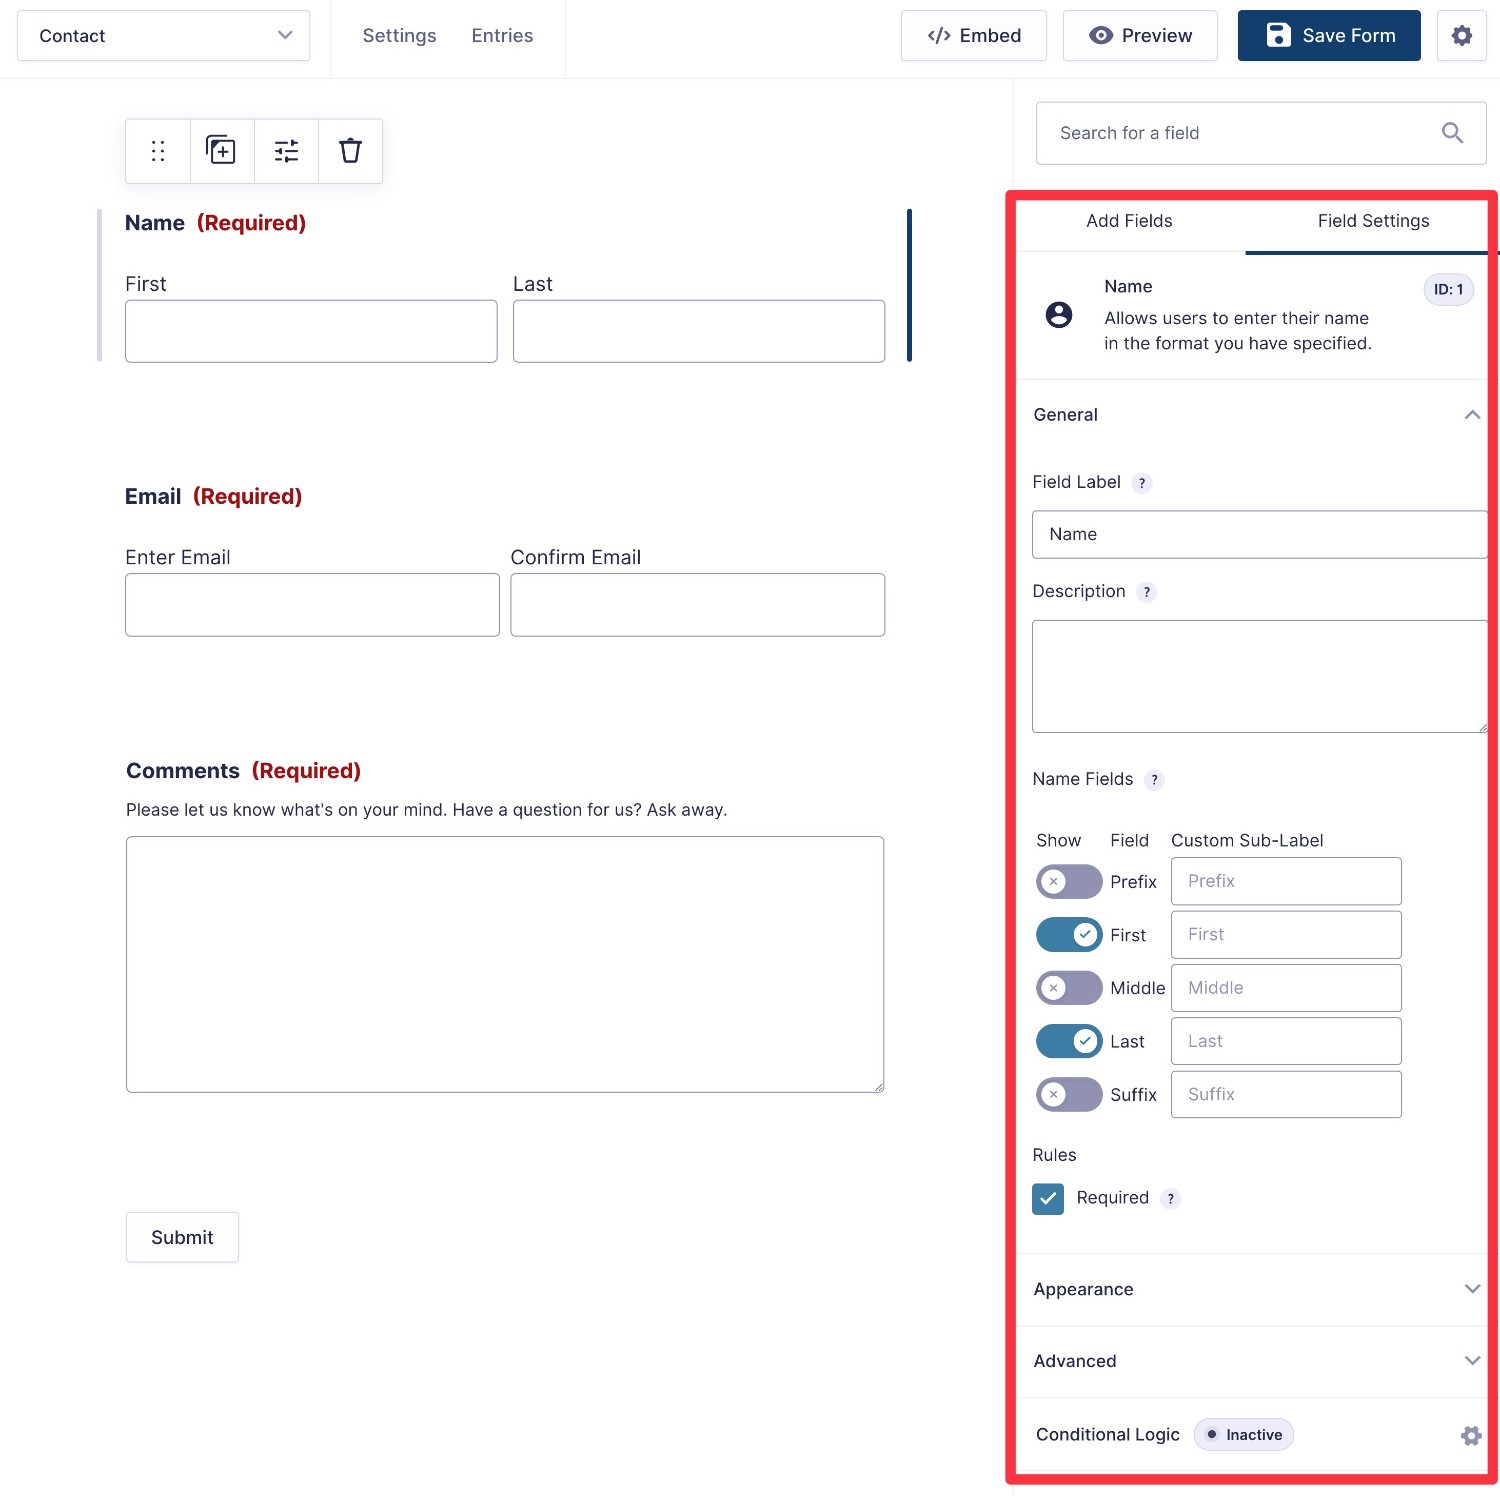
To edit an individual field’s settings, you can hover over the field and click the settings icon to open that field’s settings in the sidebar.
You can customize everything from basics like labels and formatting to advanced settings like conditional logic.
There are foundational settings that are the same for every field (e.g. field labels). Then, some fields have settings that are unique to them. For example, if you’re editing an Name field, you can customize the name format.
In addition to the full form preview, Gravity Forms also offers a condensed view. This gives you a more high-level look at the structure of your form, which can be really handy if you’re building very long and/or complex forms.
Form Embed and Styling Options
Once you’ve designed your form, both plugins give you multiple options for embedding and styling your form.
| Gravity Forms | Ninja Forms | |
| Block | ✅ | ✅ |
| Shortcode | ✅ | ✅ |
| PHP function | ✅ | ❌* |
*While there’s not a dedicated PHP function, you could use the shortcode and the WordPress do_shortcode function.
To style your forms, both plugins support two high-level approaches:
- Custom CSS – if you prefer working with code, both plugins make it easy to add your own custom CSS styles. The forms will try to inherit their default styles from your active WordPress theme but you’re free to customize them as needed using CSS.
- Code-free style customization – if you don’t like working directly with CSS, both plugins also give you code-free options to style your form via an interface.
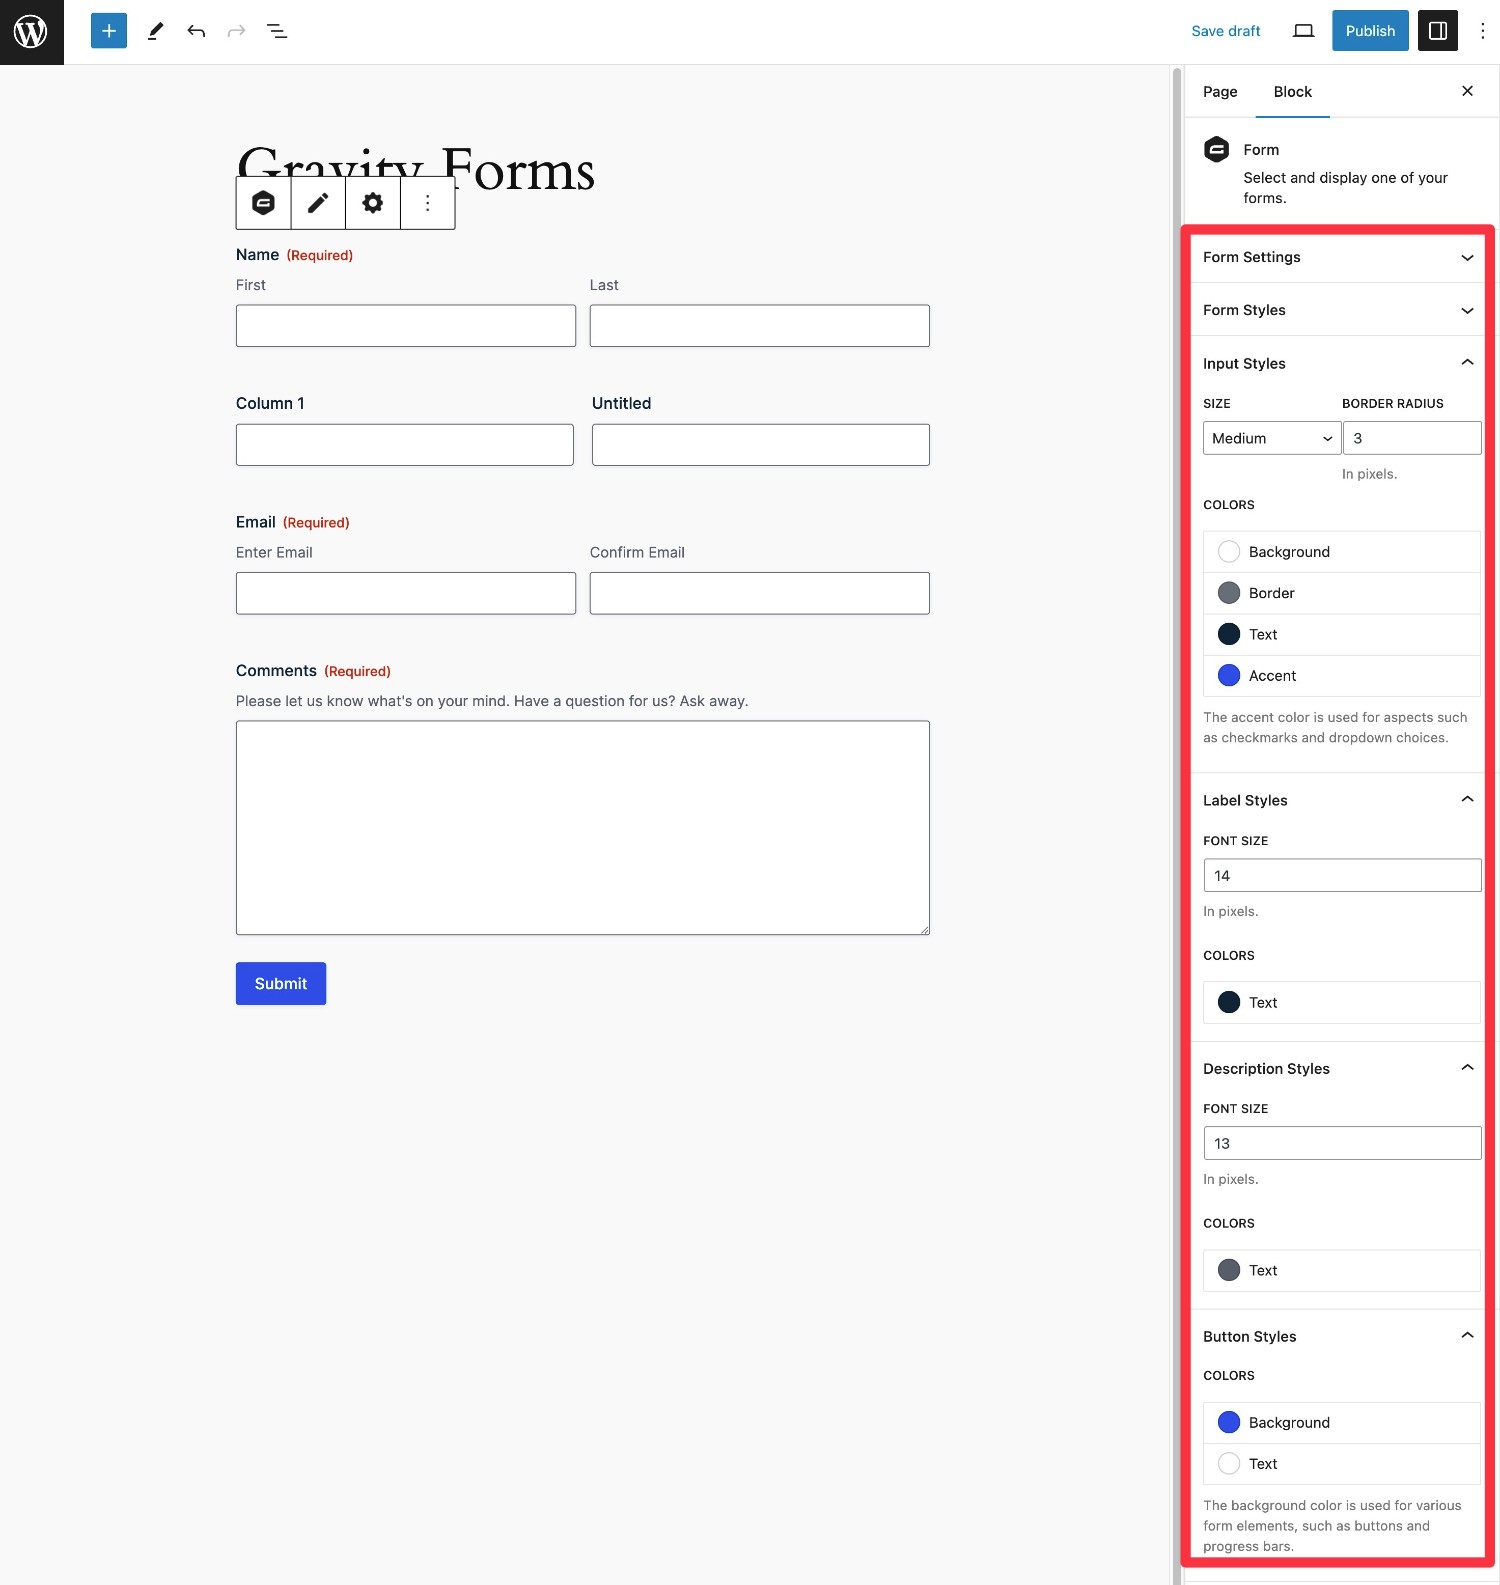
With Gravity Forms and the Orbital form theme, you can customize your form’s styles directly from the block editor. You’ll get form-specific styles in the Form block and you’re also free to use the native WordPress blocks, such as applying a form-wide background using the Group block.
Our full guide to Gravity Forms styling covers this in more detail.
Ninja Forms also gives you non-code styling options, but only if you have the Layout & Styles Add-On (which is available on all paid plans).
With this add-on, you can set up global form styling options from a dedicated interface, as well as adjust the styling for individual form fields from the form editor.
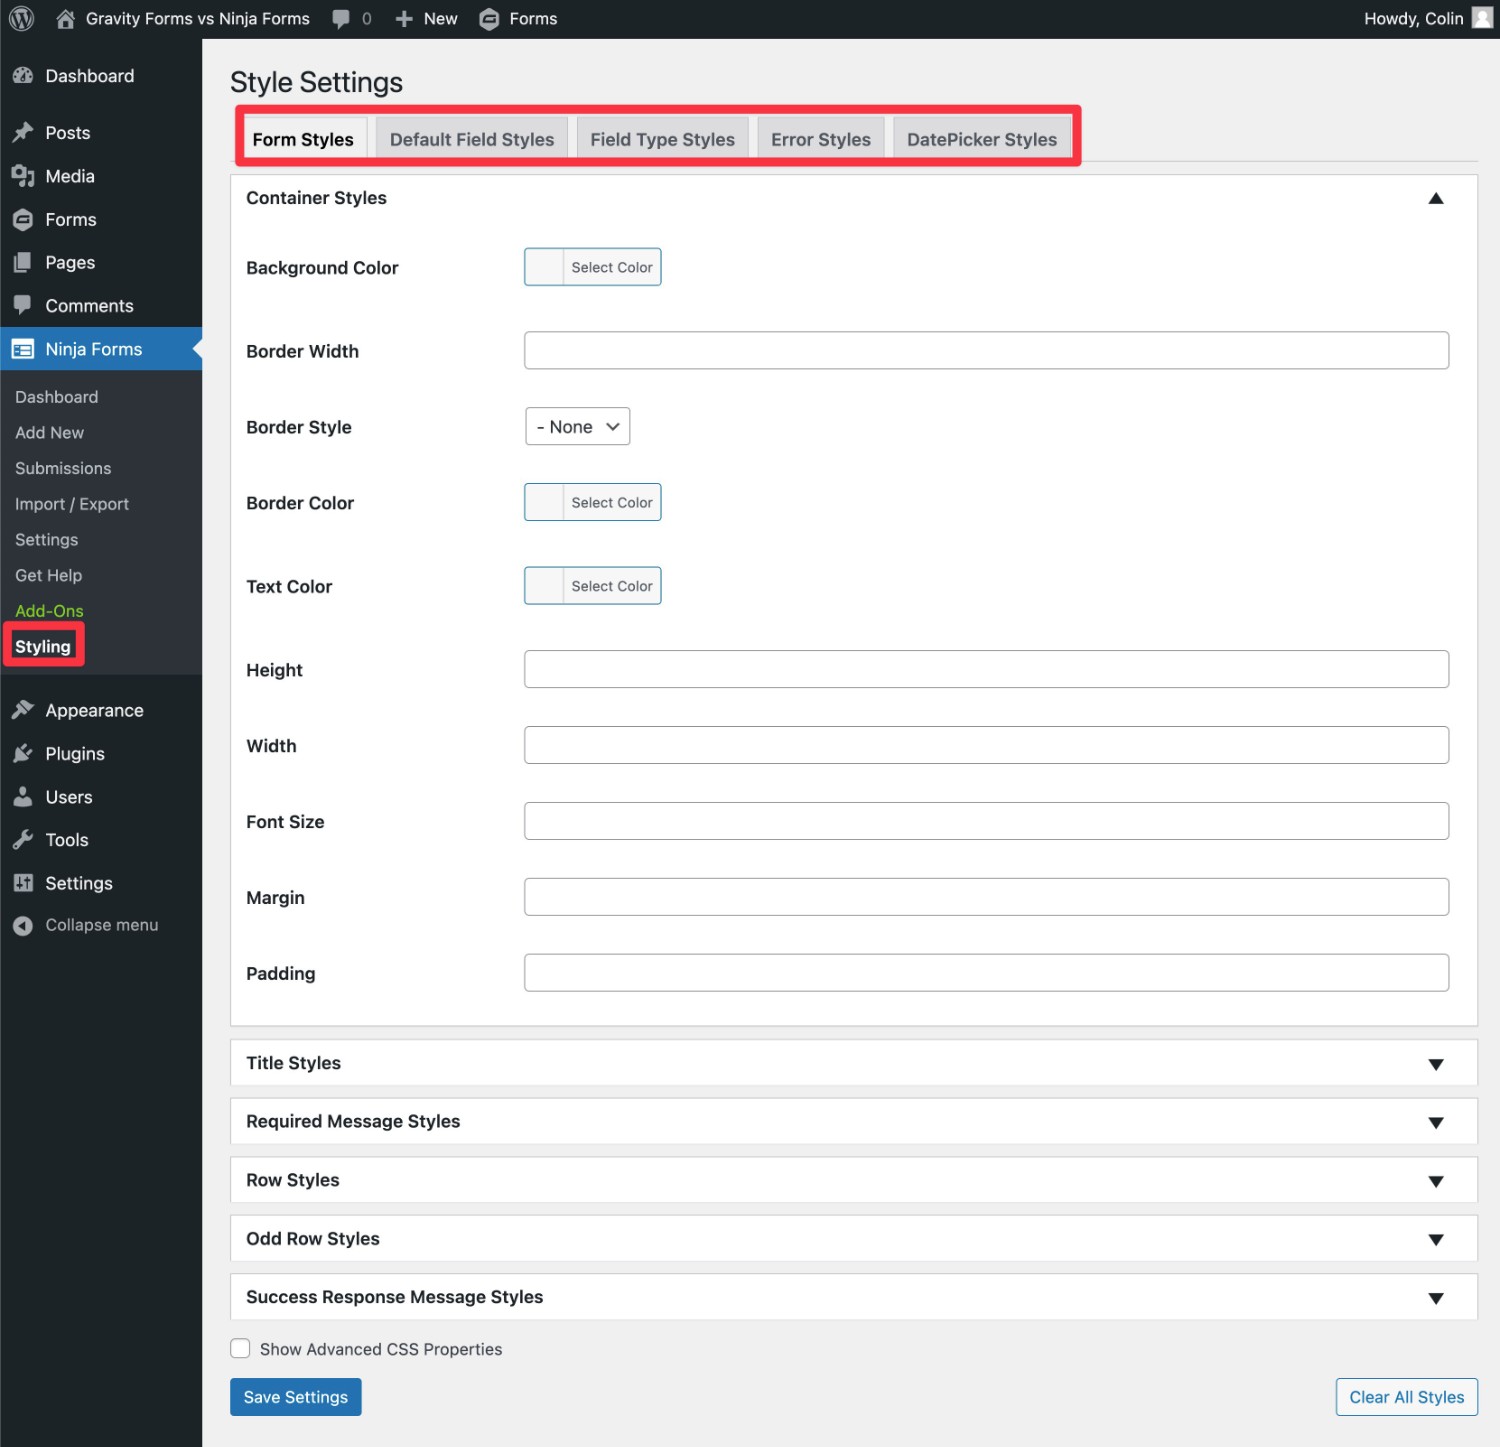
However, there’s no option to style your forms directly in the block editor like you can with Gravity Forms. While you get a lot of detailed settings, there’s also no real-time preview that lets you see what your style changes look like as you make them.
There’s no right or wrong here – it really just depends on your preferences and which approach you prefer.
For example, if you’re using the block editor, you might prefer Gravity Forms’s approach. But if you’re still exclusively using the Classic editor, you might prefer Ninja Forms’s approach (if you’re not using custom CSS).
Integrations With Other Services
To help you connect your forms to other services that your business relies on, both Gravity Forms and Ninja Forms offer tons of integrations with other services, including payment processors, email marketing services, CRMs, and more.
Beyond that, both plugins also let you connect your forms to Zapier, which allows you to interact with the thousands of apps that are available on Zapier.
In general, we recommend trying to use direct integrations whenever possible. While there’s nothing wrong with using Zapier, it adds some extra complexity and you might need to upgrade to a paid Zapier plan, depending on your usage.
Available Integrations
Now, we’ll use some comparison tables to highlight the integrations that are available in Gravity Forms and Ninja Forms.
These comparison tables only focus on official, direct integrations in both plugins.
However, it’s important to note that you can add even more direct integrations by using third-party add-ons, which we’ll discuss in more depth later in this post.
For example, while Gravity Forms doesn’t offer an official OnePageCRM integration like Ninja Forms does, you can easily add this using a third-party plugin from Gravity Extra.
Payment integrations:
| Gravity Forms | Ninja Forms | |
| Stripe | ✅ | ✅ |
| Stripe Application (in Stripe App Marketplace) | ✅ | ❌ |
| PayPal | ✅ | ✅ |
| Square | ✅ | ❌ |
| Mollie | ✅ | ❌ |
| 2Checkout | ✅ | ❌ |
| Authorize.net | ✅ | ✅ |
| Elavon | ❌ | ✅ |
| Recurly | ❌ | ✅ |
Email marketing service/CRM integrations:
| Gravity Forms | Ninja Forms | |
| ActiveCampaign | ✅ | ✅ |
| Agile CRM | ✅ | ❌ |
| AWeber | ✅ | ✅ |
| Breeze | ✅ | ❌ |
| Campaign Monitor | ✅ | ✅ |
| Capsule CRM | ✅ | ✅ |
| CiviCRM | ❌ | ✅ |
| CleverReach | ✅ | ✅ |
| Constant Contact | ✅ | ✅ |
| ConvertKit | ✅ | ✅ |
| EmailOctopus | ✅ | ✅ |
| Emma | ✅ | ✅ |
| GetResponse | ✅ | ❌ |
| HubSpot | ✅ | ✅ |
| iContact | ✅ | ❌ |
| Insightly CRM | ❌ | ✅ |
| Mad Mimi | ✅ | ❌ |
| Mailchimp | ✅ | ✅ |
| MailPoet | ❌ | ✅ |
| OnePageCRM | ❌ | ✅ |
| Pipeline CRM | ❌ | ✅ |
| Zoho CRM | ✅ | ✅ |
Other notable integrations
| Gravity Forms | Ninja Forms | |
| Zapier | ✅ | ✅ |
| Twilio (SMS messages) | ✅ | ✅ |
| Webhooks (custom) | ✅ | ✅ |
| HelpScout | ✅ | ✅ |
| Slack | ✅ | ✅ |
| Dropbox | ✅ | ✅ |
| Pipe Video Recording | ✅ | ❌ |
| Trello | ✅ | ✅ |
Automation Options
The integrations that we covered above offer one useful way to automate your web forms. For example, automatically adding a person to your CRM after they submit a form.
However, you might have situations where you want to build multi-step automations and business process workflows that go beyond a single event.
When it comes to multi-step automations, Gravity Forms has a big advantage because of the Gravity Flow plugin (which is owned by the same team behind Gravity Forms).
With Gravity Flow, you can build your own custom workflows using 40+ different actions, including sending emails or text messages, accepting payments, sending entries to users for approval, generating PDF documents, and lots more.
You can combine these actions in tons of different ways, including adding delays for time, manual approval, and so on.
Here’s an example of a multi-step workflow built with Gravity Flow:
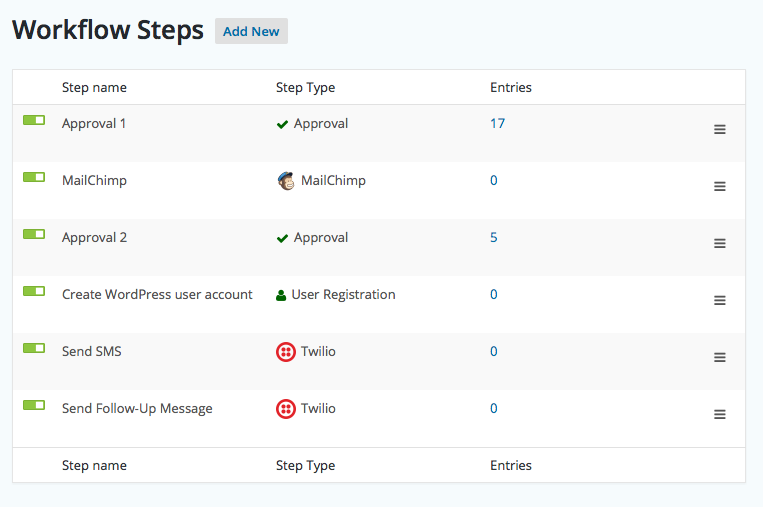
Ninja Forms doesn’t really offer anything similar when it comes to setting up multi-step automations.
So, if you think that these types of multi-step automations could help your business/agency grow and scale, that could be a point in favor of using Gravity Forms.
Spam Protection
To protect your forms from spam, Gravity Forms and Ninja Forms both give you multiple options.
| Gravity Forms | Ninja Forms | |
| Honeypot fields | ✅ | ✅ |
| reCAPTCHA (v2 and v3) | ✅ | ✅ |
| Cloudflare Turnstile | ✅ | ❌ |
| Akismet | ✅ | ✅ |
| Perspective API (Flag Toxic Comments) | ✅ | ❌ |
The Gravity Forms Moderation Add-On is unique in terms of protecting your forms because it can go beyond just blocking spam and also help you protect against toxic/abusive entries. You can learn more in our post about using the Moderation Add-On.
Ninja Forms vs Gravity Forms Pricing
While cost isn’t the only thing that matters, understanding the differences in Ninja Forms vs Gravity Forms pricing will probably play another important role in your decision.
Gravity Forms and Ninja Forms can each be slightly cheaper for certain use cases, so it will likely come down to your specific use case to determine which one is more affordable.
We’ll break down the general pricing details first and then we’ll compare the pricing for different use cases.
Free Versions
Ninja Forms offers a free version at WordPress.org, while Gravity Forms only comes in a premium version.
If you’re on a tight budget and specifically looking for the cheapest way to build web forms, that could be a point in favor of Ninja Forms.
However, keep in mind that a lot of the advanced functionality that we compared above is only available with the premium Ninja Forms Add-Ons.
Premium Versions
In terms of premium versions, there are some slight differences between Ninja Forms vs Gravity Forms.
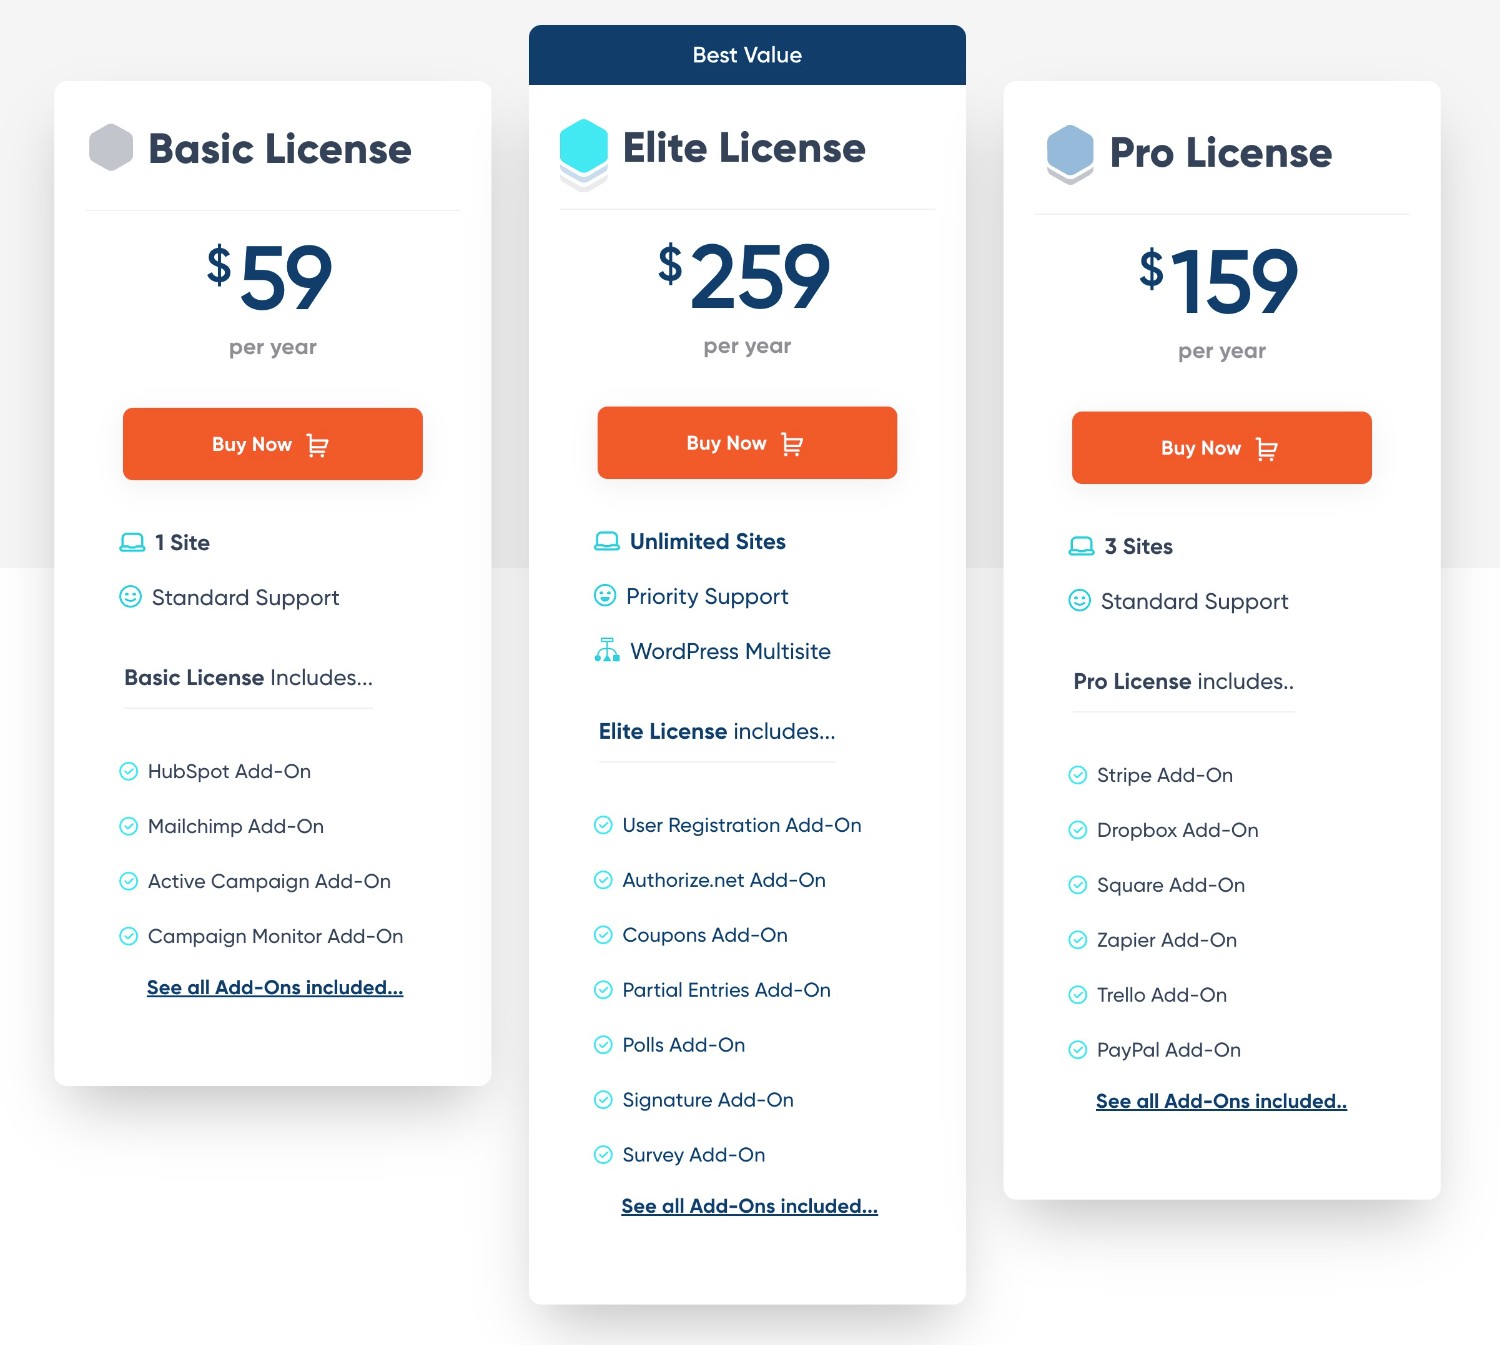
Gravity Forms offers three regular licenses that range from $59 to $259, along with a special license for registered non-profits.
There are two main differences between the regular Gravity Forms licenses:
- The add-ons that you get access to.
- How many sites you can activate Gravity Forms on.
Higher-tier plans also get special priority support (though all licenses receive support directly from the Gravity Forms team).
With Ninja Forms, however, you have two ways to get access to the premium features:
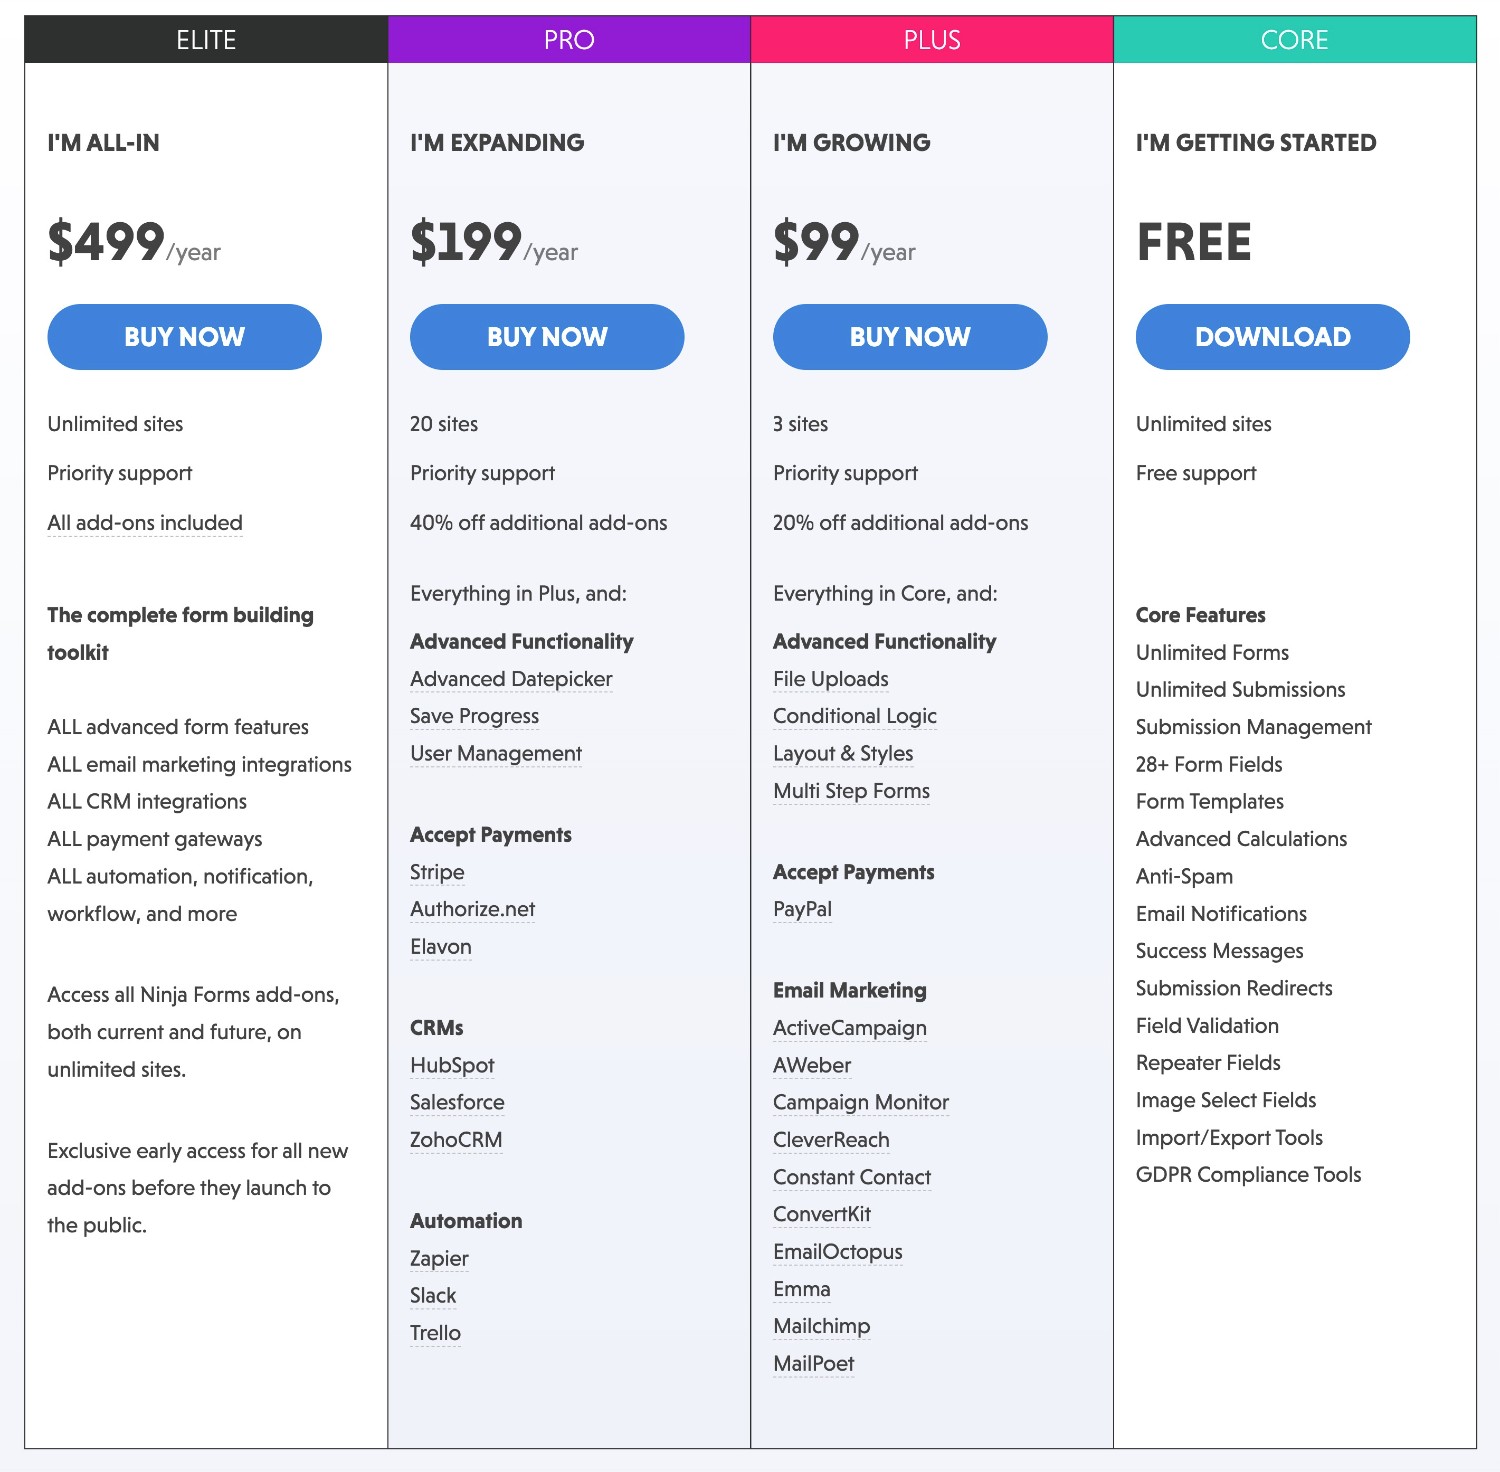
- Bundle plans – you can purchase plans that give you access to different collections of add-ons and support use on different numbers of sites (similar to Gravity Forms). They range from $99 to $499.
- Individual add-ons – you can purchase individual add-ons, which generally cost $49 for use on a single site and go up to $129 for use on up to 20 sites.
While the fact that Ninja Forms lets you purchase individual add-ons can be nice in a situation where you just need to add a single feature, the bundle plans will usually work out to be a lot more cost-effective for most use cases.
Here are the Gravity Forms prices:
Here are the Ninja Forms bundle plans:
Gravity Forms vs Ninja Forms Pricing for Different Use Cases
Now, let’s compare Gravity Forms vs Ninja Forms pricing for building specific types of forms.
For this comparison, we’re going to use the Ninja Forms bundle prices, rather than individual add-ons. However, you might be able to implement certain use cases for less by purchasing individual add-ons.
| Gravity Forms Price | Ninja Forms Price | |
| Basic contact form | $59 | Free |
| Conditional logic form | $59 | $99 |
| Calculator form | $59 | Free |
| Lead generation form connected to CRM | $59 or $159 (depends on CRM) | $199 |
| Email opt-in form | $59 | $99 |
| Payment form (Stripe) | $159 | $199 |
| Payment form (PayPal) | $159 | $99 |
| User registration form | $259 | $199 |
| Zapier-connected form | $159 | $199 |
| Frontend content creation form | $259 | $499 |
| Conversational form (like Typeform) | $259 | N/A |
| Dedicated poll form | $259 | N/A* |
| Dedicated survey form | $259 | N/A* |
| Dedicated quiz form | $259 | N/A* |
| Legal signature form | $259 | N/A |
| Webhook-connected form | $259 | $499 |
*Again, you can manually set up these types of forms with Ninja Forms, but you don’t get dedicated functionality for them like Gravity Forms offers.
Support
Both Gravity Forms and Ninja Forms provide dedicated support to all customers with a paid license.
Here are your options for support…
Gravity Forms Support Options
- Email/ticket support – Monday – Friday 9 AM to 5 PM EST
- Community support forum
- User documentation
- Developer documentation
- Facebook group
Ninja Forms Support Options
- Email/ticket support – Monday – Friday 9 AM to 4 PM EST
- Community Slack channel
- User documentation
- Developer documentation
- WordPress.org support forum (free version only)
Third-Party Add-On Marketplaces
While both Ninja Forms and Gravity Forms offer a ton of official add-ons that you can use, you might run into situations where you can’t find an official add-on for the functionality/integration that you need.
To give you more flexibility, both plugins let you install add-ons from third-party developers.
However, when it comes to the availability and accessibility of third-party add-ons, Gravity Forms has the edge over Ninja Forms (and most other form plugins).
While Ninja Forms does have a pretty good add-on marketplace compared to many other form plugins, Gravity Forms still has an even larger marketplace, which gives you more flexibility for finding new features and integrations.
Beyond the number of add-ons, Gravity Forms also has programs in place to make it easier for you to use and trust these third-party add-ons.
For example, Gravity Forms Certified Add-Ons are third-party add-ons that have had their code/developer quality checked by the Gravity Forms team, which can give you confidence that they’ll be reliable tools for your site.
Gravity Forms also lists third-party add-ons in the add-on directory, which can help you more easily discover quality add-ons.
With Ninja Forms, you’ll need to find the add-ons and vet their quality yourself.
Developer Extensibility (API and Customization)
For some projects, you might run into a situation where you need to customize your data capture setup in ways that you can’t accomplish with off-the-rack add-ons.
In these situations, you’ll want the ability to dig in and build your own custom solution with code (or hire a developer to do it for you).
Gravity Forms is very extensible from a developer perspective, which is why it’s a popular option with developers.
In addition to a number of hooks and filters that you can use to customize default functionality, Gravity Forms offers two different APIs to let you interact with Gravity Forms:
- PHP API – this lets you build custom solutions when developing on the same site/server as Gravity Forms. You could add a custom field type, build your own add-on, customize functionality, and so on.
- REST API – this lets you use HTTP to read, create, update, or delete data in forms, entries, and results. Being able to use HTTP lets you interact with Gravity Forms from external clients such as mobile apps, desktop software, JavaScript, etc.
All of these abilities are well documented in the Gravity Forms developer documentation.
Ninja Forms does offer its own PHP API that you can use to customize how Ninja Forms interacts with your WordPress site.
However, it does not offer a REST API like Gravity Forms does, which means you won’t be able to create, read, update, or delete data over HTTP. This gives you less flexibility for developing your own custom interactions with external clients (mobile apps, desktop software, JavaScript, etc.).
Final Thoughts on Ninja Forms vs Gravity Forms
And with that, we’ve come to the end of our Ninja Forms vs Gravity Forms comparison.
As we mentioned in the beginning, we’re not going to declare a single winner here, and both plugins have their strengths.
However, we think that we’ve built Gravity Forms to be the best option for most people and businesses, especially as your business’s needs start to grow and scale.
To start, Gravity Forms offers dedicated tools to build some unique form use cases, such as legal signatures, surveys, polls, and quizzes.
Beyond that, you also have access to a larger marketplace of add-ons, including Gravity Flow to build multi-step workflows, as well as tons of add-ons from third-party developers.
Gravity Forms also has programs to help you use these third-party add-ons with more confidence, such as the Gravity Forms Certified Add-Ons program. This can be especially important for business use cases, as you need to be able to trust the add-ons that you’re using.
Gravity Forms also offers more developer tools, which gives you even more tools for customizing your forms.
In terms of pricing, there’s no clear winner and both can be the cheapest option for certain use cases. For example, you can create a Stripe payment form for $159 with Gravity Forms, while the Ninja Forms bundle would cost $199. But if you’d rather use PayPal, it would cost just $99 for Ninja Forms and $159 for Gravity Forms.
Ninja Forms does let you purchase individual add-ons, which some people might prefer. But again, the pricing for the bundles usually works out to be cheaper unless you’re only building a specific type of form.
In general, though, there aren’t huge differences in pricing either way, so you’ll most likely want to focus your choice on features, integrations, and other relevant functionality.
If you want to try Gravity Forms out for yourself, you can create a free, fully functioning demo site to experience all of the add-ons.
Or, if you’re ready to start building right away, you can purchase your Gravity Forms license here.

If you want to keep up-to-date with what’s happening on the blog sign up for the Gravity Forms newsletter!
"*" indicates required fields


