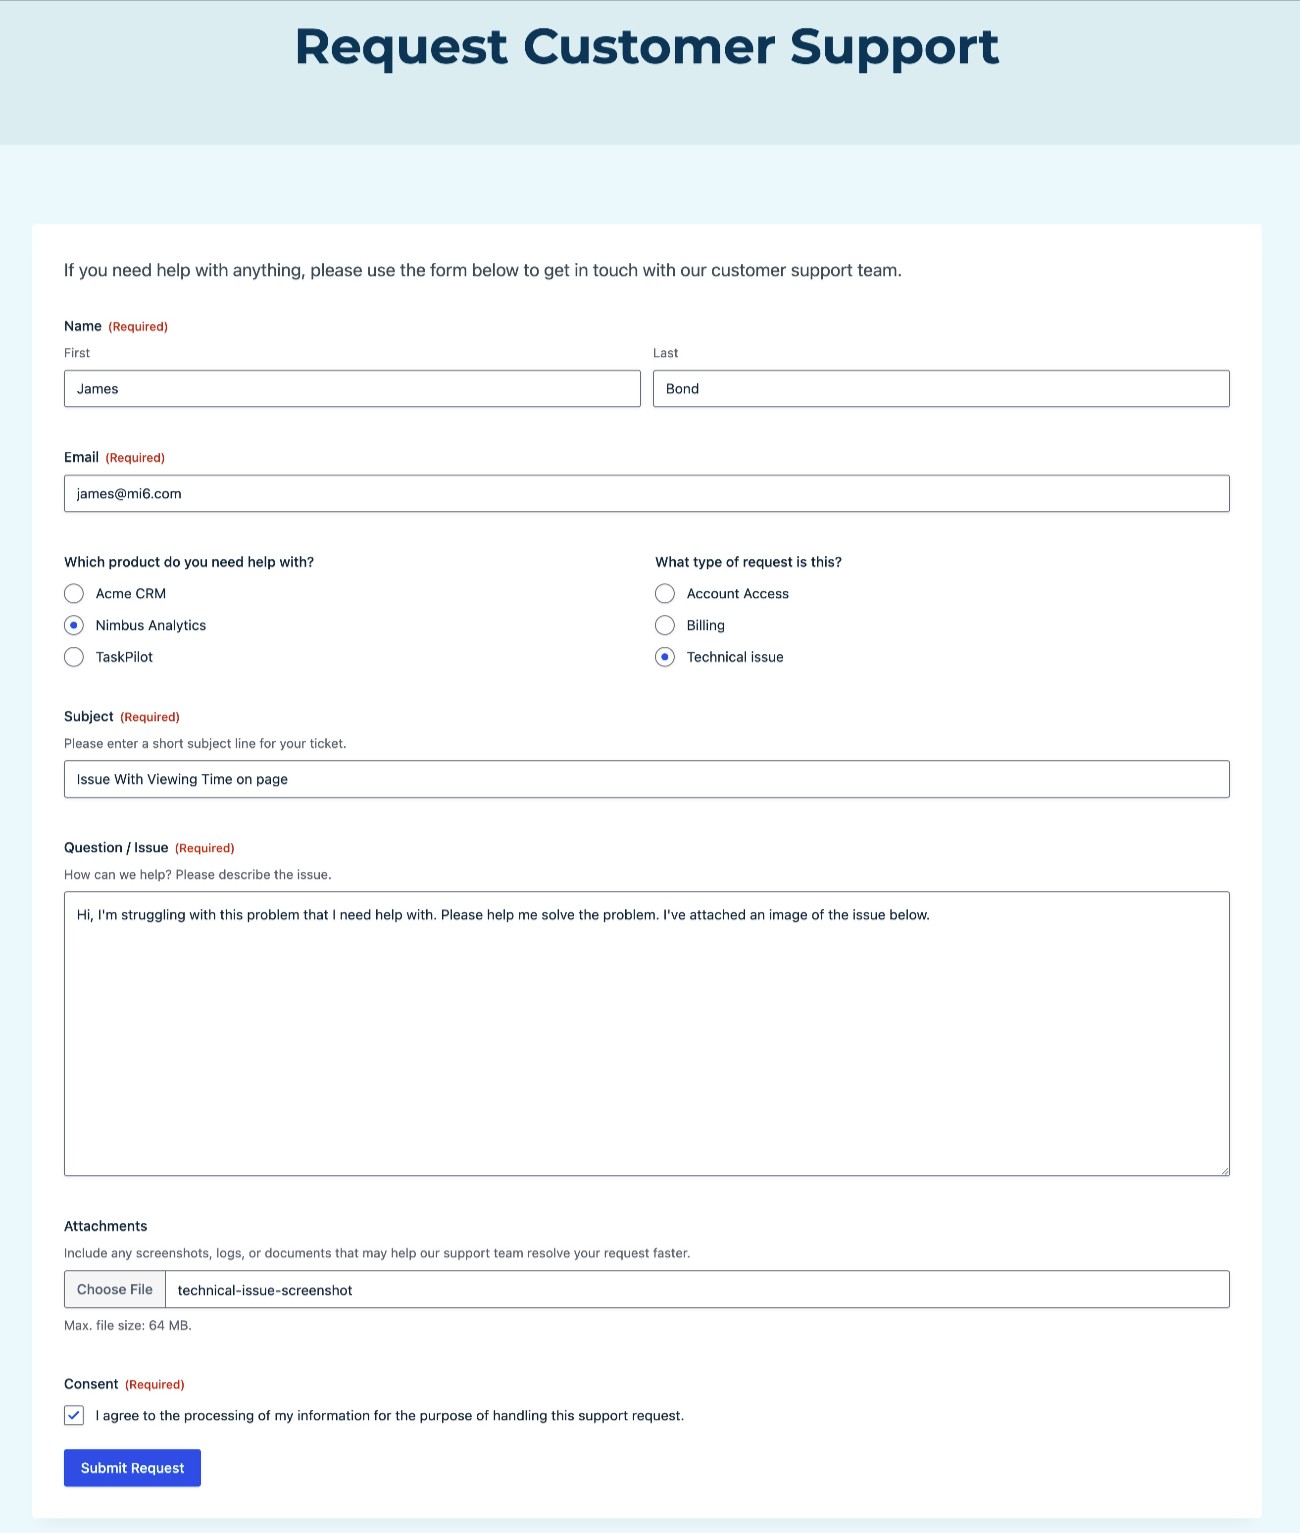
If you need to offer support to customers, creating a dedicated customer support request form can be a great decision.
For customers, it gives them a structured way to request support when they need it.
For your business, using a structured form ensures that you collect all the information that you need to deliver great support. This can include file attachments and screenshots, which can help you more quickly solve customers’ problems.
With the Gravity Forms plugin and its customer support request form template, you can easily set up this form on WordPress.
You could use it as a standalone solution for delivering customer support. Or, if you need a more robust ticketing system, you can integrate your support form with your dedicated help desk software, such as Help Scout, Zendesk, and others.
Key features in the support request form template
Let’s kick things off by quickly running through a few of the most notable features in the Gravity Forms support request form template:
- Fully customize all form fields – You’re free to fully customize all of the fields in the template, including adding, editing, and removing fields as needed.
- Options for customers to choose product(s)/department(s) – To help you understand customers’ requests and support them most optimally, you can let customers choose the specific product(s) and area(s) where they’re experiencing issues.
- File uploads – You can let customers upload one or more files as part of the support request. This lets them upload images, videos, or other files that illustrate their problems. You can also control which file types customers are allowed to upload.
- Conditional logic rules – You can use these to adjust form behavior based on how a customer fills it out. For example, you could route the support request to different departments based on the product/issue that the customer has.
- Help desk software integrations – If you need more robust ticketing, you can also integrate the template with your own help desk software. Gravity Forms has a dedicated integration add-on for Help Scout, but you can also use Zapier or webhooks to connect to other help desk software (such as Zendesk).
- Consent field – You can collect customers’ consent for data processing or other reasons. Gravity Forms can also store a full record of the consent agreement for each customer support request, which can simplify your recordkeeping.
In addition to customizing the form itself, you can also install other Gravity Forms add-ons to integrate with additional services. For example, you could use the Gravity Forms Slack Add-On to receive a Slack message whenever there’s a new customer support request that you need to respond to.
If you want to see it in action, you can interact with a live demo of the support request template.
Who can use the support request form template?
The support request form template can work for businesses of all sizes and types.
For smaller businesses and solopreneurs, you can use the template as a standalone tool for customer support. You could reach out directly to customers via email or other methods after they submit a support request via the form.
As the scale of your customer support needs grows, you’ll probably need a more robust ticketing solution to stay on top of everything.
Because you can also integrate the template with a full help desk system on the backend, you can still use it even as your support volume increases.
Even if your help desk system already includes a feature to create a support form, using Gravity Forms will usually give you more flexibility, especially if you want to integrate your support form with other tools that your business is using (e.g. your CRM, Slack, etc.).
How to set up a WordPress support request form with Gravity Forms
Now, let’s get into the step-by-step guide on how to set up the support request form template in Gravity Forms.
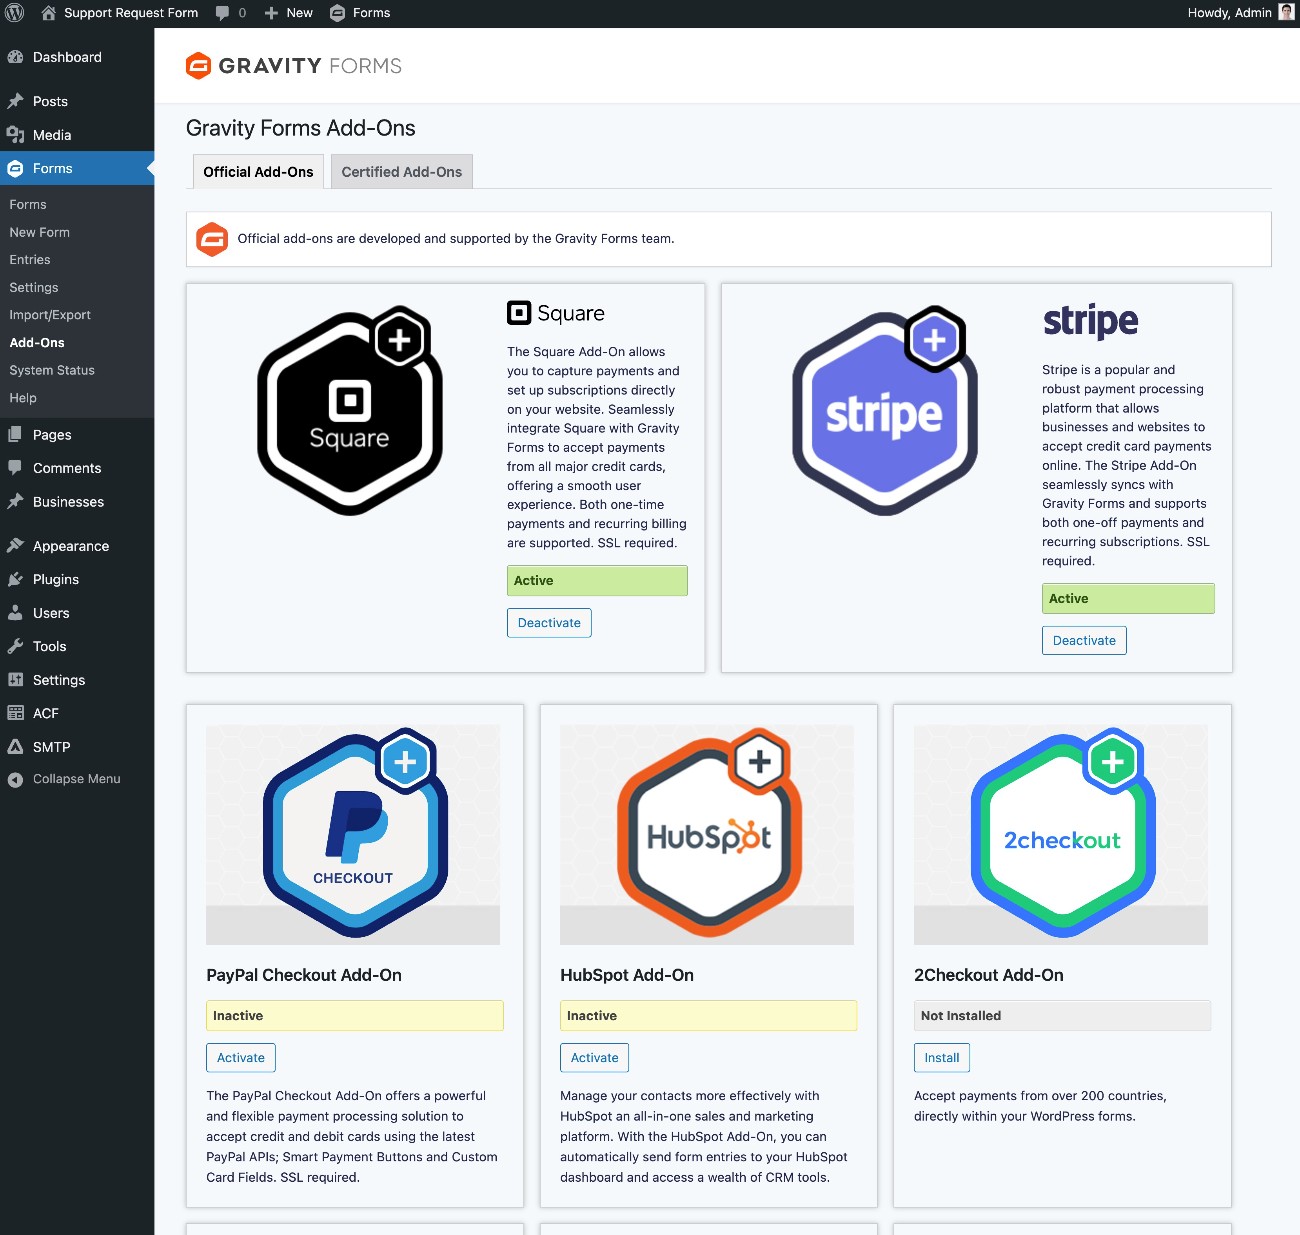
1. Install Gravity Forms and add-ons
To get started, you’ll want to make sure that you’ve installed and activated the core Gravity Forms plugin, along with add-ons for any additional functionality that you want to include (such as integrating with your help desk software).
Below, we’ll cover some examples of the types of add-ons that you might want to install, so you can always come back and install additional add-ons later on.
You can use the basic support request form template with any Gravity Forms license. However, if you want to use the dedicated Help Scout Add-On or use the Zapier Add-On to connect to other ticketing systems, you’ll need at least Pro, Elite, or Nonprofit license.
If you don’t have a Gravity Forms license yet, you can purchase your license here.
Once you’ve installed the core plugin and activated your license key, you can easily install add-ons from your WordPress dashboard:
- Go to Forms → Add-Ons in the dashboard sidebar.
- Find the add-on that you want to install.
- Click the Install button for the add-on.
- Once the installation finishes, make sure to click the Activate Plugin button.
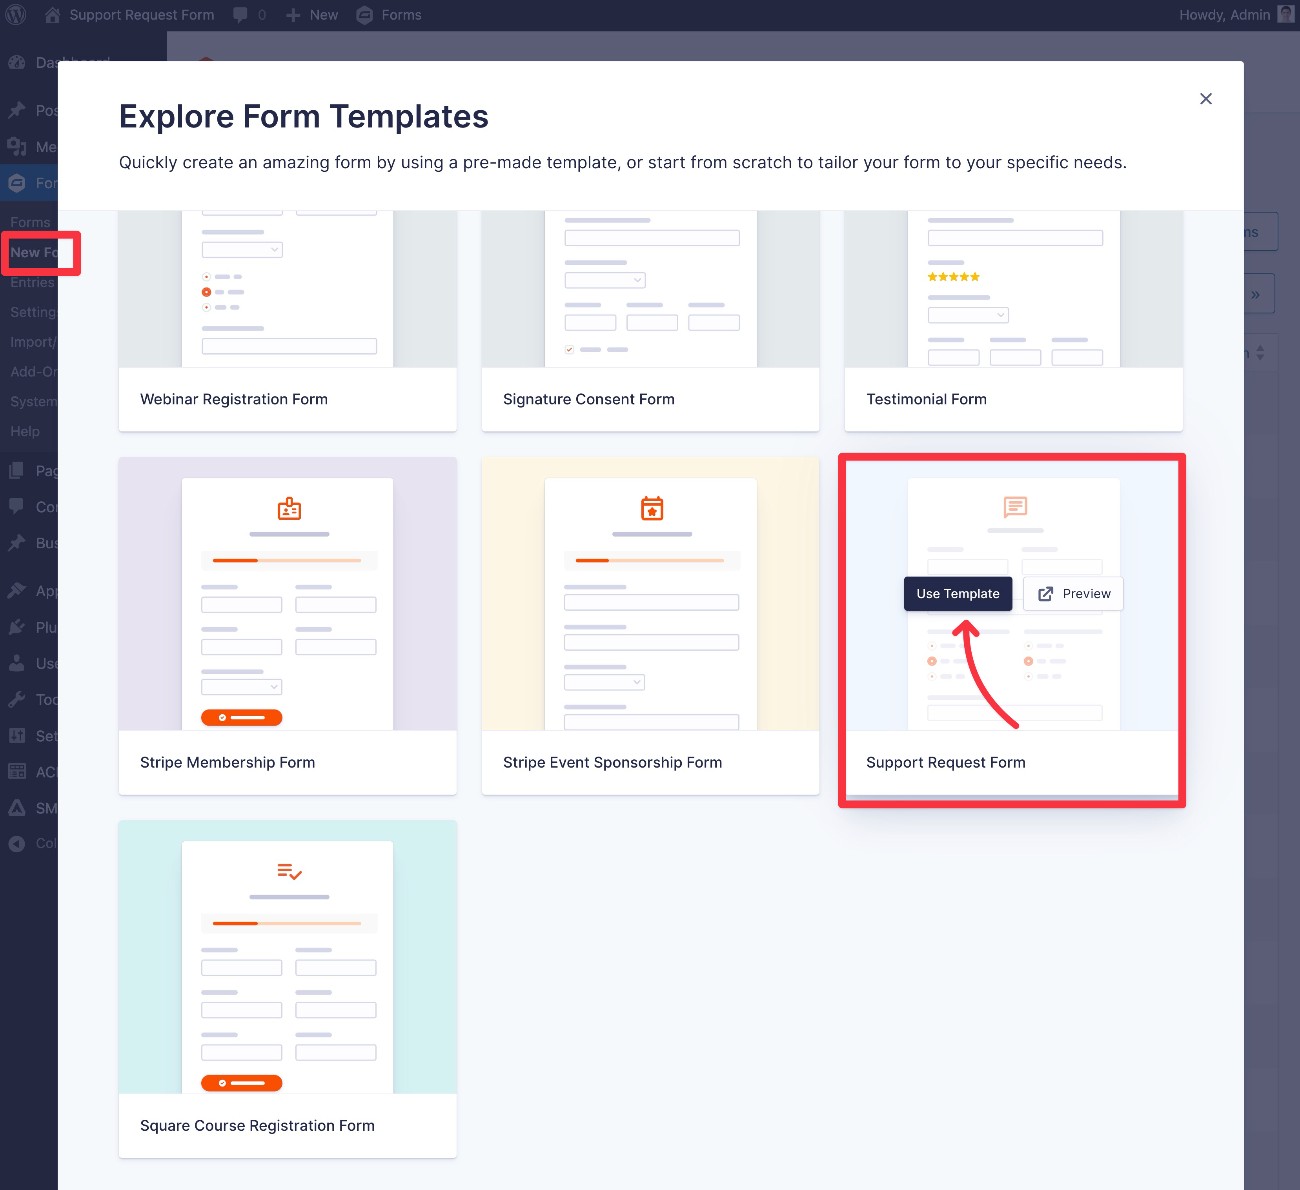
2. Customize the support request form template
Next, create a new form using the customer support request form template:
- Go to Forms → New Form in your WordPress dashboard.
- Find the Support Request Form template in the list and click Use template.
- In the popup that appears, you can give your form a title and optional description.
- Click Use template again in the popup to advance to the form editor.
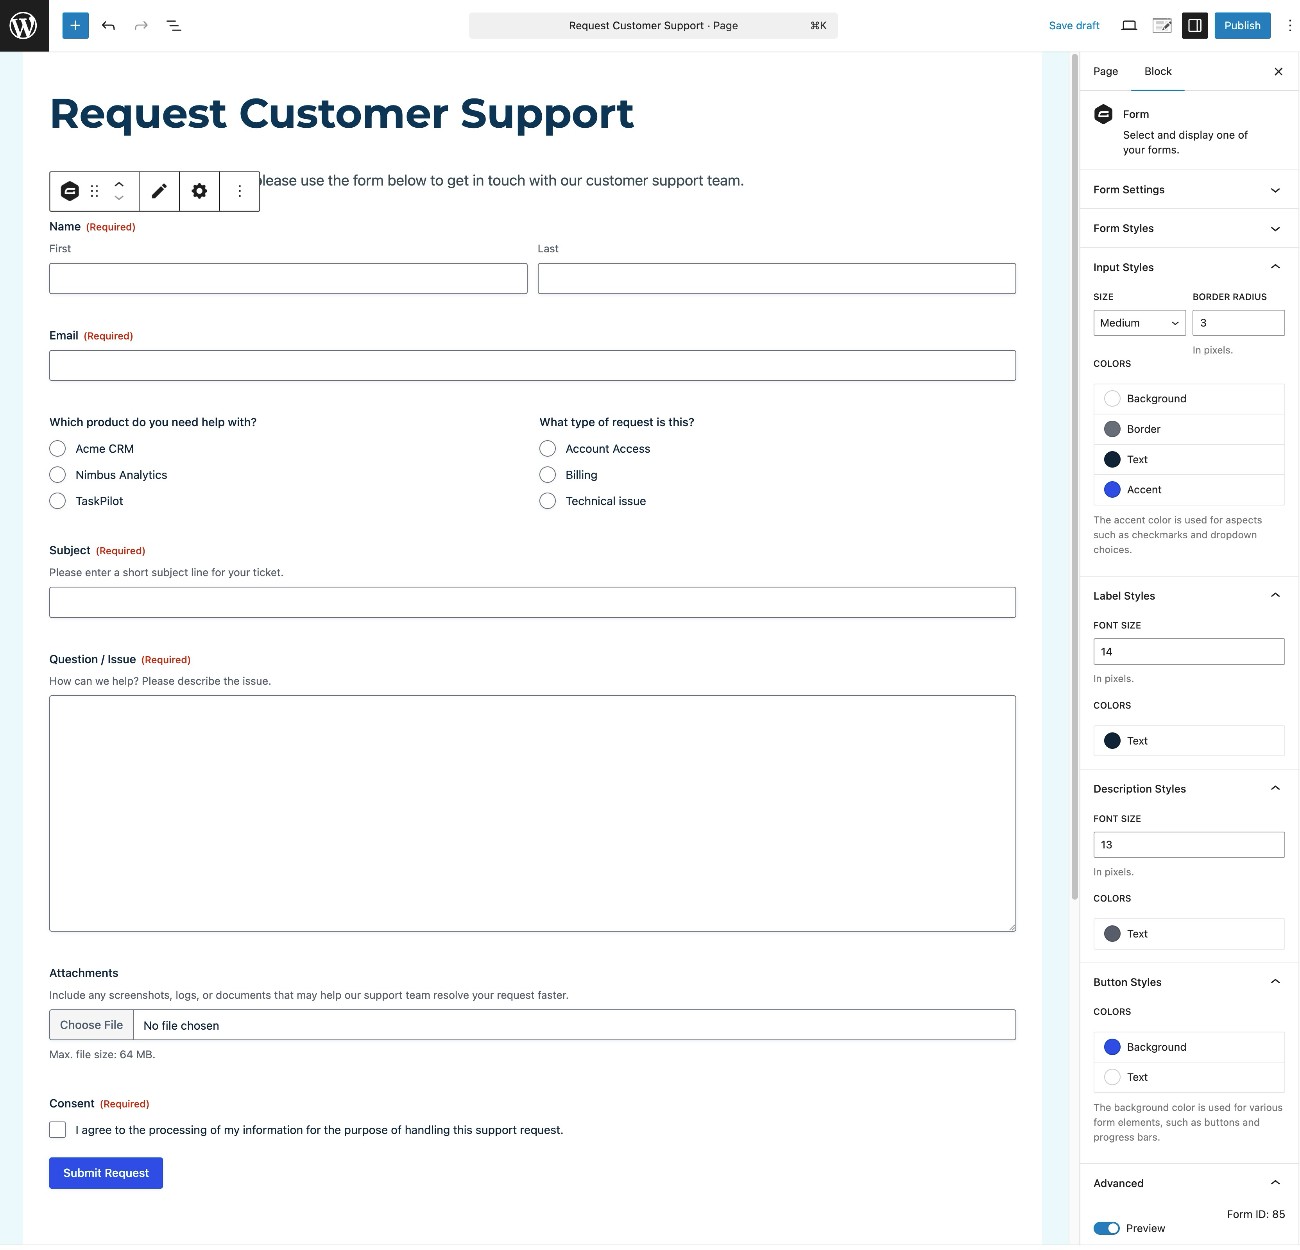
Once you choose the template, you should be in the drag-and-drop form editor interface.
Here, you’re free to customize the template as much as you want. You can…
- Add new fields to collect additional information from your customers. For example, you might need to collect more detailed information that’s specific to your product(s).
- Edit the existing fields in the template to match your needs. At a minimum, you’ll want to edit the example products and support request types. You can also adjust the File Upload field to choose whether to allow customers to upload multiple files and which file extensions to allow.
- Delete any fields that you don’t want to use in your form. If there are any fields that don’t fit your use case, you’re free to remove them.

When you’re happy with the fields in your form, make sure to click Save Form in the top-right corner.
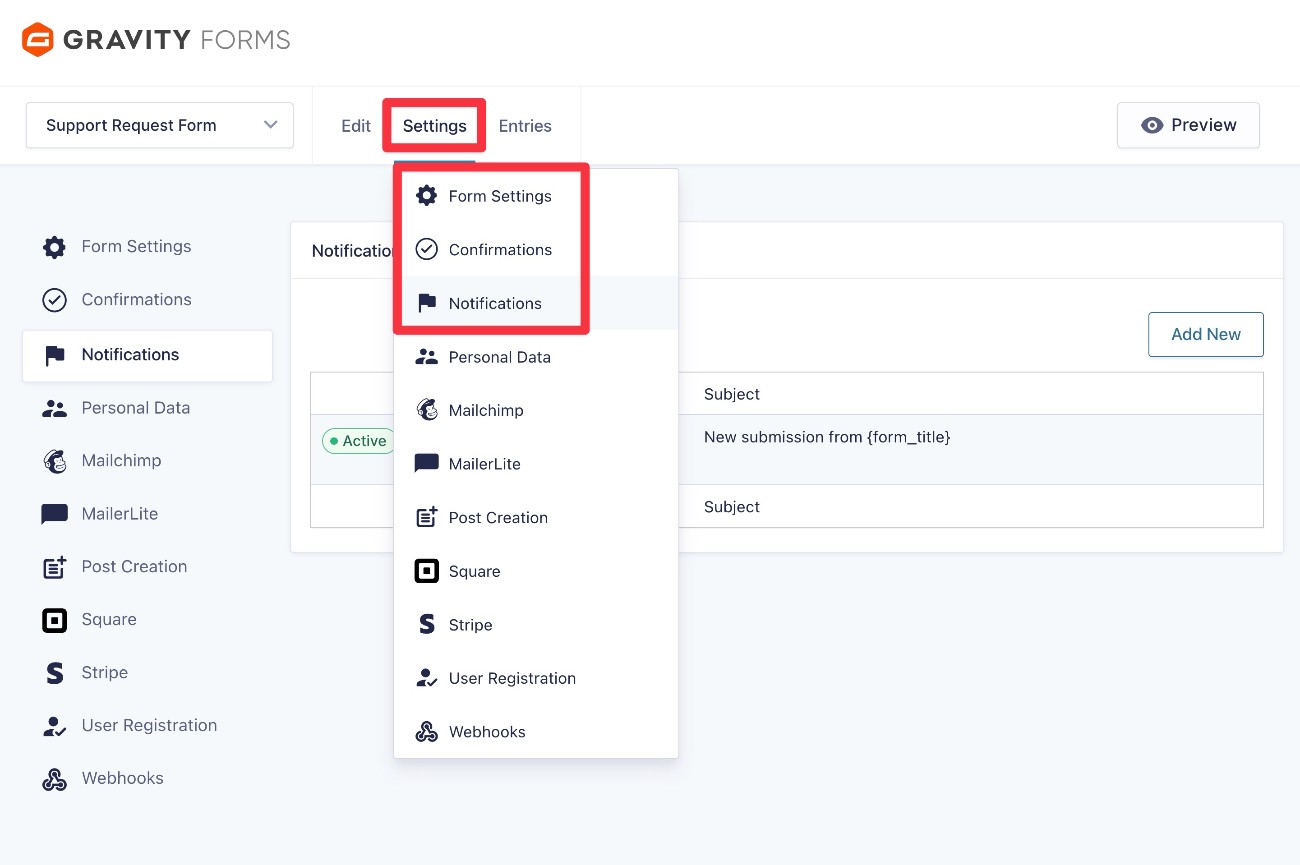
3. Set up notifications and confirmations
Now, you can dig into some of the backend settings in your form.
While we recommend exploring all of the settings, two of the most important are notifications and confirmations:
- Notifications – These let you send one or more emails when someone makes a support request. You could send notification emails to your customer support team, the customer, and anyone else. You can also add conditional logic rules, such as sending an email to different people based on the problem that a customer is having.
- Confirmations – These let you display a message after someone submits the form, or redirect them to a different page. You can use confirmations to provide more information about when customers should expect to receive a response.
To set these up, go to Settings → Notifications and Settings → Confirmations in the form editor.
Note – To ensure that your email notifications make it to the recipients’ inboxes, we recommend using a dedicated email sending service. You can connect your WordPress site to these services by using a WordPress SMTP plugin like Gravity SMTP.
4. Connect to your help desk software (optional)
This step is 100% optional.
However, if you’re getting a lot of support requests, you might want to use a dedicated helpdesk/ticketing system. These systems make it easier to manage support requests, view customer information, track prior customer interactions, and more.
If you’re using help desk software, Gravity Forms makes it easy to integrate your support request form with your help desk software. That way, you can still benefit from the flexibility of using Gravity Forms to collect information from your customers and integrate with other tools, while also benefiting from the extra functionality in help desk software on the backend.
In this example, we’ll look at how to connect Gravity Forms to Help Scout using the dedicated Gravity Forms Help Scout Add-On. However, you can also connect to most other help desk software using Zapier or webhooks, which we’ll touch on in a second.
Install the Gravity Forms Help Scout Add-On
To get started, make sure that you’ve installed and activated the Gravity Forms Help Desk Add-On, if you haven’t done so already. Again, you can go to Forms → Add-Ons in your WordPress dashboard to install add-ons.
The Help Scout Add-On is available on the Gravity Forms Pro, Elite, and Nonprofit licenses.
Connect Gravity Forms to Help Scout
Once you’ve activated the add-on, here’s how to connect Gravity Forms to Help Scout:
- Go to Forms → Settings in your WordPress dashboard.
- Select the Help Scout tab in the settings sidebar.
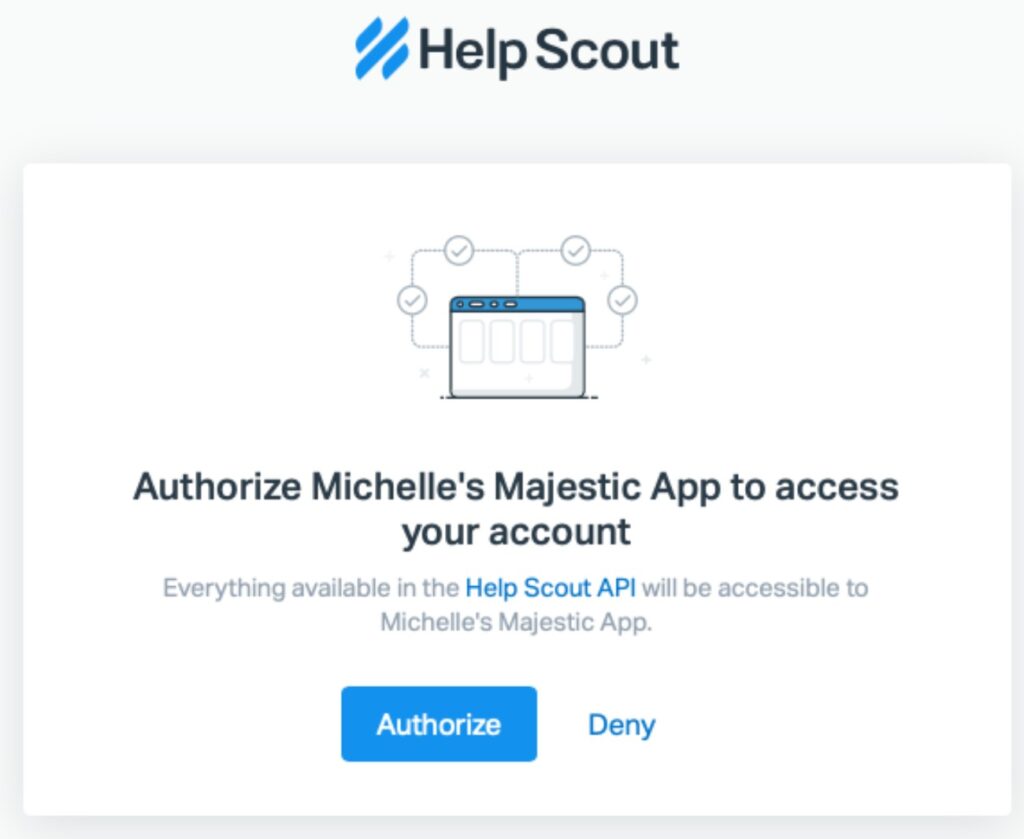
- Click the Click here to connect to Help Scout button.

Once you click that button, you’ll see Help Scout’s authorization flow. Click the button to Authorize your site to connect to Help Scout.
Create a Help Scout feed for your support request form
Once you’ve connected Gravity Forms to Help Scout, you’re ready to create a Help Scout feed for your support request form. This is what lets you control how to actually process form submissions into Help Scout tickets.
In the editor for your form, go to Settings → Help Scout. Then, click Add New to create a new Help Scout feed.
You’ll then get several options to control how to sync form submissions.
First, choose the Destination Mailbox in Help Scout, along with the Assignee (or, you can choose not to assign it to anyone).

If needed, you can create multiple Help Scout feeds and use conditional rules to select different assignees based on how the customer fills out the form. We’ll discuss this at the bottom of this section.
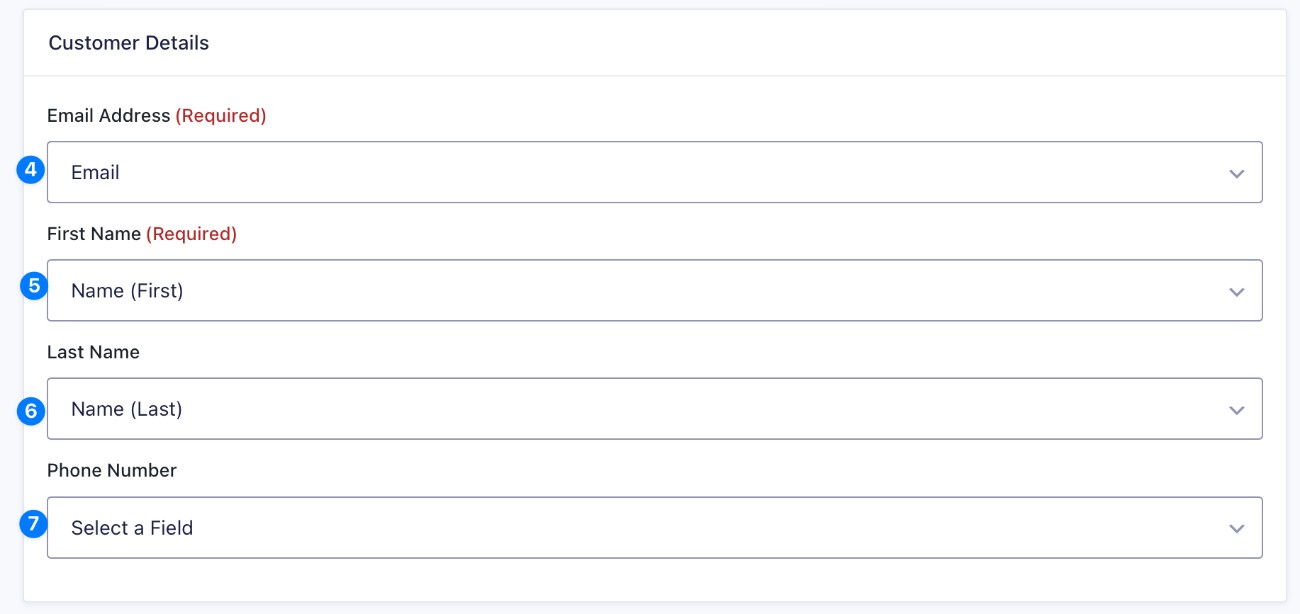
In the Customer Details, you can choose how to map customer details from your support request form to Help Scout.
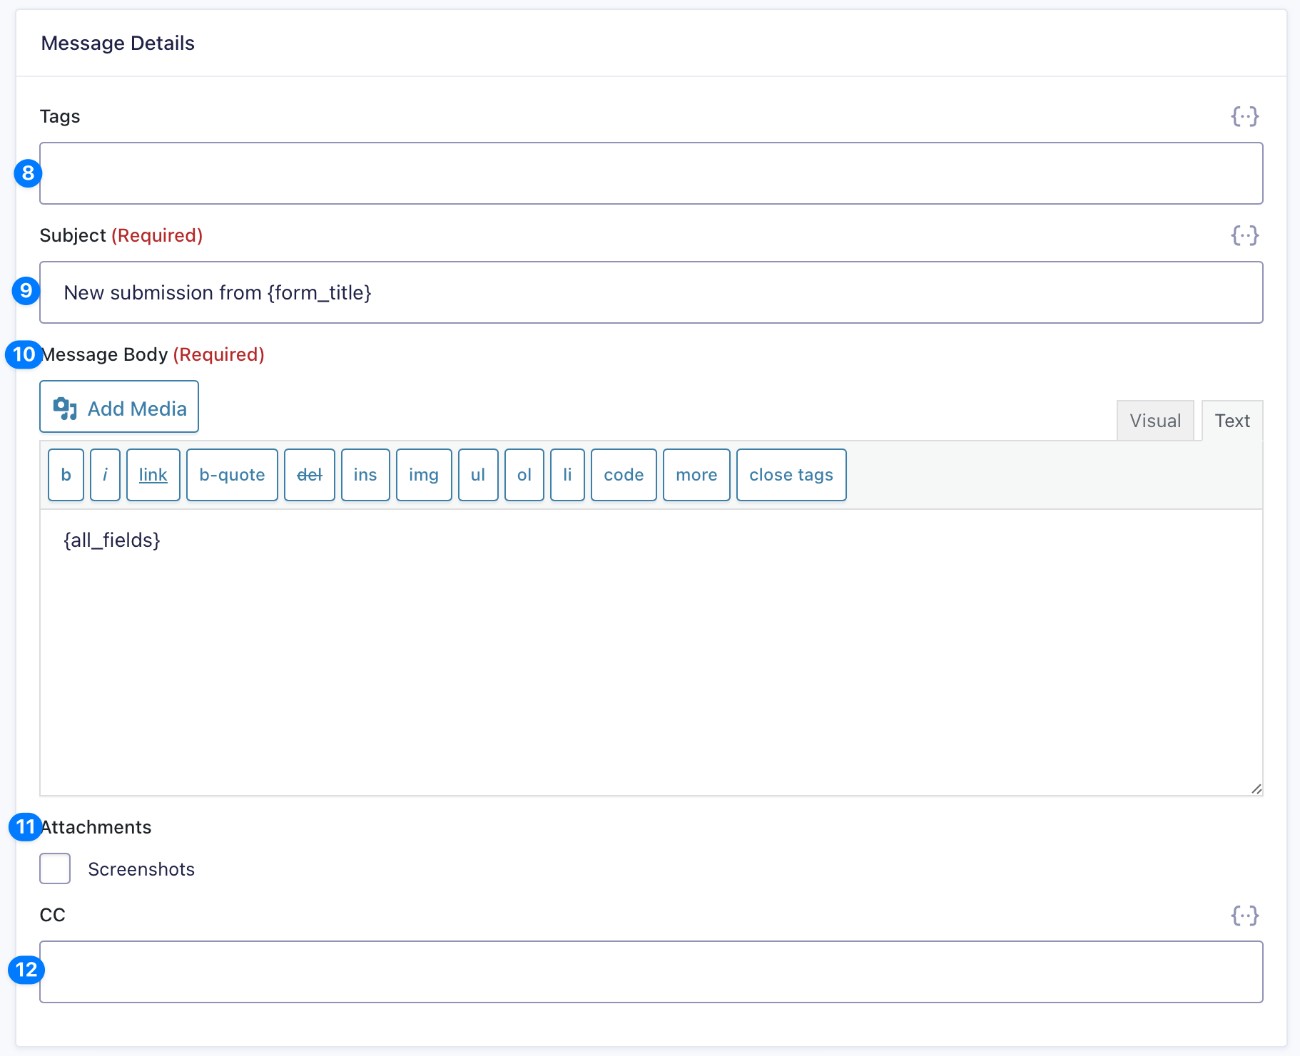
Below that, you can use the Message Details and Message Options to configure how to add content to the Help Scout ticket.
In the Message Details box, you can use merge tags to dynamically insert information from the form in ticket fields, including the following:
- Tags
- Subject
- Message Body
- Attachments – The Help Scout API only accepts files up to 10 MB. If you want to accept attachments, we recommend setting a 10 MB limit on the form field to avoid issues.
- CC
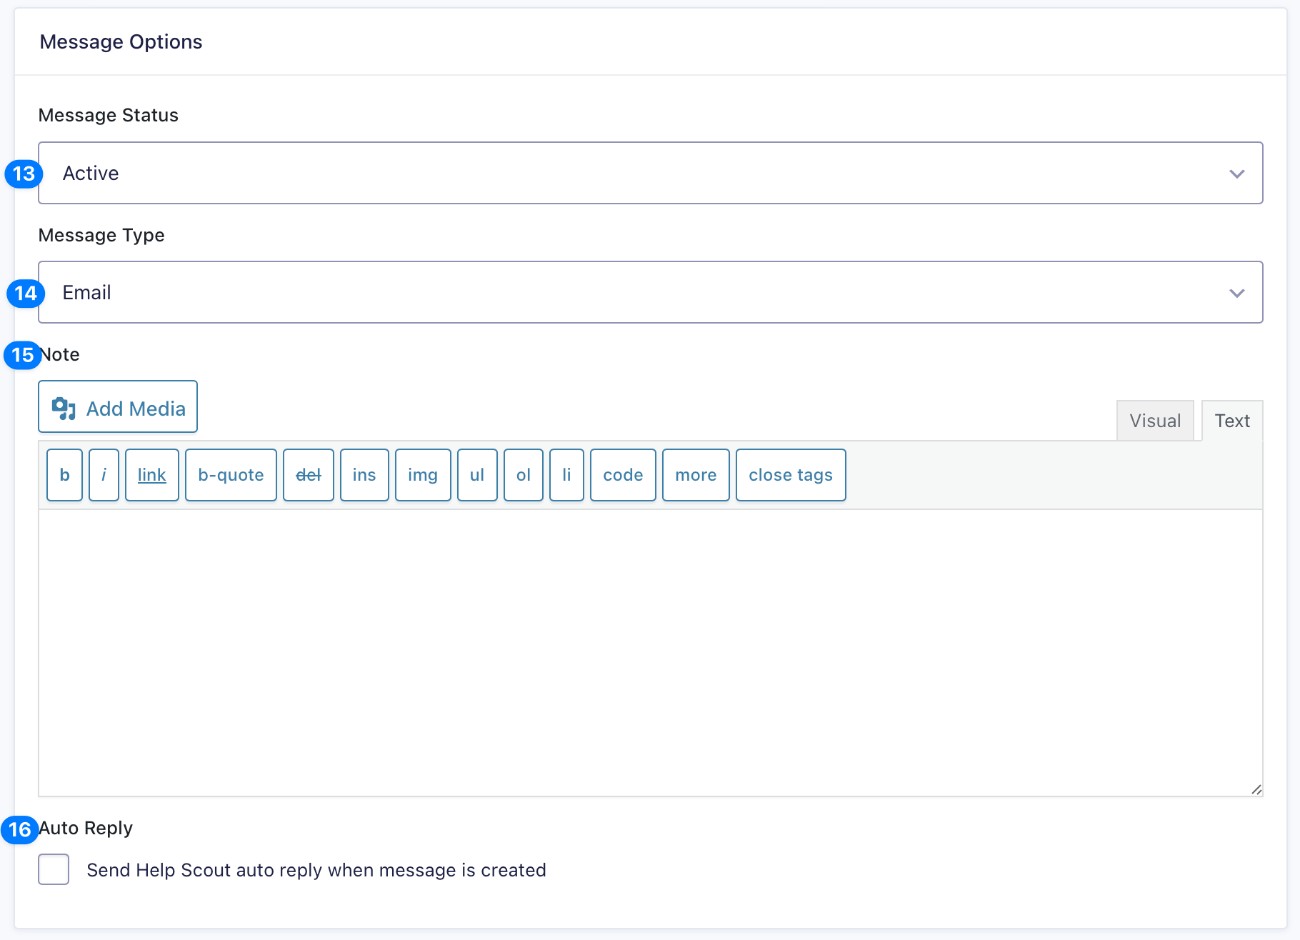
In the Message Options box, you get the following options:
- Message Status
- Message Type
- Note
- Auto Reply
Finally, you can also add Feed Conditional Logic at the bottom of the feed settings. This can be useful if you want to process the support request in different ways depending on how the person fills out the form, such as choosing a different Assignee. Typically, you’ll use conditional logic like this:
- Create multiple Help Scout feeds for different scenarios.
- Apply conditional logic rules to each feed so that each feed only runs in the correct situation (such as a customer answering a specific question in a certain way).
Once you’ve made all of your choices, click Save Settings at the bottom.
How to connect to other help desk software
If you’re using different helpdesk software, such as Zendesk or one of the many other providers, you still have plenty of options for connecting your form to your helpdesk.
One of the easiest ways to connect is to use Zapier. Zapier is an automation platform that lets you easily connect to tons of different helpdesk providers, including Zendesk, HelpDesk, Freshdesk, and many others.
You can easily connect the customer service form template to Zapier using Gravity Forms Zapier Add-On. For example, we have a guide on how to connect Gravity Forms to Zendesk via Zapier.
As an alternative to Zapier, you could also use the Gravity Forms Webhooks Add-On to connect directly to a helpdesk’s API (if it supports webhooks) or to other automation platforms, such as n8n.
5. Set up other add-ons and integrations (optional)
This step is also 100% optional.
However, in addition to potentially connecting to your help desk software, you also might want to set up some other Gravity Forms add-ons.
You can browse all of the add-ons here, but here are a few ideas of what you might want to do:
- Set up business process workflows – You can use the Gravity Flow plugin to set up all types of automated workflows that trigger when someone submits a support request. Gravity Flow is owned by the same team behind Gravity Forms.
- Sync customers to your CRM – You could add customers’ details to your CRM (or update their existing listing, such as applying a certain tag). Gravity Forms has dedicated integration add-ons for many popular CRMs, including HubSpot, Salesforce, Zoho CRM, and others.
- Give customers an option to subscribe to your email newsletter – You could add an opt-in checkbox that lets customers also subscribe to your newsletter. Gravity Forms offers dedicated integration add-ons for most popular email marketing services.
6. Embed your support form
To finish things out, you need to embed your support form on your site in a place that customers can access it.
You can embed the form anywhere on your site using the Gravity Forms block, shortcode, or PHP function.
If you use the block, you’ll also be able to style your support request form directly from the editor.
Once you embed the form, we recommend submitting a test support request to make sure everything is working as you want it to.
How to view new customer support requests
Gravity Forms gives you several different options to view new customer support requests.
Set up email notifications (or other types of notifications)
To help you know when you have a new support request, Gravity Forms gives you multiple options for receiving real-time notifications.
First, you can use the core Notifications functionality in Gravity Forms to send an email notification to yourself or your support team whenever someone submits the form.
You can create as many notifications as needed and even use conditional rules to have them function differently depending on how a customer fills out the form. For example, you could send emails to different people based on the type of support request.
To ensure the reliability of these emails, you can use a dedicated transactional email sending service and a plugin like Gravity SMTP.
In addition to the core email notification functionality, Gravity Forms also lets you send real-time notifications via a variety of different channels:
- Slack – You could use the Gravity Forms Slack Add-On to receive a Slack message when there’s a new support request.
- Other messaging apps – You could also receive messages via other apps by using Zapier (via the Zapier Add-On) or webhooks (via the Webhooks Add-On).
- Text message (SMS) – You could receive a text message to your phone, powered by a service like Twilio (via the Twilio Add-On).
View support requests in your WordPress dashboard
In addition to receiving notifications, you can also view all support requests directly from your WordPress dashboard.
You can view all of your support requests by going to Forms → Entries and selecting your support request form from the drop-down.
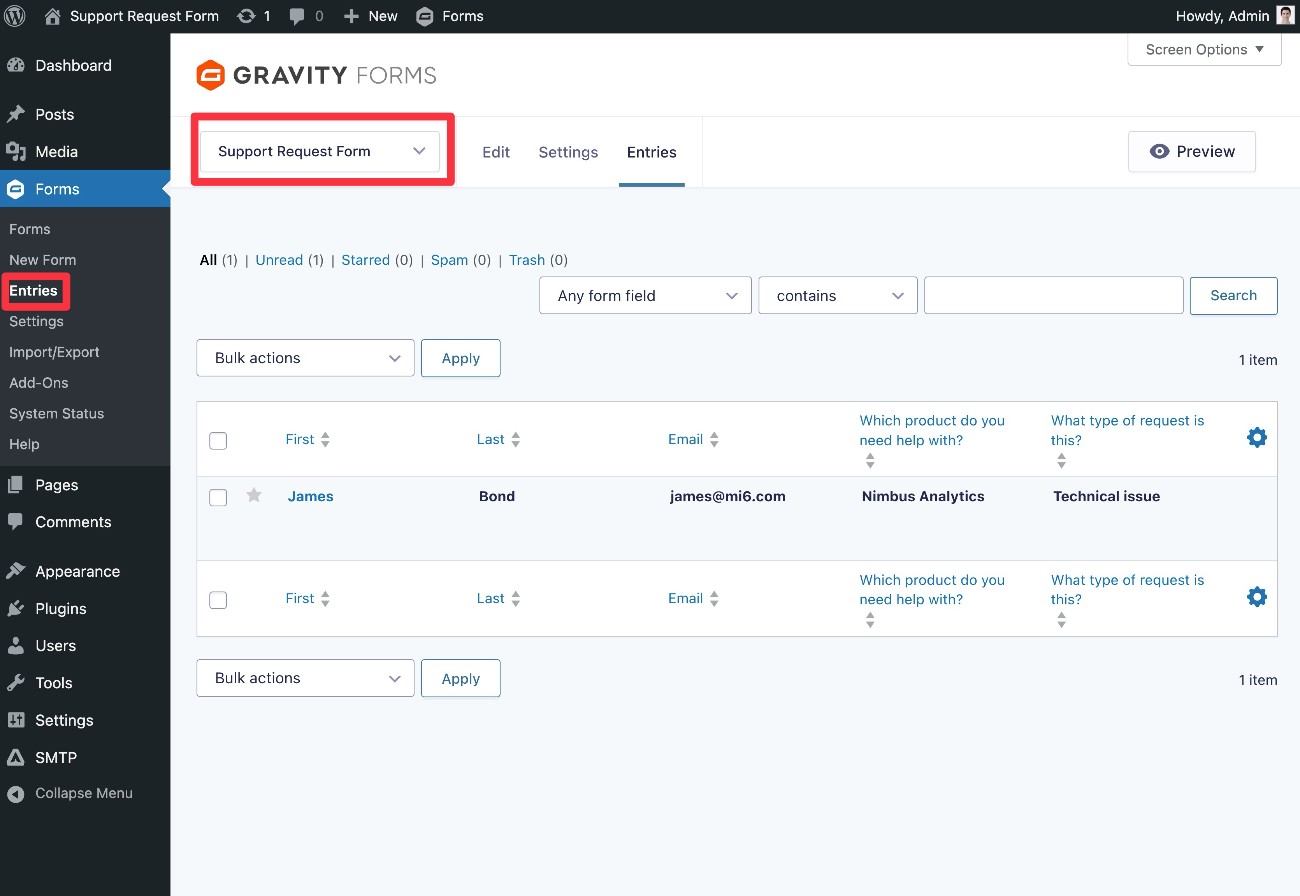
If you select an individual entry, you can view all of the details of that support request, including any files that the customer attached to their request.

Sync support requests to your help desk software
As we mentioned above, you can also sync support requests to your dedicated help desk software, if you require a more robust solution.
If you set this up, you would be able to view and manage new support requests directly from your help desk software, rather than needing to work through WordPress.
Create your WordPress support request form today
With Gravity Forms, you can easily create a WordPress support form to streamline your customer service operations.
You could choose to use the form as a standalone support tool. Or, if you want more robust functionality, you could integrate your form with help desk software such as Help Scout, Zendesk, and others.
Gravity Forms offers a dedicated Help Scout Add-On, but you can easily integrate with other help desk software using the Zapier Add-On or Webhooks Add-On, all of which come directly from the Gravity Forms team.
The Gravity Forms Help Scout Add-On and Zapier Add-On are available on the Pro, Elite, and Nonprofit licenses, while the Webhooks Add-On is available on the Elite or Nonprofit licenses.
If you don’t need to integrate with your help desk software, you can also create a standalone support request form using just the Basic license.
If you’re not holding a Gravity Forms license yet, you can purchase a new license here.
Or, if you want to try the support request form template before making your purchase, you can create a free, fully functioning demo site, which gives you access to the core Gravity Forms plugin and all of the add-ons.

If you want to keep up-to-date with what’s happening on the blog sign up for the Gravity Forms newsletter!
"*" indicates required fields