Searching for a way to accept user-generated content on WordPress?
With the Gravity Forms plugin, you can create a frontend web form that logged-in and/or anonymous visitors can use to submit user-generated content to your site. You can use it for literally any type of content – including support for the core WordPress content types, custom post types, and custom fields.
For logged-in users, you can also provide them with the option to edit the content that they’ve submitted, all from the same frontend form that they used to submit content in the first place.
This works great for directories, job boards, guest blog posts, event aggregators, and lots more.
In this post, you’ll learn how to set up everything using the Gravity Forms plugin and its Advanced Post Creation Add-On.
Examples of user-generated content on WordPress
One of the great things about using Gravity Forms for user-generated content is that you can adapt it to pretty much any use case.
In addition to letting users submit content for core WordPress posts and pages, you can also add content to custom post types and map form fields to any custom fields that you’ve created.
Here are some examples of when you might want to accept user-generated content on WordPress, though this is by no means a complete list:
- Guest blog posts – If you want to let other people publish posts on your blog, you could create a form that lets them submit/edit their guest blog posts (rather than having them use the backend WordPress dashboard).
- Events – If you aggregate in-person or online events, you might want to let users submit their own events to be listed on your site. For example, you might display all the upcoming concerts in your city.
- Directories – You might have a directory of businesses, service providers, locations, or anything else. To grow your directory, you could allow users to submit new directory listings.
- Job boards – You can let companies submit their own jobs to be listed on your site.
- Documents/resources – With the File Upload field, you could let users submit their own files for a document/resource library.
- Visuals/design – For example, Unsplash allows photographers to submit their own photos.
User-generated content with the Gravity Forms Advanced Post Creation Add-On
To accept user-generated content with Gravity Forms, you can use the official Advanced Post Creation Add-On.
The add-on lets you set up a Post Creation feed for any form that you create. When you configure the feed, you can choose how to process user-generated content:
- Choose which post type to add content to, including support for custom post types.
- Configure all post metadata, such as whether to publish content right away or hold it as a draft, who the assigned author should be, and more.
Then, you can map all of the user-submitted content from your form fields:
- Add content to the title and main editor, including using dynamic merge tags to control where to add content.
- Map form fields to any custom fields that you’ve created, which is great for custom content sites.
The add-on also now gives you the option to let logged in users edit their submitted content from the frontend. You can even choose whether to make all the form fields editable or only some.
You can use an editor block to show logged-in users a list of their submitted content, and they’ll then be able to edit a specific piece of content using the same form that they used to submit the content.
How to accept user-generated content on WordPress with Gravity Forms
Now, let’s get into the full step-by-step guide on how to accept WordPress user-generated content using the Gravity Forms plugin.
For this example, we’ll create a basic business directory listing where users can submit information about their businesses. However, you can easily adapt all of these steps to any type of WordPress user-generated content.
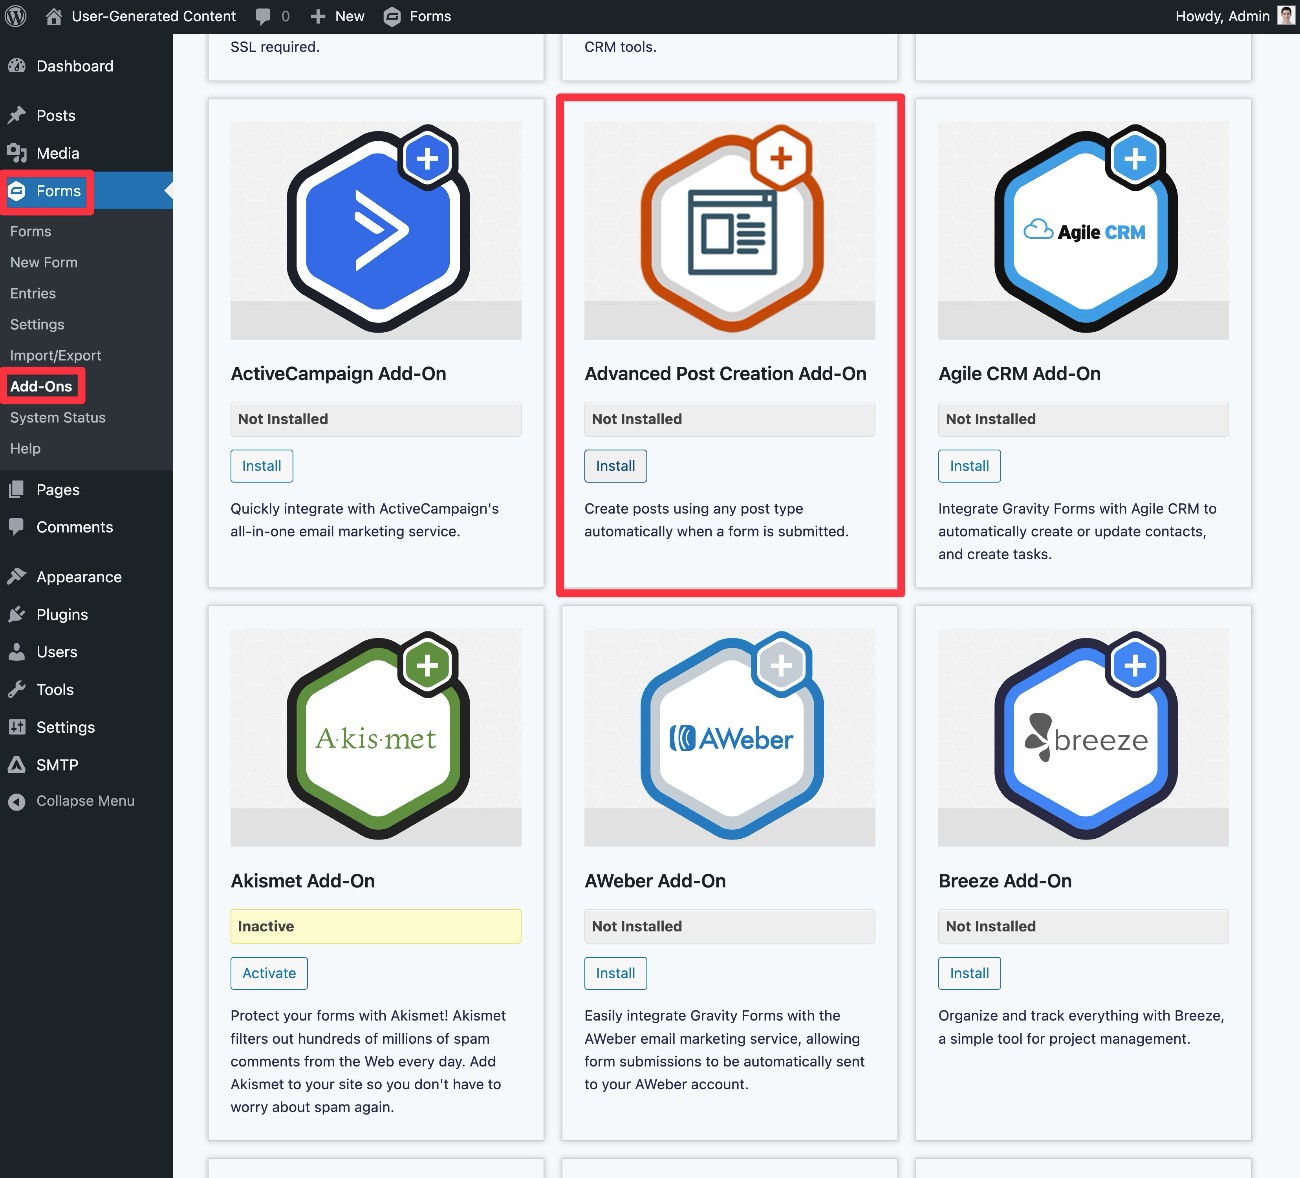
1. Install Gravity Forms and the Advanced Post Creation Add-On
To follow this guide, you’ll only need to install two things on your WordPress site:
You also might want to install some additional add-ons to enhance your user-generated content form in other ways, but this is 100% optional. We’ll discuss some examples below.
The Gravity Forms Advanced Post Creation Add-On is available on the Gravity Forms Elite and Nonprofit licenses.
If you’re not holding one of those licenses yet, you can purchase a new license here or upgrade your existing Basic or Pro license and only pay the prorated difference.
Once you’ve installed the core Gravity Forms plugin and added your license key, here’s how to install the Advanced Post Creation Add-On:
- Go to Forms → Add-Ons in your WordPress dashboard.
- Find the Advanced Post Creation Add-On in the list of available add-ons.
- Click the Install button.
- Once the installation finishes, make sure to click the Activate Plugin button.
2. Set up the content that users will be creating (if you haven’t already)
Next, you’ll want to make sure that you’ve fully set up the type of content that users will be creating.
If you just want users to be able to submit blog posts, you might be fine with the default WordPress Posts, which wouldn’t require any extra setup.
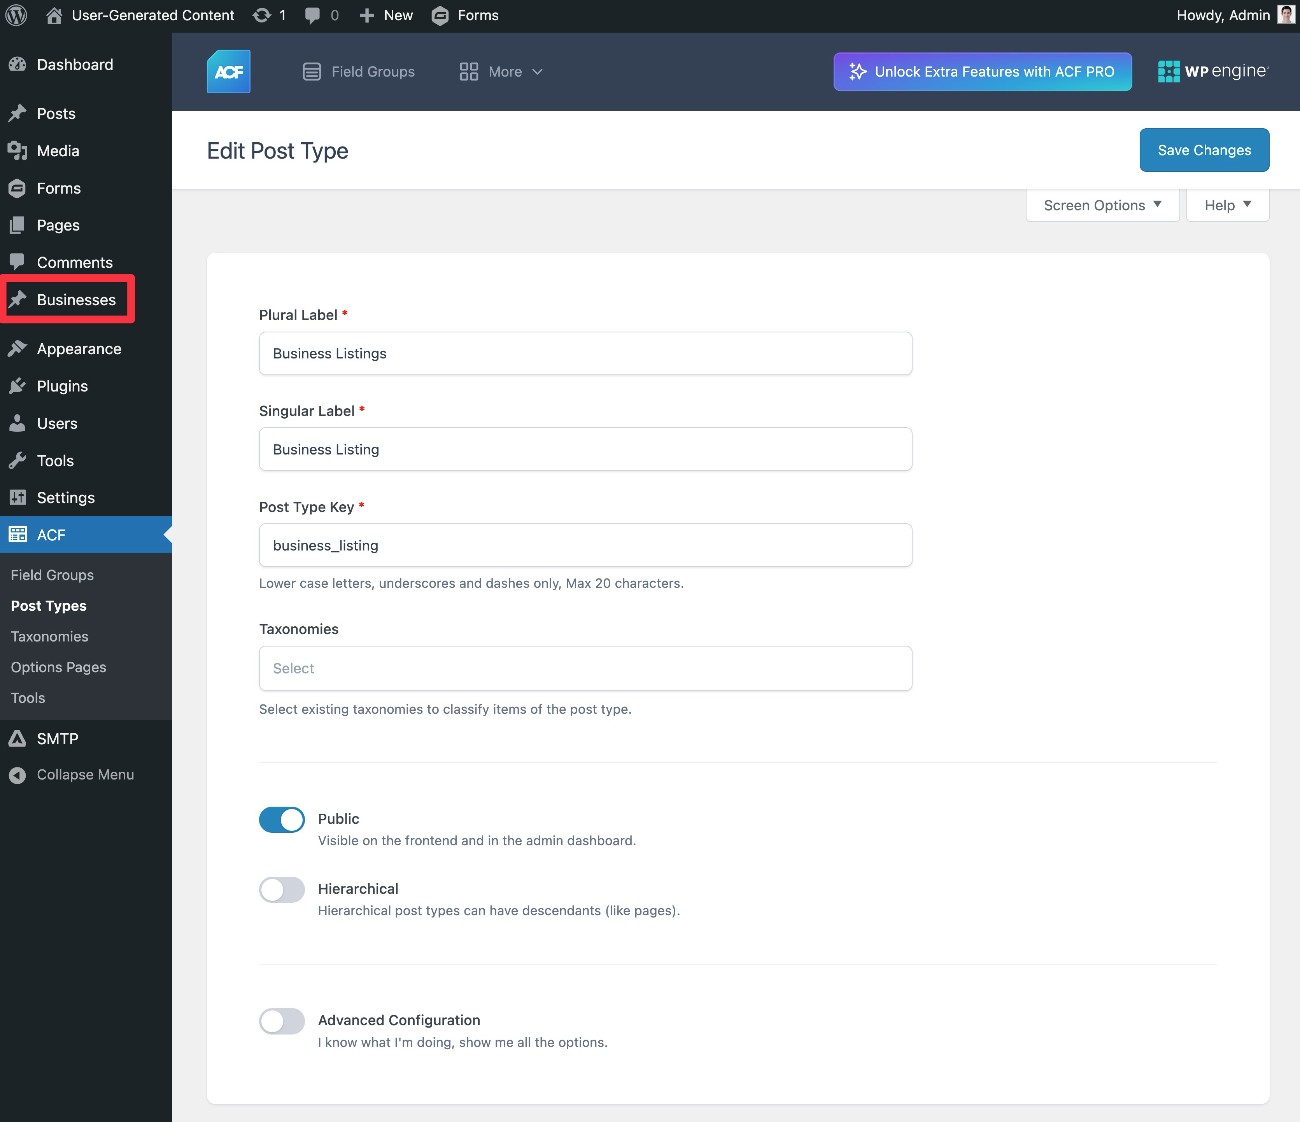
However, a lot of WordPress user-generated content use cases will rely on custom content types. For example, if you want users to be able to submit businesses to a business directory, you’ll need a dedicated “Business Listing” content type.
To set this up, you can use custom post types in WordPress.
Depending on your use case, you also might want to create custom fields, as well. This would let you store custom data in dedicated fields, which can help you accurately store/organize data and display it on the frontend of your site.
To work with both custom post types and custom fields, we recommend the free Advanced Custom Fields (ACF) plugin. It can help you create custom post types and then attach custom fields as needed.
For our example, we’ll just create a simple “Business Listing” custom post type to house business listings. For a real directory, you might want to separate business details into custom fields. But for our basic example, we’ll just put everything into the main content area, so we won’t create any custom fields.
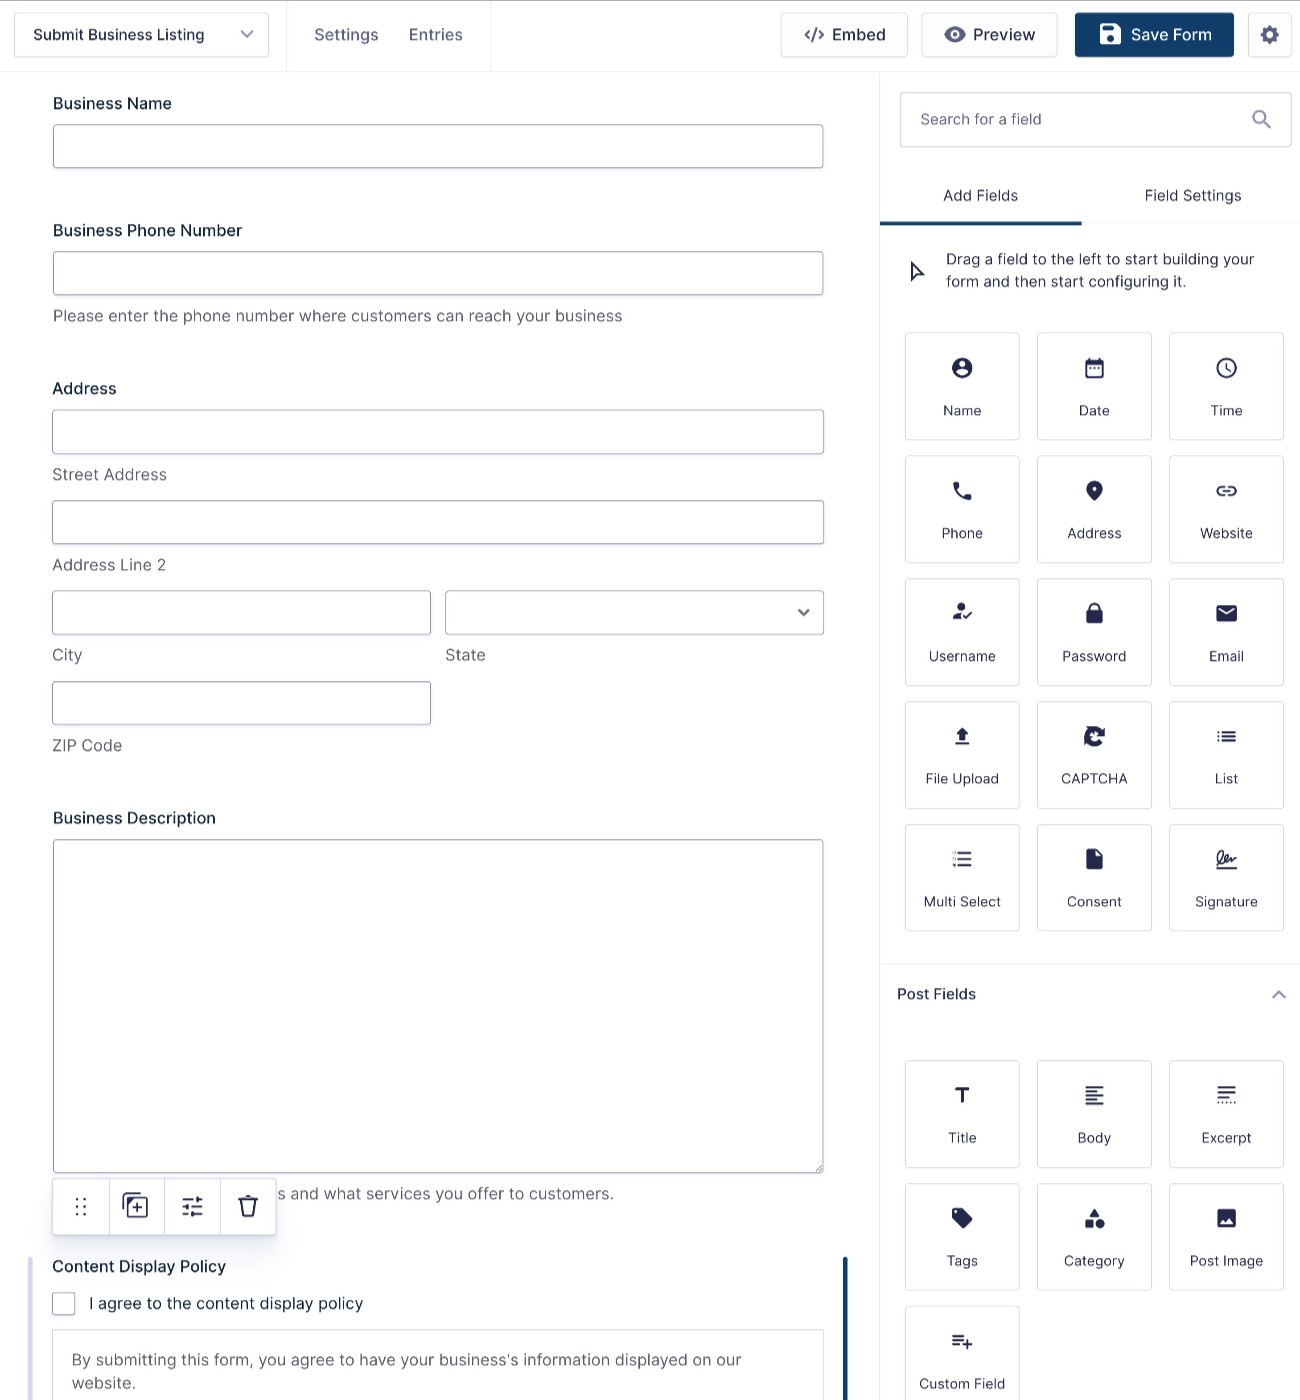
3. Create your content submission form
Next, create the form that users will submit to add their content.
Go to Forms → New Form to set up everything. You could start from a blank slate or use one of the templates.
For our example of submitting a simple business listing, we added fields for the following:
- Business name
- Phone number
- Address
- Description
We also added a Consent field so that we have a record of users consenting to display content on our site.
While we’ve chosen to use these fields for our example, you can create your own unique use case – you have 100% flexibility here.
Note – It’s important to note that you should not use the Post fields in your form, as these are not designed to work with the Advanced Post Creation Add-On.
Once you’re happy with your form fields, make sure to click the Save Form button.
4. Set up Post Creation feed
Next, set up a Post Creation feed for your form. This is what lets you control how to process the user-generated content on your site, including the following:
- What post type to add the content to.
- How to map data from the form fields to post content (e.g. which field to use as the title of the post).
- Whether to enable post editing (after the user submits the content the first time).
To create a feed, go to Settings → Post Creation → Add New inside the form editor interface.
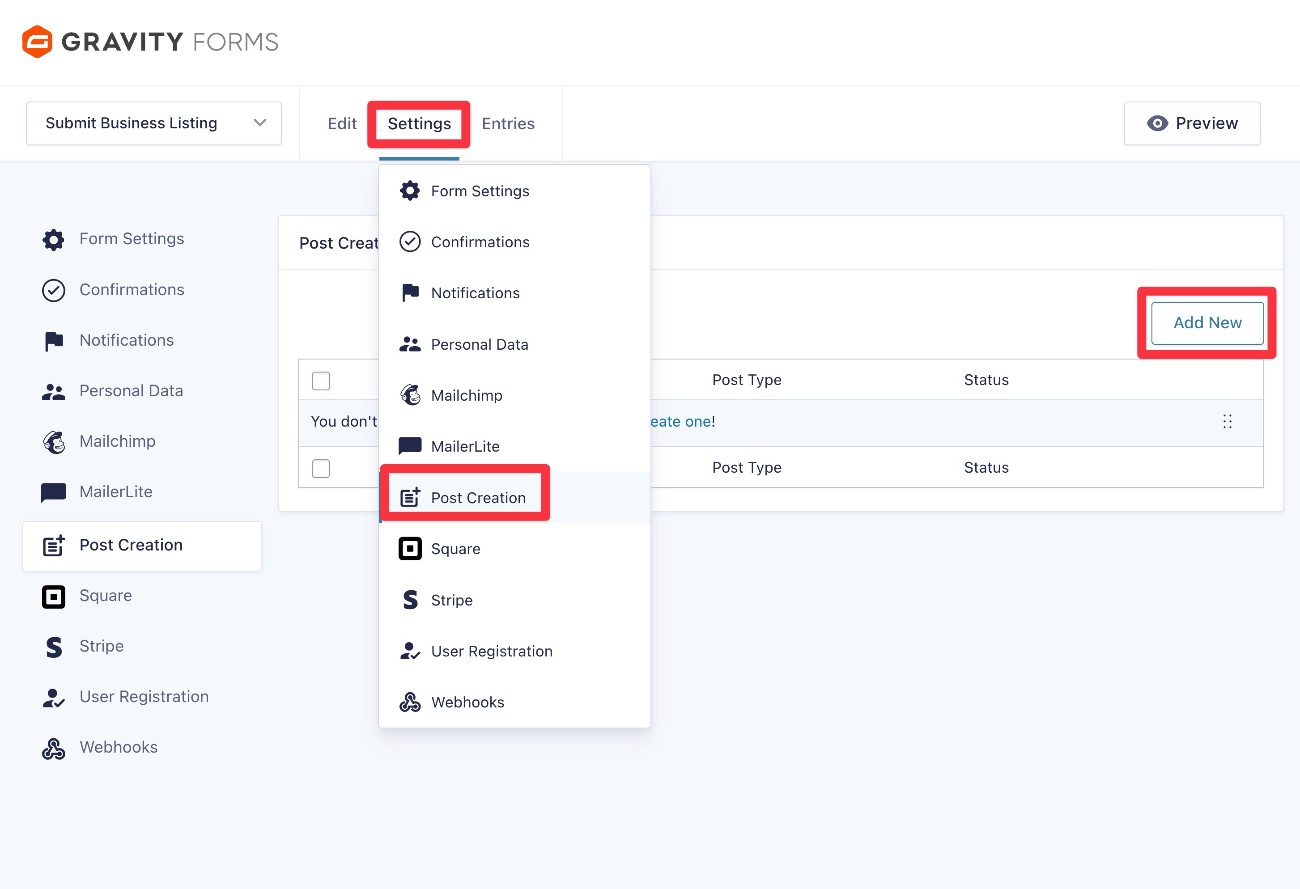
Once you click Add New, you’ll be taken to the Post Creation feed settings area, which is divided into two tabs:
- Post Creation Settings – This lets you control how to create the content when a user submits the form.
- Post Editing Settings – You also have the option to let logged-in users edit their content from the frontend of your site.
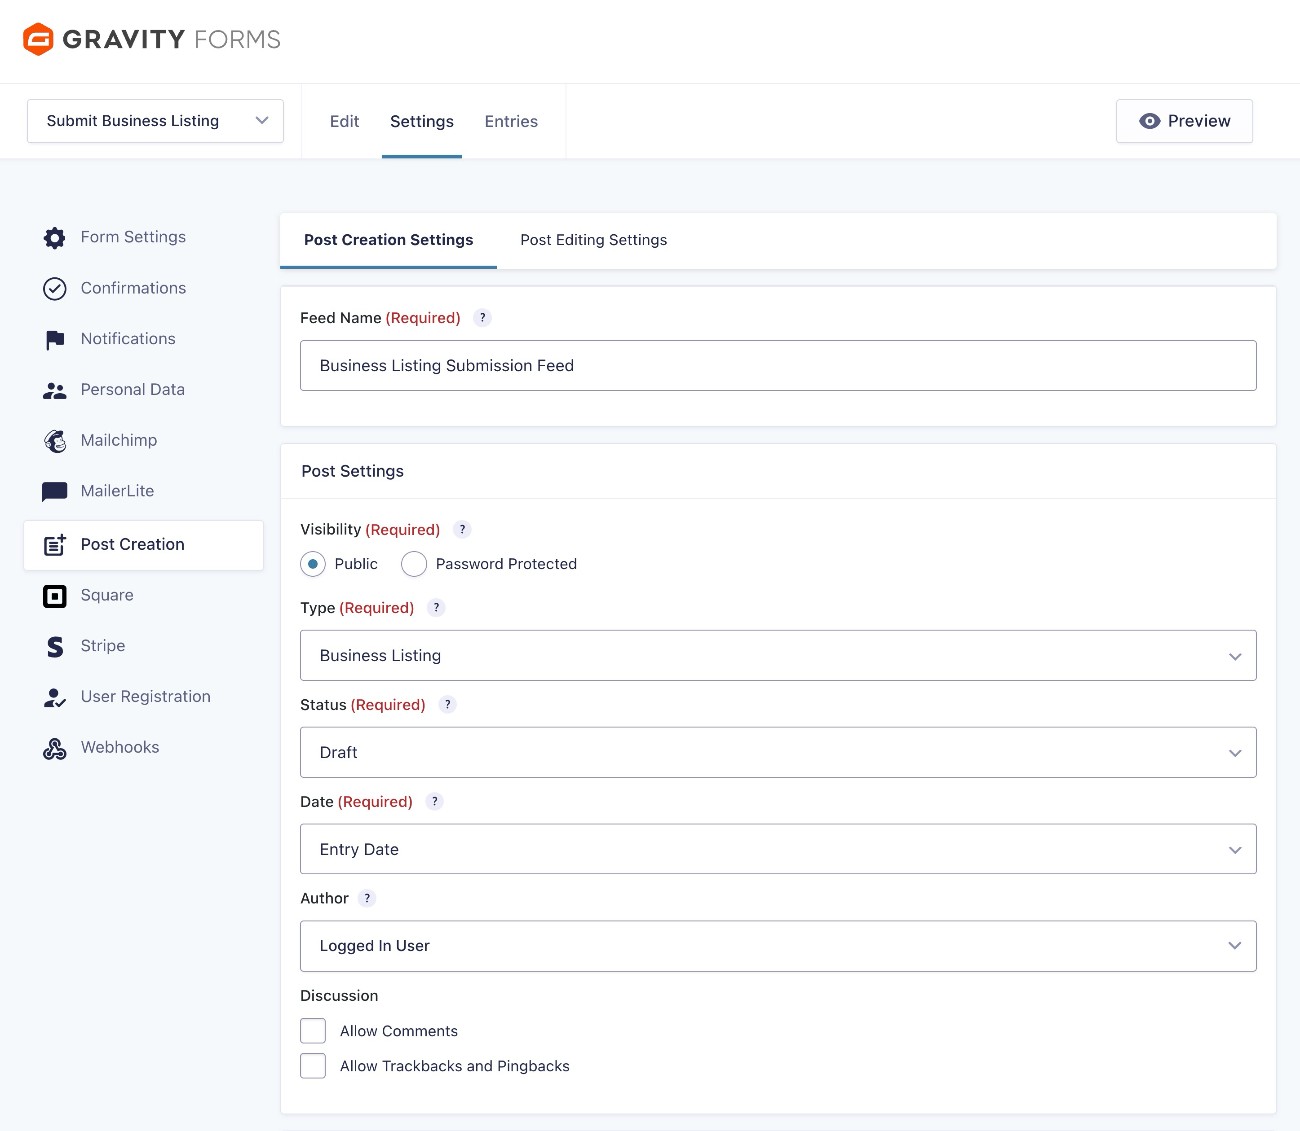
Post Creation Settings tab
In the Post Creation Settings tab, you can configure a number of important settings to control how to add content when a user submits the form.
First, choose the options in the Post Settings box:
- Visibility – Whether the content should be publicly visible or hidden behind a password.
- Type – Which post type to add the content to. You can choose Posts (blog posts), Pages, or any custom post types that you’ve added. For our example, we selected our “Business Listing” custom post type.
- Status – The initial status of the content. If you want to manually approve content, you can set this to Draft or Pending. If you want to automatically publish the content as soon as the user submits the form, choose Published.
- Date – You can choose to set the publish date equal to the time when the user submitted the form or select a custom date.
- Author – You can choose the author to which the post will be assigned. Note – if you want to let users edit their own posts after they submit them, you must set this equal to Logged In User.
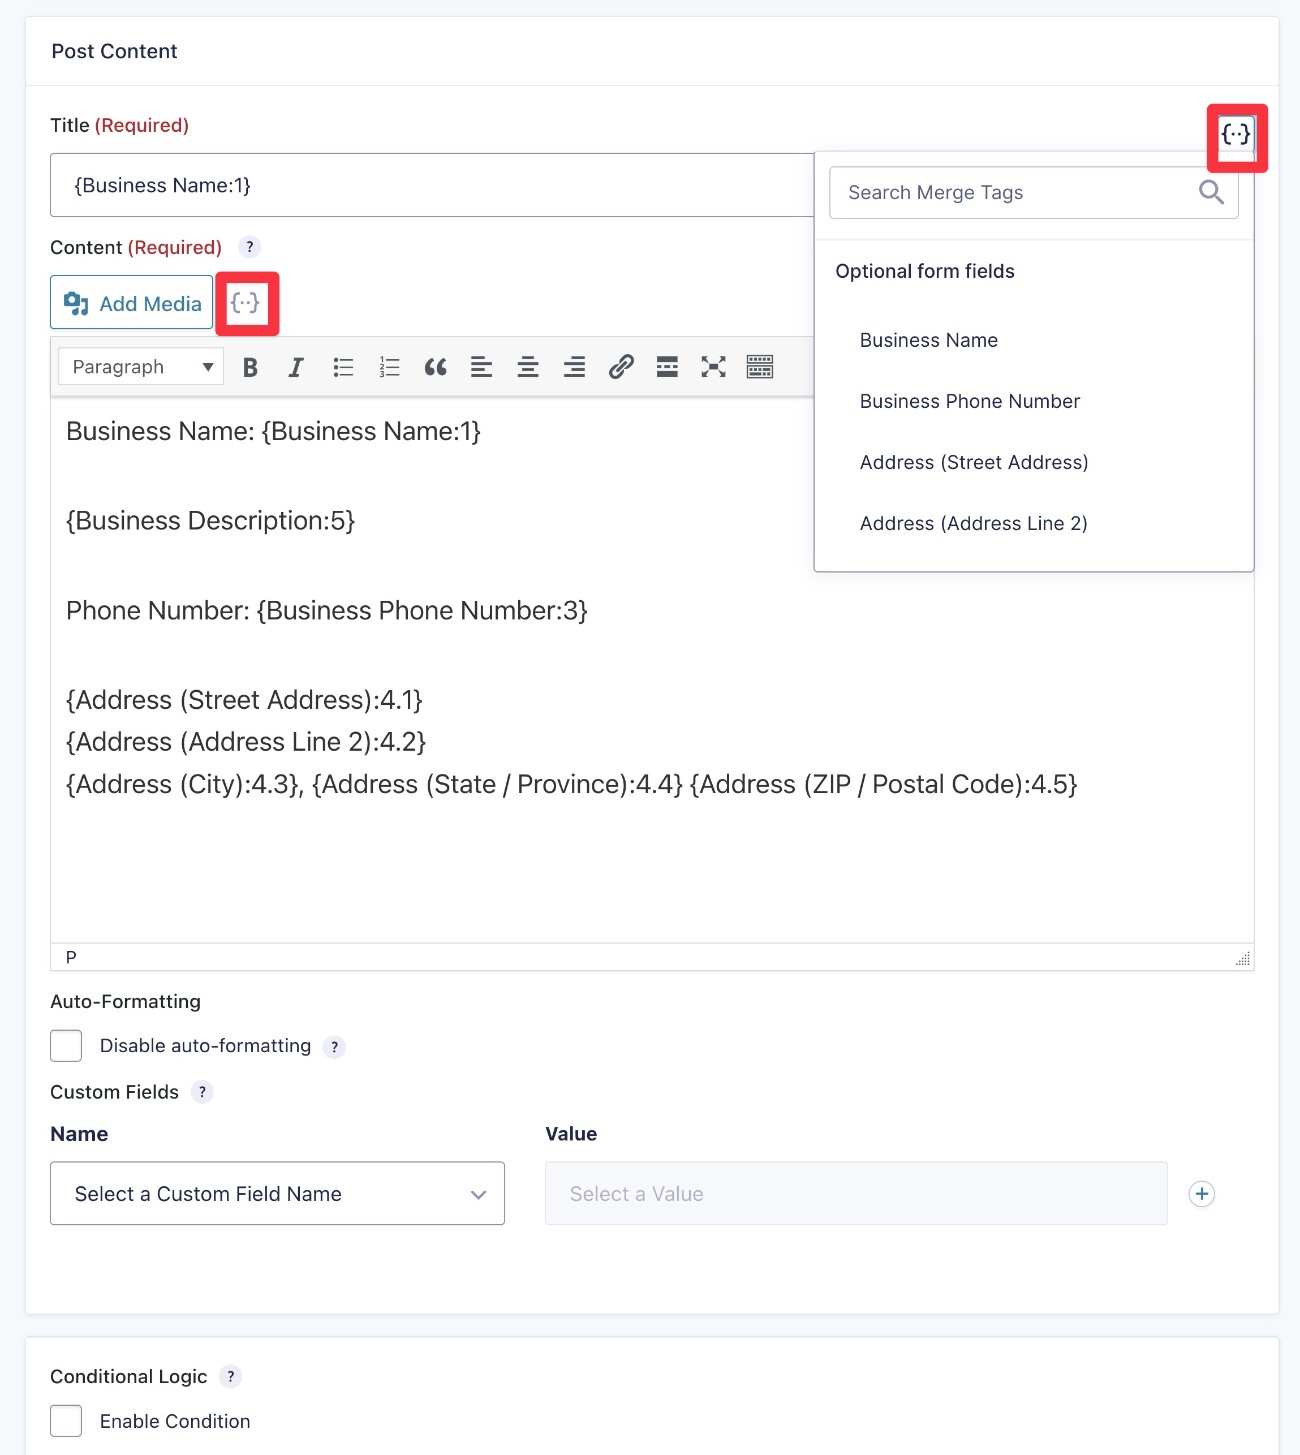
Next, you can configure the Post Content box.
To start, you can choose what content to add to the Title and Content (body) of the post. You can use merge tags to dynamically insert content from the form submission. You can also mix in your own static content that will be the same for every submission, if it fits your use case.
Below that, you can use the Custom Fields drop-downs to map content from the form submission to any custom fields that you’ve added (using a plugin like Advanced Custom Fields).
For our simple business listing, we just added all of the business details in the Content area, with some static text for structure.
Finally, you also have the option to add Conditional Logic. You do not need this for this tutorial, but it does open up some more advanced customization options. For example, you could process the content in different ways depending on how the user filled out the form.
Once you’ve made your choices, make sure to click Save Settings at the bottom.
Post Editing Settings tab
Because there are some additional steps involved in properly setting up post editing, we’re going to skip this tab for now and cover it in a later section in this tutorial. We’ll cover the entire process in “Step 8: Set up frontend content editing area.”
5. Enhance your user-generated content form with other add-ons
Another great thing about using Gravity Forms for WordPress user-generated content is that you can also enhance your forms with all the other add-ons available for Gravity Forms.
This step is 100% optional – You do not need to install any of these add-ons for the core use case of accepting WordPress user-generated content. However, these add-ons can be very useful for a lot of common use cases.
Here are a few examples…
Add users to your CRM or email marketing service
To improve your marketing and stay in touch with users who are submitting content to your site, you might want to add users to your customer relationship manager (CRM) and/or email marketing lists as part of the content submission process.
Gravity Forms offers add-ons that support direct integrations with most popular CRMs and email marketing services. Or, you can also use the Gravity Forms Zapier or Webhooks add-ons if you want to connect to a service for which Gravity Forms doesn’t currently offer a dedicated add-on.
Regardless of what service you’re using, the basic process works like this for direct integrations:
- Install the Gravity Forms Add-On for the service that you want to connect to.
- Open the main Gravity Forms settings area and connect Gravity Forms to that service (typically by adding an API key or completing an authorization flow).
- Create a feed for that service in the settings of your user-generated content form.
Charge users to submit content to your site
One common use case with user-generated content would be to charge users to submit content to your site.
For example, if you have a job listing website, you might want to charge companies in exchange for letting them list a job. You could charge all companies. Or, you could make it free to submit a basic job listing but charge them if they want to make it “featured”, which is a common monetization strategy for job boards.
If you do not need to give users the ability to edit content after they’ve submitted it, setting this up is pretty easy. You just need to install one of the Gravity Forms payment add-ons, connect your site to your chosen payment processor, and create a payment feed for your user-generated content form.
Again, you will not be able to enable the post editing features if your form has a payment feed. So, while users can submit content using the form, they cannot edit it in the future.
If you want to charge users to submit content while also letting them edit that content after they’ve submitted it, it will require the Gravity Flow plugin and some extra setup.
6. Set up other form settings
In addition to setting up your Post Creation feed (and optional feeds for any other add-ons that you want to integrate into your form), you should also set up some core form settings.
Form Settings
Going to Settings → Form Settings will show some basic options.
One of the most important choices here is whether you want to require users to be logged in to submit content. If you want to restrict user-generated content to only registered users on your site, you should check the box to Require user to be logged in.
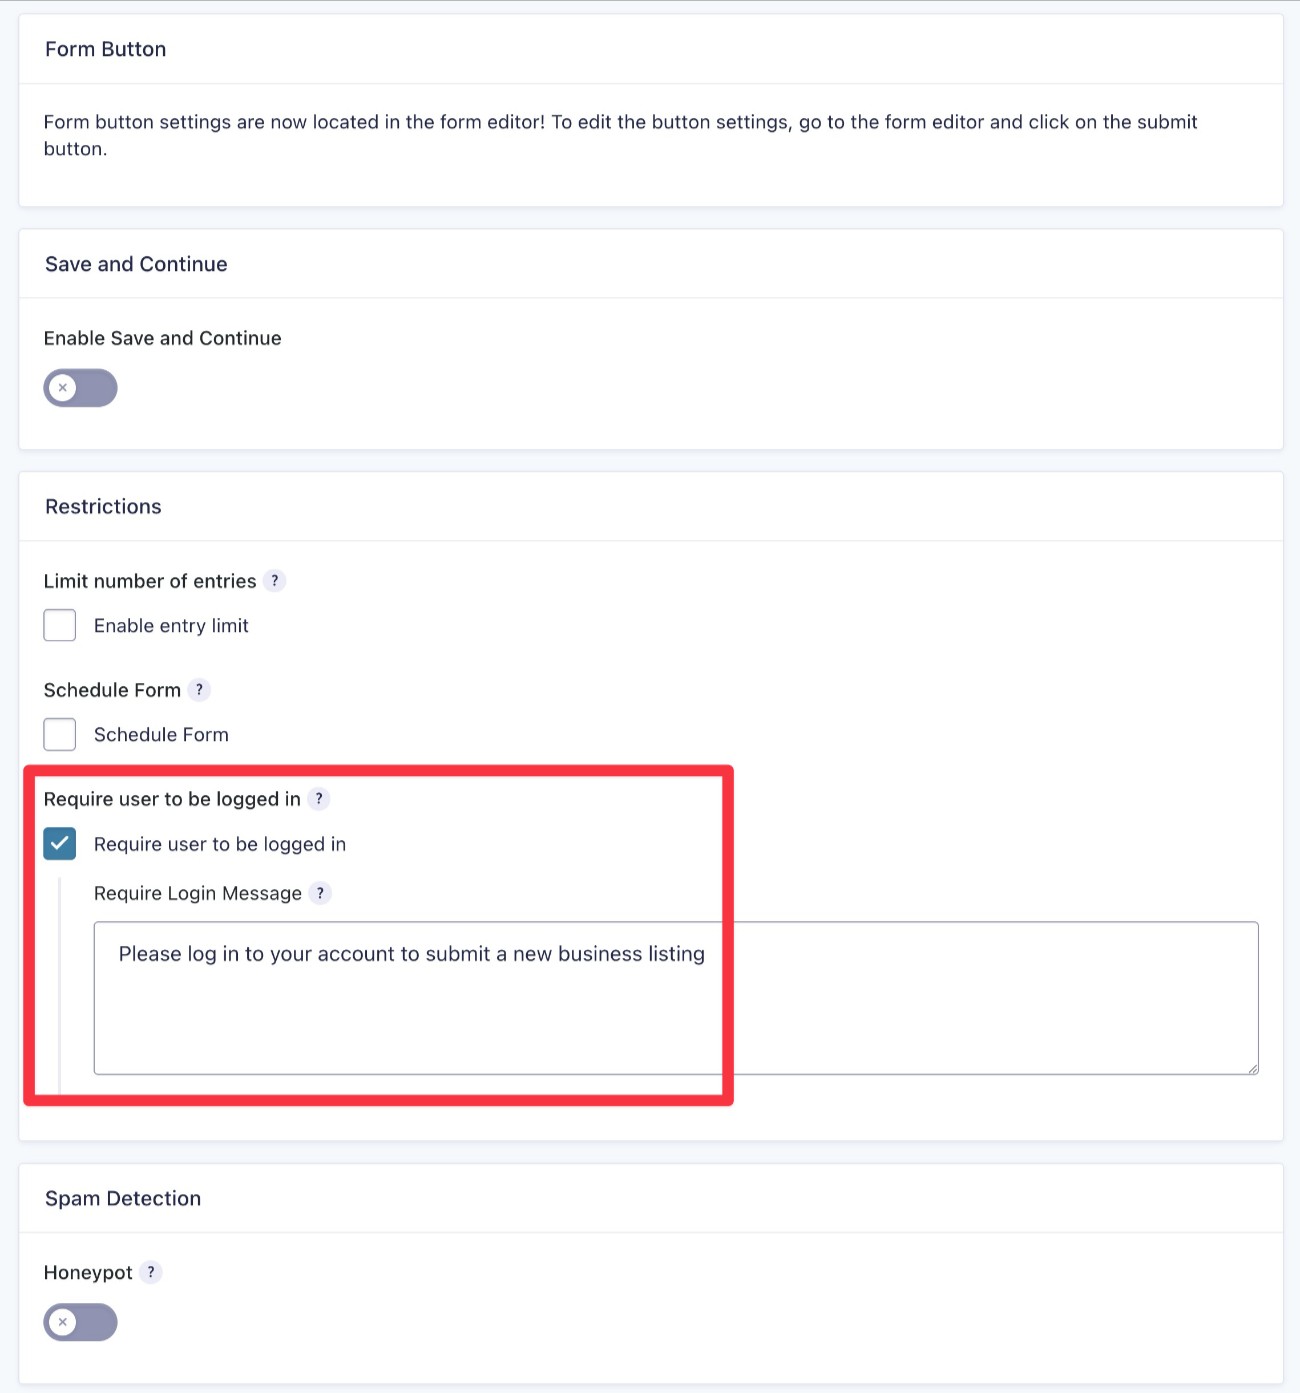
If you do require users to log in, we also have a guide on how to create a custom WordPress user registration page.
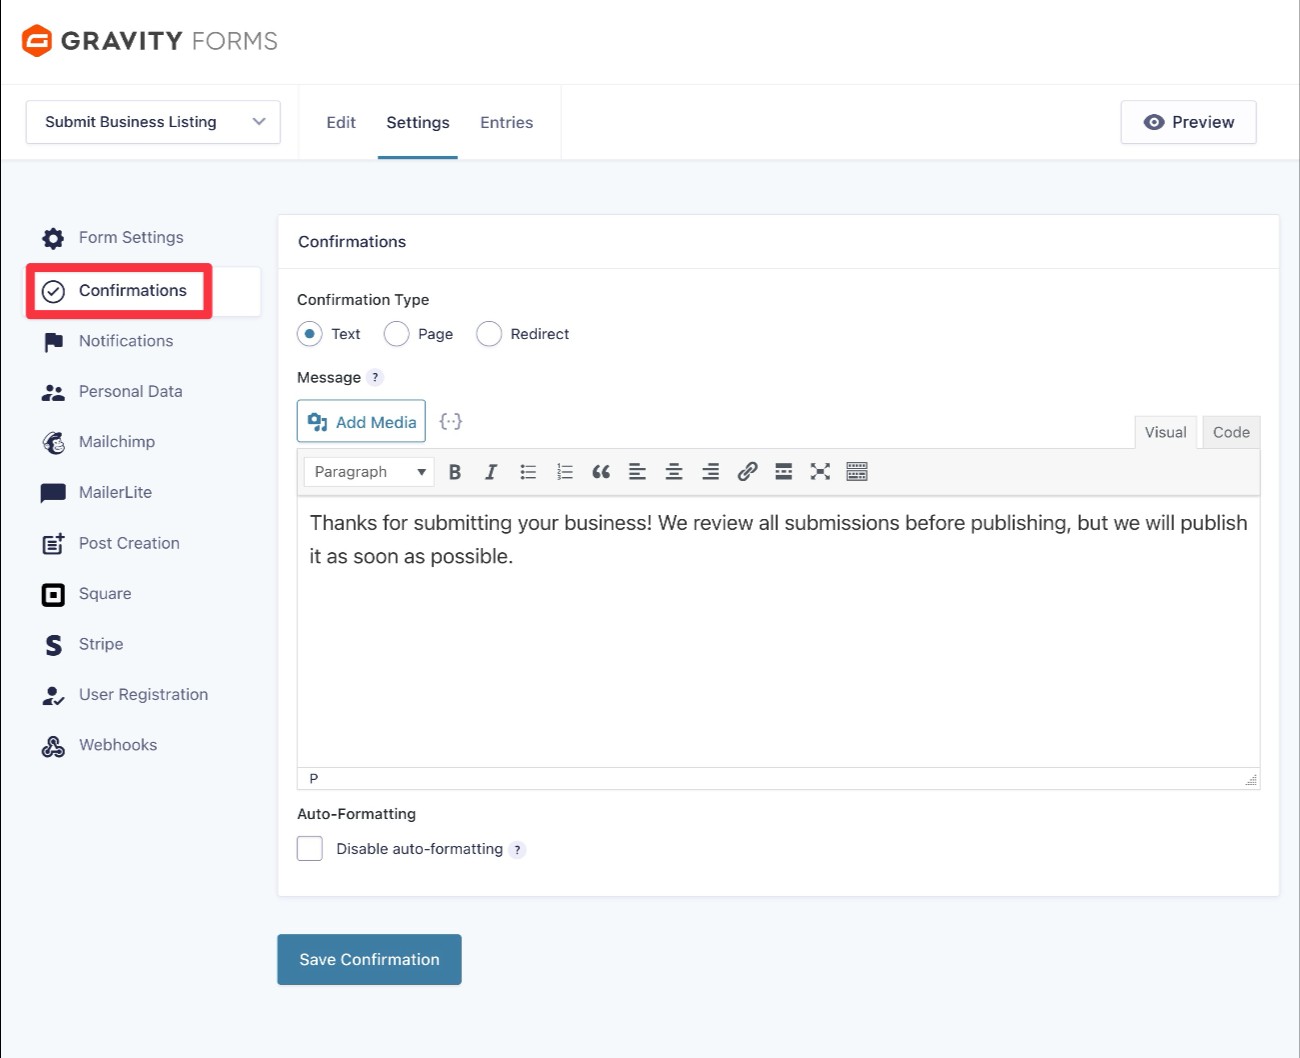
Confirmations
Confirmations let you display a message after someone submits the form or redirect users to a different page. For example, you could provide information about when the user’s content will be published, or you could tell them how they can edit the content that they’ve submitted.
You can manage confirmations by going to Settings → Confirmations.
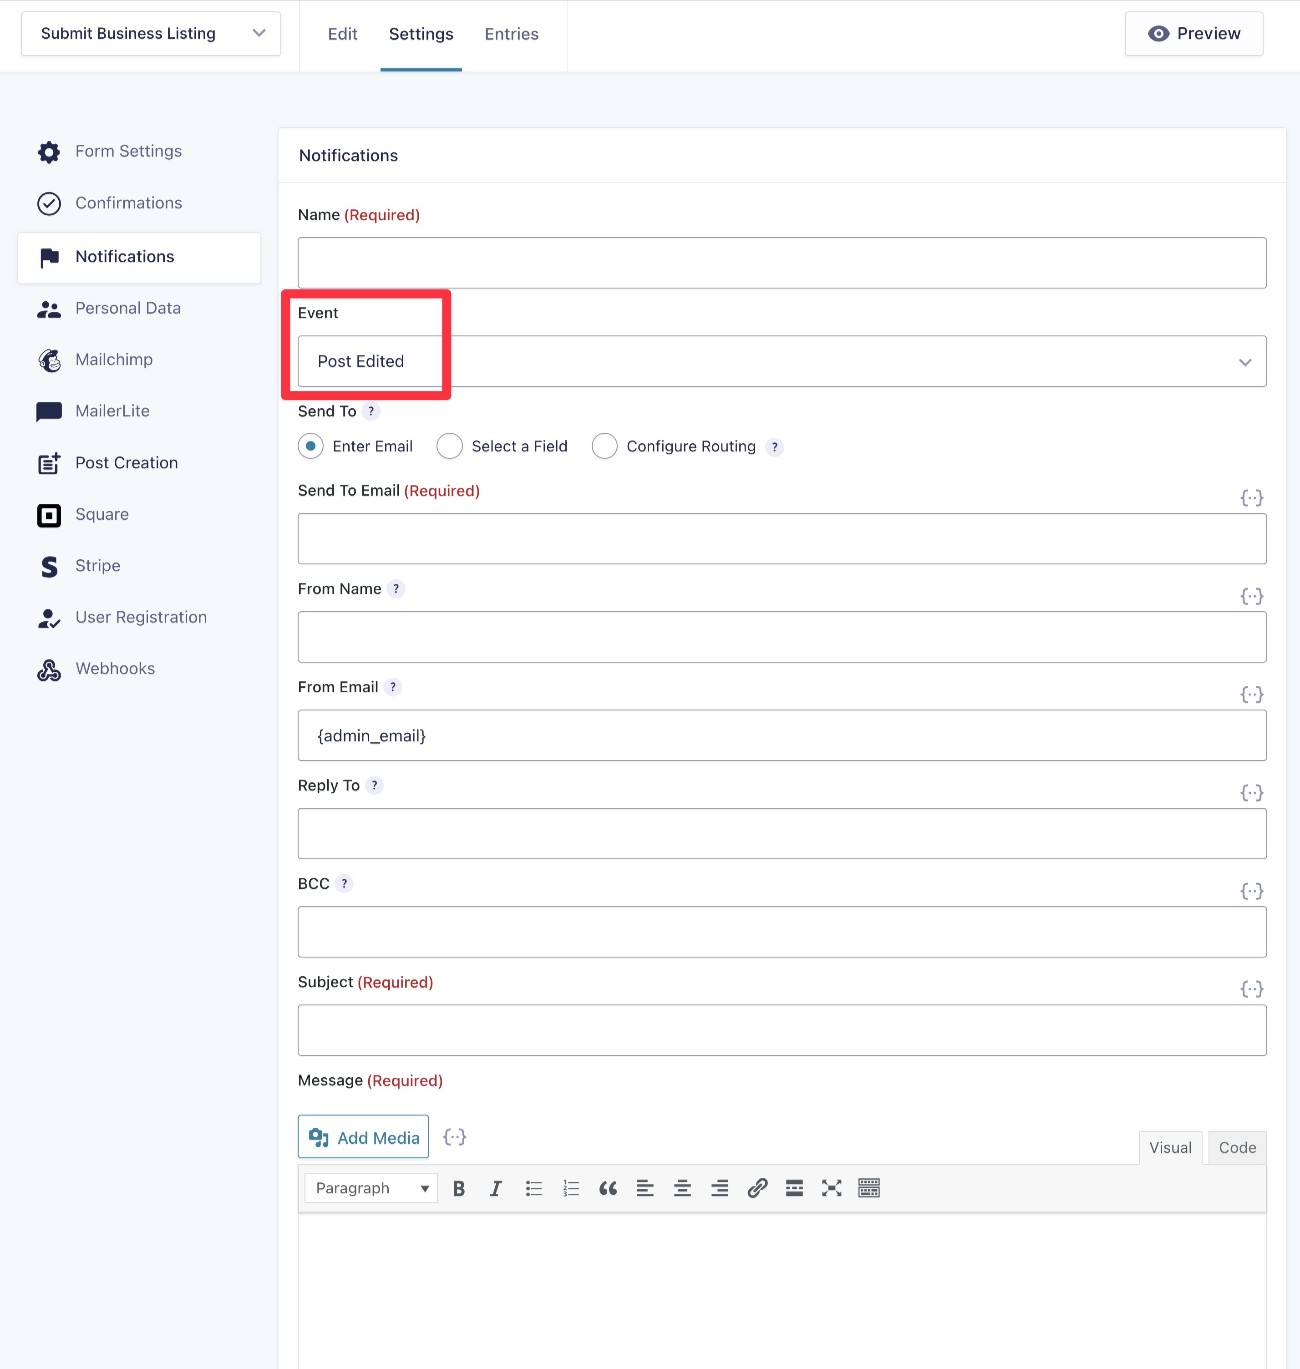
Notifications
Notifications let you send one or more emails after someone submits the form. You could use this to notify you or your team when someone submits content, send an email to the person who submitted the content, and more.
You can create notifications by going to Settings → Notifications.
You can also create email notifications for future actions. For example, you could send your team a notification email whenever someone edits one of the listings that they submitted.
7. Publish your frontend content creation form
Once you’ve finished setting up your form, you’ll want to publish the form somewhere on the frontend of your site.
You can embed the form anywhere on your site using the Gravity Forms block, shortcode, or PHP function.
If you use the block, you’ll also be able to style your form directly from the editor using non-technical options.

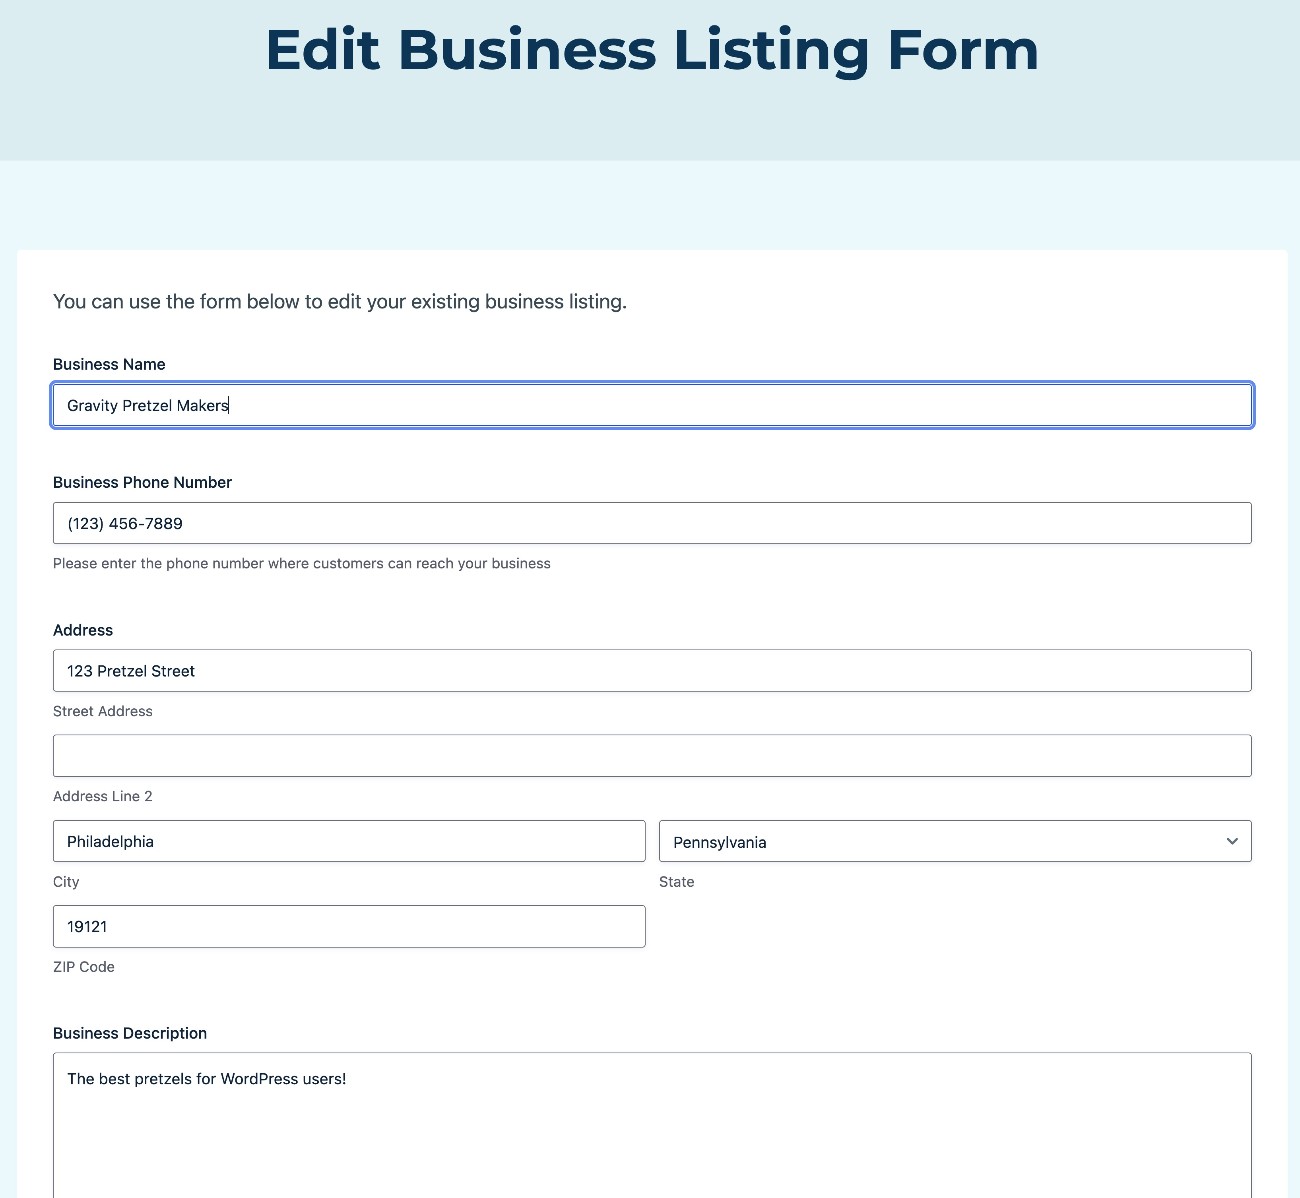
8. Set up frontend content editing area
With the Post Editing Settings in the Post Creation feed, you have the option to let users edit their content from the frontend of your site.
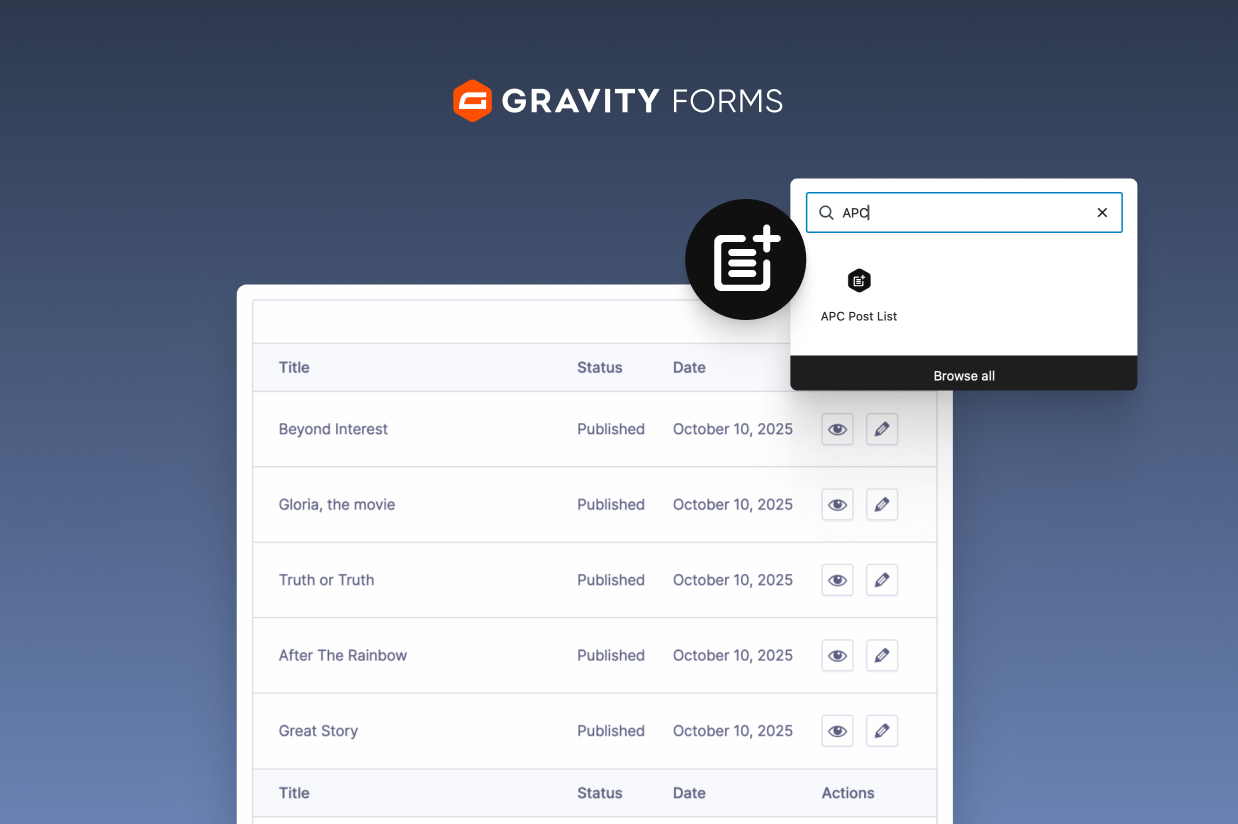
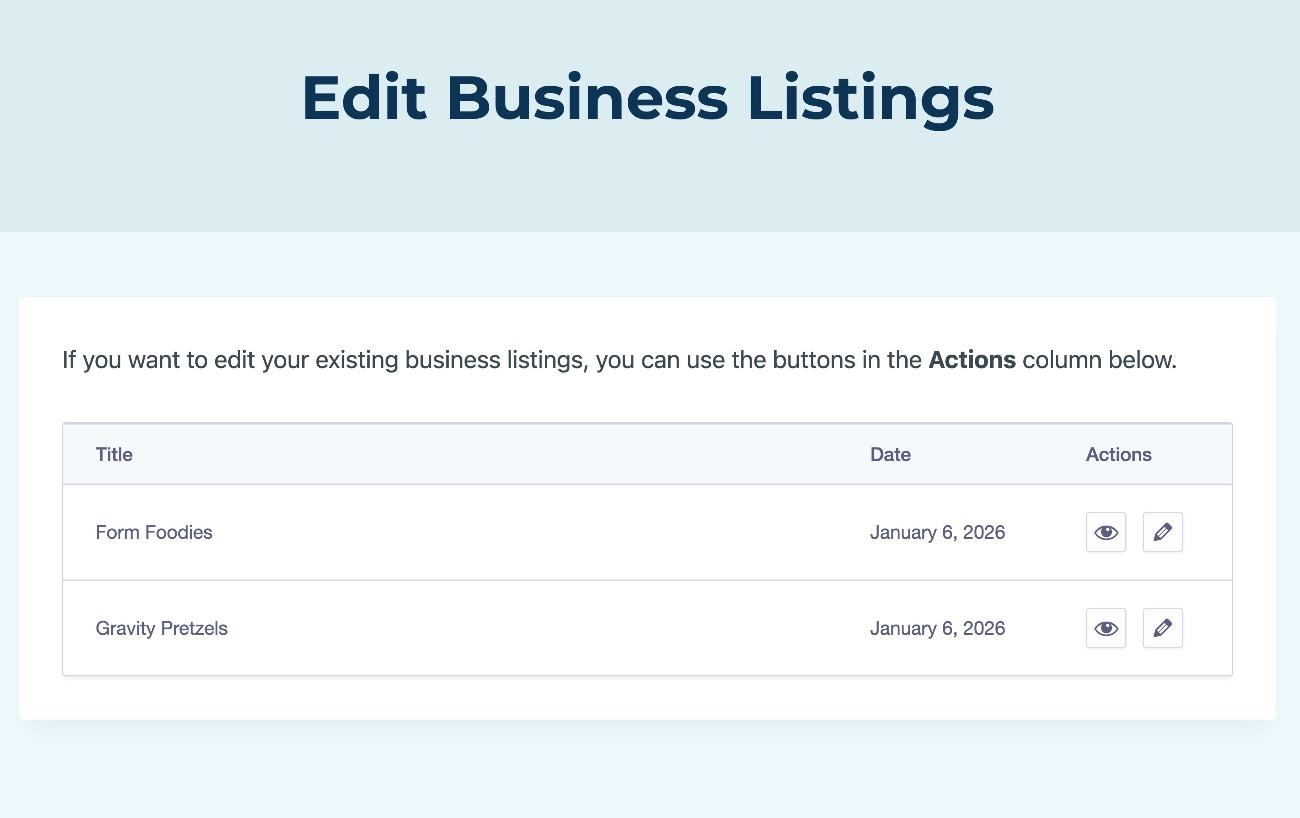
Once you set this up, users will be able to see a list of all their content on a page:
If they choose to edit a piece of content, they’ll be able to edit it using the same form that they used to submit the content.
Here’s how to set this up…
Create the frontend post listing page
To start, you’ll need to create a page on your site that lists all of a user’s posts. To help you do this, Gravity Forms includes a dedicated APC Post List block.
First, create a new page to act as the frontend editing area (Pages → Add New). Then, add the APC Post List block where you want the list of a user’s posts to appear.
In the APC Post List block settings, make sure to choose the content submission form that you just created.
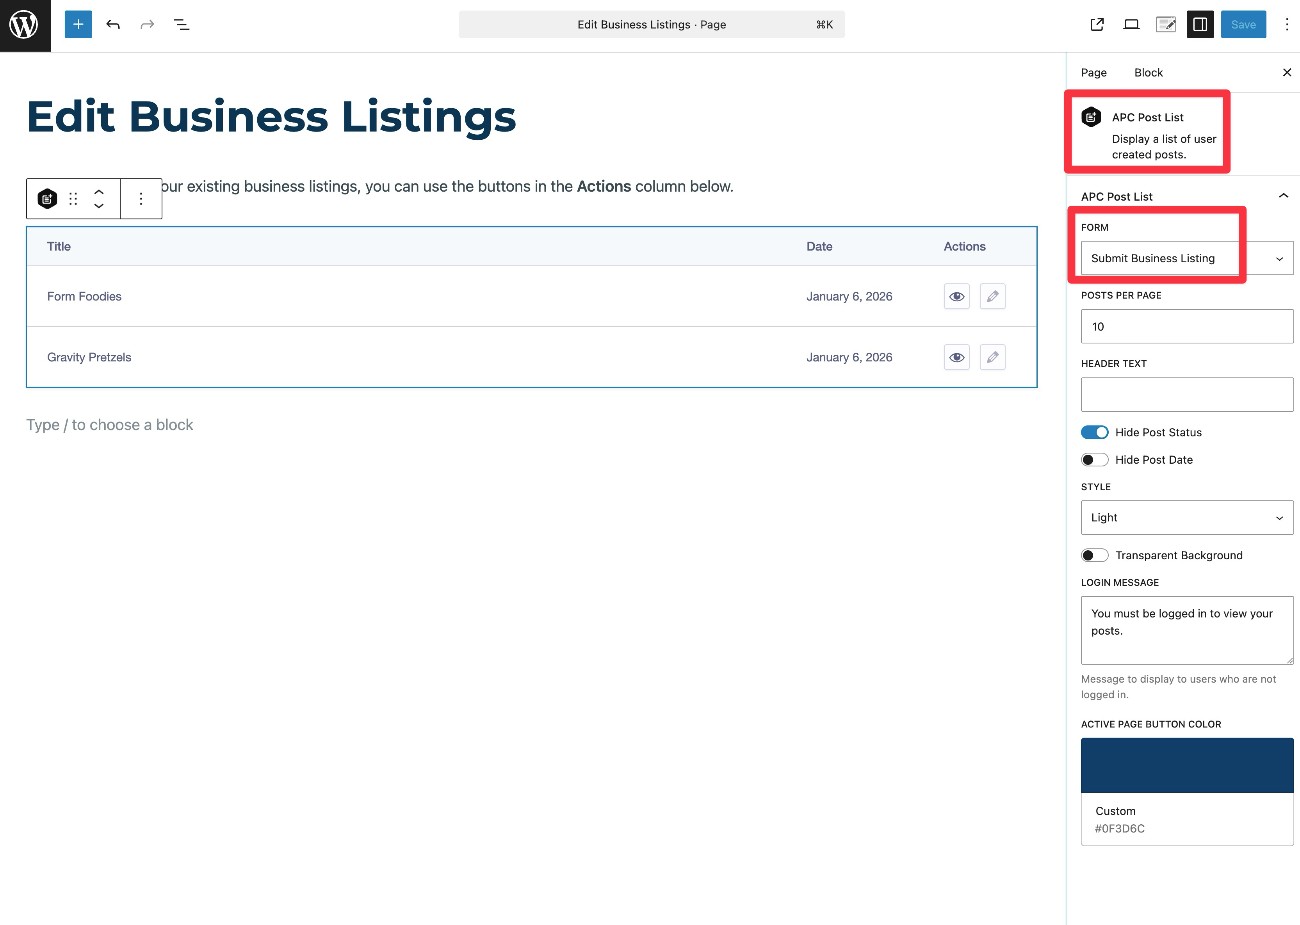
Then, publish the page.
On the frontend, this block will appear differently depending on whether or not the user is logged in to their account.
For logged-in users, they’ll see a list of their posts.
For users who are not logged in, they will be prompted to log in or register if they want to edit content. You could also use the other features in Gravity Forms to create a custom registration page for users.
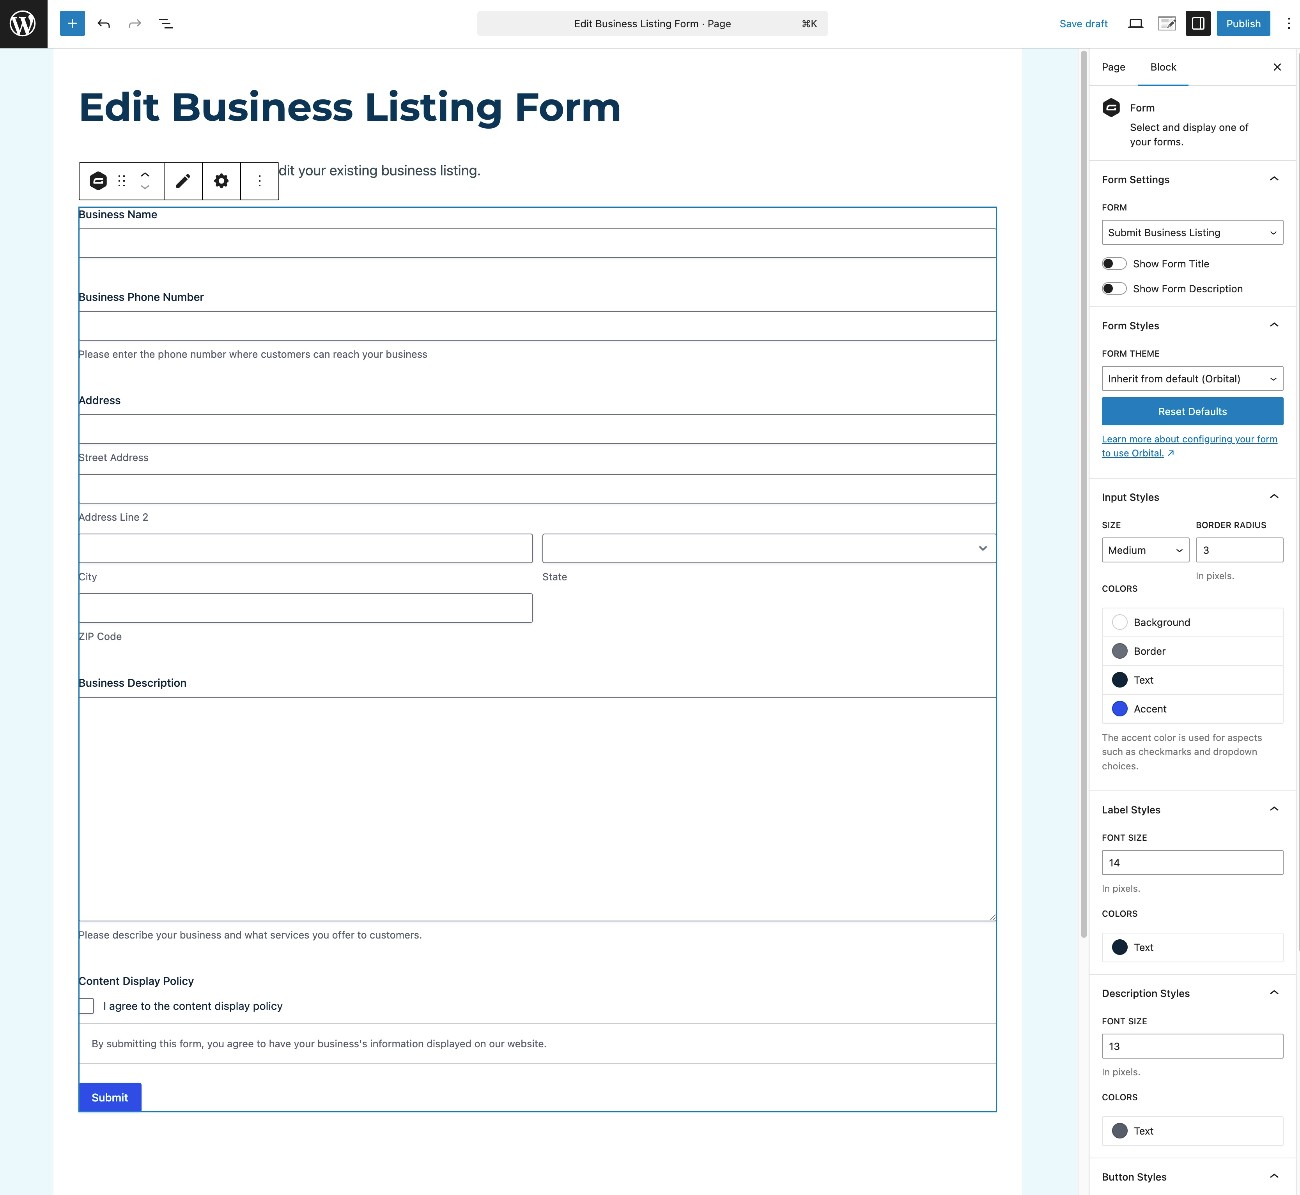
Create the frontend editing page
In addition to the page that lists a user’s posts, you’ll also need to create a second page where users can actually make their edits.
To start, create another new WordPress page (Pages → Add New).
Give the page a title and then embed your form again (the same form that people use to submit content).
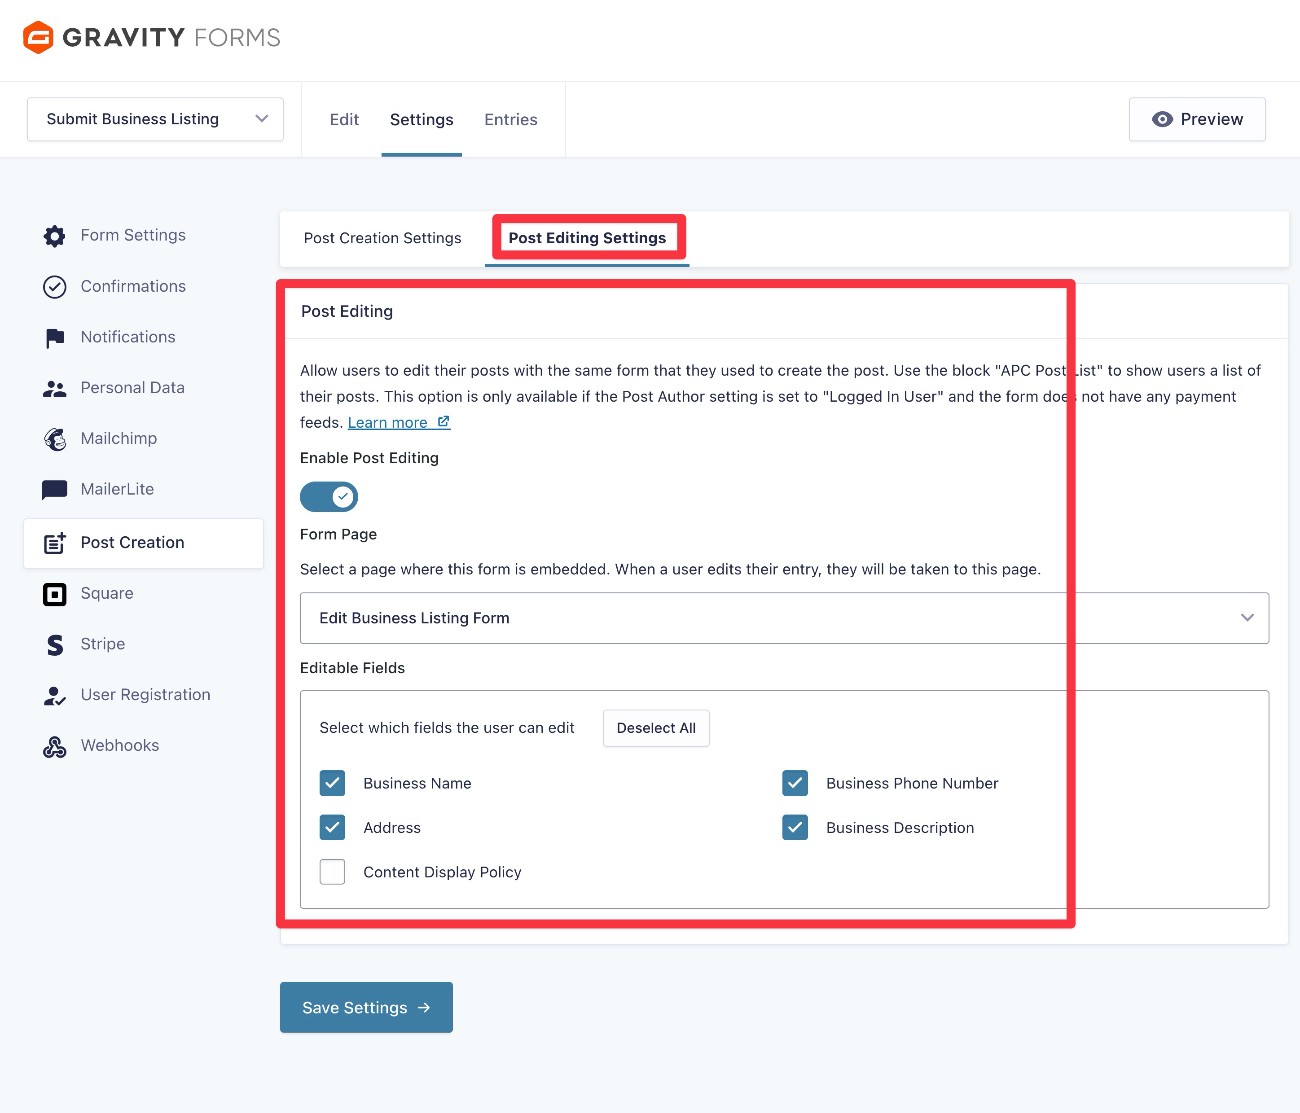
Once you’ve set up the page, go back to the Post Creation feed settings for your form:
- Open the form editor for your form.
- Go to Settings → Post Creation in the form editor.
- Edit the Post Creation feed that you set up earlier in Step 4.
- Open the Post Editing Settings tab inside the feed settings.
Then, turn on the Enable Post Editing toggle.
In the Form Page drop-down, choose the page that you just created (which has the form embedded).
Then, you can choose which fields you want users to be able to edit. For this example, we’ll choose all of the fields except for the Consent field (because we don’t want users retroactively withdrawing consent).
Click Save Settings when you’re finished.
9. Test everything
At this point, your site should be properly configured to start accepting user-generated content. However, to make sure everything is working as you intend it to, we recommend testing the entire setup as a user would experience it:
- Create a new user account.
- Submit content using the form.
- Edit the content after you’ve submitted it (if you’ve enabled user editing).
Once you’ve verified that everything is working as you want it to, you’re all finished and users are ready to start submitting content.
Get started with WordPress user-generated content today
With Gravity Forms, you can easily accept user-generated content on WordPress. You can use this in all kinds of ways, including directories, job boards, events, document libraries, guest posts, and lots more.
In addition to letting people submit content from the frontend, Gravity Forms also gives you the ability to let users edit their existing submissions from the frontend.
Basically, users can create and manage content without ever needing access to the WordPress dashboard.
All you need is the Gravity Forms plugin and the Advanced Post Creation Add-On, which is currently available on the Elite and Nonprofit licenses.
If you’re not holding one of those licenses yet, you can purchase a new license here or upgrade your existing license and only pay the prorated difference.
You can also try all of this functionality before making a purchase by creating a free, fully functioning demo site.

If you want to keep up-to-date with what’s happening on the blog sign up for the Gravity Forms newsletter!
"*" indicates required fields