
If you’re using Brevo (formerly Sendinblue) for email marketing, we have great news – with the release of our new Gravity Forms Brevo Add-On, you now have an easy way to connect WordPress and Gravity Forms to Brevo using an add-on that comes straight from the Gravity Forms team.
With the add-on, you’ll be able to sync subscribers to Brevo after they submit a form on your site while also mapping data from your form fields to attributes in Brevo, including any Brevo custom attributes that you’ve created. You can also access other useful features such as conditional logic and double opt-ins.
In this post, we’ll introduce you to the Brevo Add-On and show you step-by-step how to set it up on your own WordPress site.
Why use Gravity Forms to connect WordPress to Brevo?
Brevo can be a great option if you’re looking for a tool that can handle email marketing and automation. It can even act as a lightweight customer relationship manager (CRM).
With Gravity Forms and the Gravity Forms Brevo Add-On, you can access more powerful options for connecting the forms on your WordPress site to Brevo.
You can use Gravity Forms to create simple email opt-in forms. Or, you can also add a Brevo integration to other types of forms on your site, which is where the add-on can get really powerful.
For example, you could give people an option to subscribe to your Brevo lists as part of your WordPress user registration form. Or, you could give them an option as part of a payment form that you’ve created with Gravity Forms.
Here are some of the key features that you can access with the Gravity Forms Brevo Add-On:
- Add contacts to Brevo lists – Add a contact to any of your Brevo lists after the person submits your form.
- Connect any type of form – Add an integration to any type of form – not just dedicated email subscribe forms. This is a big advantage of using Gravity Forms over Brevo’s built-in form builder.
- Map form fields to Brevo custom attributes – In addition to syncing a person’s email address and name, you can also map data from your form to any custom attributes that you’ve added in Brevo.
- Add conditional logic rules – Use conditional logic rules to only sync contacts to Brevo if certain conditions are met, such as them checking an opt-in box to join your list.
- Enable double opt-in – If you choose to enable double opt-in, a contact will only be added to your list after they click a link in a confirmation email that Brevo sends the user after the user submits your WordPress form. You can also add a custom redirect URL to control where users are sent after they click the confirmation link.
How to connect WordPress to Brevo with Gravity Forms
Now, let’s get into the step-by-step guide on how to set up the Gravity Forms Brevo Add-On and connect your WordPress forms to Brevo.
We’ll cover the entire process. However, if you’ve already authenticated your WordPress site’s domain name with Brevo, you’ll be able to skip some of the steps in this guide (which we’ll be sure to note below).
1. Install the Gravity Forms Brevo Add-On
To begin, you’ll want to install the Gravity Forms Brevo Add-On on your site.
We’ll assume that you’ve already installed the core Gravity Forms plugin and activated it with your license key. If you haven’t, you’ll need to do that first.
The Gravity Forms Brevo Add-On is available on all Gravity Forms licenses, including the Basic license. So, as long as you have an active license, you’ll be able to use it on your site.
If you don’t have an active license yet, you can purchase your license here.
Here’s how to install the Brevo Add-On:
- Go to Forms → Add-Ons in your WordPress dashboard.
- Find the Brevo Add-On in the list.
- Click the Install Now button for the Brevo Add-On.
- Once the installation finishes, make sure to activate the add-on on your site.
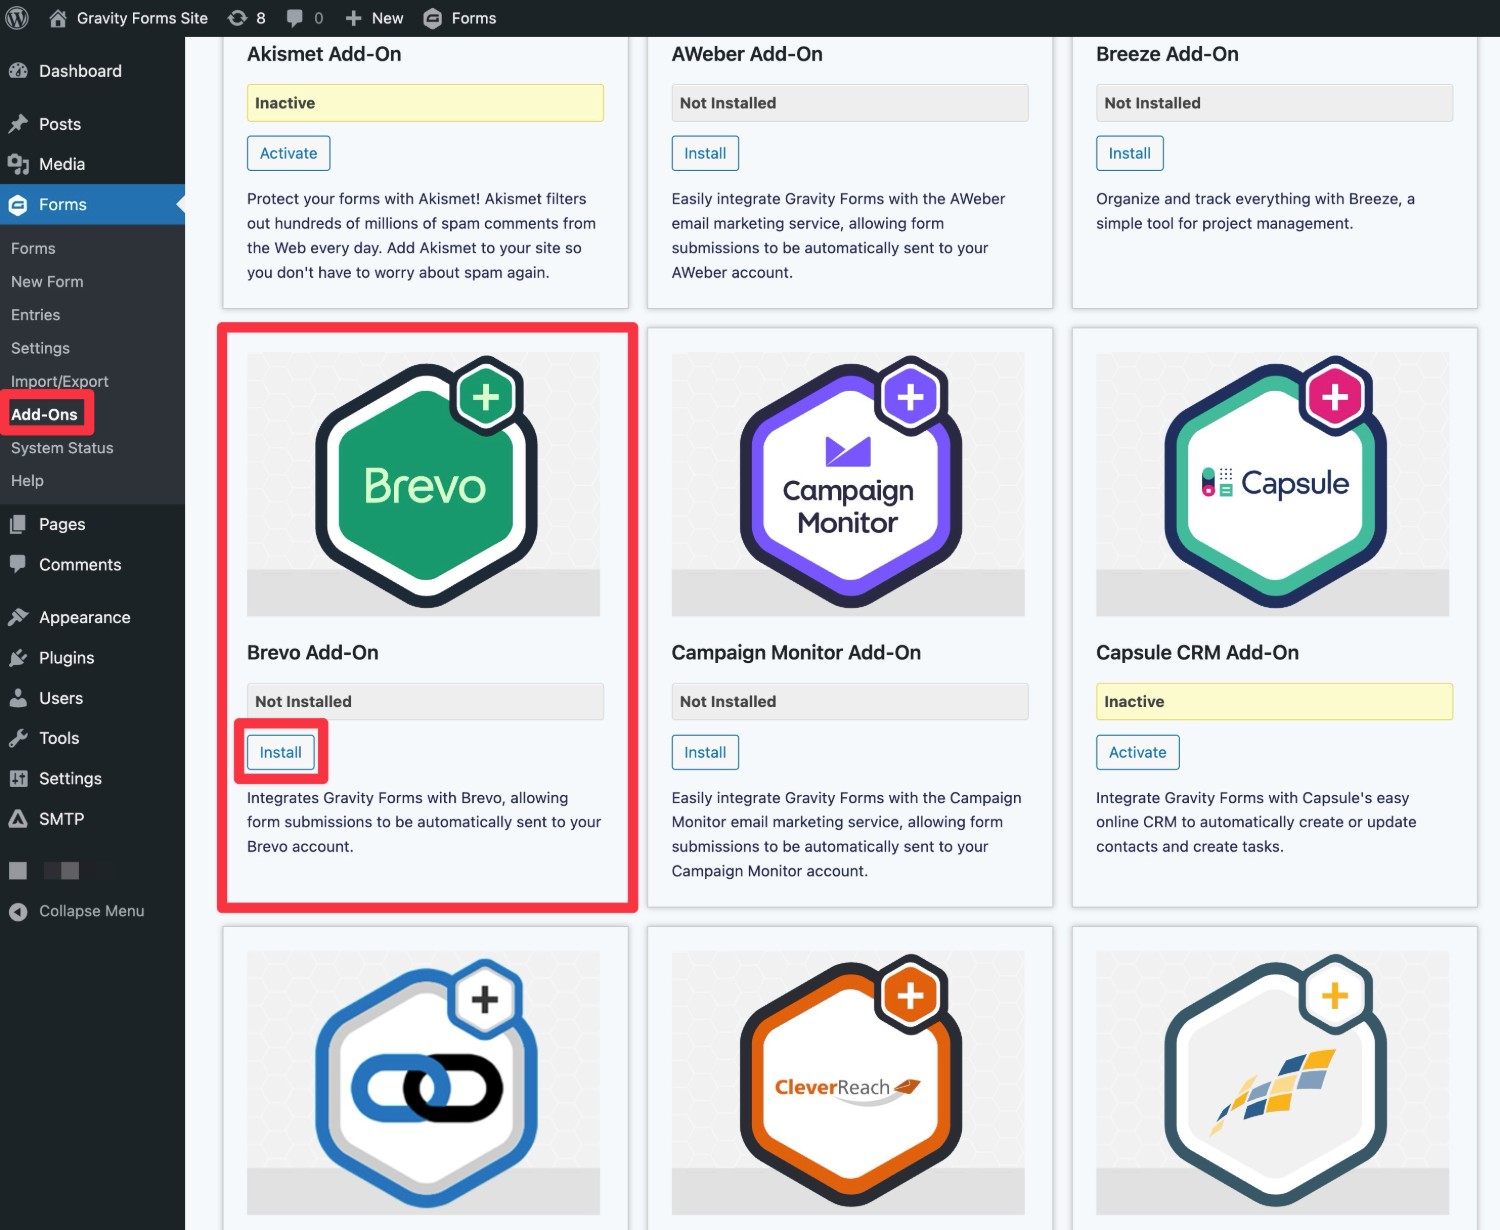
Alternatively, you can also download the Brevo Add-On from your Gravity Forms My Account area and install it like any other plugin.
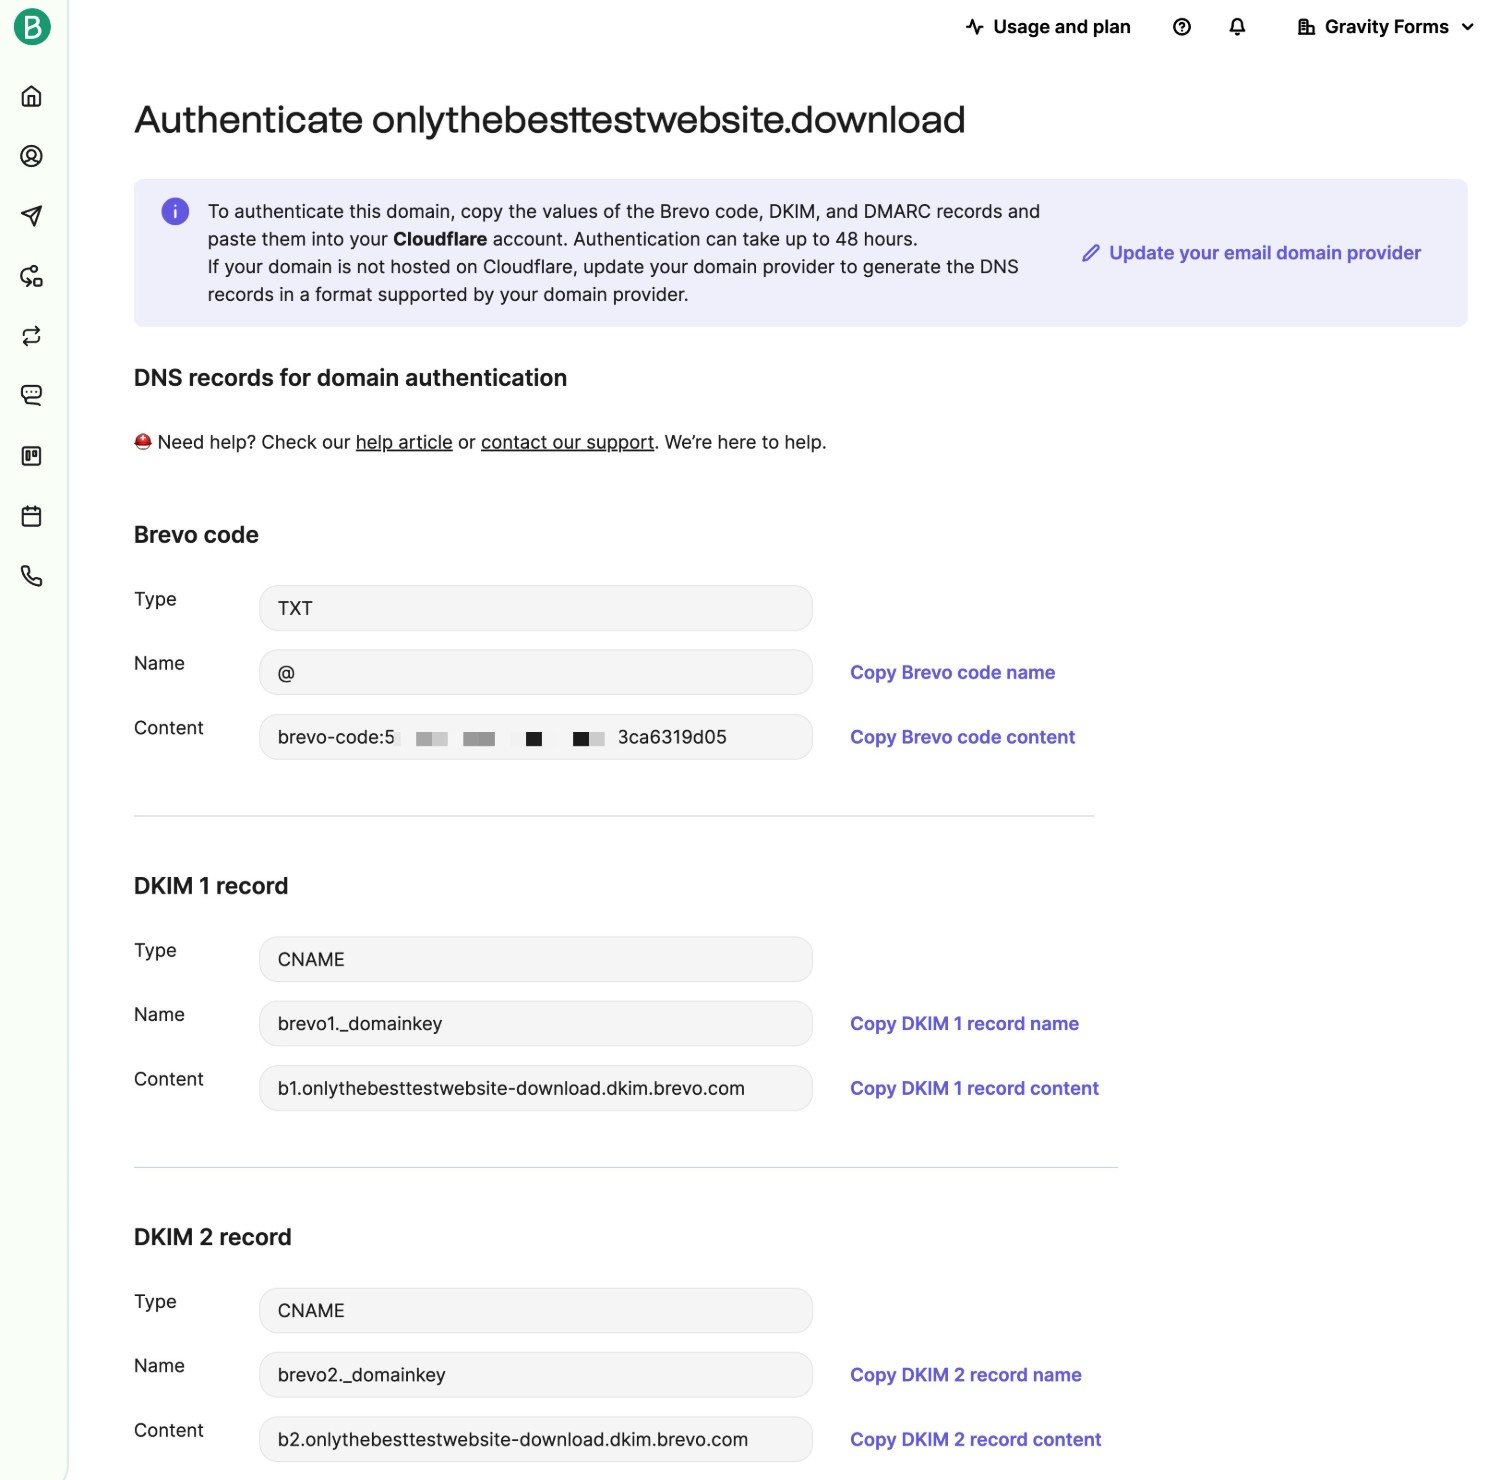
2. Authenticate your WordPress site’s domain name with Brevo
Before you can connect your WordPress site to Brevo, you first need to authenticate your WordPress site’s domain name as a Sender Identity in Brevo.
If you’re already actively using Brevo, you might have already done this, in which case you can skip ahead to the next step.
However, if you haven’t authenticated your domain name yet, you can find detailed instructions here:
- Our Gravity SMTP help article – While this article is in the Gravity SMTP documentation, it’s the exact same process for the Gravity Forms Brevo Add-On.
- Brevo’s help article
Here’s the very quick version:
- Open the Domains dashboard in your Brevo account (you can also click on your account name in the top-right corner, select Senders, Domains & Dedicated IPs, then click the Domains tab in the interface that appears).
- Click Add a domain.
- Enter your WordPress site’s domain name in the popup that appears.
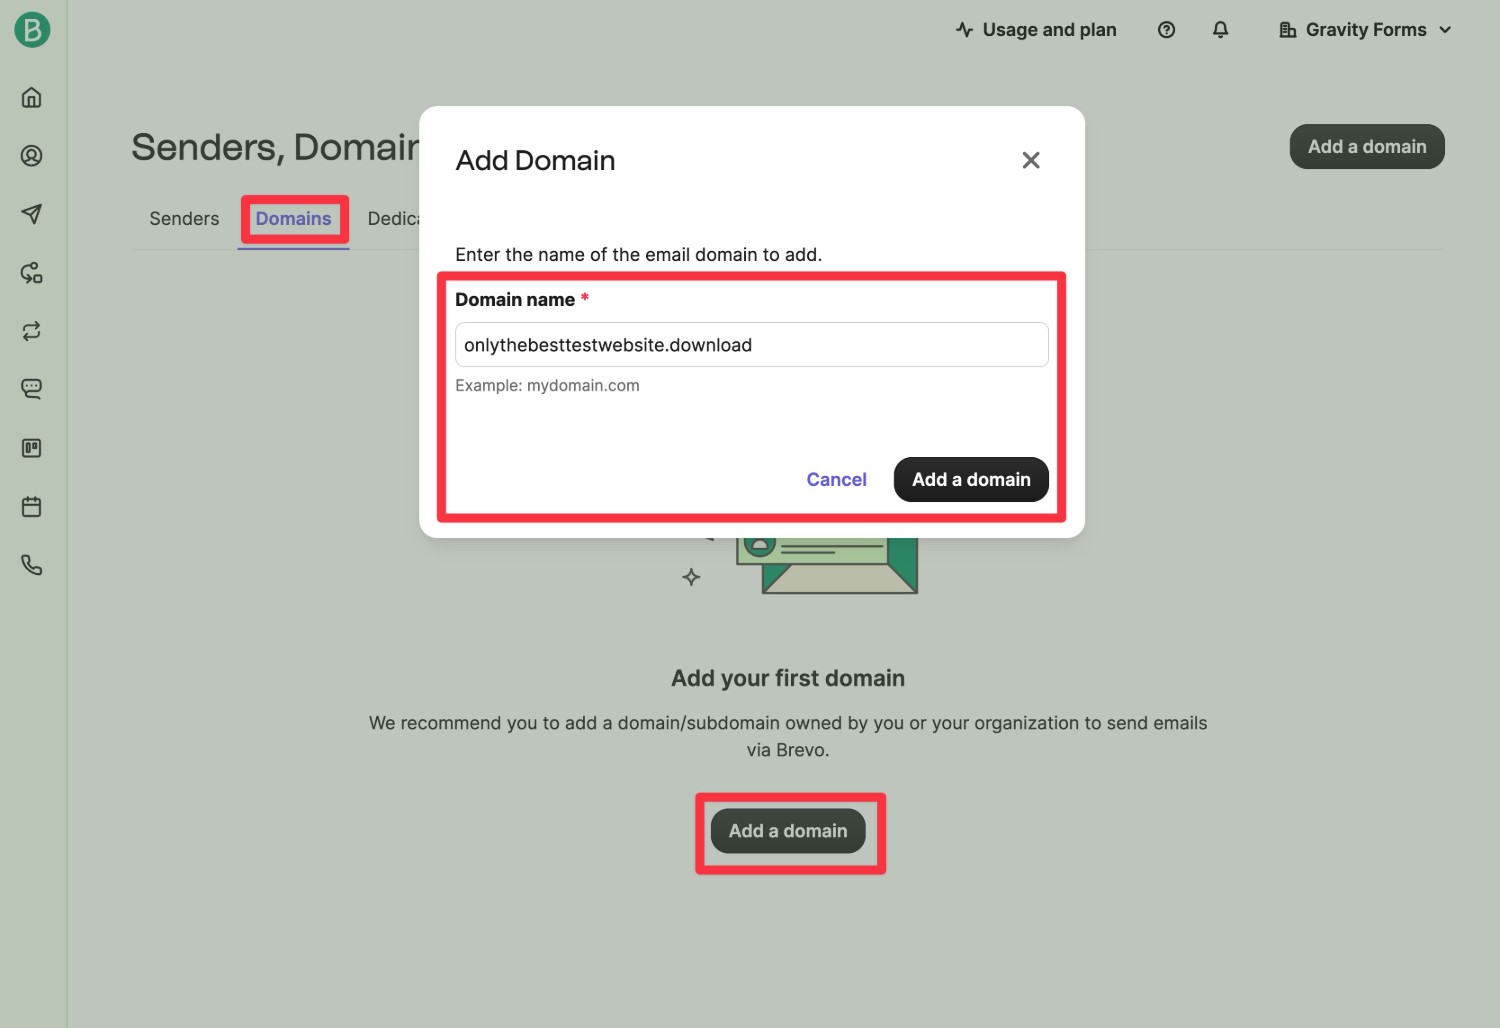
You can then choose between authenticating the domain automatically (at supported platforms) or manually authenticating the domain yourself.
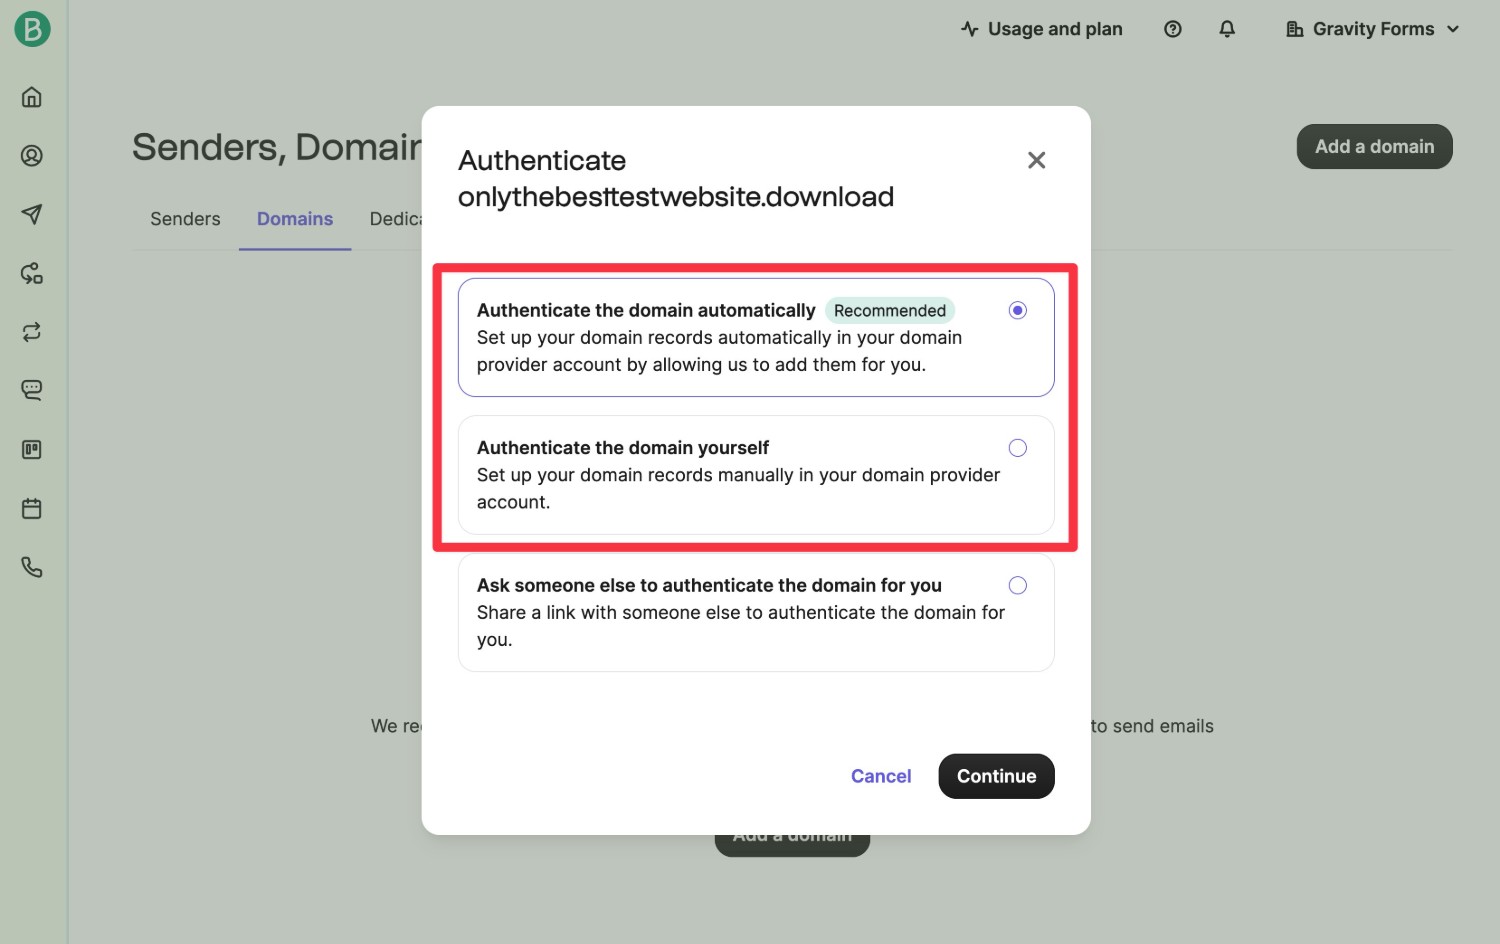
We chose to authenticate the domain name ourselves, which means that we needed to manually add a few DNS records to our domain name.
3. Connect Gravity Forms to Brevo
Next, you’ll need to connect Gravity Forms to Brevo using the Brevo API.
First, you’ll need to generate a new API key in your Brevo dashboard. We’ll cover this below, but you can also find Brevo’s help docs here.
To begin, click this link to open the SMTP & API area of your Brevo dashboard. Or, you can navigate to this screen by clicking on your account name in the top-right corner of the Brevo dashboard and then selecting SMTP & API from the drop-down.
Then, follow these steps:
- Select the API tab in the SMTP & API dashboard.
- Click Generate a new API key.
- Give your API key an internal name to help you remember it in the popup that appears.
- Click Generate in the popup.
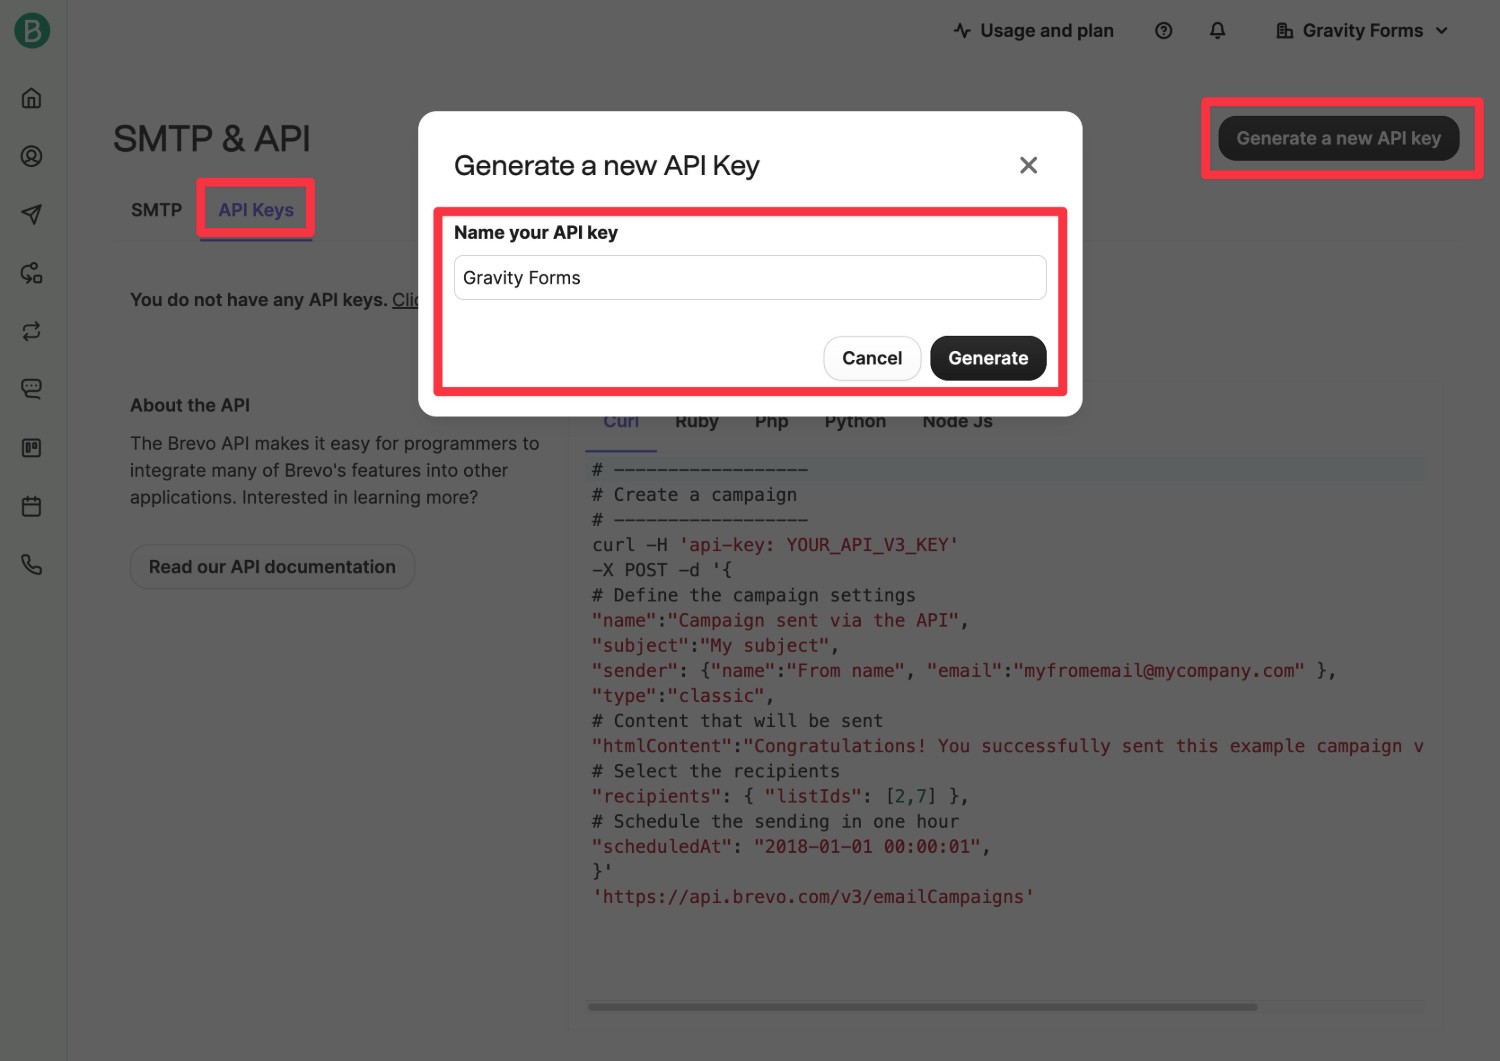
Brevo will only display the API key one time, so make sure to copy it to a safe place. However, if you accidentally lose it, it’s not a problem – you can just repeat the steps to create another API key.
Once you have your API key, you can continue the setup process in your WordPress dashboard:
- Go to Forms → Settings in your WordPress dashboard.
- Click on the Brevo tab within the Gravity Forms settings area.
- Paste the Brevo API key that you just created into the API Key box.
- Click Save Settings.
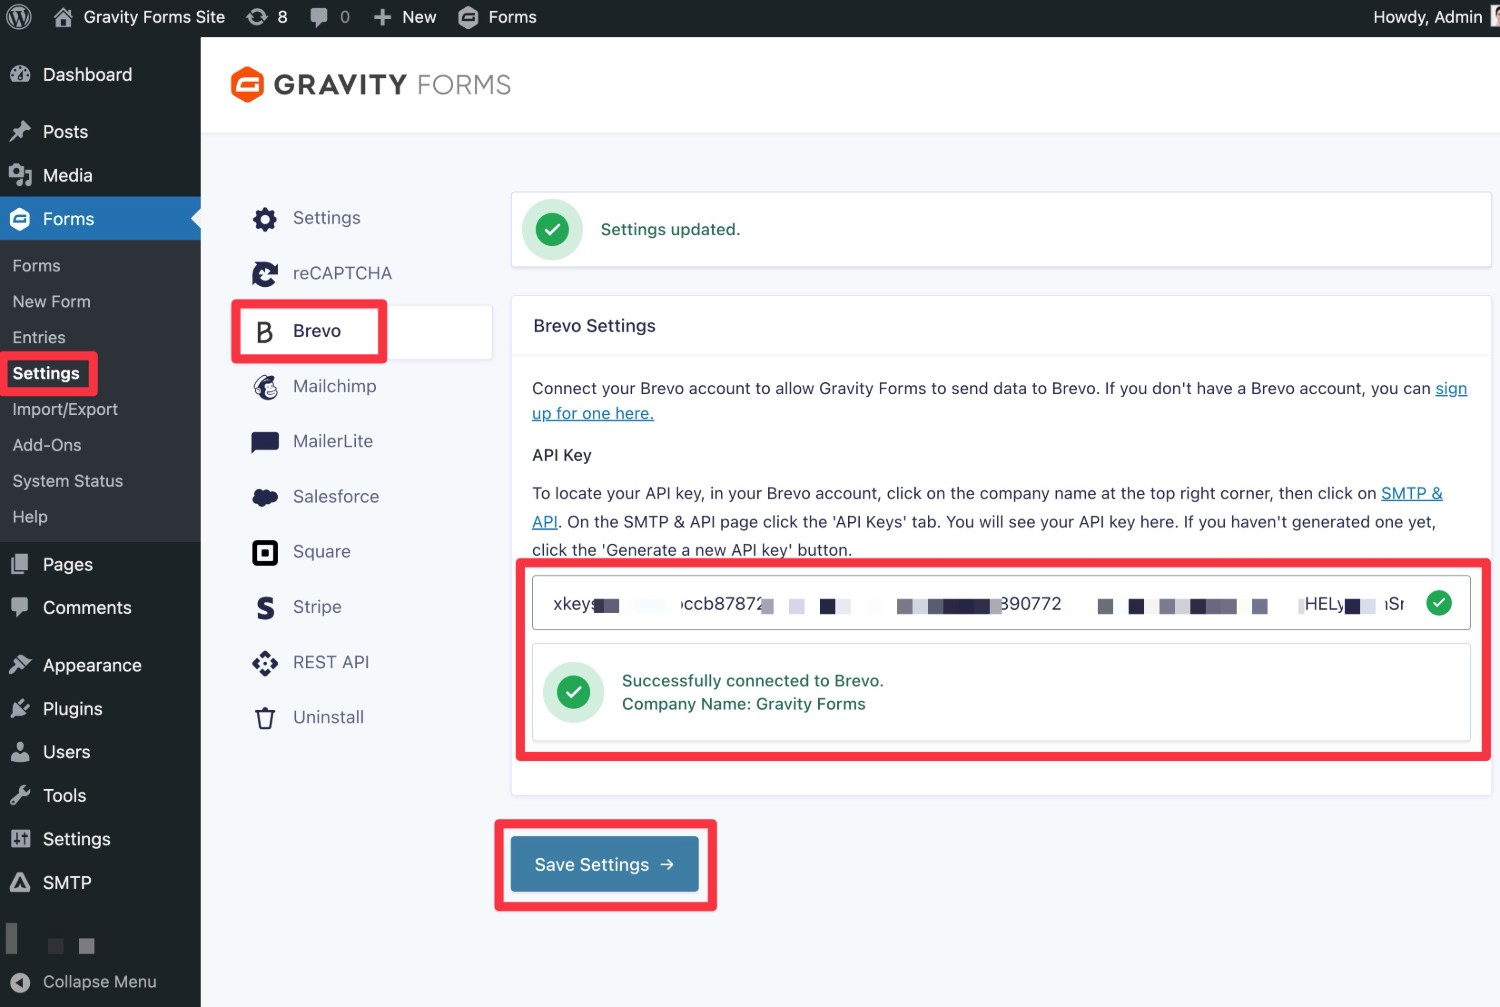
You should see a message saying “Successfully connected to Brevo” along with your company name.
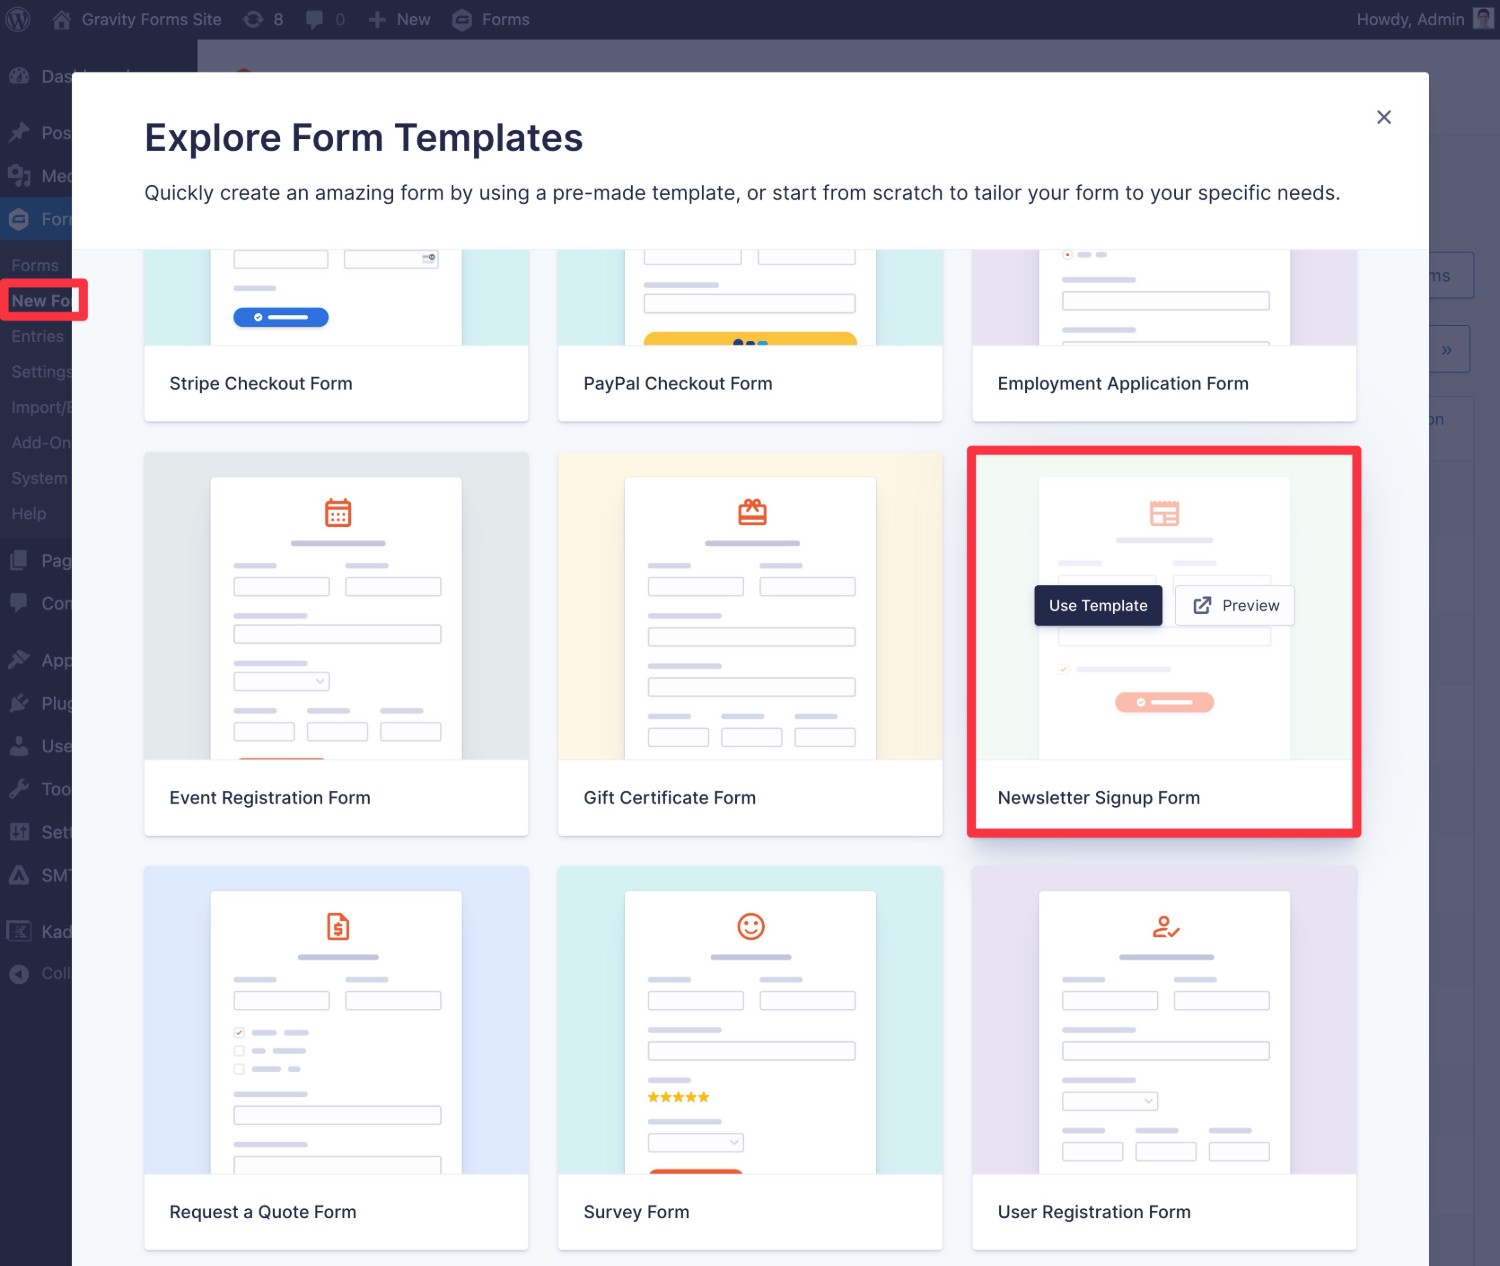
4. Create or edit your form
Next, you need to create or edit the WordPress form that you want to connect to Brevo.
You can connect any form on your site. You could create a dedicated email subscribe form or you could give users an option to join your Brevo list as part of another form, such as adding a “Join our newsletter” checkbox to a custom user registration form or payment form that you’ve created with Gravity Forms.
For this tutorial, we’ll use the example of a dedicated email subscribe form, but the same basic steps apply to any type of form.
To create the same form, you can go to Forms → New Form and choose the Newsletter Signup Form template.
You can add whatever fields you want to your form. However, at a minimum, you must add a field to collect the person’s email address.
If you want to collect additional information to sync to any custom attributes that you’ve created in Brevo, you also might want to add form fields for those details.

Once you’re finished setting up your form, make sure to save your changes by clicking the Save Form button in the top-right corner.
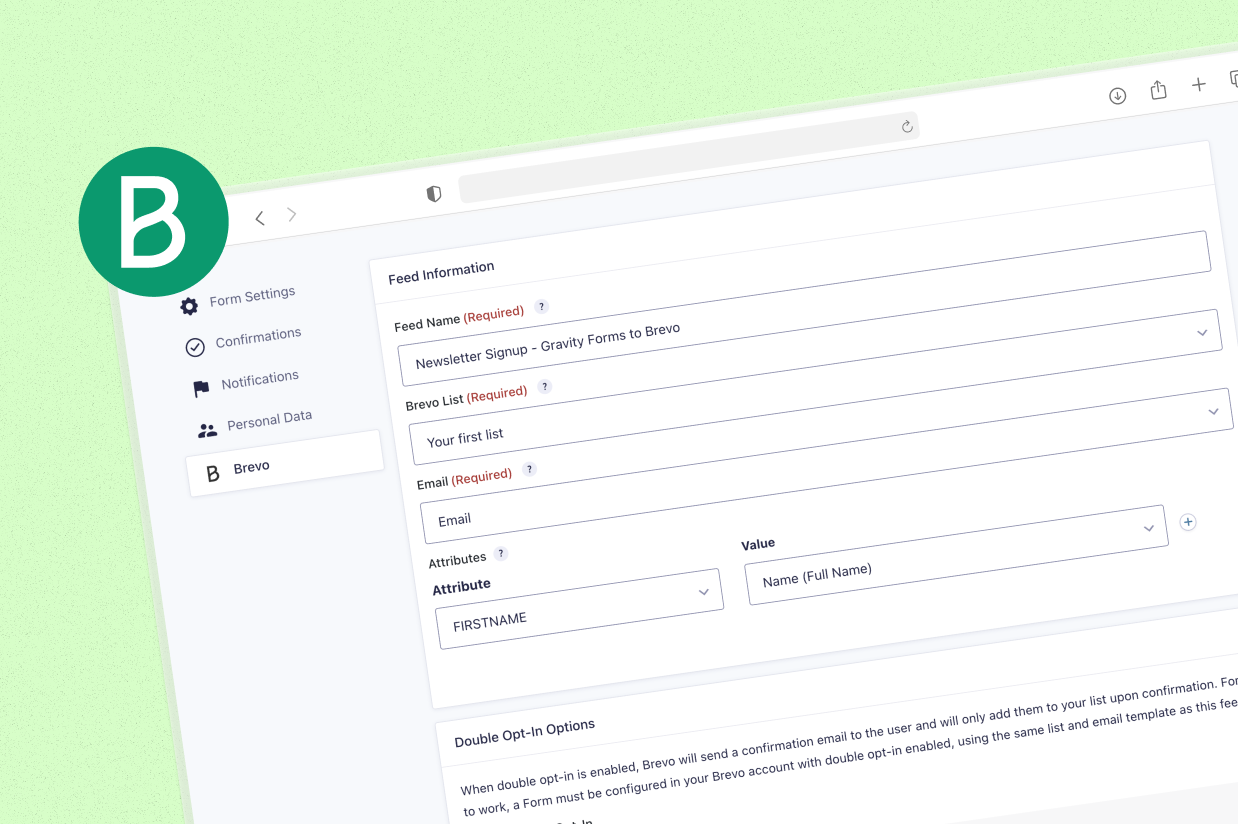
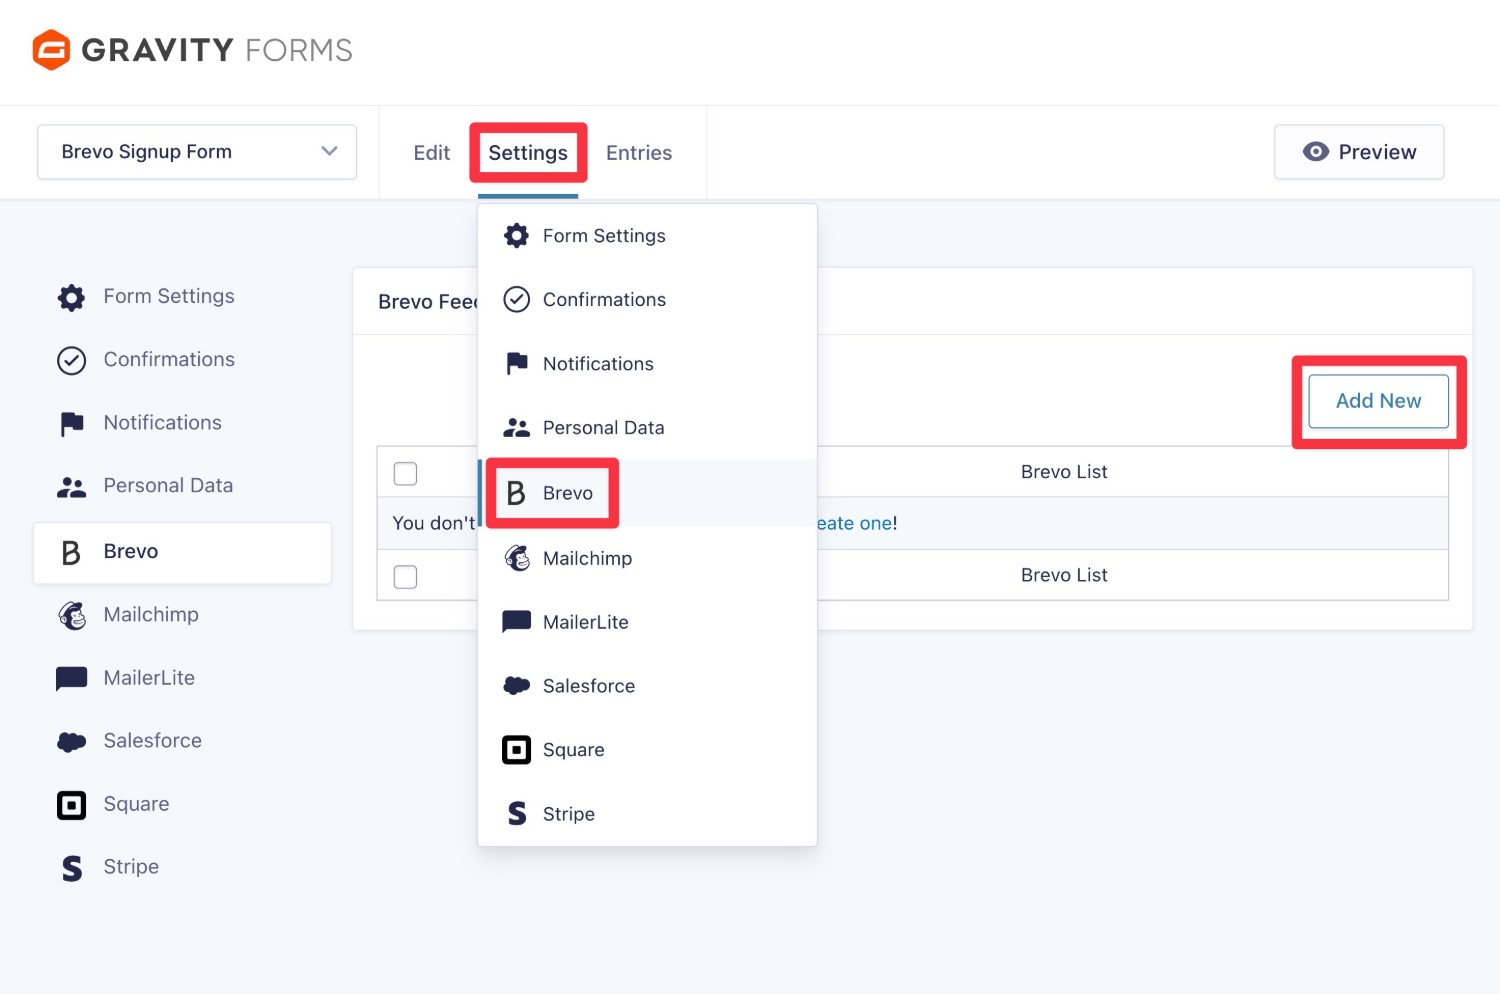
5. Create a Brevo feed for your form
Once you’ve set up all your form fields, you need to create a Brevo feed, which is what lets you connect this specific form to your Brevo account:
To create a feed, expand the Settings drop-down in the form editor and then choose Brevo in the drop-down. On the next screen, click Add New to create your first Brevo feed:
Then, you’ll get a few options to configure your Brevo feed. Let’s go through them…
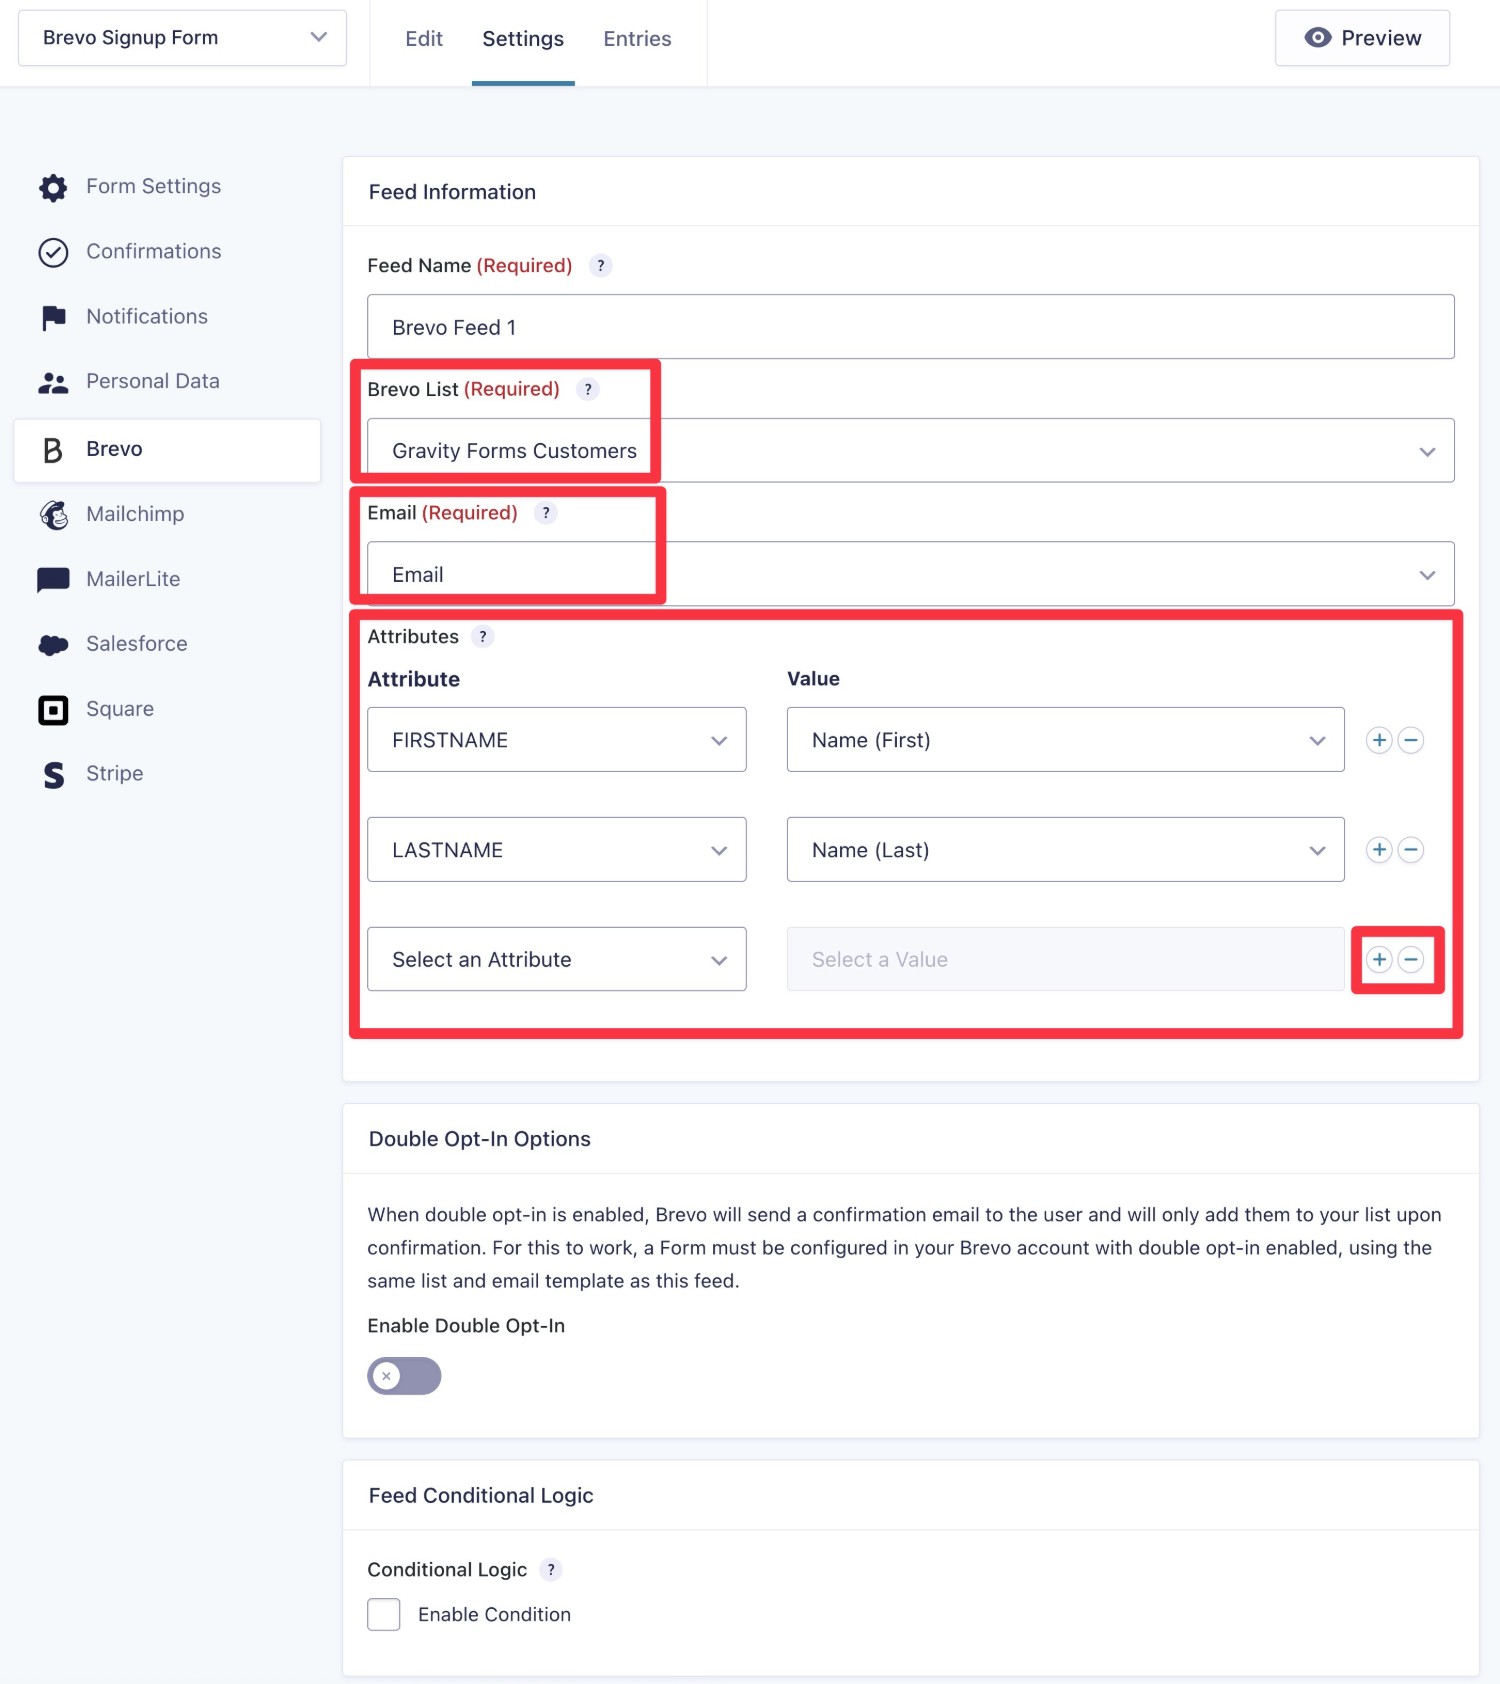
Basic feed details
First, you can use the Brevo List drop-down to choose the specific list to add contacts to. Gravity Forms will automatically populate the drop-down with all of the lists that you’ve added in your Brevo account. Here’s Brevo’s documentation on creating lists.
Next, you can choose the form field that you want to map as the contact’s email address in Brevo. Typically, this will be the Email field that you added to your form.
If you want to map additional information to other Brevo attributes, you can use the Attributes pairs below:
- In the left-hand column, you can select the Brevo attribute to which you want to map information.
- After selecting the Brevo attribute, you can use the right-hand column to choose which form field you want to map to that attribute.
To map additional information, you can click the plus icon to add more attribute/form field pairs.
For example, to map the first and last names from the Name form field to the LASTNAME and FIRSTNAME attributes in Brevo, you would configure it like the screenshot below.
Double opt-in – optional
If you want to enable the optional double opt-in feature, you must also create a form in your Brevo account that has double opt-in enabled.
Here’s how to do it:
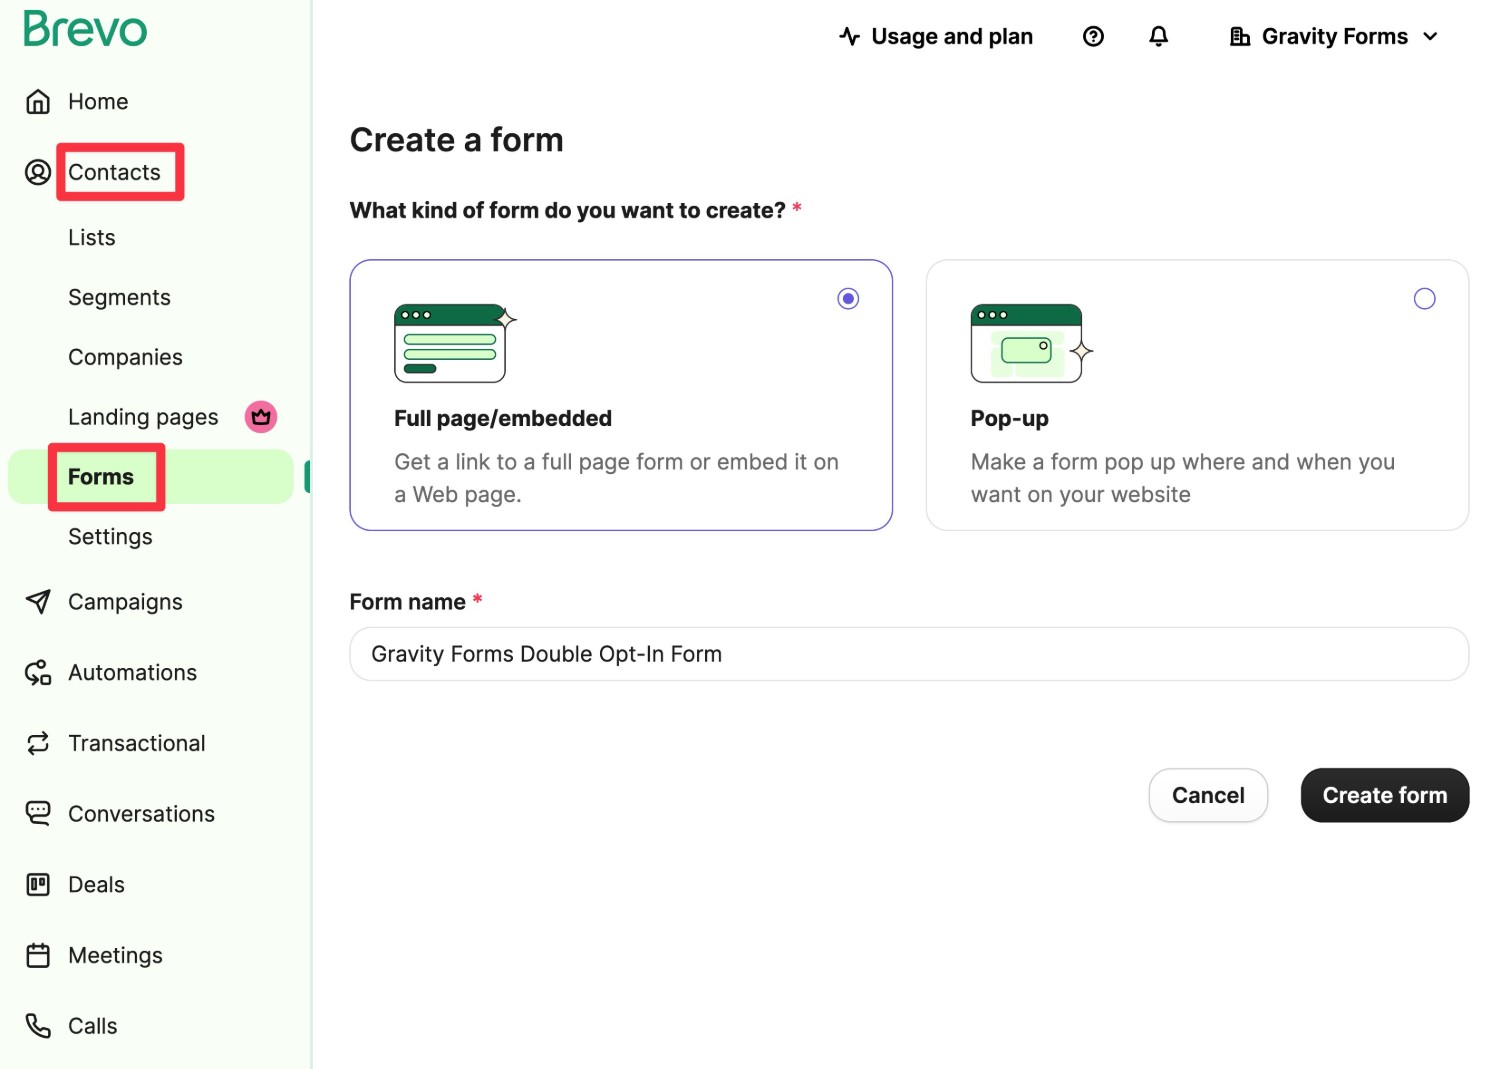
- Go to Contacts → Forms in your Brevo dashboard.
- Click Create sign-up form.
- Choose Full page/embedded as the form type.
- Give the form an internal name to help you remember it.
- Click Create form.
On the next screen, follow the steps to set up the form. The most important parts are:
- Choosing the list associated with the form. Make sure that this is the same list you choose when creating the Brevo feed in Gravity Forms.
- Choosing Double confirmation email for the Confirmation settings.
- Configuring the template of the confirmation email.

Once you’ve created a form with double opt-in enabled in the Brevo dashboard, you can turn on the Enable Double Opt-In toggle in the feed settings and choose your form template.
You can also set up a custom redirect URL, which is the page that subscribers will be sent to after they click the confirmation link in the email from Brevo.

Conditional logic rules – optional
Finally, you also have the option to add conditional logic rules to only process the feed if certain conditions are met.
One of the most helpful use cases here is only adding a person to Brevo if they explicitly opted in as part of the form. For example, you could…
- Add a checkbox field to your form that asks people if they want to subscribe to your newsletter.
- Use conditional logic to only process the Brevo field if the user checked that opt in checkbox when filling out the form.
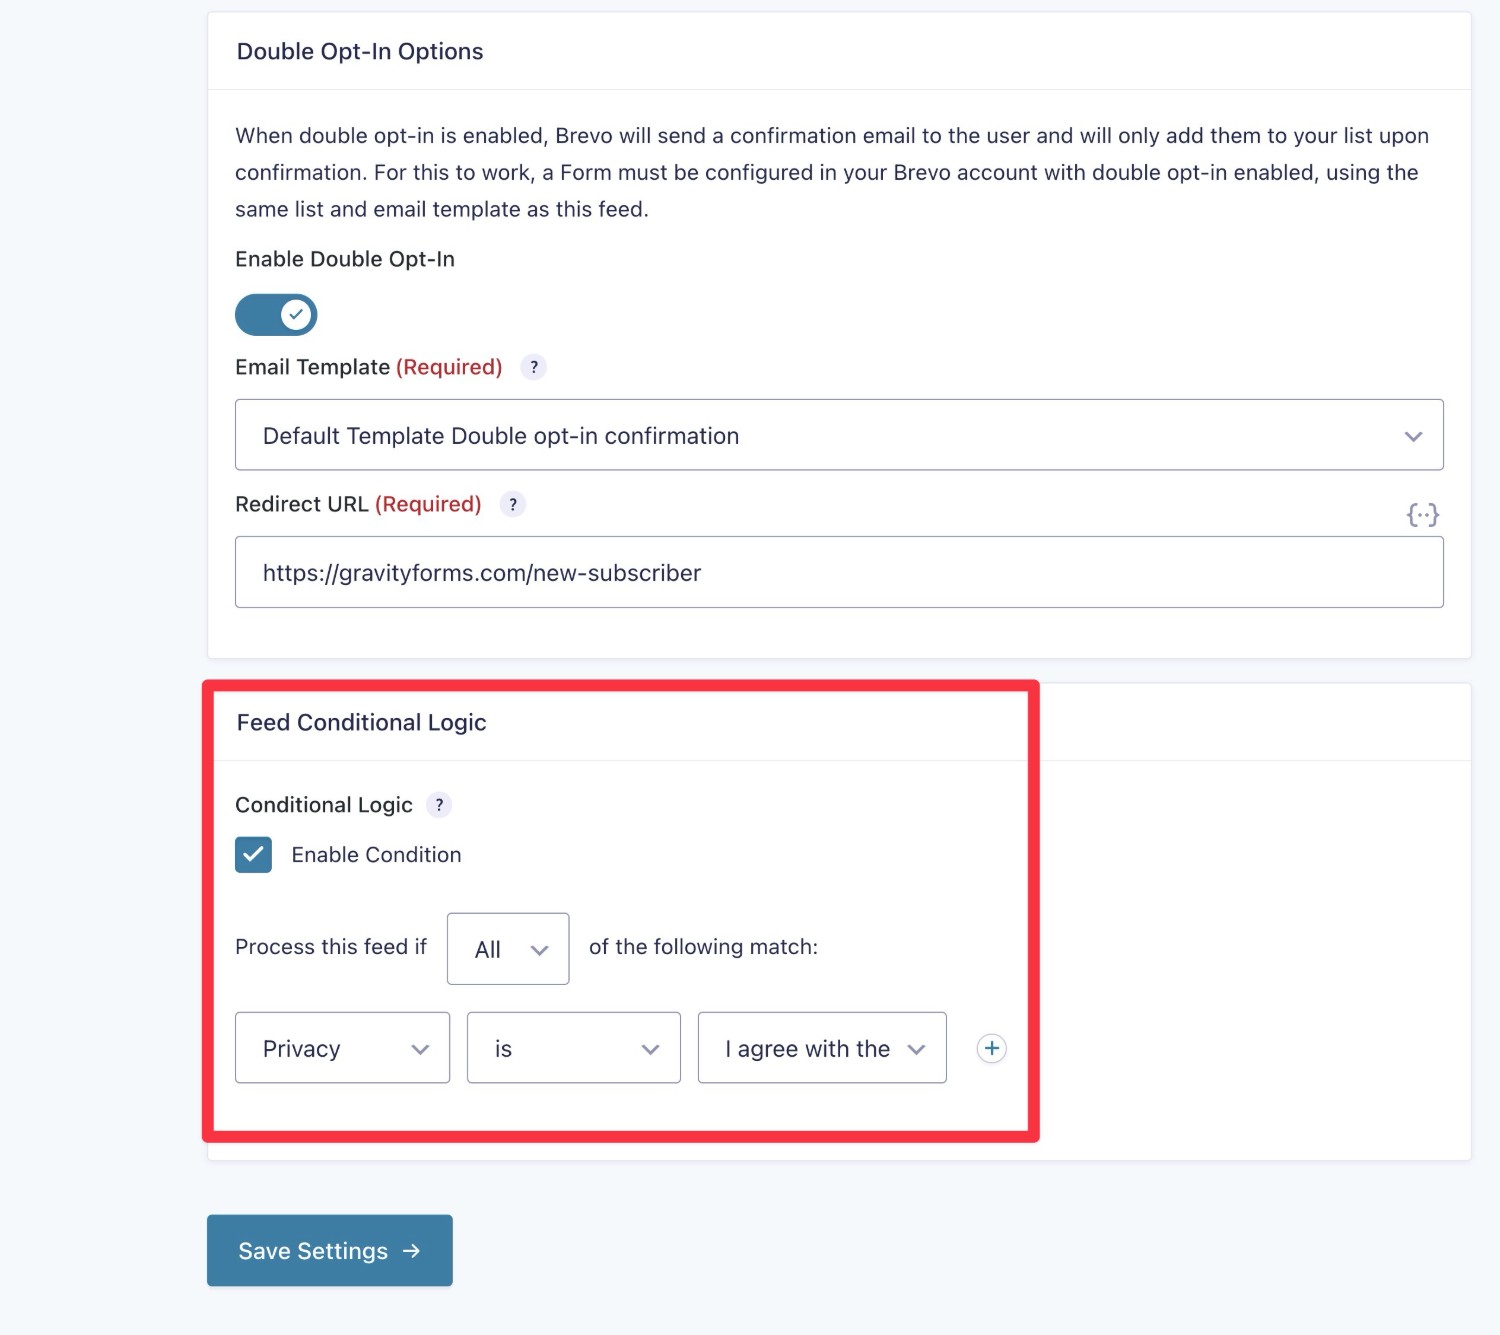
Once you’ve made all of your choices, make sure to click Save Settings at the bottom.
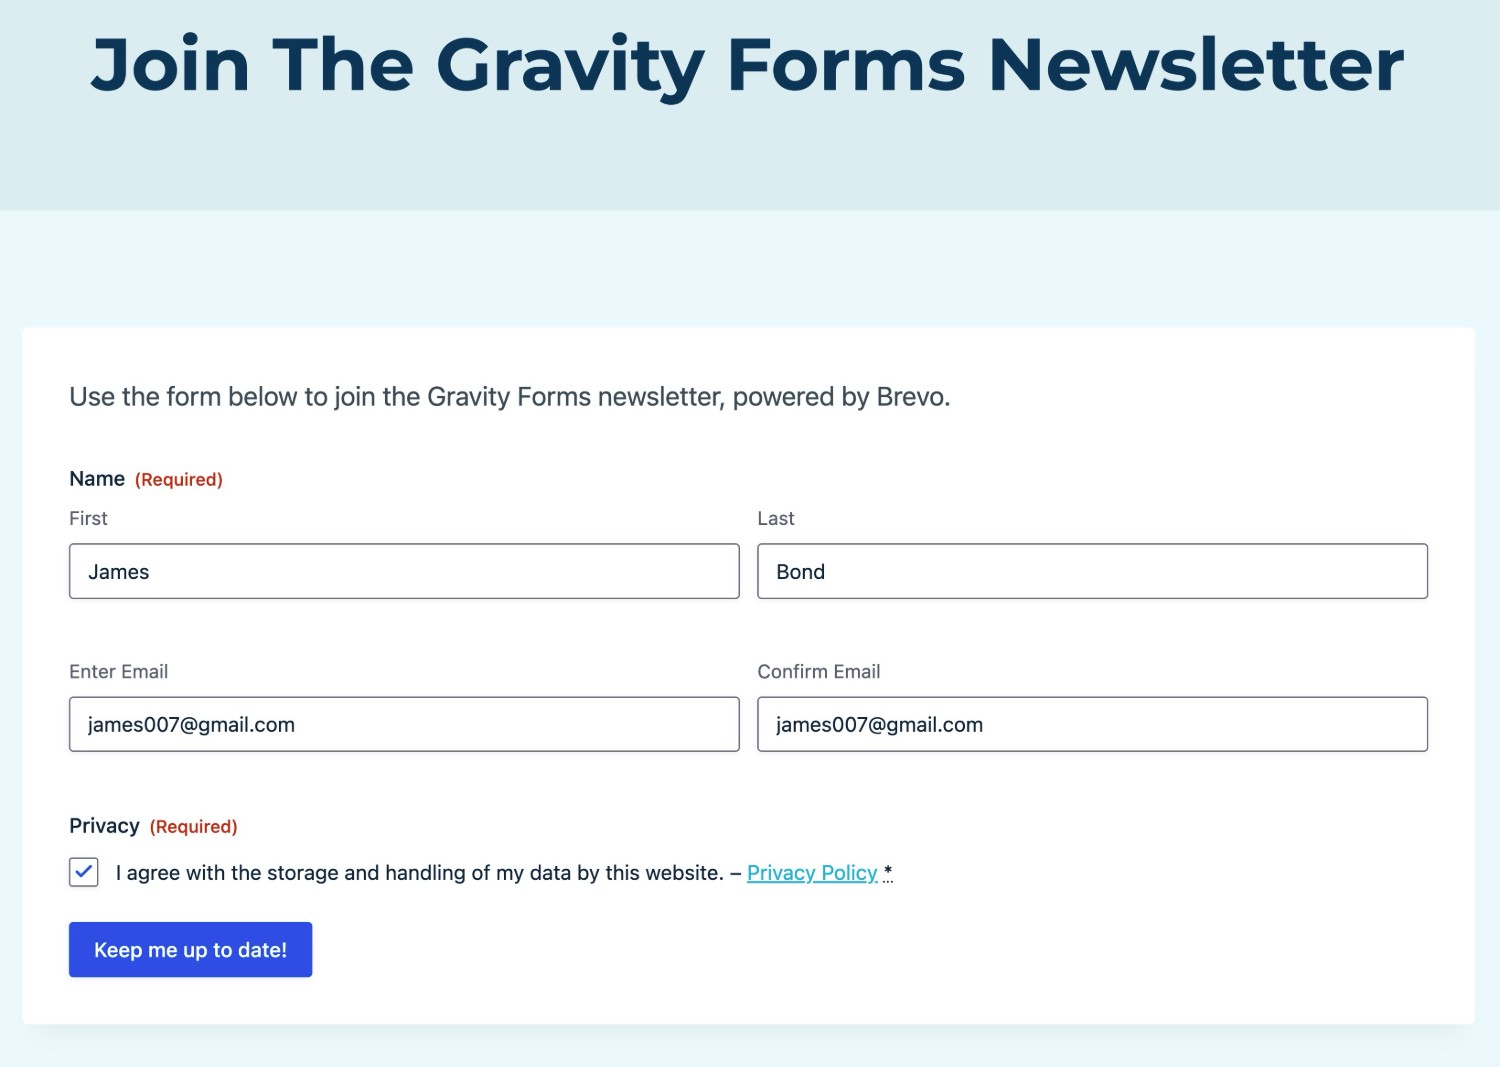
6. Embed and test your form
To finish things out, you need to embed your form somewhere on your site so that your visitors can use it.
You can embed your form anywhere using the Gravity Forms block, shortcode, or PHP function.
If you use the block, you can use the Orbital form theme to style your form directly from the block editor using non-technical controls.
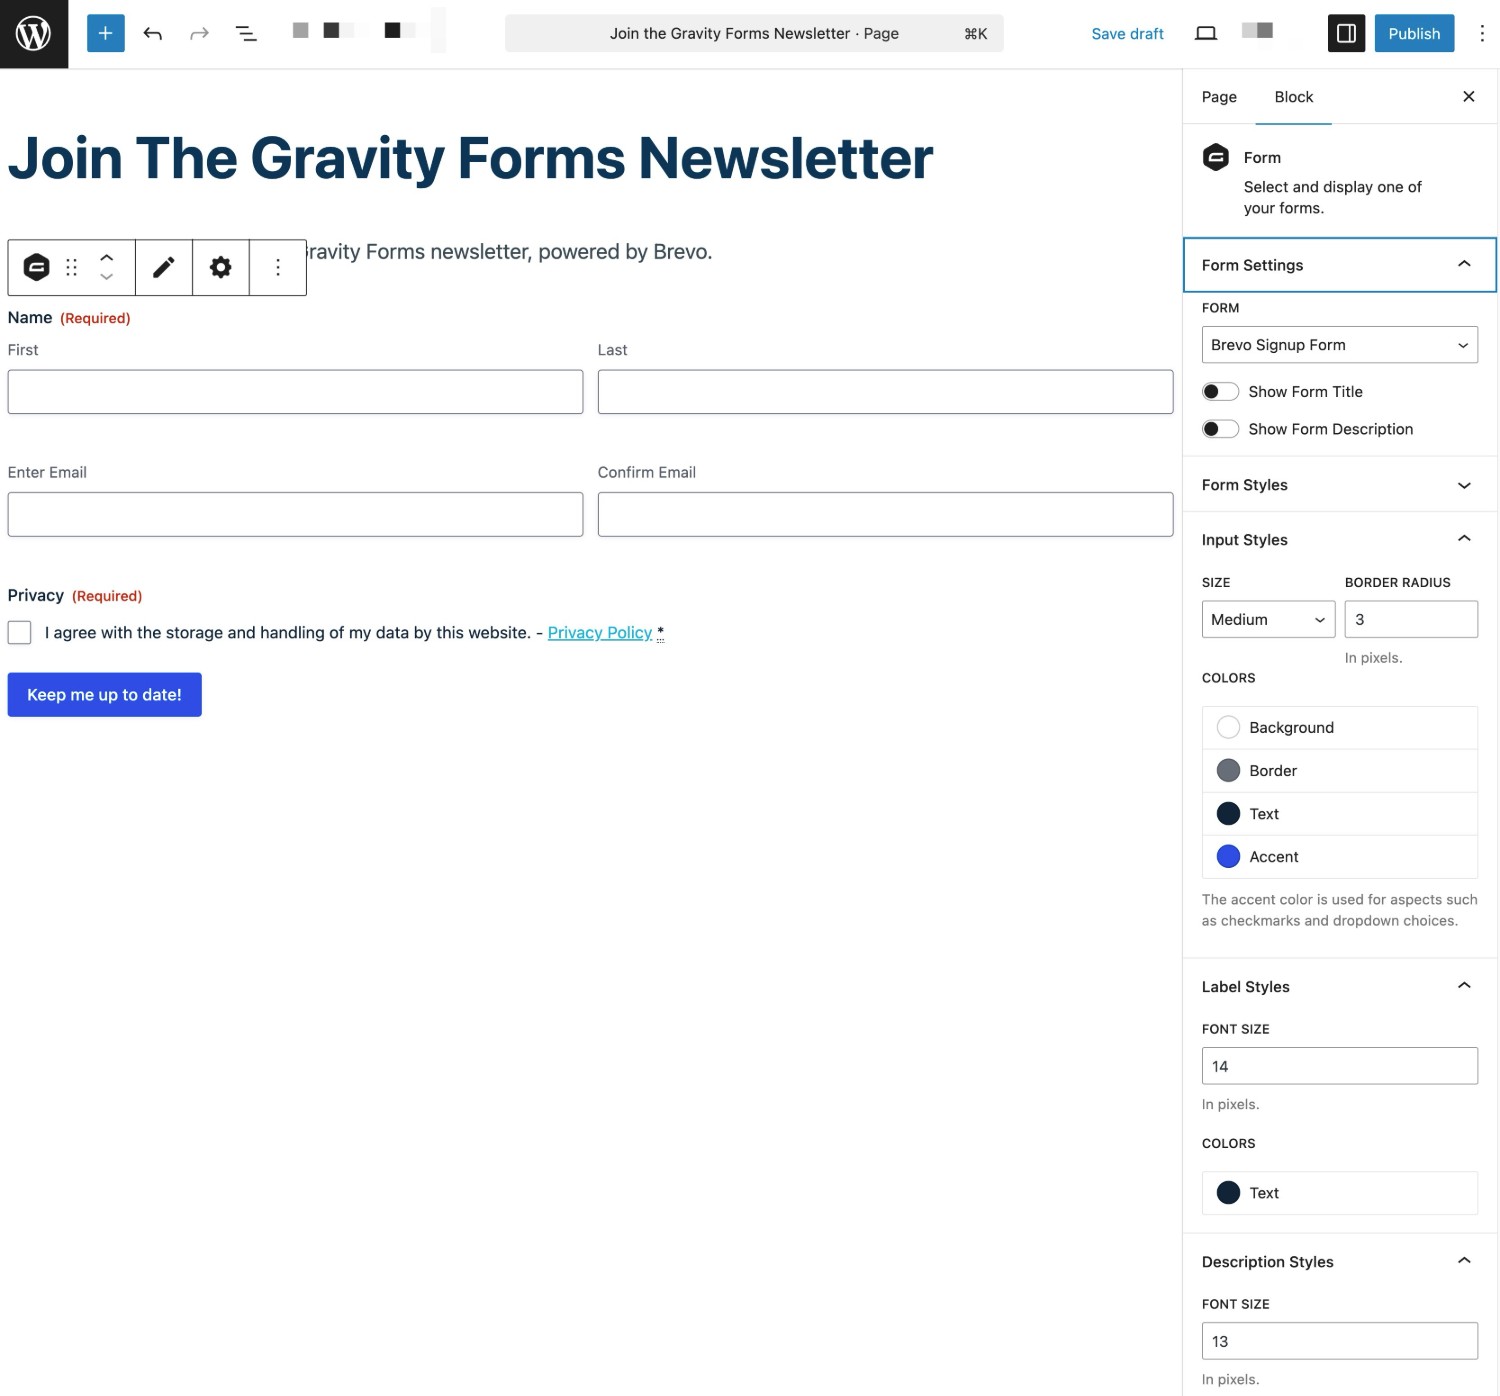
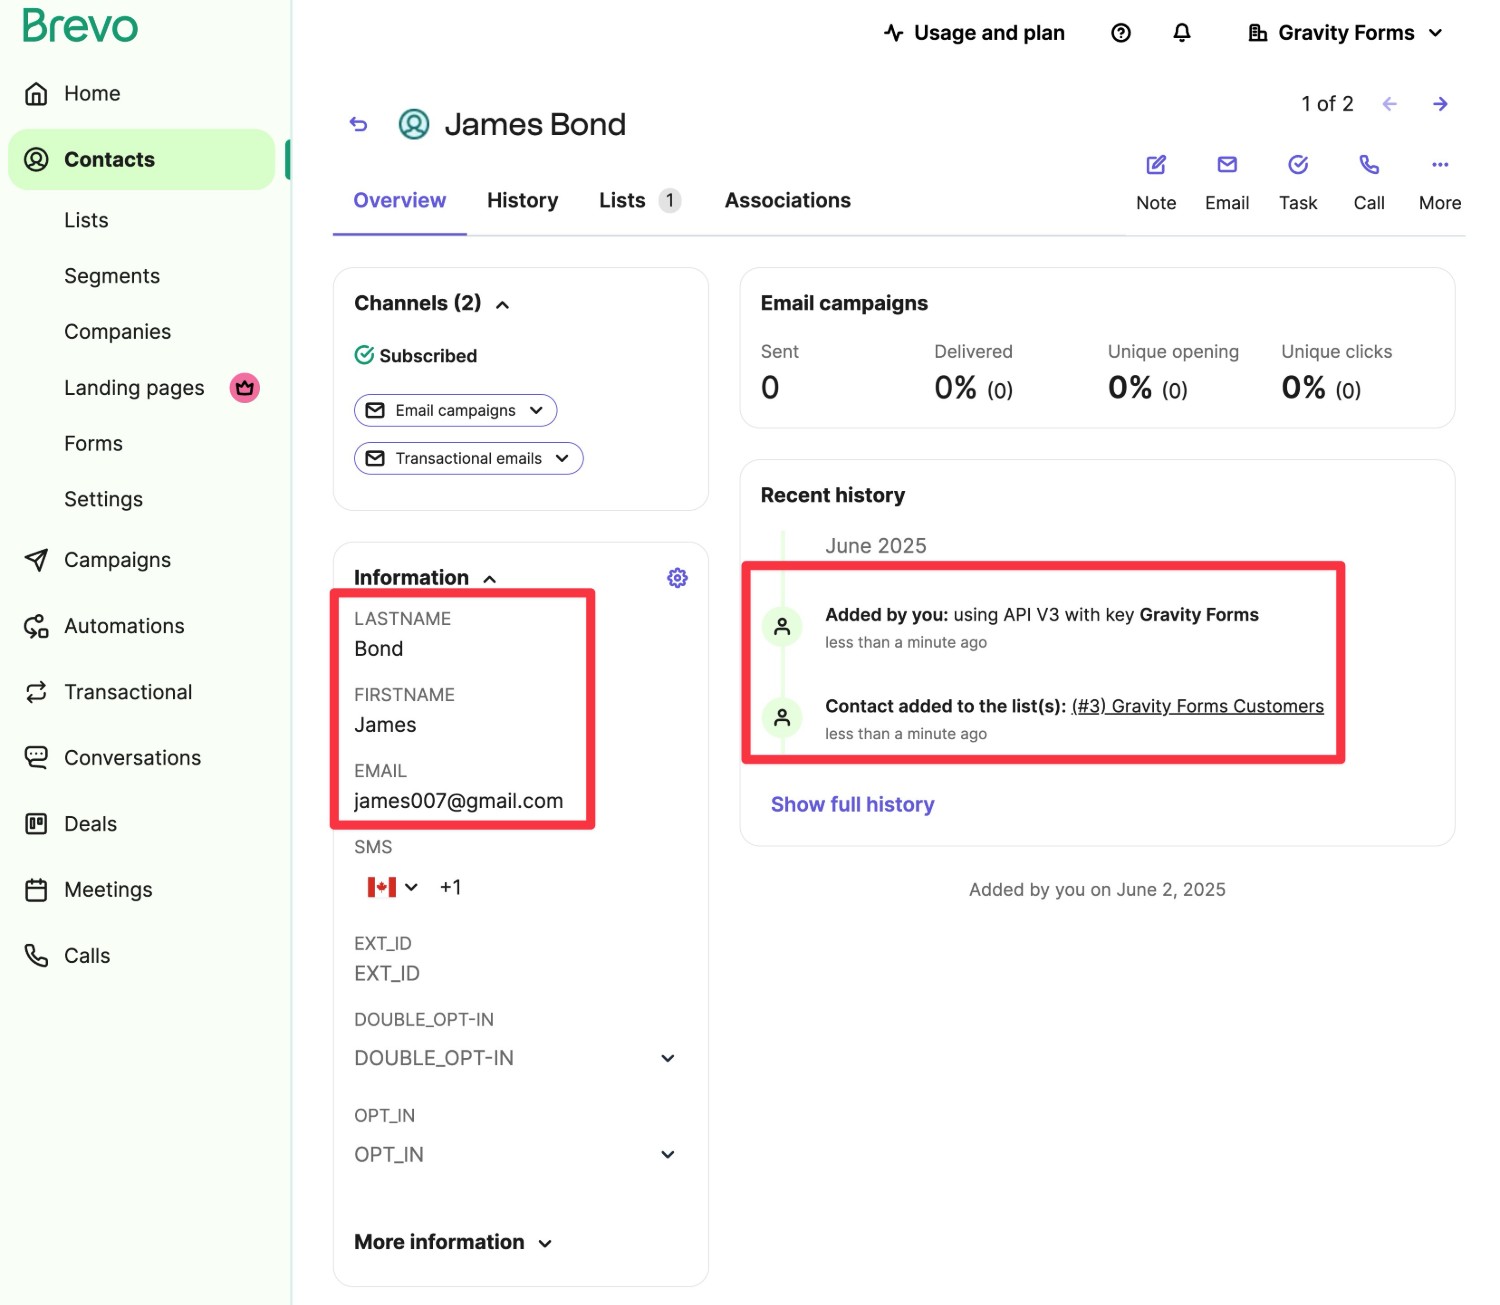
Once you embed your form, we also recommend submitting some test information to make sure that the Brevo connection is working as you want it to. For example, you might want to check that data from your form fields is showing up in your Brevo custom attributes as you want it to.
When you submit the form, all of the mapped information should show up in your Brevo dashboard. Here’s an example:
Get started with the Gravity Forms Brevo Add-On today
With the Gravity Forms Brevo Add-On, you now have an easy solution for setting up a fully configurable WordPress Brevo integration.
You can connect any form on your site to Brevo and map form data to custom attributes in Brevo.
The Brevo Add-On is available on all Gravity Forms licenses.
If you’re already holding an active license, install the add-on, then come back and follow this guide to get started.
If you’re not a license holder yet, purchase your Gravity Forms license today to connect your WordPress site to Brevo.

If you want to keep up-to-date with what’s happening on the blog sign up for the Gravity Forms newsletter!
"*" indicates required fields


