
Want to start using Gravity SMTP on your WordPress site but not sure where to begin? This ultimate guide will cover everything that you need to know, including how Gravity SMTP works, which email sending service to choose for your situation, and how to configure Gravity SMTP to start sending emails using your chosen service.
By default, WordPress sends transactional emails (password resets, new comment notifications, form notifications, etc.) via wp_mail, which is based on PHP mail.
While this method kind of works, some web hosts block it. And even if your host does allow it, your site’s emails might end up in users’ spam folders because emails sent via wp_mail aren’t optimized for deliverability.
Gravity SMTP lets you fix those issues for all of your site’s emails by helping you connect your WordPress site to a dedicated email sending service, also known as an SMTP sending service. This includes core WordPress emails, Gravity Forms notification emails, and emails from any other plugin that uses wp_mail.
Once you set up Gravity SMTP and your sending service, you can be confident that your emails will be reliably sent and make it past the spam folder – and Gravity SMTP even logs events to help you make sure your emails keep working as expected.
Here’s what we’ll cover over the rest of this post:
- How Gravity SMTP improves your site’s emails, with a quick hands-on look at its key features
- How to choose the best email sending service for Gravity SMTP, with an in-depth look at all 16+ of the dedicated API integrations that Gravity SMTP supports
- How to set up Gravity SMTP with one of the dedicated integrations (SendGrid, for our example)
- How to set up Gravity SMTP with the custom SMTP server option (which lets you use any SMTP sending service)
It is important to note that Gravity SMTP is currently only available with a Gravity Forms Elite, Nonprofit, or Developer license. If you have one of these licenses, simply head on over to your Gravity Forms Account section to download Gravity SMTP today. Check out this documentation for help with your license key.
How Gravity SMTP can fix your WordPress site’s emails (key features)
To kick things off, let’s take a look at some of the key features that Gravity SMTP offers, and how these features can improve your WordPress site’s emails.
16+ dedicated API integrations (+ a Custom SMTP option)
Gravity SMTP offers dedicated API integrations for most popular transactional email services, which lets you choose the one that works best for your situation.
Currently, you’ll find dedicated integrations for the following providers:
- Amazon SES
- Brevo
- Elastic Email
- Emailit
- Gmail / Google Workspace
- Mailchimp Transactional
- MailerSend
- Mailgun
- Mailjet
- Outlook / Microsoft 365
- Postmark
- Resend
- SendGrid
- SMTP2Go
- SparkPost
- Zoho Mail
In the next section, we’ll compare these SMTP services in detail so that you can pick the best one for your site(s).
Going forward, we also plan to add even more dedicated integrations. To have your say on new features or integrations, head on over to our feature request page.
Beyond those dedicated integrations, Gravity SMTP also offers a custom SMTP option that lets you connect your site to any standard SMTP-enabled server, which gives you even more flexibility.
We’ll also show you how to set up the custom SMTP option later in this post.

Tools to test emails
To help you make sure your site’s emails are working properly, Gravity SMTP offers multiple tools to test your site’s emails.
First, there’s an option to send a test email to any email address using any one of your connected email sending services. This lets you quickly verify that you’ve properly connected your site to your chosen service(s) and emails are being sent.
Second, there’s also a test mode feature that lets you disable external email sending while still logging emails internally.
This can be helpful if you’re working on a staging site or a local development site where you don’t want to actually send emails, but you still want to keep track of emails that your site would have sent.
You can still check the email log to make sure that everything is working properly, but you don’t need to deal with actually sending emails.
Speaking of the Gravity SMTP email log…
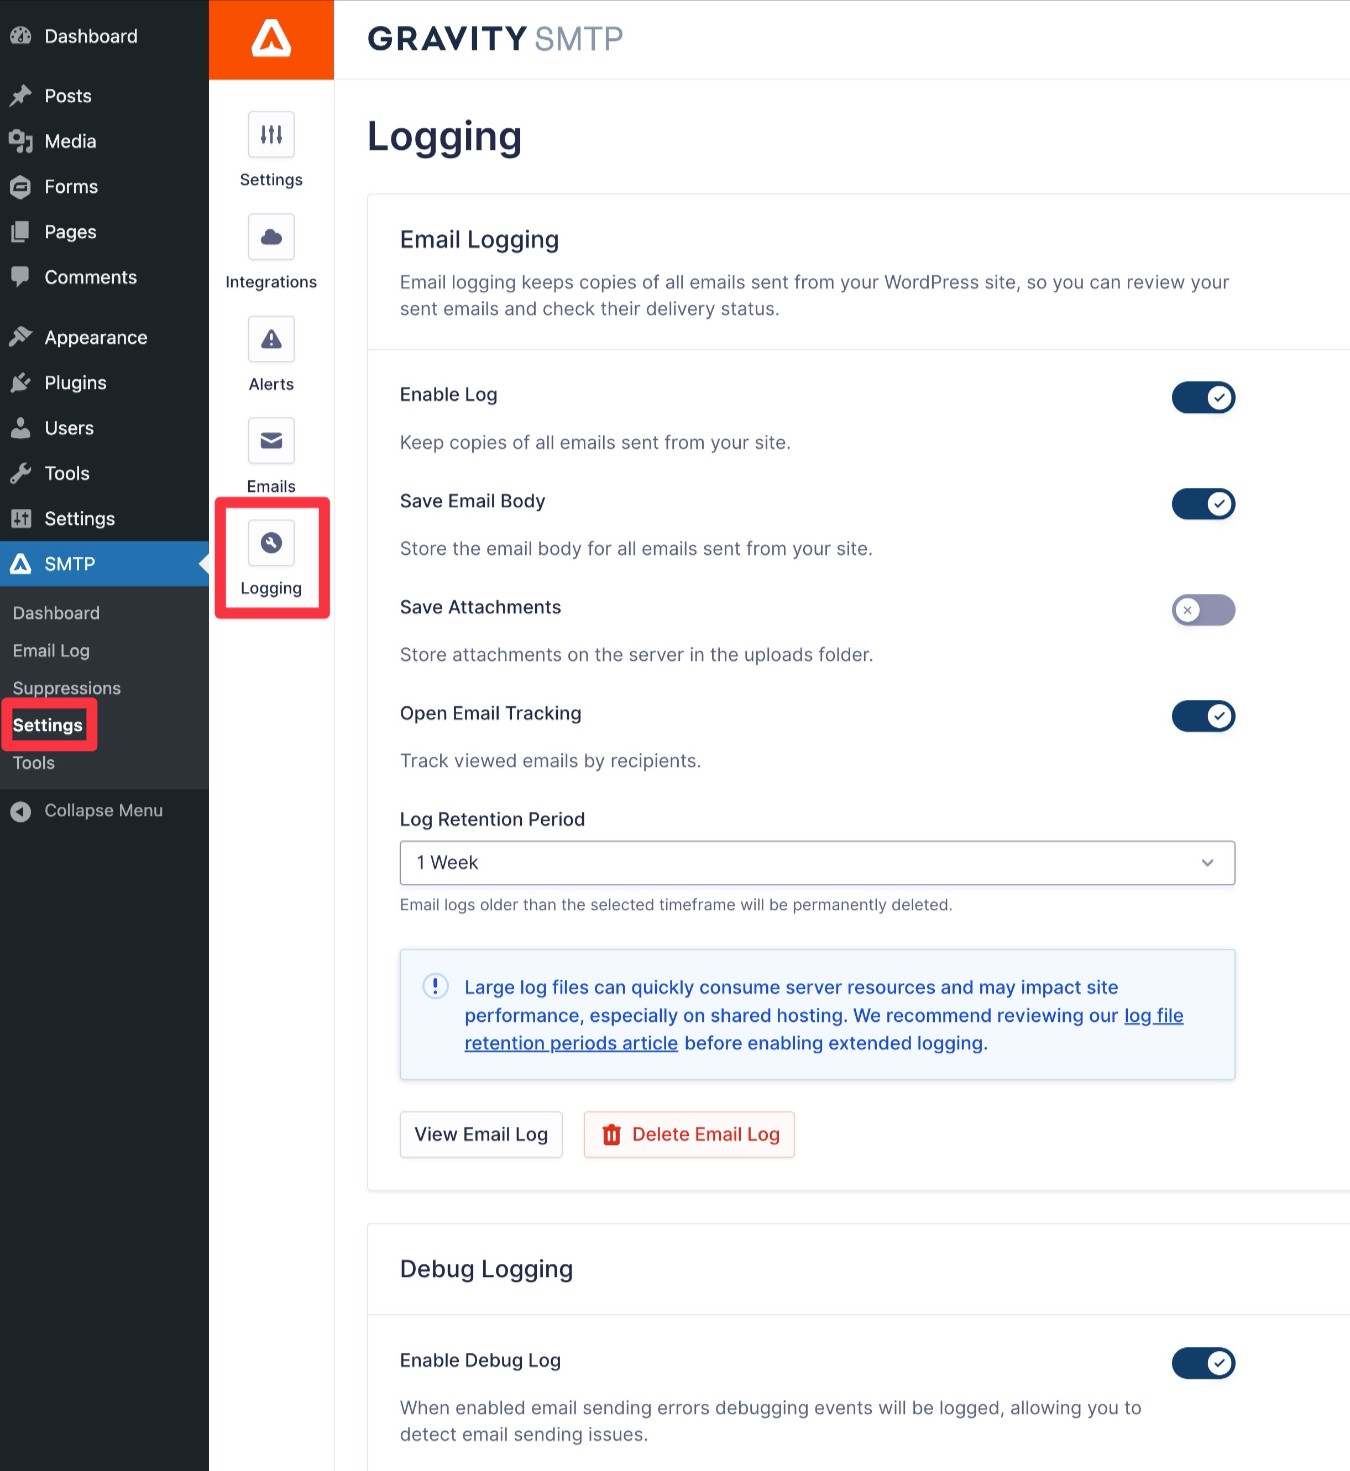
Customizable email logging
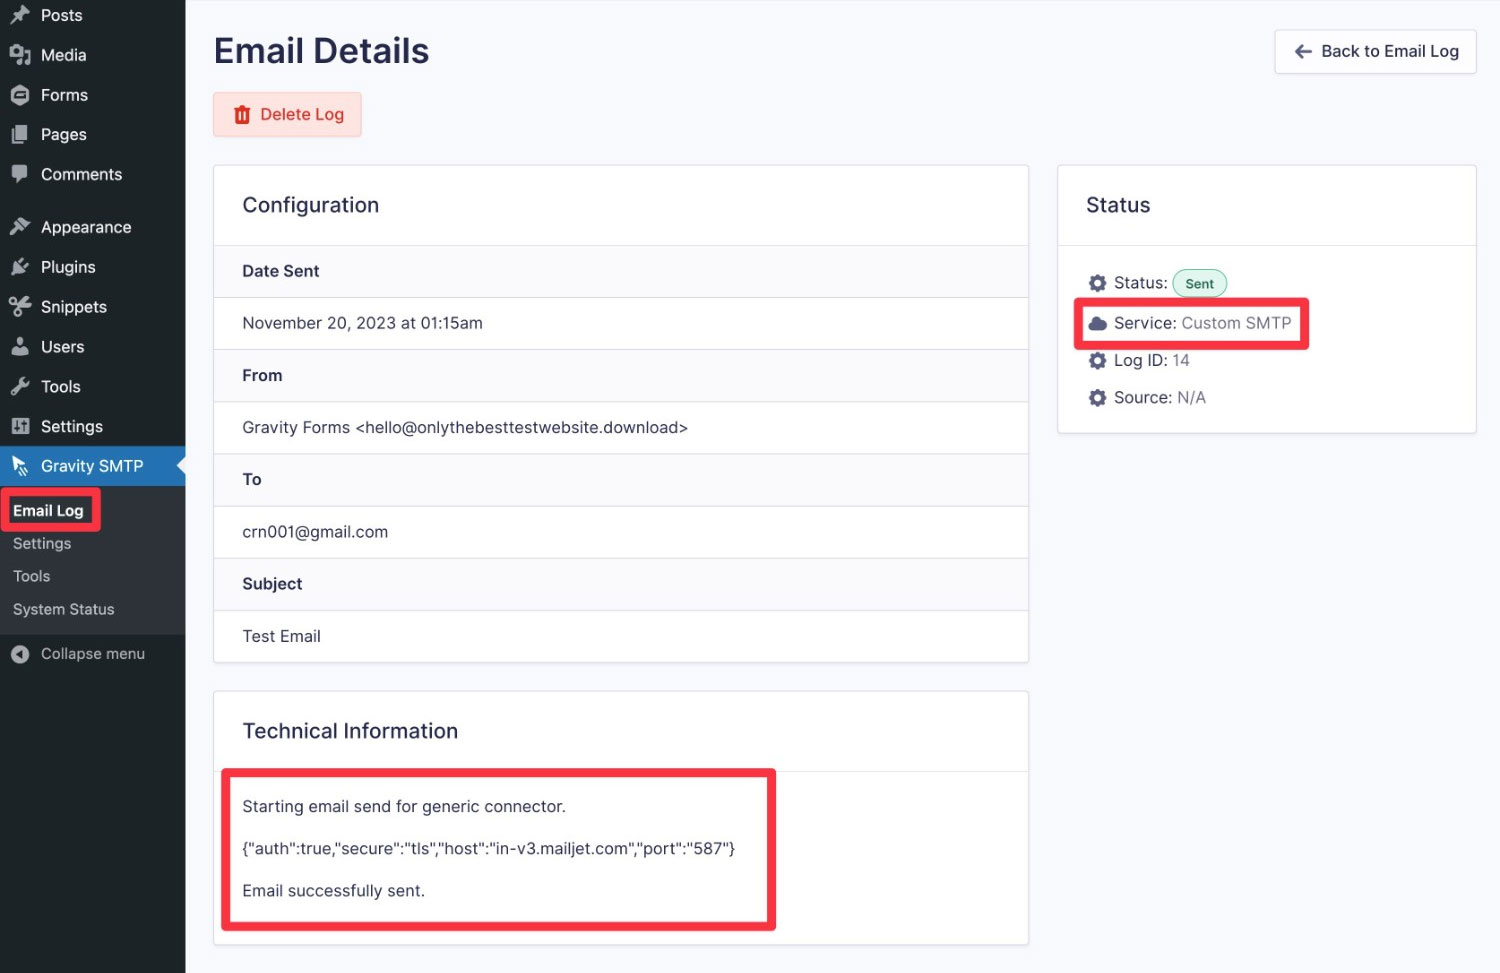
To help you check and track your emails going forward, Gravity SMTP also includes full email logging to track every single email that your site sends.
On the main email log page, you can see the following information about each email:
- Subject
- Status (e.g., whether it was sent or failed to send)
- Recipient (to whom it was sent) and associated avatar
- Source (which plugin the email originated from)
- Date sent

You can search all of the log entries by keyword and delete them if needed, either individually or in bulk.
In the Actions column, you can access additional details about each log item:
- The information icon lets you view technical information about each email, including which service it was sent with, whether it was opened (if you enable open tracking), and more.
- The eye icon lets you see the full content of the email, including its actual design for both desktop and mobile devices. Doing so enables you to review the content and check for any potential errors or formatting issues. You can also disable content logging if needed, such as for privacy reasons.
Beyond the content and design of the email, there’s also an option that lets you enable logging for email attachments, as well.
Because the email log could become quite large if your site sends a lot of emails, Gravity SMTP also lets you choose how long you want to retain log entries for. You get the following options:
- Never delete (store log entries indefinitely)
- One day
- One week
- One month
- Three months
- Six months
- One year
You’re also free to completely disable the email logging feature if you don’t want to use it.
Backup email sending services
Even if you choose a reliable transactional email sending service as your site’s primary sender, there’s still a chance that your site might run into email sending issues.
With Gravity SMTP, you can specify a backup connection that your site will automatically use if the primary connection fails for some reason.
There’s zero manual intervention required. Everything will happen seamlessly and automatically to ensure maximum deliverability for your site’s emails.
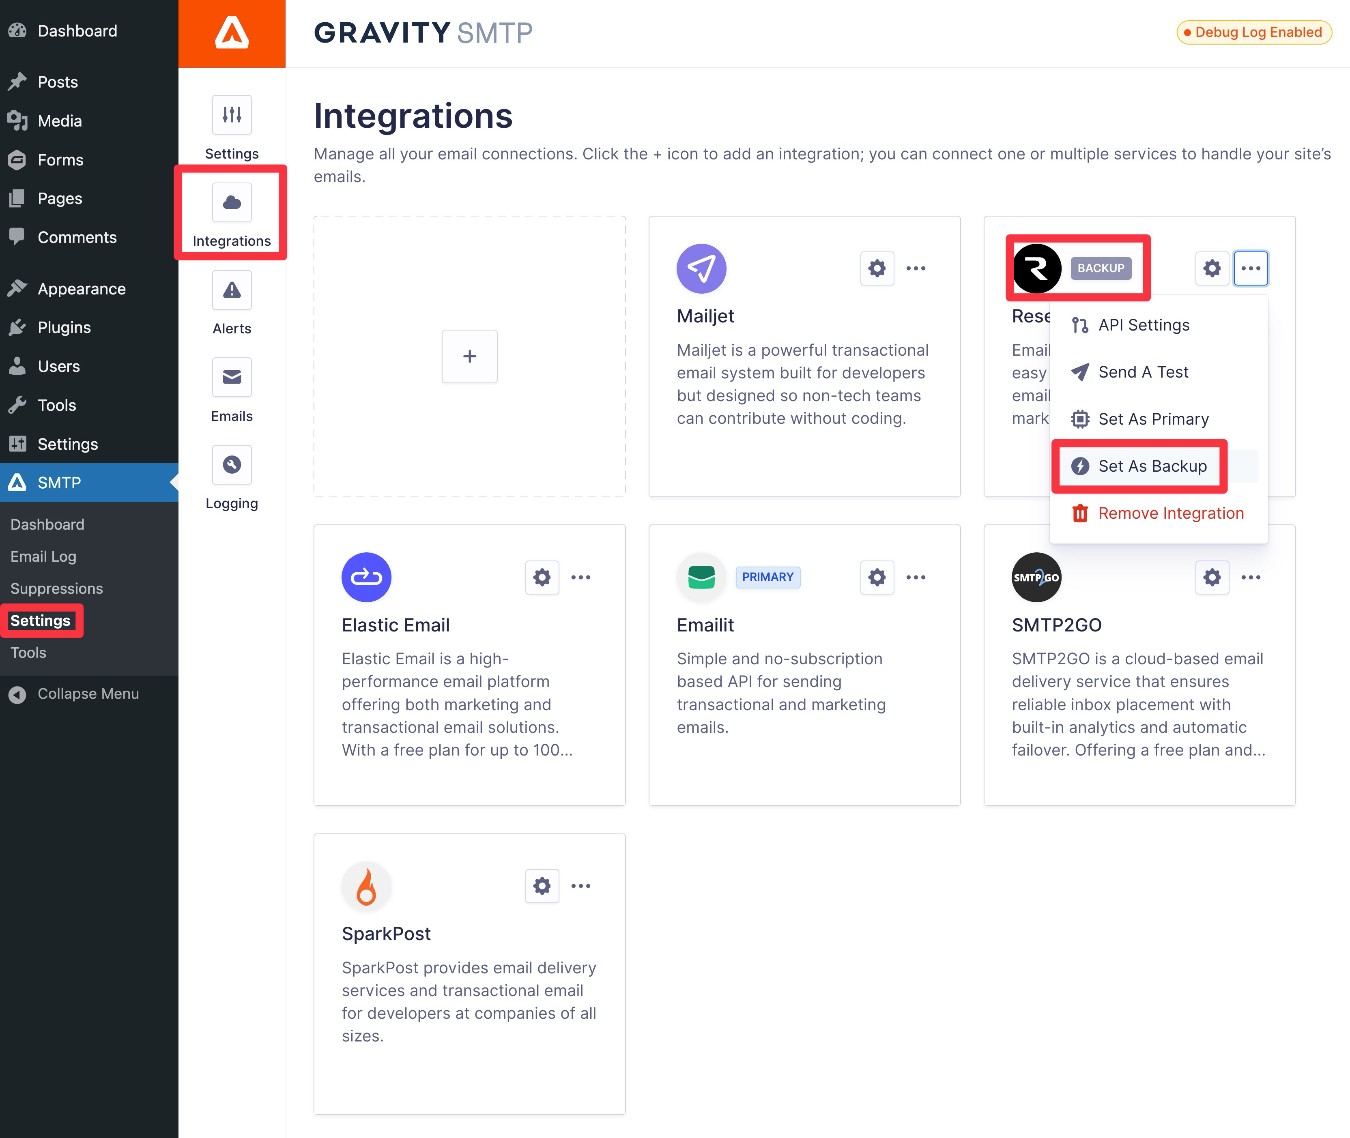
You can also keep track of the situations where your backup connection was needed by looking at Gravity SMTP’s logs.
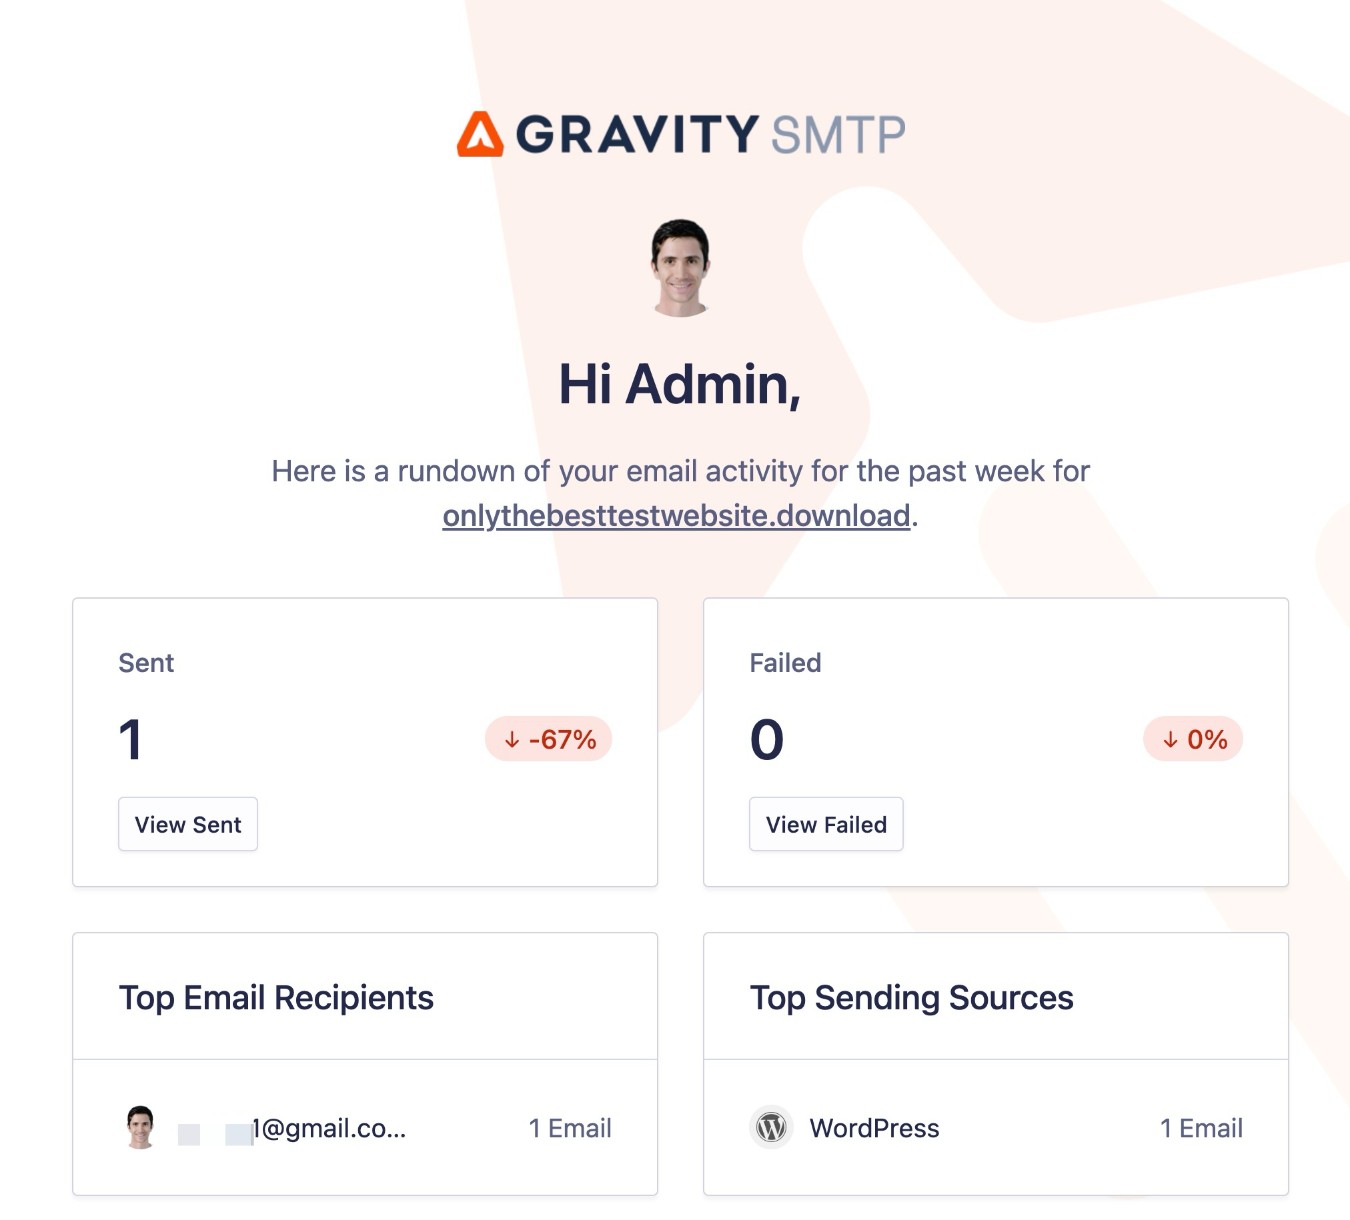
Email reporting dashboard
In addition to the email log tools, Gravity SMTP also includes a separate reporting dashboard that lets you view additional data about your site’s email sending usage.

To start, you can see high-level details about the number of emails your site has sent over your chosen time period, including the number of successful, pending, and failed emails.
You can also track the top sending sources on your site. For example, the number of emails that were initiated by the core WordPress software versus a specific plugin.
If multiple plugins are sending emails, you’ll be able to see the number of sent emails for each individual plugin. This can help you really dig in and see which plugins are sending the most email on your site.
You can also see the top email recipients, which lets you see which email addresses are receiving the most emails from your site.
Finally, you can also see your overall open rate, if you’ve enabled email open tracking. Speaking of that…
Email open and open rate tracking
Gravity SMTP also gives you the option to track individual email opens, as well as the overall open rates for your emails. You can then view all of this information directly from your WordPress dashboard.
You can see the overall open rate from the main reporting dashboard (as you can see in the screenshot from the previous section). In the email log, you can also check to see whether specific emails have been opened or not.
Many transactional email services also offer their own functionality to track email opens. However, using Gravity SMTP for open tracking can have a few benefits:
- View data from inside WordPress – you can see open tracking directly from your WordPress dashboard. This can be especially beneficial if you’re working on client sites, as clients might not want to log into a separate interface just to see open data.
- Consistent data if you ever switch sending services – if you ever change email services, you’ll still have all of your open data and the tracking will be consistent between services. If you rely on your transactional email service’s open tracking, you will lose that data if you ever change services.
Real-time notifications for failed emails via SMS (Twilio) or webhooks (Slack, etc.)
To help you quickly detect issues with your site’s transactional emails, Gravity SMTP lets you set up real-time alerts when emails fail to send.
You currently have two options for receiving alerts:
- SMS – you can use Twilio to receive a text message if there’s a failed email. You can also send messages to multiple phone numbers, if needed.
- Webhooks – you can send an alert to any service that supports webhooks. For example, you could receive a Slack message if an email fails to send, or easily connect to any of the services on Zapier.
To avoid false alarms or being flooded with alerts for every single email, you also get some helpful controls:
- Choose how many failed emails trigger an alert – for example, you could choose to only receive an alert after the second failed email.
- Throttle how often to send new alerts – you can set an interval to limit how many alerts get sent within a certain period. For example, if you set it for ten minutes, Gravity SMTP will only send one alert for every ten-minute interval, even if emails are continuing to fail.

Automatic email activity digest
In addition to receiving real-time alerts for any issues, you can also set up automatic email activity digests to more easily keep an eye on everything related to your site’s emails.
These digests include a summary of key metrics such as send volume, email failures, top sending emails, etc.
You can also choose to receive the digest on your own preferred schedule, with options for the following:
- Daily
- Weekly
- Monthly
Custom email suppression lists
Email suppression lists help you protect your email sending reputation by excluding certain email addresses from receiving emails. You can use this to avoid sending emails to addresses that have bounced, unsubscribed, or you just generally don’t want to send emails to.
Gravity SMTP includes a built-in feature that lets you add suppressed addresses directly from your WordPress dashboard. You can also add internal notes on the reason(s) why you suppressed a certain address.
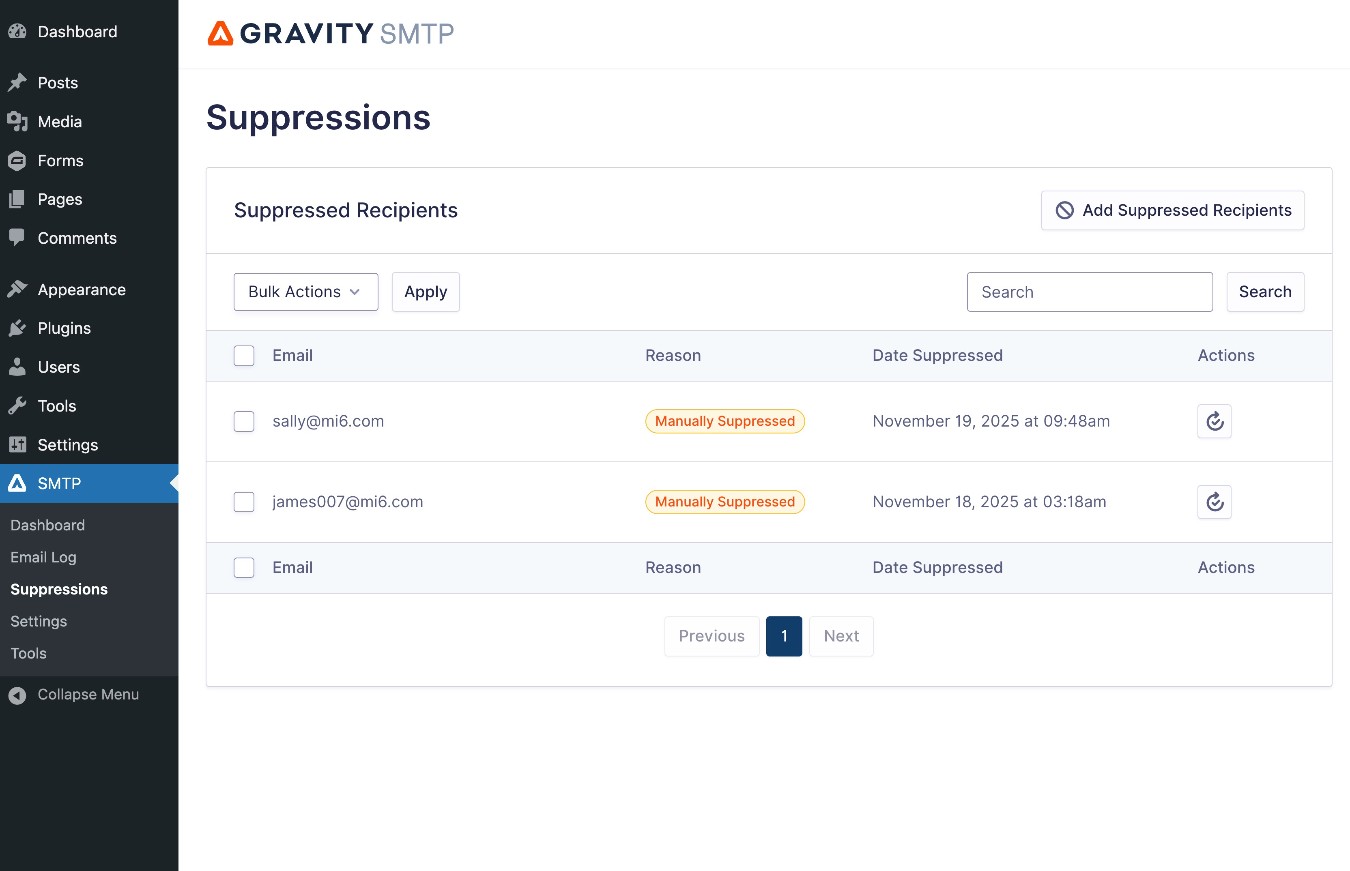
Many transactional email services also offer their own features to create email suppression lists. However, managing your suppression lists directly in Gravity SMTP has a couple of main benefits:
- WordPress dashboard management – you can manage everything from your WordPress dashboard, which means you don’t need to open a new interface every time you want to adjust your suppression list. If you’re working on client websites, your clients might also find it more convenient to be able to do everything from WordPress.
- Easier to switch email services – if you ever switch transactional email services, your suppression list will keep working without any extra work. If you set up a suppression list directly in the transactional email service, you will need to migrate that list if you ever want to switch services.
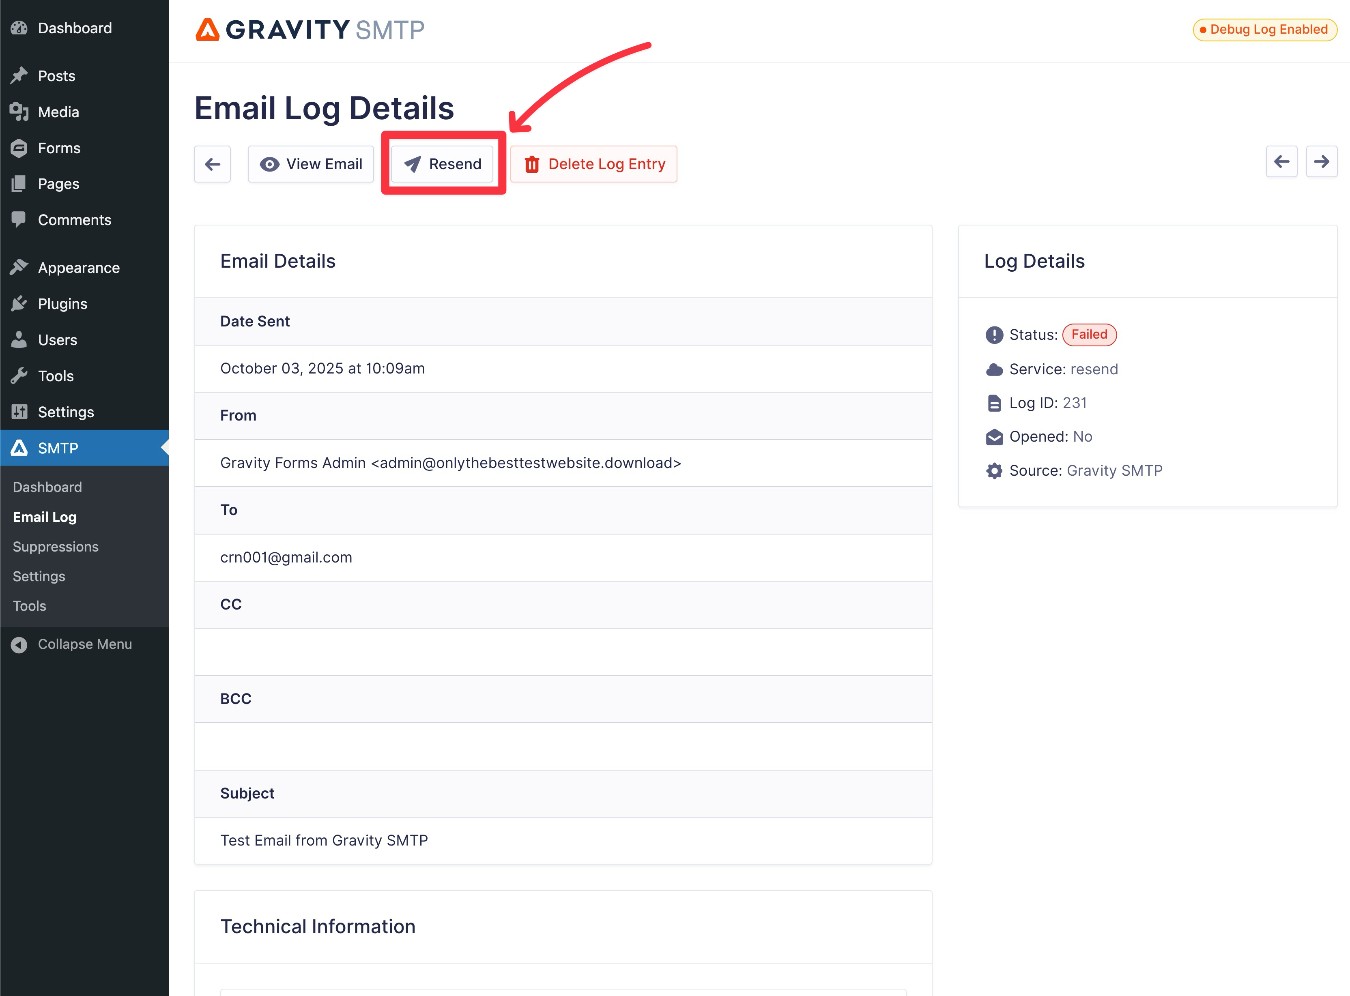
Manual email resends
In addition to the option to set up a backup connection to automatically resend emails that fail to send via your primary connection, Gravity SMTP also lets you manually resend any email on your site.
For example, if a customer says that they’ve lost track of a certain email, you could easily resend that email so that the customer has a copy.
You can do this just by clicking a button in the email log interface.
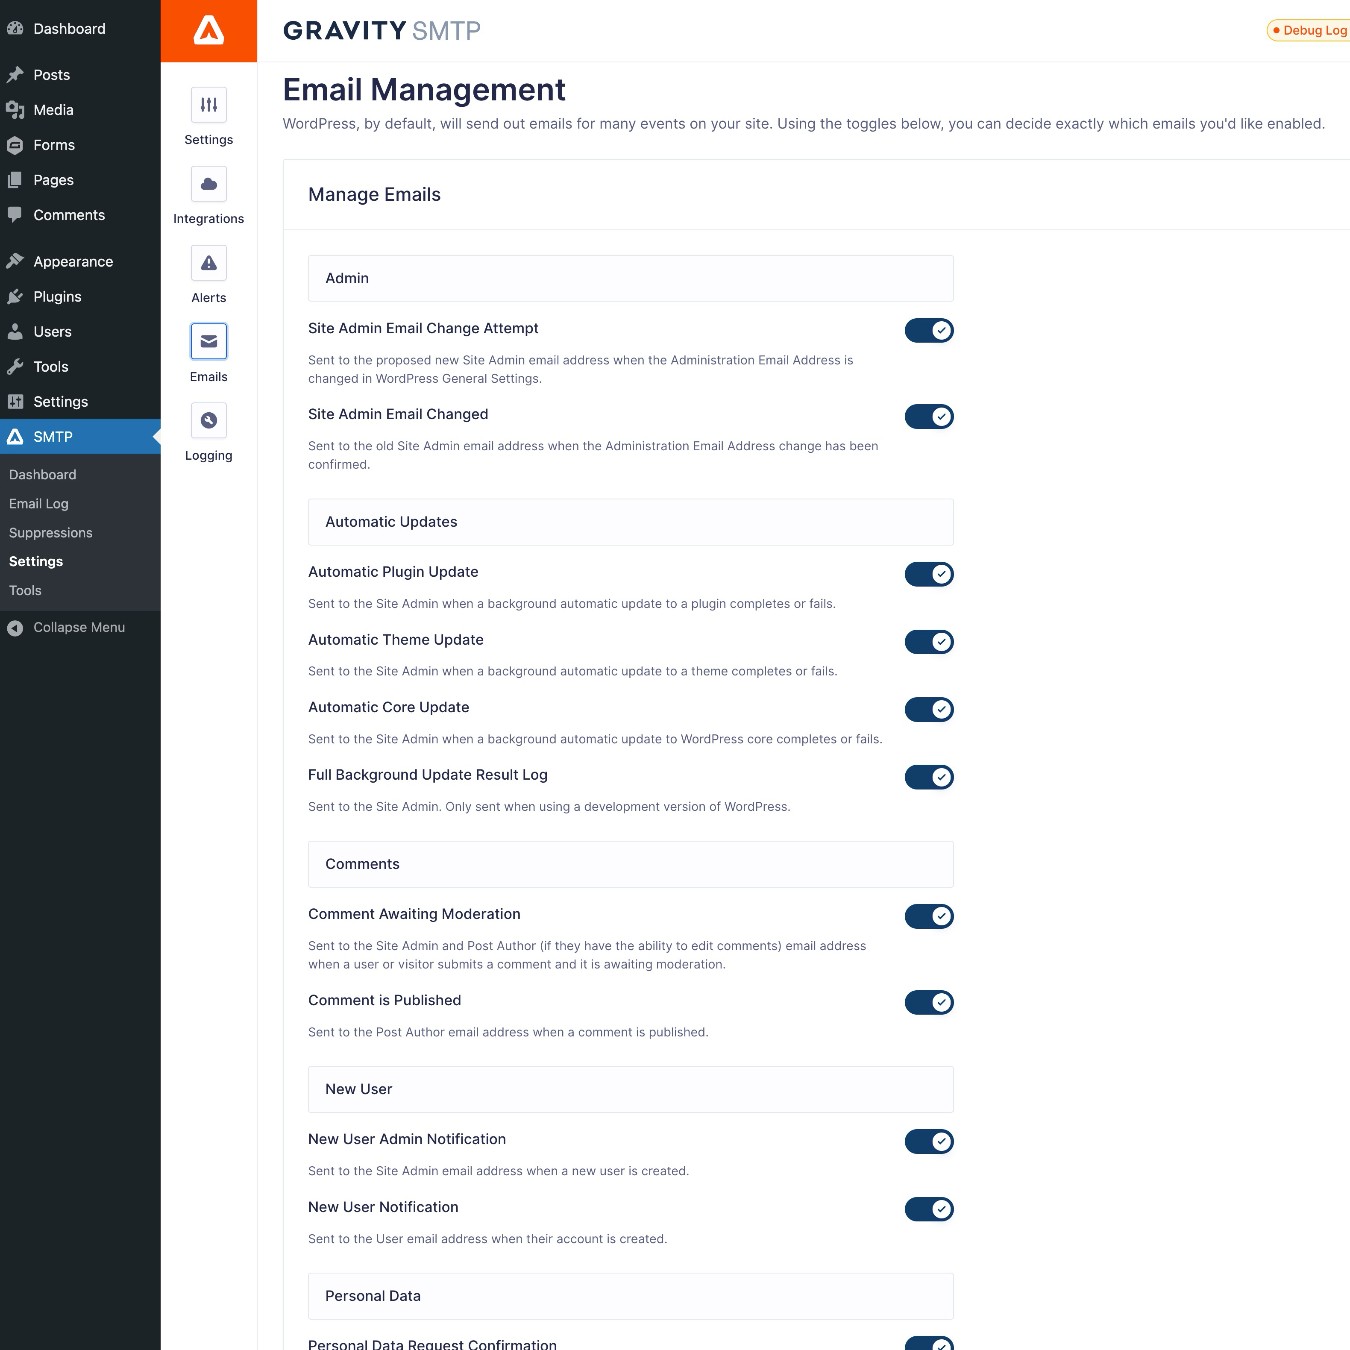
WordPress email management
To help you control the emails that your site sends, Gravity SMTP also offers an email management dashboard for all of the emails that the core WordPress software sends.
Using simple toggle buttons, you can easily activate or deactivate various types of core transactional emails including the following:
- Automatic update email notifications
- New comment notifications
- New user notifications
- Personal data request actions
- User activity notifications, including changed passwords and emails
Easy WP Mail SMTP migration
If you’re already using the WP Mail SMTP plugin on your site, Gravity SMTP makes it super easy to switch thanks to a dedicated migration tool within the Setup Wizard.
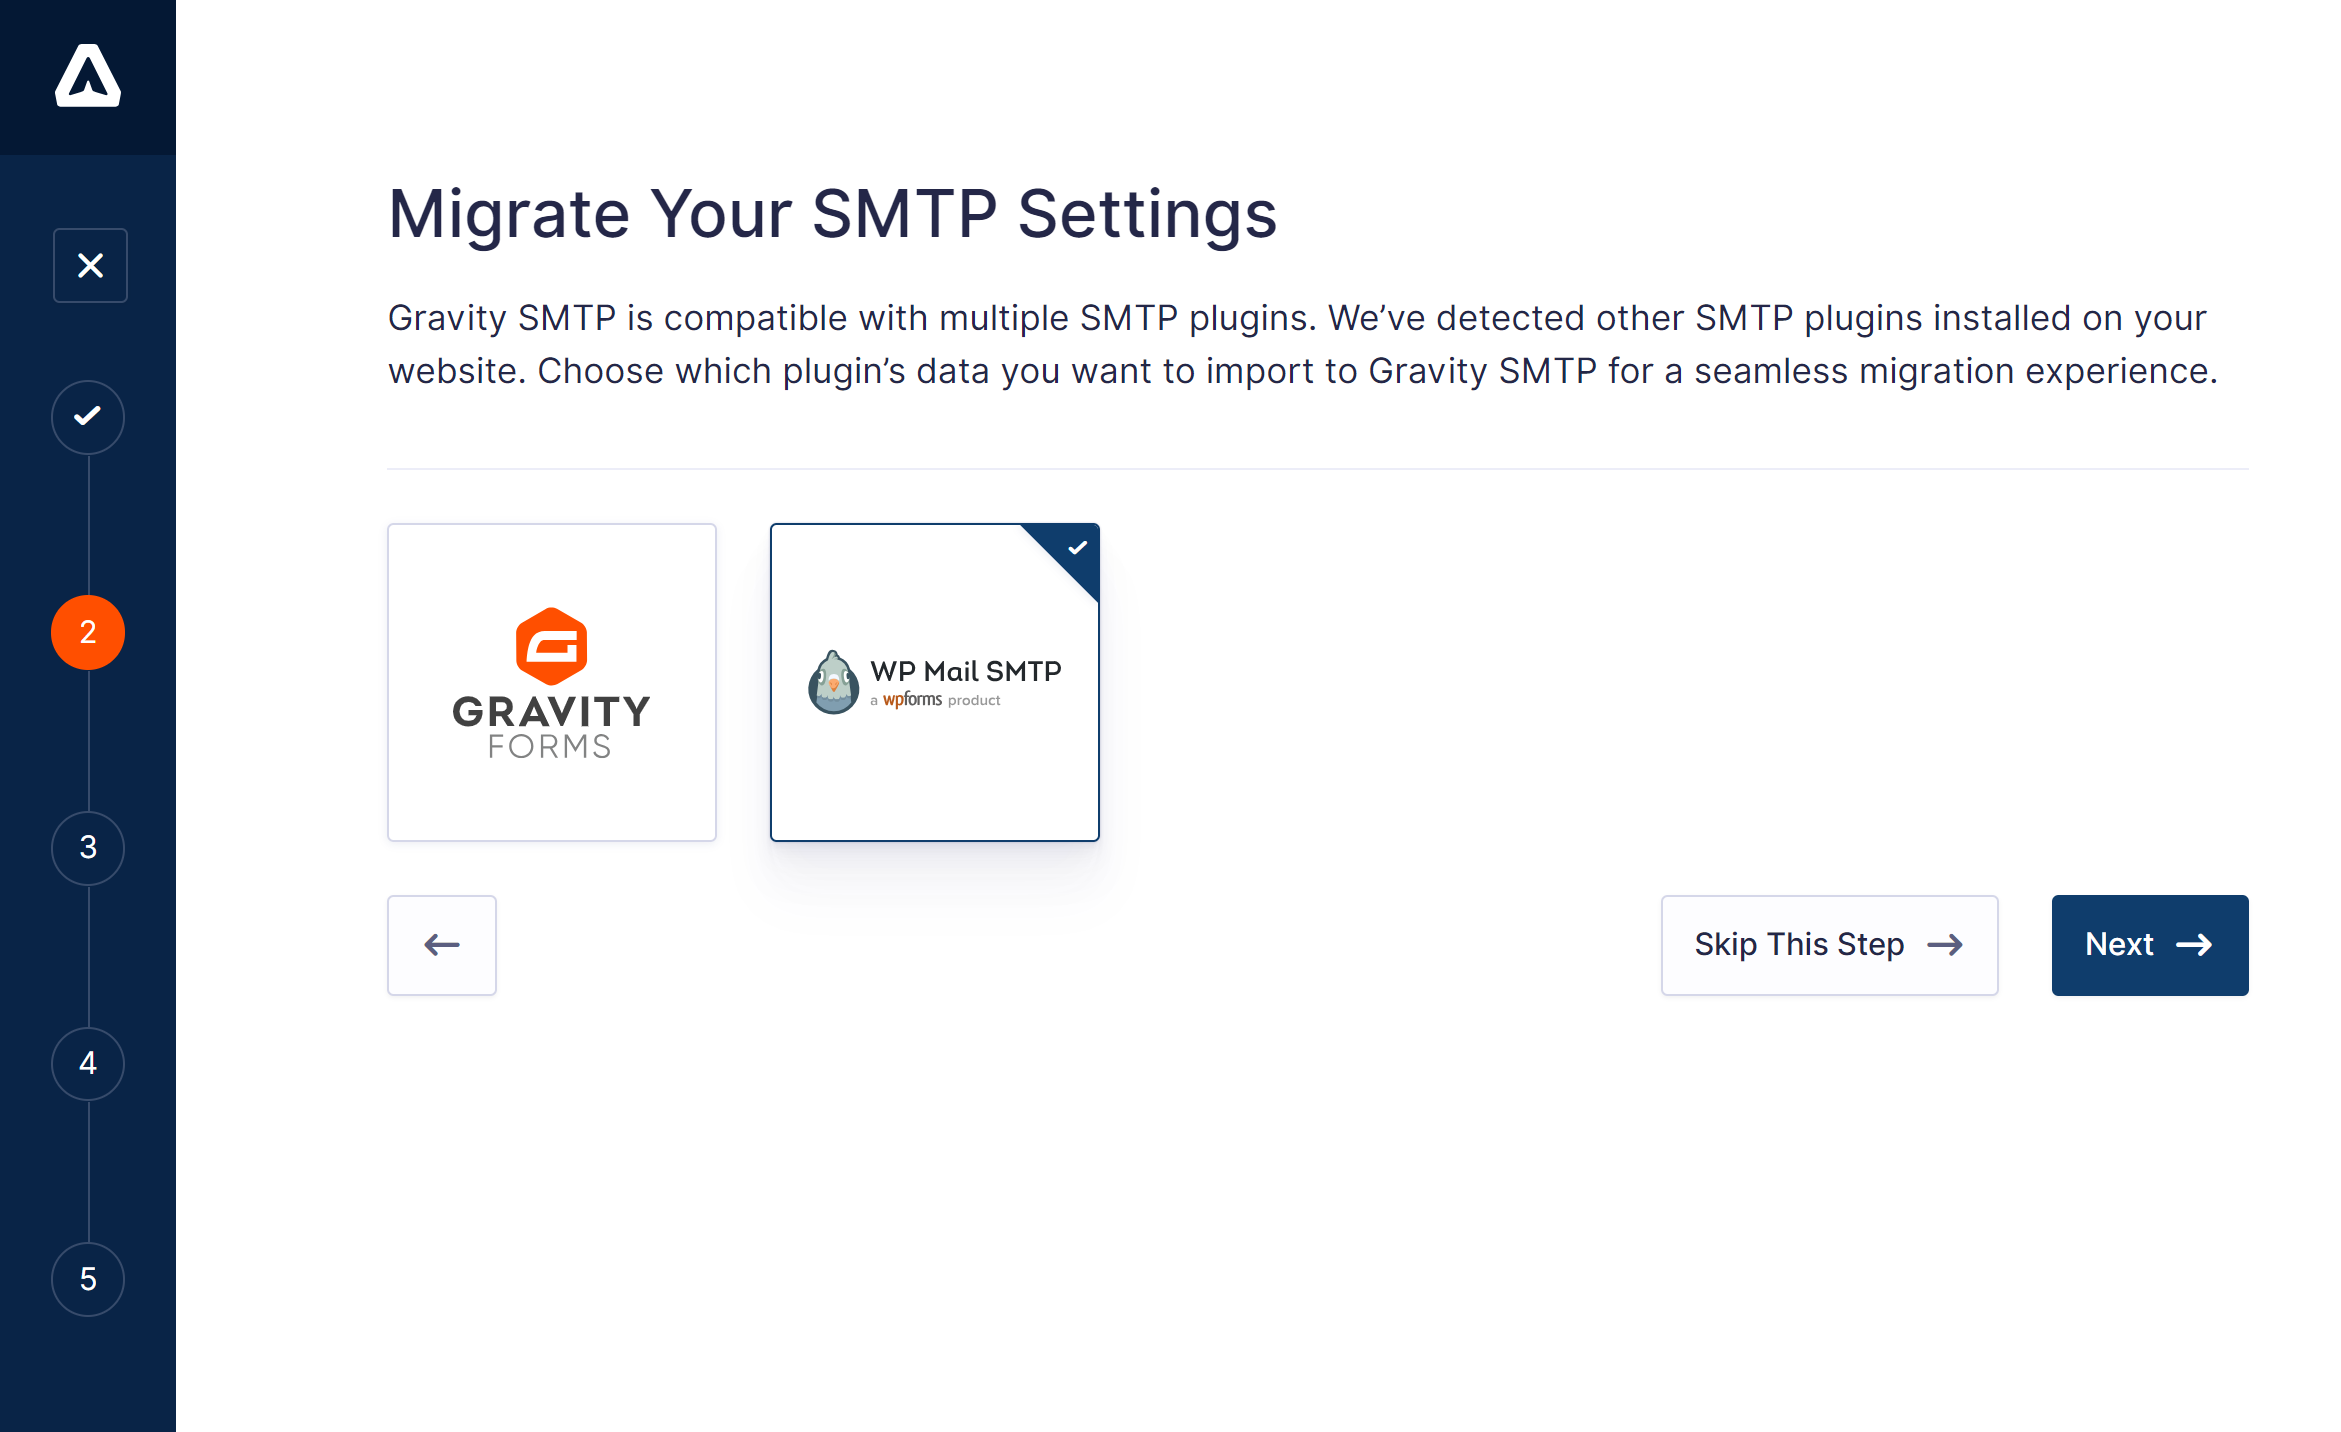
You won’t need to manually reconnect to the services that you’re using – Gravity SMTP will seamlessly migrate all of the connections so you can continue sending your site’s emails without any effort on your part.
An in-depth look at Gravity SMTP’s integrations
Currently, Gravity SMTP offers dedicated API integrations for 16+ popular services, as well as a catch-all custom SMTP feature that lets you connect to any SMTP server.
Which service should you use? Here’s a quick breakdown of the dedicated integrations…
Postmark
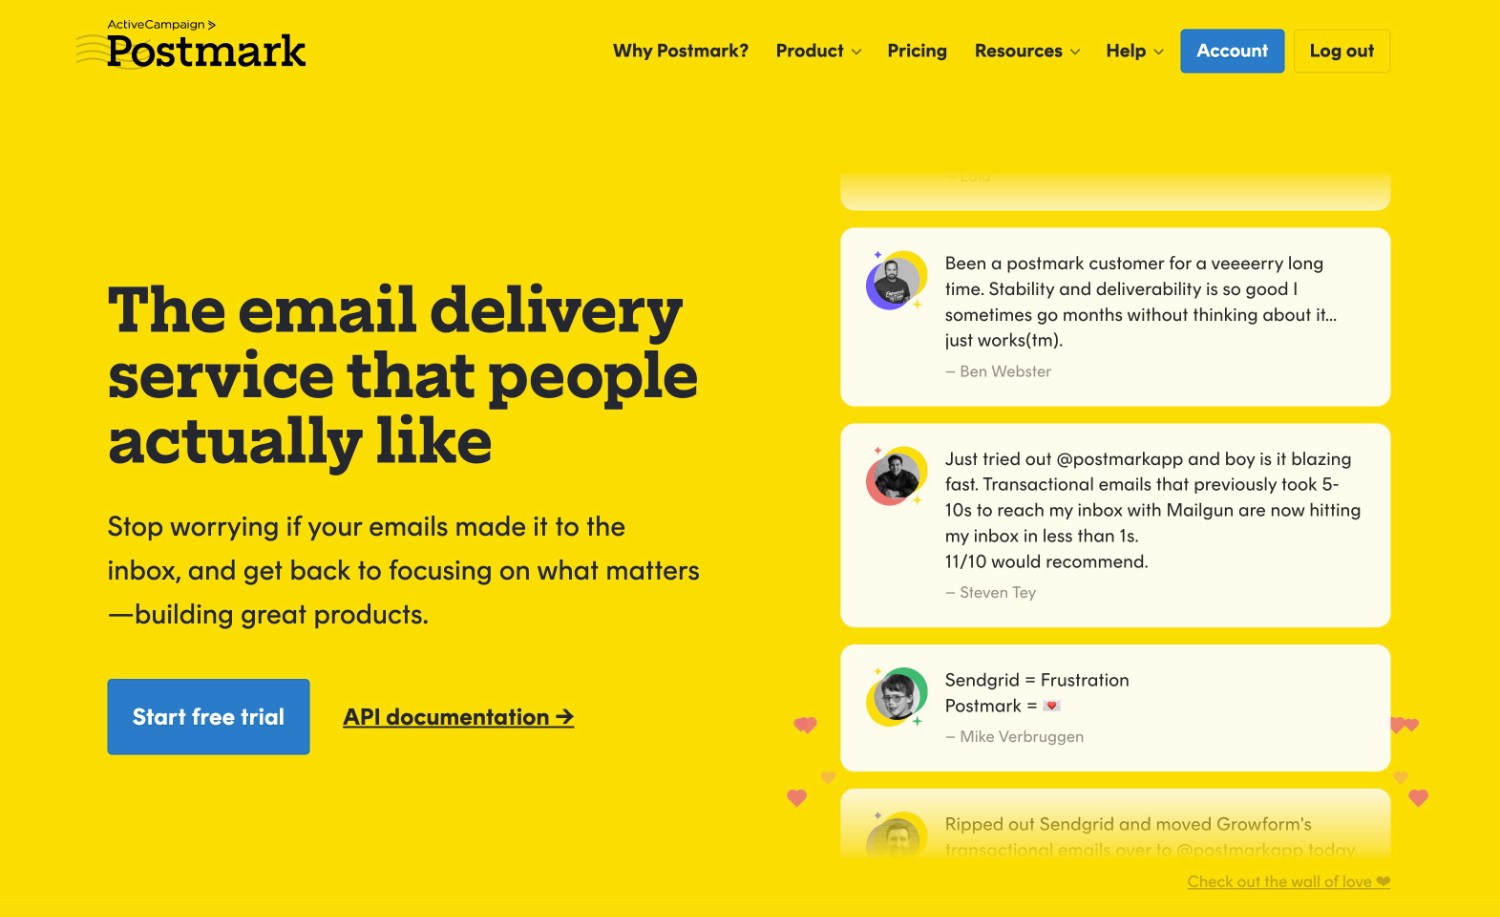
Owned by ActiveCampaign, Postmark is a popular email sending service with a reputation for having good reliability and deliverability.
It’s a little more expensive than some other options, but Postmark might be a good option if you’re willing to pay a little more for hassle-free setup and top-notch reliability.
Postmark lets you send 100 emails per month for free. Paid plans start at $15 for up to 10,000 emails per month (at time of writing).
👉Full Postmark WordPress email tutorial
Pros
- Offers high deliverability rates without needing to pay for a dedicated IP address. There is a dedicated IP option, if you really want it.
- Very detailed outbound email analytics tools.
- Offers both single sender and domain-level verification options.
- Uses separate infrastructure for transactional emails and bulk emails (which improves deliverability for transactional emails).
Cons
- Has a very low free plan limit that won’t be enough for most sites. You’ll almost certainly need a paid plan.
- Paid plans can be more expensive than other services, so you are paying for the quality.
SendGrid
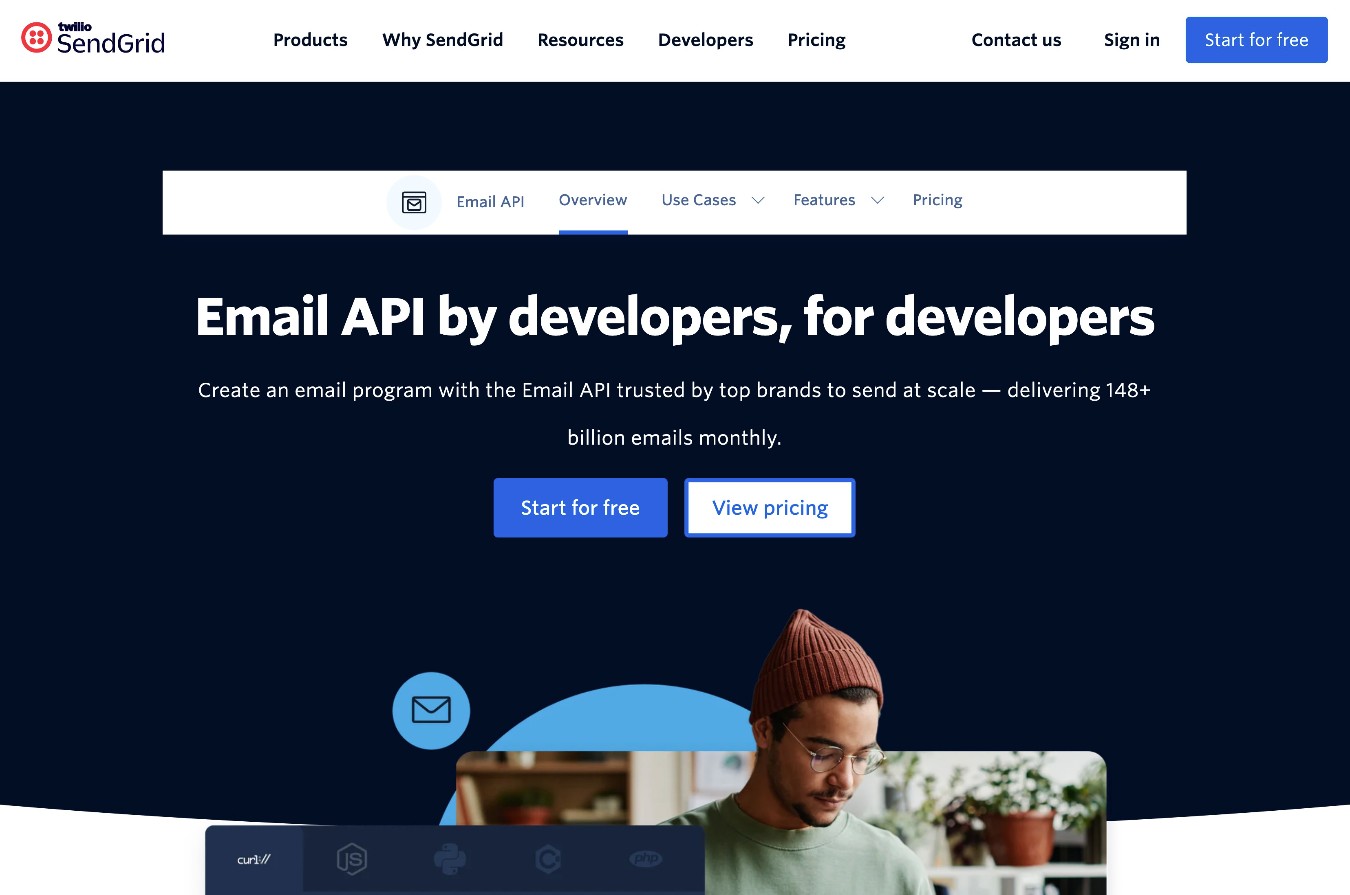
Owned by Twilio, SendGrid is one of the most well-known email sending services.
While SendGrid has discontinued its forever-free plan, it does offer a 60-day free trial that lets you send up to 100 emails per day (~3,000 per month).
If you need to exceed that limit or want to continue sending emails after the first 60 days, SendGrid offers preset pricing plans, starting at $19.95 per month for up to 50,000 emails (at time of writing). These paid plans are still quite affordable if you need that much volume.
👉Full SendGrid WordPress email tutorial
Pros
- Offers both single sender and domain-level verification.
- The paid plans are very affordable if you’re sending 50,000+ emails per month.
Cons
- The minimum spend for paid plans is $19.95 for 50,000 emails. This is affordable for high-volume sending, but it can be expensive if you only need to send 5,000-20,000 emails per month.
- Some people report issues with slightly delayed emails (e.g. a transactional email taking 45 seconds to send instead of sending immediately, which often happens because the email server is throttling that IP address).
Mailgun
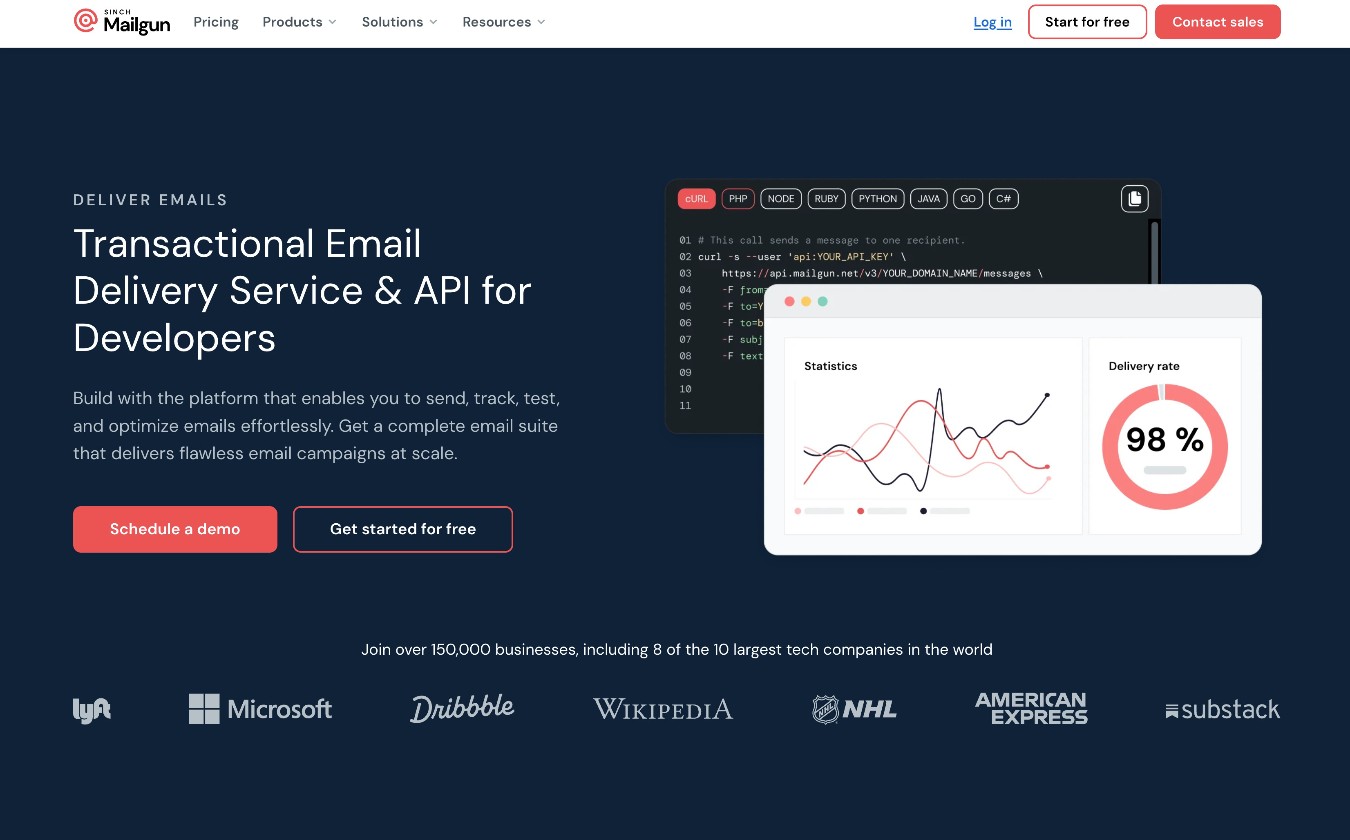
Mailgun is one of the most affordable email sending services for mid-volume sending, which can make it a good option if you’re on a budget.
To start, it offers a free plan that lets you send up to 100 emails per day. Then, Mailgun offers both preset plans and pay-as-you-go options:
- Preset plan – you pay a fixed amount per month for a certain number of emails, with an optional overage charge if you need to exceed your plan’s fixed limit.
- Pay-as-you-go pricing (Flex plan) – you pay $1 per 1,000 emails that your site sends, with no monthly minimums (at time of writing).
👉Full Mailgun WordPress email tutorial
Pros
- Has a fairly generous free usage tier that lets you send up to 100 emails per day.
- Lets you choose between preset pricing plans and pay-as-you-go pricing based on your exact usage.
Cons
- The preset plans have the highest starting price of any service on this list ($35 per month).
- You can only access a dedicated IP on the pricier Scale plan, which starts at $90 per month.
Brevo
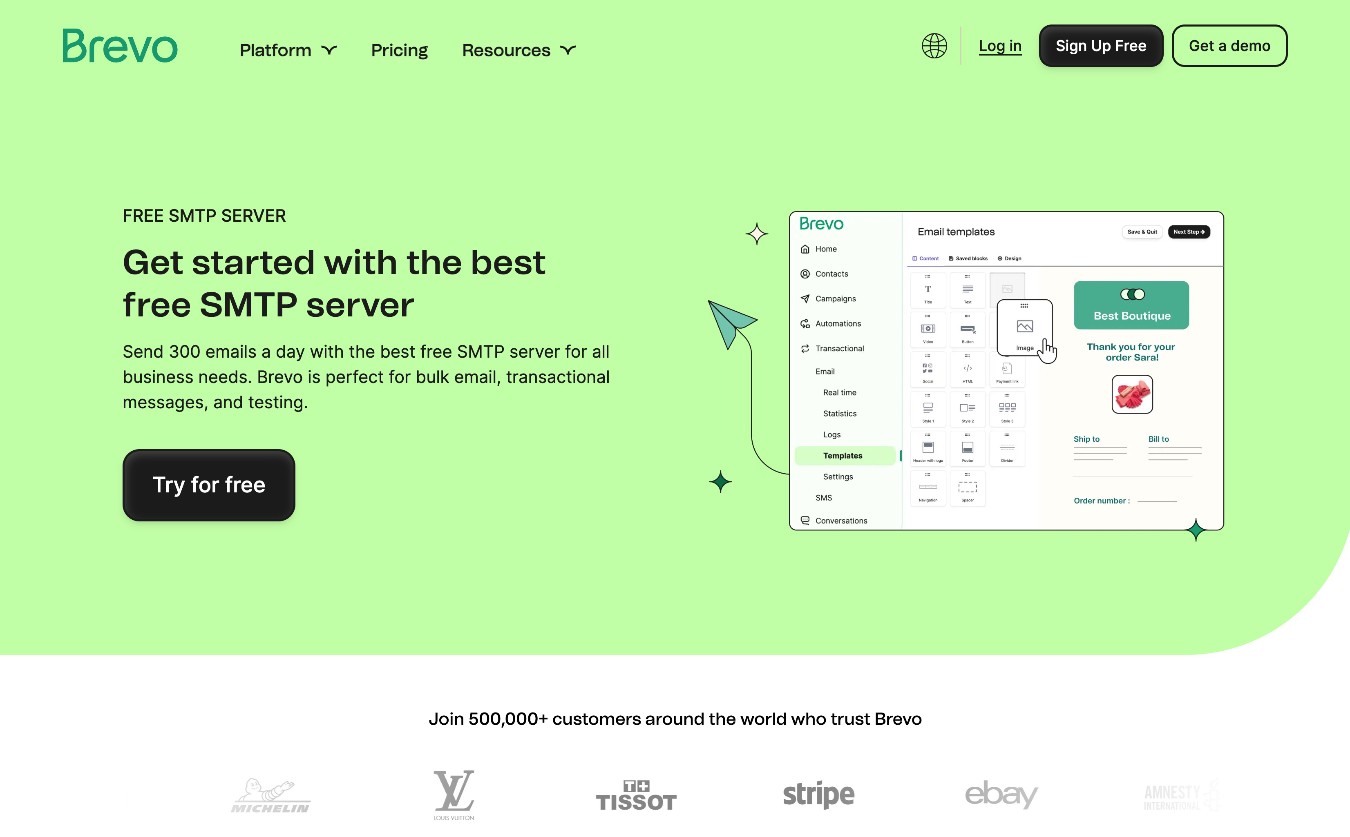
Brevo, formerly Sendinblue, is a CRM that can send transactional emails. Therefore, if you’re looking for an email marketing platform as well as an SMTP service, Brevo fulfills both needs.
However, whether you want a CRM or not, Brevo’s relatively generous free plan makes it a great choice.
Thanks to the free plan, you can send up to 300 transactional emails daily — which works out to around 9,000 per month — without spending any money (at time of writing). The next plan starts at $25 a month and supports 20,000 emails a month, or approximately 657 a day. You can also pay to increase the monthly email limit on the plans via the flexible pricing. Another option is purchasing email credits via the pay-as-you-go option rather than choosing a monthly subscription.
The Brevo paid plans are in the mid-range of the SMTP services covered in this guide. However, you do get access to a fully-featured CRM platform when you sign up. This means you can send email campaigns, use the drag-and-drop editor to design professional-looking emails, create automated workflows, and more. However, thanks to the generous free plan, you might not need to upgrade.
While everything looks good on paper for Brevo, there are some reports of relatively low email delivery rates for transactional emails.
👉Full Brevo WordPress email tutorial
Pros
- The free plan is the most generous in this comparison, with a daily limit of 300 transactional emails.
- Free and paid plans include access to the email marketing service, with email templates and a drag-and-drop email editor.
- Paid plans are cheaper than some options (e.g., Mailgun) but more expensive than others (e.g., Postmark).
- The prepaid email credits option is a pay-as-you-go alternative to the monthly plans.
Cons
- A dedicated IP is only available on the top plan or as a paid add-on.
- Some reports of relatively poor email deliverability rates.
Amazon SES (Simple Email Service)
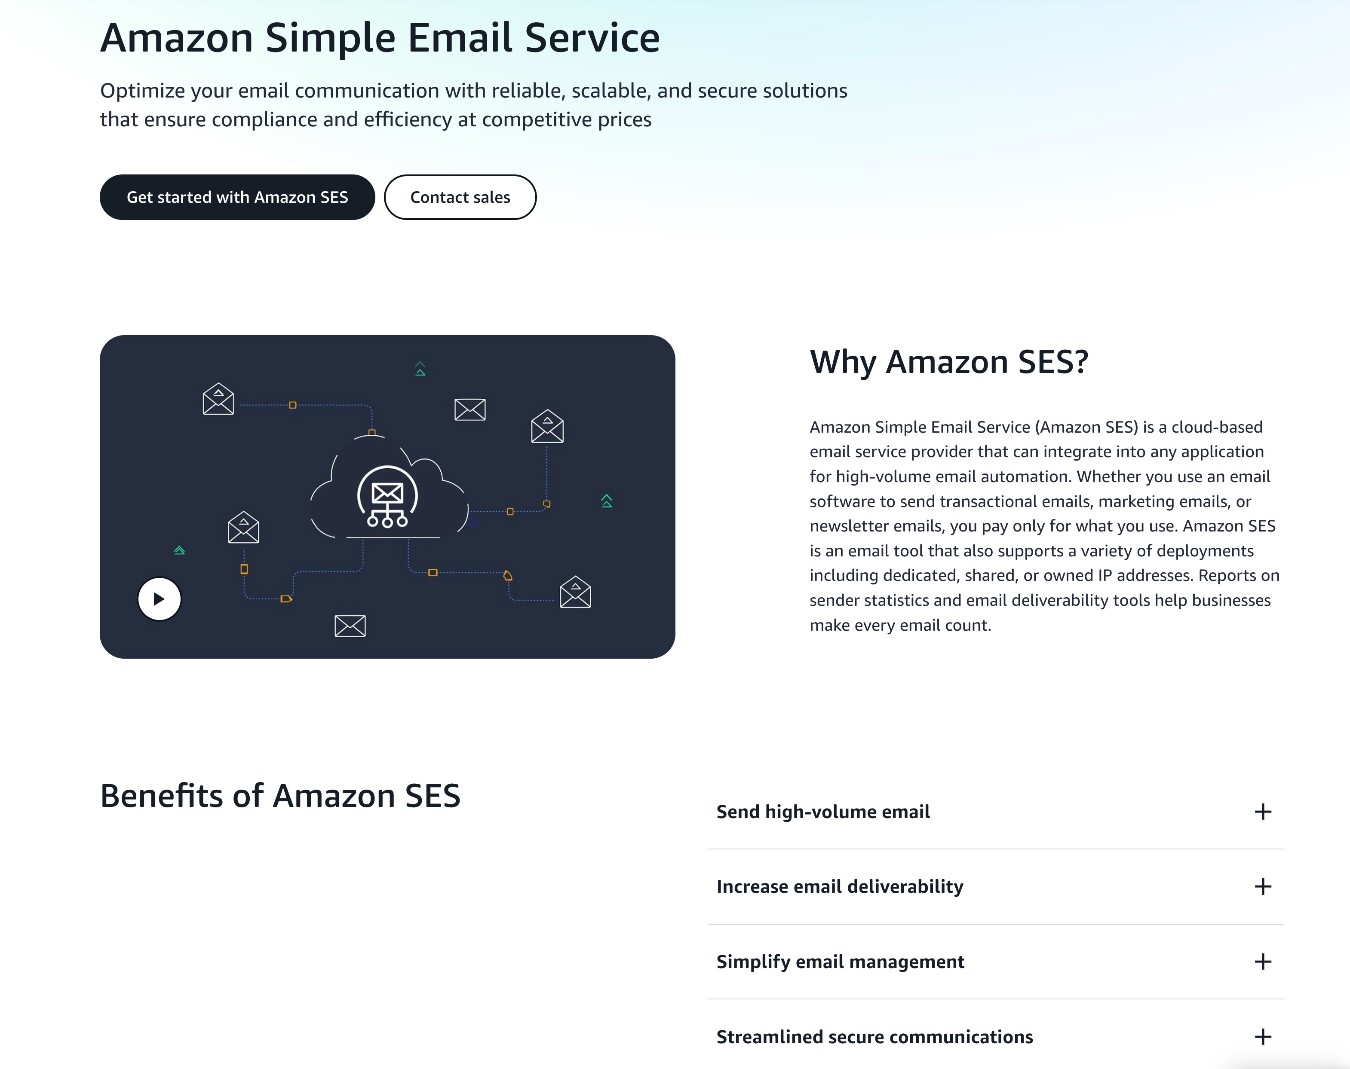
Amazon SES, short for Amazon Simple Email Service, is a transactional email service that’s part of AWS, Amazon’s suite of cloud tools.
One of the most unique things about Amazon SES is its pricing. Rather than locking you into a monthly plan for a certain number of emails that you may or may not use, Amazon SES uses 100% pay as you go pricing, with no monthly minimums.
For general email sending, you’ll pay just $0.10 per 1,000 emails. For example, sending 50,000 emails in a month would cost you just $5, which is significantly cheaper than every other service on this list.
Amazon also offers a free trial for the first 12 months where you can send up to 3,000 emails per month for free.
👉Full Amazon SES WordPress email tutorial
Pros
- One of the cheapest transactional email services out there.
- No monthly contracts or minimums – you’re only billed based on your usage.
Cons
- Reporting tools are not as detailed as something like Postmark and it can be a little more technical to manage things.
- Managing/maintaining deliverability can be a little more difficult than other services. Less technical people might prefer to pay a little more for a more managed email sending service.
Gmail / Google Workspace
While all of the previous services are dedicated transactional email services, this one is a little different. With Gravity SMTP, you can actually use your own free Gmail account (or your own paid Google Workspace account) to send emails for your website.
This approach gives you a free way to send up to 500 emails per day with a free Gmail account, which is more than the free plan of pretty much any transactional email service. However, the downside is that Gmail is not totally optimized for the transactional email use case.
In general, you should probably not use Gmail to send mission-critical emails, especially if those emails are user-facing and/or high volume. However, it can be a very cost-effective solution for sending emails to yourself and/or a few trusted users.
👉Full Gmail WordPress email tutorial
Pros
- It’s 100% free if you use a Gmail account and has no added cost if you’re already paying for Google Workspace.
- The sending limit (500 emails per day) is a lot higher than most dedicated transactional email services. If you have a paid Google Workspace account, you can send up to 2,000 emails per day.
- You can use your existing Google account – there’s no need to sign up for a new service.
Cons
- It’s not a true transactional email service. That is, the primary purpose of Gmail is not for sending your website’s emails, whereas that is the primary purpose of services like SendGrid.
- Google might temporarily suspend your account if you send too many emails at once. This is because Google throttles email sending.
- The setup process is a little more involved, but our guide covers every step.
Outlook / Microsoft 365
Just like how Gmail allows you to send your website’s emails, you can also do the same thing with a free Outlook account (or your own paid Microsoft 365 account, if you have one).
This approach probably has the highest free sending limit of any solution that you’ll find – Microsoft lets you send up to 10,000 emails per day for free (though the limit will be lower if you’re using a brand new Outlook account without any sending history).
However, using Outlook for WordPress emails has the same constraints as Gmail. As such, you probably don’t want to use it for important user-facing emails, but it can be a cost-effective option for sending primarily internal emails.
👉Full Outlook WordPress email tutorial
Pros
- It’s 100% free if you use a free Outlook account. If you already have a Microsoft 365 account, there’s also no added cost to using it for WordPress emails.
- It has a very high free sending limit. For established Outlook accounts, you can theoretically send up to 10,000 emails per day (though you might get throttled if you try to send too many emails at once).
- If you already have a Microsoft account, you can use your existing account rather than needing to sign up for a new service.
Cons
- Some email clients might filter the emails to spam. If you’re sending emails to yourself, you can easily fix this by creating a filter in your email client to make sure it routes emails straight to your inbox. However, if you’re sending emails to other users, you might want to be careful.
- It’s not a true transactional email sending service. This can lead to some deliverability issues as discussed in the previous point, along with some other things like rate-limiting.
- The setup process is a little more complicated, but our guide covers every step.
Elastic Email
Elastic Email is a popular service that offers an email API for transactional emails, along with plans that you can also use for email marketing.
It has a free plan that lets you send up to 100 emails per day, but only to your own email address. Paid plans let you send to any email address, starting at just $19 per month to send up to 50,000 emails.
👉Full Elastic Email WordPress email tutorial
Pros
- Elastic Email’s paid plans are competitively priced.
- There’s an option to use a private IP address.
- Paid plans offer 24/7 support.
Cons
- Elastic Email’s free plan only lets you send emails to yourself. While this is fine for a lot of WordPress use cases, you’ll need one of the paid plans if you want to send emails to other users.
Emailit
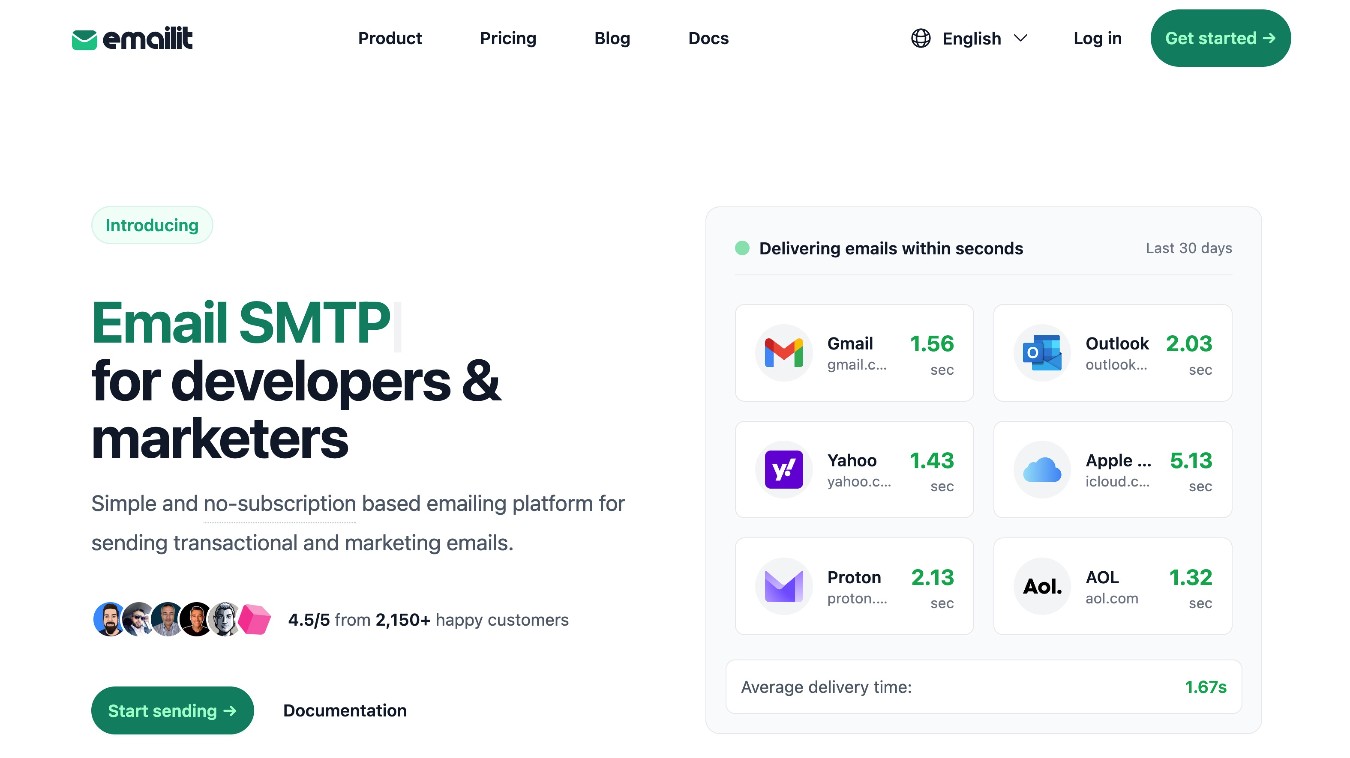
Emailit is a developer-friendly transactional email service that offers simple, pay-as-you-go pricing.
Unlike a lot of other services, Emailit doesn’t require you to pay a fixed monthly plan. Instead, you can purchase packs of credits, with each email that you send taking one credit.
You also get 1,000 free credits per month, which lets you send up to 1,000 emails per month for free.
Credit prices start at $20 for 100,000 credits ($0.20 per 1,000 emails) and go down to $500 for 5,000,000 credits ($0.10 per 1,000 emails).
👉Full Elastic Email WordPress email tutorial
Pros
- The credit billing model means you only pay for the actual emails that you send, which could be attractive if you have low and/or variable email needs.
- You can send up to 1,000 emails per month for free.
- There’s an event-based reporting log, which gives developers a lot of flexibility for setting up custom reporting.
Cons
- If you want more predictable billing, you might actually prefer a transactional email service that offers fixed monthly plans.
Mailchimp Transactional
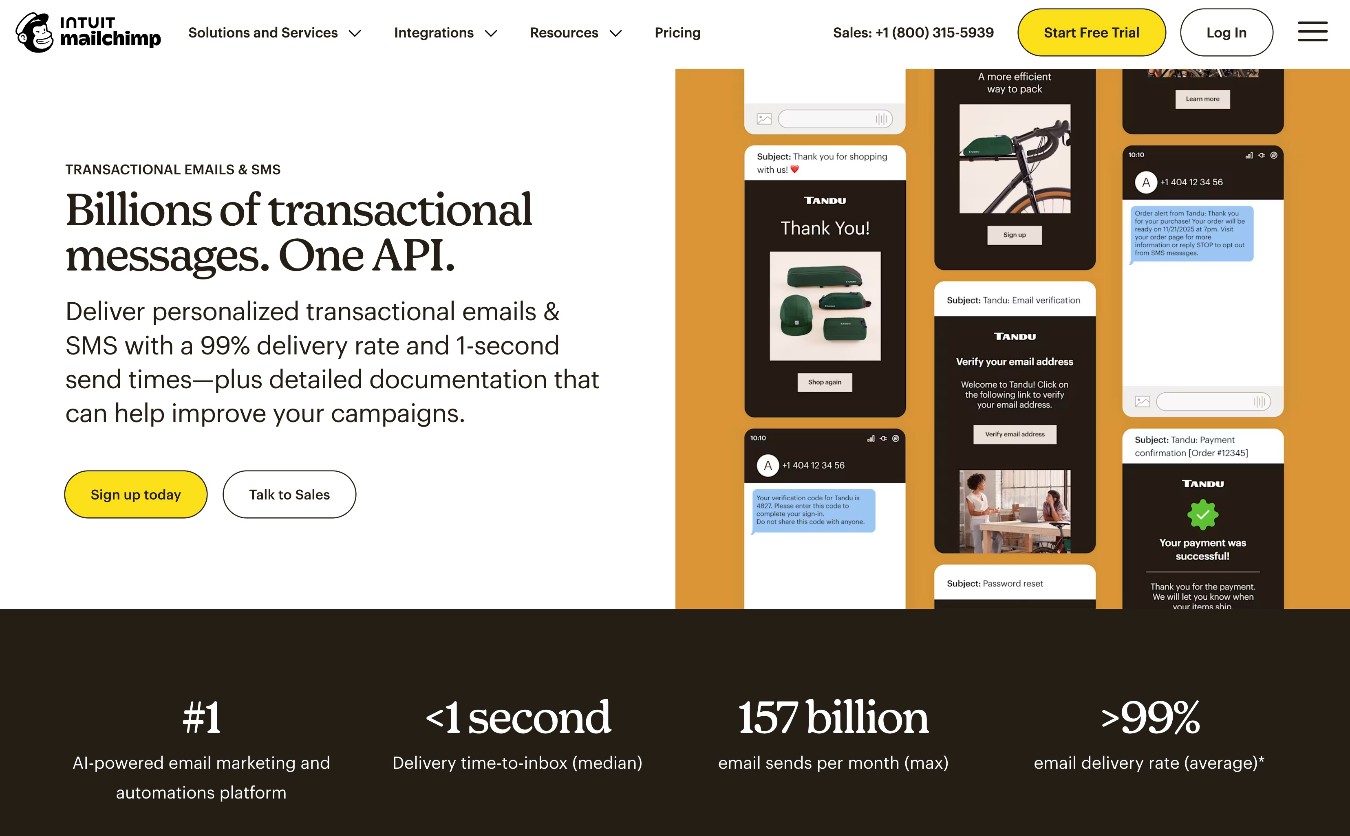
Mailchimp Transactional is a dedicated transactional email service from Mailchimp. It’s an add-on plan for the main Mailchimp plans, so it only really makes sense to use if you’re already using the core Mailchimp plans for email marketing.
You can purchase “blocks” of 25,000 email sends to use Mailchimp transactional, starting at $20 per block for low-volume usage and going down to $10 per block at higher volumes.
👉Full Mailchimp Transactional WordPress email tutorial
Pros
- If you’re already using Mailchimp, you can manage all of your emails from one tool.
- There’s an option to add a dedicated IP address for $29.95 per month.
- The pay-as-you-go pricing means you only pay for the actual emails that you send.
Cons
- Because it’s an add-on for the core Mailchimp service, it only makes sense to use if you’re already a Mailchimp user.
MailerSend
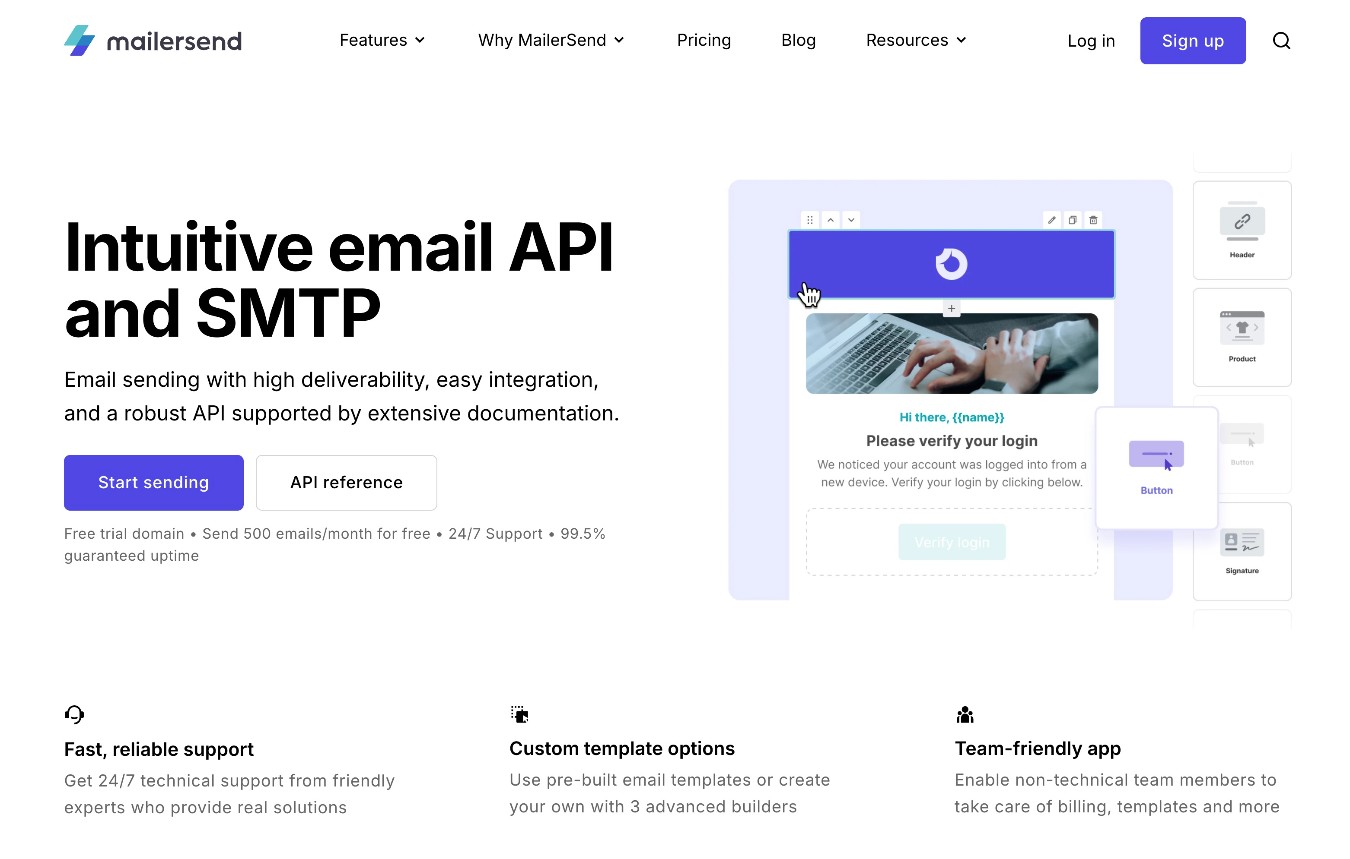
MailerSend is an affordable transactional email service from the same company behind the MailerLite email marketing service.
MailerSend lets you send up to 500 emails per month for free. After that, paid plans start at just $5.60 per month to send up to 5,000 emails per month.
👉Full MailerSend WordPress email tutorial
Pros
- MailerSend lets you exceed your plan’s limits and just pay an overage fee based on your usage, which is nice if you occasionally exceed your plan’s limits.
- You can set up webhook alerts for transactional email events.
- MailerSend also lets you send SMS messages, which is convenient if you also want that ability.
Cons
- The free plan only lets you send up to 500 emails per month, which is lower than some other services.
Mailjet

Mailjet is a popular transactional email service that’s owned by Sinch.
It offers one of the more generous free plans out there, which can make it a good option if you’re searching for a free solution. With the free plan, you can send up to 6,000 emails per month (with a maximum of 200 emails per day).
If you need to exceed that or you want to access other advanced features, the paid plans start at $17 per month to send up to 15,000 emails.
👉Full Mailjet WordPress email tutorial
Pros
- Mailjet has very generous free plan limits, letting you send up to 200 emails per day and 6,000 emails per month.
- There’s a dedicated IP address option on higher-tier plans.
- Higher-tier plans also include reputation monitoring and deliverability optimization.
Cons
- While Mailjet’s free sending limits are very generous, the free plan emails will include a Mailjet logo at the bottom of emails. You need a paid plan to remove this logo.
Resend

Resend is another developer-friendly transactional email service. It’s backed by Y-Combinator, the popular startup incubator.
You can use the Resend email API for both transactional emails and marketing emails, which could make it a good option if you want one tool that supports both.
For transactional emails, Resend has a free plan that lets you send up to 3,000 emails per month, with a maximum of 100 emails per day.
Paid plans remove the daily sending limit and start at $20 per month for up to 50,000 emails.
👉Full Resend WordPress email tutorial
Pros
- Resend is very developer-friendly, though it’s also easy enough for non-technical users.
- You can choose which region to send your emails from. Higher-tier plans also give you the option to purchase a dedicated IP address.
- It offers custom webhook endpoints and events, which give you a lot of flexibility for setting up customized reporting.
Cons
- The free plan only stores data for 24 hours, so we recommend using Gravity SMTP’s logging features if you’re using Resend’s free plan. Even paid plans have comparatively short data retention periods.
SMTP2Go
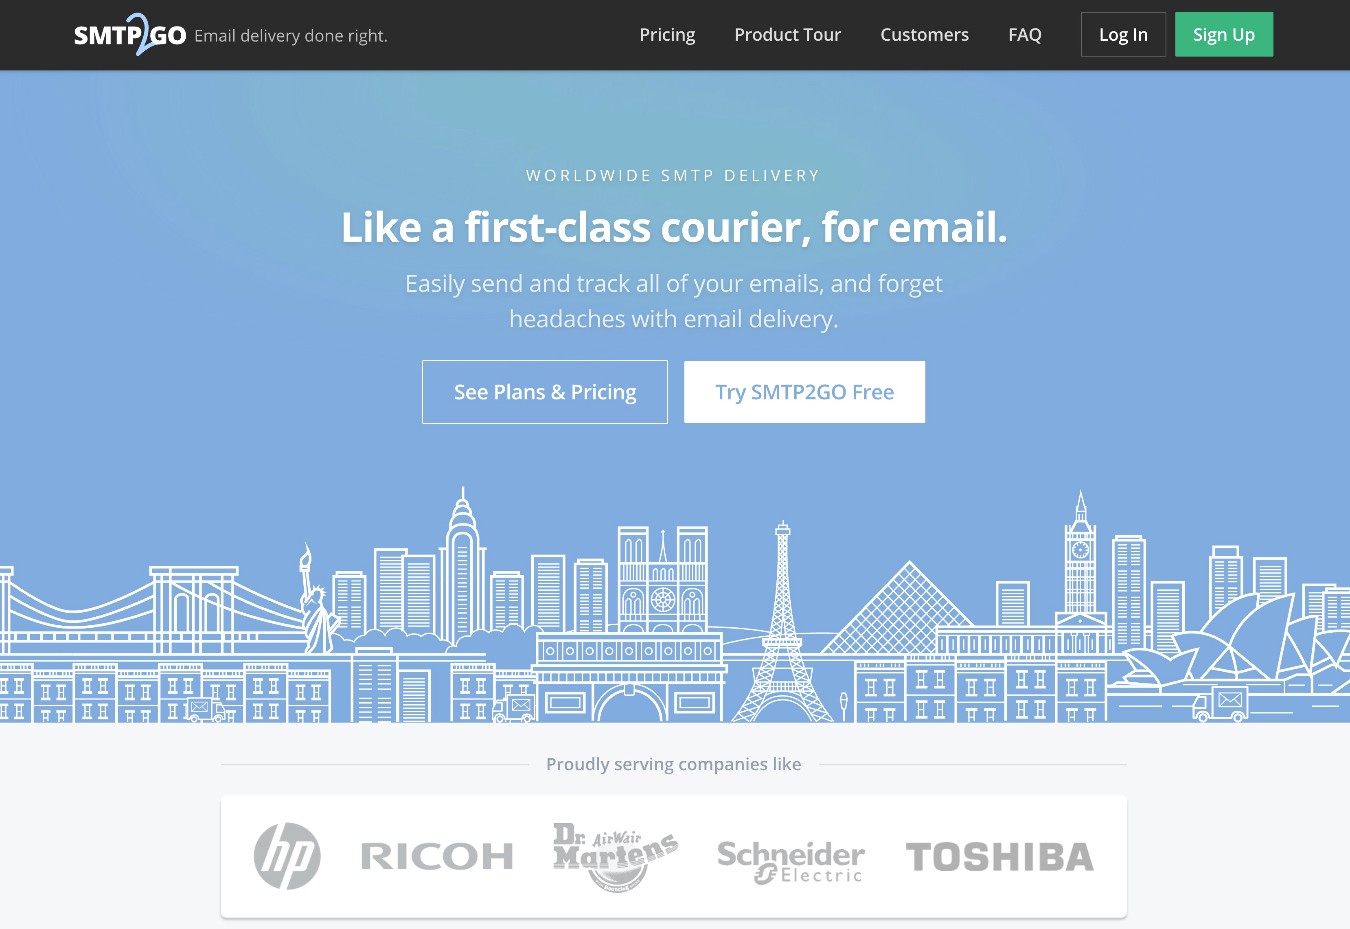
SMTP2Go is another well-known transactional email service, used by companies like HP and Toshiba.
SMTP2Go offers a free plan that lets you send up to 1,000 emails per month, with a cap of 200 emails in any one day.
After that, paid plans start at $15 per month to send up to 10,000 emails. If you need to exceed that, you can upgrade to a higher-tier plan or just pay the overage fee, which starts at $1.20 per 1,000 emails over your plan’s limit.
👉Full SMTP2Go WordPress email tutorial
Pros
- SMTP2Go can handle both transactional emails and marketing emails.
- There’s an option to purchase a dedicated IP address on the Professional plan.
- SMTP2Go lets you exceed your plan’s limits and just pay an overage fee, which lets you avoid needing to upgrade your plan if you occasionally exceed its limits.
Cons
- The free plan only lets you send up to 1,000 emails per month, which is lower than some other services.
SparkPost
SparkPost is a transactional email service that was acquired by MessageBird back in 2021. While MessageBird has taken down a lot of the dedicated SparkPost material, you can still sign up for a new SparkPost account.
SparkPost offers a free plan that lets you send up to 500 emails per month, with a maximum of 100 emails per day.
After that, paid plans start at $20 per month to send up to 50,000 emails. If you need to exceed the limit of your plan but you don’t want to upgrade, SparkPost lets you just pay an overage fee, starting at $1.00 per 1,000 emails over your plan’s limit.
👉Full SparkPost WordPress email tutorial
Pros
- SparkPost’s paid plans are generally quite affordable, which can make it a good option for high-volume sending.
- SparkPost lets you choose between sending emails from the USA and Europe.
- SparkPost lets you pay an overage fee if you need to occasionally exceed your plan’s limit, which lets you avoid being forced to upgrade to a higher-tier plan.
Cons
- The free plan only lets you send up to 500 emails per month, which is lower than some other services.
- Because MessageBird has removed SparkPost’s front-end marketing material, there is some small risk that MessageBird might discontinue the service in the future (there’s currently no indication that this will happen, though).
Zoho Mail
Zoho Mail is an email hosting service that functions similarly to Gmail/Google Workspace and Microsoft 365/Outlook.
While you can use it to host your own email account, it also includes an option to send your site’s transactional emails using your Zoho Mail account. However, it is not a dedicated transactional email service.
For most use cases, Zoho Mail will be free.
👉Full Zoho Mail WordPress email tutorial
Pros
- It lets you set up a custom domain email address for free, which is great if you also want to receive email.
- For most use cases, Zoho Mail will be 100% free.
Cons
- Zoho Mail is not a dedicated transactional email service, so we don’t recommend using it for mission-critical emails.
- Zoho Mail doesn’t publish clear email sending limits – you’re just limited to “normal” usage.
Custom SMTP
If you don’t want to use one of the dedicated integrations, Gravity SMTP also offers a Custom SMTP option that lets you connect to any standard SMTP-enabled server.
You could use this to connect to a different email sending service for which Gravity SMTP doesn’t currently offer an API integration.
Beyond dedicated services, there are also other ways to access SMTP servers. Here are some examples:
- A free SMTP server that your host provides. Not all hosts do this, but some do.
- The SMTP functionality in your email client (similar to the dedicated integrations for Gmail).
- Your own SMTP server that you create with something like DigitalOcean and Postfix (too complicated for most people, but it is an option).
Comparing the pricing of Gravity SMTP’s integrations
While ease of use, deliverability, and other features might play some role in choosing your SMTP service, the largest part of your decision will probably come down to price.
To make the differences in pricing as clear as possible, here’s a quick summary table that compares the pricing of the 16+ dedicated transactional SMTP integrations that Gravity SMTP offers.
|
| Free plan limits | Pay-as-you-go starting price | Fixed plan starting price |
| Amazon SES | N/A | $0.10 per 1,000 emails | N/A |
| Brevo | 300 emails /day (~9,000 /month) | $1 per 1,000 emails | $32/month for 5,000 emails |
| Elastic Email | 100 emails /day (only your email address) | N/A | $19.99/month for 50,000 emails |
| Emailit | 1,000 emails /month | $20 for 100,000 emails | N/A |
| Gmail / Google Workspace | ~500 emails /day (not fixed) | N/A | N/A |
| Mailchimp Transactional | N/A | $20 for 25,000 emails | N/A |
| MailerSend | 500 emails /month | N/A | $5.60/month for 5,000 emails |
| Mailgun | 100 emails /day (~3,000 /month) | $1 per 1,000 emails | $15/month for 10,000 emails |
| Mailjet | 6,000 emails /month | N/A | $17/month for 15,000 emails |
| Outlook / Microsoft 365 | ~<10,000 emails /day for established accounts (not fixed) | N/A | N/A |
| Postmark | 1,000 emails /month | N/A | $15/month for 10,000 emails |
| Resend | 3,000 emails /month | N/A | $20/month for 50,000 emails |
| SendGrid | N/A (60-day free trial) | N/A | $19.95/month for 50,000 emails |
| SMTP2Go | 1,000 emails /month | N/A | $15/month for 10,000 emails |
| SparkPost | 500 emails /month | N/A | $20/month for 50,000 emails |
| Zoho Mail | “Normal” usage (~500 emails /day) | N/A | N/A |
While services like Gmail, Outlook, and Zoho Mail are attractive from a pricing perspective, you should be careful about using them for high-volume, user-facing emails. Again, this is because these services are not really dedicated transactional email services.
How to set up Gravity SMTP using SendGrid (or other providers)
Now that you know more about the various providers that Gravity SMTP supports, let’s get into the step-by-step guide for how you can actually configure your site to start sending its emails using a dedicated SMTP service.
For this tutorial, we’re going to use SendGrid as the example. It’s one of the most established services and it’s also quite affordable for sending tens of thousands of emails per month.
While SendGrid no longer offers its forever-free plan, you do still get a 60-day free trial, which means that you can follow this tutorial for free.
With that being said, the same basic steps from this tutorial will apply to the other services as well. In the next section, we’ll also show you how to set up a custom SMTP server.
The only thing that we’ll assume here is that you’ve already installed the Gravity SMTP plugin on your site.
As mentioned, Gravity SMTP is available for free with a Gravity Forms Elite, Nonprofit, or Developer license. If you have one of these licenses, simply head on over to your Gravity Forms Account section to download and install Gravity SMTP.
1. Register for a free SendGrid account
If you haven’t done so already, your first step is to register for a free SendGrid account.
You will not need to enter a credit card to register for an account and you can send up to 100 emails per day for the first 60 days.
After the first 60 days, you will need to upgrade to a paid plan if you want to continue sending emails, as SendGrid no longer offers a forever-free plan.
2. Authenticate your WordPress site with SendGrid
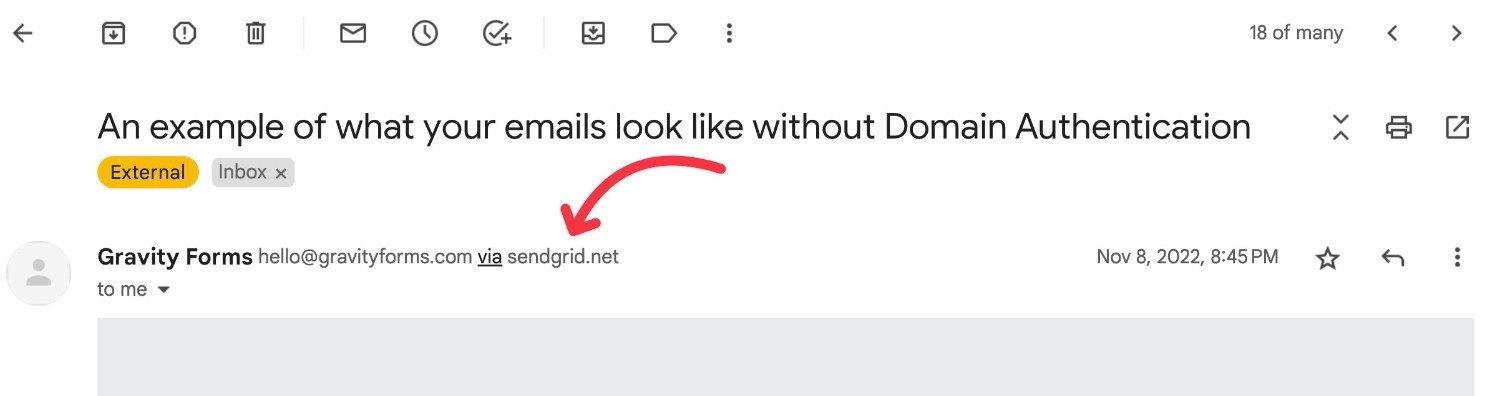
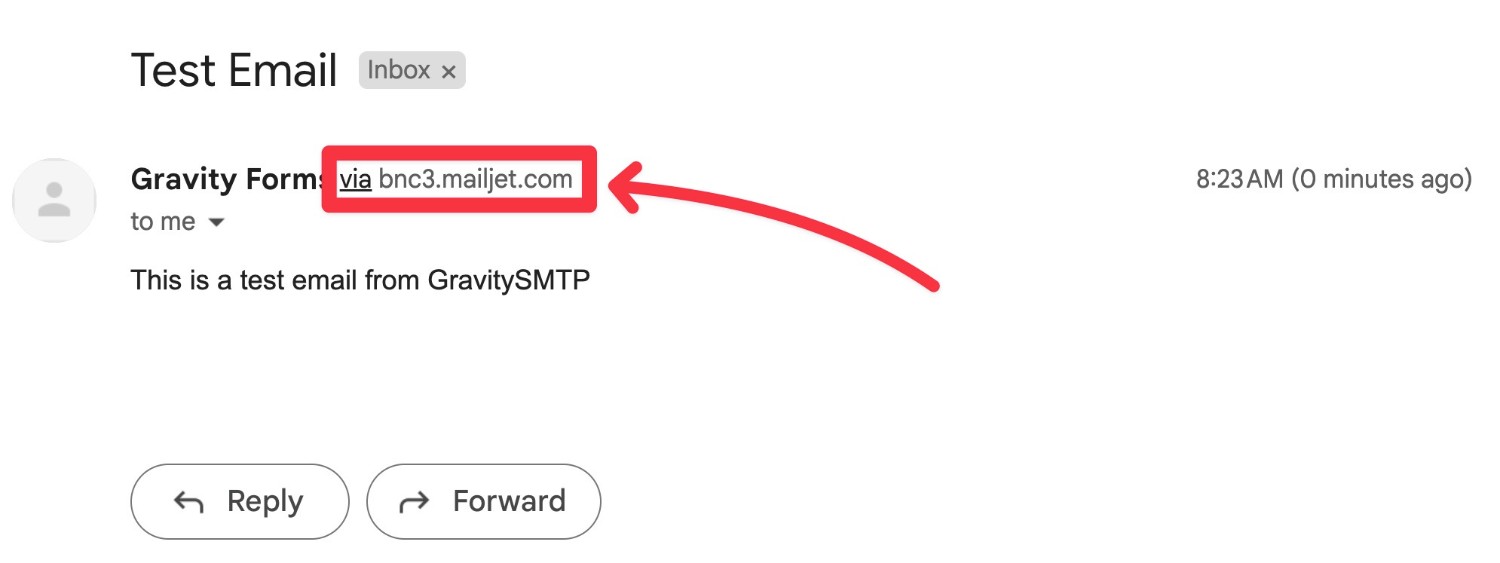
Before you start sending emails with SendGrid, we recommend fully authenticating the domain name that you want to send emails from.
While this is technically optional, unauthenticated emails might still have spam issues. Additionally, if you do not set up domain authentication, your site’s emails will still show as being sent “via sendgrid.net” instead of as just coming from your “From” email address.
Here’s an example of what your emails might look like without setting up domain authentication:
To authenticate your domain name, you’ll need to add some DNS records to your domain name’s DNS management.
If you don’t feel comfortable doing that, SendGrid also offers an option to verify a single sender email address, which just requires you to click a link in an email that SendGrid offers you.

While we still recommend setting up full domain authentication if possible, the single sender option can work fine if you’re just looking for a simple way to get started and you feel overwhelmed by needing to add DNS records to your domain name.
We cover this process in more depth in our blog post about the Gravity Forms SendGrid Add-On. You can follow the guide in Step #3 – this link should take you straight to the relevant section.
SendGrid also has documentation showing you how to set up both types of authentication:
3. Access your SendGrid API credentials
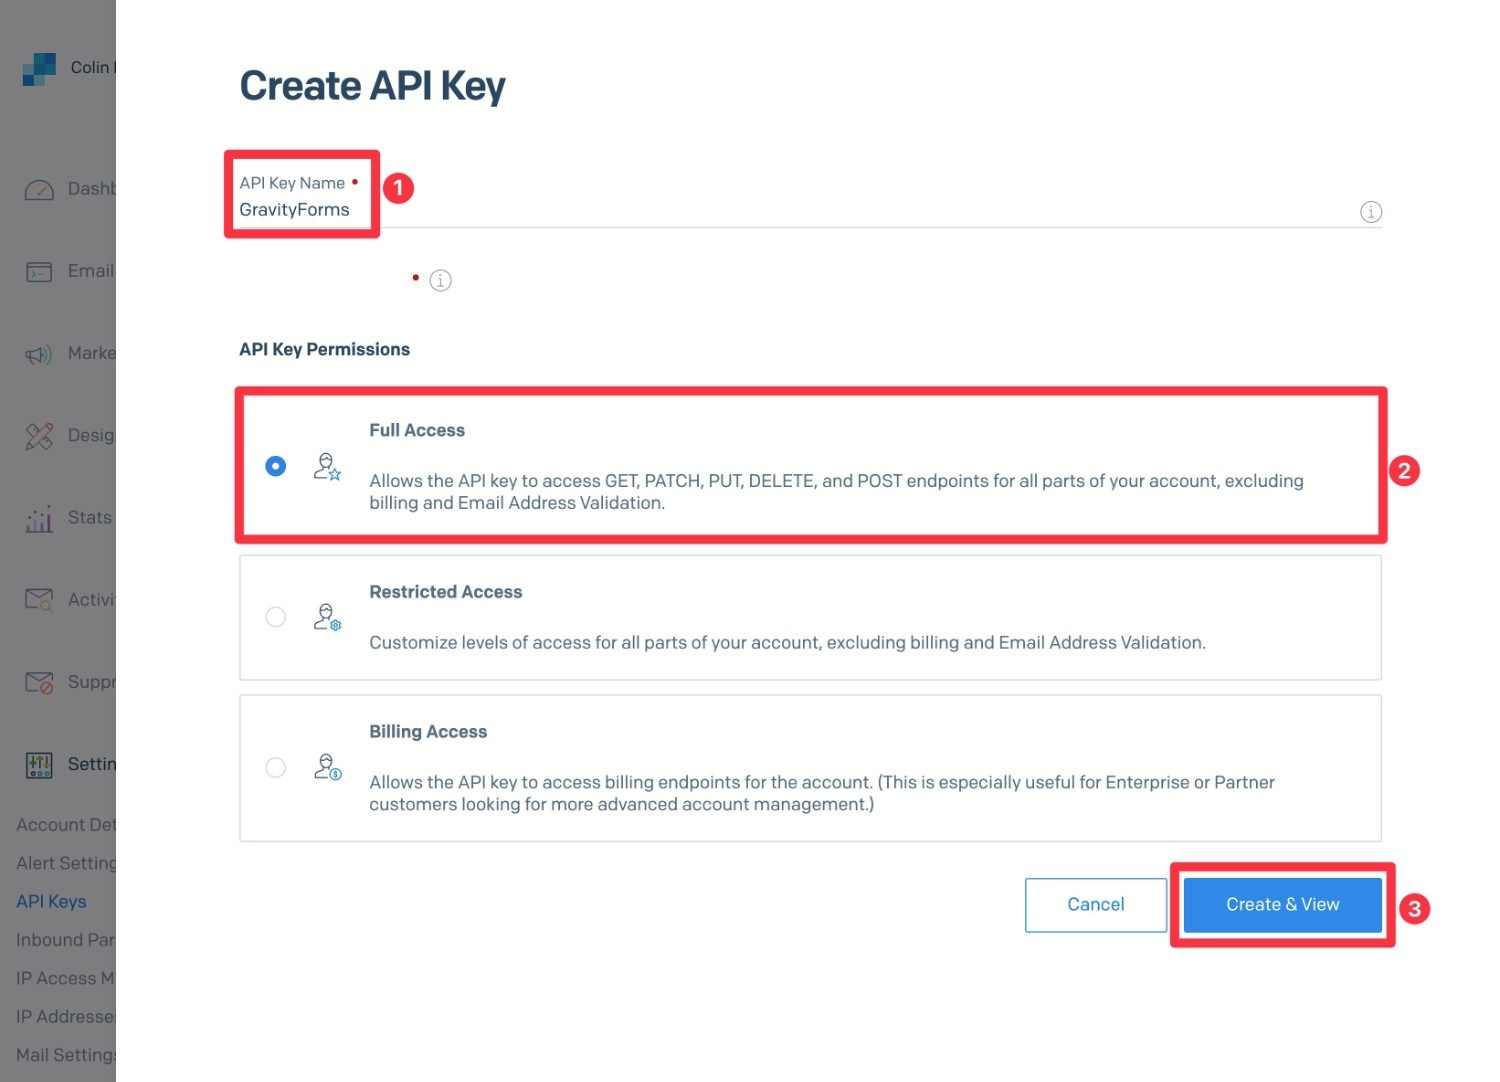
Once you’ve set up domain authentication for your WordPress site’s domain name, the next step is to generate a SendGrid API key. This is what you’ll use to allow Gravity SMTP to send its emails using SendGrid.
You can click this link to go straight to the SendGrid API dashboard. Or, go to Settings → API keys in the menu on the left side of the SendGrid dashboard.
Then, click the Create API Key button and give it Full Access.
You should then see your API key:
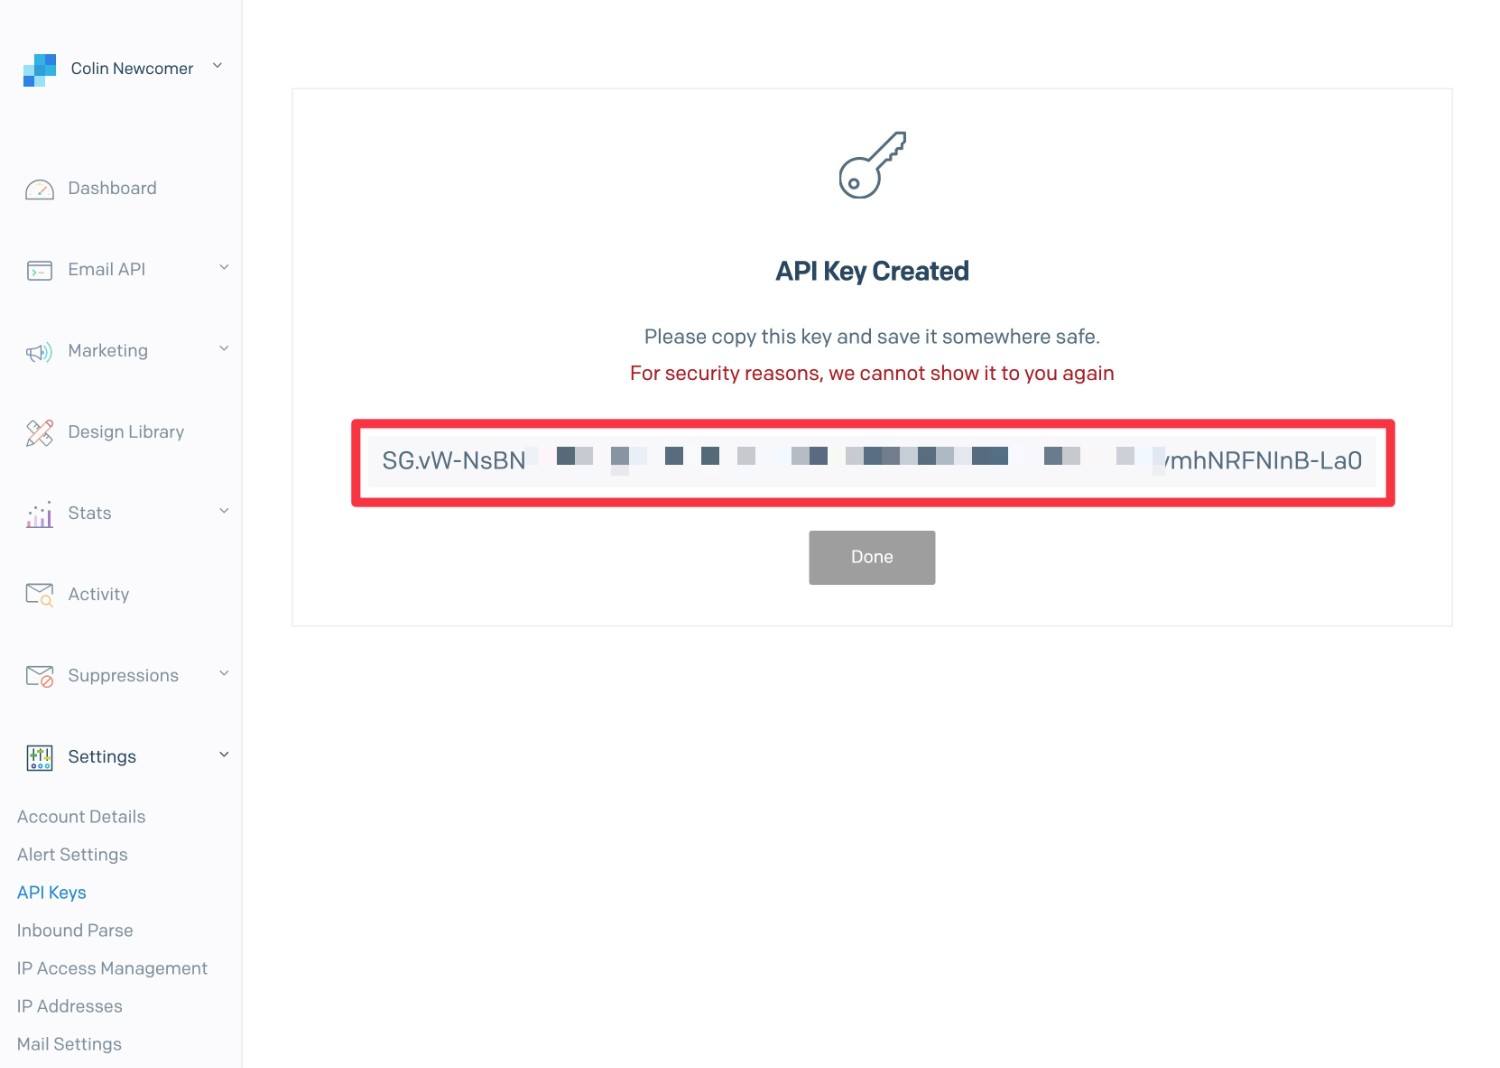
Keep this API key in a safe place because you’ll need it in the next step.
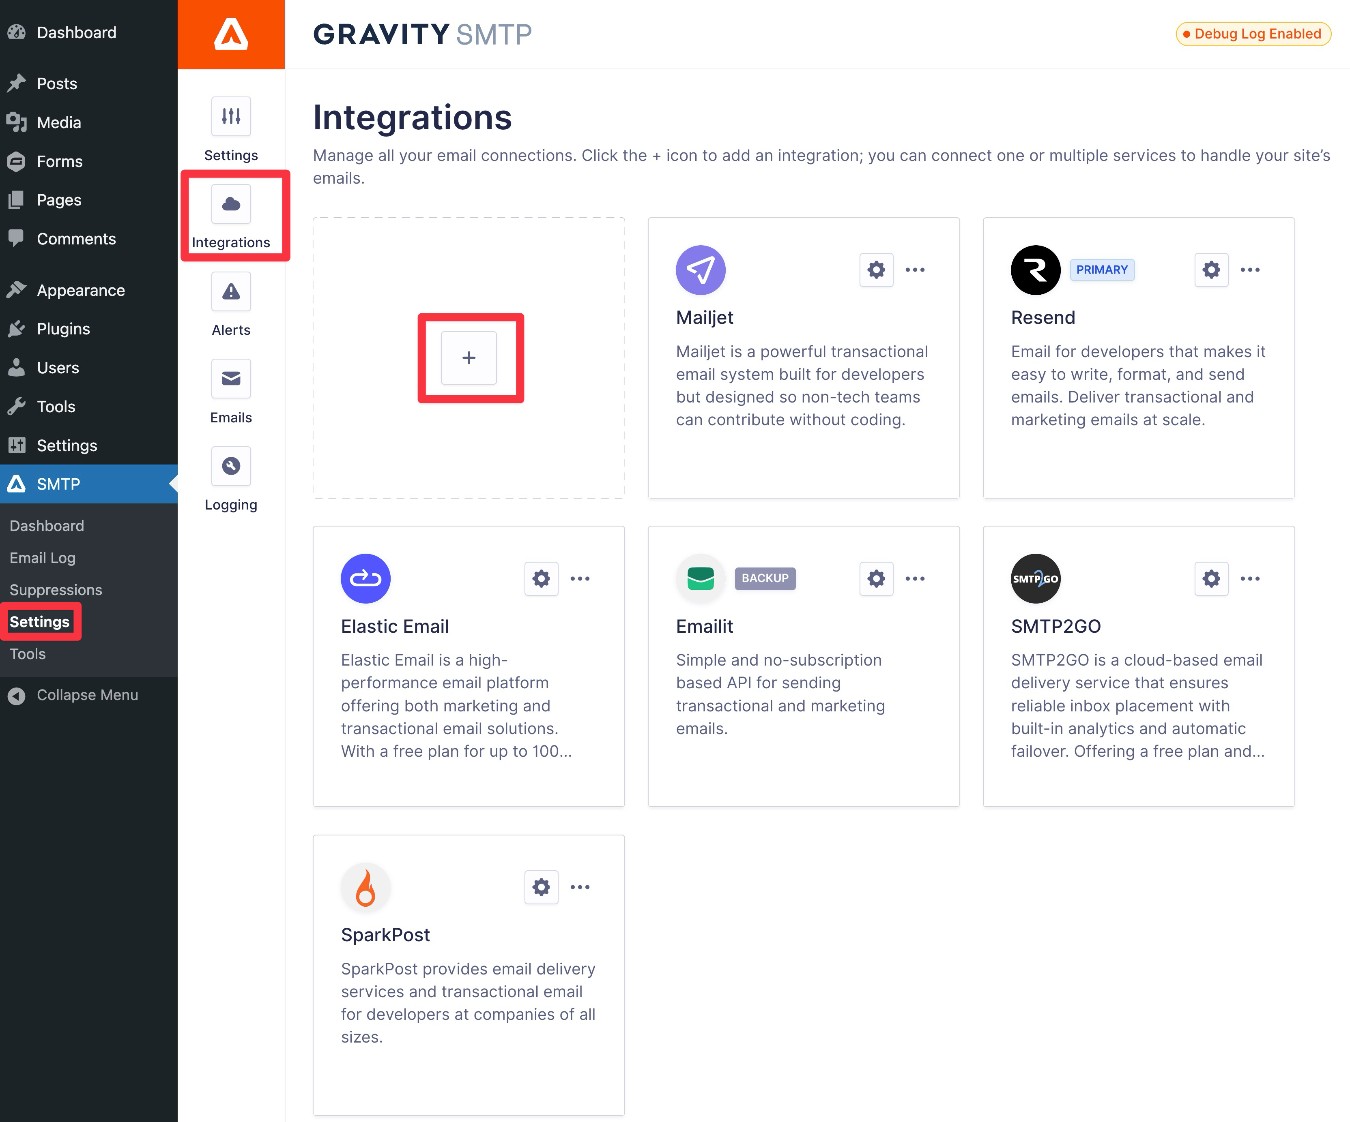
4. Add SendGrid API credentials to Gravity SMTP
Once you’ve copied your SendGrid API key to a safe place, you’ll perform the rest of the setup from your WordPress dashboard:
- Open your WordPress dashboard.
- Go to Gravity SMTP → Settings → Integrations.
- Click the Plus icon, which should launch a slide-out area where you can add new integrations.
In the slide-out area, find and select SendGrid in the list.
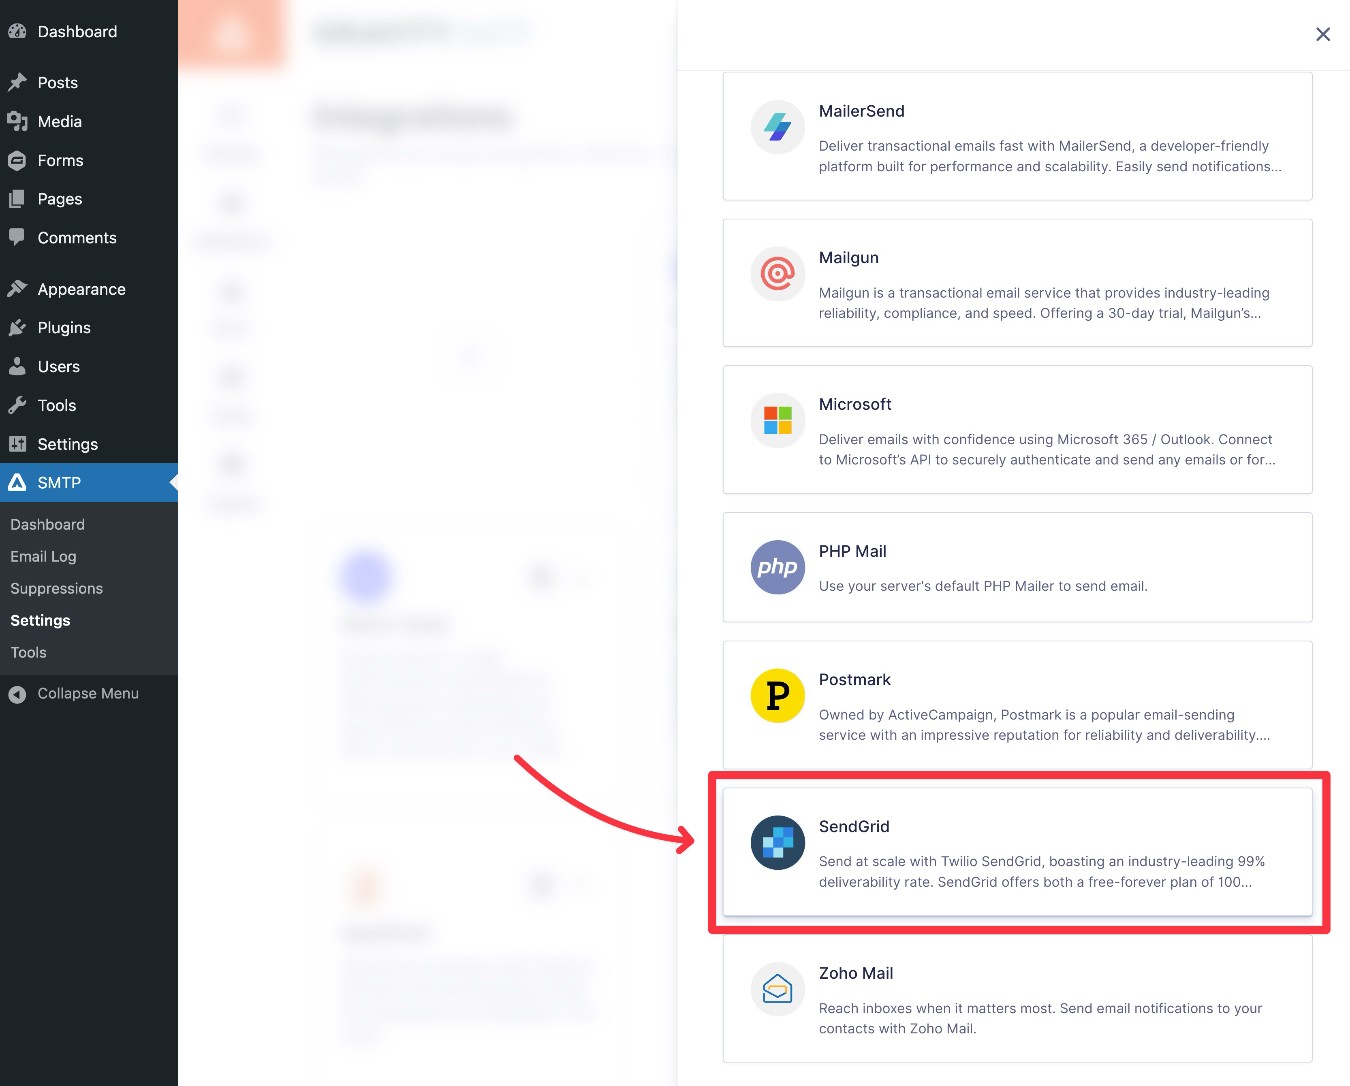
This will open a settings area where you can add your SendGrid API key, along with the Default From Email, Default From Name, and Default Reply-To Email that you want to use when sending your emails.
Note – make sure that your From Email is one that you’ve authenticated with SendGrid. If you set up domain authentication, this can be any email that uses your site’s domain name. If you only set up single sender verification, you must use the exact email address that you verified.
You can also use the Force From… toggles to force other plugins to use the same name, from email, and/or reply-to email when sending emails for those plugins.
Once you’ve entered all of the information, make sure to click the Save & Enable button at the bottom.

5. Set SendGrid as your primary email sending service
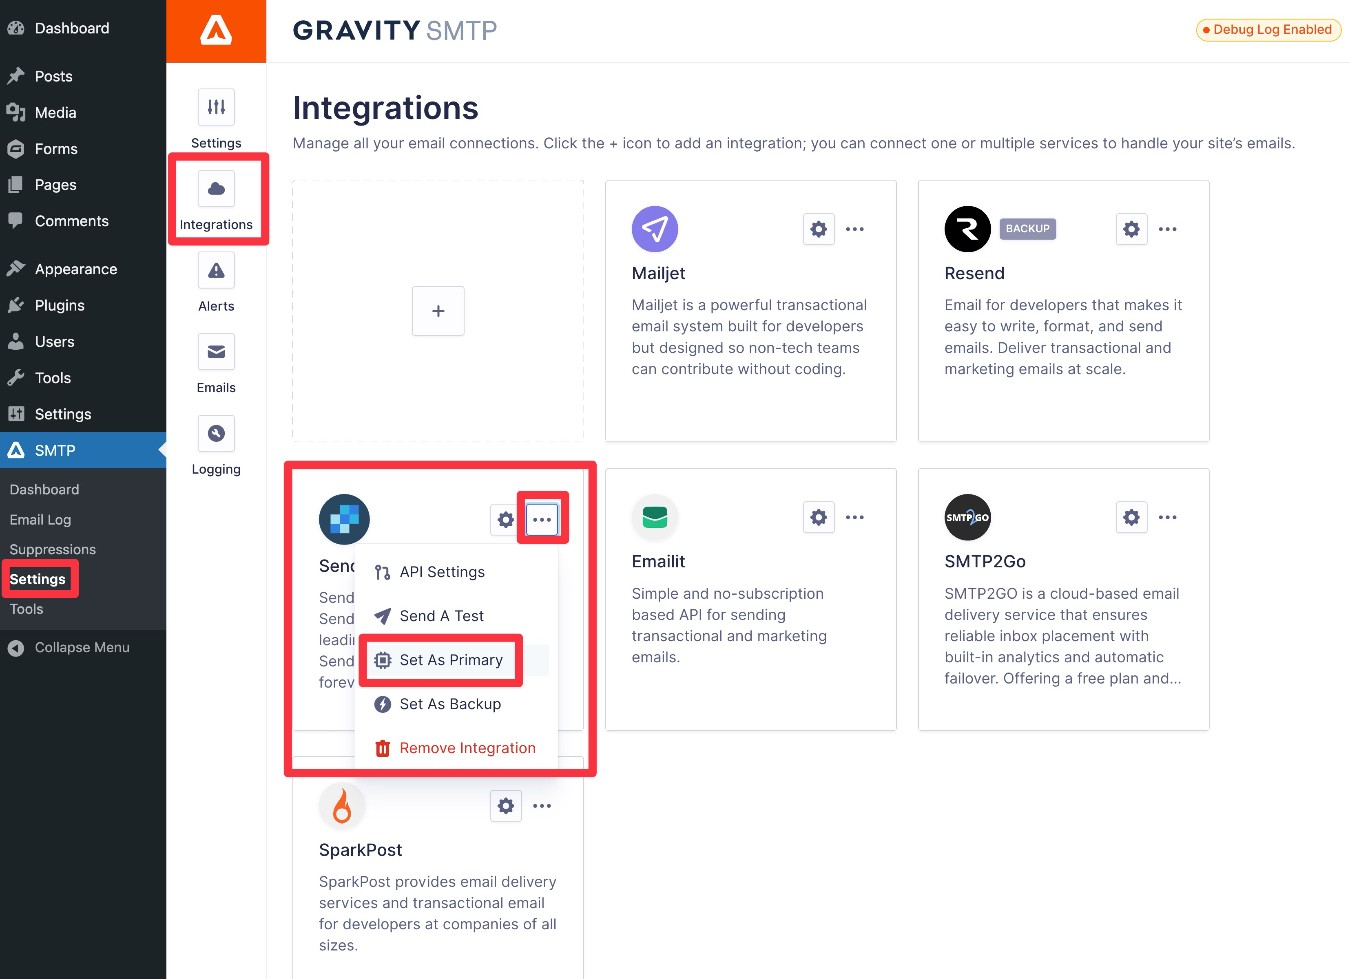
Once you’ve set up SendGrid in Gravity SMTP, you’ll want to make sure that you’ve also set it as your primary email sending service:
- Open the Gravity SMTP integrations area, if you aren’t already there (Gravity SMTP → Settings → Integrations).
- Find SendGrid in the list of integrations.
- Click the three dots icon for SendGrid.
- Choose Set as Primary from the drop-down.
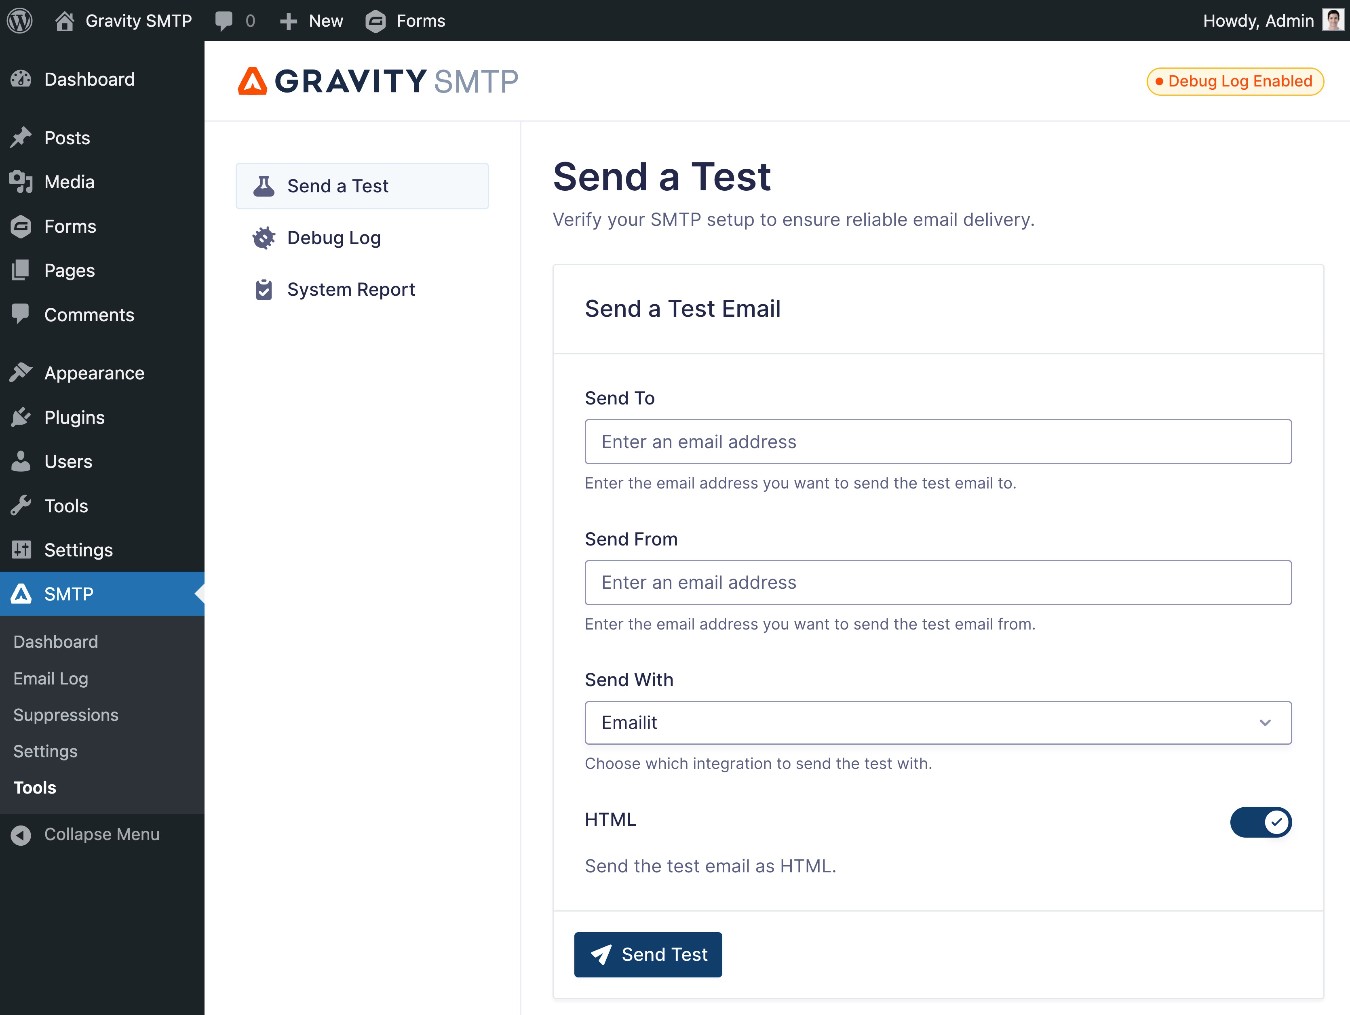
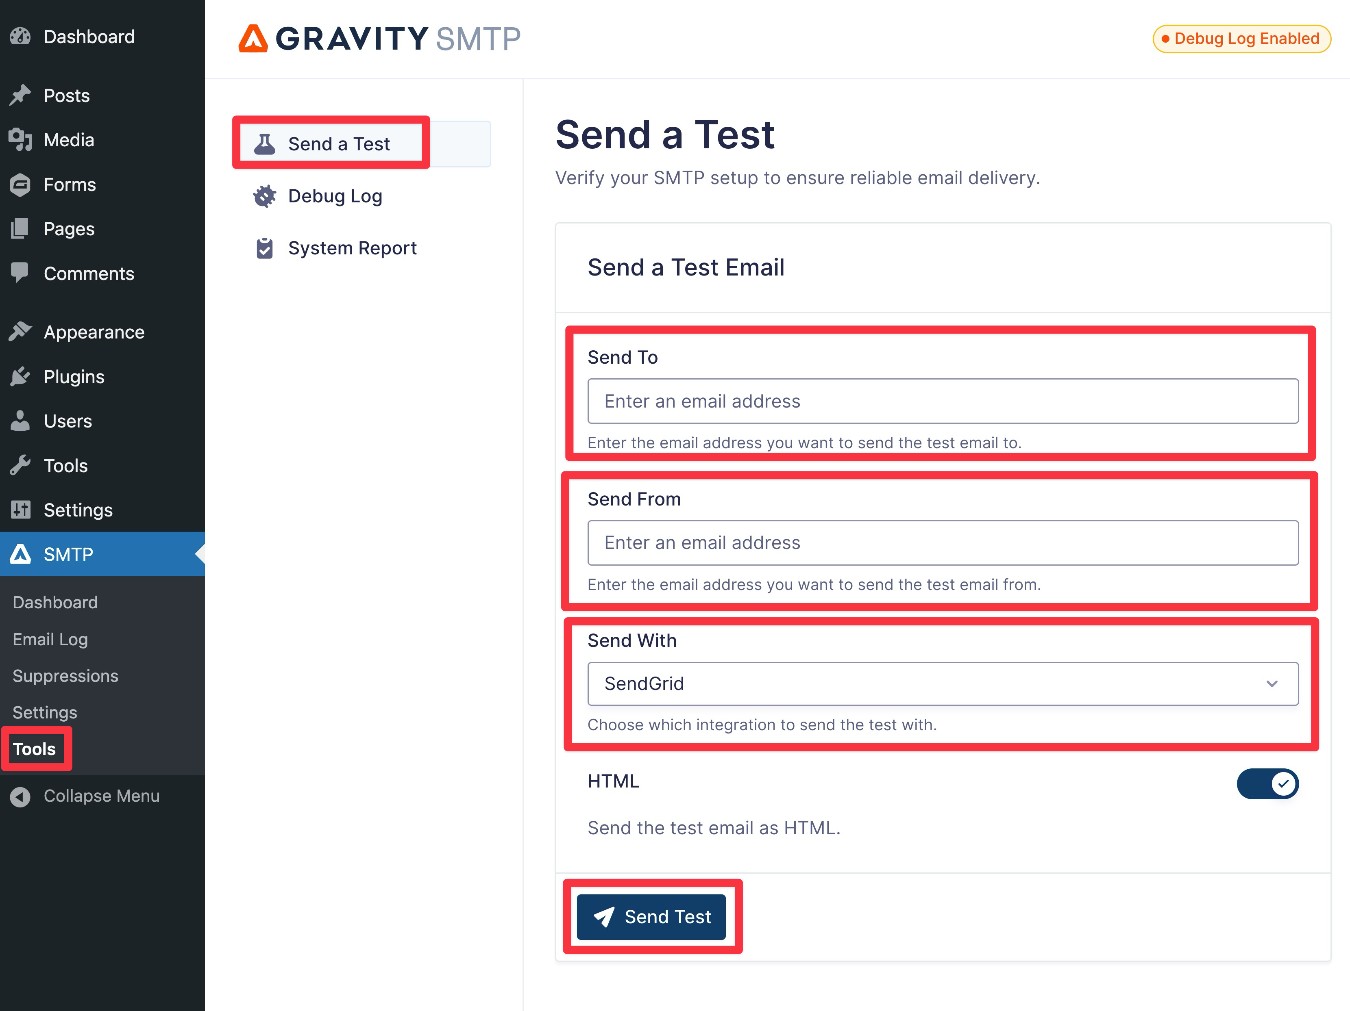
6. Send a test email
To finish things out, you’ll want to send a test email using Gravity SMTP to make sure that everything is working properly:
- Go to Gravity SMTP → Tools → Send a Test.
- Enter your email address in the Send To box.
- Enter the From Email that you want to use. Make sure this email uses the domain name that you authenticated with SendGrid.
- Make sure that SendGrid is selected in the Send With drop-down.
- Click the Send Test button.
If you see the email in your inbox, you can be confident that your site is properly configured to use SendGrid.
If you’ve enabled the email logging functionality in Gravity SMTP, you’ll also be able to track your site’s emails via the email log.
7. Set up a backup sending service (optional)
This step is totally optional.
However, if your site is sending really important emails, Gravity SMTP gives you the option to set up a backup sending service.
If an email fails to send via your site’s primary service for any reason, Gravity SMTP will automatically try to resend the email using your backup service. This lets you ensure reliable email deliverability even if your site were to lose its connection to the primary sending service (perhaps because of a temporary outage or issues with your site’s API connection).
If you do want to use a backup sending service, you’ll first need to connect your site to that service. We have dedicated tutorials for how to do this for the various services that Gravity SMTP currently supports:
- Amazon SES
- Brevo
- Elastic Email
- Emailit
- Gmail / Google Workspace
- Mailchimp Transactional
- MailerSend
- Mailgun
- Mailjet
- Outlook / Microsoft 365
- Postmark
- Resend
- SendGrid
- SMTP2Go
- SparkPost
- Zoho Mail
For example, if you want to use Resend as your backup service, you would first add your domain name to your Resend account and locate your API key, as we show you in our full Resend tutorial.
You would then connect Gravity SMTP to Resend by adding it as an integration, much like we showed you with SendGrid above.
Once you’ve connected your site to Resend (or whichever service you want to use as a backup), you can enable it as your site’s backup email sending service by following these instructions:
- Open the Gravity SMTP integrations area, if you aren’t already there (Gravity SMTP → Settings → Integrations).
- Find Resend in the list of integrations.
- Click the three dots icon for Resend.
- Choose Set as Backup from the drop-down.
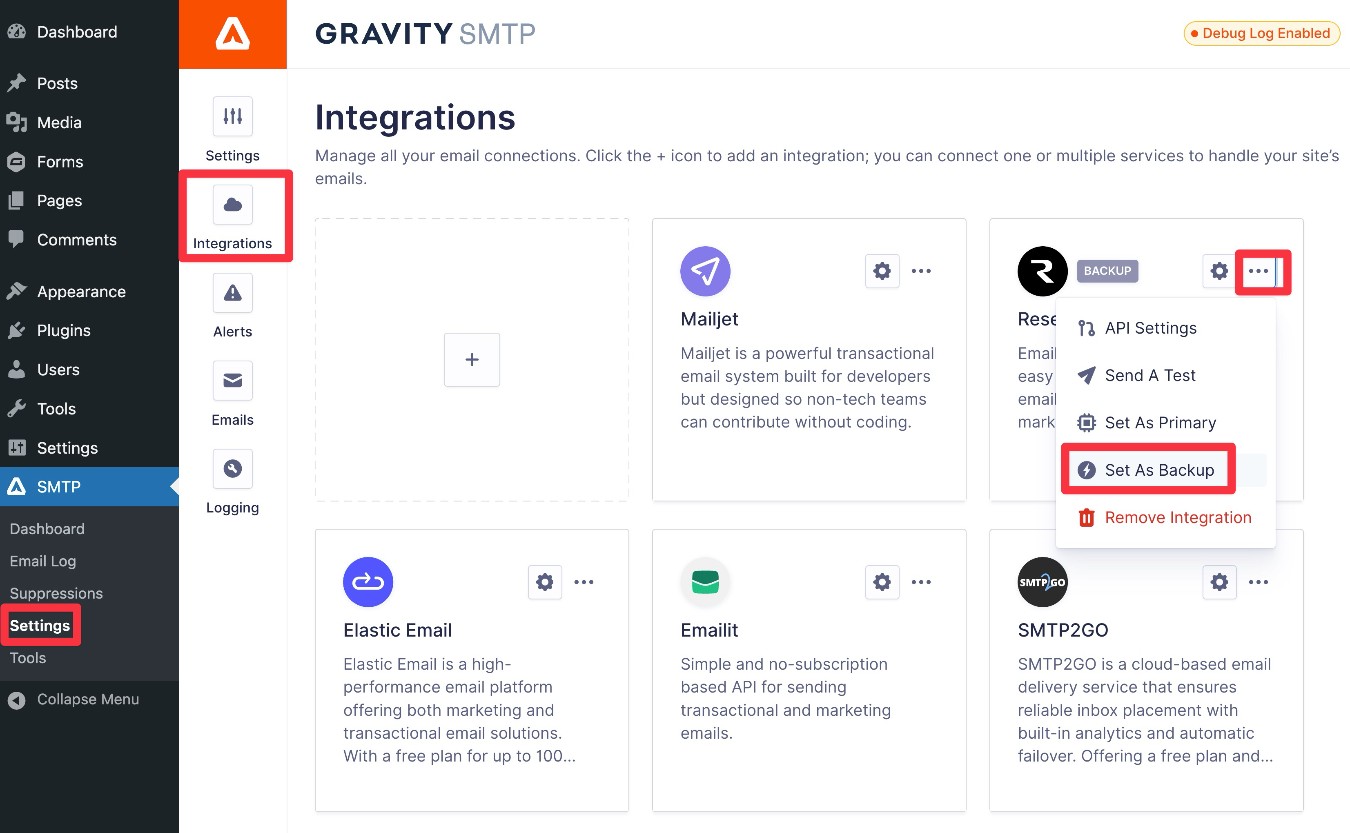
You should also see a Backup label appear next to Resend, which reminds you that it’s only the backup option.
If you want to send a test email using your backup service, here’s how:
- Go to SMTP → Tools → Send a Test.
- Enter the email address to which you want to send an email.
- Enter the email address from which you want to send the test email – make sure this email uses the same domain name that you authenticated with your backup service.
- Use the Send With drop-down to select your backup service. By default, it will send via your primary service.
- Click the Send Test button.
How to set up Gravity SMTP using a Custom SMTP server
If you don’t want to use one of Gravity SMTP’s built-in integrations, you can also use the custom SMTP option to connect to any SMTP server.
The advantage of this method is that it opens up an even broader array of new services that you can use to send your WordPress site’s emails.
1. Locate your SMTP server credentials
To start, you’ll need to locate the credentials for the SMTP server that you want to use.
Unfortunately, we can’t show you exactly how this works because it will depend on the service that you’re using.
Here are the details that you’ll need to find (usually you’ll find all of this information in the same spot):
- SMTP Host – this could be an IP address or a domain name. E.g. email.xyz.com.
- SMTP Port – this will be a two-digital or three-digit number. E.g. 587, 465, 25, etc.
- Authentication information – this will include a username and password, as well as the relevant encryption protocol. More on this below.
To prevent unauthorized use, most SMTP servers require some additional authentication, which is what the “Authentication information” item covers in the list above.
Typically, this will be a username and a password, just like you would use to log into any other website. You’ll also need to choose the encryption protocol to encrypt your data. This will almost always be TLS, but you might also see SSL or no encryption (which we don’t recommend whenever possible).
For this example, we’ll use the free Mailjet service, which has a generous forever-free plan that lets you send up to 200 emails per day (~6,000 emails per month).
Gravity SMTP has since added a dedicated API integration for Mailjet, which we recommend using instead of the SMTP credentials. However, we will still keep Mailjet as our example here because it illustrates the principles well.
We already signed up and verified our domain name. You may or may not need to verify your domain name depending on the SMTP server that you’re using. If you also want to use Mailjet, we recommend following these steps to validate your sending domain.
At Mailjet, the SMTP server credentials look like this:
- SMTP Host – in-v3.mailjet.com
- SMTP Port – 587
- Encryption – TLS
- Auth Username – Public API key from Mailjet
- Auth Password – Secret API key from Mailjet
If you’re unable to locate these details, we recommend reaching out to the support staff of whatever service you’re using.
2. Add your SMTP server credentials to Gravity SMTP
Once you’ve located the SMTP credentials that you need, you’re ready to add them to Gravity SMTP:
- Open your WordPress dashboard.
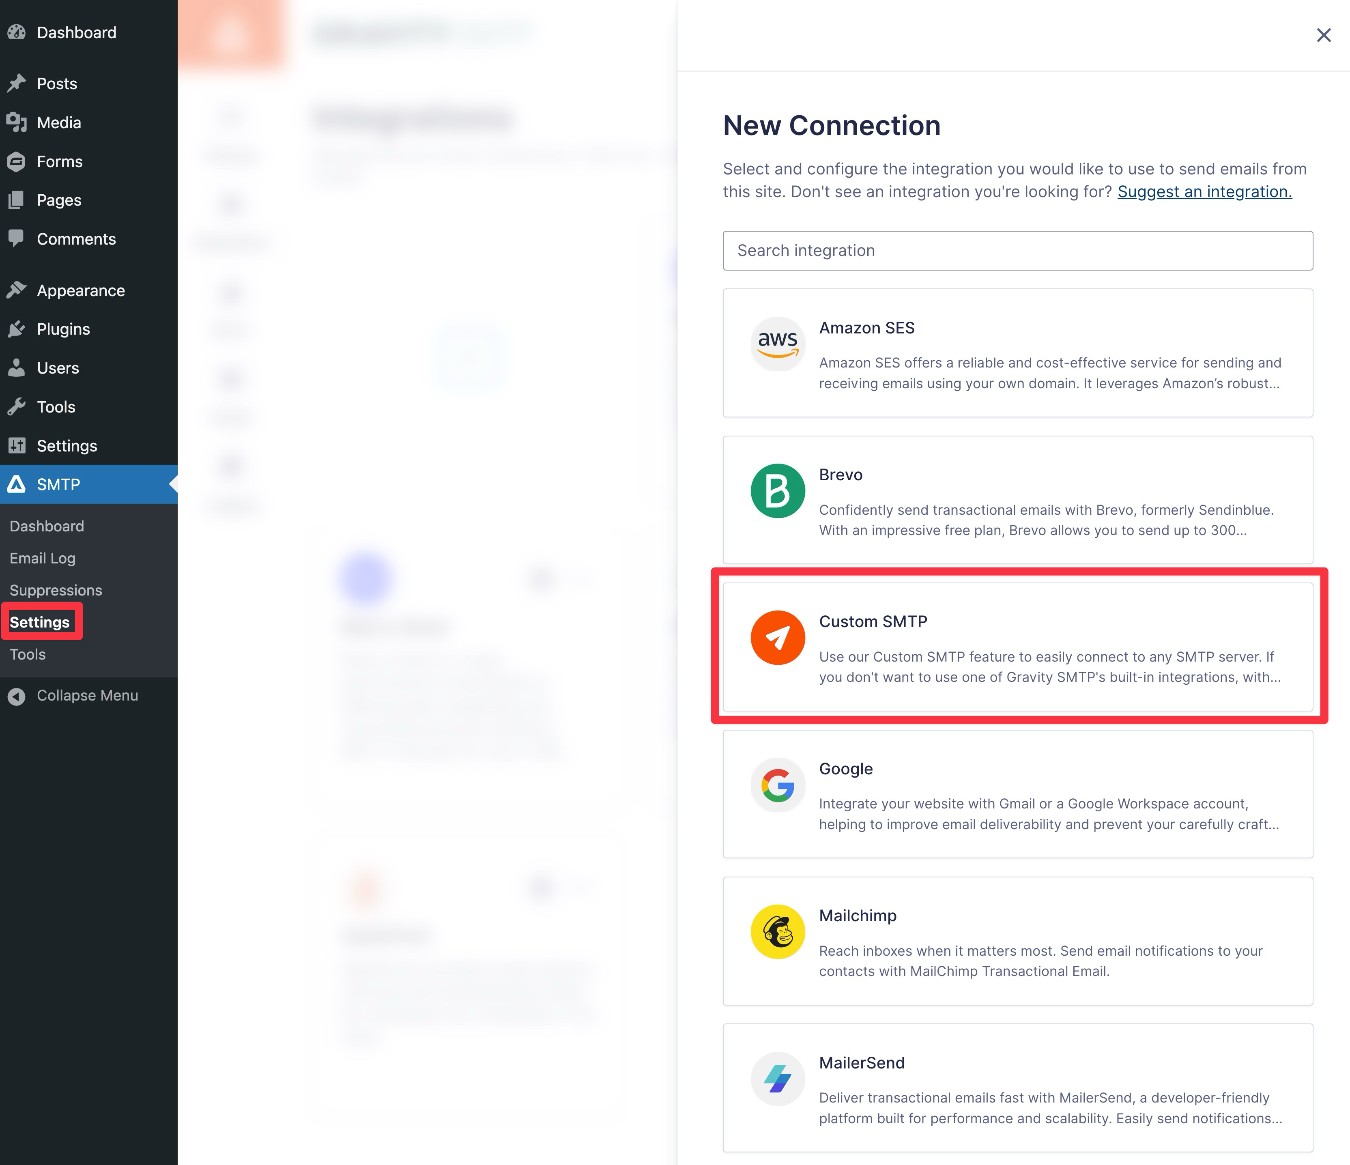
- Go to Gravity SMTP → Settings → Integrations.
- Click the plus icon to add a new integration.
- In the slide-out panel that appears, select the Custom SMTP option.
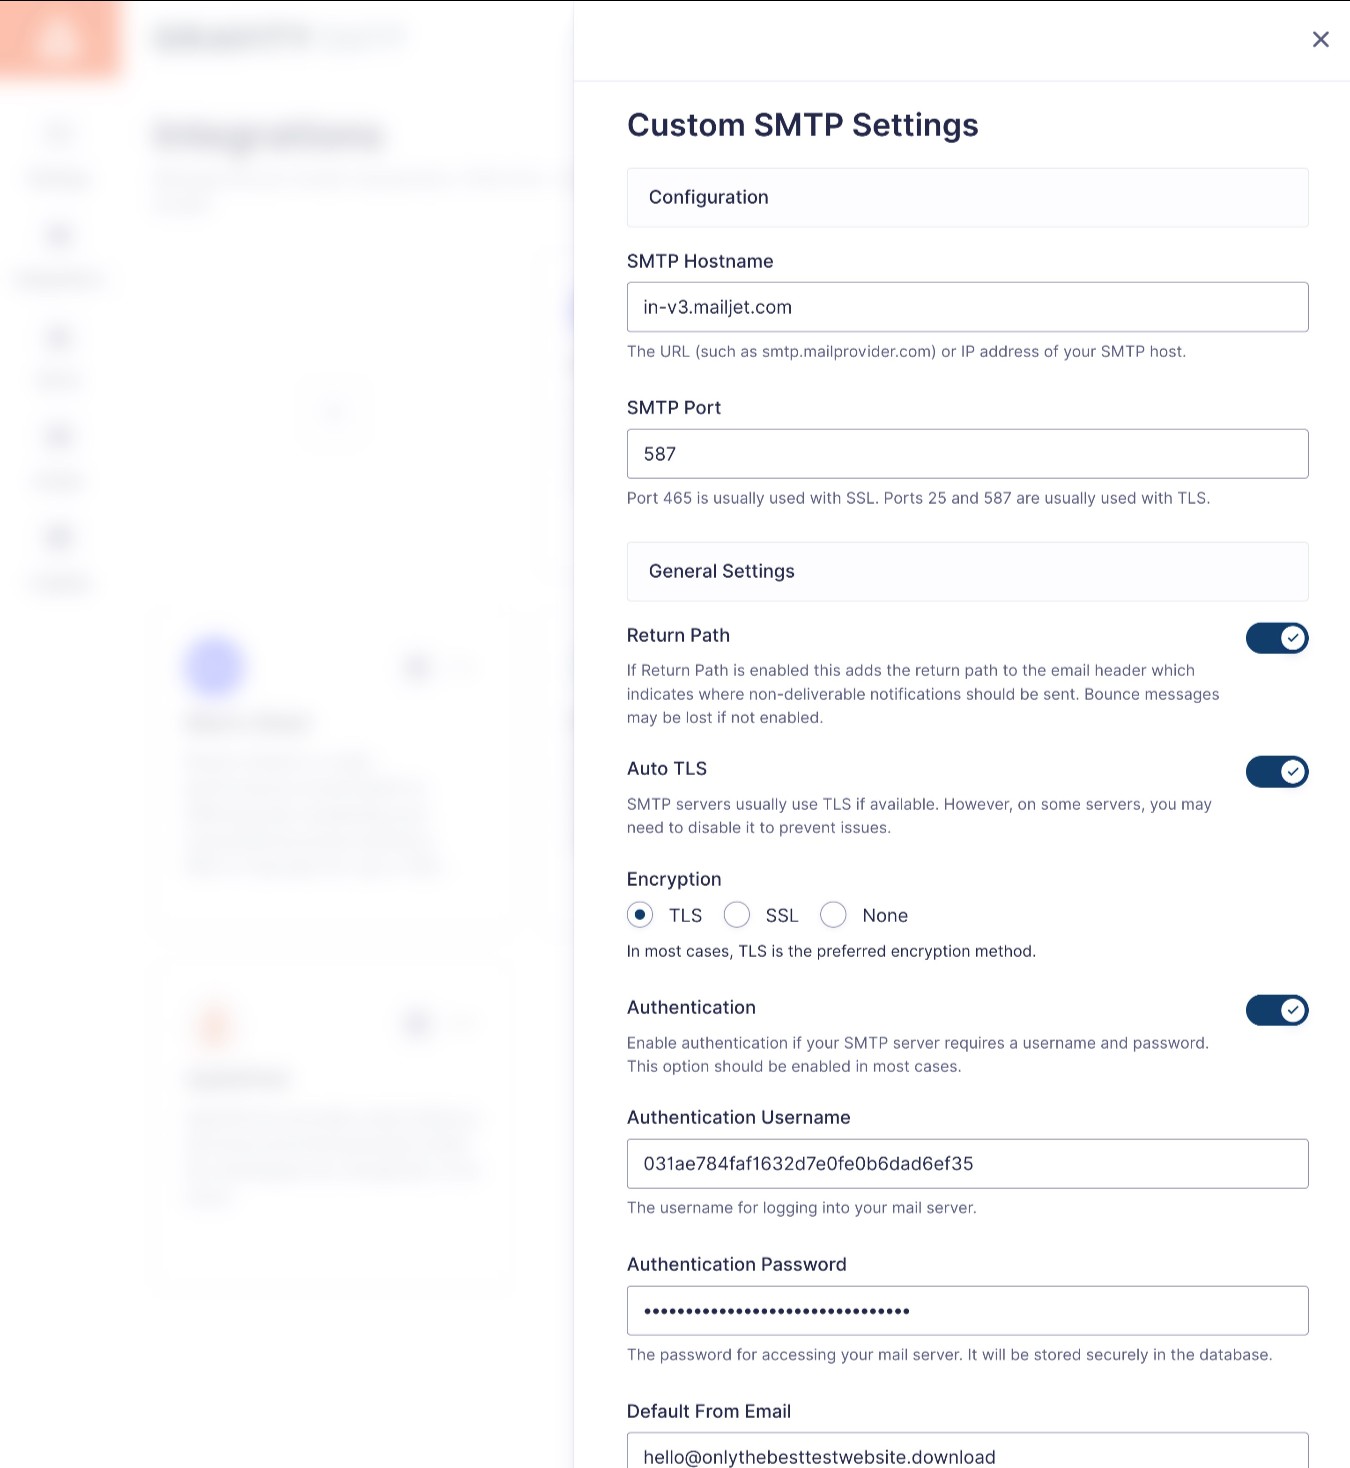
This will open a settings area where you can enter your SMTP server credentials, as well as some other information.
For our Mailjet example, we would enter things as follows:
- SMTP Host – in-v3.mailjet.com
- SMTP Port – 587
- Return Path – enabled
- Auto TLS – enabled
- Encryption – TLS
- Authentication – enabled
- Auth Username – Public API key from Mailjet
- Auth Password – Secret API key from Mailjet
- Default From Email – enter the email address that you want your emails to be sent from – e.g. [email protected].
- Default From Name – enter the name that you want your emails to be sent by – e.g. [Your Brand Name]
- Default Reply-To Email – enter the email address that you want replies to be sent to.
Once you’ve added everything, click the Save & Enable button at the bottom.
3. Set custom SMTP as primary integration
Next, make sure to enable the Custom SMTP option as your primary integration.
- Open the Gravity SMTP integrations area, if you aren’t already there (Gravity SMTP → Settings → Integrations).
- Find Custom SMTP in the list of integrations.
- Click the three dots icon for Custom SMTP.
- Choose Set as Primary from the drop-down.
4. Send a test email
Finally, you’ll want to send a test email to make sure that your SMTP server is working properly.
Again, go to Gravity SMTP → Tools → Send a Test, making sure to choose Custom SMTP in the Send With drop-down.
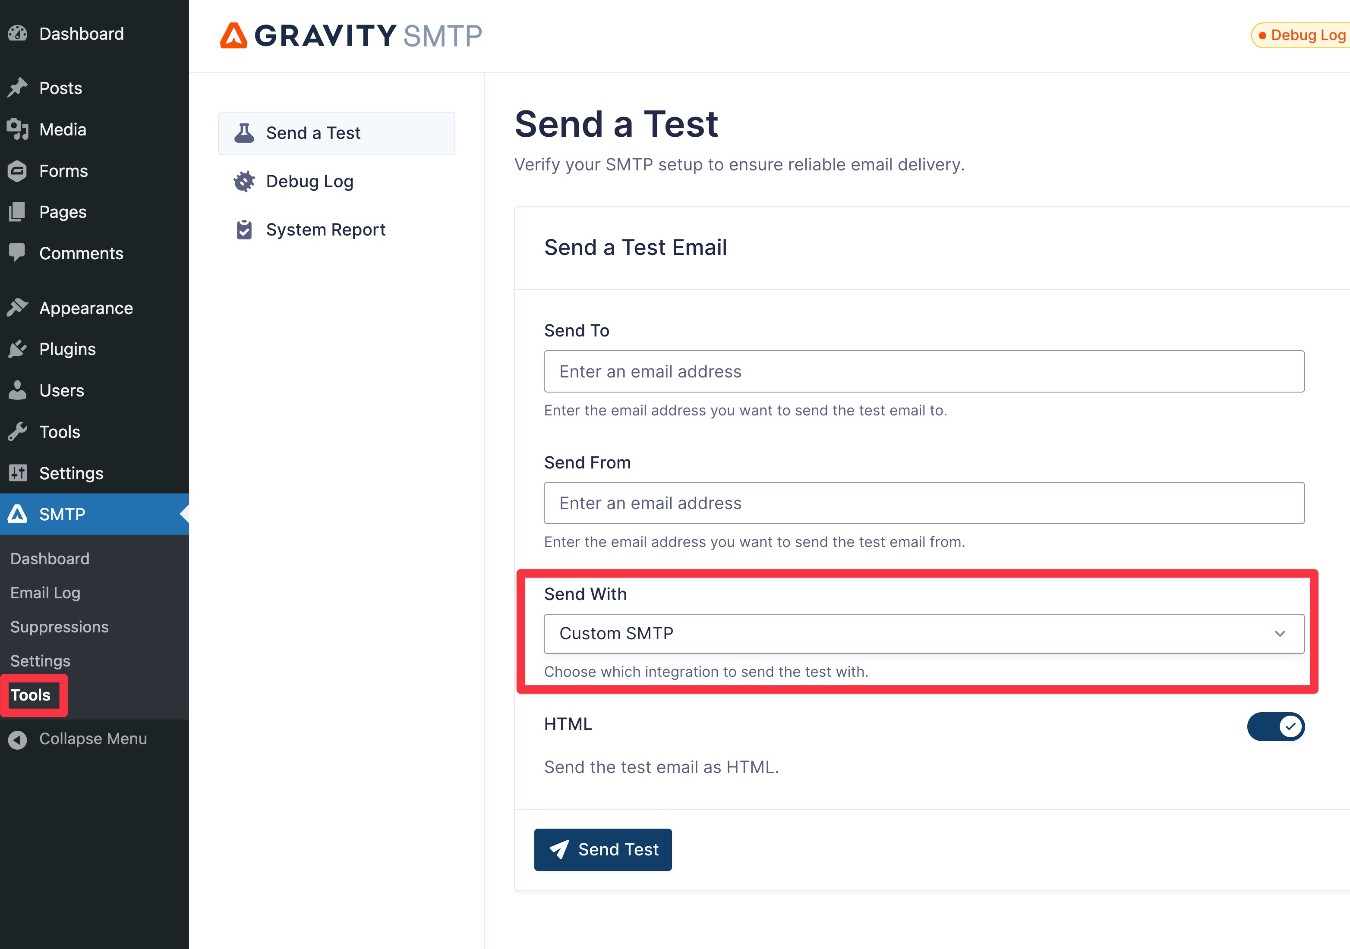
If you see the email in your inbox, you know that everything is working properly.
If you’ve enabled email logging, you’ll also be able to monitor emails from the email log.
For more in-depth information on Gravity SMTP, please check out the documentation.
How to migrate from WP Mail SMTP to Gravity SMTP
In the tutorials above, we assumed that you had been using the default WordPress email sending method before setting up Gravity SMTP on your site.
However, some of you might be looking to switch from a plugin like WP Mail SMTP.
If you are already using the free or premium version of WP Mail SMTP, Gravity SMTP includes a built-in migration tool to help you seamlessly migrate all of your email service connections without any interruption in delivery.
Here’s a quick guide on how to migrate WP Mail SMTP to Gravity SMTP…
1. Install and activate the Gravity SMTP plugin
To get started, install and activate the Gravity SMTP plugin on the site where you’re using WP Mail SMTP.
If you’re holding the Gravity Forms Elite license, you can download Gravity SMTP from the My Account area on the Gravity Forms website.
Do not deactivate the WP Mail SMTP plugin yet. You should have both plugins active until you complete the migration.
2. Complete the Gravity SMTP setup wizard, including migration
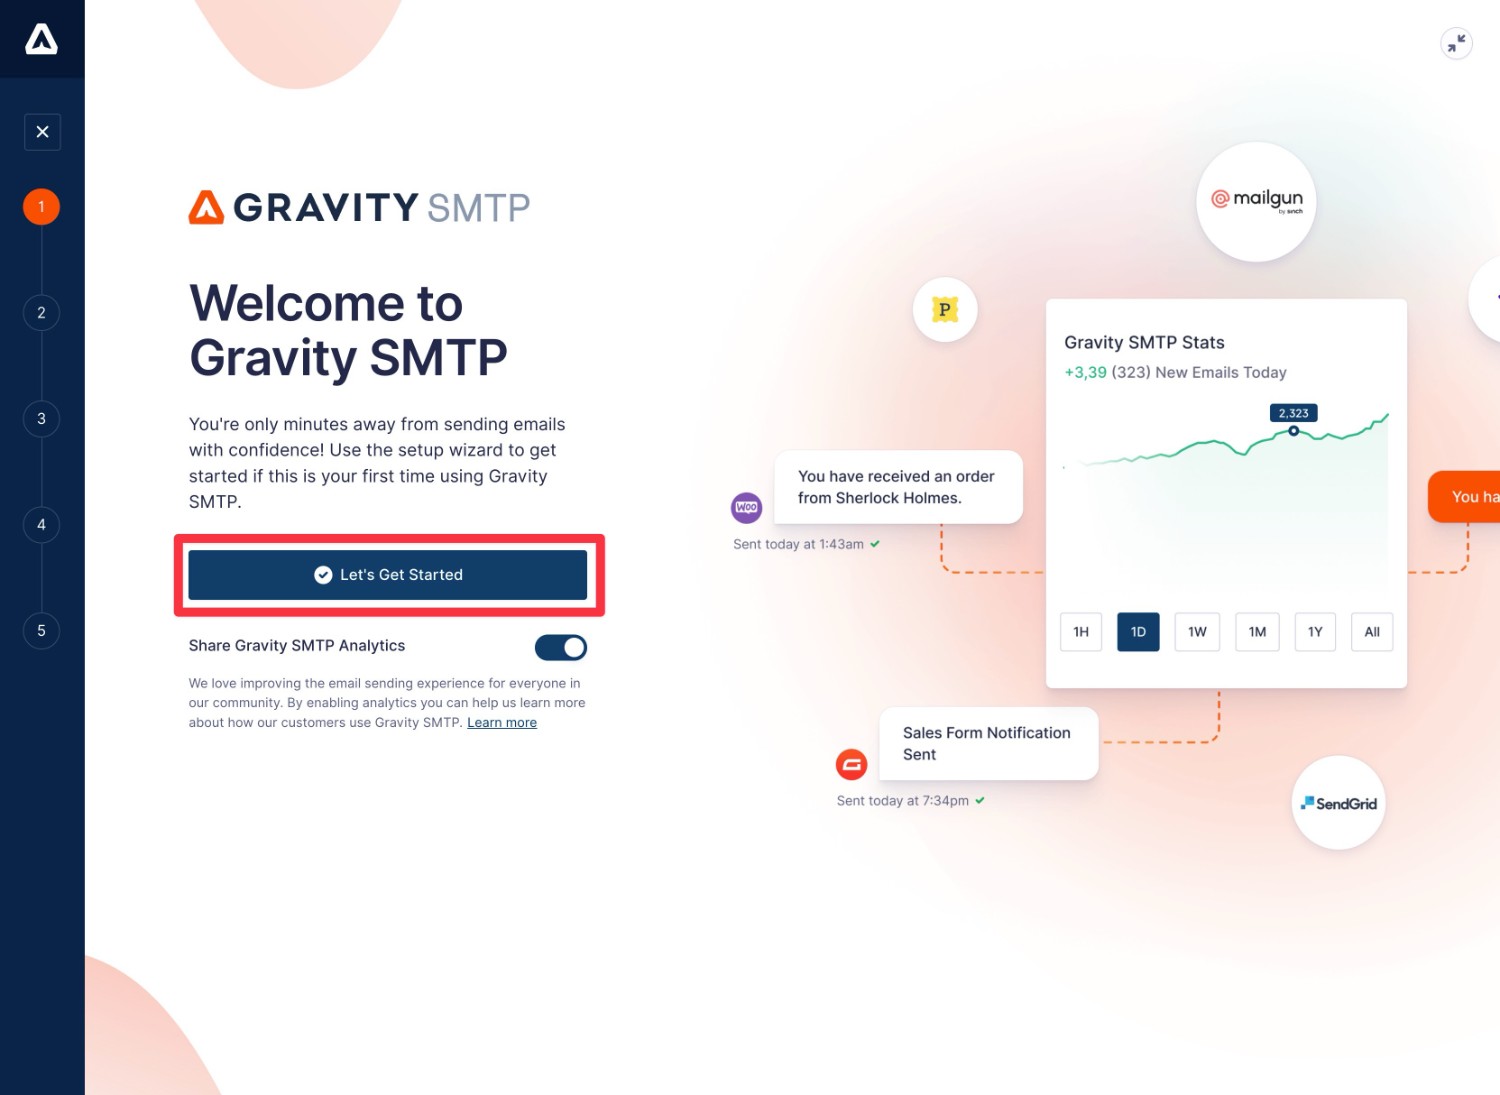
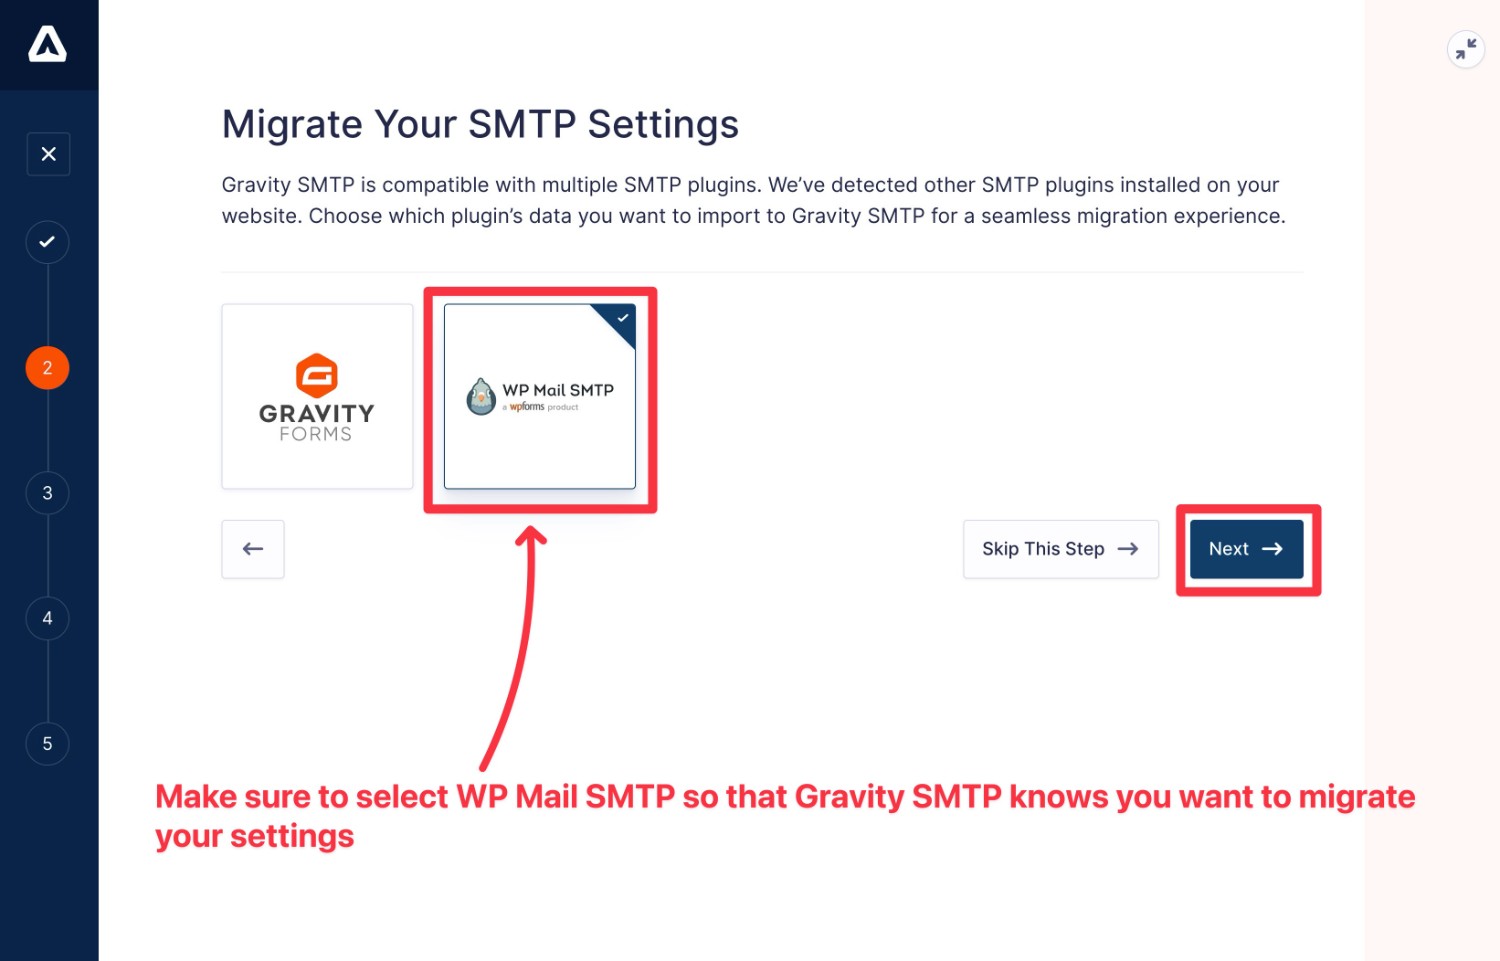
Once you’ve activated Gravity SMTP, click on the new SMTP tab in your WordPress dashboard sidebar. This should automatically launch the Gravity SMTP setup wizard.
To start the wizard, click the blue Let’s Get Started button.
On the next screen, select WP Mail SMTP from the list of migration options. This tells Gravity SMTP that you want to migrate all of the settings from WP Mail SMTP. This includes all of the services that you’ve connected to WP Mail SMTP – not just the primary sending service.
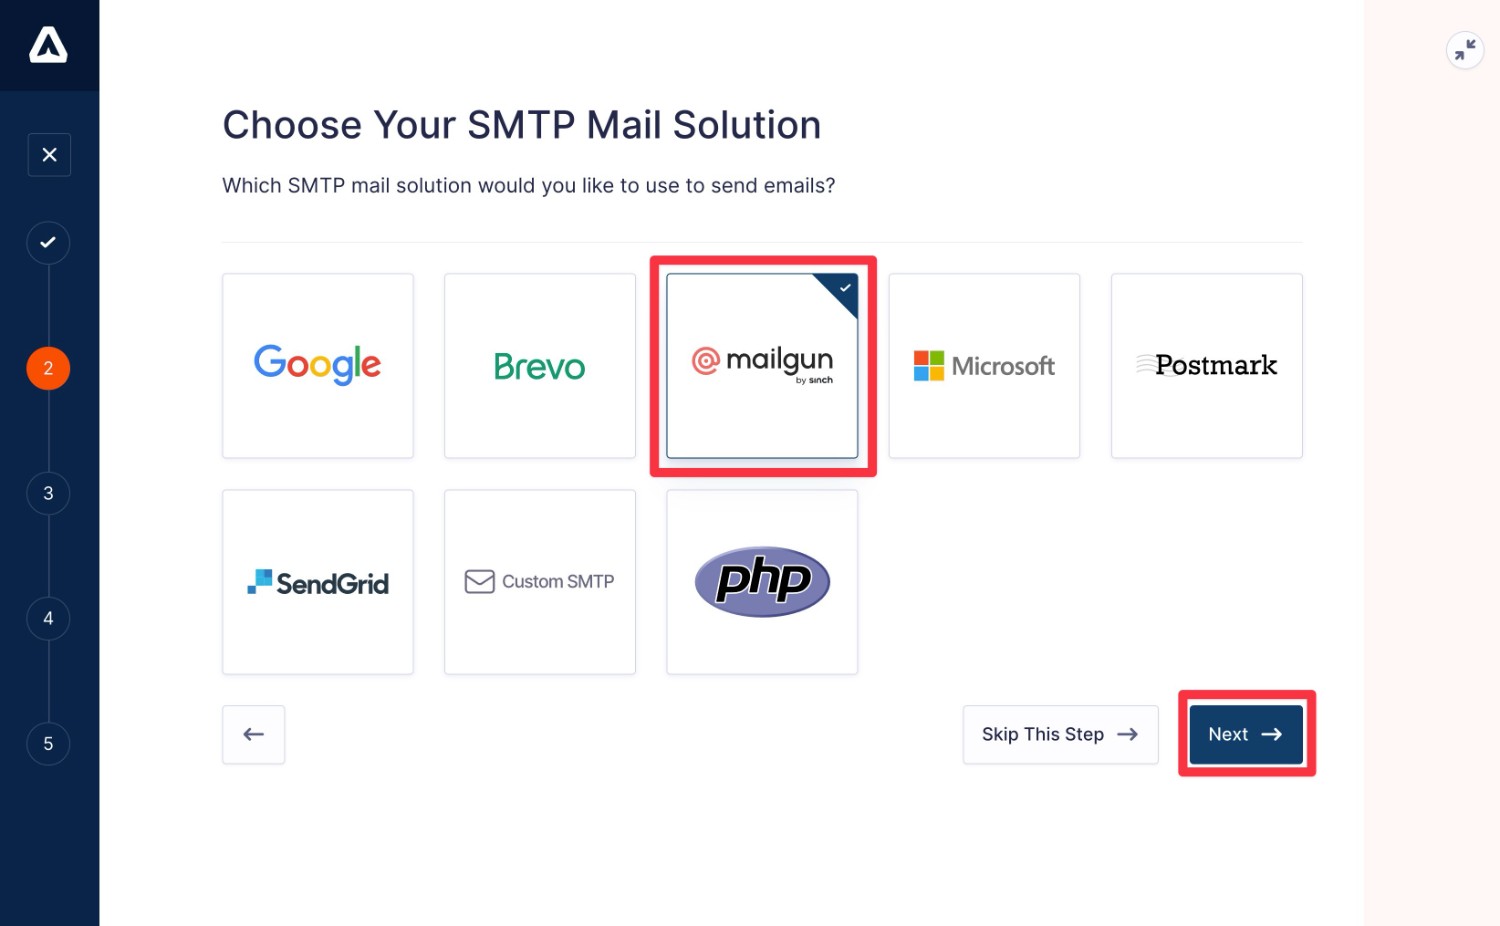
Next, you can choose which service to use as the primary sending method in Gravity SMTP.
Typically, you’ll choose the same service that you were using with WP Mail SMTP.
For this migration example, we were using Mailgun with WP Mail SMTP so we’ll also select Mailgun for Gravity SMTP.
On the next screen, you’ll see a summary of the details that Gravity SMTP has imported. For our Mailgun example, Gravity SMTP automatically imported the API key, Mailgun region, Mailgun sending domain, and the From name/email address.
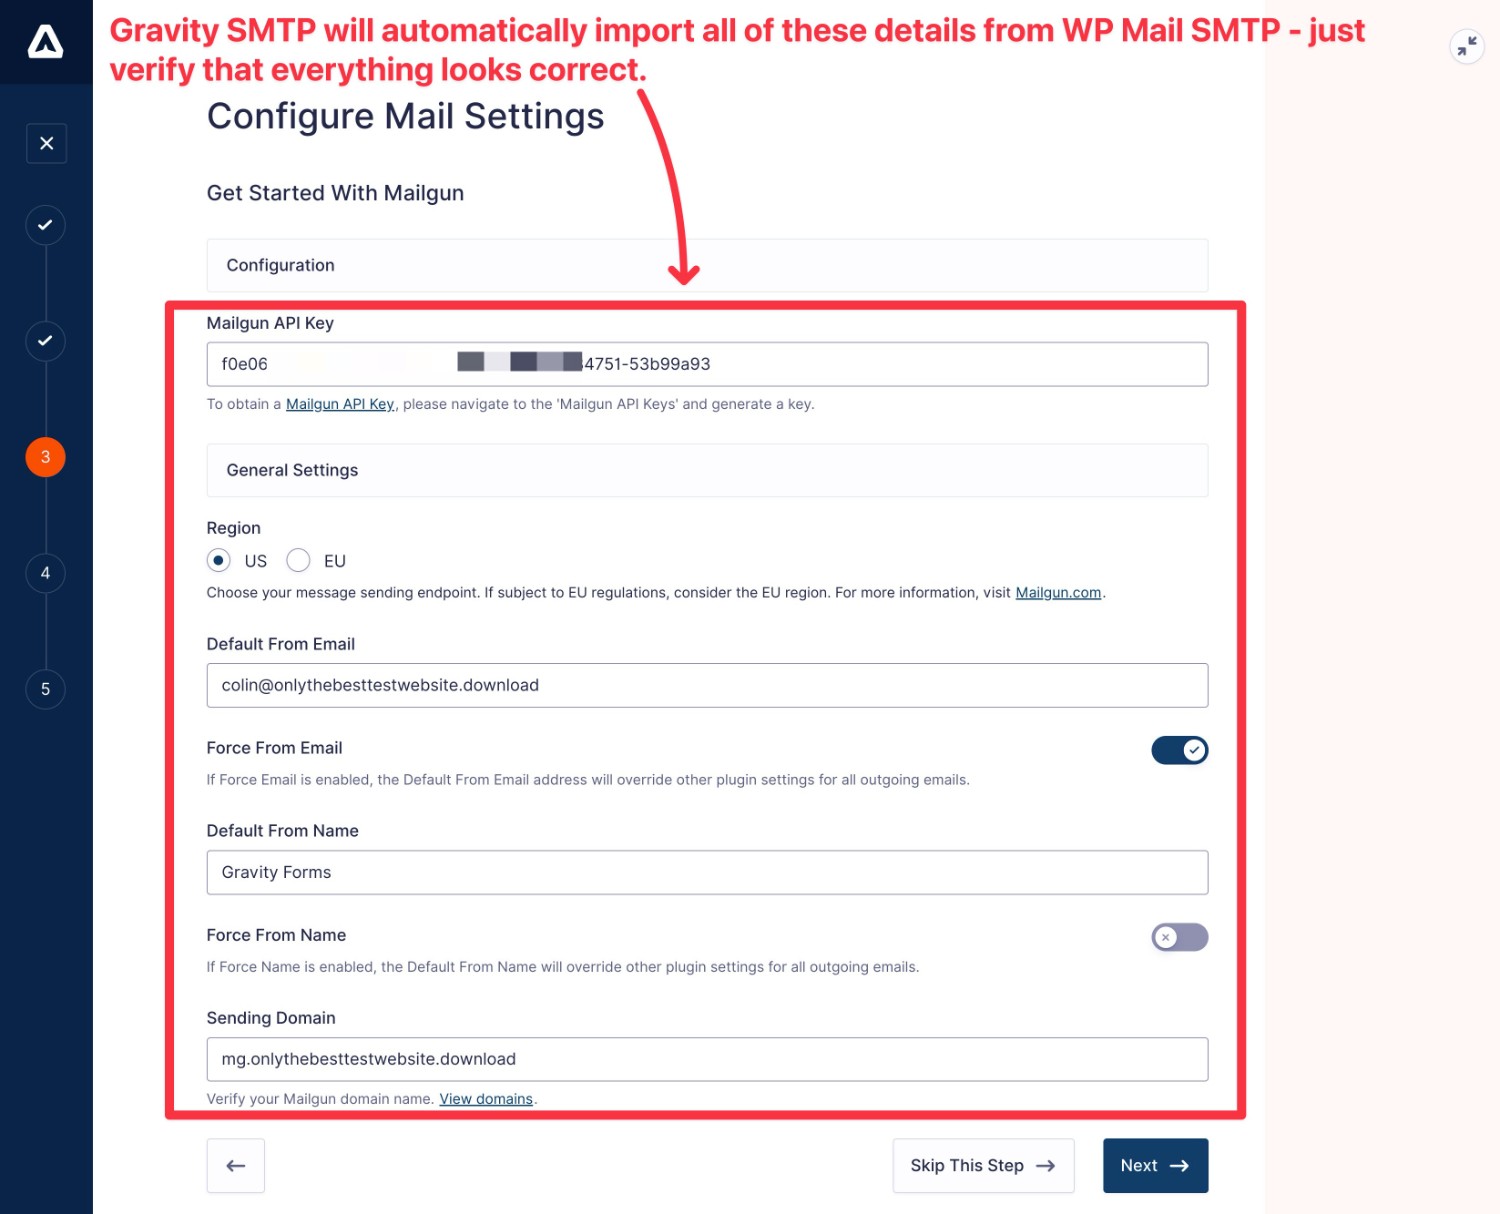
All you need to do is verify the information and then activate your chosen sending service on the last step of the setup wizard.
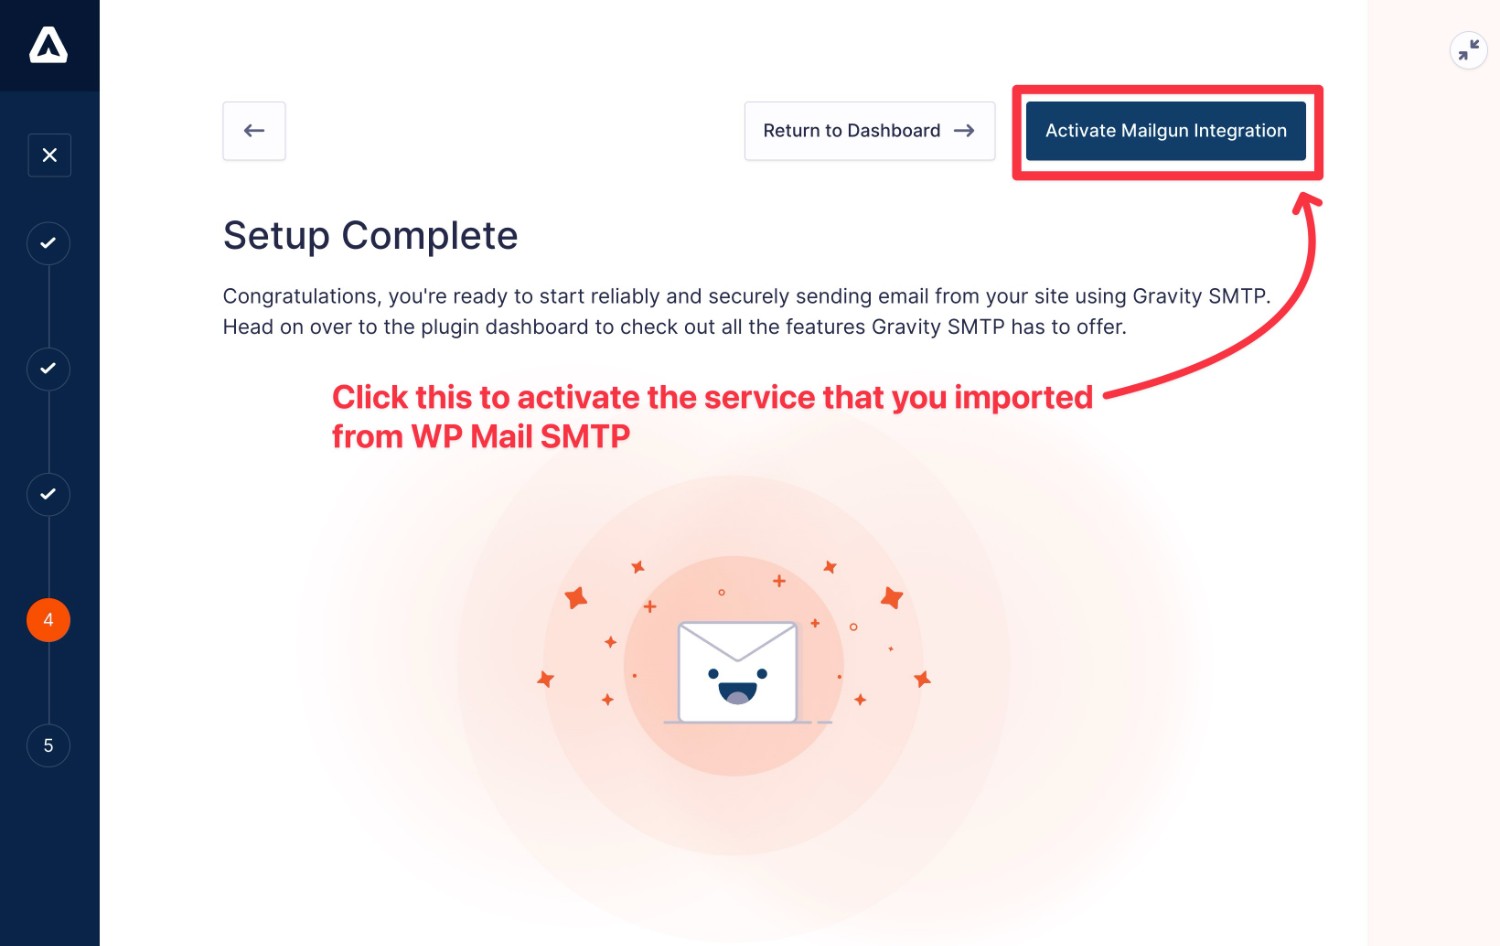
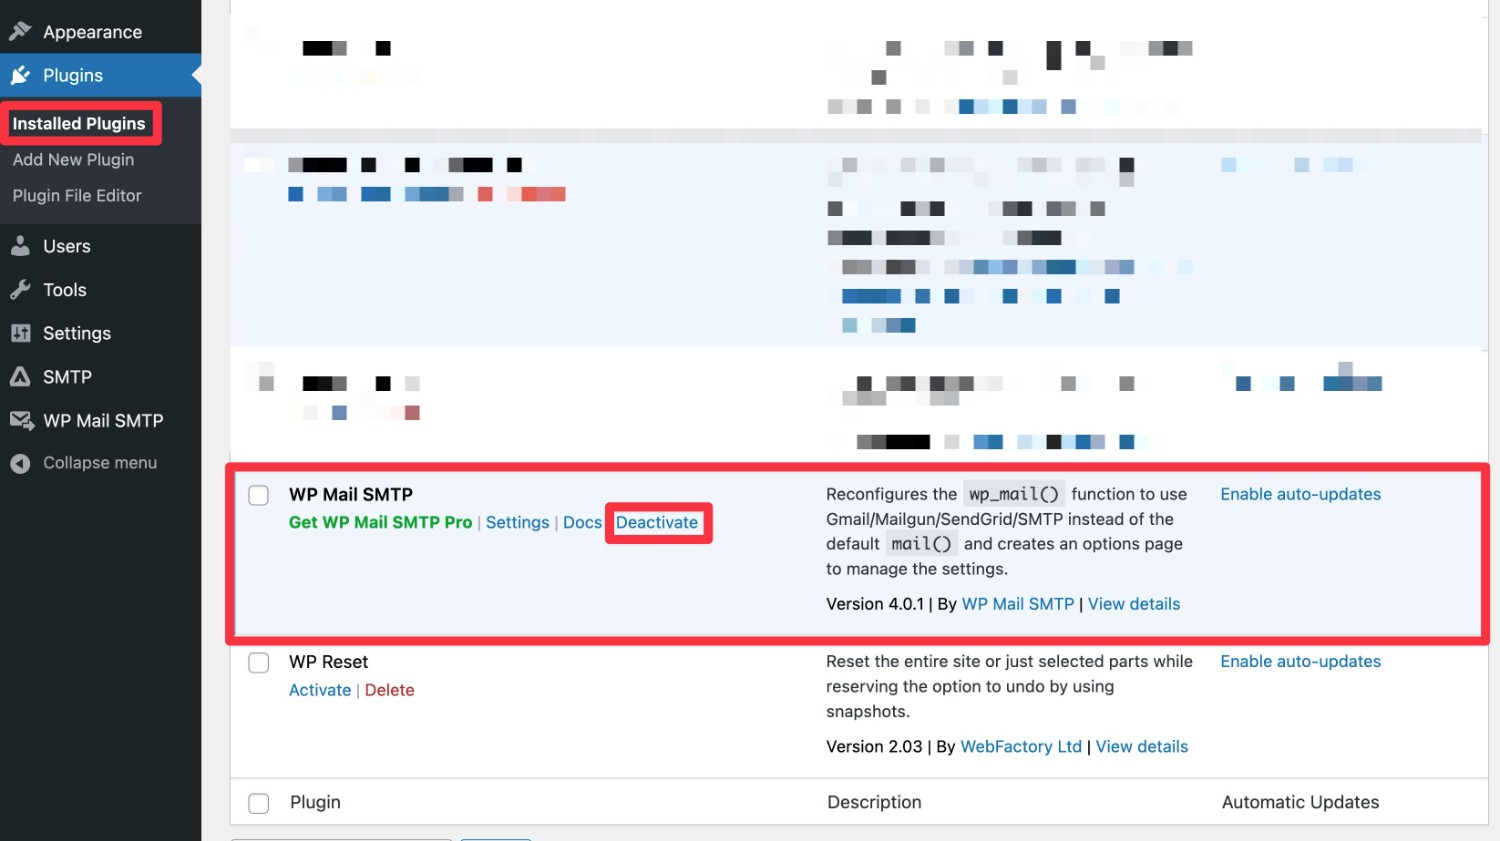
3. Deactivate the WP Mail SMTP plugin
Once you’ve migrated your details to Gravity SMTP and activated your preferred service as your site’s primary email sending service, you can deactivate the WP Mail SMTP plugin without interrupting your site’s emails:
- Go to Plugins → Installed Plugins.
- Find WP Mail SMTP in the list.
- Click the Deactivate link underneath WP Mail SMTP.
4. Send a test email
To finish things out, we recommend sending yourself a test email to make sure everything is working properly with your migrated configuration.
Here’s how to send a test email:
- Go to SMTP → Tools.
- Select the Send a Test tab (it should be selected by default).
- Enter the email address to which you want to send a test email.
- Choose the From Email, which is the email address from which the test email will be sent. Usually, you need to use an email address on the domain name that you verified with your sending service.
- Use the Send With drop-down to select the email sending service that you want to use (if you imported multiple connections from WP Mail SMTP).
- Click the Send Test button.
Get started with Gravity SMTP today
That wraps up our ultimate guide to using Gravity SMTP to deliver your WordPress site’s emails.
With Gravity SMTP, you can access a more reliable way to send all of your WordPress site’s emails, including core emails, emails from Gravity Forms, and emails from any other plugin that uses wp_mail.
You can choose one of the dedicated integrations for the services that we detailed above. SendGrid can be a good option for high-volume sending, but there are also many services that still offer forever-free plans for low-volume sending.
Or, the Custom SMTP option in Gravity SMTP also lets you use any SMTP server just by entering some basic details.
The Gravity SMTP plugin is available at no extra cost to all Gravity Forms Elite, Nonprofit, and Developer license holders. You can download it directly from your Gravity Forms account dashboard and get started right away.
And if you’d like to have your say on future Gravity SMTP features and integrations, head on over to our feature request page and let us know what’s important to you.
Newsletter
If you want to keep up-to-date with what’s happening on the blog sign up for the Gravity Forms newsletter!
"*" indicates required fields