Are you using ConvertKit to manage your WordPress email marketing efforts?
In the past, you needed to rely on a third-party add-on from the ConvertKit team to connect Gravity Forms to ConvertKit.
But with the release of our new official Gravity Forms ConvertKit Add-On, you can now connect Gravity Forms to ConvertKit without the need for a third-party plugin. And if you are already using the third-party add-on, you’ll be able to easily migrate everything over without needing to re-create your feeds.
In this post, you’ll learn all about the official Gravity Forms ConvertKit Add-On.
We’ll start with a quick introduction to some of the key features in the official ConvertKit Add-On.
Then, we’ll show you step-by-step how to get started with the ConvertKit Add-On, with tutorials for two scenarios:
- How to set things up if you’re brand new to using Gravity Forms and ConvertKit together.
- How to migrate your forms if you’ve already been using the third-party add-on from the ConvertKit team. It’s super easy to do – don’t worry!
What Does the Gravity Forms ConvertKit Add-On Do?
The official Gravity Forms ConvertKit Add-On offers an easy way to connect your WordPress forms to ConvertKit.
Here are some of the specific features that you get access to:
- Connect your WordPress forms to forms that you’ve created in ConvertKit.
- Sync subscriber information to ConvertKit after they submit the form.
- Apply a tag to everyone who submits the form.
- Map form fields from your form to core fields in ConvertKit, as well as any custom fields that you’ve added to ConvertKit.
- Use the value of a form field to apply an additional tag to users in ConvertKit.
- Use conditional logic to control when/how to sync information to ConvertKit.
- Enable the ConvertKit Creator Network Recommendations feature to show recommended creators after someone submits the form (optional).
If you’re already using the integration plugin from the ConvertKit team, the official Gravity Forms ConvertKit Add-On also offers an automatic migration feature to help you seamlessly move over without needing to re-configure your form(s).
When you activate the official add-on alongside the plugin from the ConvertKit team, here’s what it does:
- Preserves the connection between your WordPress site and ConvertKit (there’s no need to re-add your ConvertKit API keys).
- Migrates all of your existing ConvertKit feeds so that you don’t need to re-create feeds for forms that you’ve already connected to ConvertKit.
- Deactivates the plugin from the ConvertKit team to avoid any issues.
Basically, moving to the official add-on is as simple as activating it on your site – we’ll show you how it works later in this post.
How to Connect Gravity Forms to ConvertKit With the Official Add-On
Now that you know what the add-on does, let’s get into a step-by-step tutorial on how to connect Gravity Forms to ConvertKit.
This first guide will focus on how to set things up if this is your first time connecting your WordPress site to ConvertKit. The only other things that we’ll assume are…
- You already have a WordPress site with the Gravity Forms plugin installed. The add-on is available on all Gravity Forms license plans. If you don’t have a license yet, you can purchase one here.
- You already have a ConvertKit account. If you don’t, you can register for a free account here.
If you’re already using the third-party add-on from the ConvertKit team, the setup process is a little simpler, scroll down to the section – How to Migrate from the Third-Party ConvertKit Gravity Forms Add-On.
1. Install the Official Gravity Forms ConvertKit Add-On
To begin, you’ll want to install and activate the official Gravity Forms ConvertKit Add-On:
- Open your WordPress dashboard.
- Go to Forms → Add-Ons.
- Find the ConvertKit Add-On in the list.
- Click the Install button.
- Once the installation finishes, make sure to activate the plugin.
2. Connect Your Site to ConvertKit
Once you’ve activated the add-on, the next step is to connect Gravity Forms to ConvertKit:
- Go to Forms → Settings → ConvertKit in your WordPress dashboard.
- Add your ConvertKit API Key and API Secret. We’ll show you how to find these below.
- Click the Save Settings button.
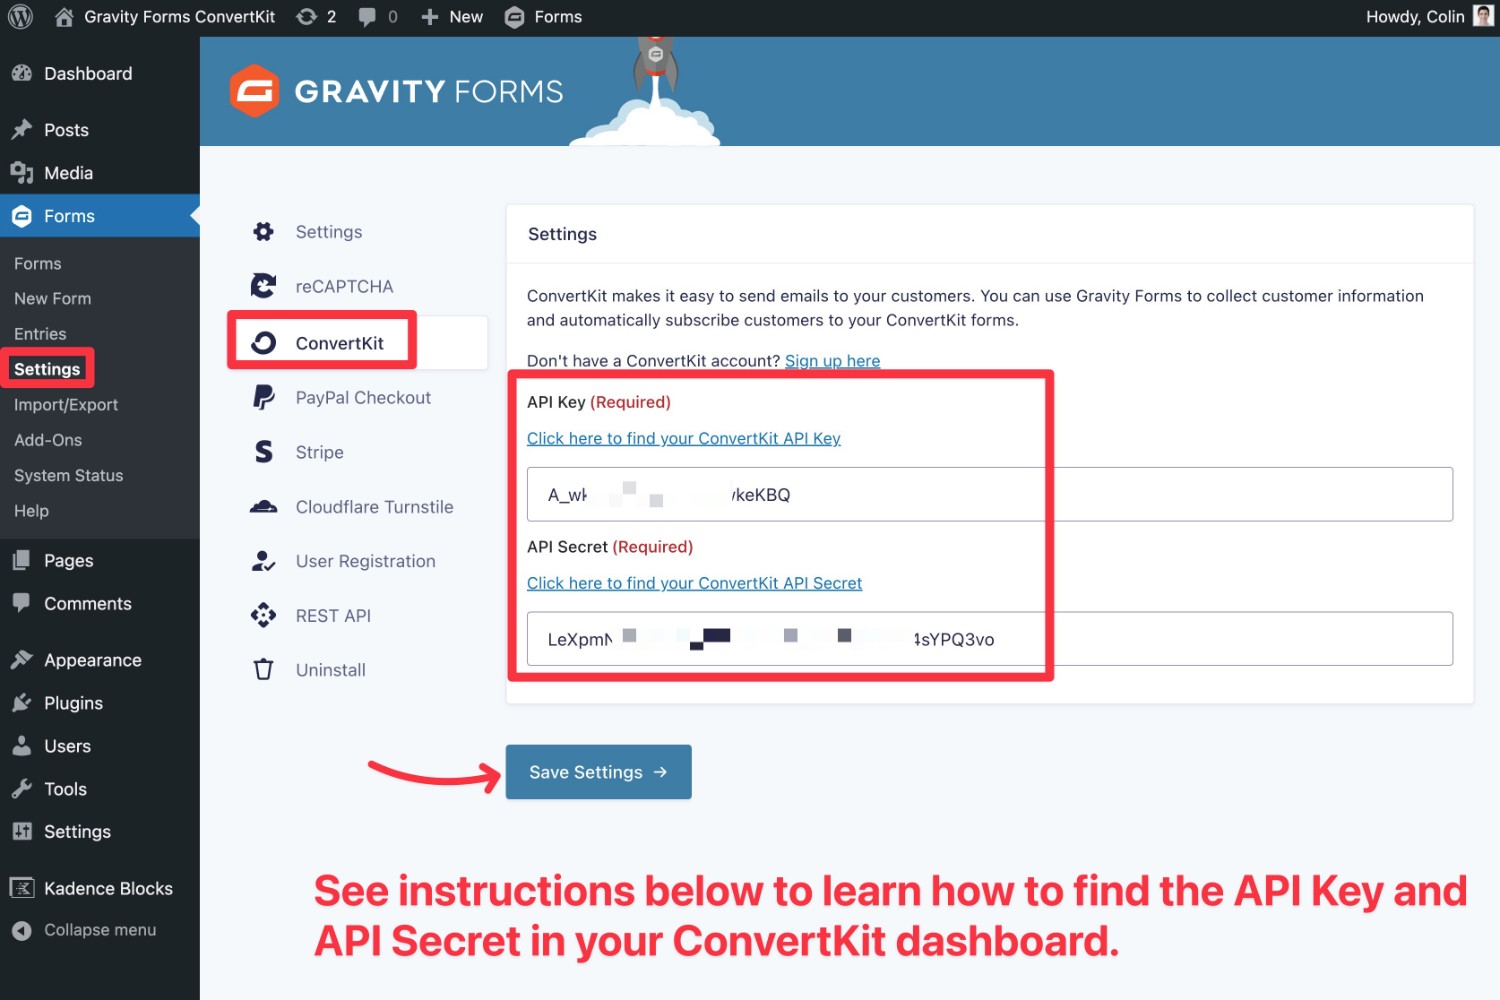
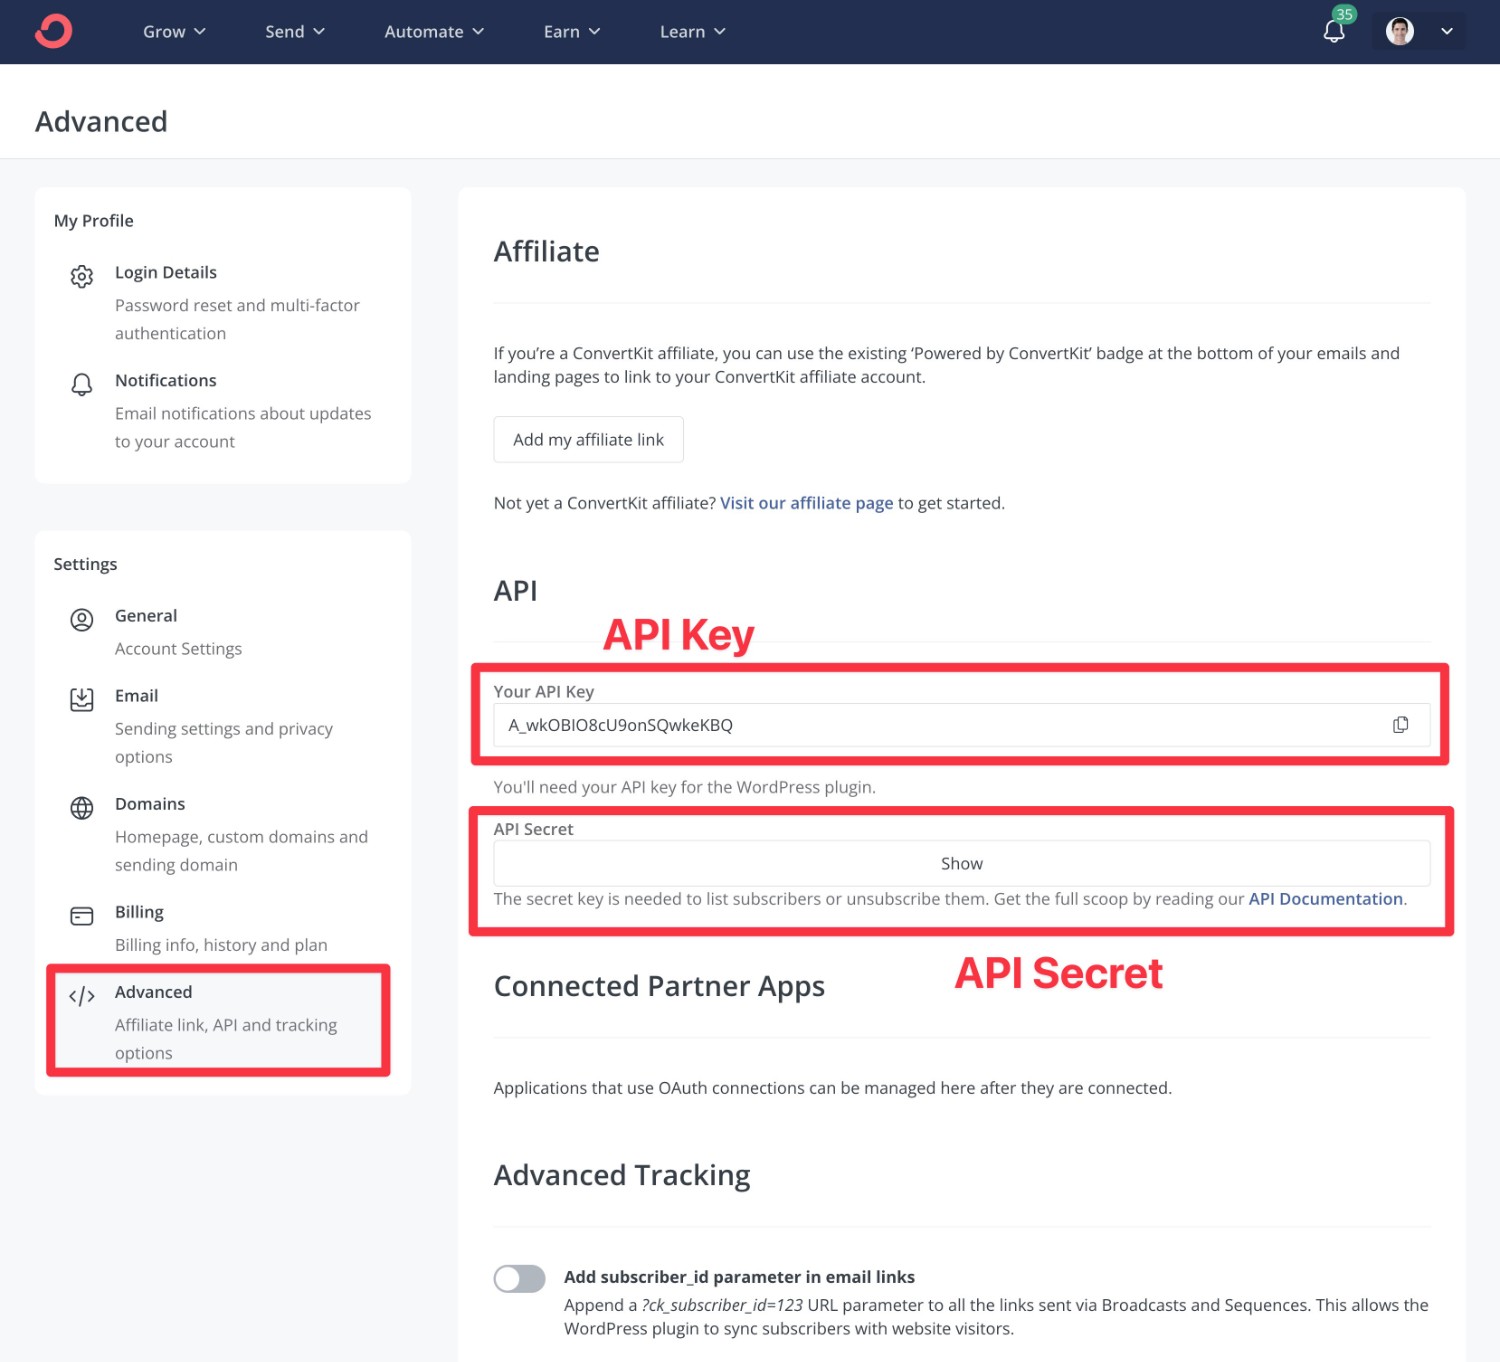
Here’s how to find your ConvertKit API Key and API Secret:
- Click this link to open the ConvertKIt Advanced Settings page. You can also manually open this page by clicking your profile icon in the top-right corner of the ConvertKit website, selecting Settings, and then choosing the Advanced tab at the bottom of the settings sidebar.
- Copy the Your API Key value and add it to the API Key field in the Gravity Forms settings.
- Click Show under API Secret to display the API Secret Value.
- Once the API Secret is visible, copy the API Secret value and add it to the API Secret field in the Gravity Forms settings.
3. Create a Form (or Edit an Existing Form)
Now, you can do one of two things:
- Create a new form that you want to use to sync subscribers to ConvertKit.
- Edit an existing form where you want to set up a ConvertKit integration.
You can create a dedicated email subscribe form. Or, you can also add a ConvertKit integration to other types of forms, such as syncing new users who register via your Gravity Forms registration form, subscribing people who pay via your Gravity Forms payments form, and so on.
At a bare minimum, you’ll need an Email field to collect people’s email addresses. You also might want to add a name field to sync their names to ConvertKit, though this is optional.
Other optional fields you might want to add include the following:
- A field to get opt-in consent from users. You can then use conditional logic to only sync people to ConvertKit if they opt in.
- A field to use as a tag in ConvertKit, such as collecting information about a person’s interests. This could be in addition to a tag that you apply to everyone who submits the form.
- Fields to collect information for custom fields that you’ve added in ConvertKit.
For this example, we’re just using the pre-made Newsletter Signup Form template.
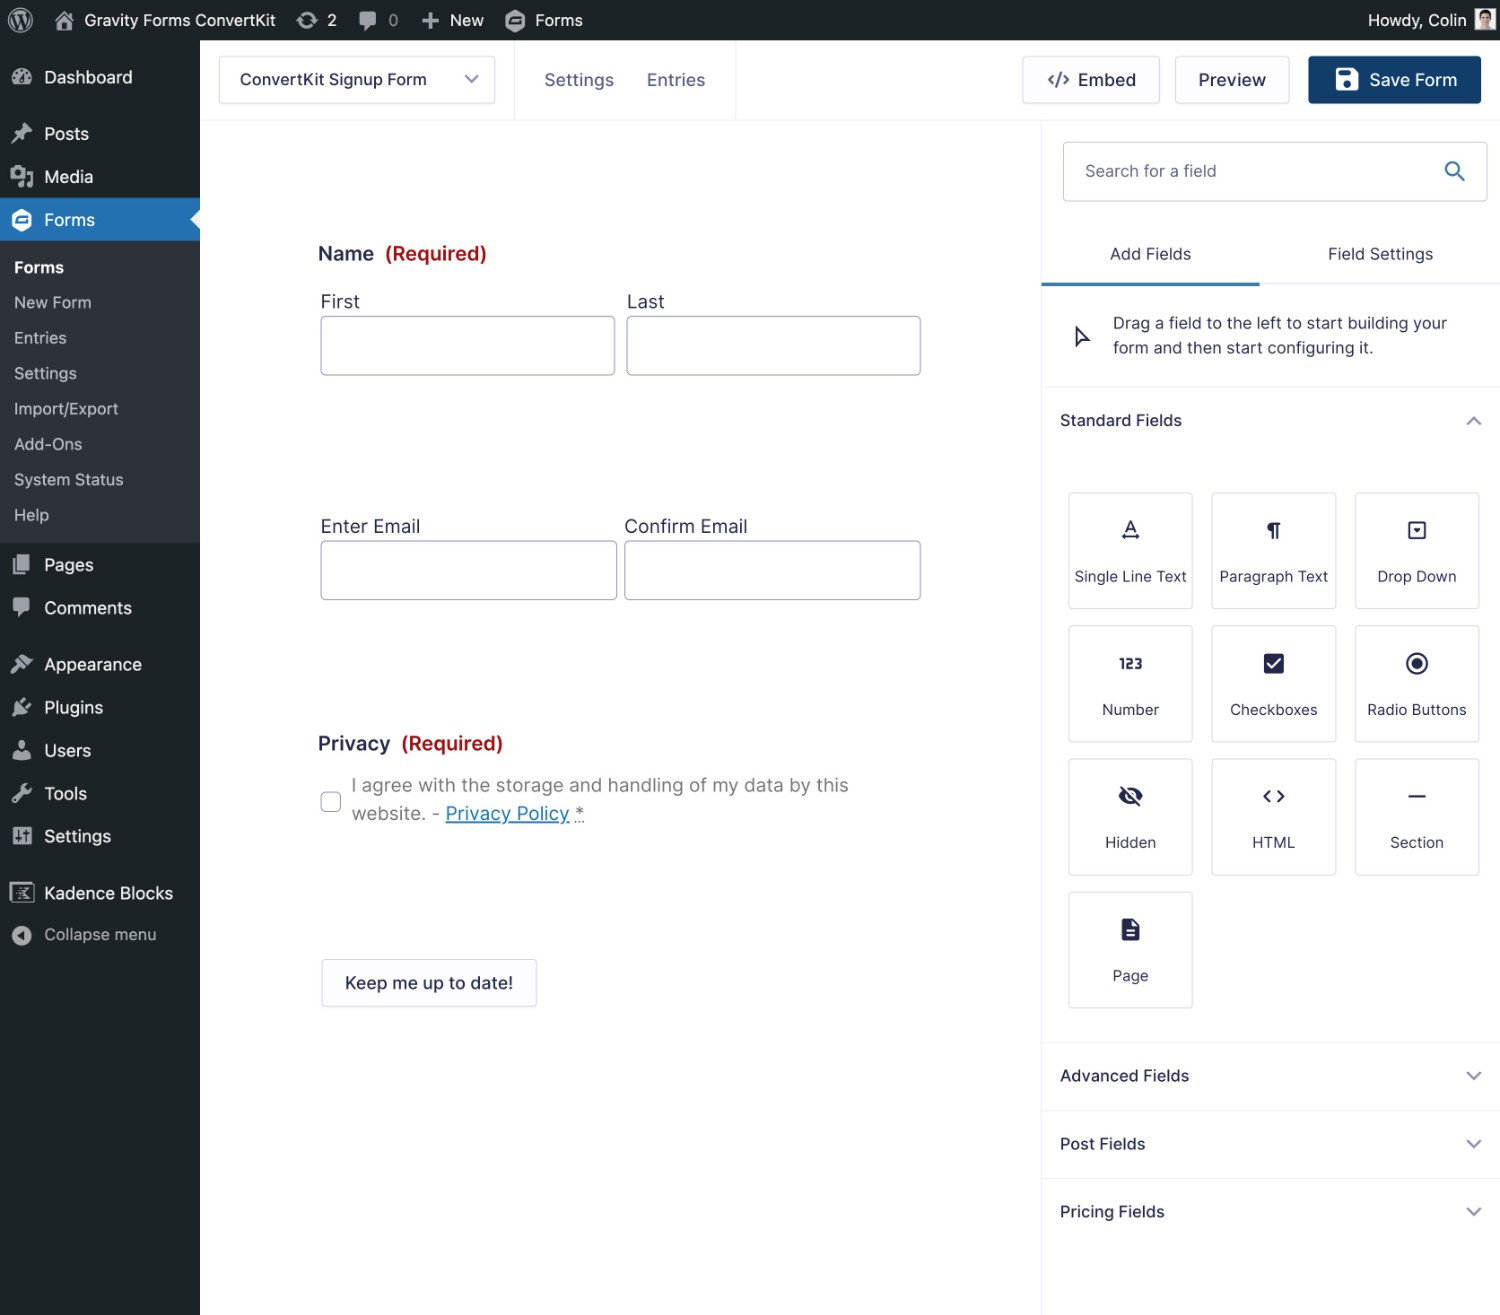
Once you’re happy with the fields in your form, make sure to click the Save Form button.
4. Create a ConvertKit Feed and Configure Creator Network Settings
Next, you’ll want to create a ConvertKit feed and also configure some other settings. This lets you configure how to sync information to ConvertKit.
Create a ConvertKit Feed
To start, go to Settings → ConvertKit in the form editor interface. Then, click Add New to create a new ConvertKit feed.
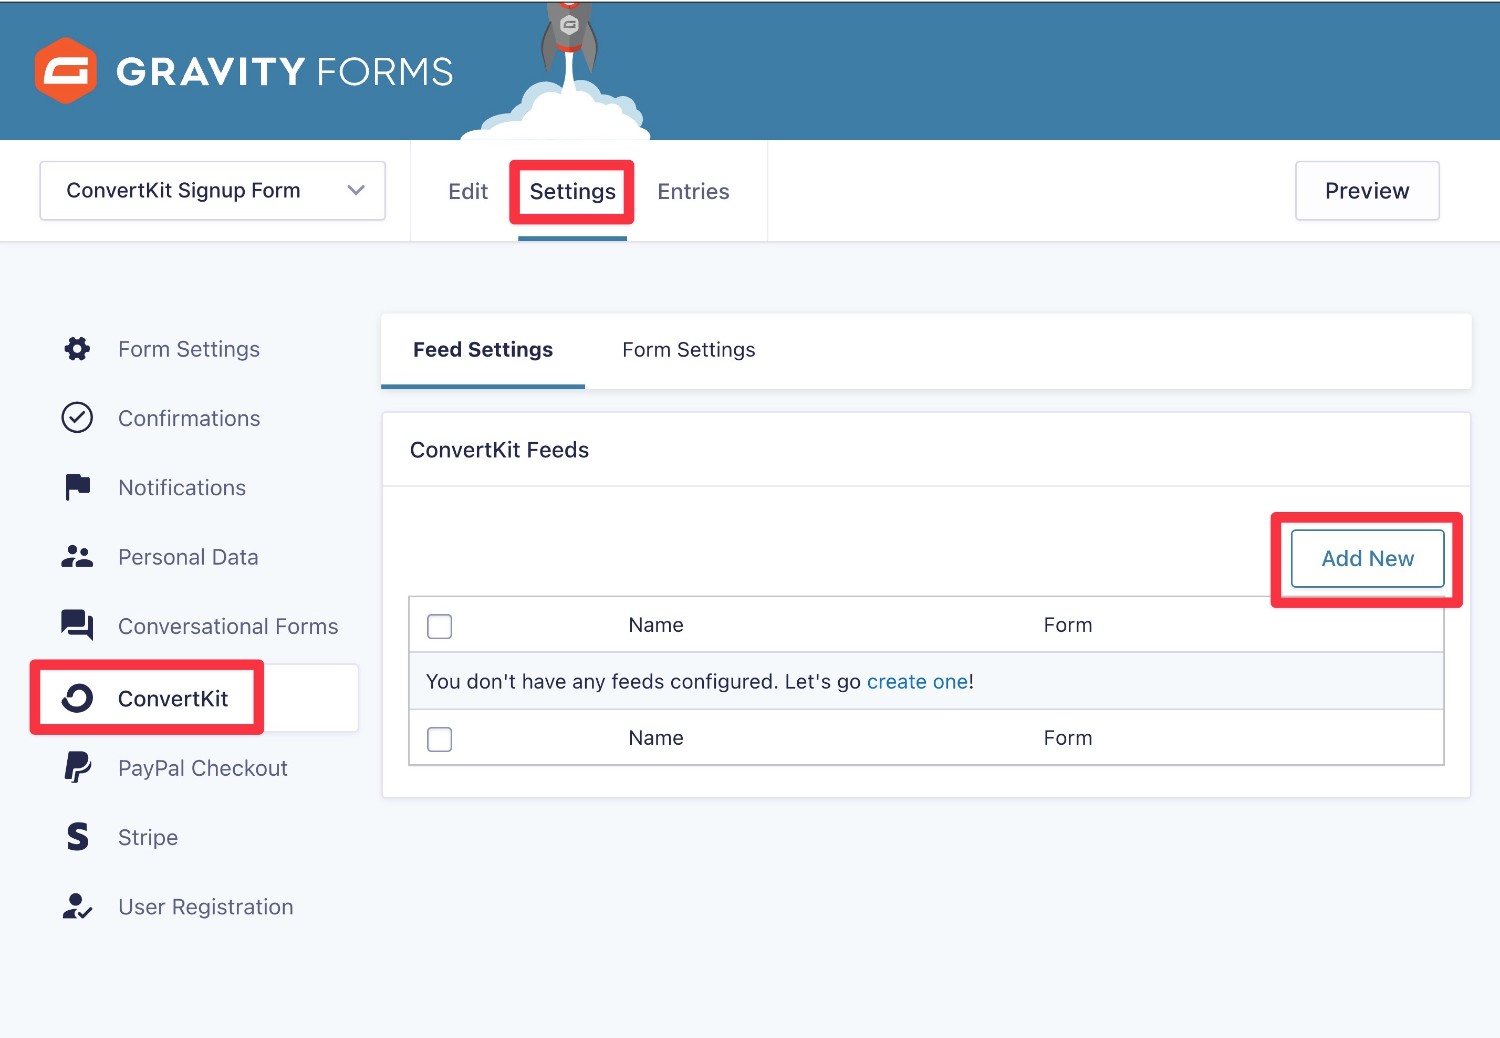
Fill out the options to configure how you want to sync submissions to ConvertKit:
- ConvertKit Form – use the drop-down to select the ConvertKit form to which you want to add your contacts. If you haven’t created a form in the ConvertKit dashboard yet, you can create one here.
- ConvertKit Tag – assign a ConvertKit tag to every user from this feed. If you haven’t added any tags in your ConvertKit dashboard yet, you can add them here.
- Map Fields – map the email field from your form to the email field in ConvertKit. You can also map the name field, if it exists, as well as mapping a field as an additional tag.
- Key/Value – If you’ve added custom fields to your ConvertKit form (via the ConvertKit dashboard), you’ll see those appear in the Key drop-down. You can then map a field from your form to the custom ConvertKit field using the Value drop-down.
You also have the option to enable conditional logic. For example, you could use conditional logic to only sync people to ConvertKit if they check a box giving consent to be added to your lists. Or, you could apply different tags depending on how people filled out the form.
Once you’ve filled out everything, make sure to click Save Settings.
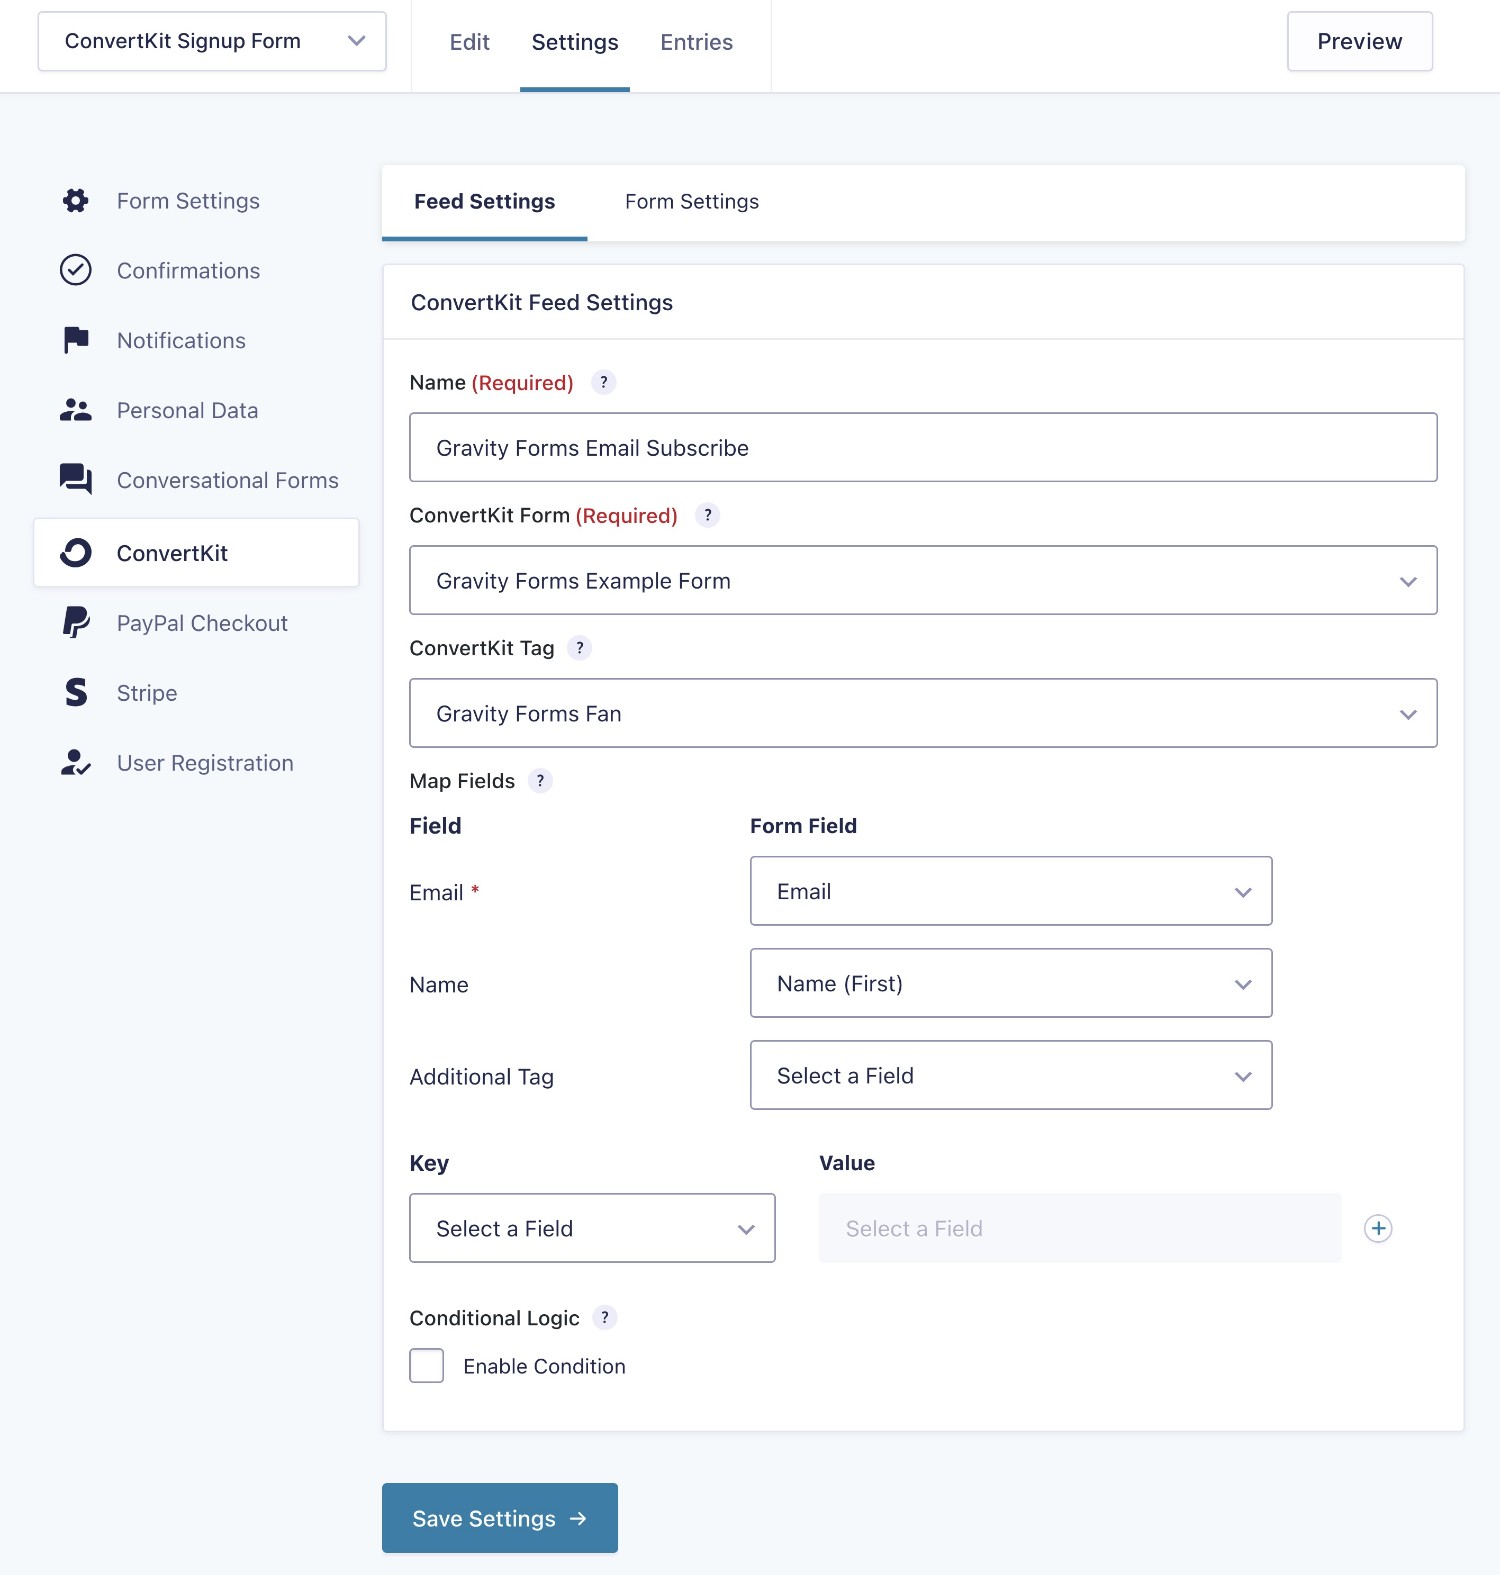
Choose Whether to Enable Creator Network Recommendations
Beyond the ConvertKit feed, you also have the option to enable Creator Network Recommendations for the form to display creator recommendations after the form submission.
To enable this, go to Settings → ConvertKit → Form Settings in the form editor.
Note: to use Creator Network Recommendations, you’ll need to meet the following conditions:
- You’re using a paid ConvertKit plan.
- You’ve created a Creator Profile in your ConvertKit dashboard.
- You’ve enabled recommendations on the Creator Network page in your ConvertKit dashboard.
5. Embed Your Form
If you added a ConvertKit feed to an existing form, Gravity Forms will now start automatically syncing contacts to ConvertKit.
If you created a brand new Gravity Forms ConvertKit subscribe form, though, you’ll need to embed it so that people can start submitting the form.
You can do this with the Gravity Forms block or shortcode.
If you want to use the Creator Network Recommendations feature, make sure to enable AJAX when you embed the form:
- Block embed – enable AJAX under Advanced in the block settings.
- Shortcode embed – add the following parameter – ajax=”true”
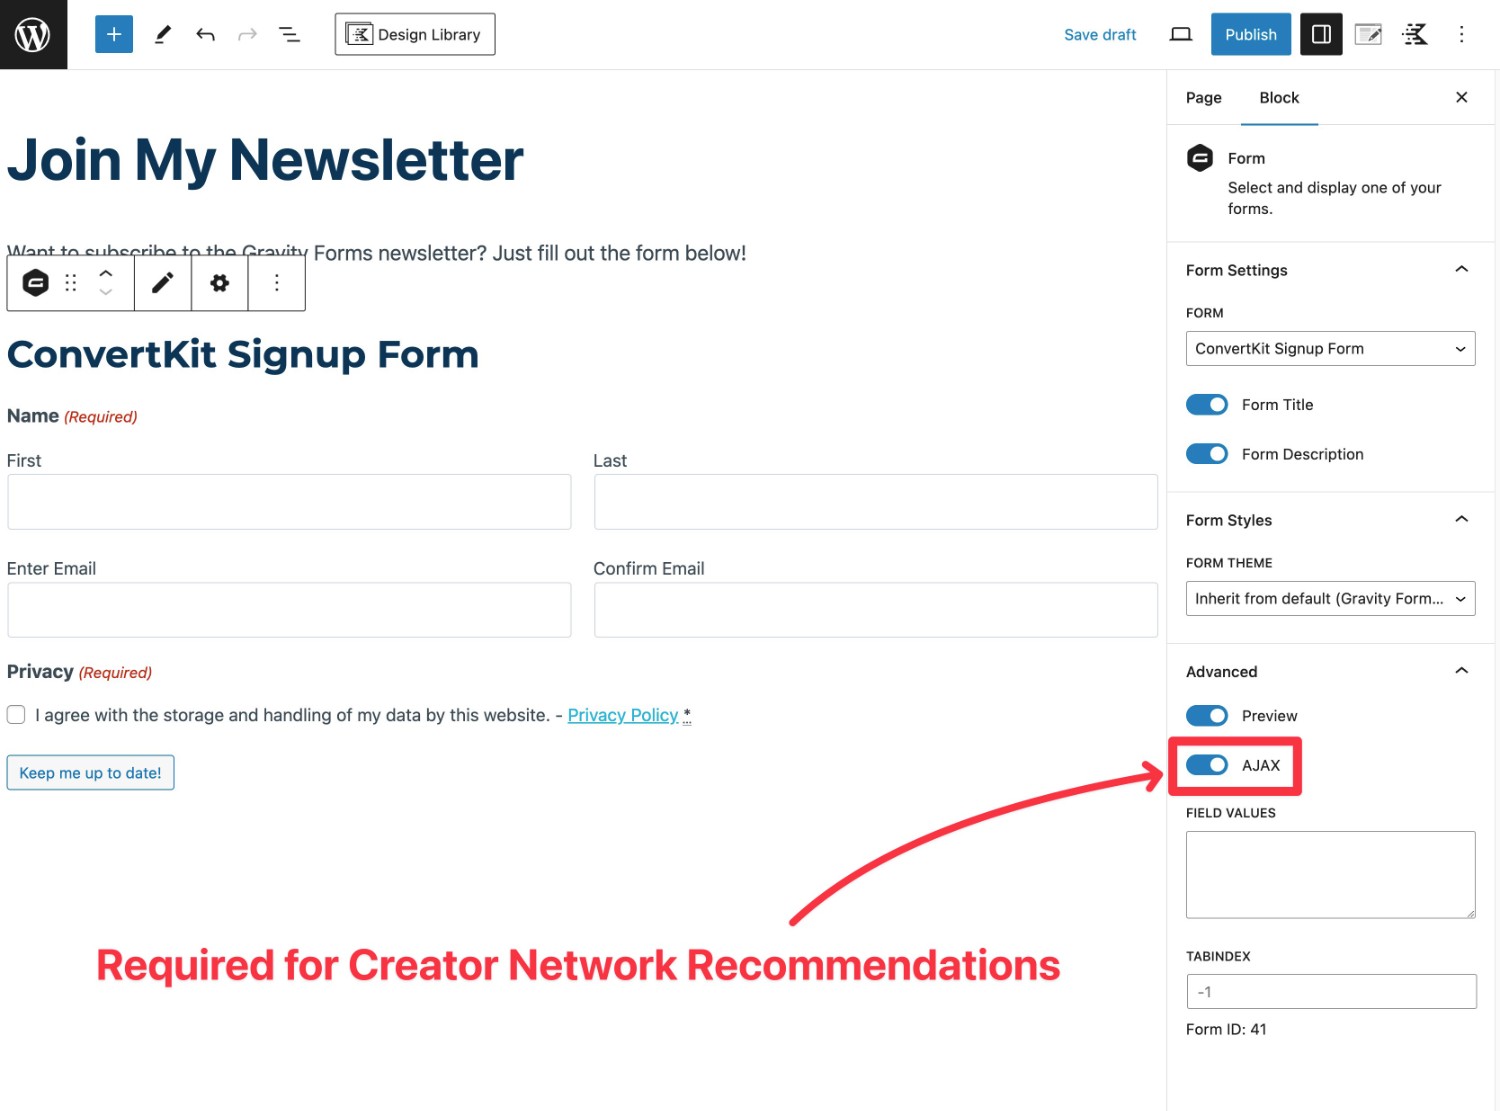
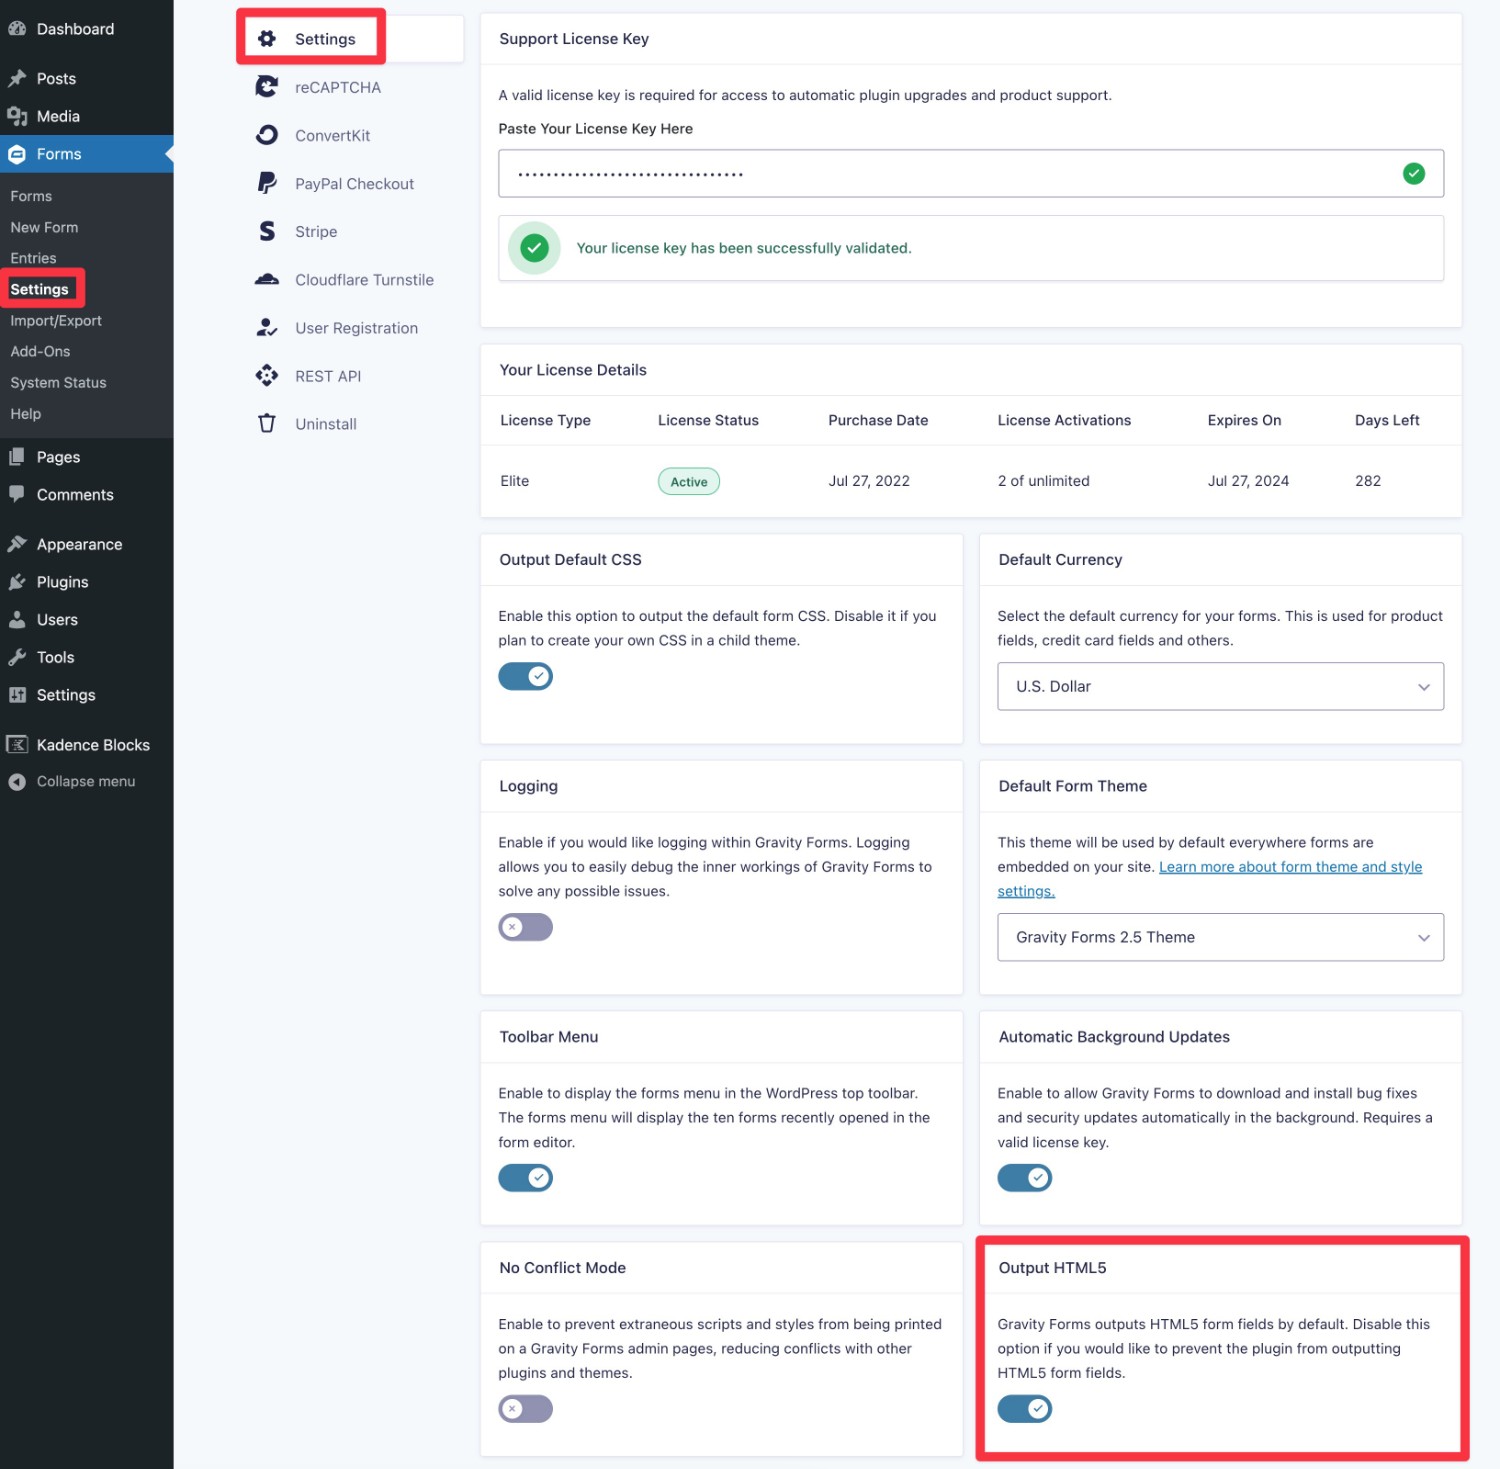
If you enabled AJAX but you’re still not seeing Creator Network Recommendations, you’ll also want to make sure that you’ve enabled HTML5 in the overall Gravity Forms settings:
- Go to Forms → Settings in your WordPress dashboard.
- Make sure that the Output HTML5 toggle is turned on.
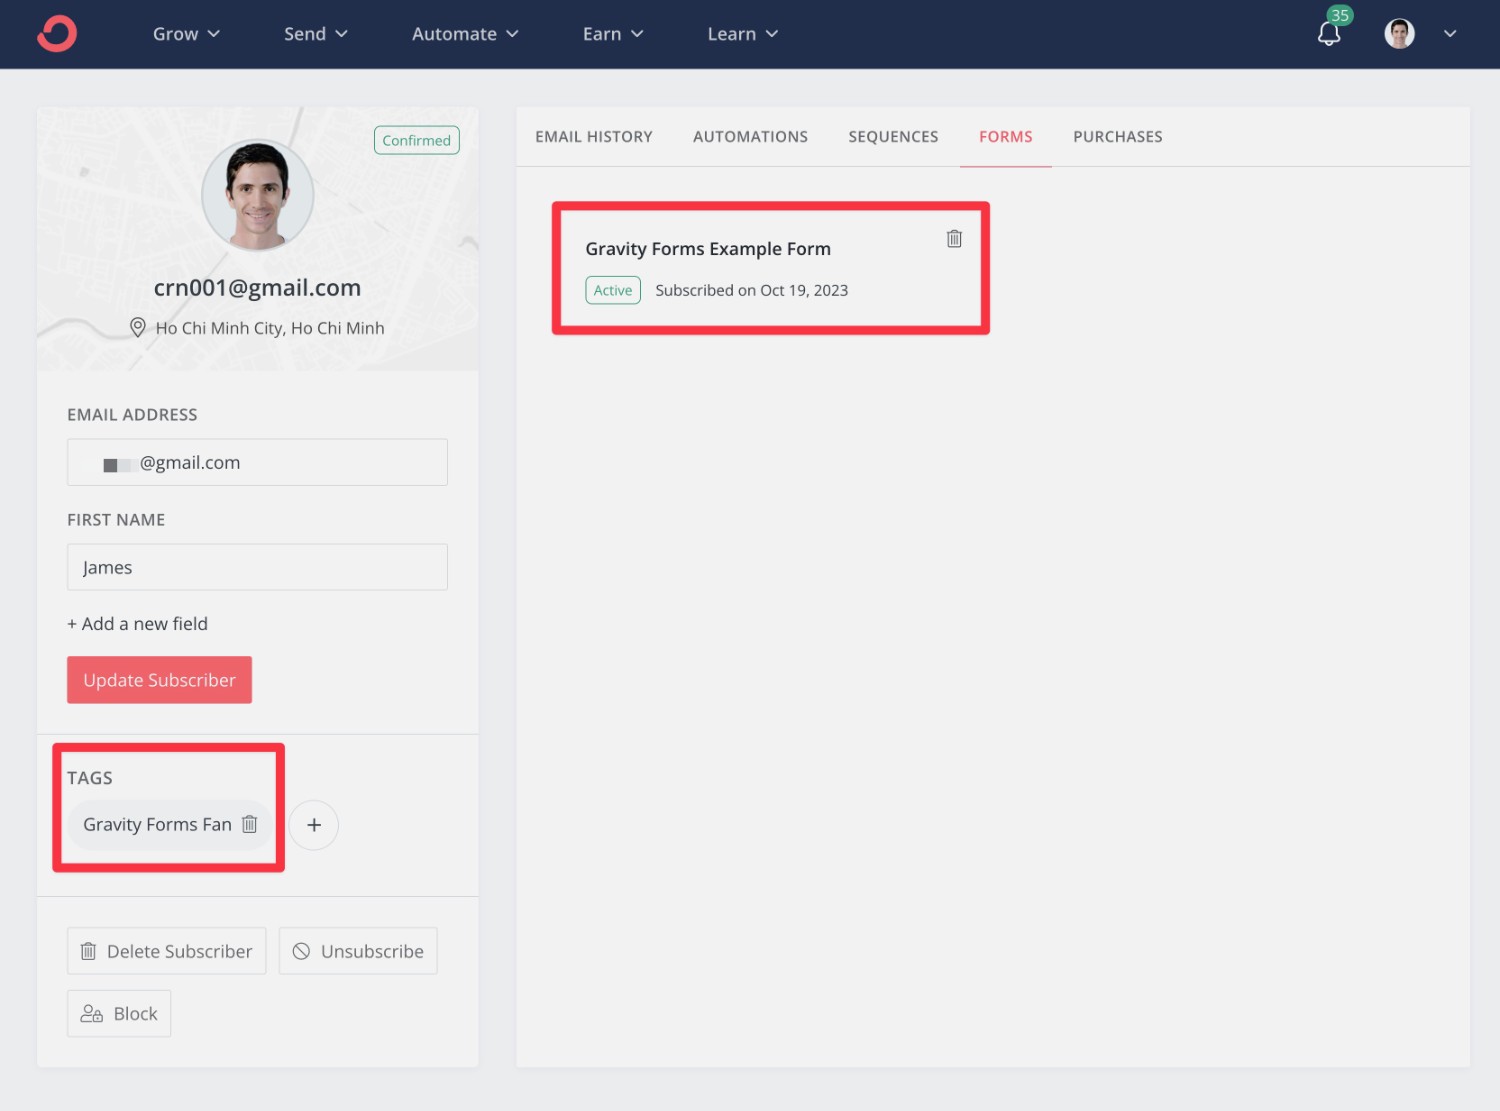
And that’s it!
Subscribers who opt-in should now start showing up in your ConvertKit dashboard according to your feed’s settings.
How to Migrate from the Third-Party ConvertKit Gravity Forms Add-On
As we mentioned earlier, the ConvertKit team offers its own third-party add-on that helps you connect ConvertKit to Gravity Forms. It’s listed in WordPress.org with the name “Gravity Forms ConvertKit Add-On”.
Because we know that some of you might already be using that add-on, we’ve built our official ConvertKit Add-On to make the migration as painless as possible.
When you migrate, all of your existing feeds and settings will come along, which means that there’s no need to reconnect your site to ConvertKit or recreate feeds in your forms.
Let’s go through the process in more detail so that you know exactly what to expect.
1. Understand Where You’re Starting
Before going further, we recommend checking your current setup with the third-party ConvertKit plugin. This will help you ensure that everything migrates over properly.
For example, you might want to check how your current feed is configured so that you can verify that it has the same settings after the migration.
Here’s an example of the feed interface for the third-party plugin.

2. Install the Official Gravity Forms ConvertKit Add-On
Once you’ve verified your current settings, you’re ready to install and activate the official ConvertKit Add-On:
- Go to Forms → Add-Ons in your WordPress dashboard.
- Find the ConvertKit Add-On.
- Click the Install option.
- Once the installation process finishes, make sure to activate the plugin.
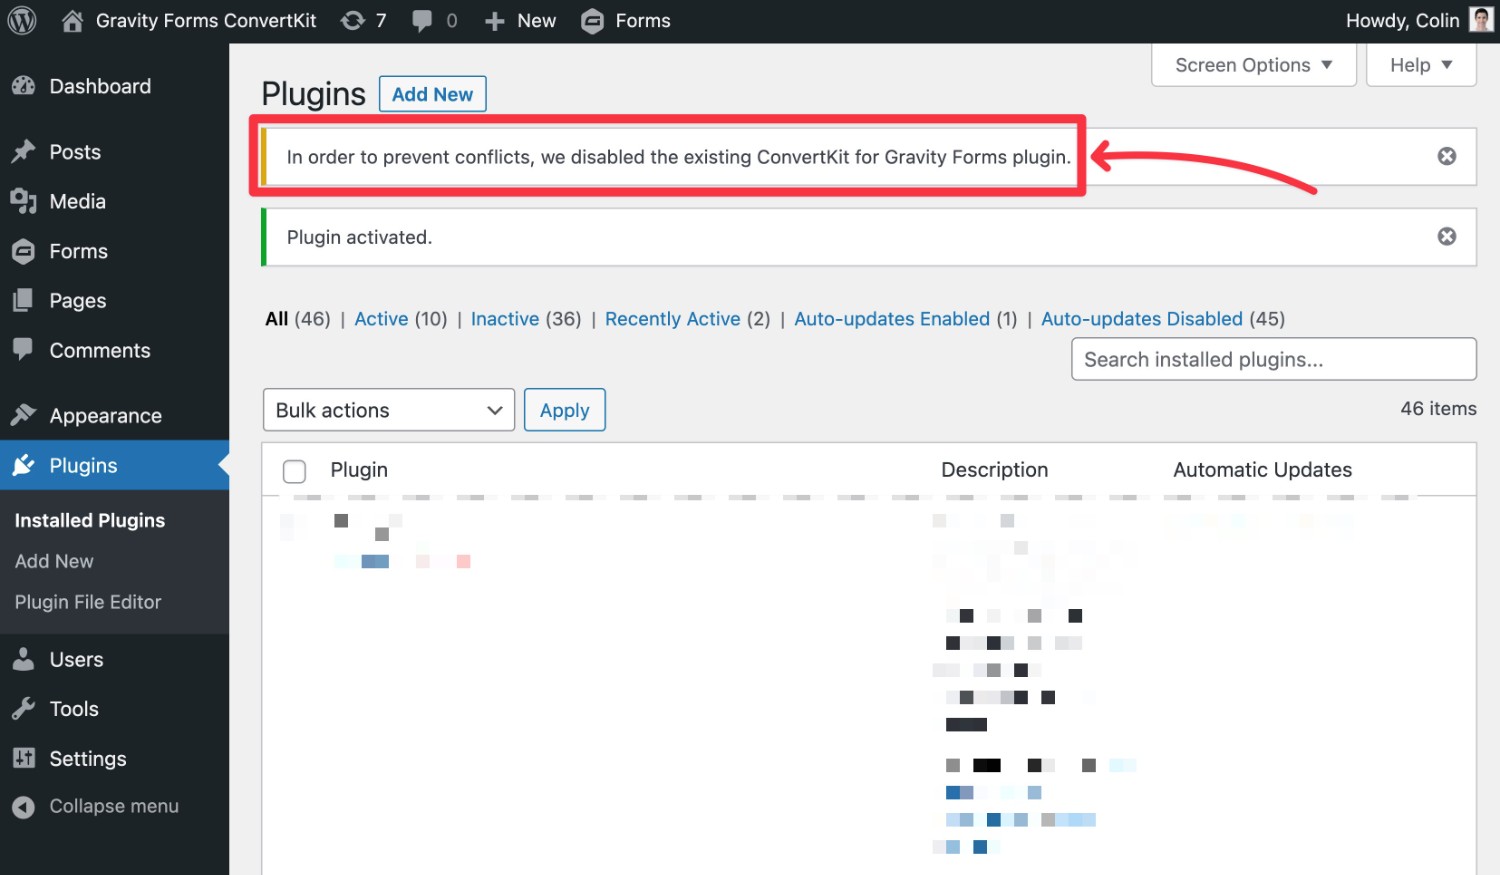
Once you activate the official add-on, it will do two things:
- It will migrate all of your existing settings and feeds from the third-party ConvertKit Add-On.
- Once the settings have been migrated, it will automatically deactivate the third-party add-on to avoid conflicts.
You should see a message that says something like “In order to prevent conflicts, we disabled the existing ConvertKit for Gravity Forms plugin.”.
3. Verify That Your Form Settings Have Migrated Properly
At this point, you should be done because the official add-on handled the migration for you.
However, because your ConvertKit marketing efforts probably play a key role in your business’s success, we always recommend verifying that the migration worked correctly.
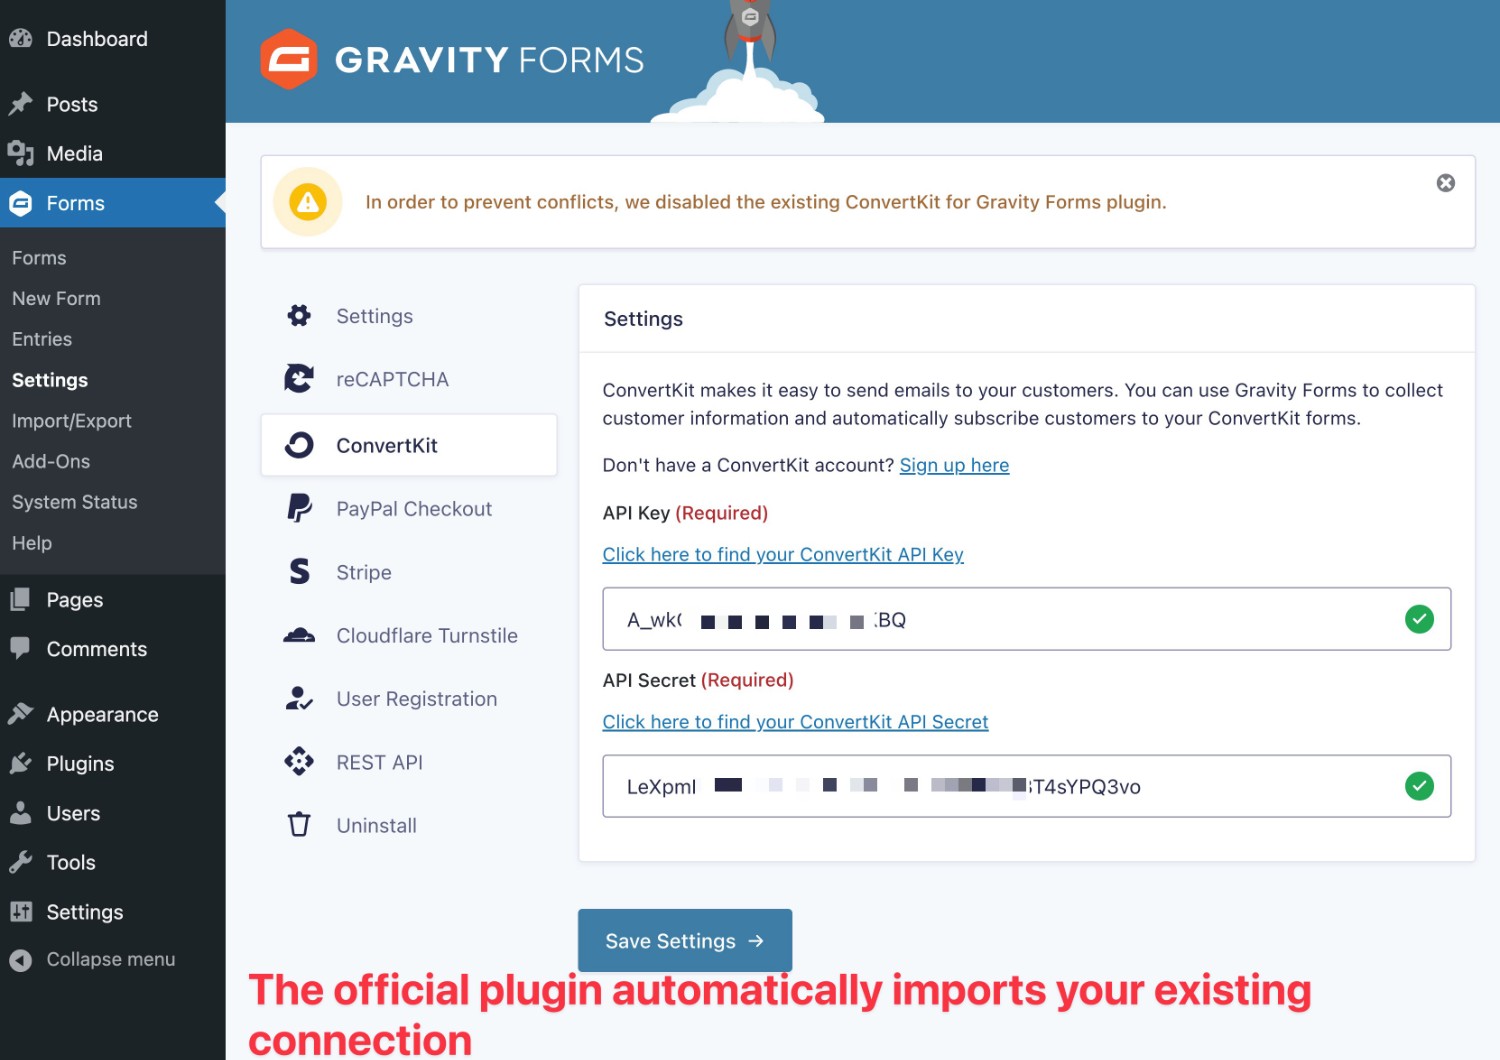
To start, go to Forms → Settings → ConvertKit.
You should see that your WordPress site is already connected to ConvertKit:
Next, open one of the forms that you’ve connected to ConvertKit.
Go to Settings → ConvertKit in the form editor interface.
You should see a ConvertKit feed already there. Or, if you created multiple feeds, you should see multiple feeds.
If you edit the feed, you should see that all of your field mapping, tags, and other settings are the same as before.
If you want to be thorough, you can also submit some dummy data via the form to make sure that it’s properly syncing to ConvertKit.
Try the Official ConvertKit Add-On Today
With our new ConvertKit Add-On, you now have an official way to connect your forms to ConvertKit.
If you’re just getting started with ConvertKit, give it a try on your next form. And if you’re already using the integration plugin from the ConvertKit team, you can install the official add-on to painlessly migrate everything over.
The ConvertKit Add-On is available on all Gravity Forms licenses. If you’re not holding an active license yet, you can purchase your license here to start using the add-on.

If you want to keep up-to-date with what’s happening on the blog sign up for the Gravity Forms newsletter!
"*" indicates required fields