

With the free BuddyPress plugin, you can add social network-like functionality to your WordPress site, including frontend user profiles, user groups, activity streams, private messaging, notifications, and more.
You can use it to create a standalone social network powered by WordPress or you can use it to enhance your existing website, such as adding more social features to your online course.
With Gravity Forms, you can then create custom BuddyPress registration forms to further extend your community with advanced features such as charging a one-time or recurring fee for people to join your community.
In our Gravity Forms BuddyPress tutorial, you’ll learn exactly how to set this up for your own community.
As part of that, you’ll also learn how to charge users for access to your community. However, this step is completely optional and you can also use this tutorial to create a registration form for free BuddyPress communities.
Let’s dig in!
What Can You Use BuddyPress For?
BuddyPress makes a great option for any type of website where you want to build a social community.
BuddyPress could be the “main” driver of your site, which would be the case for something like a social network.
Or, you can also use BuddyPress to extend an existing site with more social features. For example, if you have an online course, you could use BuddyPress to give your students more detailed profiles and ways to interact with one another, such as letting students send private messages to one another.
Here are a few real-world BuddyPress examples to show you what it can do:
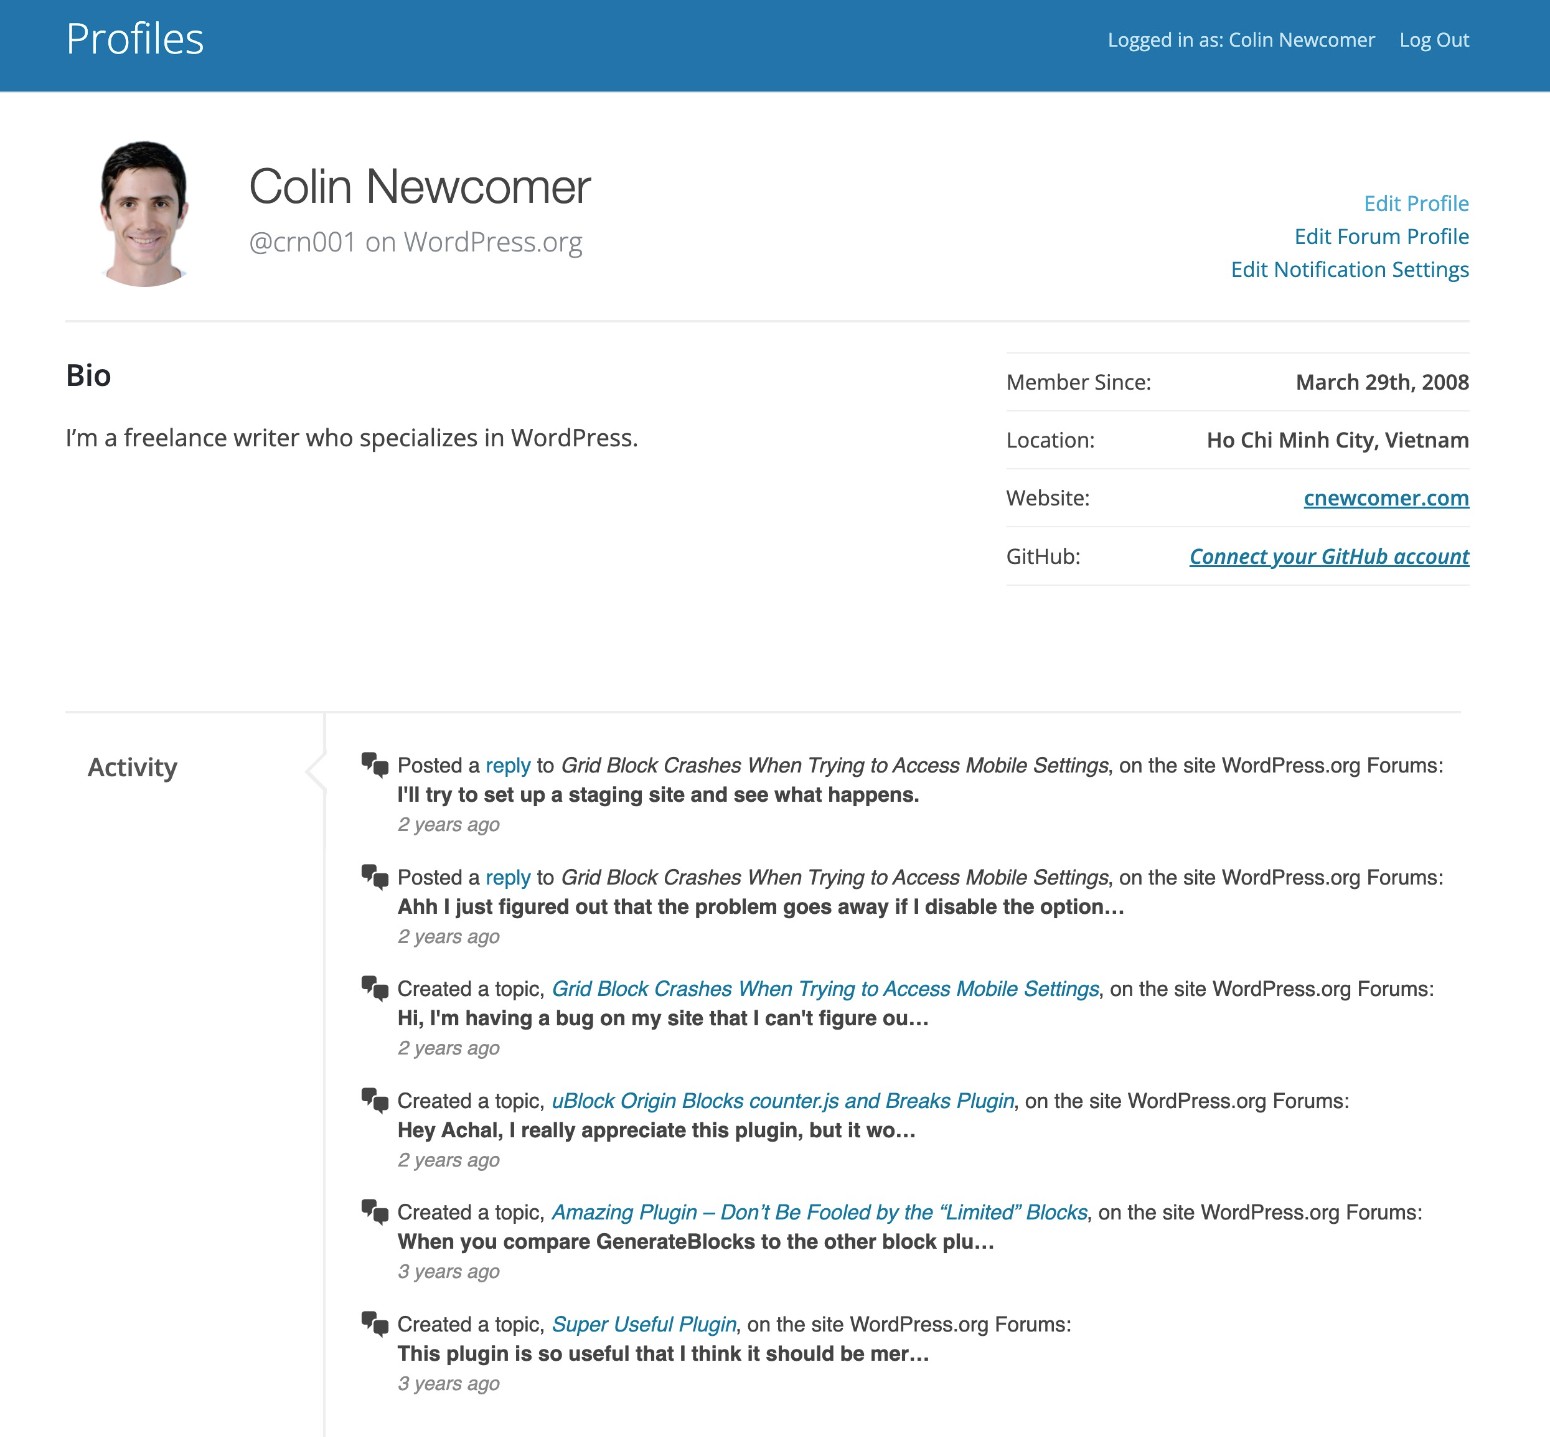
- WordPress.org profiles
- StyleCraze
- The Poynter Institute for Media Studies
- Power of Positivity Community
Why Use Gravity Forms for BuddyPress Registration Forms?
By default, BuddyPress lets you create a frontend registration form that looks something like this:
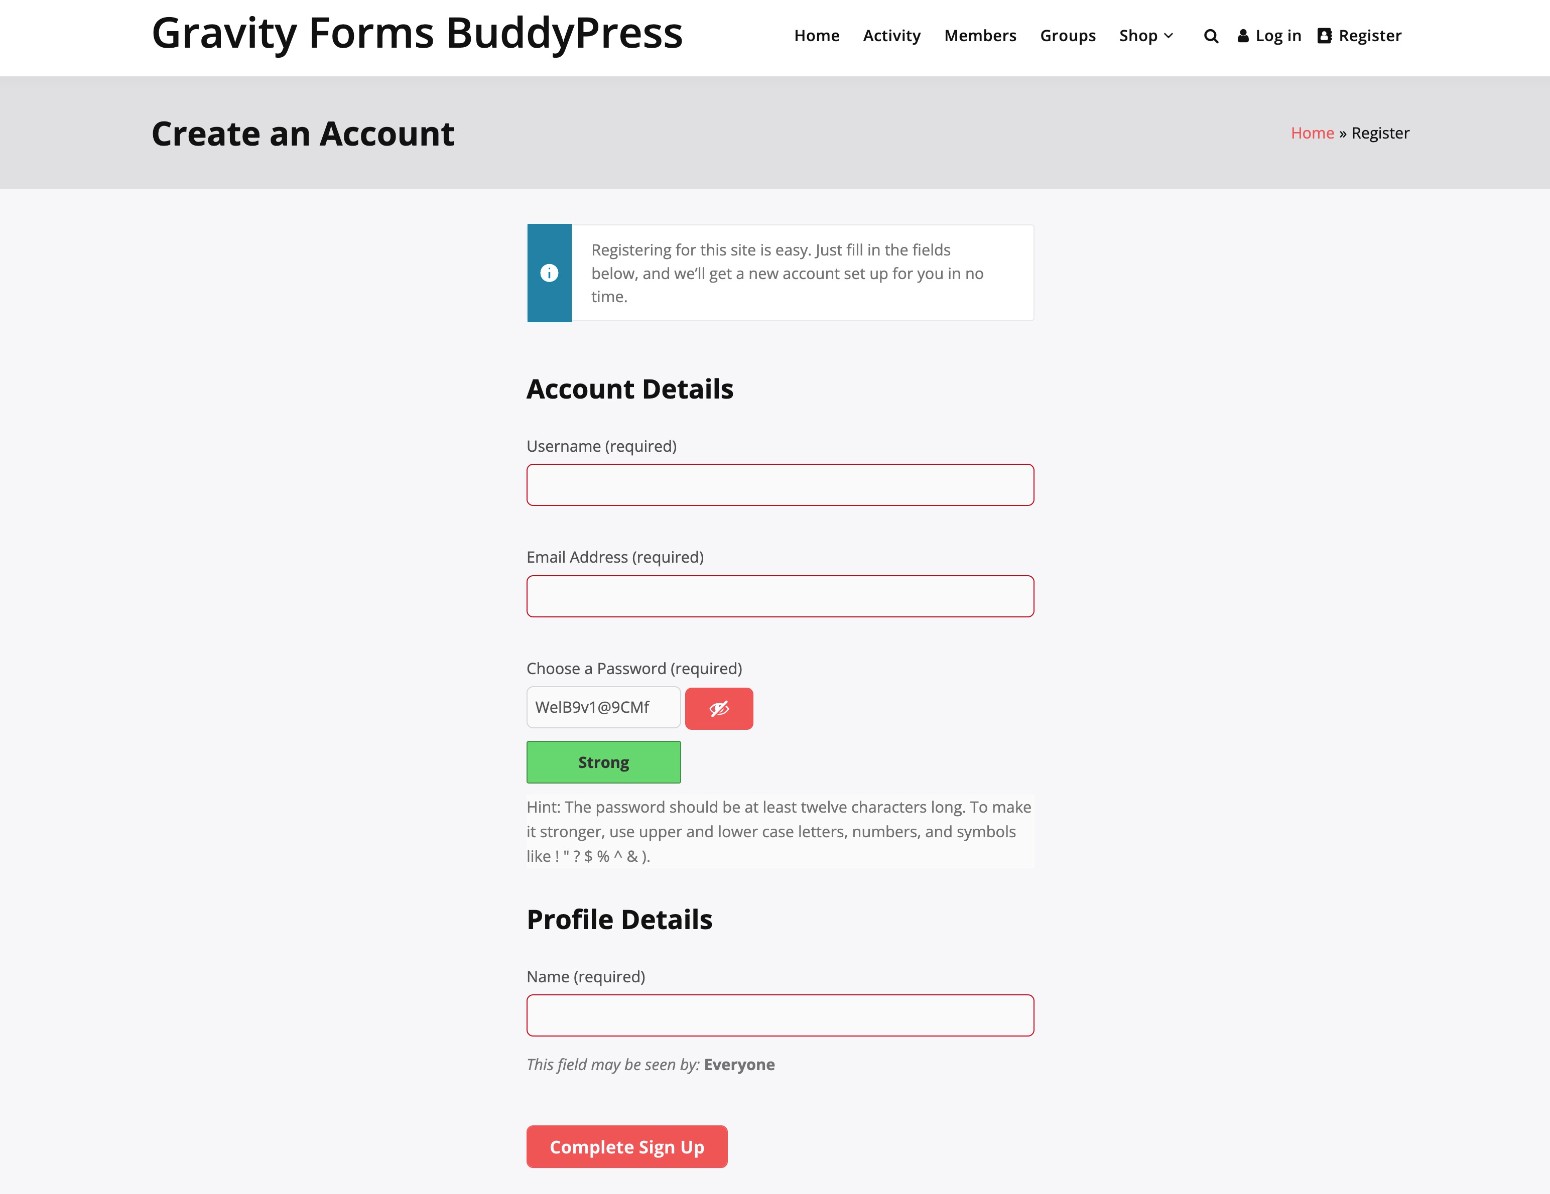
With Gravity Forms, however, you can create a completely custom BuddyPress registration form.
At a basic level, you’ll be able to add more form fields to collect extra information from users (while still syncing that data to BuddyPress) and also get more control over the layout of your registration form.
However, where Gravity Forms really excels is that it lets you integrate completely new functionality into your BuddyPress registration forms. Here are some examples:
- Control your form’s layout – while BuddyPress does let you add custom fields to its built-in registration form, Gravity Forms gives you much more control over how those fields look and the general layout of your form.
- Charge users to register for your BuddyPress community – if you want to monetize your community, Gravity Forms lets you charge one-time or recurring fees as part of the registration form.
- Use conditional logic – you can perform different actions based on how people fill out a form, such as assigning them a different user role.
- Add people to your newsletter – you can give people an option to subscribe to your email newsletter right from the registration form.
- Integrate with other apps and services – Gravity Forms has dedicated integrations for tons of other tools, as well as support for Zapier and webhooks so that you can connect to thousands of other apps.
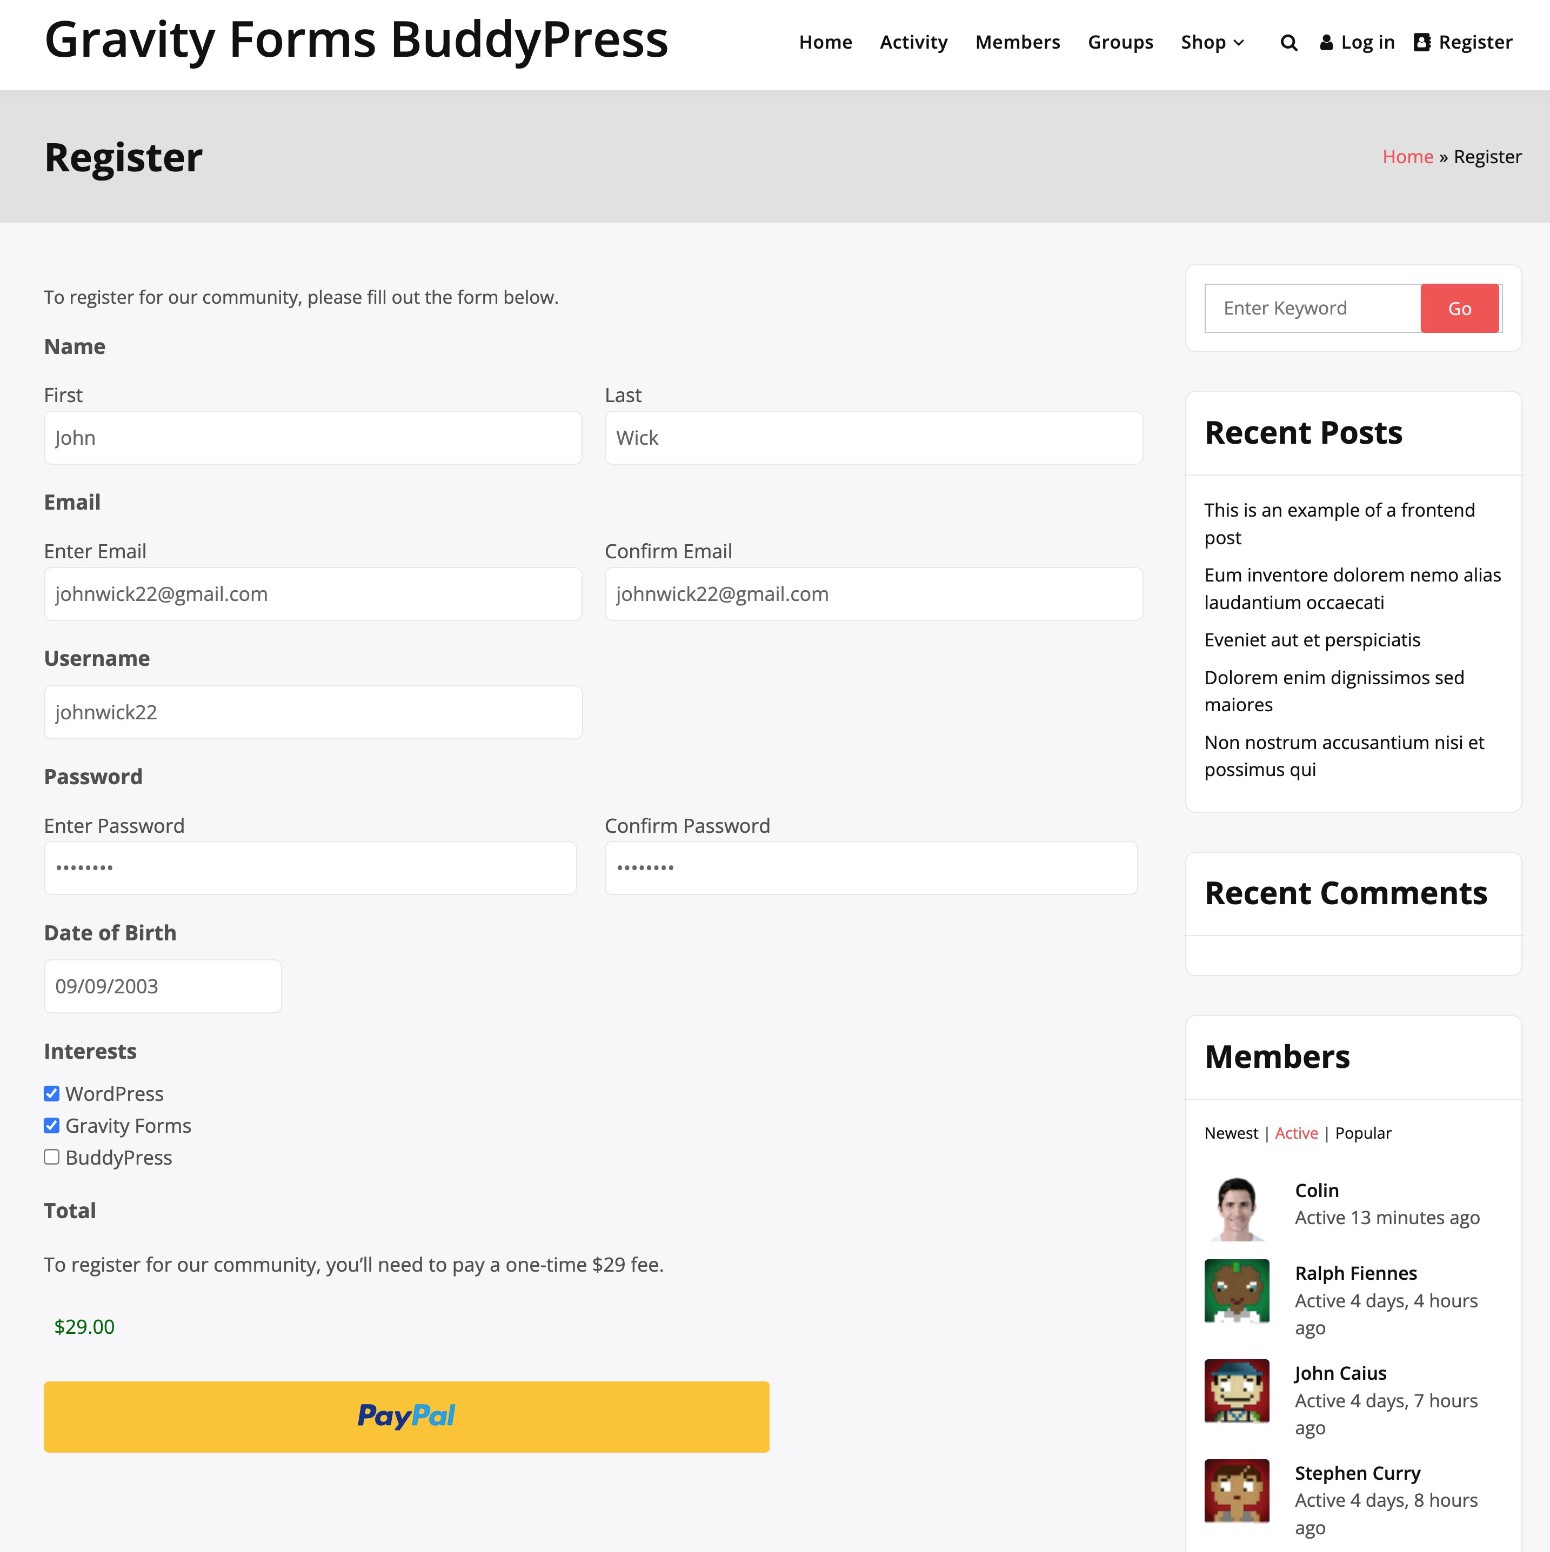
Here’s an example of a custom BuddyPress registration form with payment functionality, all powered by Gravity Forms.
How Does Gravity Forms Work With BuddyPress?
To integrate Gravity Forms with BuddyPress, you can use the official Gravity Forms User Registration Add-On.
The User Registration Add-On lets you create custom registration forms for your WordPress site, including the ability to integrate more advanced features like payments, email subscribe integrations, assigning different user roles using conditional logic, and more.
As part of that, the User Registration Add-On also has a dedicated BuddyPress integration that lets you sync form field information to BuddyPress profile fields (including custom BuddyPress profile fields).
How to Customize BuddyPress Registration Forms and Accept Payments With Gravity Forms
Now that you have some background on BuddyPress, Gravity Forms, and how the two plugins work together, let’s get into the actual step-by-step guide for how to create a custom BuddyPress registration form using Gravity Forms.
To follow our Gravity Forms BuddyPress tutorial, you’ll need to install a minimum of two plugins:
- The core Gravity Forms plugin.
- The official Gravity Forms User Registration Add-On, which is available with the Elite license and the Nonprofit license.
If you want to accept payments as part of your custom BuddyPress registration form, you’ll also want to install an add-on for your chosen payment processor. We’ll cover this step in the tutorial, though.
1. Set Up Your BuddyPress Community (If You Haven’t Done So Already)
If you’ve already set up BuddyPress on your site, go ahead and skip to the next step.
But if you have not set up your foundational BuddyPress community yet, you’ll want to do that before following the rest of our Gravity Forms BuddyPress tutorial.
We won’t cover this in too much detail, but here’s a quick BuddyPress tutorial to set up the basics:
- Purchase web hosting and a domain name, if you don’t already have them.
- Install the WordPress software on your hosting.
- Choose a BuddyPress-compatible WordPress theme – we’re using the free BuddyX theme for our examples, but there are lots of other options to choose from.
- Install the free BuddyPress plugin from WordPress.org.
Once you have your basic BuddyPress community, you’re ready to set up your community’s registration form.
2. Add BuddyPress Profile Fields for Data That You Want to Collect
As we mentioned earlier, one of the advantages of using Gravity Forms with BuddyPress is that you can seamlessly sync information from your Gravity Forms registration form with BuddyPress user profile data – even with custom BuddyPress fields.
If you want to use your registration forms to collect additional information beyond the default BuddyPress profile fields, you’ll first want to set up those custom profile fields in BuddyPress.
On the other hand, if you just want to map data to the default BuddyPress profile fields, you can just go straight to creating your form in the next step.
You can also skip ahead if you want to collect additional information, but you do not need to actually sync that information to BuddyPress profile fields.
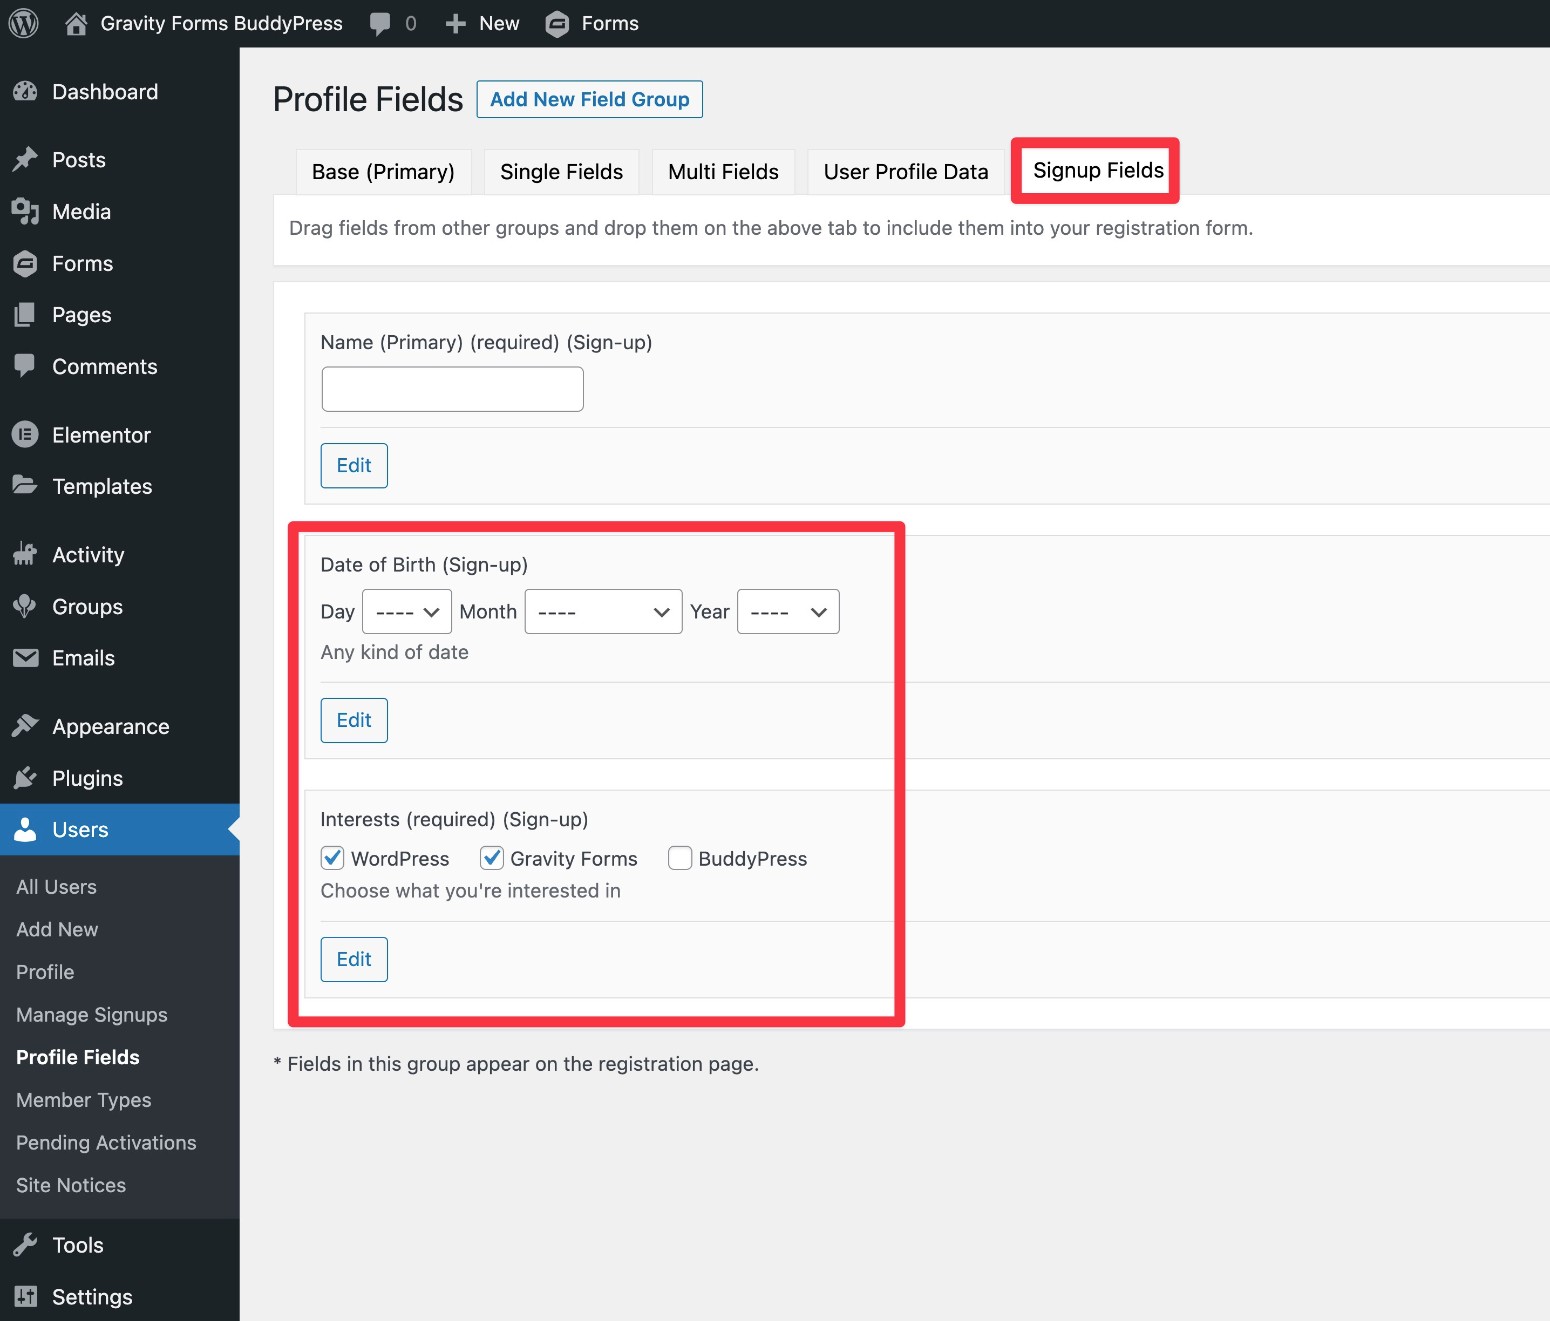
To create custom profile fields in BuddyPress, go to Users → Profile Fields in your WordPress dashboard.
There, you can add new fields and field groups as needed.
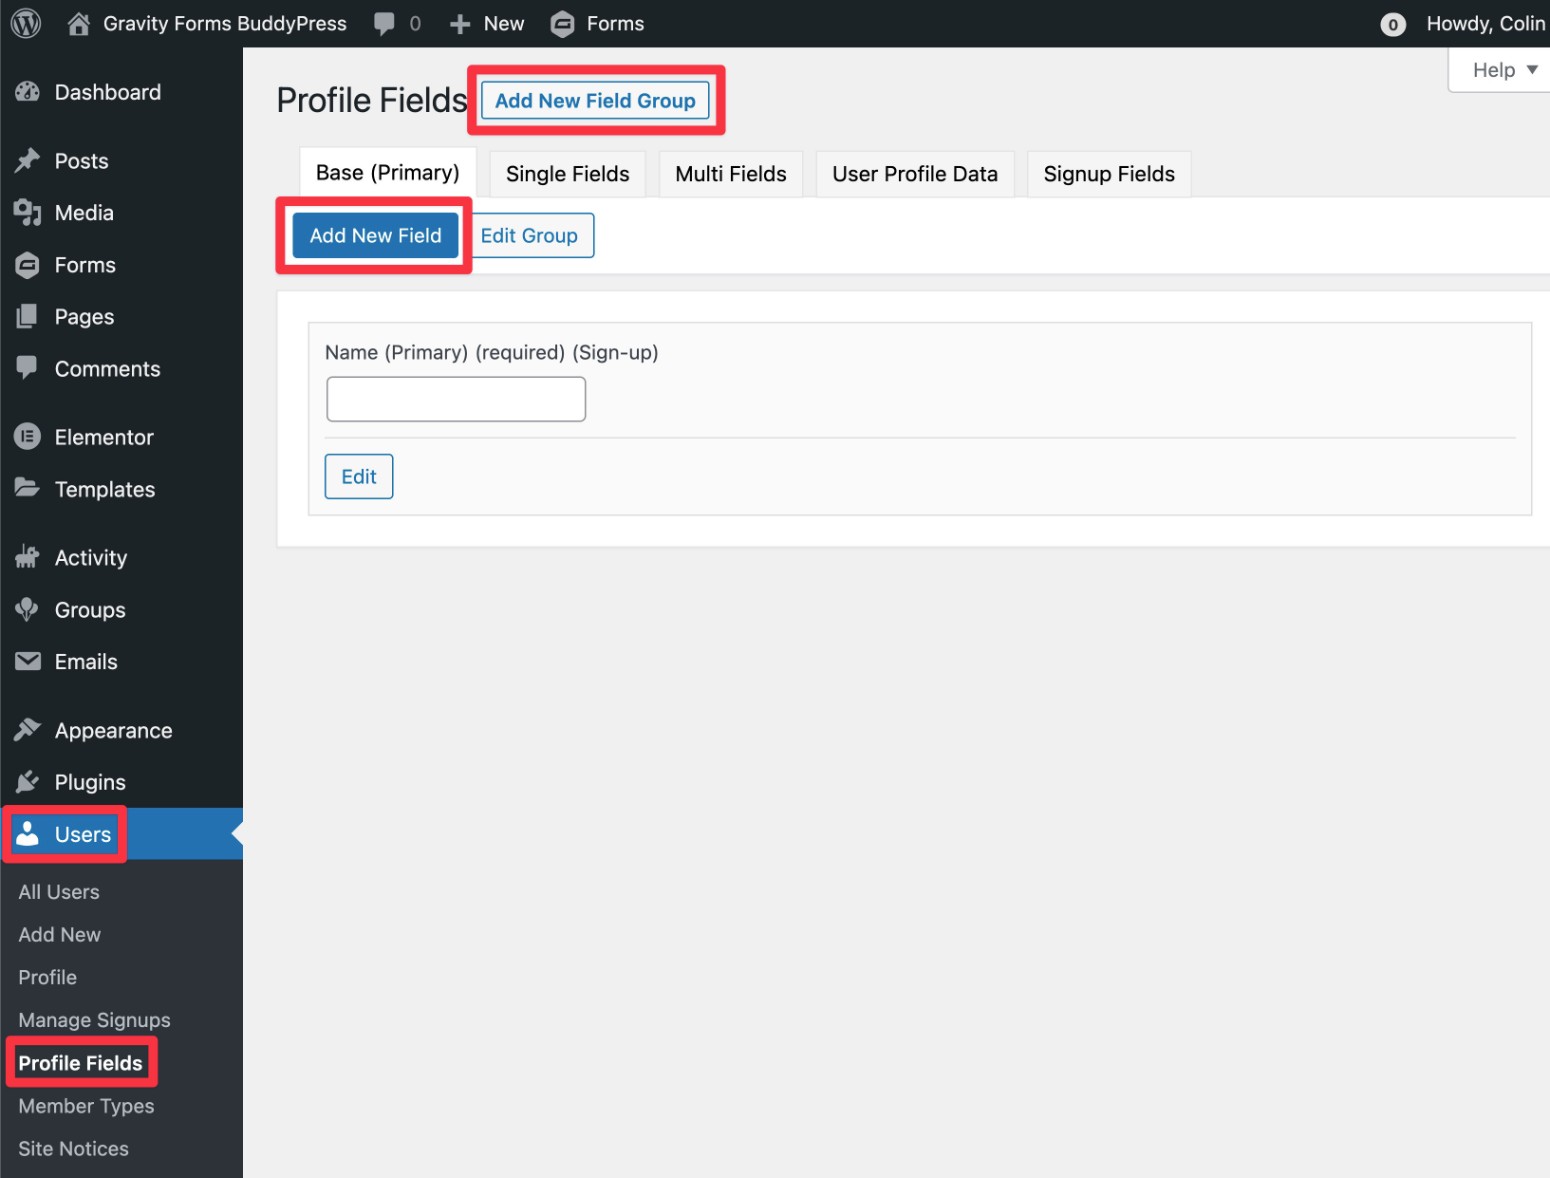
For example, here’s what it looks like to add fields for “Date of Birth” and “Interests”:
3. Create Your Gravity Forms BuddyPress Registration Form
Now, you’re ready to get into actually creating your BuddyPress registration form with Gravity Forms.
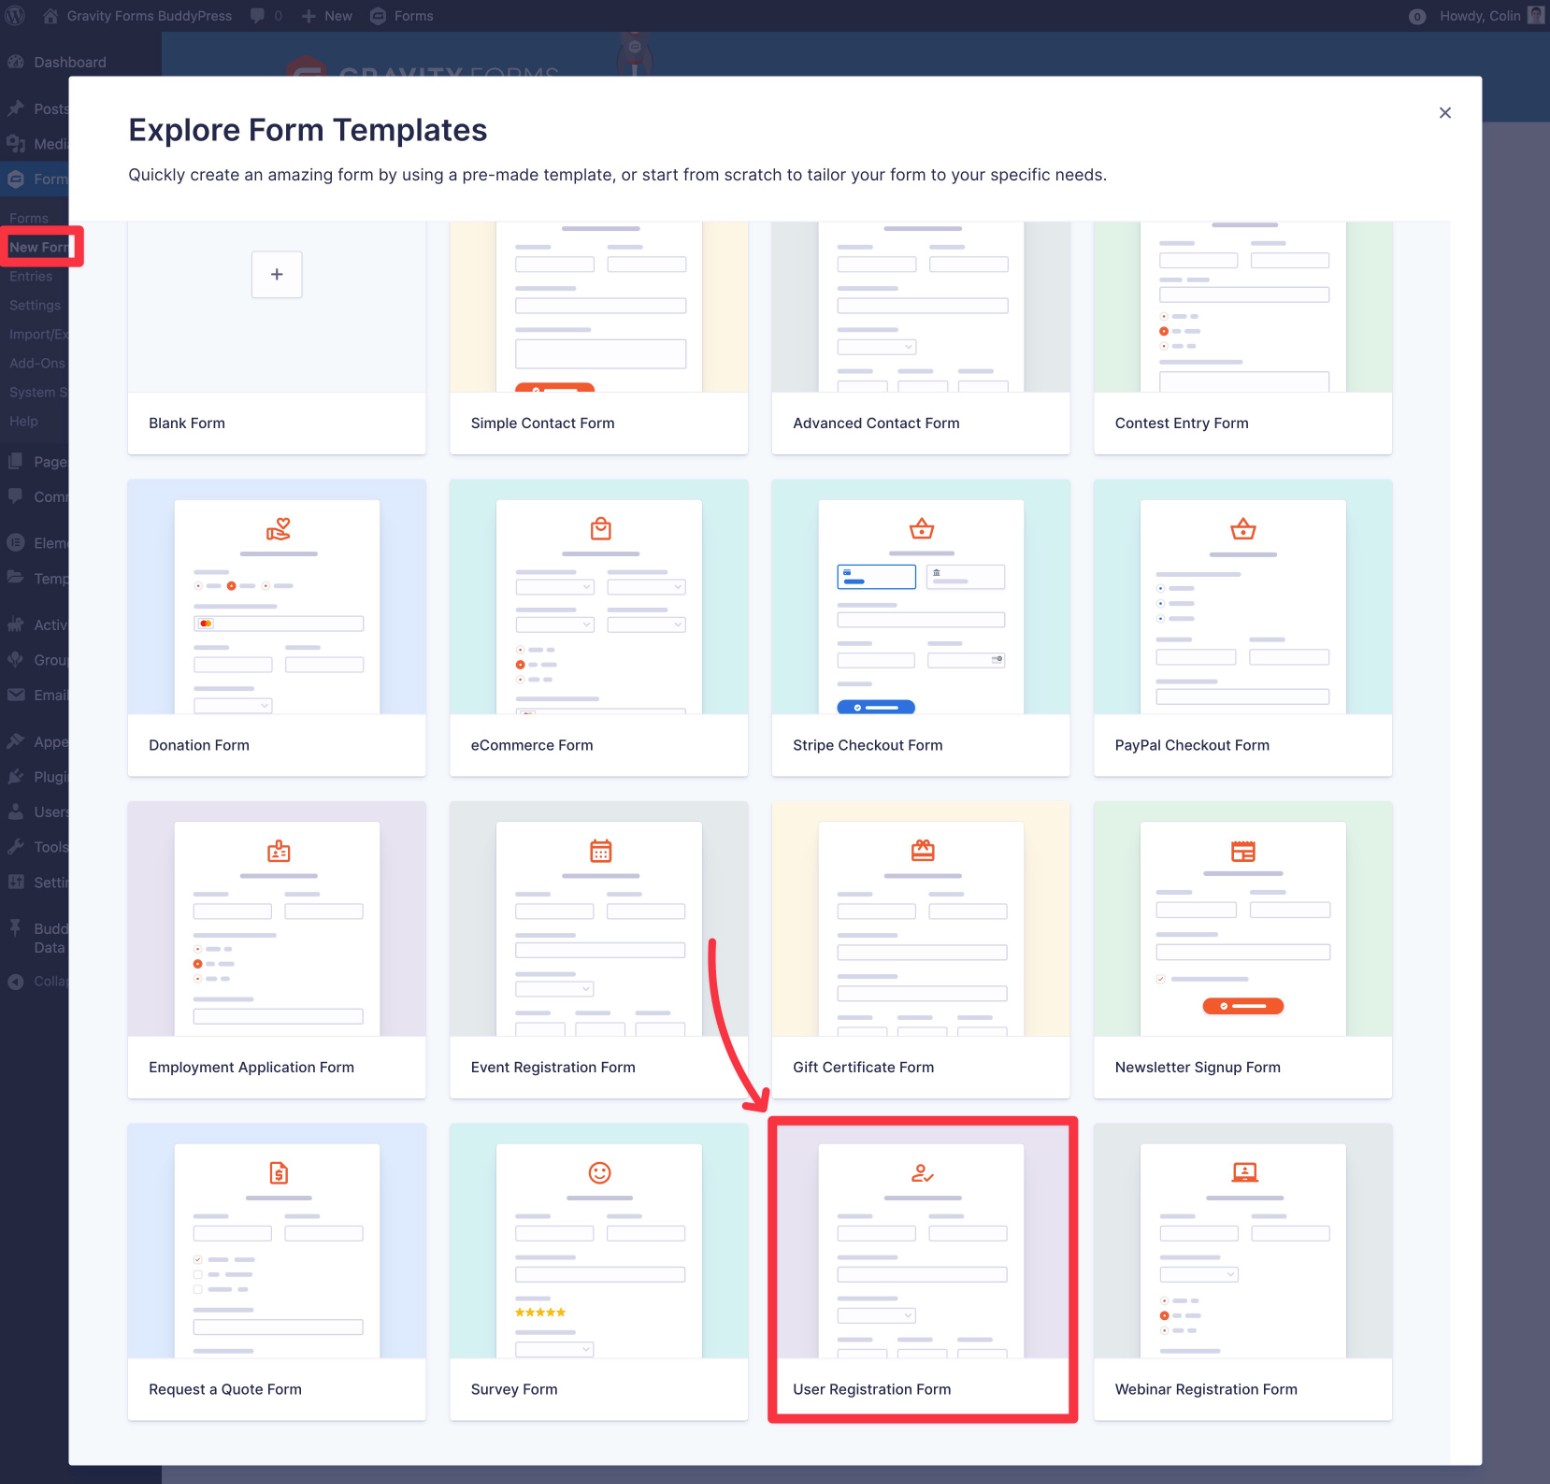
To begin, go to Forms → New Form in your WordPress dashboard.
This will show a list of available form templates, as well as an option to start with a blank form.
To save time, we recommend starting with the premade User Registration Form template, though you’re always free to choose the Blank Form option if you’d rather build your BuddyPress registration form from scratch.
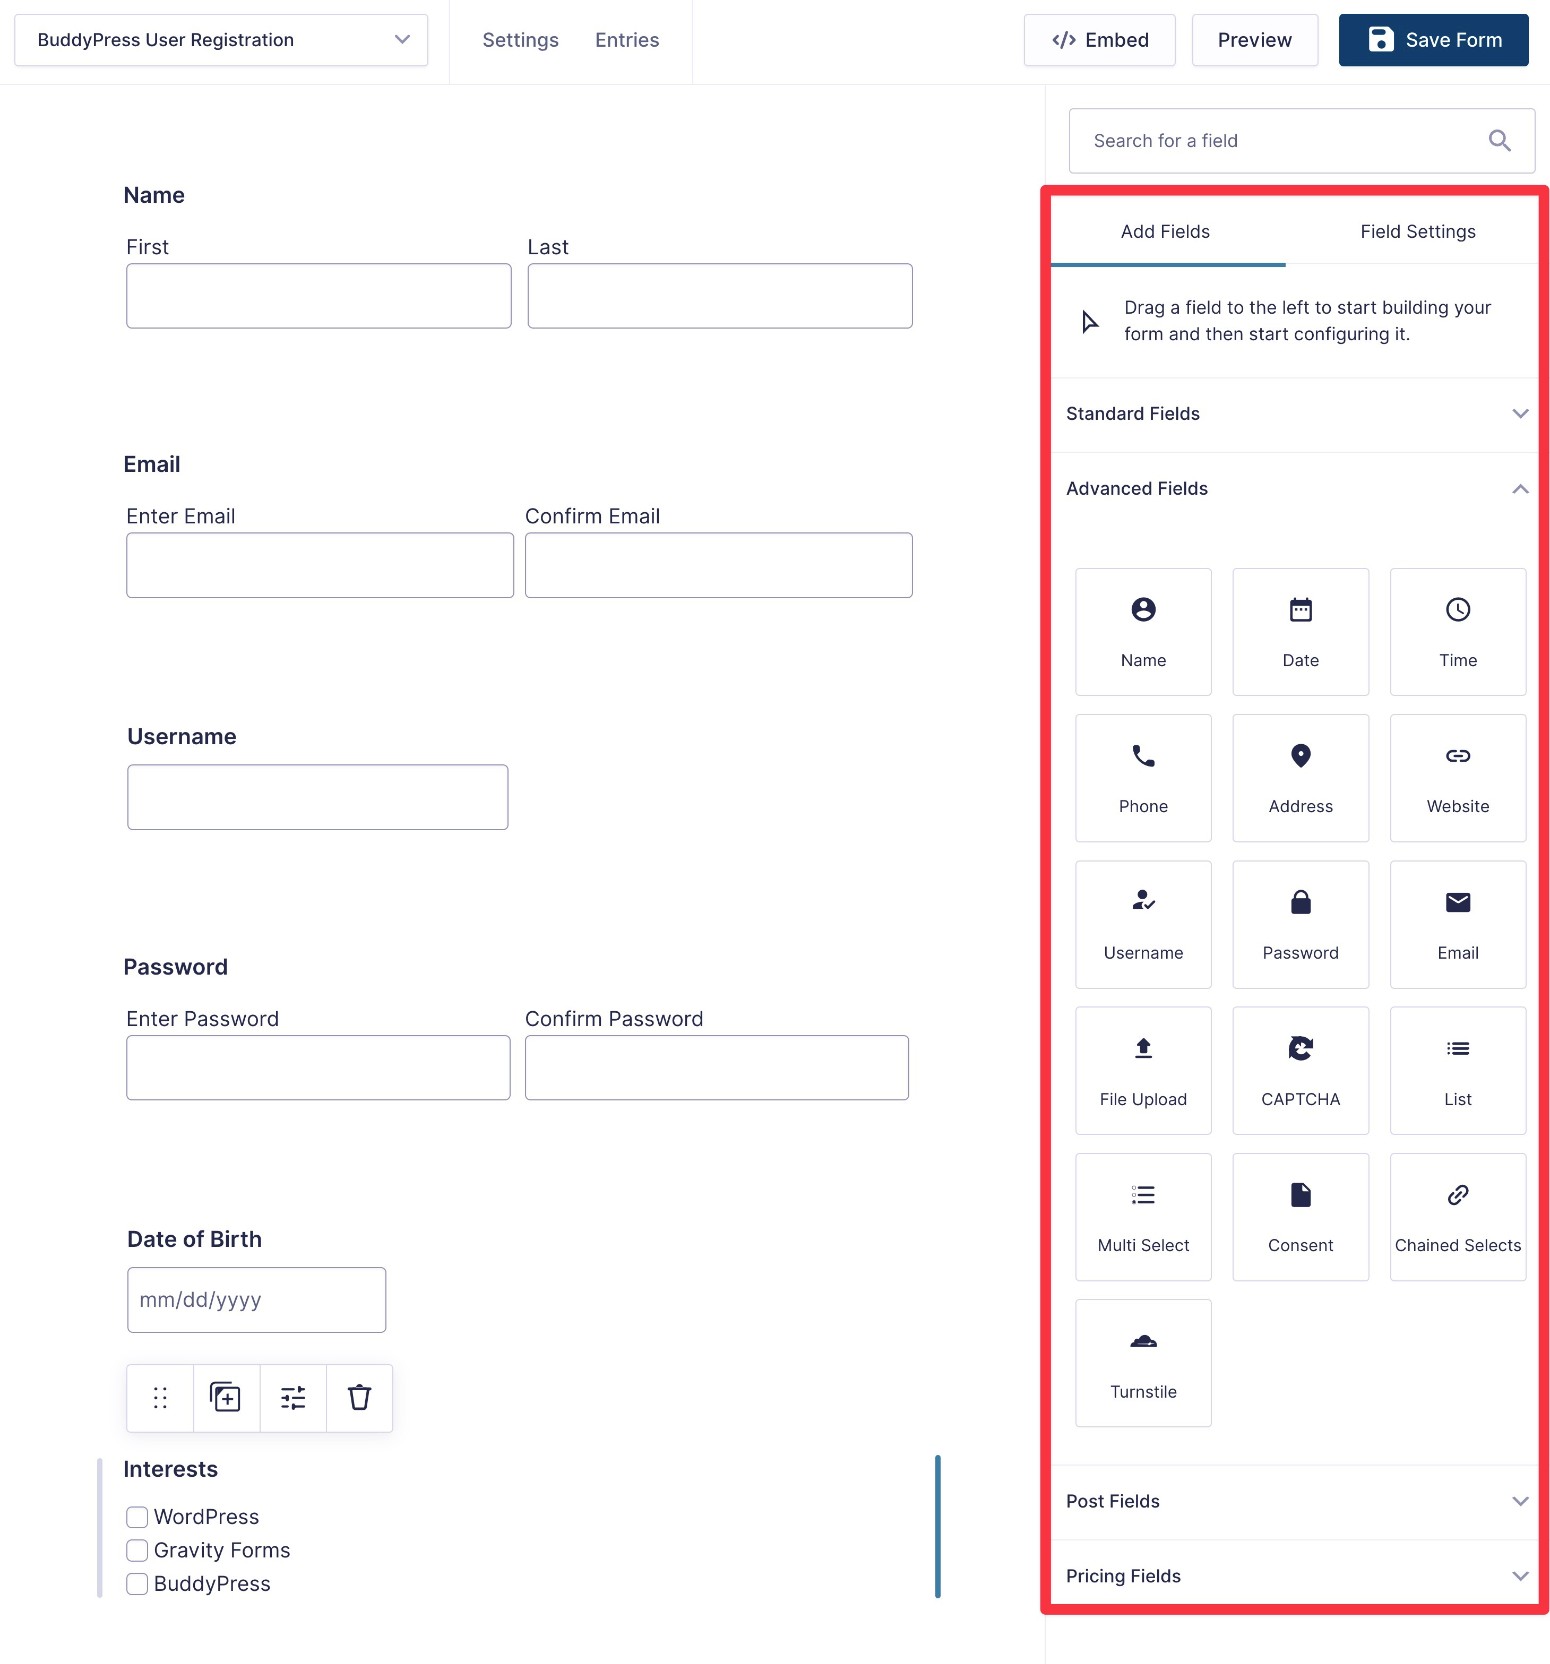
The premade template already includes all of the basic form fields that you need for name, email, username, and password.
However, if you want to collect additional information from users at registration, you’re free to add as many other fields as needed. For example, you could collect information about their interests, their locations, and so on.
If you want to add payment functionality to your form, we’ll cover that in Step 5. So, just hold on a second!
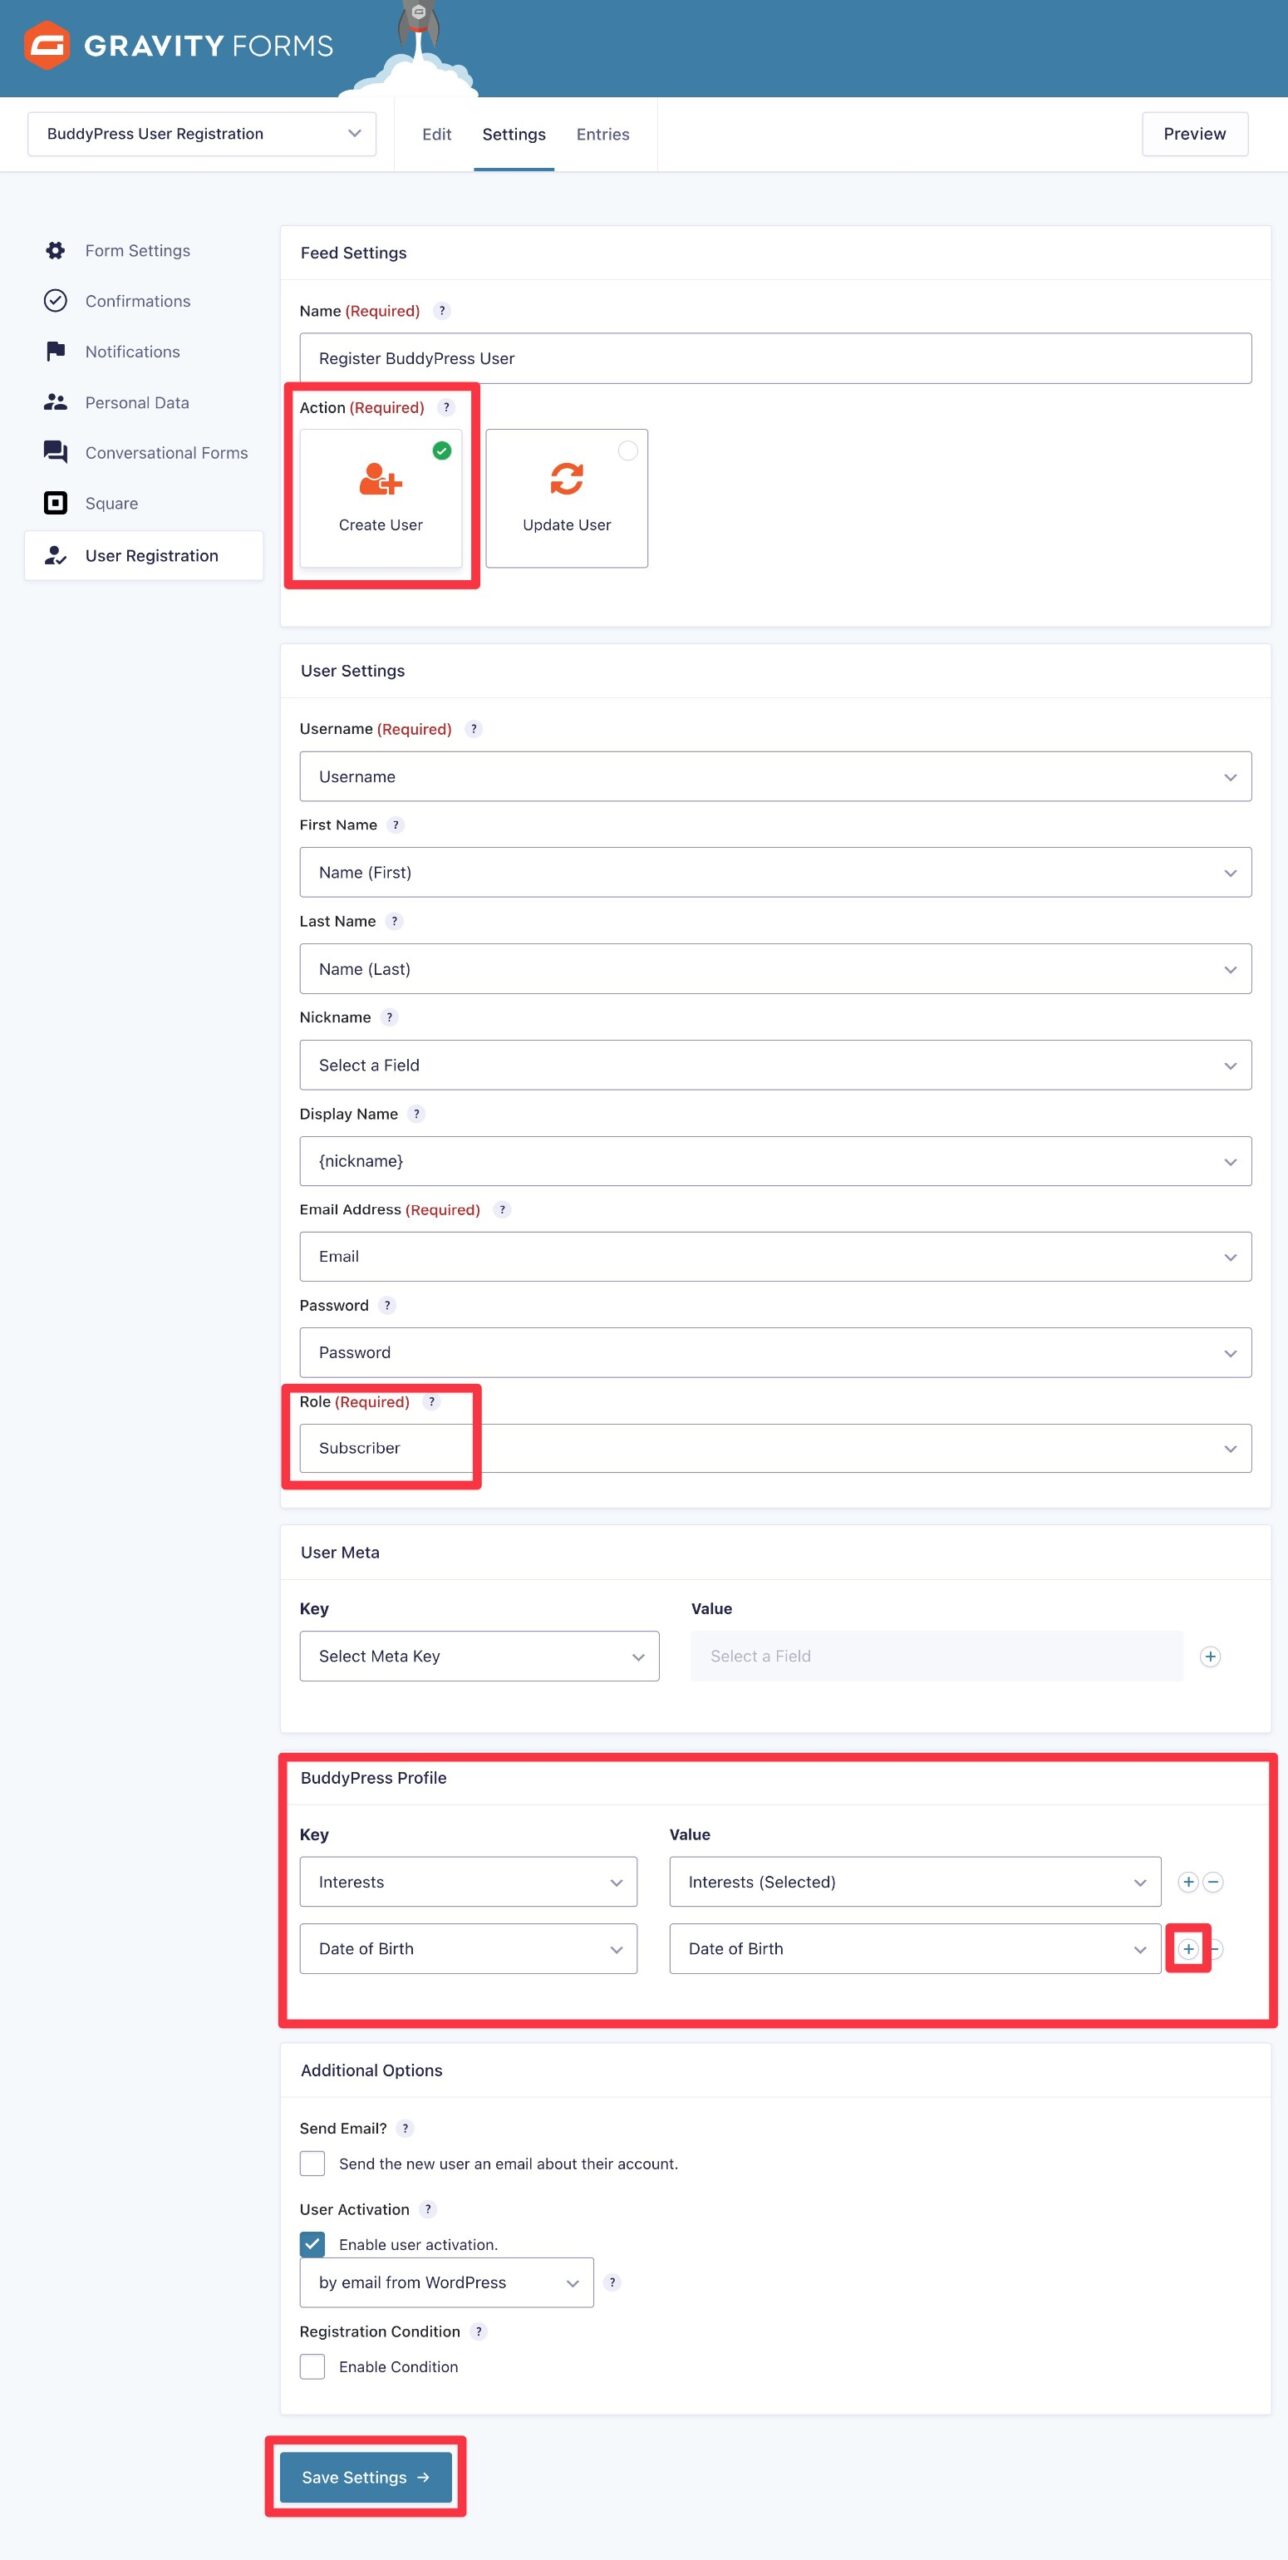
4. Create a User Registration Feed
Once you’ve added fields for all of the information that you want to collect at registration, you can save your form and then set up a user registration feed.
This “feed” controls how to register users on your site, such as how to map fields from your form to BuddyPress user profile fields.
To start, go to Settings → User Registration in the form editor interface. Then, choose Add New.
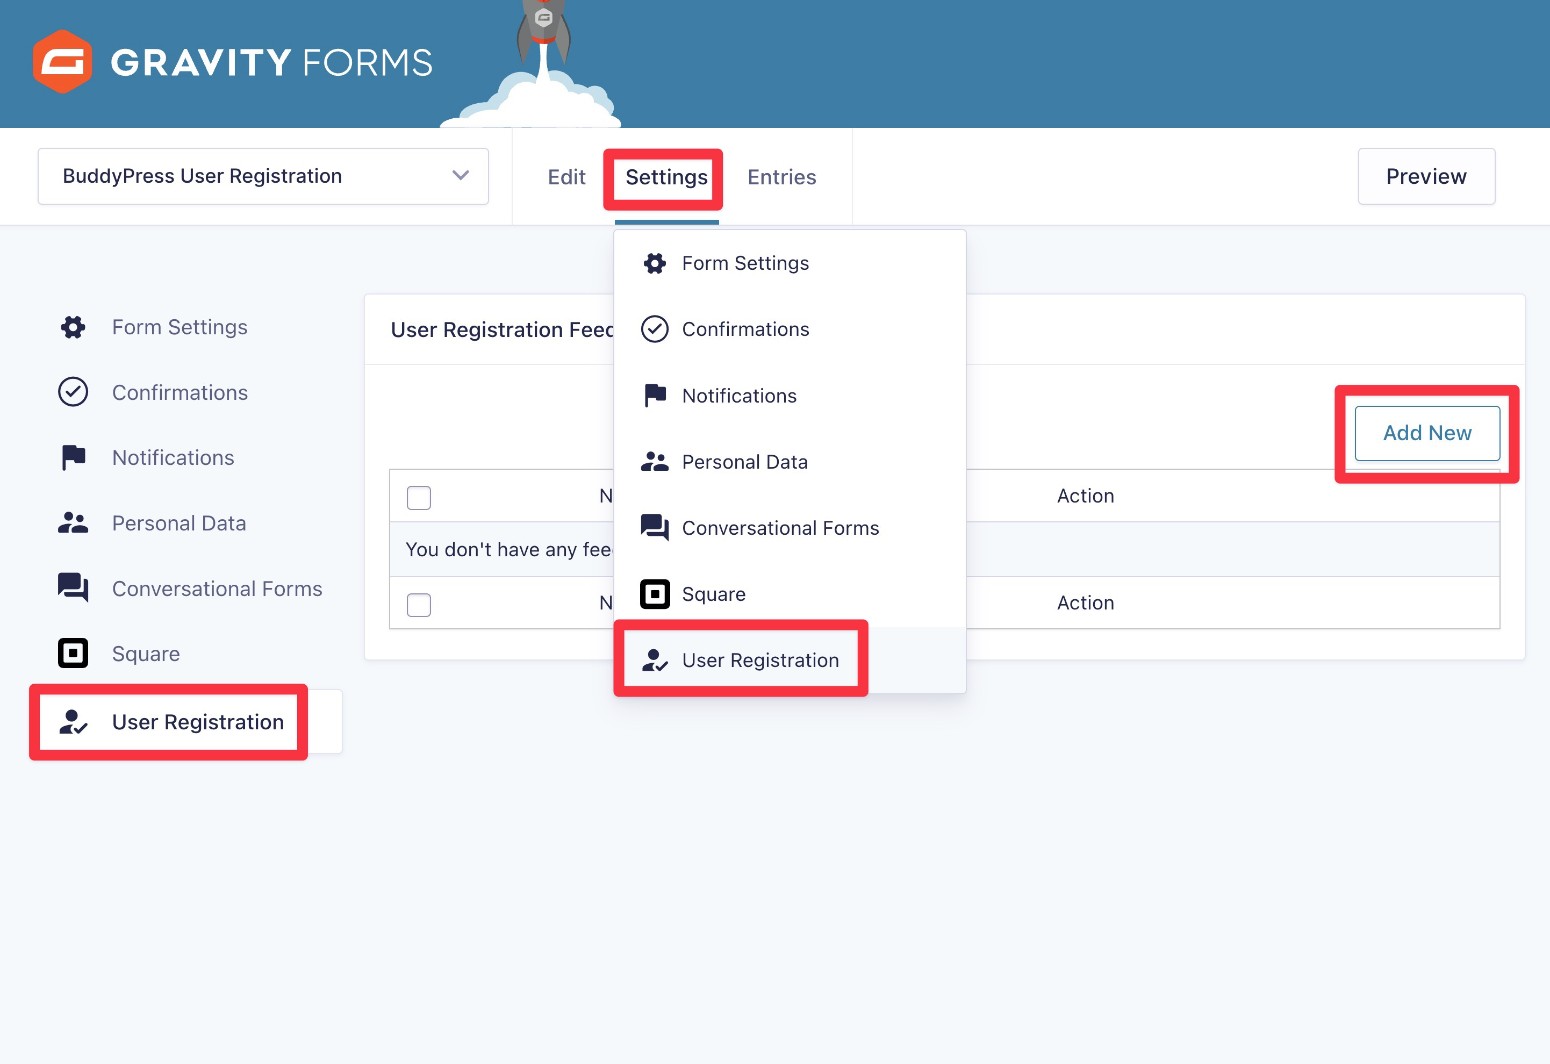
In the Feed Settings box, set the Action equal to Create User.
In the User Settings box, you can map fields from your form to core WordPress user profile fields (which BuddyPress also uses). Usually, you can leave these as the defaults.
For the Role, you’ll typically want to register BuddyPress users as the Subscriber user role, though you’re free to choose a different role if needed.
Below that, you can use the special BuddyPress Profile box to map form fields to any BuddyPress custom profile fields that you set up in step two of this tutorial.
Finally, you can use the Additional Options box to configure some general settings, such as whether or not to send the user an email about their account.
You also have the option to set up conditional logic rules to only register users for BuddyPress if certain conditions are met.
Make sure to click Save Settings at the bottom.
5. Set Up Payment (Optional)
If you want to charge users to register for your BuddyPress community, you can also add payment functionality as part of your registration form.
If you set this up, Gravity Forms will only register the user after a successful payment.
You could charge every single user who registers or only charge some users. For example, you could give users an option for a VIP membership and only charge them if they choose that option.
If you do want to require payment as part of your BuddyPress registration form, here’s how to set it up…
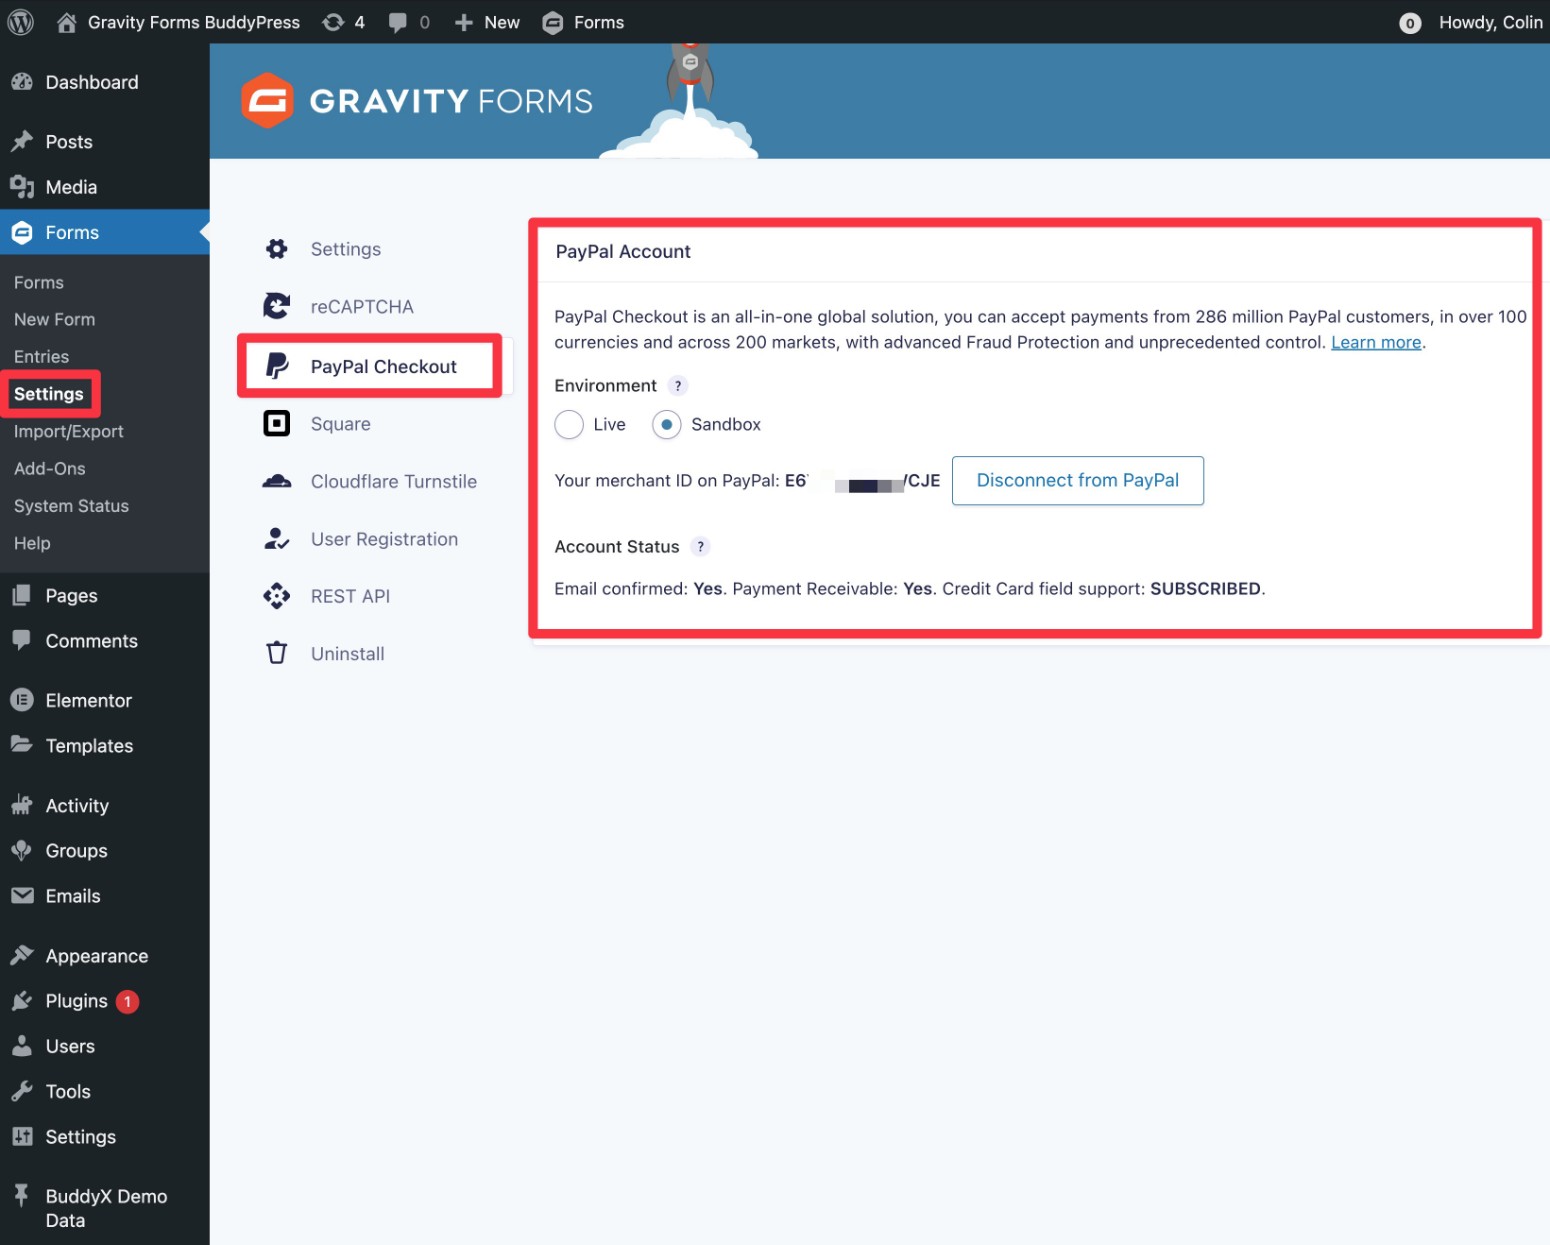
Install a Gravity Forms Payment Add-On
First, you’ll want to install an add-on for your preferred payment gateway. Popular options include PayPal, Stripe, and Square – here’s a breakdown of all the Gravity Forms payment add-ons.
We’ll use PayPal Checkout for this tutorial, but the basic steps will be the same for other providers.
To begin, install the add-on for your preferred payment processor (e.g. PayPal Checkout).
Once you’ve activated the add-on, here’s how to set it up:
- Go to Forms → Settings → PayPal Checkout.
- Choose between Live or Sandbox environment – we recommend Sandbox when you’re testing things because it lets you process dummy payments.
- Click the Connect with PayPal button and follow the prompts to log in. If you want to use Sandbox mode, you’ll need to create a sandbox account in the PayPal Developer Dashboard – full instructions here.
To see the process in more detail, check out the Gravity Forms PayPal Checkout documentation.
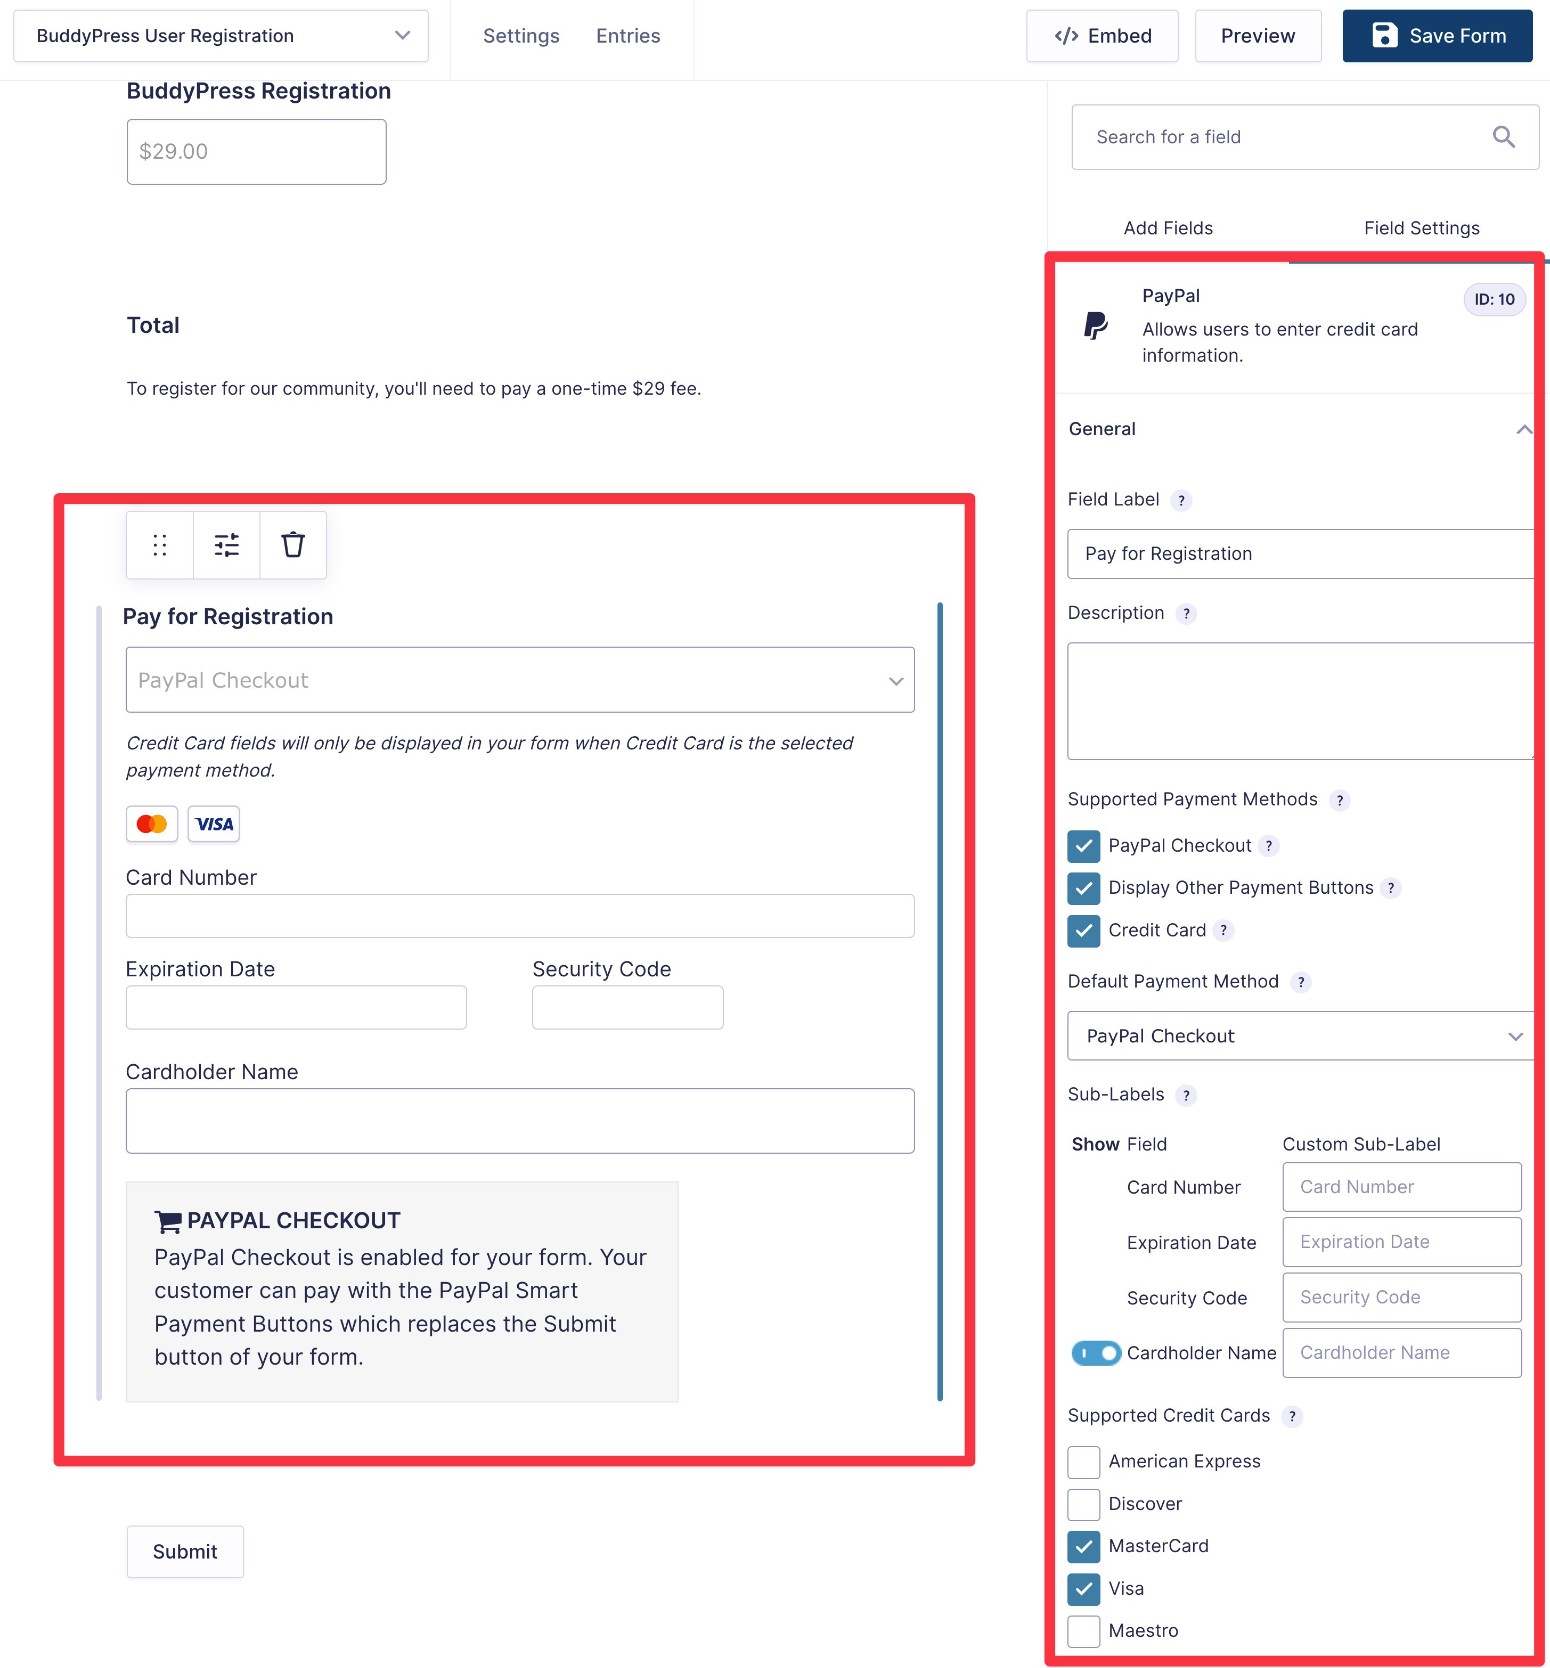
Add Payment Fields to Your BuddyPress Registration Form
Once you’ve set up the add-on, go back to the form editor for your BuddyPress registration form.
First, you’ll want to add fields to collect the billing address/information of users.
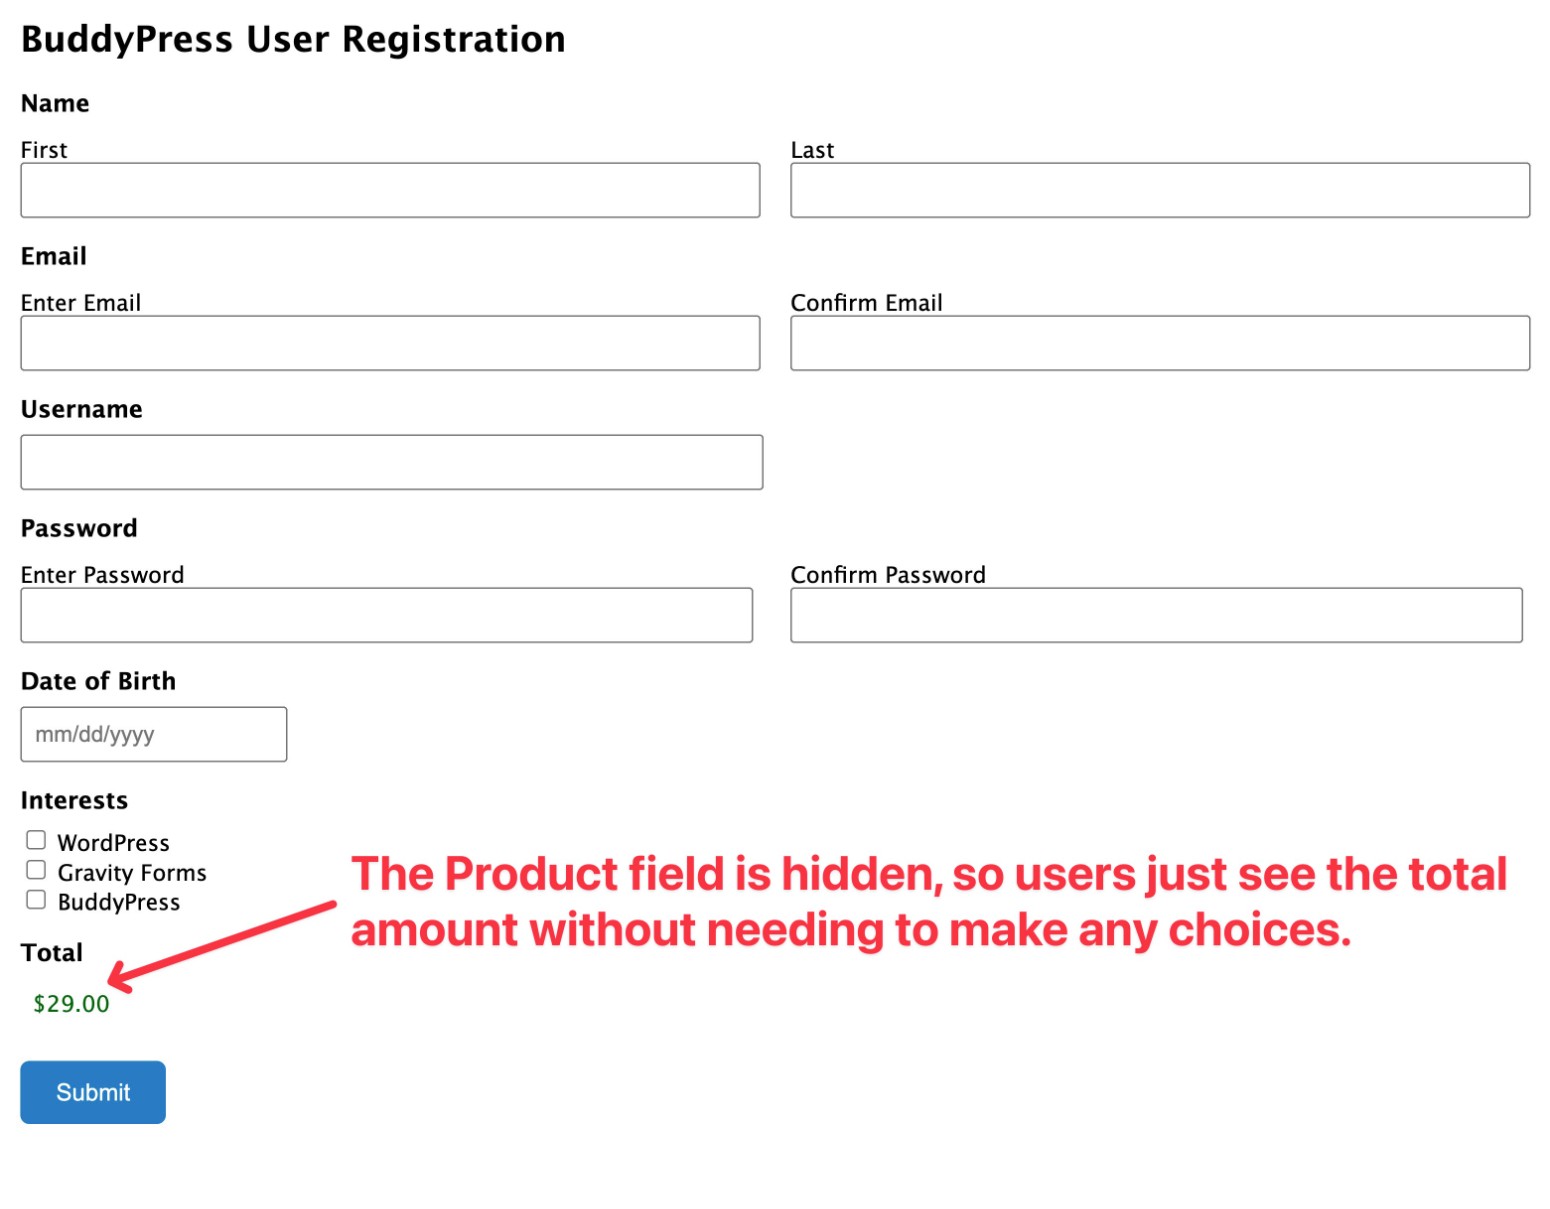
Then, to control the price of registration, you’ll want to add at least one Product field.
If you want to let users choose between options, you can make your product field visible and display options in a drop-down or radio buttons.
However, if you want to charge every user the same fee as a basic condition of registration, you can set the Product field’s type equal to Hidden and then enter the price in the box.
You need to then add the Total field to show users the price that they will need to pay to register.
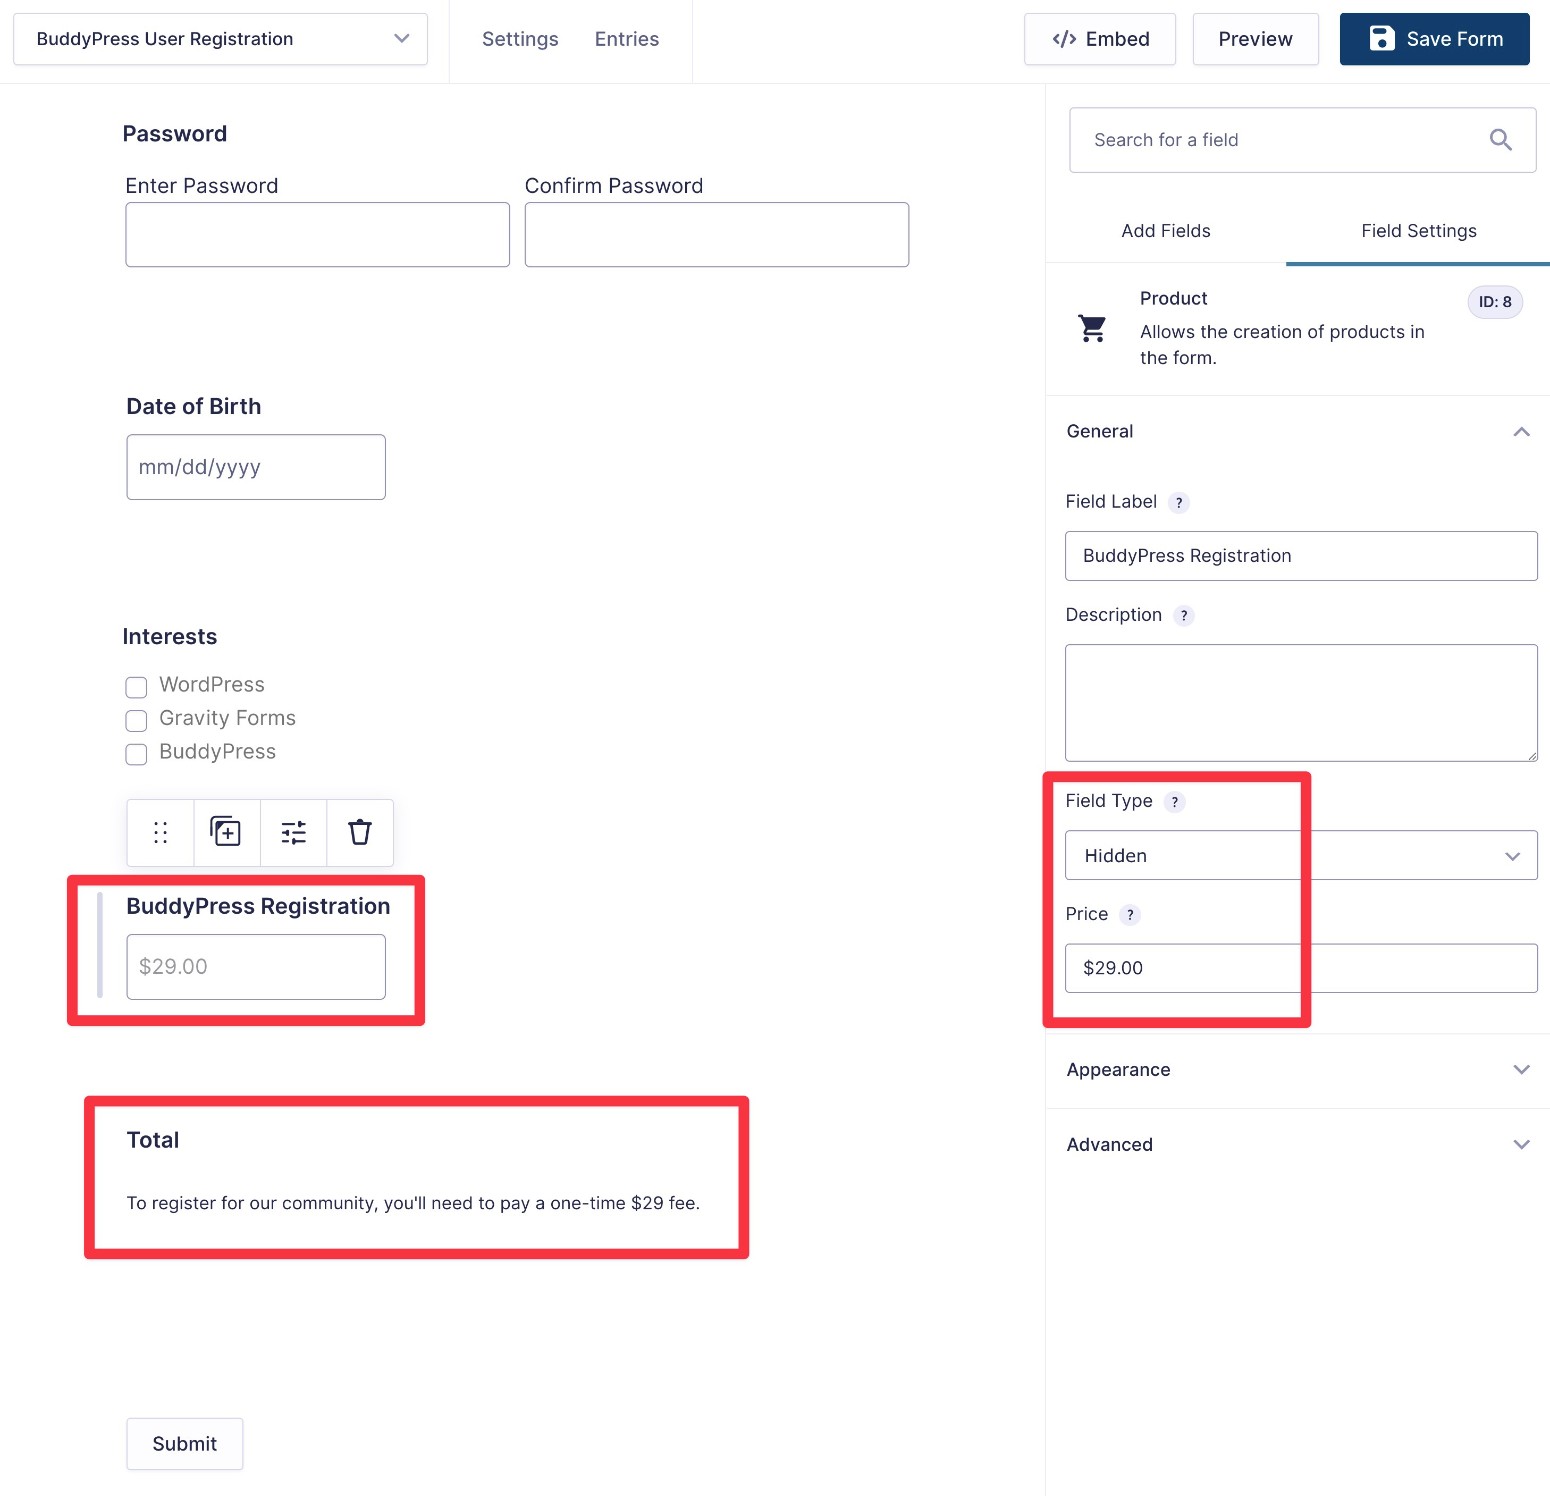
Here’s a preview of what that setup would look like:
Finally, add the PayPal field below the Total field. In the field’s settings, you can configure PayPal behavior, such as whether to show a credit card field in addition to the PayPal Checkout option.
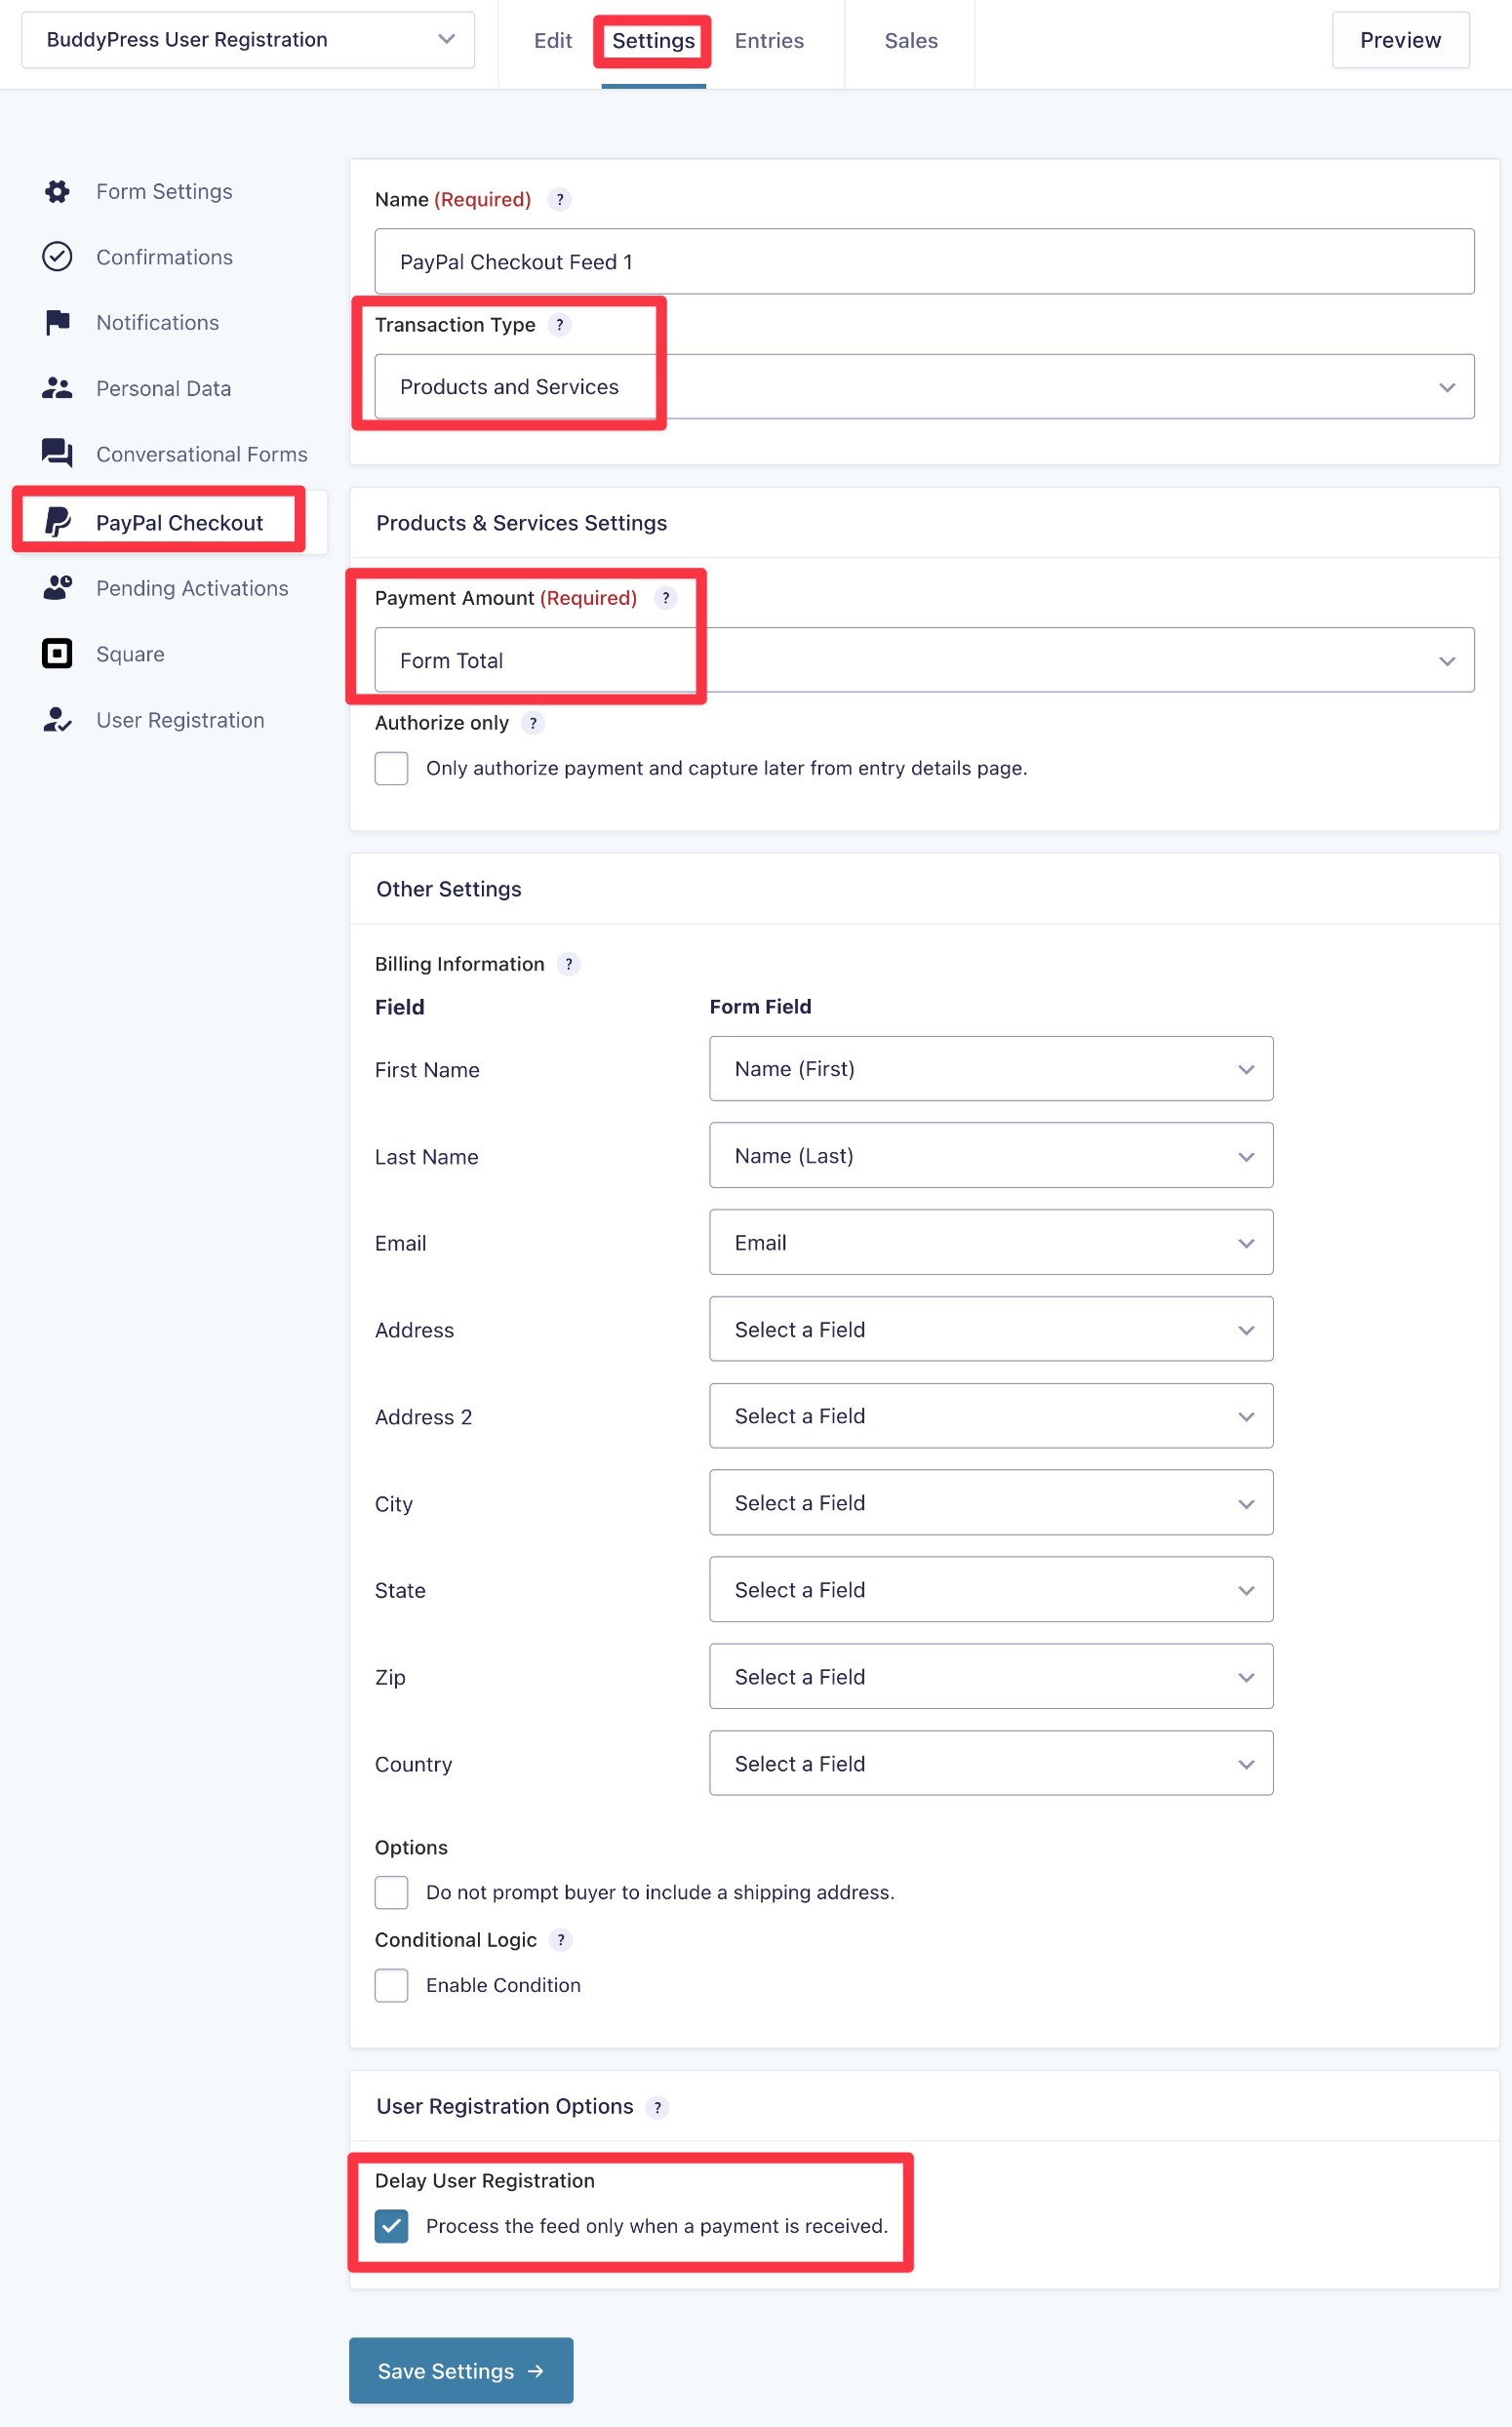
Create a Payment Feed
Once you’ve added the needed fields, make sure to save your form.
Then, go to Settings → PayPal Checkout and create a new PayPal Checkout feed:
- Use the Transaction Type to choose between a one-time payment (Products and Services) or a recurring subscription (Subscriptions).
- Set the Payment Amount equal to Form Total.
- Use the Other Settings box to map fields from your form to PayPal billing information.
- Check the Delay User Registration box in the User Registration Options settings. This will wait to register the user for your BuddyPress community until the payment has been successfully received.
- Click Save Settings.
6. Set Up Other Integrations (Optional)
Beyond payments, another benefit of using Gravity Forms for BuddyPress registration forms is that you can also set up other integrations.
For example, you could add new BuddyPress users to your favorite email marketing software, such as Mailchimp, AWeber, Campaign Monitor, and so on. Or, you could add BuddyPress users to your customer relationship manager (CRM).
To get some ideas, browse all of the Gravity Forms Add-Ons here. Because you’re already using the Elite license, you can access all of these add-ons at no extra charge.
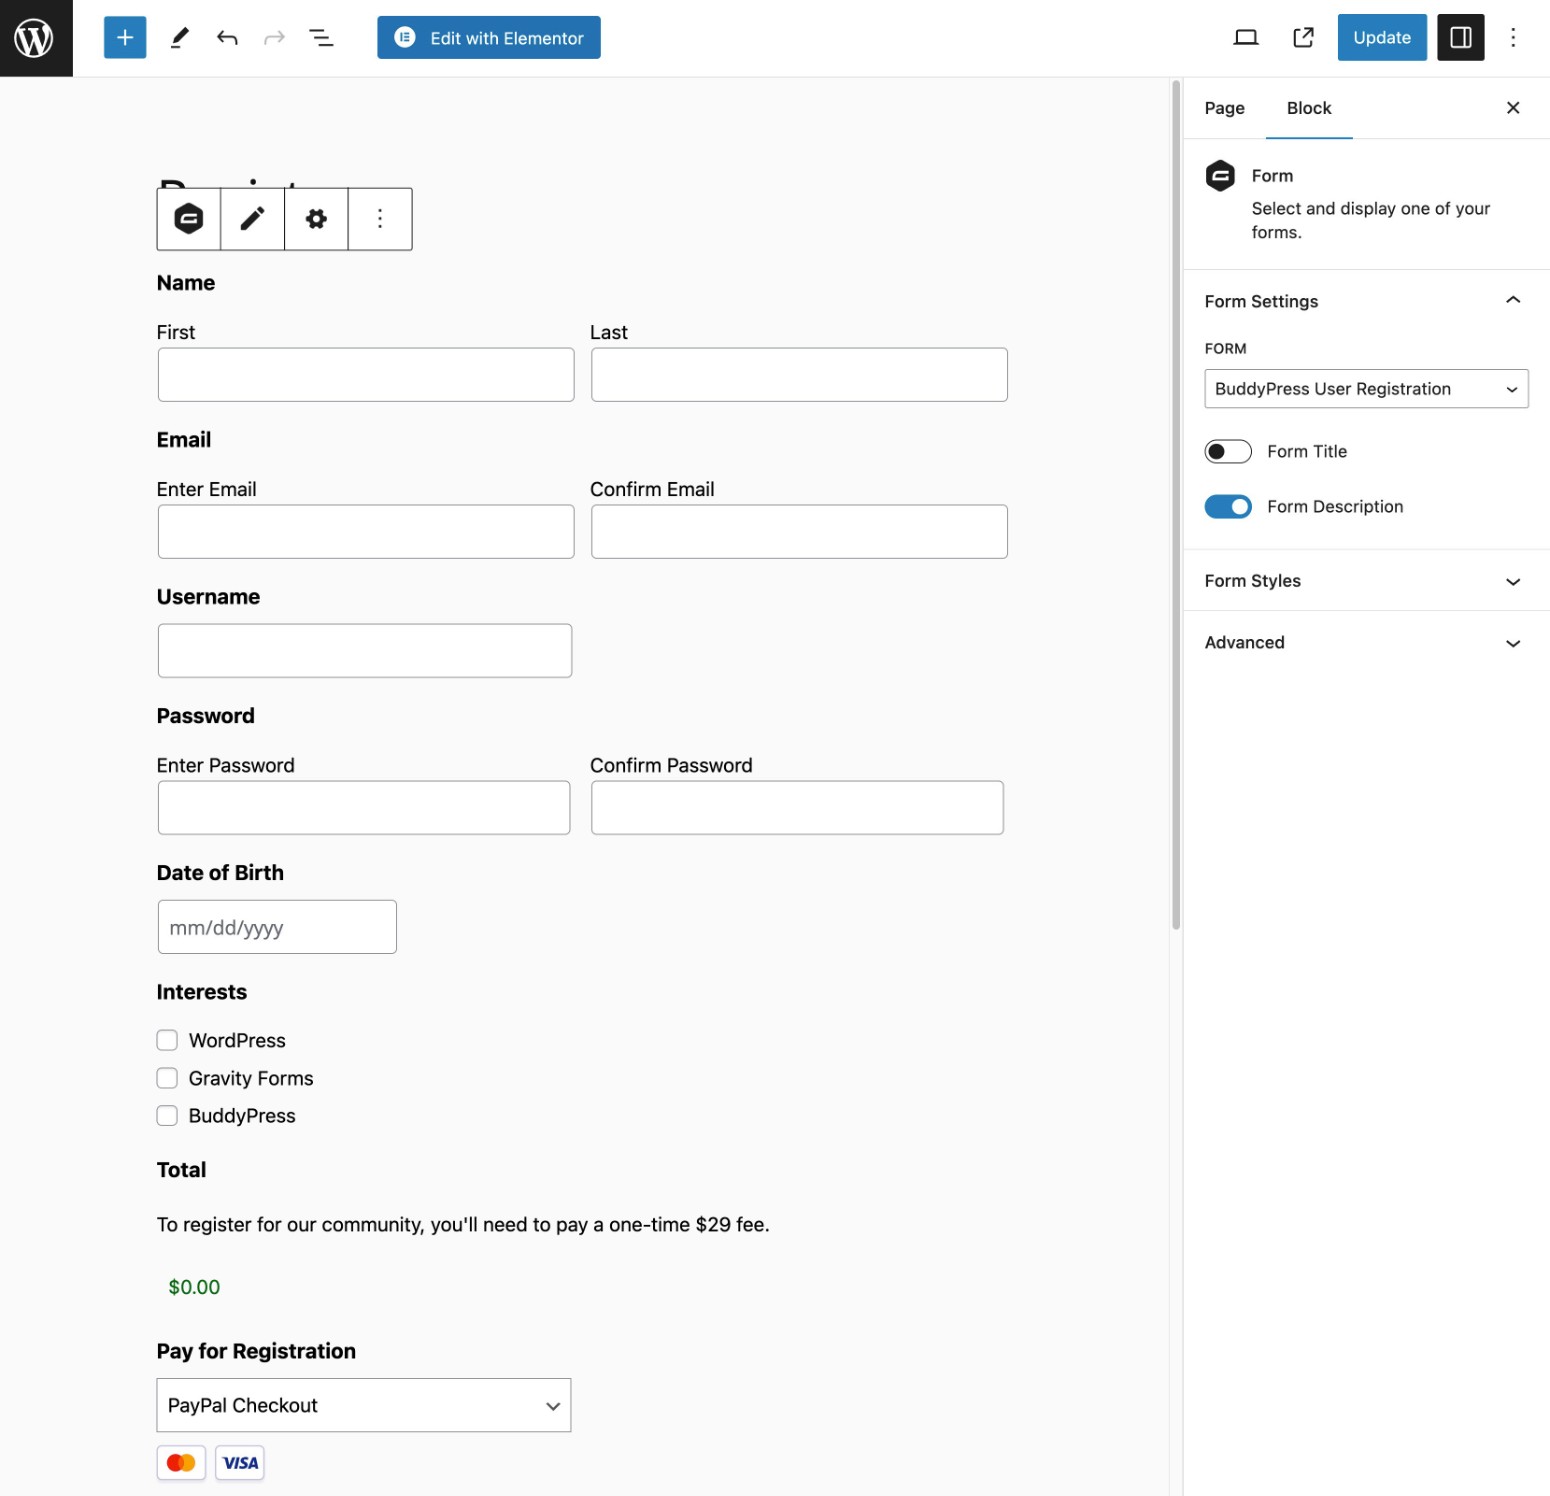
7. Embed Your BuddyPress Registration Form (and Test!)
To finish things out, you’ll want to embed your Gravity Forms BuddyPress registration form so that people can start using it to register for your community.
Create a new page or edit an existing page. Then, use the Gravity Forms block or shortcode to embed your form. For top tips on styling your form in the block edit, check out this article – How to Style Forms in Gravity Forms: Ultimate Guide.
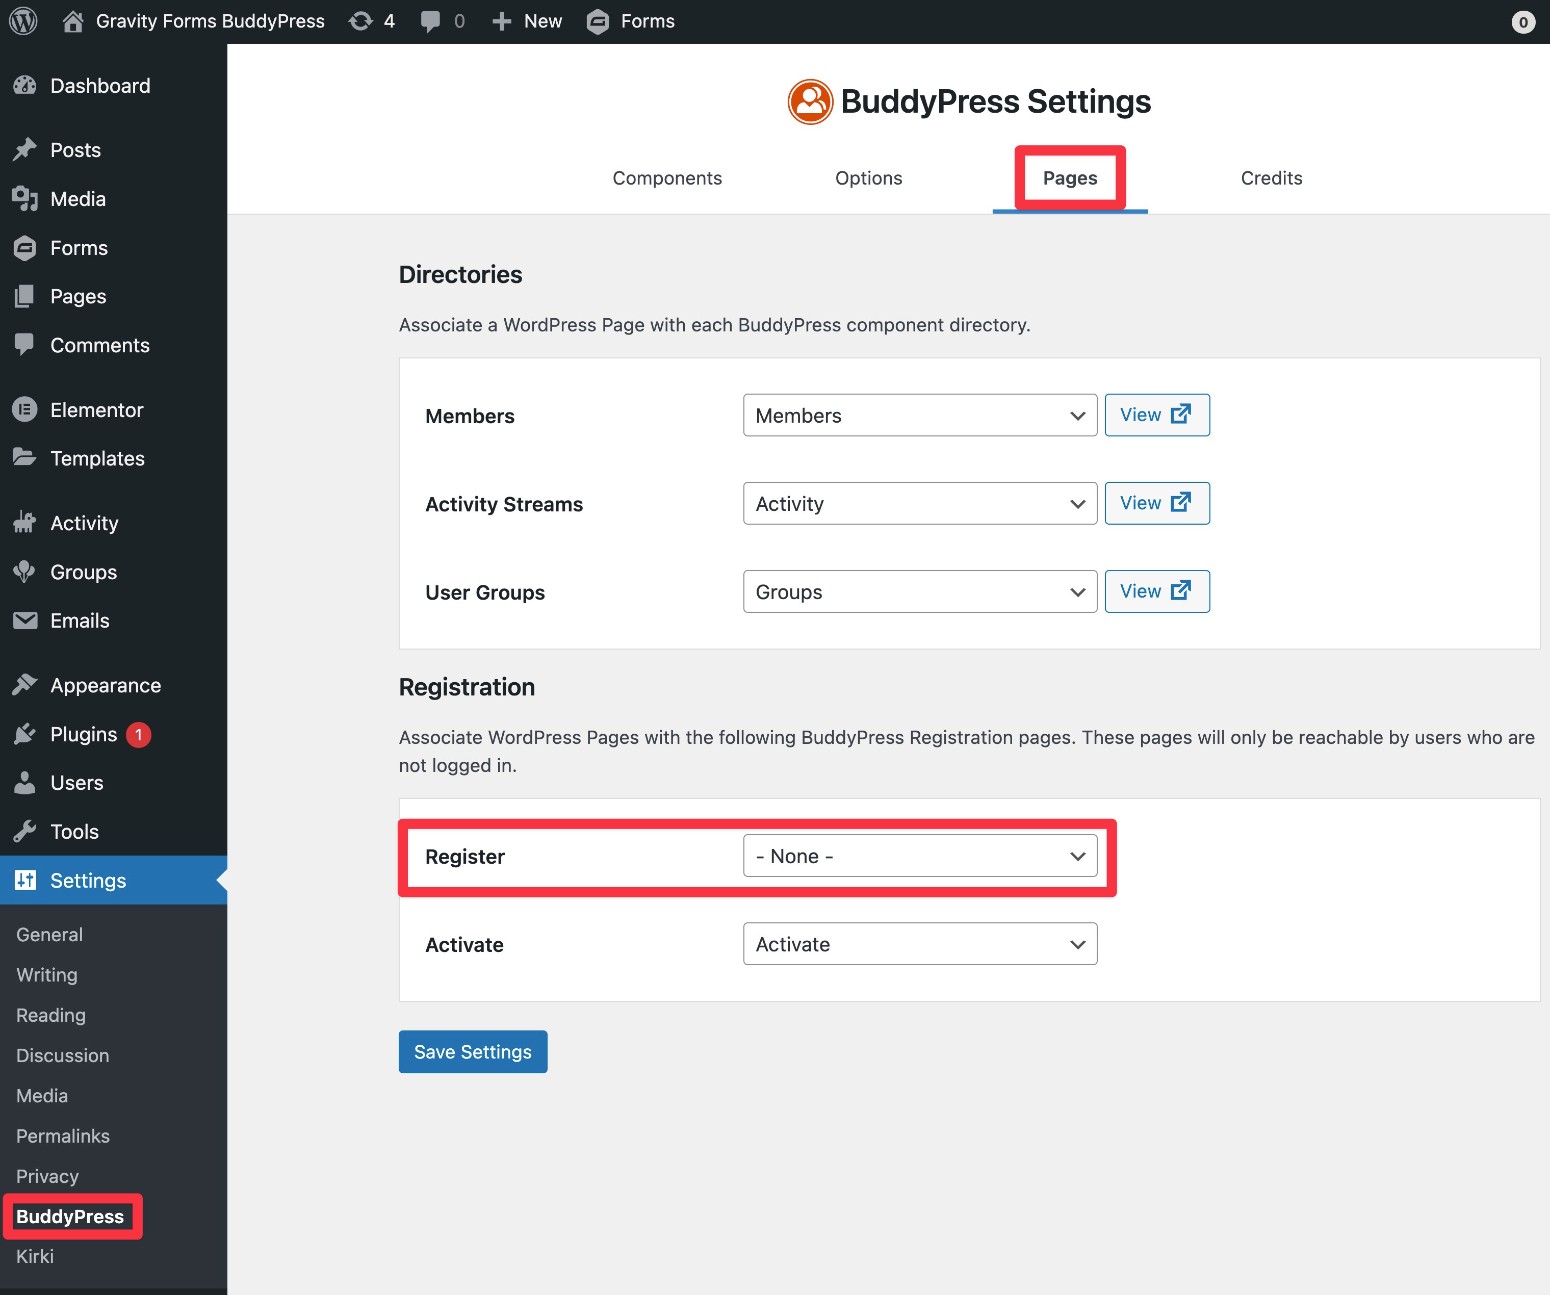
To avoid users accidentally seeing the default BuddyPress registration page, we also recommend going to Settings → BuddyPress → Pages and setting the Register page equal to None.
Now, you can send all new users to the custom BuddyPress registration form that you created with Gravity Forms.
We recommend testing the form, especially if you’re processing payments as part of the registration process.
If you are processing payments, make sure to enable Live mode in your payment processor add-on once you’ve verified that everything is working properly. You can do this by going back to Forms → Settings → [Payment Add-On] in your WordPress dashboard.
Create a Gravity Forms BuddyPress Registration Form Today
That wraps up our Gravity Forms BuddyPress tutorial.
Using Gravity Forms lets you easily collect additional information about your users and sync that data to BuddyPress profile fields. Plus, it unlocks a whole range of new features including the ability to charge users to register for your community, integrate with email marketing services, use conditional logic, and lots more.
If you’re ready to get started, purchase the Gravity Forms Elite license today.
If you’re already holding the Basic or Pro licenses, you can also upgrade your license and only pay the prorated difference.
And if you want to test these features before you buy, you can spin up a fully functioning demo site for free. You’ll be able to install the BuddyPress plugin on that demo site and play around with the features from this tutorial to see how everything works.

If you want to keep up-to-date with what’s happening on the blog sign up for the Gravity Forms newsletter!
"*" indicates required fields


