
Interested in Gravity Forms’ dynamic population feature but not sure how, or even why, to use it?
Dynamic population opens up a lot of options for helping you create more effective and user-friendly WordPress forms.
However, it is a slightly more advanced feature, so it can take a little bit of time to wrap your head around how to use it most effectively.
To help you get the most from Gravity Forms’ dynamic population, this post will not just show you how to set it up, but also explain some of the reasons why you might want to use it and give you some examples of when it can be helpful.
If you already have a specific use case in mind, you can click this link to jump straight to the tutorial part of this article.
Otherwise, we’re going to get started with a general introduction to what dynamic population is, the different ways it can be utilized, and some real examples of when to use each approach.
Then, we’ll get into the step-by-step tutorials for how to use it on your site…
What Is Gravity Forms Dynamic Population?
In a nutshell, Gravity Forms dynamic population lets you pre-fill/pre-select fields in your form.
These could be fields that are visible to the visitor (and that the visitor could edit if needed), but they could also be hidden fields that are only visible to you.
For example, you could pre-fill the “Email” field with the user’s email address or you could pre-select a checkbox in a list based on the link that a person visited from.
Dynamic population has two high-level benefits.
For the people submitting your forms, it lets you create a better user experience by eliminating as much friction as possible. Rather than requiring users to duplicate their efforts or manually fill in information, you can pre-fill/pre-select the form as much as possible.
For WordPress admins, it lets you create more optimized workflows. For example, you could easily create contact forms for a whole team of sales people from one base form. Or, you could add helpful backend information to forms that’s only visible to admins using dynamically populated hidden fields.
When Should You Use Dynamic Population?
It’s impossible to list every use case for dynamic population, but we can talk about some high-level situations in which it can be helpful.
Add Backend Information to Improve Workflows and Differentiate Forms
First, dynamic population can be helpful for adding backend information to forms to improve your workflows and help you differentiate between different forms.
You can do this using hidden fields.
For example, let’s say you run lots of events. To let people register for each event, you want to include an event registration form on each separate event page.
One option would be to create a unique form for each event. However, this would quickly become complex as you’d need to manage a bunch of different forms.
Instead, you could just create one form and then use dynamic population to add the correct event name.
So if a user submitted the form on the “GravityNY” event page, it would show the event as “GravityNY”. But if a user submitted that same form on the “GravityUK” event page, it would show the event as “GravityUK”.
You can do something similar with landing pages, to help you track which landing pages are driving the most sales.
Or, you could use dynamic population to track how user behavior connects to your form. For example, you could pre-fill certain information in a public or hidden field based on a specific browser cookie that a user has.
Pre-Fill Information to Reduce Friction
Dynamic population can also help you reduce friction by pre-filling information in your forms.
For example, if you already have a user’s email address, there’s no reason to ask them to enter it again. Instead, you could use dynamic population to pre-fill the email field with the user’s email address.
If a user is logged in to WordPress, you can also pre-fill the form with the user’s information.
You can also pre-fill non-user information, such as filling in the current date.
Or, you could nudge users in the right direction, while still letting them adjust the field if needed. For example, let’s say you have different sales agents and you want to let users choose which agent to message using a drop-down. To create a better experience, you could pre-select an agent based on the page from which a user accessed the form.
For example, if the user accessed the form from the agent listing page for “Jon Brown”, it would pre-select Jon Brown in the drop-down (while still allowing the user to edit the drop-down if they want to message another agent).
The Four Different Methods of Gravity Forms Dynamic Population
In total, Gravity Forms gives you four different options for dynamic population. While each approach shares some similarities, your use case will help decide which makes the most sense for your form.
Here’s a quick list – we’ll explain them in more detail below:
- Query string
- Shortcode
- Block
- Hook
When to Use Query String Dynamic Population
Query strings are small bits of code that you append to the end of a page’s URL. They’re not unique to Gravity Forms, but Gravity Forms does support using them to dynamically populate a field.
Here’s an example:
In this case, the query string starts at the question mark – ?your_parameter=value
It will still display the base URL – https://siteurl.com/form-url/
However, adding the query string lets you pass additional information alongside the URL.
Here’s an example:
This method is especially helpful if you want to dynamically populate a form based on the link that a user clicks.
However, one downside of using query parameters to populate fields is that the field value is visible in the URL. For this reason, you shouldn’t use this approach for any information that might cause a problem if a user accidentally shared the URL that includes the query parameters.
When to Use Shortcode Dynamic Population
You can also set up dynamic population using the regular Gravity Forms embed shortcode.
The shortcode method of dynamic population is especially helpful when you want to modify the value of a field based on the post that it’s embedded in. Instead of needing to create a separate form for each post, you can just create a single form and then use dynamic population to automatically adjust things based on the post in which the form is embedded.
The example above of creating an event registration form that you use for different events would be a good fit for the shortcode method.
Shortcode dynamic population can also be helpful when chaining two forms together because you can use the shortcode to pre-fill information in the second form with information from the first form.
When to Use Block Dynamic Population
Block dynamic population works pretty much the same as the shortcode method above. The only difference is that you’re working from the Gravity Forms block and the block settings instead of the shortcode.
As such, the block approach has the same benefits and use cases as the shortcode method – it really just depends on which interface you prefer using.
The shortcode method is more versatile in a few specific areas, though, most notably if you want to chain two forms together.
When to Use Hook Dynamic Population
Finally, you can also use PHP to dynamically populate your forms using the gform_field_value_[parameter] filter.
This lets you dynamically populate a field with the result of any PHP function.
Because you can use any PHP function, the main advantage of this method is that it gives you the most flexibility.
You can easily pull in data from other parts of your WordPress site as needed. Or, you can use PHP functions in other ways.
Here are some examples of how you might populate field data using this method, to give you an idea of its flexibility
- Browser cookie – you could use data from a browser cookie to populate the field.
- Current date/time – you could enter the current date or time using something like the date_i18n function.
- Previous value – you could populate the form with the value of a field from a form that the user previously submitted.
- Post author – you could dynamically populate the author’s email address from whatever post the form is embedded in.
- Custom fields – you can dynamically populate a field with the value from a custom field that you’ve added with plugins like Advanced Custom Fields, Toolset, or Pods.
This is by no means a complete list – you can do pretty much whatever you want… as long as you have the PHP knowledge to implement it.
And that’s the main downside of this method…
While using hooks offers the most flexibility for dynamic population, it’s also the most technical method because it requires at least a working knowledge of PHP to use.
How to Set Up Gravity Forms Dynamic Population
Now that you know the different methods for dynamic population and when/why you might want to use each method, let’s get into step-by-step guides for how to use each method.
But first, no matter which method you use, you’ll need to enable dynamic population in a field’s settings before you can start dynamically populating that field.
Here’s how to do this:
- Open the editor for the form to which you want to add dynamic population.
- Open the settings for the specific form field to which you want to populate data.
- Check the box to Allow field to be populated dynamically.
- Give the field a unique parameter name. This is how you’ll target the field using all of the dynamic population methods below. We recommend adding a unique prefix to avoid naming conflicts. For example, instead of using agent_name, use sa_agent_name.
- Save the changes.
For example, if you configure a field’s settings like below, you would target it using the parameter name of sa_event_name.
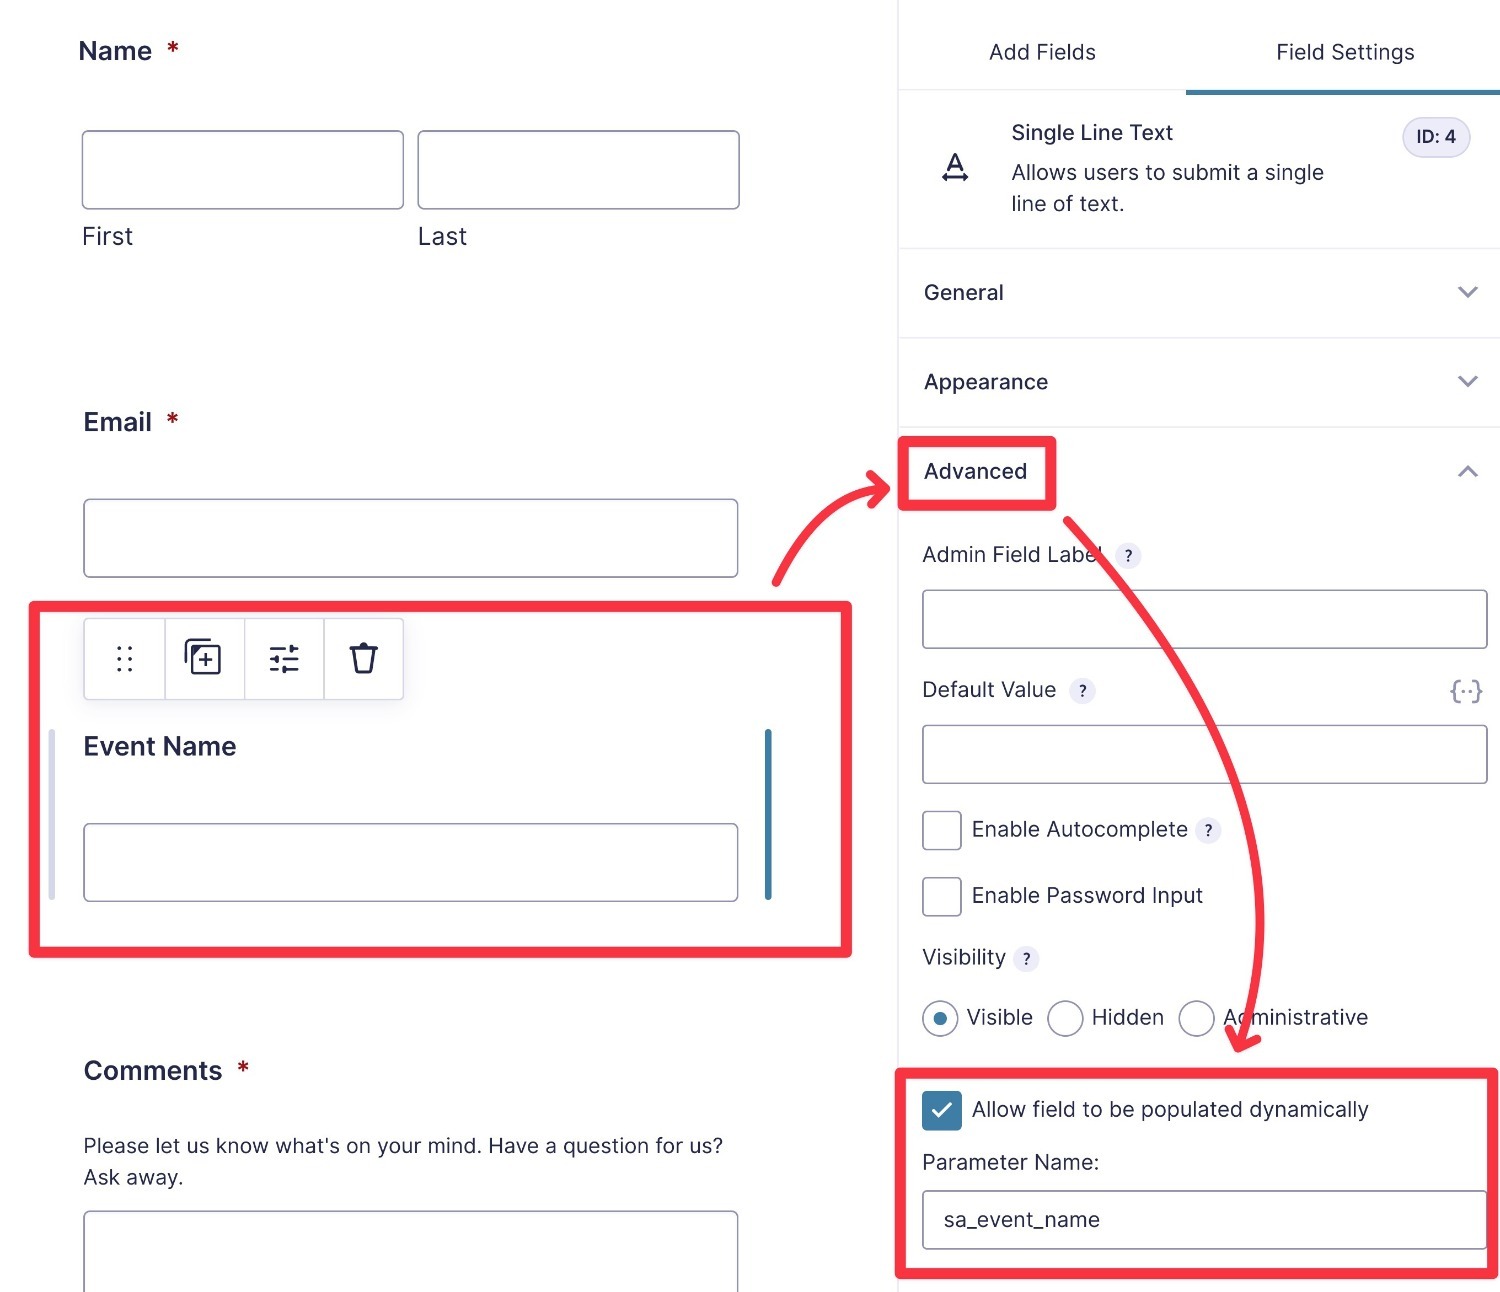
Note – if you want the field to be hidden, make sure to set its visibility to Hidden and not to Administrative. Administrative fields are not part of the form submission, so they can’t be dynamically populated like this. Hidden fields can be populated and they achieve the same goal of hiding the dynamically populated field from the user submitting the form.
Once you’ve enabled dynamic population for the necessary fields, you can use the tutorials below to implement your preferred method of dynamic population.
Query String Method Tutorial
To use query string dynamic population, you’ll create a special URL format.
You can then link to this URL from your site or share it directly with your customers. Alternatively, you could also chain multiple forms together by redirecting users to this URL after they submit a form.
Again, the basic format looks like this:
Here’s how to customize it:
- Change your_parameter_name to the actual parameter name that you set when you enabled dynamic population for a field.
- Change value to the data that you want to populate into that field.
One tricky thing is that you need to encode symbols such as spaces and symbols. The easiest way to do this is using a free tool such as this URL encoder.
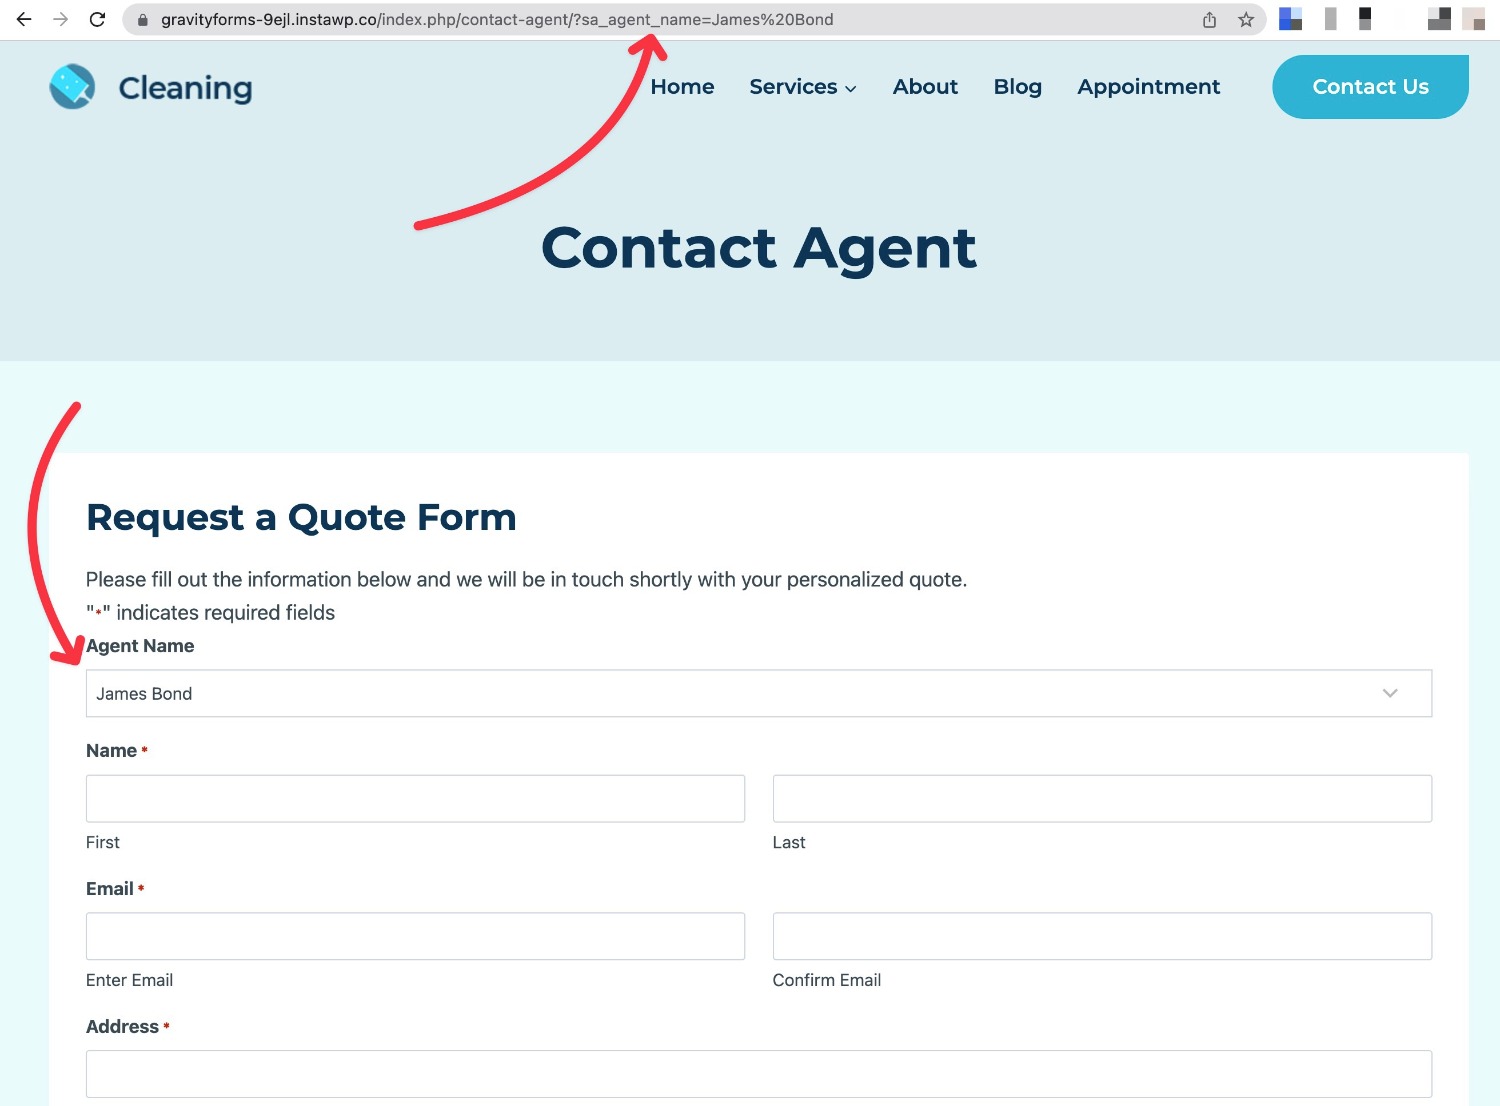
For example, to pre-fill a field with a parameter of sa_agent_name with the value of “James Bond”, you would create your URL like so:
In the example above, the space between “James” and “Bond” is encoded using “%20”.
If you want to pre-fill multiple fields, you can separate each parameter=value pair using an ampersand. For example:
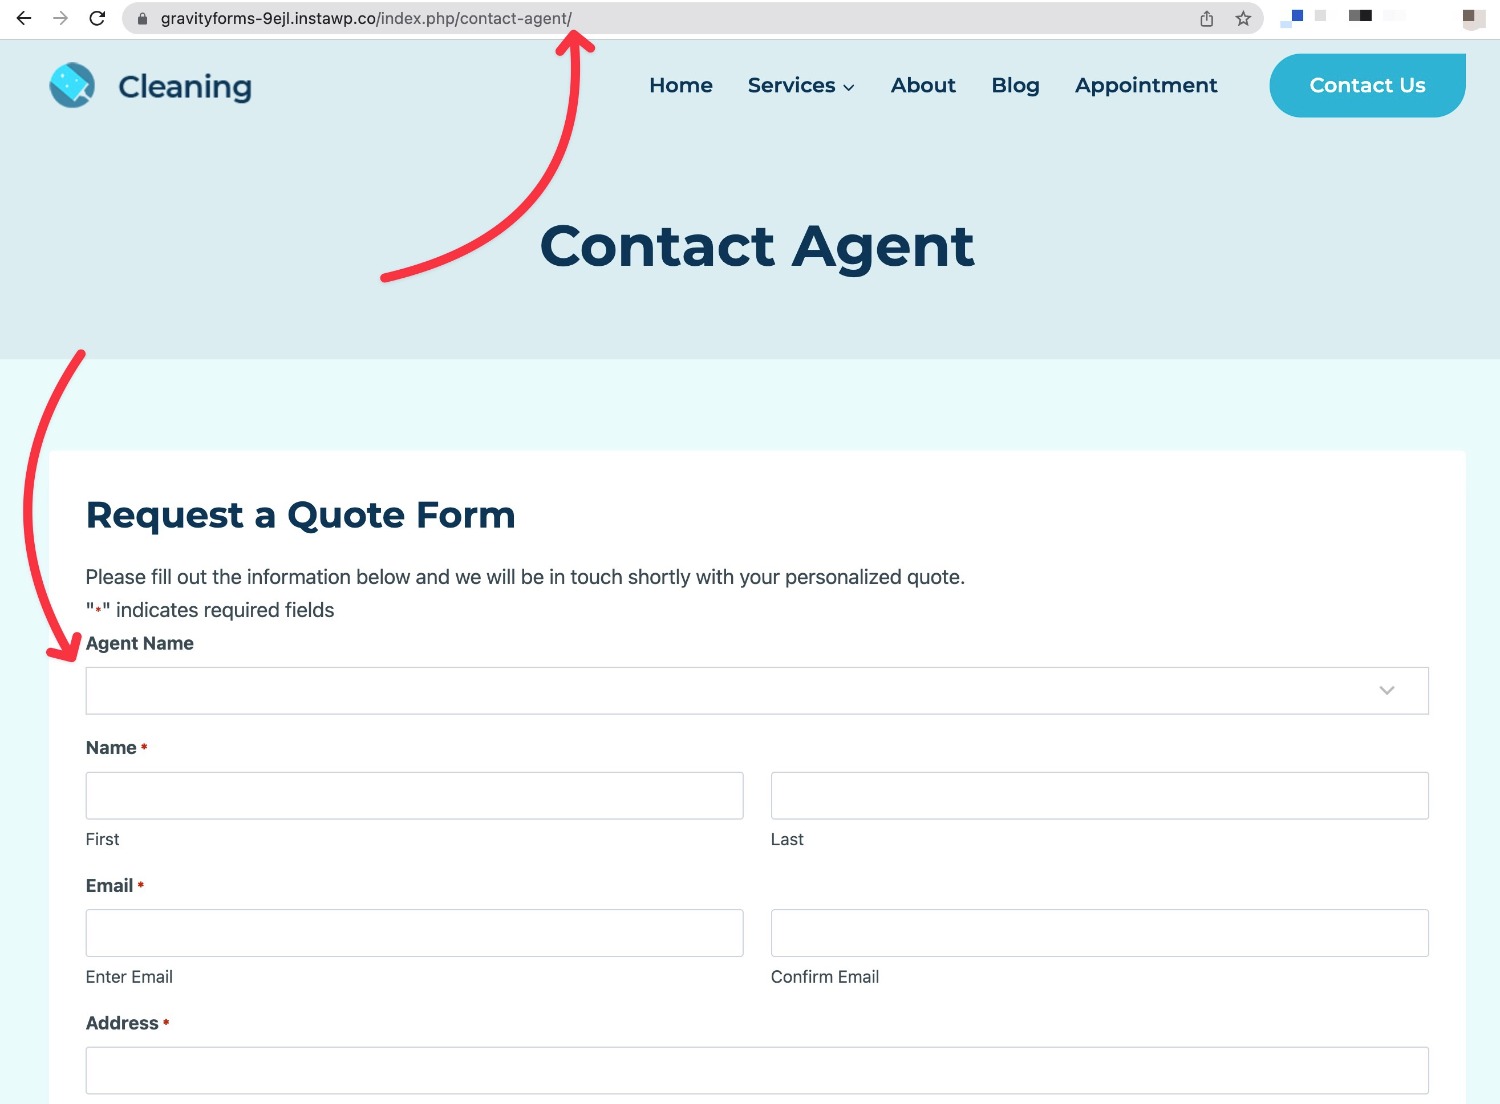
Here’s what the frontend form looks like when a user visits this URL without the query string:
Now, here’s what it looks like with the query string – you can see that the Agent Name drop-down is pre-populated with “James Bond”.
Shortcode Parameter Method Tutorial
To use dynamic population with the Gravity Forms embed shortcode, you’ll use the field_values parameter.
To start, get the basic embed shortcode for the form that you want to populate.
If you’re not sure how to find the shortcode, check out our full guide to the Gravity Forms shortcode.
Once you have the shortcode, you can add one or more pairs of parameter_name=value to the field_values parameter.
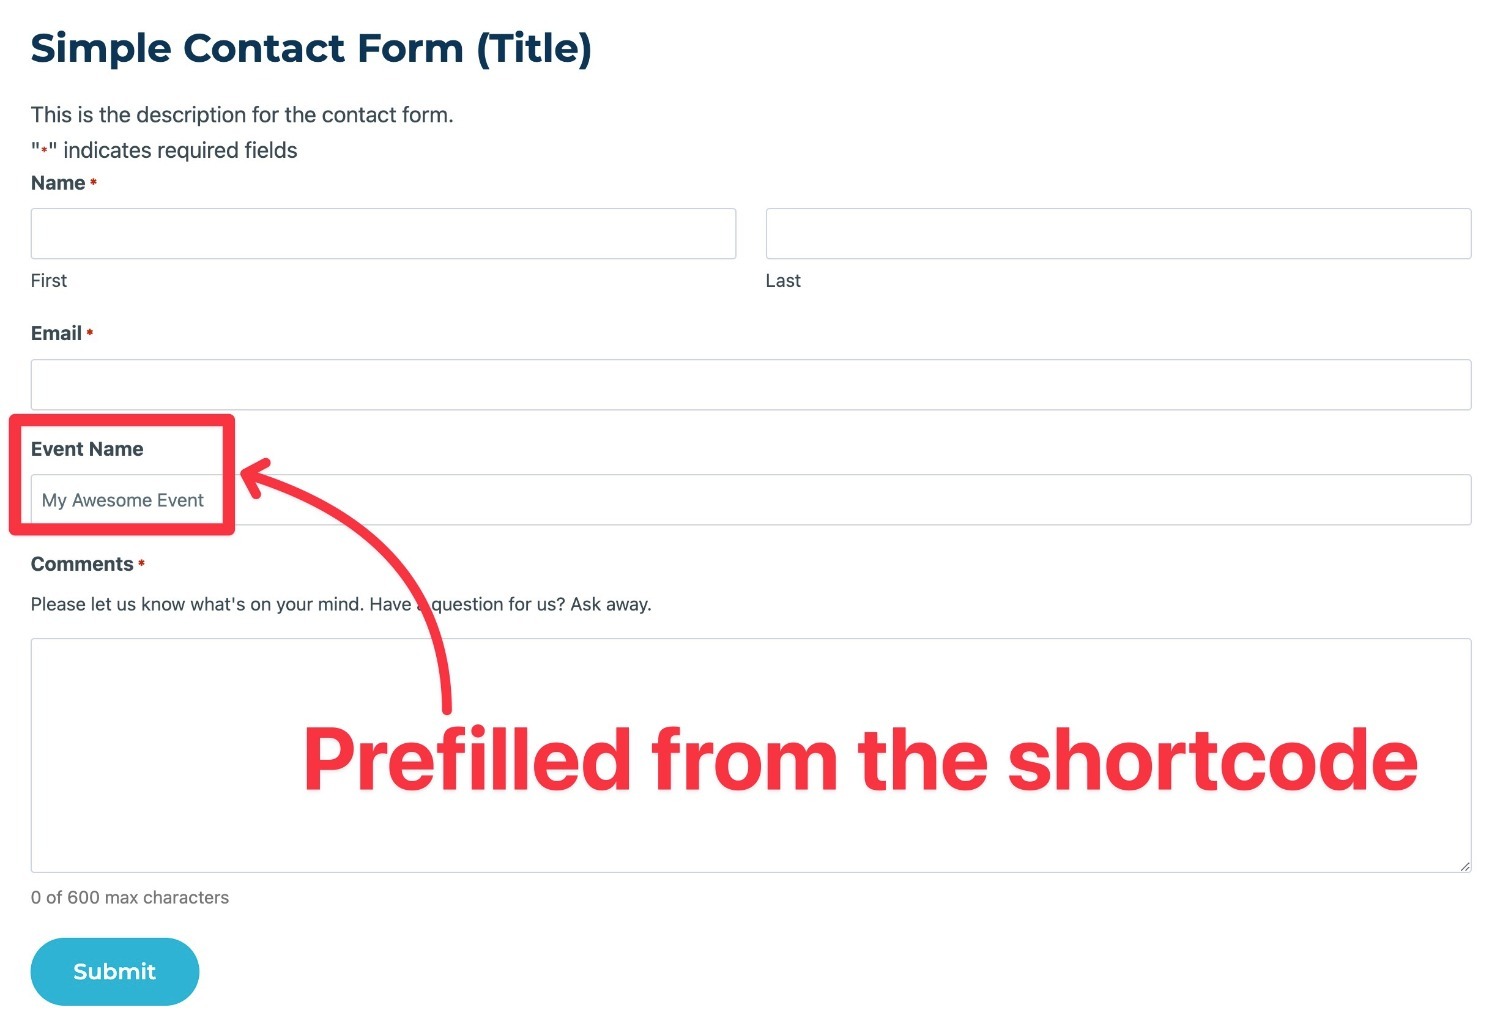
For example, let’s say you want to fill a field with the parameter of sa_event_name with the text “My Awesome Event”.
The embed shortcode might look like this:
[gravityform id="1" field_values="sa_event_name=My Awesome Event"]
On the frontend, you can see that the event field is pre-filled when the form is loaded:
If you want to dynamically populate multiple fields, you can separate each pair with an ampersand like so:
[gravityform id="1" field_values="sa_event_name=My Awesome Event¶meter_name2=value2"]
Block Settings Method Tutorial
To use dynamic population with the Gravity Forms embed block, you can work entirely from the block settings sidebar in the WordPress editor.
First, add the Gravity Forms block and choose the form that you want to embed, if you haven’t done so already.
Then, expand the Advanced tab of the block’s settings. You should see a field named Field Values.
Inside this field, you can add parameter/value pairs just like you would in the shortcode method above.
The syntax is identical – the only difference is that you don’t need to wrap them in quotation marks.
Here’s what it would look like to add the same configuration as the shortcode tutorial above – you can even preview the dynamic population without leaving the editor:
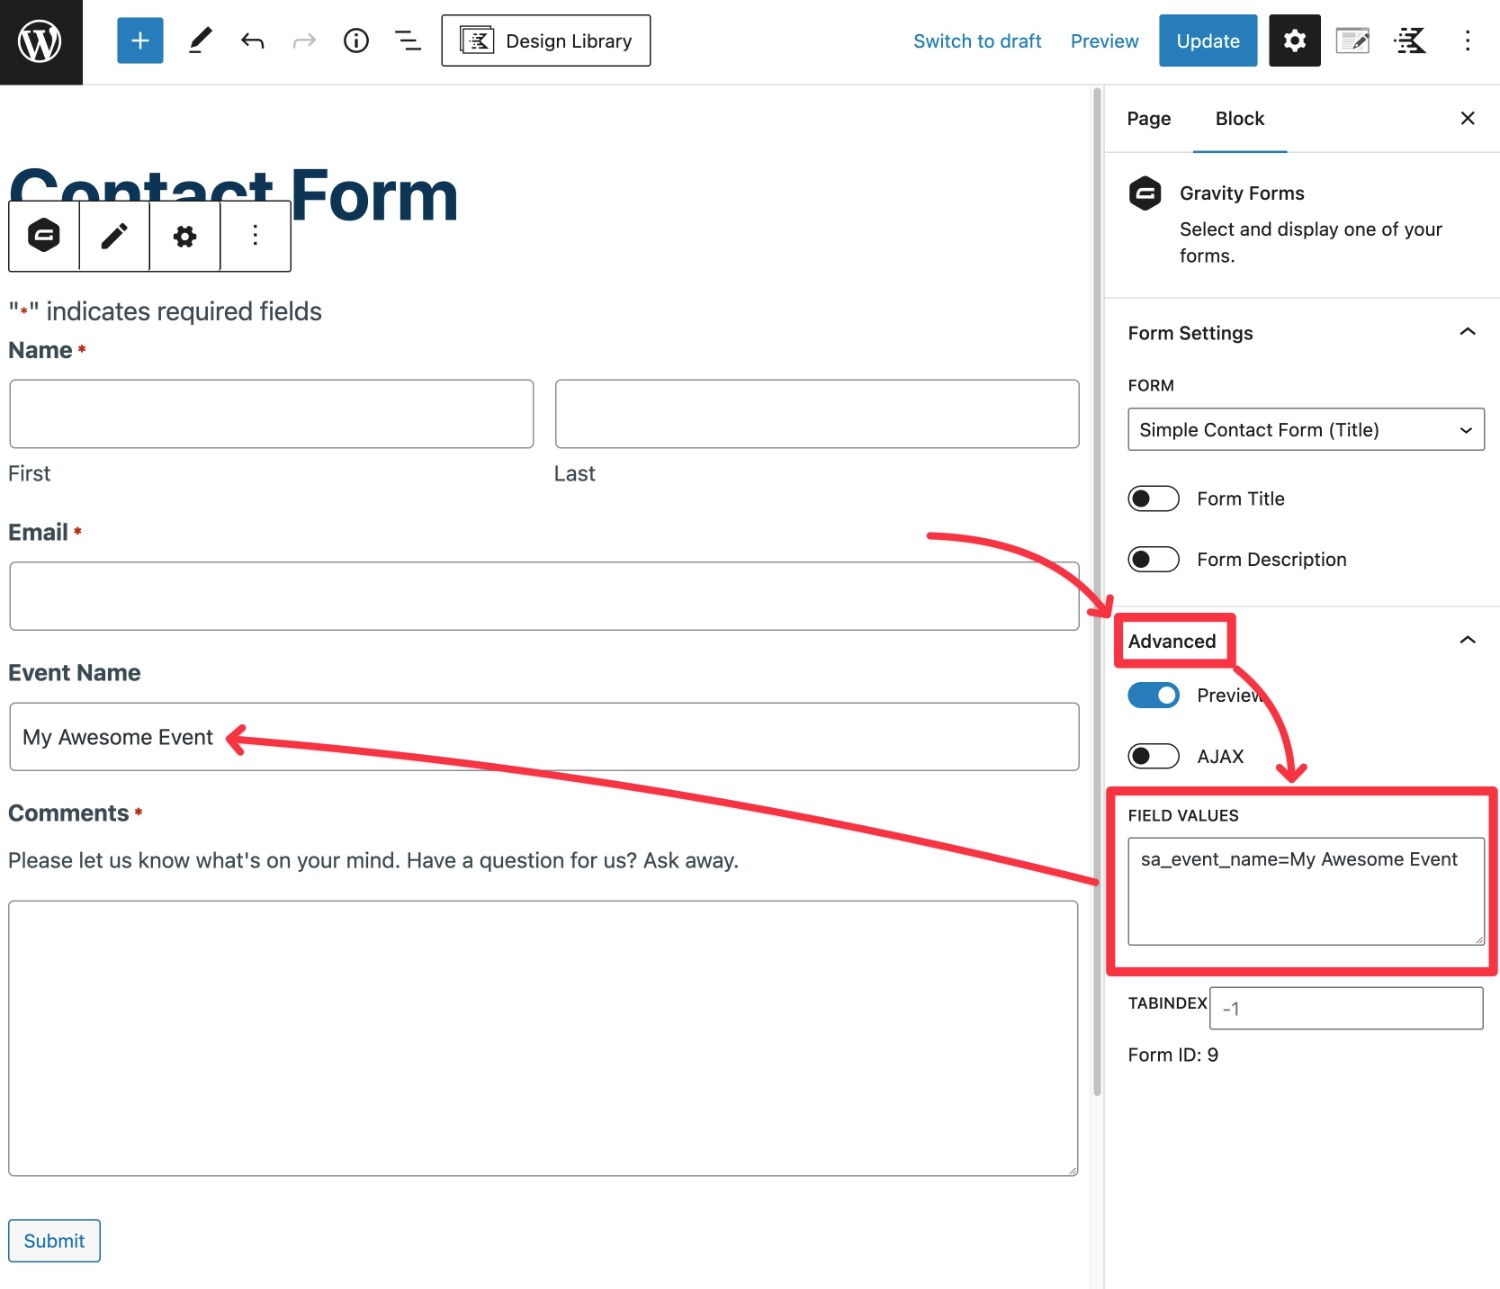
Again, if you want to populate multiple fields, you can separate them with ampersands.
PHP Hook Method Tutorial
As we mentioned earlier, the PHP hook method of dynamic population is the most flexible, but it’s also the most complex because it requires at least some knowledge of PHP.
If you don’t feel comfortable working with PHP, we recommend using one of the previous methods (or reaching out to a developer for help).
To use this method, you’ll rely on the gform_field_value_$parameter_name filter, where $parameter_name is the actual parameter name from the Gravity Forms field settings.
For example, if you set the parameter name to sa_agent_name, the filter would look like this:
add_filter( 'gform_field_value_sa_agent_name', 'your_function_name' );
You can then customize the function to return the value that you want to populate that field with.
Here are some examples…
Populate a text string in a field with parameter name of “sa_event”:
add_filter( 'gform_field_value_sa_event', 'gf_event_name' );

function gf_event_name( $value ) {

return 'GravityNY';

}
Populate the dynamically updated current in a field with parameter name of “sa_date”:
add_filter( 'gform_field_value_sa_date', 'populate_current_date' );

function populate_current_date( $value ) {

$local_timestamp = GFCommon::get_local_timestamp( time() );

return date_i18n( 'm/d/Y', $local_timestamp, true );

}
Preselect multiple checkboxes in a field with parameter name of “sa_interests”:
add_filter( 'gform_field_value_sa_interests', 'pre_check_interests' );

function pre_check_interests( $value ) {

return 'Books,Movies';

}
Where should you put the code for this method? Well, you have a few options…
- Add it to the functions.php file of your active theme (make sure to use a child theme so that it doesn’t get overwritten when you update your parent theme).
- Use a snippet manager plugin like Code Snippets.
- Create a custom plugin for your code snippets.
Gravity Forms Dynamic Population Not Working?
If you’re having issues with Gravity Forms’ dynamic population not working, here are a few things to check…
First, check the caching on your site. Dynamic population is done using PHP, so you’ll want to avoid caching the page where the form is embedded.
Most caching tools, whether they’re a caching plugin or a server-level solution, should let you manually exclude an individual page from being cached.
Second, make sure that you’ve enabled the option for the field to be dynamically populated in the field’s settings in the form editor. Again, you must manually enable this setting in order for dynamic population to work on the field.
What’s more, you must use the parameter name exactly as you entered it in the field’s settings.
Extend Gravity Forms Dynamic Population With Add-Ons
In this article, we’ve focused on how you can use dynamic population within the core Gravity Forms plugin.
However, you can also find Gravity Forms Add-Ons to help you work with dynamic population in different ways.
For example, the Gravity Forms Certified Populate Anything Add-On from Gravity Wiz lets you populate both field choices and field values using a range of data including WordPress data, Gravity Forms entries, Google Sheets, external databases, and more.
Similarly, if you’re using Gravity Flow to build custom workflows, you can use dynamic population to designate the assignee for your workflows.
Get Started With Gravity Forms Dynamic Population Today
Understanding how to use Gravity Forms’ dynamic population can help you better use Gravity Forms for your needs and unlock new potential use cases.
You can streamline your backend workflows, create more optimized experiences for your visitors, and just generally get even more value from Gravity Forms.
The easiest way to get started is to try one of the code-free dynamic population methods – shortcode, block, or query string.
Advanced users and developers can also use the PHP hook for ultimate flexibility.
Dynamic population is a core Gravity Forms feature, so you can access it on any license. If you don’t have a Gravity Forms license yet, purchase your license today to get started.
Or, you can spin up a free fully functional demo site to test dynamic population for yourself!

If you want to keep up-to-date with what’s happening on the blog sign up for the Gravity Forms newsletter!
"*" indicates required fields