If you have a WordPress website, displaying real customer testimonials is a great way to boost trust with your website’s visitors and increase your conversion rates.
However, collecting and displaying those testimonials can be a bit of a pain, which is why this post is going to show you how to automate the entire process using the Gravity Forms plugin.
We’ll kick things off by discussing some of the benefits of using testimonials and social proof on your website.
Then, we’ll get into the more actionable part and cover how to automate both collecting and displaying testimonials on your site, along with a full step-by-step tutorial on how to use the testimonial form template in Gravity Forms to set up everything.
By the end, you’ll be able to build a system that does the following:
- Collects customer testimonials via a customizable form.
- Saves those testimonials to a custom post type on your site.
- Automatically displays the testimonials anywhere on your site (you can also manually approve testimonials before they show up on the frontend of your site).
Benefits of adding testimonials and social proof
Collecting real customer testimonials and displaying them on your site can be beneficial for a few different reasons:
- Boost trust with potential customers – When potential customers see testimonials from existing customers, they’ll be more likely to trust your business and the quality of your products/services.
- Increase conversion rates – There are case studies showing that testimonials can increase your website’s conversion rates, which is important if you’re selling products or services via your website.
- Build brand reputation – Showcasing happy customer testimonials can improve your brand’s reputation, even among customers who don’t end up purchasing your products/services.
- Understand what customers find important – Though market research isn’t the primary purpose of testimonials, collecting testimonials has a secondary benefit of helping you understand what your customers value about your business. You can use this information to double down on what’s working well and improve your marketing and sales materials.
How to collect and display testimonials with Gravity Forms (on autopilot)
There are two things you’ll need to handle to start benefiting from social proof on your WordPress site:
- Collect testimonials from your customers.
- Display those testimonials on your site.
With the Gravity Forms plugin, you can automate both parts of the process.
We’ll show you the entire step-by-step guide below, but the basic idea is this:
- You create a form to collect testimonials using the pre-made Gravity Forms testimonial form template.
- Your site automatically saves new testimonials from the form to a Testimonials custom post type that you’ve created. You can do this using the Gravity Forms Advanced Post Creation Add-On.
- New testimonials are automatically displayed on your site using whatever design you want (you can also hold testimonials as drafts if you want to manually approve them before displaying them on your site).
Below, we’ll show you every step of the process, including setting up the form and creating your custom post type.
1. Install Gravity Forms and the Advanced Post Creation Add-On
To get started, you’ll want to install the Gravity Forms plugin and any necessary add-ons, if you haven’t done so already.
If you just want to create a form to collect testimonials and you’ll handle manually adding them to the frontend of your site, all you need is the core Gravity Forms plugin.
However, if you also want to automate displaying testimonials on your site, you’ll also need the official Advanced Post Creation Add-On. This add-on lets you automatically save new testimonials to a “Testimonials” custom post type, which we’ll show you how to create below. You could then review and publish them with one click (or even have them automatically published on your site, if you feel comfortable doing so).
The Advanced Post Creation Add-On is available on the Gravity Forms Elite and Nonprofit licenses.
To sum up:
- If you just want to create a testimonial form but don’t need to display testimonials, you can purchase any Gravity Forms license.
- If you want to automate displaying testimonials as part of your form, you can purchase the Elite or Nonprofit license. Or, if you’re already holding a different Gravity Forms license, you can upgrade your license and only pay the prorated difference.
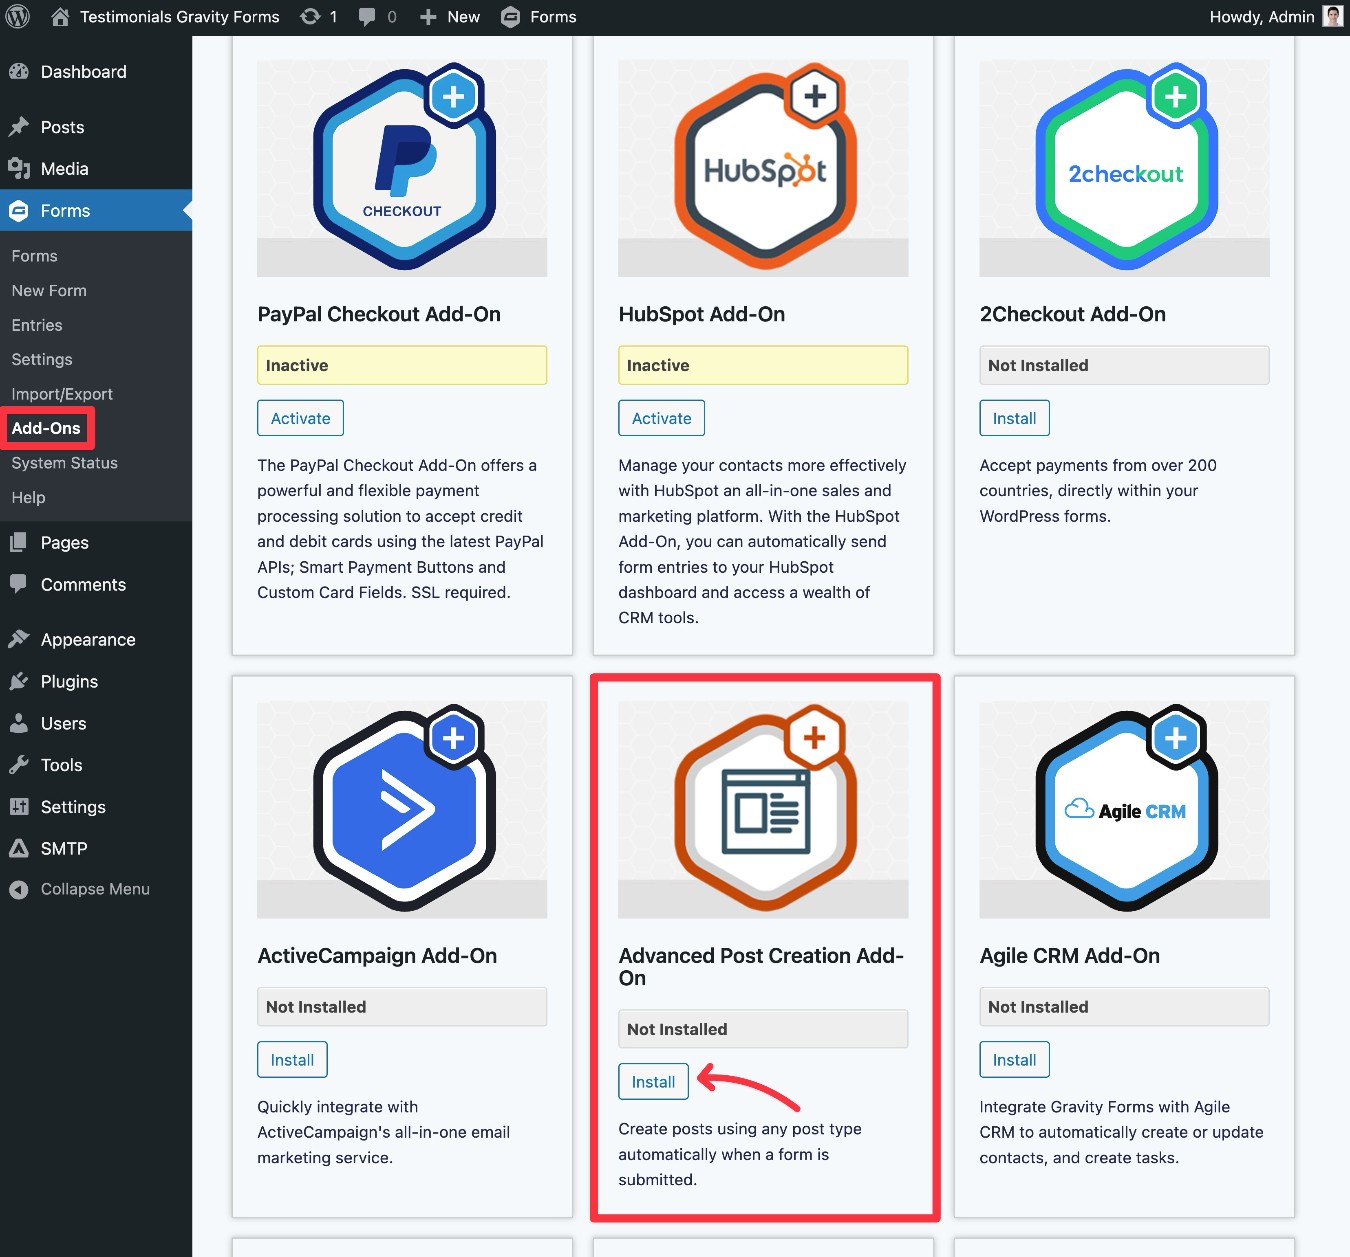
If you want to display testimonials, here’s how to install the Advanced Post Creation Add-On, once you’ve installed the core Gravity Forms plugin and added your license key:
- Go to Forms → Add-Ons in your WordPress dashboard.
- Find the Advanced Post Creation Add-On in the list of available add-ons.
- Click Install.
- Once the installation process finishes, make sure to activate the add-on.
2. Set up your custom post type for testimonials
If you want to automatically display testimonials on your site, one of the most efficient approaches is to create a “Testimonials” custom post type.
Much like the default “Posts” post type is for blog posts and the “Pages” post type is for static pages, your custom “Testimonials” post type will house all of your testimonials. You can then easily display testimonials anywhere on your site using the block editor, a page builder like Elementor, or custom code.
While there are several popular plugins that can help you create custom post types and add custom fields, we’re going to use the free version of the Advanced Custom Fields (ACF) plugin for this post.
Once you’ve installed the free Advanced Custom Fields plugin from WordPress.org, here’s a quick tutorial on how to set up what you need…
Create your “Testimonials” post type
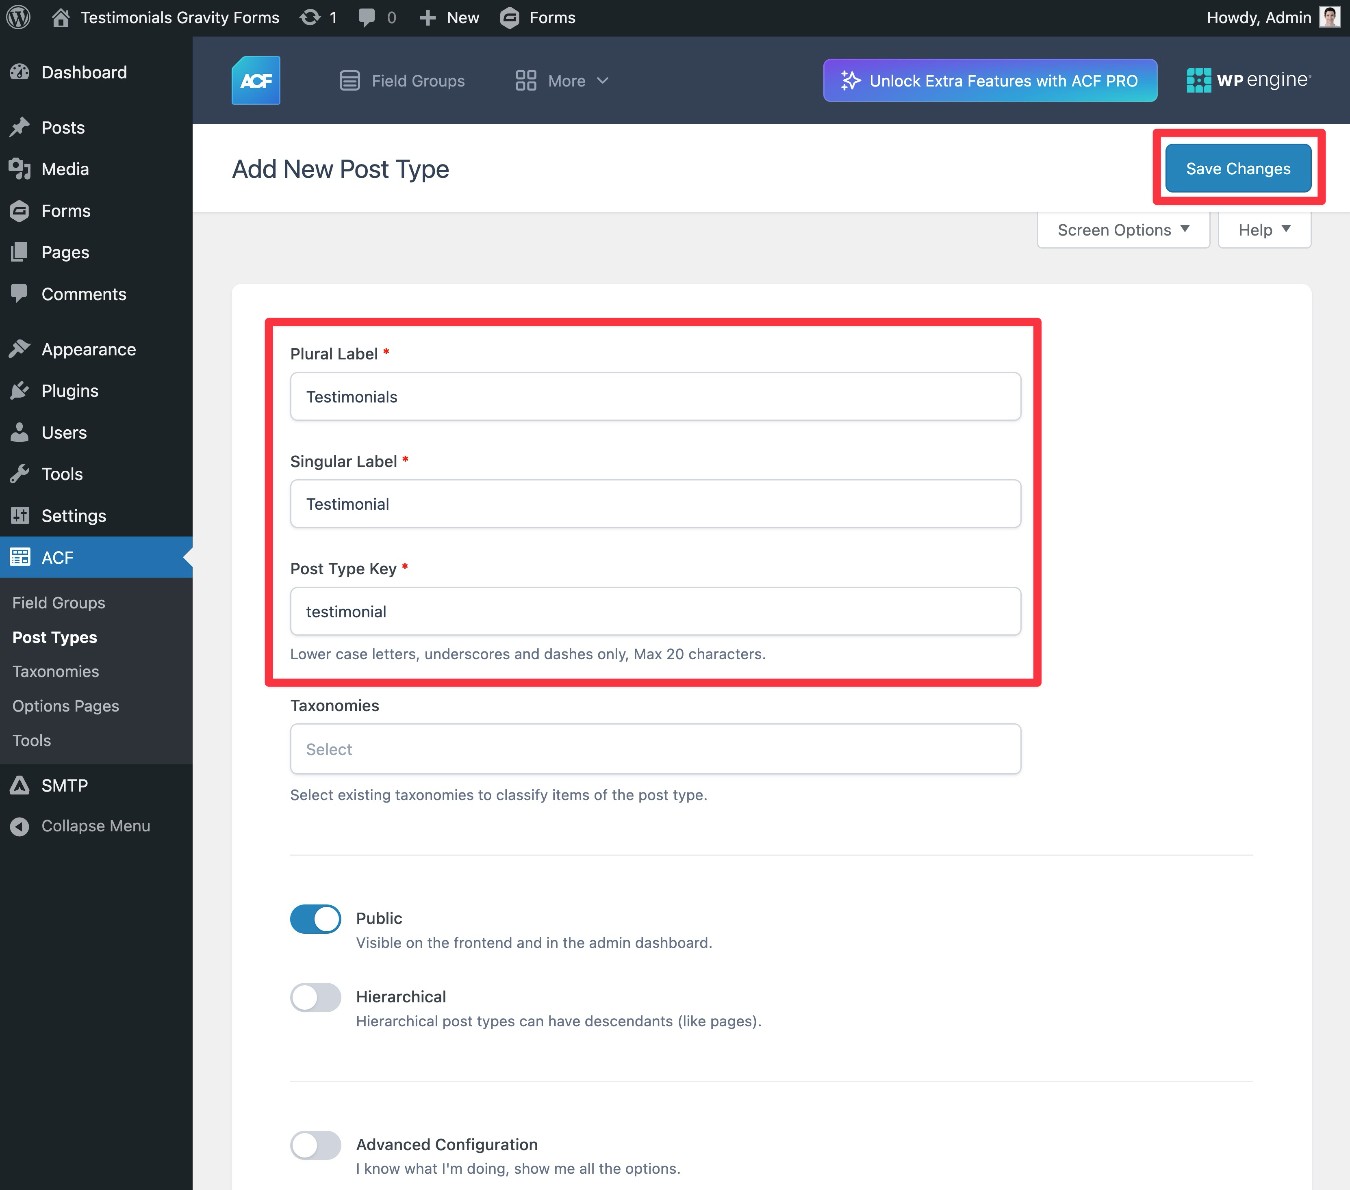
To create your “Testimonials” post type with ACF, go to ACF → Post Types → Add Post Type.
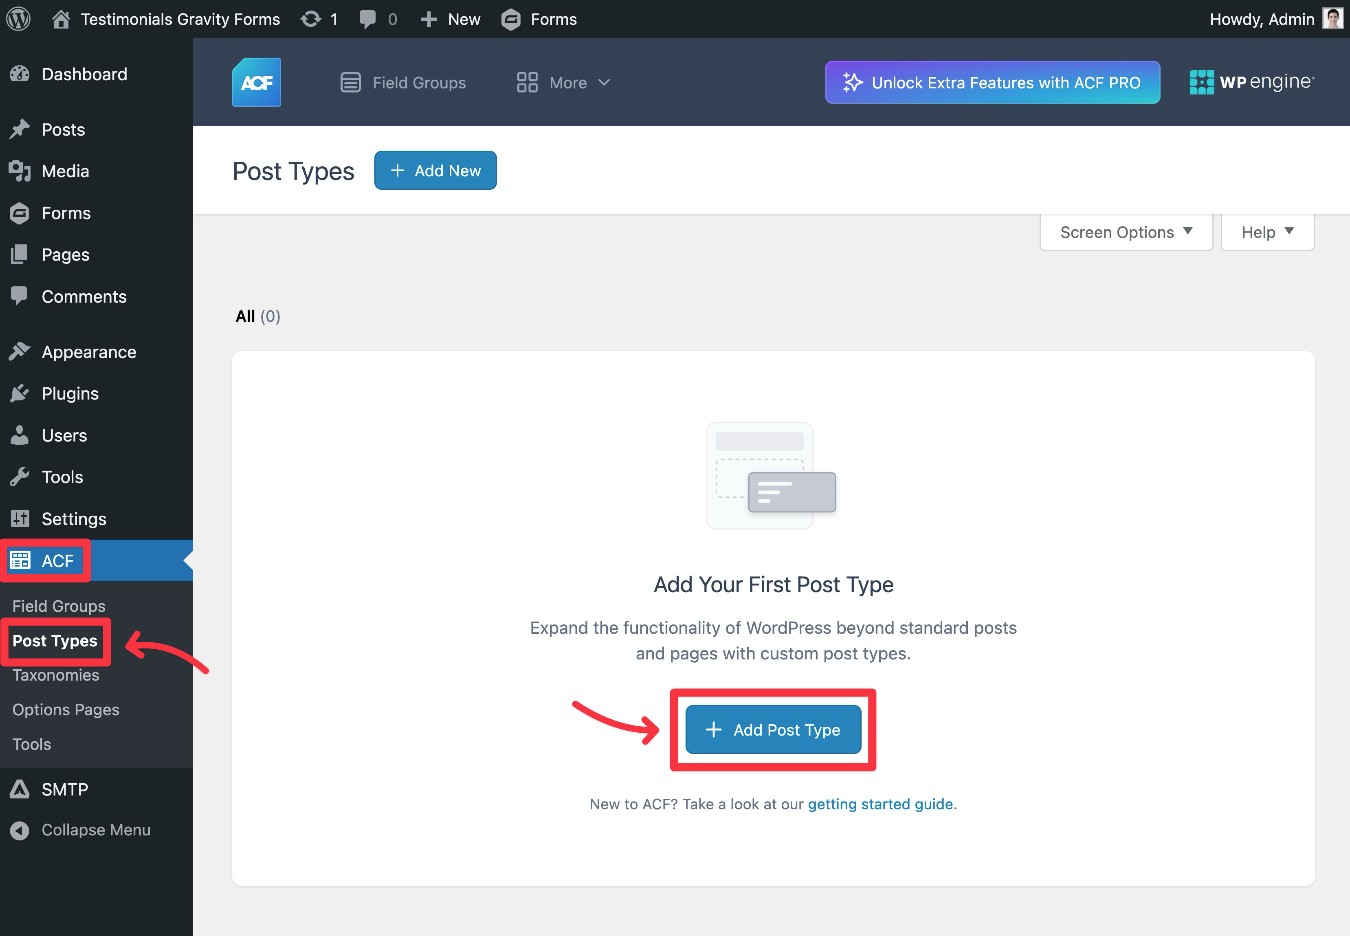
Then, fill out some basic information and click Save Changes:
- Plural Label – Testimonials
- Singular Label – Testimonial
- Post Type Key – testimonial
Add custom fields to store relevant information
In addition to creating the post type, you’ll also want to add some custom fields to store relevant information from your testimonial form, such as the name of the person leaving the testimonial, their job title and/or company name, etc.
While you don’t need to store this information separately, putting these details in custom fields will give you more flexibility for controlling how to display testimonials on the frontend of your site.
To add custom fields, go to ACF → Field Groups → Add Field Group.
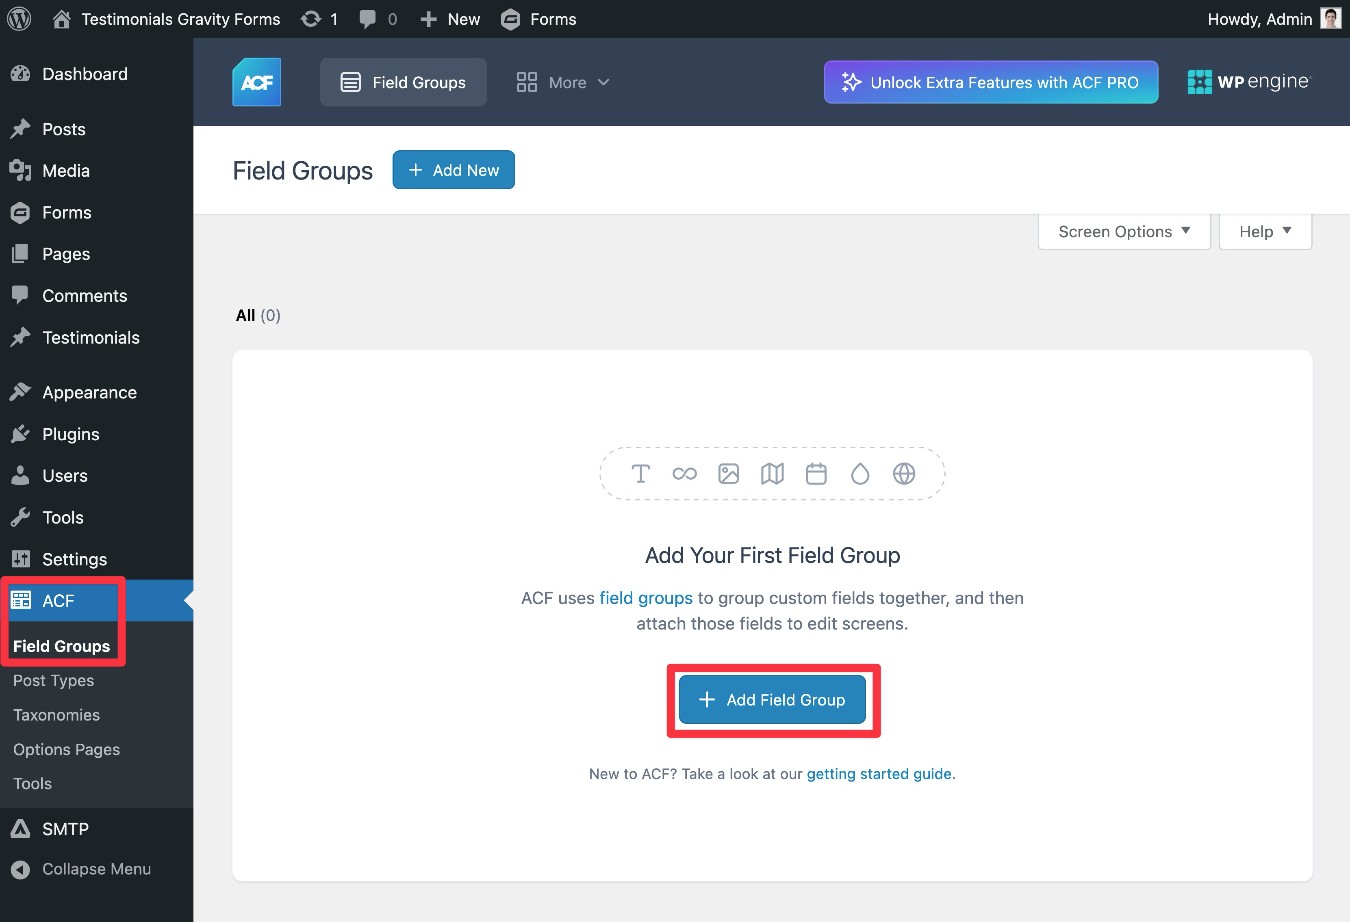
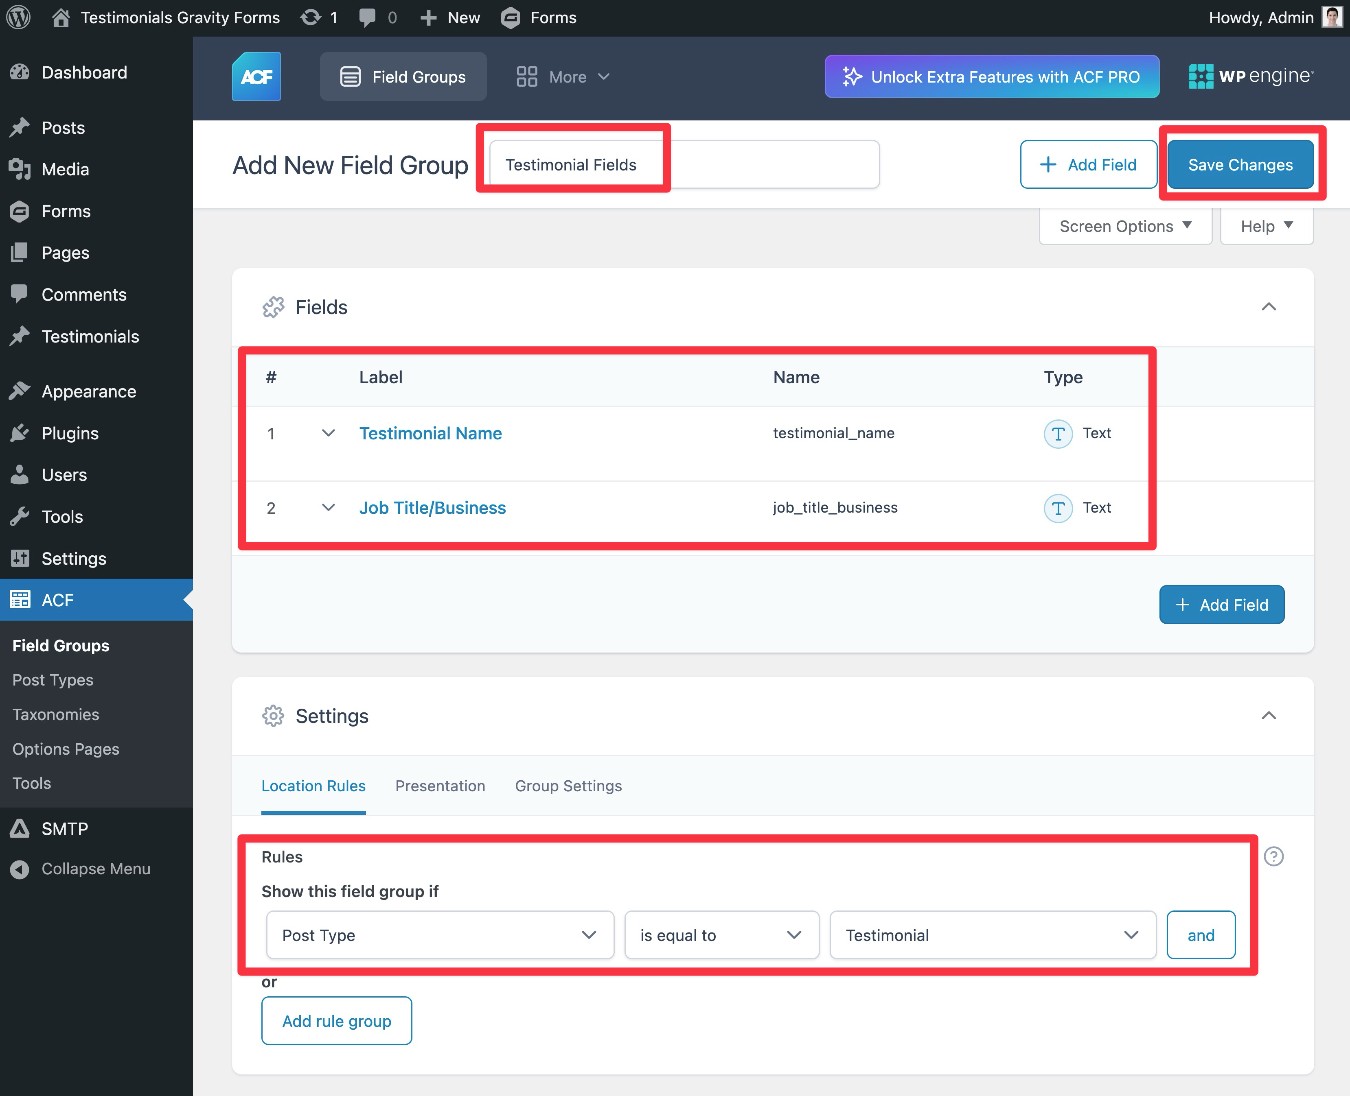
First, give your field group a name at the top, e.g., “Testimonial Fields.”
In the Fields settings, add any custom fields that you want to use.
To match the Gravity Forms testimonial form template, you’ll want to add two fields:
- Testimonial Name – set its Field Type as Text.
- Job Title/Business – set its Field Type as Text.
If there’s any other custom information that you want to display as part of the public, front-facing testimonial, you should also add custom fields for that information. However, adding more fields is 100% optional.
In the Settings area below that, set the Show this field group if rule to display these fields when the Post Type is equal to Testimonial.
Then, click Save Changes in the top-right corner.
3. Create your WordPress testimonial form
Once you’ve installed Gravity Forms and set up your testimonial custom post type, you’re ready to get into creating your actual WordPress testimonial form:
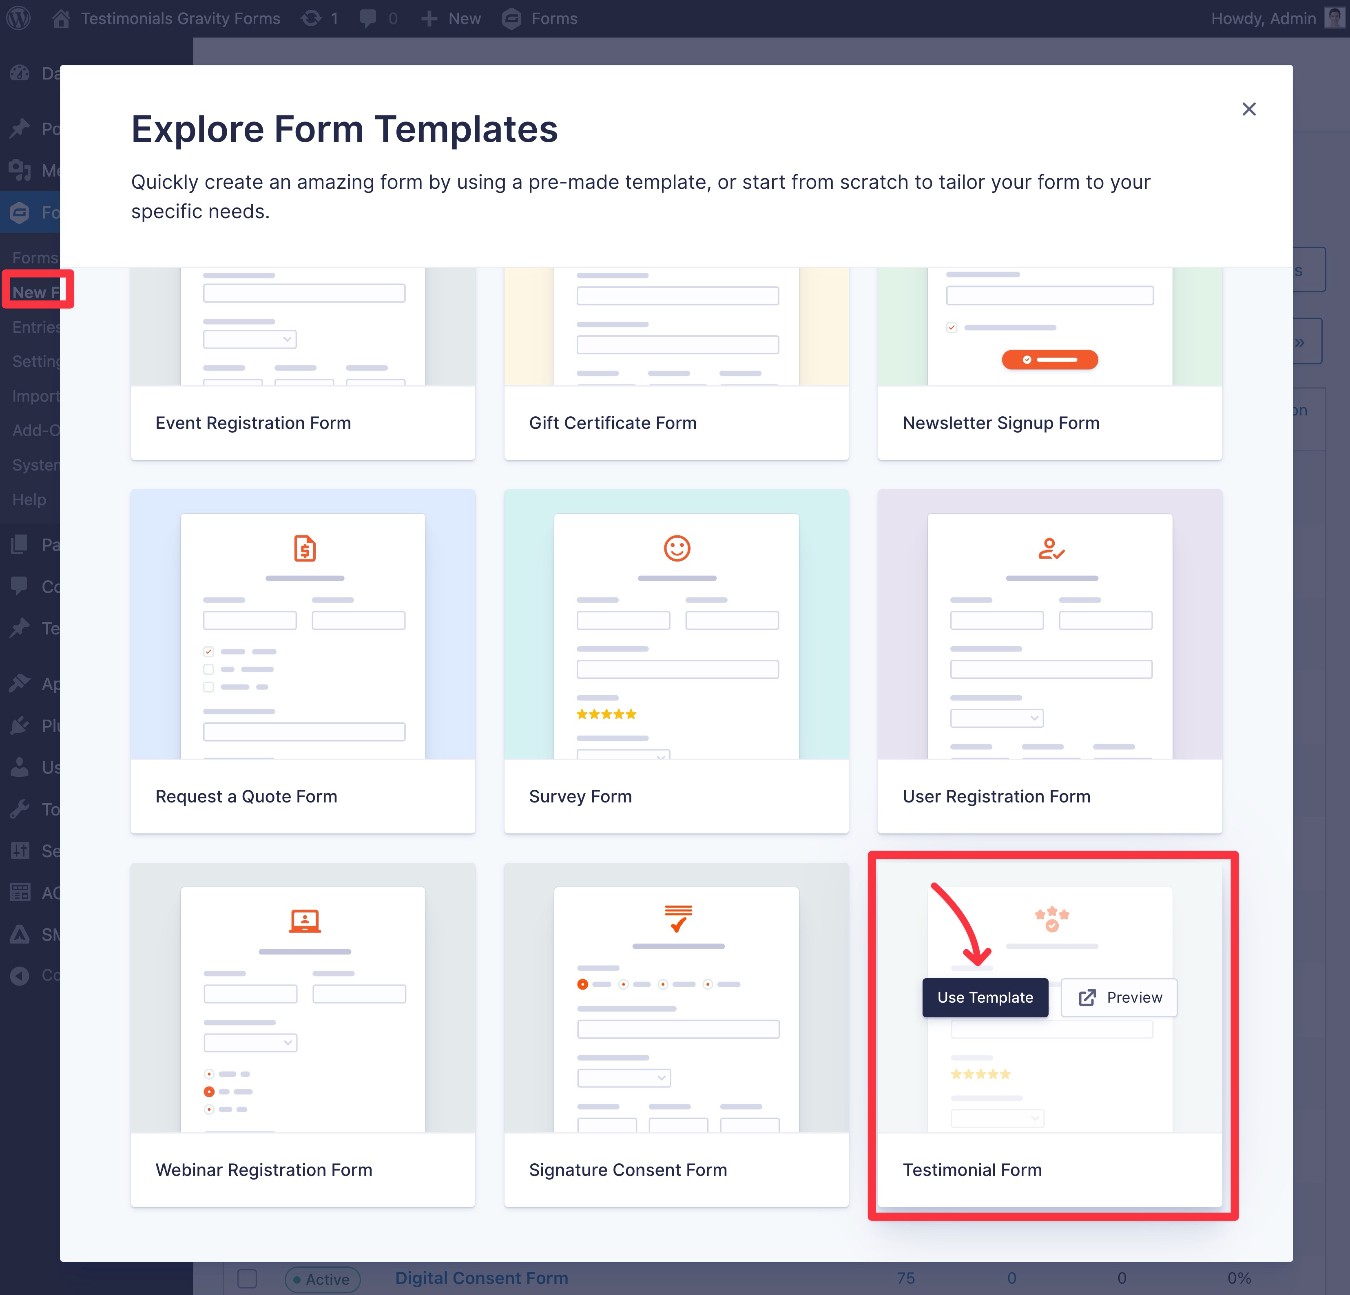
- Go to Forms → New Form in your WordPress dashboard.
- Find the Testimonial Form template in the list of templates – it should be near the bottom.
- Hover over it and click Use Template.
- On the next screen that appears, give your testimonial form an internal name to help you remember it and click Use Template again.
Now, you should be in the drag-and-drop form builder interface.
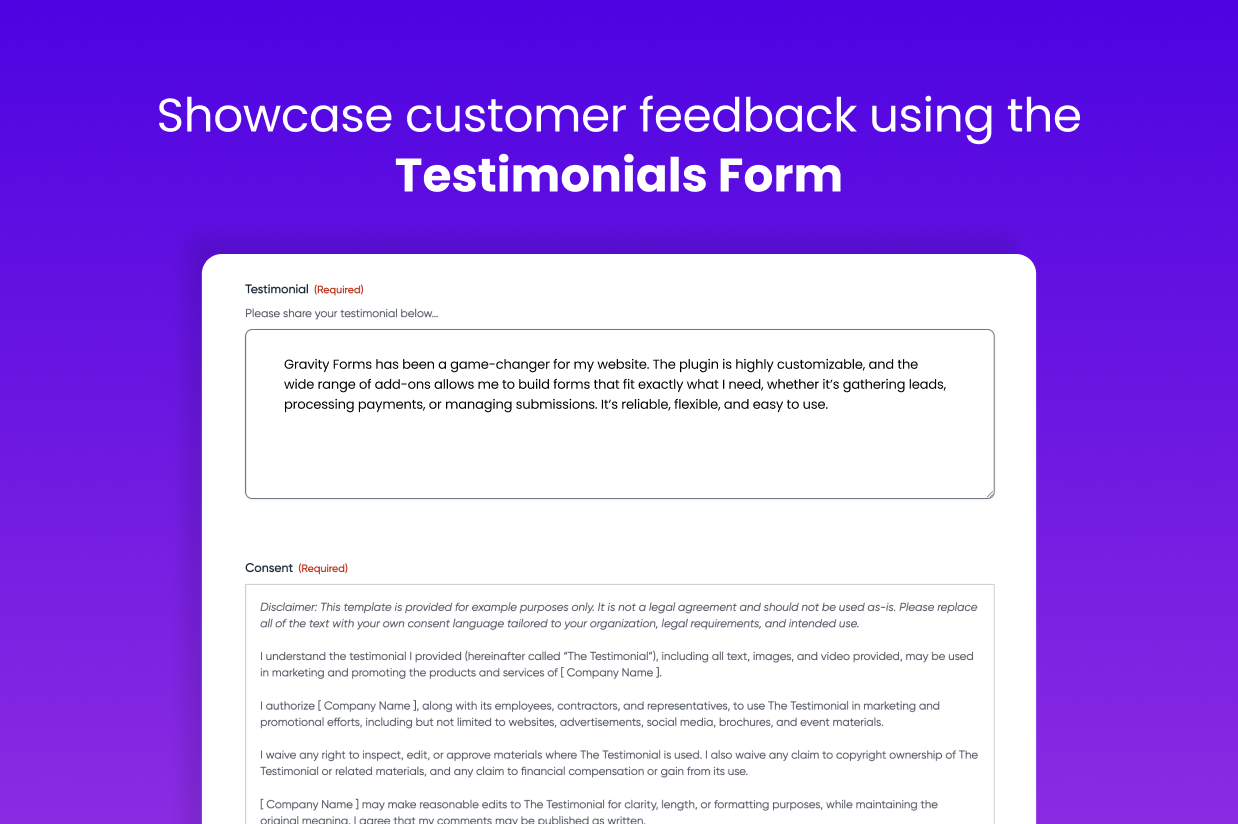
The Testimonial Form template already includes all of the essential fields that you need, so you don’t need to make any changes here.
However, you are still free to add more fields if you want to collect more information (or remove fields for any information that you don’t need to collect).
For example, if you wanted to collect a video testimonial instead of or in addition to the text testimonial, you could use the Gravity Forms Pipe Video Recording Add-On to do this directly via your form – we have an entire tutorial on how to use Pipe Video Recording.
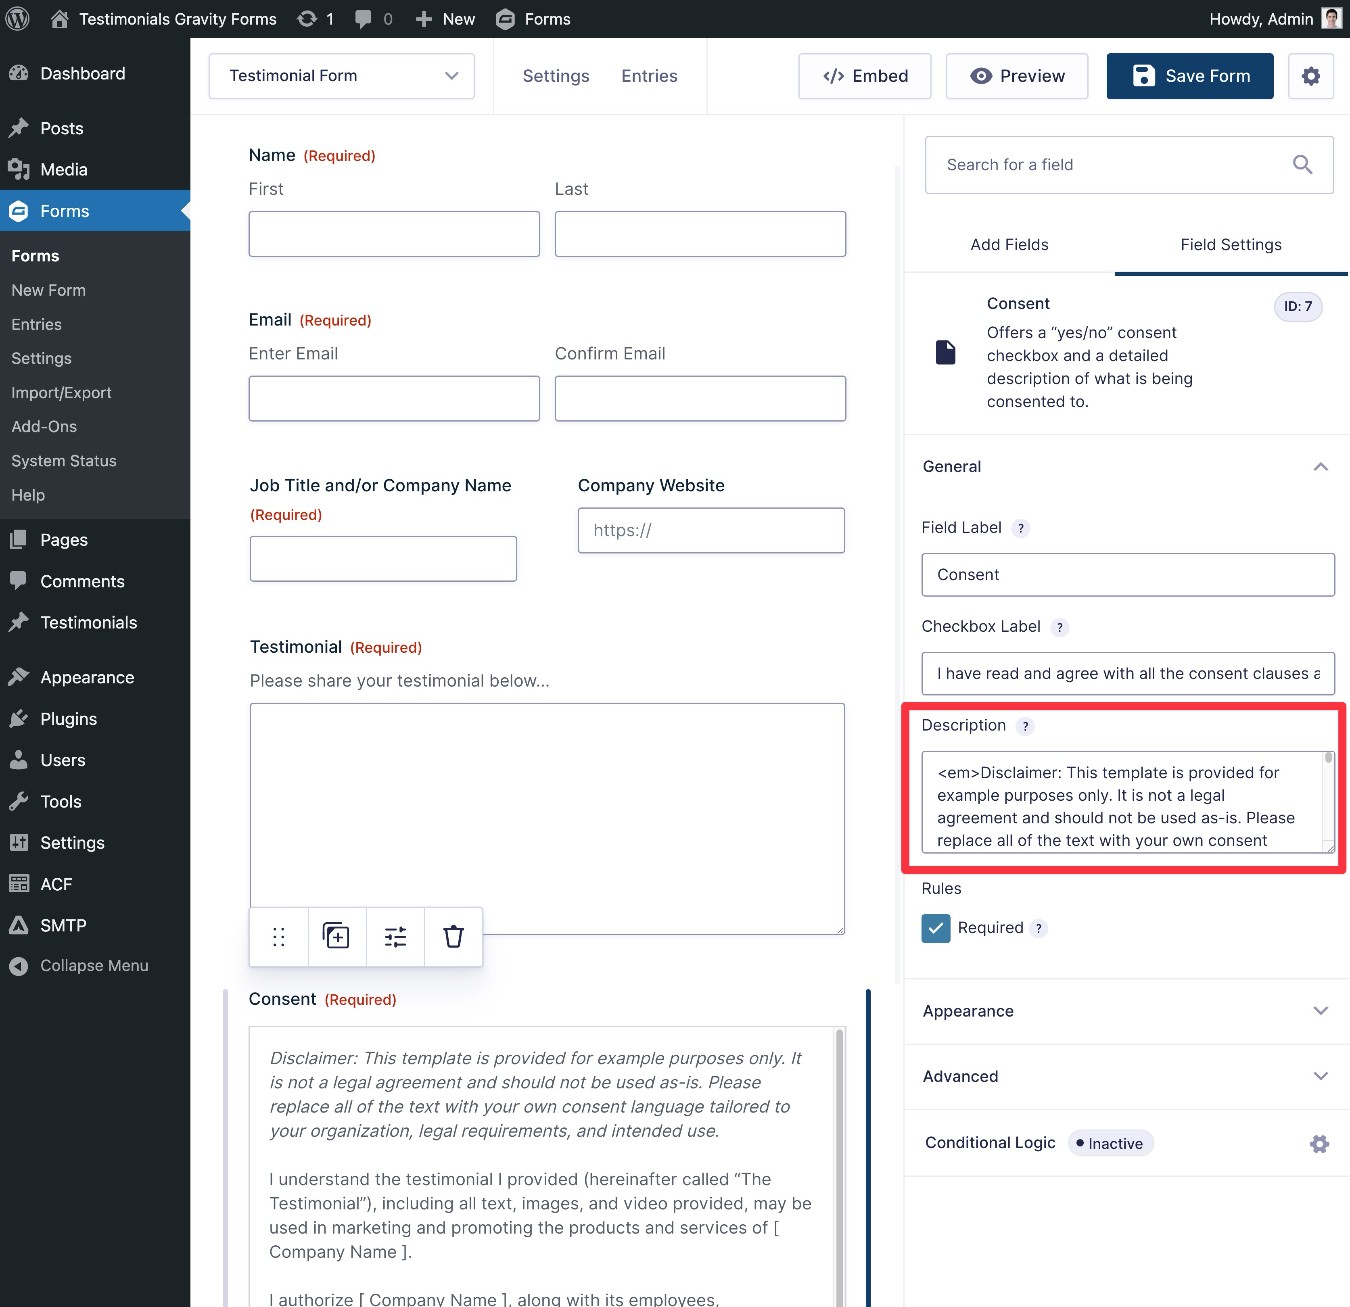
The only thing you must change here is the Consent field – you should edit the consent agreement to match your business/use case.
The benefit of using the Consent field is that it will store the full agreement text as part of the form submission, which gives you a historical record of exactly the text that your customers agreed to when submitting the testimonial.
Once you’re happy with how the form looks, make sure to click the Save Form button in the top-right corner.
4. Connect your testimonial form to custom post type
Once you’re finished editing the fields in your testimonial form, you can jump into the form’s settings to connect your form directly to your testimonial custom post type.
If you’re just creating a form to collect testimonials and you plan to manually display them, you can skip this step.
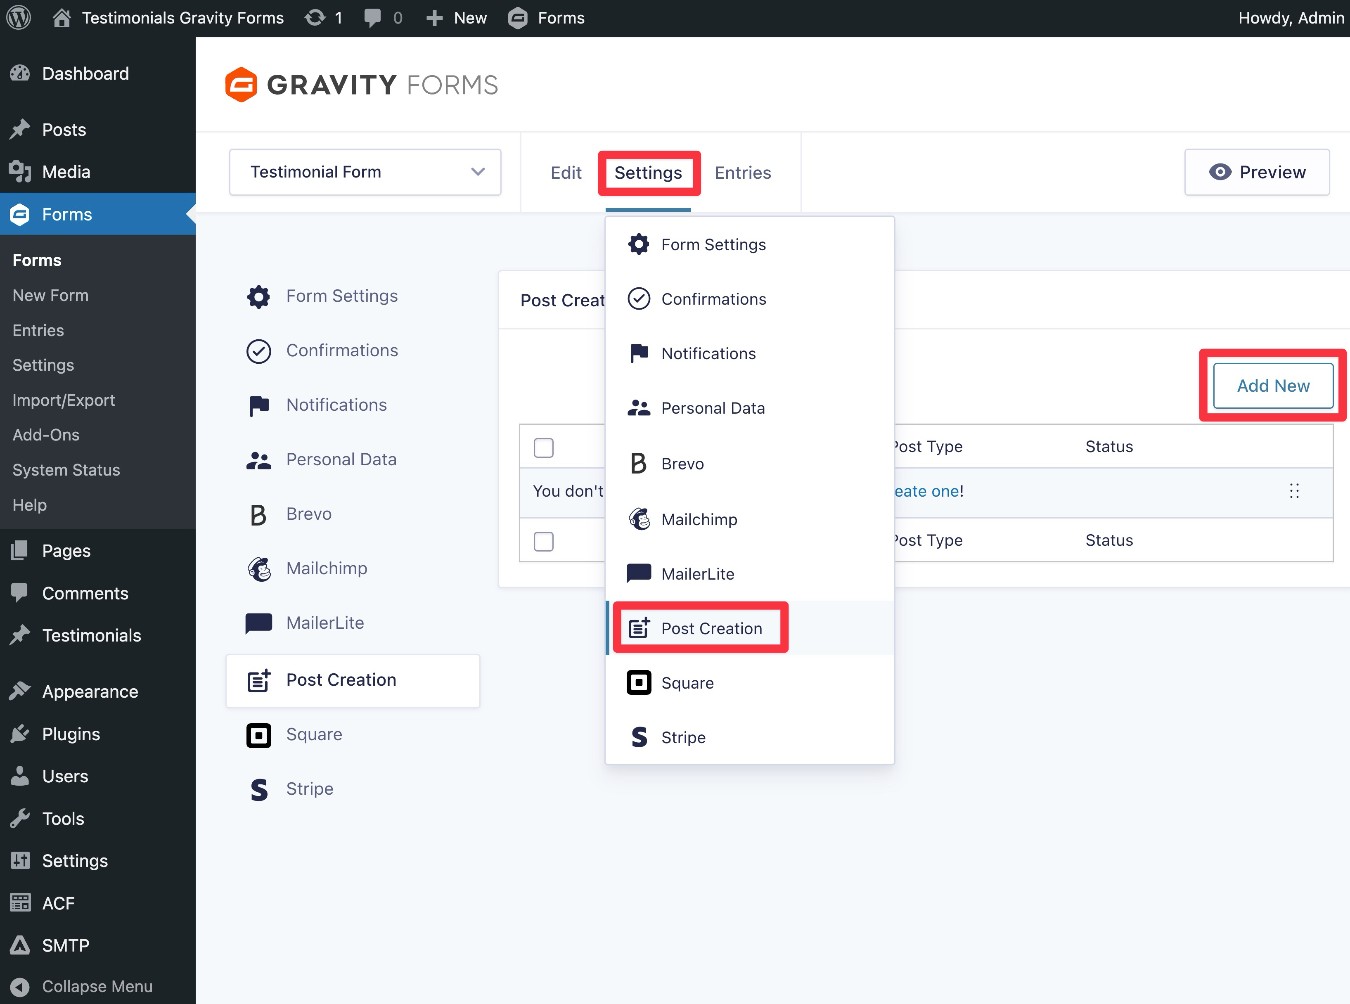
To get started, go to Settings → Post Creation inside the form editor interface. Then, click Add New.
If you don’t see this option, make sure that you’ve already activated the Advanced Post Creation Add-On.
On the next screen, you can configure the connection.
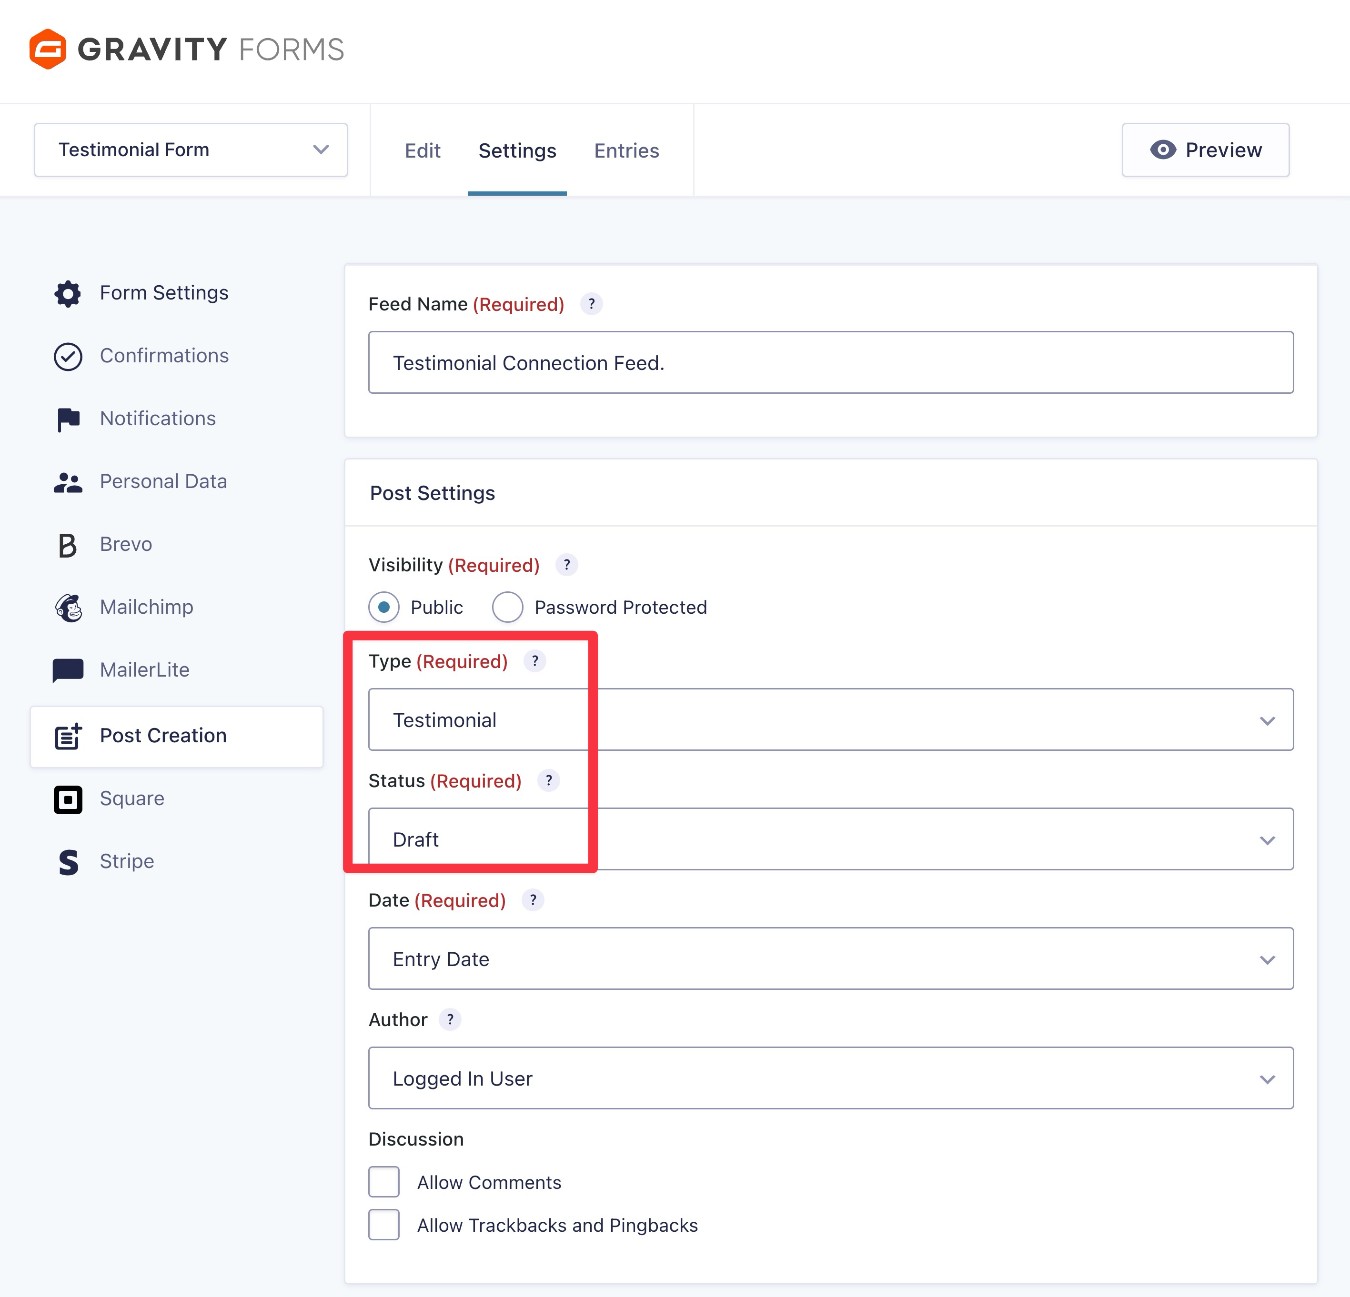
In the Post Settings box, you should consider all the settings, but pay special attention to these:
- Type – Set this to Testimonial.
- Status – If you want to hold testimonials for approval before displaying them on your site, you should set this to Draft instead of Published.
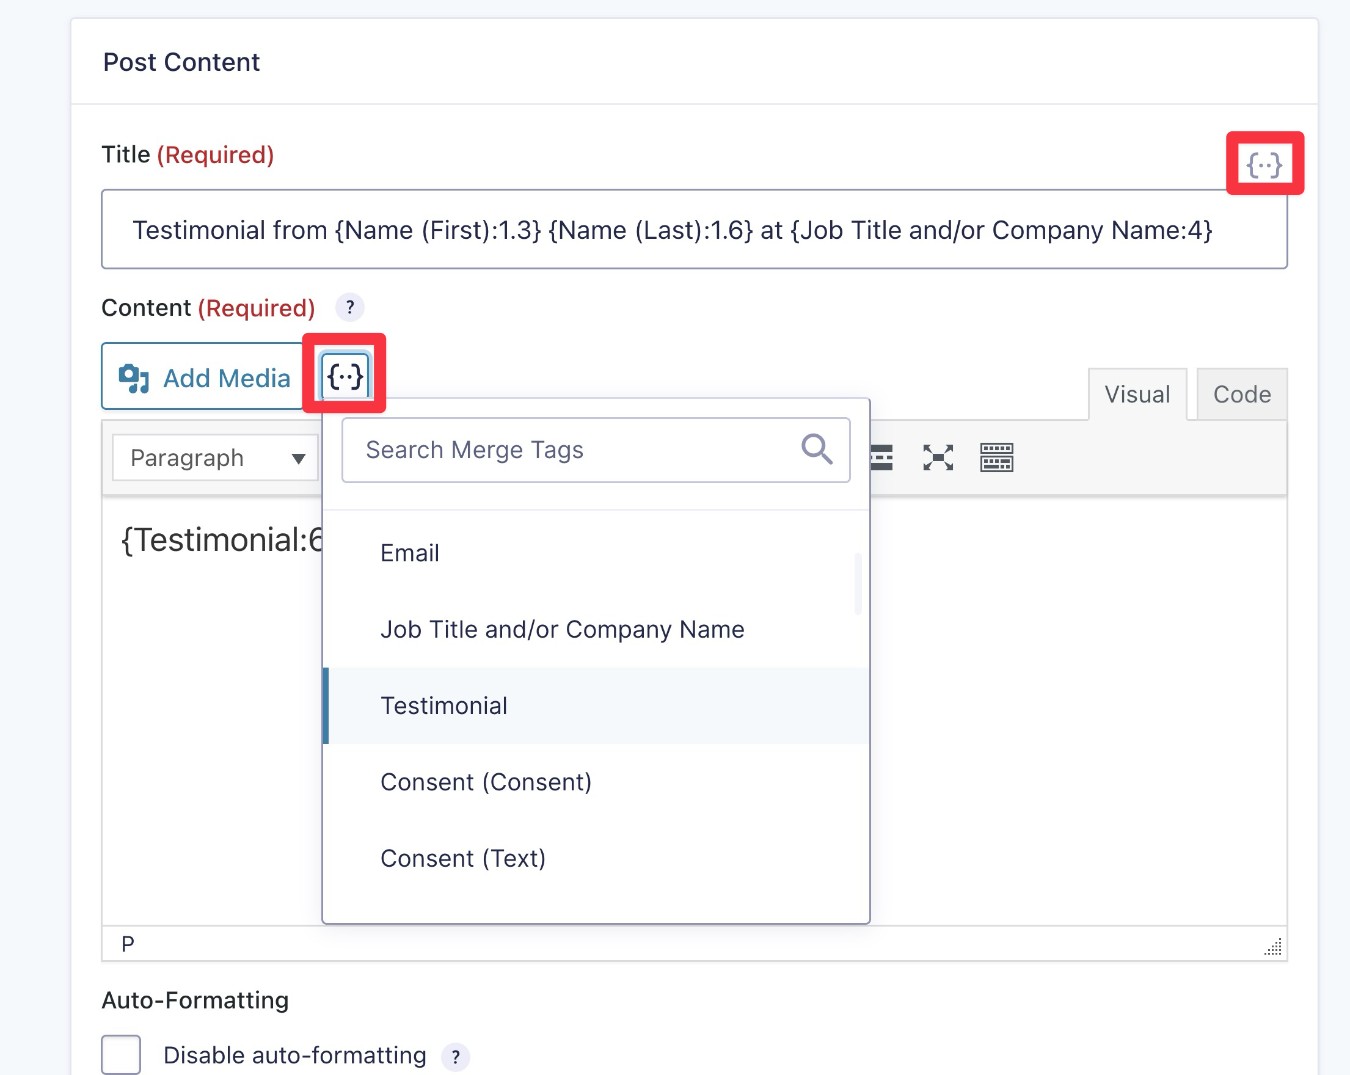
Then, scroll down to the Post Content box. This lets you map the content from your testimonial form to your “Testimonials” post type and custom fields so that you can properly display everything on the frontend of your site.
To dynamically insert form fields, you can click the {..} option.
You’re free to configure it however you want, but here’s a good starting point:
- Title – “Testimonial from [first name] [last name] at [company name]”. After dynamically inserting the content, it might read something like “Testimonial from Colin Newcomer at Gravity Forms”.
- Content – Dynamically insert the testimonial field from the form.
Below that, you can also map form fields to any custom fields that you’ve added to your “Testimonials” post type.
Note – Any custom fields that you added with ACF won’t appear in the Name drop-down until you create at least one testimonial in your post type. If you aren’t seeing the fields appear in the drop-down list, go back and create a test testimonial (Testimonials → Add New Testimonial). Then, save your Advanced Post Creation feed settings and refresh the page.
If you followed our guide, you would set up two mapping rules like this:
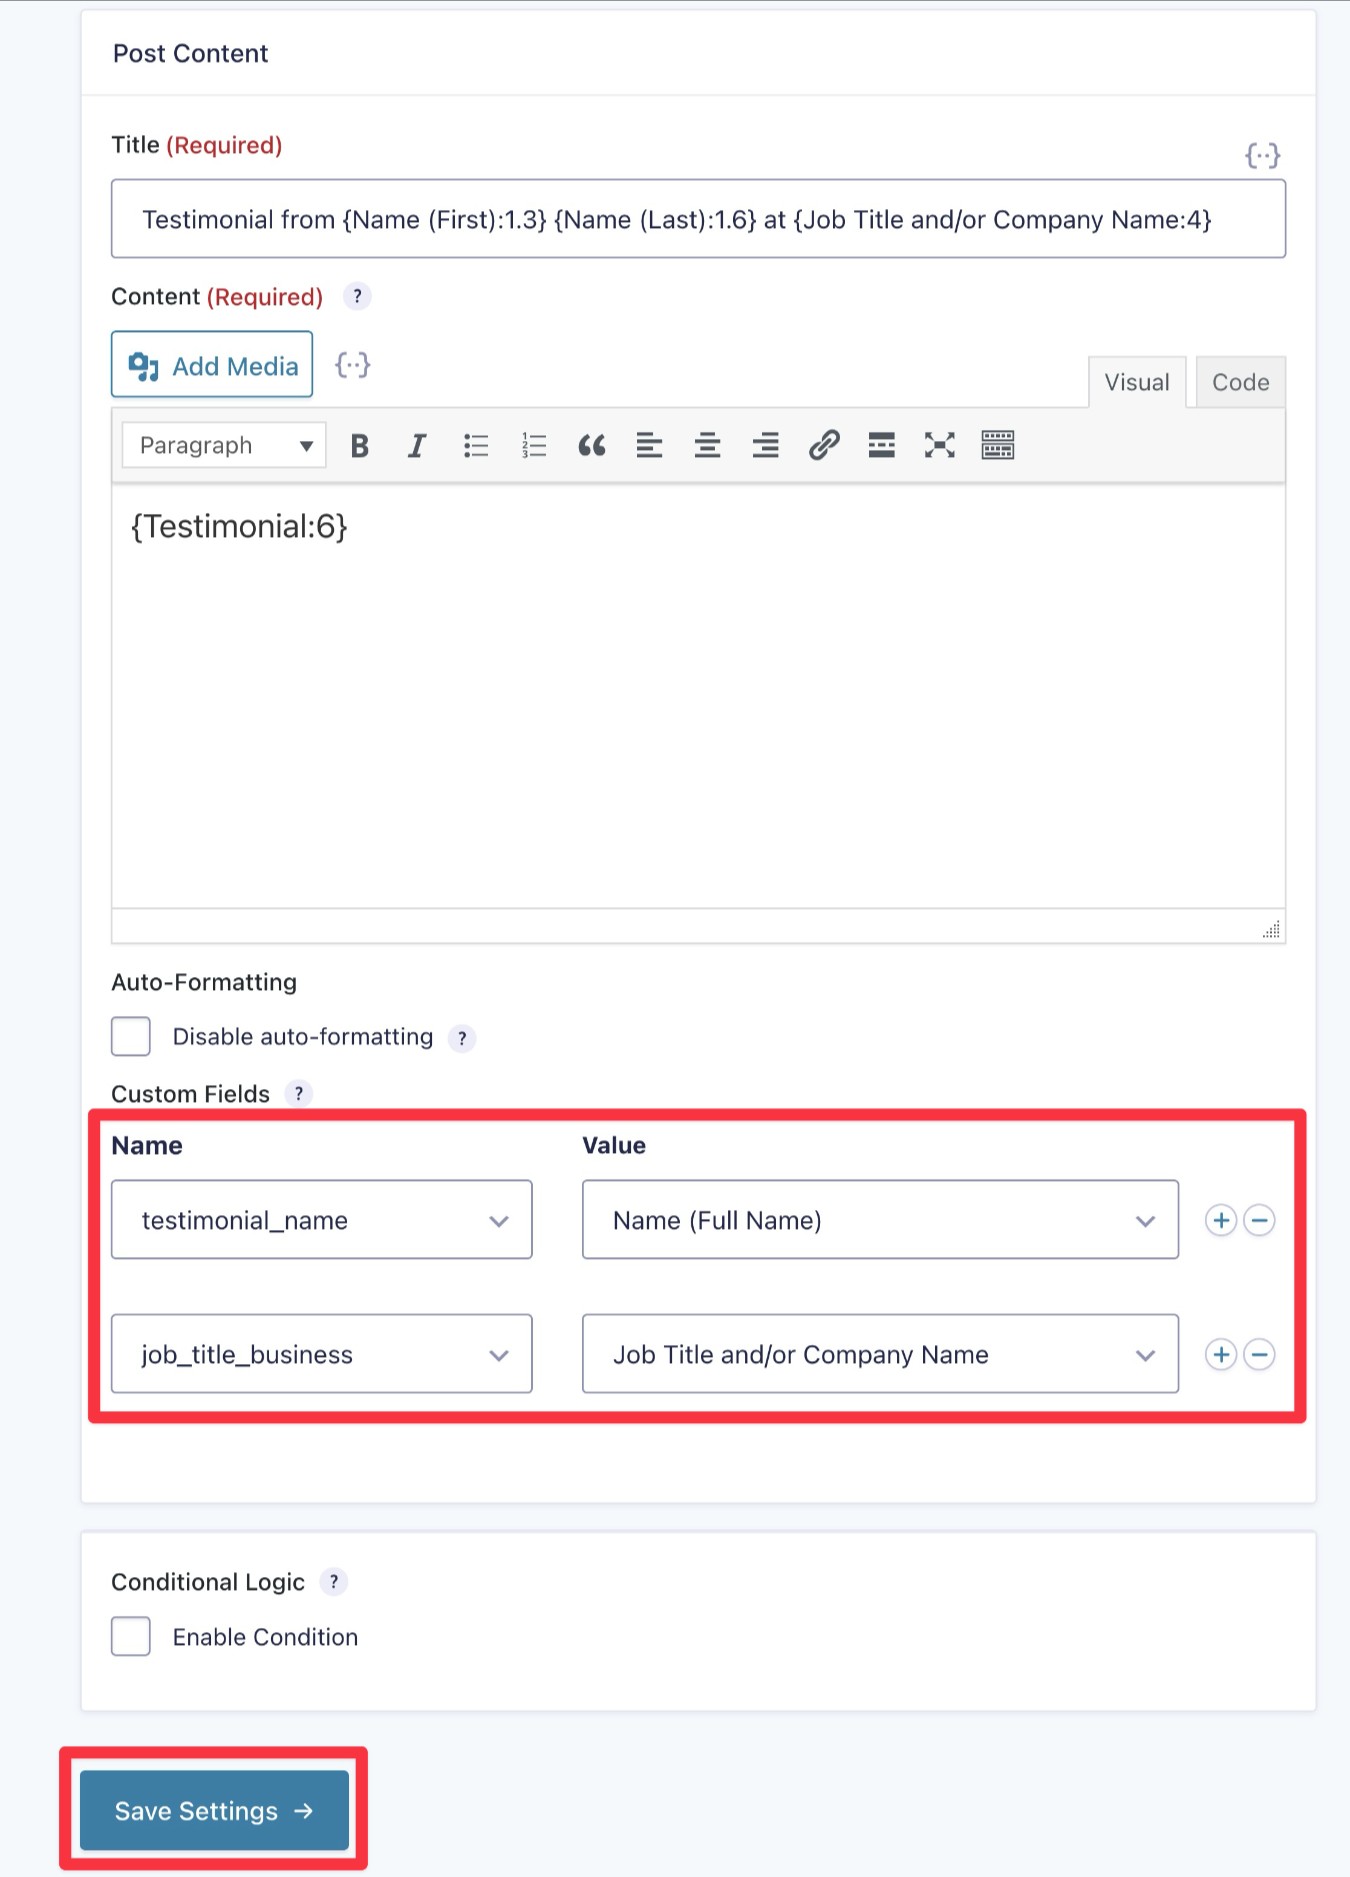
Once you’ve configured everything, make sure to click Save Settings at the bottom.
5. Configure other form settings (notifications, confirmations, etc.)
In addition to configuring the Advanced Post Creation Add-On, you also might want to set up some other form settings.
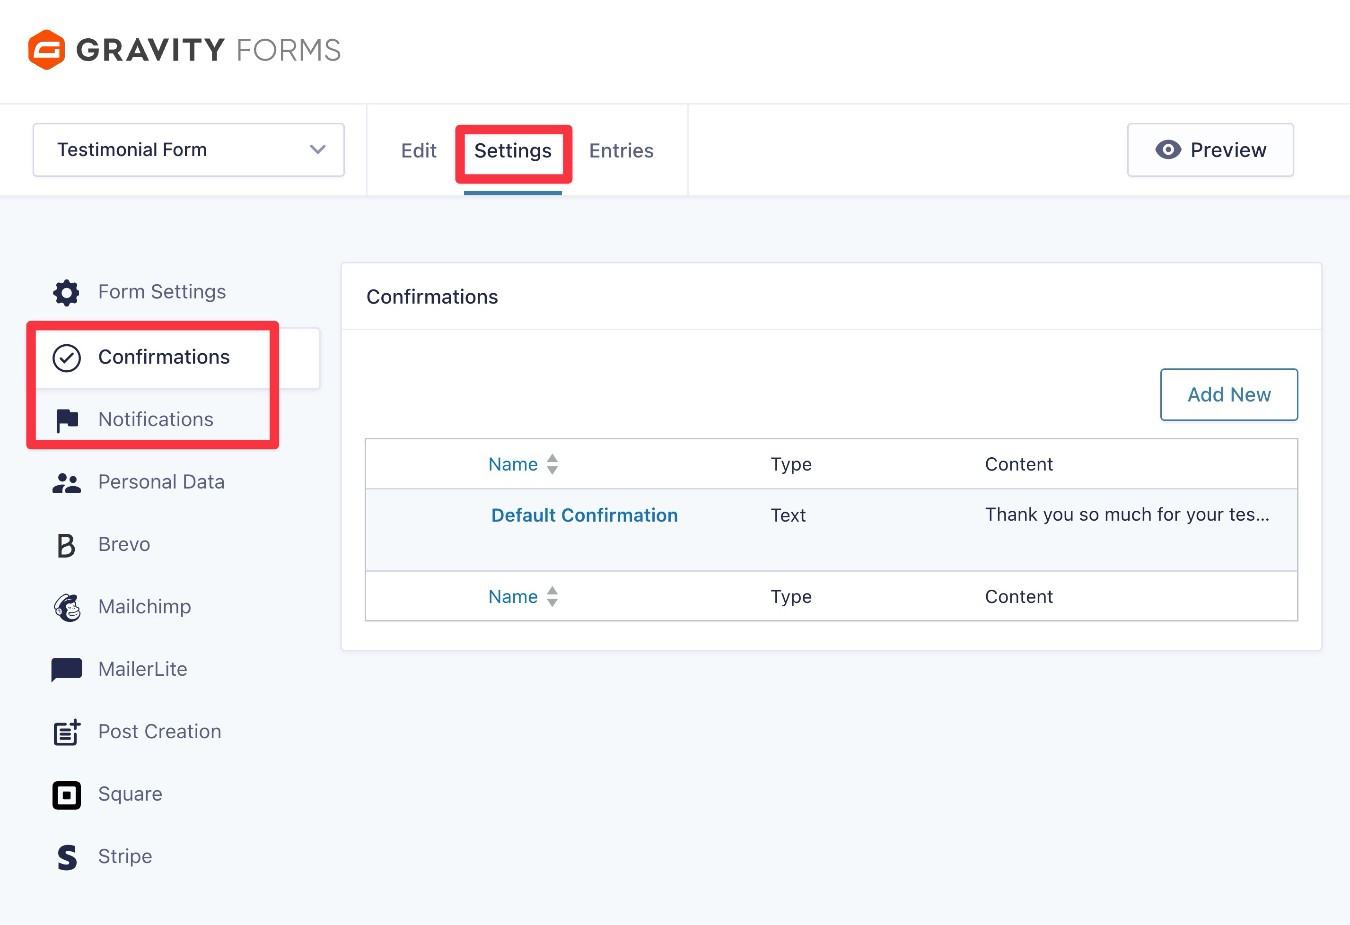
First, you’ll want to consider two core functions:
- Confirmations – This lets you display a message to people, or redirect them to a different page, after they submit the form. You could use this to thank them for taking the time to share their testimonial.
- Notifications – This lets you send one or more email notifications when someone submits the form. For example, you could send yourself (or a team member) a notification when you receive a new testimonial. If you’re holding new testimonials as drafts, this would let you know that you need to go in and publish the testimonial.
You could also consider using other Gravity Forms add-ons to enhance your form, such as giving people an option to subscribe to your email newsletter as part of submitting a testimonial.
You can find all of these options in the settings area of your testimonial form.
6. Embed your testimonial form
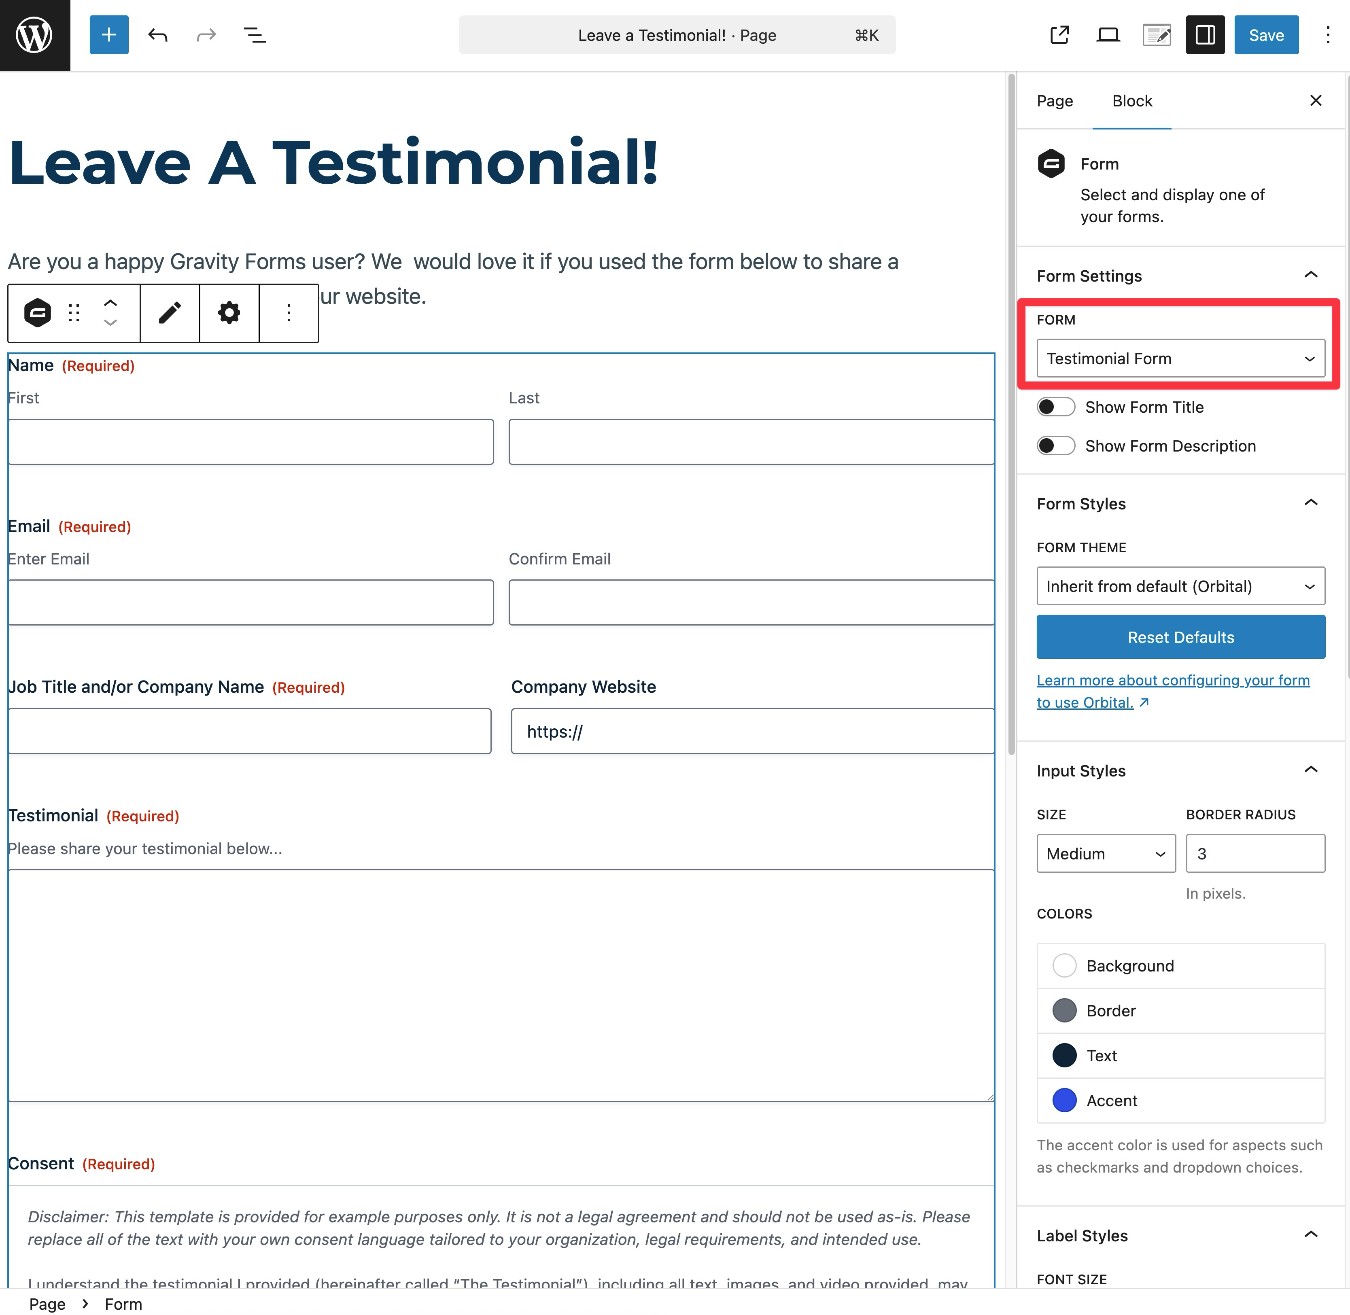
To make it so that people can actually use your testimonial form, you need to embed it somewhere on your site, which you can do using the Gravity Forms block, shortcode, or PHP function.
If you want anyone to be able to leave a testimonial, you could embed the form on a public page on your site.
On the other hand, if you only want people who you “invite” to leave a testimonial to be able to access the form, you might want to embed it on a hidden or password-protected page. You can also add rules about who is eligible to submit the form in the Form Settings tab of the form’s settings area.
For this example, we used the Gravity Forms Form block to embed the form in a public “Leave a Testimonial!” page.
7. Test your testimonial form
To finish things out, we recommend testing your form by submitting a testimonial with some dummy information.

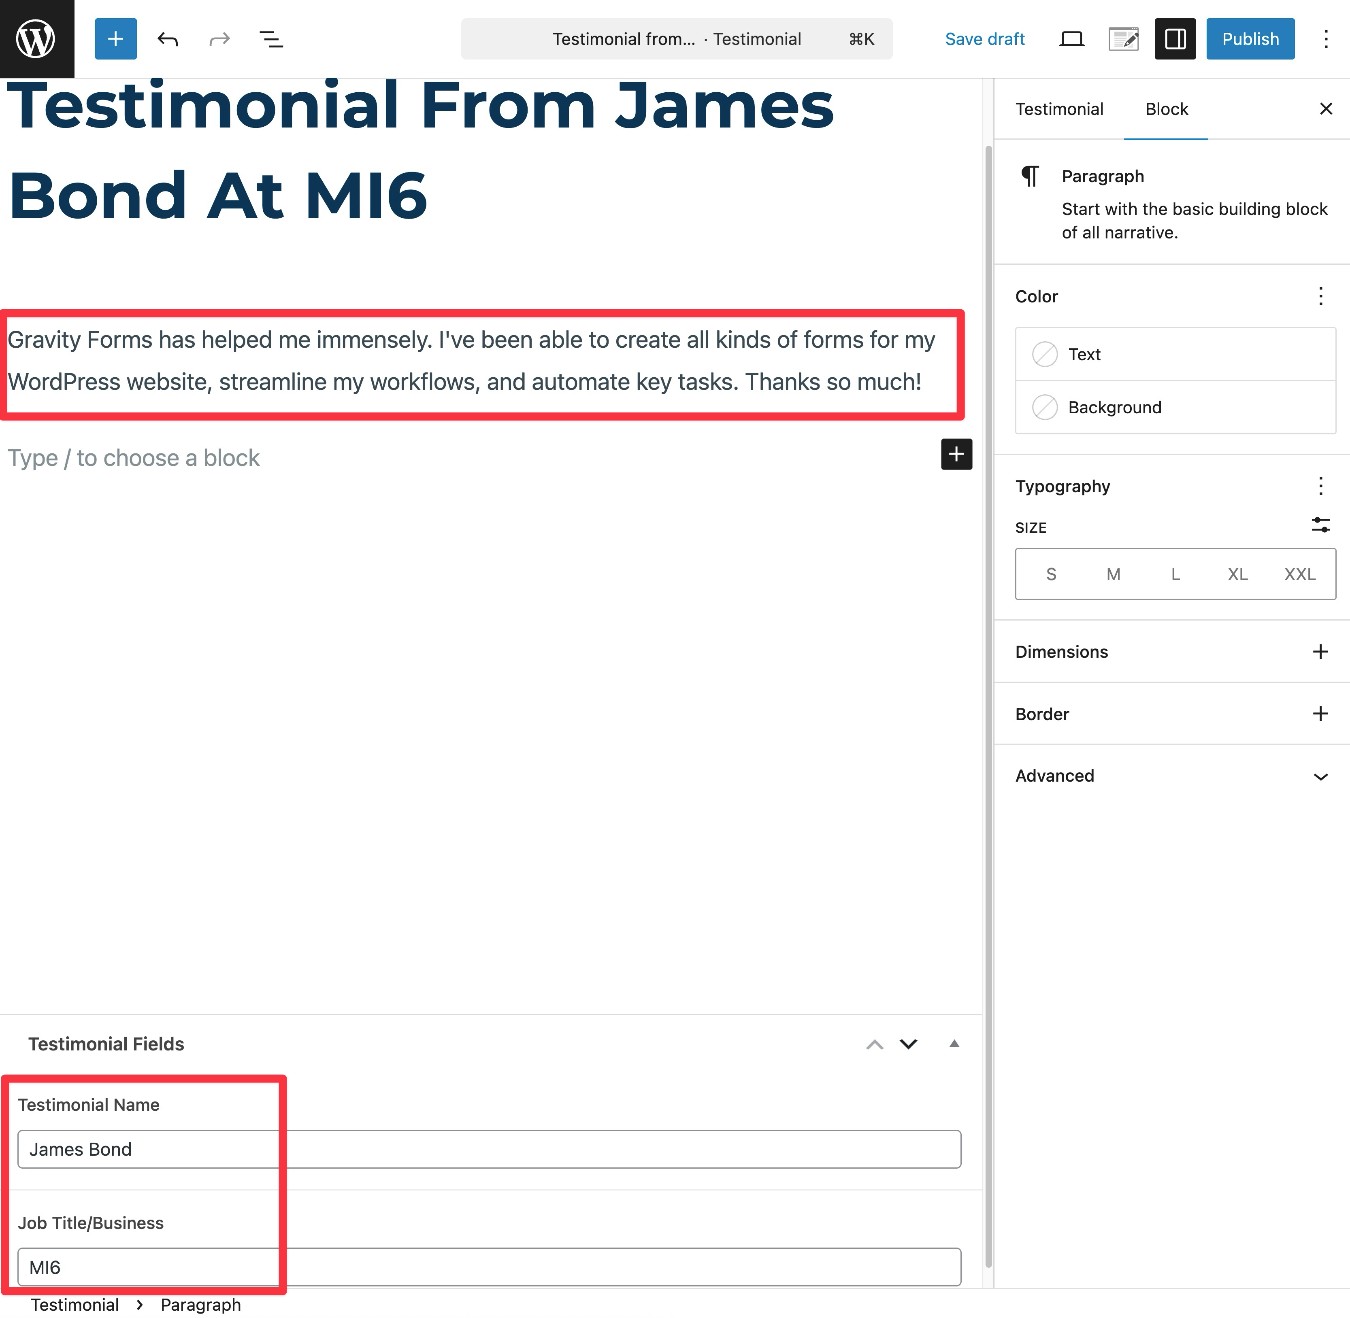
After submitting the form, you should see a new testimonial appear if you go to the Testimonials area in your WordPress dashboard.
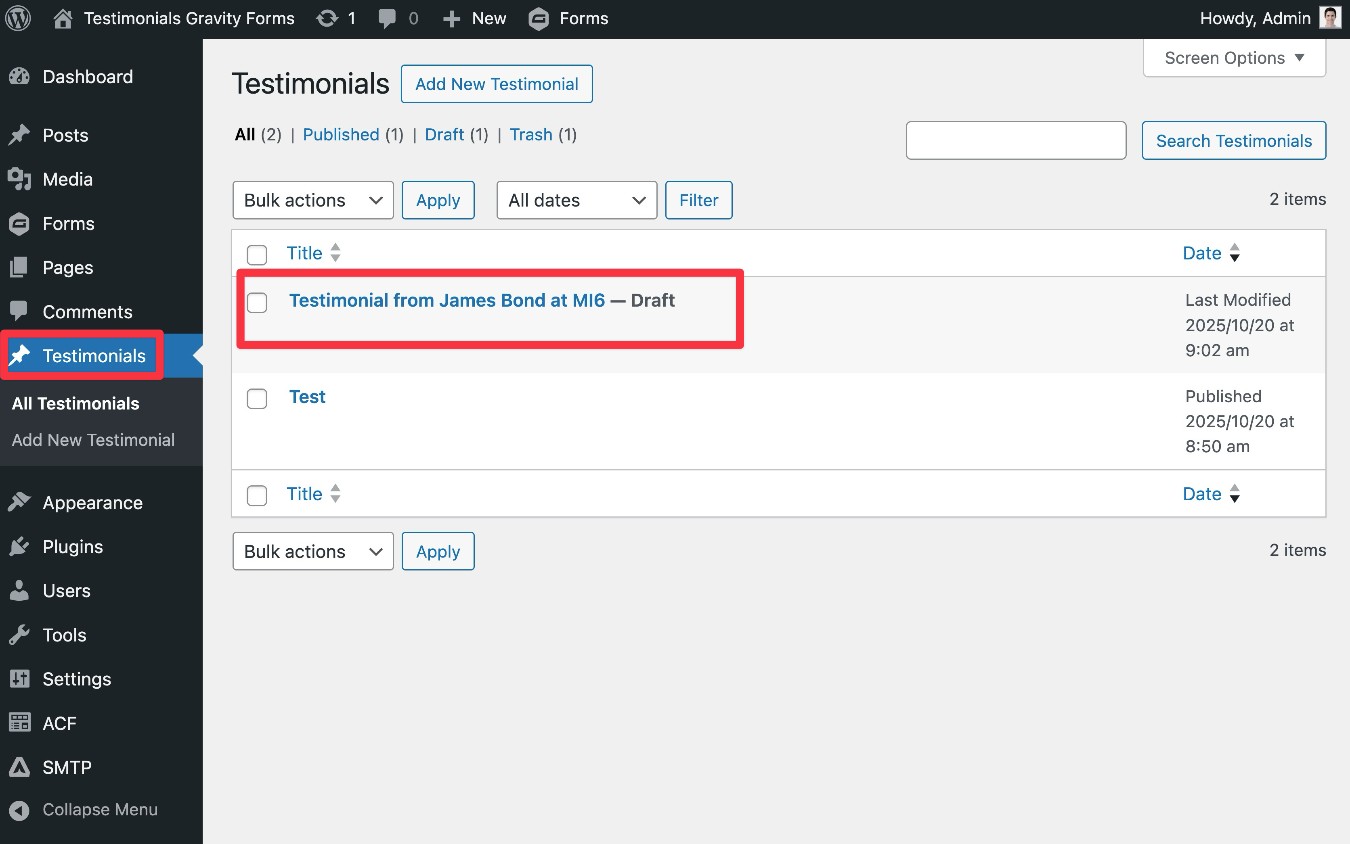
If you edit the testimonial, you should see the actual testimonial appear in the main editor, with other relevant details mapped to the custom fields that you created.
If you set the testimonial to be added as a draft, it won’t actually be live on your site until you review it and click the Publish button.
How to control how your testimonials are displayed on your website
To actually control how your testimonials display on the frontend of your site, you have several options.
Firstly, WordPress will automatically create a page for each testimonial, much like it does for Posts and Pages. You could just link directly to these pages, if you want each testimonial to be a separate page.
Another common use case would be to list multiple testimonials in some type of grid or list. You could use this as the complete display or you could link each list item to the full testimonial page.
There are a lot of different ways that you can do this, but here are a few good options to get you started:
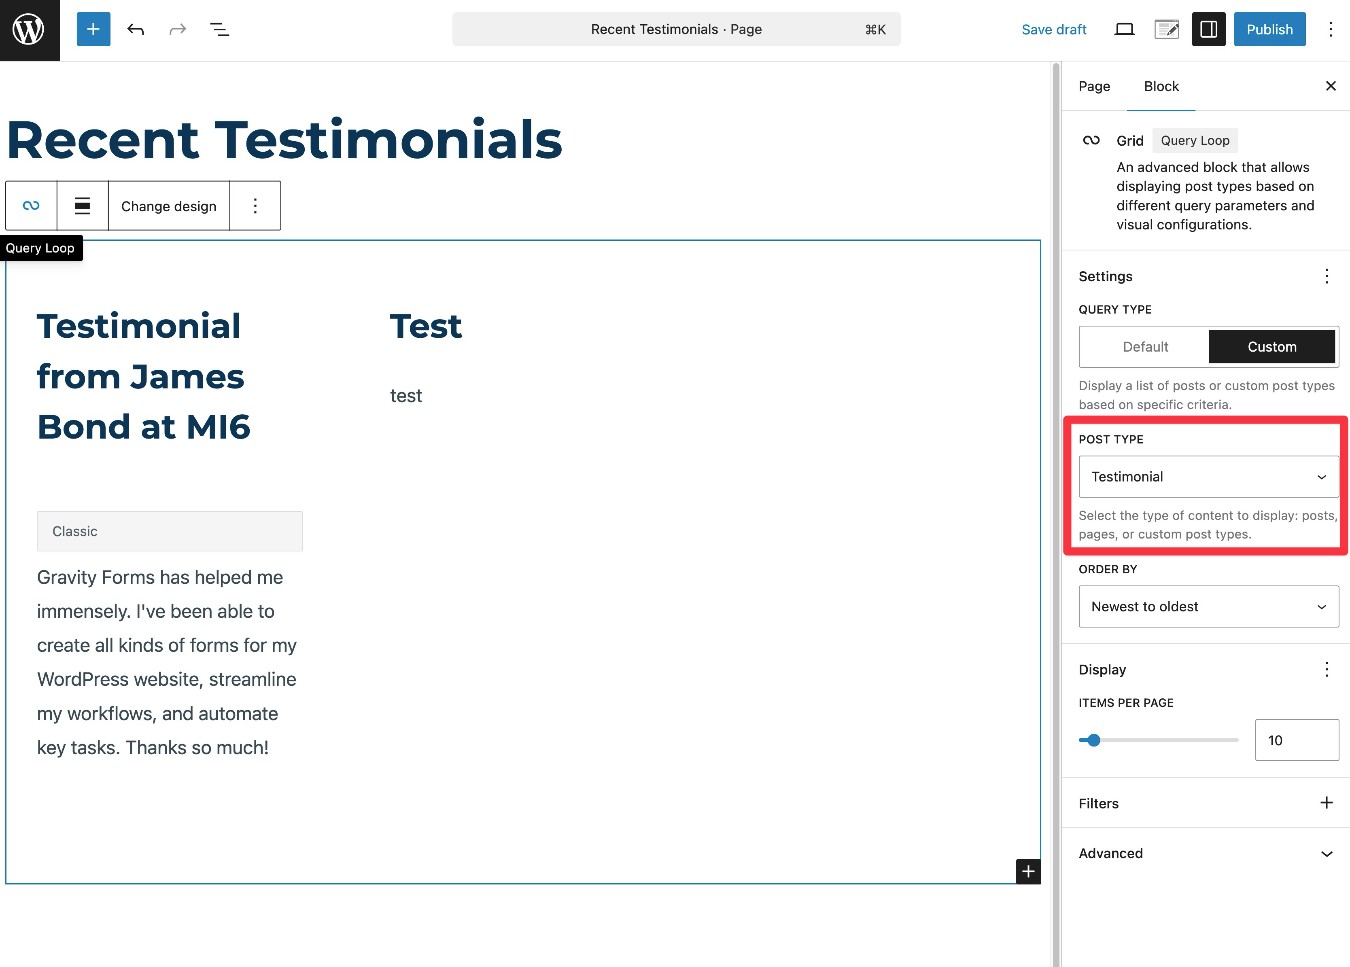
- Query Loop block – You can use the core Query Loop block, which will let you automatically list content from your Testimonials post type, including inserting dynamic content from your custom fields.
- Page builder plugin with dynamic content support – You can use any page builder plugin that supports dynamic content, including Elementor, Beaver Builder, etc.
- Post listing plugin – You can use any post listing plugin that supports querying custom post types, such as Content Views, PostX, and The Post Grid.
- Custom code – If you have the technical knowledge, you can also set up everything using your own custom code.
For example, here’s what it might look like to list content using the core Query Loop block:
Create your WordPress testimonial form today
Testimonials are a great way to leverage social proof to build trust with your customers.
With the Gravity Forms plugin, you can automate the entire testimonial process so that you can achieve these benefits without spending time manually collecting testimonials.
You can use the pre-made testimonial form template to set up your form, connect it to a custom post type, and then automatically display new testimonials anywhere on your site.
If you’re already holding the Gravity Forms Elite or Nonprofit licenses, you can install the Advanced Post Creation Add-On and follow this guide to get started.
If you’re not holding one of those licenses yet, you can purchase a new license here or upgrade your existing license and only pay the prorated difference.

If you want to keep up-to-date with what’s happening on the blog sign up for the Gravity Forms newsletter!
"*" indicates required fields