

Want to set up WordPress Resend transactional emails?
Whether you’re working on your own website or a client website, Resend offers a flexible, developer-friendly solution for transactional emails.
To connect WordPress to Resend, you can use the Gravity SMTP plugin, which is what we show you in this post.
Below, you’ll learn step-by-step how to use Resend for WordPress transactional emails, powered by the Resend email API and the Gravity SMTP plugin.
Before the tutorial, we’ll also briefly cover why Resend and Gravity SMTP work well for WordPress transactional emails.
Let’s get into it…
Why use Resend for WordPress transactional emails?
Resend is a Y-Combinator-backed transactional email service aimed at developers.
While anyone is free to use Resend, this developer focus makes it an especially good fit for developers, agencies, and anyone else looking for a reliable email solution for client websites.
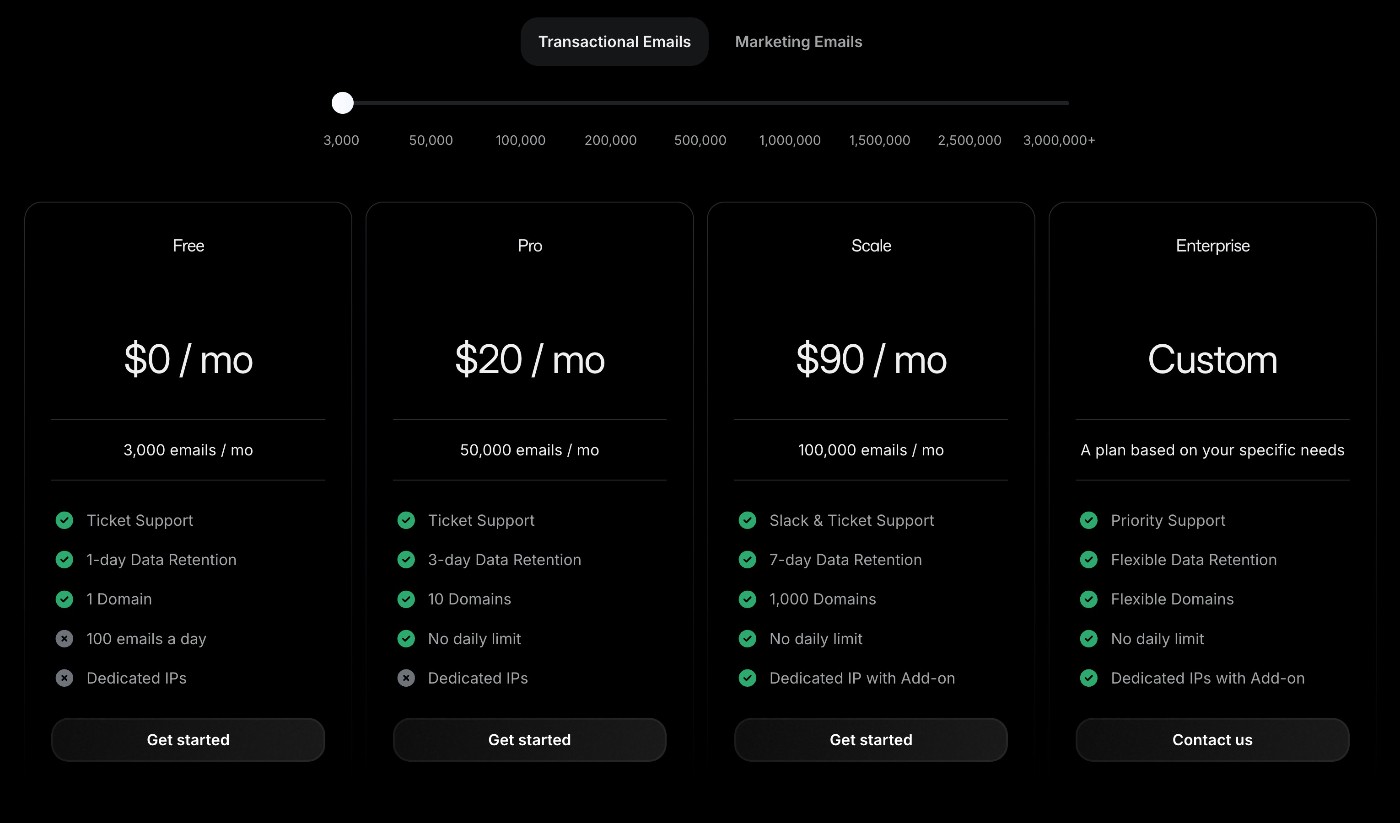
Resend offers a generous free plan that lets you send up to 3,000 emails per month (with a maximum of 100 emails per day).
You can also consider paid plans if you want to increase the monthly limits, remove the daily limit, access dedicated IP addresses, and more. Here are the starting prices for the paid plans:
Beyond its pricing, here are some of the other features that Resend offers:
- Email delivery API (in addition to an SMTP relay)
- High-level email reporting, with multiple “events” tracked for each email
- Open and click tracking
- Option to pass data for events to webhooks, such as triggering an alert for email bounces
- Dedicated IPs (with add-on)
- Bounce details for hard and soft bounces
- Suppression lists
- Multi-region support so that you can choose where your emails are sent from
- 1-7 day data retention (or more for enterprise plans)
How Gravity SMTP helps you use Resend on WordPress
Gravity SMTP is a WordPress SMTP plugin that helps you easily connect your or your clients’ websites to Resend.
Gravity SMTP lets you connect WordPress directly to the Resend email API, which is the most reliable way to send your site’s transactional emails.
In addition to that, Gravity SMTP also includes several other features to improve your site’s transactional emails:
- Email logging – Log the individual emails that the site has sent, including technical information, as well as optional logging for email content and attachments.
- Email reporting – Get high-level email reporting that lets you see total emails sent, along with the most popular recipients and sending sources (e.g. core emails or emails sent by a plugin).
- Open tracking – While Resend has its own email open tracking, Gravity SMTP also lets you enable this feature so that you or your clients can see email open analytics inside your WordPress dashboard.
- Backup email sending services – Connect to a backup sending service in addition to Resend. If an email ever fails to send via Resend, Gravity SMTP can automatically resend it using your backup service.
- Real-time alerts for failed emails – Receive real-time alerts for any failed emails, with support for SMS (via Twilio) and webhooks.
- Email suppressions – While Resend supports suppression lists, Gravity SMTP also has its own suppression feature that lets you set them up directly from the WordPress dashboard.
Gravity SMTP is available for free to anyone holding one of these Gravity Forms licenses:
- Elite license
- Nonprofit license
- Developer license (legacy)
You can download Gravity SMTP from the Gravity Forms My Account area. However, it is still a standalone plugin, and you do not need to be using Gravity Forms to set up Gravity SMTP.
How to set up WordPress Resend with Gravity SMTP
Now, we’ll get into the full step-by-step guide on how to set up WordPress Resend transactional emails using Gravity SMTP…
1. Install the Gravity SMTP plugin
To get started, install the Gravity SMTP plugin on the WordPress website where you want to set up Resend.
Gravity SMTP is currently available for free to anyone holding the Gravity Forms Elite or Nonprofit licenses (or the legacy Developer license). If you have one of those licenses, you can download it from the Gravity Forms My Account area.
2. Register for your Resend account
After installing the Gravity SMTP plugin, you’ll want to register for your Resend account, if you haven’t done so already.
As we mentioned earlier, Resend does offer a forever-free plan that lets you send up to 3,000 emails per month, so you can follow this tutorial 100% for free.
If you need to send more than 3,000 emails per month (or 100 emails per day) and/or you’re interested in other features like a dedicated IP address, you can also explore the paid plans here.
For this guide, however, we’re just going to use the free plan, which you can sign up for here.
3. Authenticate your domain name with Resend
Before you can start sending emails, you need to authenticate your WordPress site’s domain name with Resend.
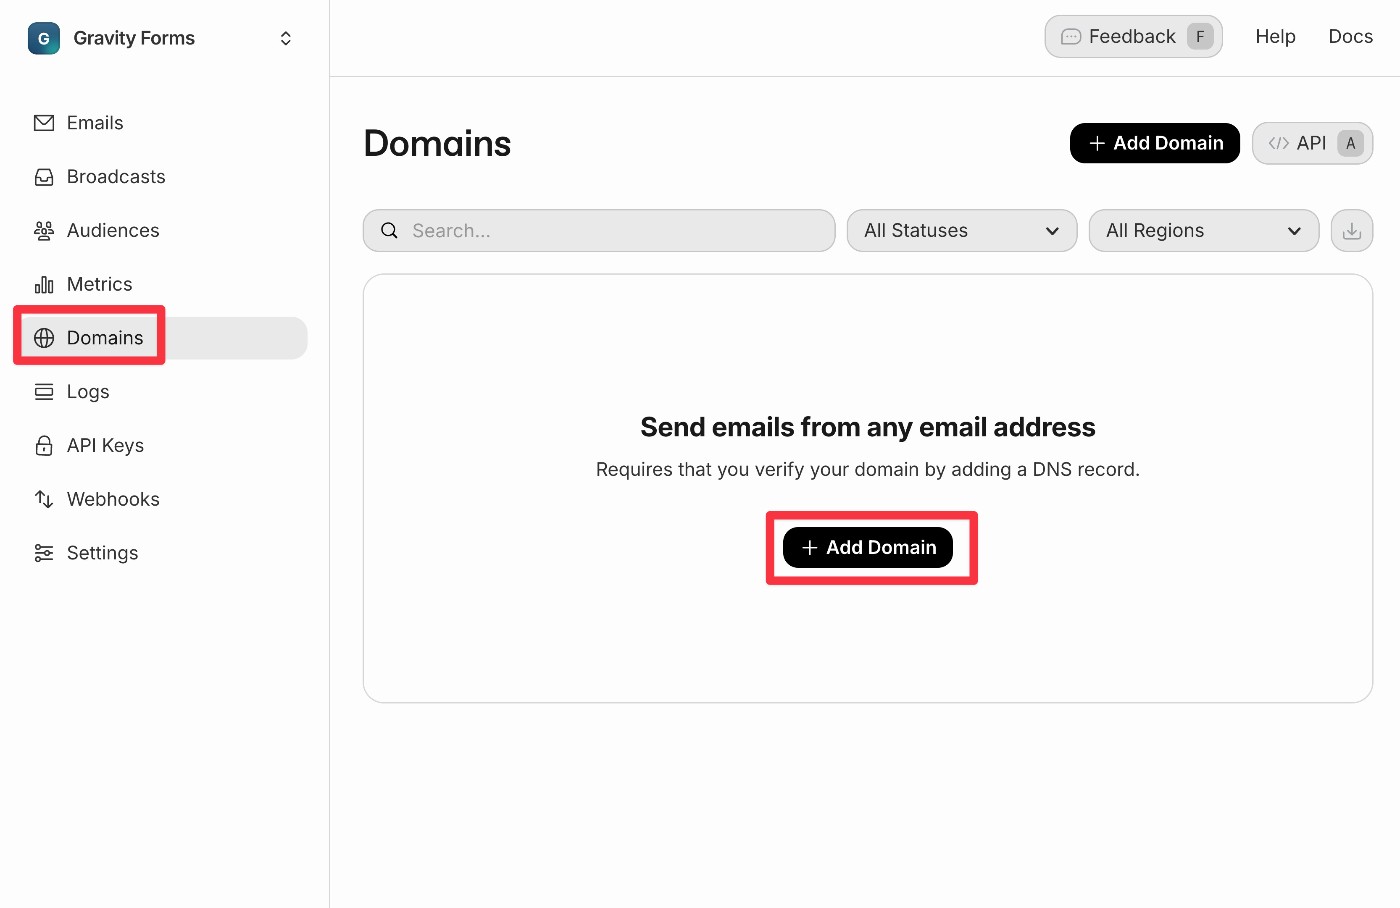
Click Domains in the left sidebar of the Resend dashboard and then click Add Domain.
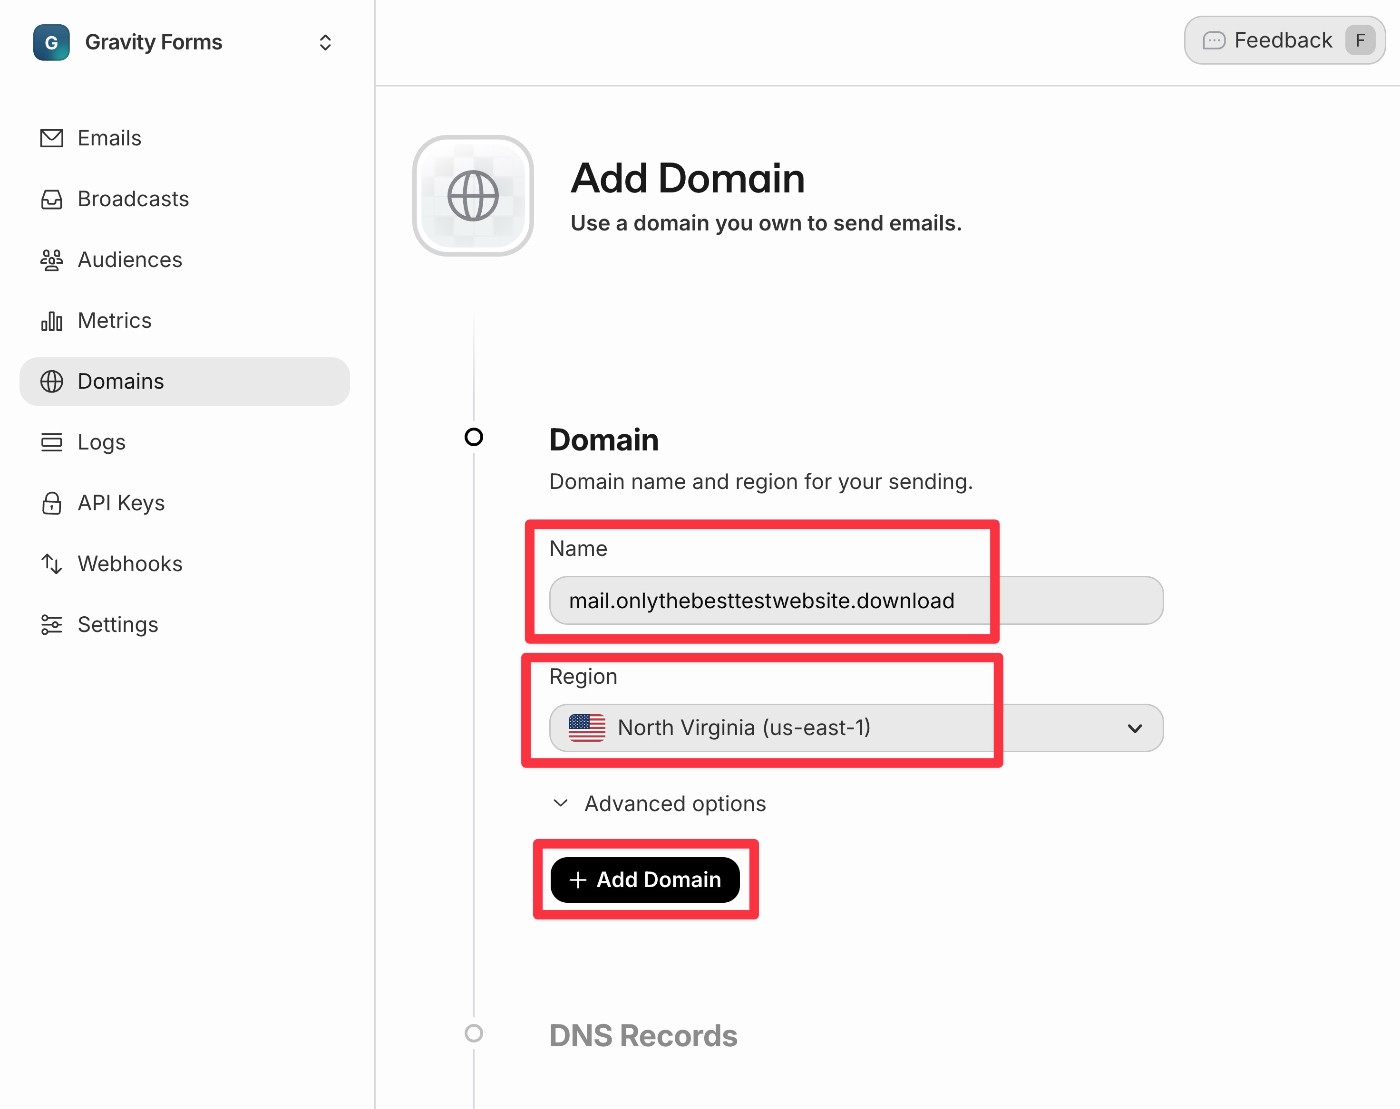
Enter your domain name in the Name box. You can use the root domain of your WordPress site (e.g. gravityforms.com), but Resend recommends using a subdomain to preserve the reputation of your domain name.
For example, mail.gravityforms.com or updates.gravityforms.com.
For this example, we’ll use a subdomain, but the basic process will be the same even if you use your root domain.
Below that, you can choose the Region from which your emails will be sent. You should choose the location that’s closest to the majority of your audience. Resend currently supports four different regions:
- North Virginia, USA
- Ireland
- Sao Paulo, Brazil
- Tokyo, Japan
If you want to set a custom return path, you can also expand the Advanced options, but this is 100% optional.
Once you’ve made your choices, click the Add Domain button again.
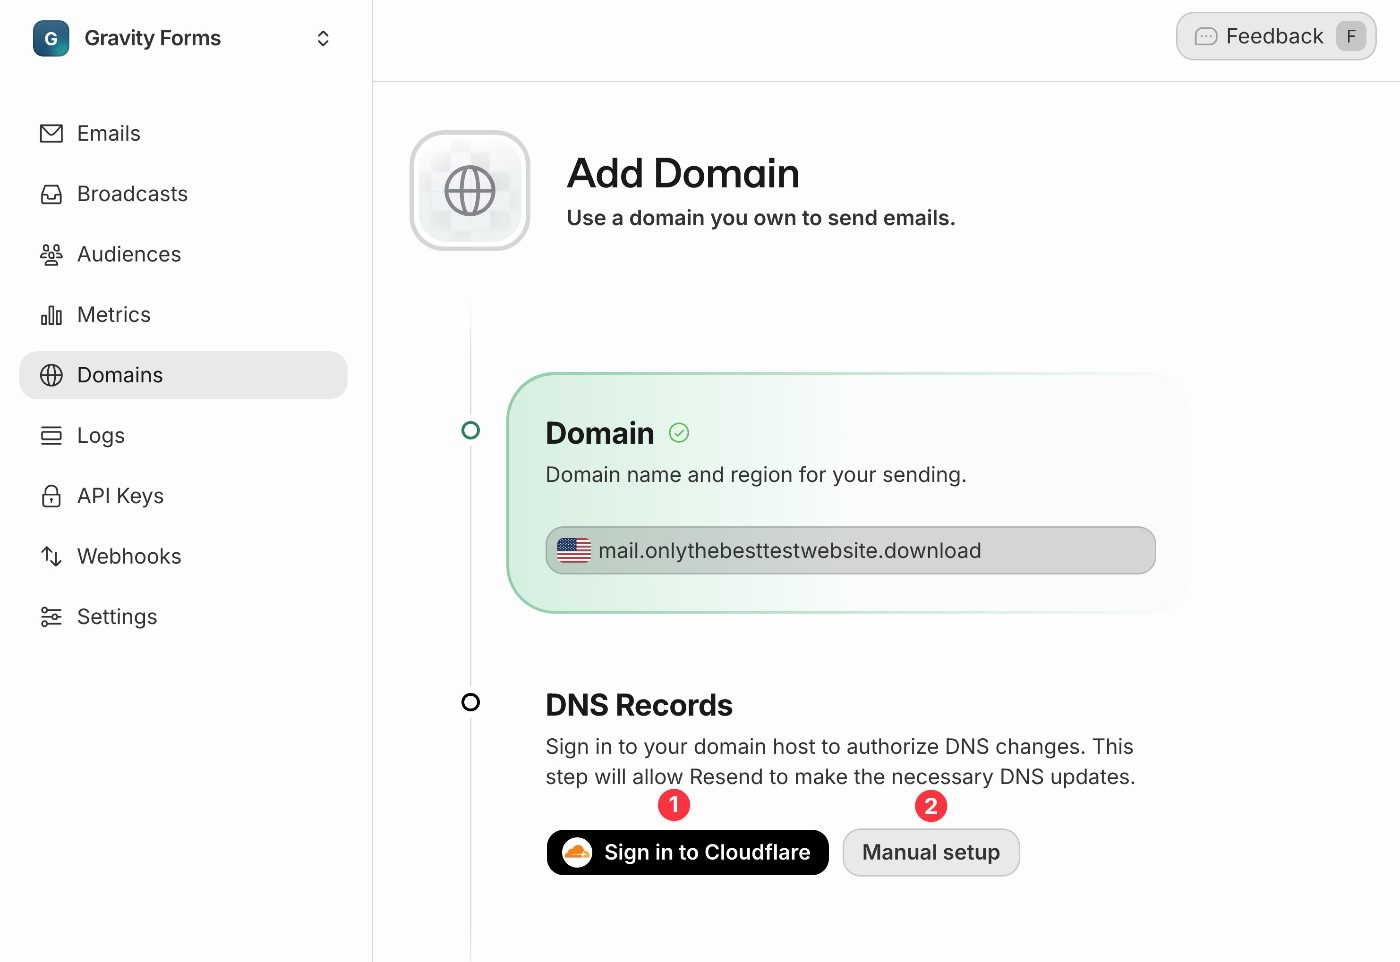
Resend will now prompt you to add some DNS records to your domain name:
- If possible, it will automatically detect where you manage your domain’s DNS records and give you an automated method. For example, our test site uses Cloudflare’s nameservers, so Resend provided an option to sign in to Cloudflare.
- You can always click Manual setup to view the required DNS records and add them yourself.
For this example, we chose Manual setup and added the four DNS records ourselves.
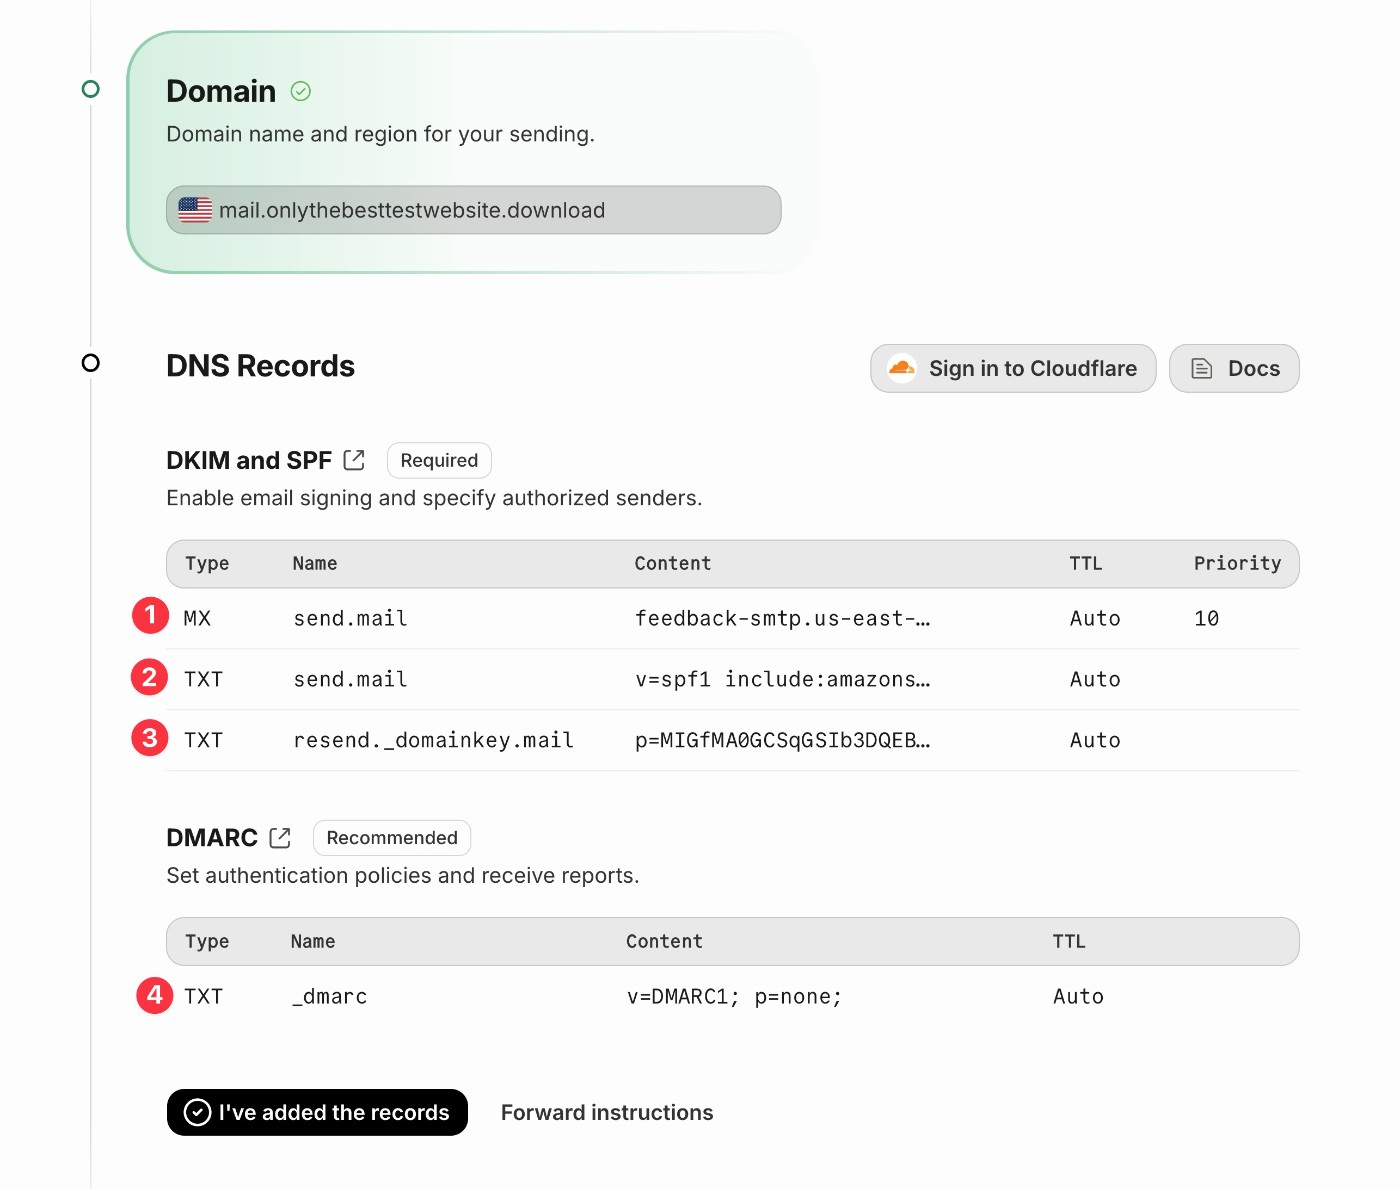
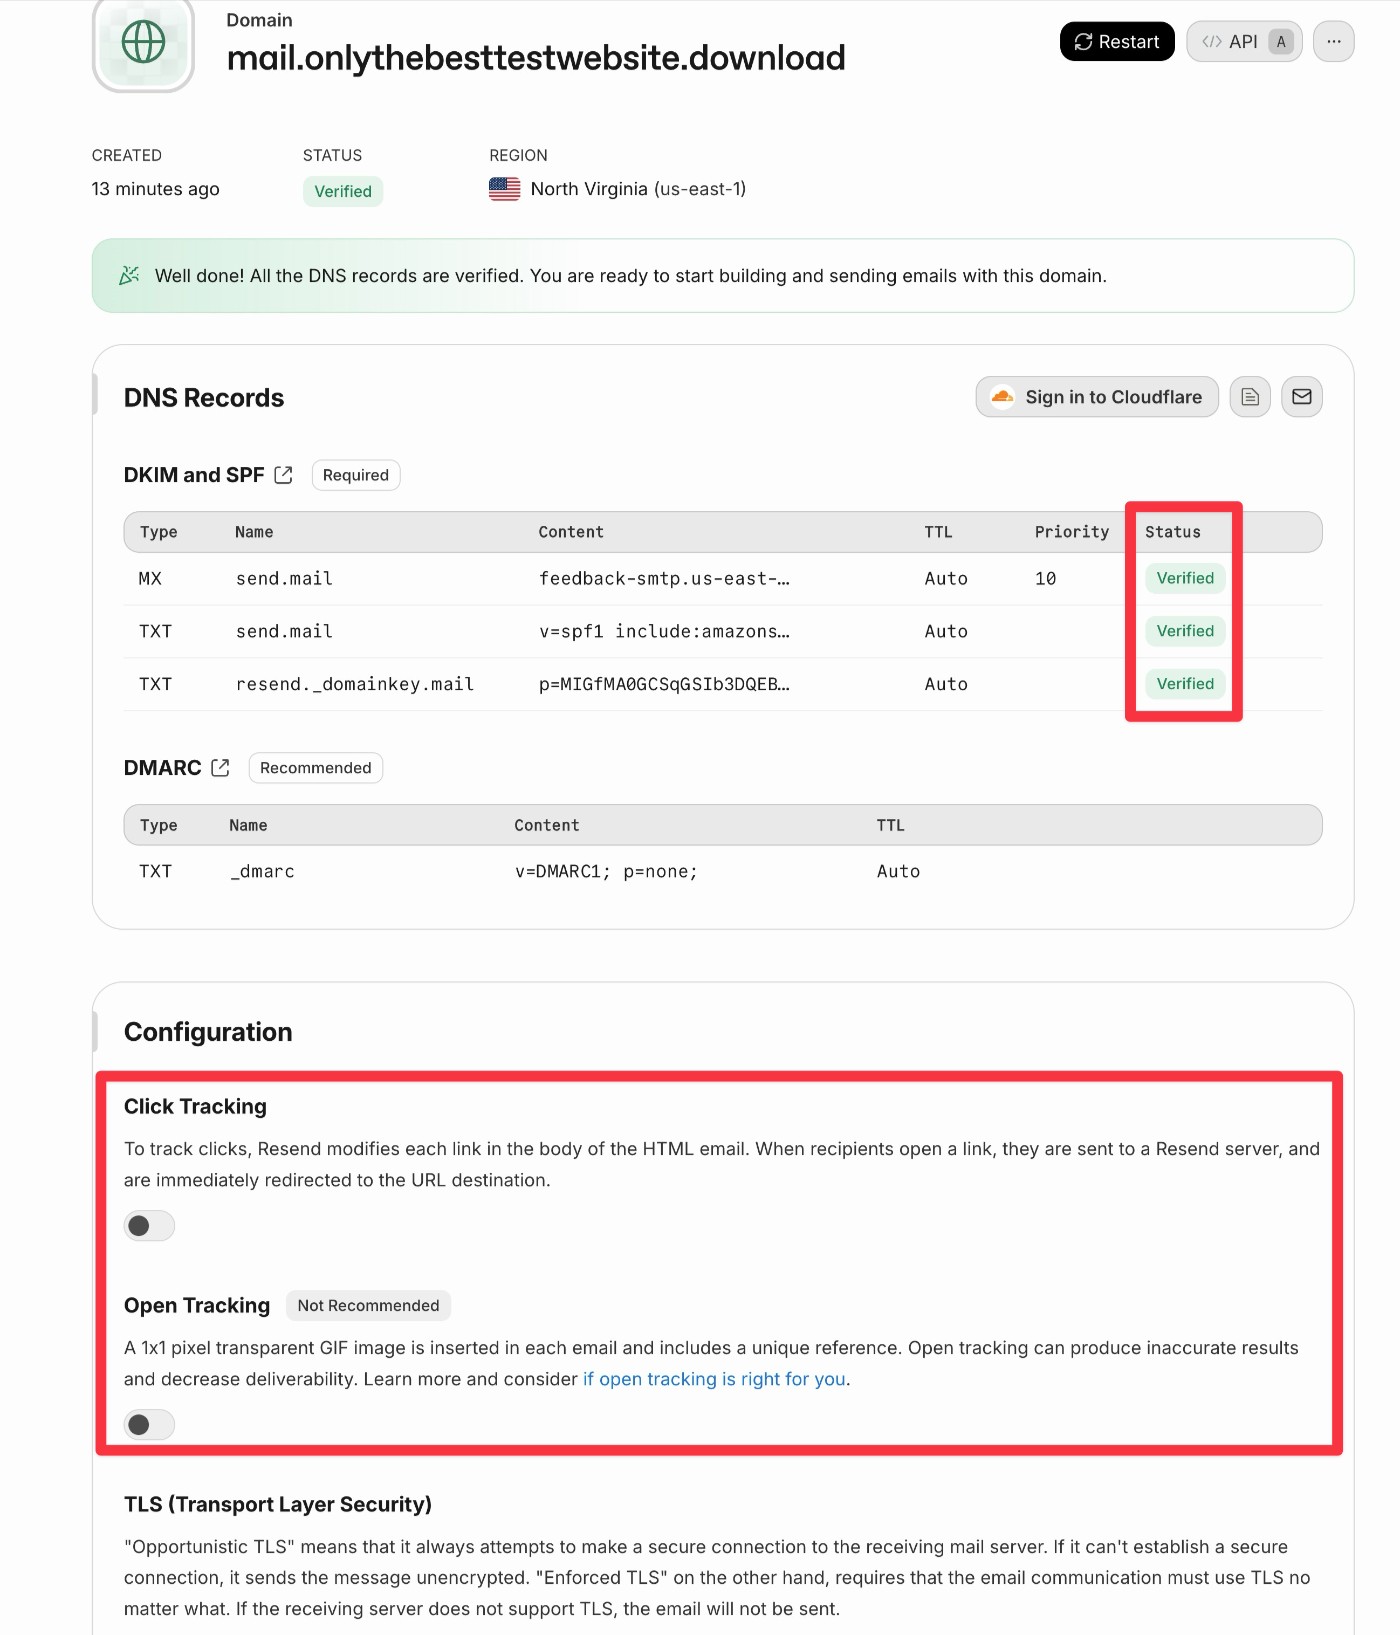
Once you click the button indicating that you’ve added the records, Resend will scan to see if it detects the records. It can take a few minutes or hours for DNS changes to propagate, so it might take some time before Resend detects them.
When it does, the Status column will change to Verified.
In this interface, you can also choose whether or not to enable Click Tracking and Open Tracking. The Gravity SMTP plugin also includes its own feature for open tracking, so you can consider using that instead if you think that you (or your client) would prefer viewing open tracking data inside the WordPress dashboard.
4. Create your Resend API key
Once you’ve authenticated your domain name with Resend, the next step is to create a Resend API key.
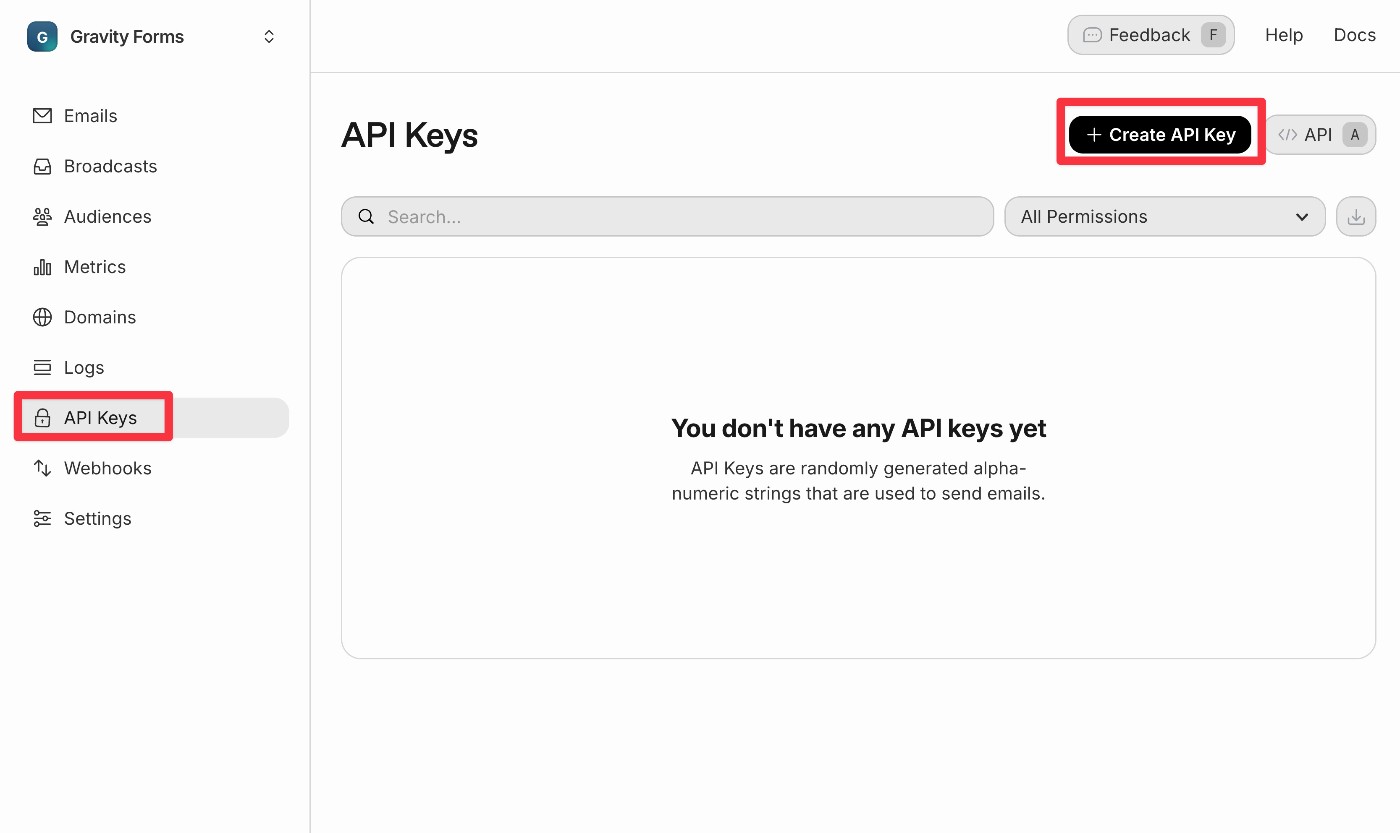
Click the API Key menu in the left sidebar of the Resend dashboard. Then, click Create API Key.
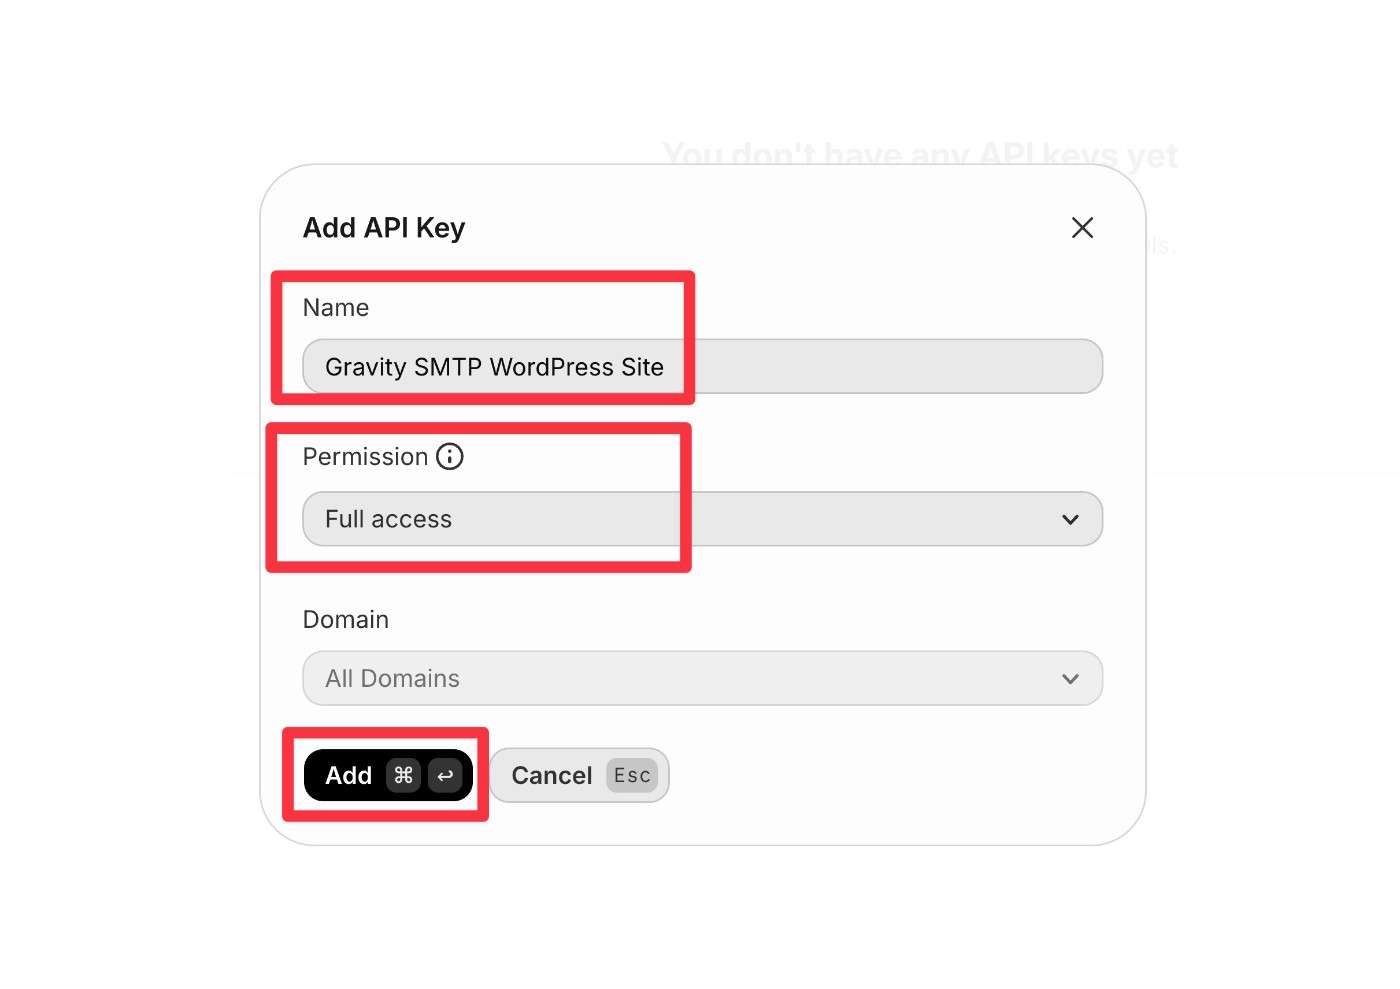
This will expand a popup where you can configure the API key:
- Name – Give it an internal name to help you remember what this API key is for.
- Permission – Choose Full access.
- Domain – This choice is disabled when you choose Full access.
Once you’ve made your choices, click Add.
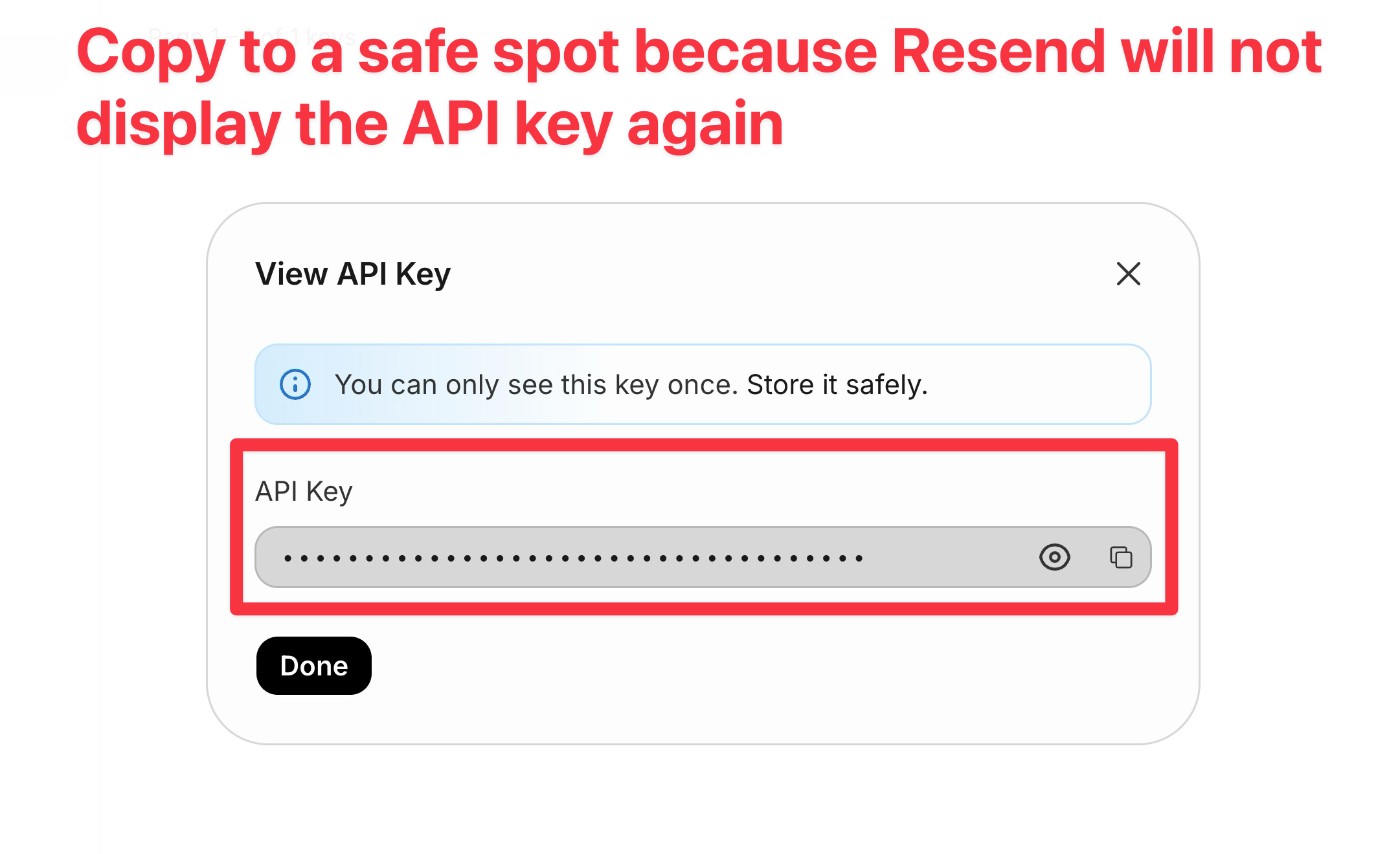
Resend will now display your API key. Make sure to copy this API key to a safe place because Resend will not show it again.
If you accidentally lose track of your API key, you can just repeat the same steps to create a new one.
5. Connect Gravity SMTP to Resend
Once you’ve authenticated your domain name and created an API key, you’ll perform the rest of the setup process from your WordPress site:
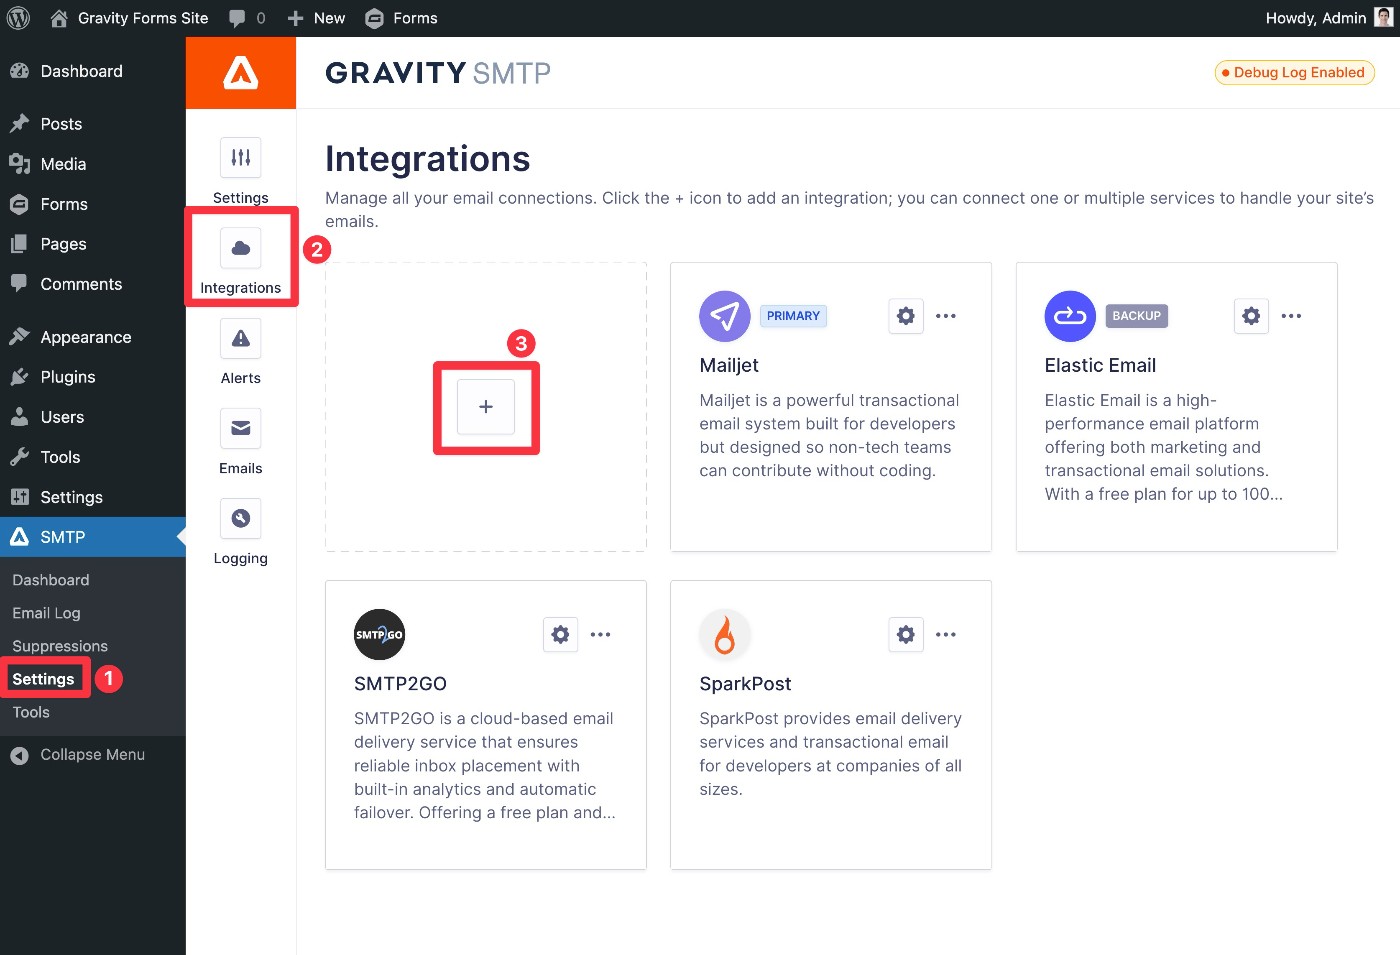
- Go to SMTP → Settings in your WordPress dashboard.
- Select the Integrations tab in the settings area.
- Click the plus icon to add a new integration.
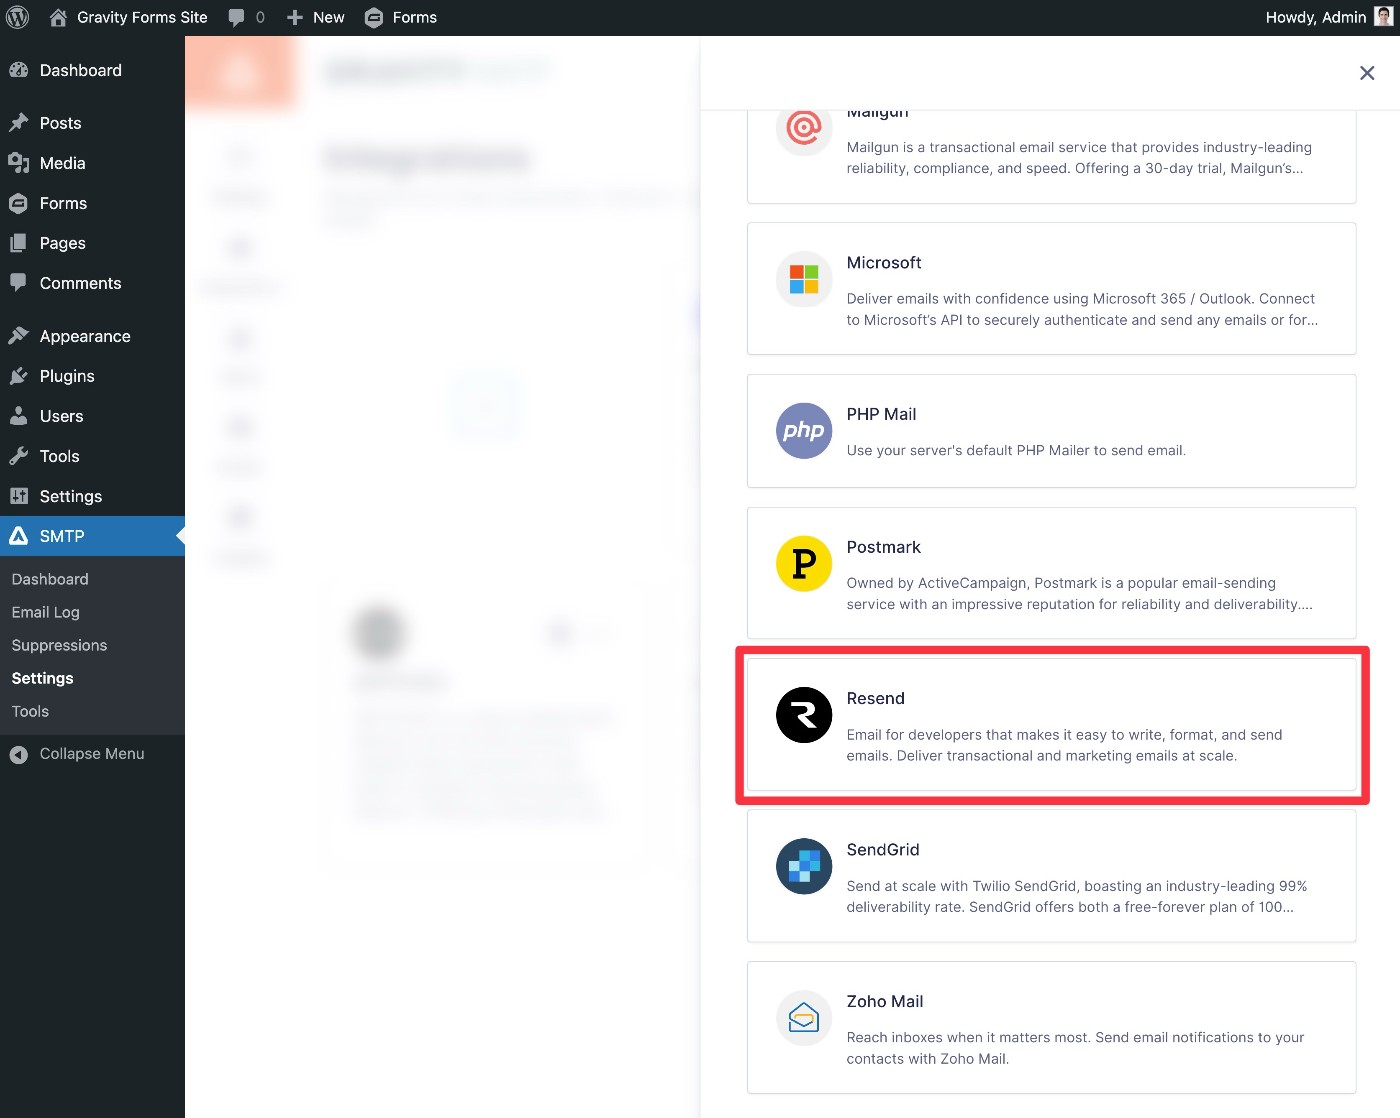
In the slide-out panel that appears, select Resend.
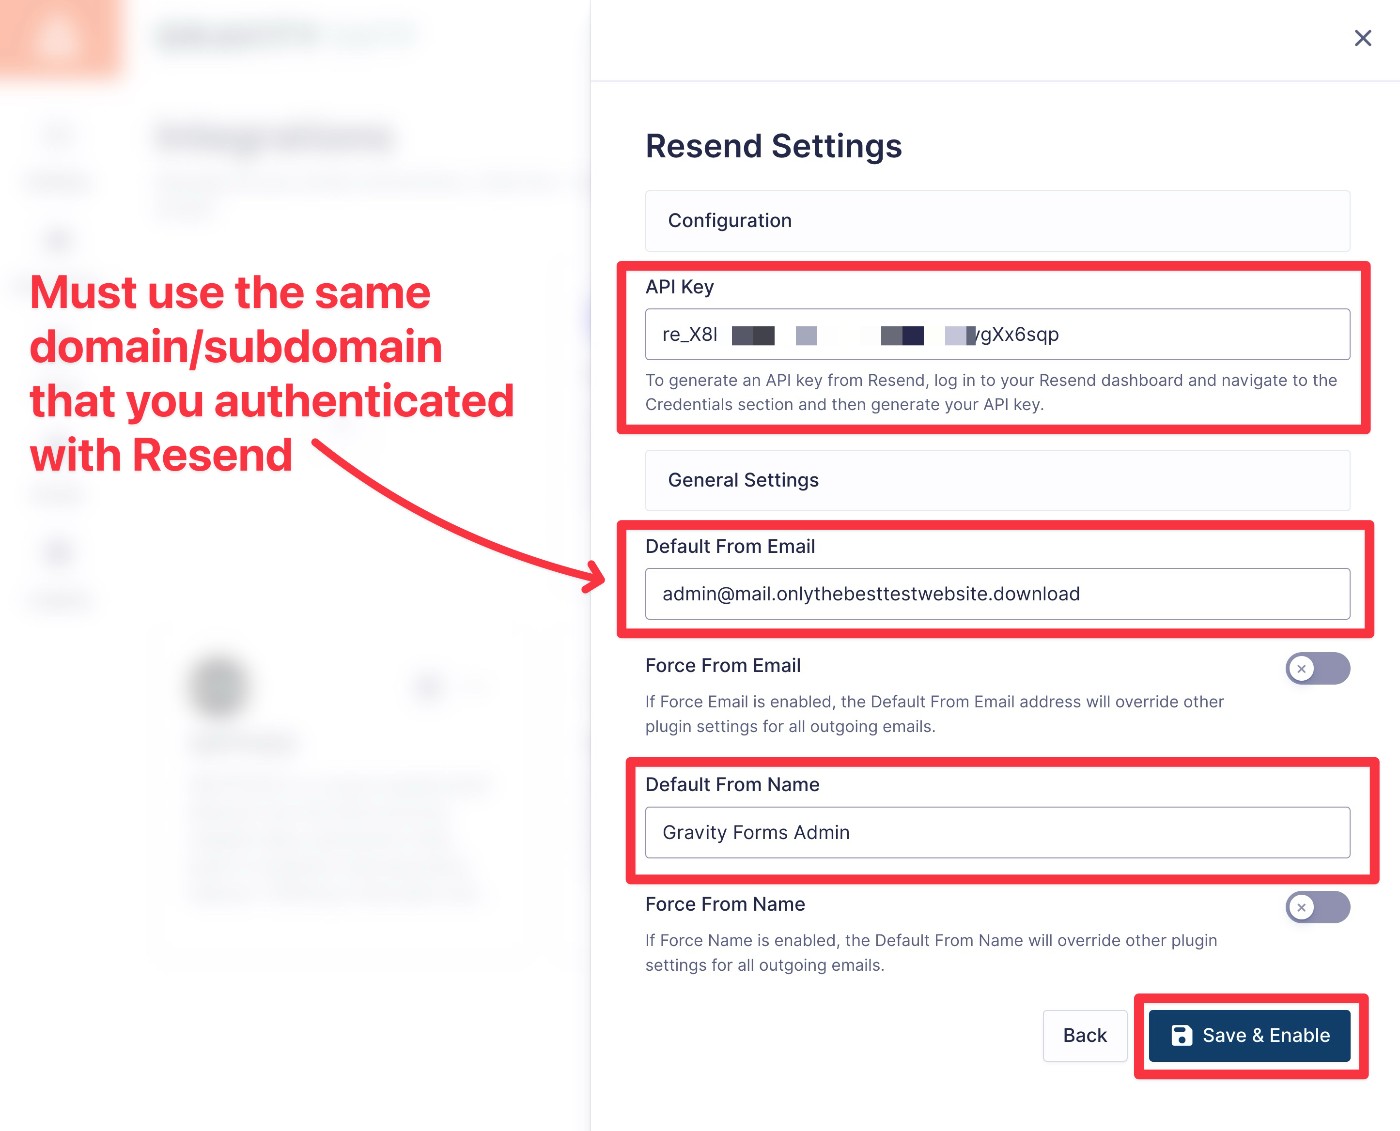
This will open some options to configure the connection:
- API Key – Paste in the Resend API key that you just created in the previous step.
- Default From Email – Enter the email address from which you want to send emails. This must use the same domain that you authenticated with Resend. If you authenticated a subdomain instead of your root domain, you must use an email address on that subdomain.
- Default From Name – Enter the name from which you want your emails to be sent.
- Force From Email/Name – If you enable these toggles, you can override the settings in other plugins to force them to use the same name and/or email that you’ve added here.
Once you’ve made your choices, click Save & Enable.
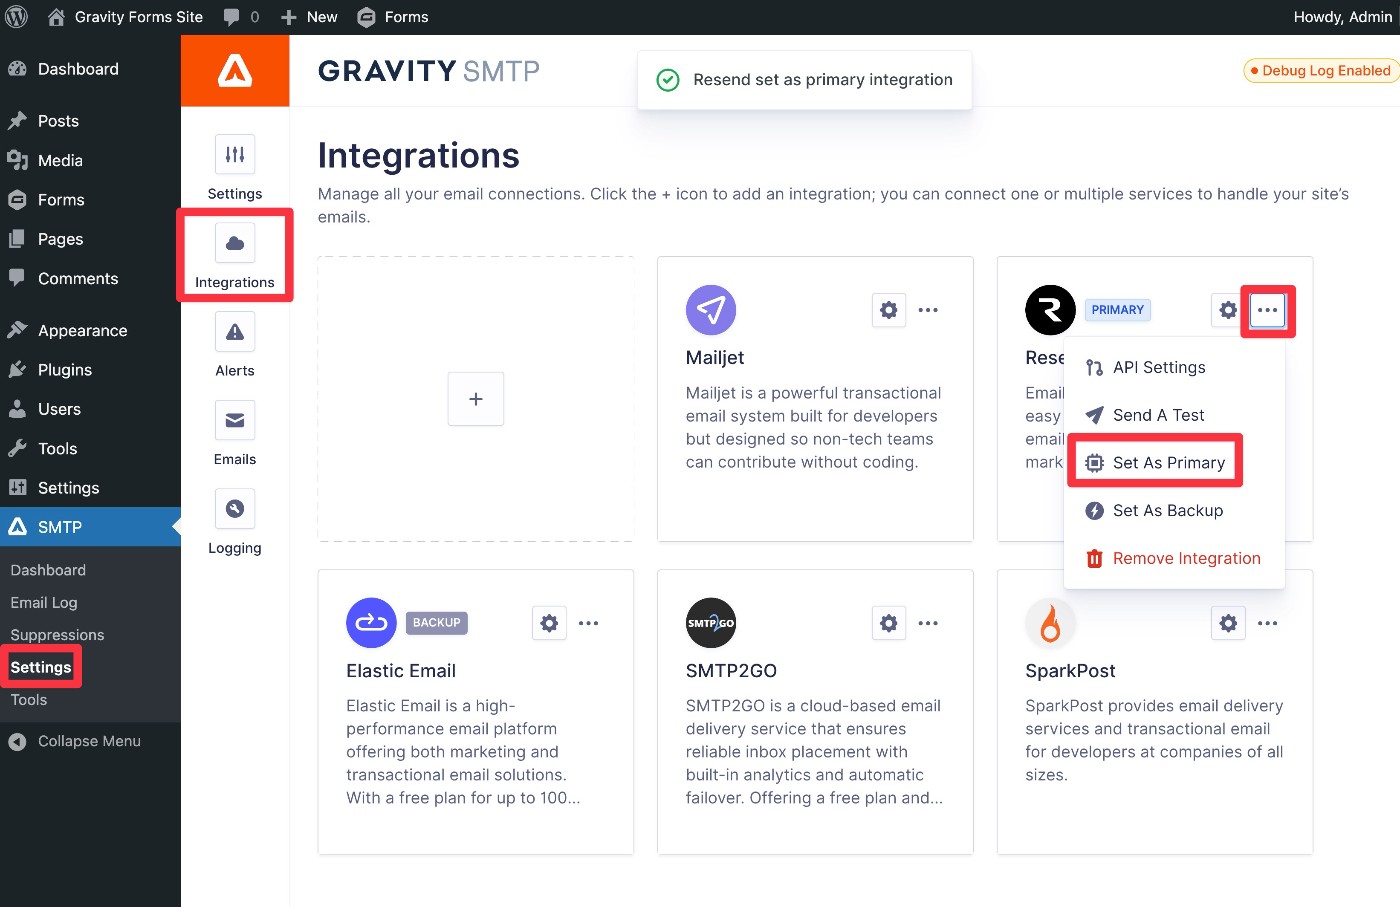
To finish enabling the connection, you need to set Resend as your site’s primary email sending service:
- Go to SMTP → Settings → Integrations (if you’re not already in the Integrations area).
- Click the three dots icon next to Resend.
- Choose Set As Primary in the drop-down menu that appears.
You should see a Primary label appear next to Resend, which indicates that it’s now your site’s active email sending service.
6. Send a test email
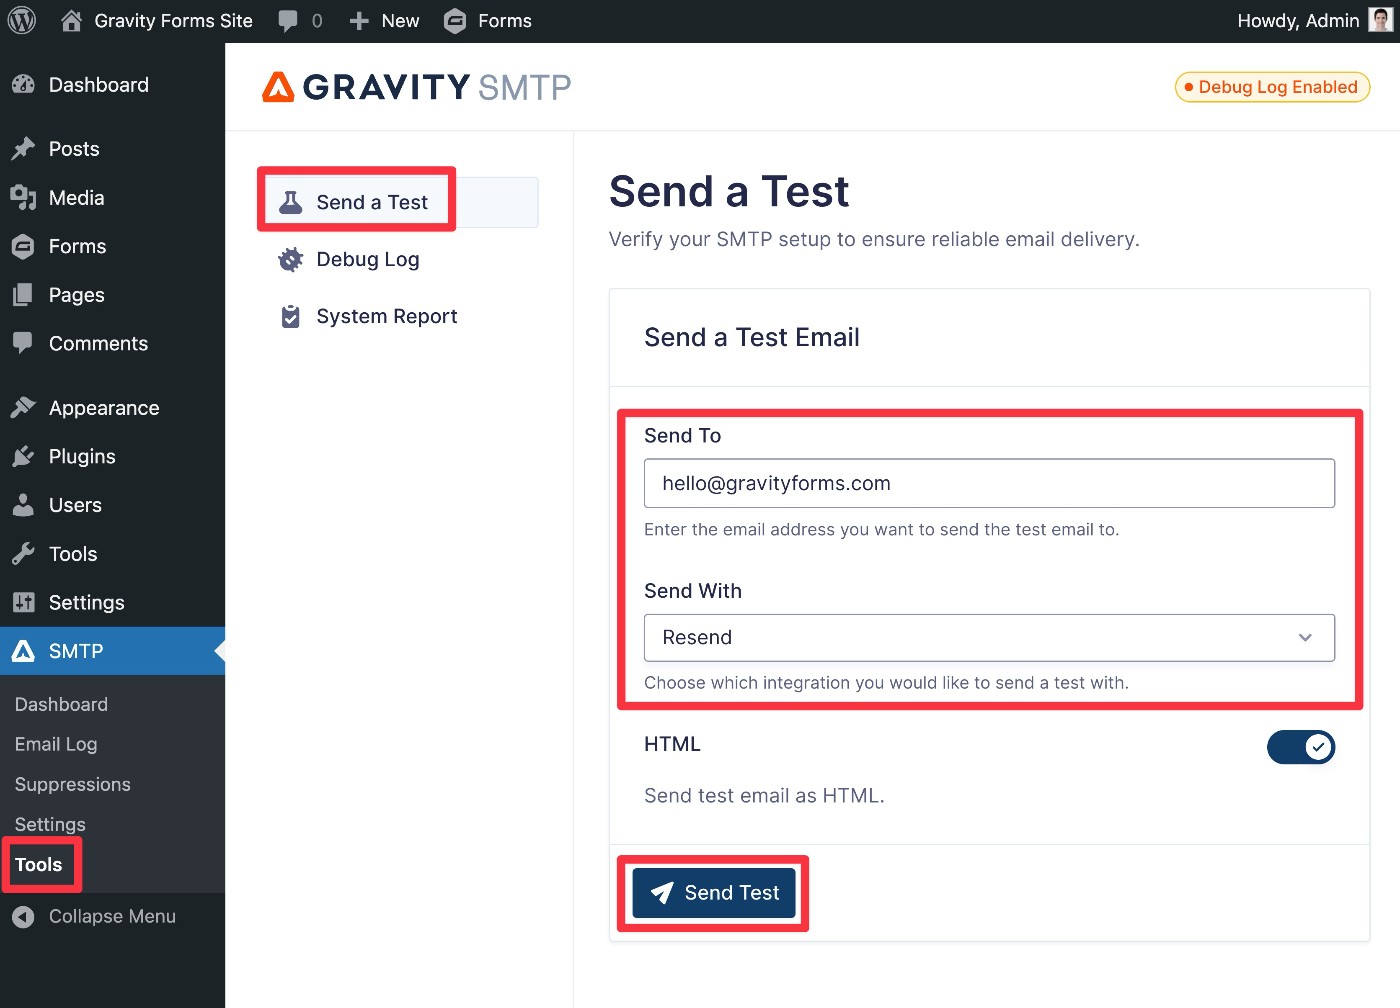
To make sure everything is working properly, Gravity SMTP includes a built-in tool that lets you send a test email to any email address:
- Go to SMTP → Tools in your WordPress dashboard.
- Select the Send a Test tab.
- Enter the email address to which you want to send a test email in the Send To box.
- Make sure that Resend is selected in the Send With drop-down.
- Click Send Test.
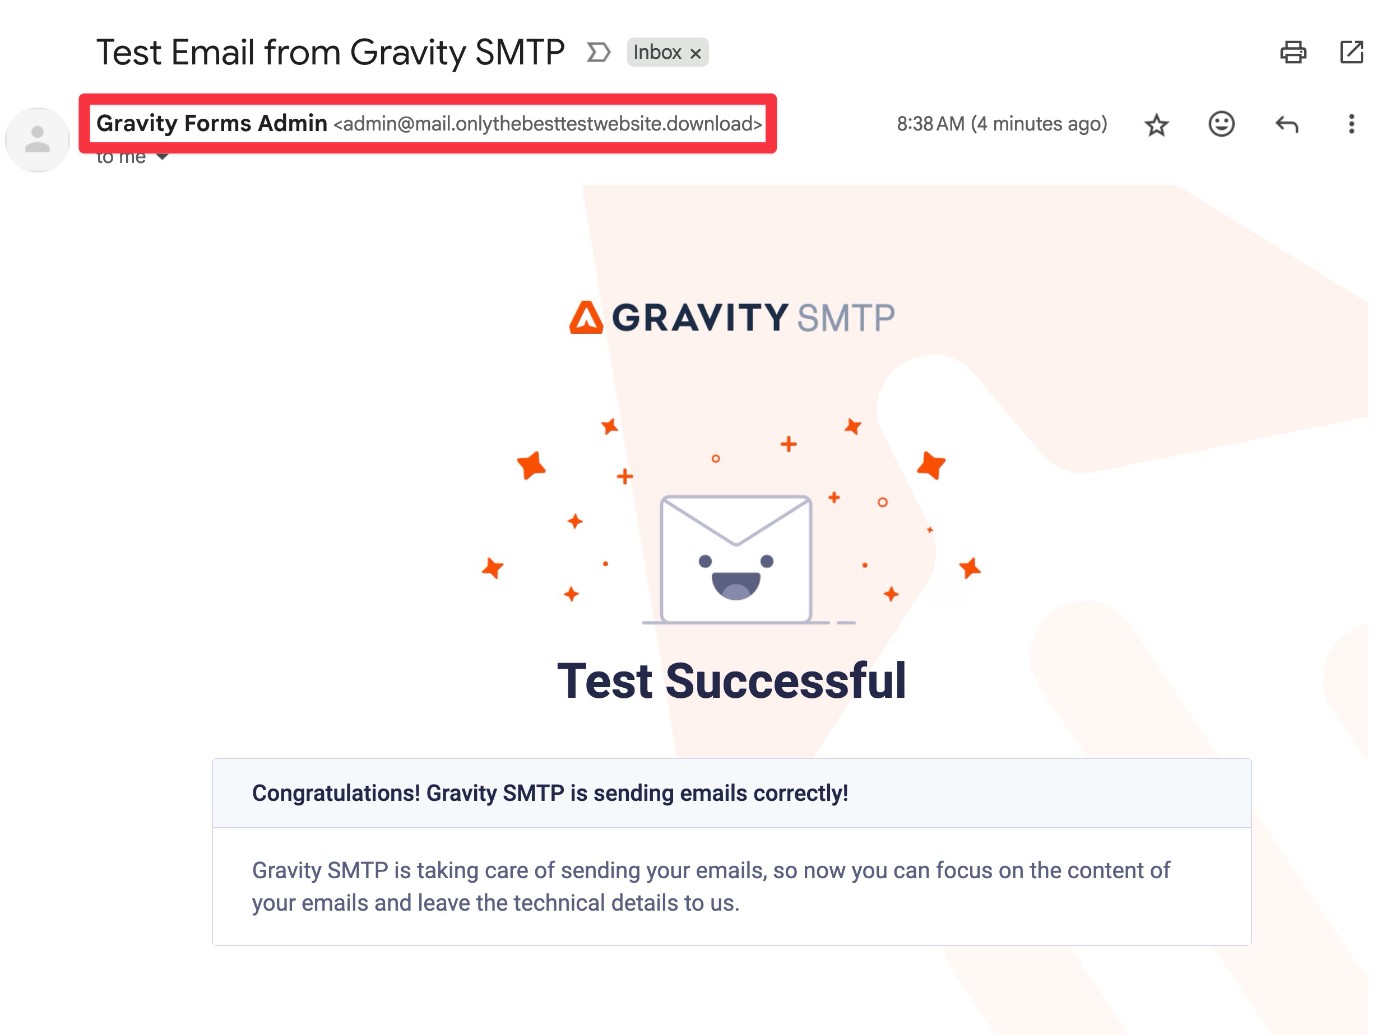
You should see a success message appear in the interface, and you should see an email in your inbox that looks like this:
If you see a failure message with an issue like {“statusCode”:403,”error”:”The example.com domain is not verified..}, here are some tips to diagnose the issue:
- Make sure that your From Email address uses the exact domain or subdomain that you authenticated with Resend.
- Try checking the option to Force From Email in the Resend integration settings of Gravity SMTP.
7. Set up a backup email sending service and alerts (optional)
This step is 100% optional.
However, another nice thing about using Gravity SMTP is that it also lets you set up a backup sending method in addition to Resend.
If an email ever fails to send via Resend (e.g. a billing issue or a technical issue at Resend), Gravity SMTP can automatically resend the email using the backup service.
Gravity SMTP also lets you set up real-time alerts via SMS or webhook so that you can know immediately if there’s ever an issue with your site’s emails.
For your own sites, these features can be really handy for peace of mind. And if you’re building/maintaining client websites, these features can help you keep your clients happy and avoid any issues with transactional emails on their sites.
Backup email sending service
If you want to set up a backup email sending service, you’ll first need to connect your site to that service, just like you did for Resend.
We have dedicated tutorials for the direct integrations that Gravity SMTP offers, but you can also leverage the Custom SMTP option if you want to use a different service:
- Amazon SES
- Brevo
- Elastic Email
- Emailit
- Gmail / Google Workspace
- Mailchimp Transactional
- MailerSend
- Mailgun
- Mailjet
- Outlook / Microsoft 365
- Postmark
- SendGrid
- SMTP2Go
- SparkPost
- Zoho Mail
- Custom SMTP
You can also find the integration documentation here.
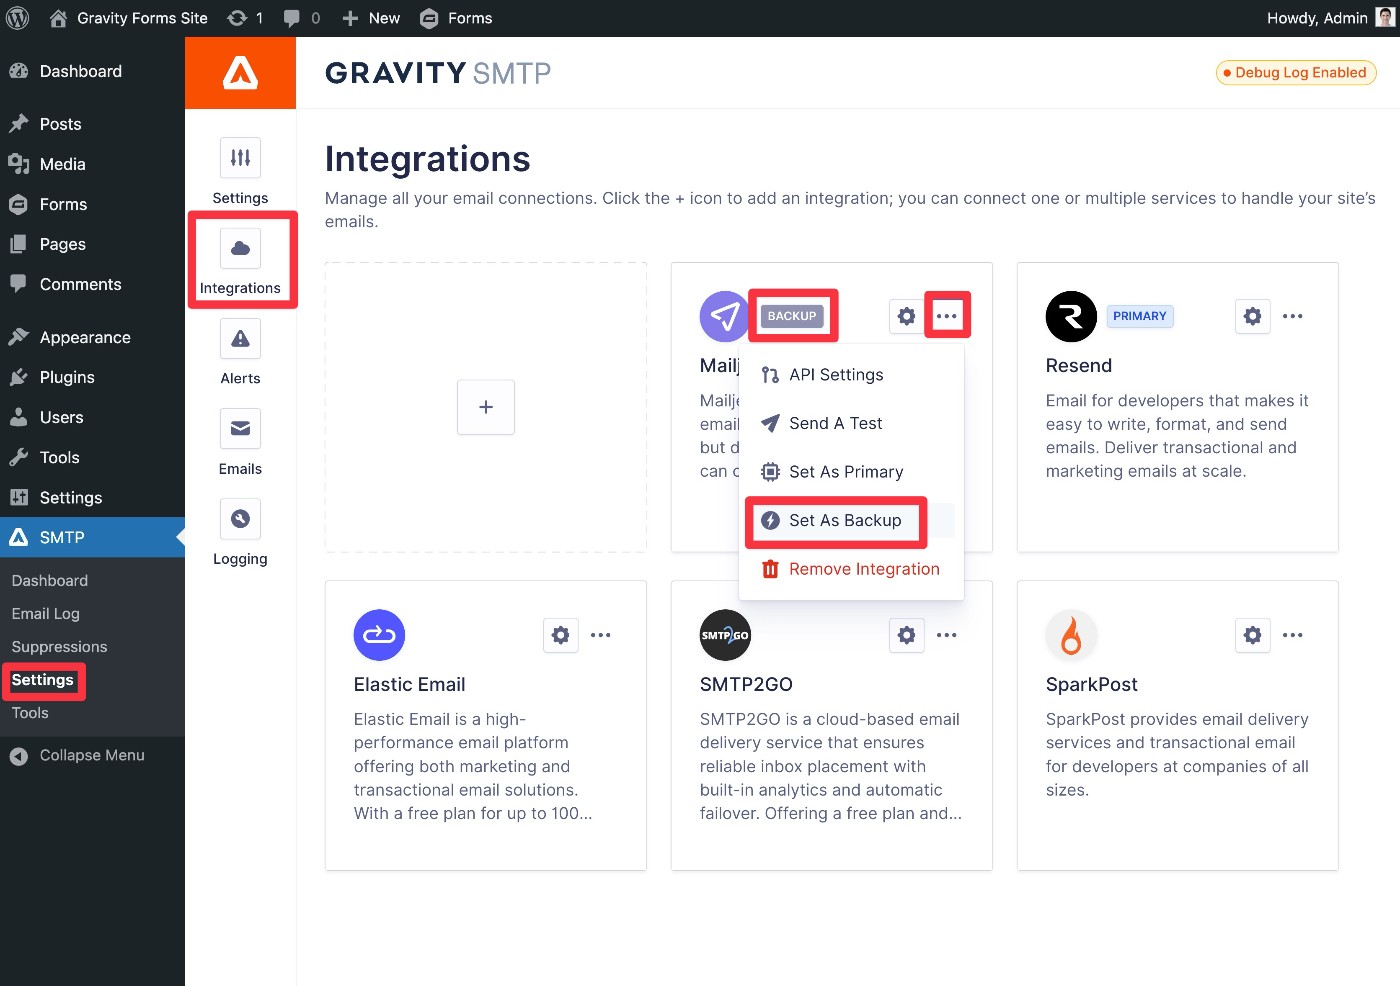
Once you’ve connected to the service, here’s how to set it as your site’s backup method:
- Open the Gravity SMTP Integrations area (SMTP → Settings → Integrations).
- Click the three dots icon next to the service.
- Choose Set as Backup from the drop-down.
- Verify that the Backup label appears next to the service.
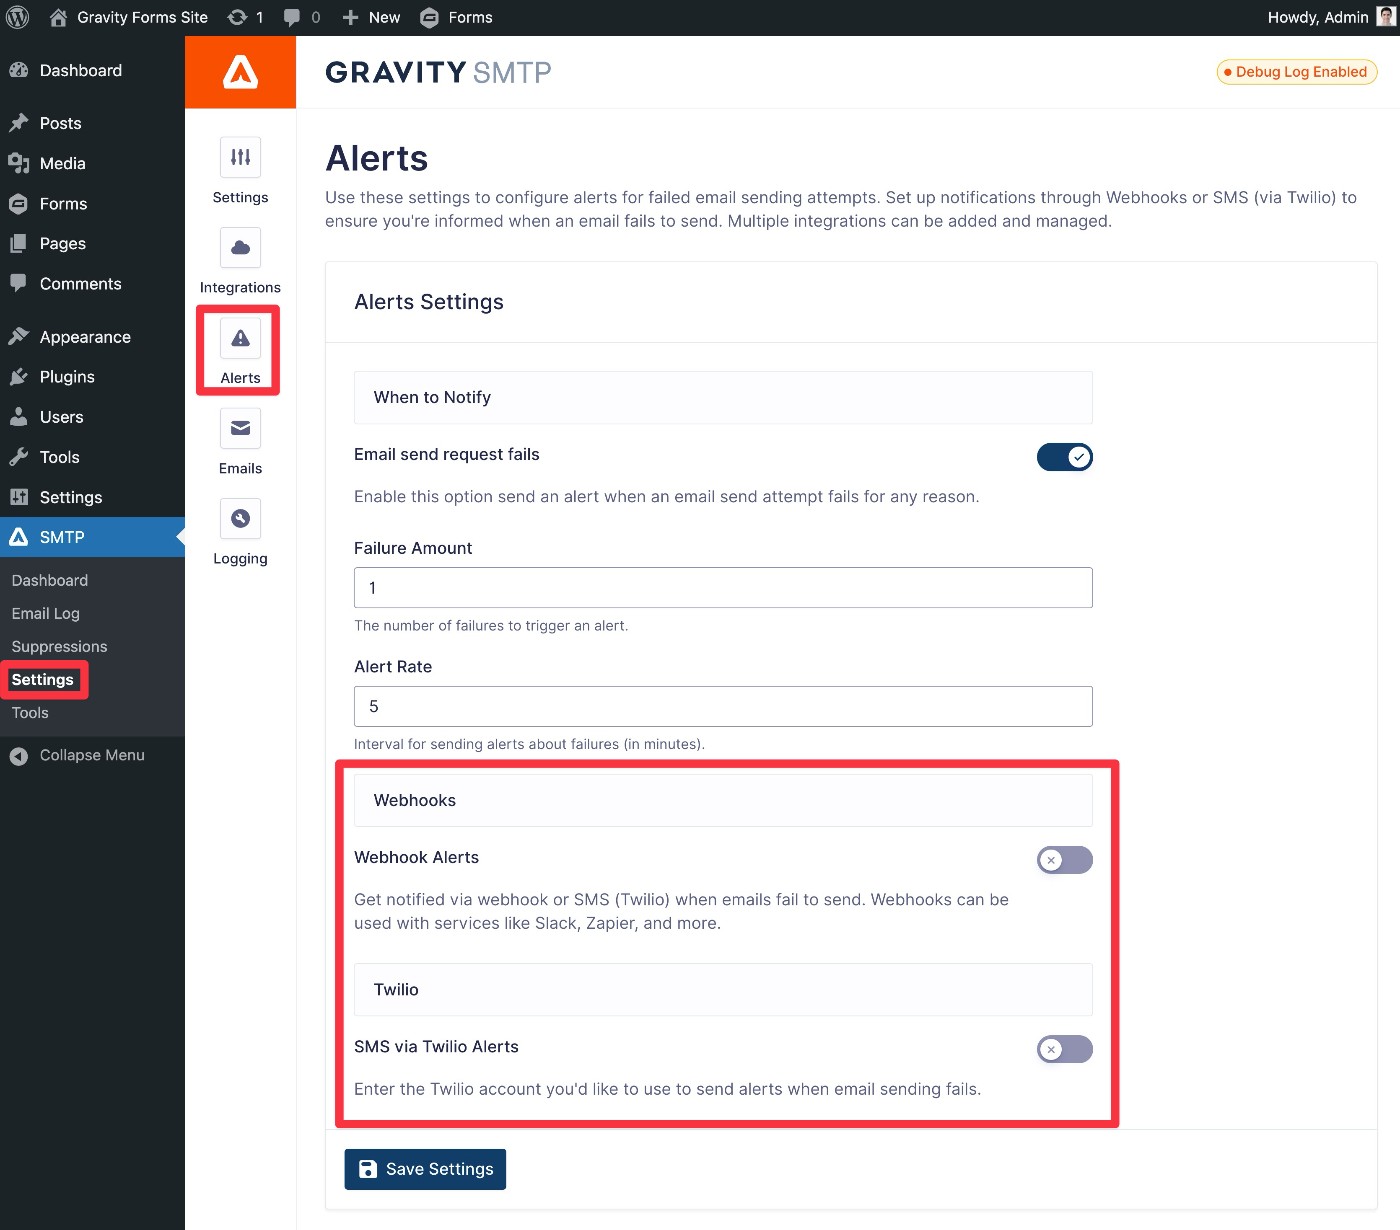
Real-time alerts
If you want to set up real-time alerts, Gravity SMTP currently supports two methods:
- Webhooks – This lets you send an alert to any service that can receive webhooks, such as receiving a Slack message.
- SMS – This lets you receive real-time text messages using Twilio.
You can set up alerts by going to SMTP → Settings → Alerts and the links above cover tutorials for both methods.
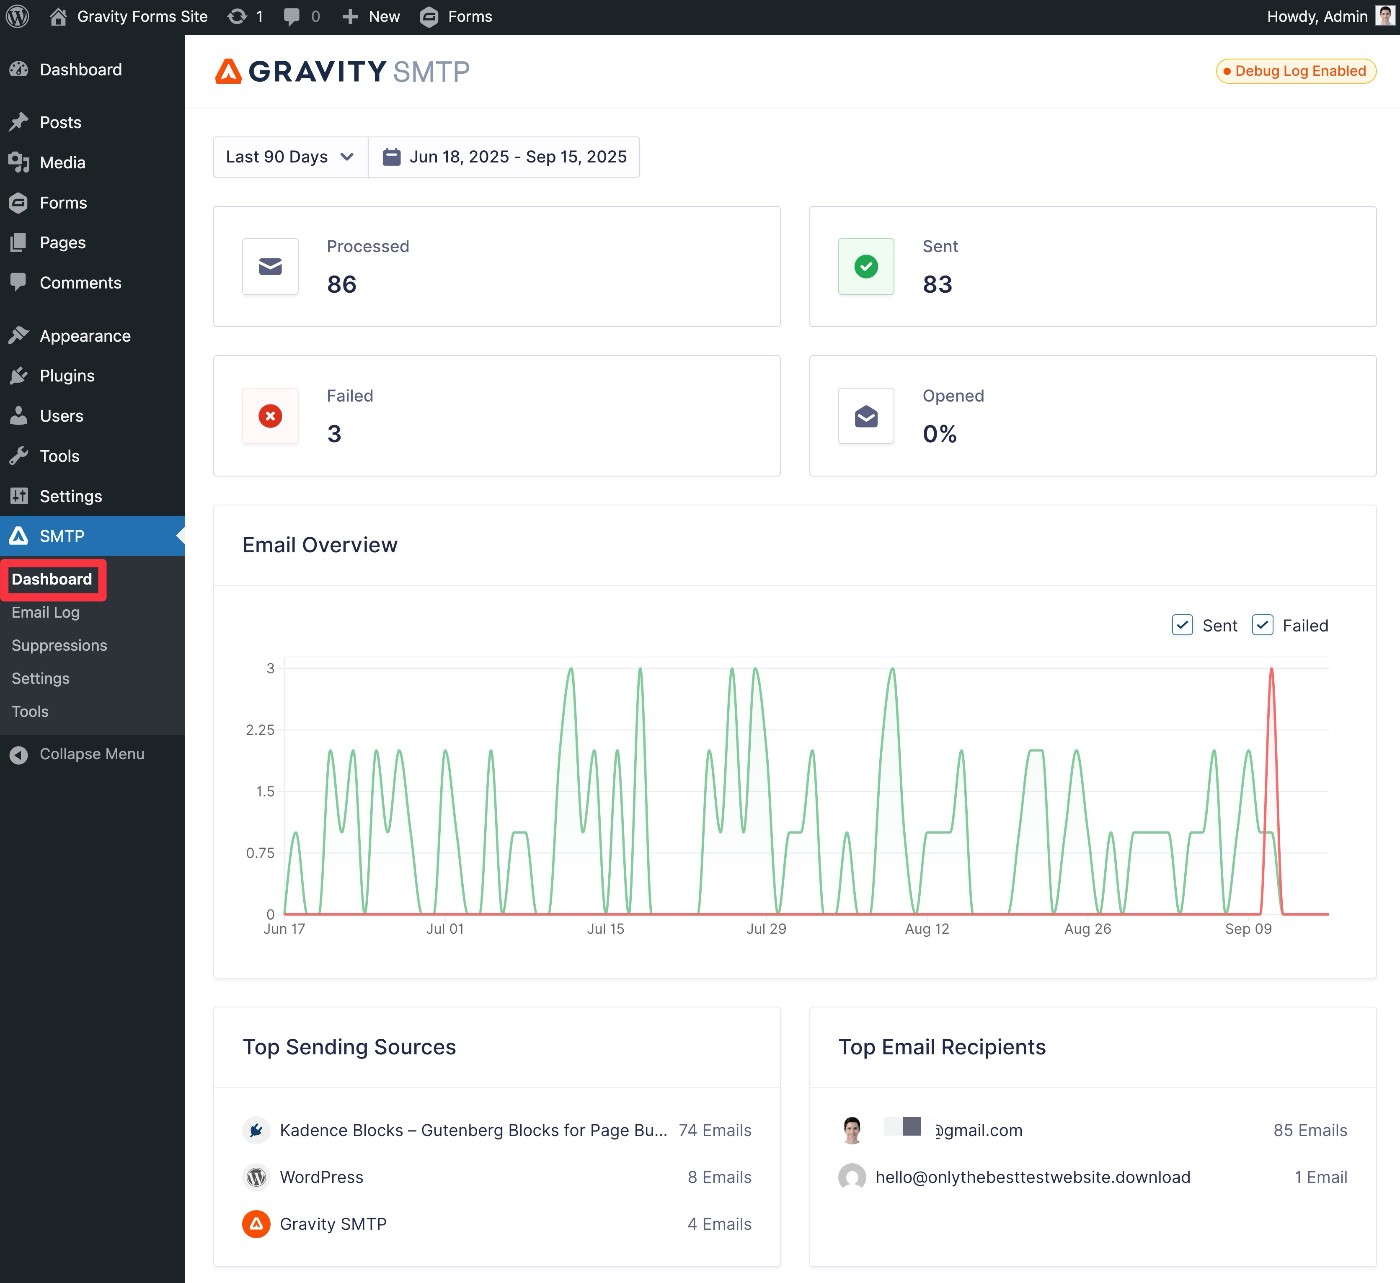
How to monitor your site’s email usage
Gravity SMTP also offers some tools to help you monitor and analyze your site’s transactional email usage.
If you go to SMTP → Dashboard, you can view high-level stats about your site’s emails, including the top sending sources (e.g. a certain plugin) and the top email recipients.
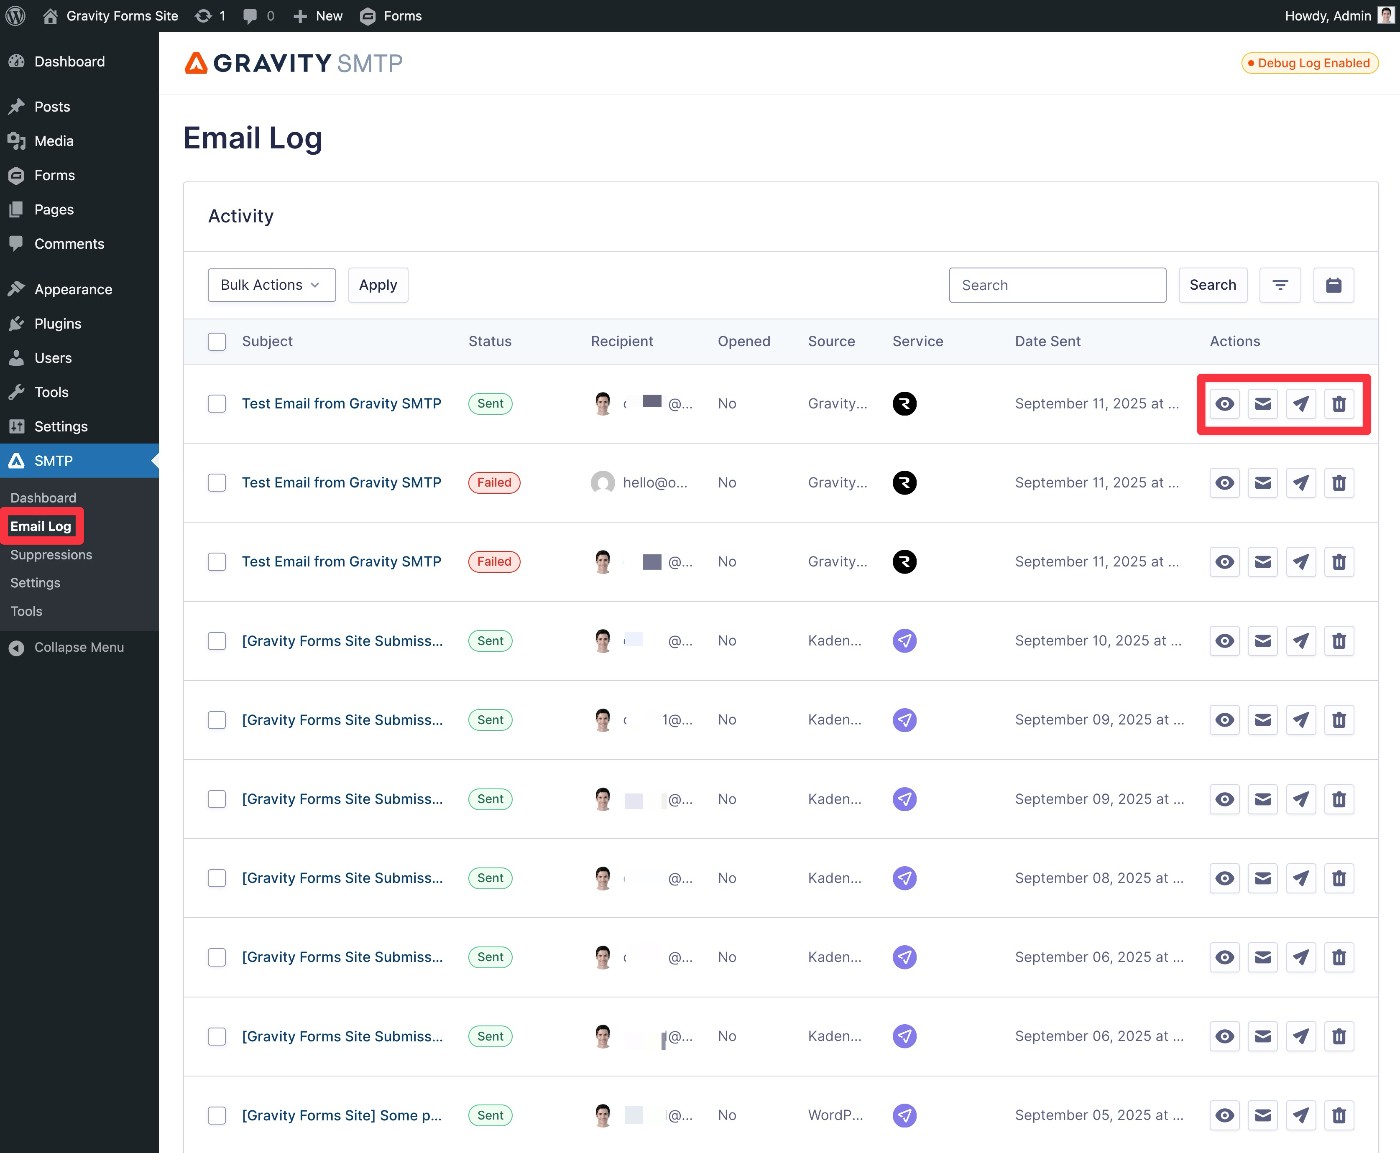
If you go to SMTP → Email Log, you can see a detailed log of individual emails. You can also use the buttons in the Actions column to access some useful abilities:
- See the technical information about each email.
- View the actual content and design of the email, including any attachments. You can also turn off content/attachment logging if you don’t want to store this information.
- Manually resend any email.
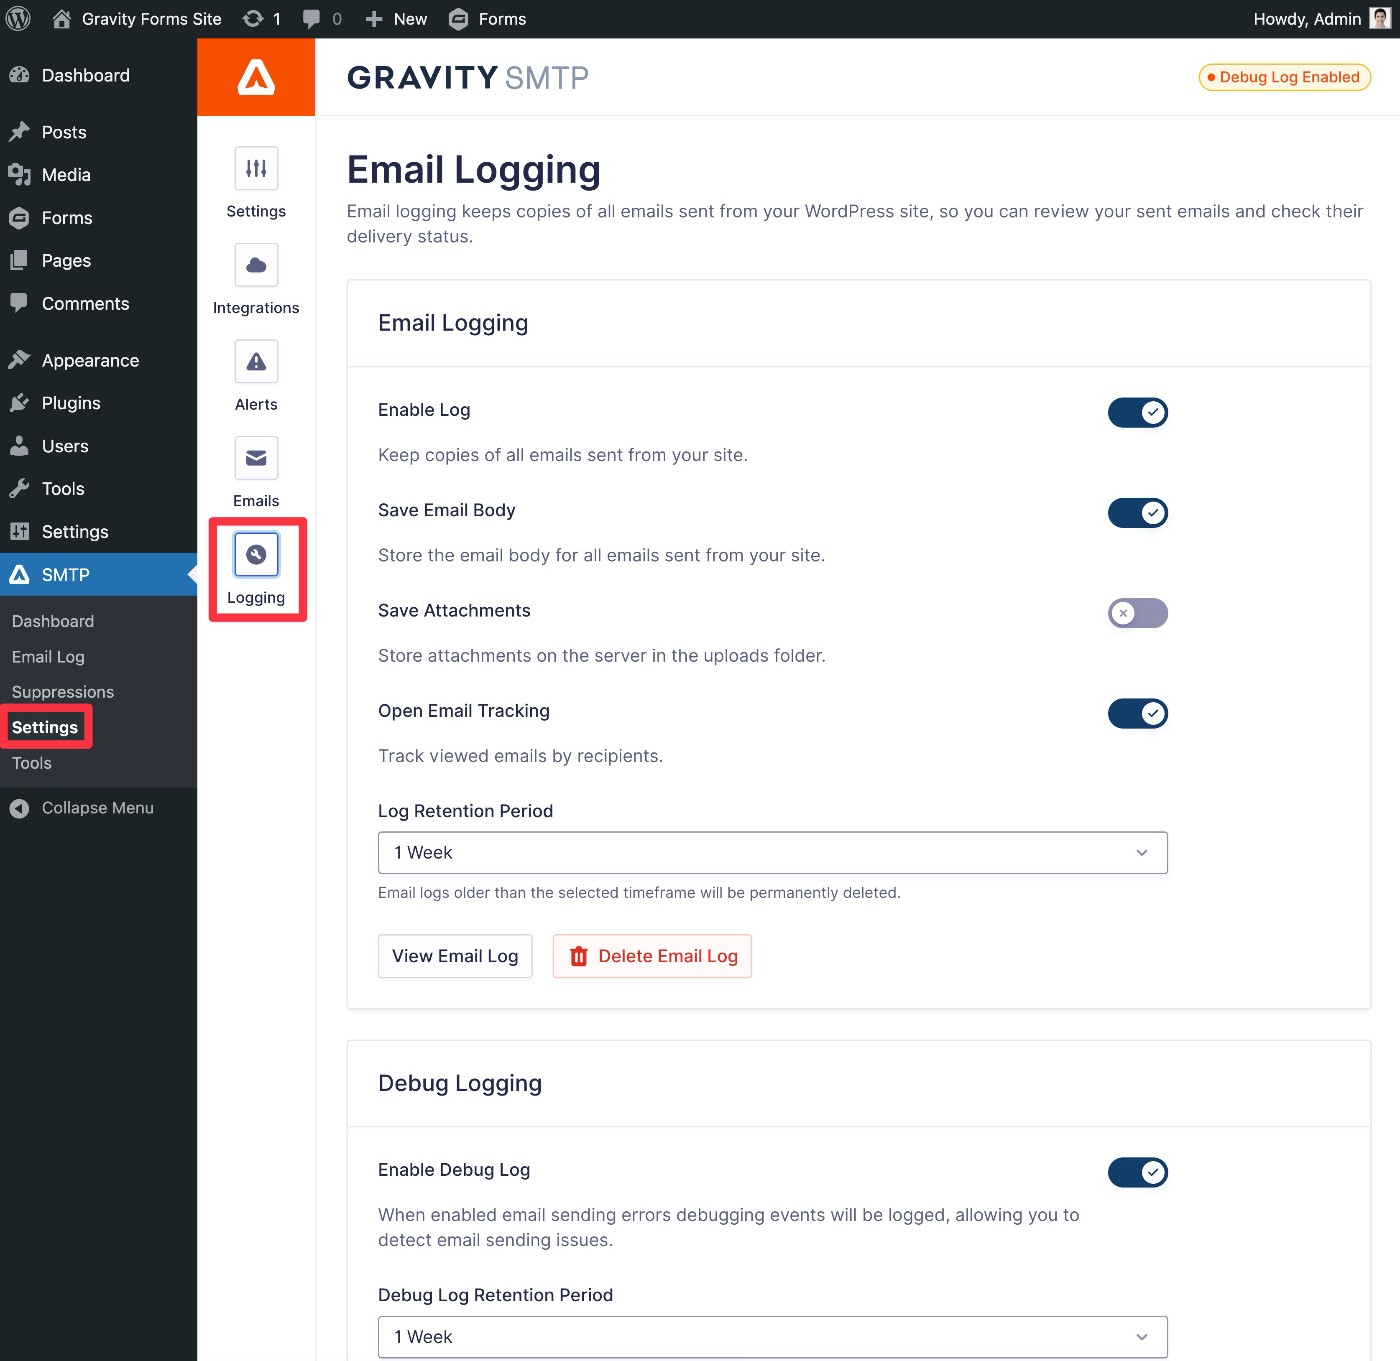
To adjust email logging behavior, you can go to SMTP → Settings → Logging.
Get started with WordPress Resend today
Whether you’re working on your own website or client websites, Resend offers an easy and cost-effective solution for sending WordPress transactional emails.
With the Gravity SMTP plugin, you can easily connect WordPress to Resend, while also accessing other helpful features such as backup sending services, real-time alerts, open tracking, email logging, and more.
If you’re ready to get started, download Gravity SMTP today and follow this guide to start sending WordPress transactional emails with Resend.

If you want to keep up-to-date with what’s happening on the blog sign up for the Gravity Forms newsletter!
"*" indicates required fields


