Searching for a way to send SMS text message notifications for your WordPress forms?
With Gravity Forms and the official Gravity Forms Twilio Add-On, you can send SMS messages to any phone number after a form submission – that could be the admin, the form submitter, or anyone else.
You can fully customize the SMS content (including using merge tags to insert dynamic information) and also automatically shorten URLs using a Bitly integration.
Best of all, you do not need Zapier to set this up as some other WordPress form plugins require, which can help you simplify your tech stack and save a lot of money when sending your text message form notifications.
In this post, we’ll introduce you to the Gravity Forms Twilio Add-On and some potential use cases. Then, we’ll share a step-by-step tutorial for how to send your first text message form notification.
Key takeaways
- The Gravity Forms Twilio Add-On enables customizable SMS notifications without needing third-party tools like Zapier.
- Use SMS for instant admin alerts, user confirmations, access codes, app links, and booking notifications.
- Notifications can be triggered based on form inputs, making them perfect for multi-provider bookings, opt-in confirmations, and segmented messaging.
- Twilio’s pay-as-you-go pricing (~$2 for 250 texts/month) makes it affordable for small businesses, events, and online services.
- Enhance SMS campaigns with Bitly link shortening and automate delivery using Gravity Flow workflows.
Example Use Cases for SMS Form Notifications
There are a lot of different situations in which you might want to send WordPress text message form notifications:
- Instant admin notifications – if it’s important that you know about new form entries ASAP, you can send yourself SMS notifications in addition to (or instead of) email notifications.
- User confirmations – you can send users SMS confirmations, which is great for payments, event registrations, bookings, webinars, and lots of other use cases.
- New booking notifications for service providers – if you have a booking form for multiple service providers (e.g. different personal trainers at your gym), you could use conditional logic to send an SMS notification to the specific service provider that the customer chose to let the provider know about the new booking.
- App download links – you could text users the link to download your mobile app. For example, this can be great for membership sites, online courses, social communities, and more – you could text users the download link right after they register.
- Access codes – you could text users an access code that they can use to gain access to a physical event.
This is by no means a complete list – it’s just to give you some ideas and get your creative juices flowing.
How Does the Gravity Forms Twilio Add-On Work?

With the Gravity Forms Twilio Add-On, you can send SMS messages to any phone number using the Twilio service.
As part of Twilio’s service, you’ll get your own dedicated phone number from which you can text users.
Twilio is a paid service, but it offers affordable pay-as-you-go pricing that should be quite cheap for most use cases.
For example, sending text messages to US-based numbers costs just $0.0079 per message. If you needed to send 250 messages per month, your monthly bill would only be around ~$2.
Note: Pricing varies by country, number type, and volume. Please check with Twilio for pricing for your specific use case.
Again, Gravity Forms integrates directly with Twilio and does not require you to use Zapier like some other form plugins. This means that there’s no need to pay extra just for a connector service – you’ll only need to pay for your actual SMS usage on Twilio.
Once you set up the add-on, you can create unlimited Twilio feeds for each form to send as many different SMS notifications as needed.
For each feed, you can specify the following:
- From number – this will usually be your dedicated Twilio number.
- To number – this can be pulled from the Phone field in your form, your Twilio numbers, or you can enter a custom number.
- Message – you can fully customize the message text, including using merge tags to insert dynamic information. You can also automatically shorten links using Bitly.
You can also use conditional logic to control when to send the message. For example:
- You could only send the message if a user opts in to receive SMS notifications.
- You could send different SMS notifications based on how the user filled out the form.
How to Send SMS Form Notifications on WordPress
Now that you have some background context, let’s get into the step-by-step guide for how to send WordPress SMS form notifications for the forms that you create with Gravity Forms.
To set up this functionality, you’ll need a minimum of three elements:
- The core Gravity Forms plugin
- The official Gravity Forms Twilio Add-On – it’s available on the Pro or Elite licenses, so you’ll want to purchase one of those licenses to get started. If you’re already using the Basic license plan, you can upgrade to Pro and only pay the prorated difference between the plans.
- A Twilio account – you can create an account and test things for free (no credit card needed). But for long-term usage, you will need to pay (but again, it’s quite affordable).
Let’s go through how to set up everything…
1. Create Your Twilio Account
To get started, you’ll need to register for a Twilio account.
During the setup process, Twilio will ask you a few questions. If applicable, you’ll want to indicate that you want to use the SMS functionality in Twilio.
After signing in to your Twilio account for the first time, Twilio will also present a few other steps. For example, you’ll need to set up a virtual phone number to send and receive texts, which Twilio lets you do for free.
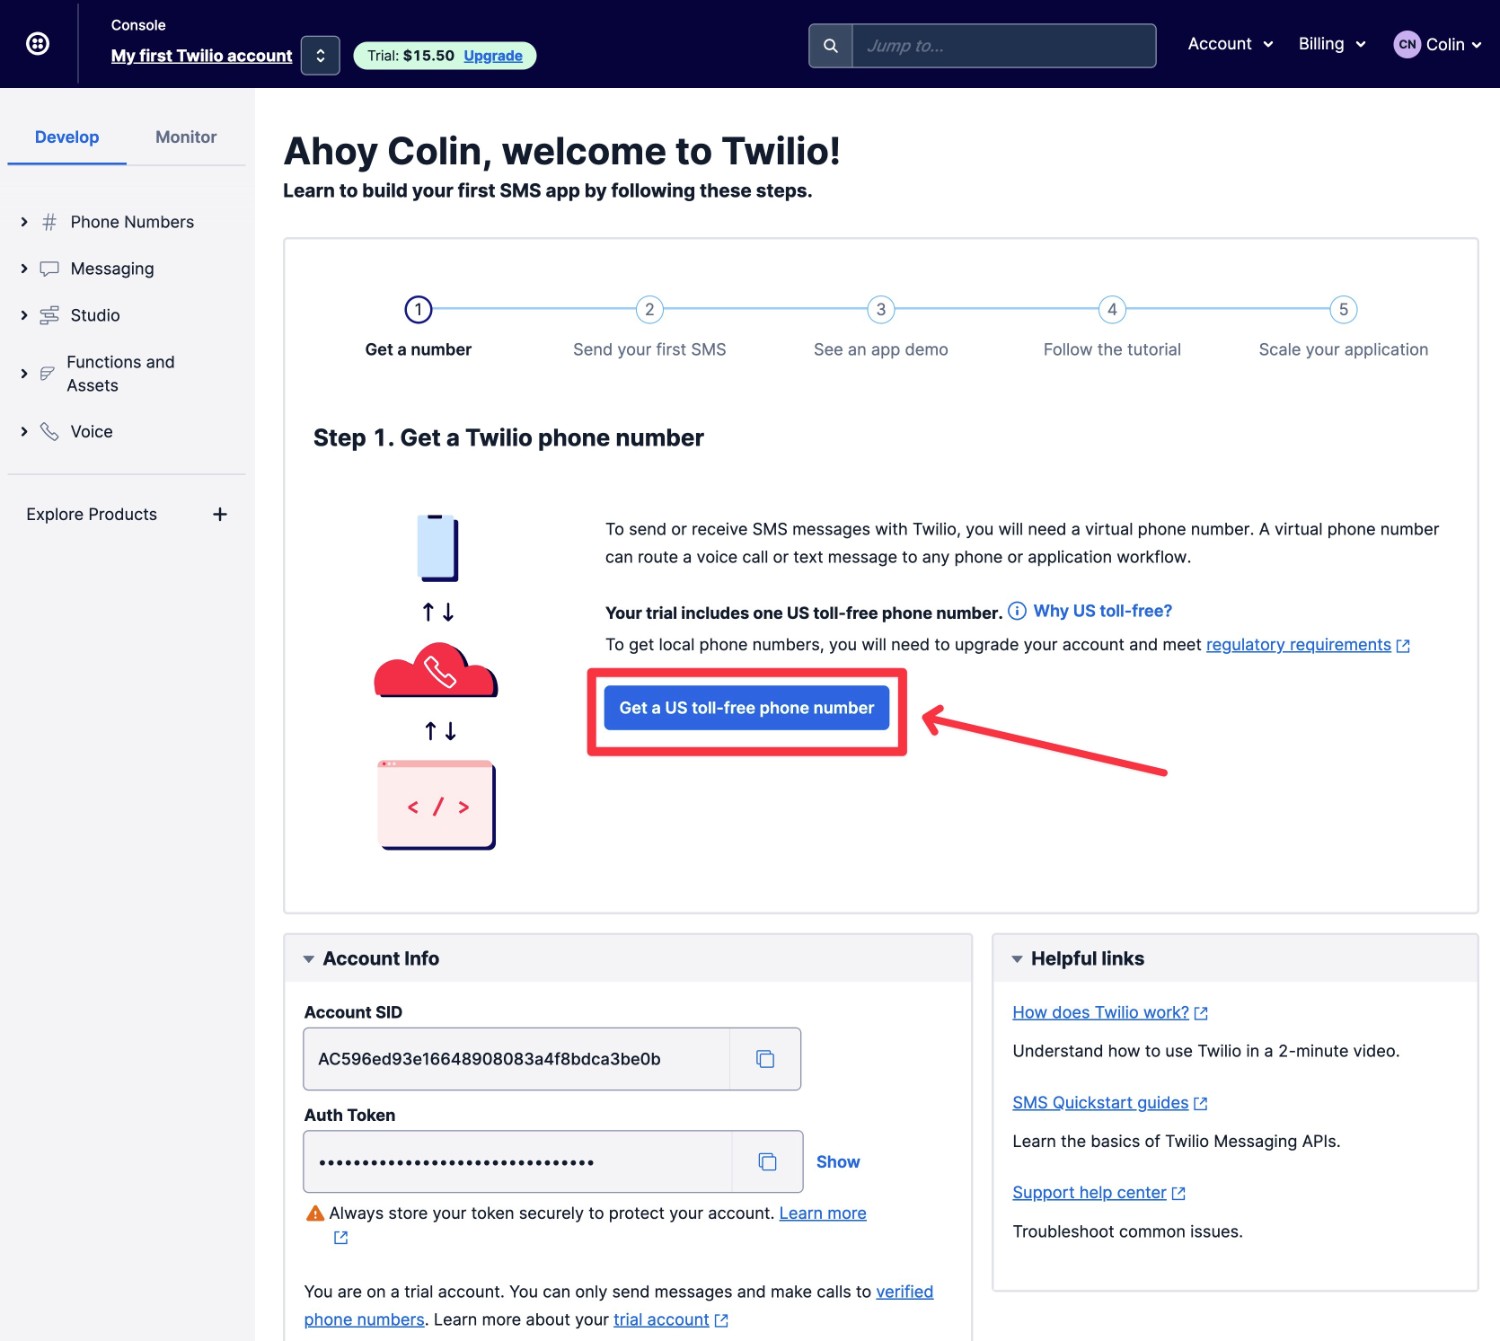
Once you have your phone number, you’re ready to advance.
2. Access Your Twilio API Key
Next, you’ll need to access your Twilio API keys from the Twilio interface.
From there, you’ll be able to do everything else from your WordPress dashboard.
Here’s how to access the API keys:
- Expand the Account menu in the top-right corner of the Twilio dashboard.
- Select API keys & tokens from the submenu.
- Look for the Live credentials and Test credentials under Auth Tokens.
You’ll need to add four pieces of information to the Gravity Forms settings:
- Account SID
- Auth token
- Test Account SID
- Test Auth token
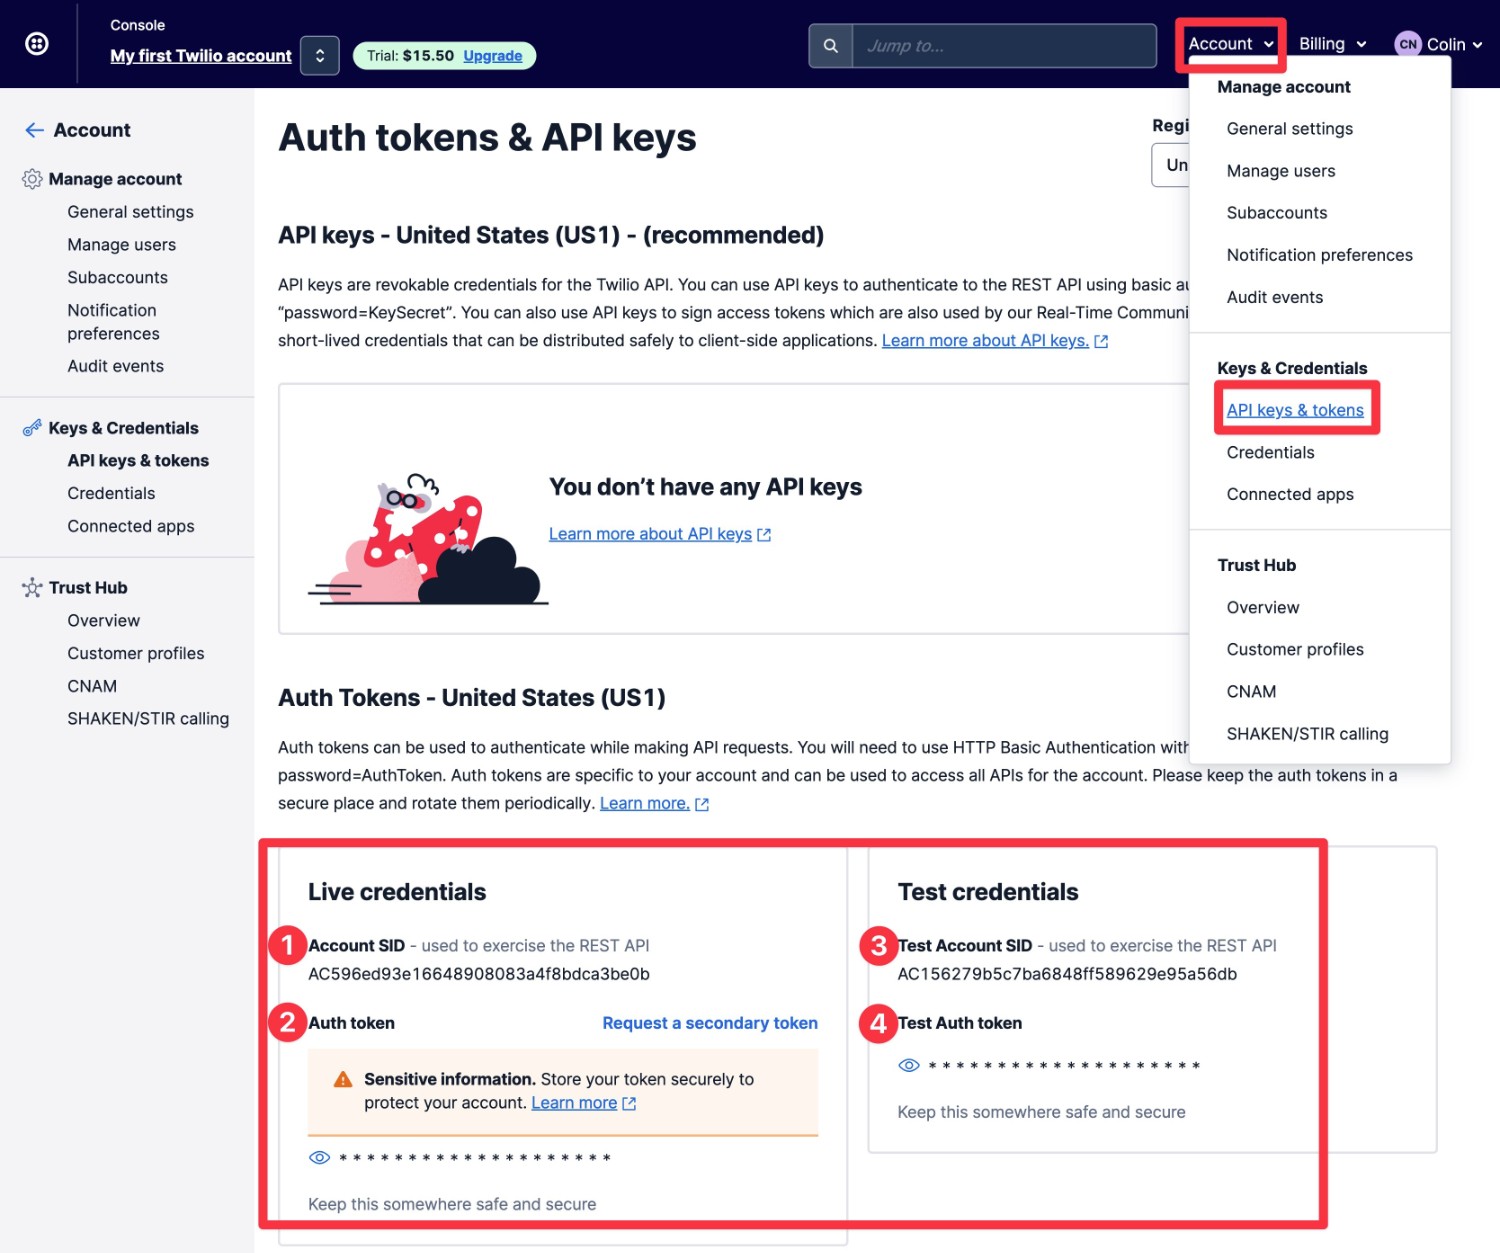
Keep this interface handy because you’ll need to paste these values to Gravity Forms in the next step.
3. Add Twilio API Key to Gravity Forms Settings
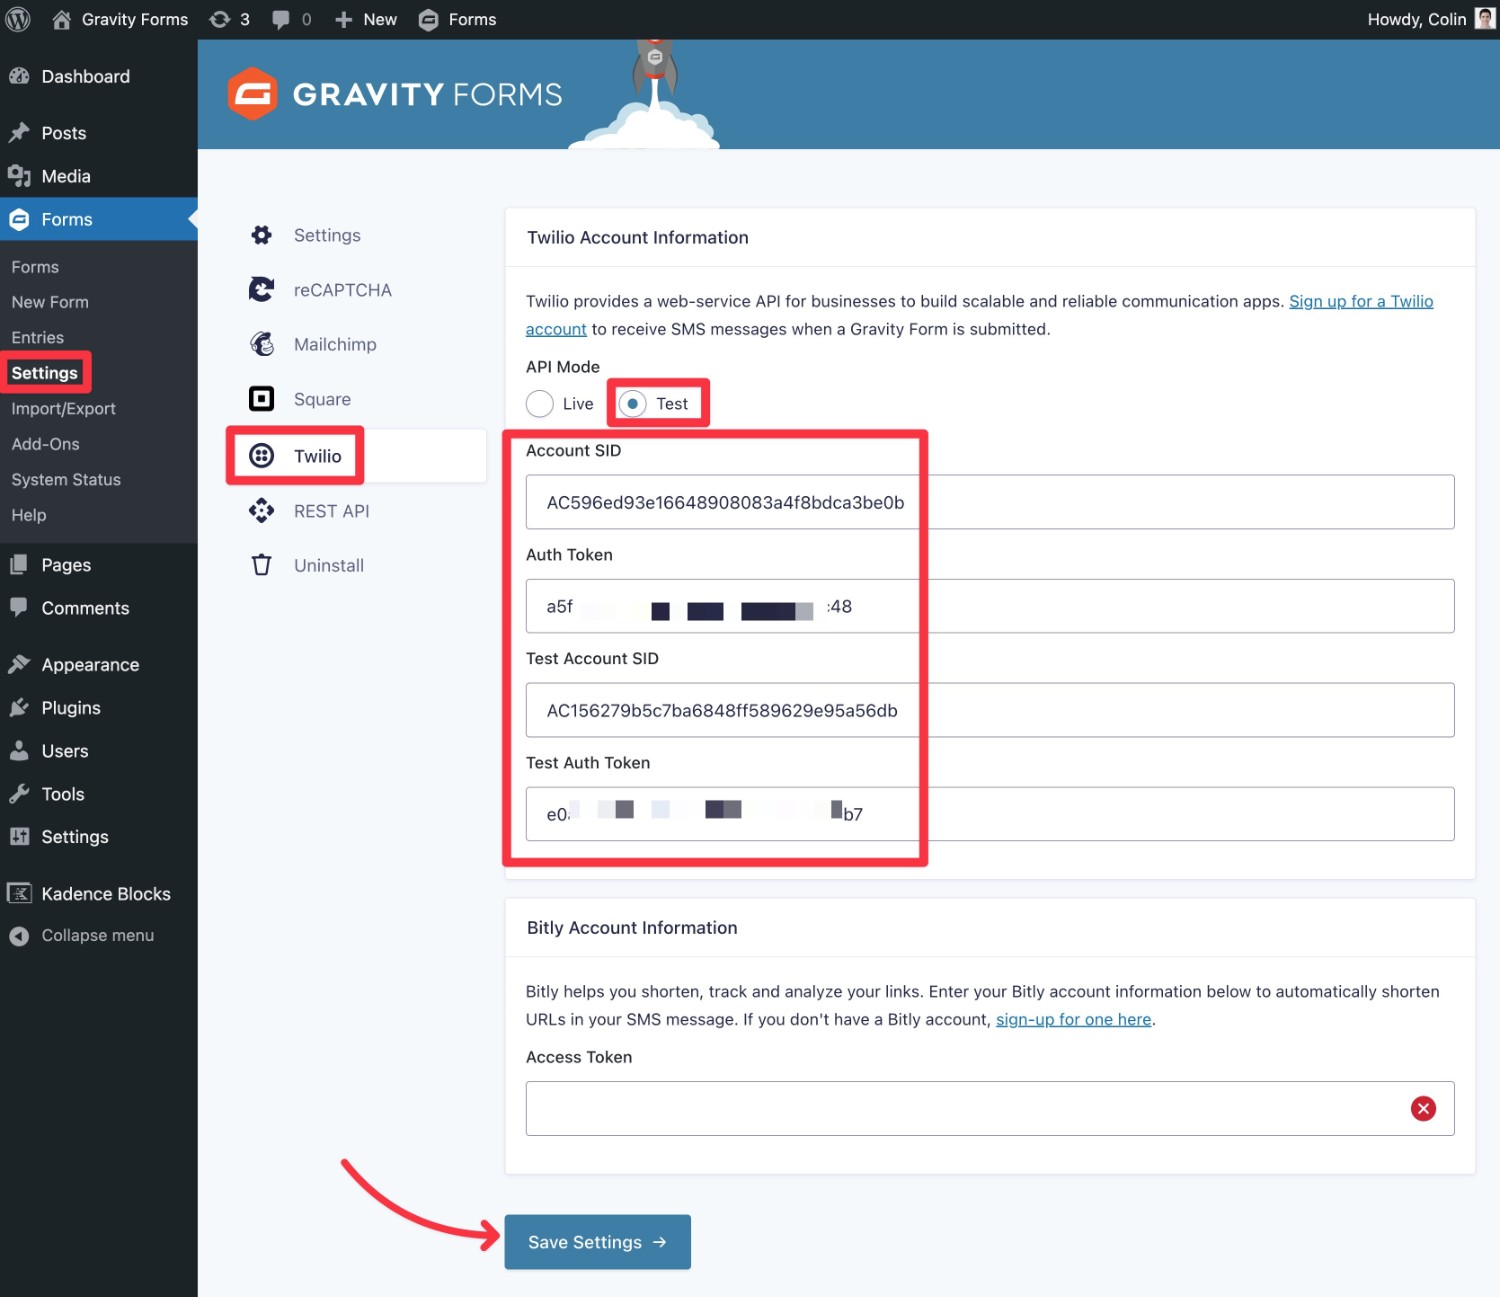
Next, you’ll need to add the Twilio API key to the settings area in Gravity Forms:
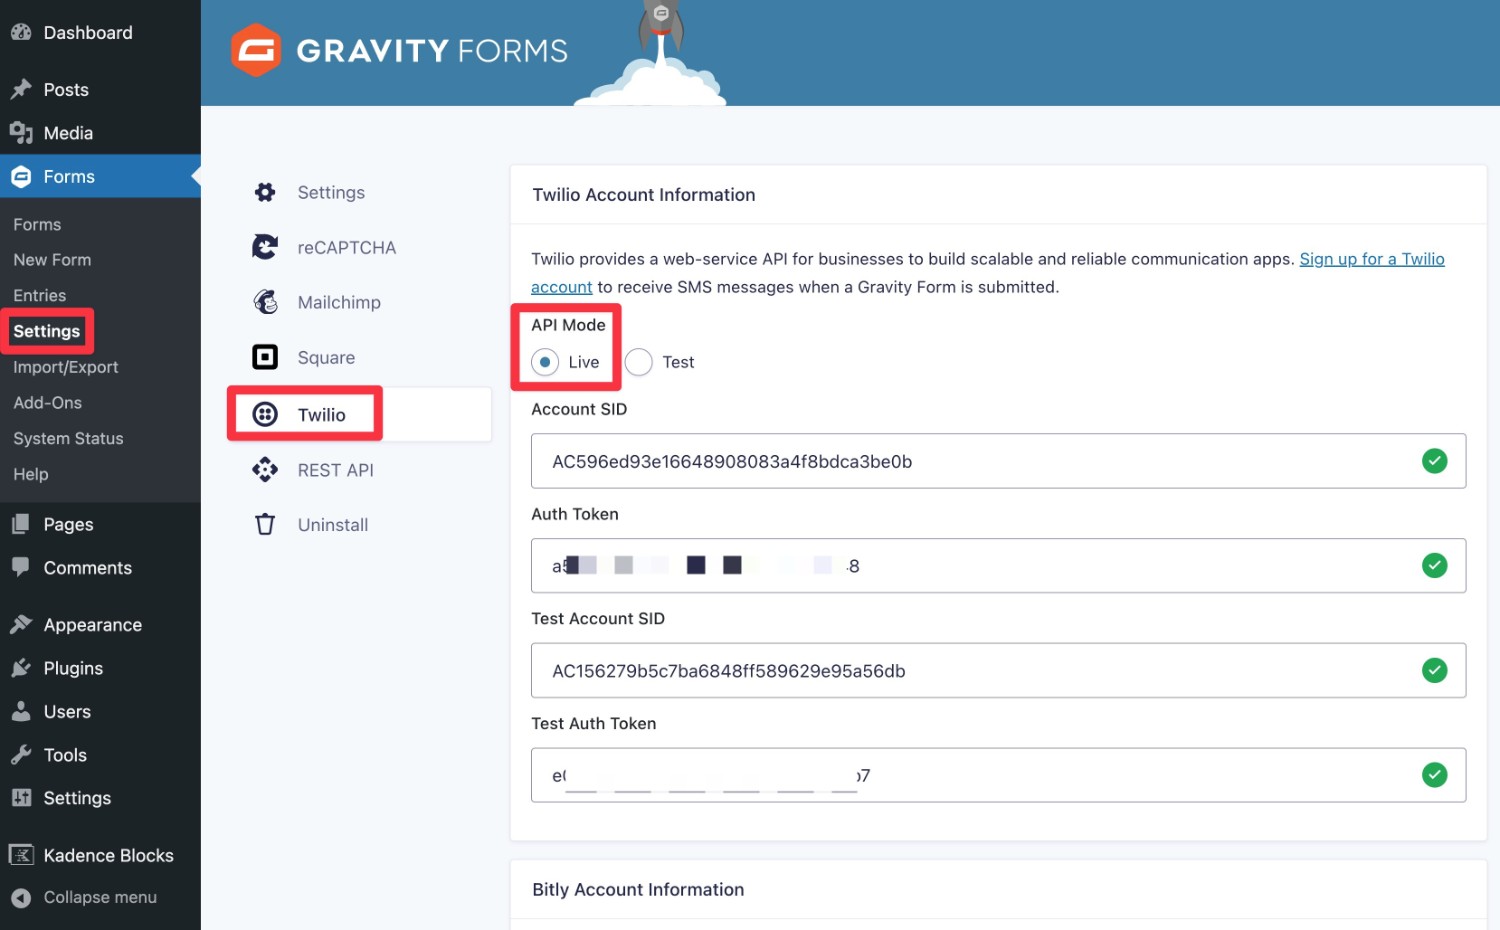
- Open your WordPress dashboard.
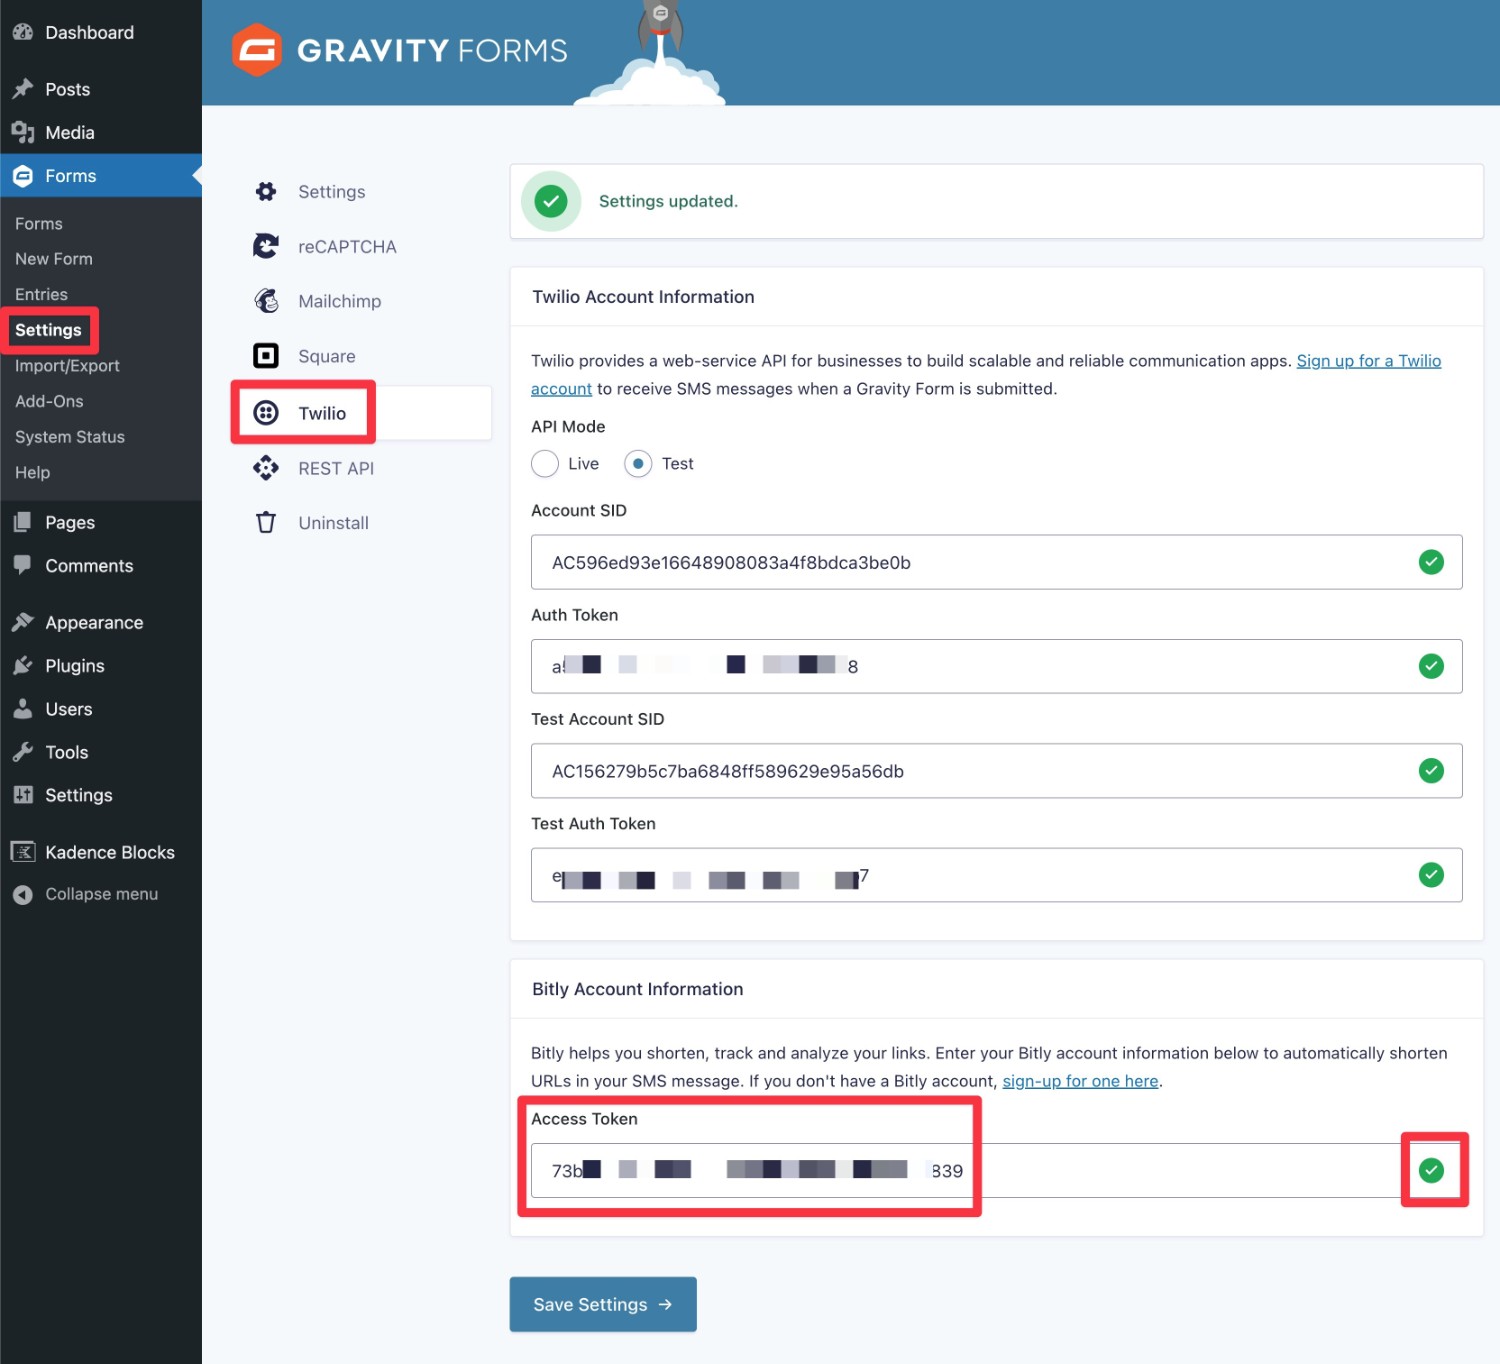
- Go to Forms → Settings → Twilio. If you don’t see the Twilio option in the Gravity Forms settings area, make sure that you’ve installed and activated the Twilio Add-On.
- Select Test under the API Mode. This will start things off in test mode while you’re setting up the functionality. You can also choose Live if you want to go straight to sending real text messages.
- Paste in the four values from the Twilio dashboard (from the previous step).
- Leave the Bitly Account Information section blank for now – we’ll talk about how to set this up later on if you want to use this feature.
- Click Save Settings.
If you entered the correct Twilio credentials, you should see a green checkmark appear next to each credential after clicking Save Settings.
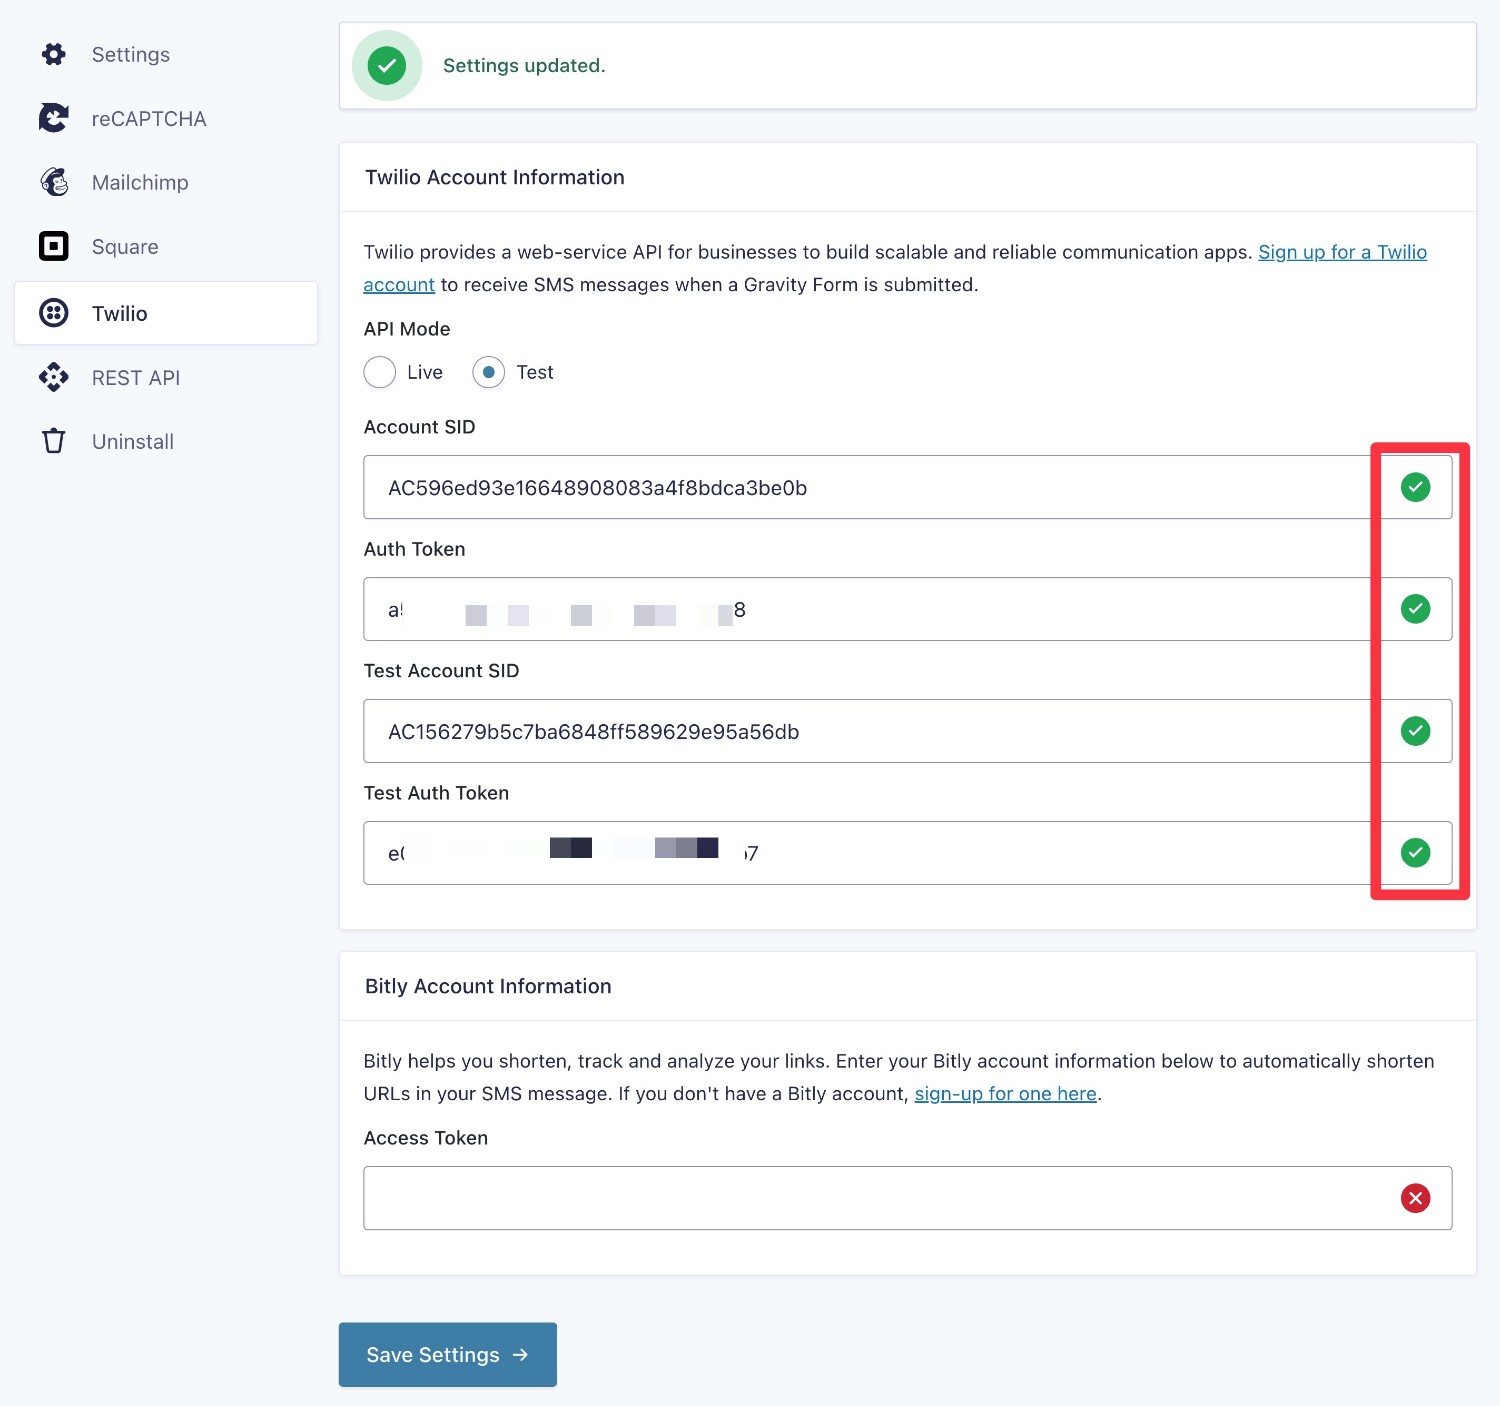
This checkmark means that Gravity Forms was able to successfully connect to the Twilio service.
4. Set Up Your Form
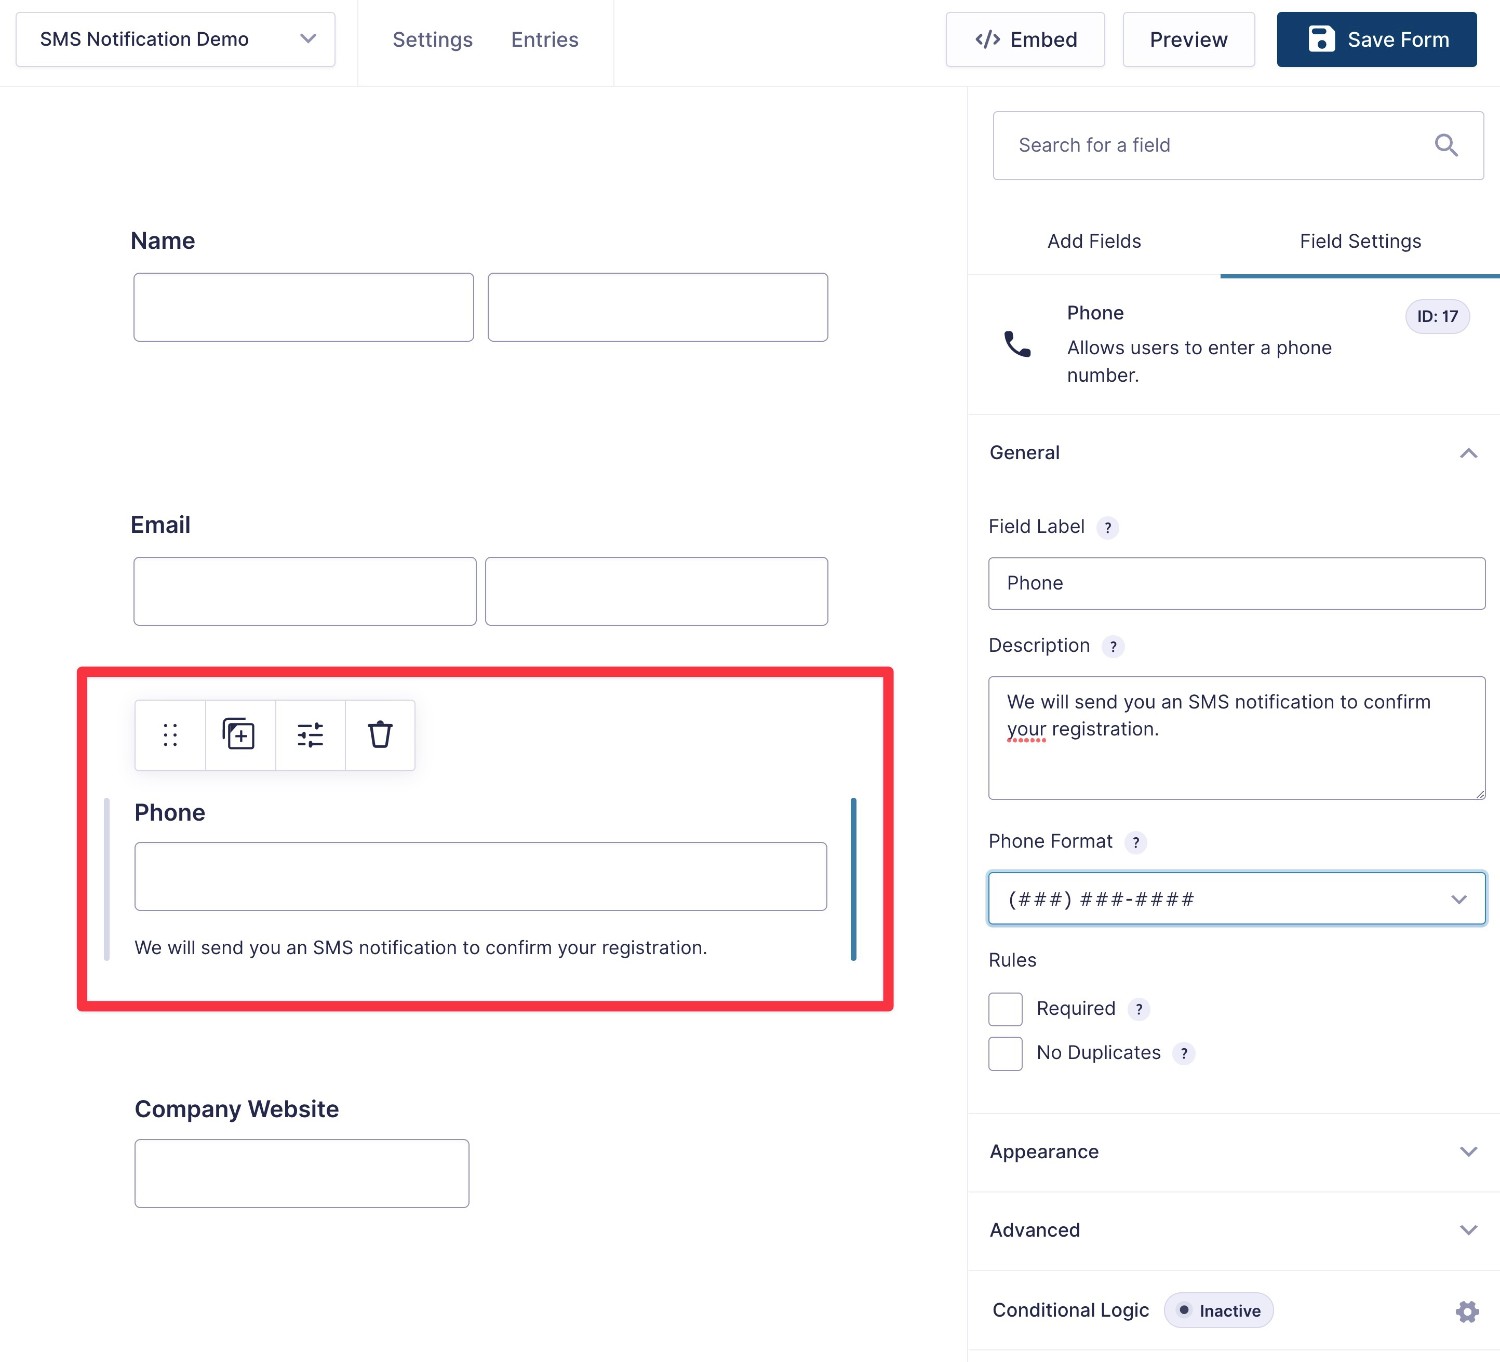
Next, open the editor for the form to which you want to add SMS notifications.
You can set up the form however you want. But if you want to send SMS notifications to form submitters, you’ll want to add a Phone field so that you have their phone numbers.
On the other hand, if you only want to send SMS notifications to site admins, you don’t need to collect a user’s phone number (unless you need it for other reasons, of course).
5. Create Twilio Feed for Your Form
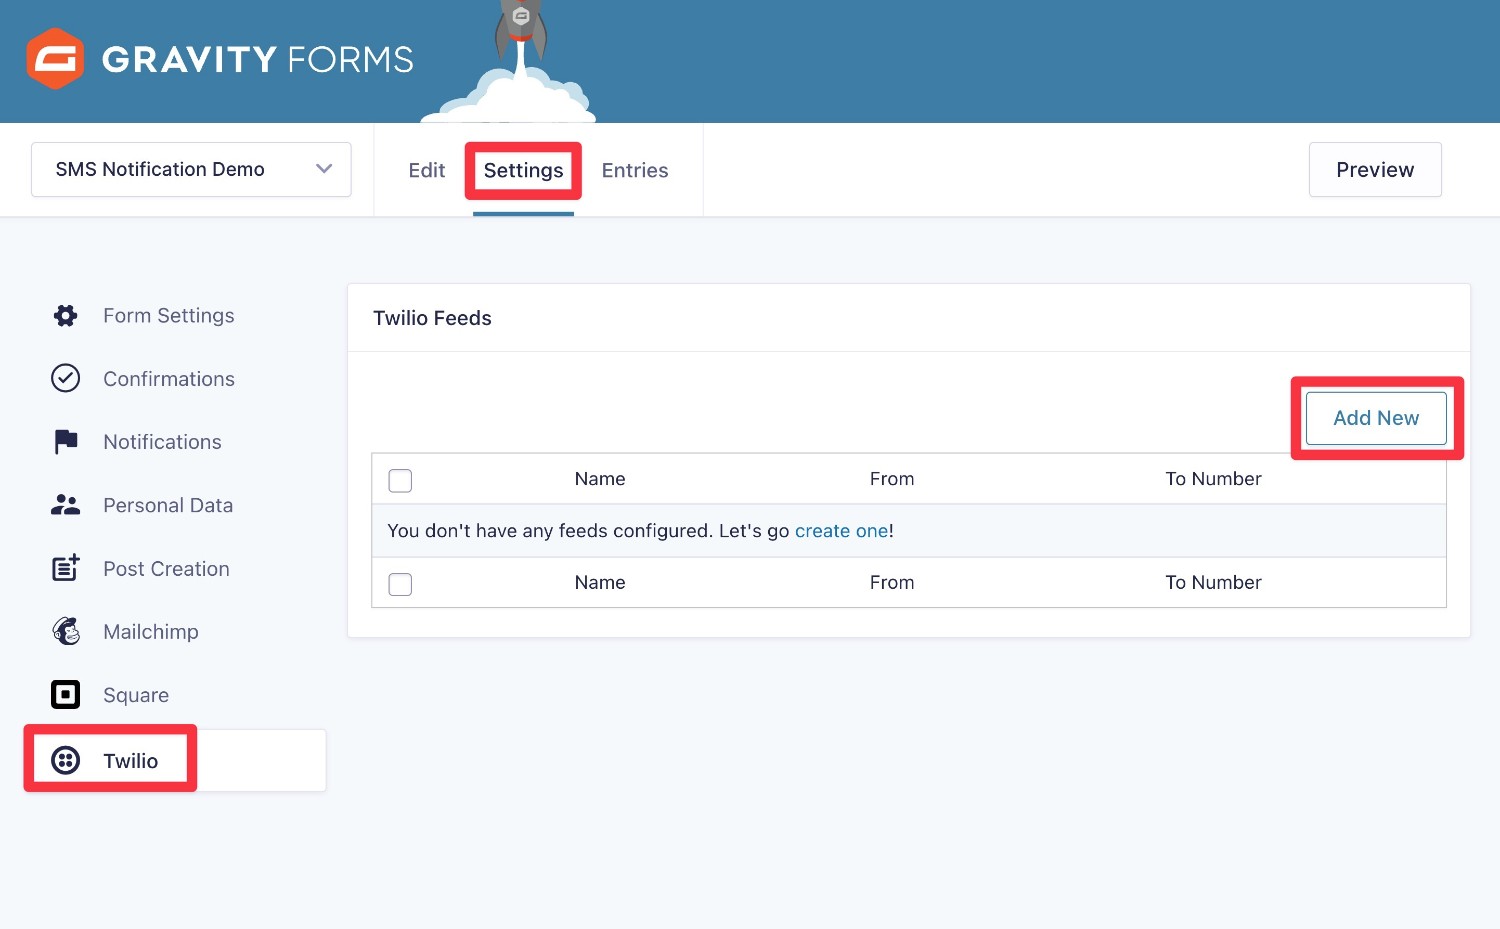
Now, you’ll create a Twilio feed for your form, which lets you set up the actual SMS notification behavior:
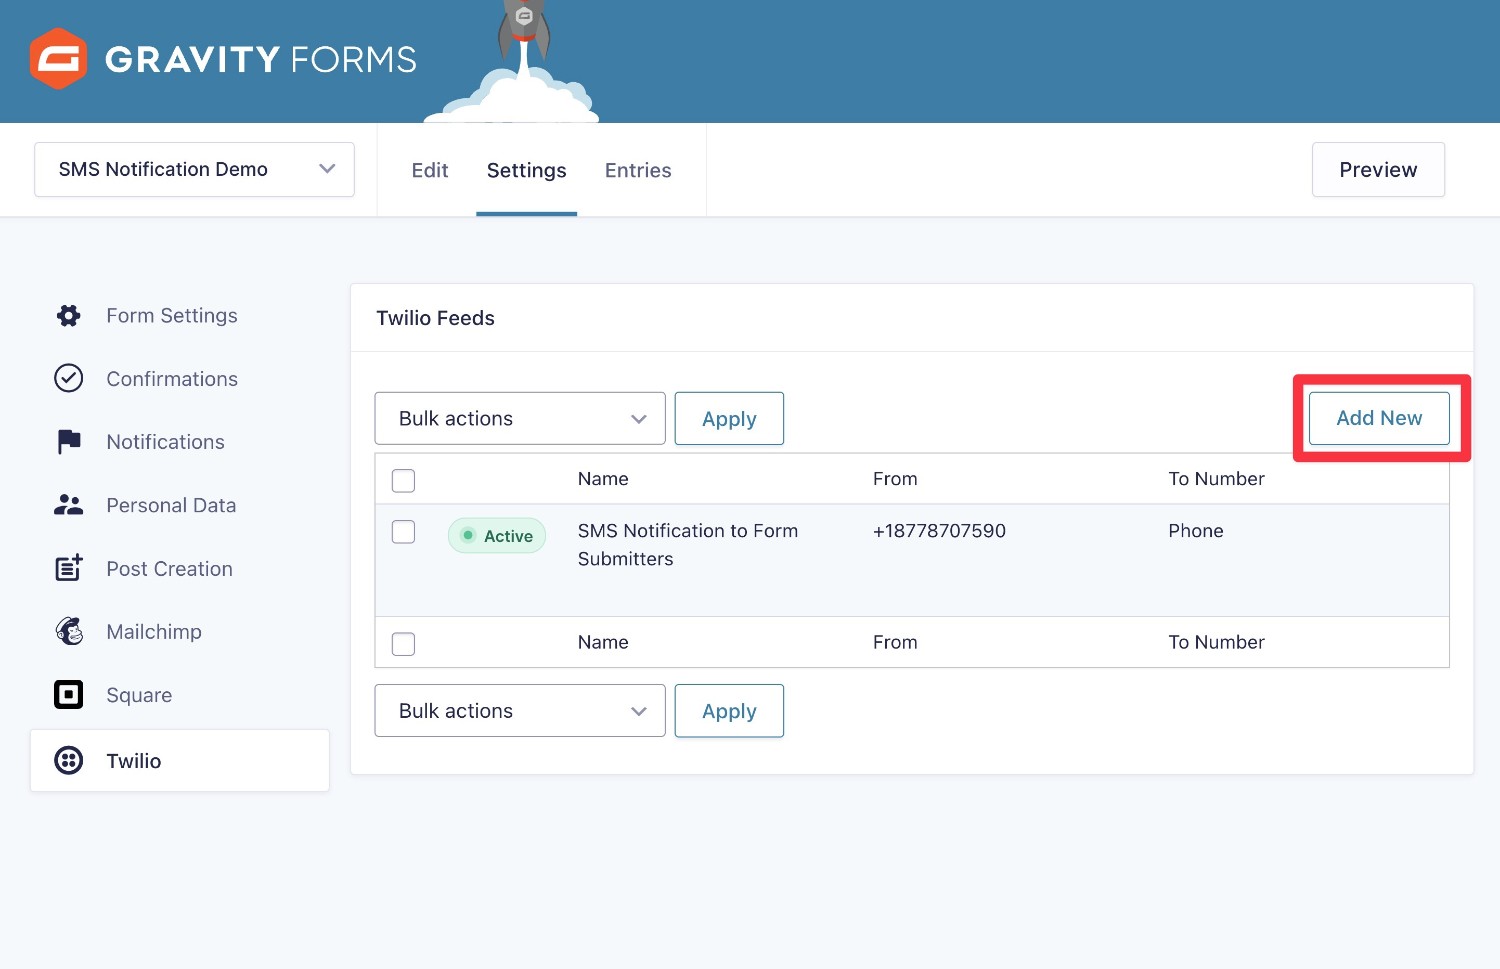
- Open the Settings area for the form.
- Click on the Twilio tab.
- Click Add New to create a new feed.
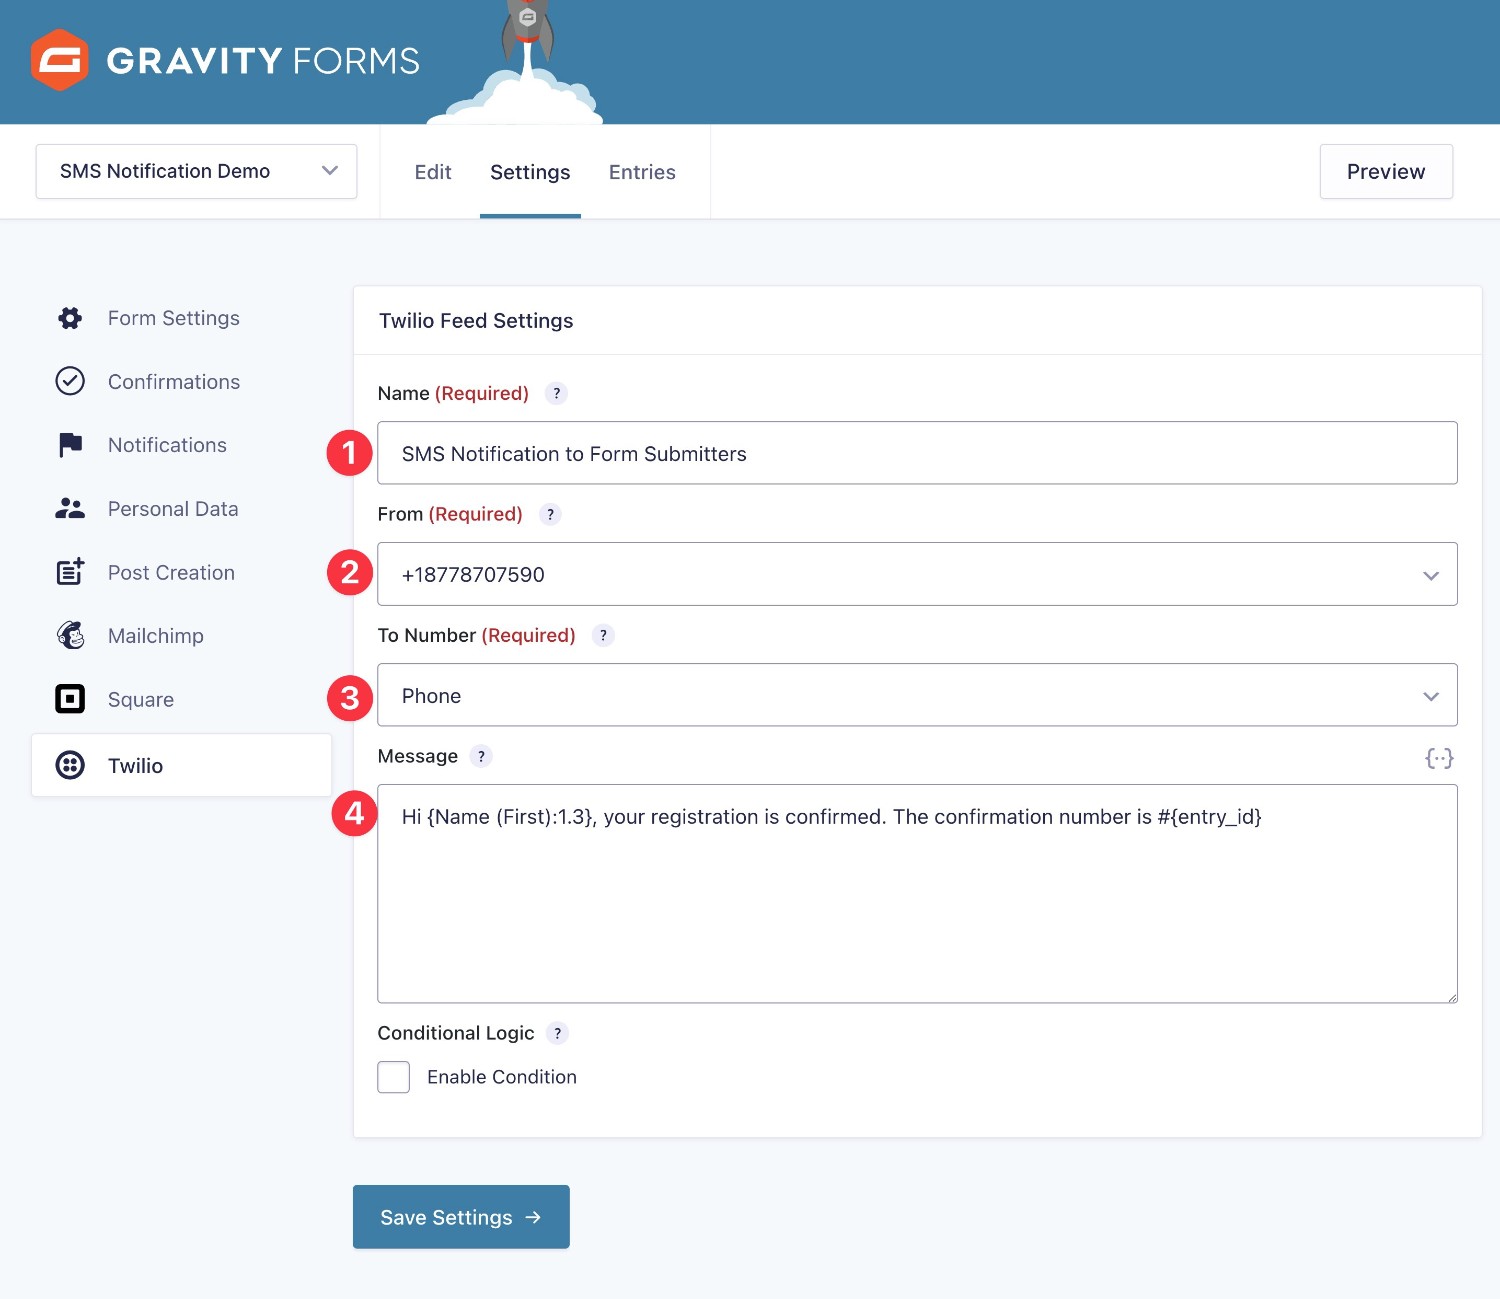
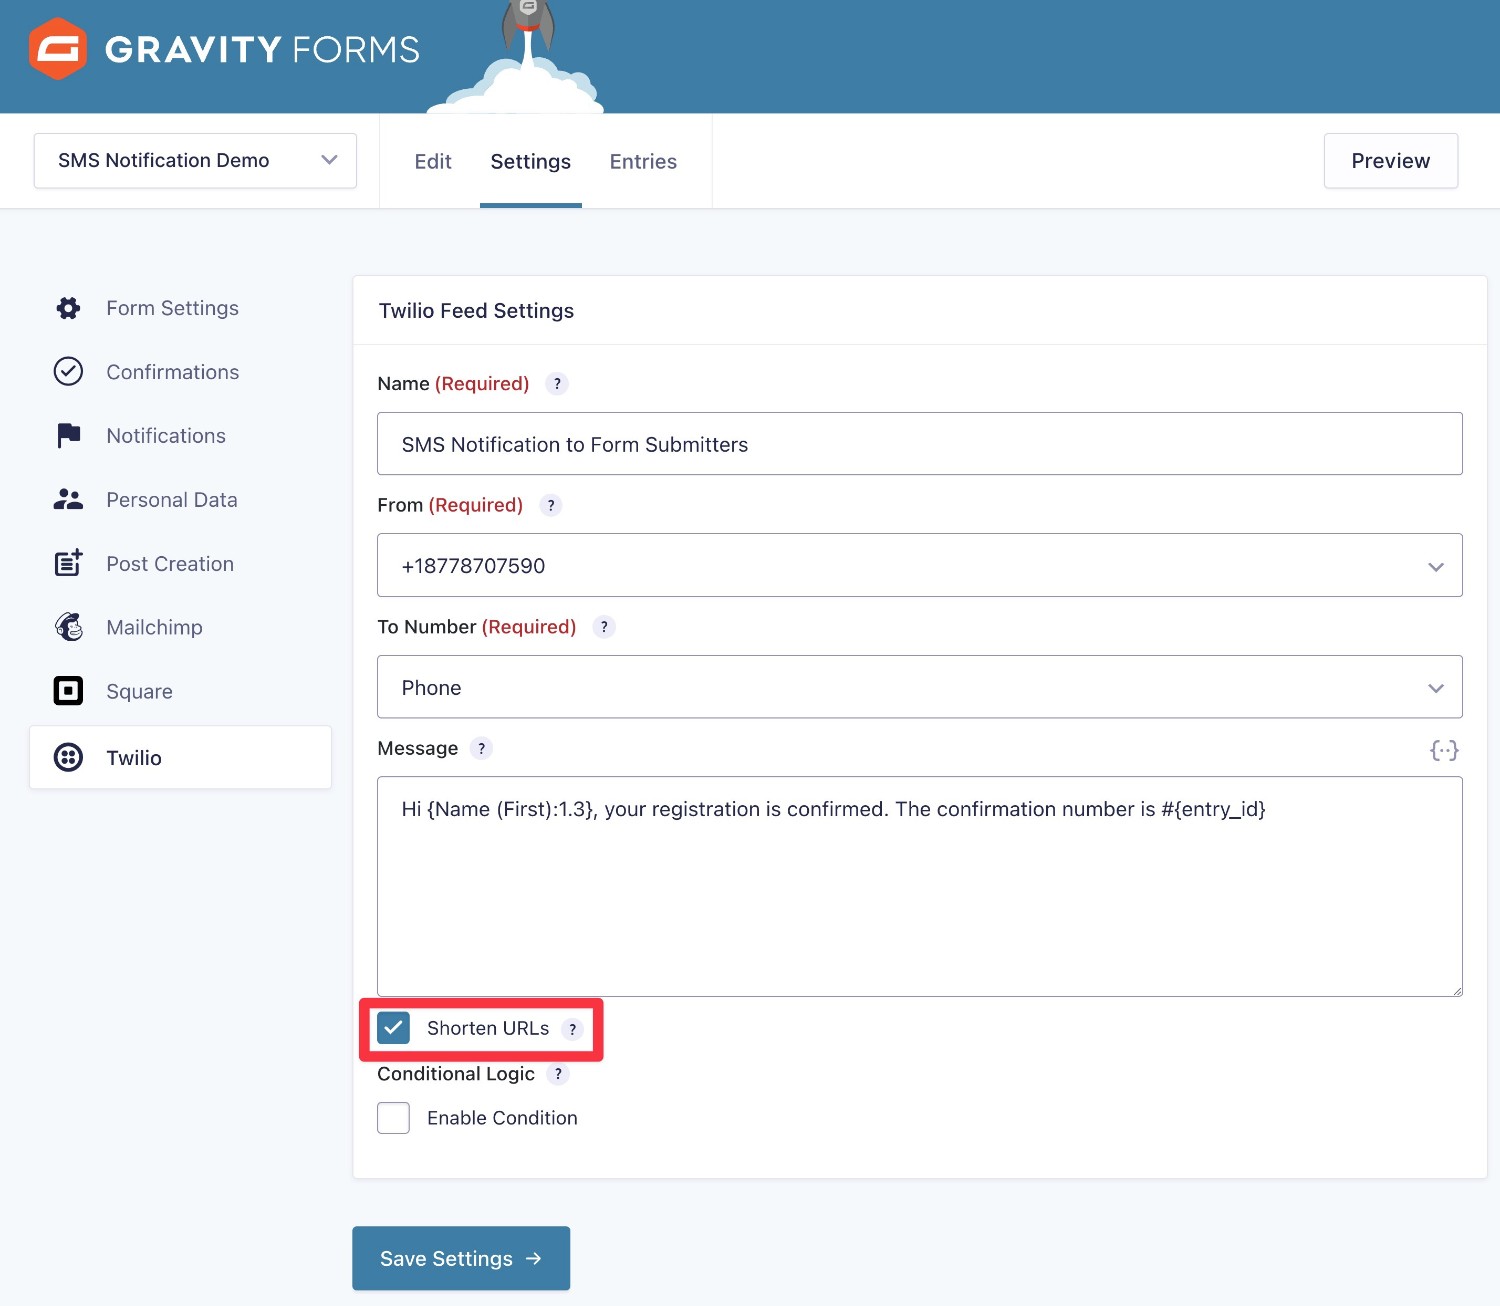
Here’s how to configure your Twilio feed:
- Name – an internal name to help you remember it. This is especially helpful if you want to send different SMS notifications to different people.
- From – choose your Twilio phone number from the drop-down. Gravity Forms should automatically detect all of the phone numbers that you’ve added in Twilio.
- To Number – the number to which Gravity Forms will send the SMS. You can select the Phone field in your form (if applicable), choose one of your verified Twilio numbers, or enter a custom phone number.
- Message – the content of the SMS message. You can include merge tags to dynamically insert information from the form. SMS messages are limited to 1,600 characters – if your message is longer than that, it will be split into multiple messages. If you want to include a URL but you’re worried about it being too long, we’ll go over how to set up the Bitly integration at the end of this tutorial.
You also have the option to add conditional logic to the feed. For example, you could only send this SMS notification if the user checked a box in the form to opt-in to SMS notifications.
Or, if you have a booking form for multiple service providers, you could send an SMS notification to the actual service provider that the user chose when filling out the form.
On the other hand, if you want to send the same SMS notification for every single entry, you should leave the conditional logic field disabled.
When you’re happy with how things look, make sure to click Save Settings.
If you want to send another SMS notification, you can repeat the same steps to create as many Twilio feeds as needed.
6. Test Your SMS Notifications and Enable Live Mode
At this point, your SMS form notifications should be ready to go.
If you’re using the Test API mode, you can test your SMS notifications using Twilio’s test credentials (this might require editing your feed settings).
When you’re ready to send real live SMS notifications, make sure that you’ve enabled the Live API Mode in the Twilio Add-On settings (Forms → Settings → Twilio).
You should be all finished now – but let’s talk about a few optional enhancements you can make to your form’s SMS functionality…
Optional: Use Bitly to Shorten URLs in SMS Messages
If you want to include URLs in your SMS messages, Gravity Forms includes a Bitly integration so that you can automatically shorten URLs to help you stay under the 1,600 character limit.
If you want to use this feature, you’ll first need to register for a Bitly account.
Bitly does offer a free plan that you can use with Gravity Forms, but you might need one of the paid plans depending on your usage.
Once you’ve registered…
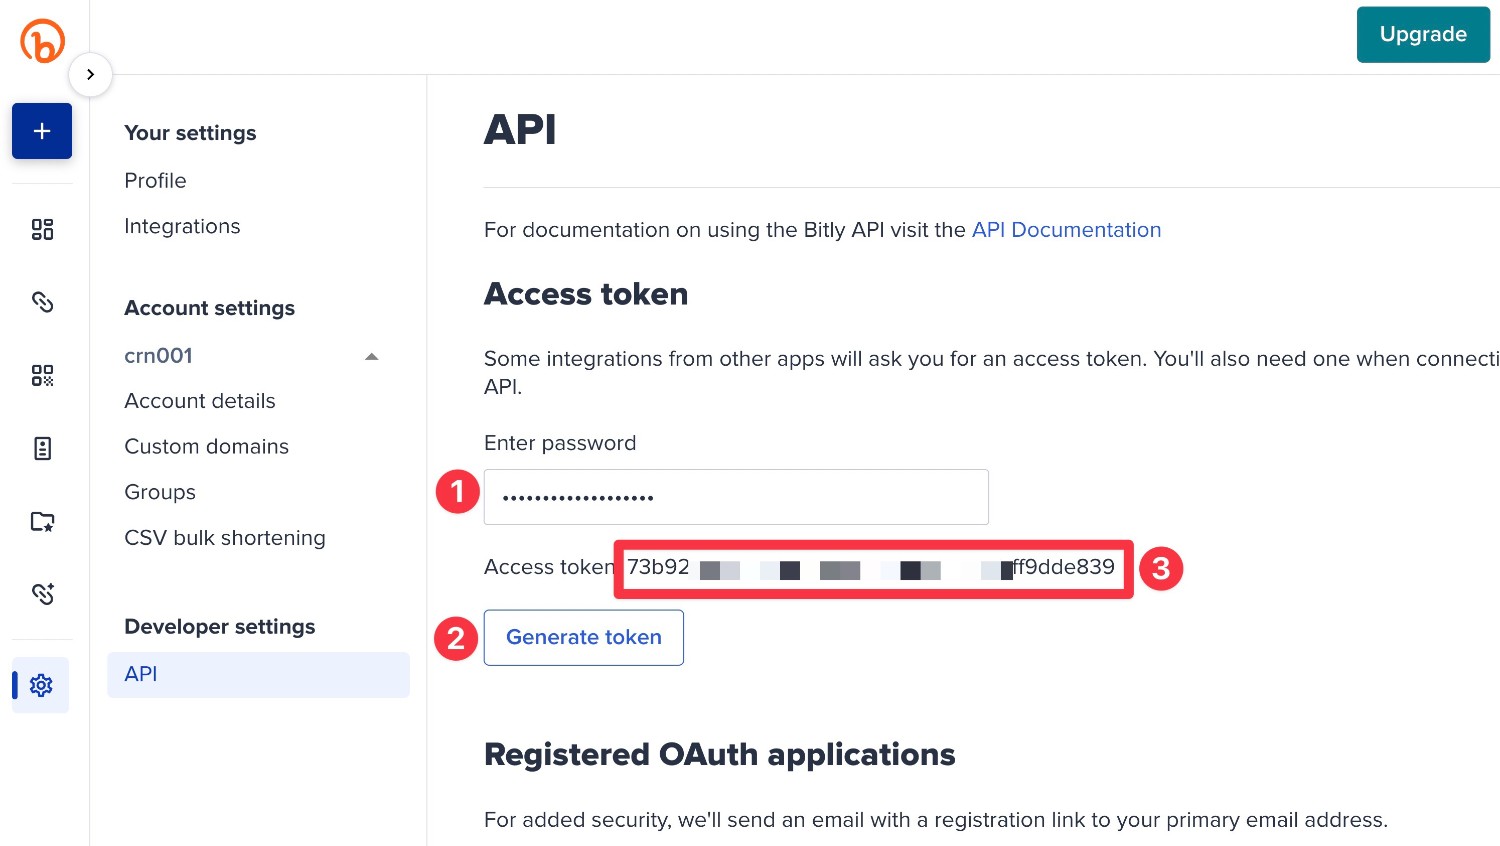
- Click this link to go to the Bitly API dashboard. You can also access it by clicking Settings in the Bitly dashboard and selecting the API tab.
- Enter your password and click the Generate token button to create a new API key.
- You should see an Access token appear – copy this value to a safe place because you’ll need to add it to the Gravity Forms settings.
Once you have the Bitly access token…
- Go to Forms → Settings → Twilio in your WordPress dashboard.
- Paste the access token into the Bitly Account Information box.
- Click Save Settings.
- Look for the green checkmark to confirm that the access token is working.
To finish things out, edit the Twilio feed for the SMS notification where you want to shorten URLs.
After adding the Bitly access token, you should see a new Shorten URLs option. Checking that box will have Bitly automatically shorten any URLs that appear in your SMS notification.
Optional: Build More Advanced SMS Notification Workflows With Gravity Flow
With the tutorial above, you can send immediate SMS notifications when someone submits a form.
However, you might have situations where you want to delay the SMS notification.
For example, you might want to wait to send an SMS confirmation message until the admin takes some action, such as confirming an appointment. Or, you might want to send the SMS in the future, such as sending it 24 hours before the event that a user registered for is scheduled to begin.
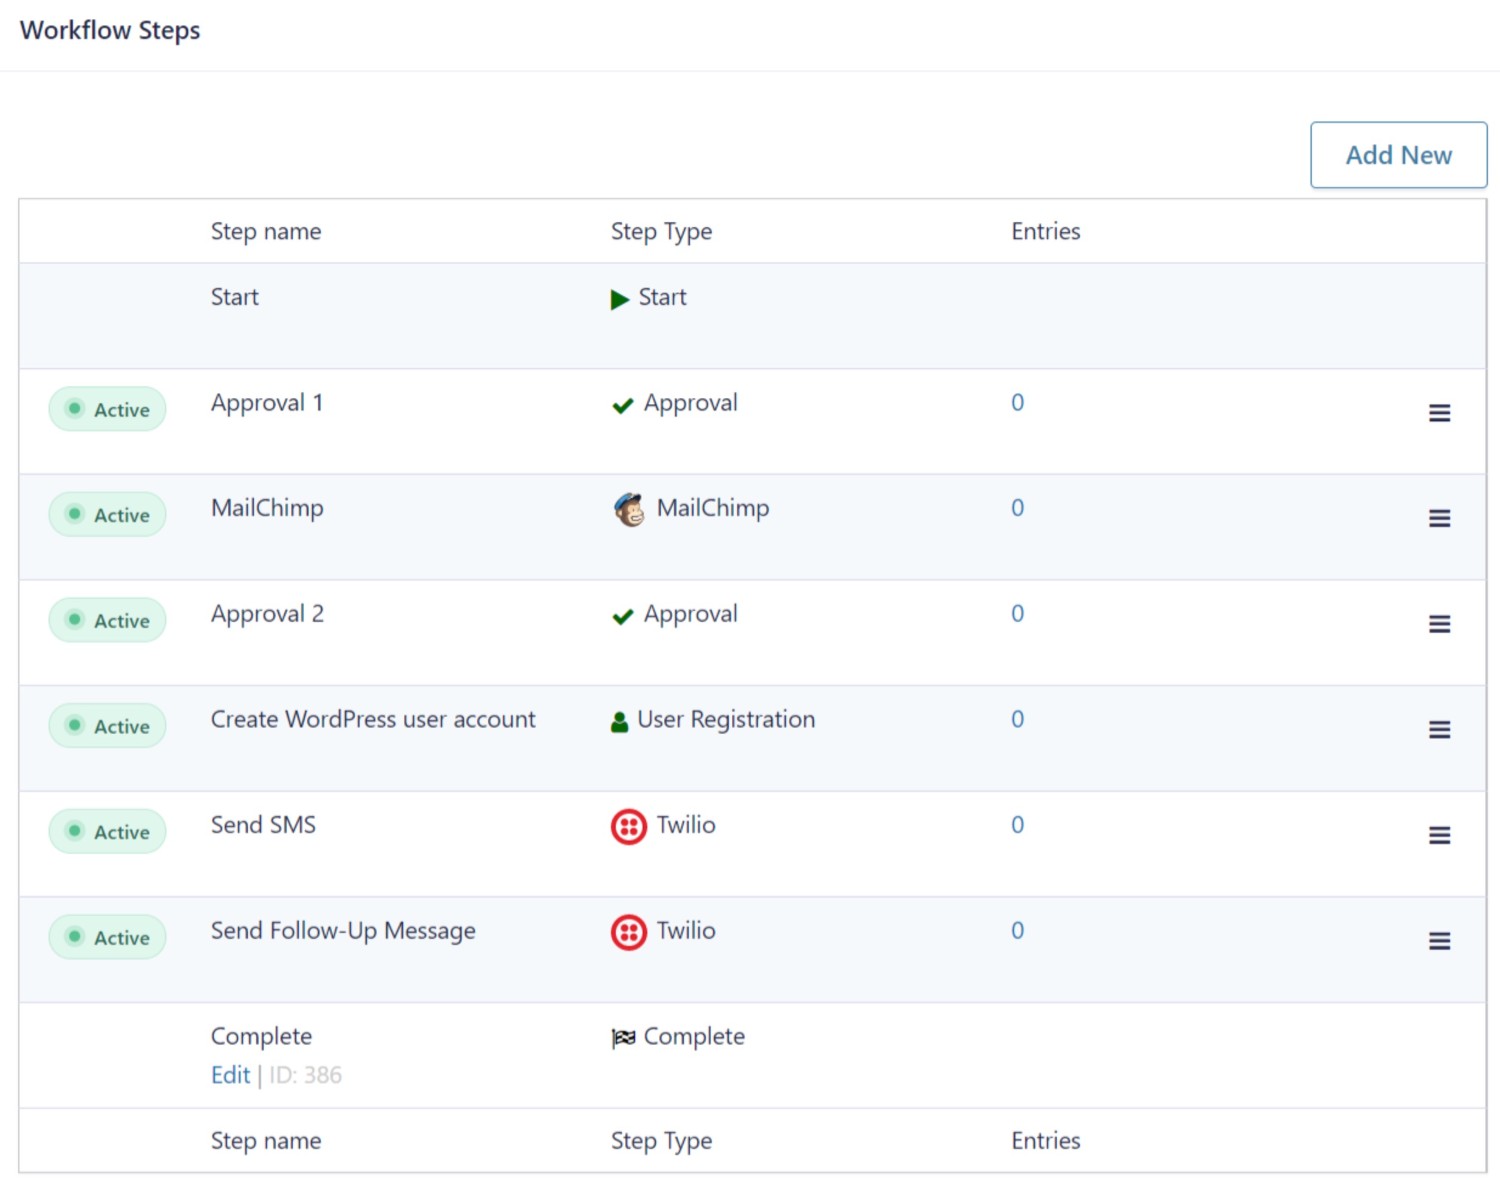
For these more advanced use cases, you can use Gravity Flow, another plugin that’s owned by the same team behind Gravity Forms.
Gravity Flow works with the Gravity Forms Twilio Add-On to let you build SMS notifications into more advanced workflows like this:
Get Started With WordPress SMS Form Notifications Today
With the Gravity Forms Twilio Add-On, you can affordably send SMS form notifications to any number – including site admins, the form submitter, or custom phone numbers.
You can send SMS notifications for all form entries. Or, you can use conditional logic to control when to send a text message (or route text messages to different numbers based on how the user filled out the form).
The Twilio Add-On is available on the Pro and Elite licenses. If you’re already holding one of those licenses, you can get started today.
If not, upgrade or purchase your license today to start sending SMS notifications.

If you want to keep up-to-date with what’s happening on the blog sign up for the Gravity Forms newsletter!
"*" indicates required fields