How to Create Coupons for Your Payment Gravity Forms

Everyone likes to save money, which is why coupons are powerful tools to market your products and services. 90% of consumers use coupons1 and 75% of consumers expect discounts/offers2. In fact, coupons are the top-ranking tactic for driving loyalty3.
If you sell products/services with a Gravity Form, you may want to create coupons for holiday sales, special offers, affiliates, or influencers. Often, a simple discount can bring in enough business to make up for the discount’s loss in revenue.
In this article, we’re going to show you how to set up a payment form in Gravity Forms and create your own coupons.
Step 1: Install Gravity Forms
If you haven’t already, your first step is to install Gravity Forms. If you’ve never done that before, check out our Getting Started Guide. In order to add payment forms and coupons, you’ll need an Elite License.
The Elite License is our most powerful license. It gives you access to all of our payment Add-Ons (2Checkout, Authorize.net, PayPal Payments Pro, and Stripe) as well as other useful extensions that allow you to create polls, create quizzes, create surveys, collect partial entries, and require signatures. You also gain access to all of Basic License and Pro License Add-Ons.
Step 2: Install the Right Add-Ons
To create coupons for your payment forms, you’ll need 1) the Coupons Add-On, and 2) the payments Add-On that corresponds with the service you use to collect money.
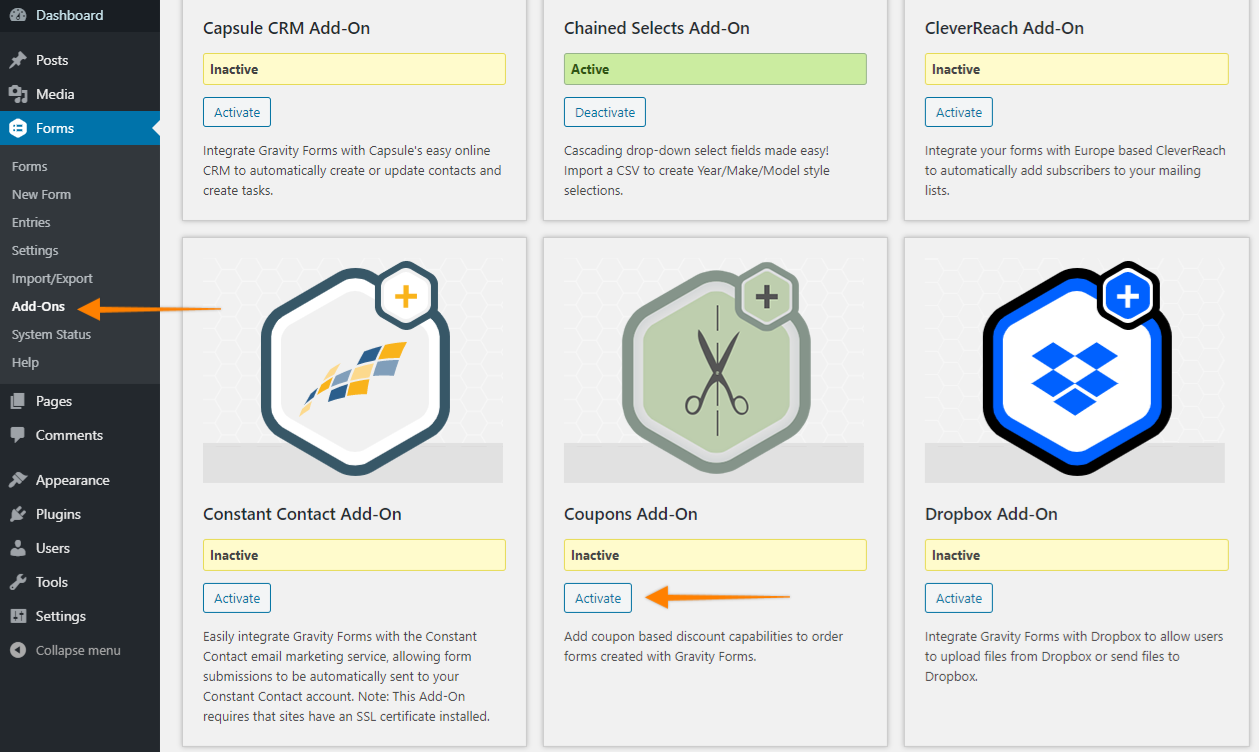
To install an Add-On, hover over Forms on the left side of your WordPress dashboard and click Add-Ons. Find the Coupons Add-On in the list and click Activate.
Next, activate your payment Add-On from the list as well. We have three payments Add-Ons that integrate seamlessly with the most popular payment processors. Setting them up simply requires following a few steps.
- Read our guide on setting up 2Checkout
- Read our guide on setting up Stripe
- Read our guide on setting up PayPal Payments Pro
- Read our guide on setting up Authorize.net
(Please note that Authorize.net is a payment gateway that links you with other payment processors, so you may need to take some additional steps with your bank.)
Step 3: Create Your Payment Form
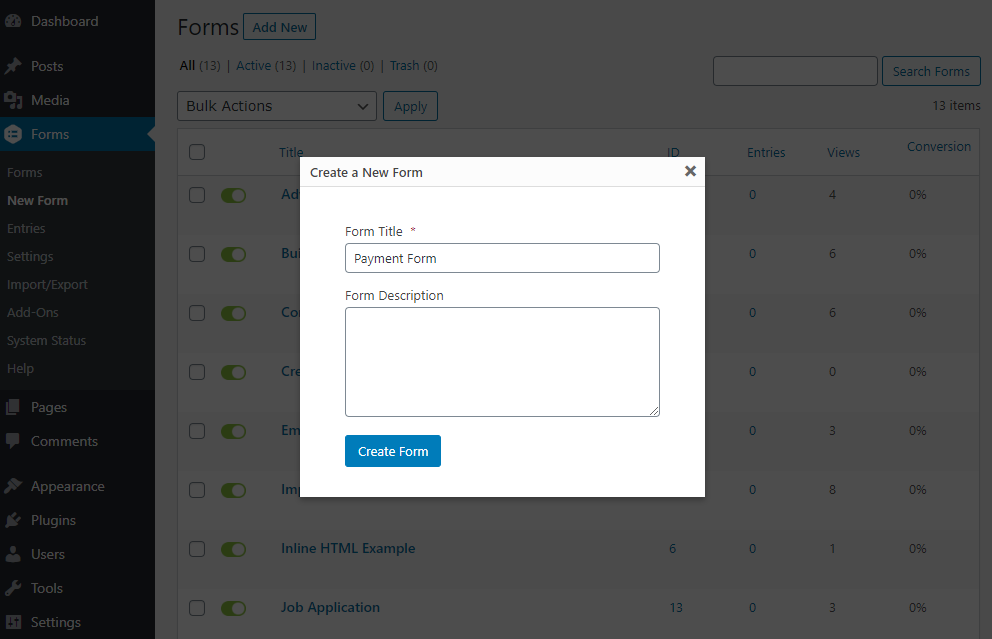
Creating a form in Gravity Forms is quick and easy. Hover over Forms on the left side of your WordPress dashboard and click New Form. You’ll be asked to give the form a name. Use something that distinguishes it from any of your other forms and click the Create Form button.
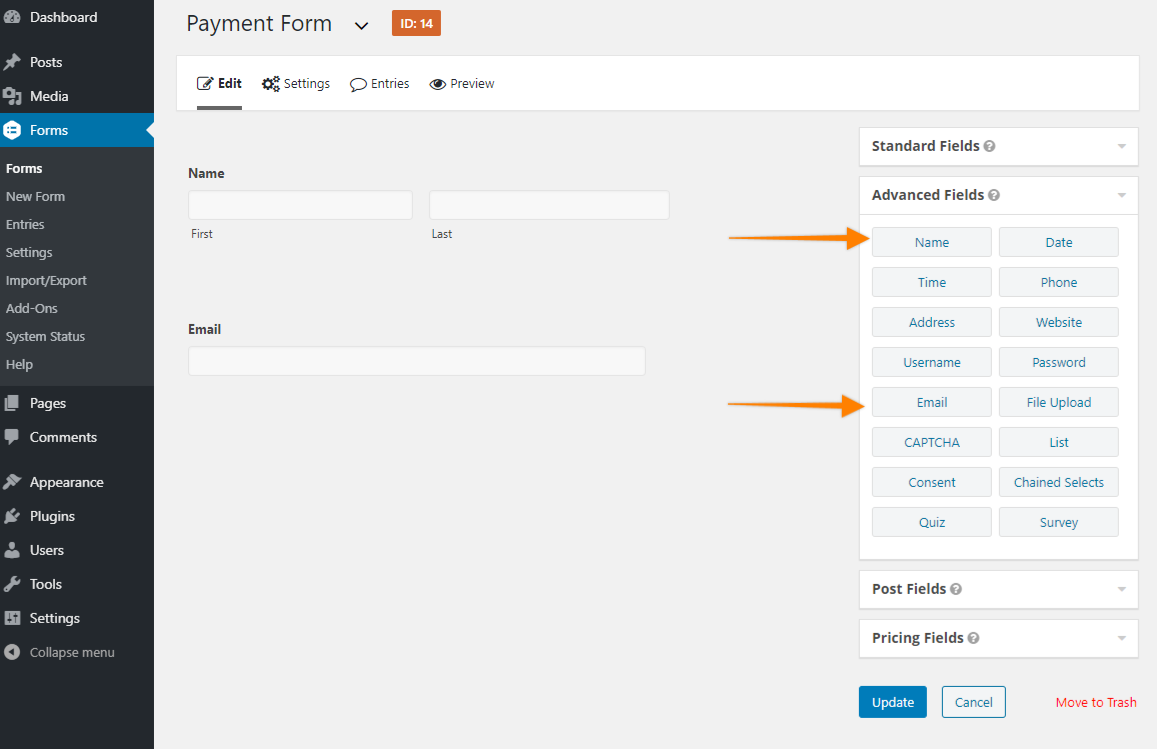
Once you create the form, you will be sent to the form builder. Here’s where you can add fields and customize settings. Start by opening the Advanced Fields dropdown menu on the right to access the Name and Email fields. Click on each to add them to the form.
Next, add any other fields you need in your form. For instance, you might need the submitter’s physical address if you have to ship them a product. Or you might need them to upload files, consent to your terms, or solve a CAPTCHA.
Avoid including any fields that aren’t necessary. Each extra field will reduce the number of people who complete the form, and since this form represents a sale, it’s absolutely critical that you keep as many conversions as possible.
Finally, you’ll need to add the fields that pertain to payments. You’ll find these fields by opening the Pricing Fields dropdown menu on the right of the form builder.
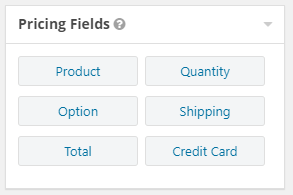
- Product – This field lets you create products so the form can calculate a total price. Add one or multiple products with different prices.
- Option – This field lets you create different options for the products you created with the Product field. For instance, if you sell T-shirts, use this field to create options for size, color, artwork, etc.
- Quantity – Use this field to let the user specify quantities for any of the products you created with the Product field.
- Shipping – This lets you add a shipping cost to the customer’s total. You can let the customer choose from multiple shipping options with different prices.
- Credit Card (Required) – This is where customers will input their credit card number, expiration date, cardholder name, and security code. This field is compliant with PCI Standards, which means it doesn’t store any of the personal information entered. Only the last four digits of the card are stored. If your website does not have an SSL certificate, this portion of the form will be highlighted with a red warning on the page.
- Total (Required) – This field will total up the customer’s entire purchase and display it on the page. Make sure to place this field last.
Once you’ve added all the fields you need, open each field and check the box labeled Required so users are forced to answer the field before submitting the form.

Make sure to click Update when you’re finished.
Step 4: Set Up Your Coupons
Now that your payment form is ready, it’s time to set up your coupons!
You’ll need to create a coupon feed. A coupon feed integrates the Coupons Add-On with your form to create a Coupon Pricing Field. The coupon field works in conjunction with the other pricing fields. To make the coupon field work, at least one product field and one total field are required.
You’ll need to set up a new coupon feed for each coupon you create. But don’t worry! Creating a feed only takes a moment.
To make a coupon feed, hover over Forms on the left side of your WordPress dashboard and click Coupons. On the Coupon Feeds page, click Add New at the top. This will bring you to the Coupons feed settings screen.
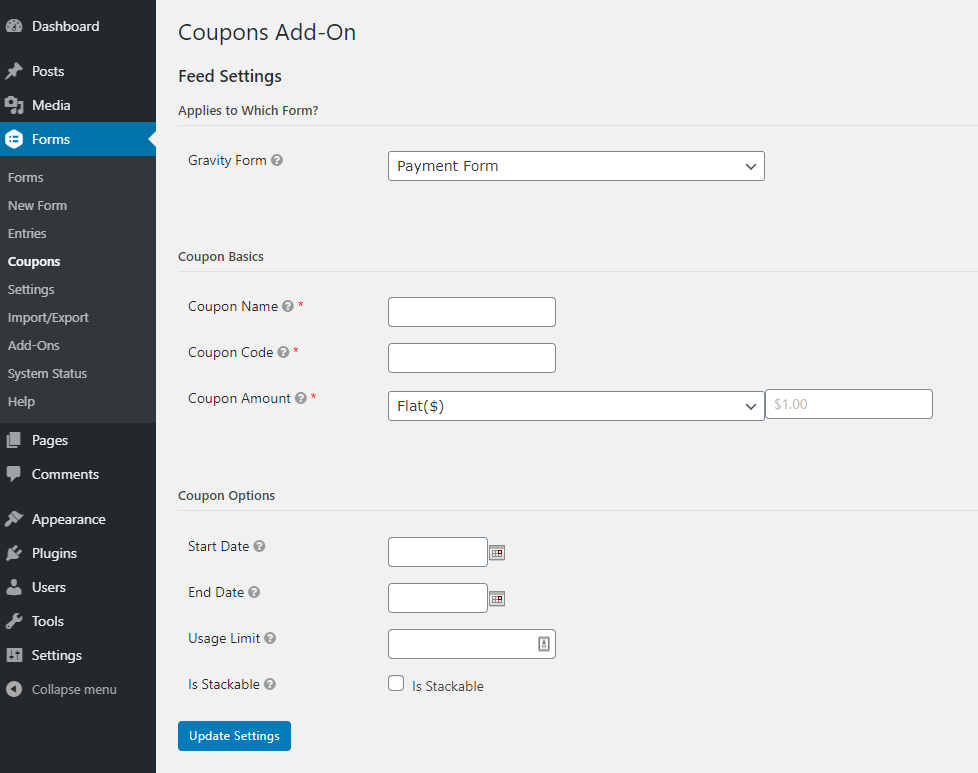
First, choose the form this feed will apply to. Then give your coupon a name, code (like THANKYOU or SPRINGSALE2020) and amount (either flat discount or a percentage). Next, choose a start date, end date, usage limit, and decide whether this coupon will stack with other coupons. Click Update Settings when you’re done.
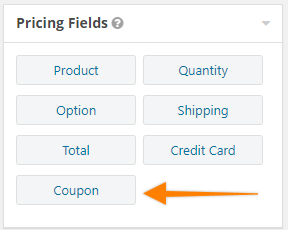
Next, head back to your payment form. You’ll notice a new coupon field in the Pricing Fields menu. Click it to add it to your form so users have a place to input their code.
Once the coupon field is in your form, open it and check the box labeled Required.
Step 4: Set Up Your Confirmations
A confirmation is a cue to the customer that they’ve completed the form properly. Without a confirmation, the customer would never know if you received their order.
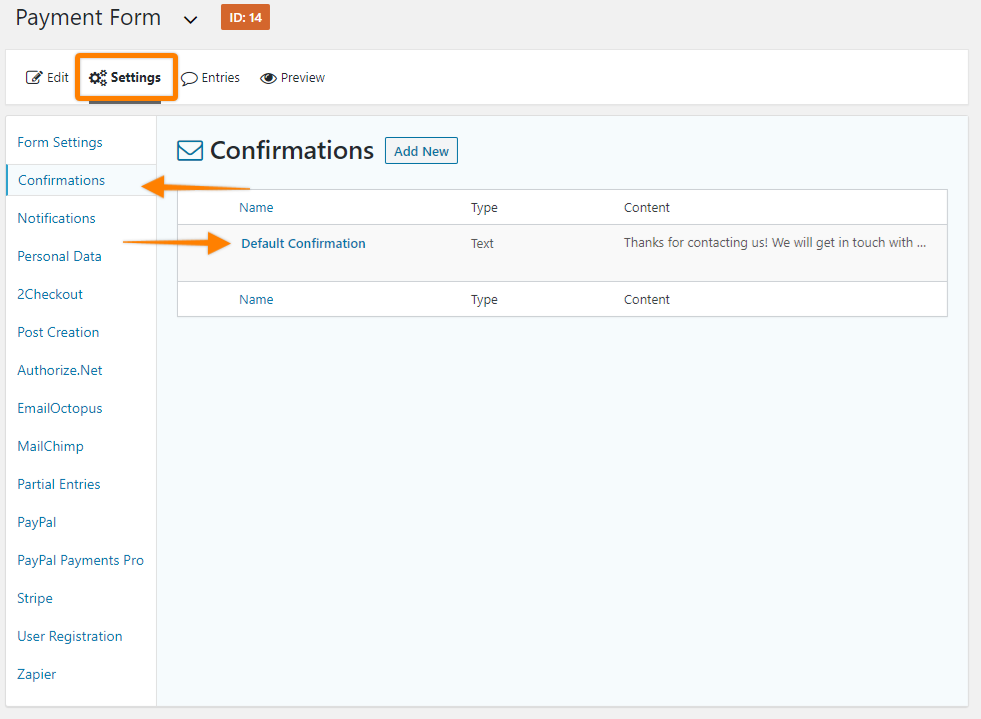
To create and edit form confirmations, click Form Settings at the top of the form builder. On the settings page, click Confirmations on the left menu. Click Default Confirmation to edit the existing confirmation. (You can add multiple confirmations if you like, but one is usually enough.)
Once you’re in the confirmation editor, choose a Confirmation Type:
- Text – This displays a text message on the page. This is a standard WYSIWYG editor, so it accepts HTML, images, etc.
- Page – This redirects the user to any of your existing WordPress pages.
- Redirect – This redirects the user to whatever URL you input.
Which option is right for you? That depends on your needs. If a simple “thank you” is sufficient, a text confirmation is usually enough. But if your customer needs additional information that requires its own page, consider using a redirect.
Step 5: Set Up Your Notifications
A notification is an email Gravity Forms automatically generates upon a successful form submission. It’s best practice to send a notification email to your customer so they have a receipt of the purchase. You may also want to create notifications to yourself or people on your team so everyone is aware of the new customer.
Create a new notification for your payment form by clicking Form Settings at the top of the form builder, then Notifications in the left menu. Click Add New to make a new notification email.
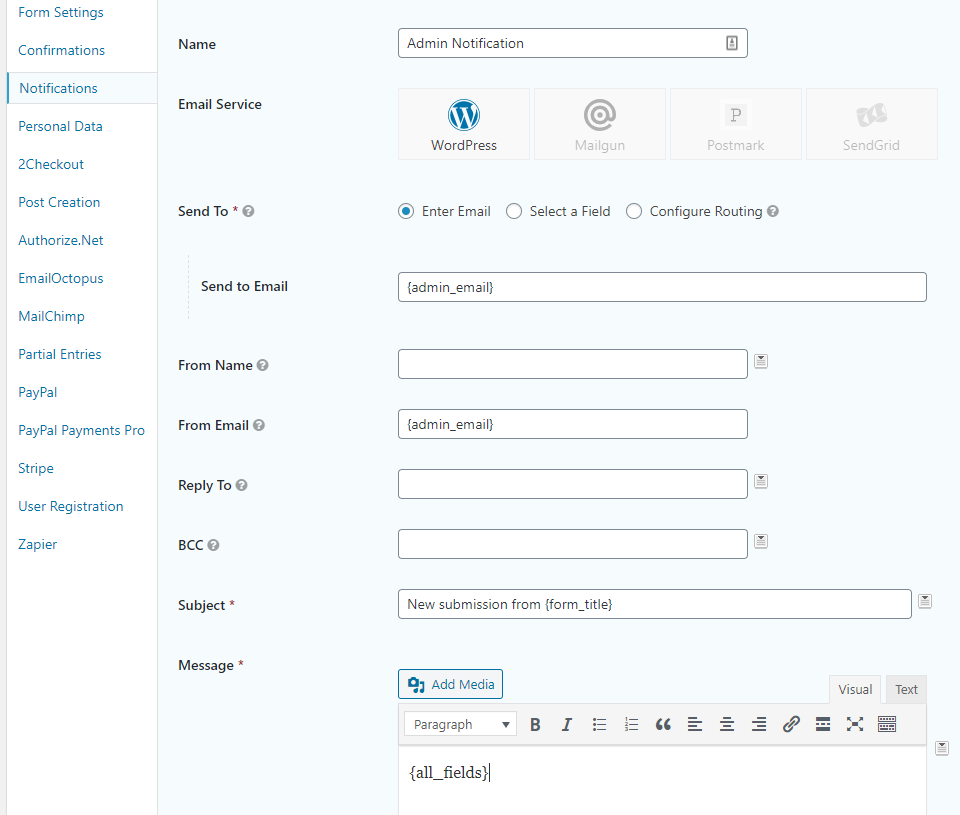
First give your notification a name. The Send To field designates a recipient. If the notification is for you, put your own email address here. If the notification is for the customer, check the Select a Field option and select Email from the drop down list. Then enter a From Name, Subject, and Message.
What you write in the email will depend on who receives it. If the email notifies you about a recent purchase, you might opt for a simple, spartan message with just the necessary data. If the email notifies the customer of the recent purchase, thank them for their purchase,
Step 6: Embed the Payment Form on the Page
Your final step is to place the form on a public page so users can access it and make purchases.
Open the page in your WordPress dashboard where you’d like to display the form. You may need to create a new page if you don’t have one already.
Identify the spot where you’d like the payment form to appear. Use the Gravity Forms Gutenberg Block, WordPress’ default Shortcode Bloc, or paste the shortcode in manually. If you need help, read our full documentation.
Place the form somewhere on the page your users won’t miss. You don’t want anyone to leave the page because they couldn’t find the spot to make a purchase.
Start Discounting!
Coupons are effective ways to attract new customers and retain old ones. Now that you know how to add coupons to your Gravity Forms payment form, use them to drive sales, delight your customers, and grow your brand.
Sources

If you want to keep up-to-date with what’s happening on the blog sign up for the Gravity Forms newsletter!