Supercharge your WordPress photography website with Gravity Forms

Thinking about building a WordPress photography website and wondering where to start?
In the fast-paced world of professional photography, your time is literally money. Every minute spent wrestling with client inquiries, booking sessions, or managing questionnaires is a minute you’re not behind the camera creating magic.
With WordPress and Gravity Forms, you can create a photography website that is as beautiful as your photographs and easy to manage. Picture seamless booking forms, customized questionnaires that help you understand your clients before you even meet them, automated workflows, and more.
Even if you’re brand new to WordPress, we’ll break down the basics and show you how to get started with Gravity Forms.
By the end of this guide, you’ll know exactly how to harness the power of Gravity Forms to transform your photography website from a simple portfolio into a client-converting, time-saving business machine.
Whether you’re drowning in admin work or looking to scale your photography business to new heights, the solutions you need are just a few forms away.
Let’s dive in…
Why use WordPress and Gravity Forms for your photography website
WordPress powers over 40% of all websites globally for good reason; it’s free, and offers the flexibility and features photographers need to showcase their work beautifully. When combined with Gravity Forms, you gain powerful tools to interact with clients seamlessly.
Photography businesses have unique needs that go beyond basic contact forms. You need to collect detailed information about shooting locations, package preferences, and event timelines.
With WordPress and Gravity Forms handling everything behind the scenes, you can focus on what you do best – creating beautiful images.
Before we dive deeper into Gravity Forms, let’s take a moment to highlight why WordPress is the best platform for hosting and managing your photography website:
- Full control over your content – With WordPress, you own your website, so you get the freedom to share your content on your terms (unlike social media platforms where you’re at the mercy of changing algorithms).
- Themes for photography – There are many free and paid WordPress themes out there that are geared toward photographers. You can host your entire portfolio and showcase your work in one accessible place.
- Customization at your fingertips – WordPress is known for its flexibility and vast array of themes and plugins. You can customize the look and functionality of your site with just a few clicks, ensuring it reflects your unique style.
- SEO & growth potential – With its built-in SEO features and powerful plugins like Yoast SEO, WordPress gives you the tools to help you get discovered. This helps you optimize your content and attract organic traffic to your website.
What is Gravity Forms and how can it help photographers?
Gravity Forms is a premium WordPress plugin that goes beyond basic contact forms with features that can be especially valuable for photographers.
With Gravity Forms, you can build custom forms without any coding knowledge. The drag-and-drop builder makes adding fields, customizing layouts, and creating professional-looking forms simple.
For photographers, this means you can easily create booking forms, price quote calculators, and client questionnaires. With these tools, you can streamline your workflow and create a more professional client experience.
What’s more, Gravity Forms has an expansive suite of add-ons, so you can integrate with even more tools and services that are popular among professional photographers. Connect with email marketing services, payment processors, client management systems, and more for a seamless workflow.

Common questions
Do I need technical skills to use Gravity Forms? – No technical skills required! The visual builder makes it easy for beginners to create professional forms without touching code.
Can clients upload photos through Gravity Forms? – Yes, Gravity Forms includes file upload fields that allow clients to share inspirational photos or documents with you securely.
Will forms work well on mobile devices? – Absolutely! All forms are responsive and will look great on phones, tablets, and computers, so your clients will be able to reach you from any device.
Can I collect payments through Gravity Forms? – Yes, Gravity Forms integrates with PayPal, Stripe, Square, and other payment processors, making it easy to collect session deposits or full payments.
Best Forms for WordPress Photography Websites
- Client booking form – Create a comprehensive booking form that collects all the essential details you need for a photography session. Include fields for date preferences, location information, and package selection to streamline your booking process.
- Wedding photography questionnaire – Design a detailed form for wedding clients to share their vision, timeline, and must-have shots. This form helps you prepare and ensures you capture all the important moments on their special day.
- Photography package calculator – Build a dynamic form that helps clients explore different photography packages and add-ons. This interactive tool can provide instant price estimates based on their selections, making your pricing transparent.
- Client feedback survey – Create a post-session survey to gather valuable feedback about your services. This information helps you improve your business and can generate testimonials for your wordpress photography website.
- Mini-session registration – Develop a specialized form for booking limited-time mini-sessions. Include automatic capacity limits so the form closes when all slots are filled, creating urgency and preventing overbooking.
How to get started with Gravity Forms on WordPress
Now that you know how Gravity Forms can help you, let’s look at how you can get started using it on your WordPress site.
Purchase a Gravity Forms license or try our free demo
Gravity Forms offers a few types of licenses, all of which include access to our knowledgeable and friendly support team. You can compare license types here, and pick the one that will suit your needs.
Any license will work for the purposes of this tutorial, but it’s worth noting that if you ultimately want to be able to accept payments on your site, you’ll need to purchase a Pro, or Elite, or Nonprofit license.
If you’d like to try Gravity Forms first, you can create a free demo site – it has all the functionality you’ll need to follow along with this tutorial. If you want to stick with the demo for now, skip ahead to the Create Your First Form section.
Install Gravity Forms
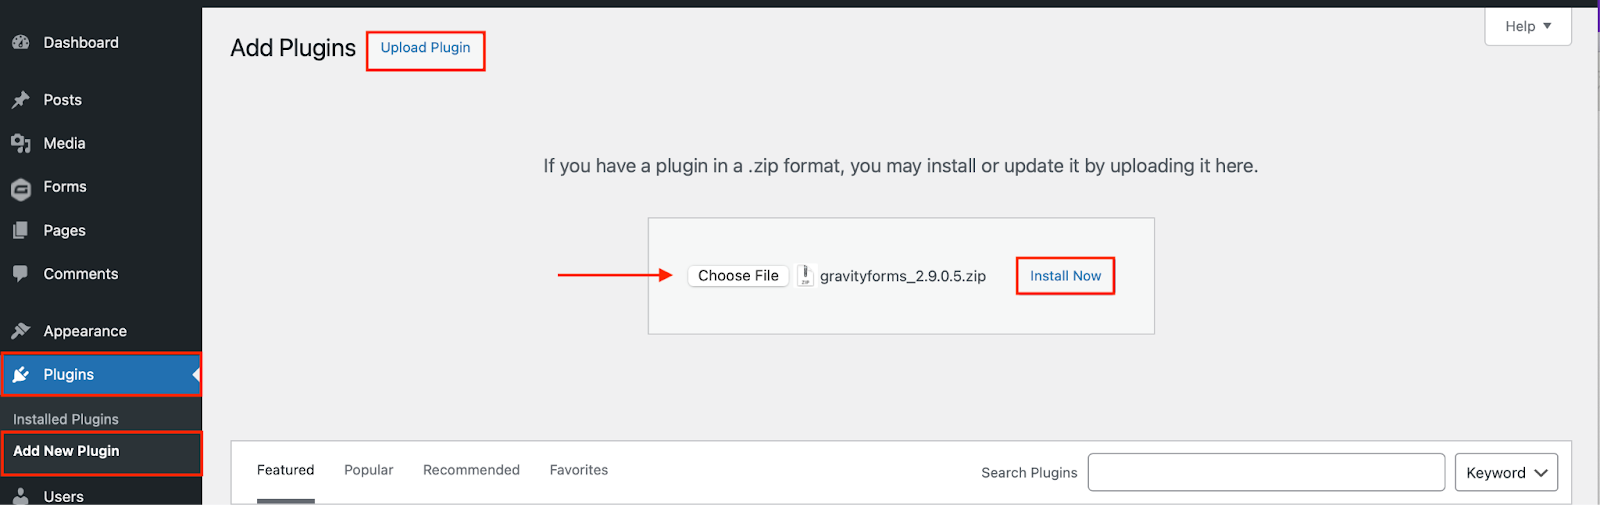
After you’ve made your purchase, you can log in and download Gravity Forms directly from your My Account section. This download should remain a ZIP file, as this is the format in which you’ll upload it to your WordPress site.
Next, install the Gravity Forms plugin on your WordPress site. Here’s how:
- Go to your WordPress dashboard and navigate to Plugins → Add New Plugin.
- Click Upload Plugin.
- Choose the ZIP file you just downloaded, then click Install Now.
- After the plugin is installed, click Activate.
Now, follow the instructions in the Setup Wizard. You’ll be asked to enter your Gravity Forms license key and answer a few questions to help you get started. You can find your license key by logging in to Gravity Forms and clicking My Account.
Create your first form
Once Gravity Forms is installed (or if you’re using our demo), creating a form is simple. Here’s how:
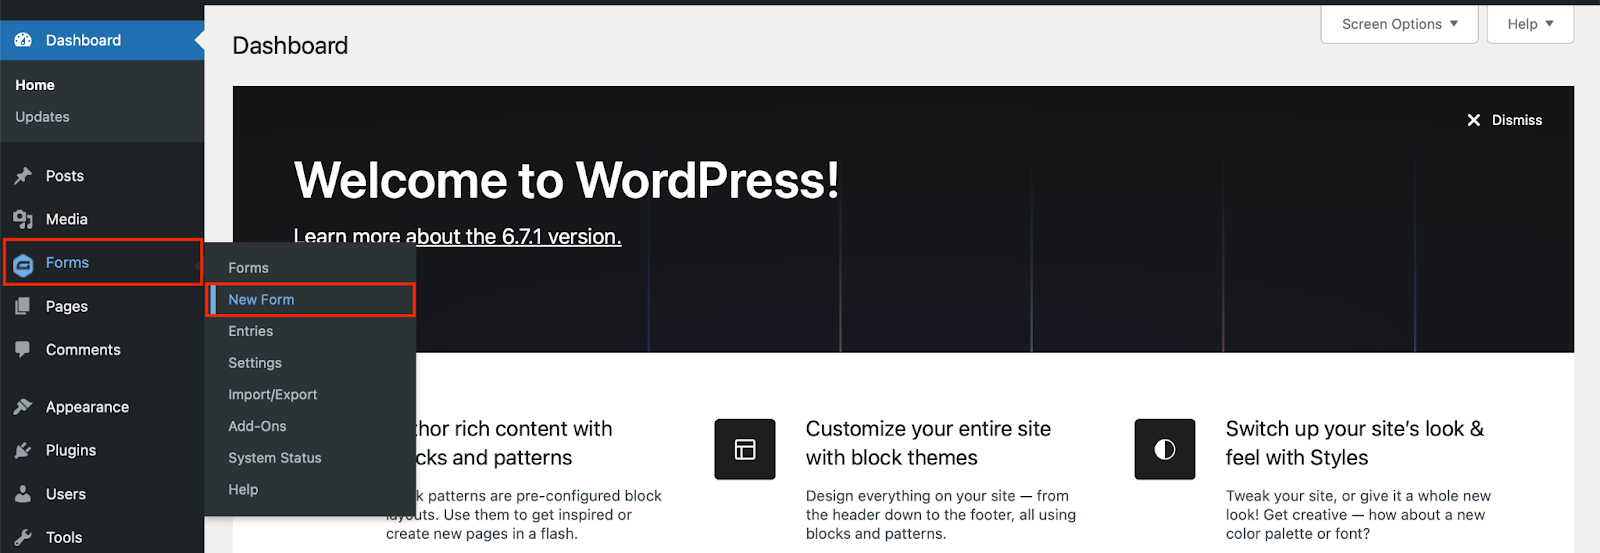
From your WordPress dashboard, go to Forms → New Form.
Choose a form template from the Gravity Forms template library, or start from scratch by choosing the Blank Form.
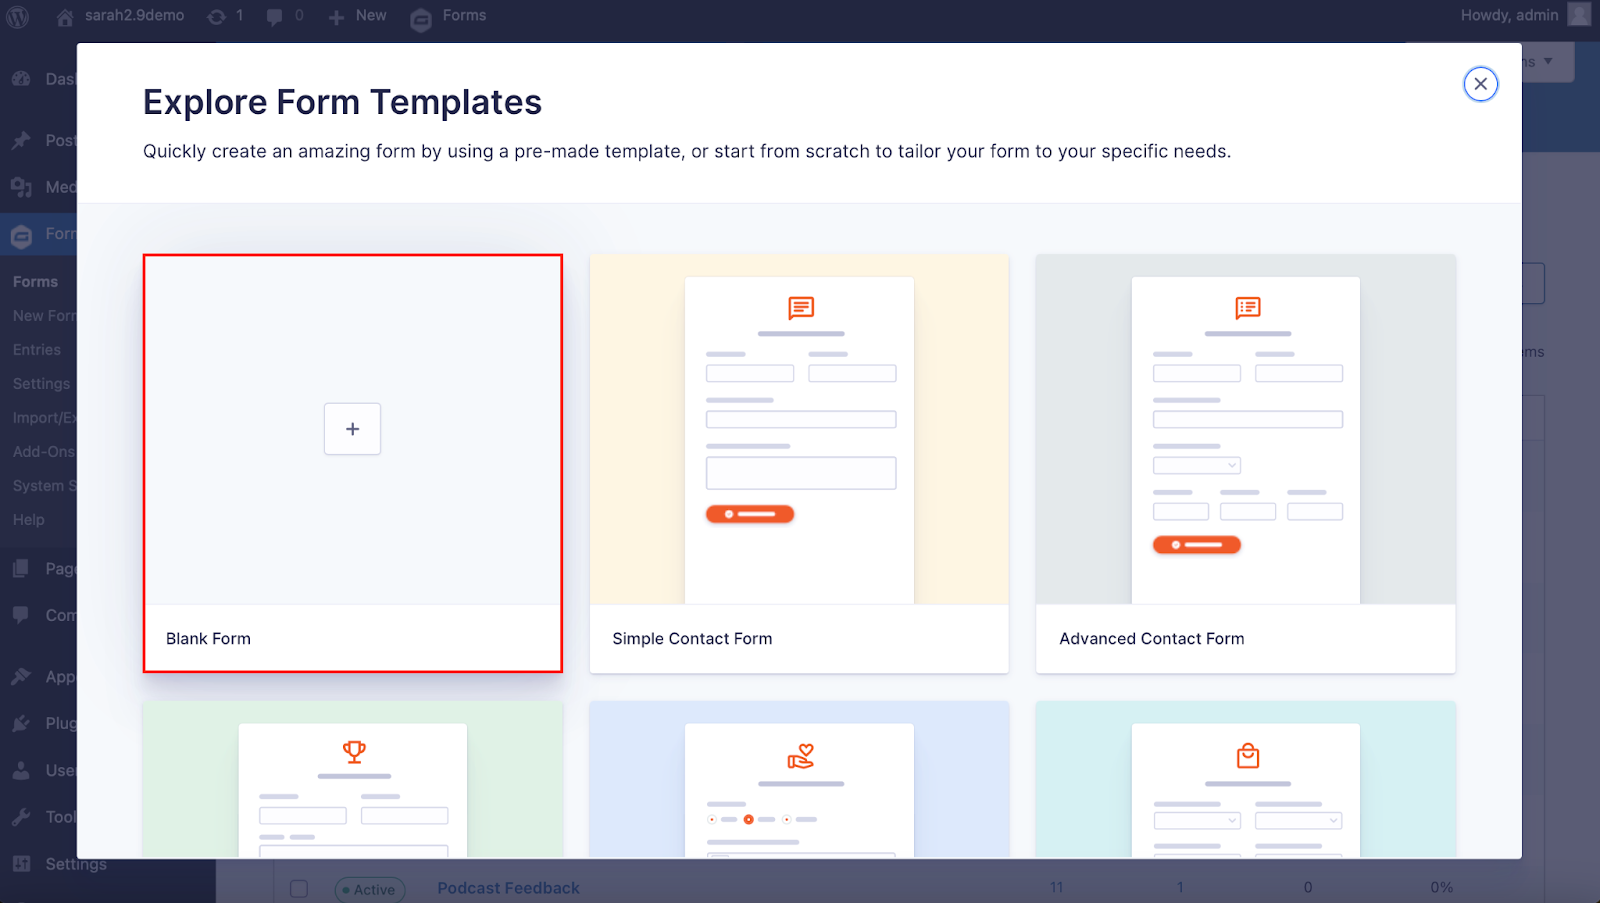
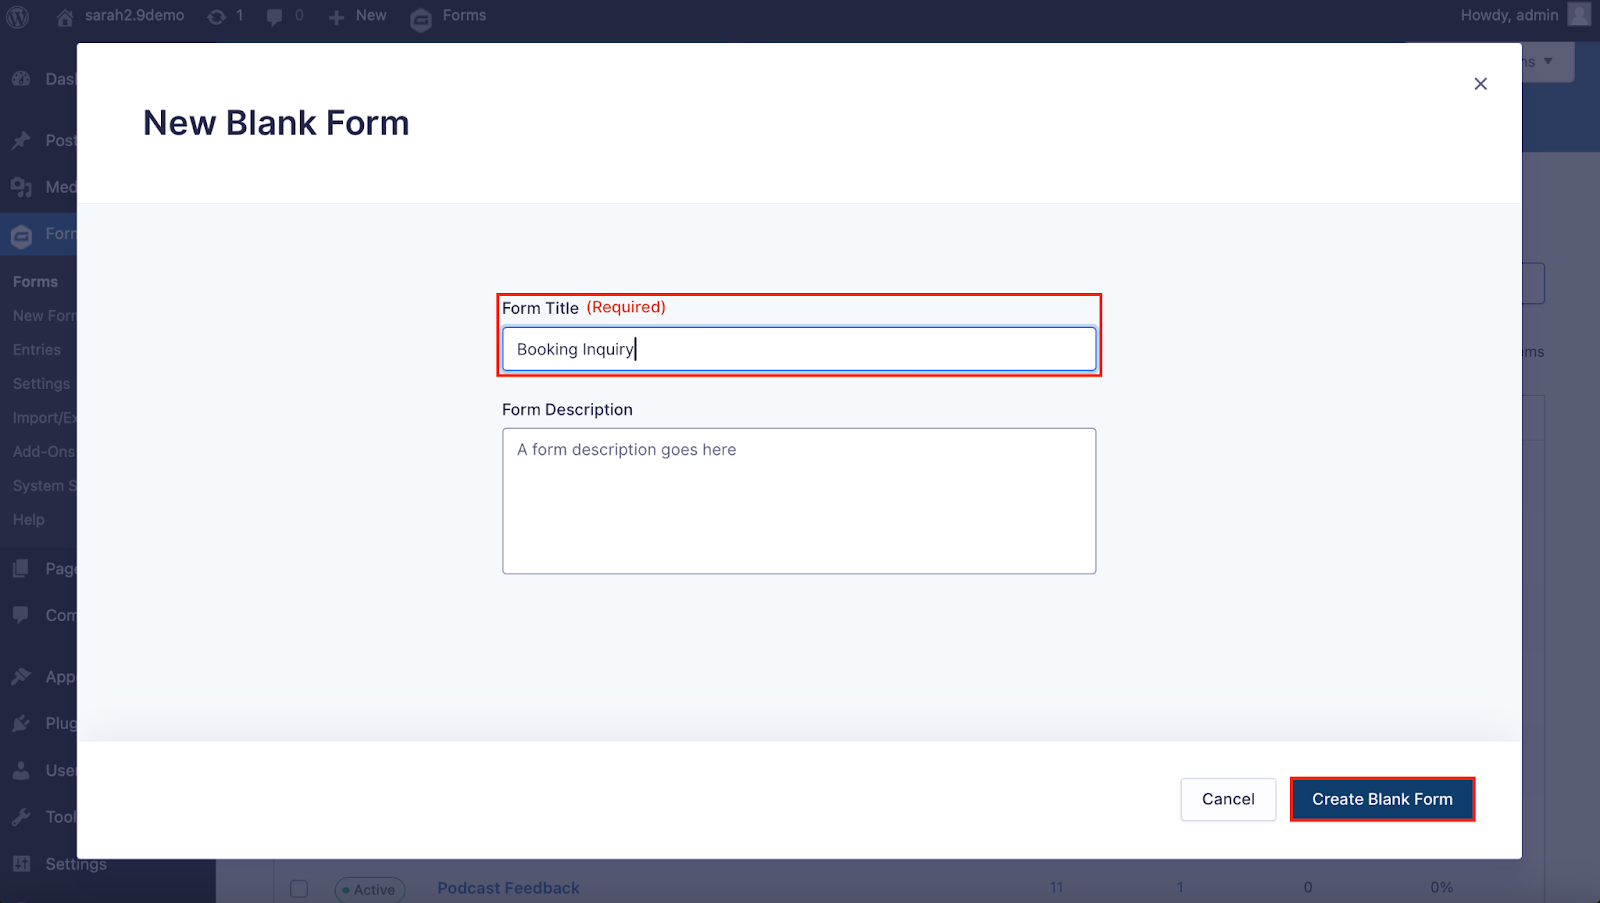
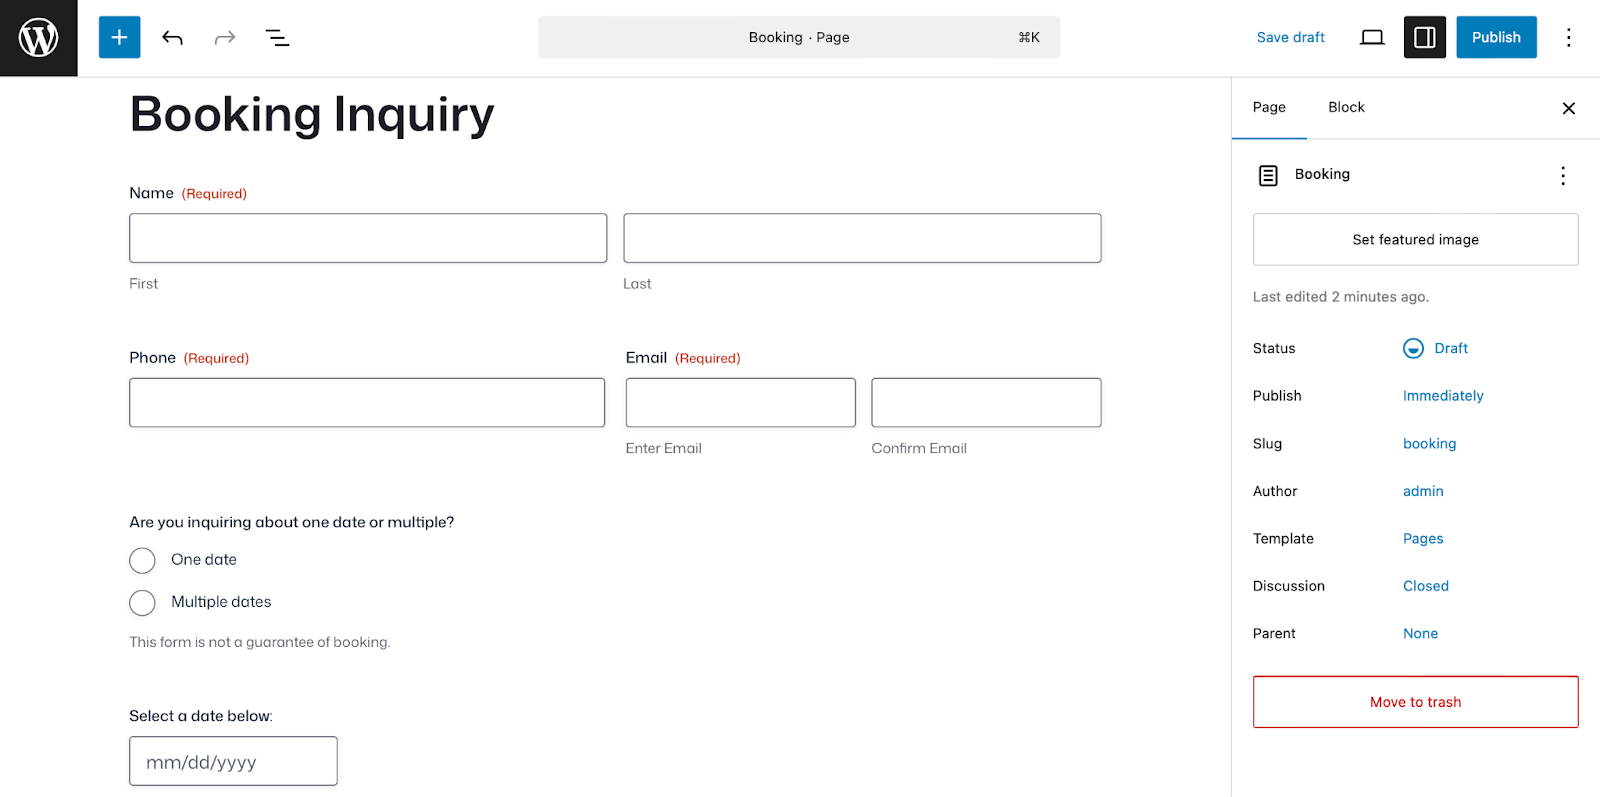
In this tutorial, let’s create a booking inquiry form. Give your form a title and optionally a description, and then click Create Blank Form.
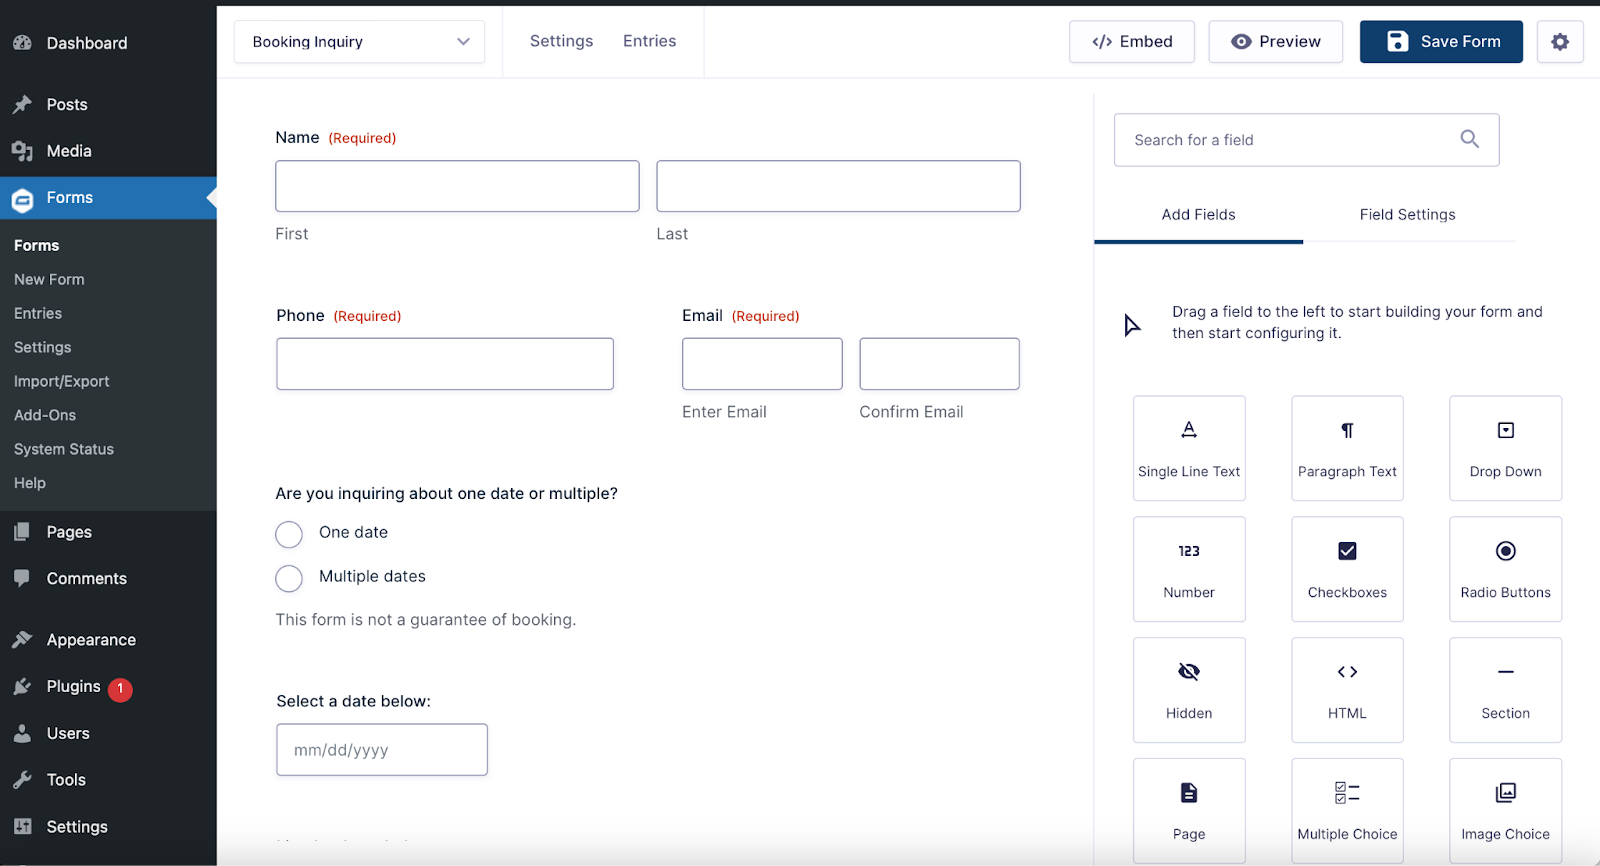
This is the fun part. Drag and drop fields onto your form and arrange them as needed. Edit the field settings to make fields required, modify the appearance, add conditional logic and so on. With Gravity Forms, you have an enormous amount of flexibility when it comes to customization. When you are satisfied, click Save Form.
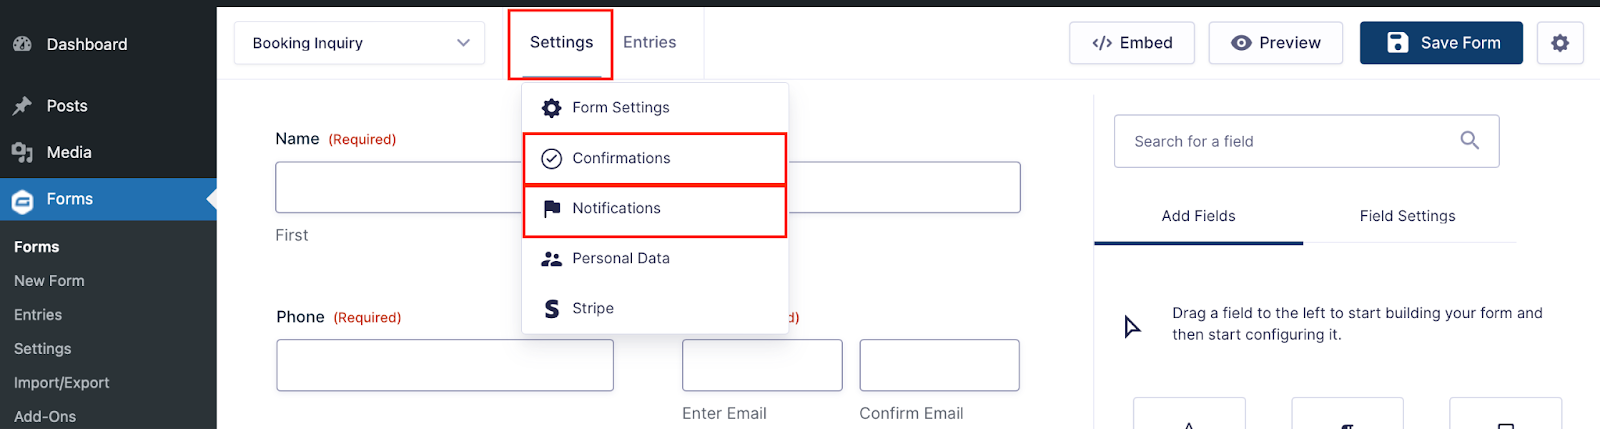
Under Settings, you can further enhance your form by customizing the notifications and confirmations to let your users know their form has been submitted successfully. Our documentation will help you get started with notifications and confirmations.
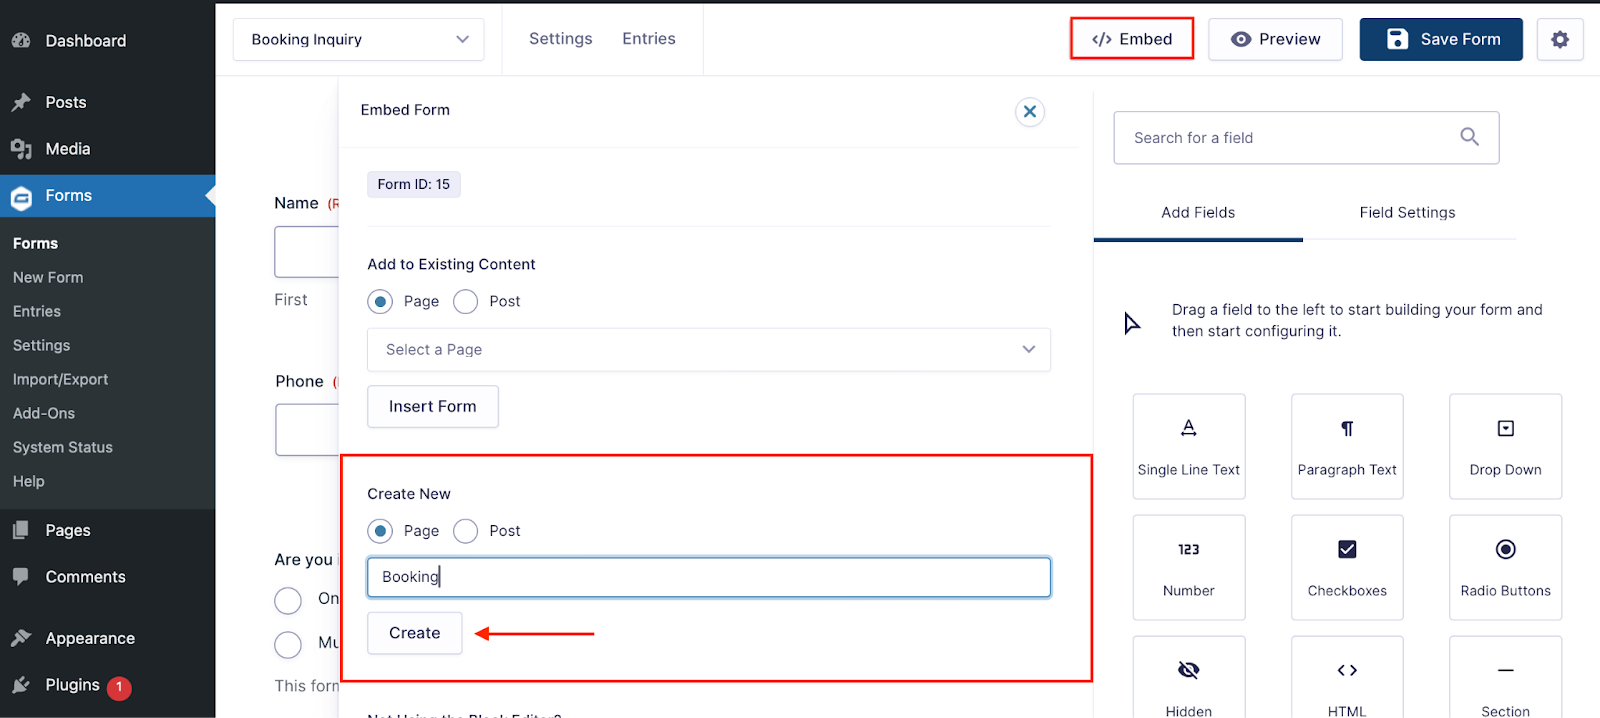
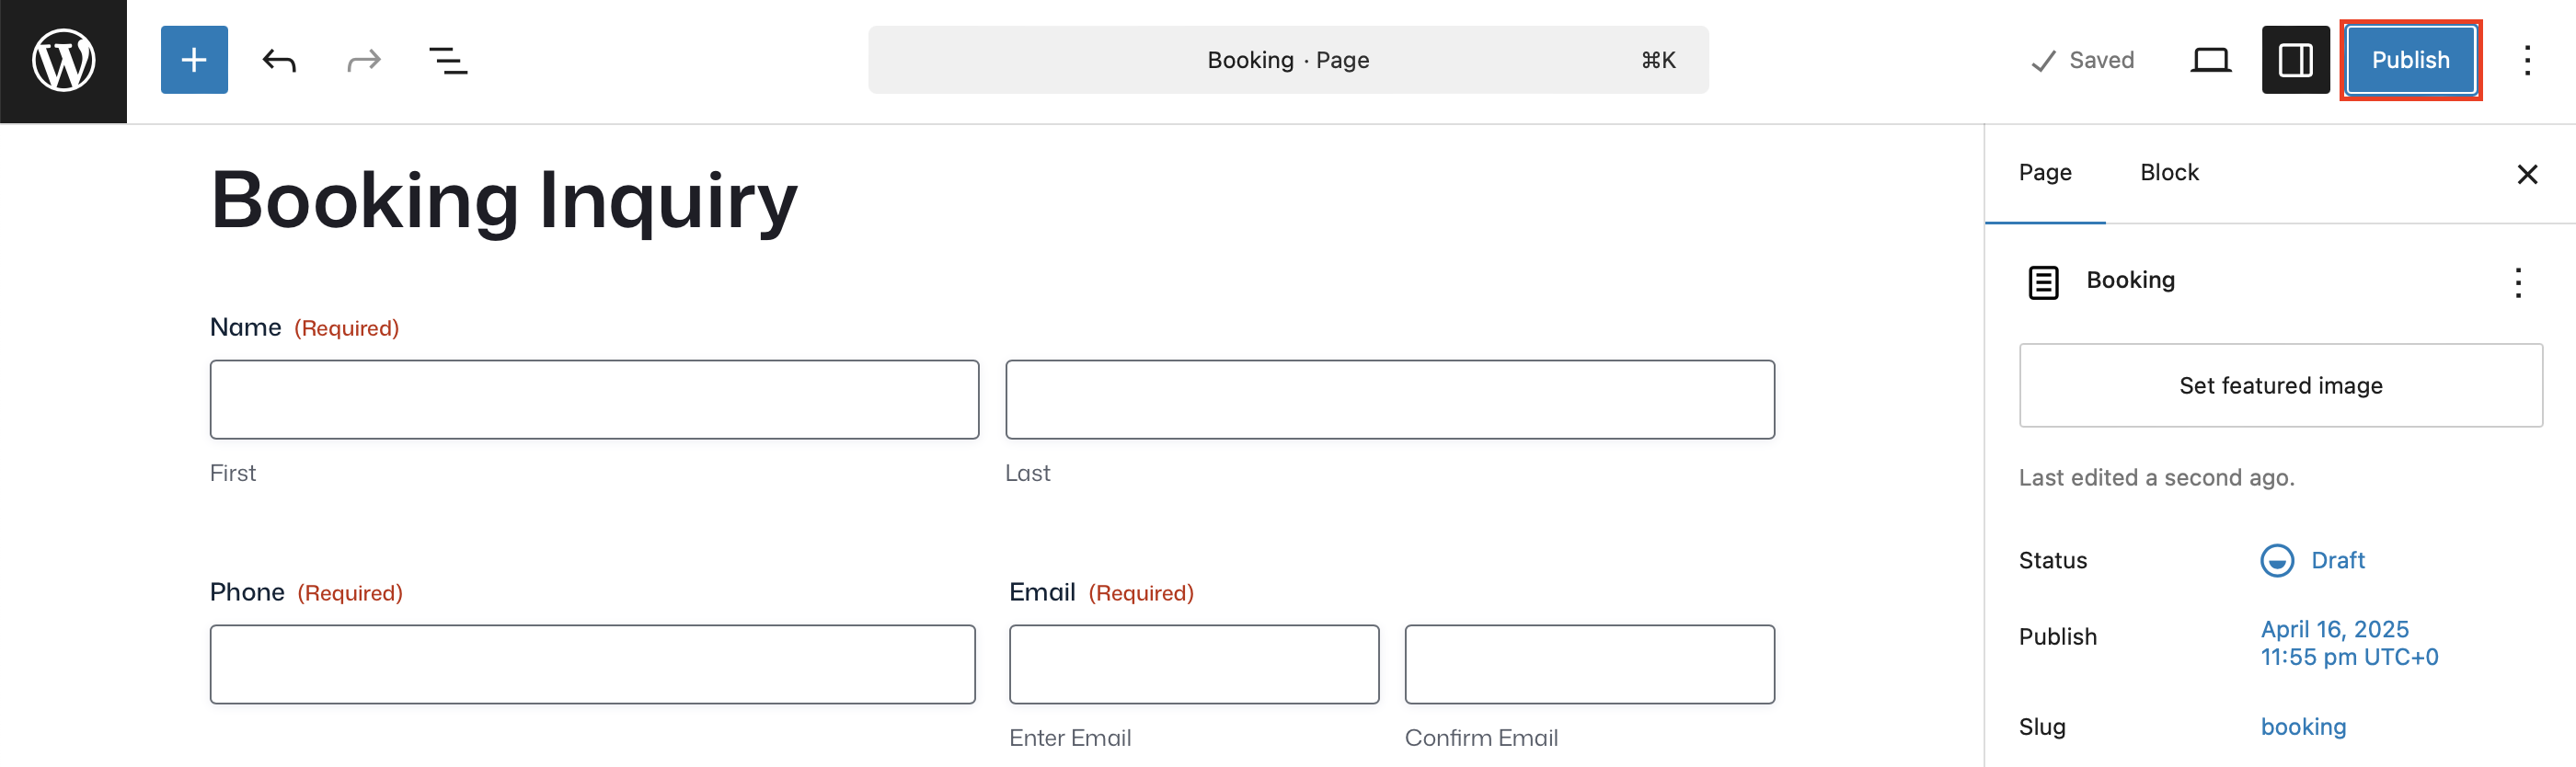
To view the finished product, embed the form on any page or post. In this case, we’ll embed the form on a new page.
From here, you’ll be able to view your form and make further changes to style your form via the block editor as needed. Don’t worry, this page starts out in Draft status, so you can still make as many changes as you need to before publishing for the world to see.
Test your form
Make sure to test your form by submitting a few test entries. The easiest way to do this is from the page editor, by clicking Preview in new tab.
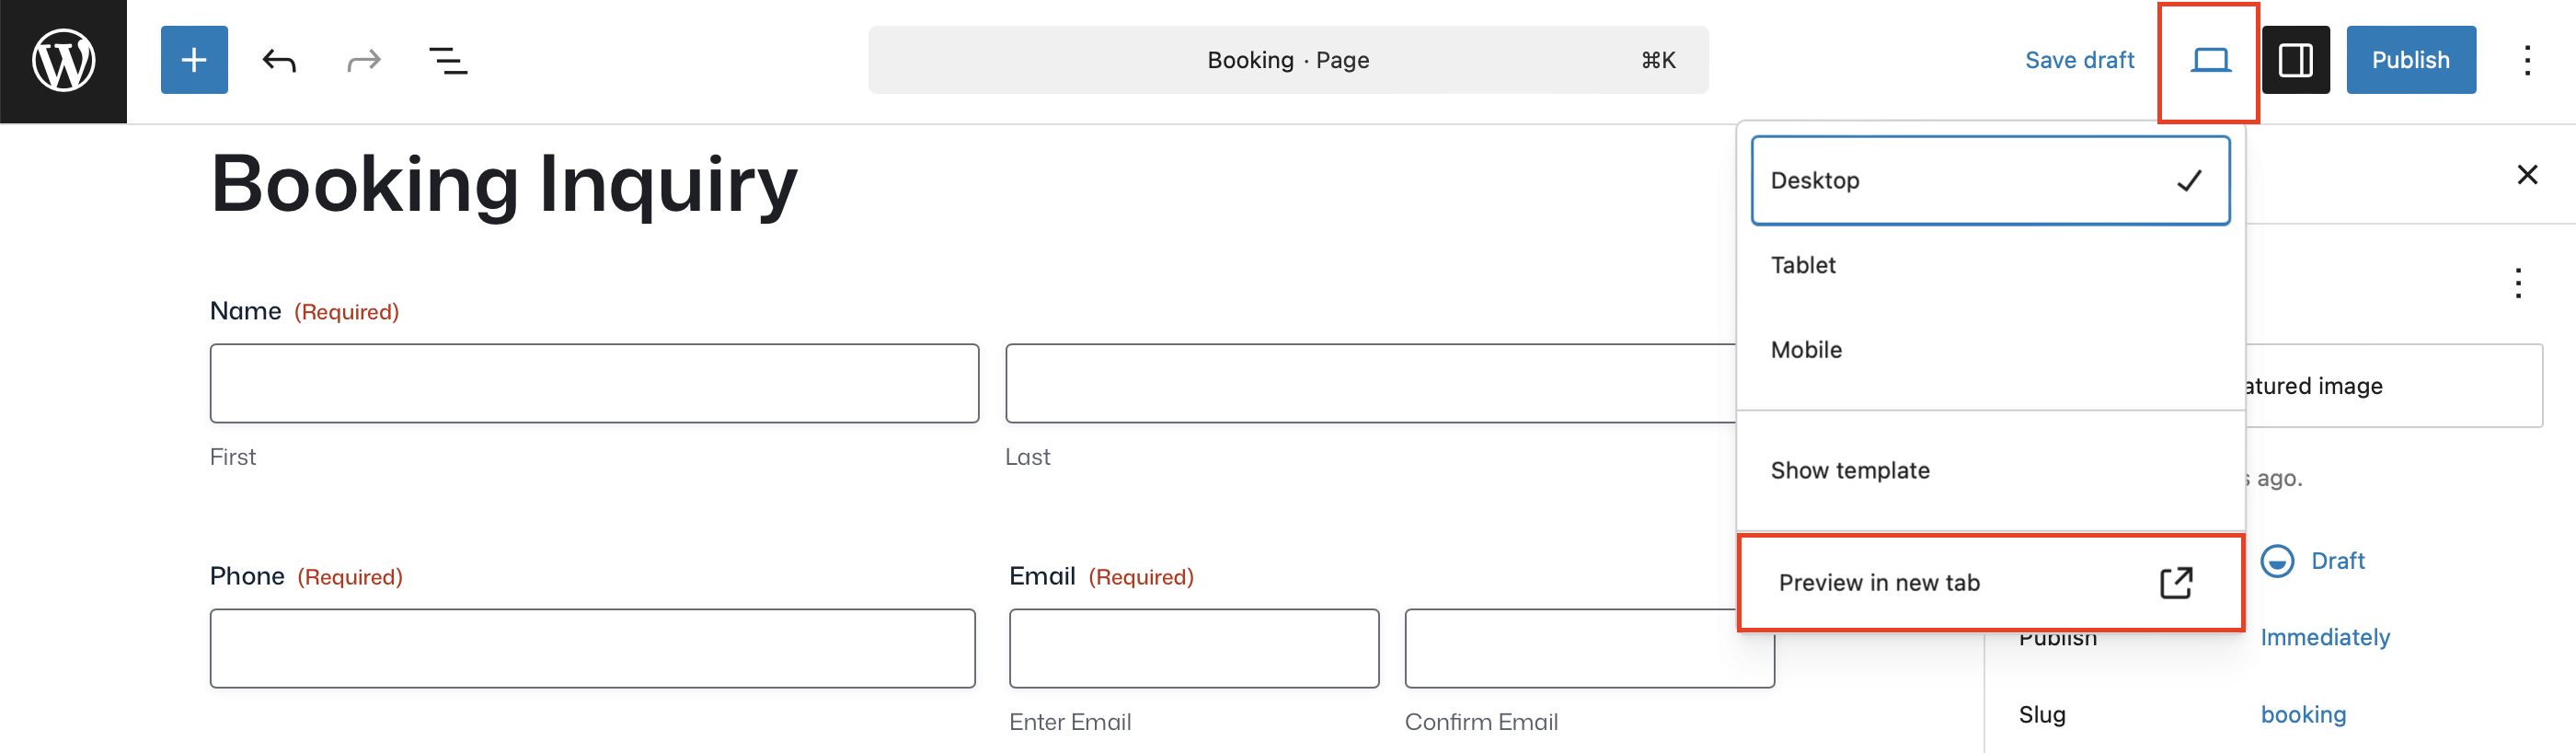
Fill out the form and click to submit.
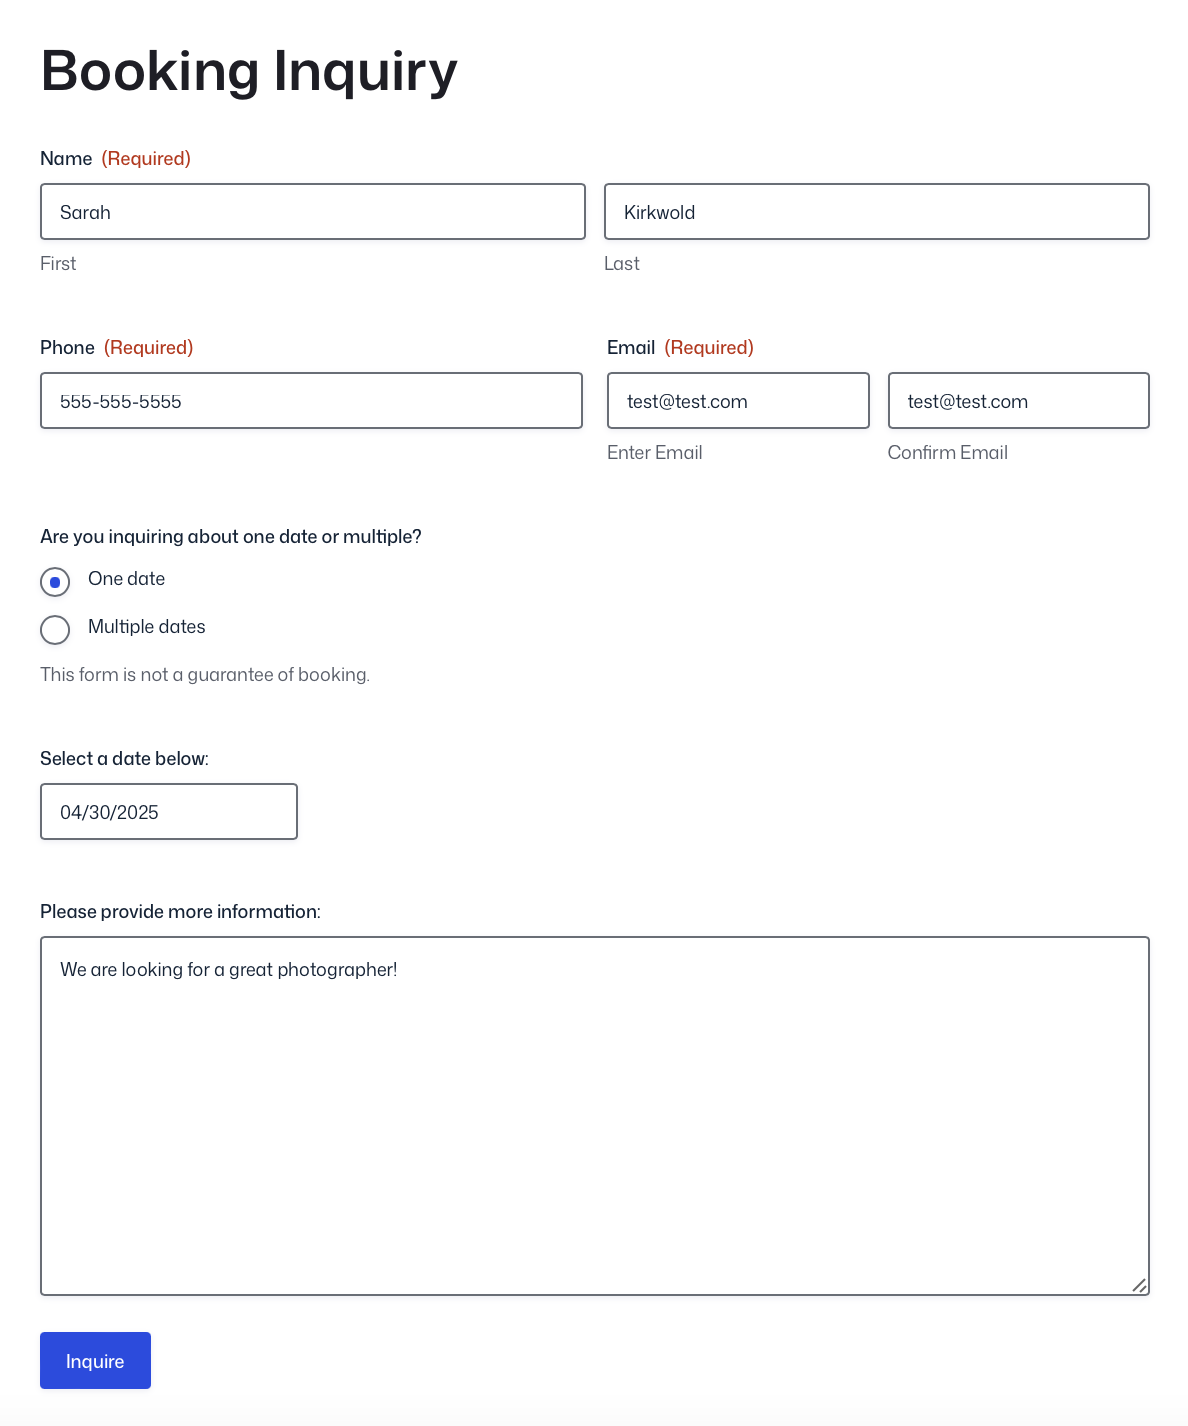
This will ensure everything is working as expected and that all submissions are being routed correctly. This is also how you’ll be able to validate your confirmation messages and notifications, if you’ve added any.
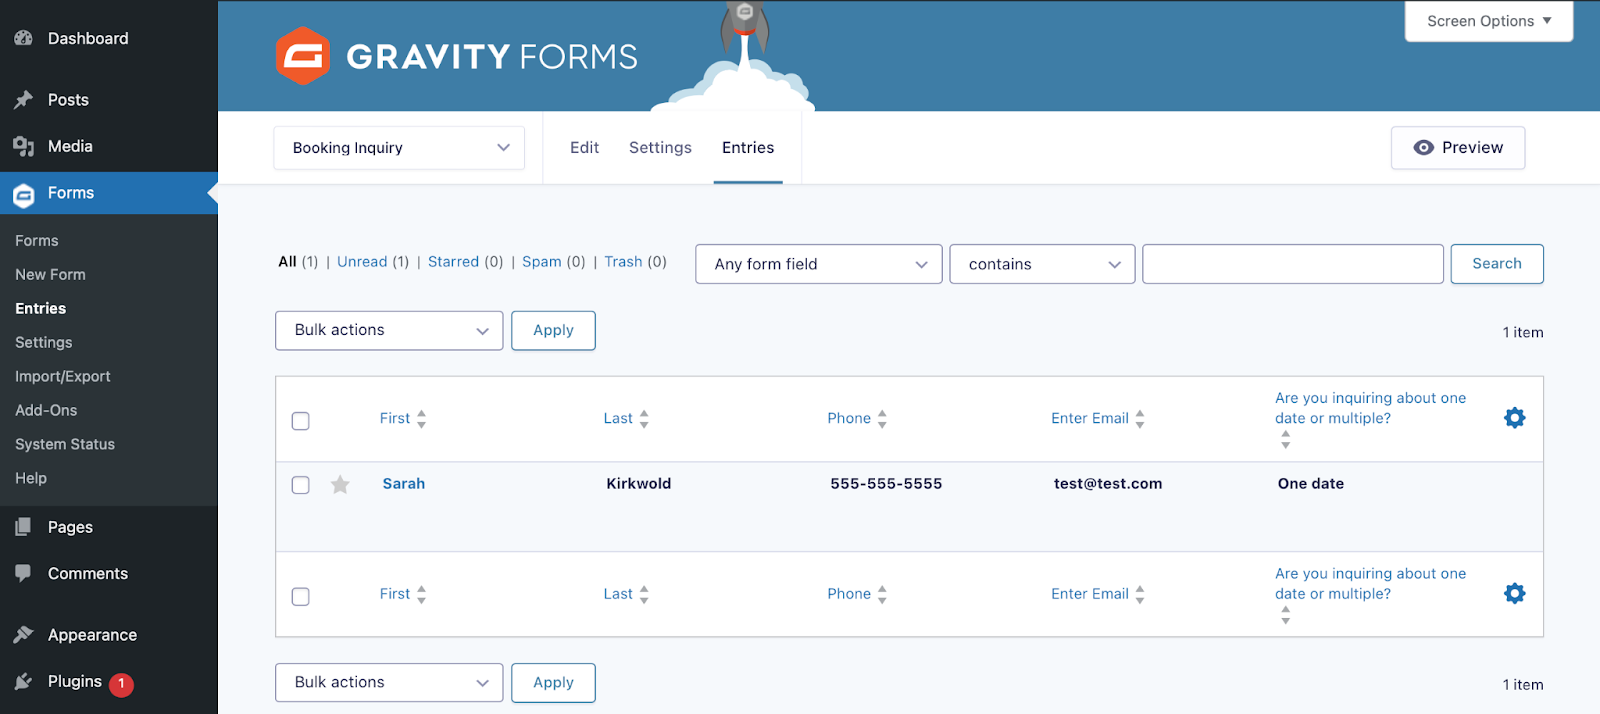
To check that your form submission has been received, head to your Forms list and click Entries.
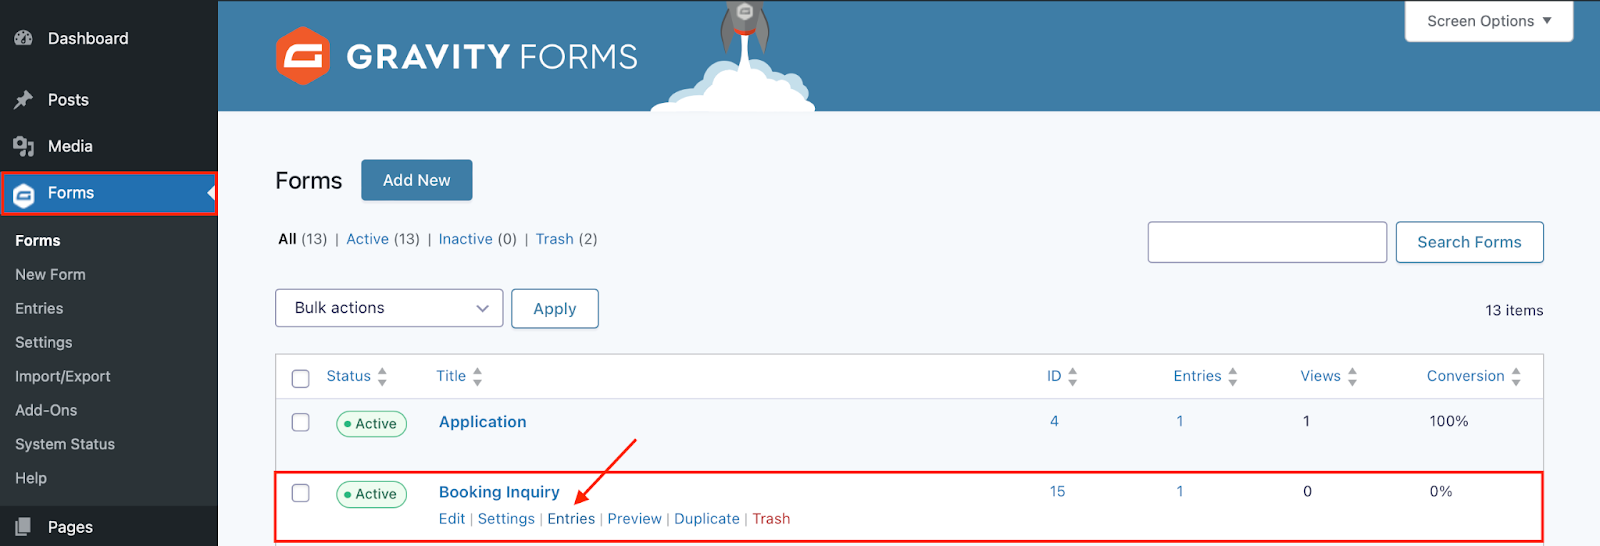
Here you should see the test entry you just submitted, and can confirm everything is working properly.
Publish your form
When you are ready to publish your page, simply navigate back to the page you created and click Publish. That’s it!
Enhance your form
If you really want to take your forms to the next level, you can extend the functionality of your WordPress site by taking advantage of the many features and add-ons available with your Gravity Forms license.
To name a few:
Enable conditional logic
Think of conditional logic as an “if-this-then-that” system. For example, if someone inquires about booking you for a wedding gig, then show additional questions about location.
Check out our documentation to learn more about conditional logic.
Set up confirmations and notifications
Confirmations appear after someone submits your form. You can show a simple “Thank you” message, or direct them to take further action like signing up to your email list, or invite them to follow you on social media.
Notifications are the emails that get sent from your WordPress website. Send payment receipts, booking confirmations, and more – automatically.
Accept file uploads
Add the File Upload field to accept things like signed contracts, inspiration pics, and more.
Learn more about the many other fields you can use in the Gravity Forms documentation.
Easily integrate with other tools
Gravity Forms integrates seamlessly with a wide range of third-party tools. Whether you’re integrating your calendar, automating social media posts, or generating contracts, Gravity Forms allows for a smooth workflow.
Check out our expansive list of add-ons and explore the possibilities. For example, if you hold a Pro, Elite, Nonprofit, or Developer (legacy) license, you can take advantage of the powerful Gravity Forms Zapier Add-On, and connect your forms to thousands of other web services.
Control what happens after the form submission
If you want to make your life even easier, you can use a dedicated automation tool like Gravity Flow. Gravity Flow helps photographers focus more on their craft while automating the behind-the-scenes work by streamlining tasks including:
- Booking requests – Automatically route booking requests to the right team member and notify them without manual intervention.
- Pre-Shoot Questionnaires – Send questionnaires for weddings, portraits, or commercial shoots, and automate reminders to fill them out.
- Testimonials – Set up automated approval workflows to instantly review and manage testimonials from your clients.
For more information on Gravity Flow and to see examples of automation in action, check out the video tutorials in our documentation or try out a free demo!
Supercharge your photography website with WordPress and Gravity Forms
As a professional photographer, your website serves as both your portfolio and business hub. When you add Gravity Forms into the mix, you can transform your site into an active tool that helps you manage client relationships and streamline your workflow.
Remember, the easier it is for potential clients to find and contact you, the more likely they are to book your services.
Also, your forms can evolve as your photography business grows. Start with the essentials and gradually add more sophisticated forms as you identify new needs in your workflow.
With WordPress and Gravity Forms working together, you can create a photography website that both showcases your art and works hard behind the scenes. This powerful combination helps you spend less time on administration and more time behind the camera.
Purchase your Gravity Forms license today and start building professional forms in minutes. Your clients will appreciate the polished experience, and you’ll have more time to create beautiful images.

If you want to keep up-to-date with what’s happening on the blog sign up for the Gravity Forms newsletter!