

Interested in WordPress multisite but not sure where to start?
Whether you don’t even know what WordPress multisite is or you’re looking for more advanced information on when and how to use multisite, this post is here to help.
Below, we’ll cover everything that you need to know about WordPress multisite.
We’ll start at the beginning with an introduction to what WordPress multisite is, along with some example use cases and multisite pros and cons to help you know when to use it.
Then, we’ll get into a more actionable guide for how to set up WordPress multisite, as well as how you can use Gravity Forms to enhance your multisite network.
Let’s dig in!
Key takeaways
- WordPress Multisite lets you run multiple websites from a single installation with unique URLs, users, themes, and plugins.
- It’s perfect for businesses, universities, agencies, and WaaS providers that need centralized control across multiple sites.
- Multisite supports subfolders, subdomains, and domain mapping, but has trade-offs like a single point of failure and plugin compatibility challenges.
- Gravity Forms Elite license fully supports Multisite, enabling each site in the network to manage its own forms independently.
- With the Gravity Forms User Registration Add-On, you can auto-provision new sites in a Multisite network during user registration, even charging fees for WaaS setups.
What Is WordPress Multisite?
WordPress multisite is a core WordPress feature that lets you create a network of multiple sites all based on a single WordPress install.
Each website in your multisite network is called a network site, and you’re free to create unlimited network sites.
You can control all of the network sites yourself. Or, you can also give other users their own sites in your network. For example, you could let users sign up at your site to create a free blog (and Gravity Forms can help you do this – more on that later).
You can install themes and plugins from a special Network Admin dashboard. Then, you can choose whether to force enable those extensions across your entire network or give individual site admins the option to activate/deactivate individual options from the list of installed plugins and themes.
Each network site will also get its own unique URL. You can choose from three different approaches for the URL structure:
- Subfolder – each site gets its own subfolder on your main domain name. For example, yourdomain.com/site-1/, yourdomain.com/site-2/, and so on.
- Subdomain – each site gets its own subdomain. For example, site1.yourdomain.com, site2.yourdomain.com, and so on.
- Unique domain (domain mapping) – while this last option requires some more advanced setup, you can also configure your network so that each network site has its own completely unique domain name. For example, site1.com, site2.com, and so on.
Because WordPress multisite is a core feature, you do not need to install any plugins to use WordPress multisite.
However, WordPress multisite is disabled by default, so you won’t see any WordPress multisite functionality unless you specifically enable it in your site’s wp-config.php file. We’ll show you how to do this below.
Example Use Cases for WordPress Multisite
To give you some ideas for how you might use WordPress multisite in the real world, here are some example use cases for WordPress multisite.
We’ll divide these into two categories:
- Using WordPress multisite for your own sites
- Using WordPress multisite for other people’s sites
These are just some ideas to get you started and are by no means the complete exhaustive list of ways to use WordPress multisite.
Multisite for Your Own Websites
- Separate physical locations – if you own a business with multiple physical locations, you can easily create a separate site for each branch (while keeping everything consistent).
- Separate department websites – as with above, you can also use multisite to create a separate site for each department. For example, a lot of universities use WordPress multisite to create sites for their different departments/colleges.
- Team member sites – you can create a unique network site for each team member/agent. For example, you’ll see this a lot with insurance agents, realtors (within the same agency), and so on.
- Intranets – multisite can work great for internal company intranet sites as you can easily create a separate site for each division, team, employee, or any other grouping. You’ll also be able to more easily manage user access, as each employee only needs a single account.
- Multilingual website – you can create a network site for each language version that you want to offer. To make it easier to manage things, you can use a plugin like MultilingualPress.
Multisite for Other People’s Websites
- Website-as-a-Service (WAAS) – you can let people create a website on your network, either for free or by charging them. For example, there are restaurant-focused WaaS tools that make it easy for restaurants to create their own website. The most common well-known example here would be something like WordPress.com.
- Blog networks – you could let people sign up to create their own blogs on your network, much like how Blogspot works (or how WordPress.com worked before shifting more towards a full website builder approach).
- Managing client websites – while there are some very real pros to this and we don’t recommend it for most people, there are some freelancers/agencies that use WordPress multisite to more easily manage their clients’ websites.
Pros and Cons of Using WordPress Multisite
There are both advantages and disadvantages to using WordPress multisite. If you’re considering using it for a project, it’s important to understand both the good and the bad.
Pros of WordPress Multisite
- Manage sites from a single dashboard – instead of needing to log into each site separately, you can manage everything from a single dashboard.
- Ensure consistency – you can make sure that all of your sites use the same design and the same set of plugins. You can still disable plugins on specific network sites if needed.
- Sites can have different content – even though sites share themes/plugins, each site can still have 100% unique content.
- URL structure flexibility – you can use any URL structure that works for your business, even including custom domain names for each site.
- Share users – a user can create one single account to interact with sites across the network.
- Easier updates – instead of needing to update the core software, plugins, and themes for each individual site, you only need to update them one time for your entire network.
Cons of WordPress Multisite
- Single point of failure – because your entire network is powered by a single WordPress install, you have a single point of failure. If anything happens to that install (e.g. it gets hacked or the server goes down), your entire network of sites will go down.
- Network sites can affect one another – if one network site has much higher traffic and/or consumes more resources than the others, that one network site might still slow down on other sites on your network. This wouldn’t happen if each site had its own separate installation and hosting resources.
- Not all plugins are compatible – some plugins won’t work with WordPress multisite. Or, you might need to purchase a special license to use the plugin on multisite (which is usually more expensive). Note – Gravity Forms is fully compatible with WordPress multisite as long as you have a Gravity Forms Elite license.
- Hard to separate sites – while it is possible to split a network site into its own separate install, it’s very complicated to do. This is one key reason why multisite is generally not a good option for client sites.
How to Set Up WordPress Multisite
Now that you understand the context and theory behind WordPress multisite, let’s go more hands-on and look at how to set up WordPress multisite to launch your own network.
While you can enable WordPress multisite on an existing WordPress site, we’re going to focus on setting up a new WordPress install for multisite.
If you want to enable multisite on your existing site, you can use the manual method below. However, we recommend being careful if you use the “subfolder” approach to network site URLs, as you could have a chance of conflicting URLs if you’re setting up multisite on an existing site.
Option 1: Enable WordPress Multisite In Your Host’s Installer
Nowadays, many web hosts offer an option to enable WordPress multisite in their regular WordPress installer tools.
If your host does offer this feature, it’s by far the easiest way to set up WordPress multisite, and we recommend that you use it.
Here are a few examples of what this option might look like at different hosts.
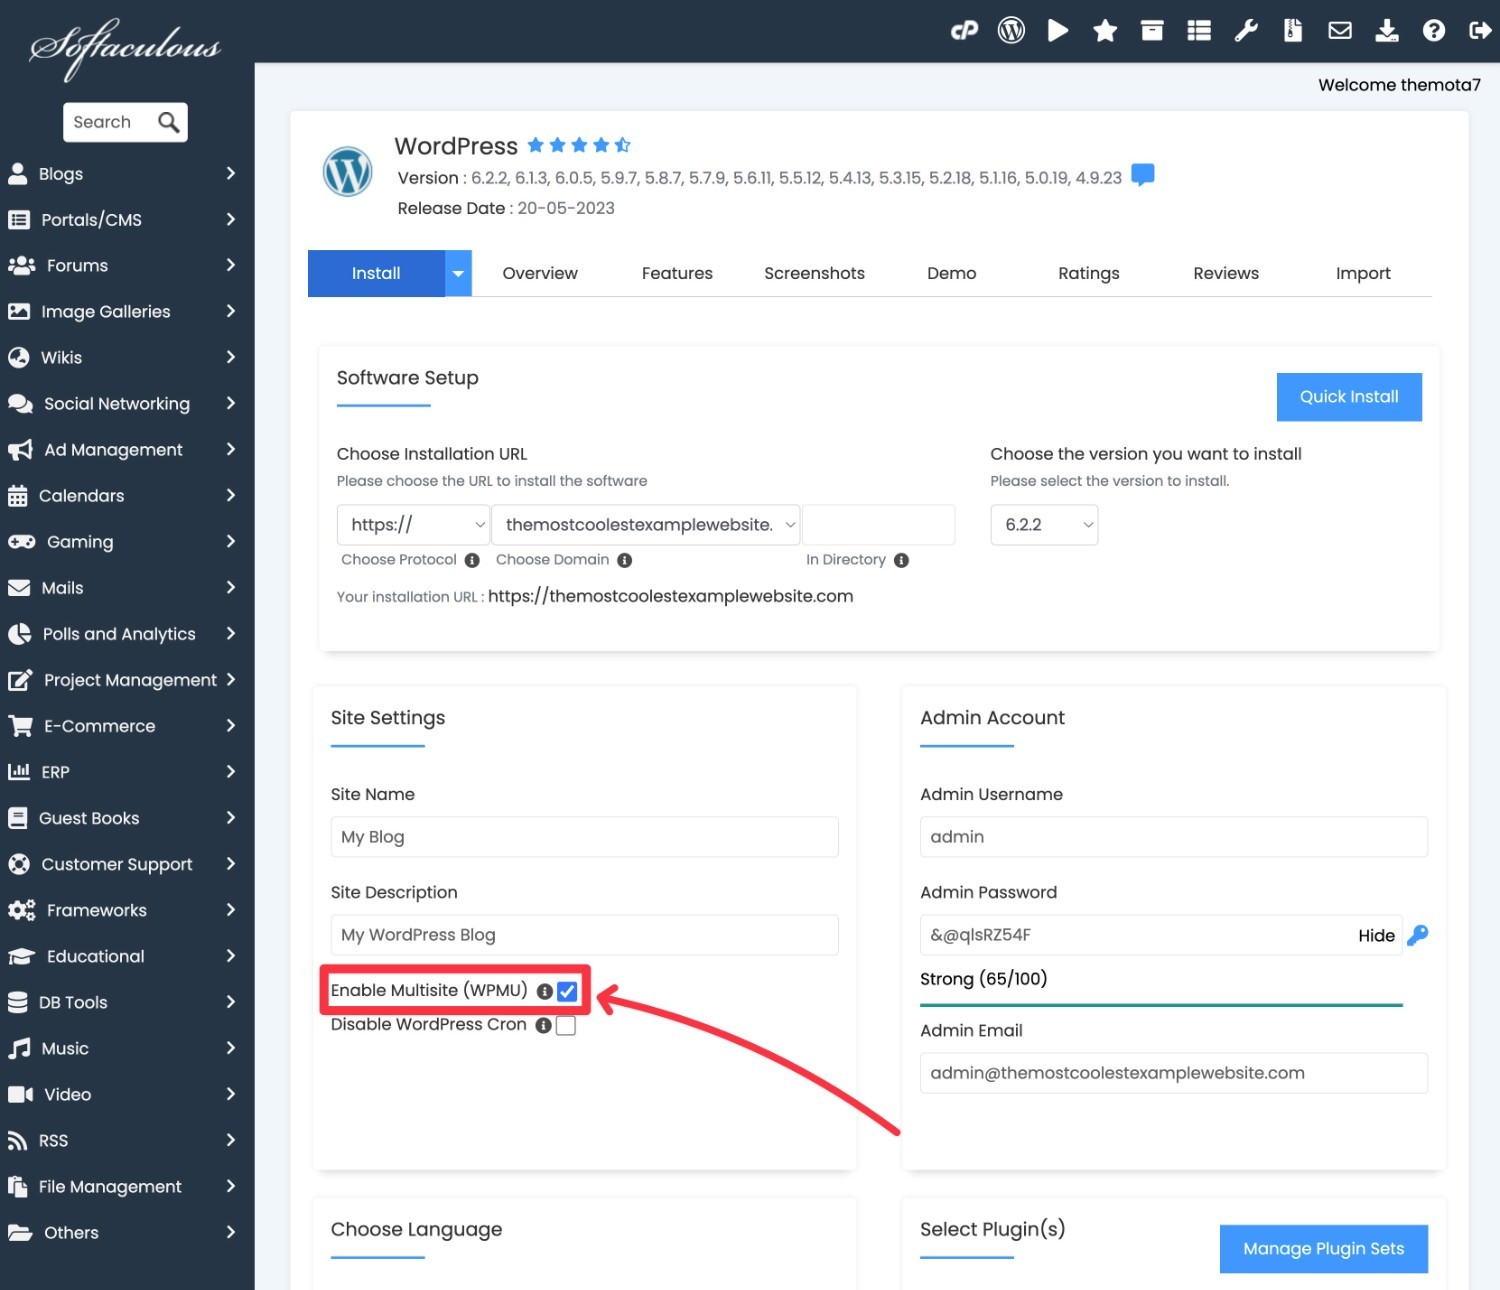
Softaculous (cPanel) multisite option:
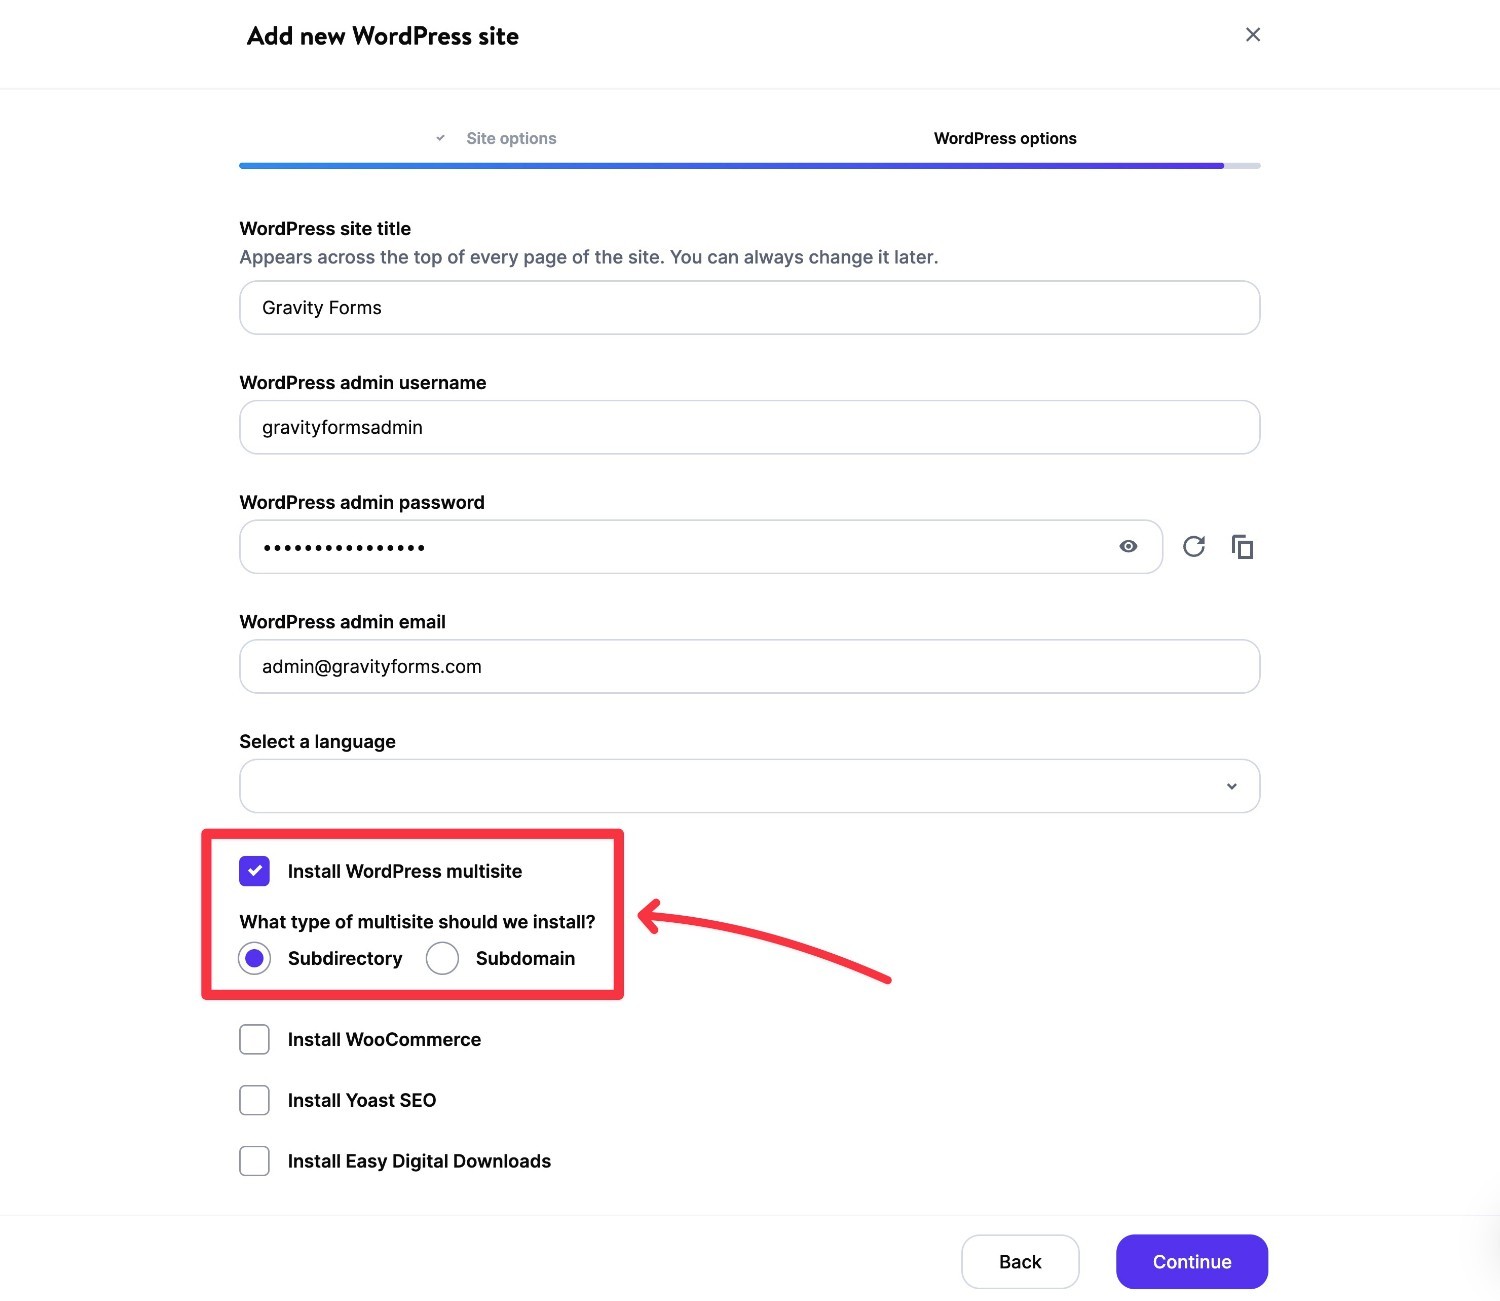
Kinsta WordPress multisite option:
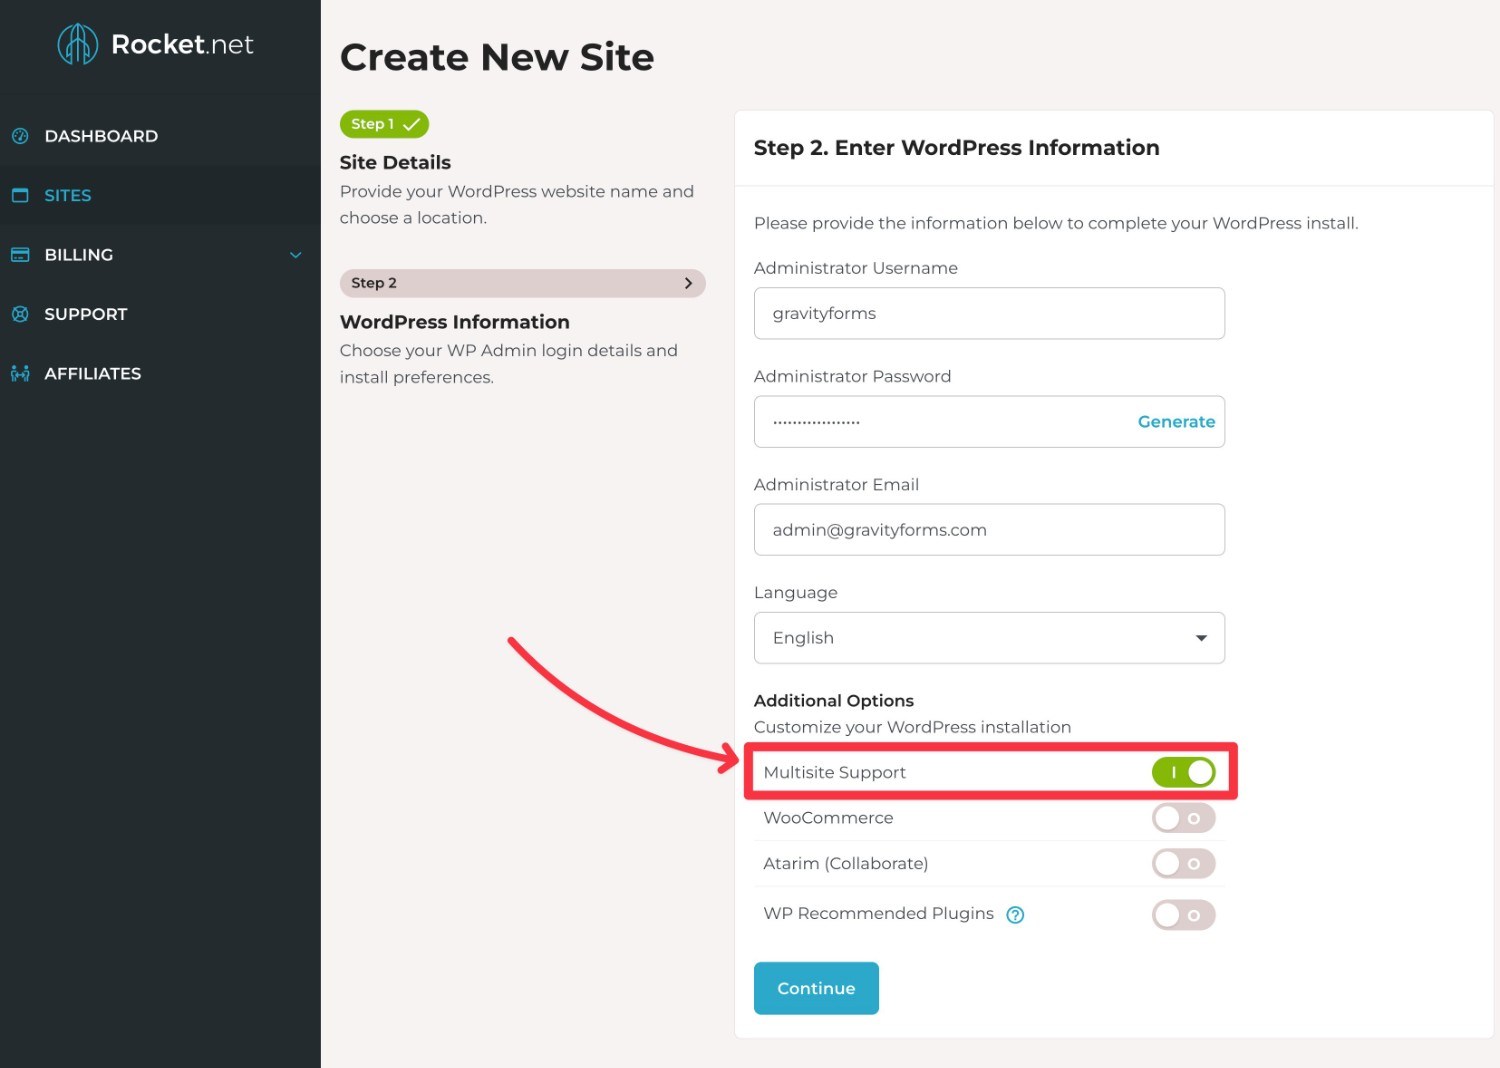
Rocket.net WordPress multisite option:
The exact process might be different at your host, so we recommend consulting your host’s documentation or reaching out to their support team if you’re not sure how anything works.
Option 2: Manually Enable WordPress Multisite
If your host doesn’t offer a WordPress multisite option, you can also manually enable WordPress multisite on any WordPress install. While this takes a little more work, it’s nothing too complex.
Here’s a quick rundown of how it works…
1. Create a Regular WordPress Single Site Install
To start, create a regular WordPress install, just like you would install WordPress for a regular site.
You can use your host’s auto-installer tool or manually install WordPress yourself.
2. Enable Multisite in wp-config.php
Once you have a regular WordPress install, you’ll need to perform a few steps to enable WordPress multisite.
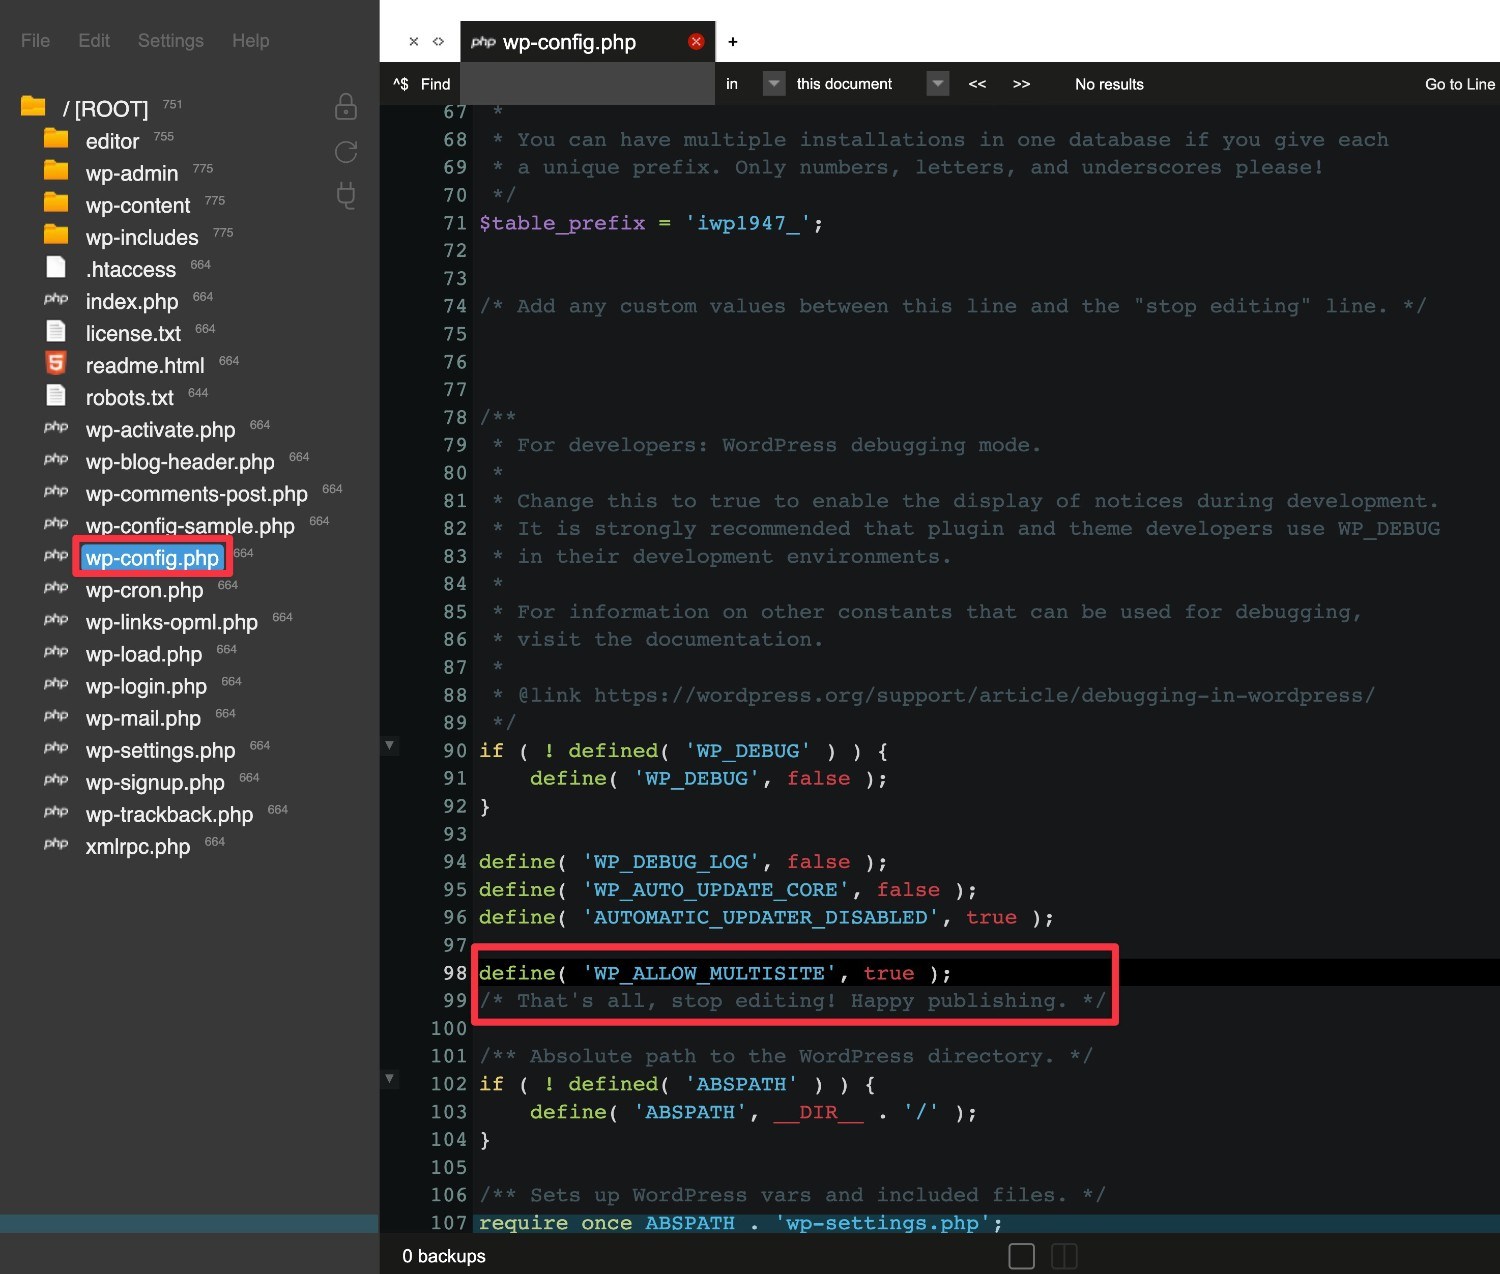
First, edit your site’s wp-config.php file using SFTP or something like cPanel File Manager.
Add the following code snippet immediately above the line that says /* That's all, stop editing! Happy publishing. */
define( 'WP_ALLOW_MULTISITE', true );
Save the file.
3. Go to Network Setup
Open your WordPress dashboard and go to the new Tools → Network Setup menu (this menu will only be visible after you’ve added the previous code snippet).
You can now choose between using subfolders or subdomains for your network site URL structure.
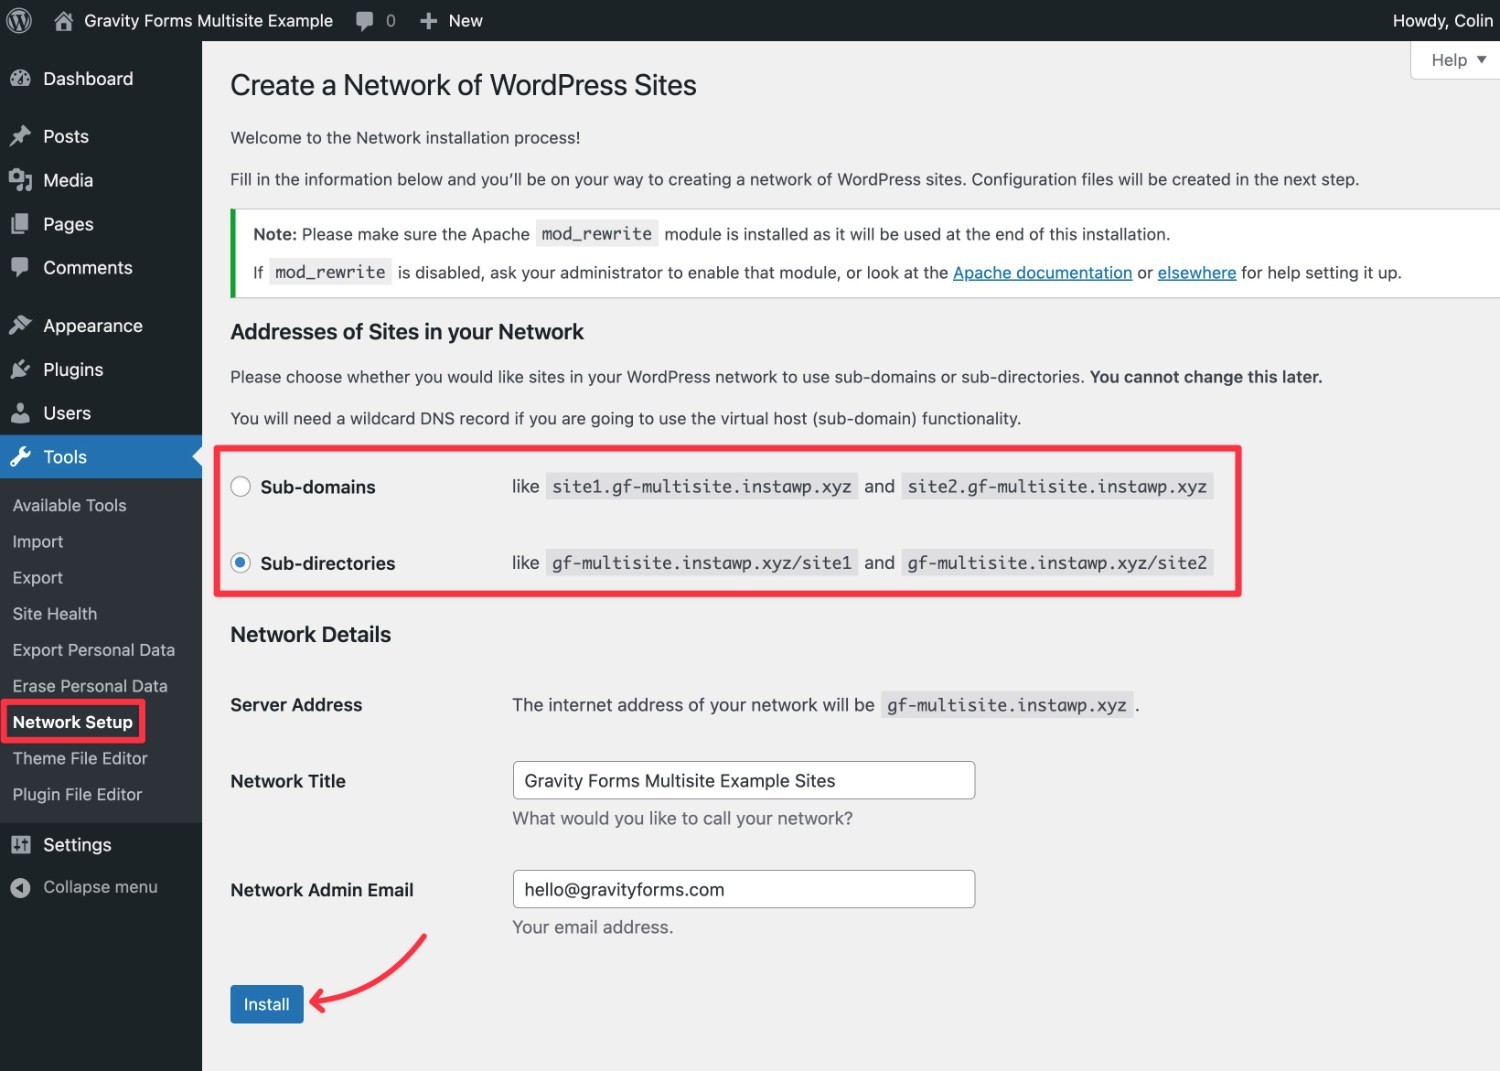
While you can also use domain mapping to use a custom domain name for each network site, that’s outside the scope of this article.
Once you’ve made your choices, click the Install button.
4. Add Code Snippets to Configure URL Structure
Once you choose your URL structure and click Install, you’ll see two more code snippets that you need to add to your site – one goes in your wp-config.php file (above the Happy publishing line) and the other completely replaces the existing WordPress code in your .htaccess file.
In the .htaccess file, the WordPress code should be between # BEGIN WordPress and # END WordPress comments. If you’ve added any custom code to the .htaccess file, you should avoid overwriting that.
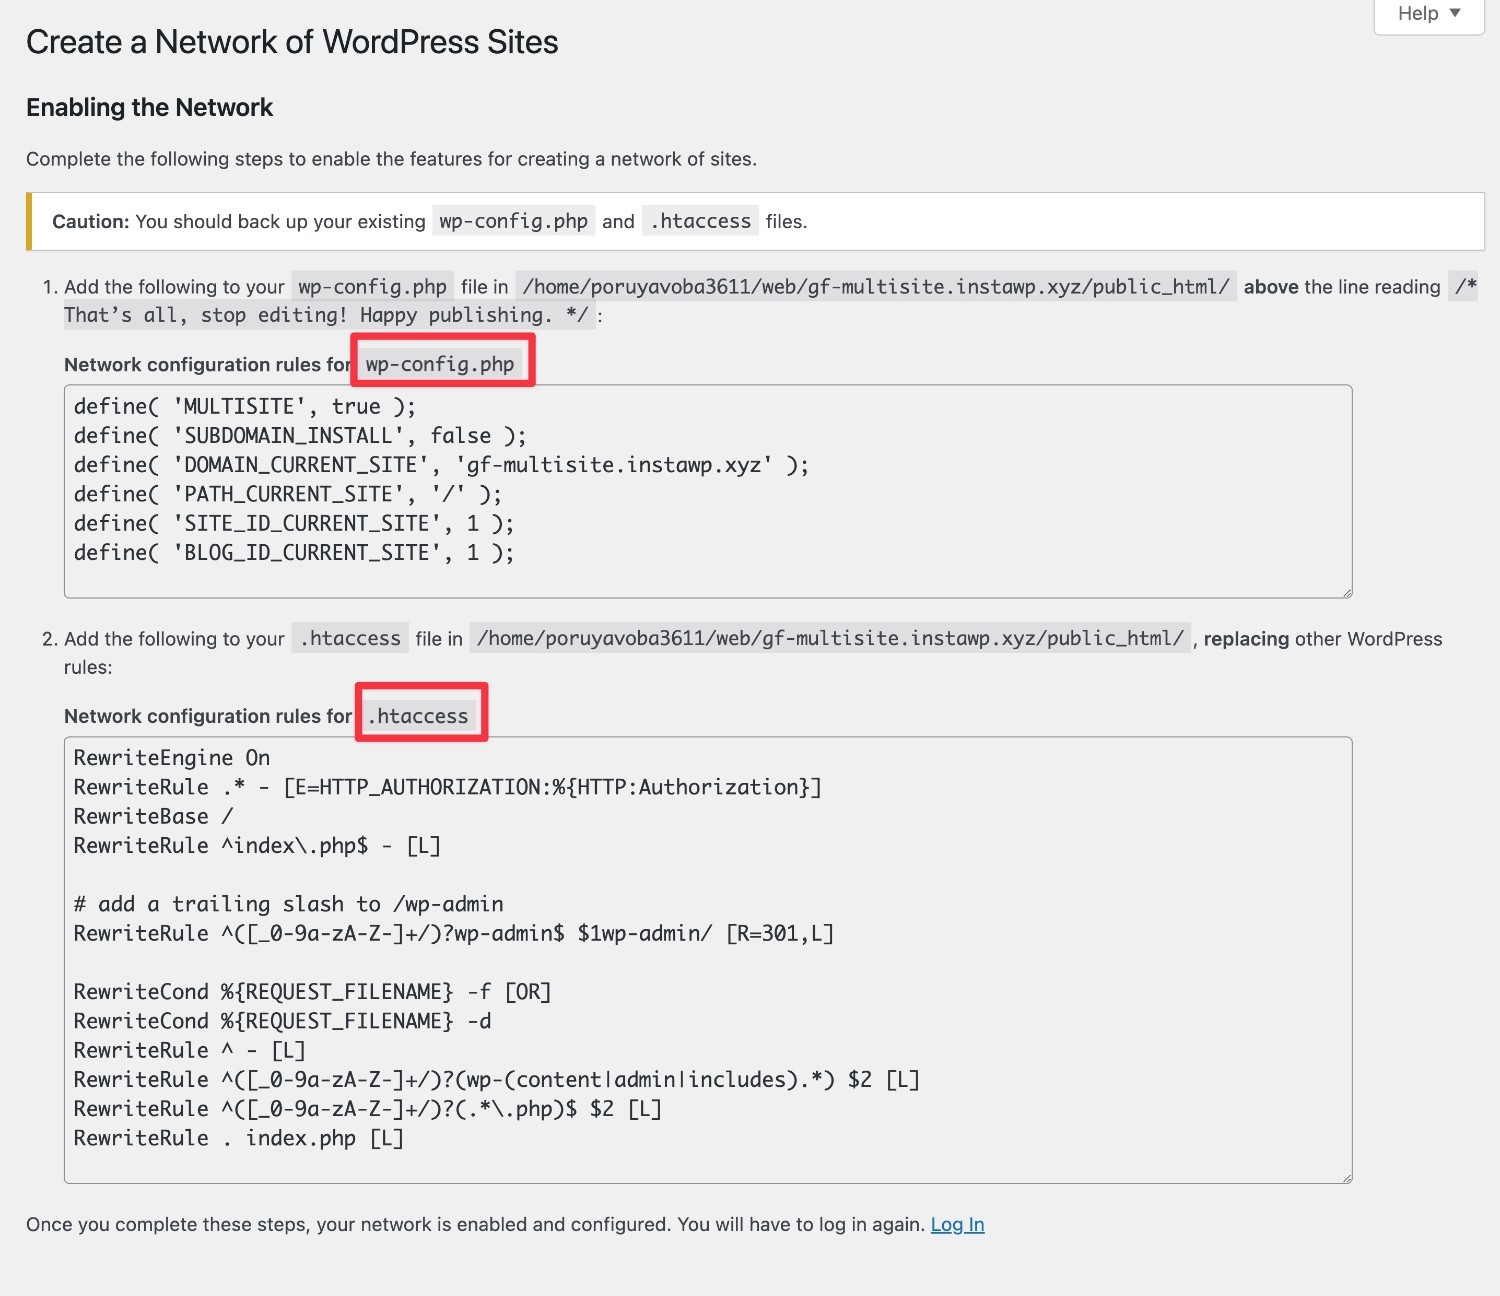
Note – if you’re using the subdomain structure, you’ll also need to set up wildcard subdomains. This allows your network to create new subdomains “on the fly” as you add network sites. You can typically do this via something like cPanel or Plesk – here’s the WordPress.org doc that covers it.
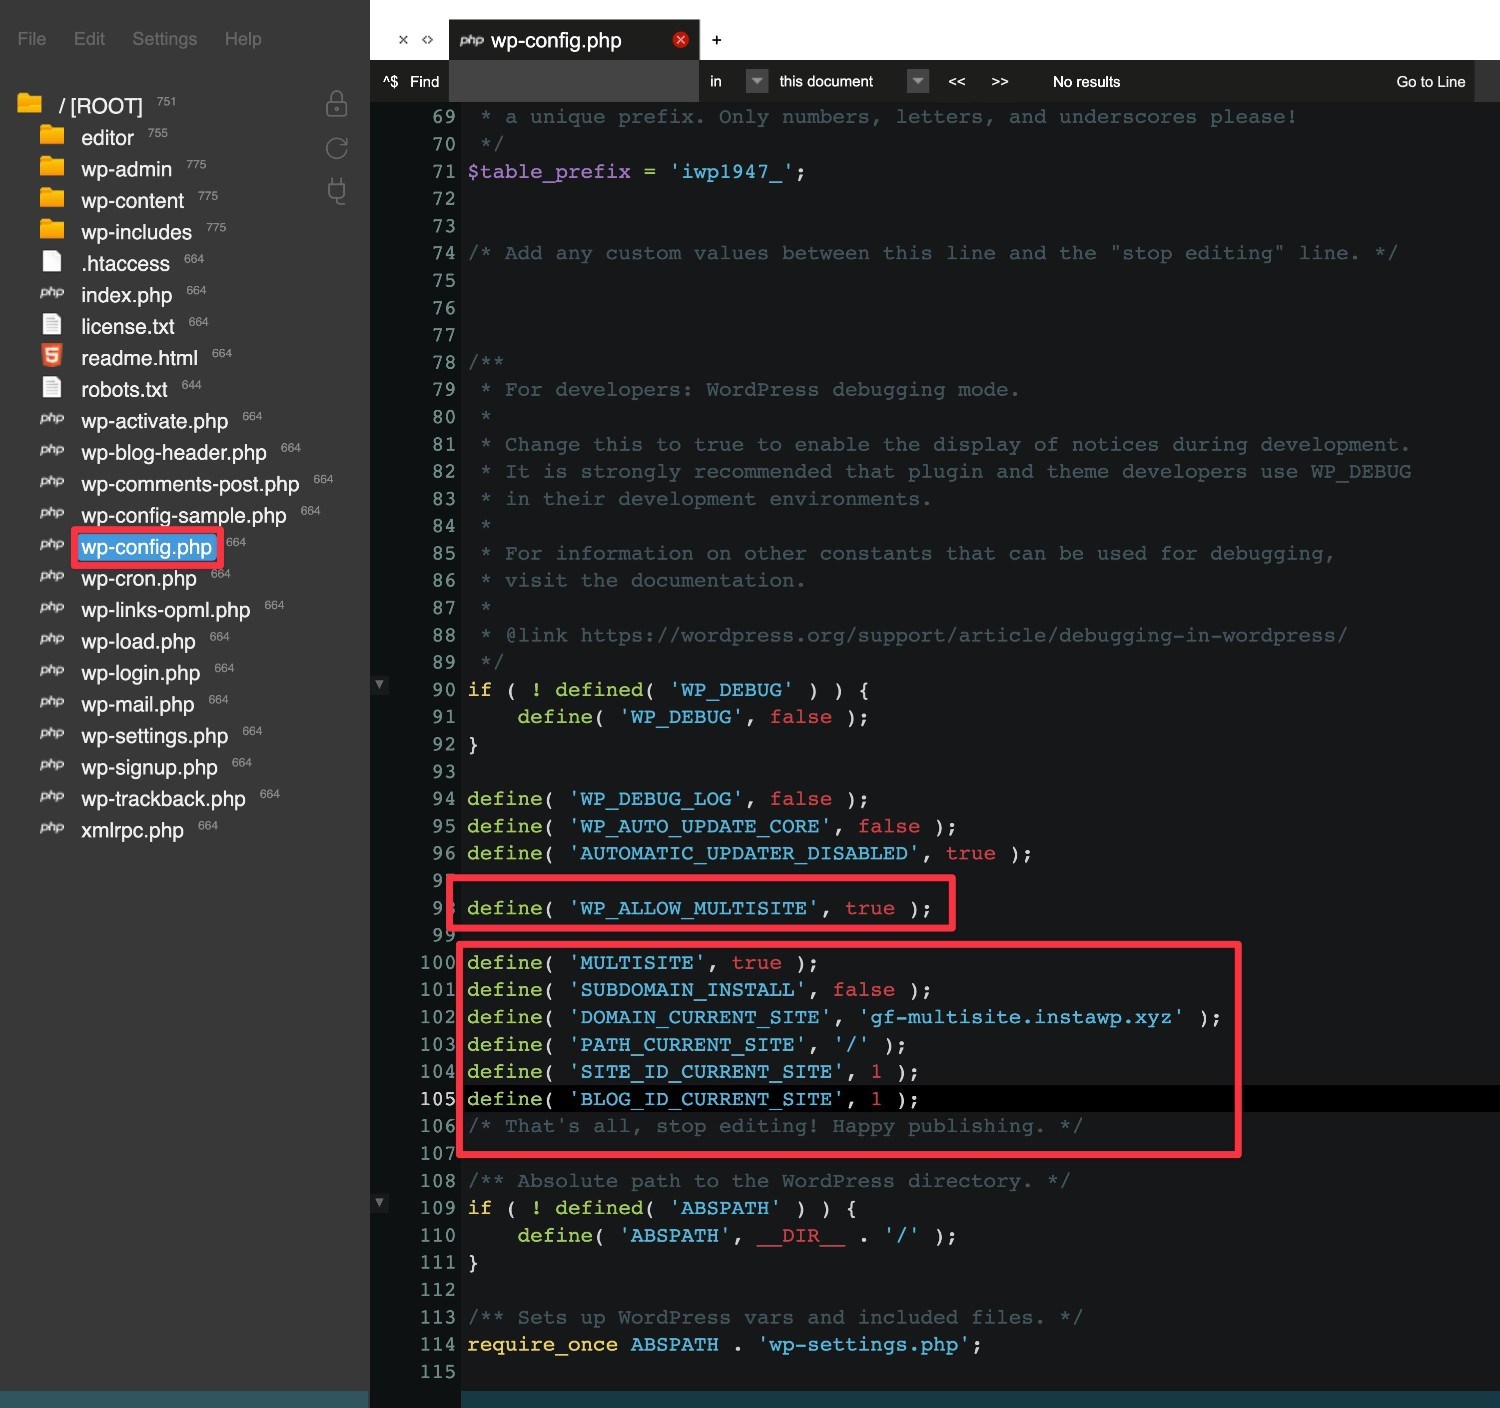
Here’s an example of what the wp-config.php code might look like – you can see that the original code snippet is still there, as well as the new code snippet.
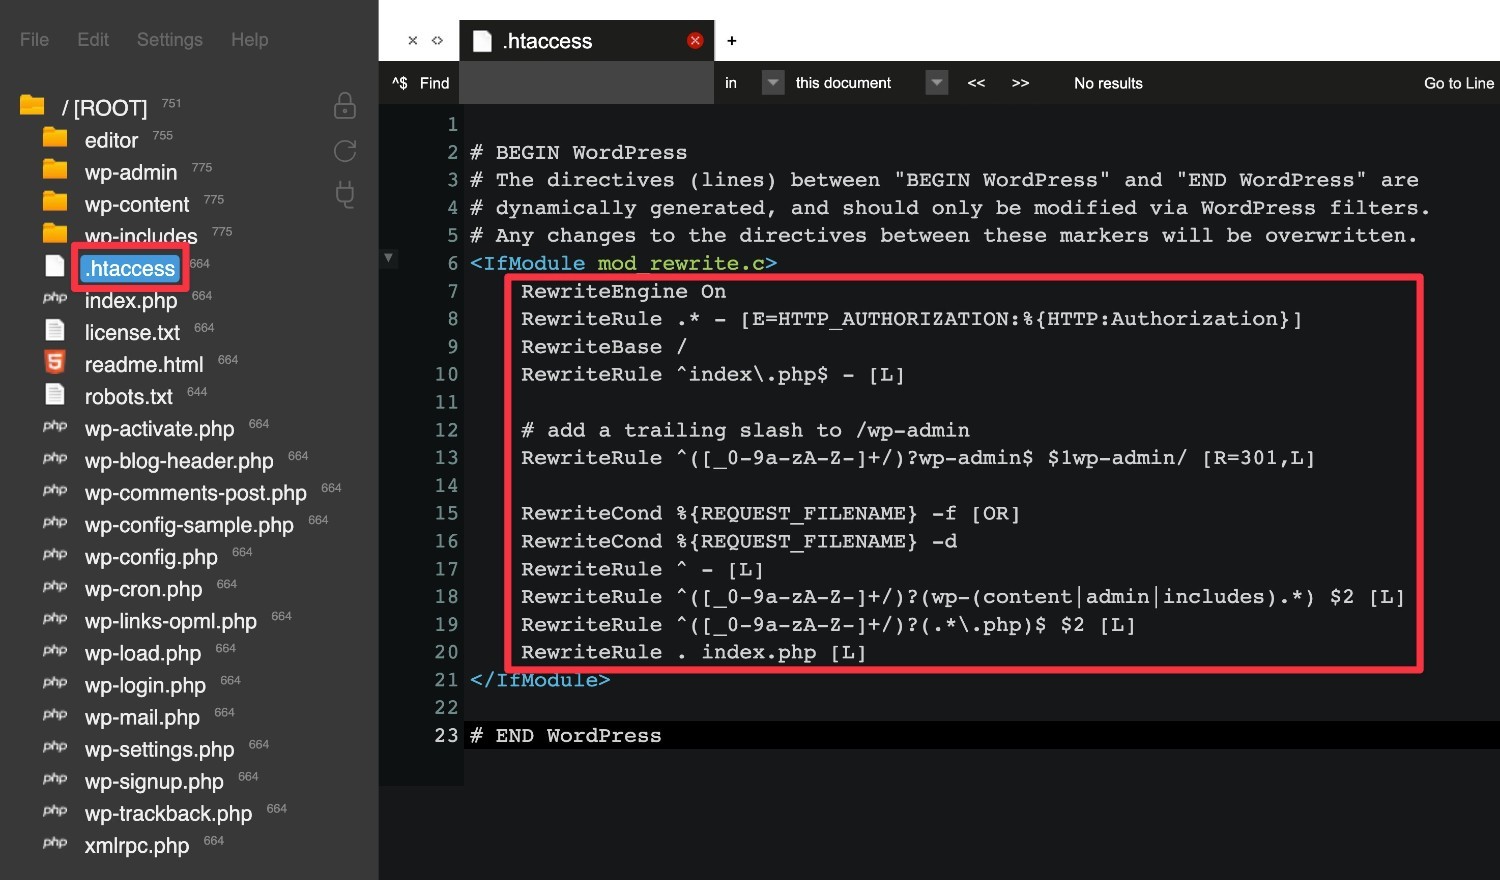
And here’s what the new .htaccess file looks like:
Once you’ve added the two code snippets above, you’re pretty much done.
When you go to your WordPress dashboard, you’ll be prompted to log in again.
How to Manage Your Network from the Network Admin
Once you’ve set up WordPress multisite using your host’s autoinstaller or the manual method above, you’re ready to start working with your network.
To manage your multisite network, you’ll get a new Network Admin dashboard that you can access from the main WordPress dashboard by going to My Sites → Network Admin.
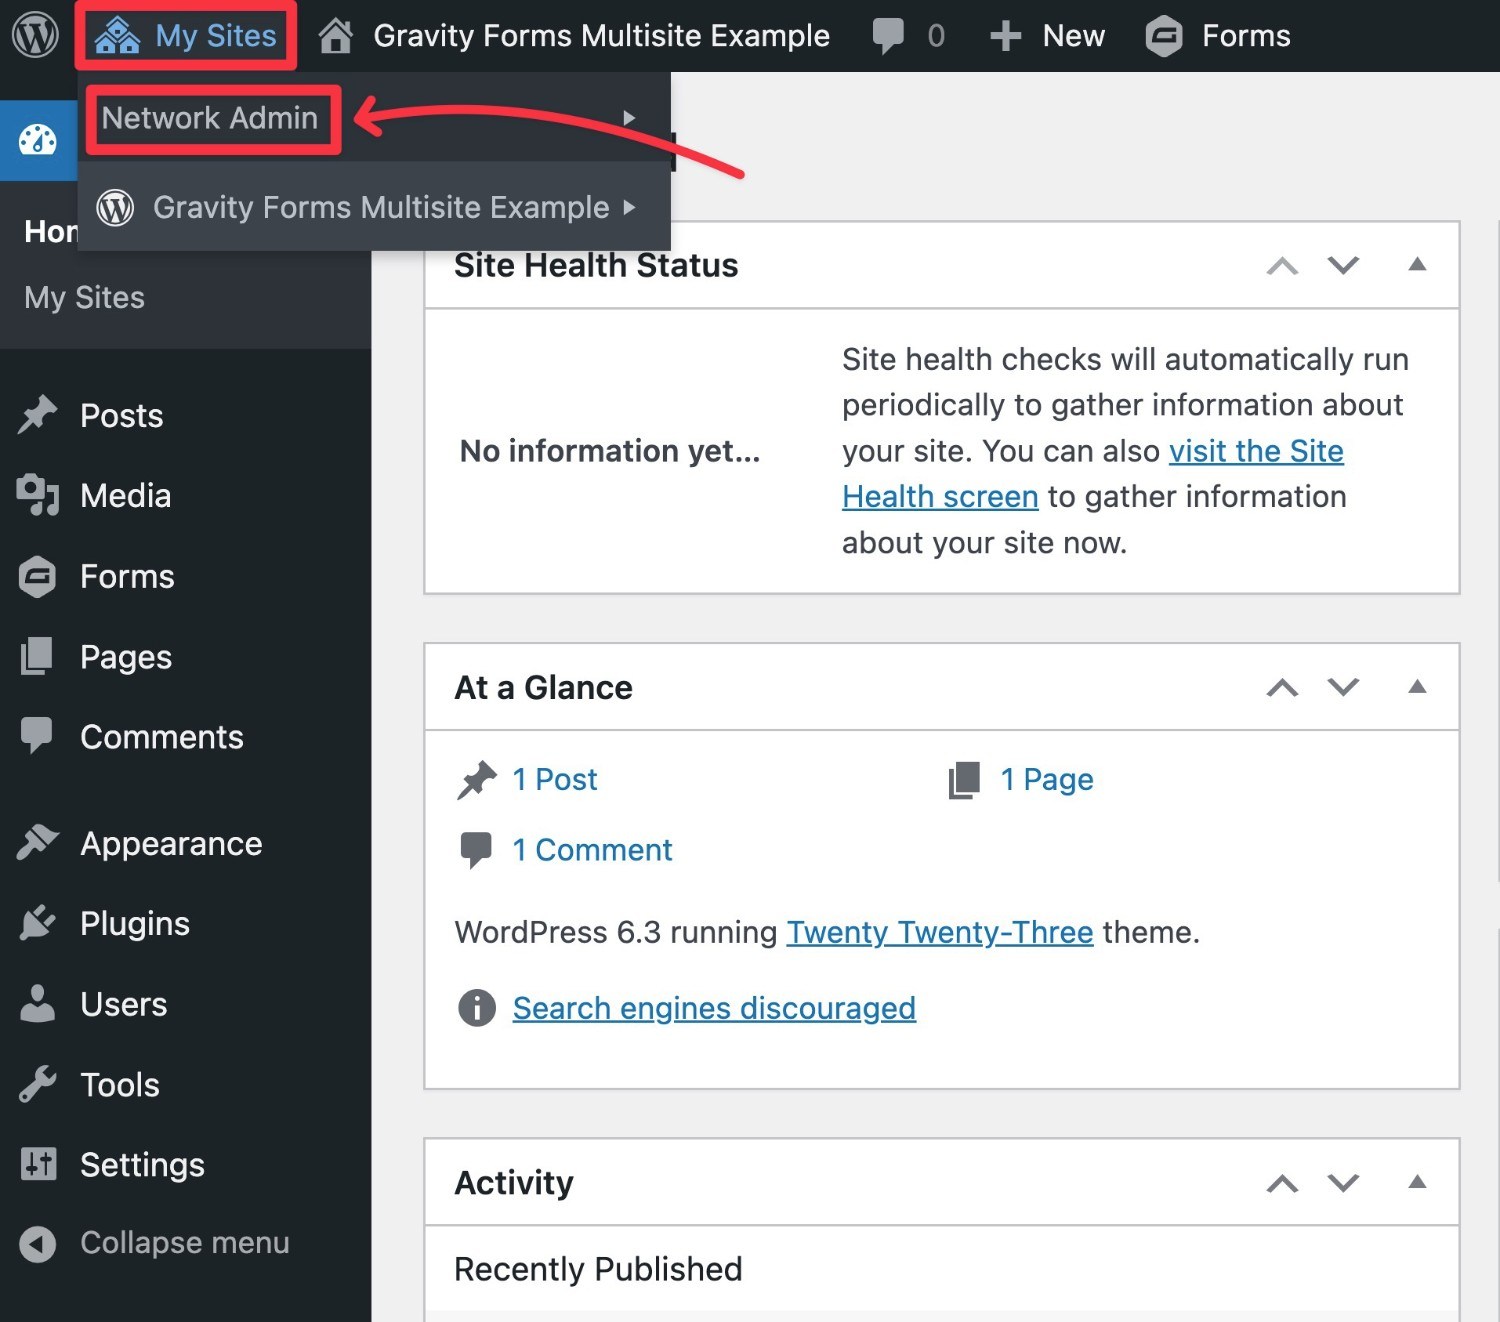
Only WordPress accounts with the Super Admin user role will be able to see this dashboard, so you don’t need to worry about other people being able to access it.
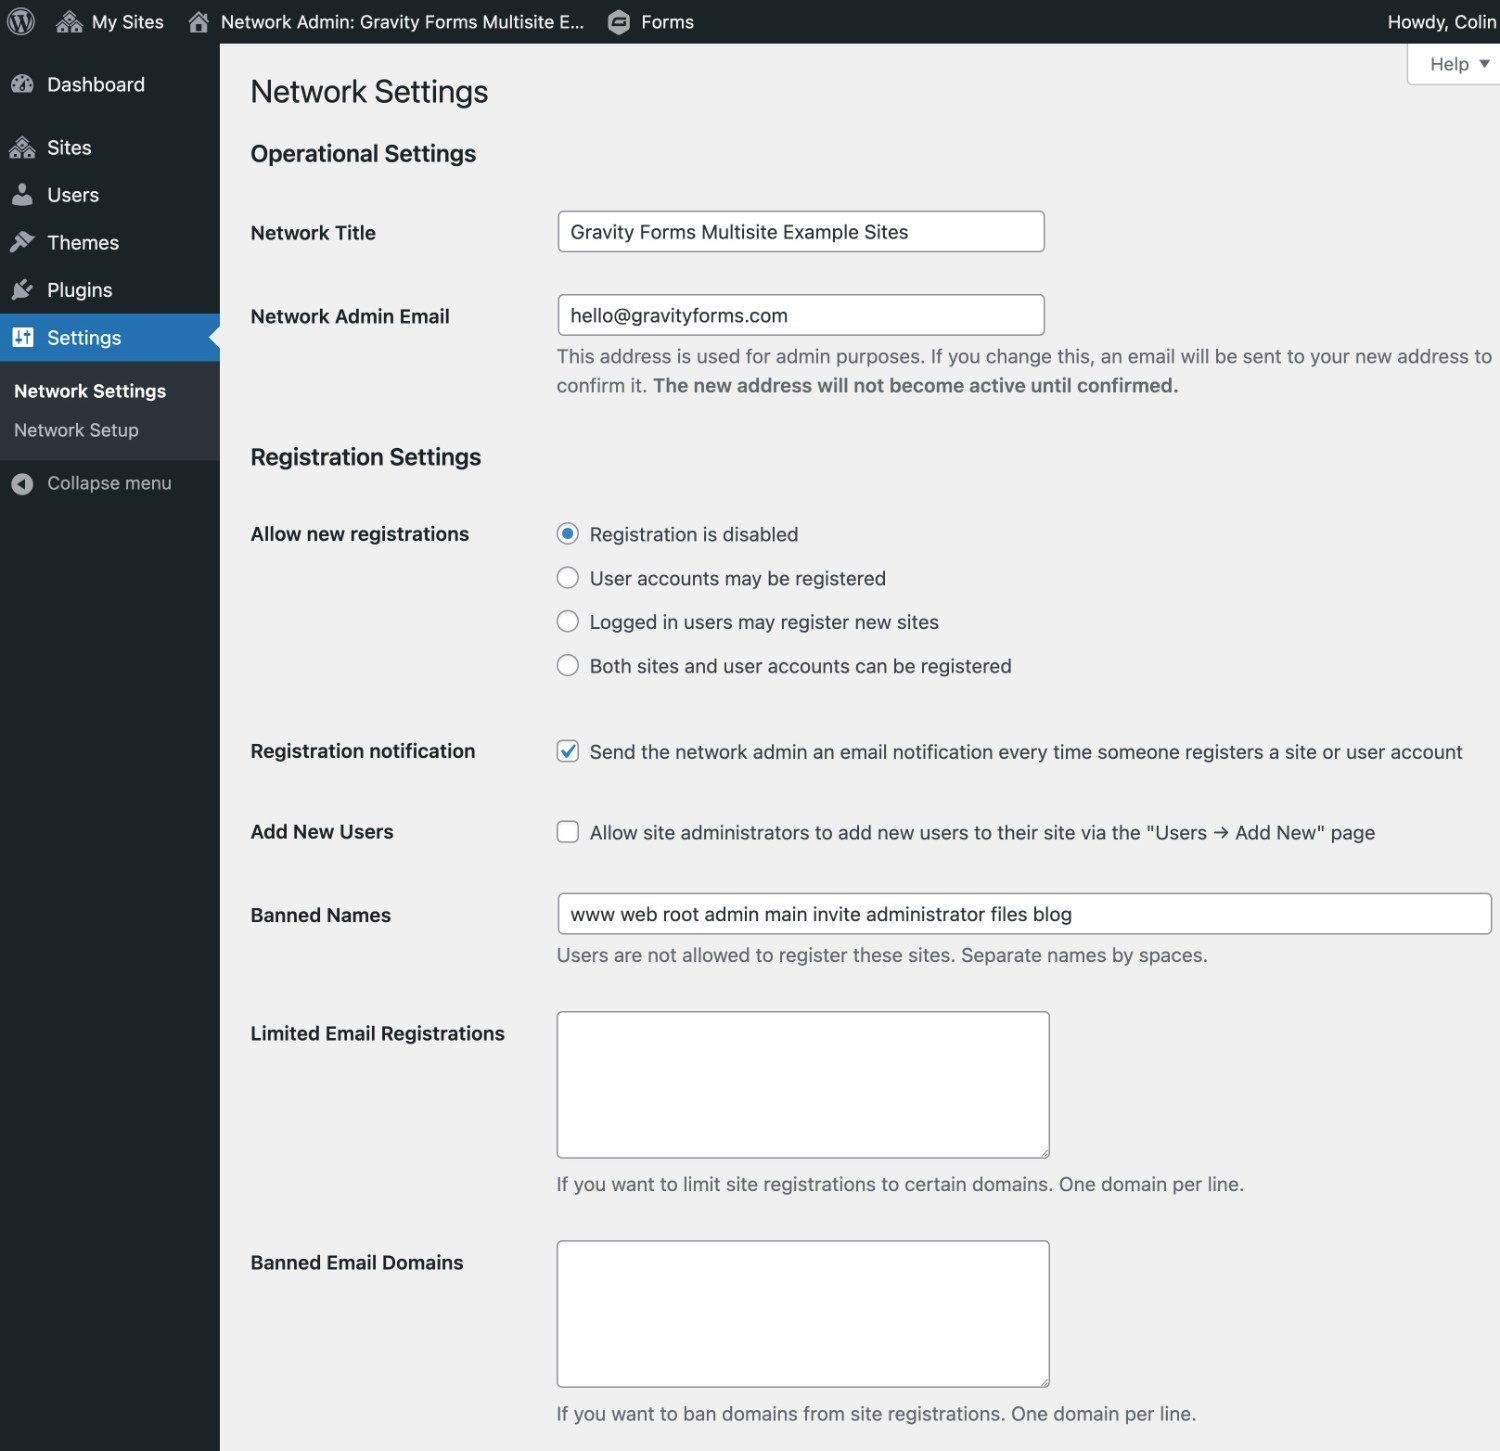
Before going any further, you should go to Settings → Network Settings in the Network Admin to configure a few important details.
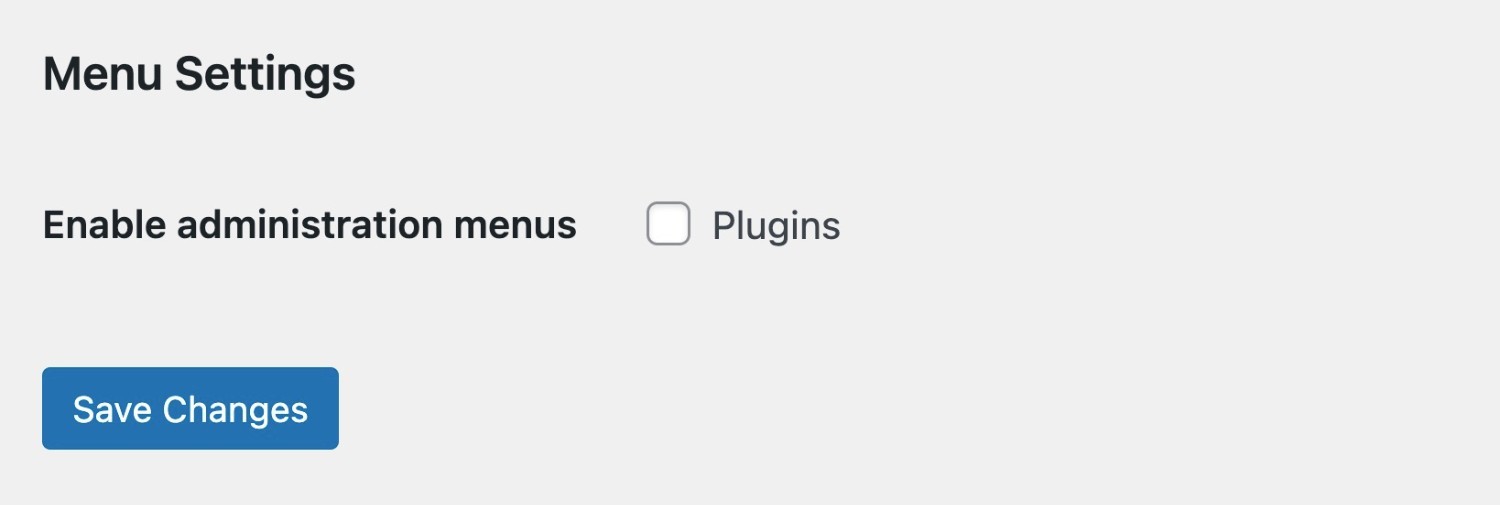
One very important option is all the way at the bottom – whether or not to enable the plugin administration menu. By default, individual site admins cannot manage plugins at all. But if you check this box, they will be able to manage plugins, but only from the plugins that the Network Admin has installed.
How to Create New Sites In Your Network
When you first set up multisite, you’ll only have a single site in your network (the original site that you created before enabling multisite).
To manually create a new site in your multisite network, you can go to Sites → Add New in the Network Admin dashboard.
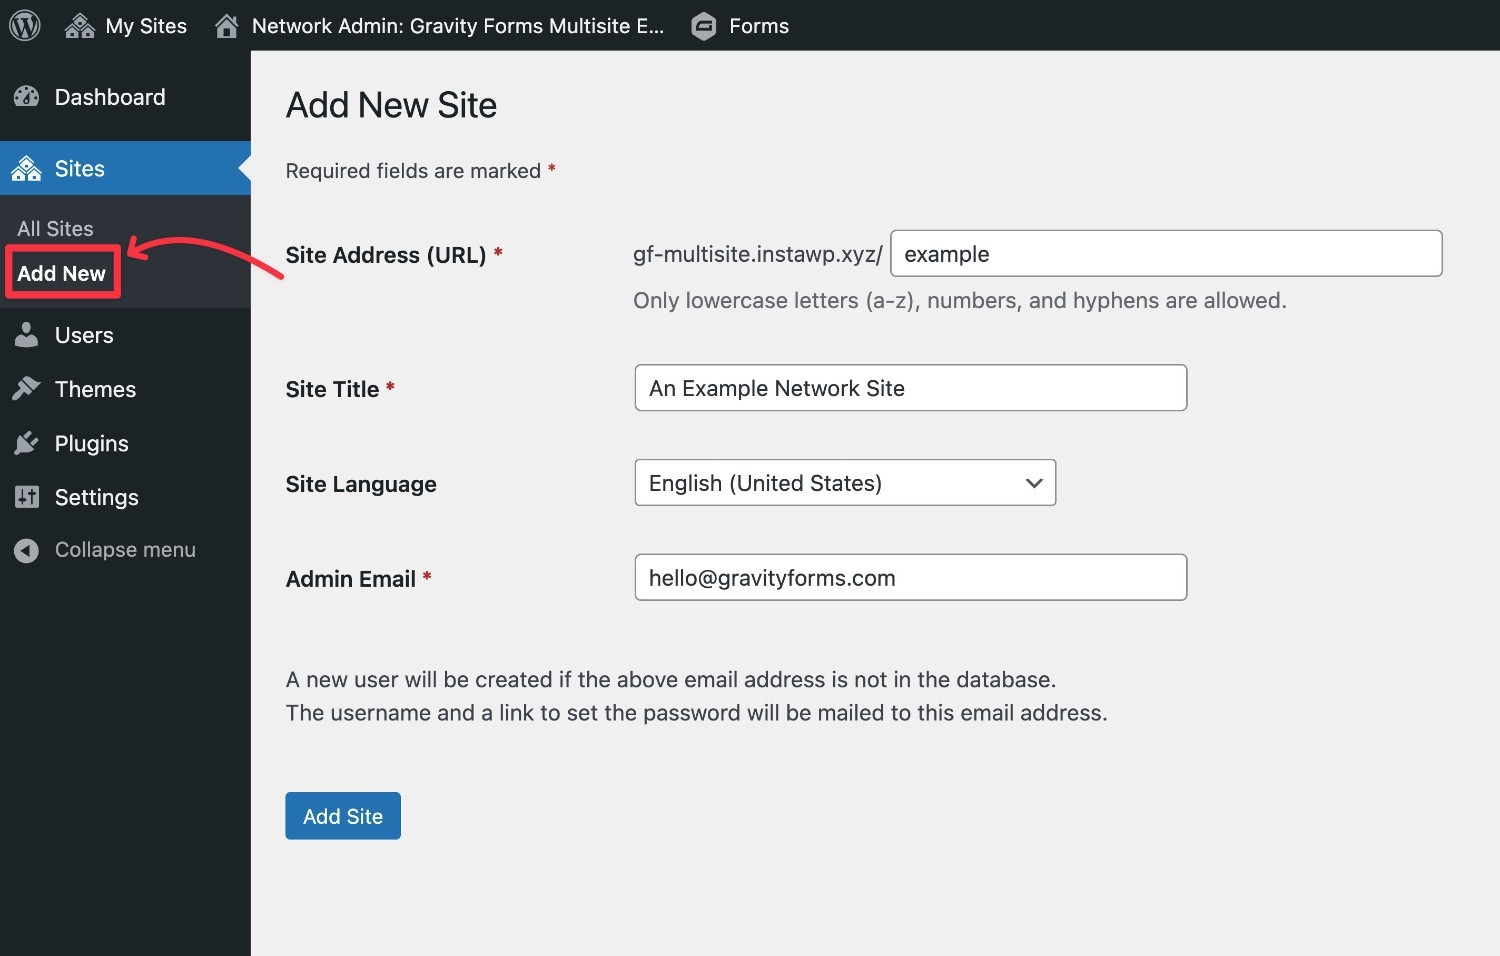
If there isn’t already a WordPress user with the admin email address, WordPress will automatically create a new user for that email.
If you want to let users register to create their own sites, you can do that using Gravity Forms. We’ll cover how to do that in the next section.
How to Manage Plugins and Themes
One key difference between WordPress multisite vs single site is that you’ll now only be able to install new themes and plugins from the Network Admin dashboard.
You cannot install new extensions from the dashboard for individual sites – you can only choose from the extensions that have been installed via the Network Admin.
To install a new extension, you can open the Network Admin and go to Plugins → Add New or Themes → Add New, respectively.
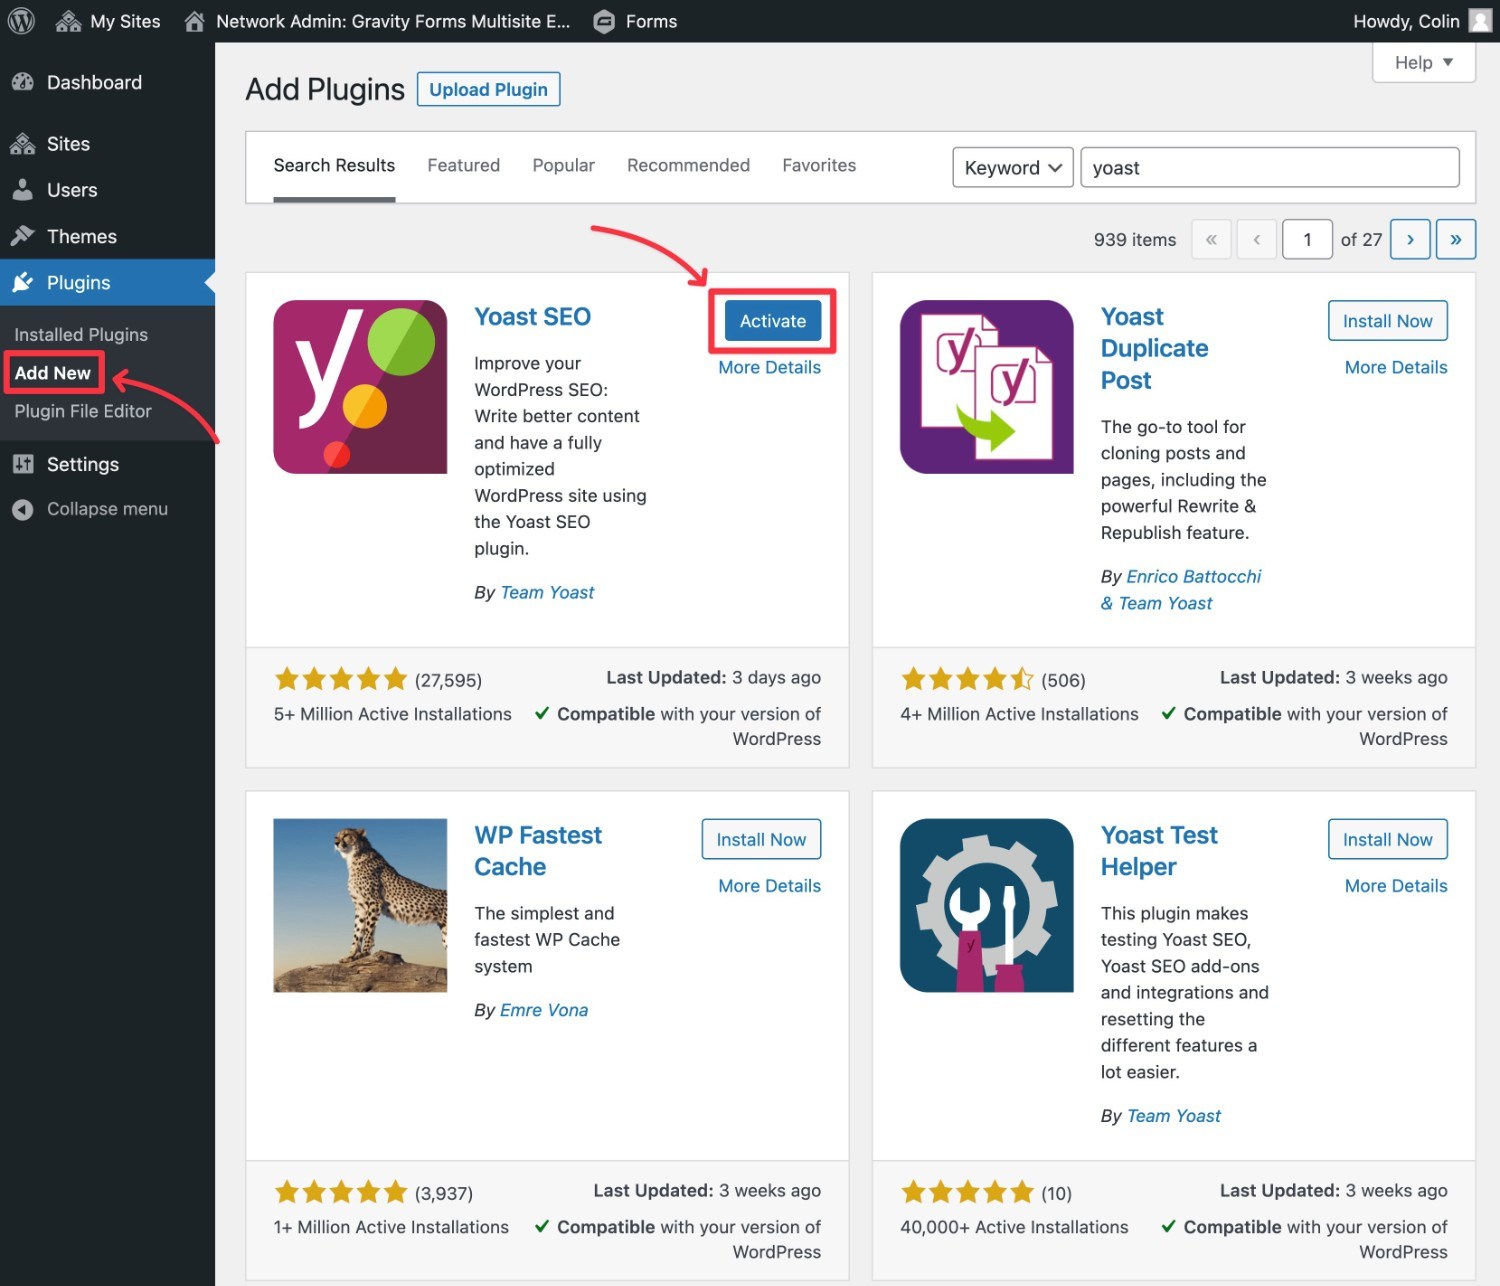
Installing a plugin or theme works almost identically to a regular WordPress install, but there’s one tweak.
When you install a plugin, you can choose whether or not to Network Activate it:
- If you Network Activate the plugin, it will be active on every single site in the network.
- If you don’t Network Activate the plugin, you (or other Super Admins) can choose whether or not to activate it on each individual site. If you enabled the plugin administration menu, individual site admins will also be able to choose whether or not to activate that plugin*.

* Even if you enable the plugin administration menu, an individual site admin still cannot deactivate a plugin that you Network Activate.
How to Manage Individual Network Sites
To manage an individual site, you can go to Sites → All Sites and click the Dashboard link underneath the site that you want to edit.
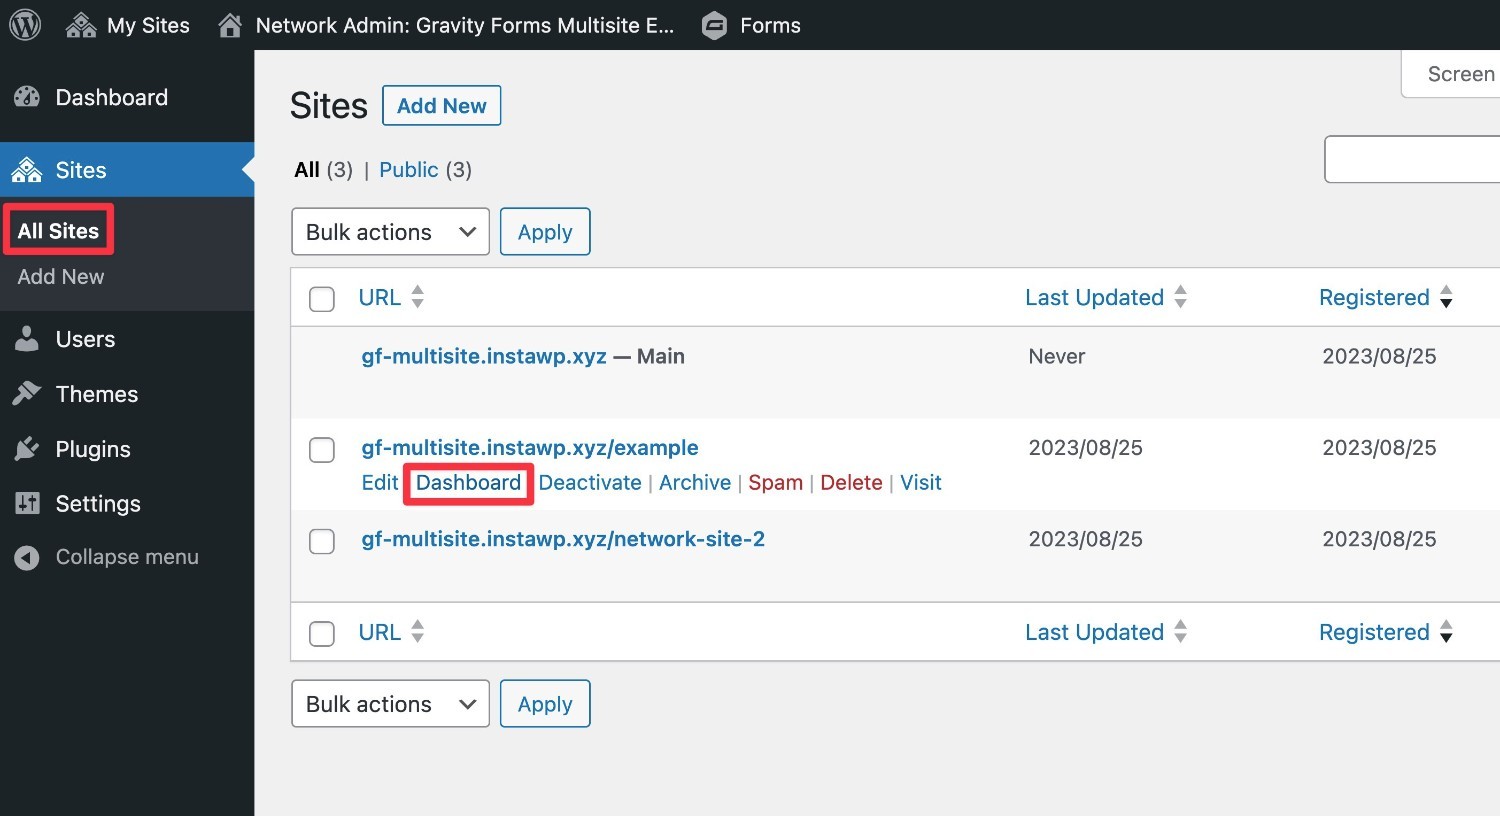
This will open the regular WordPress dashboard for that site.
How to Use Gravity Forms With WordPress Multisite
Now that we’ve discussed WordPress multisite in a general sense, let’s start taking a look at how you can use Gravity Forms with WordPress multisite.
Basic Gravity Forms Multisite Compatibility
If you want to use Gravity Forms on your WordPress multisite network, Gravity Forms offers full multisite compatibility with the Elite license.
At a basic level, this lets you use Gravity Forms to create forms across your entire multisite network. For example, each network site could have its own contact form created with Gravity Forms (or any other type of form, including payment forms and so on).
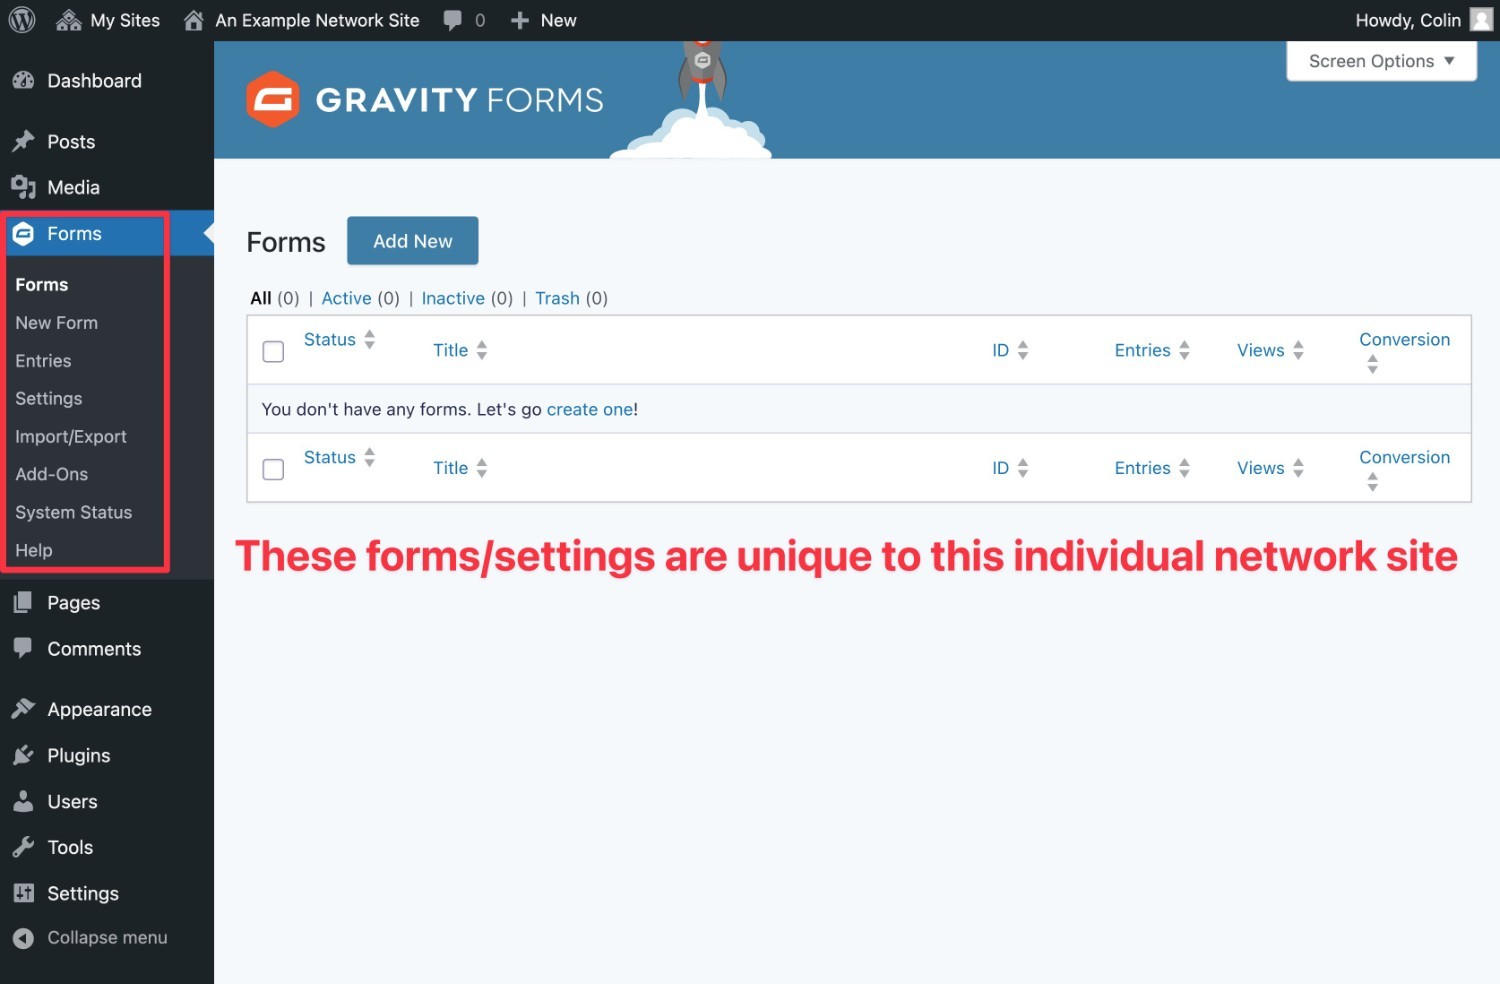
When you activate Gravity Forms on your network, each network site will have its own Forms area inside the site admin.
If the site admin goes there, they will see a unique set of forms for just their site. They can also configure Gravity Forms’s settings in a unique way for each site.
Create Network Sites When Someone Submits a Form
Beyond general compatibility, the Gravity Forms User Registration Add-On also offers a special integration that lets you create a new network site when someone registers via your custom Gravity Forms user registration form.
Whenever someone submits the form, Gravity Forms will automatically create a new network site for that user.
Where this gets even more powerful, though, is that you’re also able to integrate other functionality in Gravity Forms, such as payments.
For example, you could charge people a one-time or recurring fee for the privilege of creating a website in your multisite network. This lets you create your own WaaS (website as a service) apps and opens up all kinds of interesting use cases.
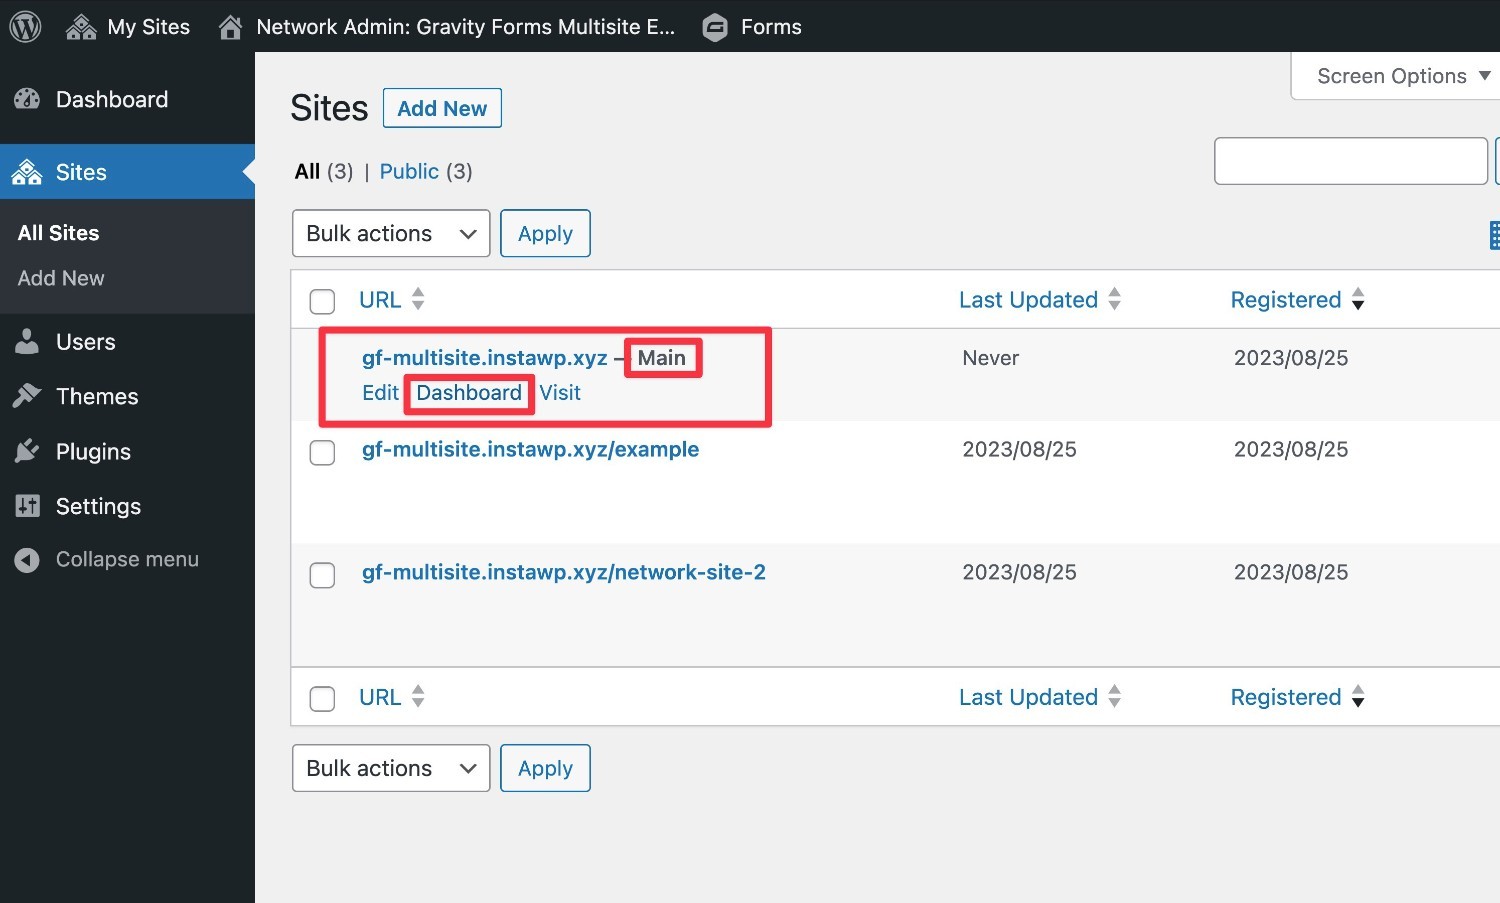
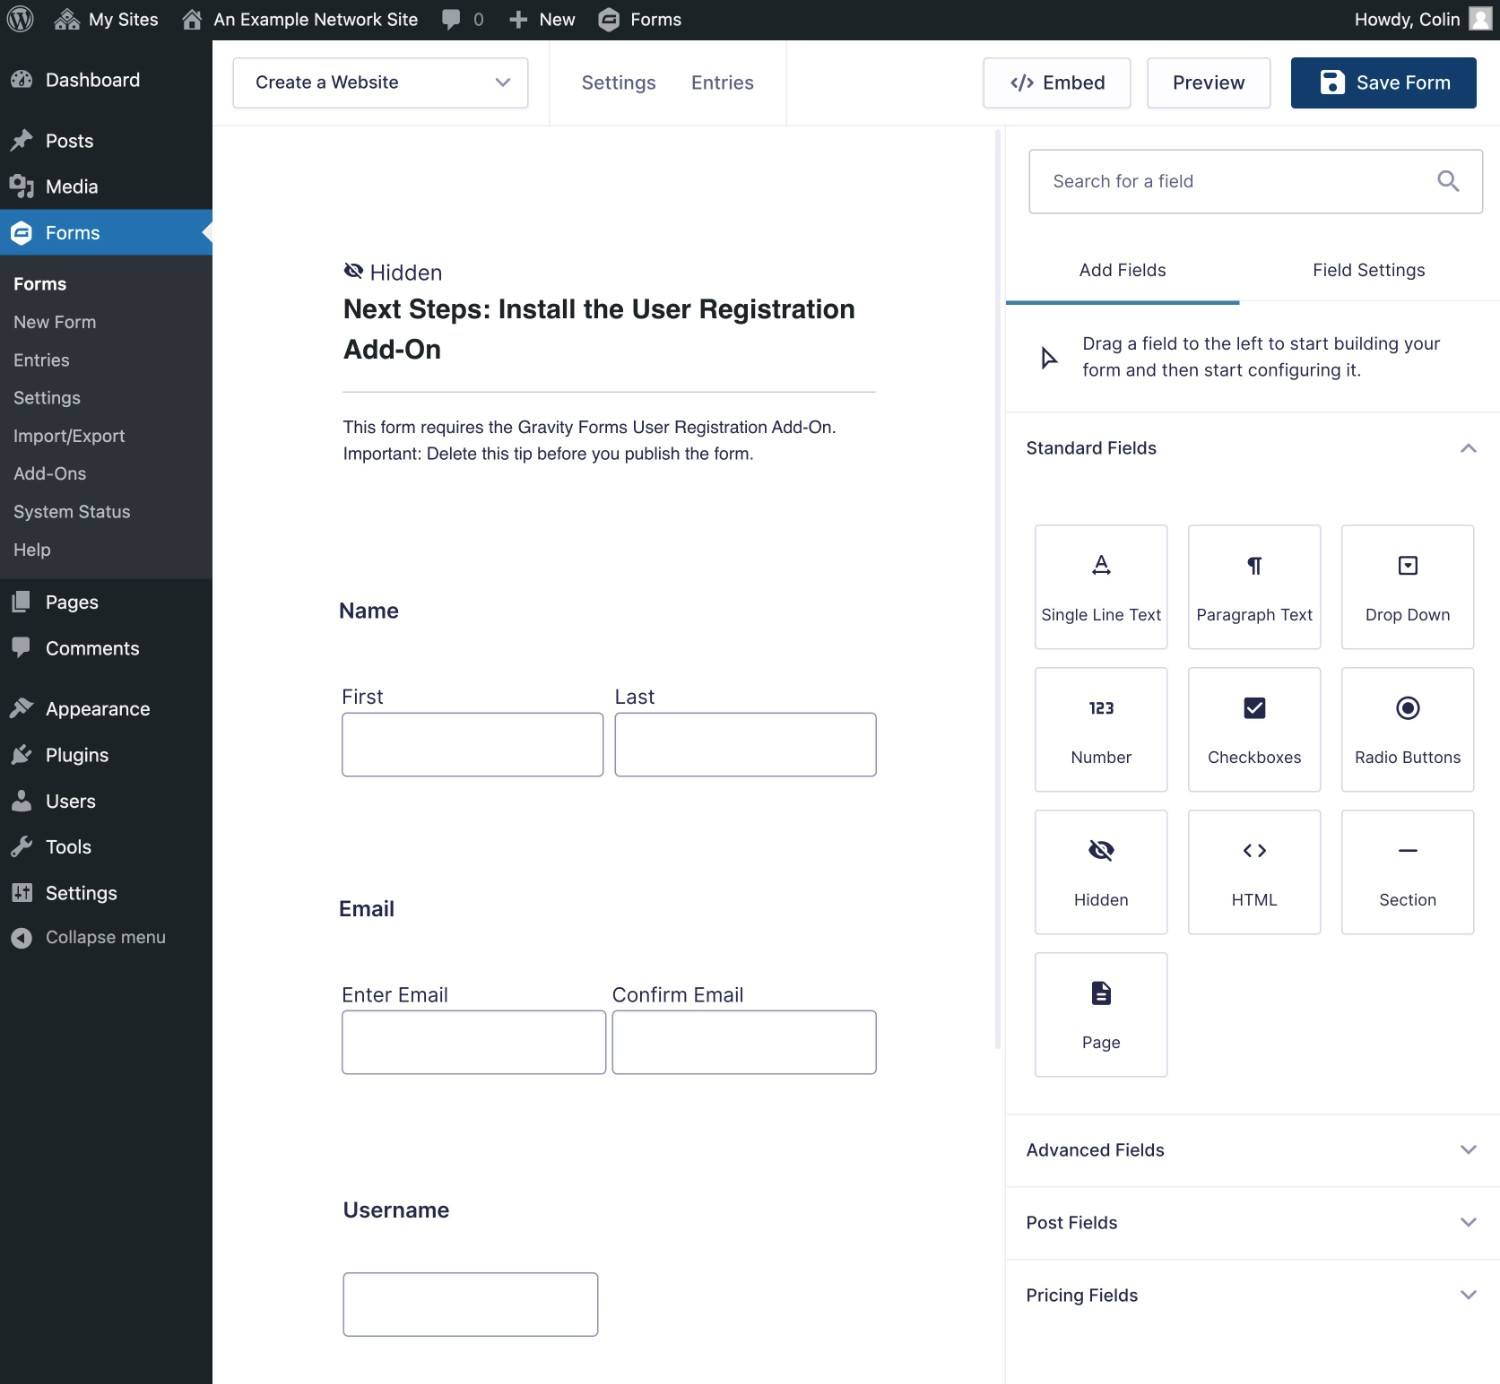
To use this feature, you’ll first want to install the official User Registration Add-On and create a custom user registration form on your main network site.
You’ll need to use the site marked with Main in the Network Admin sites list.
To get started, you can use the pre-made user registration form template. If you want to add any extra functionality, such as requiring a payment, you can add that in the form editor.
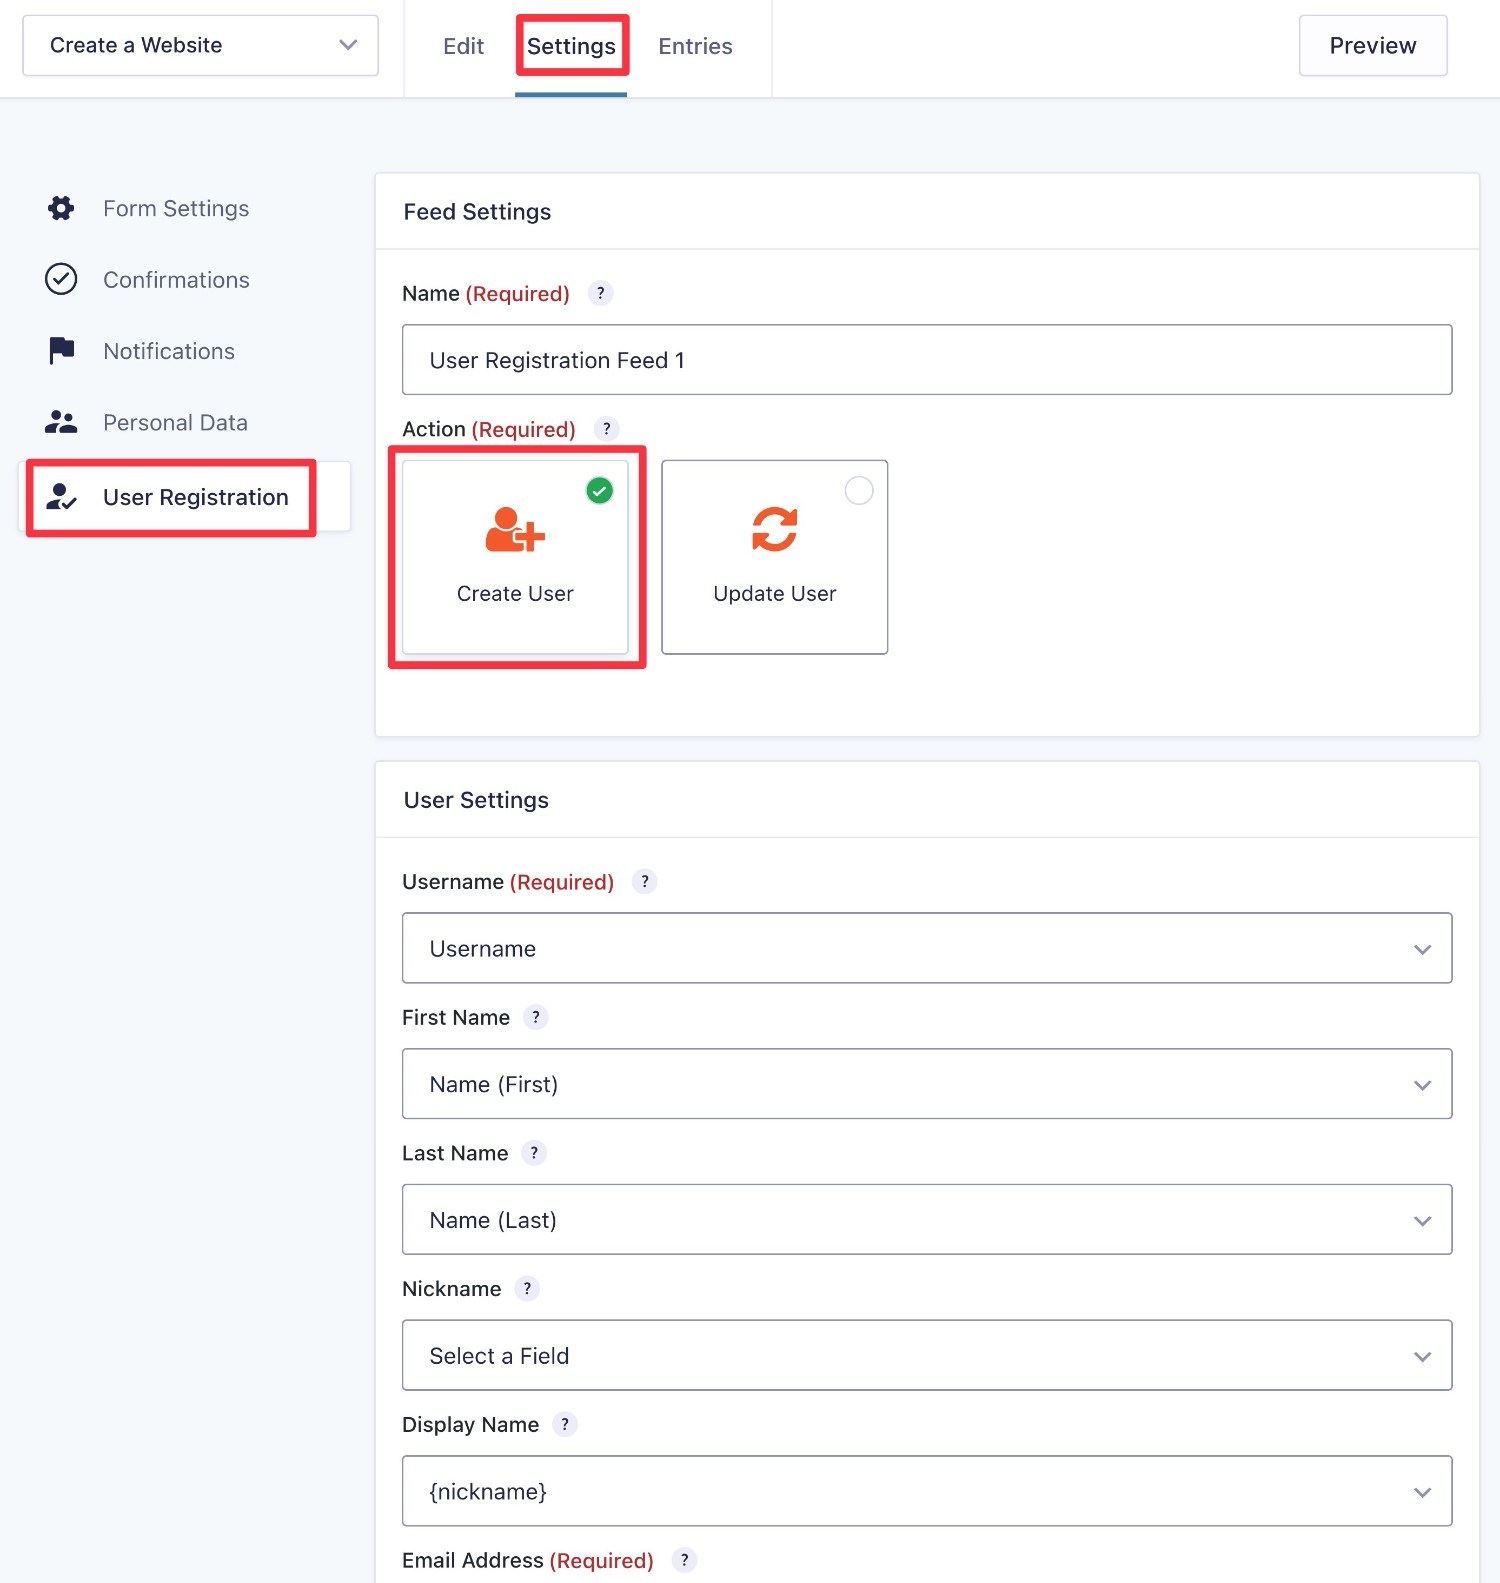
To set up the multisite integration, go to Settings → User Registration and create a new user registration feed.
Select Create User as the action and fill out the details.
Near the bottom of the settings area, you’ll see a new Network Options box. To create a new site for the user, check the Create Site box.
This will show some additional options to configure the site details.
For example, you can map the Site Address and other information to fields in your form. This might require you to go back to your form and add fields to collect the relevant information, such as giving users the option to choose their site name and URL.
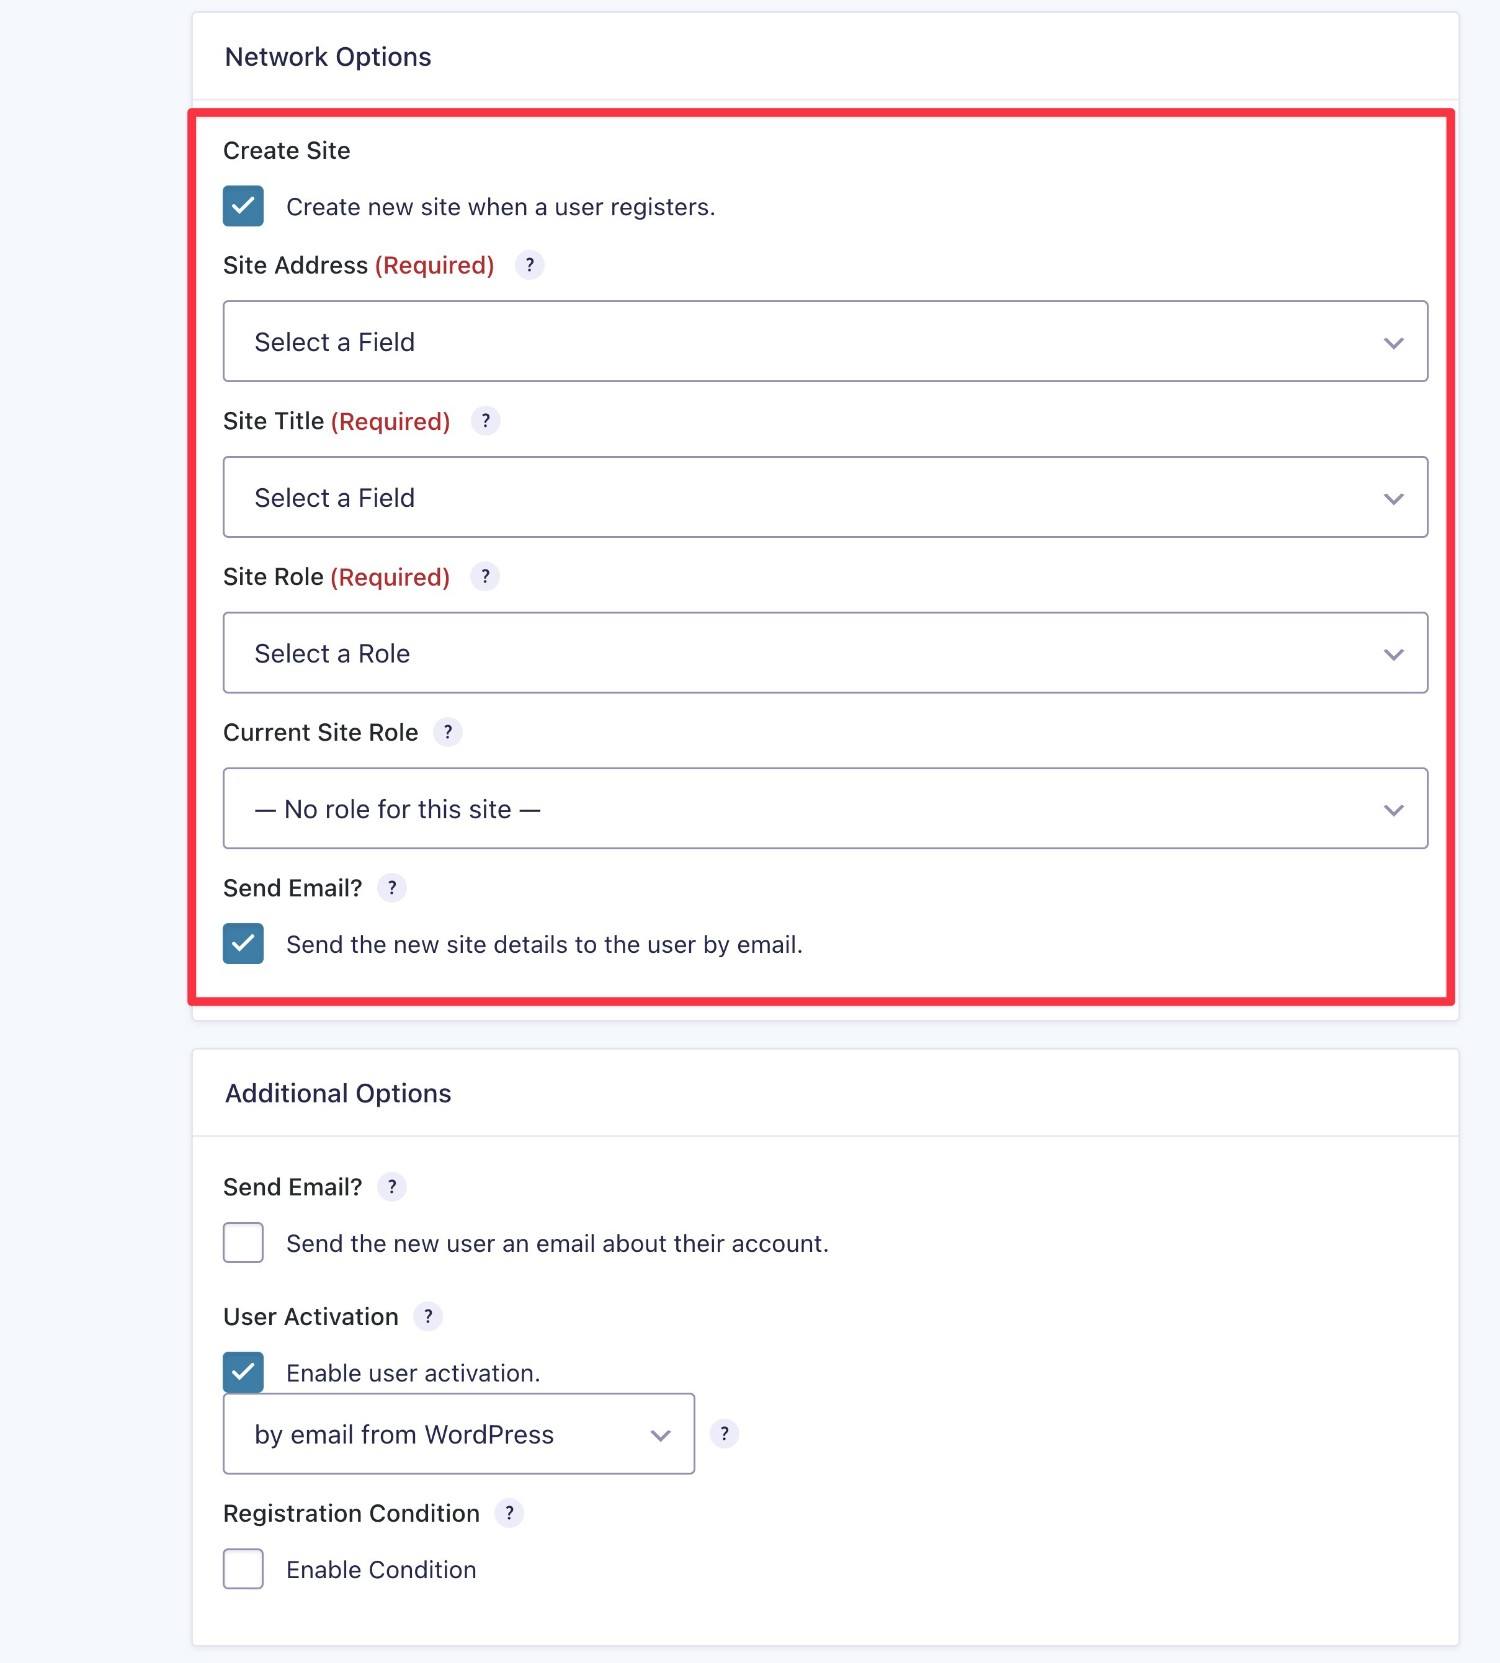
You could also use conditional logic for the feed to only create a network site if a user meets certain conditions.
For more information on using Gravity Forms and the User Registration Add-On to create new sites in multisite, check out our documentation.
Get Started With WordPress Multisite Today
To recap what we covered above, WordPress multisite is a core WordPress feature that lets you create a network of multiple sites from a single WordPress install.
WordPress multisite opens up all kinds of interesting use cases, such as offering separate websites for different locations, creating a network of blogs, making a multilingual site, offering a website-as-a-service app, and more.
Gravity Forms offers full WordPress multisite compatibility with the Gravity Forms Elite license, which means you can build custom forms on every single site in your network.
Beyond that, the Gravity Forms User Registration Add-On also offers an option to automatically create a new website for a user when they register on your site.
You could let users create their own blogs/websites for free or you could use the Gravity Forms payment features to charge them a one-time or recurring fee to create their sites.
If you’re ready to get started with Gravity Forms on WordPress multisite, purchase the Gravity Forms Elite license today.

If you want to keep up-to-date with what’s happening on the blog sign up for the Gravity Forms newsletter!
"*" indicates required fields


