
Are you interested in using Constant Contact to grow and manage your email list? Or are you already a Constant Contact customer and looking for a way to connect your account to WordPress? If so, this article featuring the Gravity Forms Constant Contact Add-On might be just what you need to read!
As one of the most popular email marketing providers, Constant Contact offers numerous features to make your marketing campaigns a success. In this post, we’ll tell you why it is a great option and what makes it a great companion for Gravity Forms. Finally, we’ll walk you through how to connect the two using our add-on.
What Does Constant Contact Offer?
Constant Contact gives you all the tools you need to build an email list and run email marketing campaigns:
- Customizable email templates: Quickly create your emails with a drag-and-drop email design tool and hundreds of templates.
- AI content generator: Constant Contact has an artificial intelligence tool to help you write email copy and propose fitting headlines.
- Marketing and optimization features: Segment email lists for higher personalization, run A/B tests for headlines, create landing pages, and post to social media all from one place.
- Real-time reporting: Understand how your marketing efforts are performing with detailed analytics. See your audience’s engagement level, compare campaigns, see which links your readers click, compare mobile and desktop users, and more.
- Automation: Create automatic workflows to send the right message to the right audience at the right time. Put your marketing on autopilot with plug-and-play templates, welcome emails, automatic email resending, and more.
- Social and SMS marketing: Depending on your plan, you can also use Constant Contact to market your business on social media and via SMS.
- Integrations: Use integrations with many other tools like Canva, Vimeo, Salesforce, and more.
There are also other features worth checking out – if you’re not a customer yet, they offer a 14-day free trial and a 30-day money-back guarantee.
Benefits of Using Constant Contact With Gravity Forms
By integrating Gravity Forms with Constant Contact, you can directly connect your existing sign-up forms and easily determine what data is sent to Constant Contact.
In addition, with the help of custom fields, you can collect custom data from your customers and send it to Constant Contact, helping you to collect and manage the specific data you need.
Furthermore, by taking advantage of Gravity Forms’ powerful conditional logic, you can segment email subscribers into lists at sign-up and qualify leads beforehand. And you can also easily ensure GDPR compliance of your email list with Gravity Forms’ Consent field, which allows you to make your sign-up forms GDPR-compliant in just a few clicks.
Notably, the Constant Contact Add-On is available for all Gravity Forms customers.
How to Connect Gravity Forms With Constant Contact
If the above sounds like the right fit for your business, the Gravity Forms Constant Contact Add-On is the way to go. It’s the quickest method to connect your WordPress site and Gravity Forms forms with Constant Contact and automatically add form submissions to your email list. And as you will see, it just a few minutes to set up.
The only prerequisite: you need an SSL certificate on your WordPress site in order to use the latest Constant Contact API. If you don’t have one, talk to your hosting provider.
1. Sign Up for a Constant Contact and Create an Email List
Naturally, to use the Gravity Forms Constant Contact Add-On, you will need a Constant Contact account. If you don’t have one yet, the first step is to head over to the Constant Contact homepage and sign up.
As mentioned, they offer both a 14-day free trial and a 30-day money-back guarantee, allowing you to experiment before fully committing.
Once you’ve created an account, you’ll land on the Constant Contact dashboard.
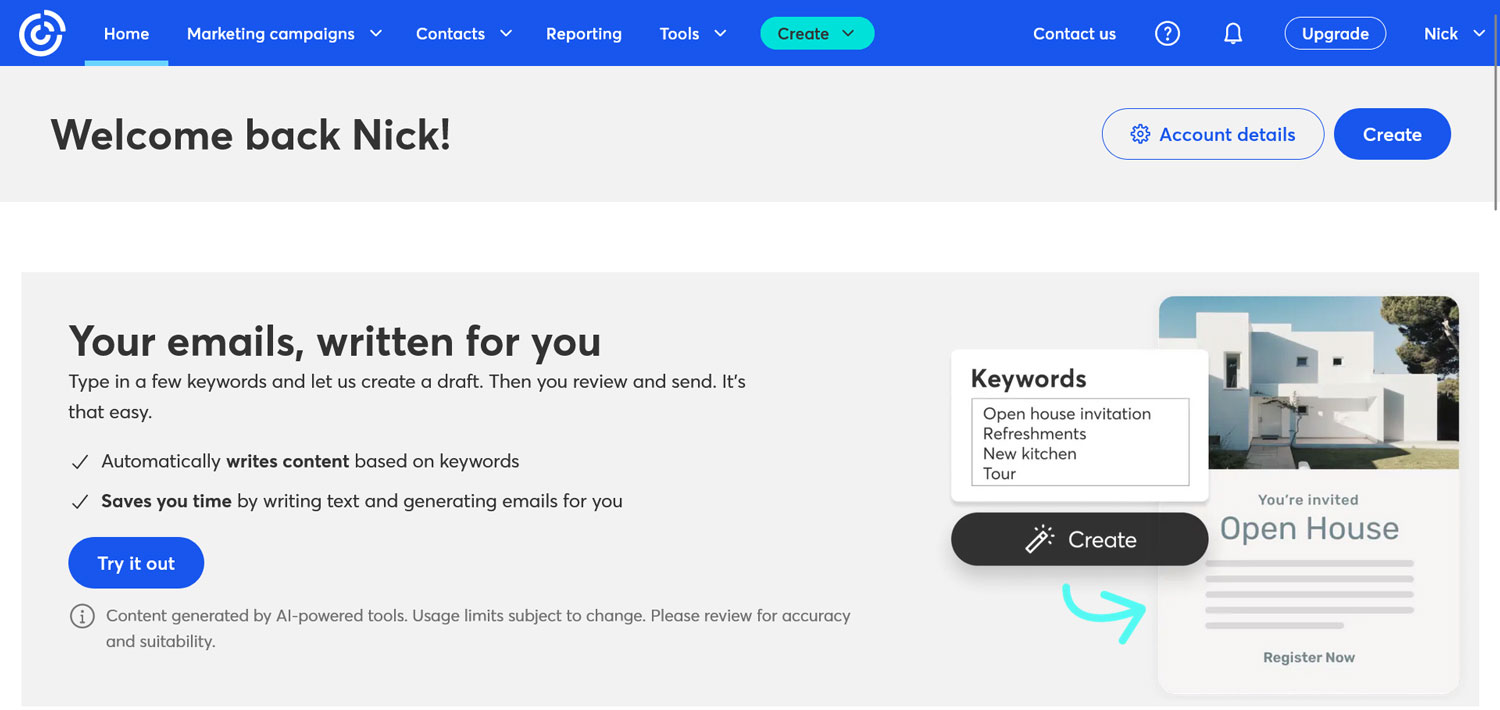
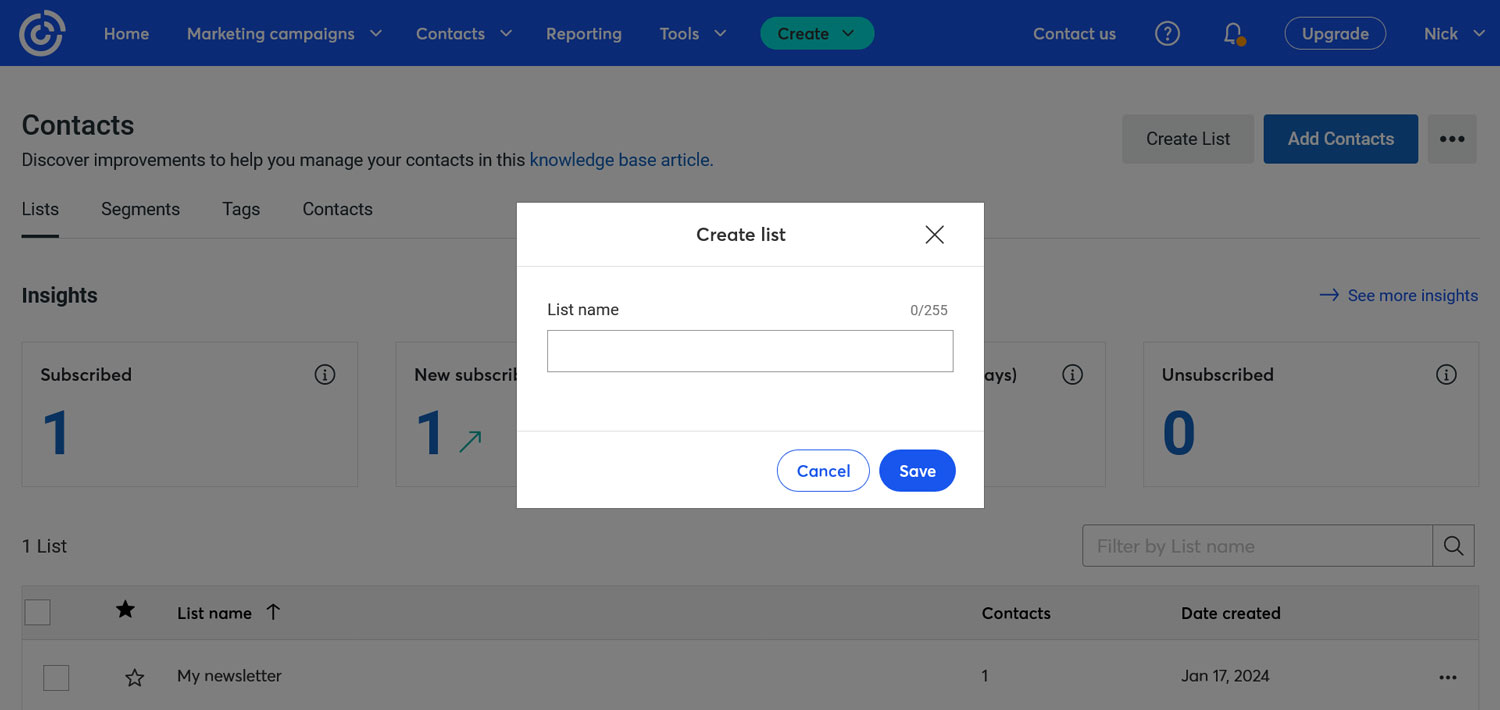
Here, your first main task is to create an email newsletter list, where you’ll send subscribers who sign up on your website.
(Obviously, if you are an experienced Constant Contact user and already have an email list you want to add subscribers to, you can skip this step.)
The fastest way to do this is to go to Contacts → Lists. Here, either click on Create List at the top right or, if you are a new users, click on the three dots behind the list Constant Contact has automatically created in order to rename it.
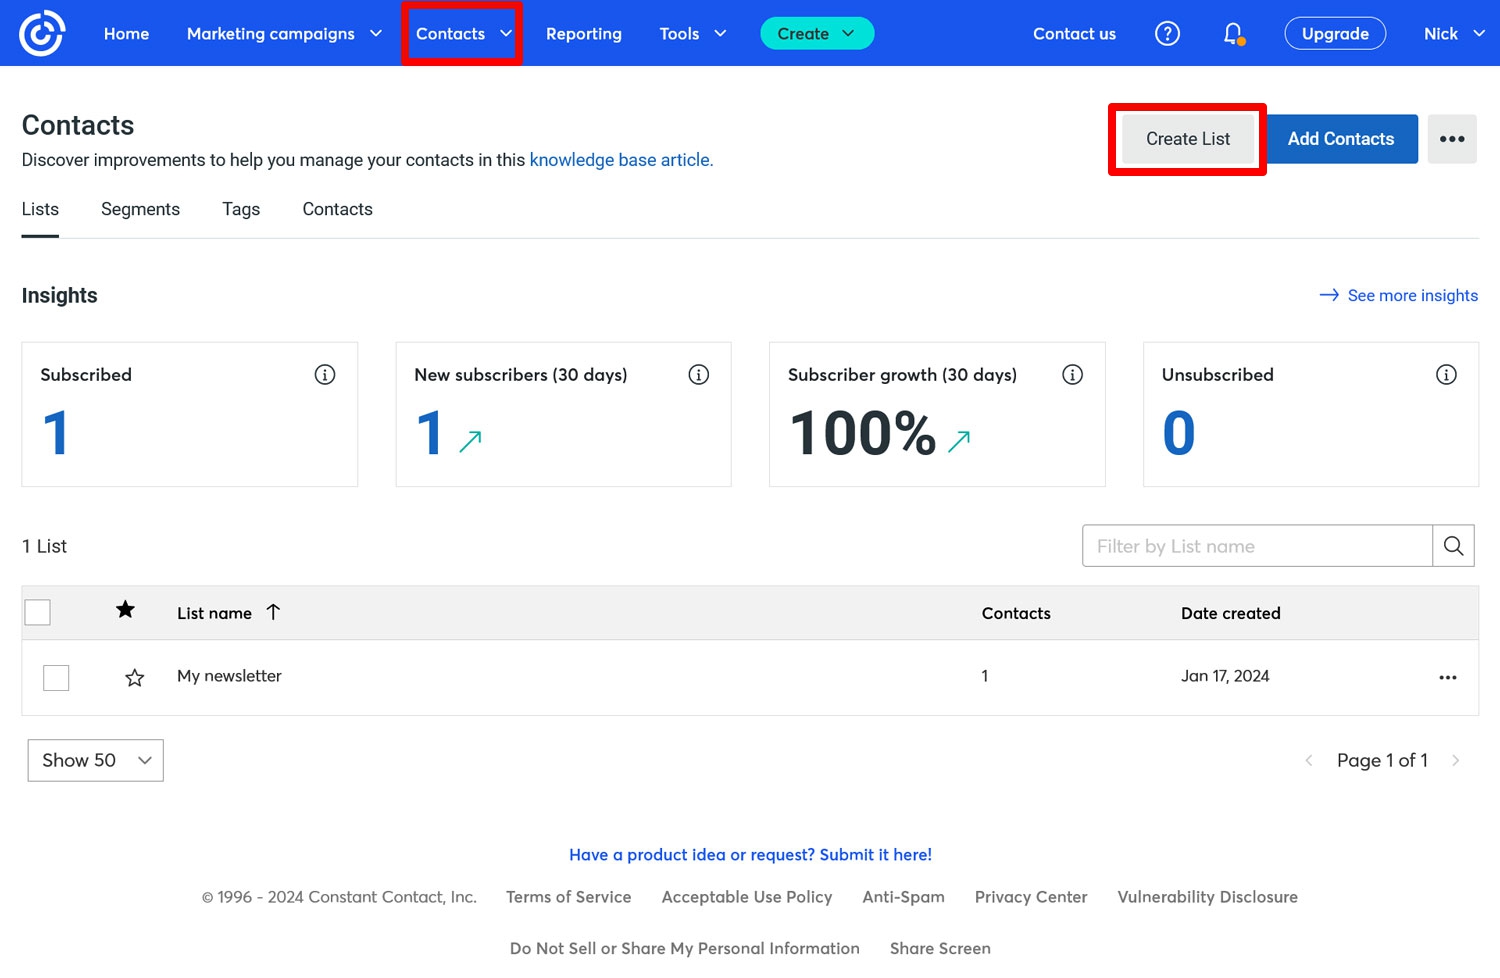
In either case, you should be prompted to provide a (new) name and end up with a newsletter list ready to add subscribers to.
2. Install the Gravity Forms Constant Contact Add-On
Now, it’s time to create the foundation to connect Constant Contact with your WordPress site. The first step for that is to install the add-on on your site.
For that, head over to Forms → Add-Ons. Here, scroll down until you see the Constant Contact Add-On and click the Install button.
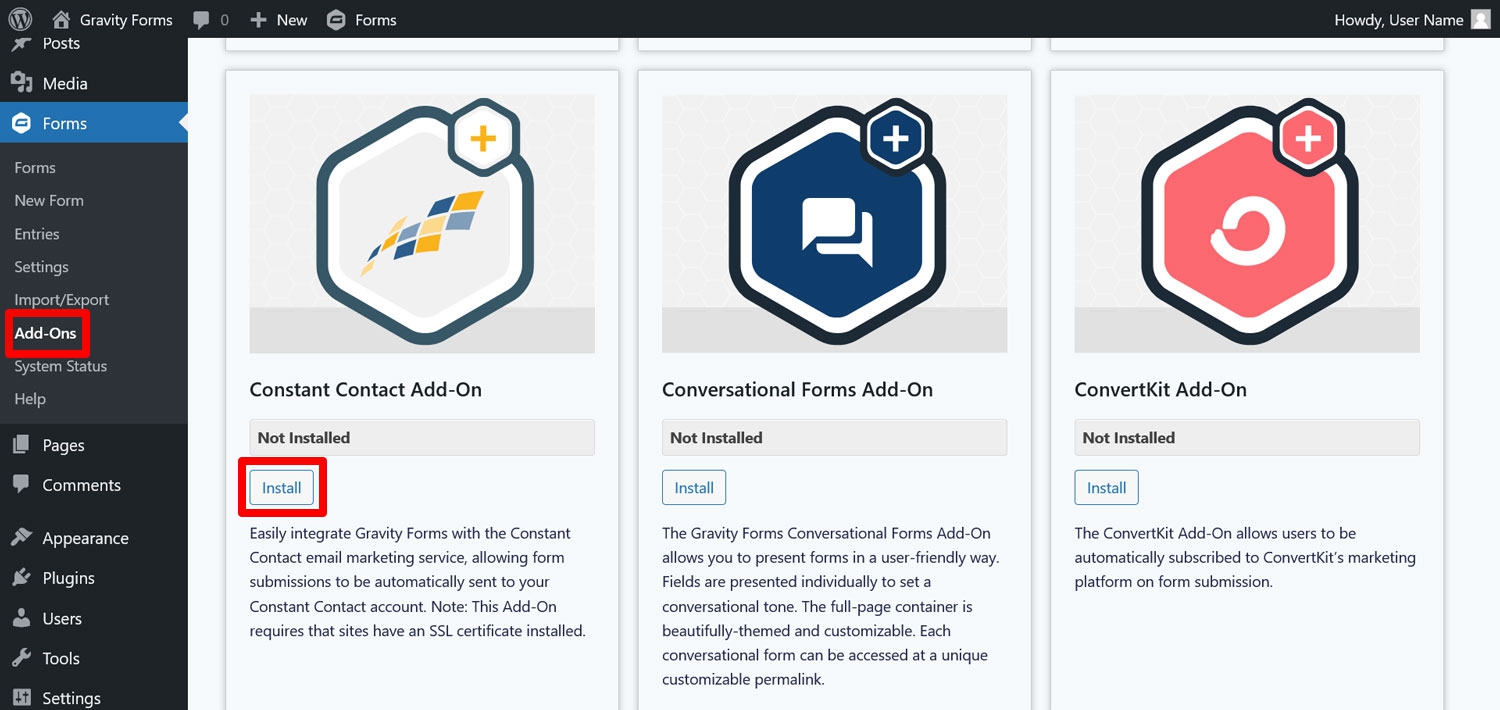
When done downloading, you’ll then need to activate it. After that, navigate to the add-on settings page. You’ll find it on your WordPress site under Forms → Settings → Constant Contact.
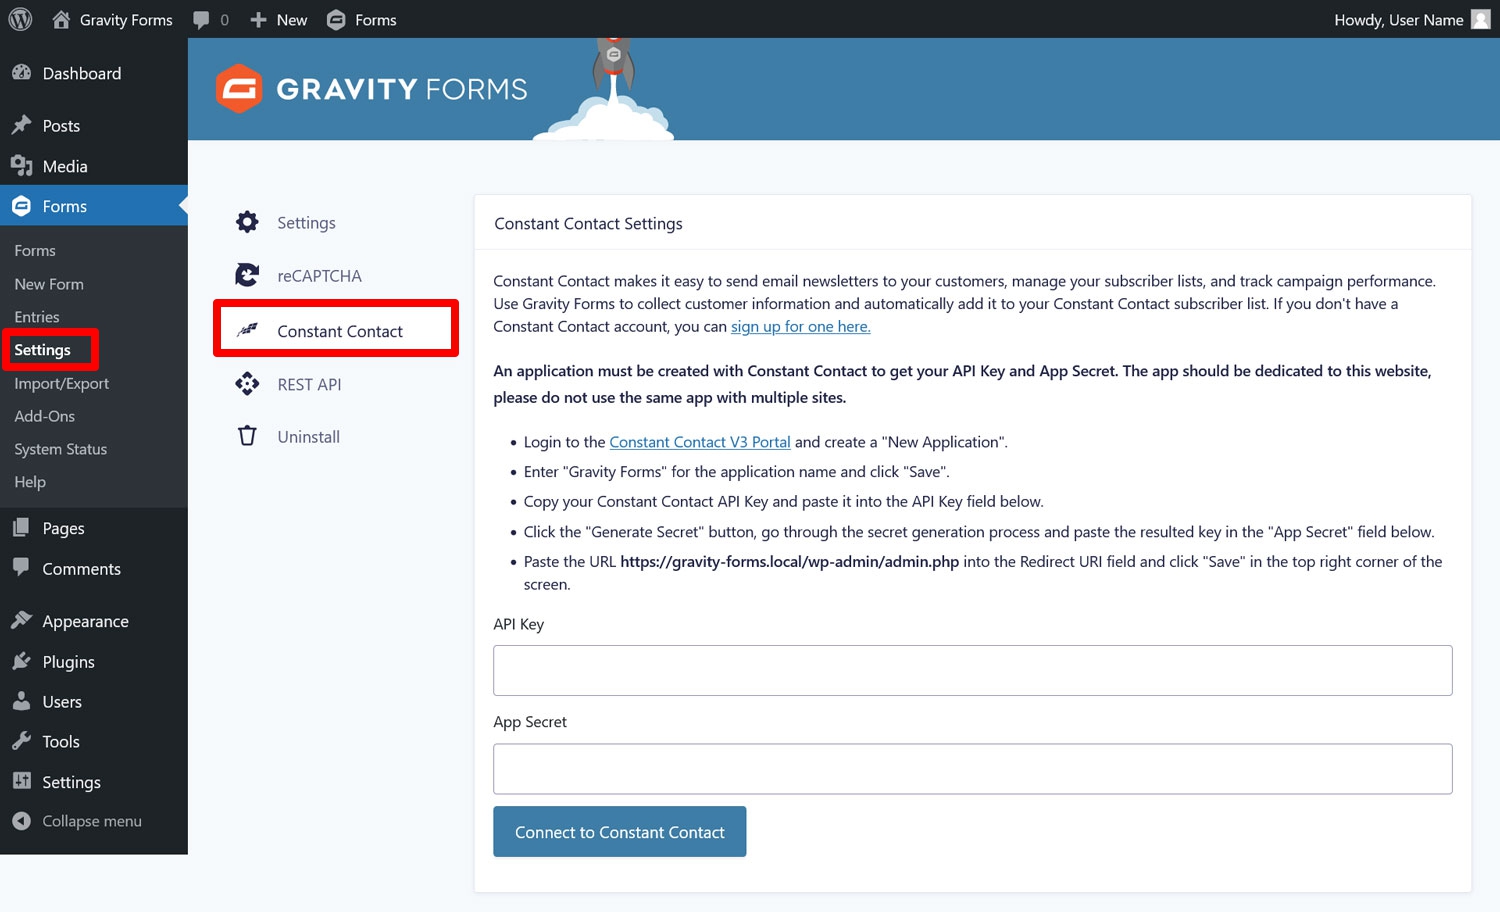
Only two fields will be visible here, which you’ll need to fill in. We’ll cover that next…
3. Obtain an API Key
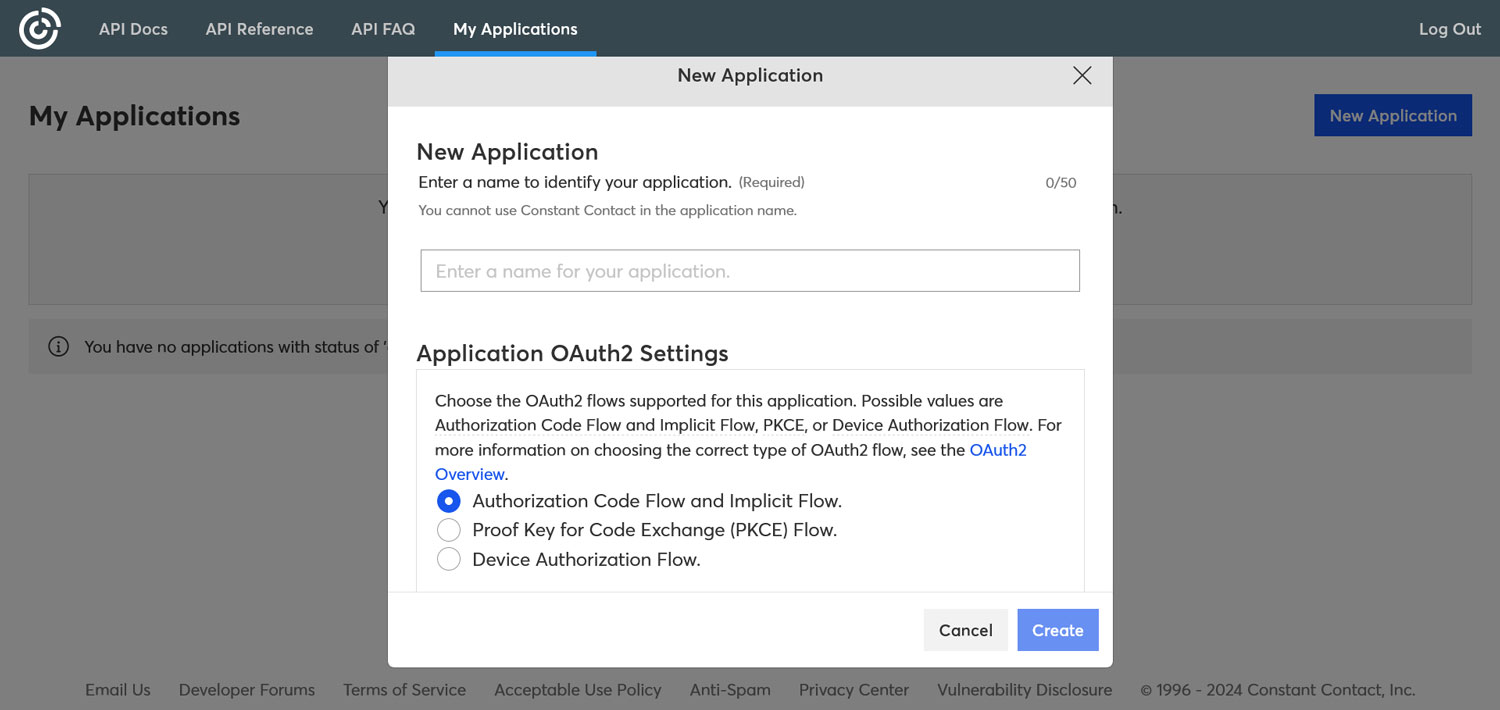
To get started, we want to obtain an API key. For that, we need to create what Constant Contact calls an “application”.
To so so, sign in to the Constant Contact Developer Portal (not the main website!) using your Constant Contact credentials. In fact, if your login is active on the main website, you should also be automatically logged in here when you click the button. Once there, it will automatically prompt you to create a new application.
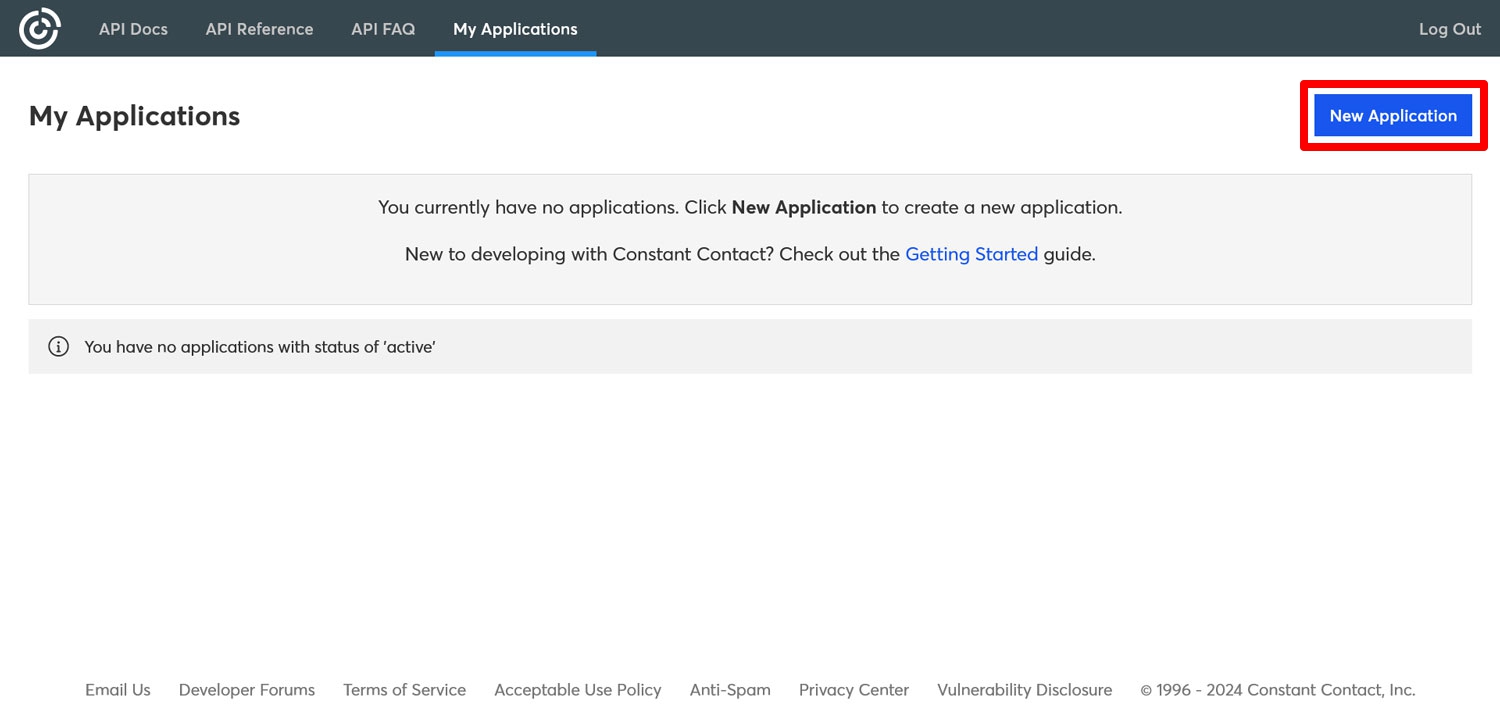
Click the button that says the same thing to get started. The only thing you need to do here is name your application, for example, “Gravity Forms”. Leave all the other settings alone and just hit Create.
After that, it will create your application and show it in the list. Here, you can also already see your Constant Contact API Key.
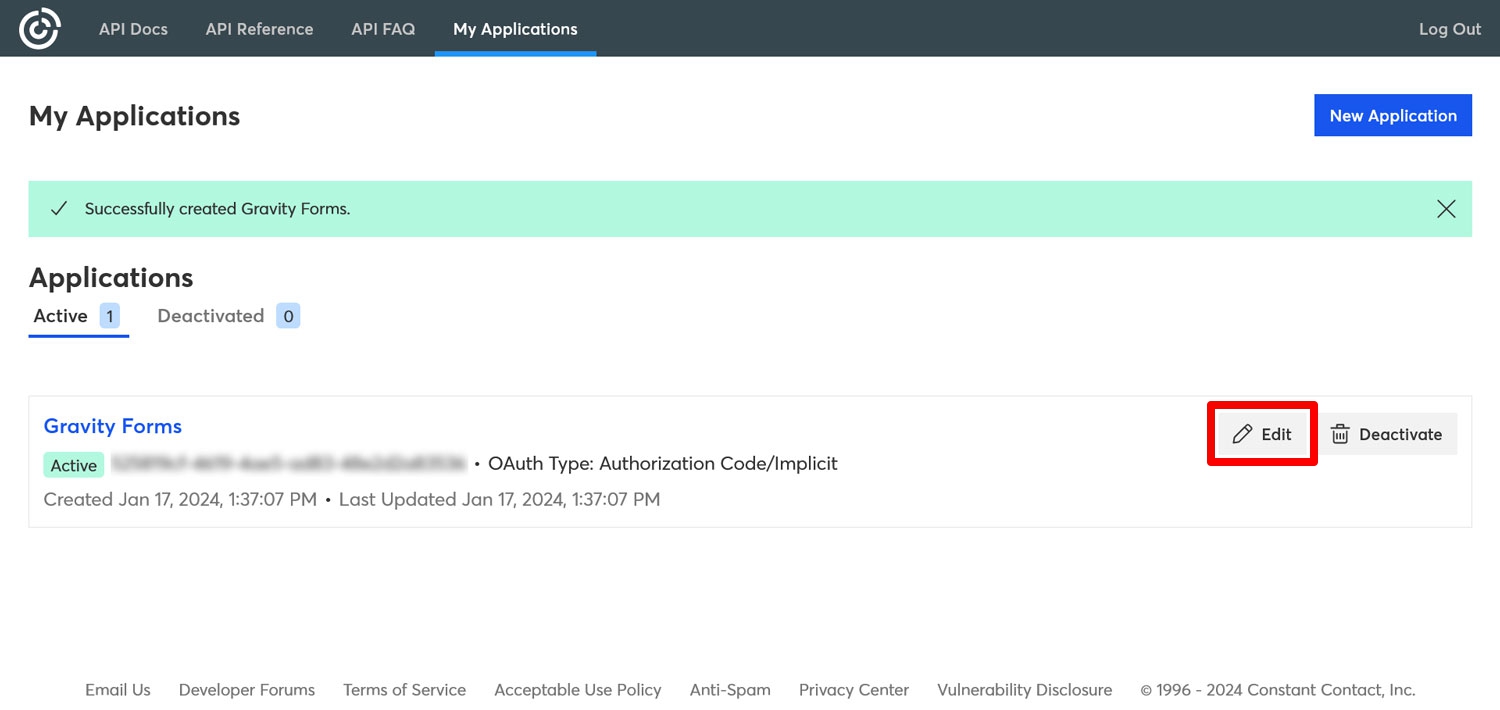
To generate the accompanying Secret, click on the application name or the Edit button to access its details. In the next screen, which also shows the API key and the ability to copy it, hit Generate Client Secret.
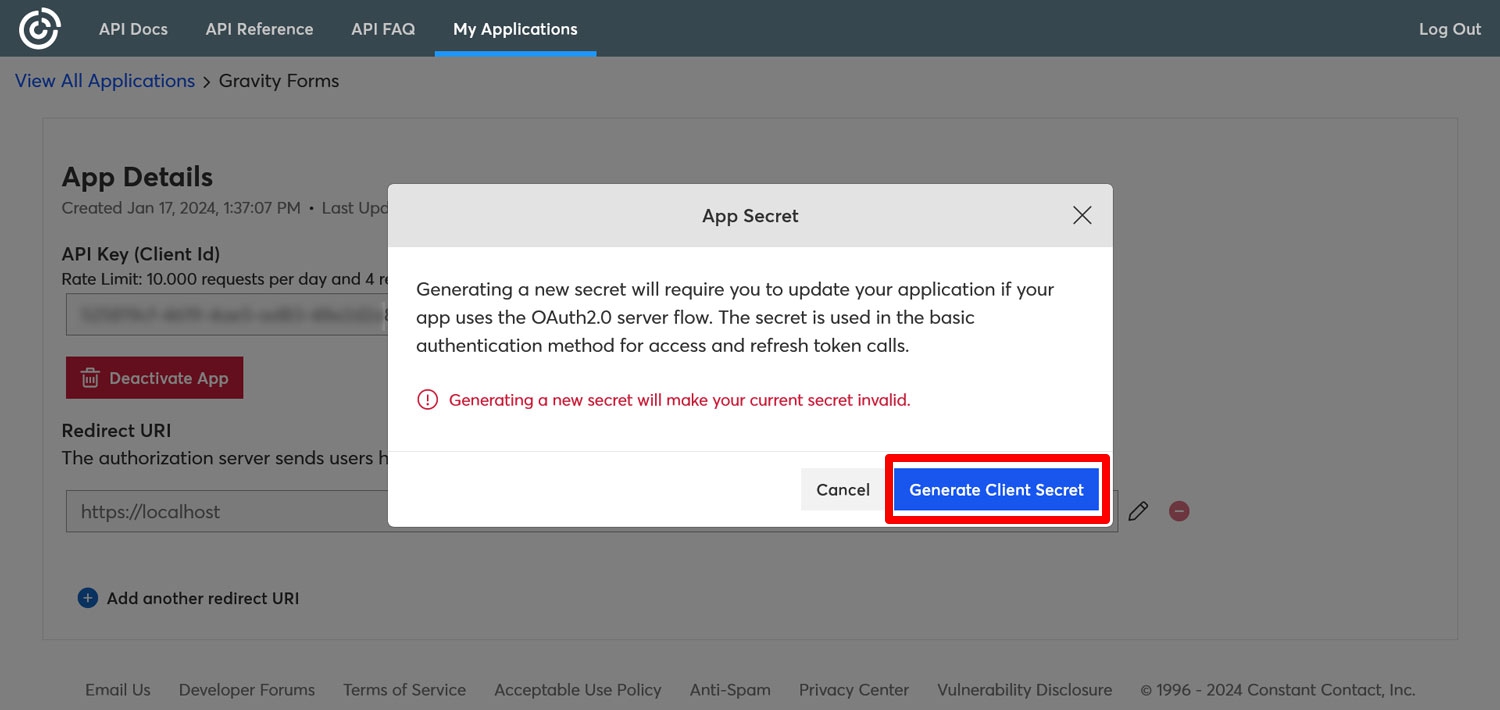
It will warn you that generating a new secret will make the current one invalid, which you can confirm. After that, it will show you the secret so you can copy it.

You should do that and keep it somewhere safe since this is the only time you will see it.
4. Connect to Gravity Forms
Now that you have both the API key and the App secret, it’s time to copy and paste those into the Gravity Forms Constant Contact Add-On settings. Here, too, you’ll see instructions on how to connect to Constant Contact. It includes an important piece of information, the redirect URI.
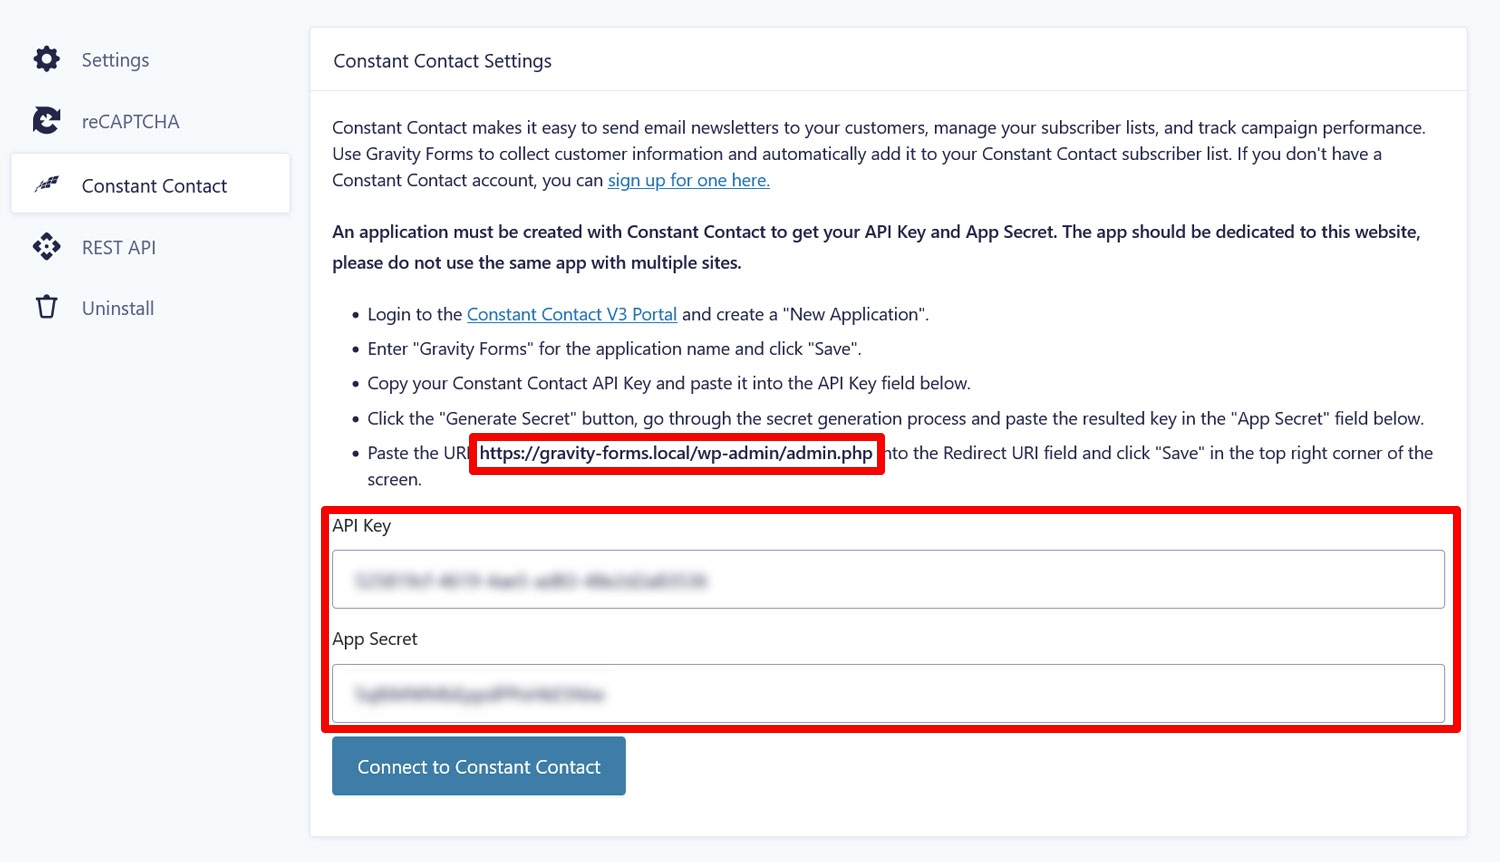
Copy and paste it in the respective field of your Constant Contact application (you have to click the little pen symbol to do so).
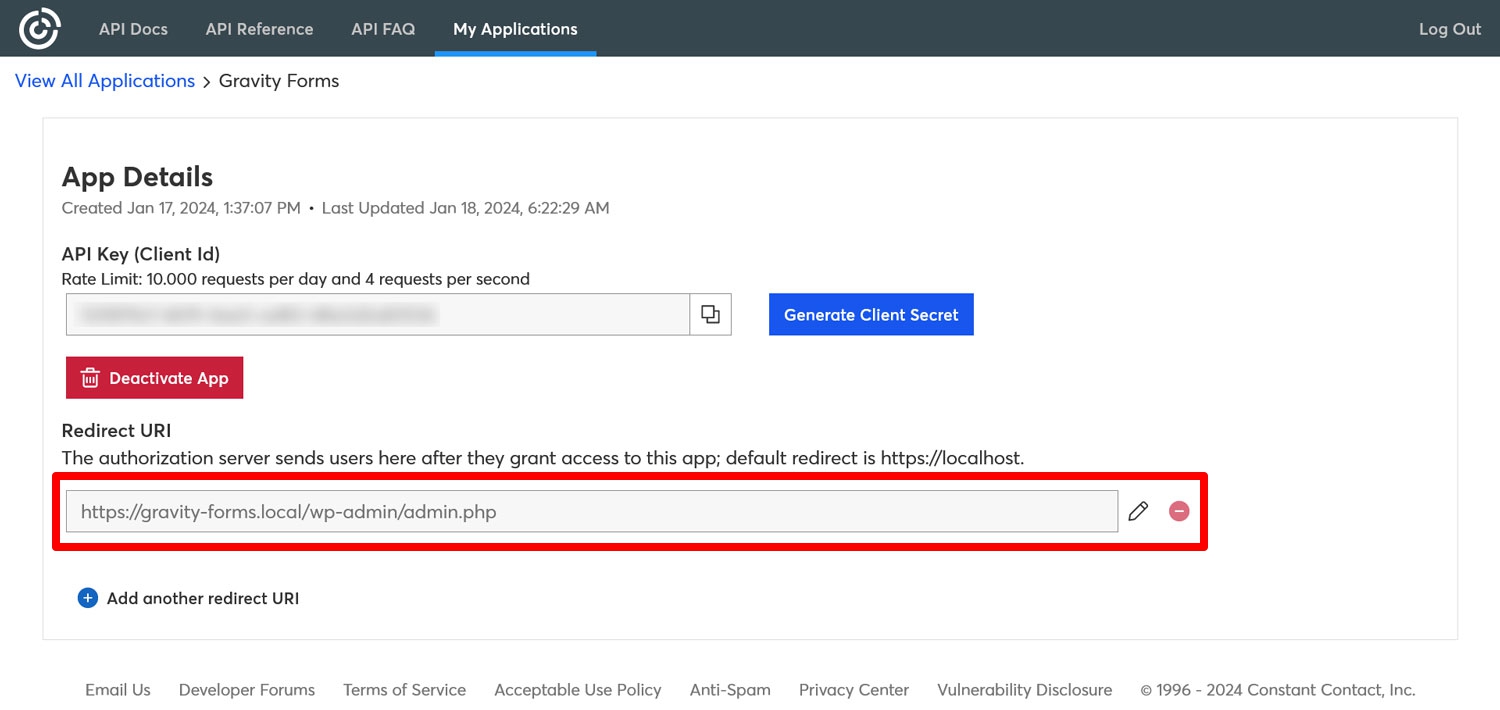
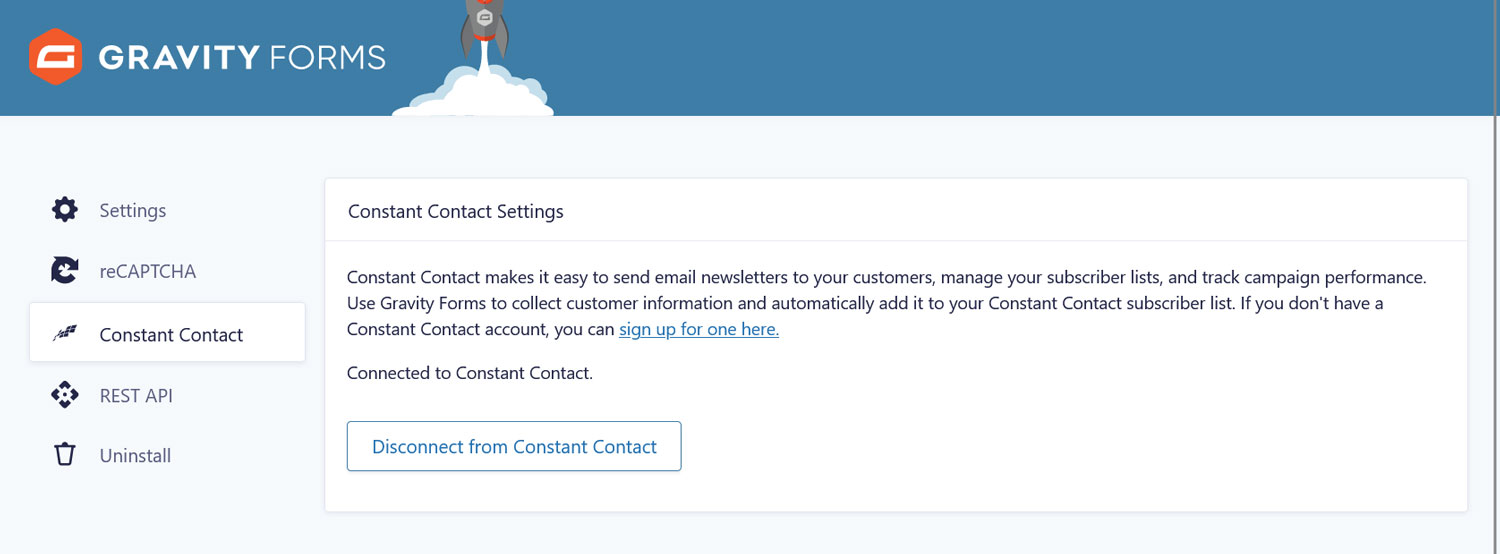
After that, save in the upper right corner. Now go back to the Gravity Forms settings and click Connect to Constant Contact. It will ask you to give access to the necessary data, which you need to confirm. After that, the process is done, and it should show that you are connected to Constant Contact.
For more information on connecting to Constant Contact, check out our documentation that outlines the process.
5. Create an Email Sign-up Form
In order to take advantage of the Gravity Forms connection to Constant Contact, you first need to create a form that you want to use with your email marketing provider. After all, the goal is to collect email addresses on your website. Here’s how to do that.
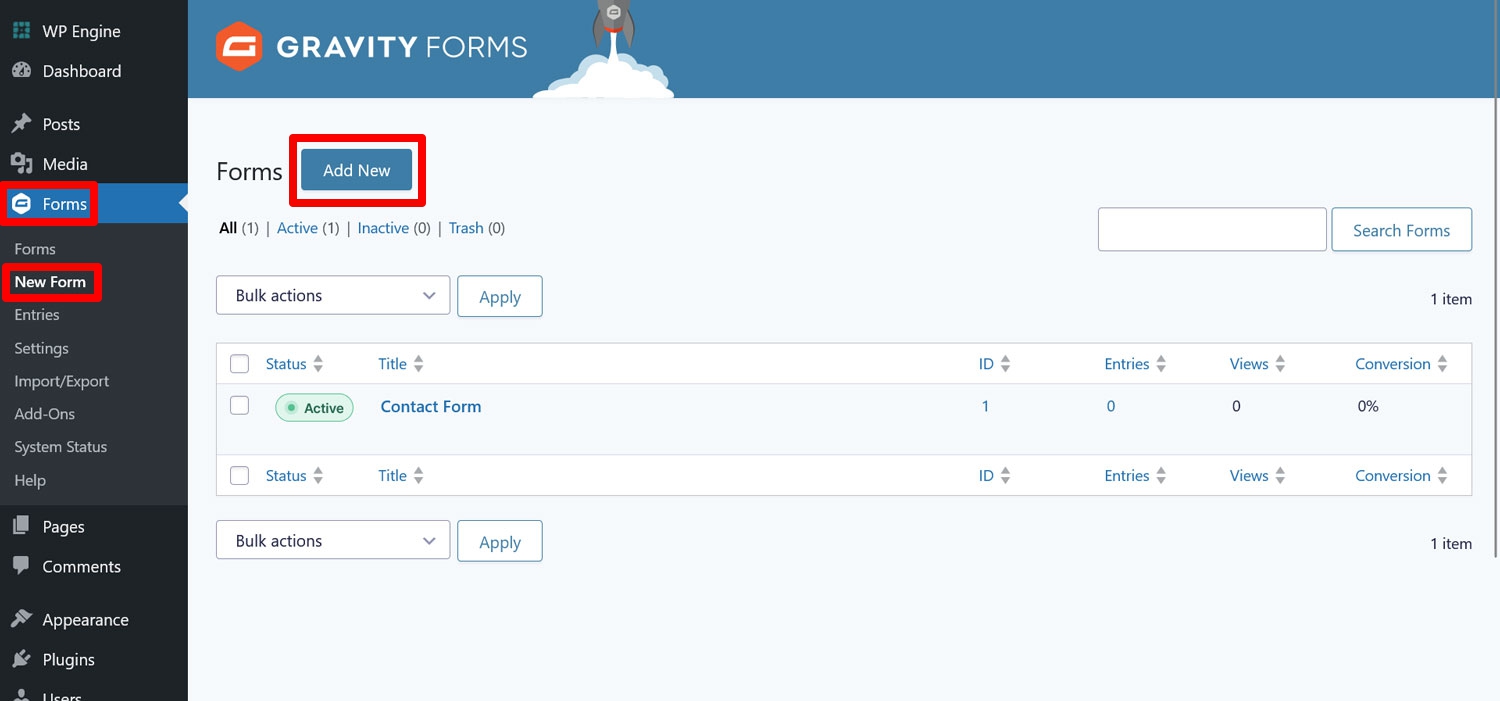
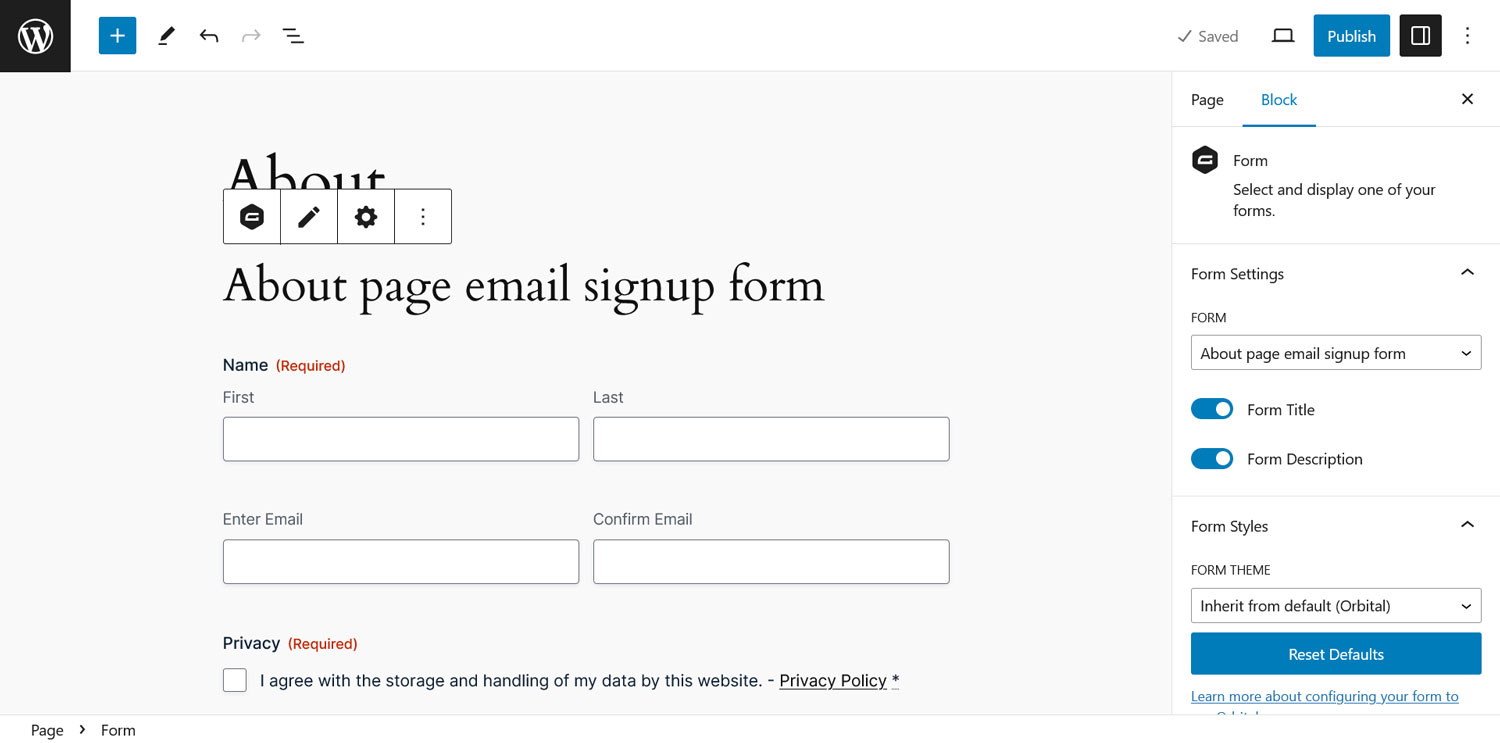
In your WordPress back end, go to Forms → New Form.
You can either start a form from scratch or use one of the many one-click templates Gravity Form offers. In this case, we’re going with the Newsletter Signup Form template.
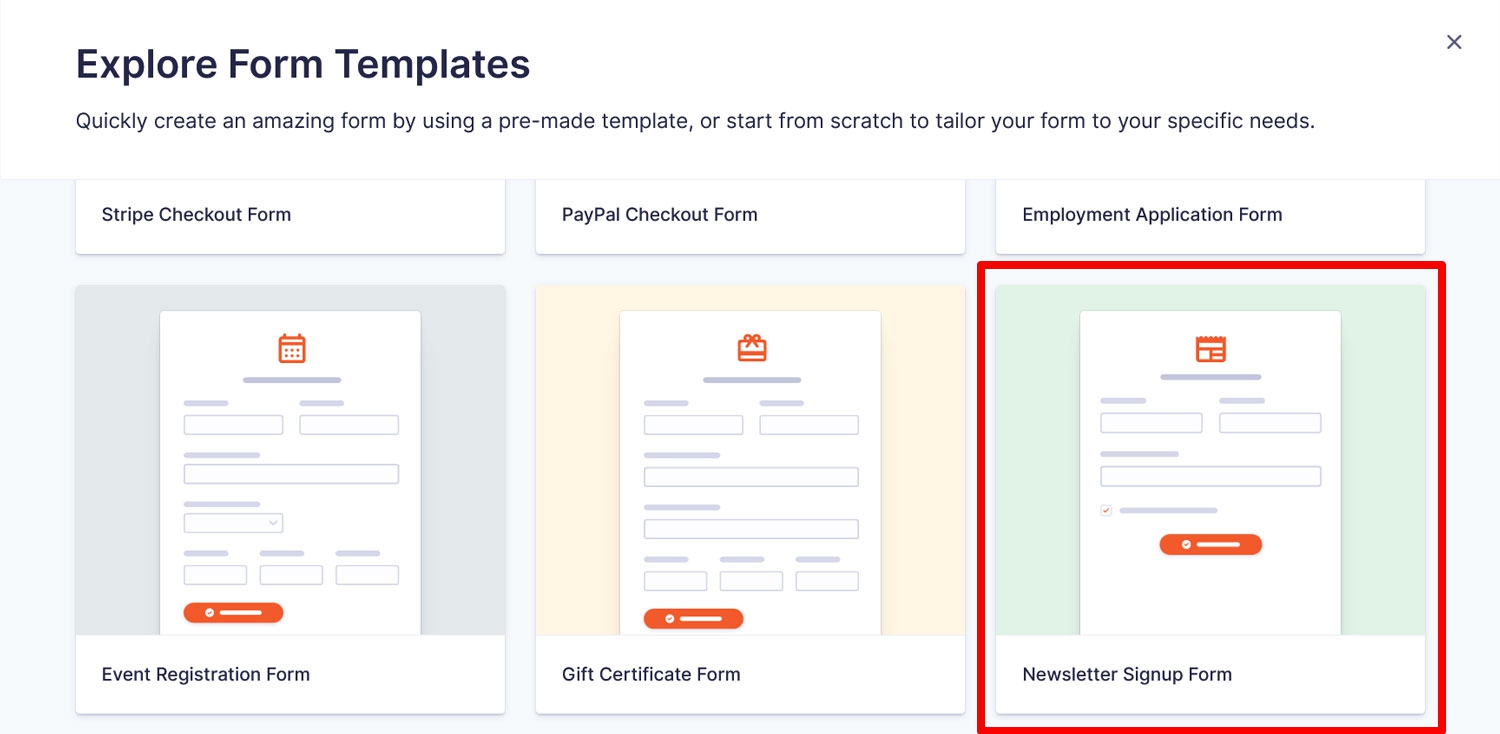
Hover over it and click on Use Template to get started with it. In the next step, enter a form title so you can recognize it at a later date.
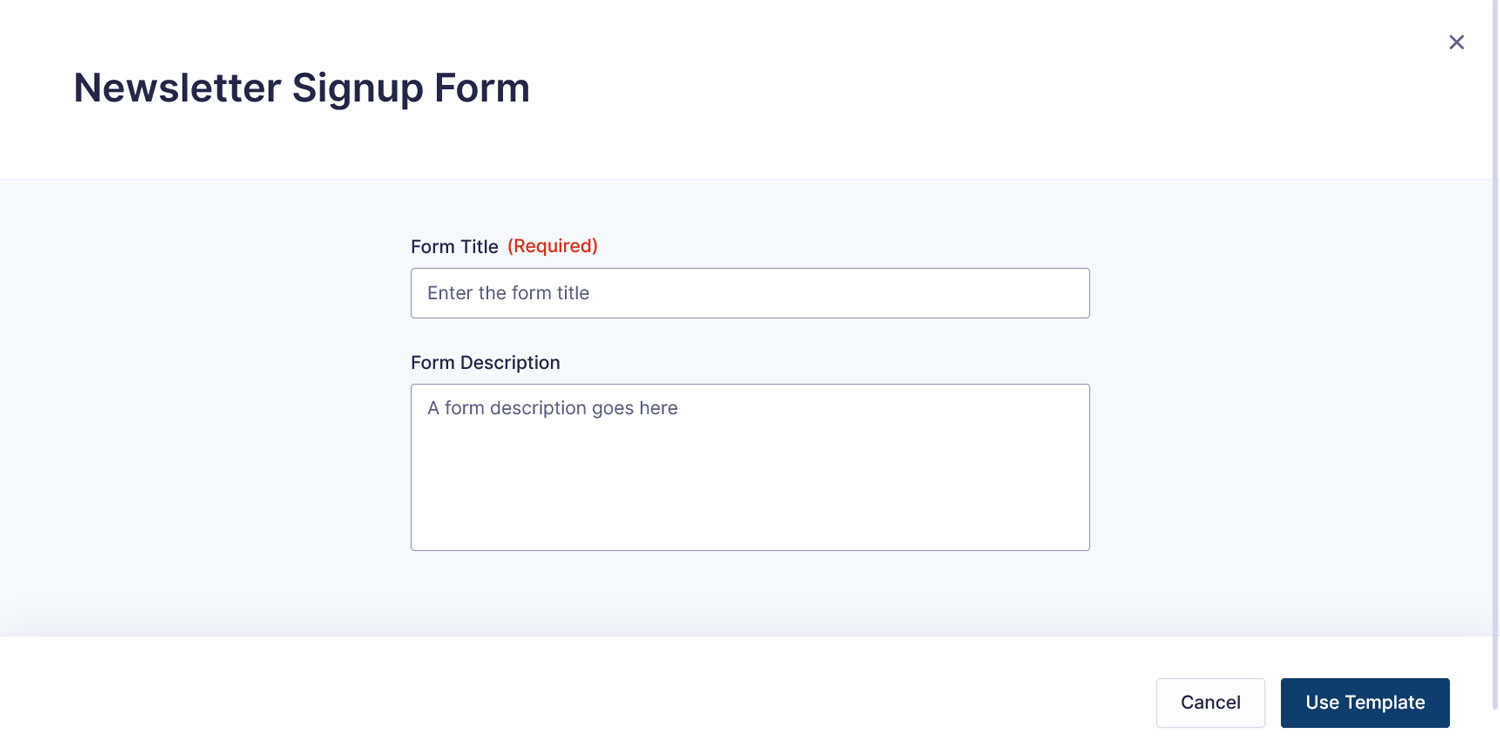
When you are satisfied, click on Use Template at the bottom. This will land you in the form editor.
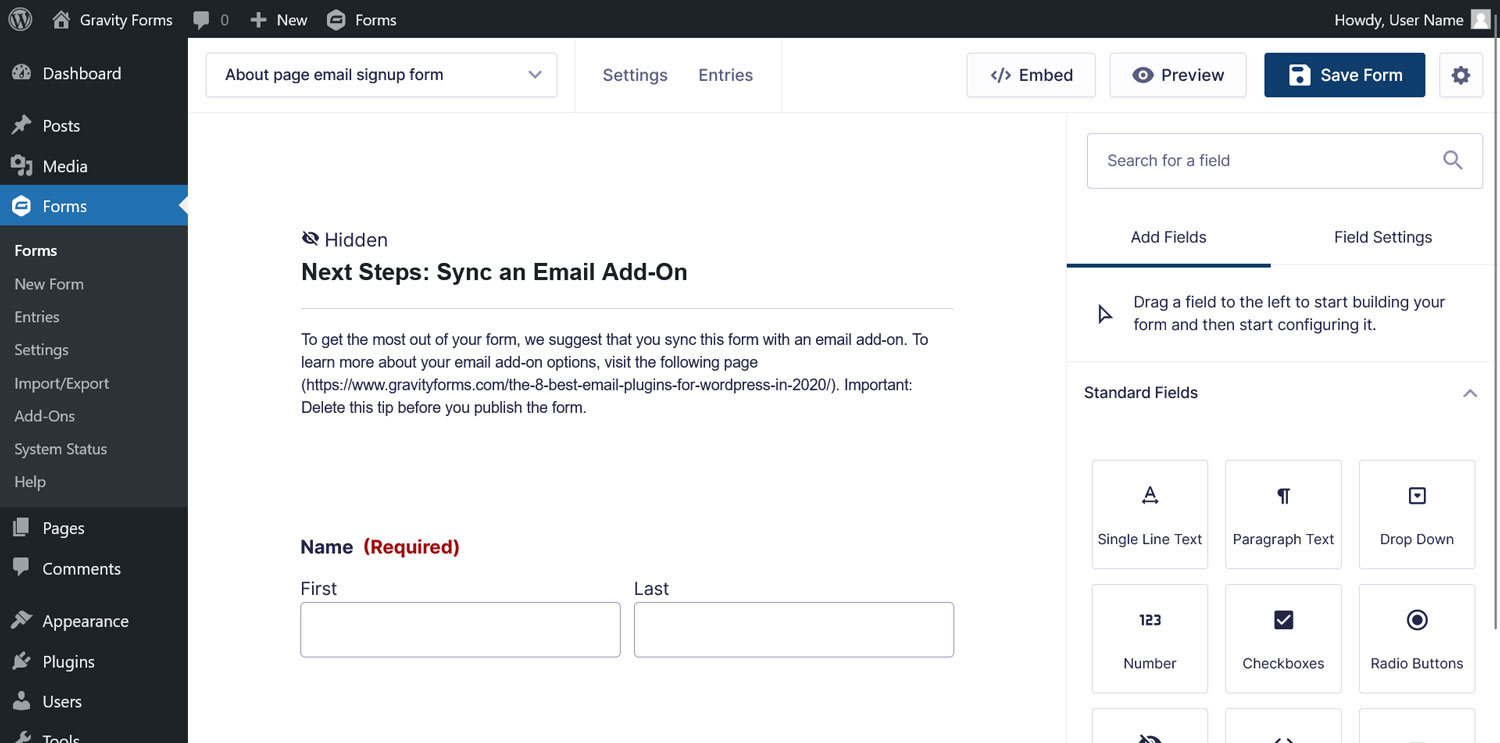
Make any adjustments you need by dragging and dropping fields, or editing them in the Field Settings and click Save Form when you are finished.
6. Set Up a Constant Contact Feed
In Gravity Forms, creating a “feed” means configuring what happens to form data after it is submitted. After all, when someone uses your email sign-up form, you want the data to go to the right place in your Constant Contact account – so let’s take care of that next.
You find the option for creating a Constant Contact feed in the form settings. In the editor, hover over Settings and then click Constant Contact.
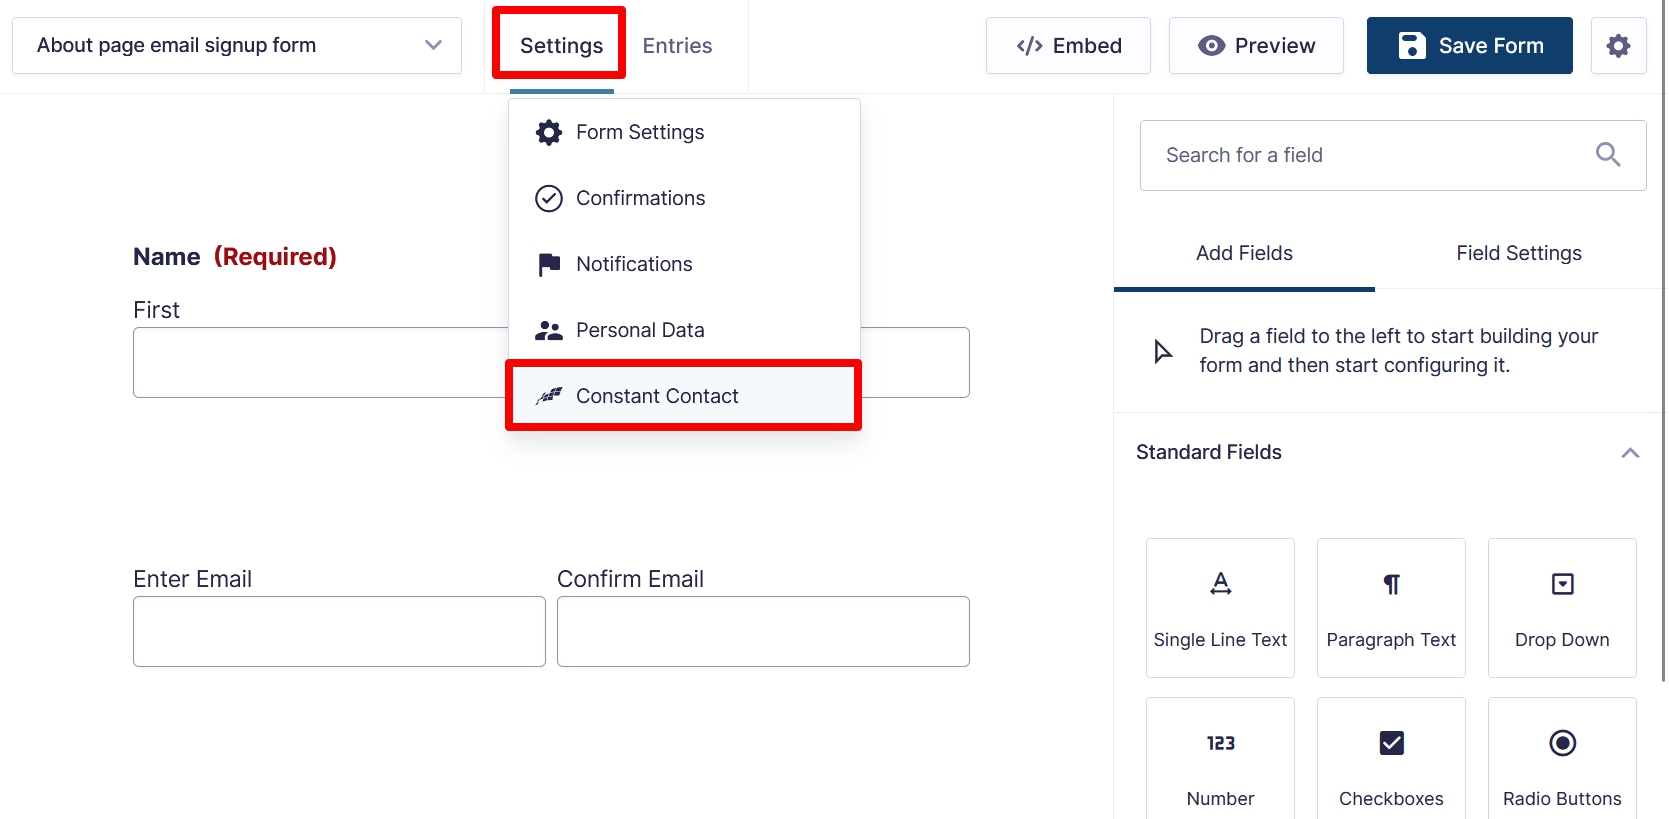
Then, click Add New to create a new feed.

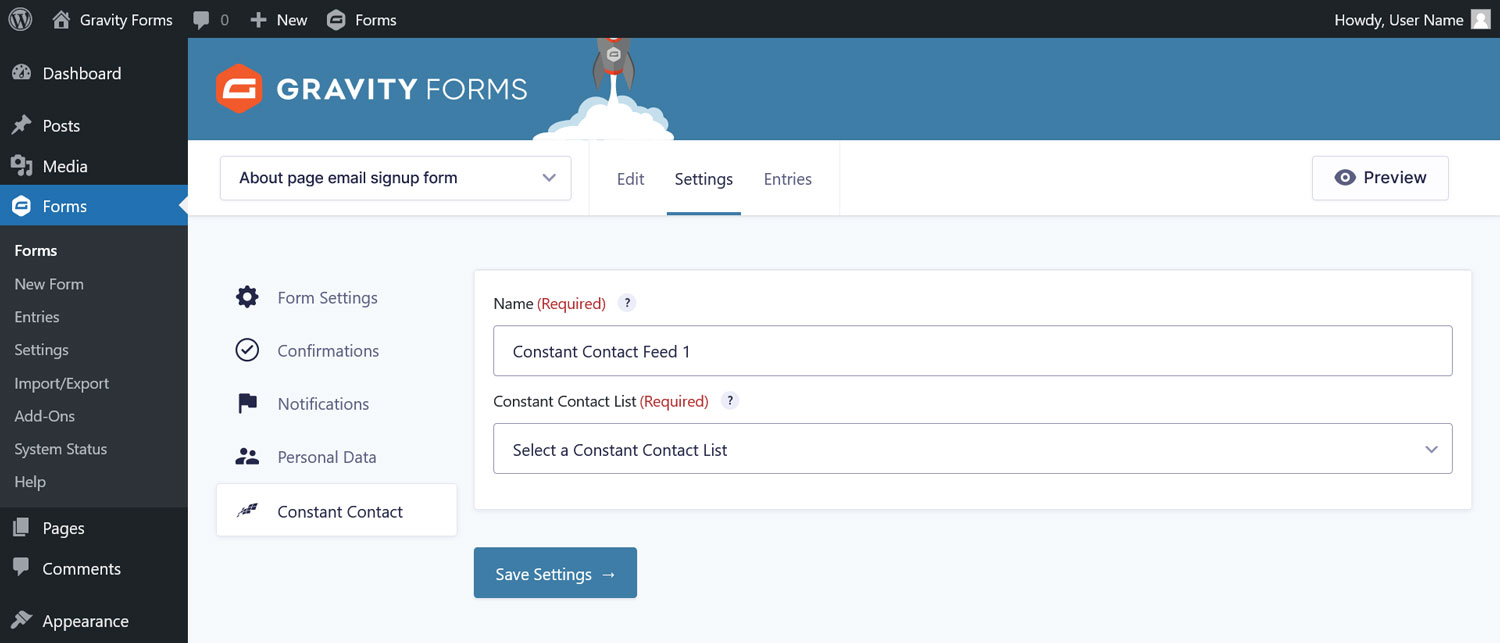
In the next screen, name your feed at the top and select the list you want to associate with this form from the drop-down menu below. That means, whenever somebody uses this particular form to sign up to your email newsletter, they will be added to that list.
The moment you choose a list, it will open a new menu in which you can map the form fields to the information saved in Constant Contact.
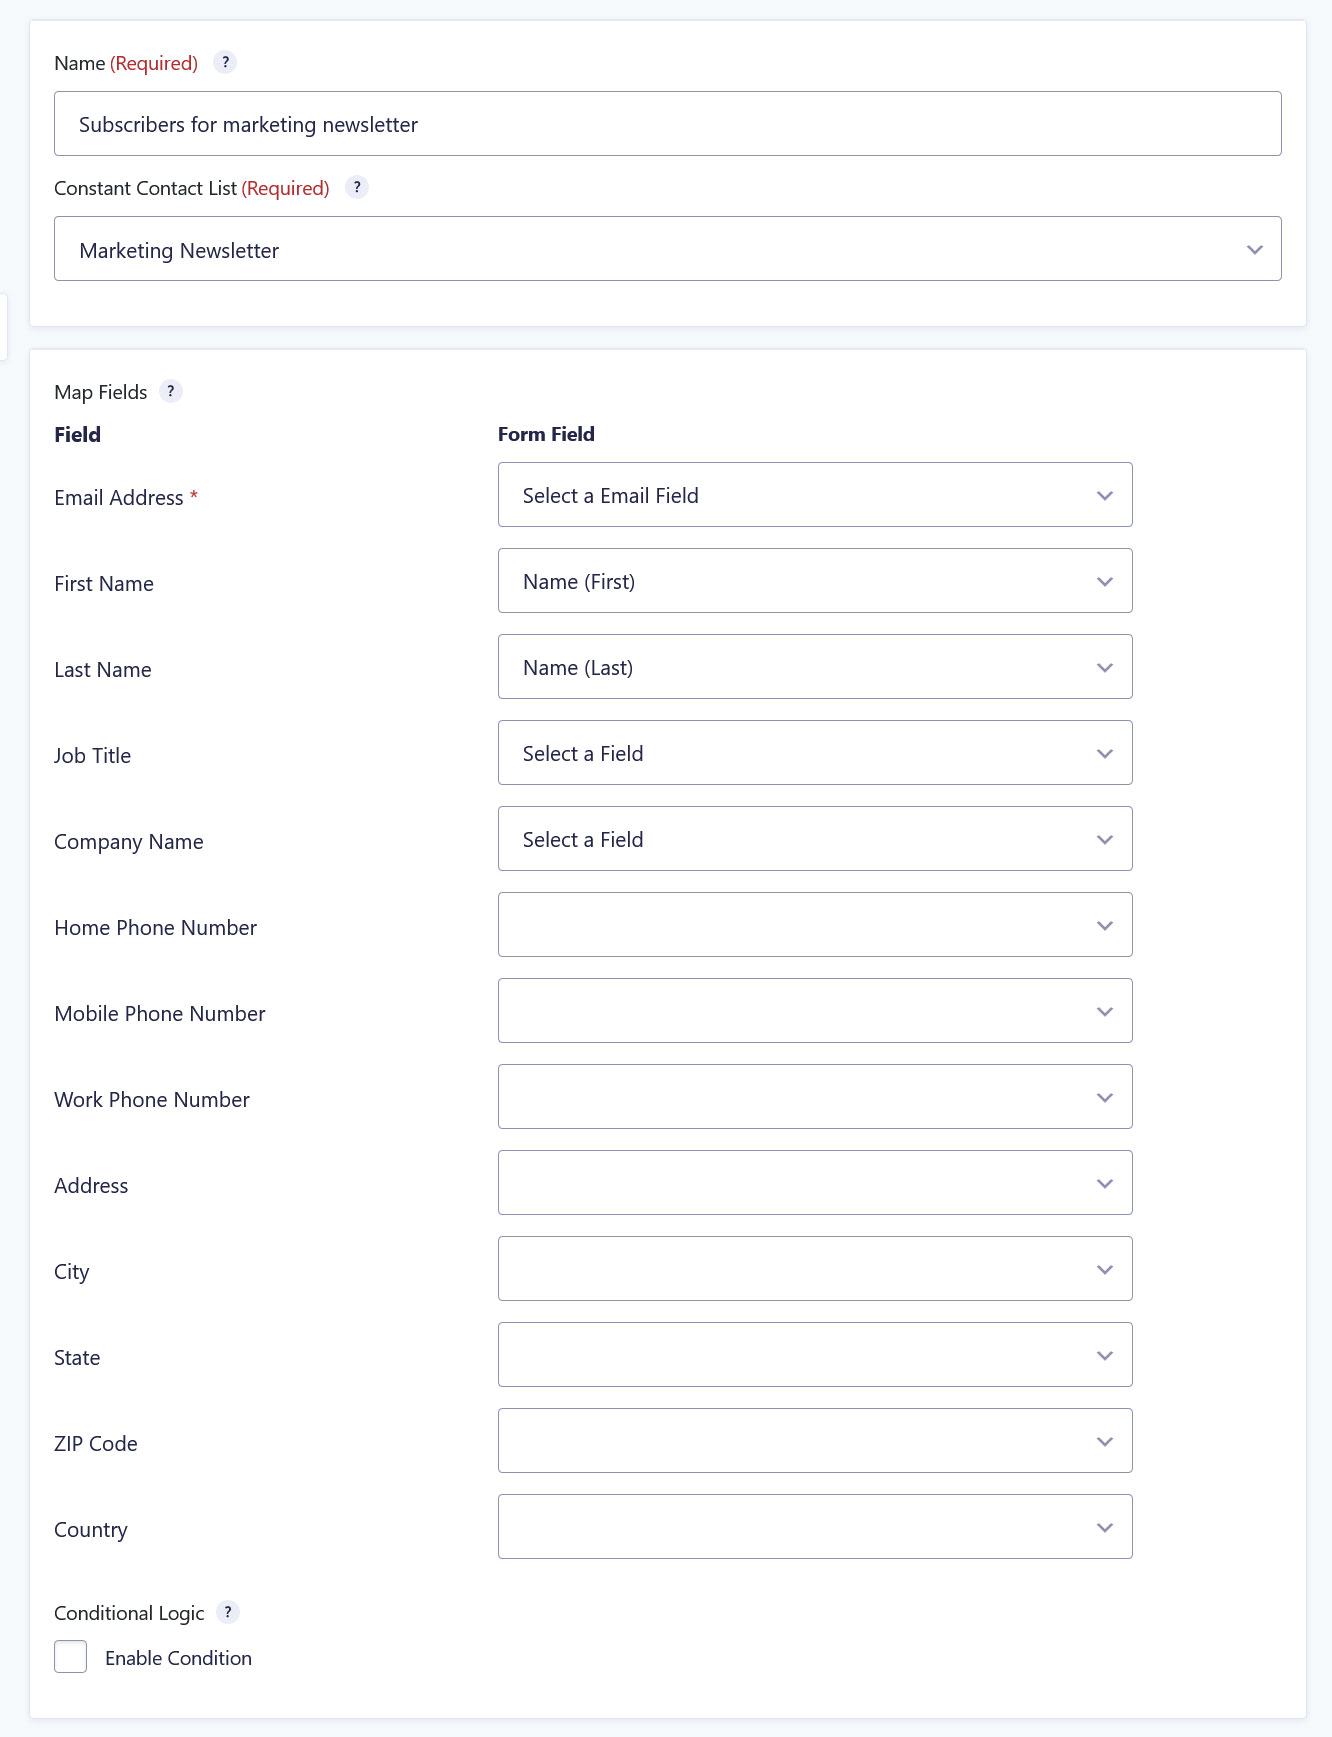
That way, you can make sure the email address is saved as email, the first name as first name, the last name as last name, etc. Check that everything is as it should be and use the drop-down fields on the right to make any corrections. Click Save Settings at the bottom when you are done.
A side note: at the bottom, you also have the possibility to apply conditional logic to your submissions. For example, you might have several email lists aimed at people from different professions. In that case, you can also create several feeds, each going to a different list depending on their information. For example, you can have a subscriber only added to each list if they pick a certain profession or industry that is included in your form.
7. Embed and Test Your Form
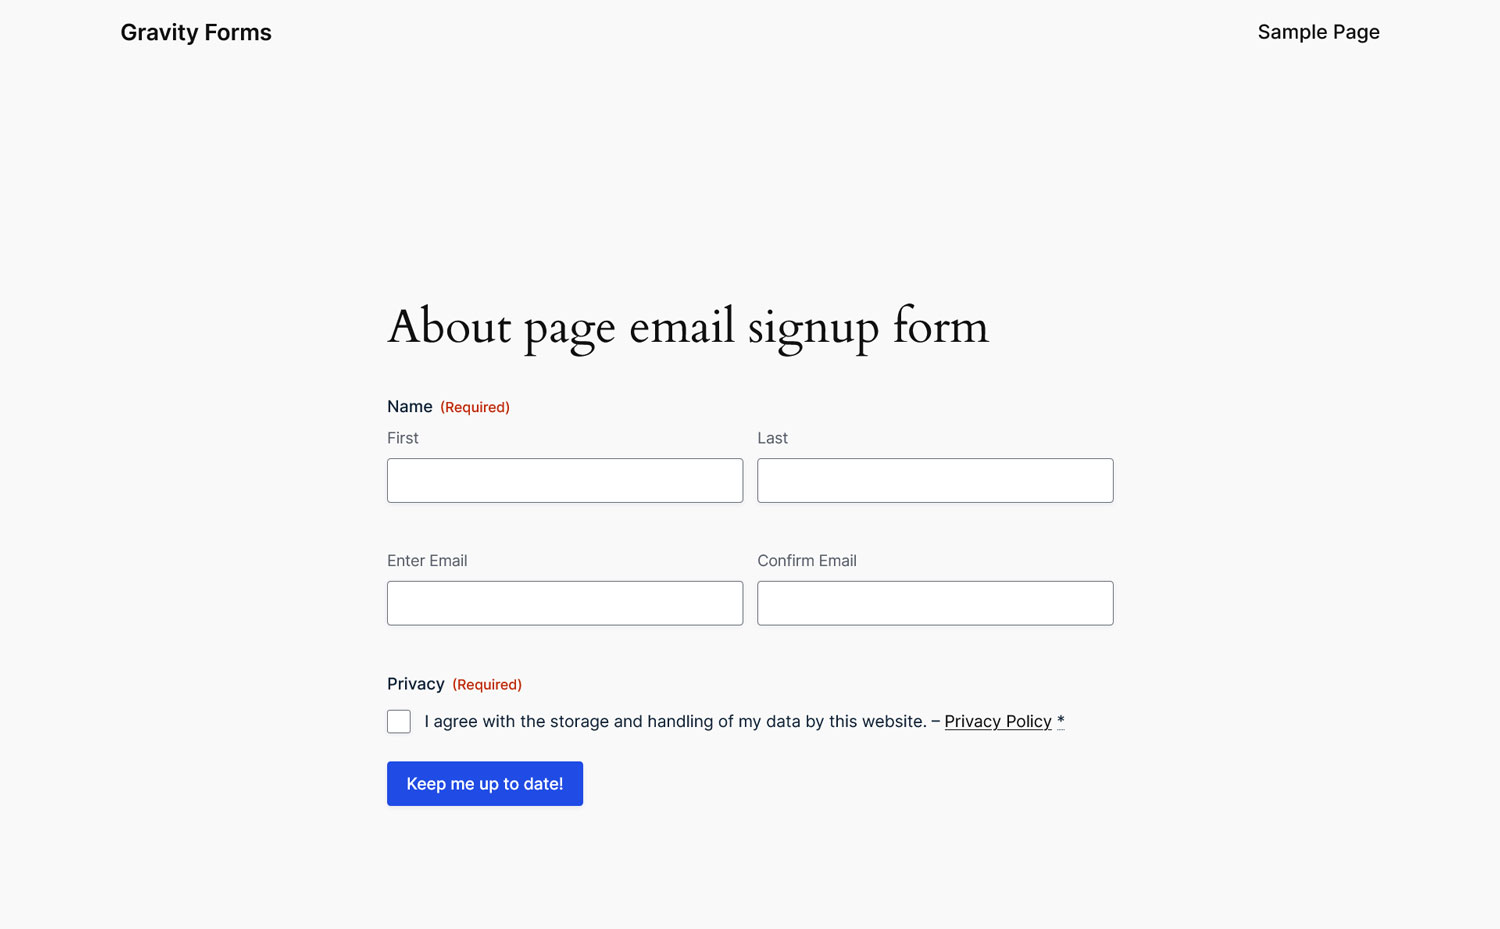
Naturally, in order for potential subscribers to use your newly minted form, it needs to be present on your site somewhere. You can do that as usual with the Gravity Forms block or the Gravity Forms shortcode.
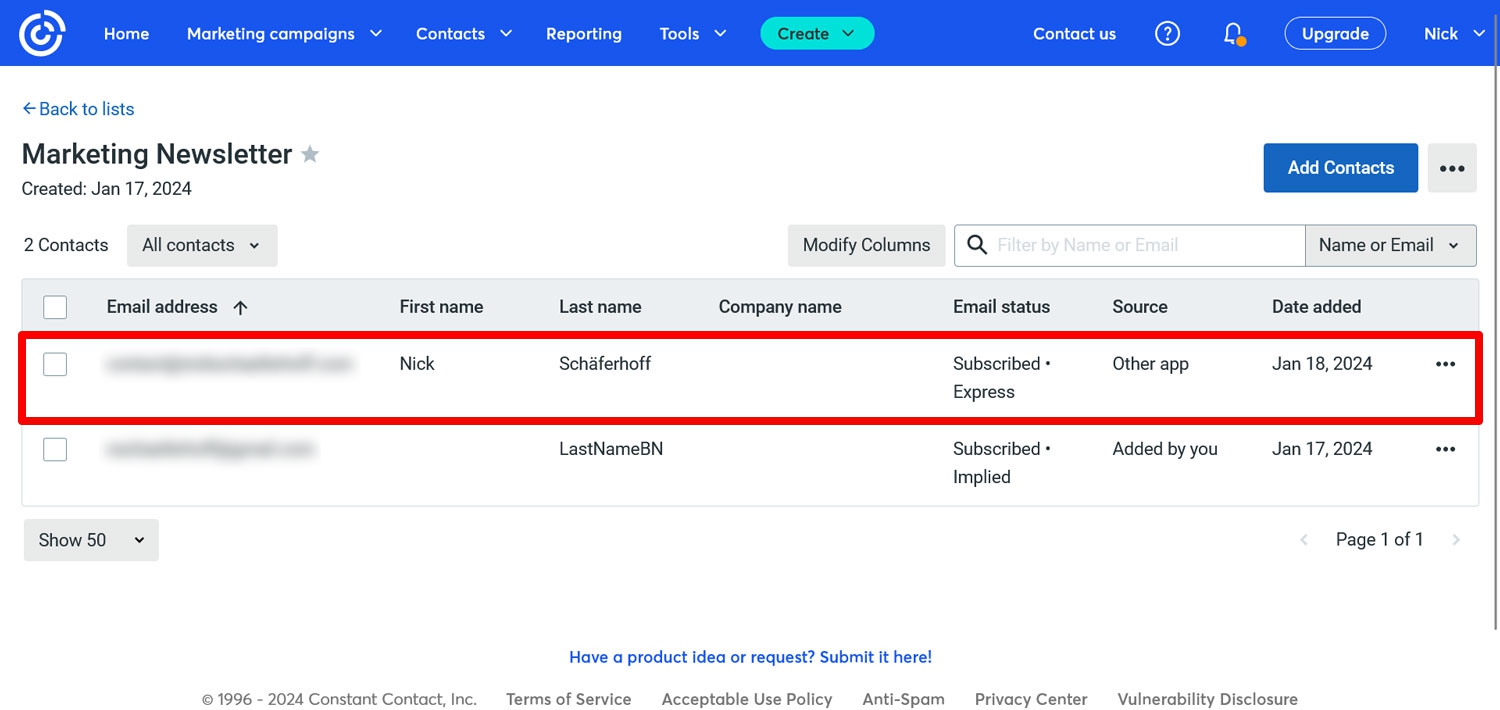
We also recommend that you test your form. Put it on a temporary page or use the preview function to see it on the front end of your site and fill it in with some test information.
After you submit the form, go back to your Constant Contact email list and check if all the information has been correctly added to your email list.
8. Configure Confirmation and Notification Messages
The above is the basic workflow to add email subscribers to Constant Contact via Gravity Forms. However, there are a few additional options you can take advantage of using the Gravity Forms Constant Contact Add-On.
For one, there are confirmation messages. You will find this option in the Form settings under Confirmations.
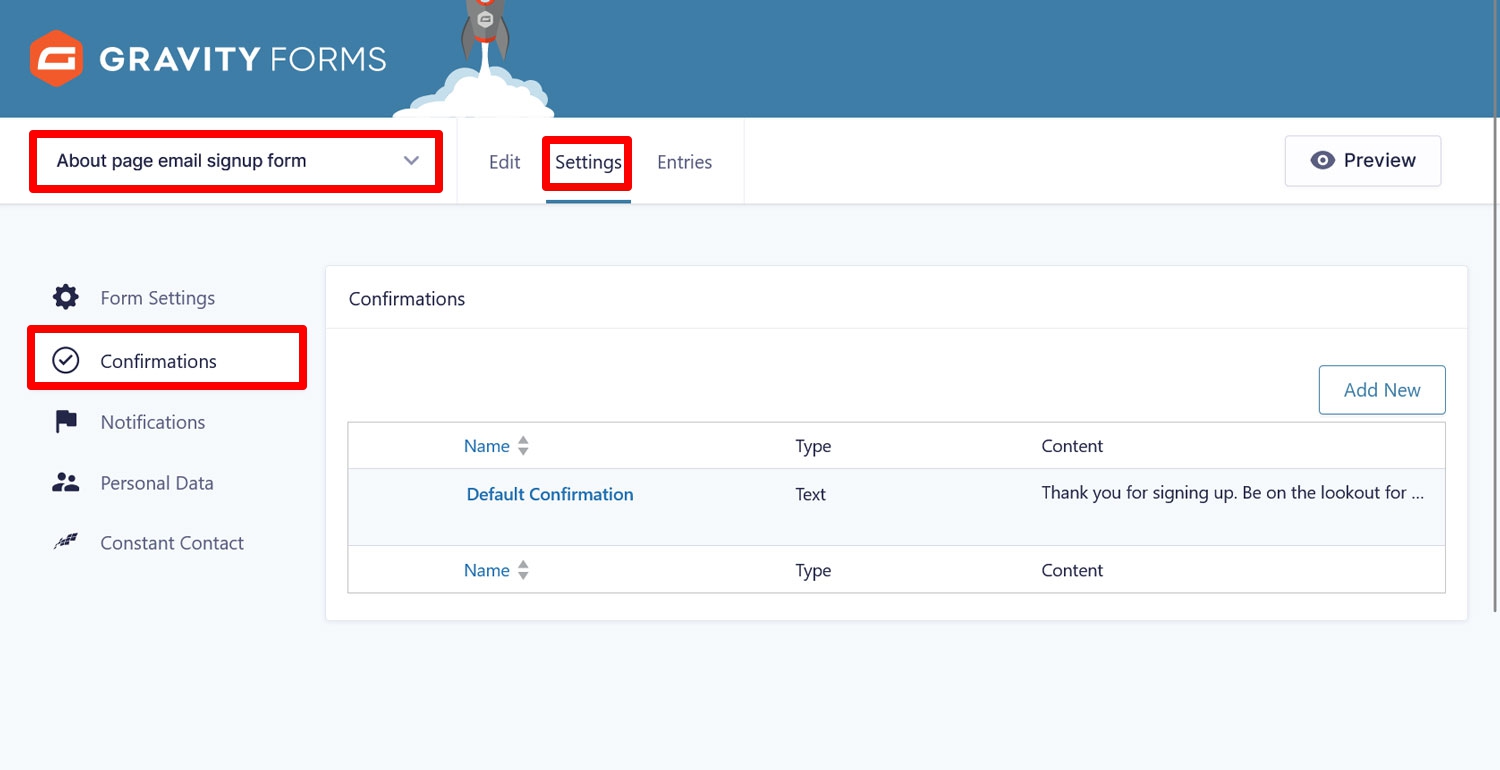
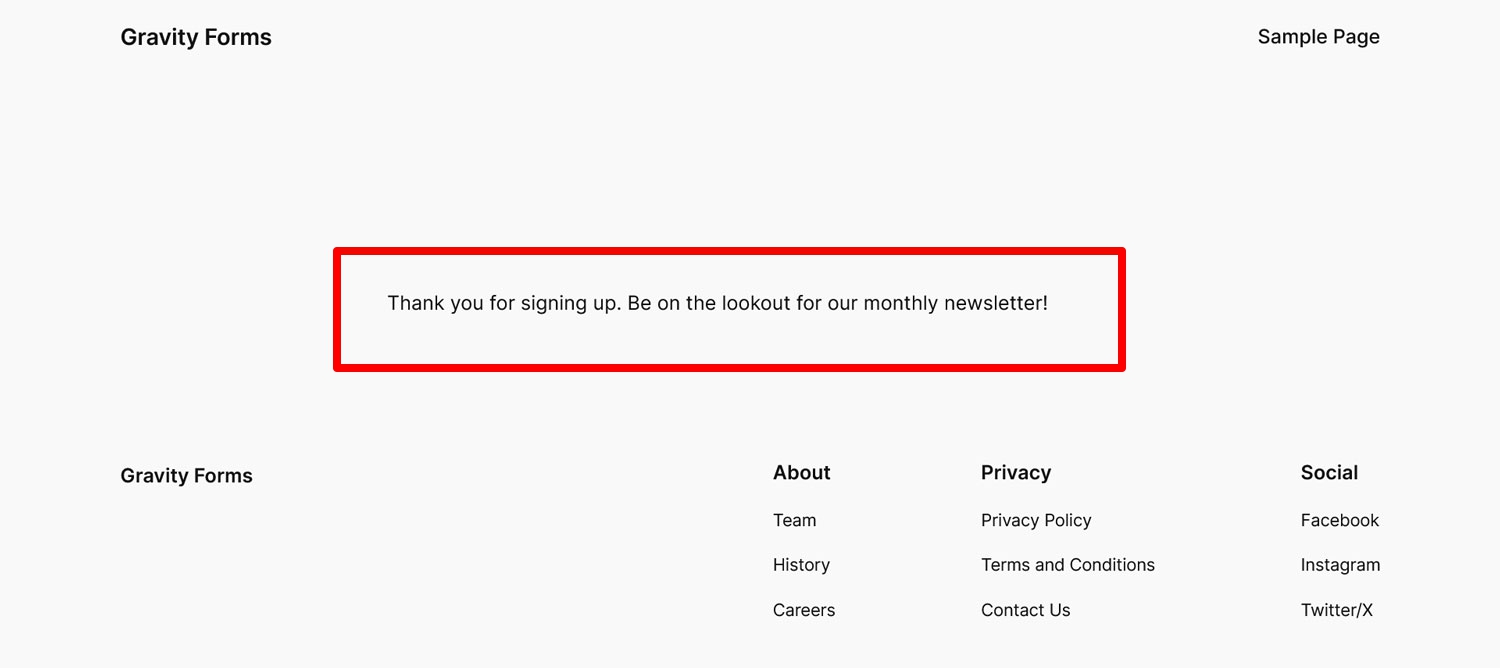
When submitted, your email signup form will display a default confirmation message to your subscribers.
You can modify that under Confirmations by editing the existing message or creating a new one. You can also use this option to send them to another page instead. For more information, please refer to this resource.
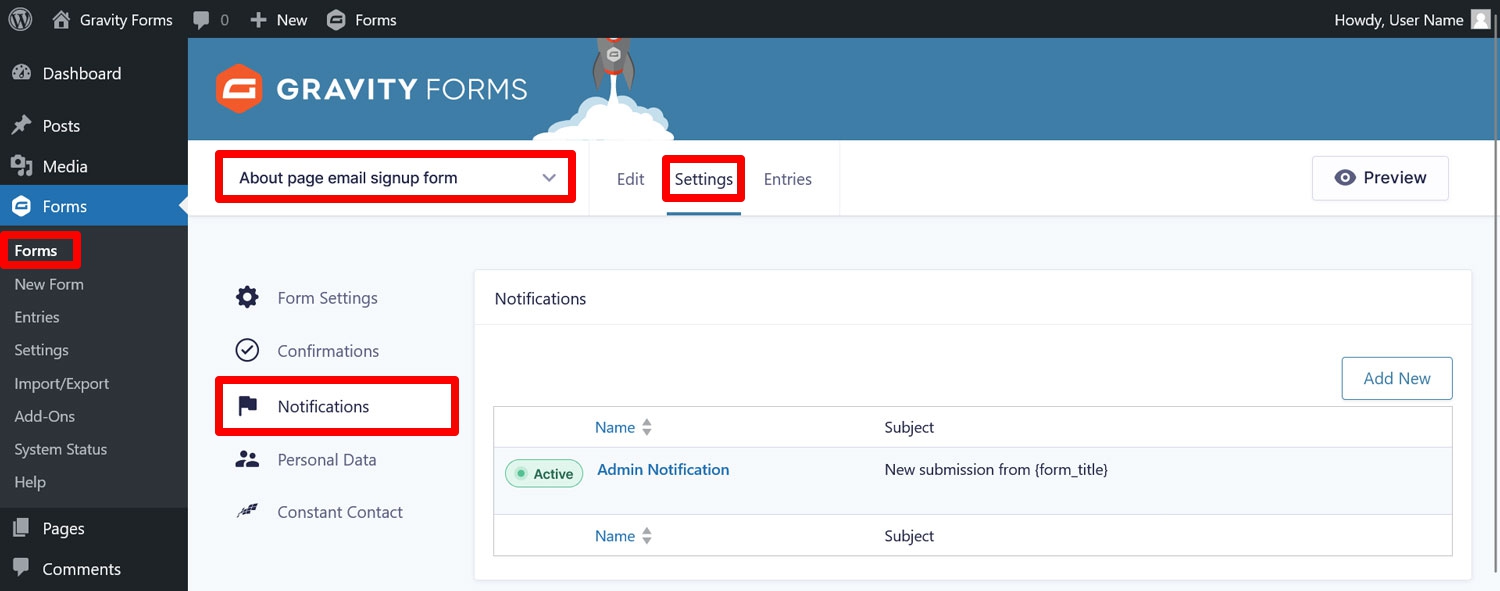
In addition to the above, under Notifications (also in the form settings), you are able to configure the notification emails sent to you and your subscribers. For that, too, we have detailed documentation.
9. Take Advantage of Custom Fields
Another option worth mentioning is working with Custom Fields. This allows you to add your own information to email subscribers in Constant Contact and collect them in Gravity Forms.
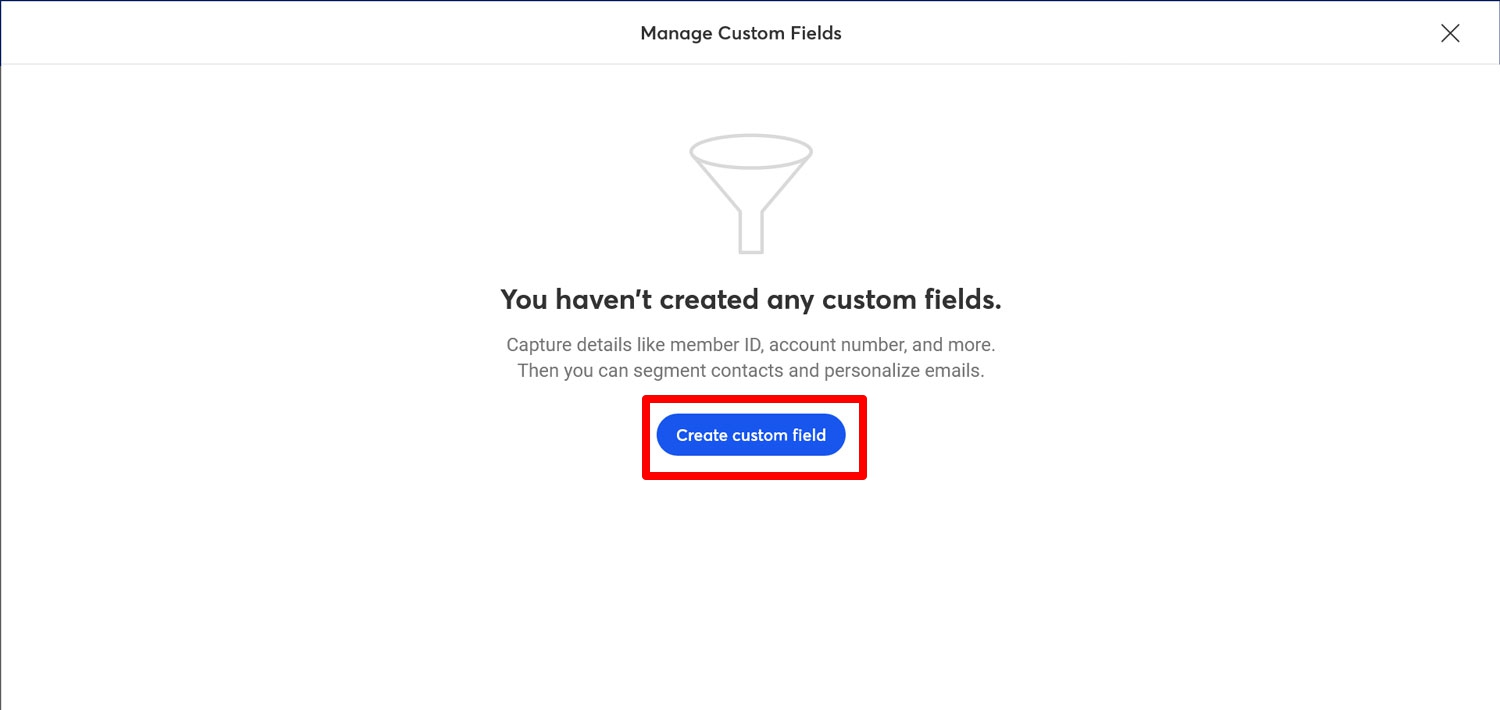
In order to collect information for a custom field, first, you have to create it. You can do that in Constant Contact in the Contacts menu. Click on the three-dot icon, then Manage Custom Fields.
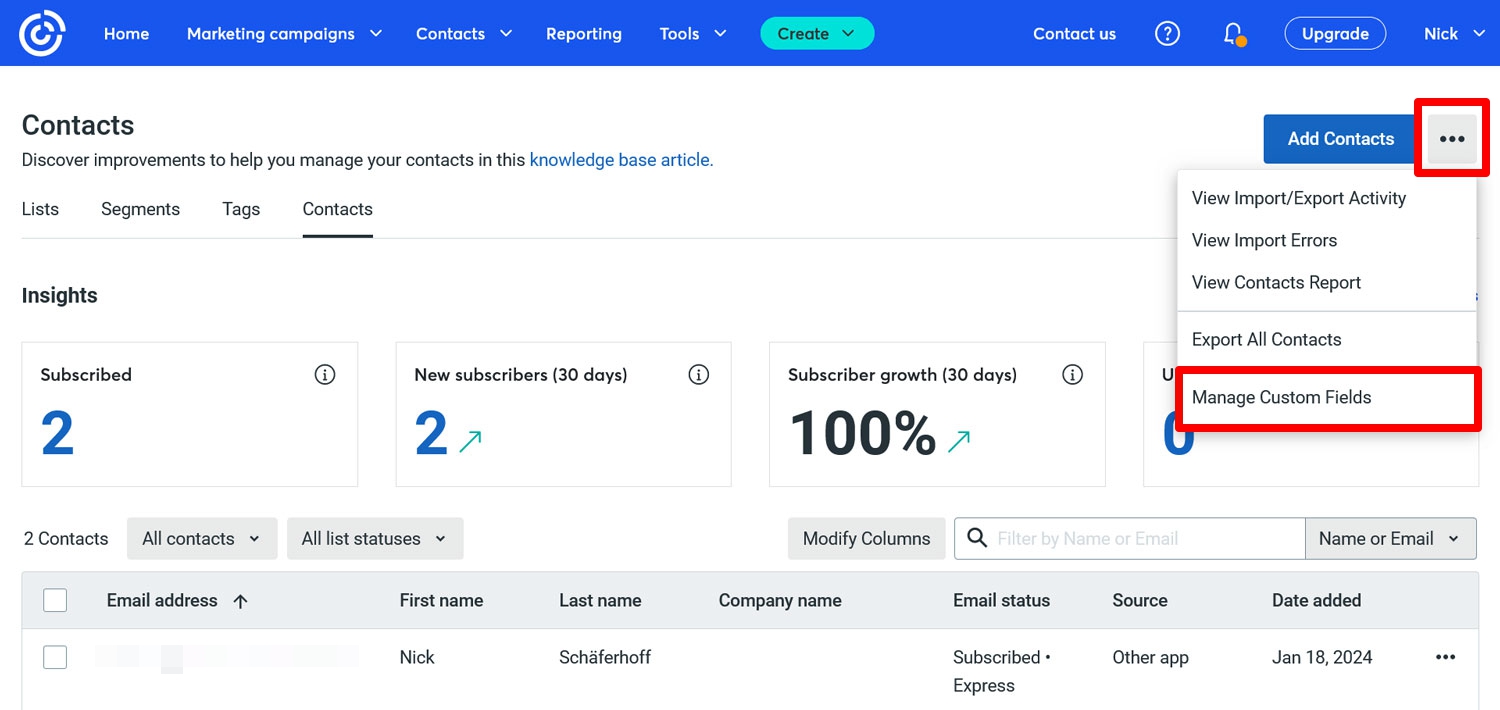
In the menu that appears, choose Create Custom Field.
Alternatively, when you edit any of your contacts, you also see the option to create a custom field at the bottom.
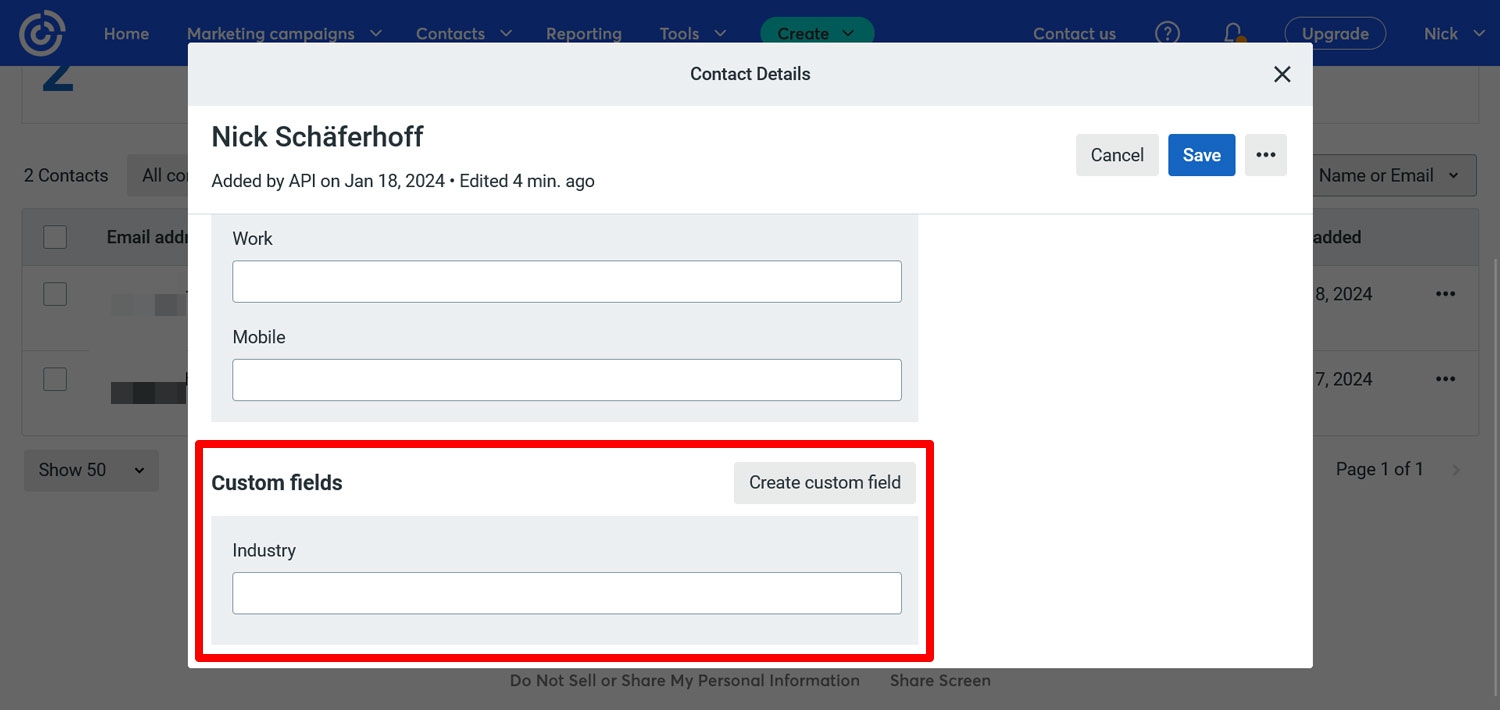
Either way, you will be asked to enter a field name and choose a type (text or date).
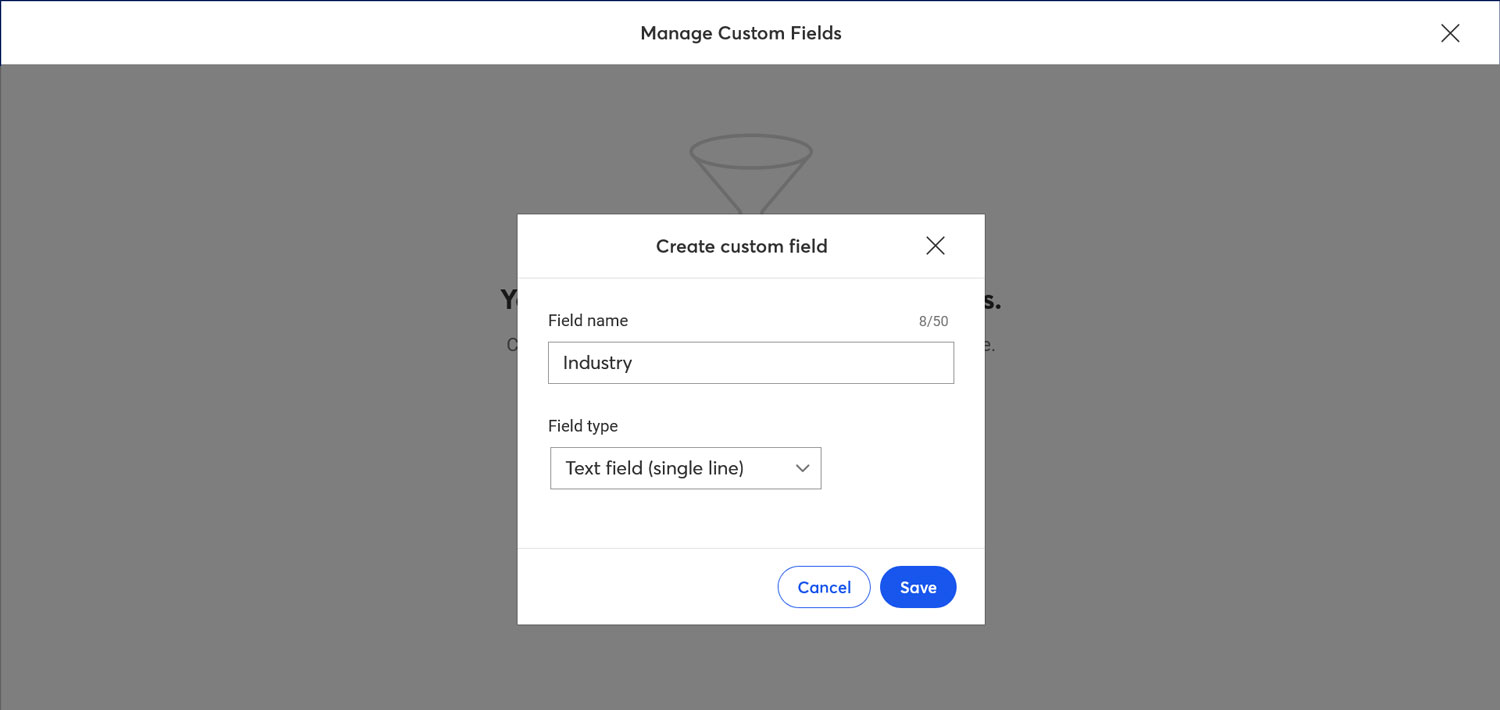
In this case, let’s say we want to add the industry your subscribers work in to it, so we call it Industry and choose a text field. With that in place, when you go back to your Constant Contact feed in form settings, you’ll find a new option at the bottom under Custom Fields.
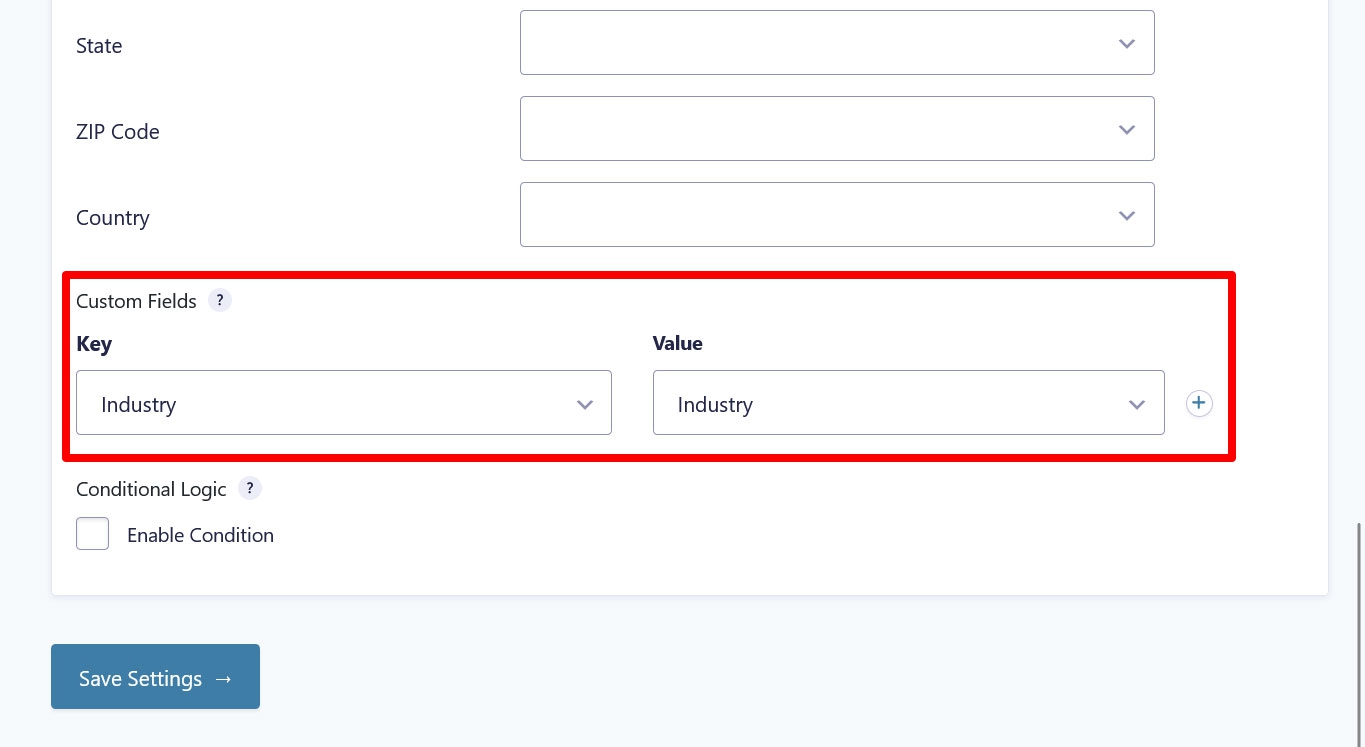
Here, you now have the option to map a drop-down question about the industry from your email sign-up form to the field in Constant Contact.
Start Using Constant Contact With Gravity Forms Today!
Gravity Forms and Constant Contact are a match made in heaven. Thanks to the Gravity Forms Constant Contact Add-On, it’s never been easier to create effective email sign-up forms and connect them to your email marketing provider.
All you need to do is install, obtain an API key and secret, connect, and create a form feed. You can have it set up in minutes. In addition, you can fully sync whatever data you want to collect, use conditional logic to segment subscribers, and much more.
If you already have an active Gravity Forms license, and you’re ready to put your subscriber collection on autopilot, simply install the Gravity Forms Constant Contact Add-On today to get started.
For everyone else, head on over to the Gravity Forms pricing page to make a purchase!

If you want to keep up-to-date with what’s happening on the blog sign up for the Gravity Forms newsletter!
"*" indicates required fields


