How to Use Mailjet to Send WordPress Emails

Looking for a way to set up Mailjet to send your WordPress transactional emails?
If you want to improve the reliability of your WordPress site’s emails, using a transactional email service like Mailjet is a great option. And thanks to Mailjet’s generous free plan, it might not even cost you a single penny.
However, if you want to use Mailjet for WordPress emails, you’ll need the help of a WordPress SMTP plugin like Gravity SMTP because WordPress doesn’t offer any built-in functionality to set up the connection.
In this post, we’ll show you step-by-step how to set up your site’s emails using the Gravity SMTP plugin and the Mailjet email API. You do not need any technical knowledge – just follow along and we’ll cover every step.
But first, let’s quickly run over some of the reasons why you might want to pair Mailjet and Gravity SMTP for WordPress transactional emails.
Why use Mailjet for WordPress transactional emails?
Mailjet is a transactional email service owned by Sinch, a well-established messaging platform.
One of the biggest reasons to consider Mailjet is its generous free plan, which lets you send up to 6,000 emails per month (though no more than 200 emails within a given day).
This limit should be plenty for most WordPress websites, which means Mailjet can be a 100% free solution if you’re looking to greatly improve the reliability of your site’s transactional emails.
If you do need to increase those limits (and/or you want to access additional features), Mailjet is still quite affordable, starting at $17 to send up to 15,000 emails per month.
Beyond its affordability, here are some other reasons to consider Mailjet:
- Email sending API – This offers a more reliable and secure approach than using SMTP credentials.
- Customized tracking links – You can use your own custom domain name for the tracking links in your emails.
- Email statistics – You can view details such as opens, clicks, bounces, etc. The Gravity SMTP plugin can also help you track some of these metrics from inside your WordPress dashboard.
- Monthly deliverability reports – These reports also include tips to further improve the deliverability of your emails.
- Dedicated IP option – Higher-tier plans include the option to have a dedicated IP address.
- Customer support – Paid plans get dedicated support (you also get support for the first month of the free plan).
How Gravity SMTP helps you use Mailjet on WordPress
If you want to connect WordPress to Mailjet, you’ll need the help of a WordPress SMTP plugin like Gravity SMTP.
To start, Gravity SMTP lets you send all of your site’s transactional emails using Mailjet’s API, which is the most secure and reliable way of sending emails.
Beyond that, Gravity SMTP includes lots of features to help you use Mailjet more effectively and improve your site’s transactional emails:
- Email logging – You can log each email that your site sends and store it for a period of your choice. In addition to logging the technical details of each email, you also have the option to log the actual content and/or attachments.
- Email usage reports – You can see how many emails your site sends, along with the top sending sources (e.g. core WordPress vs a specific plugin).
- Open tracking – While Mailjet does let you track opens from the Mailjet dashboard, Gravity SMTP lets you see this information from inside WordPress.
- Email suppressions – You can create your own suppression list to avoid sending emails to certain users. This is useful because Mailjet’s exclusion feature is more focused on marketing emails rather than transactional emails.
- Real-time alerts for email issues – You can receive immediate alerts via SMS or webhook (e.g. Slack alerts) so that you can quickly fix any issues.
- Backup email sending methods – You have the option to connect to a secondary email sending service in addition to Mailjet. If Mailjet ever fails to send an email for any reason, Gravity SMTP can automatically retry that email using your backup service.
- Support – You can get direct support from the Gravity SMTP team.
Gravity SMTP is available for free to people holding one of these Gravity Forms licenses:
- Elite license
- Nonprofit license
- Developer license (legacy)
While you will access Gravity SMTP via your Gravity Forms license, Gravity SMTP is still a standalone plugin and you do not need to have the Gravity Forms plugin installed to use Gravity SMTP (though it does work well for improving the reliability of your form notification emails).
How to set up your WordPress Mailjet integration with Gravity SMTP
Now, let’s get into the full tutorial on how to set up Mailjet WordPress transactional emails.
We’ll cover every step, including authenticating your site’s domain name with Mailjet, connecting your WordPress site to the Mailjet API, and testing your emails to make sure they’re working.
1. Install the Gravity SMTP plugin
To get started, install the Gravity SMTP plugin on the WordPress site where you want to set up Mailjet transactional emails.
As mentioned, the Gravity SMTP plugin is currently available at no extra cost to anyone holding one of these Gravity Forms licenses:
- Elite license
- Nonprofit license
- Developer license (legacy)
You can download the Gravity SMTP plugin from your Gravity Forms My Account area and install it like any other plugin.
2. Register for your Mailjet account
Next, you’ll want to register for your free Mailjet account, if you don’t already have one.
As we mentioned earlier, Mailjet has a generous free plan that lets you send up to 6,000 emails per month (and no more than 200 emails per day). This means you can get started and follow this tutorial without needing to pay anything or enter a credit card.
If you ever need to exceed 6,000 emails/month or 200 emails/day, Mailjet’s paid plans are still affordable.

3. Authenticate your domain name with Mailjet
Once you have a Mailjet account, the next step is to authenticate your WordPress site’s domain name with Mailjet.
This proves to Mailjet that you’re authorized to send emails for your site and it also will improve your deliverability by making your emails look more trustworthy.
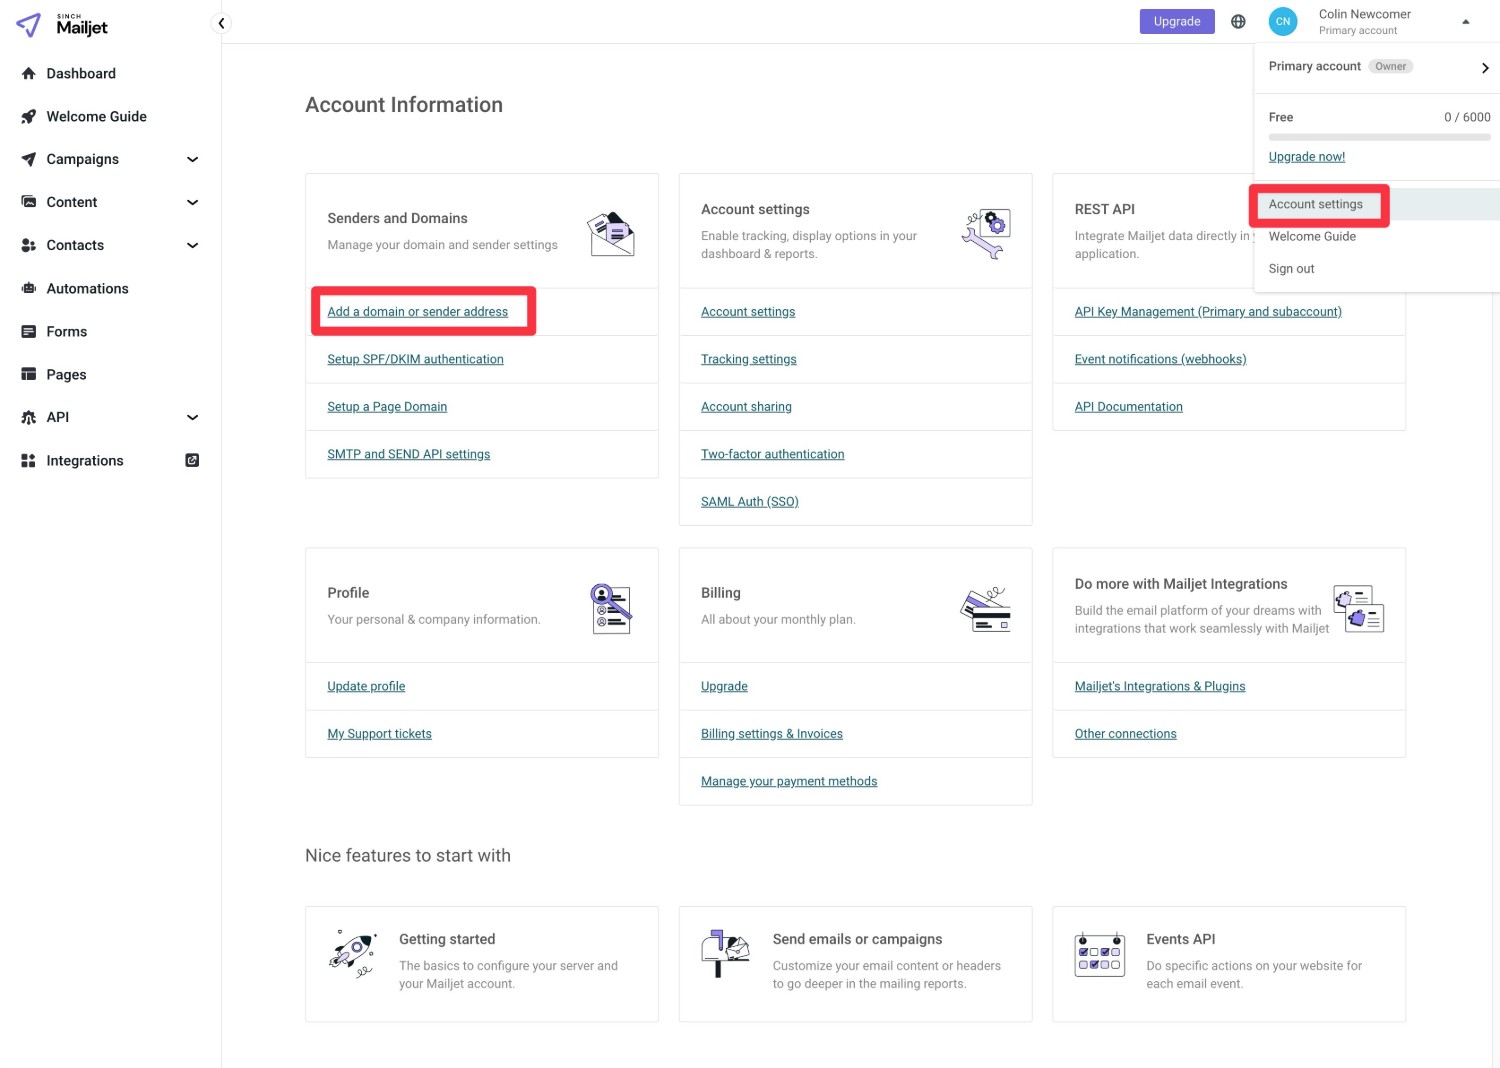
To get started, open your Mailjet account settings page – you can click this link to open it directly or click on your name in the top-right corner and select Account settings from the drop-down.
Then, click Add a domain or sender address under Senders and Domains.
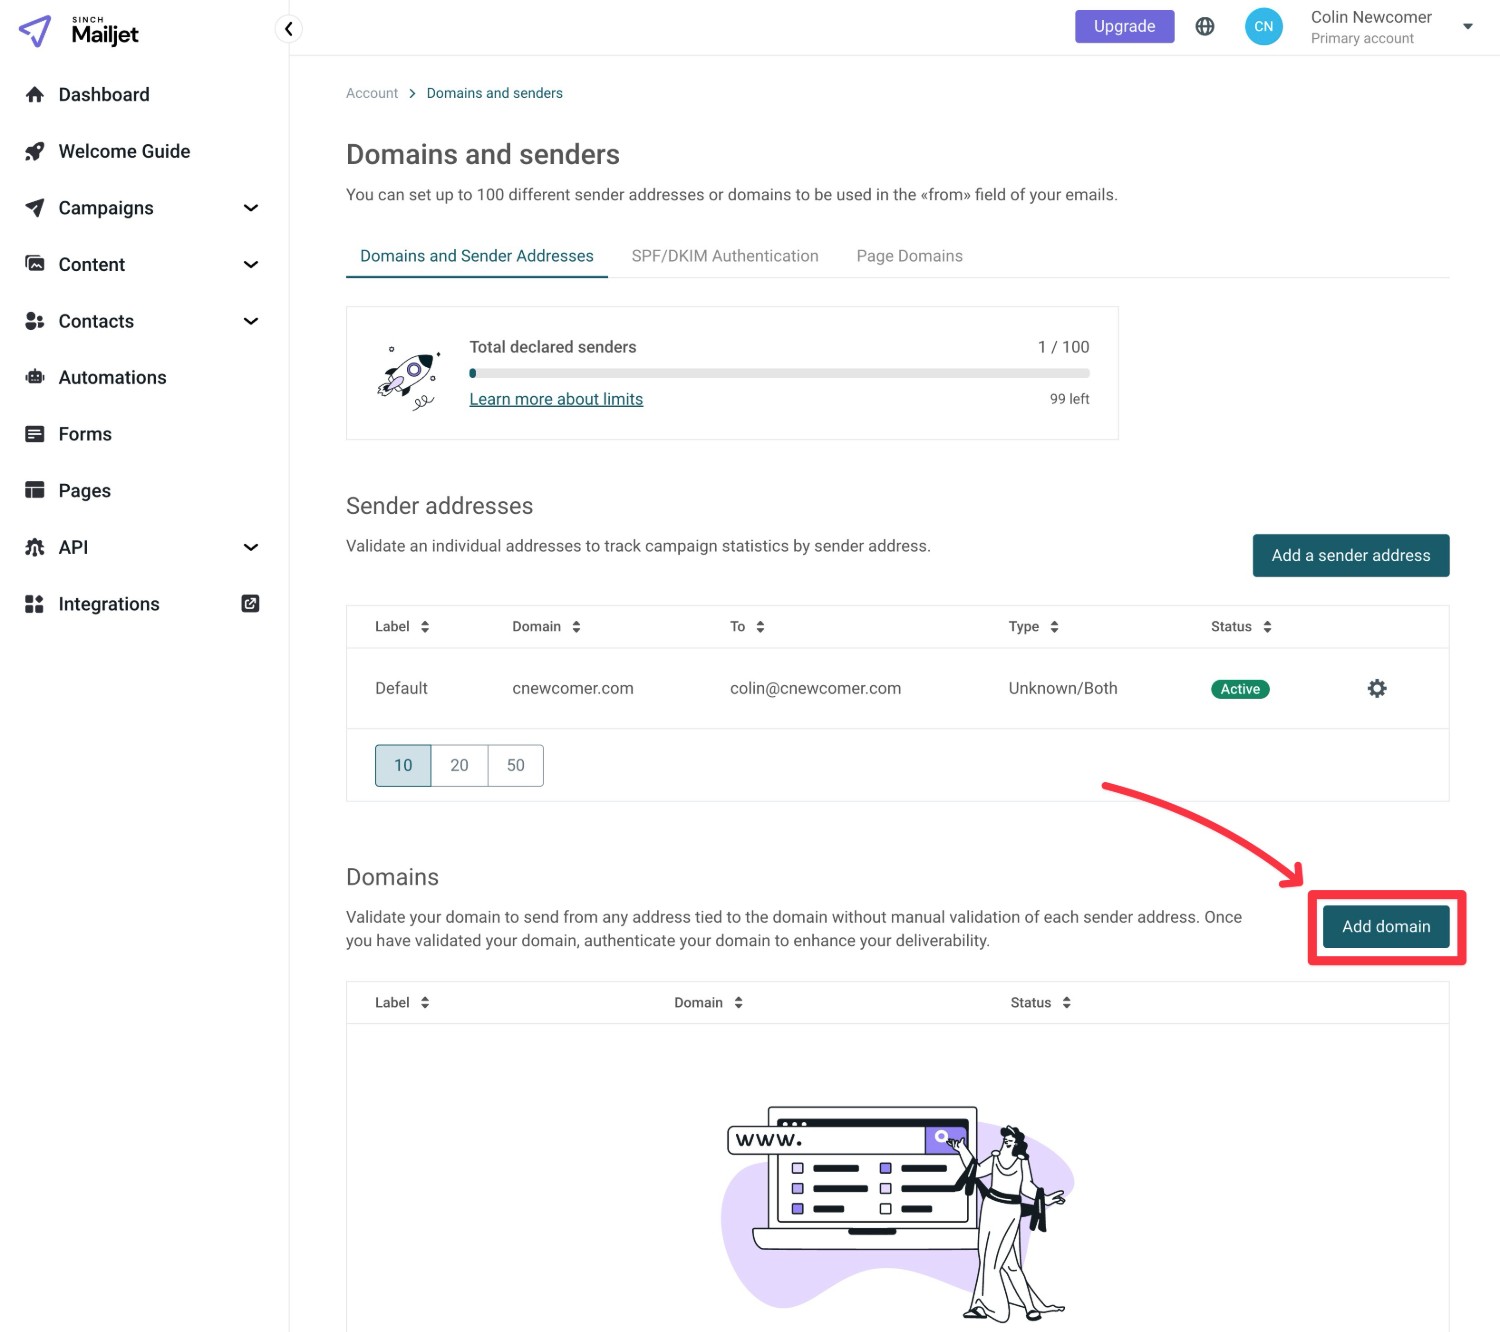
While Mailjet does let you validate a single sender address, we recommend validating your entire domain name. This has two main benefits:
- It will further improve the deliverability of your emails, which is the biggest reason to use this approach.
- It lets you send emails from any email address on your domain name.
With that being said, if you’re unable to edit your domain’s DNS records or add a file to your web server for some reason, you can add a sender address instead.
To add your domain name, click the Add domain button in the Domains and senders interface.
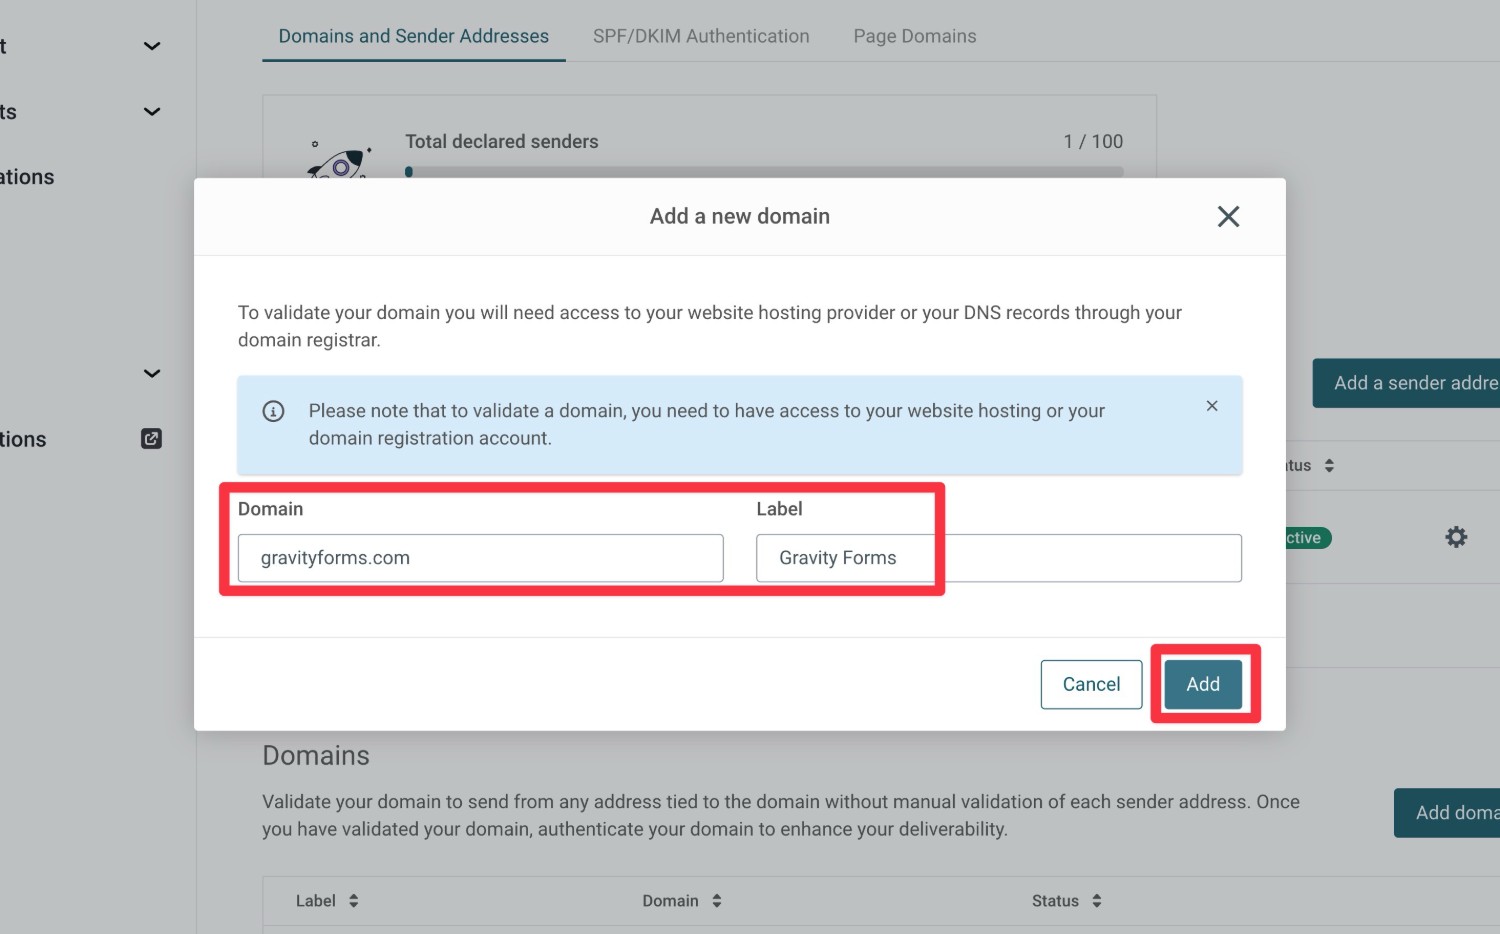
In the popup that appears, enter your domain name and give it an internal label to help you remember it. Then, click Add.
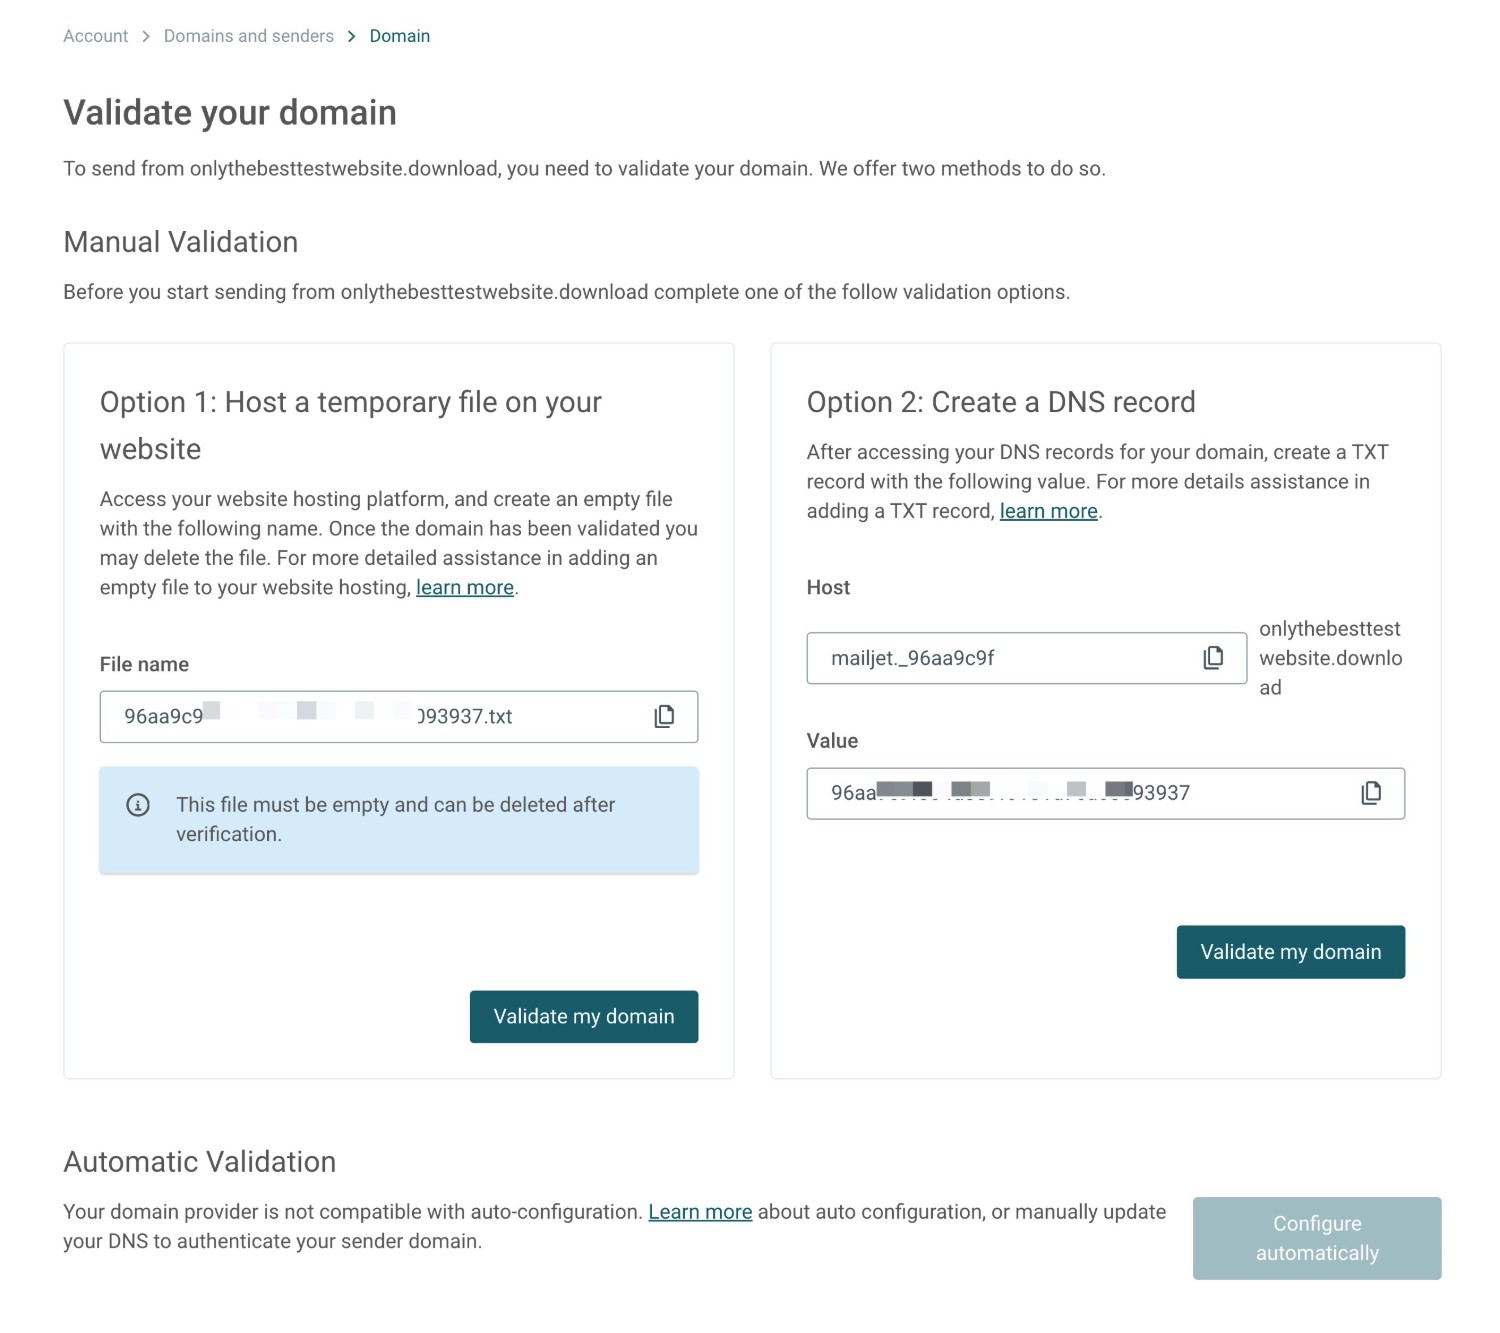
You’ll then need to validate your domain name. Mailjet gives you two ways to do this:
- Option 1: You can temporarily host a file on your web server. After the validation process, you can delete the file.
- Option 2: You can add a TXT record to your domain’s DNS.
We recommend using the DNS approach because you’ll need to add some additional DNS records in the next step anyway. However, feel free to use either one according to your preferences.
Once you’ve performed either one, click Validate my domain.
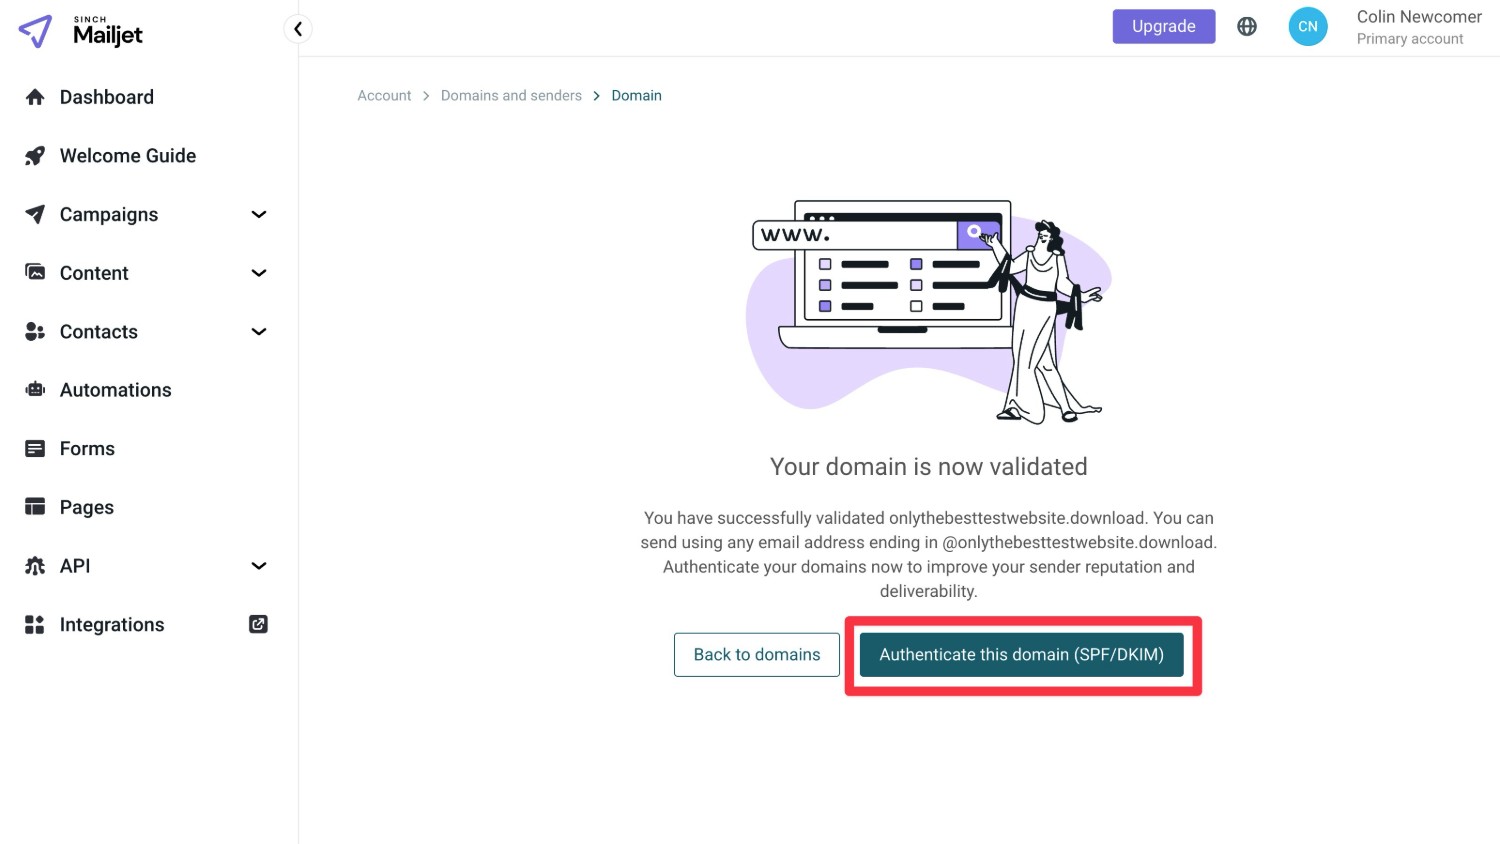
On the next screen, you’ll be prompted to further validate your site’s domain name by adding SPF/DKIM records, which is important to do because it will help improve the deliverability of your emails.
Click the Authenticate this domain (SPF/DKIM) to continue.
On the next screen, you’ll be prompted to add two more TXT records to your domain’s DNS.
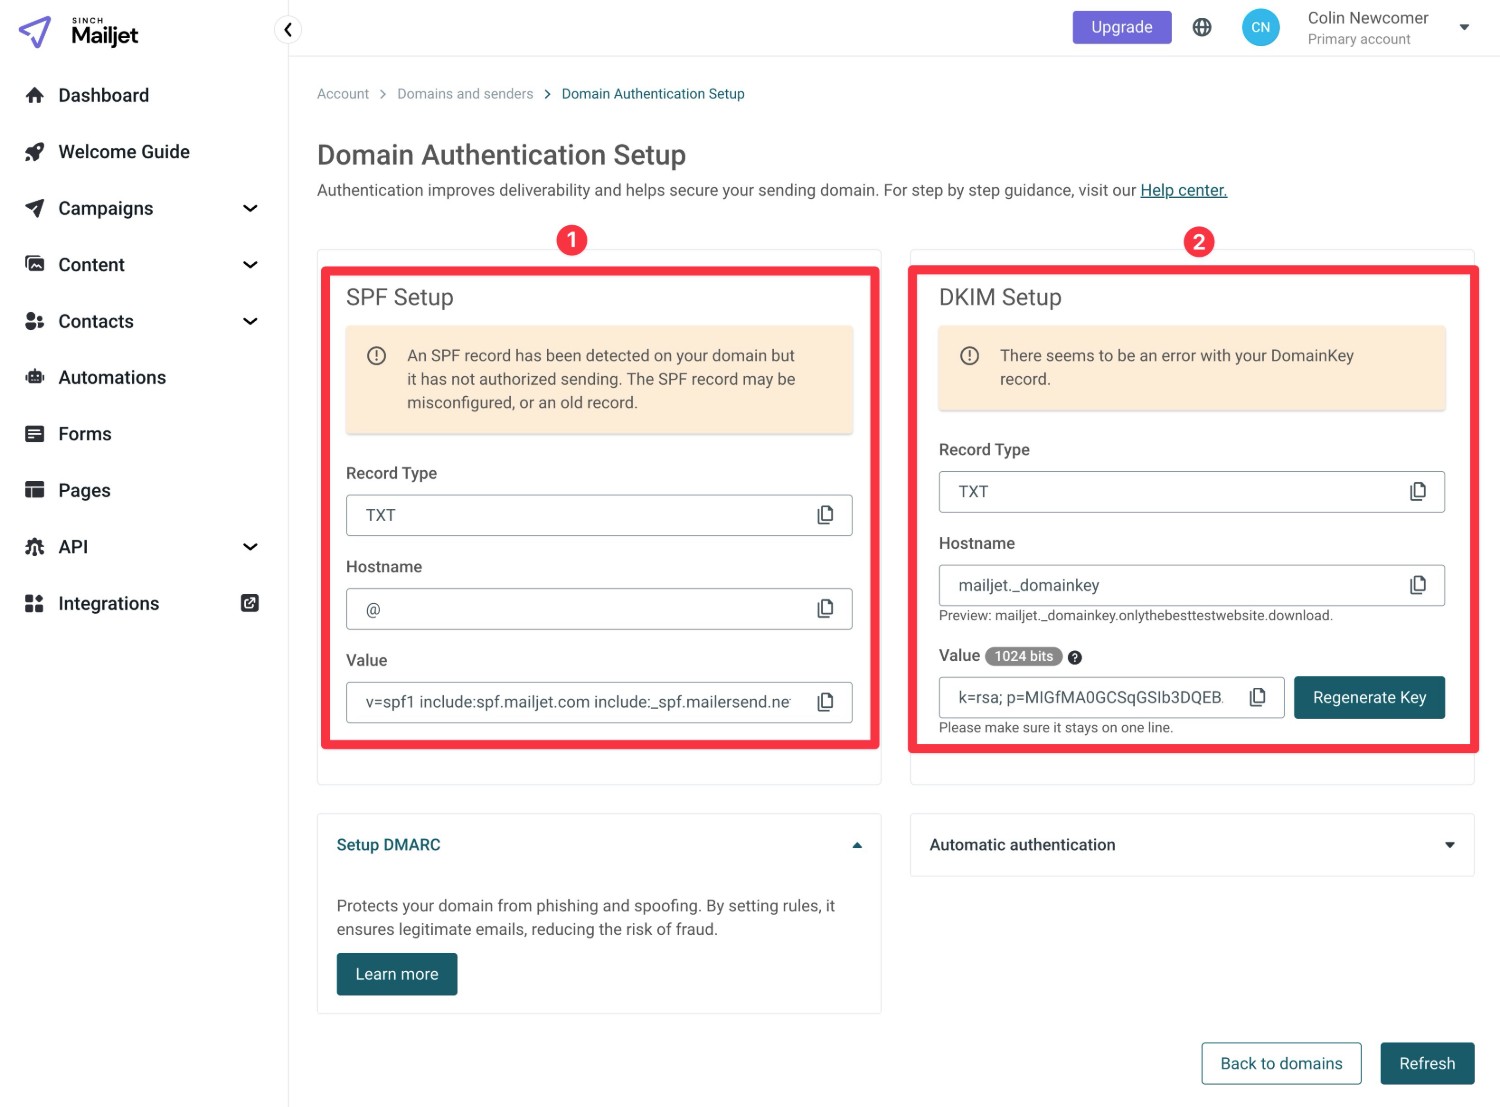
Once you’ve added both records, click Refresh in the bottom-right corner.
You should then see green check mark messages appear to validate your SPF and DKIM setup.

That’s it for domain authentication!
4. Create your Mailjet API key
Next, you need to create a Mailjet API key, which is what Gravity SMTP will use to connect your WordPress site to Mailjet.
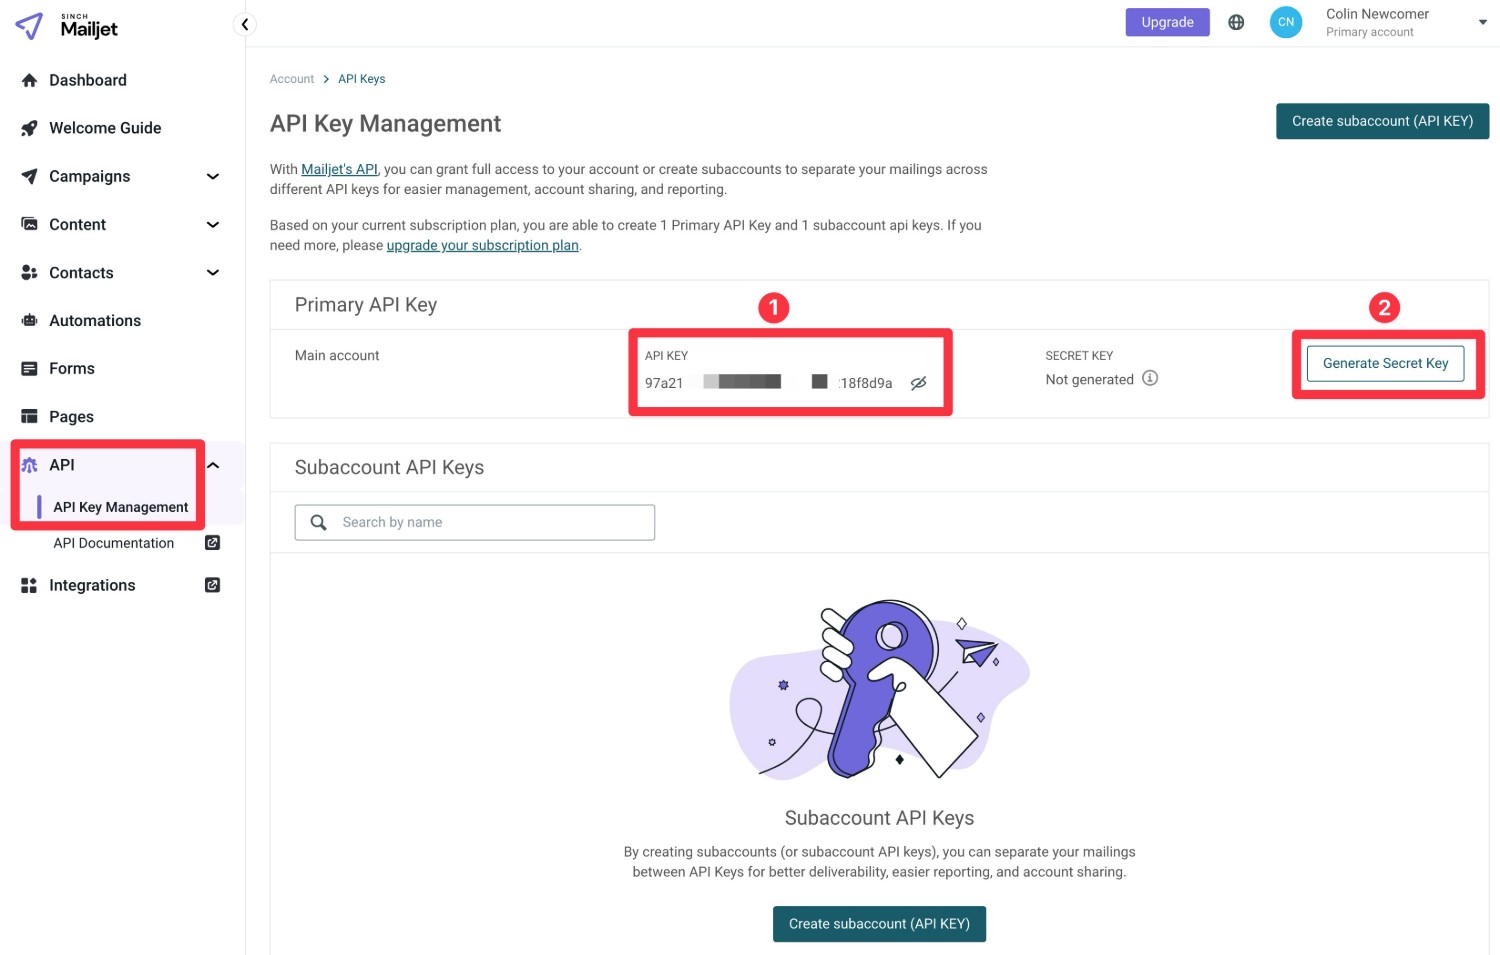
To create your API key, go to API → API Key Management in the Mailjet sidebar.
Mailjet has two types of API keys:
- Primary API Key – This is a single key for your entire account.
- Subaccount API Keys – This lets you create separate API keys to organize different websites or projects.
With a free Mailjet account, you can only have one primary key and one subaccount key. However, paid plans let you create more subaccount keys as needed.
We’re using the free plan for our guide, so we’ll just use the Primary API Key to connect our WordPress site. The same basic principles will apply to subaccount keys, though.
There are two parts to the key:
- API Key (public) – Copy the value under API Key to a safe spot.
- Secret key (private) – Click Generate Secret Key to create your secret key.
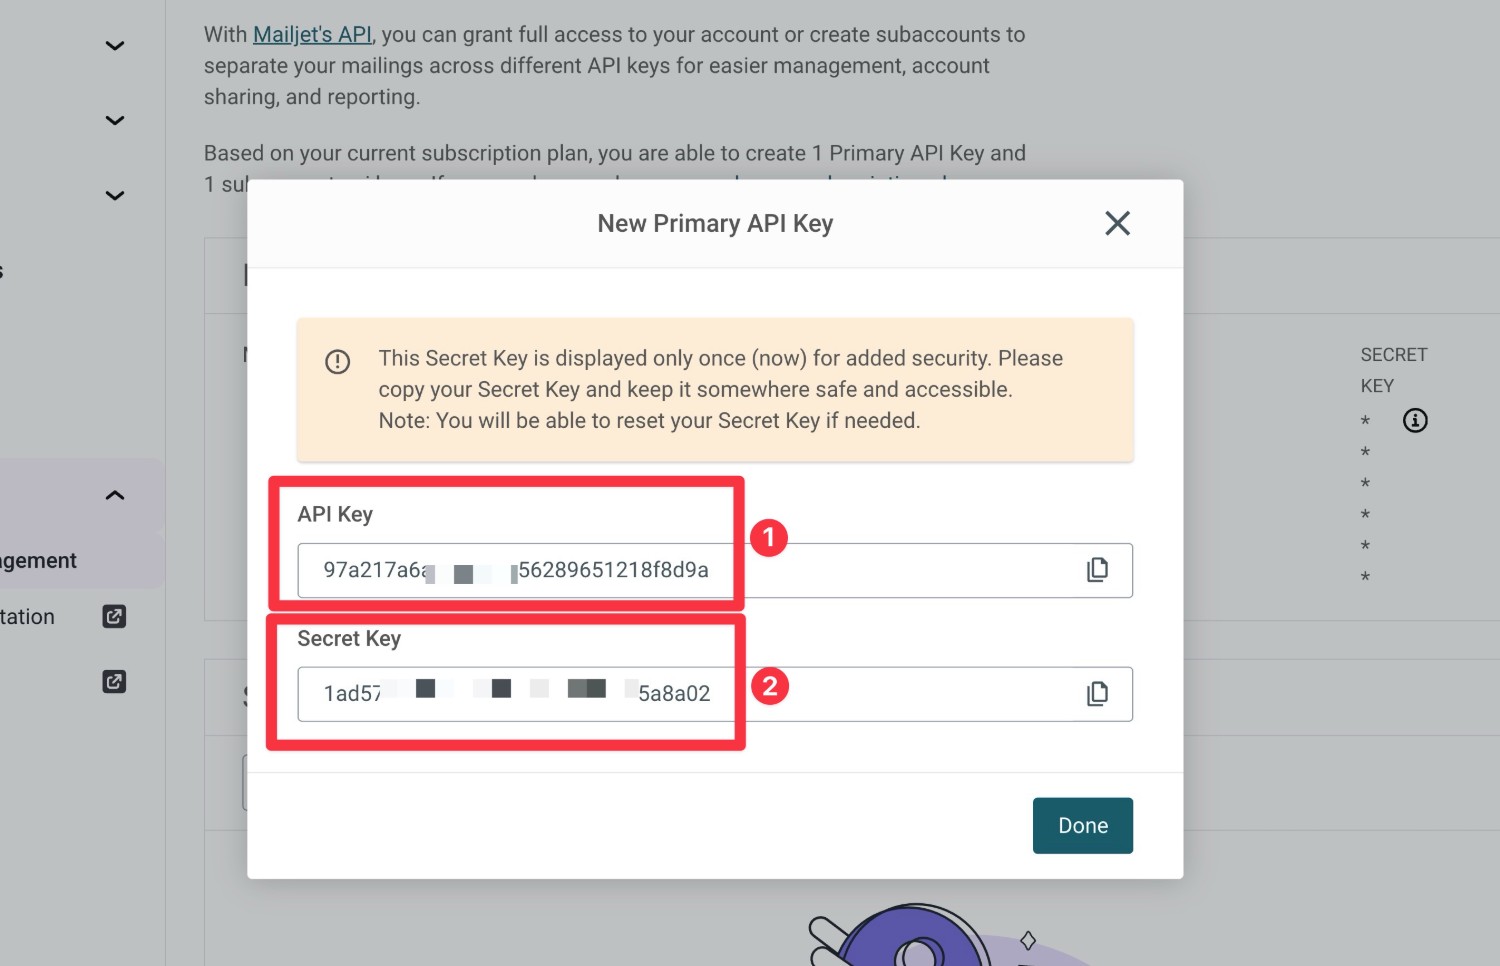
When you click the Generate Secret Key button, Mailjet will show a popup that contains your public API key and the Secret Key.
Copy both values to a safe spot because you’ll need both in the next step.
Mailjet will only display your secret key one time. If you accidentally misplace it, you’ll need to reset it by clicking the gear icon next to it in the API Key Management interface.
5. Connect Gravity SMTP to Mailjet
Once you’ve authenticated your domain name with Mailjet and copied both your API key and Secret key to a safe spot, you’ll perform the rest of the setup process from inside your WordPress dashboard.
To connect Gravity Gravity SMTP to Mailjet, follow these instructions:
- Go to SMTP → Settings inside your WordPress dashboard.
- Select the Integrations option inside the Gravity SMTP settings area.
- Click the gear icon next to Mailjet to open its settings.

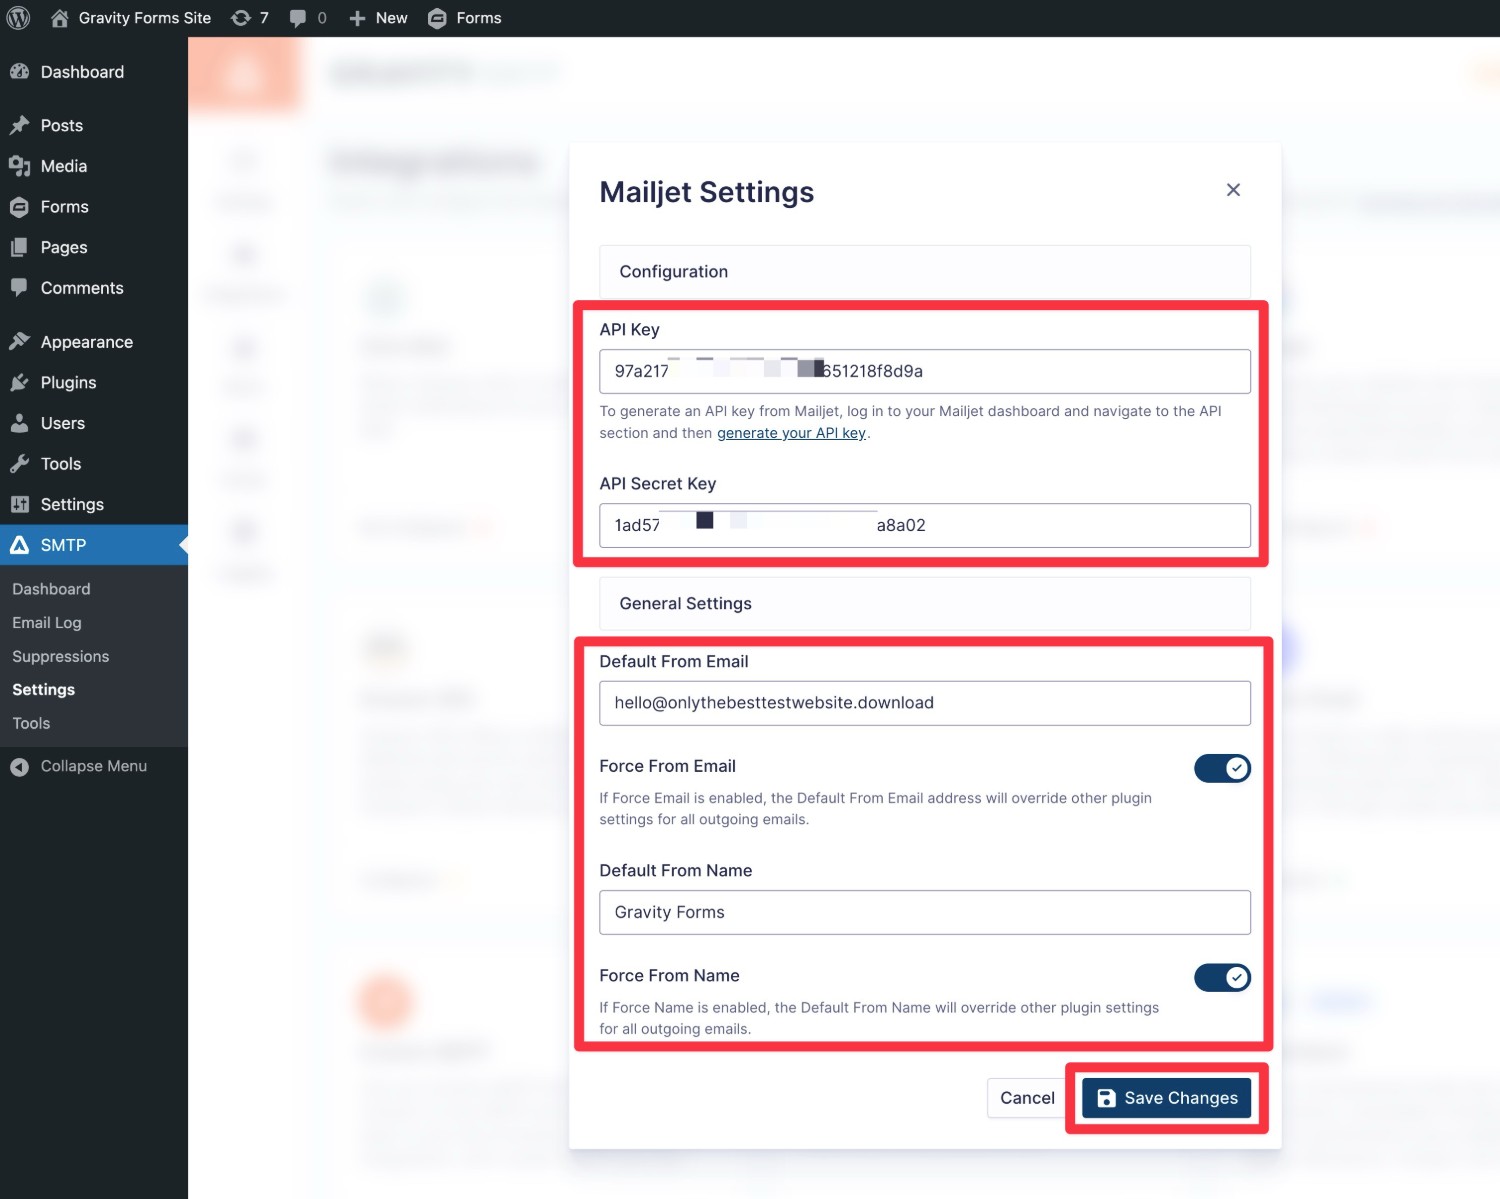
This will open a popup where you can configure the Mailjet connection.
First, add the API Key and API Secret Key that you obtained from the Mailjet interface in the previous step.
Then, you can enter the From Email and Name that you want to use for your emails, along with whether or not to force other plugins to use the same name and email.
Note – Your From Email must match the domain that you authenticated with Mailjet. Or, if you authenticated a single sender instead of your domain name, you must enter the exact email address that you added as a single sender.
Once you’ve added these details, click Save Changes.
To finish things out, you need to set Mailjet as your site’s primary sending service:
- Open the Integrations area (SMTP → Settings → Integrations).
- Click the three dots icon next to Mailjet.
- Select Set As Primary in the drop-down that appears.
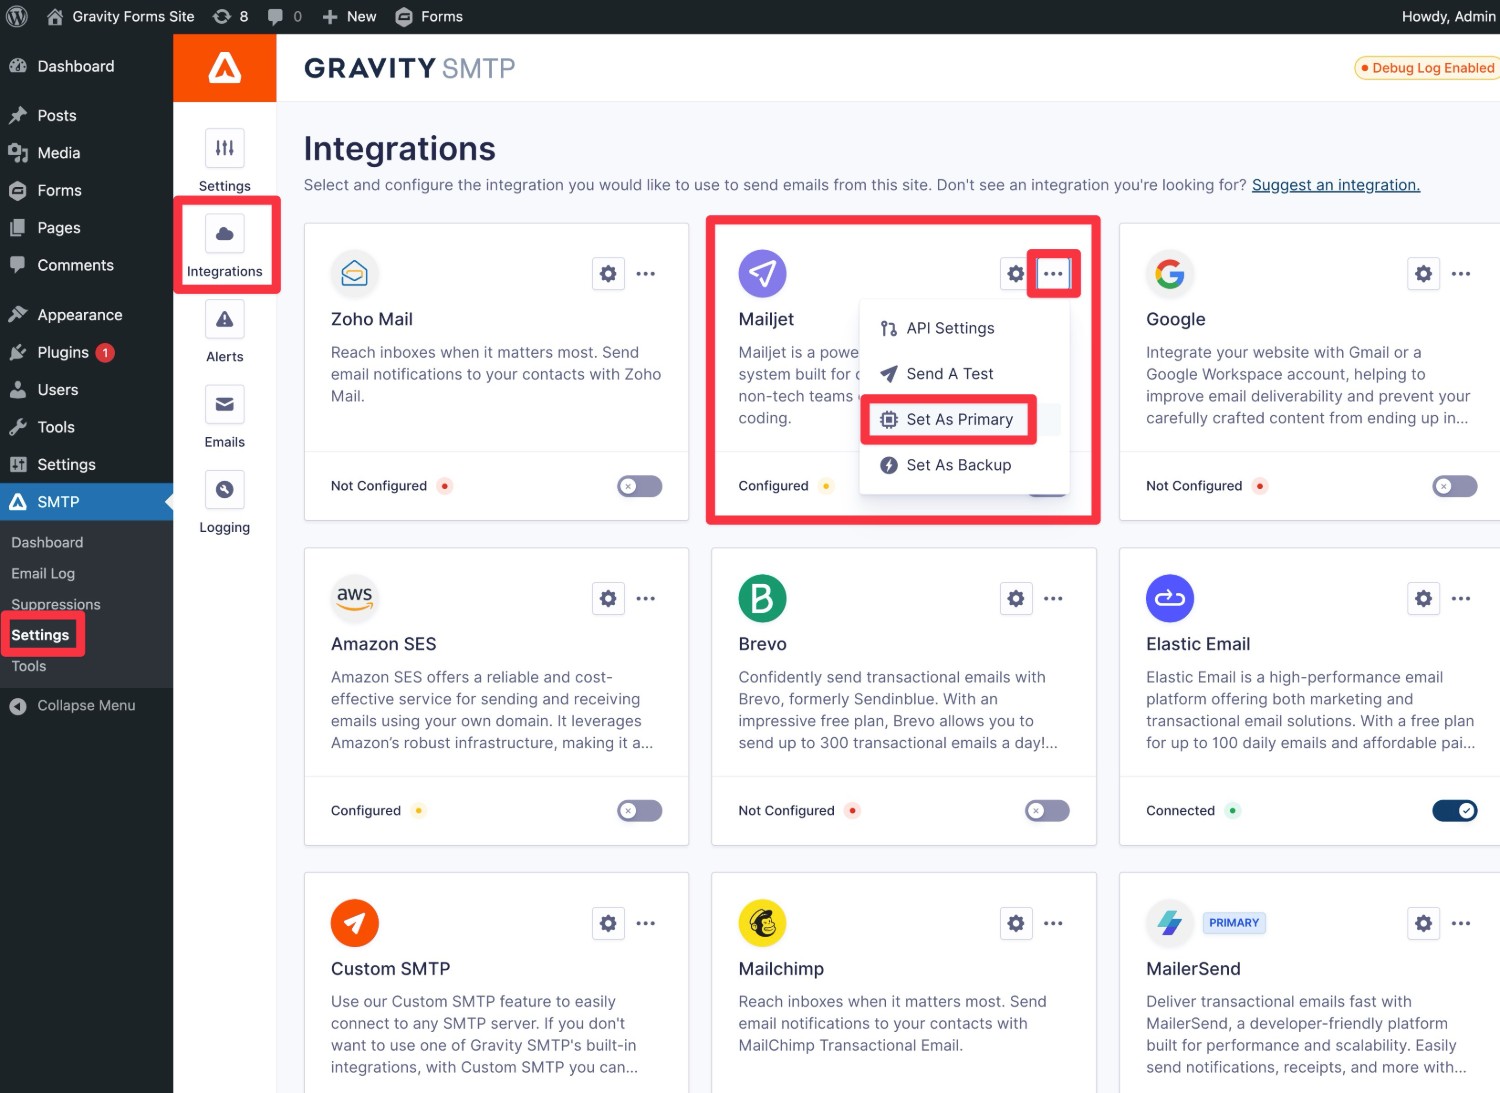
You should then see a Primary label appear next to Mailjet and the yellow Configured label will change to a green Connected label.
6. Send a test email
To verify that your site’s Mailjet connection is working properly, we recommend using Gravity SMTP’s built-in feature to send a test email:
- Go to SMTP → Tools in your WordPress dashboard.
- Select the Send a Test tab (it should open by default).
- Enter the email address to which you want to send a test email in the Send To box.
- Make sure that Mailjet is selected in the Send With drop-down.
- Click Send Test.
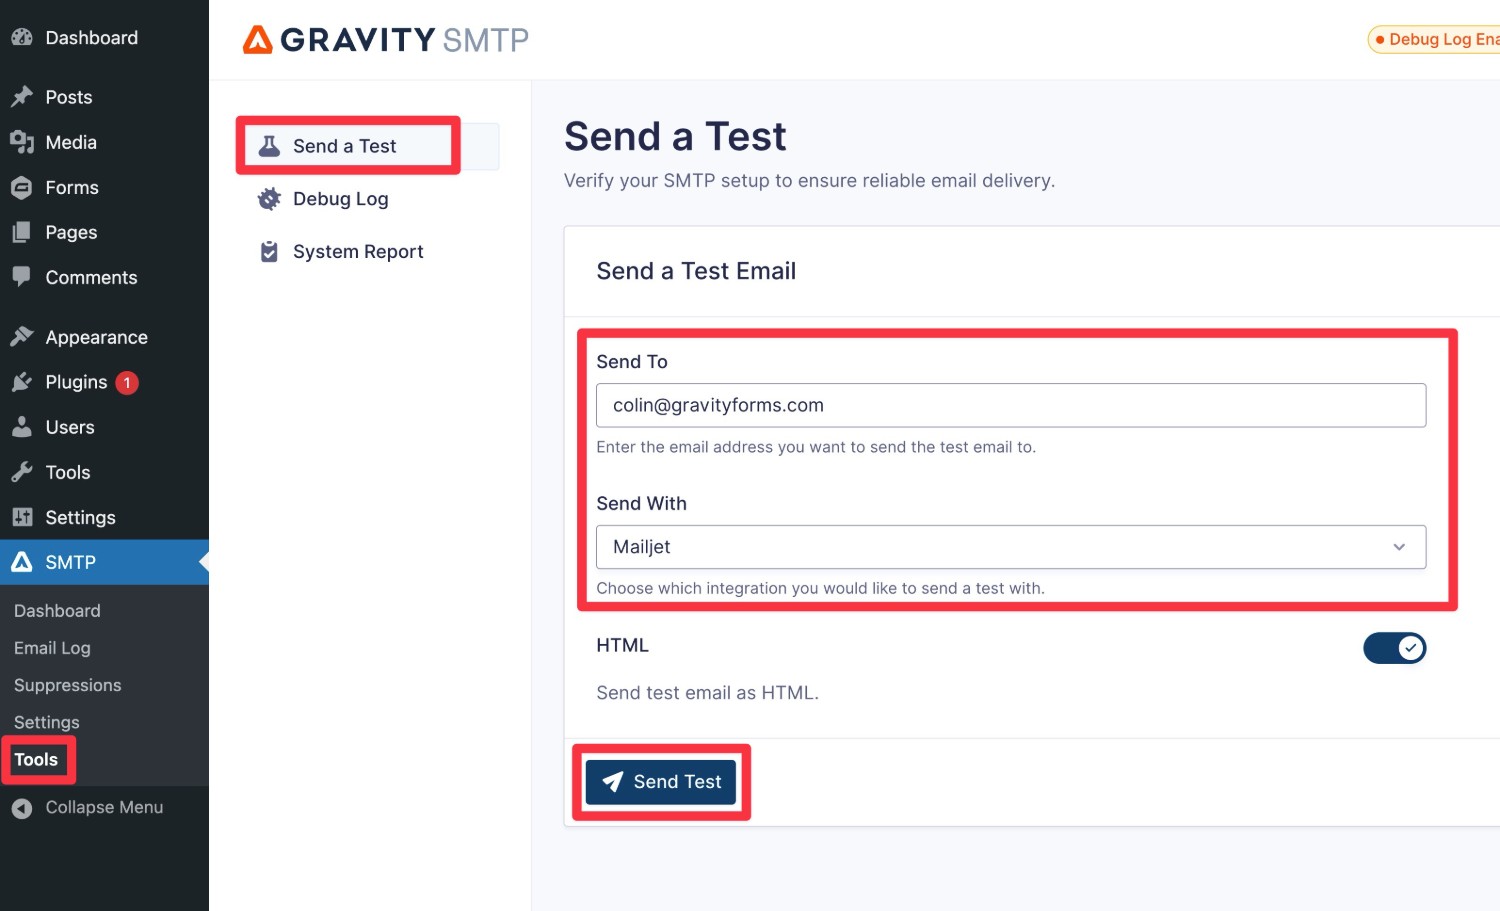
You should see an “Email successfully sent” message appear in the interface. Then, if you open your email inbox, you should see an email that looks something like below.

7. Set up a backup email sending service and alerts (optional)
This step is 100% optional. At this point, your WordPress site is already properly configured to send its transactional emails using Mailjet.
Another added benefit of using the Gravity SMTP plugin is that it also includes features to help you to even further improve the reliability of your site’s transactional emails in case Mailjet ever stops working for some reason.
First off, Gravity SMTP lets you set up real-time email issue alerts that you can receive via SMS message or webhook. You can check out these guides if you’re interested:
In addition to setting up real-time alerts, you also have the option of setting up a backup email sending service. If an email ever fails to send via Mailjet for some reason (e.g. a billing or technical problem), Gravity SMTP will automatically resend that email using your backup service.
To use a backup service, you’ll first need to connect Gravity SMTP to the service, similar to what you did with Mailjet in this guide. We’ve written detailed tutorials for many of the API integrations that Gravity SMTP supports, but you can also read the documentation:
- SendGrid
- Mailgun
- Postmark
- Brevo
- Amazon SES
- Gmail/Google Workspace
- Outlook/Microsoft 365
- Mailchimp Transactional
- Elastic Email
- Custom SMTP
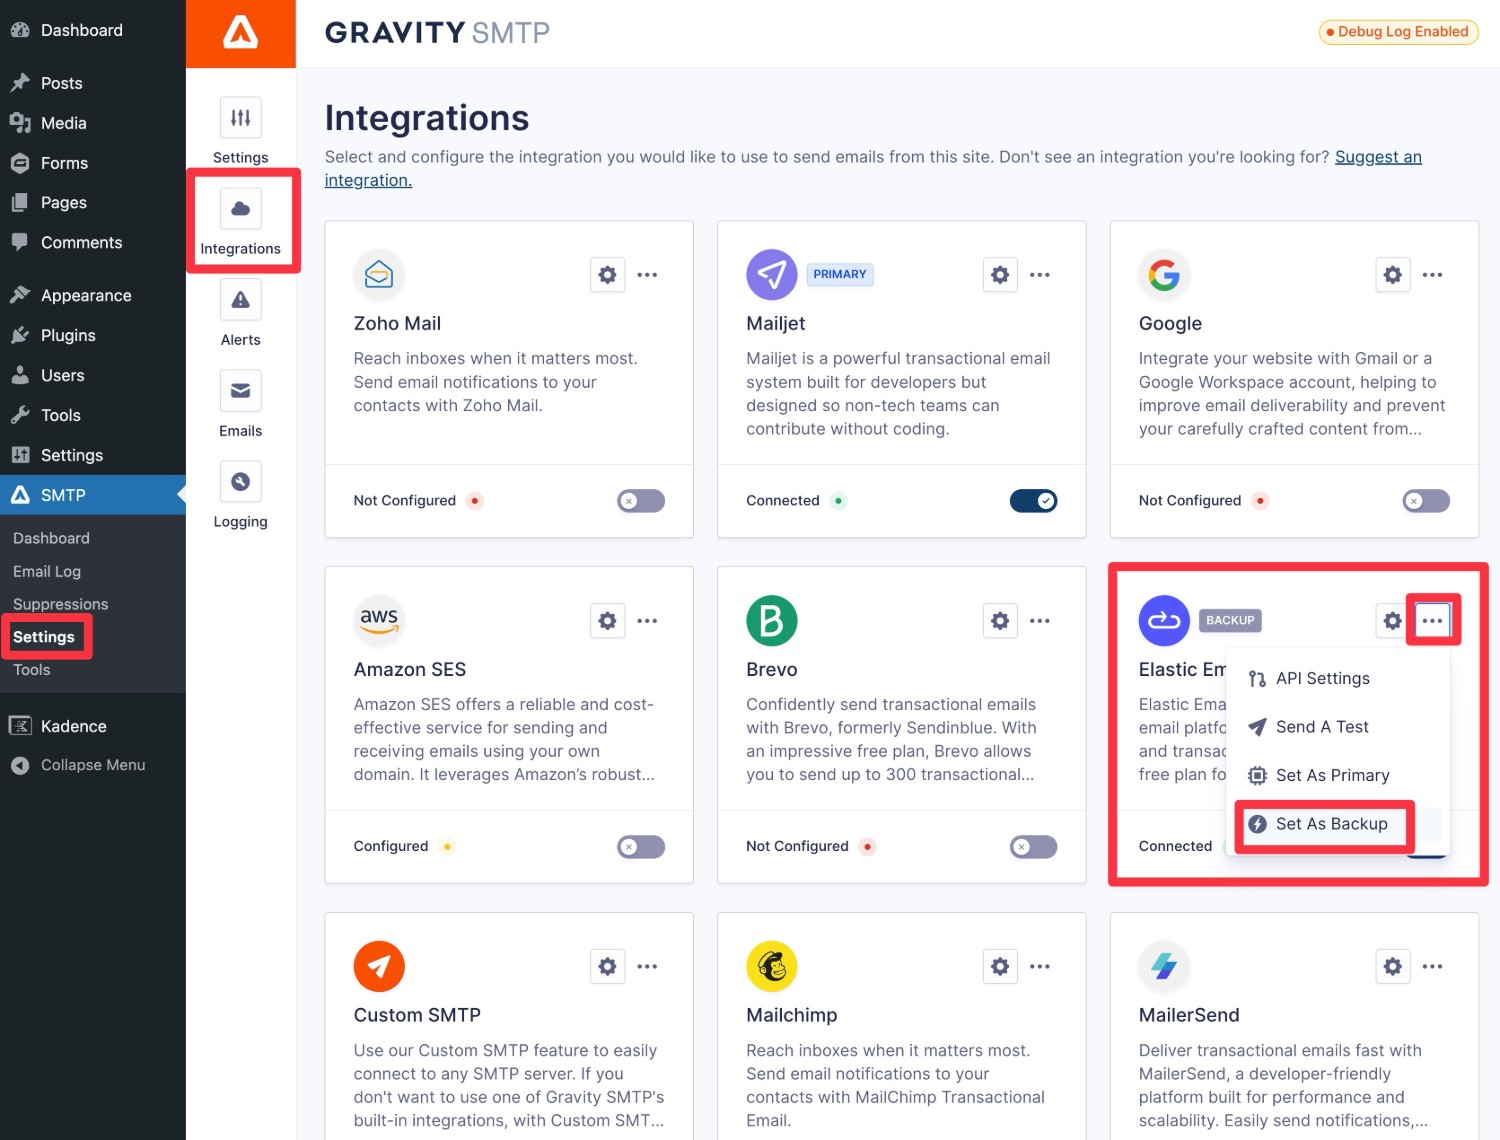
After you’ve connected to the service, here’s how to set it as your site’s backup:
- Open the Gravity SMTP integrations area (SMTP → Settings → Integrations).
- Click the three dots icon next to the service.
- Choose Set As Backup from the drop-down.
How to monitor your site’s email usage
The Gravity SMTP plugin also includes some useful features to help you monitor and analyze your site’s transactional emails from inside your WordPress dashboard.
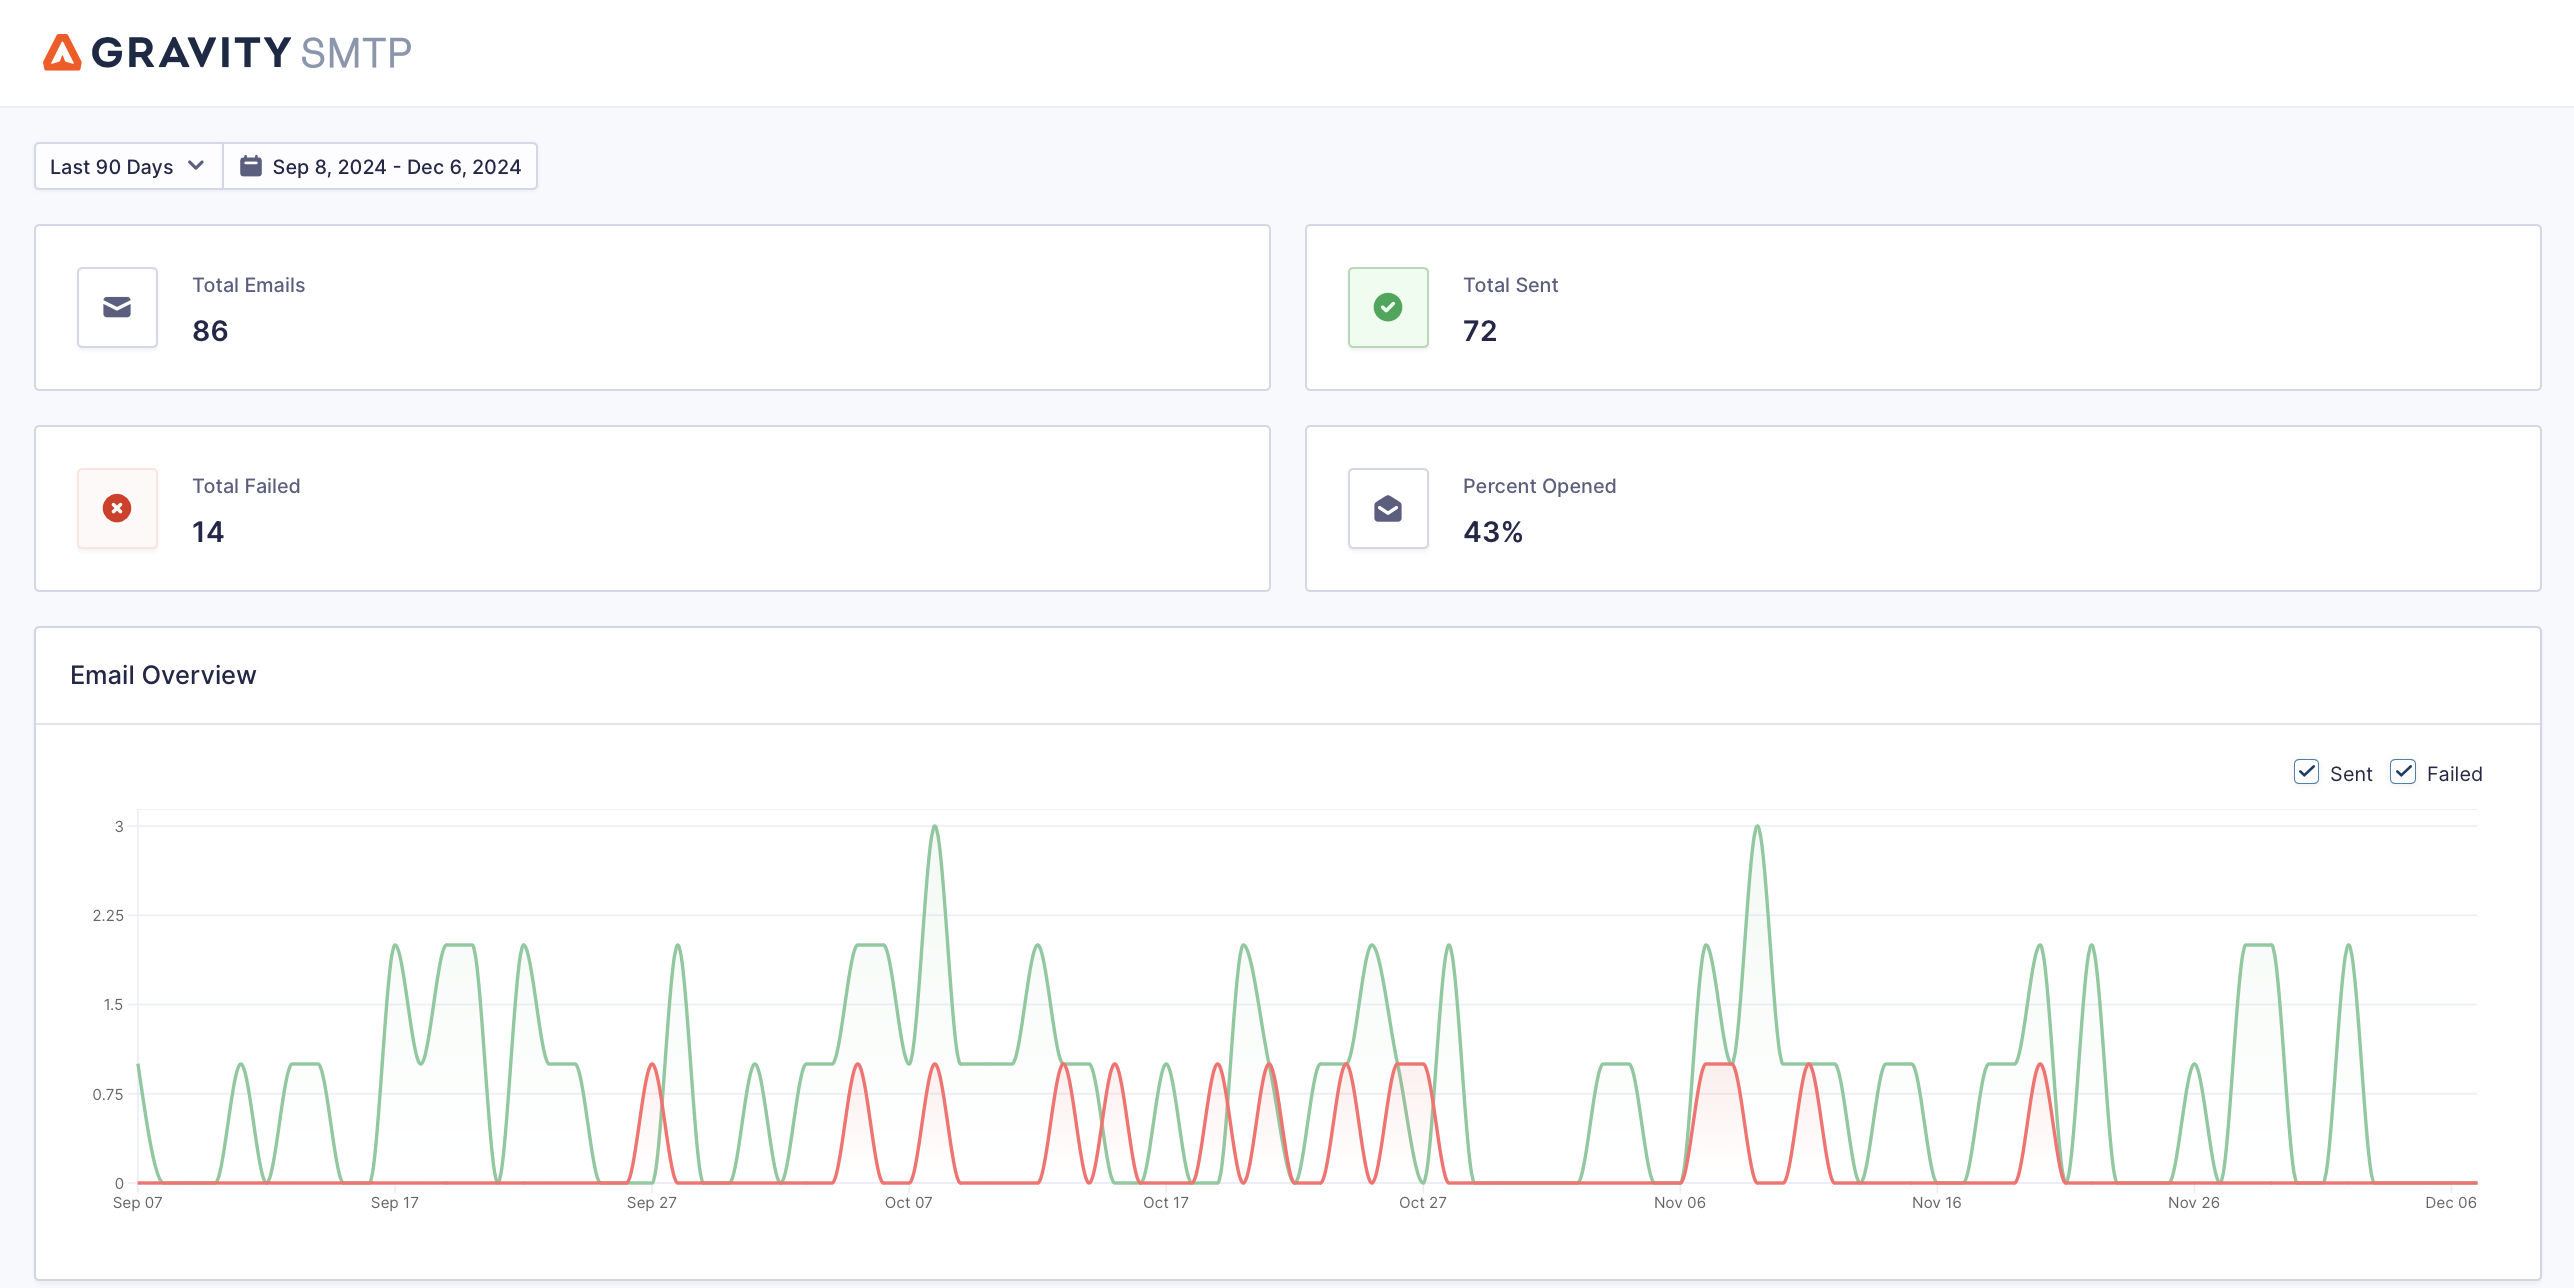
First, you can go to SMTP → Dashboard to see high-level reports of your site’s transactional emails, including overall sending volume, open rates, top sending sources (e.g. core WordPress or a certain plugin), top recipients, and more.
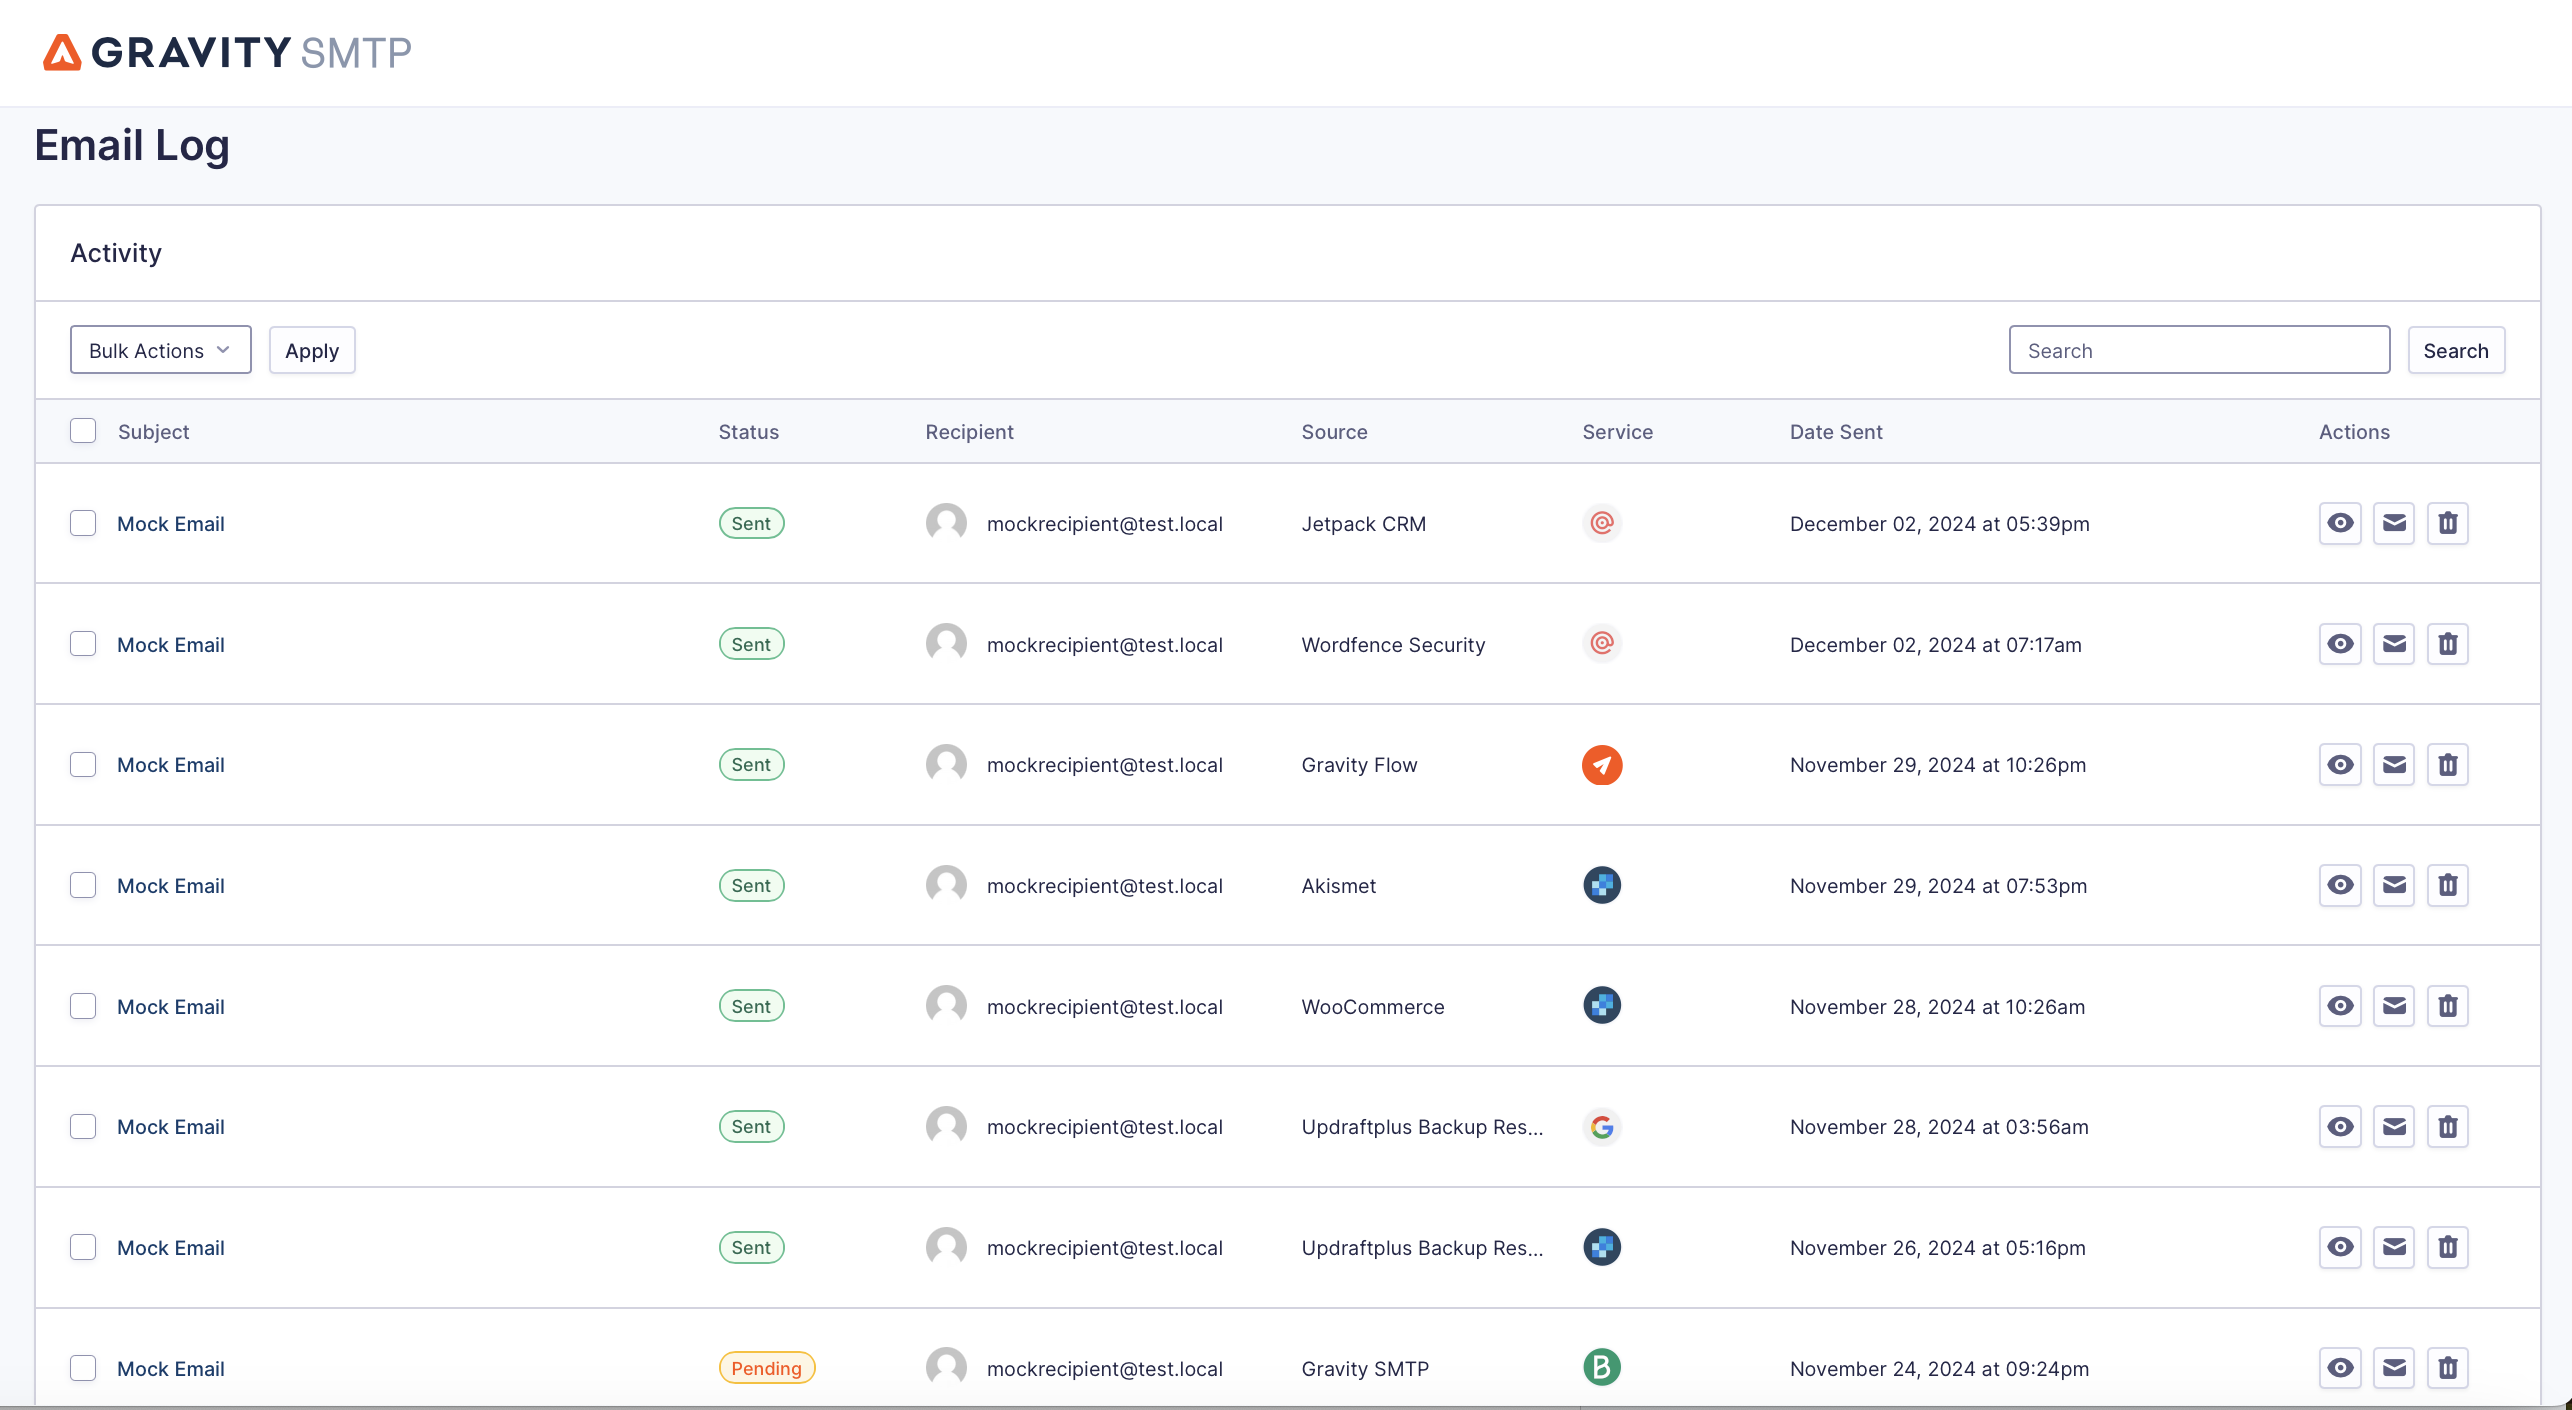
For more details about individual emails, Gravity SMTP can also log every single email that your site sends, including the technical information and content (you can even log attachments if needed).
You can access the log by going to SMTP → Email Log. You can also adjust the log period and control which details to log by going to SMTP → Settings → Logging.
Get started with WordPress Mailjet sending today
If you want to improve the reliability of your WordPress site’s transactional emails, Mailjet can be a budget-friendly solution, with a free plan that lets you send up to 6,000 emails per month for free. If you ever need to exceed that, Mailjet’s paid plans are still affordable.
With the Gravity SMTP plugin, you can set up Mailjet WordPress transactional emails using Mailjet’s API, while also accessing other useful features such as email logging, reports, real-time alerts, backup sending services, and more.
Purchase or upgrade your Gravity Forms license today, and then come back to follow this guide and start enjoying more reliable WordPress transactional emails.

If you want to keep up-to-date with what’s happening on the blog sign up for the Gravity Forms newsletter!