How to use Elastic Email for WordPress transactional emails
If you want to improve the reliability of your WordPress site’s transactional emails, the Elastic Email service is an effective and cost-efficient solution.
With the Gravity SMTP plugin, you can easily connect WordPress to Elastic Email and send all of your site’s transactional emails using Elastic Email’s Email API.
In this post, we’ll show you step-by-step how to set up everything, including authenticating your domain name with Elastic Email and then connecting WordPress to the Email API.
We’ll start with some general details about Elastic Email and Gravity SMTP and then we’ll get into the full step-by-step tutorial.
Why use Elastic Email for WordPress transactional emails?
There are a few different reasons to consider Elastic Email for your WordPress site’s transactional emails.
To start, Elastic Email has a free plan that lets you send up to 100 emails per day to yourself. The free plan does not let you send transactional emails to other people.
This can make it a great option if you’re looking for a free solution to send transactional emails to yourself, such as form notifications, order notifications, etc.
If you want to send emails to other people, Elastic Email’s paid plans are competitively priced, which can still make it a budget-friendly solution.
The paid plans start at just $19 to send up to 50,000 emails per month, which is cheaper than a lot of other transactional email services.
Beyond pricing, here are some of the other reasons to use Elastic Email:
- Email API – You can connect directly using the API rather than needing to use SMTP credentials.
- Private IP option – You have the option to use a private IP for an extra $40 per month.
- Open/click tracking – You can also use your own domain name for tracking links.
- Detailed analytics – You get great-looking reports and helpful filtering options.
- 24/7 support – With paid plans, you get 24/7 support via email.
How Gravity SMTP helps you use Elastic Email on WordPress
Gravity SMTP is a standalone WordPress SMTP plugin that helps you connect your WordPress site to a variety of transactional email services, including Elastic Email.
Here are some of the biggest reasons to use Gravity SMTP for Elastic Email WordPress sending:
- Direct API connection – You can connect directly to Elastic Email using its API.
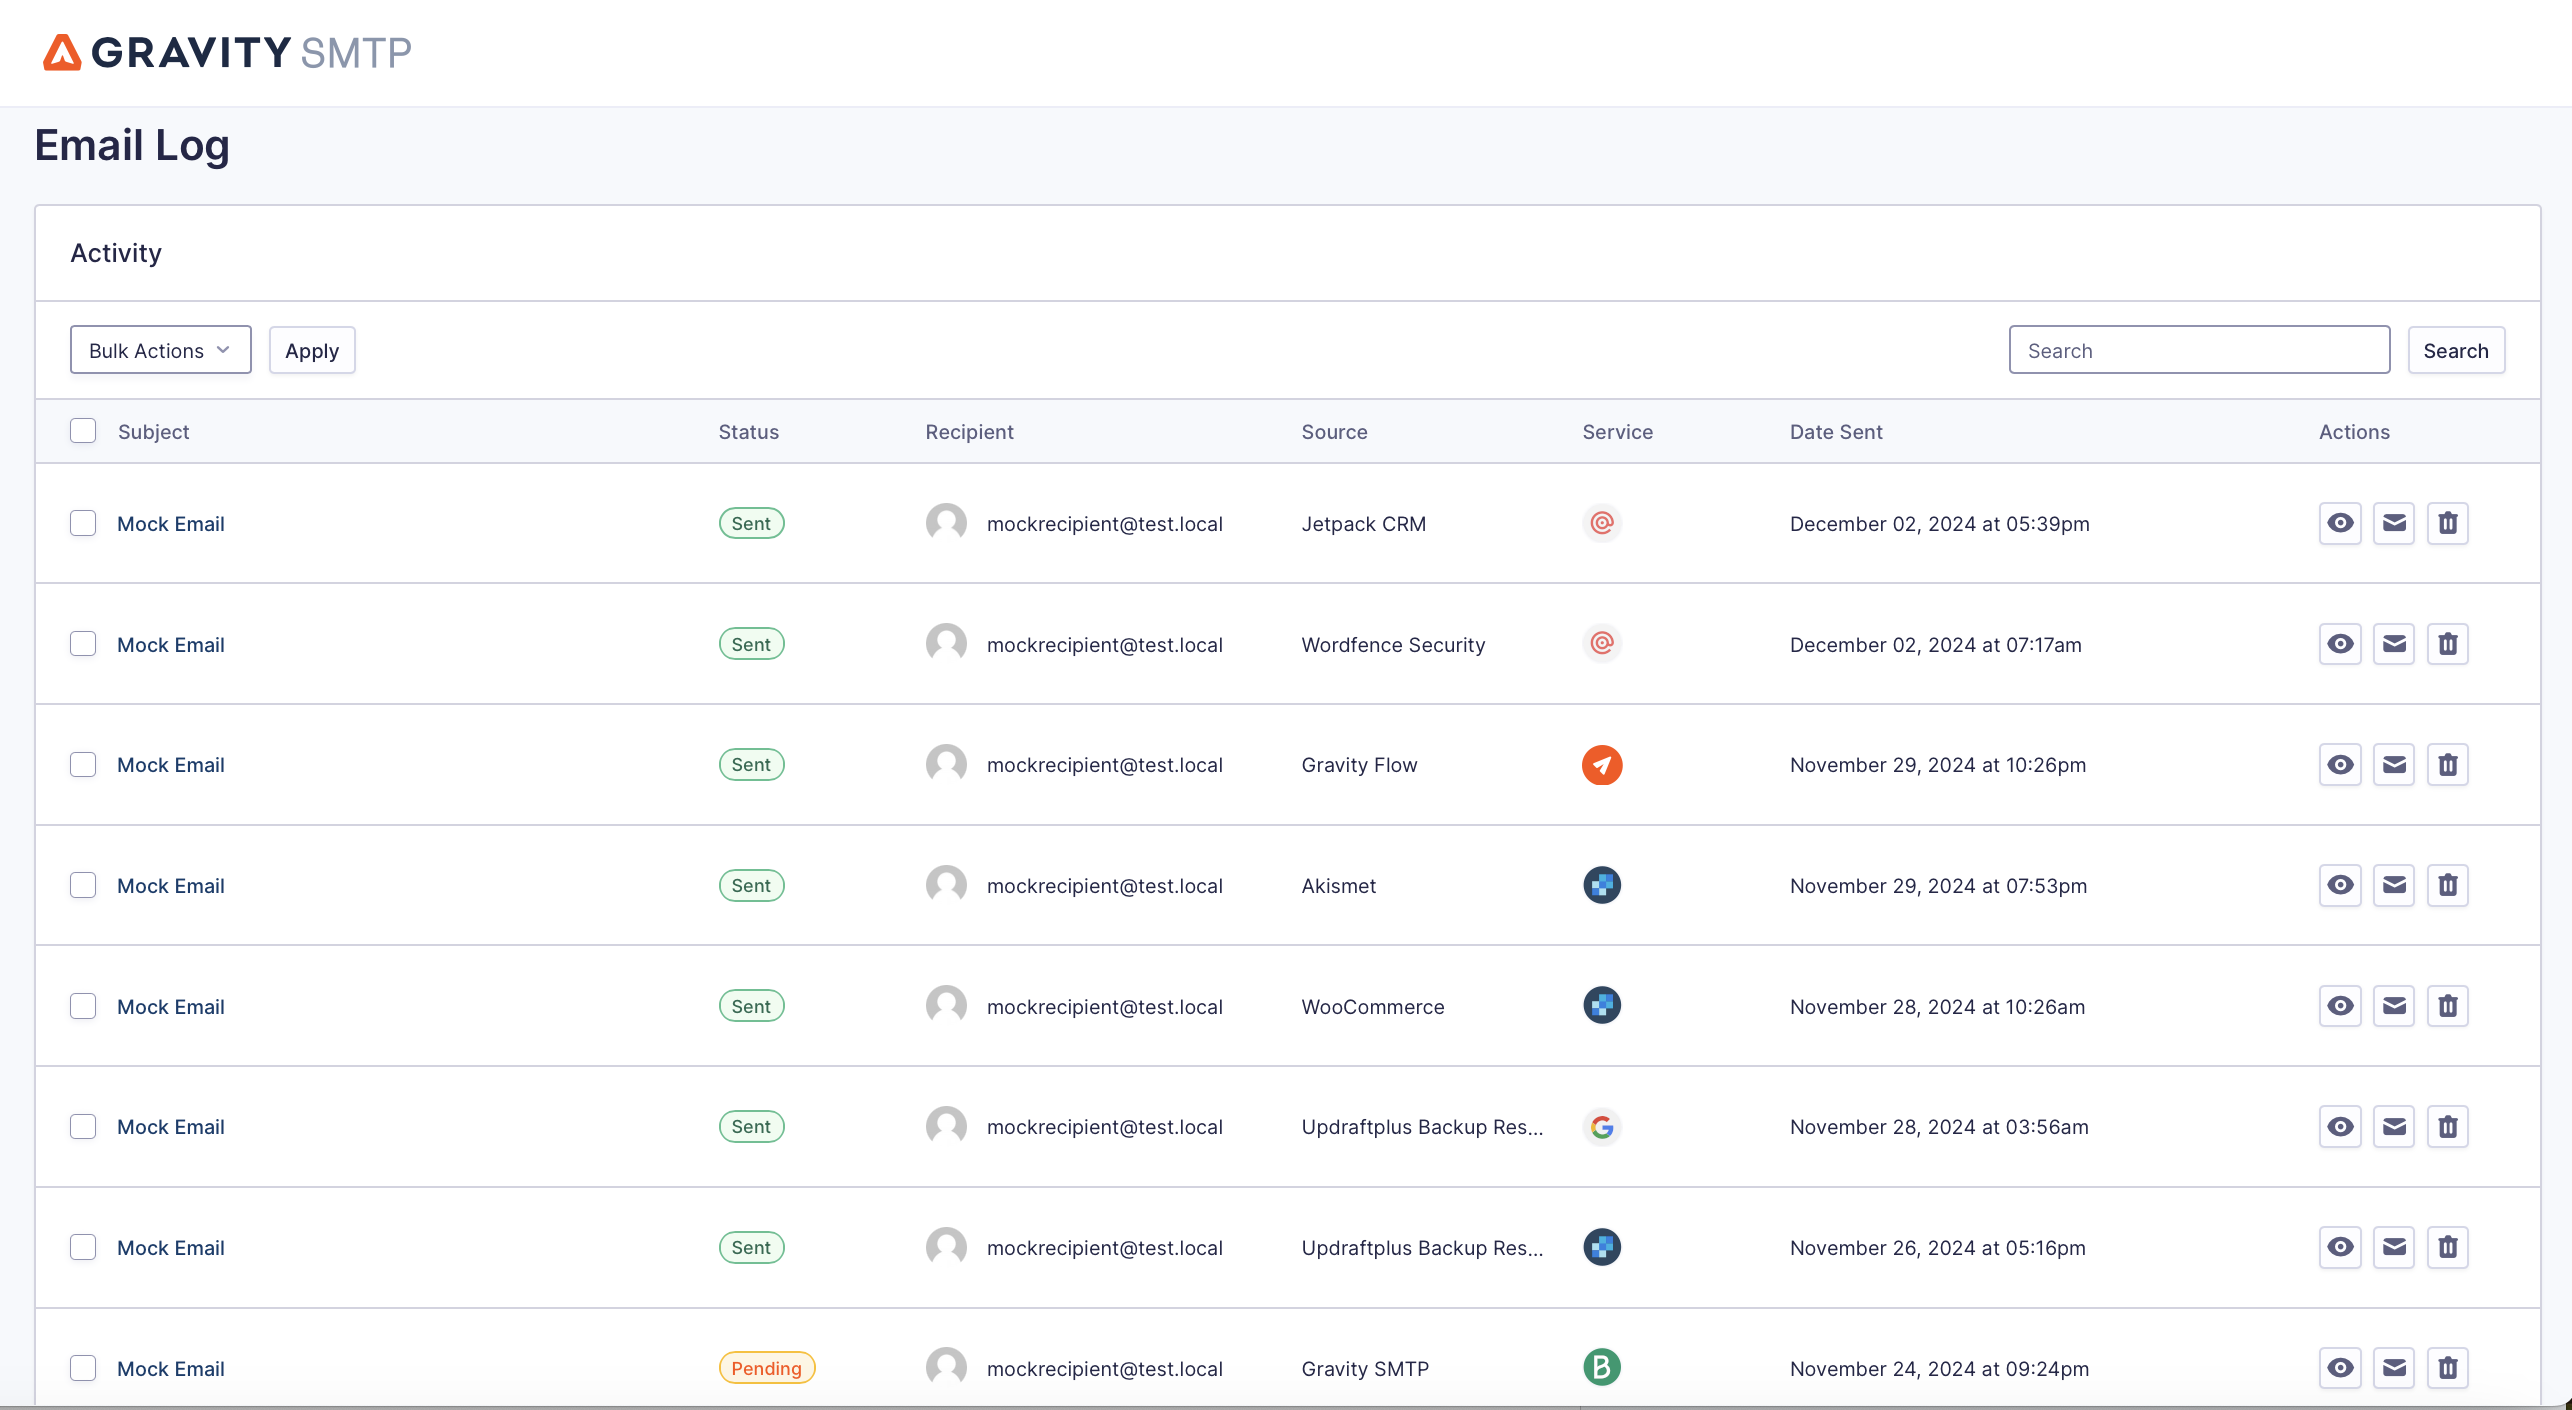
- Detailed email logging – You can see a detailed log of each individual email that your site has sent, including technical information, the content of the email, and any attachments. You can also adjust which information to log or completely disable logging if needed.
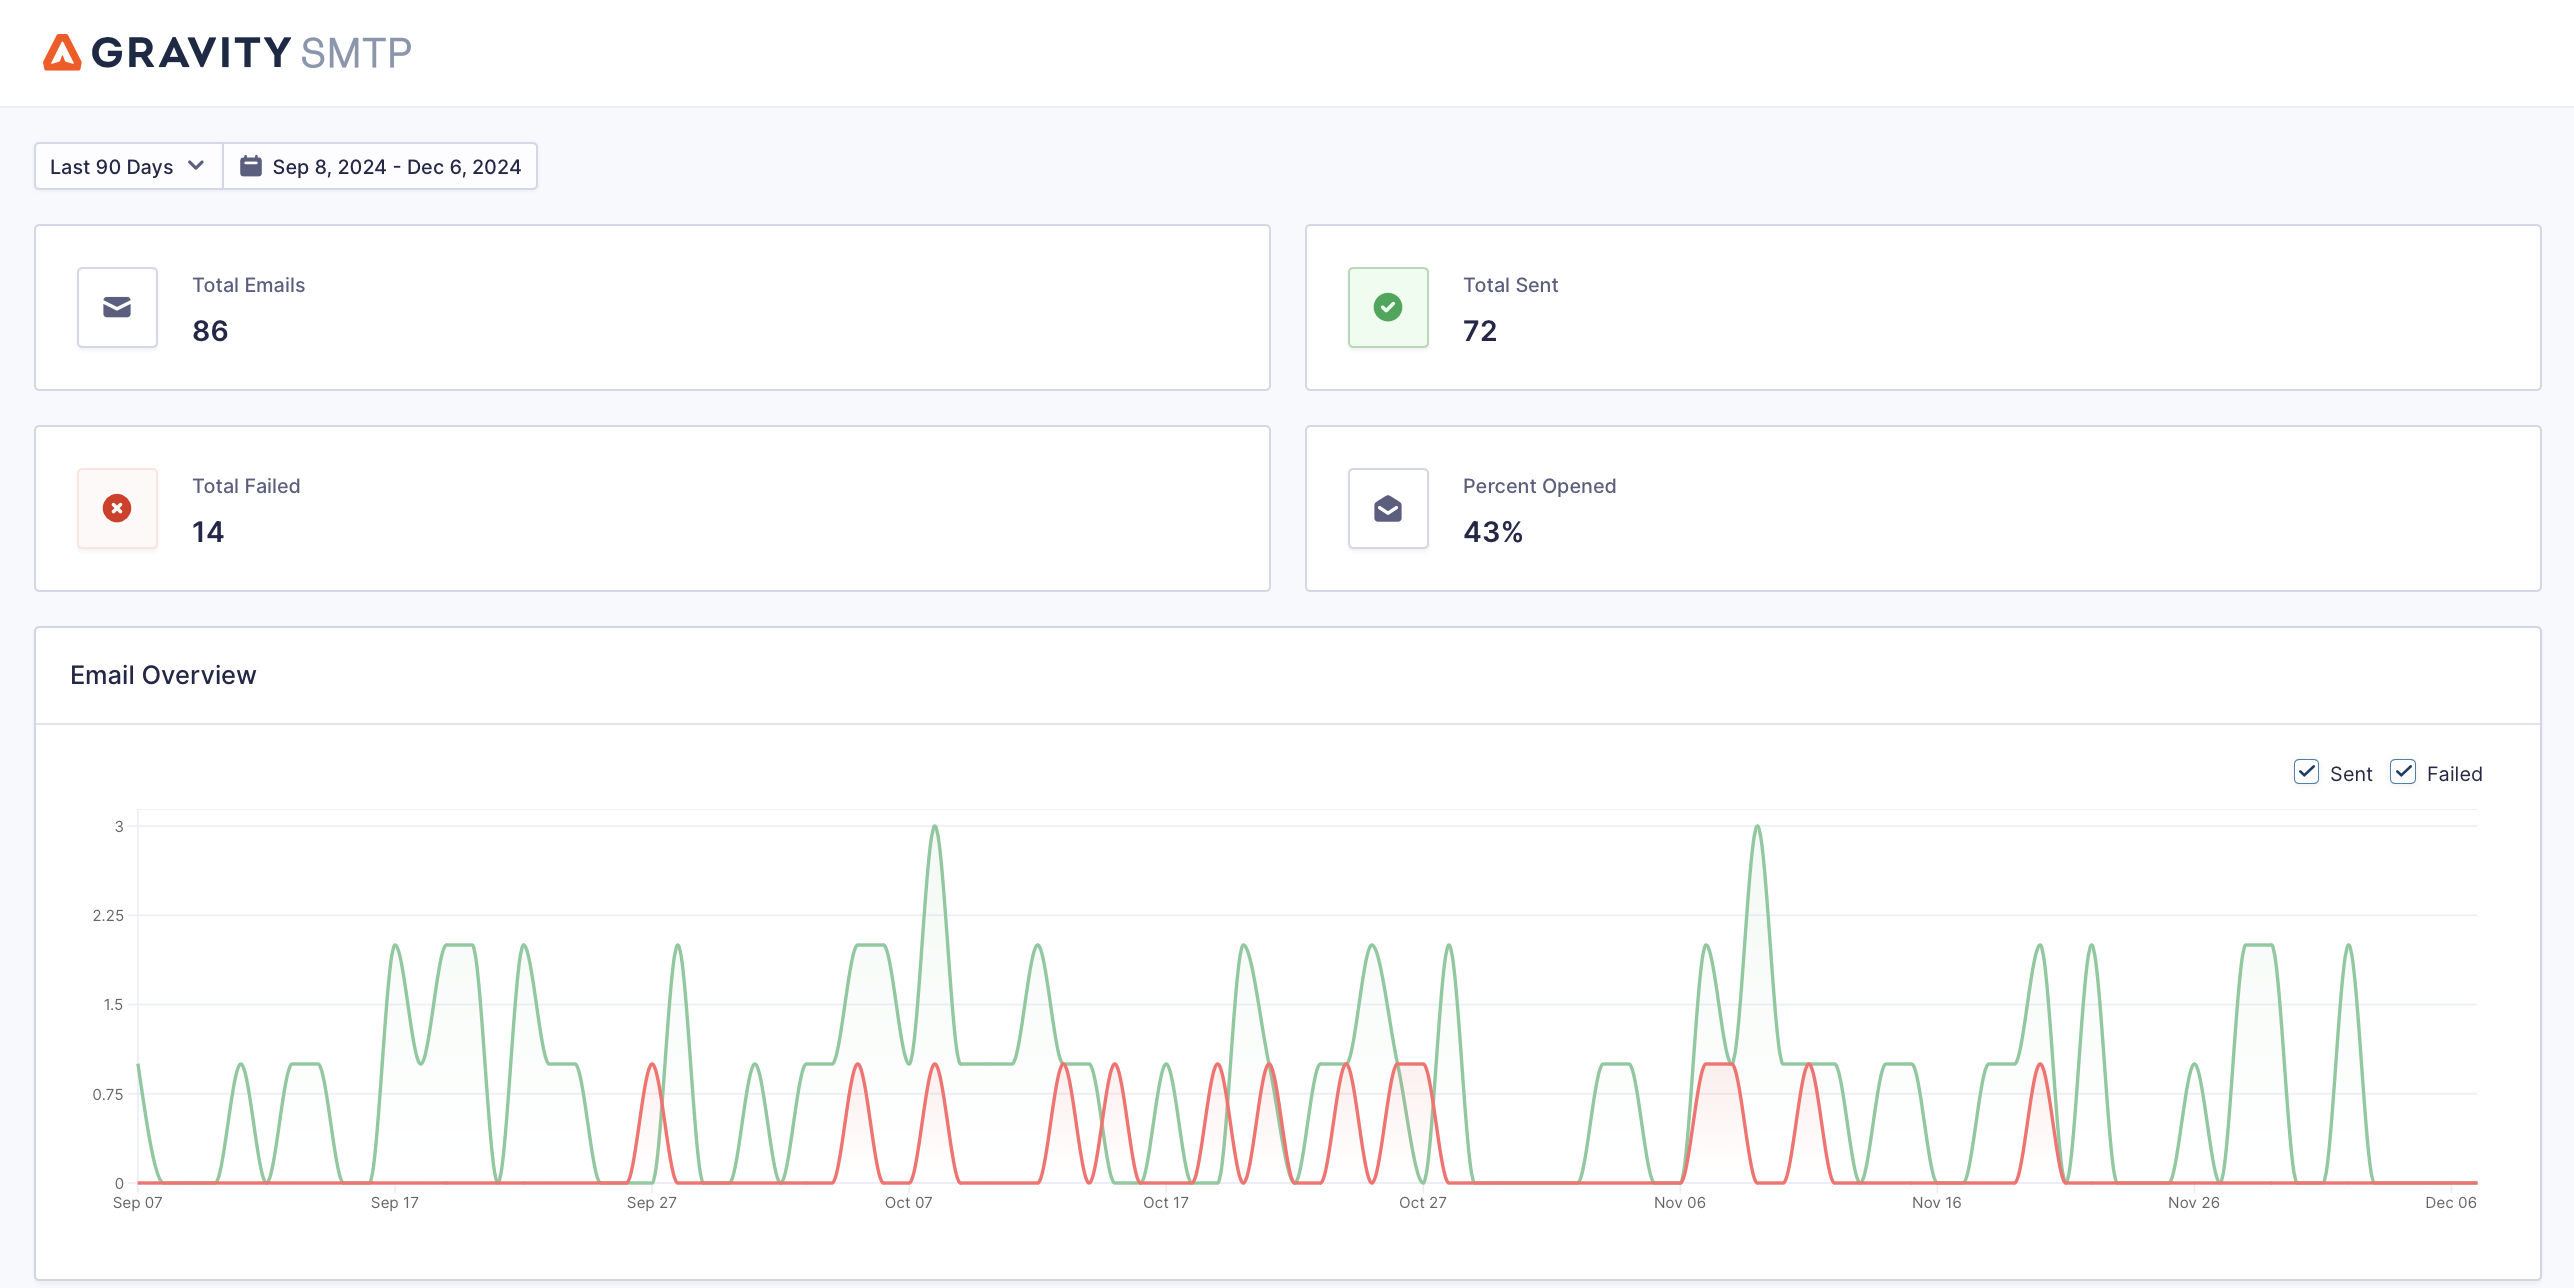
- High-level reports – You also get high-level reports to analyze your site’s transactional email usage.
- Open tracking – Gravity SMTP has its own open tracking that lets you see data inside your WordPress dashboard, which you can use with Elastic Email’s tracking or as a replacement.
- Real-time alerts – You can receive immediate alerts for failed emails via webhook (including Slack alerts) or SMS/text message via Twilio.
- Backup email sending methods – You can connect to a backup email sending service and have Gravity SMTP automatically resend any emails that fail to send with Elastic Email.
Currently, Gravity SMTP is available for free to anyone holding one of these Gravity Forms licenses:
- Elite license
- Nonprofit license
- Developer license (legacy)
While you will download Gravity SMTP from the Gravity Forms My Account area, you do not need to have Gravity Forms installed to use Gravity SMTP.
How to set up WordPress Elastic Email with Gravity SMTP
Now, let’s get into the full guide on how to use Gravity SMTP to send WordPress transactional emails with Elastic Email.
1. Install the Gravity SMTP plugin
To get started, install the Gravity SMTP plugin on the site where you want to use Elastic Email.
As we mentioned above, Gravity SMTP is available for free to anyone holding the Gravity Forms Elite, Nonprofit, or Developer licenses. You can download it from the Gravity Forms My Account area and install it like any other plugin.
2. Register for your Elastic Email account
Next, you’ll want to register for your Elastic Email account, if you haven’t done so already.
Elastic Email offers a free plan that you can use to follow this tutorial and set up email sending on your site.
However, the free plan only lets you send transactional emails to your own email address.
Elastic Email’s free sending limits are actually pretty generous and allow you to send up to 100 emails per day. So, if you only need to send transactional emails to yourself, this could work depending on your site traffic.
But if you’re looking to send transactional emails to any other users, you’ll need to go with one of the paid plans.
Note – Elastic Email offers separate plans for email marketing and transactional email sending. If you exclusively want to use Elastic Email for WordPress transactional emails, you should make sure to sign up for Elastic Email’s Email API plans.

At the time of this writing, paid Email API plan prices start at $19 per month for up to 50,000 emails per month and go up from there based on how many emails you need to send. There’s also a more expensive Pro plan that adds more features, such as inbound email processing.
3. Authenticate your domain name with Elastic Email
Once you create your Elastic Email account, the next step is to verify your domain name.
You can do this by clicking Verify domain under Start.
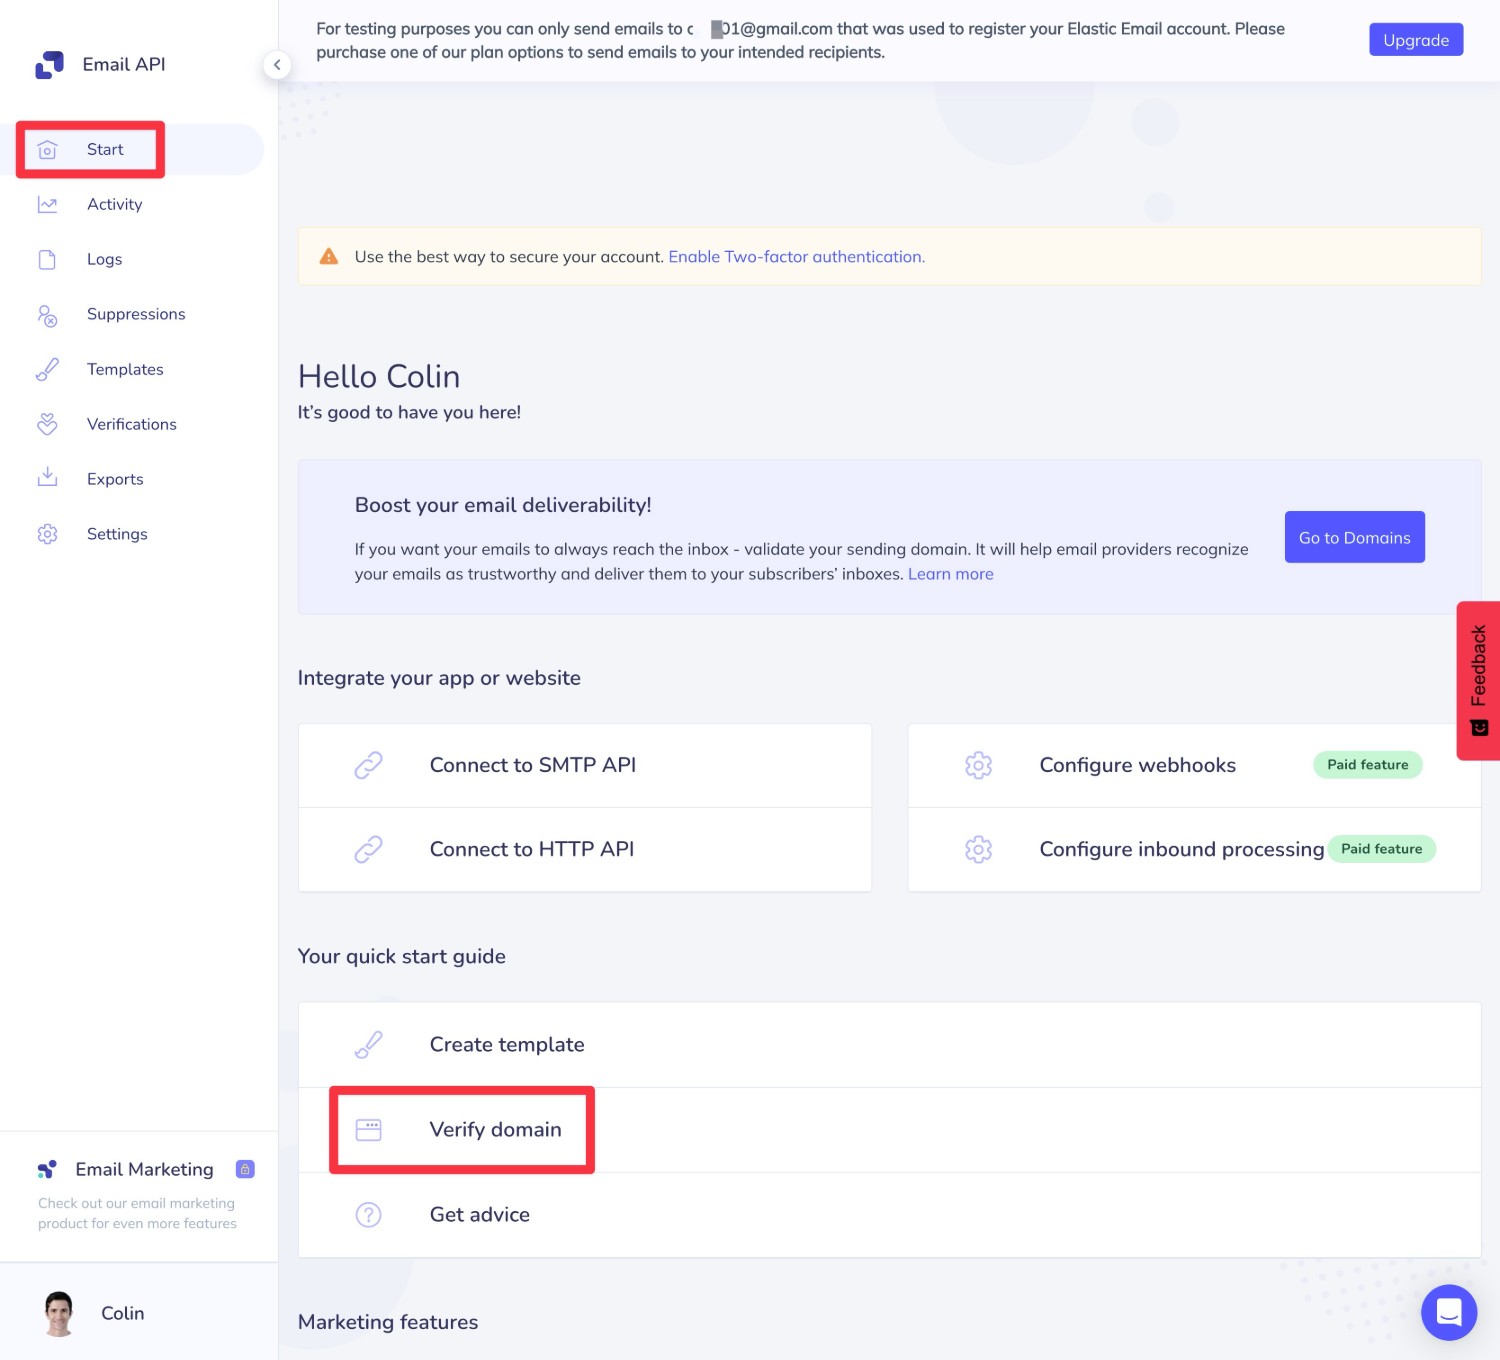
You can also find this interface by going to Settings → Manage Domains or clicking this link.
Choose how to verify your domain
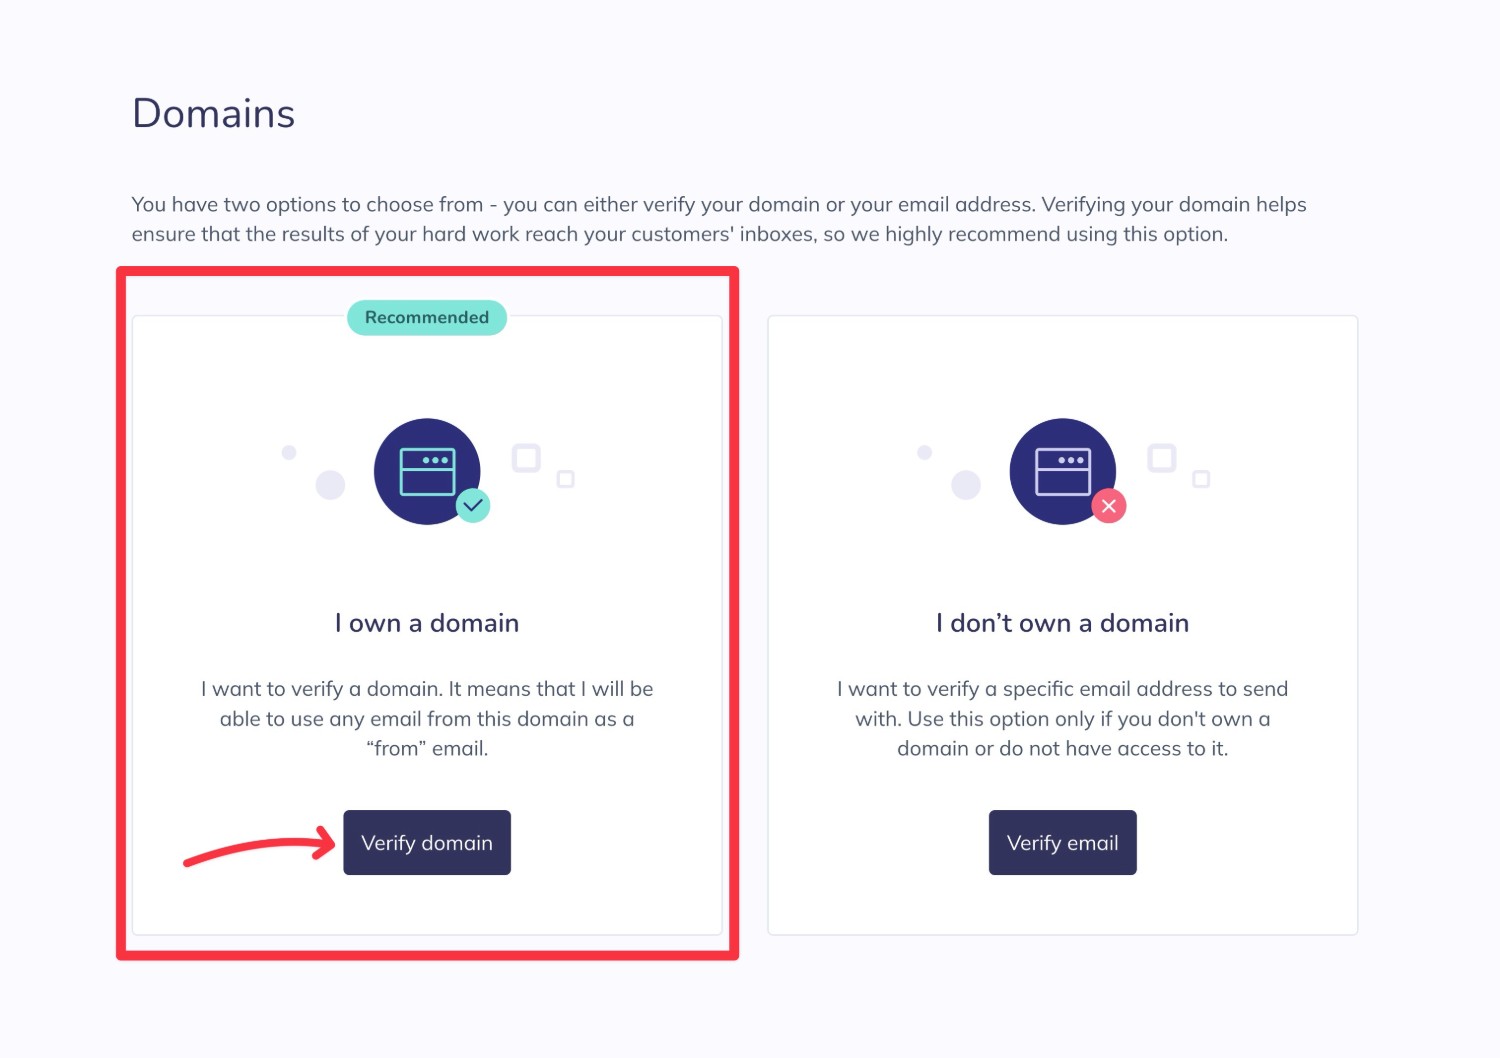
Like many transactional email services, Elastic Email offers two ways to verify:
- Domain – You’ll need to add some DNS records to your domain name to prove that you control it.
- Single email address – You just need to click a link in an email that Elastic Email sends to this email address.
While the single email address approach is simpler, we recommend using the domain-level approach for two main reasons:
- Improved deliverability – By verifying your domain name, you can make your emails appear more trustworthy and increase your deliverability.
- More flexibility – You’ll be able to set your “From Email” to any email address on your domain name, whereas the single email address approach only lets you send emails from that specific email address.
If you can’t edit your domain’s DNS for some reason, you can use the single email address approach. But whenever possible, we recommend verifying at the domain level and that’s the approach that we’ll use in this guide.
To do this, click Verify domain.
Add DNS records
On the next screen, you can enter your domain and then click Continue.
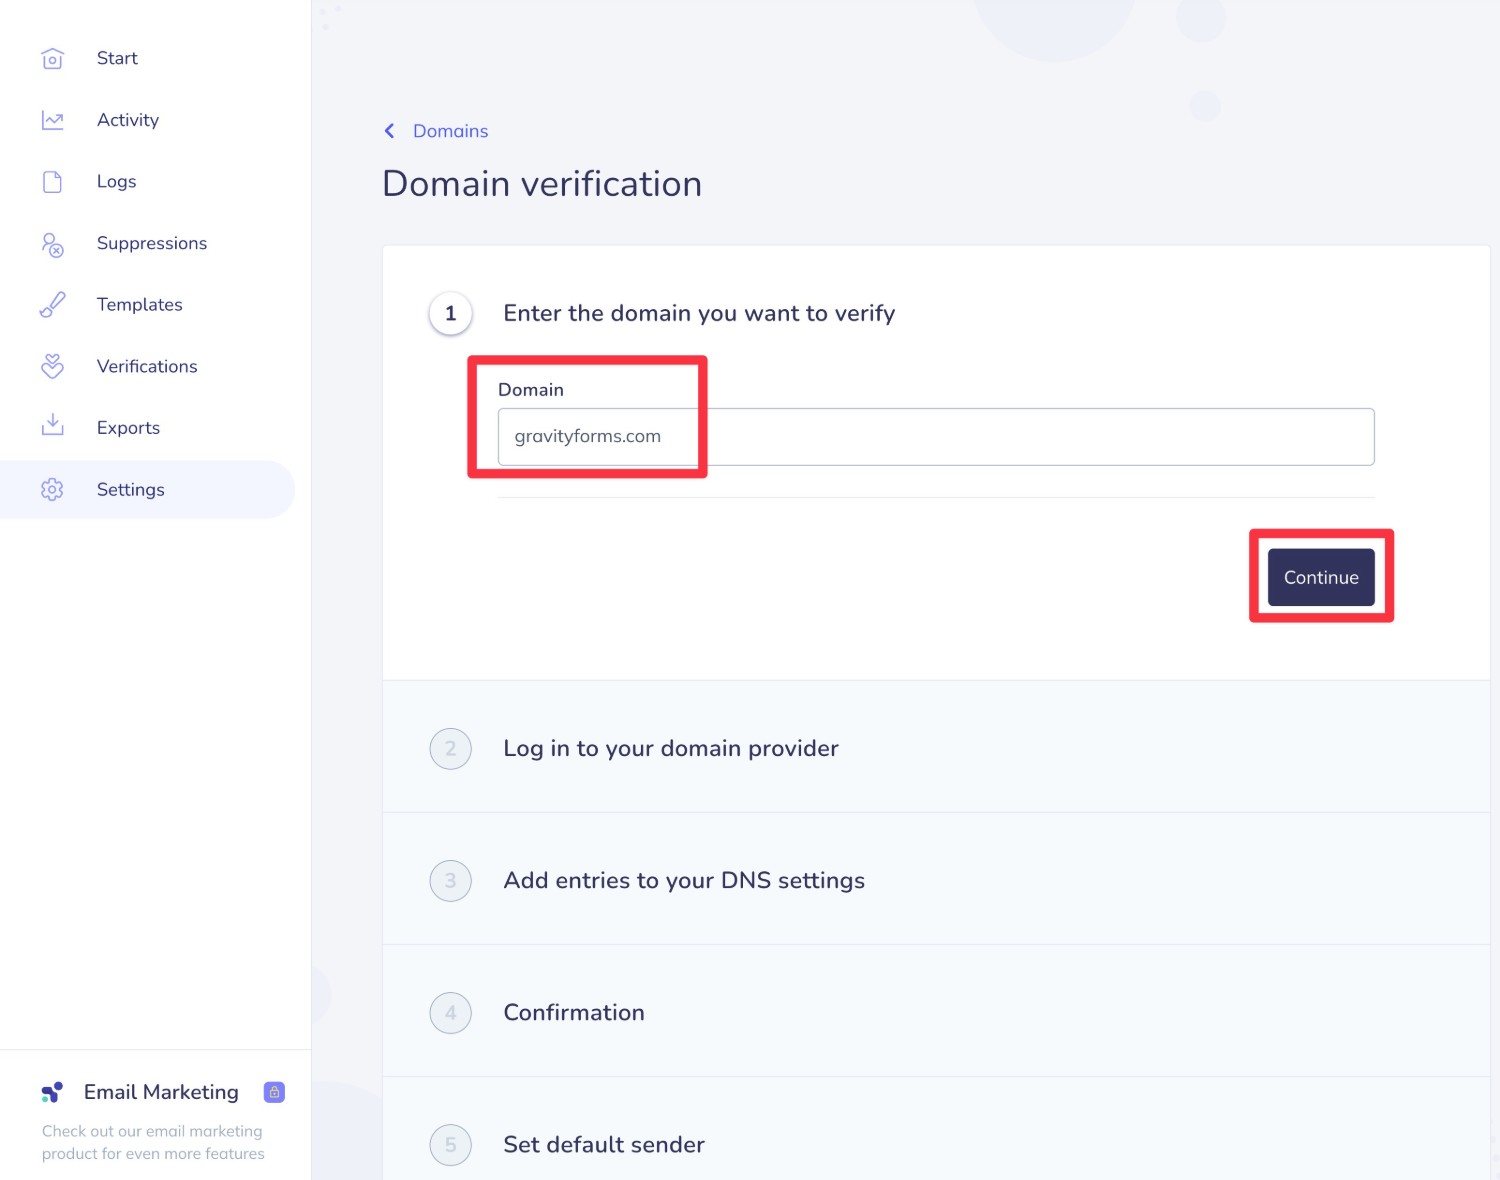
Then, Elastic Email will prompt you to log in to wherever you manage your domain’s DNS. Depending on how you’ve configured things, this could be one of the following locations:
- Your web host if you’re using your host’s nameservers.
- Your domain registrar.
- A reverse proxy service like Cloudflare.
Once you click Continue again, Elastic Email will provide you with four different DNS records. You can use the accordion icons to expand the details for each record.
We recommend adding all four records for the best deliverability.
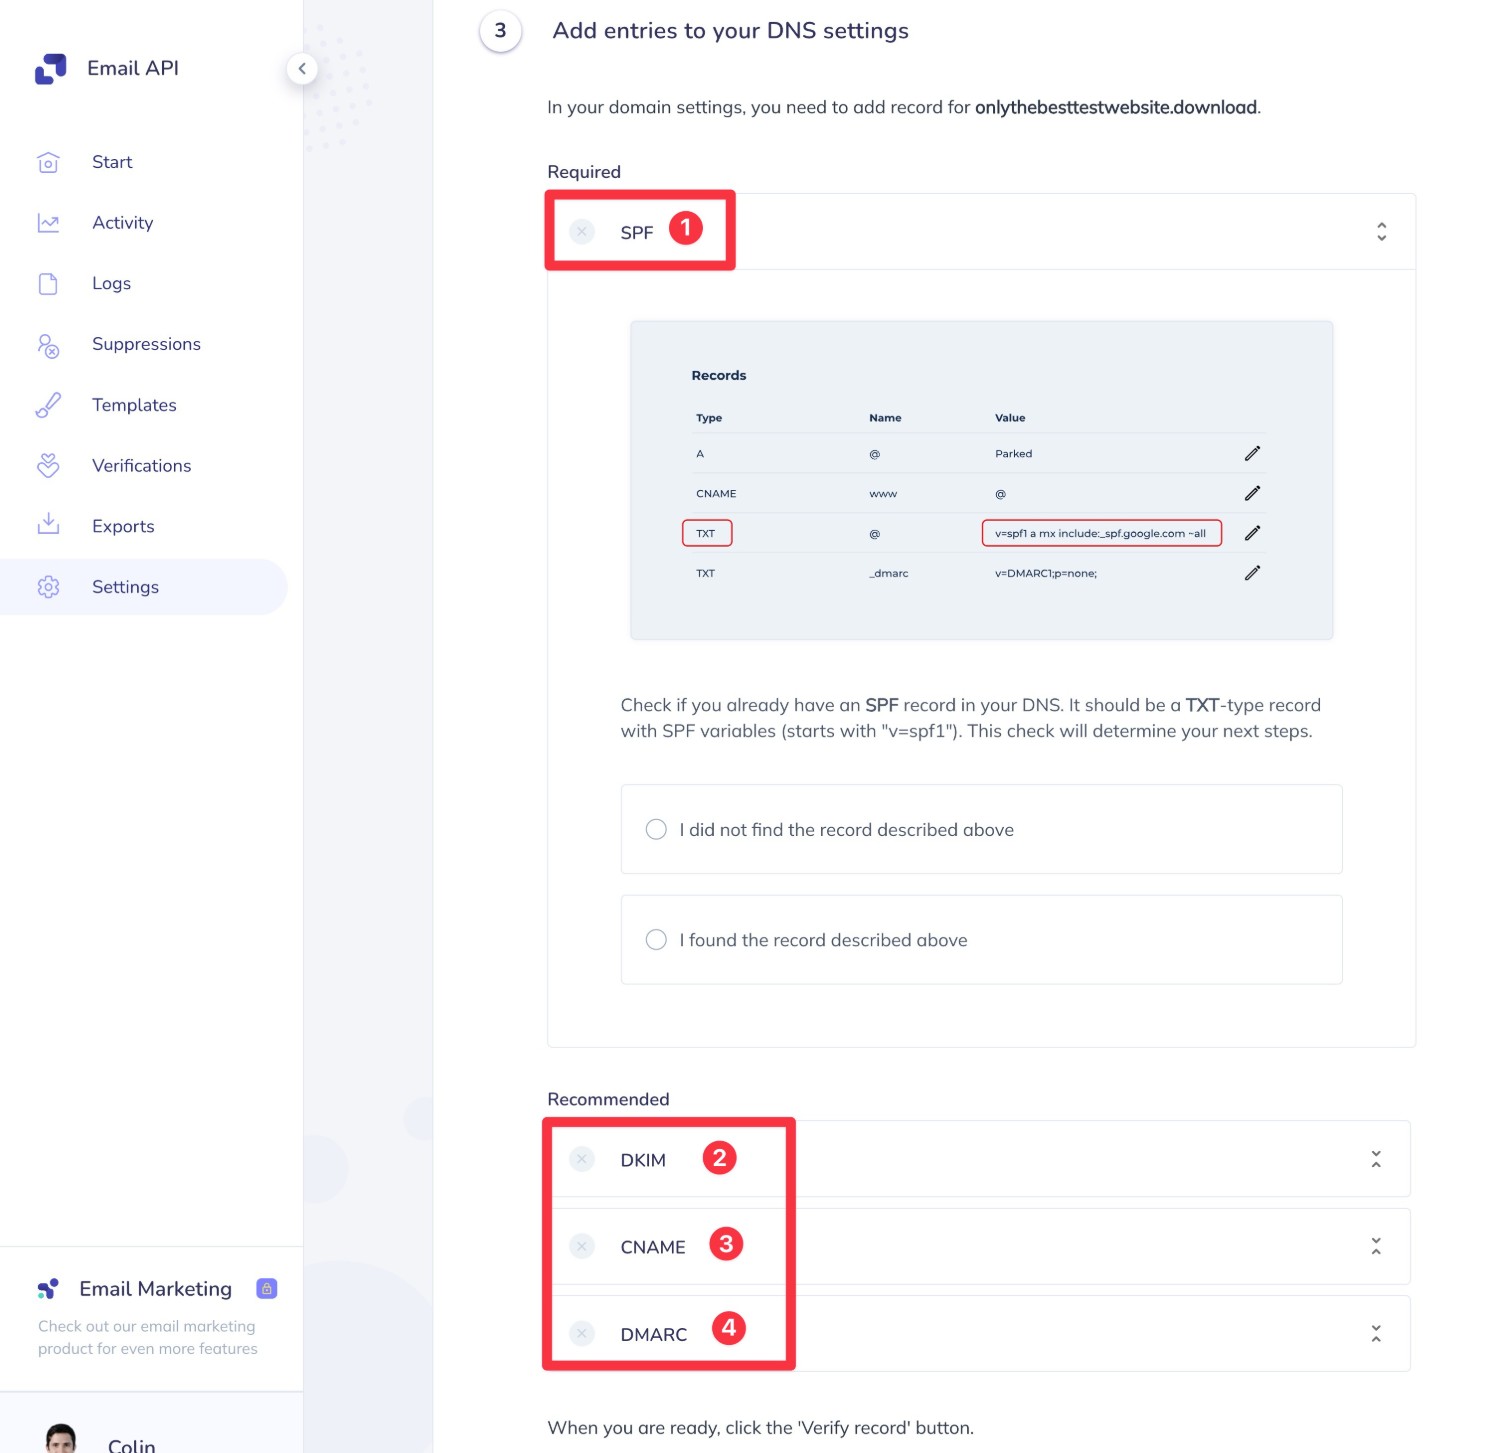
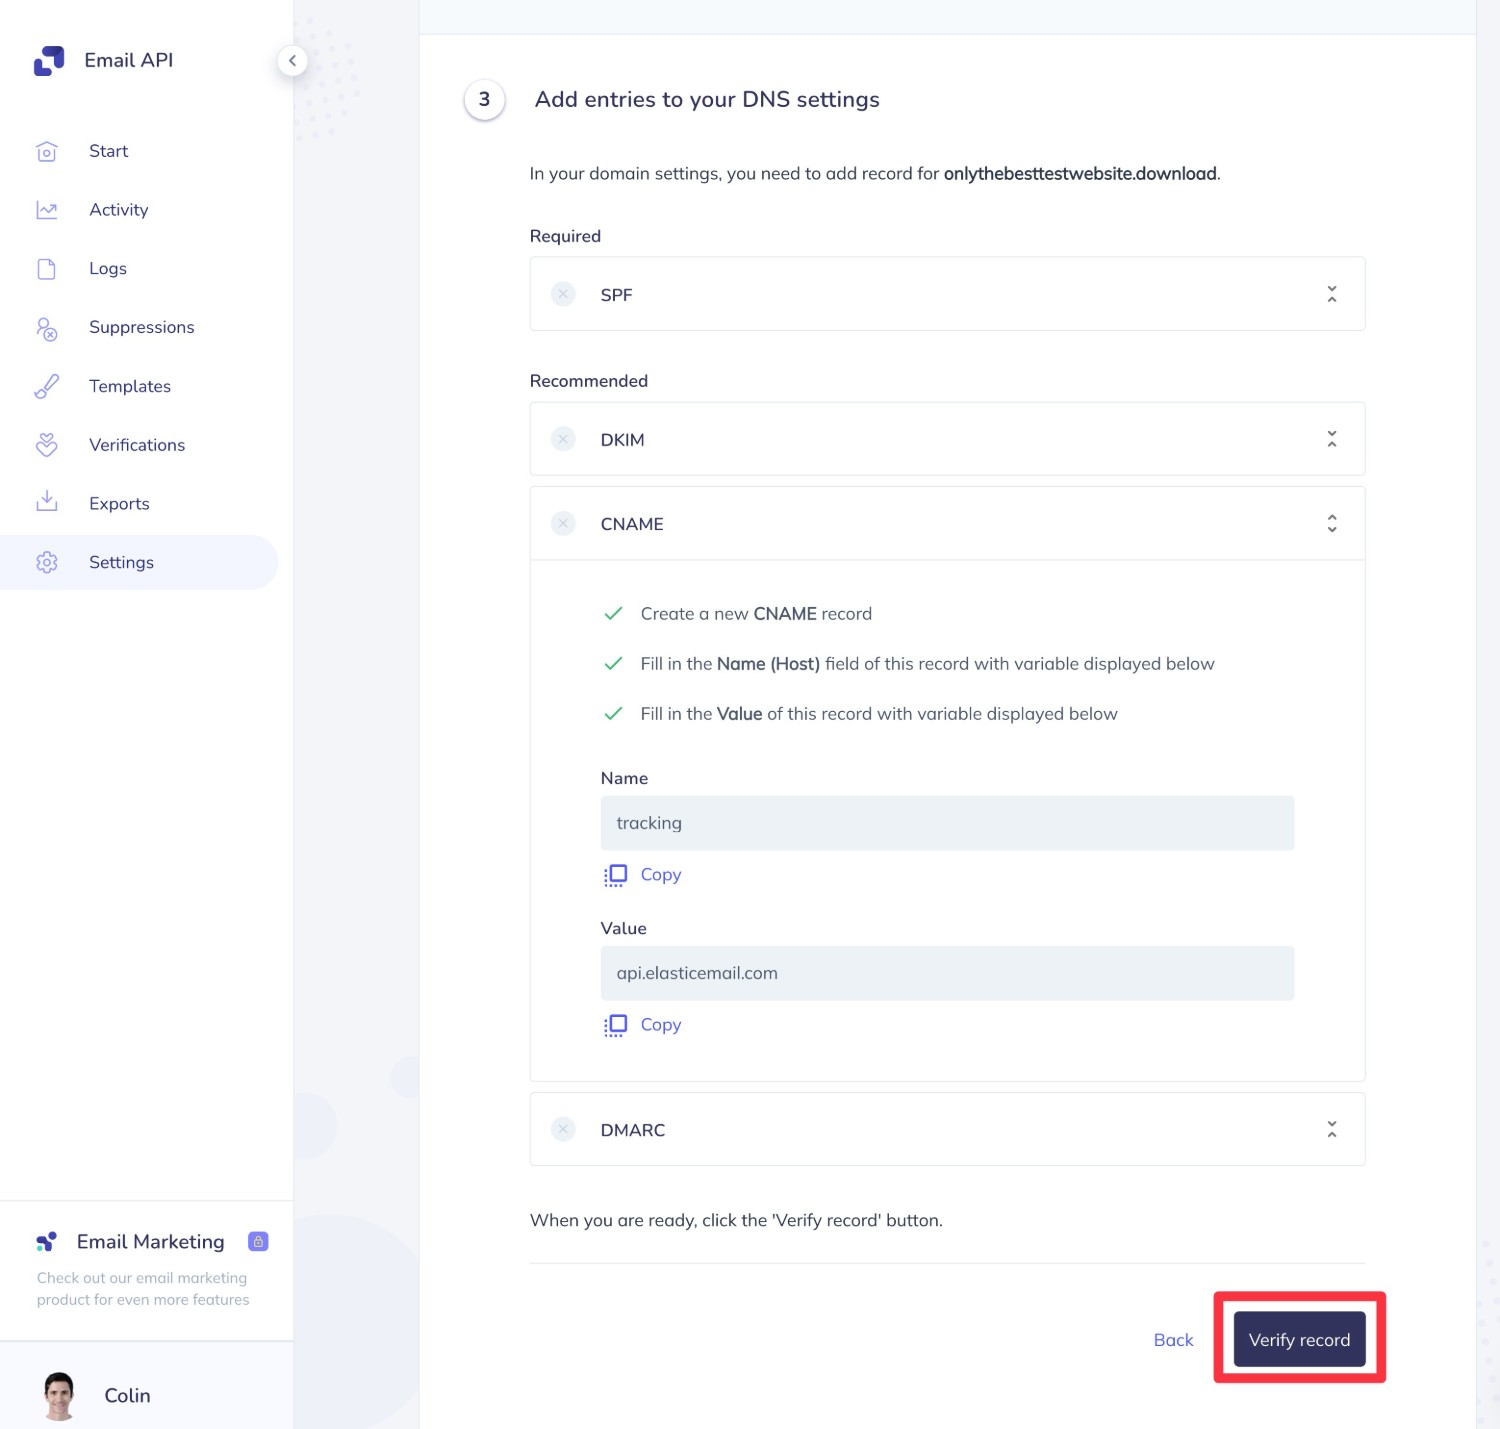
Once you’ve added all four records, click Verify record at the bottom.
If you correctly added them, you should see green checkmarks next to each record and you can click Close.
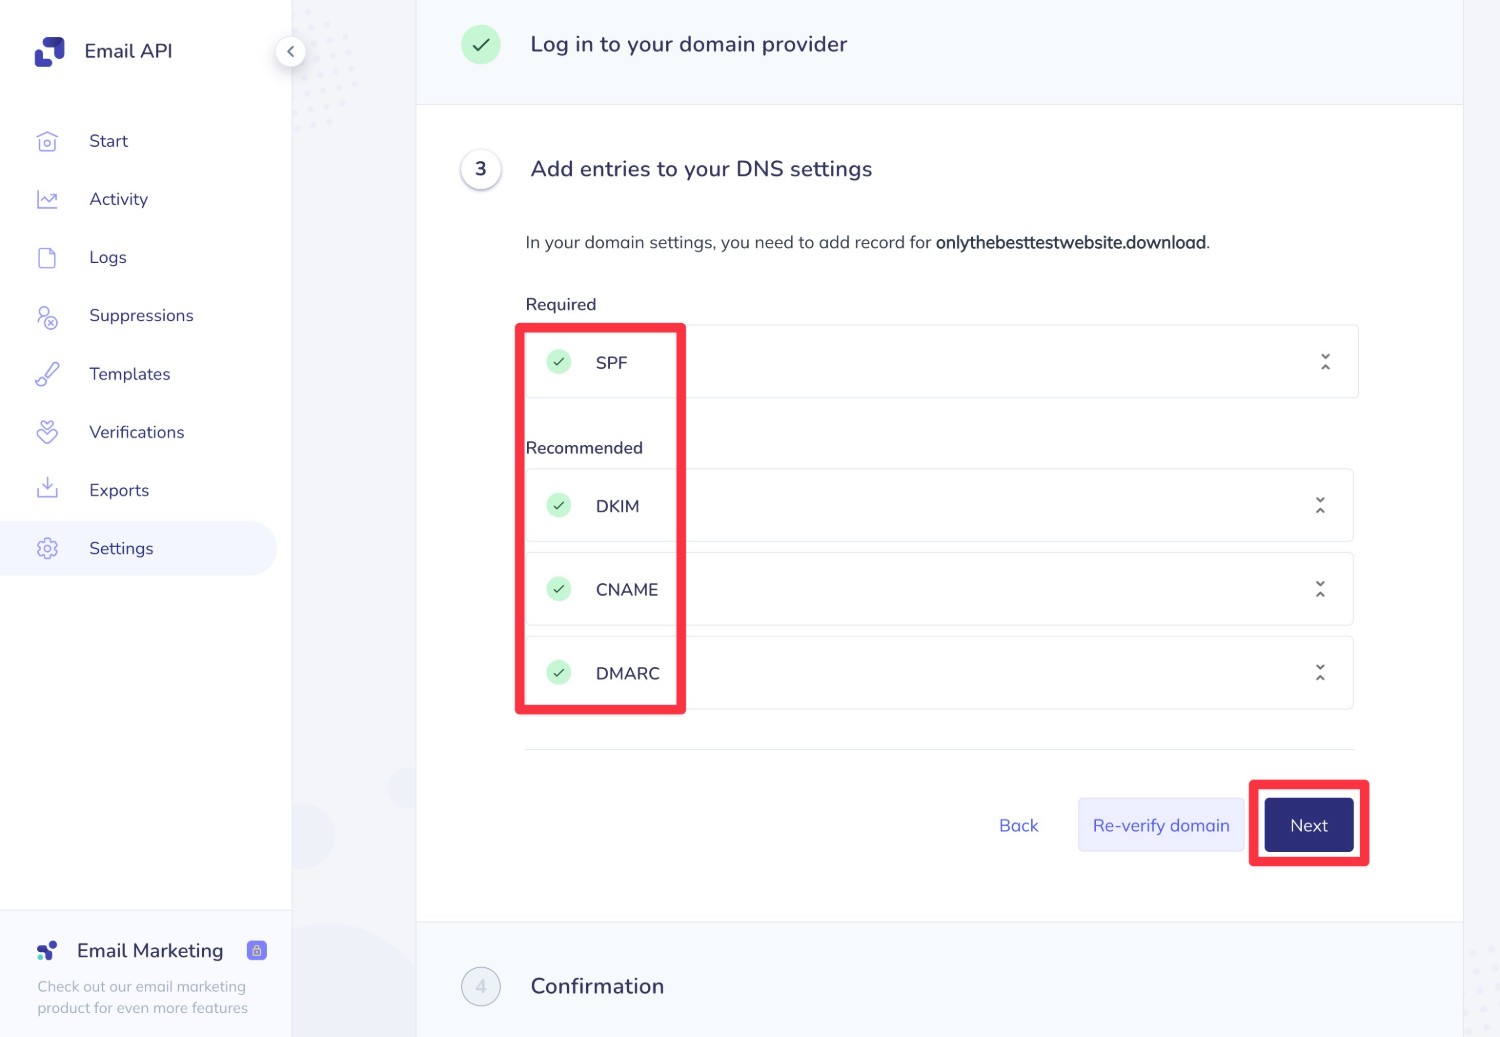
Then, click Next to continue to the next step in the process. After clicking Continue again, you can set a default sender, which will be used as your default “From” address.
You can still adjust this in the Gravity SMTP settings later on, so don’t stress too much about your choice.
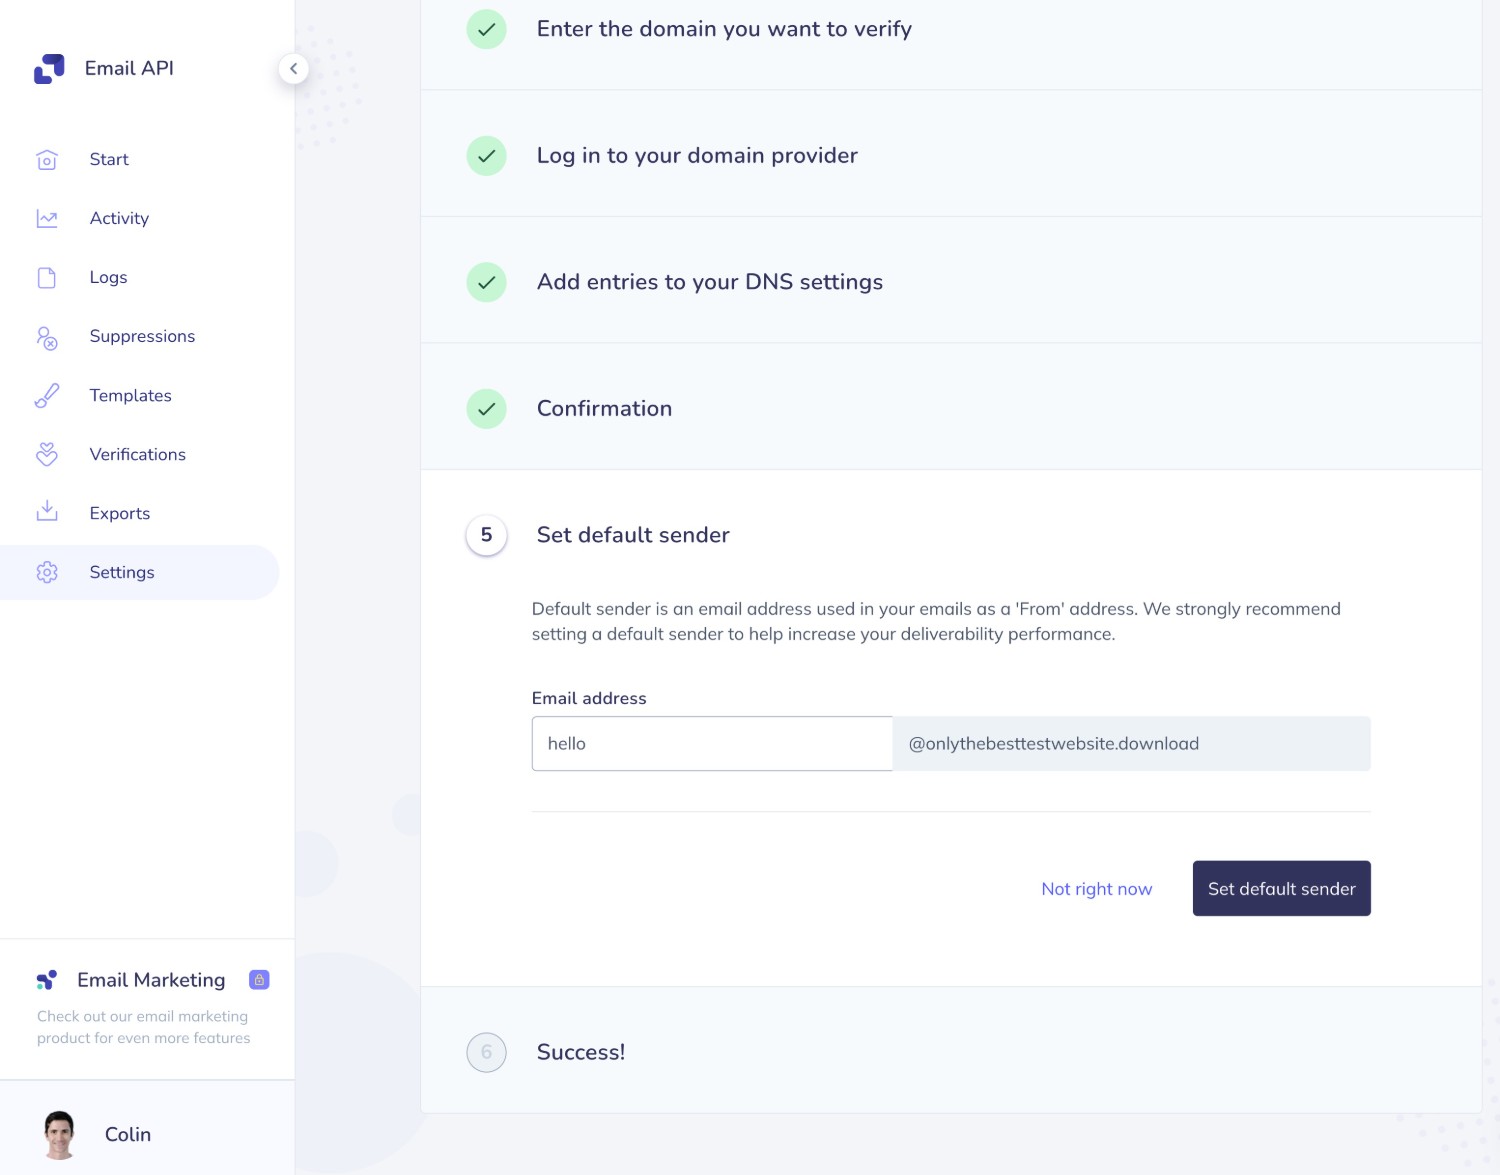
And that’s it – you’re all done with verifying your domain name.
4. Create your Elastic Email API key
Now, you need to create your Elastic Email API key, which is what Gravity SMTP will use to connect to Elastic Email.
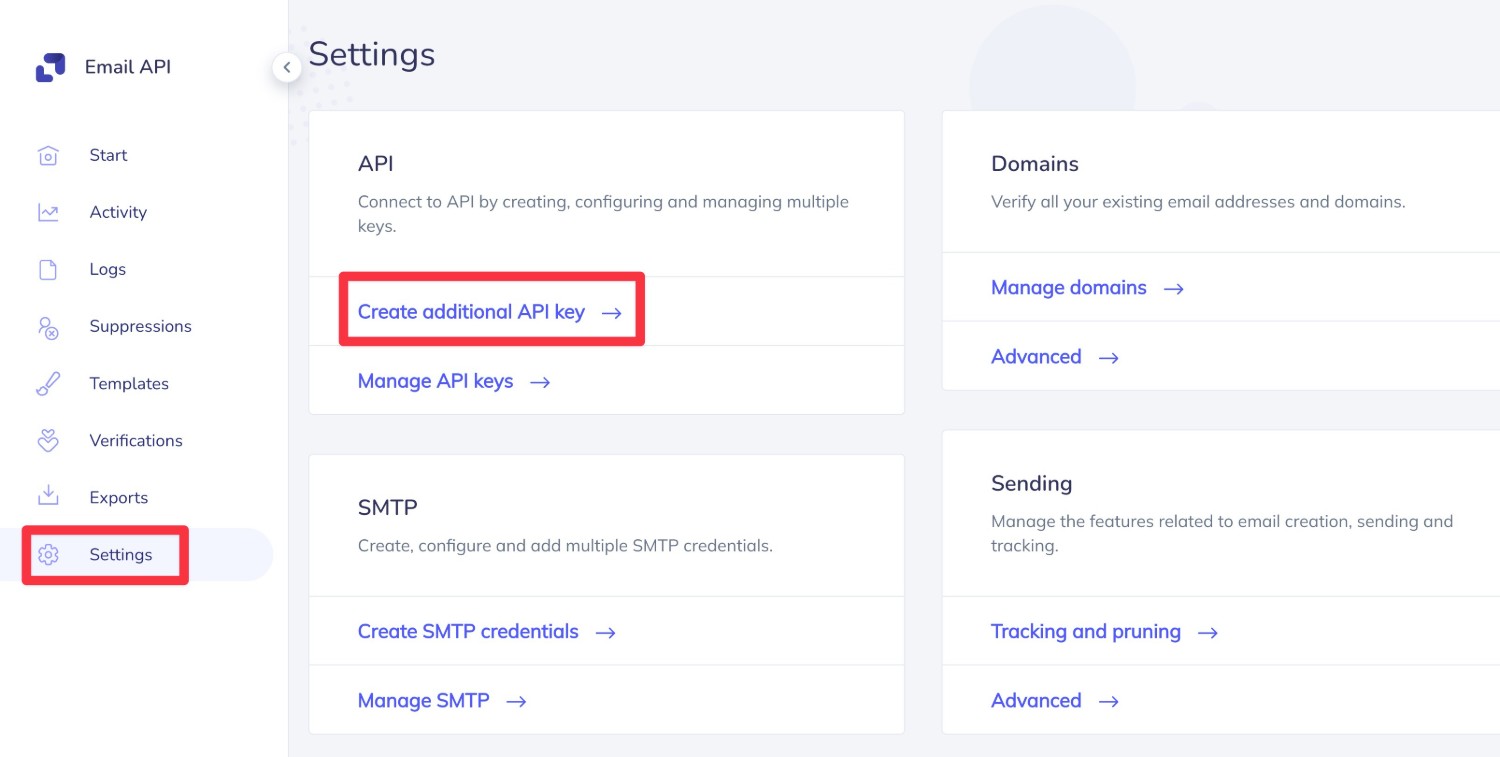
Go to Settings → Create additional API key in the Elastic Email dashboard or click this link to jump straight there.
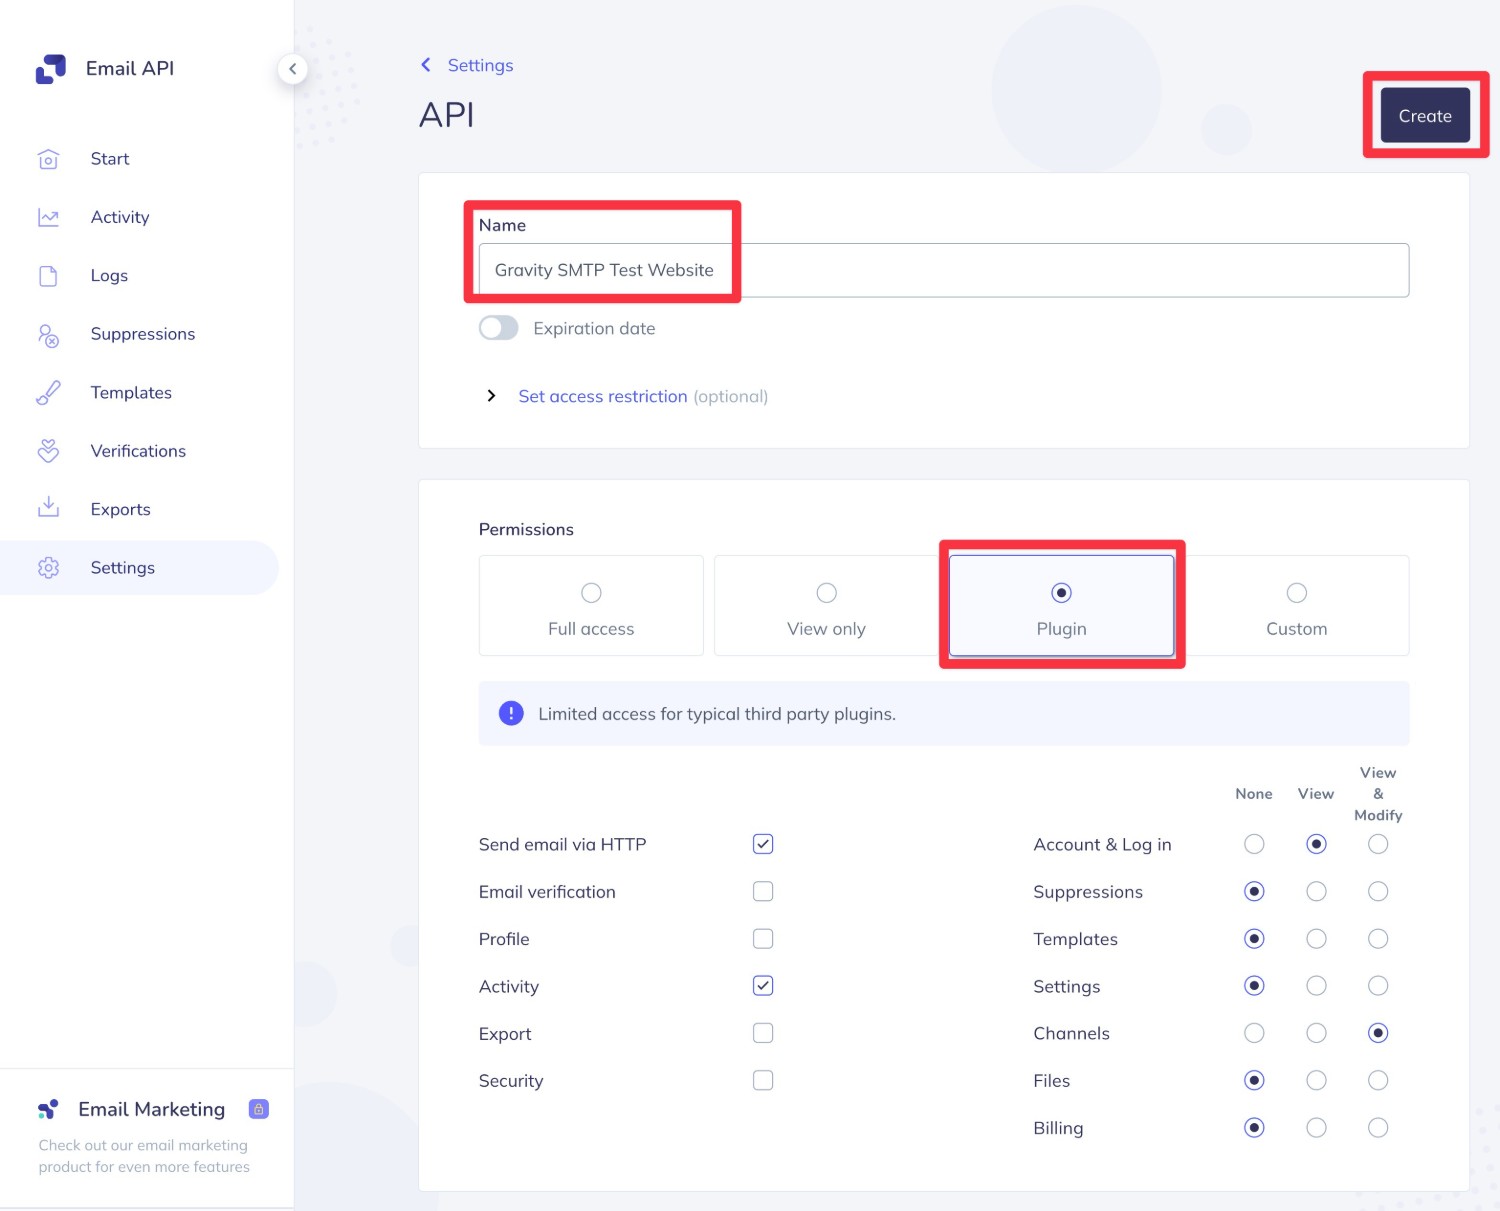
To start, give your API key an internal name to help you remember it.
Then, choose the Plugin radio button under Permissions. You can leave all of the other settings as the defaults.
To finish, click the Create button.
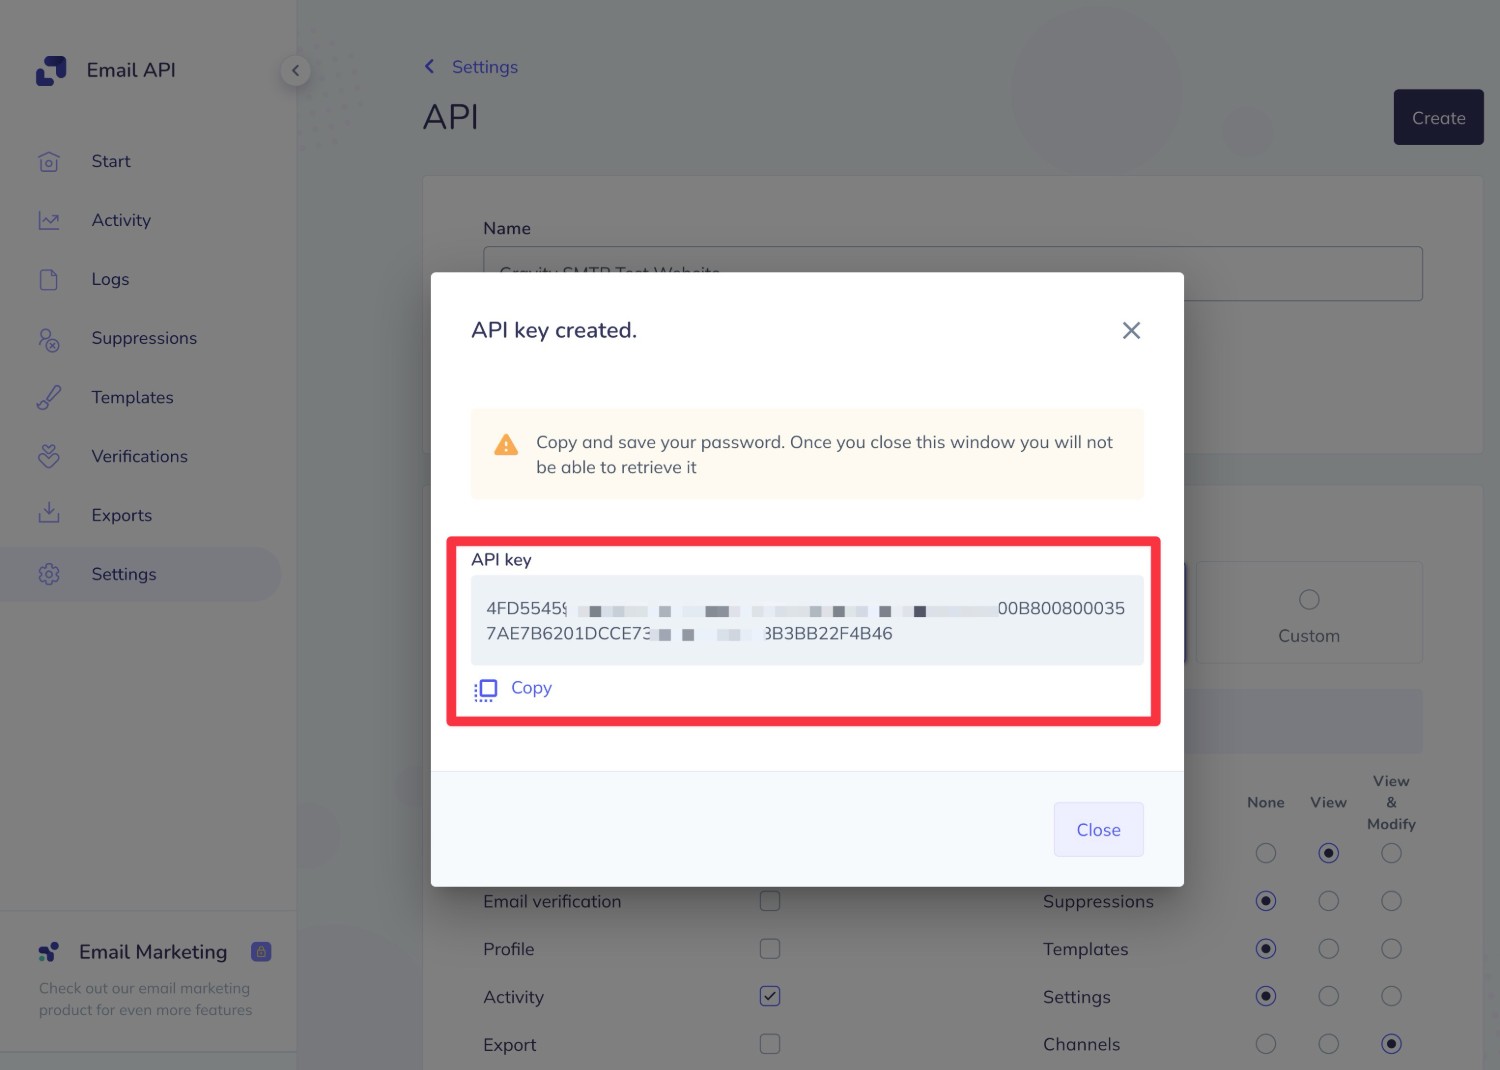
Elastic Email will then show you your API key. Copy this value to a safe place because you’ll need it in the next step and Elastic Email will only show this value once.
If you accidentally close the window without copying the API key, you can just repeat these steps to create another API key.
5. Connect Gravity SMTP to Elastic Email
Now, you’ll perform the rest of the setup process from your WordPress dashboard.
To connect Gravity SMTP to Elastic Email, open the settings for Elastic Email in Gravity SMTP:
- Open your WordPress dashboard.
- Go to SMTP → Settings.
- Select the Integrations tab in the Gravity SMTP settings area.
- Click the gear icon next to Elastic Email to open its settings.
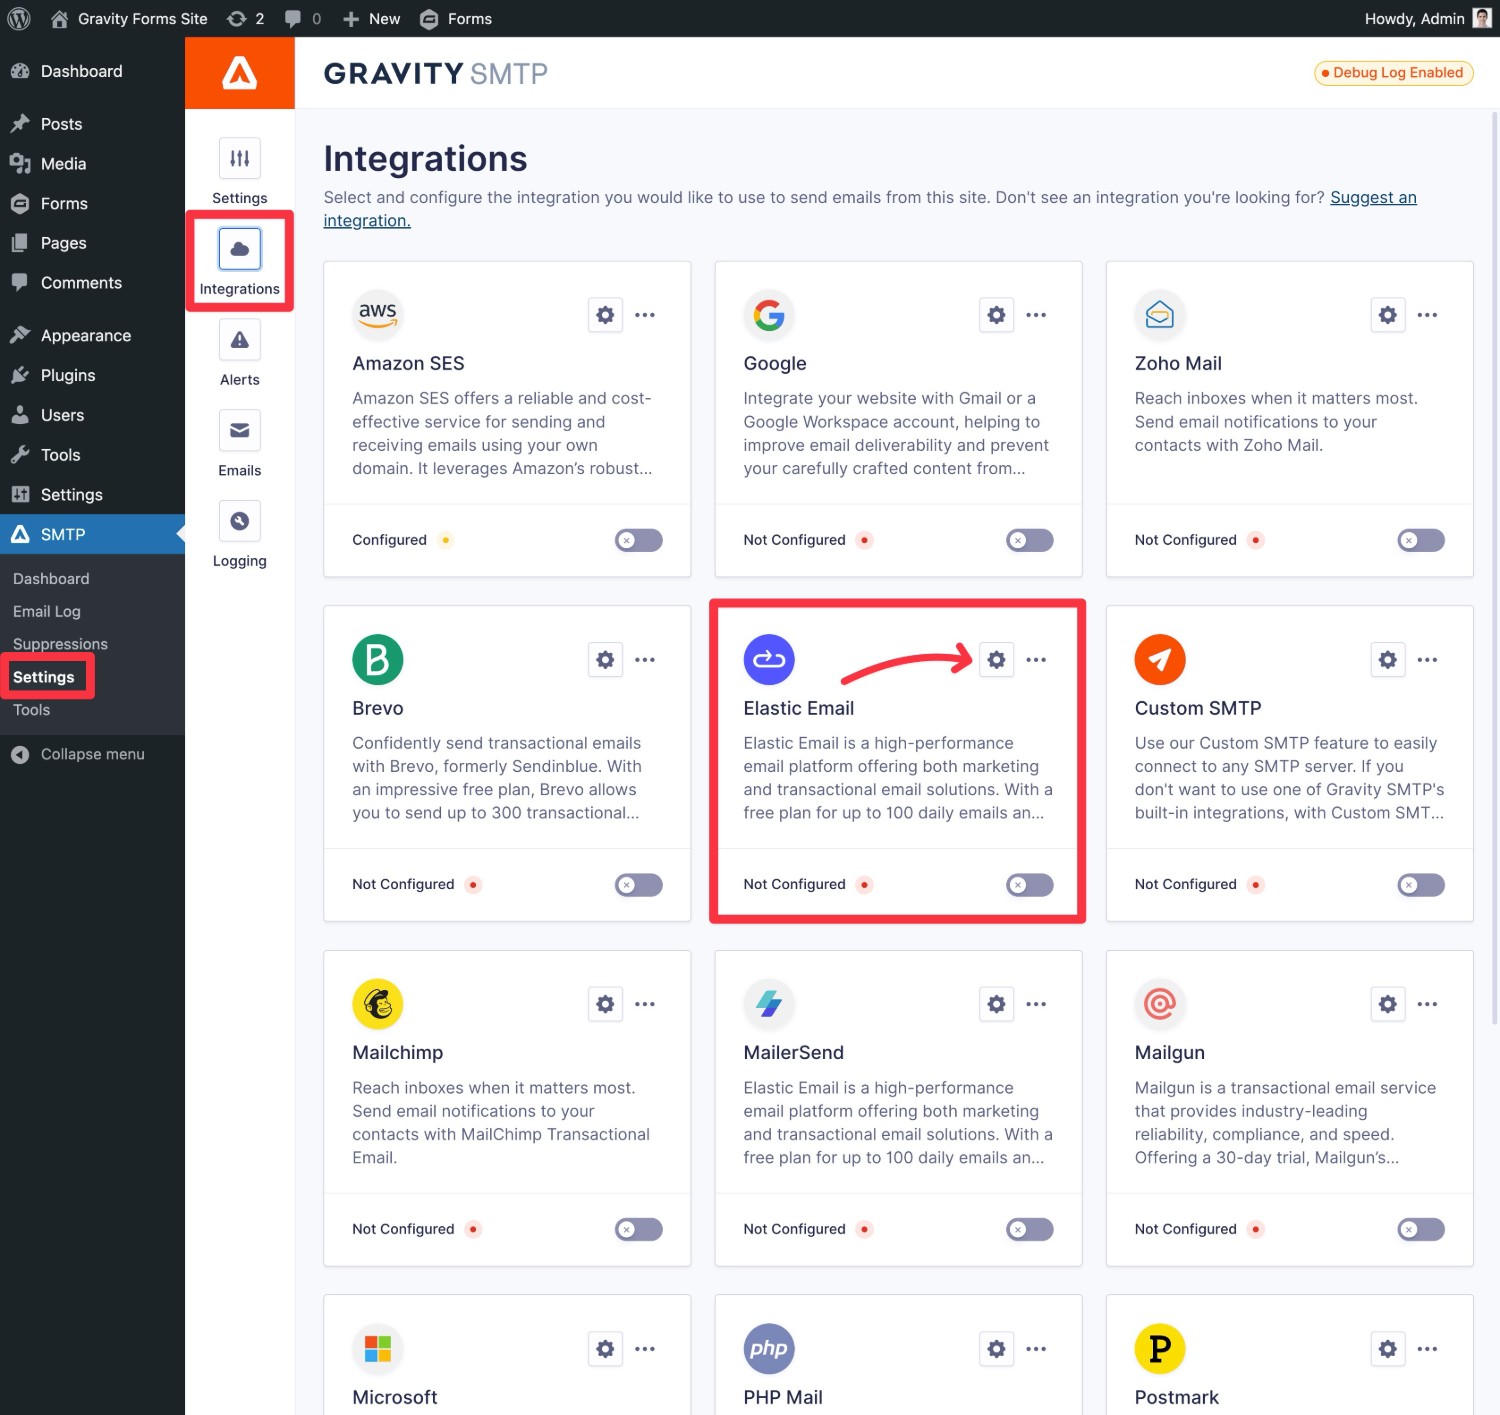
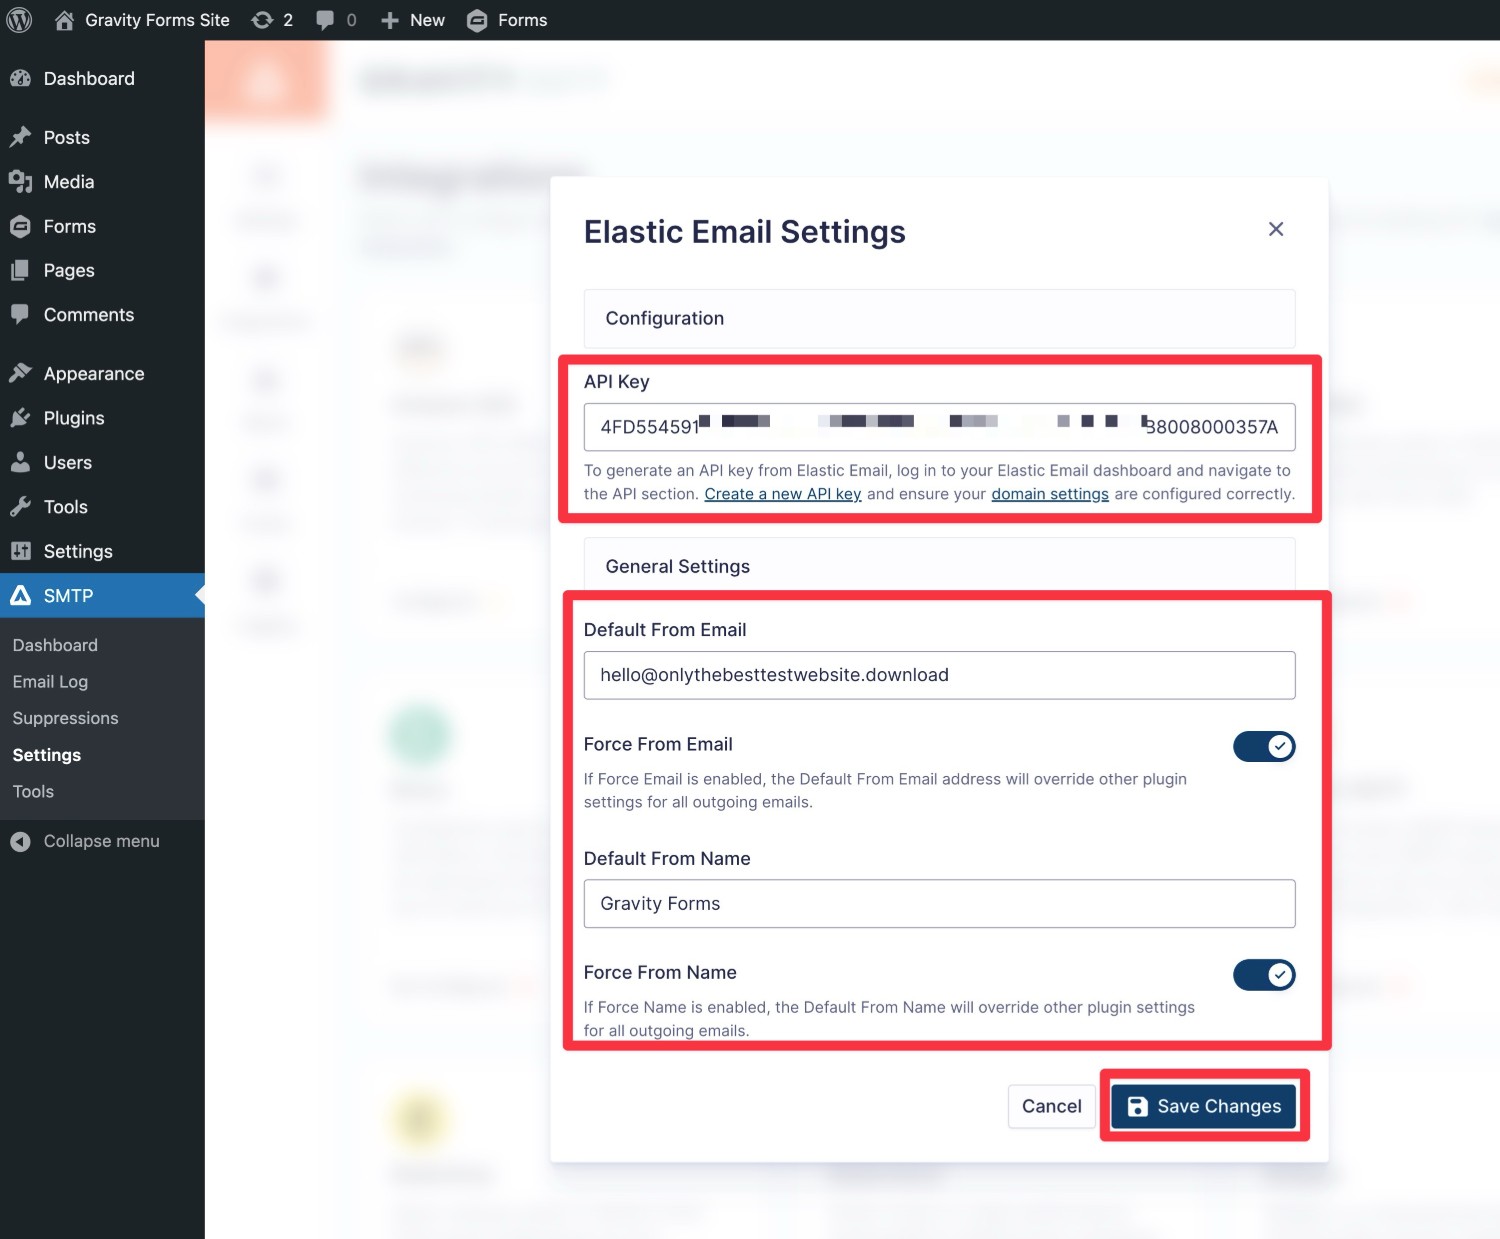
This will open a popup where you can configure the connection.
First, paste the Elastic Email API key that you created in the previous step into the API Key box.
Then, you can choose your default From Email and From Name, along with whether or not to force other plugins on your site to send their emails using these same identities.
If you verified your domain name with Elastic Email, you can set your From Email to any email address on your domain name. If you only verified a single email address, you must enter that exact email address as the From Email.
When you’ve made your choices, click Save Changes.
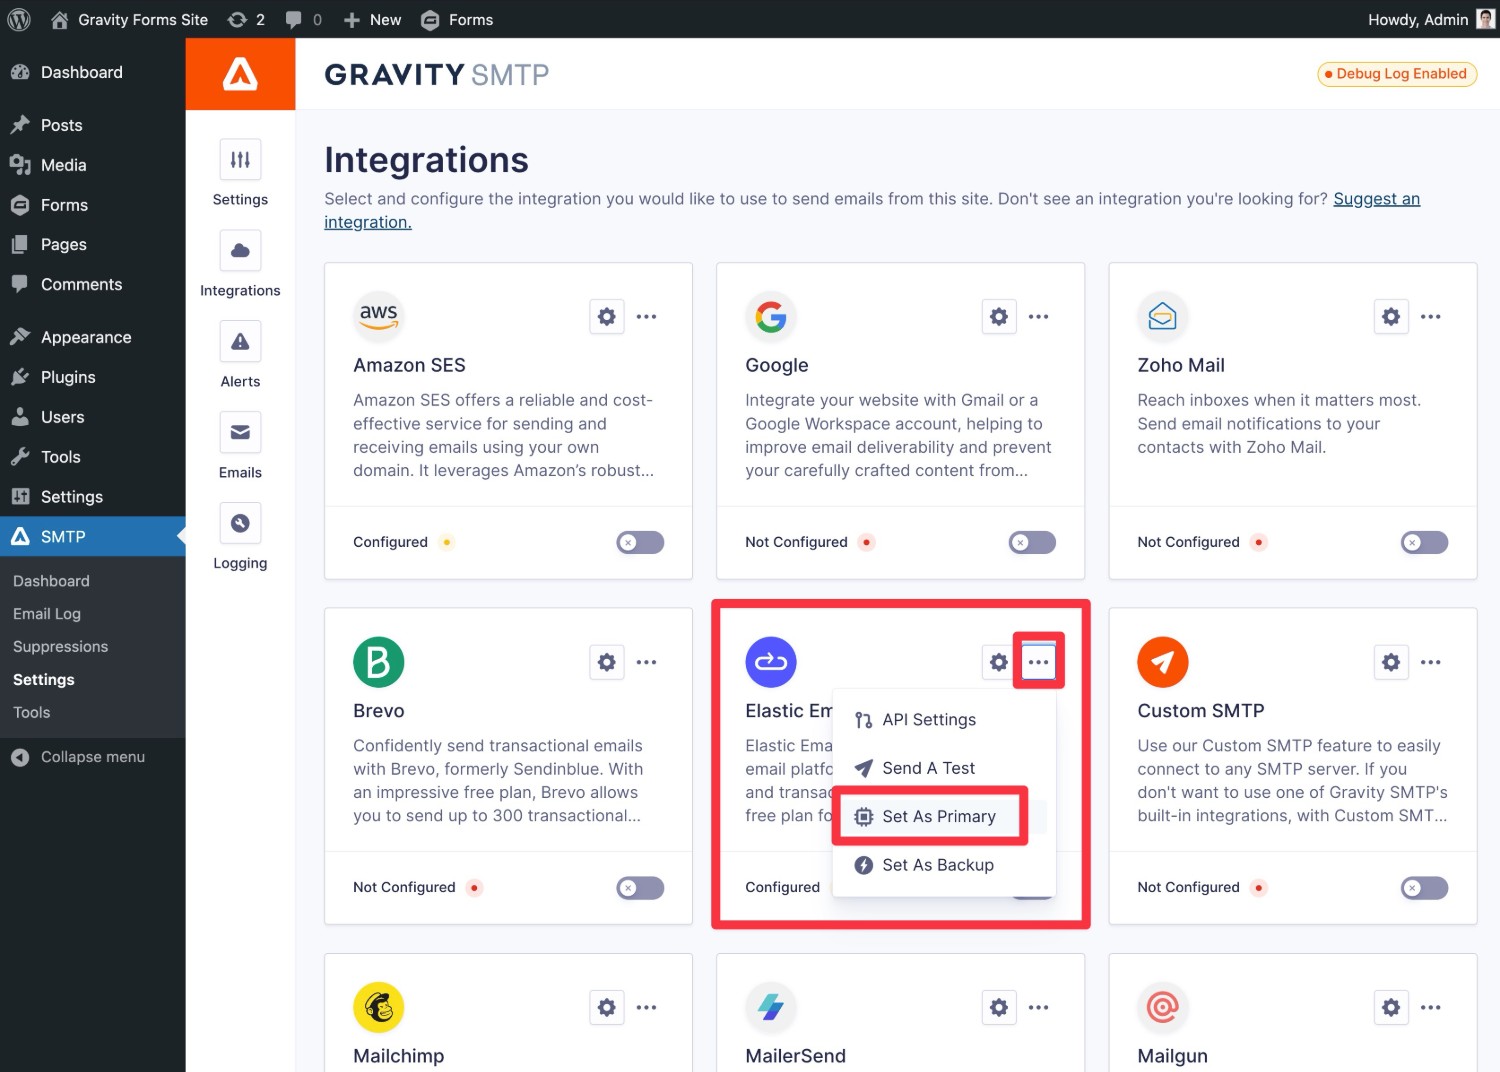
To finish things out, you need to enable Elastic Email as your site’s primary email sending service.
To do this, click the three dots icon next to Elastic Email and choose Set As Primary from the drop-down.
After setting it as your primary service, you should see the yellow Configured status change to a green Connected status and you’ll also see a Primary label next to the Elastic Email logo.
6. Send a test email
At this point, your site is already configured to send all of its transactional emails using Elastic Email.
To make sure that everything is working properly, Gravity SMTP includes its own email test tool that lets you send a test email to any email address*.
Note – If you’re using Elastic Email’s free plan, you will only be able to send emails to the email address that you used to register for Elastic Email. If you have a paid plan, you can send a test email to any email address.
Here’s how to use it:
- Go to SMTP → Tools in your WordPress dashboard.
- Select the Send a Test tab (it should open by default).
- Enter the email address to which you want to send a test email in the Send To box. Again, if you’re using a free plan, this must be the same email that you used to register for Elastic Email.
- Make sure that Elastic Email is selected in the Send With drop-down.
- Click Send Test.
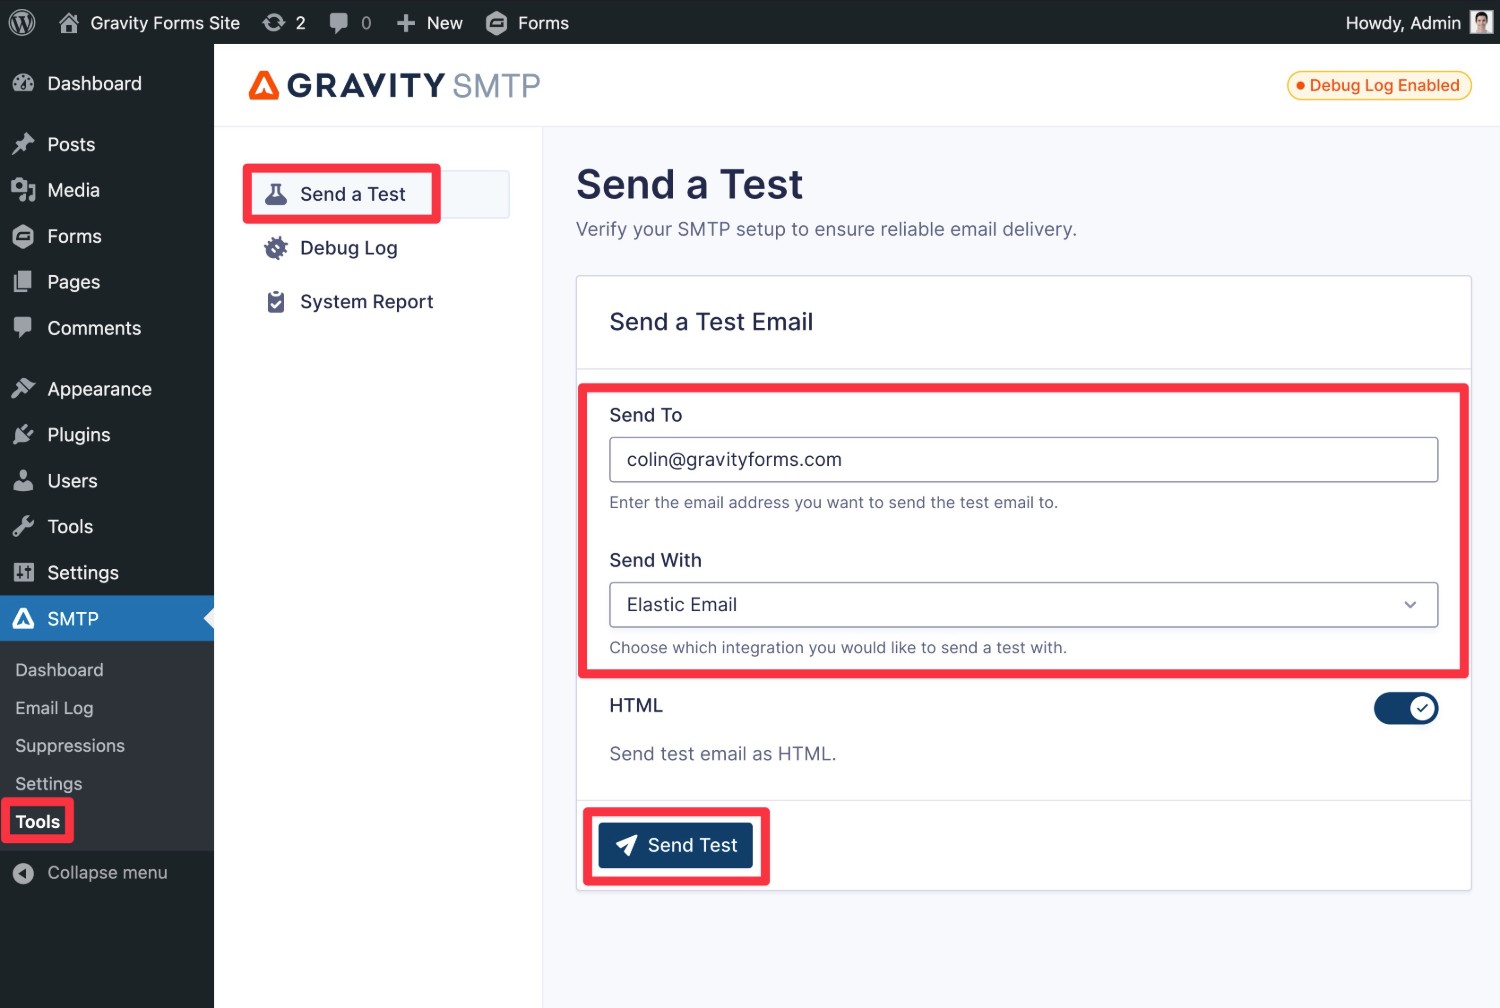
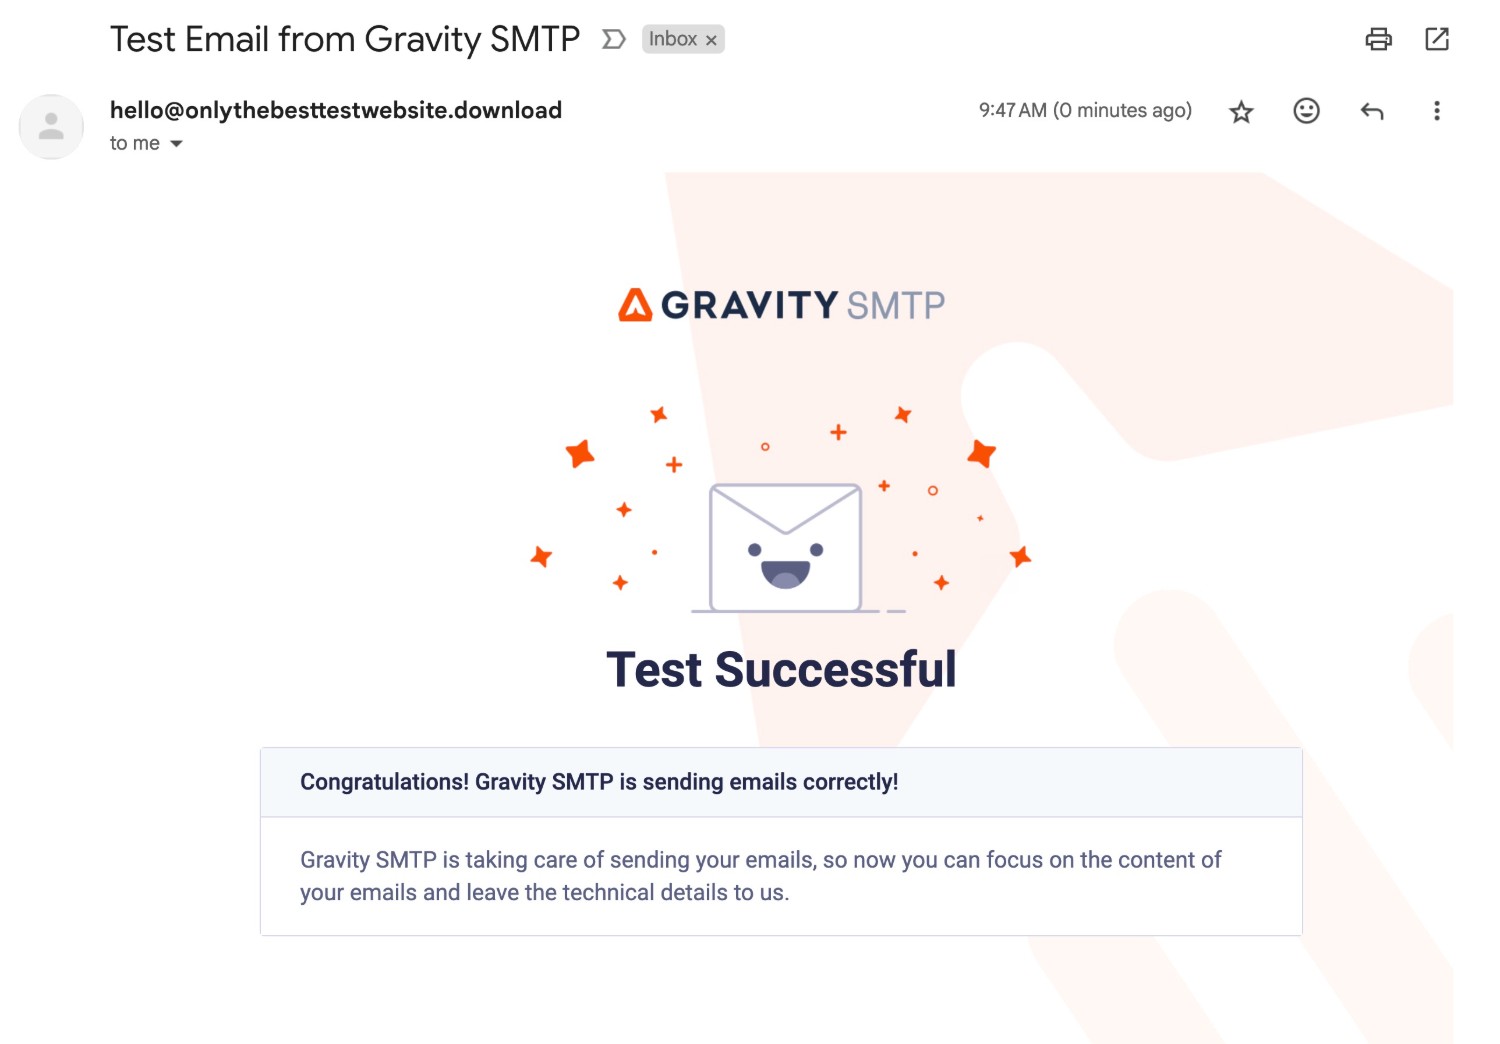
After clicking Send Test, you should see an “Email Sent Successfully” message appear in the interface. If you open your email inbox, you should also see an email that looks something like this:
If the email fails to send or you don’t see it in your inbox, here are a few things to check:
- Make sure you entered the correct API key and that the API key has the Plugin permissions.
- Ensure your From Email is an email address that you authenticated with Elastic Email – this could be any email address on your domain name for domain authentication or the exact email address for single email authentication.
- If you’re using the free plan, make sure you send the test email to the exact email address that you used to register for Elastic Email.
7. Set up a backup email sending service and alerts (optional)
At this point, your site is already configured to send all of its transactional emails using Elastic Email, so this next step is 100% optional.
However, Gravity SMTP includes some additional features that you might want to set up to be able to keep your site’s transactional emails working if Elastic Email were ever to experience issues.
First, Gravity SMTP lets you set up real-time alerts so that you can be notified immediately if emails are failing to send via Elastic Email:
Additionally, Gravity SMTP lets you set up a backup email sending service. If an email ever fails to send via Elastic Email for any reason, Gravity SMTP can automatically resend that email using your backup service.
If you want to use a backup email sending service, you’ll first need to connect Gravity SMTP to that service. Here are guides for most of the direct API integrations that Gravity SMTP supports, but there’s also a custom SMTP option:
- SendGrid
- Mailgun
- Postmark
- Brevo
- Amazon SES
- Gmail/Google Workspace
- Outlook/Microsoft 365
- Mailchimp Transactional
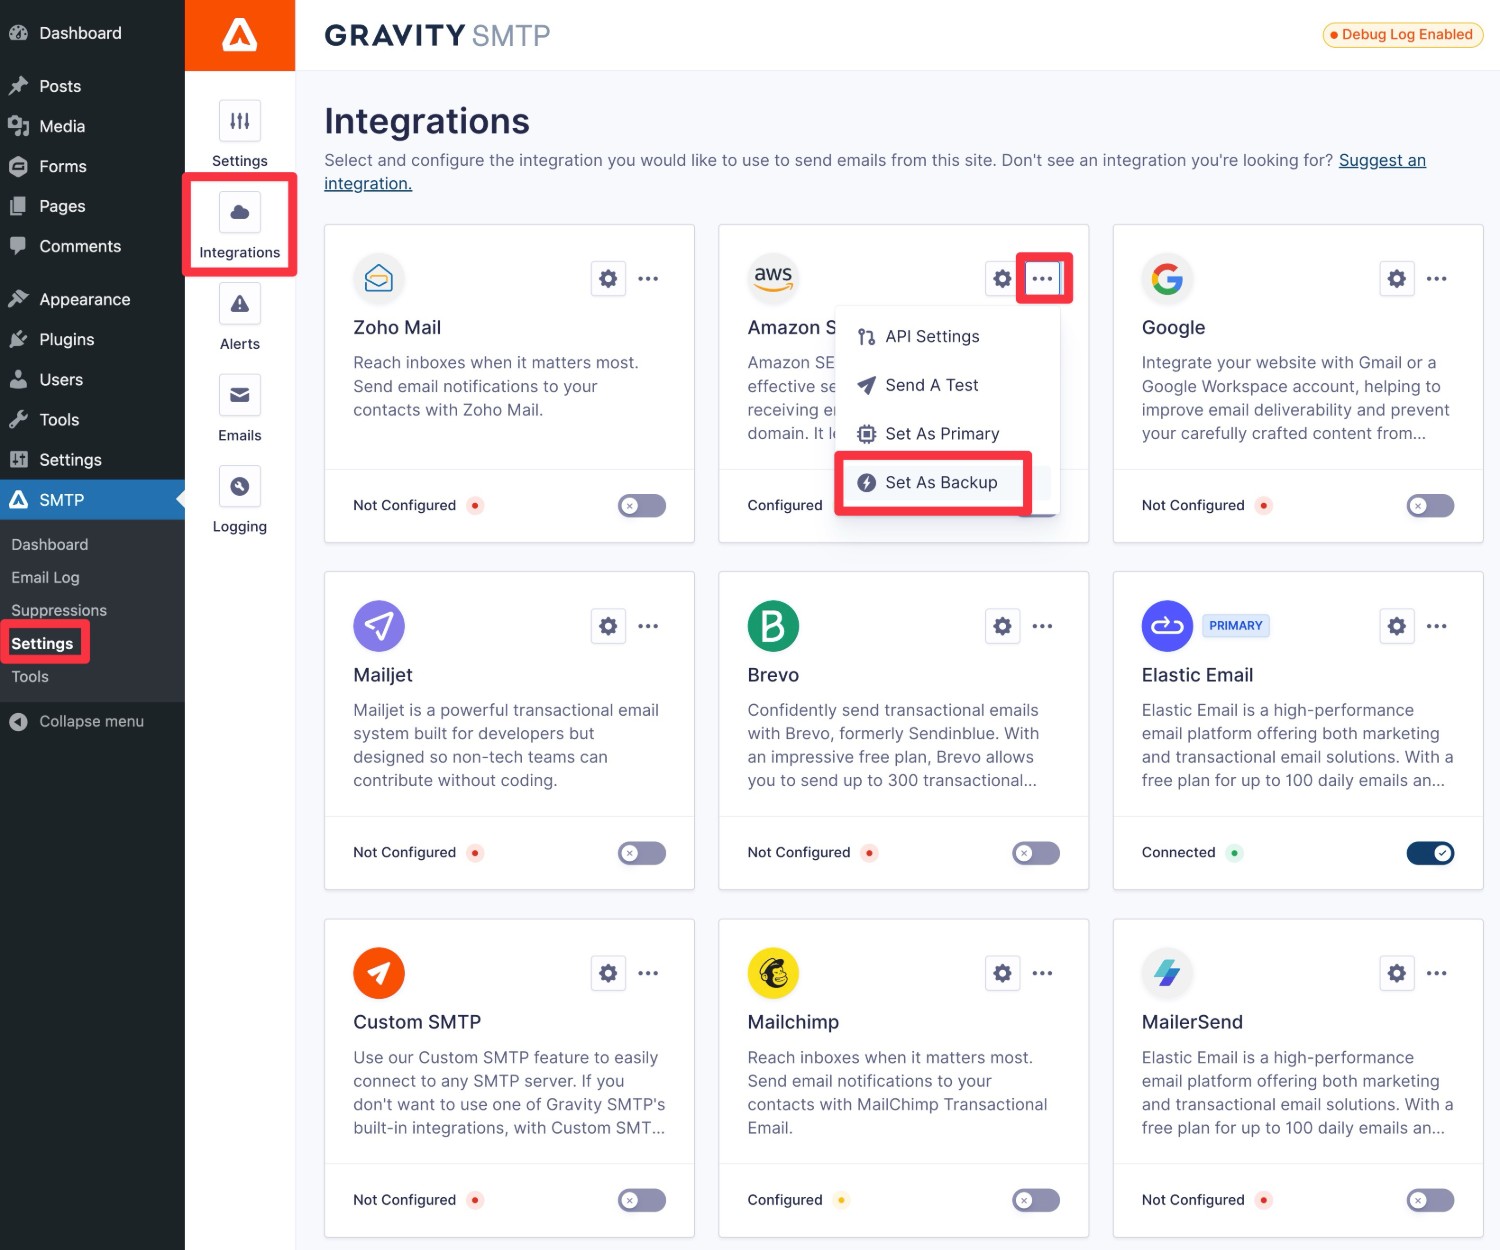
Once you’ve done that, click the three dots icon for the service in the Integrations list. Then, choose the Set as Backup option.
How to monitor your site’s email usage
In addition to its real-time alerts functionality, Gravity SMTP also includes some in-dashboard tools to help you monitor your site’s email usage.
First, you can access high-level reports by going to SMTP → Dashboard.
You can also access a detailed log of each individual email that your site has sent, along with technical information and the content of each email.
You can also fully adjust or disable the logging functionality by going to SMTP → Settings → Email Log.
Get started with WordPress Elastic Email today
If you want to use Elastic Email for WordPress transactional emails, the Gravity SMTP plugin offers an easy solution.
Not only does Gravity SMTP let you connect directly via the Elastic Email API, you’ll also be able to access other helpful features such as real-time email problem alerts, reports/logging, and backup email sending services.
Gravity SMTP is currently available for free to Elite and Nonprofit license holders, so you can either purchase your license or download from your My Account page to get started.
Set up Gravity SMTP and Elastic Email today and enjoy more reliable WordPress transactional emails.

If you want to keep up-to-date with what’s happening on the blog sign up for the Gravity Forms newsletter!

