Ditch the spreadsheets: How to build a custom application tracker with Gravity Forms and GravityKit
Written by the Editorial Team at GravityKit…
In this step-by-step tutorial, we’ll show you how to build a sleek, no-code application management system using Gravity Forms, GravityView, and (optionally) GravityBoard.
From collecting submissions to tracking statuses and automating notifications, you’ll have everything you need to streamline your application process. And the best part? It all happens right from the front end of your WordPress site.
Sneak peek
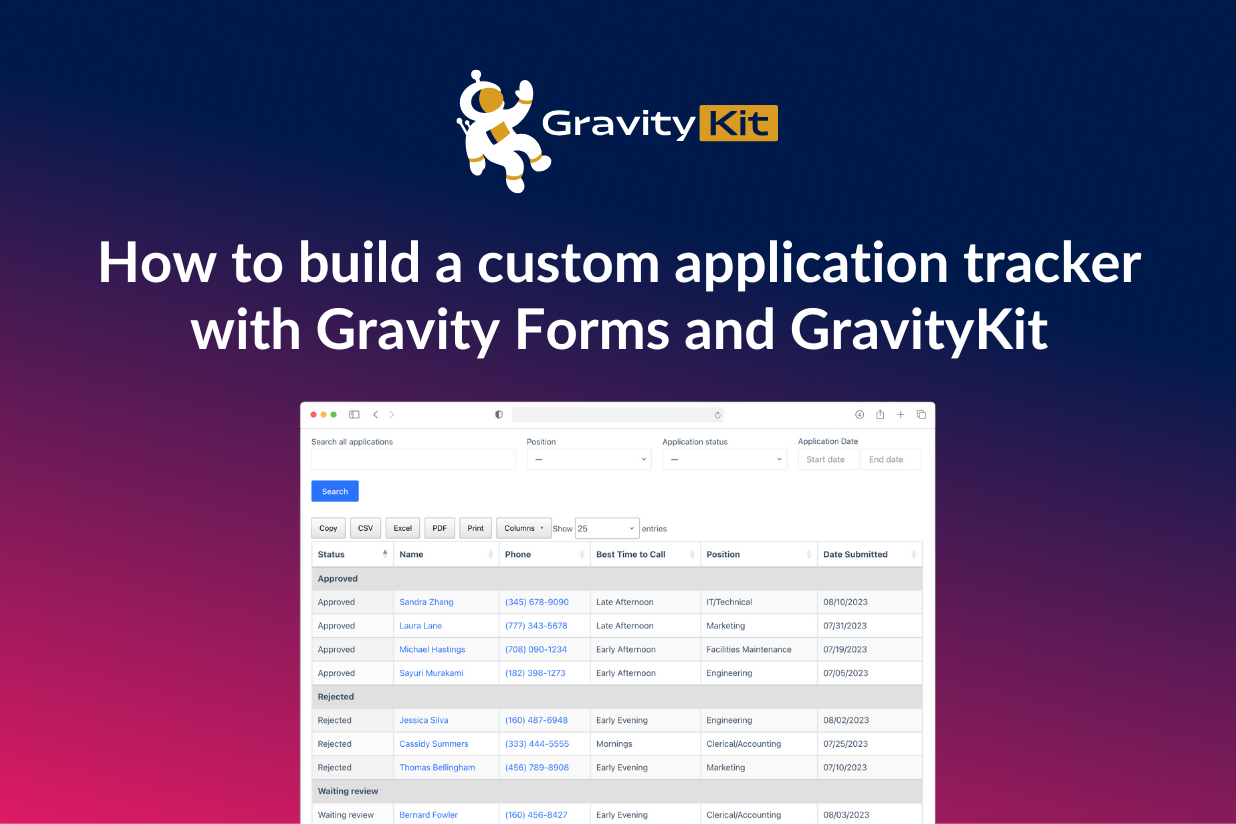
In this tutorial, we’ll be creating a system for managing employment applications. Here’s a sneak peek at the final result:
![]()
Want to try it out for yourself? You can check out the live demo here.
Step 1: Create the application form
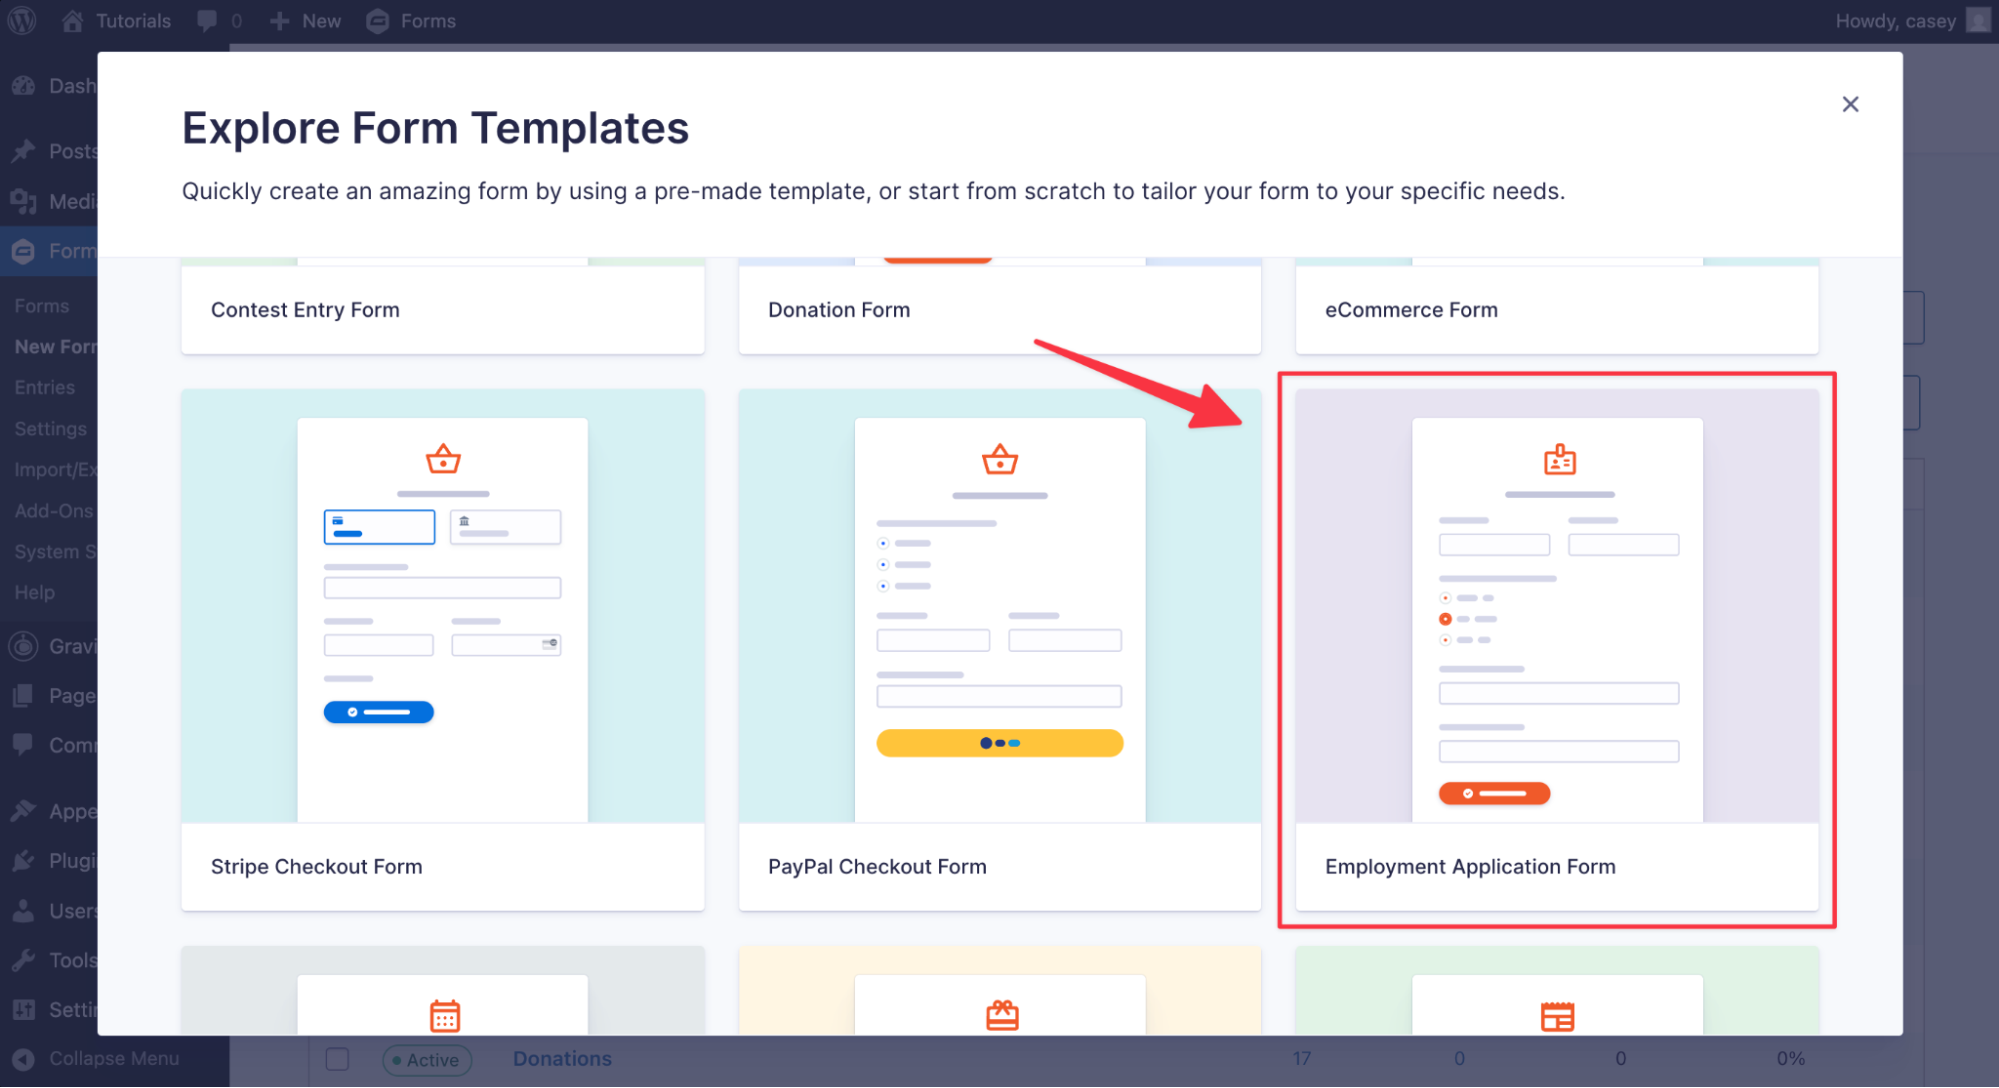
The first thing we need to do is create a job application form that we can embed on our site. To do this, we’ll hover over Forms, click New Form and select the Employment Application Form template.
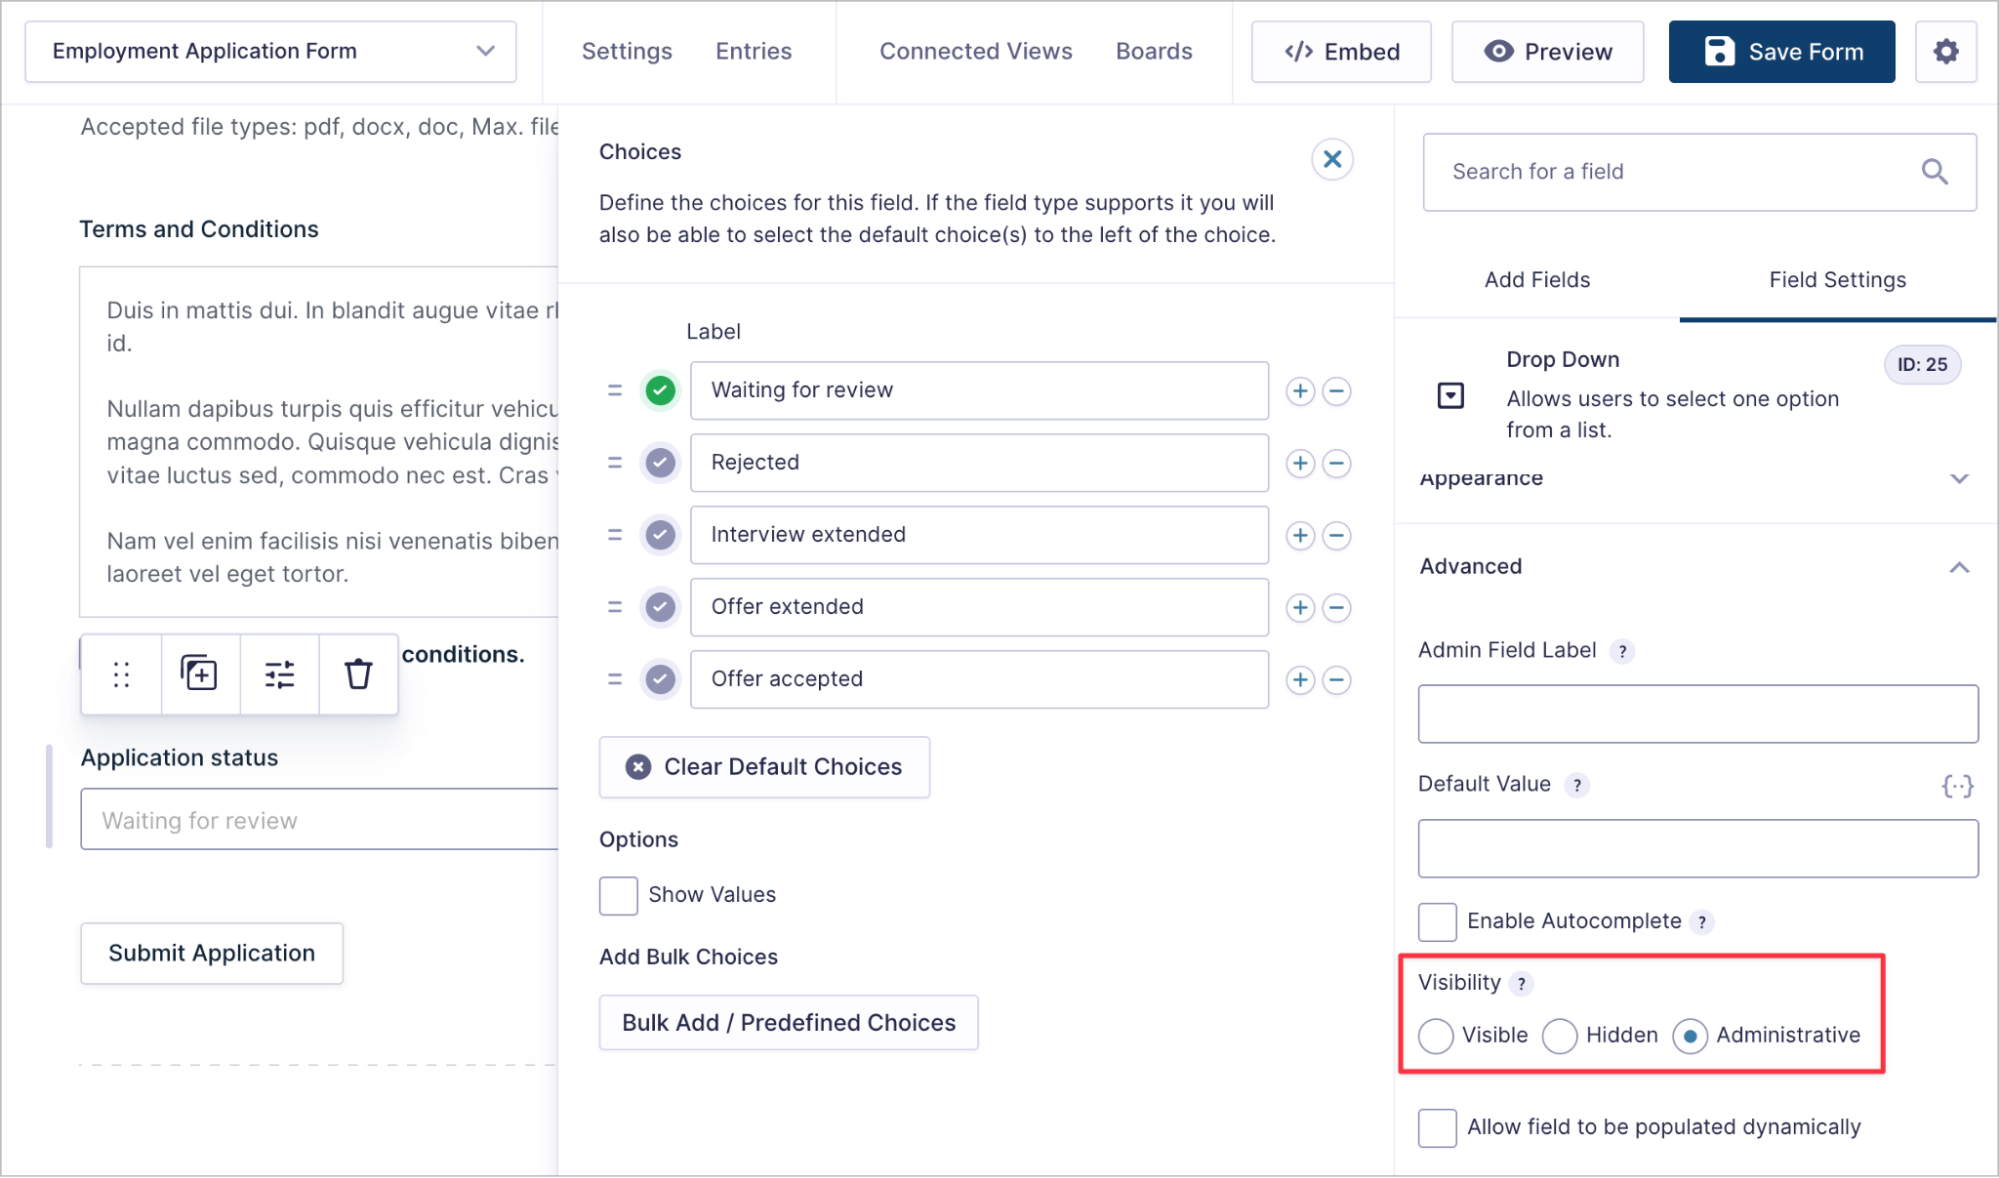
Now we can customize the form by adding/removing fields. For example, let’s add a new Drop Down field called Application Status with the following values:
- Waiting for review (selected by default)
- Rejected
- Interview extended
- Offer extended
- Offer accepted
This field will only be used for hiring managers to track applications, so we’ll set the visibility to Administrative. This will ensure that the field does not add user facing functionality but still captures data and is visible to hiring managers.
After configuring our form, we can embed it on a page using a shortcode or Gutenberg block.
Now that we have a way for users to apply to job postings, the next step is to create a system for managing these applications.
Step 2: Build a front-end application dashboard
Using GravityView, we can create a front-end dashboard for managing new applications. The dashboard will enable hiring managers to:
- Manage applications without needing backend access to the site.
- Track and update the status of all applications.
- Download applicant resumes and review application information.
- Export information to Excel or PDF.
- Easily search, sort and filter applications by status or other values.
Creating a new View
To create a new View, we’ll hover over GravityKit and click New View. After giving our view a name (“Employment Applications View”), we’ll select our Employment Applications Form as a data source and choose DataTables Table as the View type.
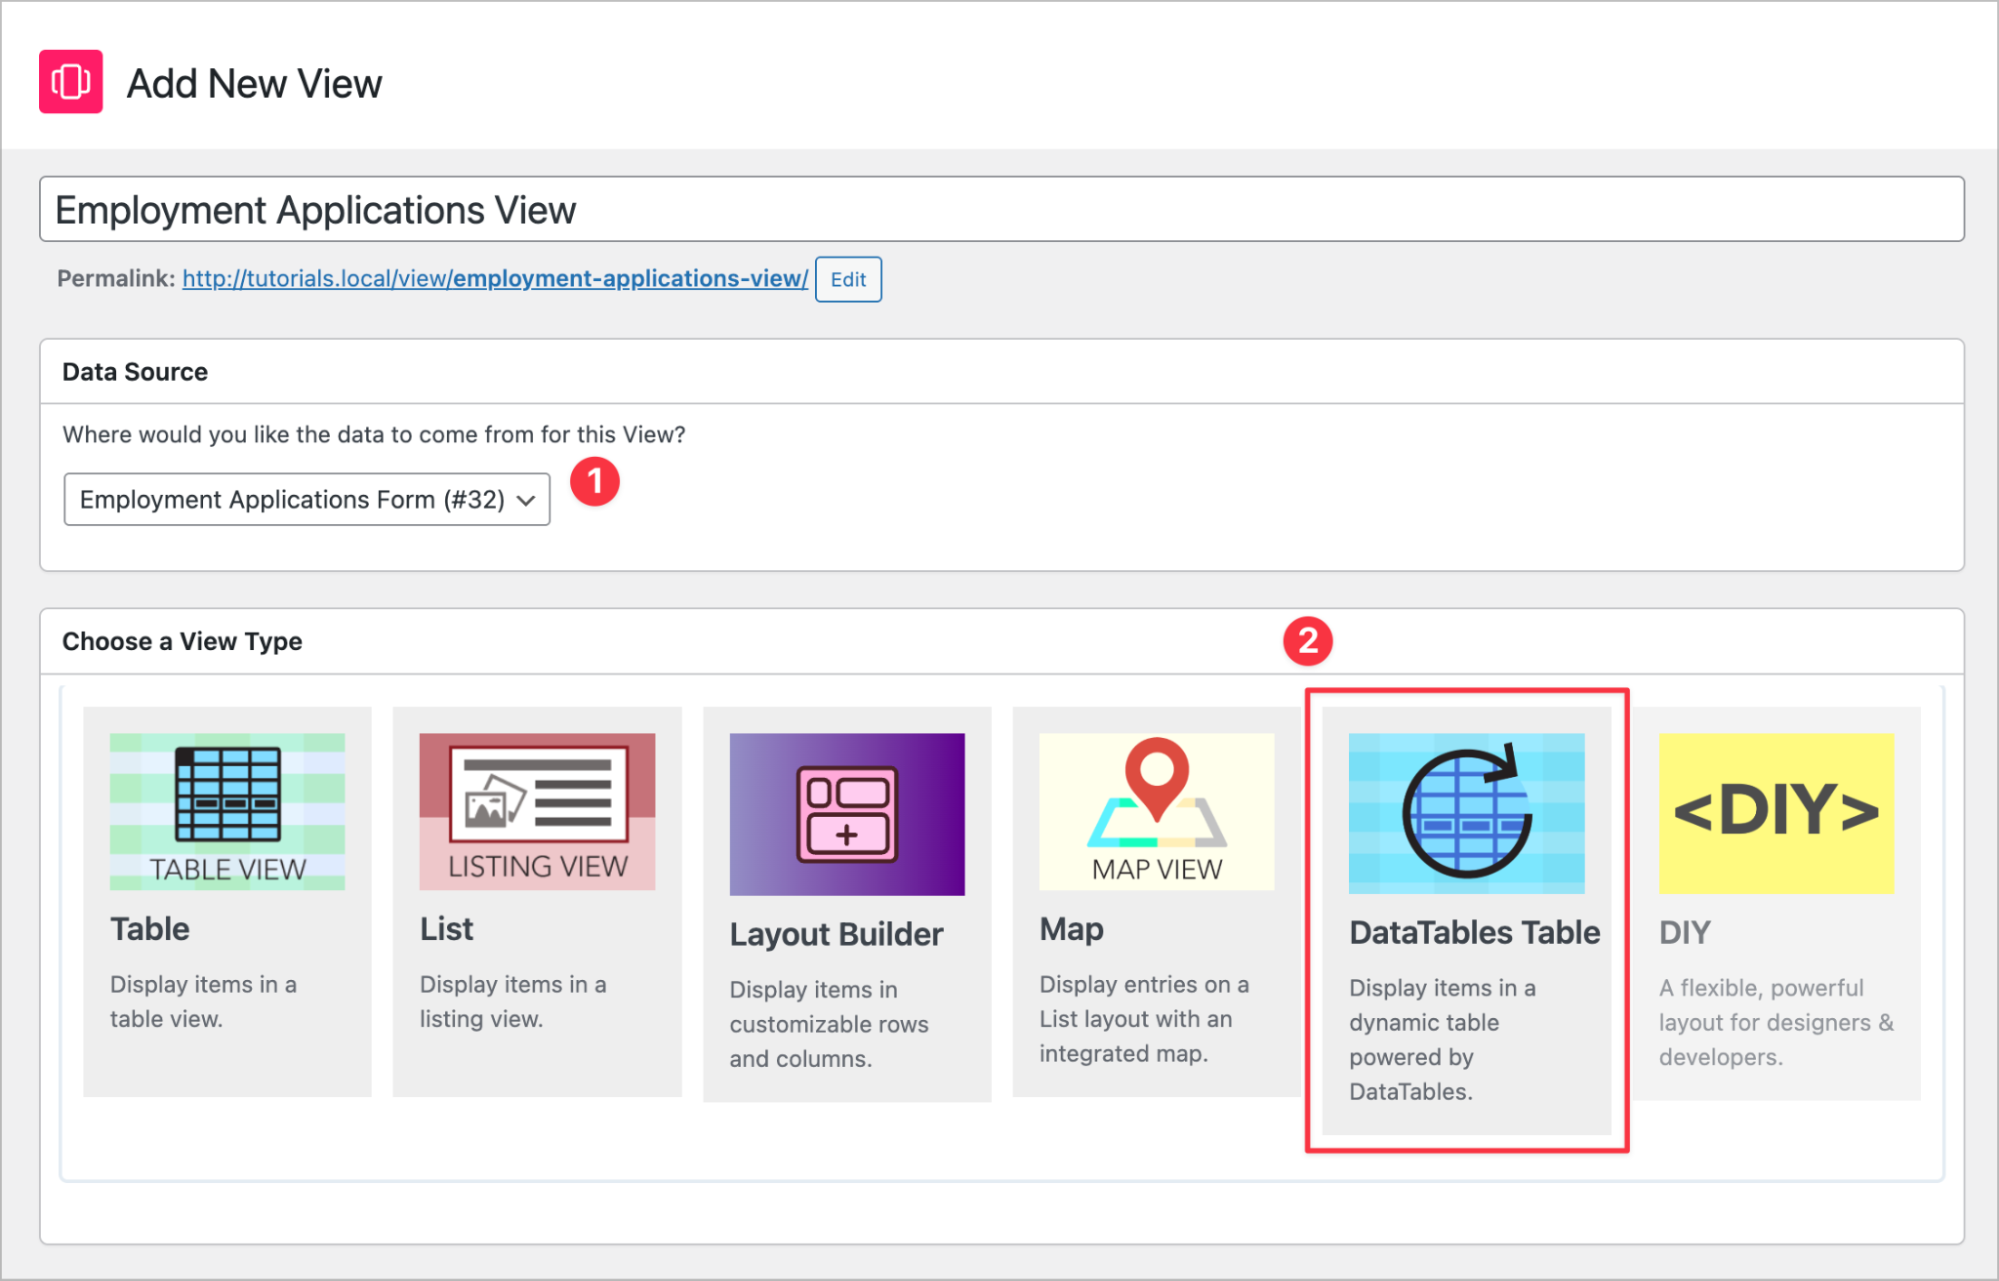
In GravityView, View types control how form data is displayed. In this case, DataTables is the best fit for what we need as it includes built-in search, filtering and exporting. This makes it easy to navigate and review applications quickly.
Now we can configure the View, starting with the Multiple Entries layout. This is the main table where all submitted applications will appear. Here, we’ll add a search bar widget enabling hiring managers to search and filter applications by field value.
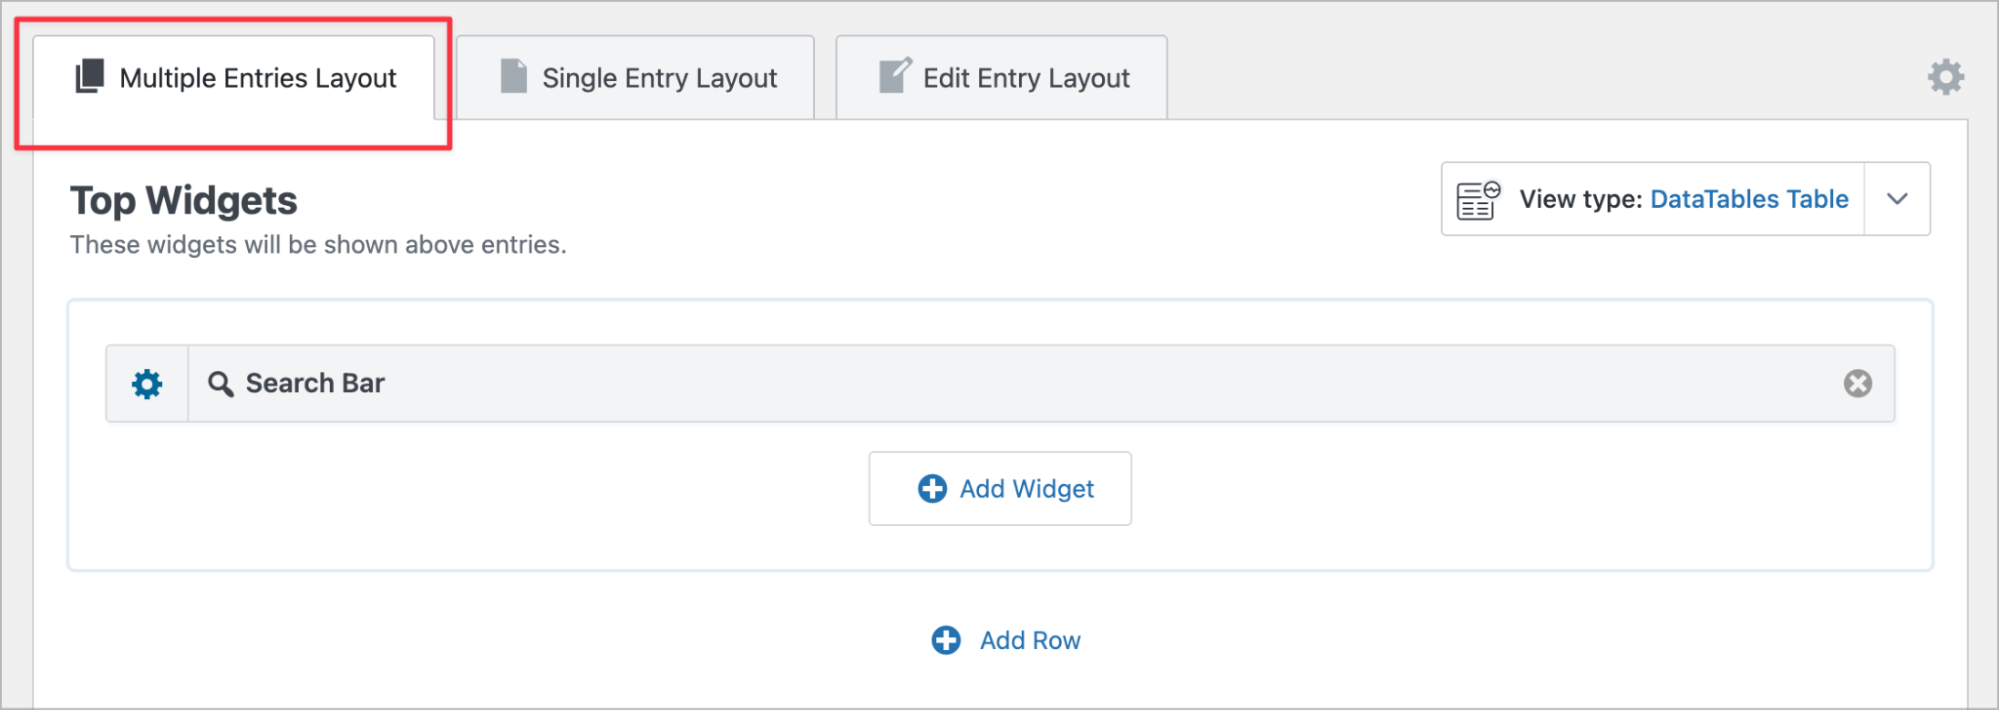
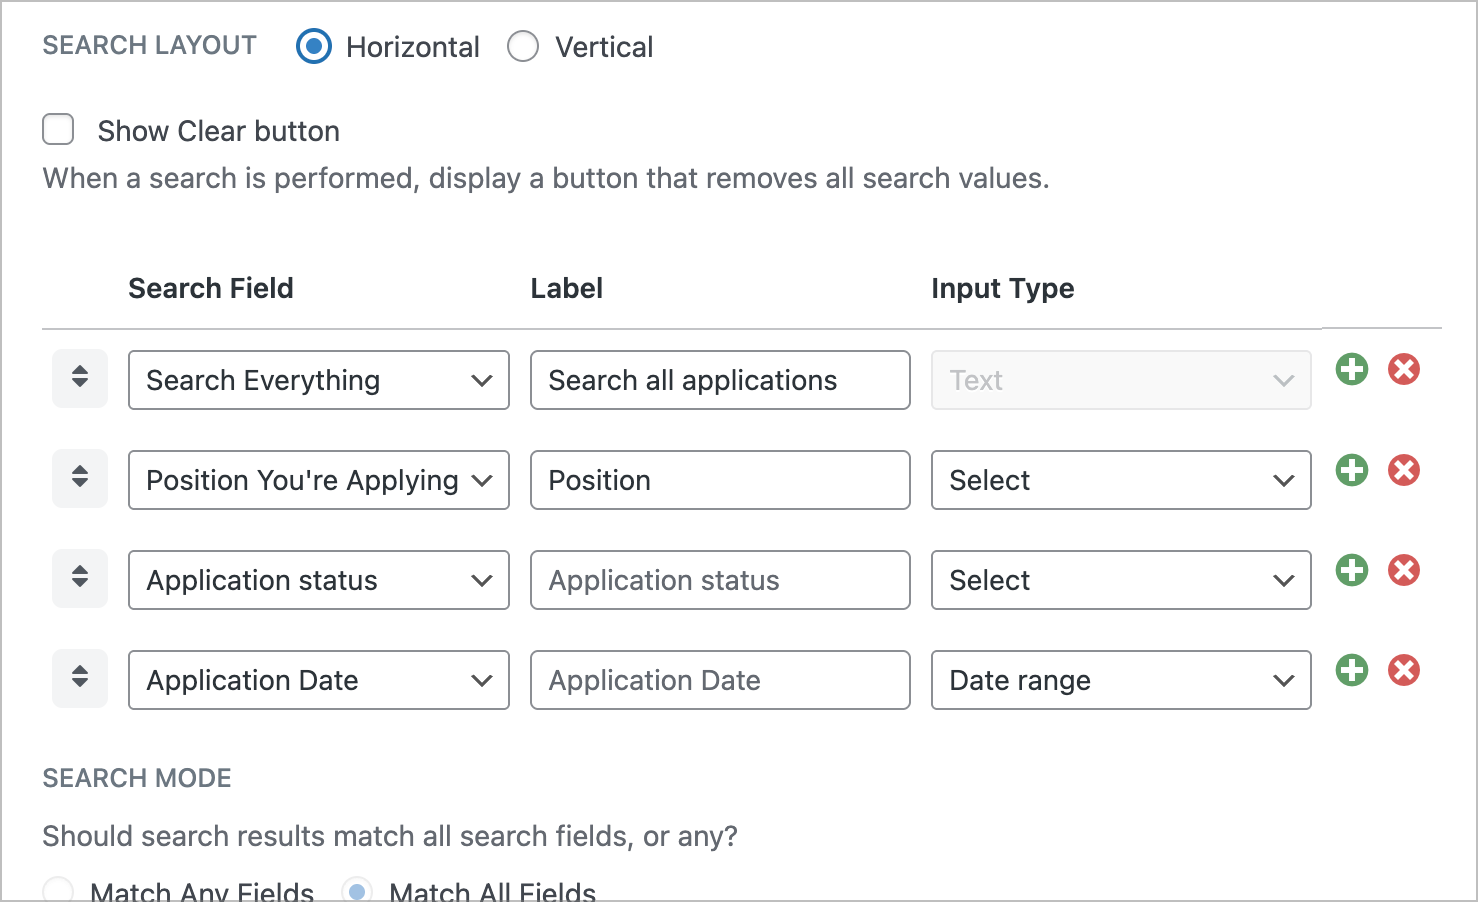
Click the gear icon to configure the search settings, add additional input fields, and customize the way searches are performed.
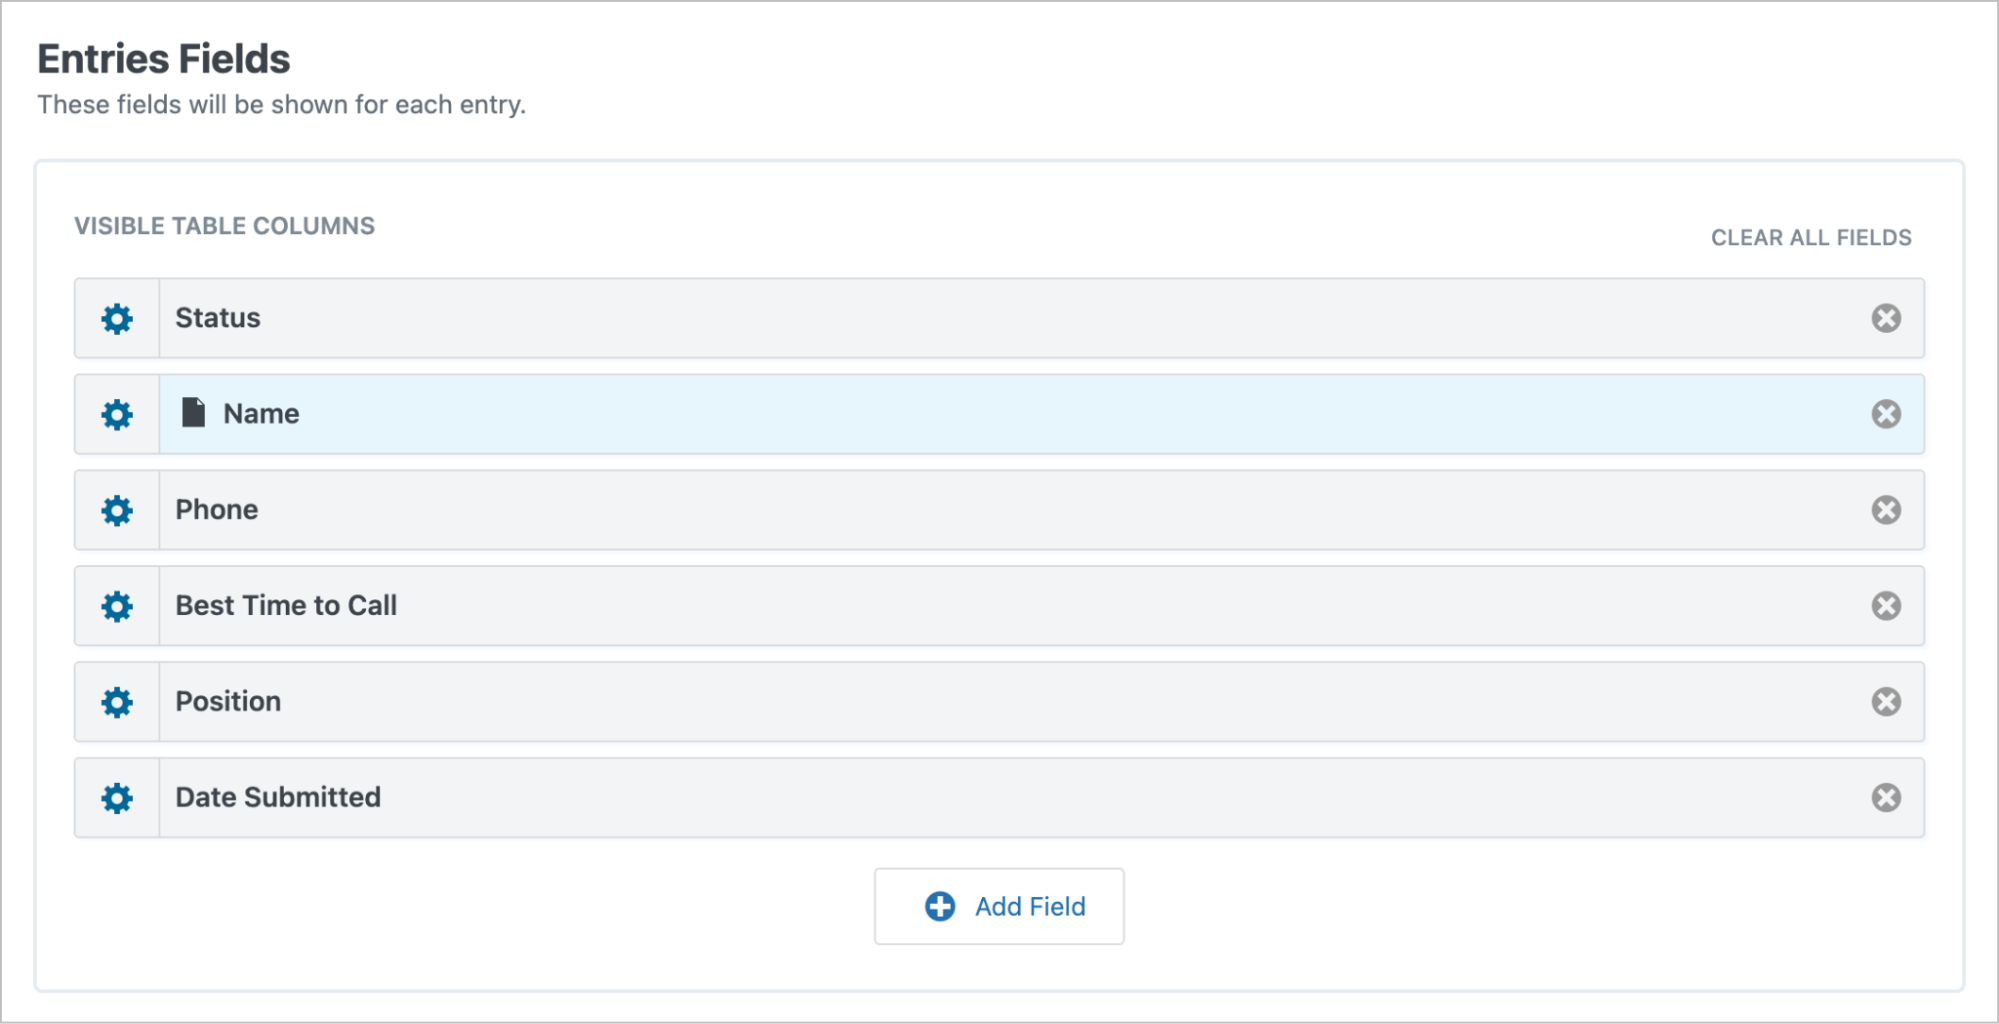
Next, we’ll scroll down to the Entries Fields section of the View editor. Here, we’ll choose which fields to display and arrange them in the order that makes the most sense for reviewing entries at a glance.
Let’s add the following fields:
- Status
- Name
- Phone
- Best Time to Call
- Position
- Date Submitted
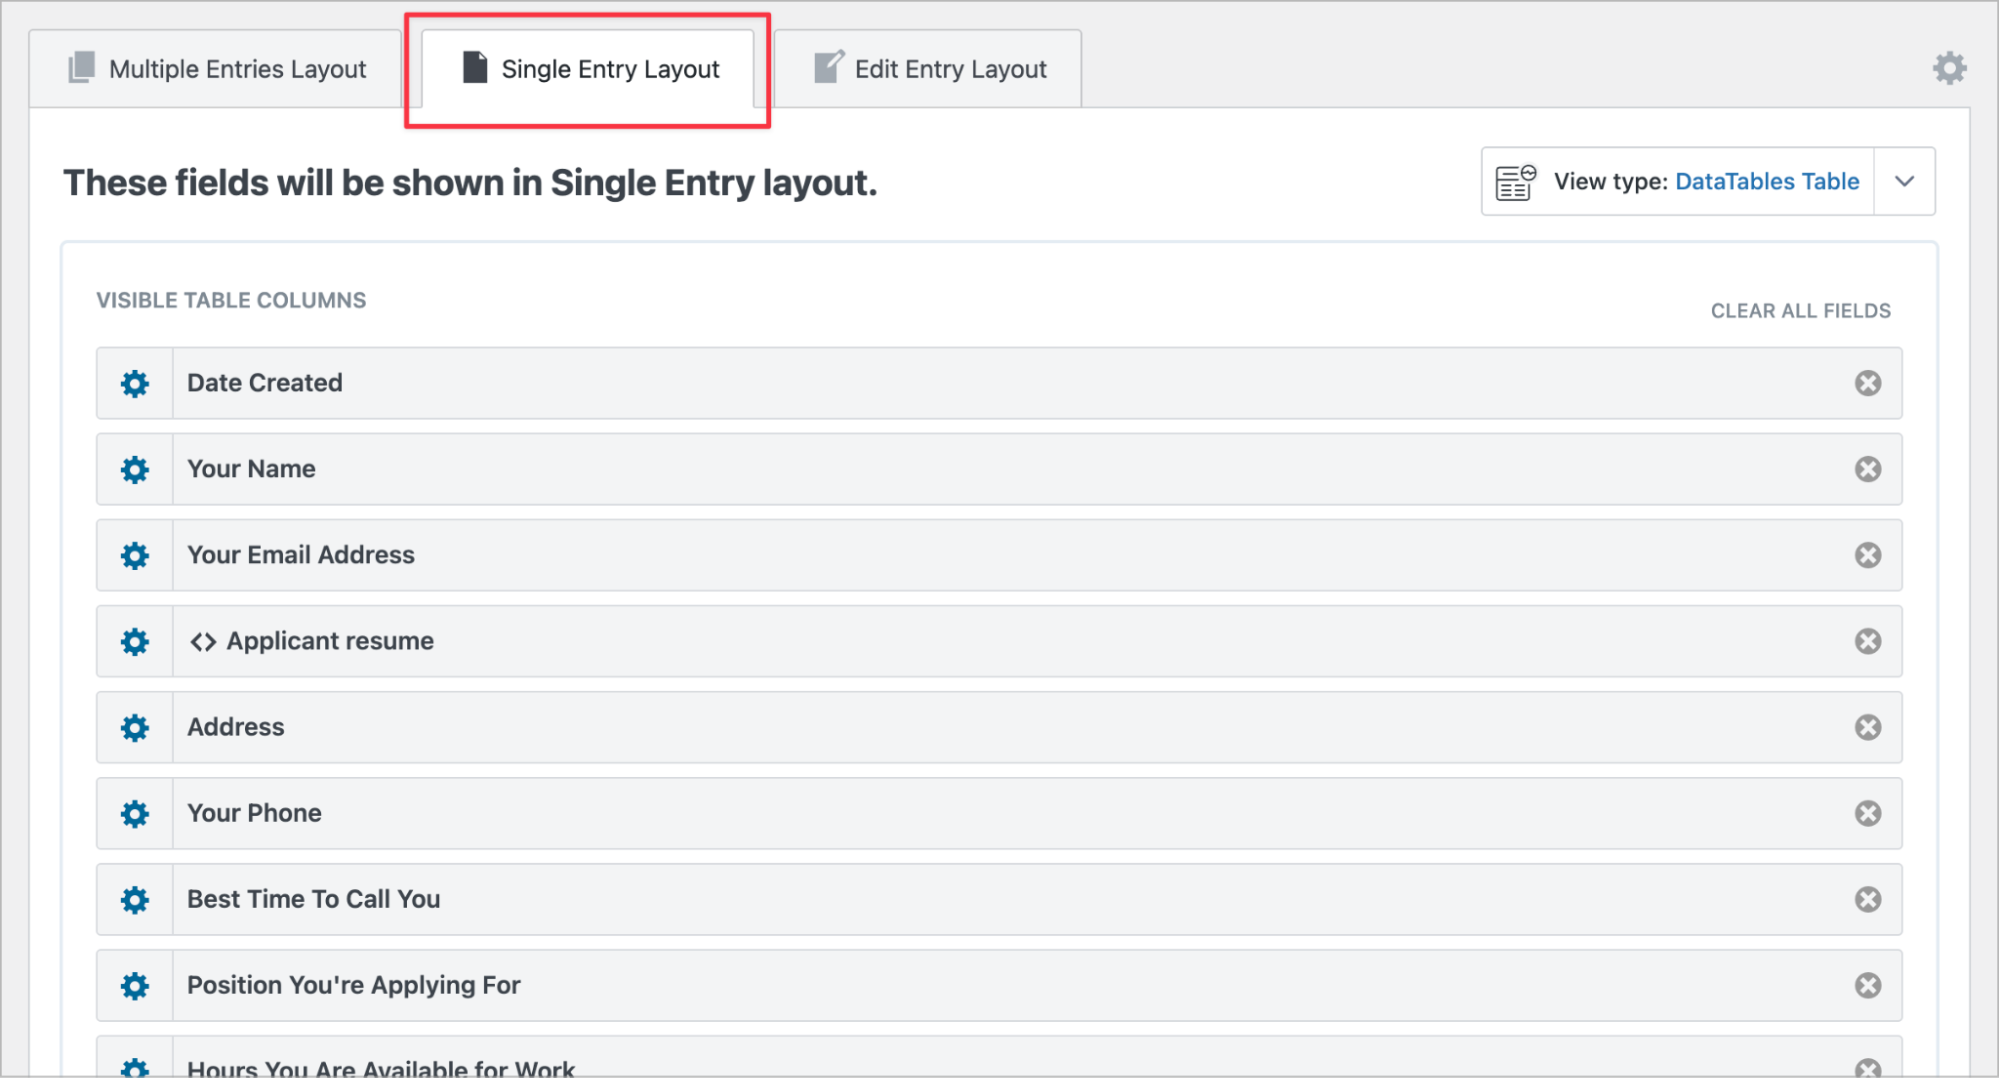
Now let’s turn our attention to GravityView’s Single Entry layout. This is the template for displaying data about a single job application.
Configuring the Single Entry layout
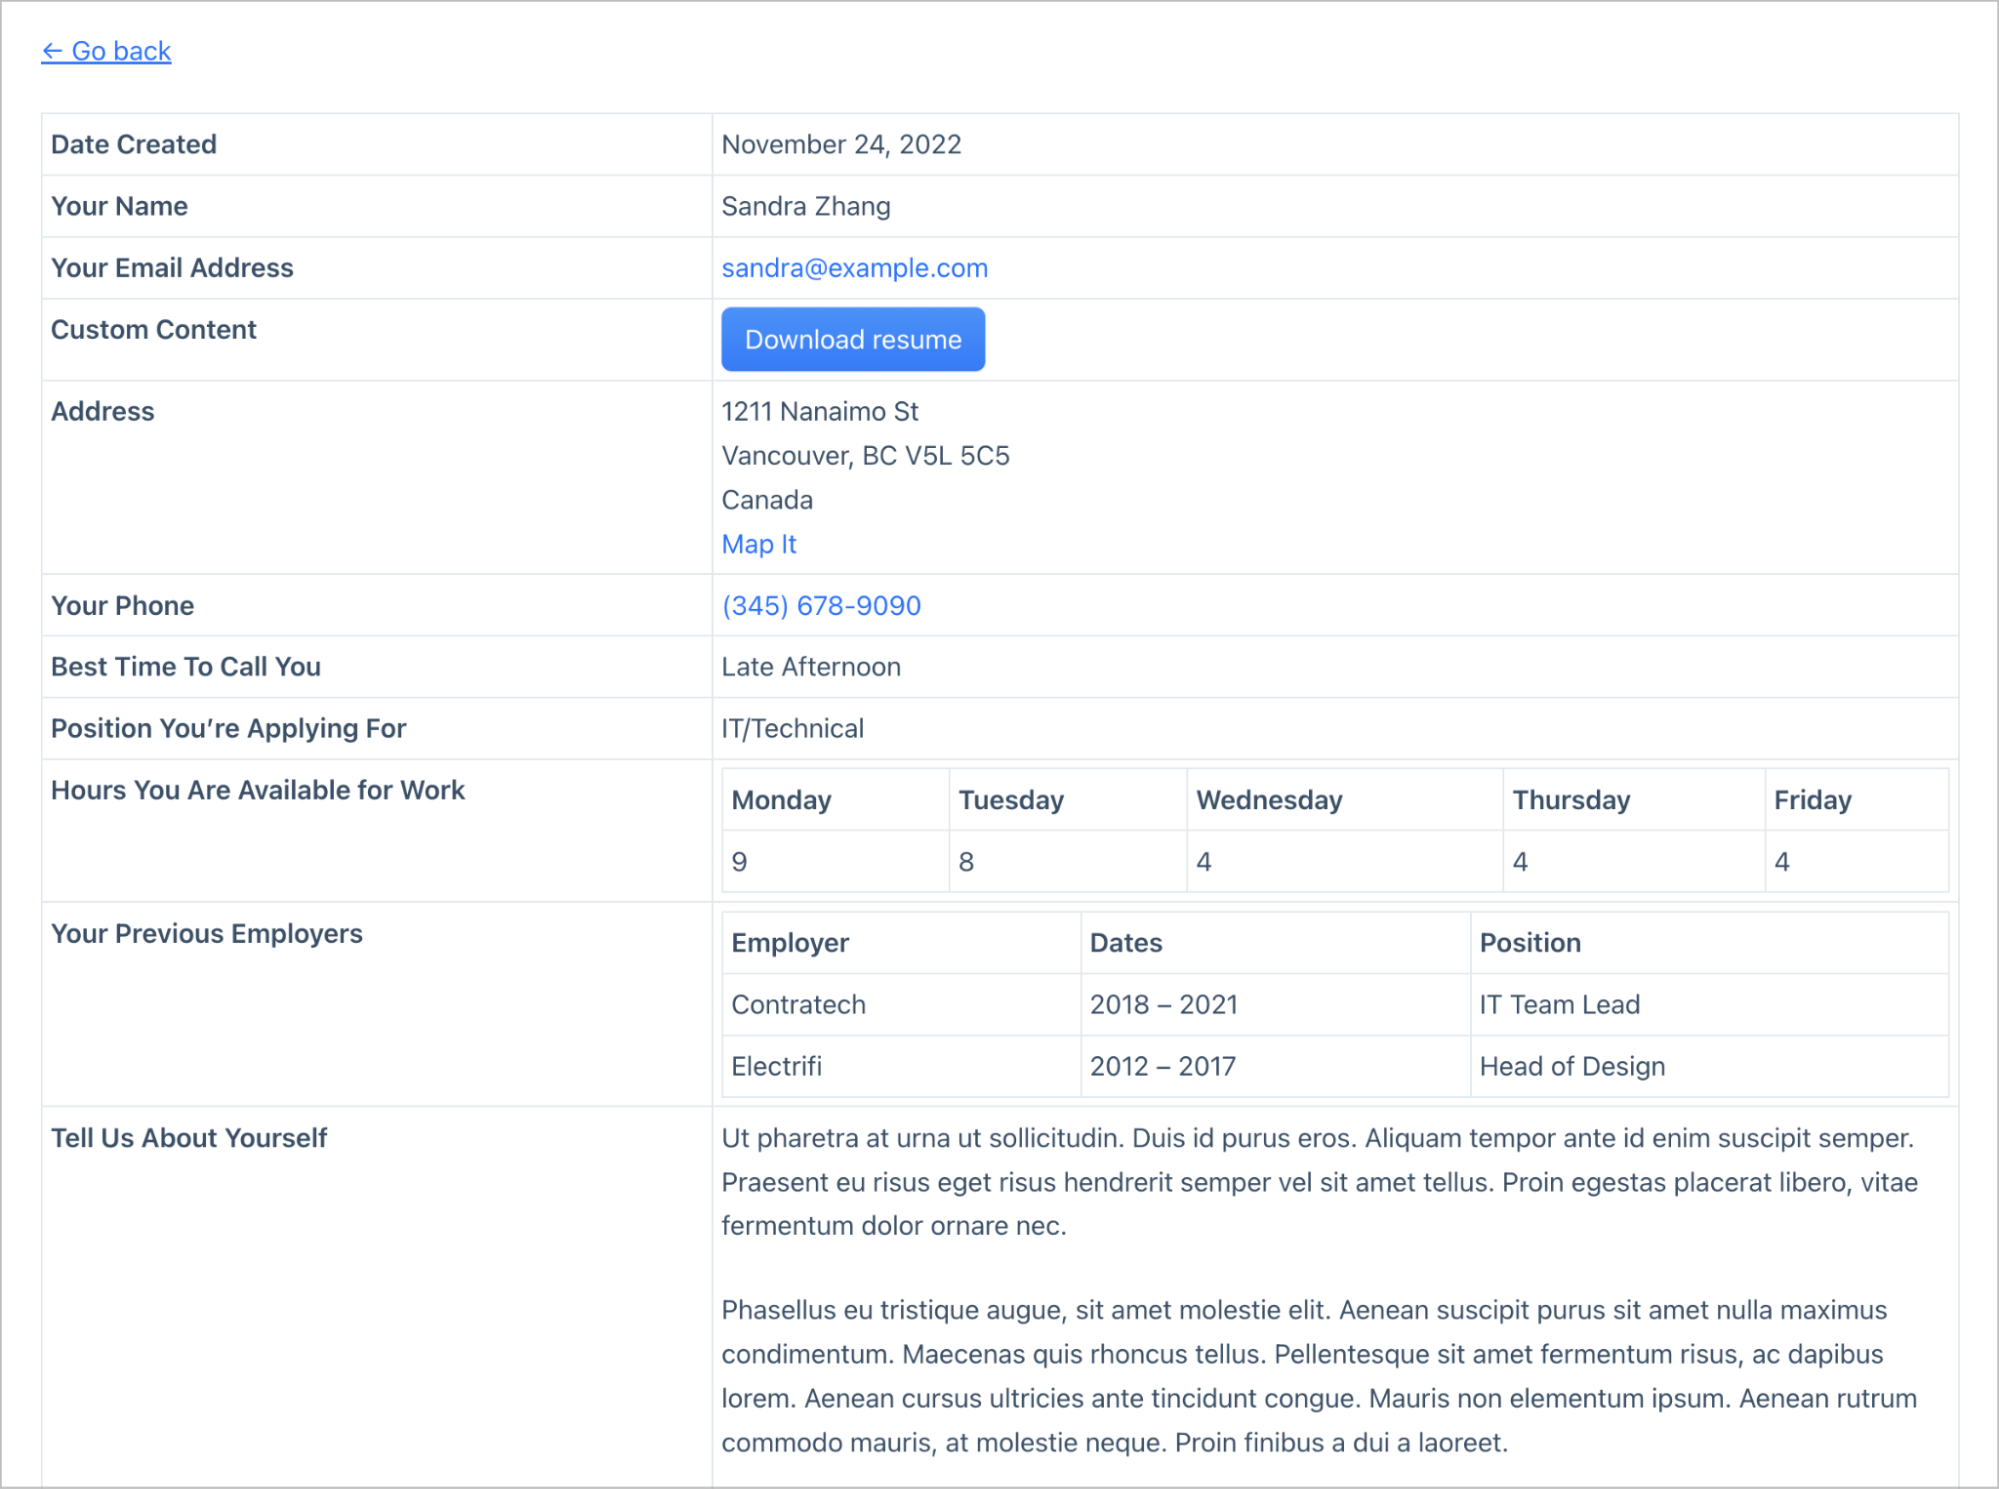
In the Single Entry layout tab, we’ll add all the additional fields that provide more context about each applicant. For example, their name, contact details, address, resume, and bio.
Configuring the DataTables settings
After adding a search bar and selecting the fields we want to display, there are a few options we need to configure in the settings.
First, we’ll enable buttons to allow users to easily copy, print, or export the table data to CSV, Excel or PDF. This is especially useful for HR teams who need to share or archive application data.
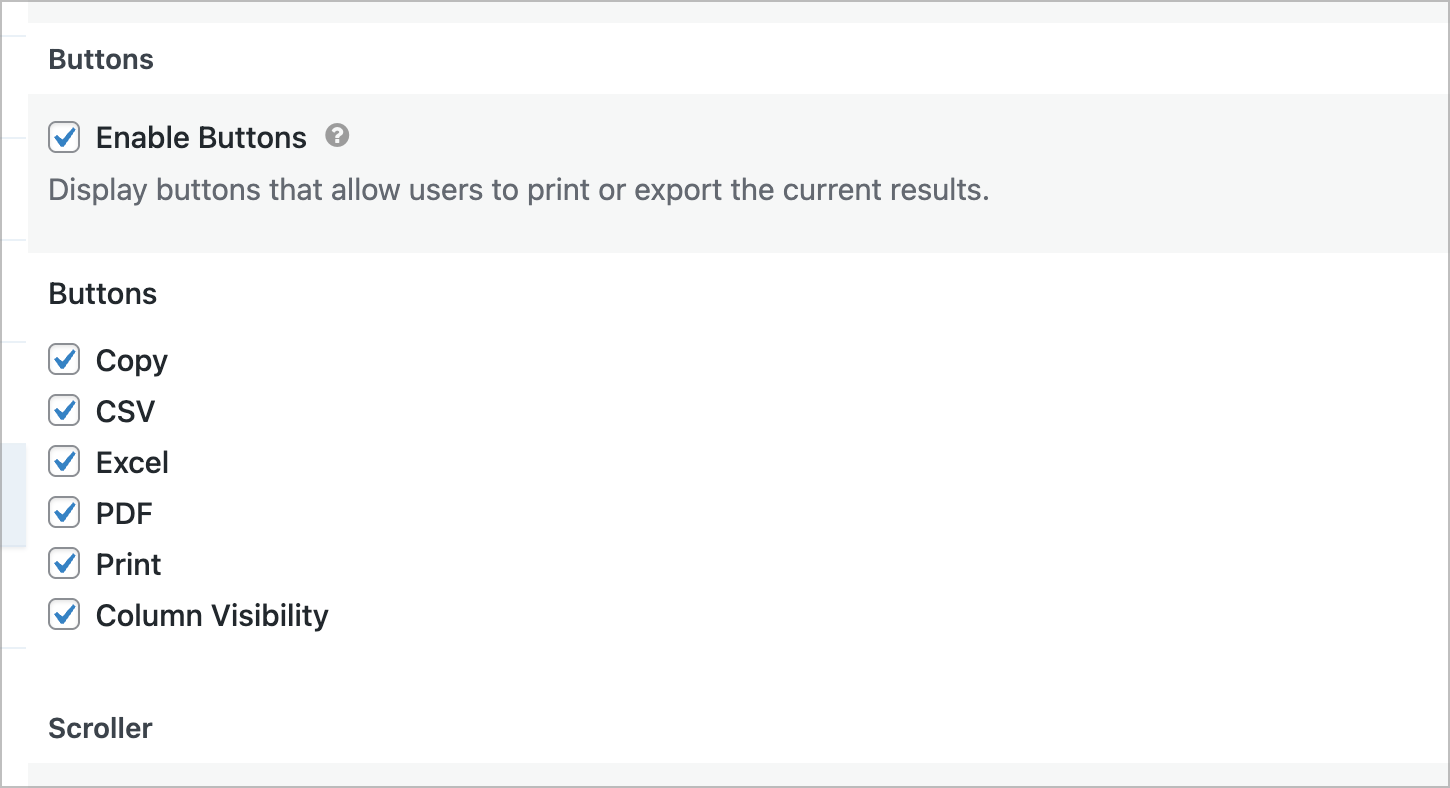
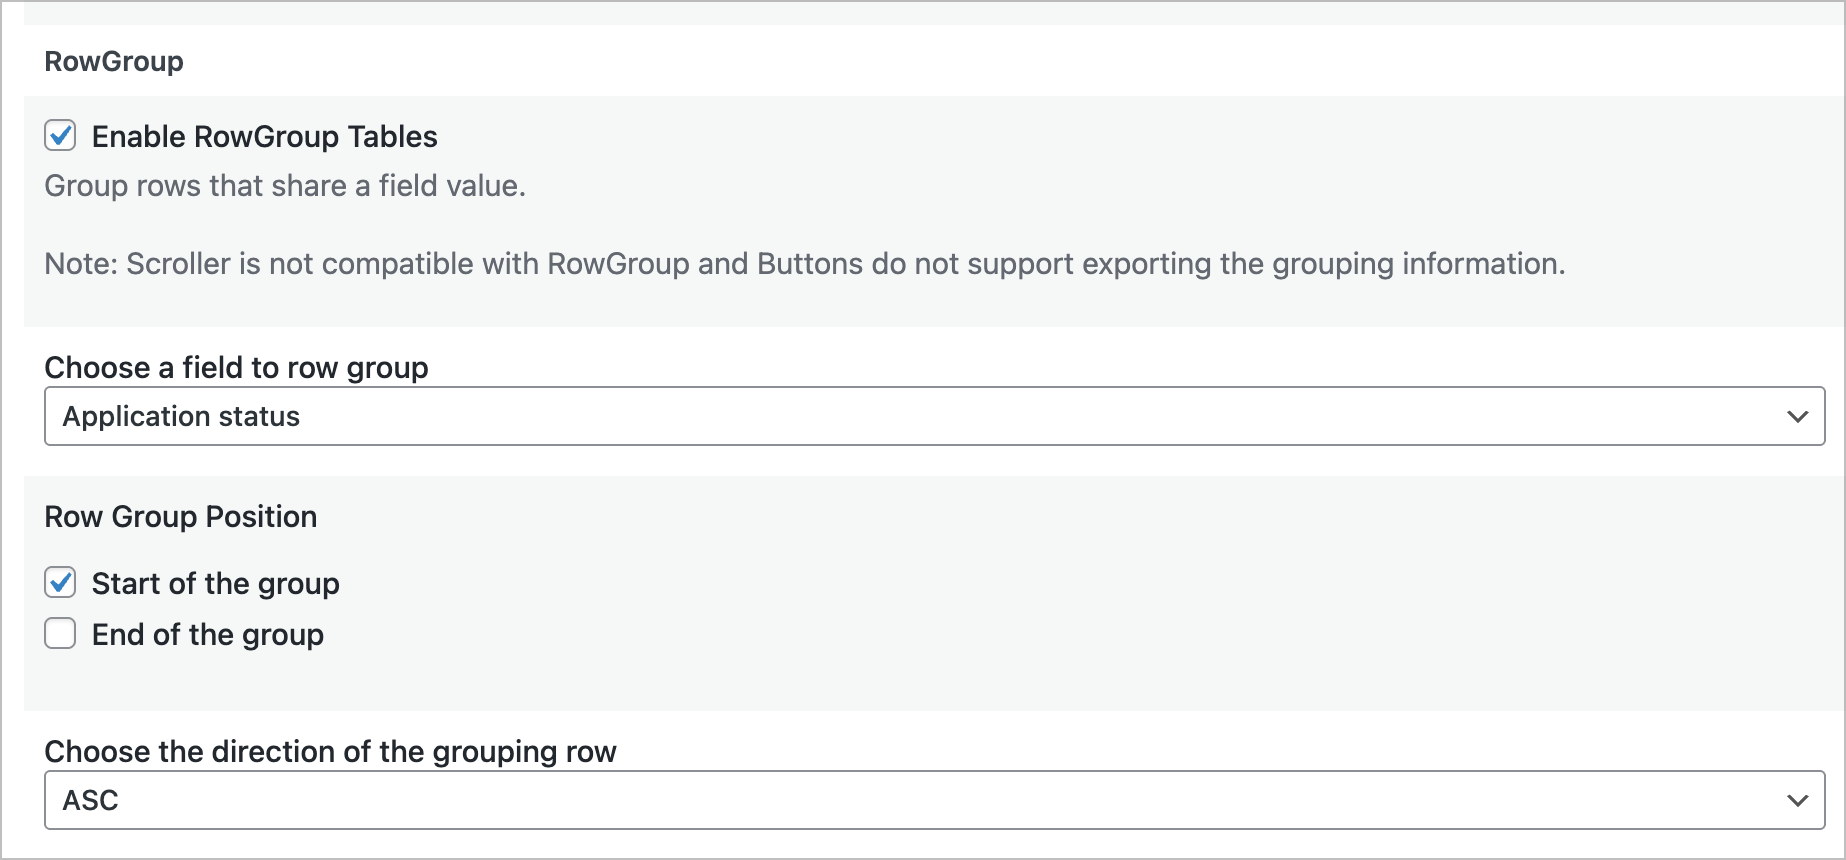
Next, we’ll enable Row Grouping by application status. This organizes the table by status, making it easier to scan and manage applications based on where they are in the hiring process.
Here’s what our finished View looks like on the frontend:
![]()
By clicking on the name field, hiring managers will be able to see additional information about that particular application:
Step 3: Make applications editable
To enable hiring managers to update application statuses directly from the frontend, click on the Edit Entry layout tab and add the Status field here. This gives managers the control they need without letting them edit sensitive or unnecessary information.
You could also include other relevant fields such as internal notes, or interview outcomes. If you want to do this, it’s best to ensure they are Administrative fields.

Step 4: Automate notifications and status updates
Next, we’ll create several notifications in Gravity Forms to keep both hiring managers and applicants in the loop.
GravityView adds several new triggers, allowing us to send notification emails when entries are updated. And with conditional logic, we can control exactly who receives these emails.
Here’s an example:
First, we’ll go to the Form Settings and click on Notifications. Next, we’ll fill out the following important details:
- Name: Name the notification for your reference.
- Event: Select an event that will trigger the notification. Let’s choose GravityView – Entry is updated.
- Send To: We’ll choose Select a Field and then choose the Email field in our form.
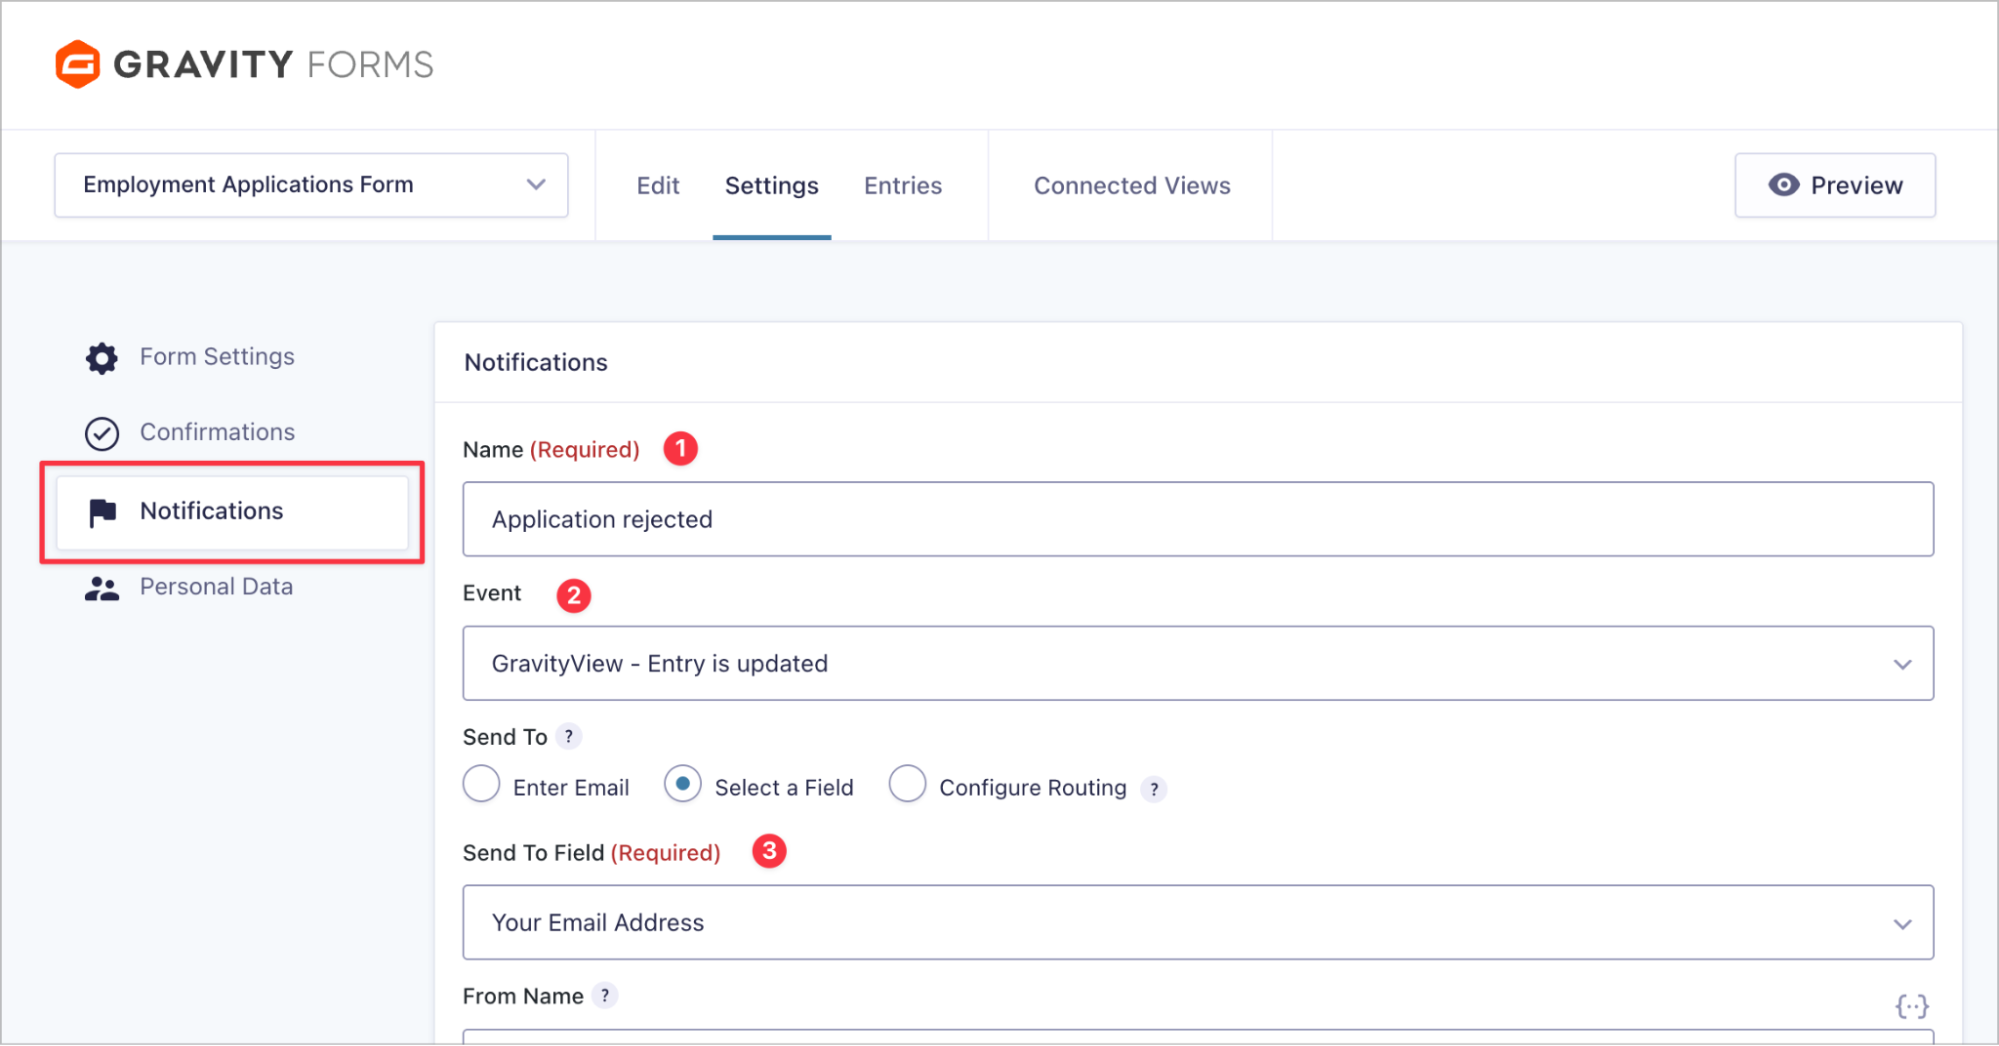
Here’s the most important part: We’ll add a conditional logic filter to make sure the notification only sends when the application status is set to “Rejected.” This ensures applicants only get this message if their application was unsuccessful.
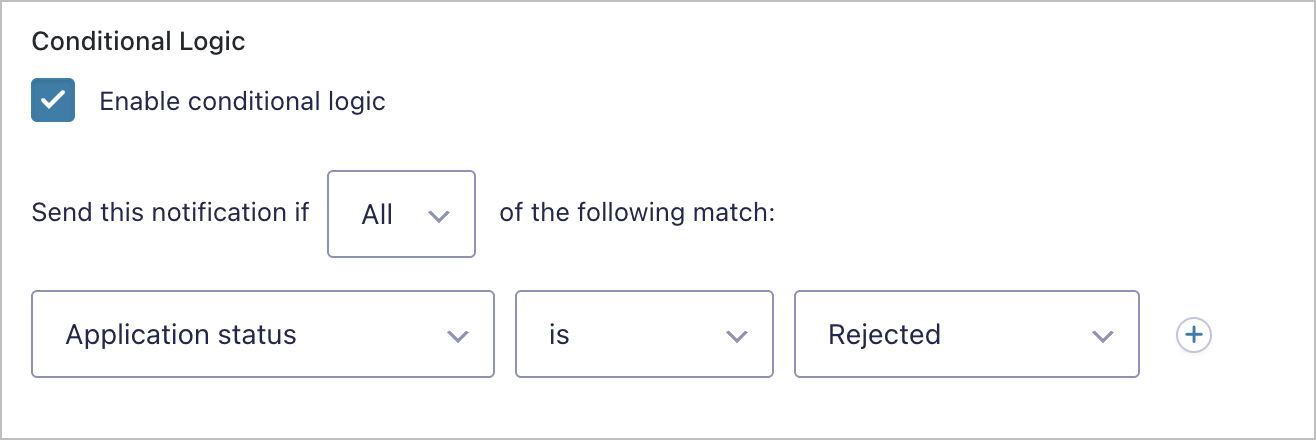
Now, in the notification body, we can add a custom message, something like:
“Thank you for applying. After careful consideration, we’ve decided not to move forward with your application at this time.”
We can also include merge tags to personalize the message, giving the email a more professional and thoughtful touch.
After configuring the first notification email, we can duplicate it and adjust things for each application status. This ensures applicants receive timely, relevant updates throughout the process.
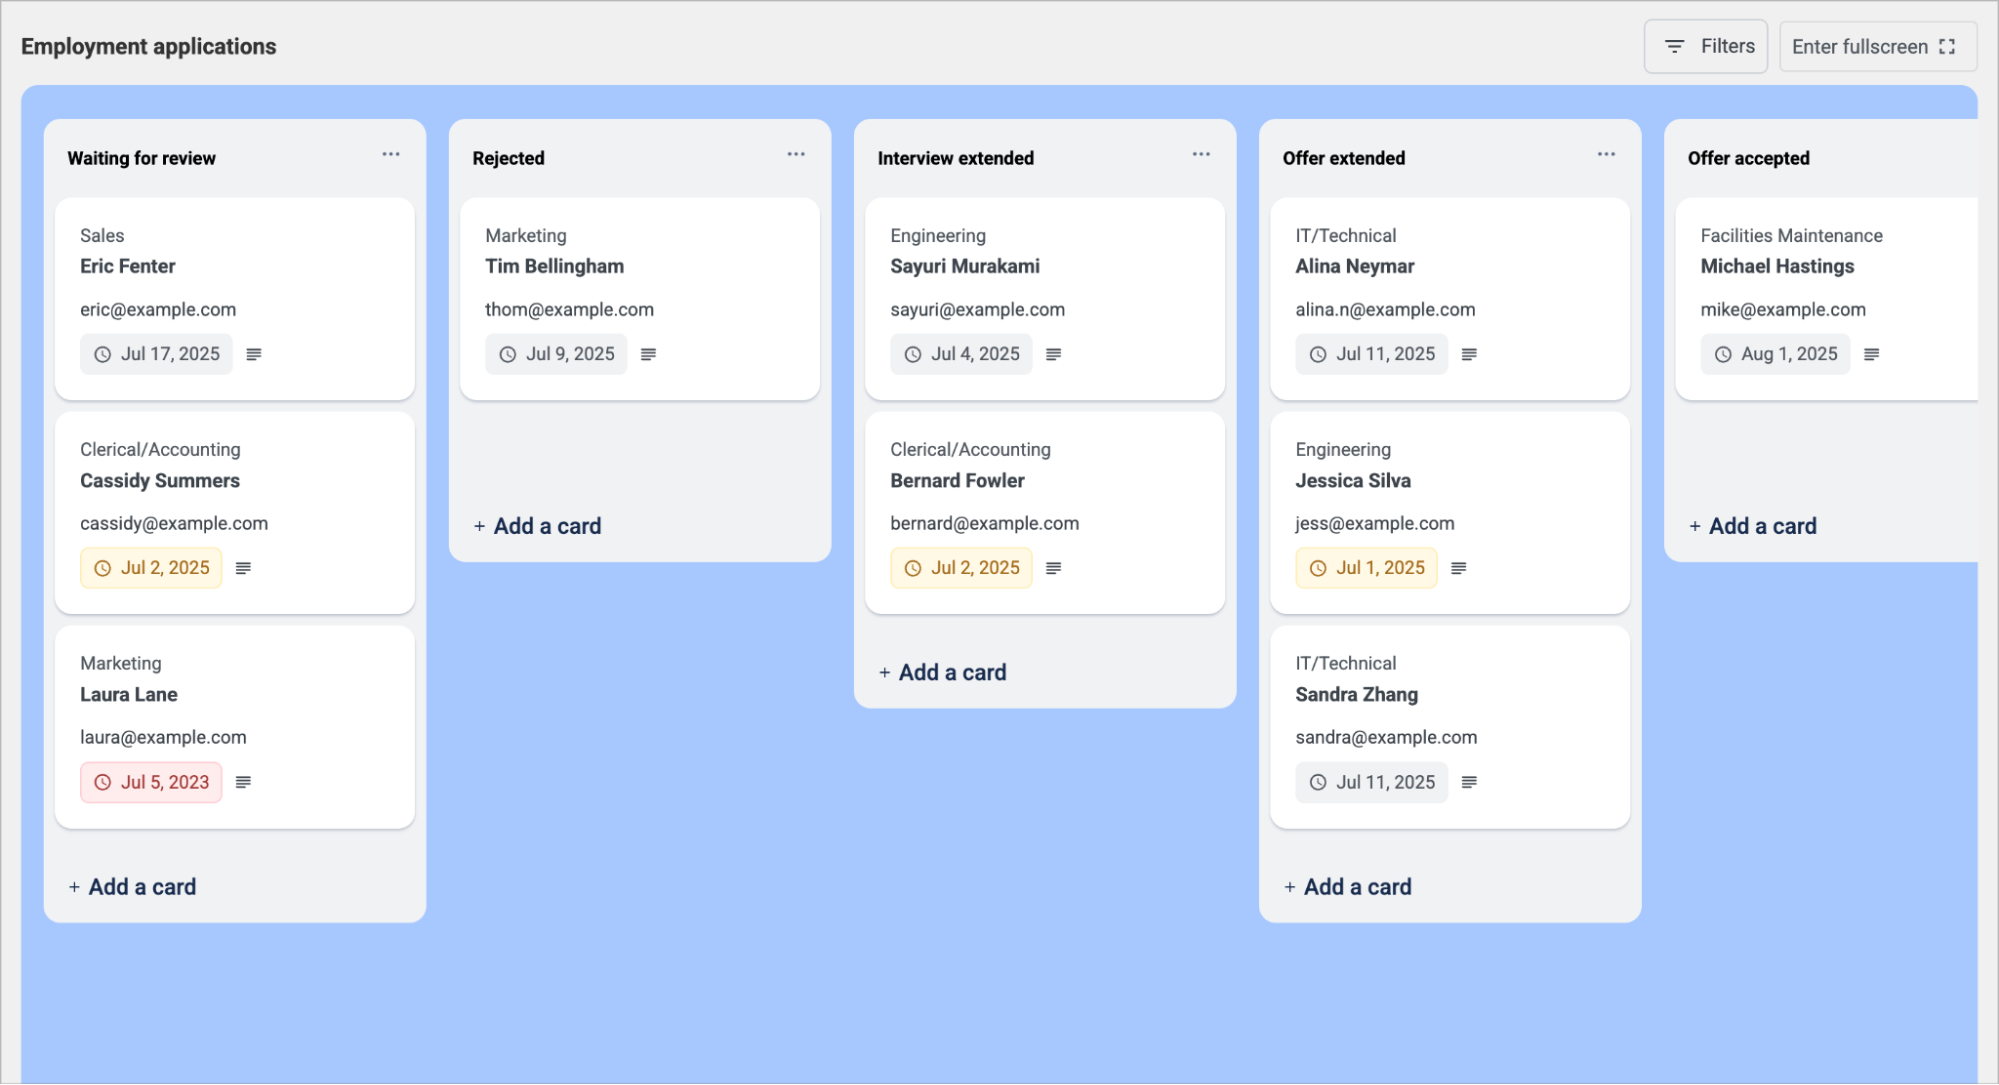
Bonus: Integrate a Kanban board
An alternative way to manage applications is to use GravityBoard, a Kanban-style project management add-on for Gravity Forms. It also integrates with GravityView, allowing you to link each Kanban card to a specific entry in your View!
When connected, you can click on a card in GravityBoard to open and edit the entry using GravityView’s Edit Entry layout. This creates a smooth, no-code workflow that pairs visual organization with GravityView’s powerful front-end editing tools.
To learn more about GravityBoard, read Introducing GravityBoard: The visual project management add-on for Gravity Forms.
Streamline your application process, today
That’s it! In this tutorial we showed you how to build your very own front-end application management system, complete with a searchable dashboard, editable entries, data exports, and automated notifications.
Ready to get started? Play around with our live demos or learn more about Gravity Forms and GravityKit.