

Trying to set up SparkPost WordPress transactional emails on your site?
Using SparkPost is a great way to improve the reliability of your WordPress site’s transactional emails, but WordPress doesn’t include any built-in functionality to connect to a transactional email service like SparkPost.
With a WordPress SMTP plugin like Gravity SMTP, you can fix that problem – and in this post, we’ll show you how.
Below, we’ll take you through every step of using SparkPost for WordPress transactional emails via the Gravity SMTP plugin.
Before we get to the full tutorial, we’ll also go over some of the main reasons why SparkPost and Gravity SMTP make an effective duo for transactional emails on WordPress.
Let’s dive in…
Why use SparkPost for WordPress transactional emails?
SparkPost is a transactional email service that was acquired by MessageBird in 2021. If you go to sparkpost.com, you’ll be redirected to bird.com. However, you can still sign up for a new account and use SparkPost at the app.sparkpost.com subdomain – you just won’t be able to access the main SparkPost website anymore.
One reason to consider SparkPost is that it offers a fully-featured free plan that lets you send up to 500 emails per month for free (with a max of 100 emails per day).
While this limit is lower than the free plans at some other services, it still can be enough for many WordPress websites.
If you need to exceed 500 emails per month, SparkPost offers two premium plans, both of which have multiple tiers based on your email sending.
- Starter – It begins at $20 per month to send up to 50,000 emails, plus $1 per 1,000 emails over your plan’s limit.
- Premier – It begins at $75 per month to send up to 100,000 emails, plus $0.85 per 1,000 emails over your plan’s limit.
This help article covers the feature differences between the Starter vs Premier plan.
In addition to its pricing, here are some other reasons to consider SparkPost:
- Email API – With Gravity SMTP, you can connect WordPress directly to SparkPost’s API.
- Analytics – You can see detailed analytics, including open rates and bounces.
- Detailed log – In addition to high-level reports, you can also see a log of each action, including when an email was opened.
- Deliverability tools – You can see your emails’ Health Score, along with Spam Trap Monitoring to further improve your deliverability.
- Dedicated IP options – You can purchase dedicated IPs and combine them into an IP pool with multiple addresses.
How Gravity SMTP helps you use SparkPost on WordPress
Gravity SMTP is a WordPress SMTP plugin that helps you send your WordPress site’s transactional emails using the SparkPost email API.
In addition to letting you directly use the SparkPost API, Gravity SMTP also includes lots of other features to help you more easily monitor and optimize your site’s transactional emails:
- Email logging – While SparkPost has its own logging functionality, Gravity SMTP also lets you view an email log from inside your WordPress dashboard. This includes technical information, along with options to log the content and/or attachments of each email.
- Email reports – You can see how many emails your site sends, along with the top sending sources (e.g. core WordPress vs a specific plugin). You can also view open rates from inside WordPress.
- Email suppressions – You can create your own suppression list to avoid sending emails to certain users. This is useful because SparkPost’s suppression list requires adding email addresses as recipients before you can suppress them, so doing it from WordPress can be a bit more convenient.
- Real-time alerts for email issues – You can receive real-time email issue alerts via SMS or webhook (e.g. Slack alerts) so that you can quickly fix any problems.
- Backup email sending methods – If you want to further improve reliability, you can set up a secondary backup sending service in addition to SparkPost.
- Support – You can get direct support from the Gravity SMTP team.
Currently, Gravity SMTP is available for free to people holding one of these Gravity Forms licenses:
- Elite license
- Nonprofit license
- Developer license (legacy)
However, Gravity SMTP is still a completely standalone plugin, so you do not need to have the Gravity Forms plugin installed in order to use Gravity SMTP.
Gravity SMTP does work well with Gravity Forms as a solution to improve the reliability of form notification emails, though.
How to set up WordPress SparkPost integration with Gravity SMTP
Now, let’s get into the full step-by-step guide on how to set up SparkPost WordPress transactional emails using the Gravity SMTP plugin.
1. Install the Gravity SMTP plugin
To get started, you should install the Gravity SMTP plugin on the site where you want to set up SparkPost.
Gravity SMTP is currently available for free to anyone holding one of these Gravity Forms licenses:
- Elite license
- Nonprofit license
- Developer license (legacy)
If you’re holding one of the above licenses, you can download Gravity SMTP from your Gravity Forms My Account area.
2. Register for your SparkPost account
Next, you’ll want to register for your SparkPost account, if you don’t already have one.
While MessageBird has started redirecting sparkpost.com traffic to bird.com, you can still register for a new SparkPost account by clicking this link.
When signing up for your account, you can choose between creating an account in the United States or Europe. We recommend choosing the applicable location based on your website and target audience.
- Choose the SparkPost tab to create an account in the USA,
- Choose the SparkPost EU tab to create an account in Europe. This will take you to a separate app.eu.sparkpost.com subdomain.
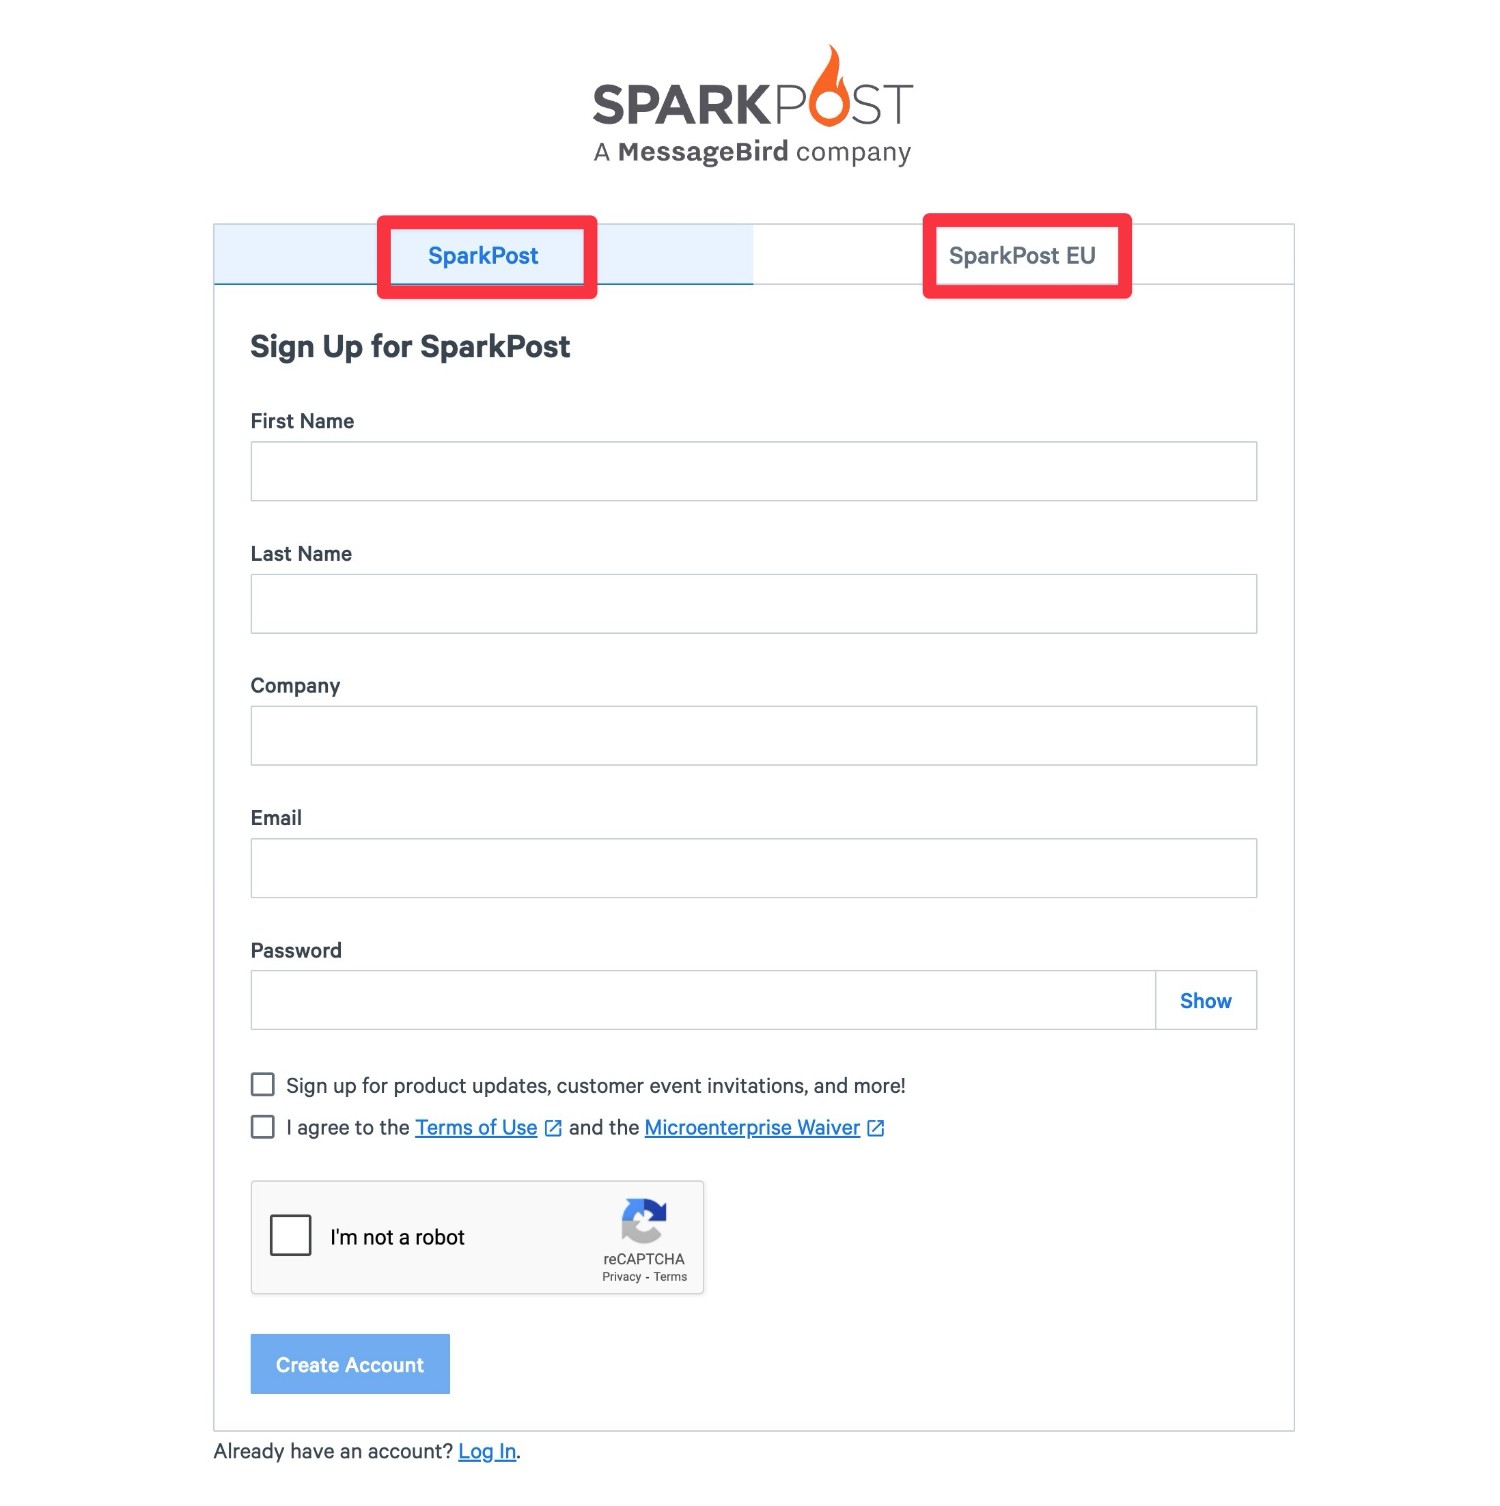
Once you create your account, you’ll be prompted to choose your plan. For this tutorial, we’re using the forever-free plan, which lets you send up to 500 emails per month with all features.
However, as we mentioned above, there are also two tiers of premium plans if you need to send more emails – Starter and Premier.
3. Authenticate your domain name with SparkPost
After creating your SparkPost account, the next step is to authenticate your WordPress site’s domain name with SparkPost.
This proves to SparkPost that you control your domain name and it also lets you add SPF/DKIM to improve your email deliverability rate and lessen the chance that your site’s emails get flagged as spam.
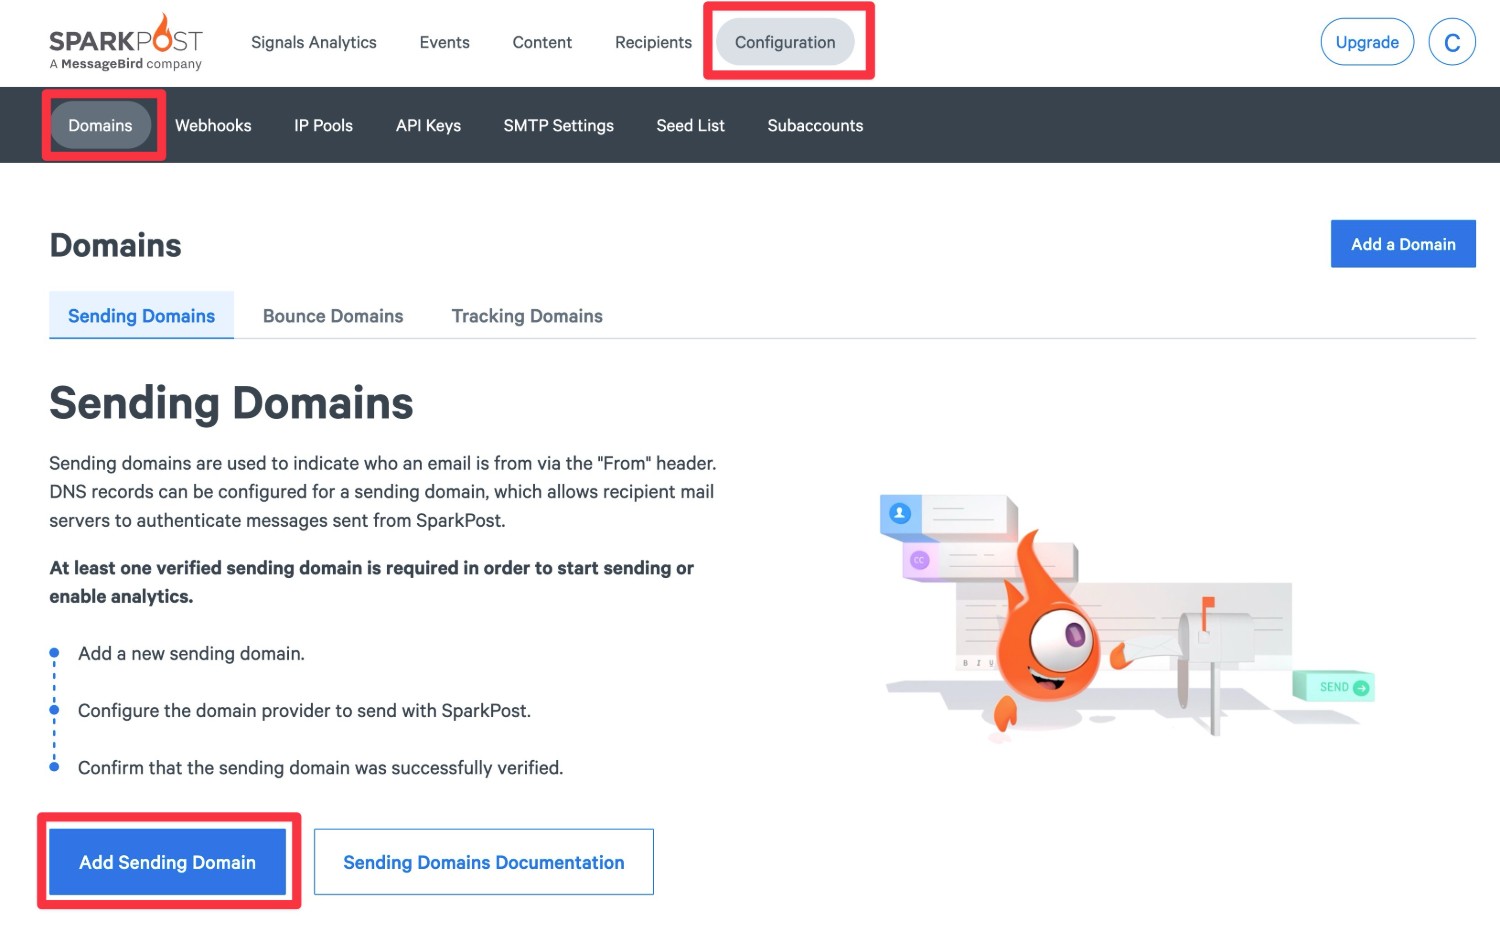
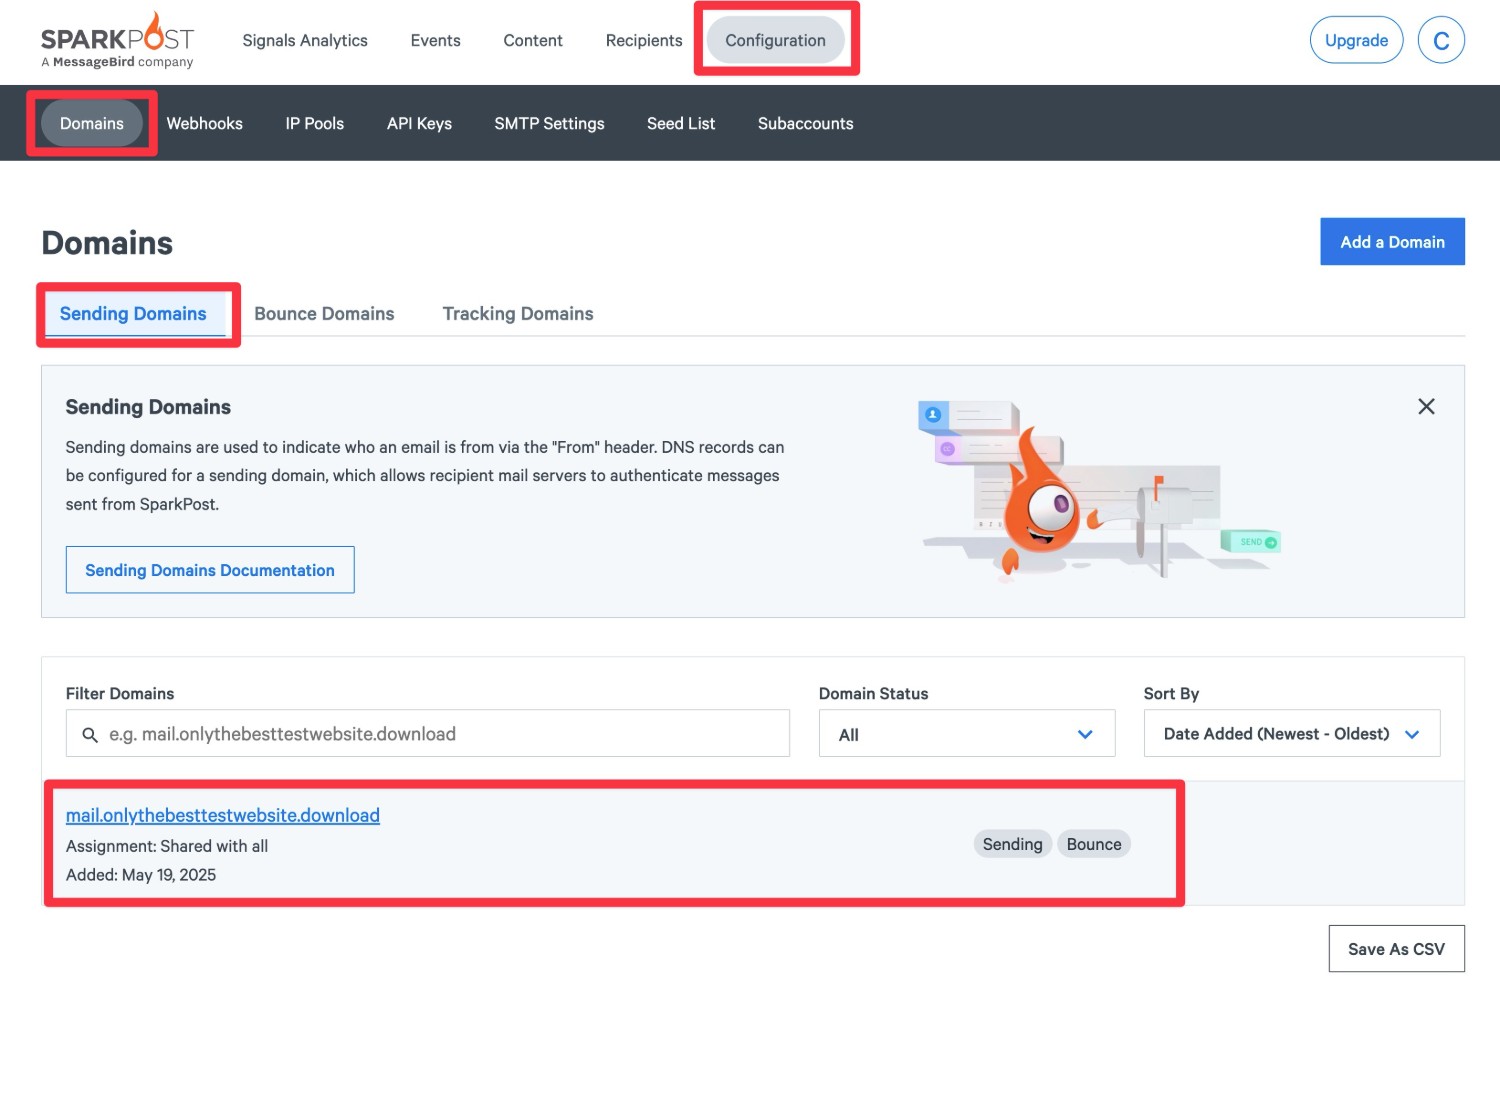
To add your domain name, select Configuration on the SparkPost navigation bar and then click the Add Sending Domain button in the Domains area.
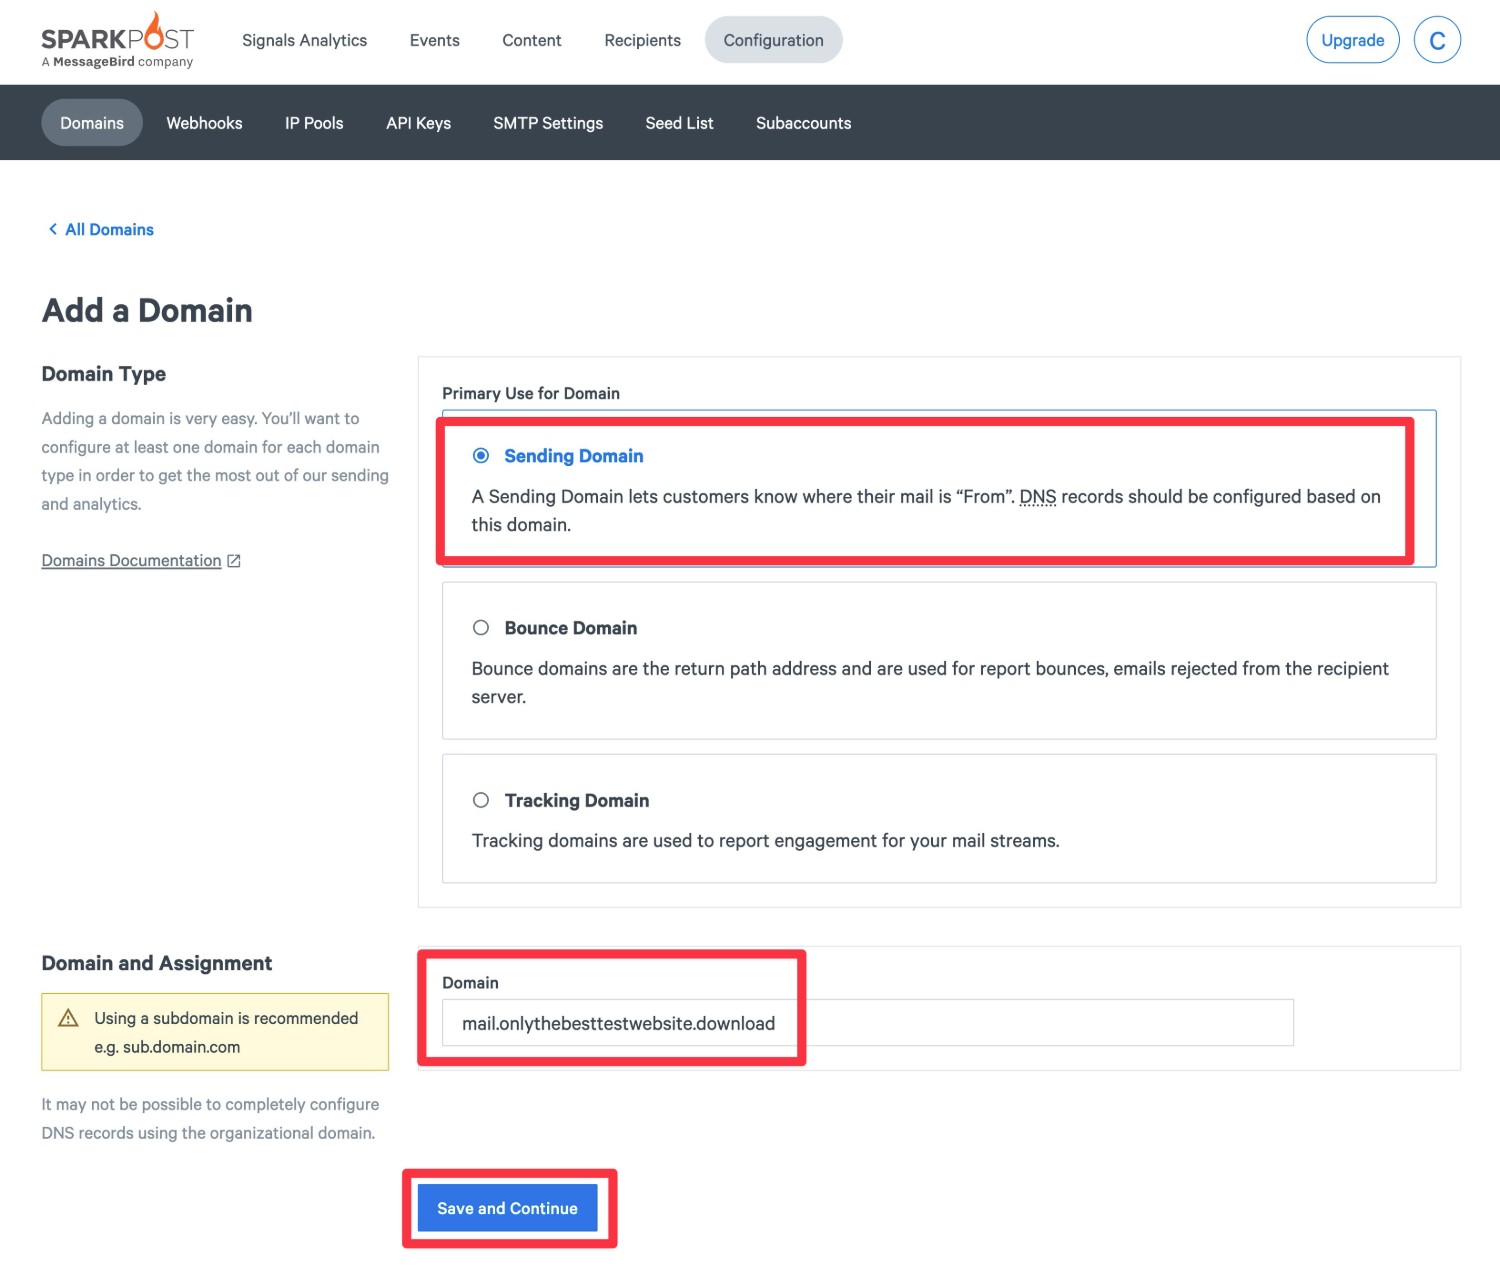
On the next screen, select Sending Domain as the Primary Use for Domain. Then, enter your domain name in the Domain box and click Save and Continue.
While you can use your main domain name, SparkPost recommends using a subdomain instead because it will make it easier to configure DNS records. For example, instead of using gravityforms.com, you could use mail.gravityforms.com.
For our guide, we’ll use the mail.site.com subdomain approach. However, you are allowed to just use your primary domain name if you prefer that over a subdomain.
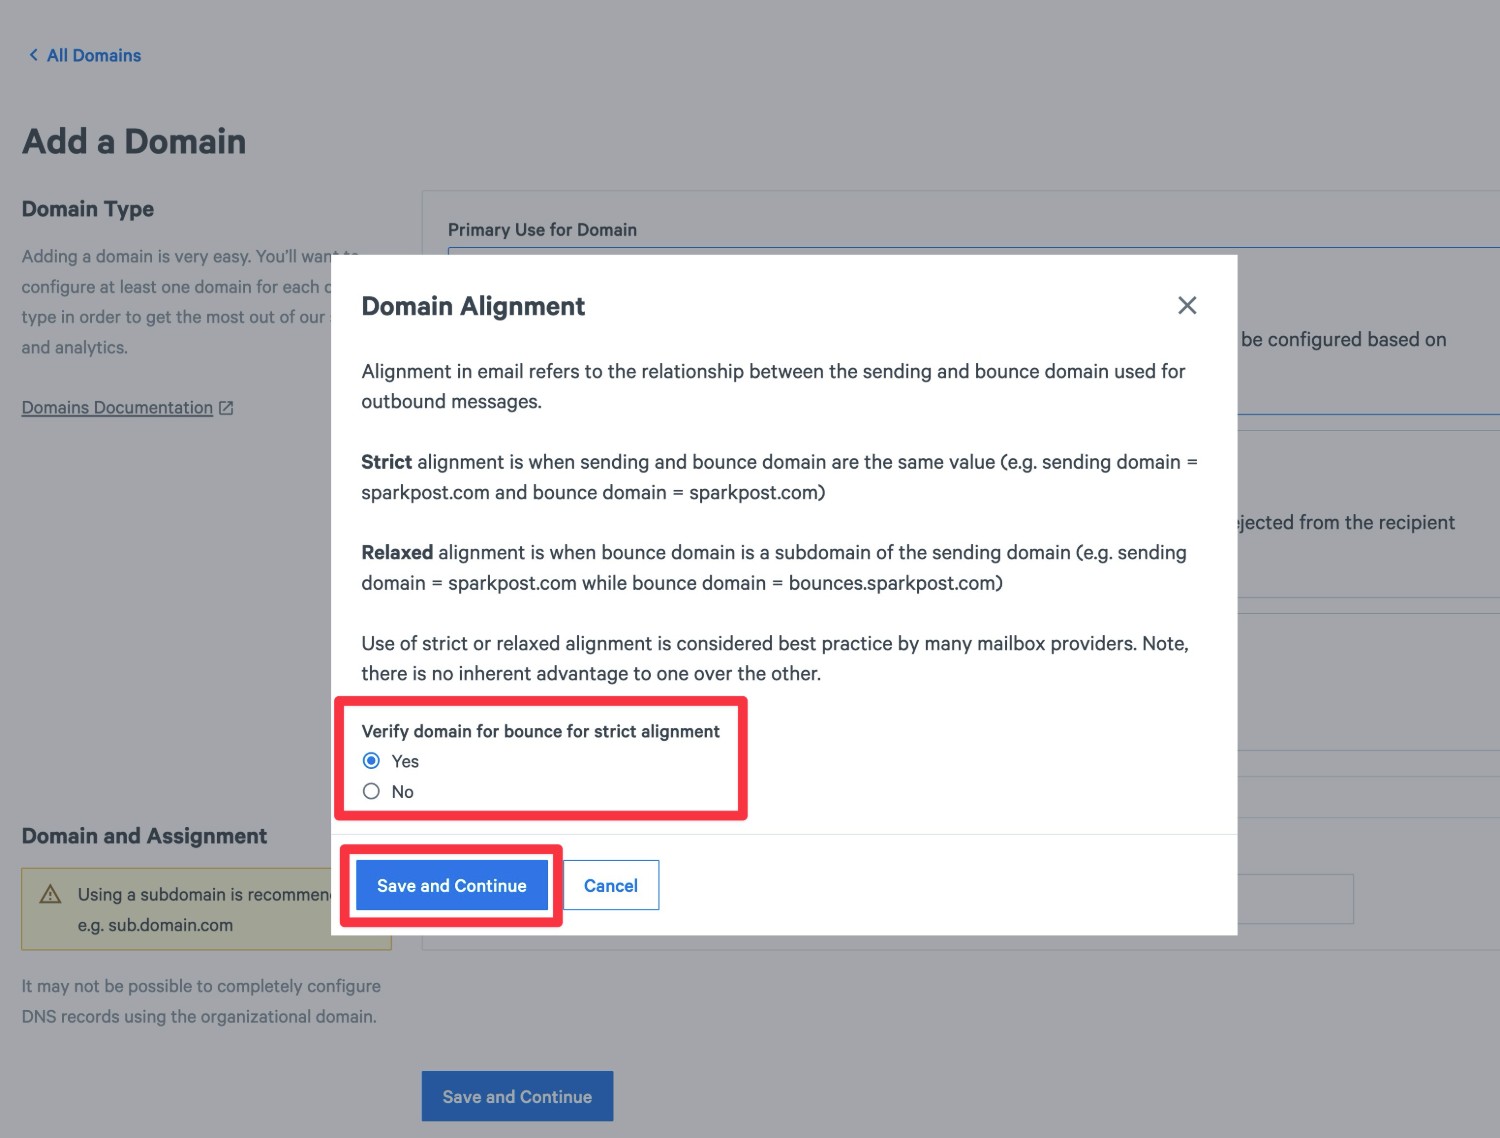
You’ll then see a popup asking you about domain alignment for your site’s bounce domain:
- If you’re using your root domain name – e.g. gravityforms.com – choose No. You will then need to set up a separate bounce domain after adding your root domain name as the sending domain.
- If you’re using a subdomain name – e.g. mail.gravityforms.com – choose Yes. Because we’re using a subdomain, we chose Yes in this option.
After clicking Save and Continue, SparkPost will prompt you to add some DNS records to your domain name – a TXT record for DKIM and a CNAME record for bounces.
Note – If you’re adding your root domain name instead of a subdomain, you’ll only need to add one TXT record.
You’ll need to add these records wherever you manage your domain name’s DNS. Depending on your domain’s configuration, that could be…
- Your hosting dashboard if you’re using your web host’s nameservers.
- Your domain registrar if you pointed your domain name to your host using an A record or a similar approach.
- Your Cloudflare dashboard if you’re using Cloudflare (or similar services).
Once you’ve added both records, check the box and then click Verify Domain at the bottom.

If you added the records properly, you should see two floating success messages appear in the interface.
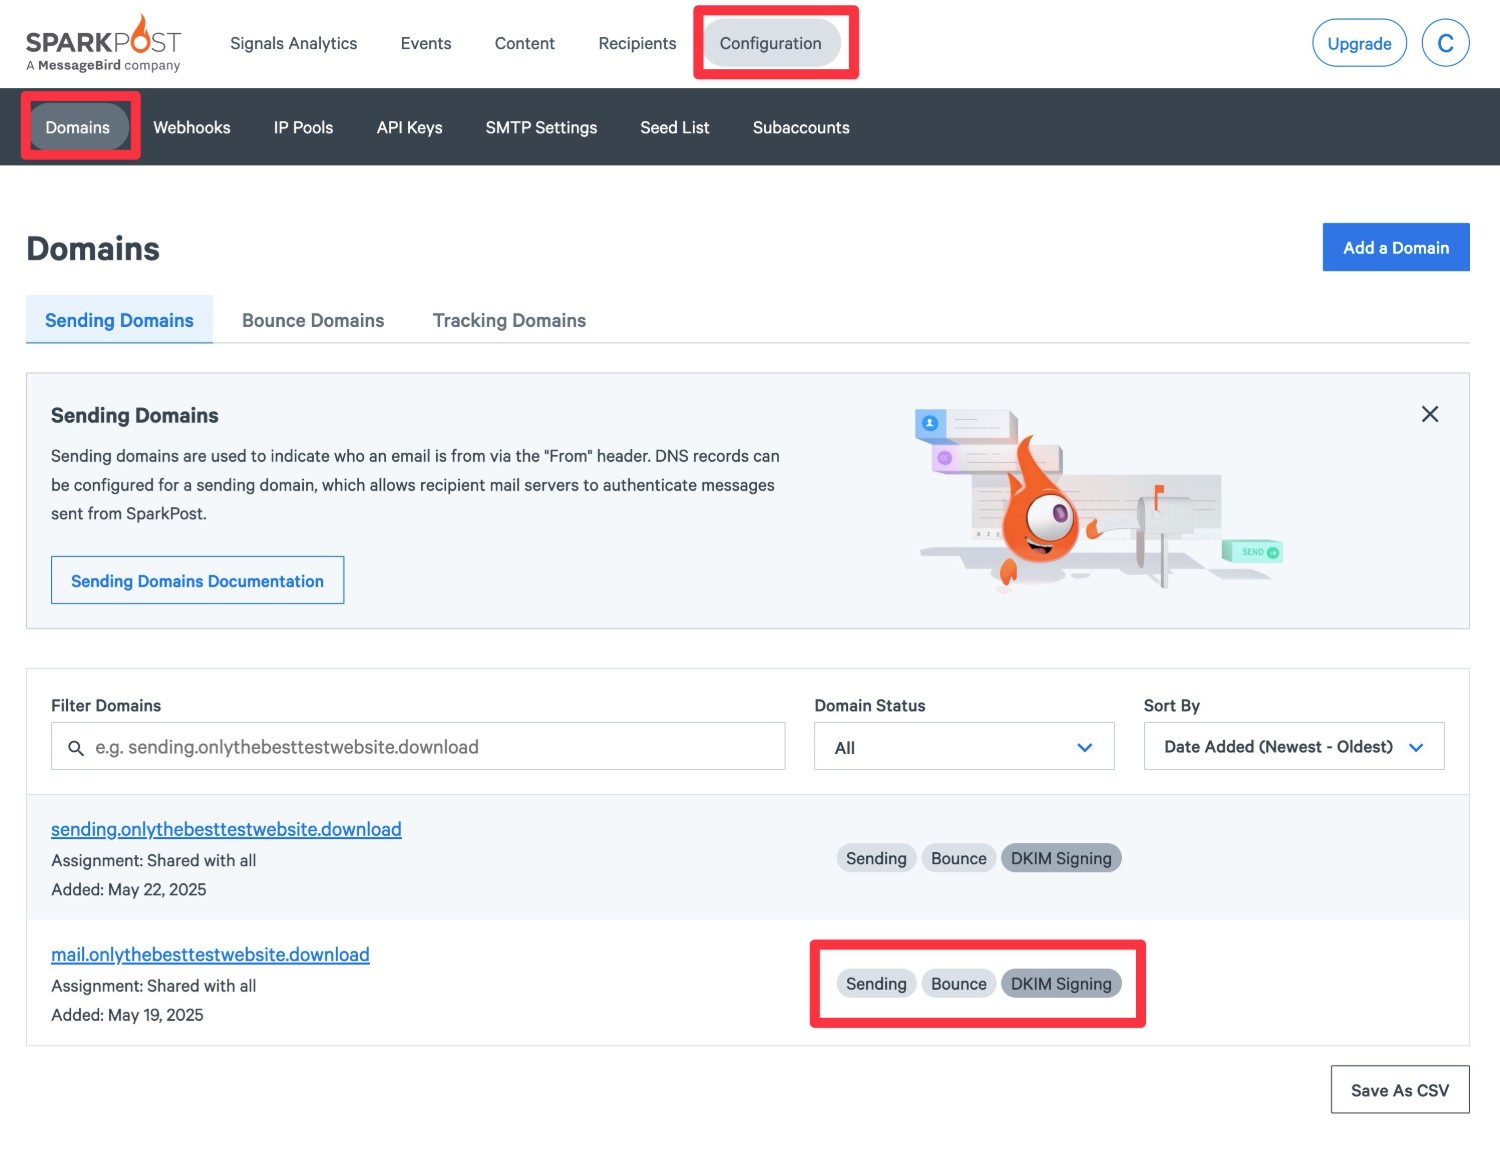
Then, if you go back to the Sending Domains area (Configuration → Domains → Sending Domains), you should see your WordPress site’s domain name (or a subdomain) in the list.
If you don’t see DKIM Signing appear next to your domain name, you might need to perform an additional step to verify your domain’s DKIM record:
- Click on your domain name in the list to open the Domain Details.
- Check the box for The TXT record has been added…
- Click Verify Domain.

Once you do that, DKIM Signing should appear in the Domains list.
At first, your domain might be in pending status while SparkPost performs some checks to verify that your domain meets SparkPost’s best practice requirements. This can take up to 24 hours, though SparkPost says it’s usually done in under an hour.
4. Create your SparkPost API key
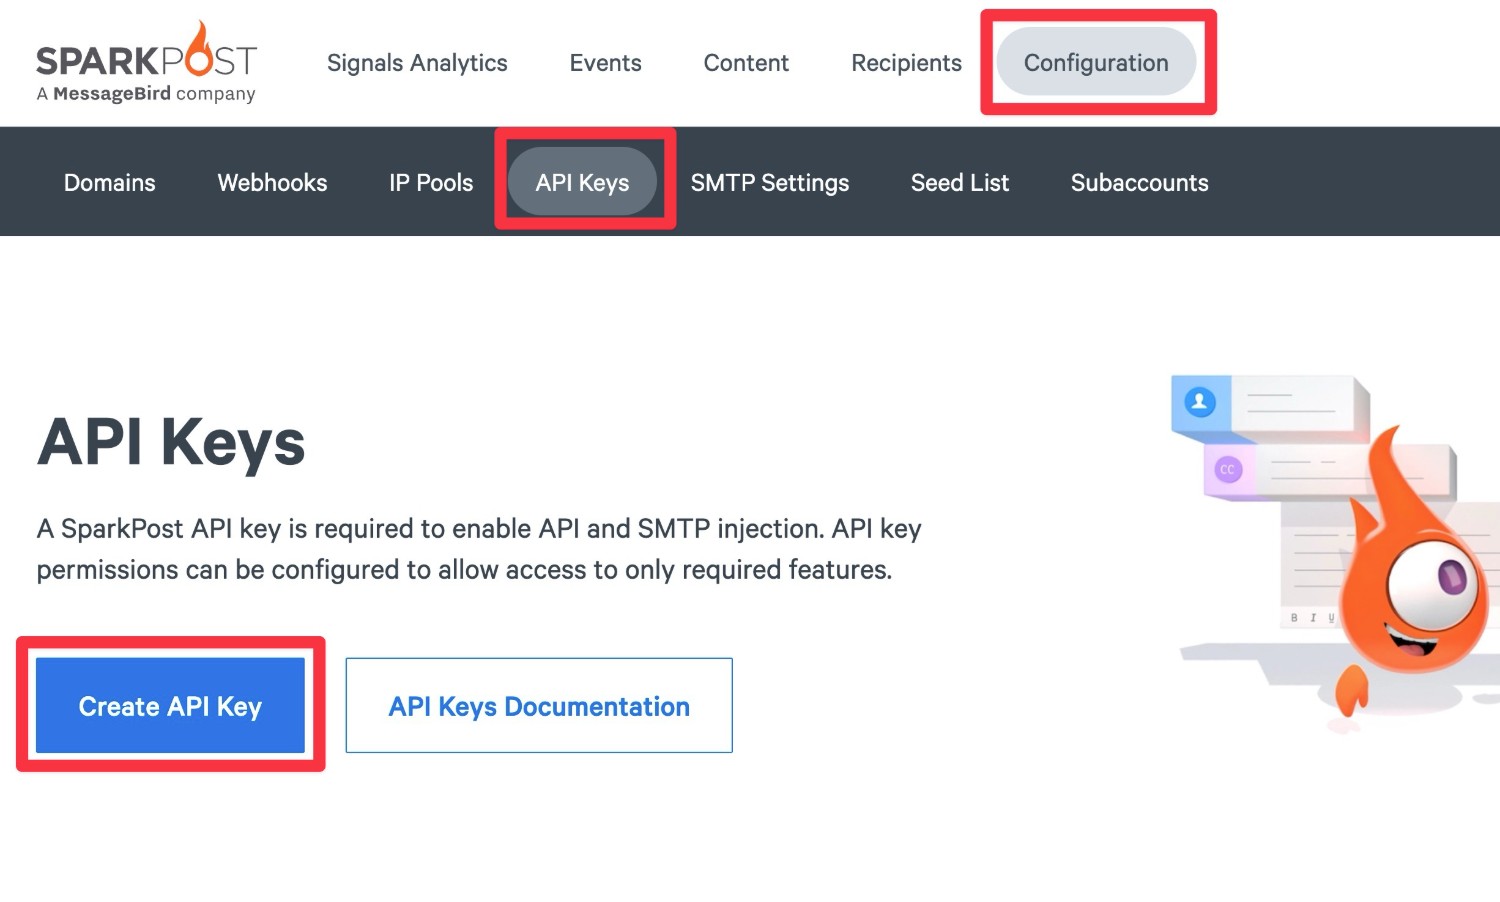
Next, you need to create a SparkPost API key, which is what you’ll use to connect WordPress/Gravity SMTP to SparkPost.
In your SparkPost dashboard, go to Configuration → API Keys and then click the Create API Key button.
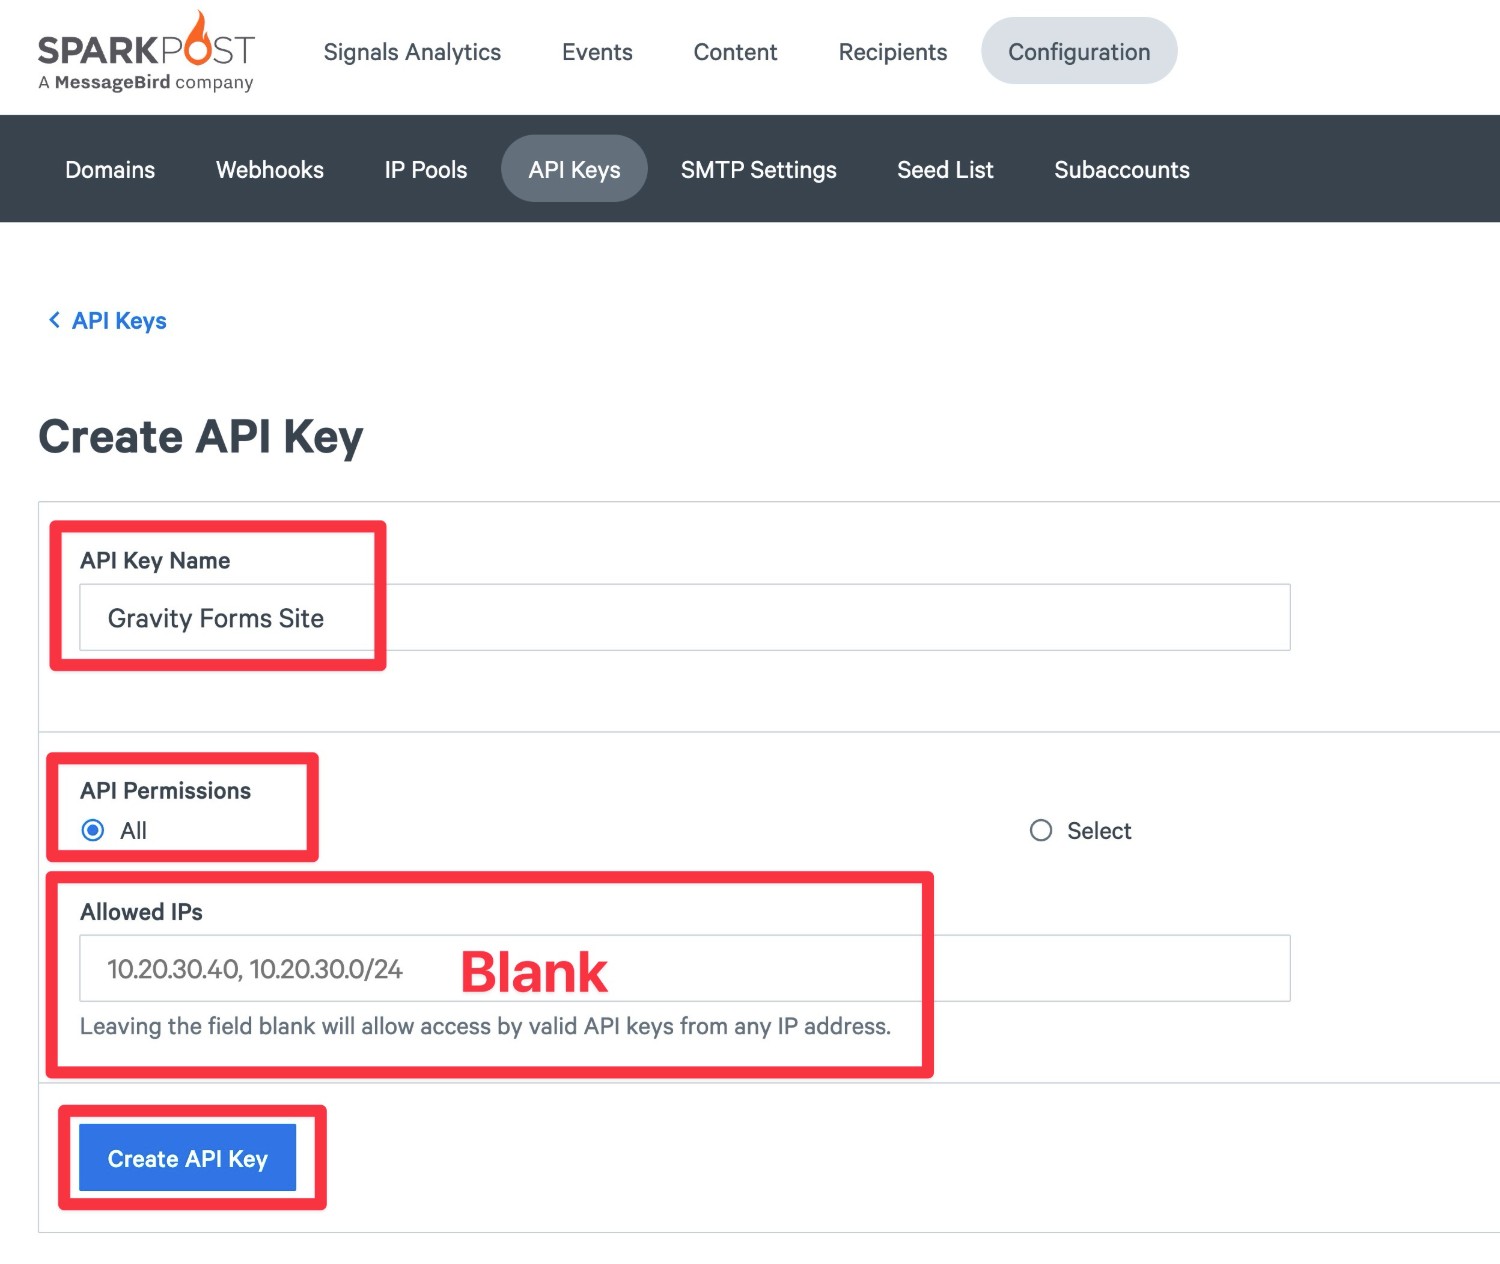
On the next screen, you can configure your API key:
- API Key Name – This is an internal name to help you remember it.
- API Permissions – Choosing All is the simplest option. However, you can more granularly restrict permissions if you’re worried about security. For this guide, we’ll just choose All.
- Allowed IPs – Leaving this blank will allow access from any IP address with a valid API key, which is the simplest option. But again, if you’re worried about security, you could restrict this to just the IP address of your WordPress site’s server. For this guide, we’ll leave it blank.
Then, click Create API Key.
On the next screen, SparkPost will display your API key.
Make sure to copy the API key to a safe spot because you’ll need it in the next step and SparkPost will only display this value one time.
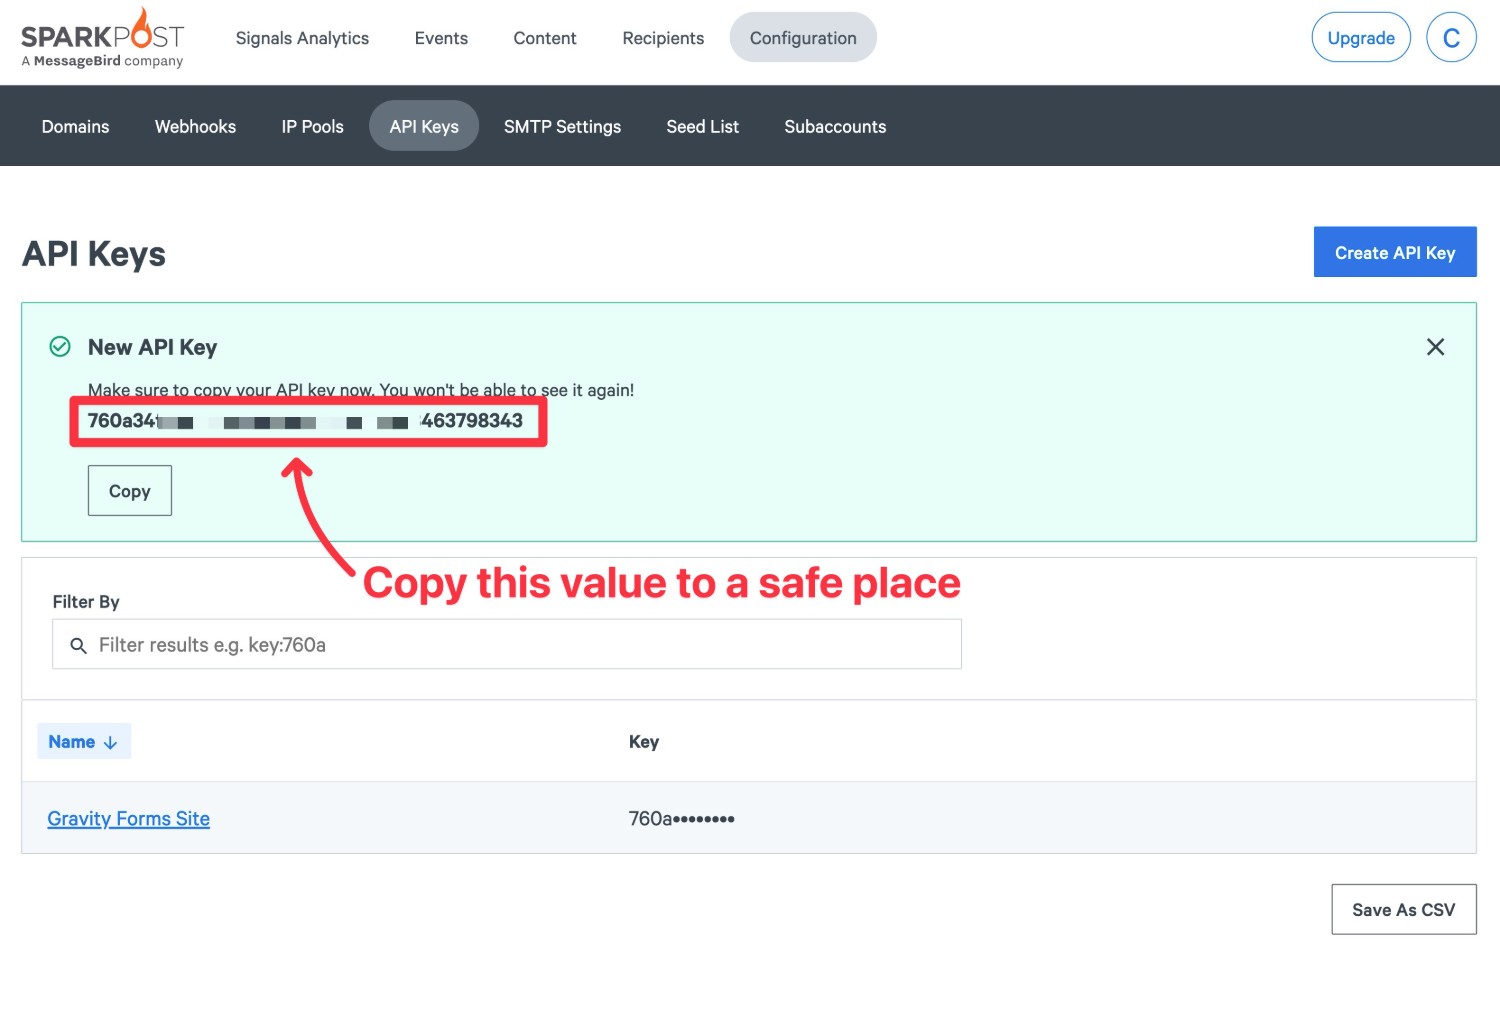
Don’t worry, though. If you accidentally lose your API key, you can just repeat these same steps to create a new key.
5. Connect Gravity SMTP to SparkPost
Once you’ve authenticated your WordPress site’s domain name with SparkPost and copied your SparkPost API key to a safe place, you’ll perform the rest of the setup process from your WordPress dashboard.
Here’s how to get started:
- Go to SMTP → Settings in your WordPress dashboard.
- Select the Integrations tab in the Gravity SMTP settings.
- Click the gear icon next to SparkPost to open its settings in a popup. Gravity SMTP offers a lot of integrations, so you might need to scroll to the bottom to find it.

Here’s how to configure the popup:
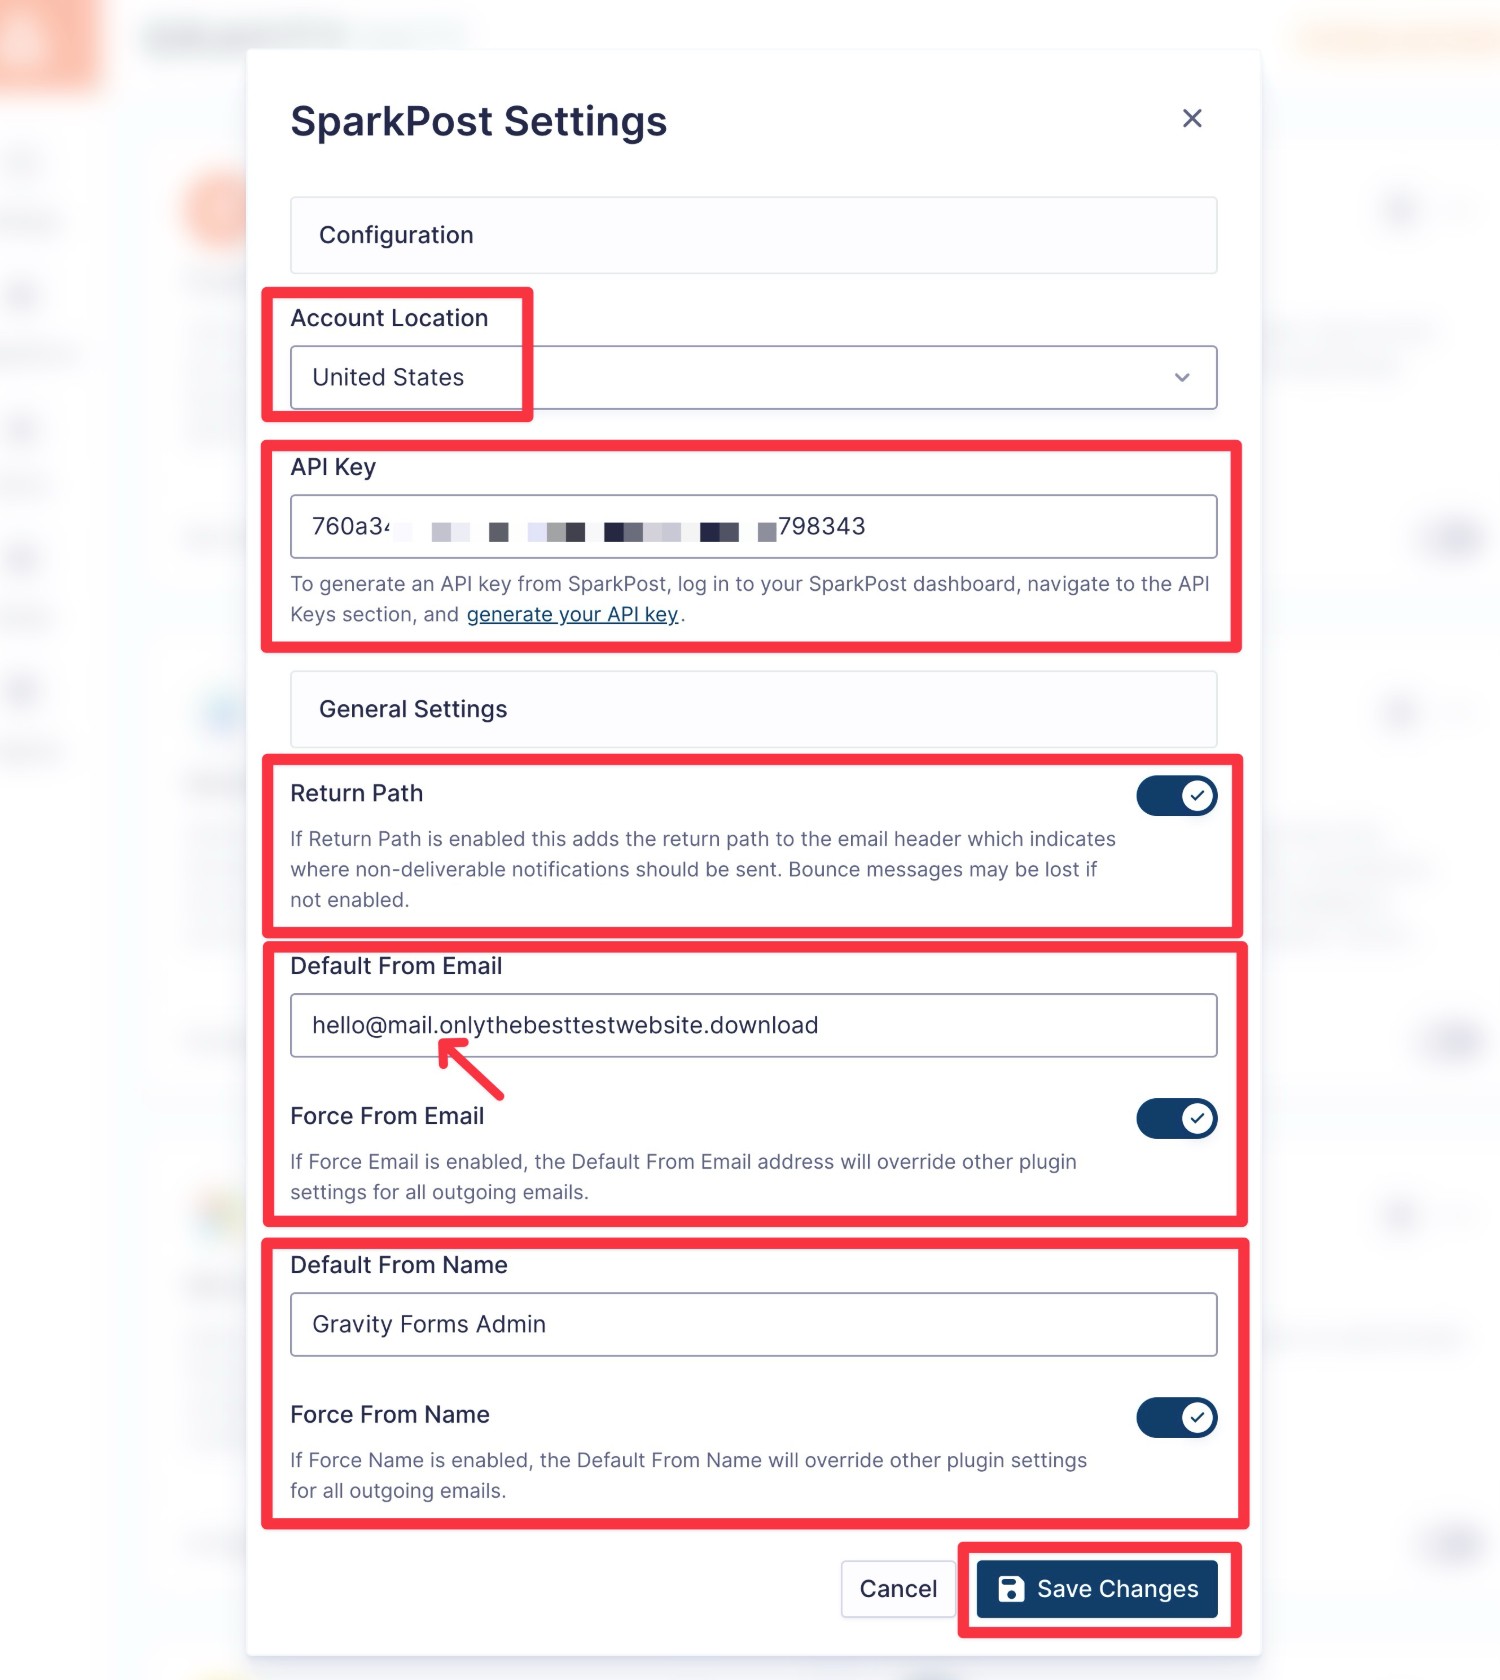
- Account Location – Choose the location that you selected when registering for SparkPost. Choose United States if you used the default SparkPost tab and choose Europe if you used the SparkPost EU tab. You can also look at the URL of your SparkPost account. If you see .eu in the subdomain, you should choose Europe.
- API Key – Paste in the API key that you created in your SparkPost dashboard in the previous step.
- Return Path – We recommend enabling this to avoid losing bounce messages.
- Default From Email – The default email address from which your transactional emails will be sent. Make sure this email uses the sending domain name that you authenticated with SparkPost (if you authenticated a subdomain, your From Email must use that subdomain). You can also enable the toggle to force emails from other plugins on your site to use this same email.
- Default From Name – The default name from which your transactional emails will be sent. You can also enable the toggle to force emails from other plugins on your site to use this same name.
Then, click Save Changes.
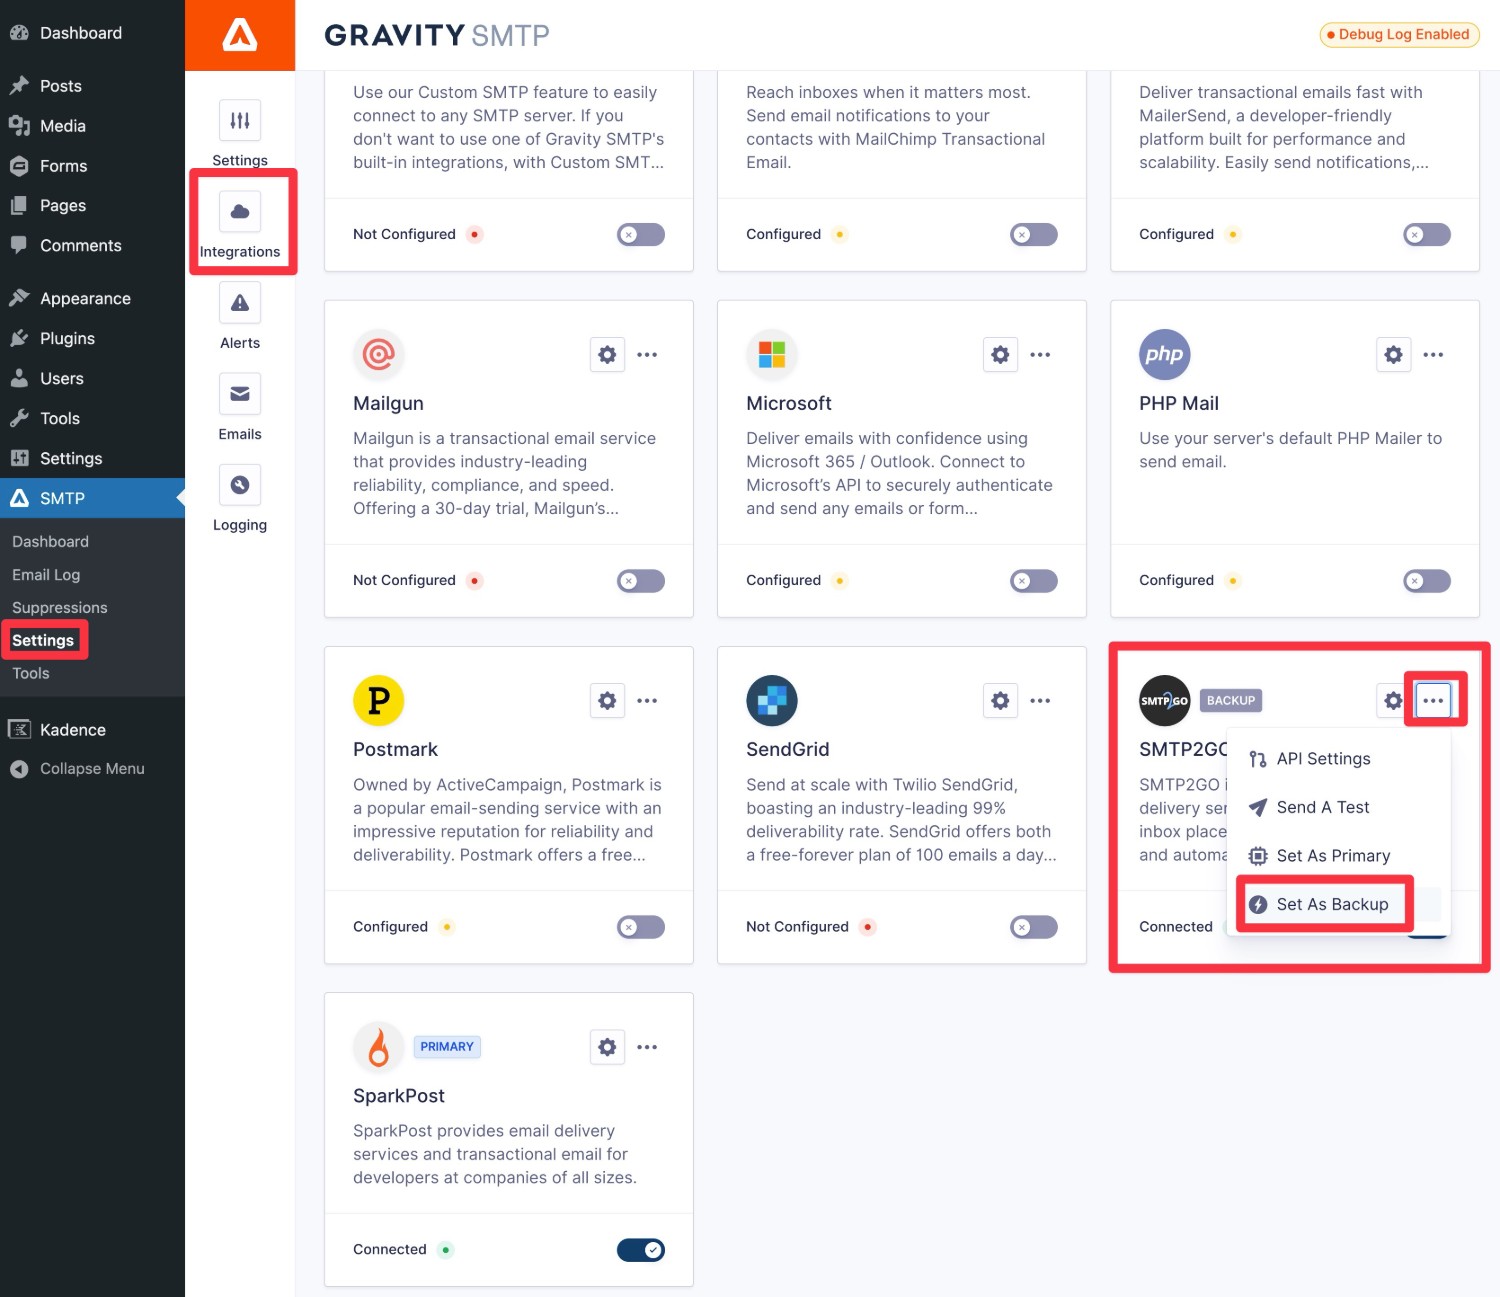
To finish things out, you need to enable SparkPost as your site’s primary email sending service.
In the integrations area (SMTP → Settings → Integrations), click the three dots icon next to SparkPost. Then, choose the Set As Primary option in the drop-down that appears.

After selecting this, you should see a Primary label appear next to SparkPost. The yellow Configured label will also change to a green Connected label.
6. Send a test email
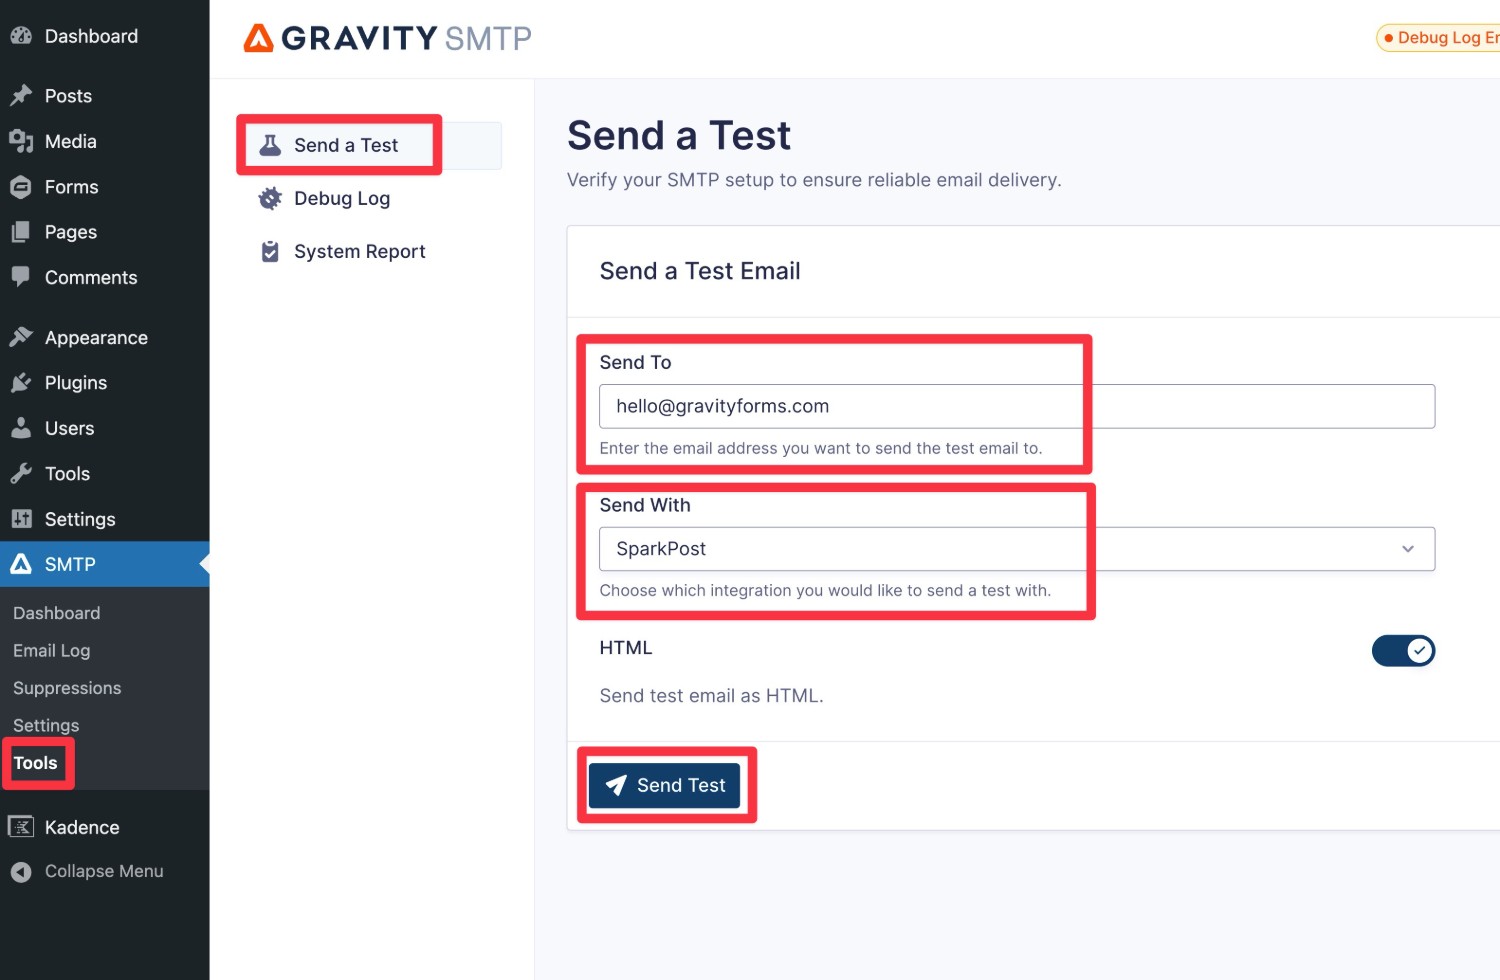
To make sure you properly set up your SparkPost WordPress transactional emails, Gravity SMTP includes a built-in feature to send a test email.
- Go to SMTP → Tools in your WordPress dashboard.
- Select the Send a Test tab (which should open by default).
- Enter the email address to which you want to send a test email in the Send To box.
- Make sure that SparkPost is selected in the Send With drop-down.
- Click Send Test.
You should see an “Email successfully sent” message appear in the interface. Then, if you open your email inbox, you should see an email that looks something like below.
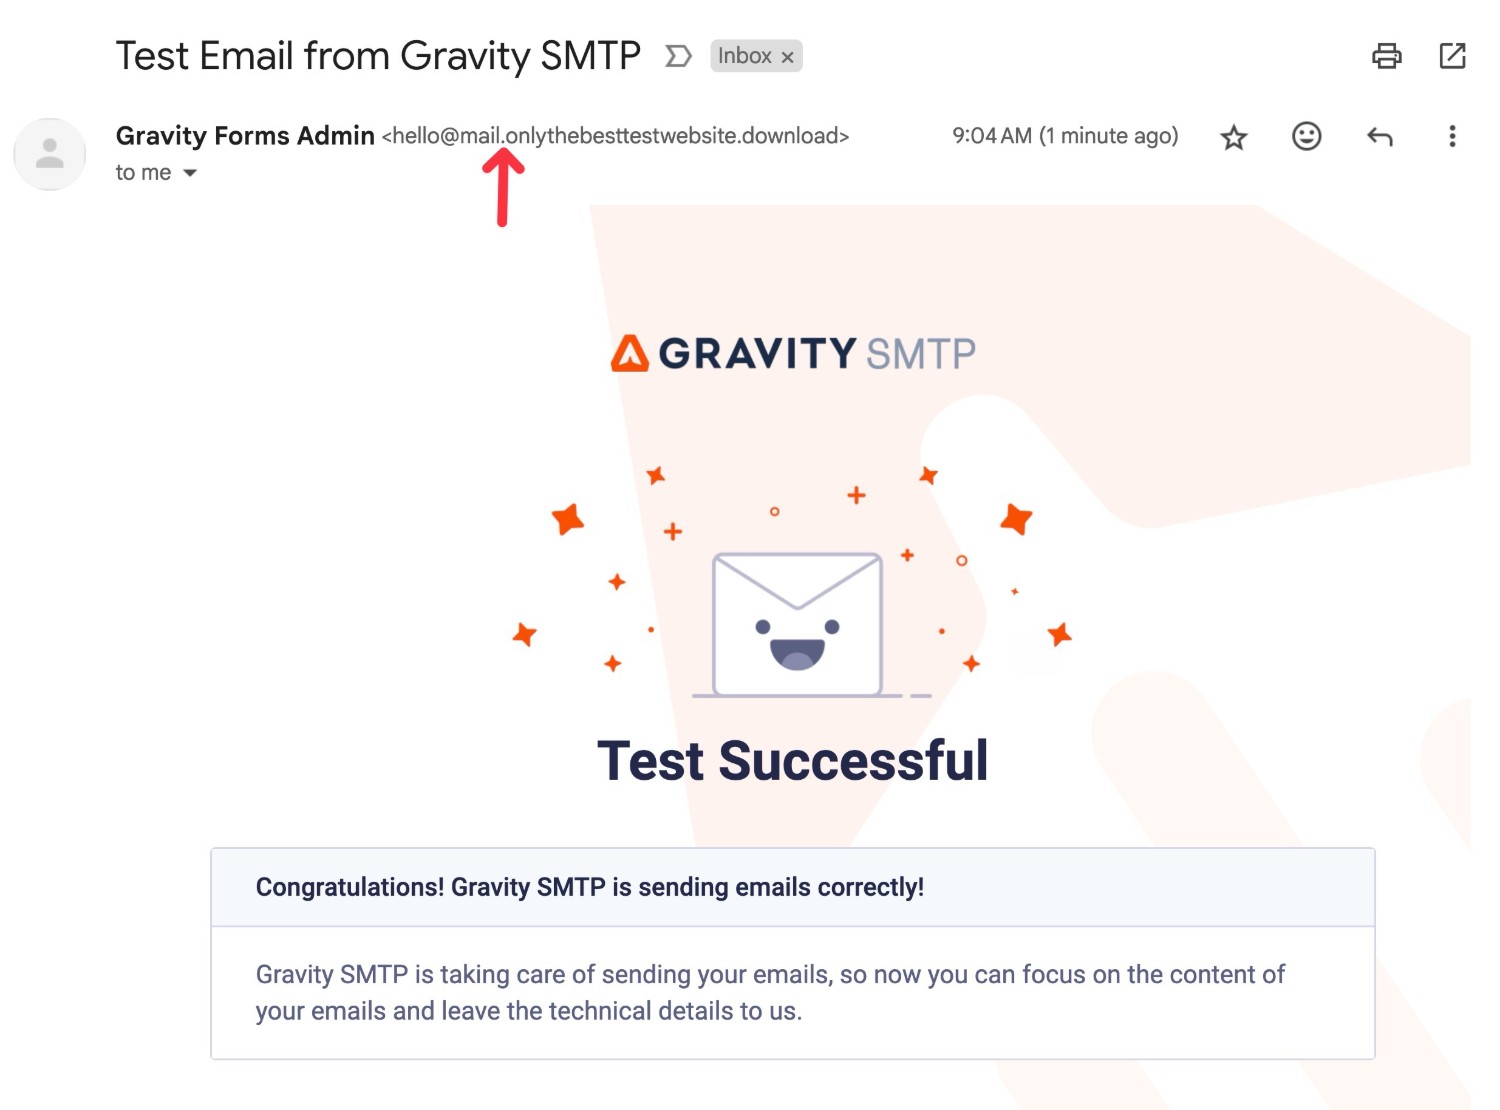
Note – If you see something like “sent via sparkpost.com“, make sure that you go to the Domain Details area in SparkPost and click Verify Domain for the DKIM record (the TXT record).
If there’s a problem, you should see an error log detailing the message.
For example, we initially saw an “Unconfigured Sending Domain” error because we had verified a subdomain with SparkPost but our “From Email” used the root domain. After switching our “From Email” to use the same subdomain, the error disappeared.
7. Set up a backup email sending service and alerts (optional)
This step is 100% optional.
Another advantage of using Gravity SMTP to set up SparkPost WordPress transactional emails is that you get additional tools to ensure the reliability of your site’s emails.
To start, you can set up real-time alerts to get instant notifications if your site’s emails are failing, such as for a technical or billing issue:
- Webhook alerts that let you send an alert to any webhook destination, such as receiving a Slack message if an email fails.
- SMS alerts to any phone number, powered by Twilio.
If you want to go even further, Gravity SMTP also lets you set up a backup email sending service. If SparkPost ever fails to send an email for some reason, Gravity SMTP will automatically resend that email using your backup service.
To start, you’ll need to connect your WordPress site to the service that you want to use as a backup, just like you did for SparkPost. We’ve written detailed guides on our blog for many of the API integrations that Gravity SMTP supports, but you can also read the documentation.
- SendGrid
- Mailgun
- Postmark
- Brevo
- Amazon SES
- Gmail/Google Workspace
- Outlook/Microsoft 365
- Mailchimp Transactional
- Elastic Email
- Custom SMTP
Once you’ve set up the service and sent a test email, you can follow these steps to enable it as your site’s backup:
- Open the Gravity SMTP integrations area (SMTP → Settings → Integrations).
- Click the three dots icon next to the service.
- Choose Set As Backup from the drop-down.
How to monitor your site’s email usage
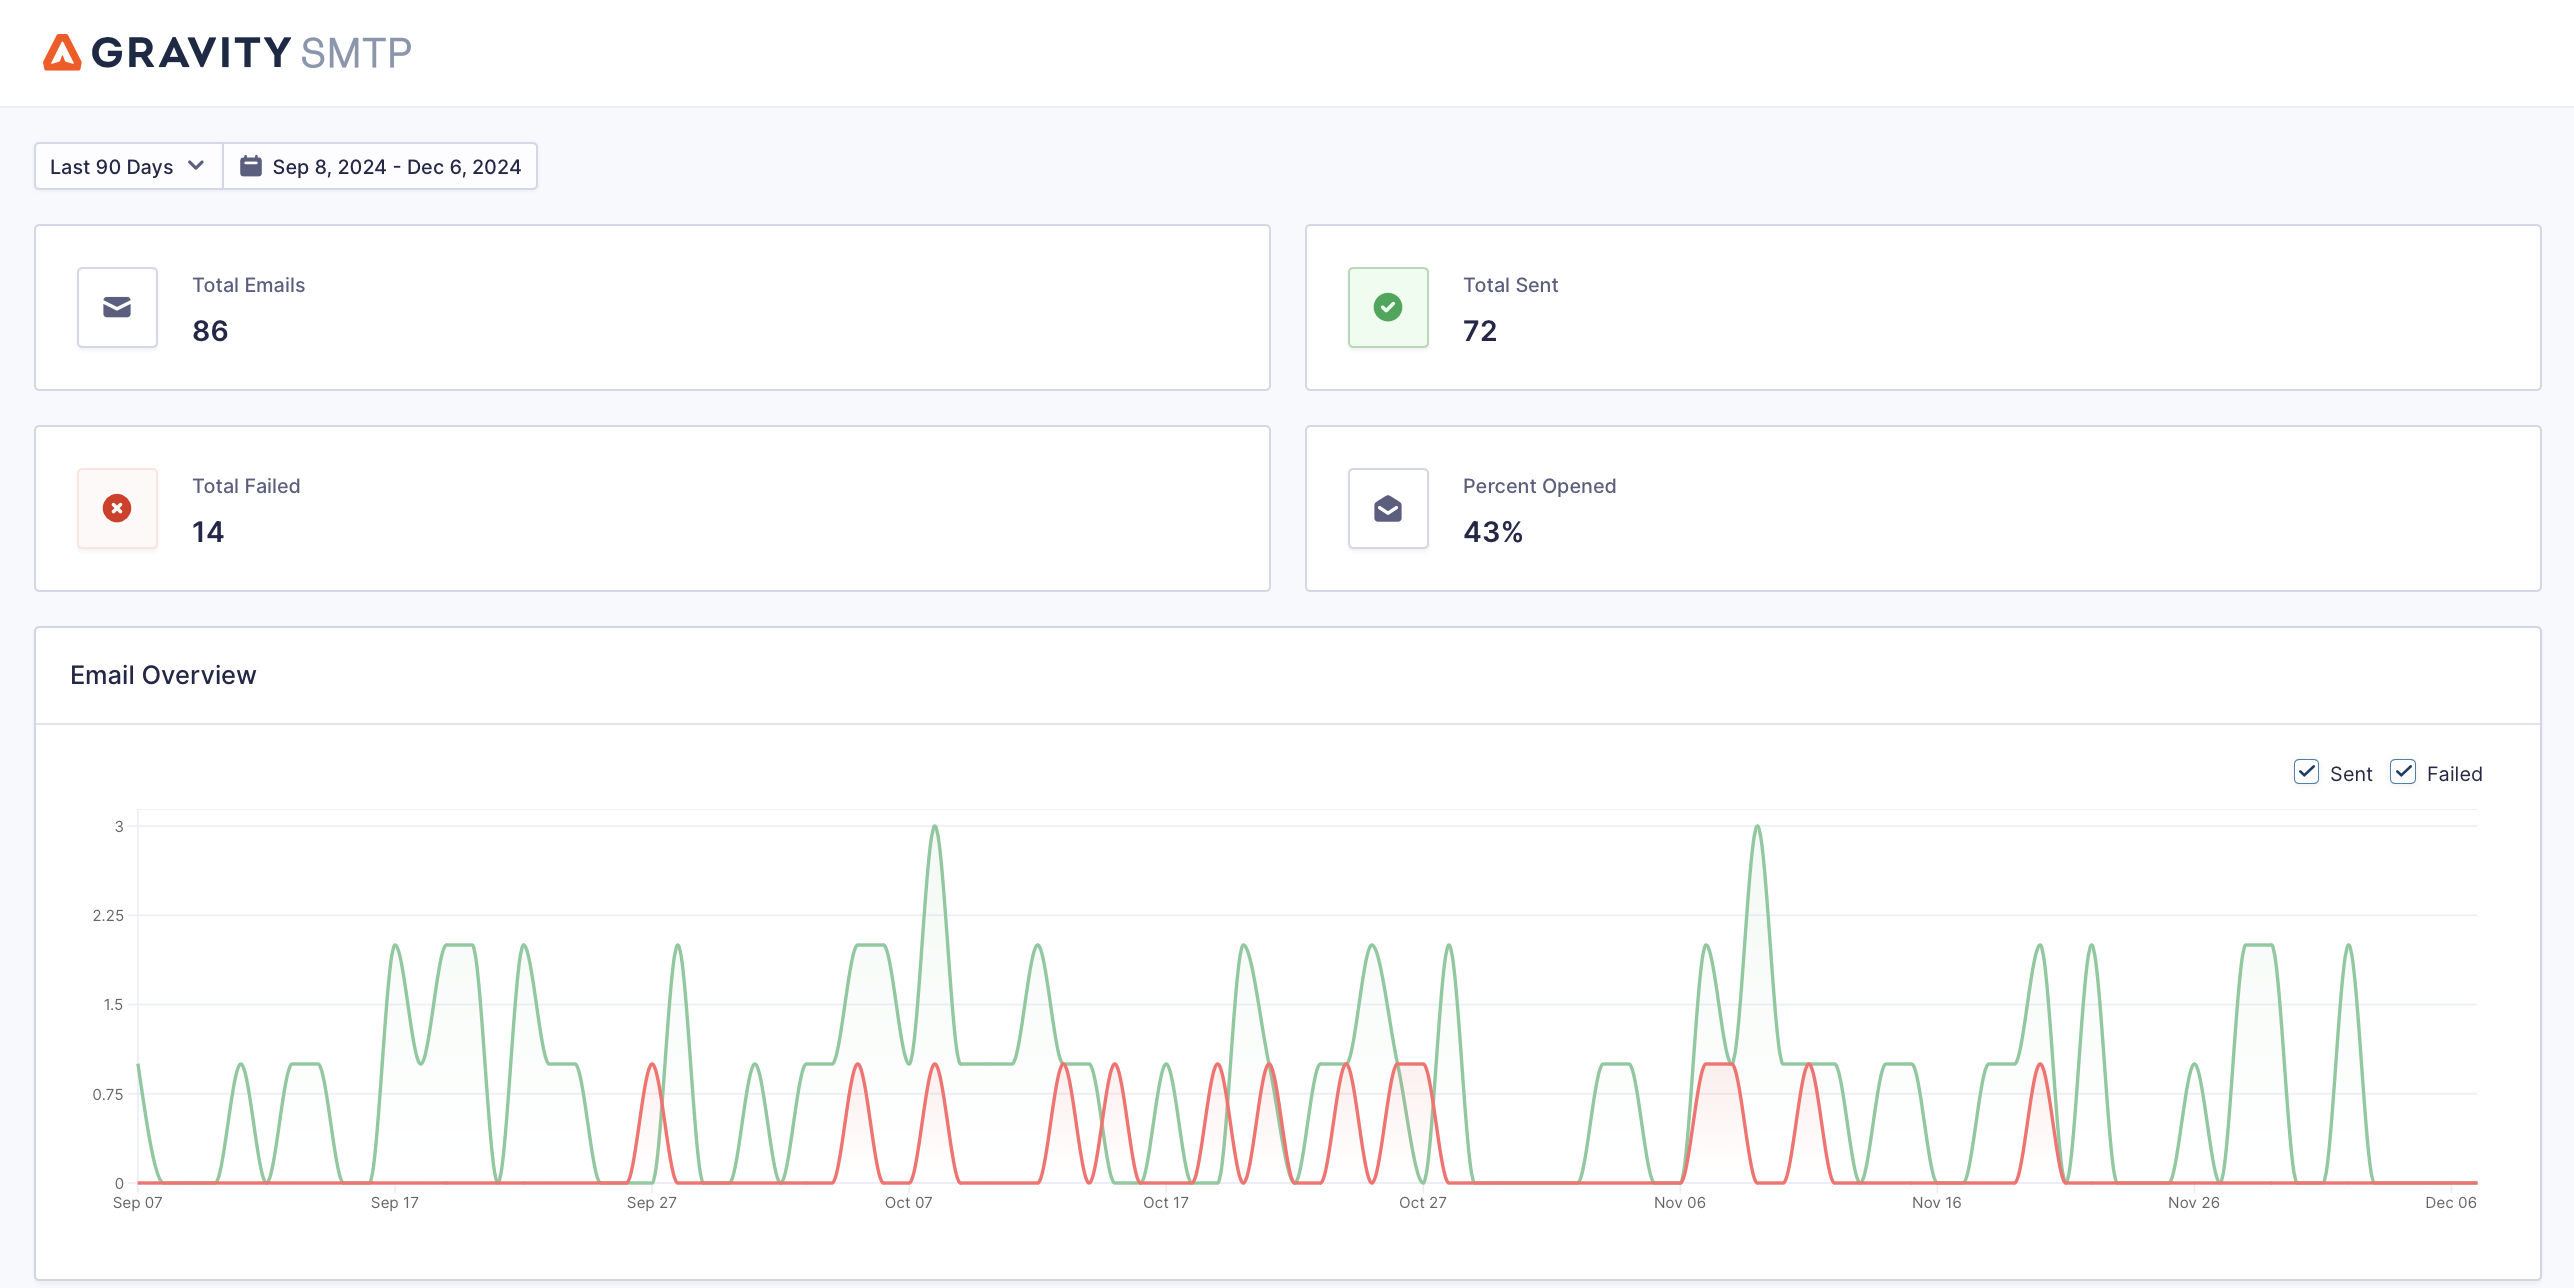
While SparkPost gives you pretty detailed analytics and logging tools in the SparkPost dashboard, Gravity SMTP also offers its own monitoring tools that you can access directly from your WordPress dashboard.
This includes some additional information that SparkPost can’t offer, such as the top sending sources on your site. That is, how many emails are coming from core WordPress versus the plugins on your site.
For high-level reports, you can go to Dashboard → Reports:
For individual email logging, you can go to SMTP → Email Log. In addition to technical information for each email, you also have the option to log the email contents and/or attachments.
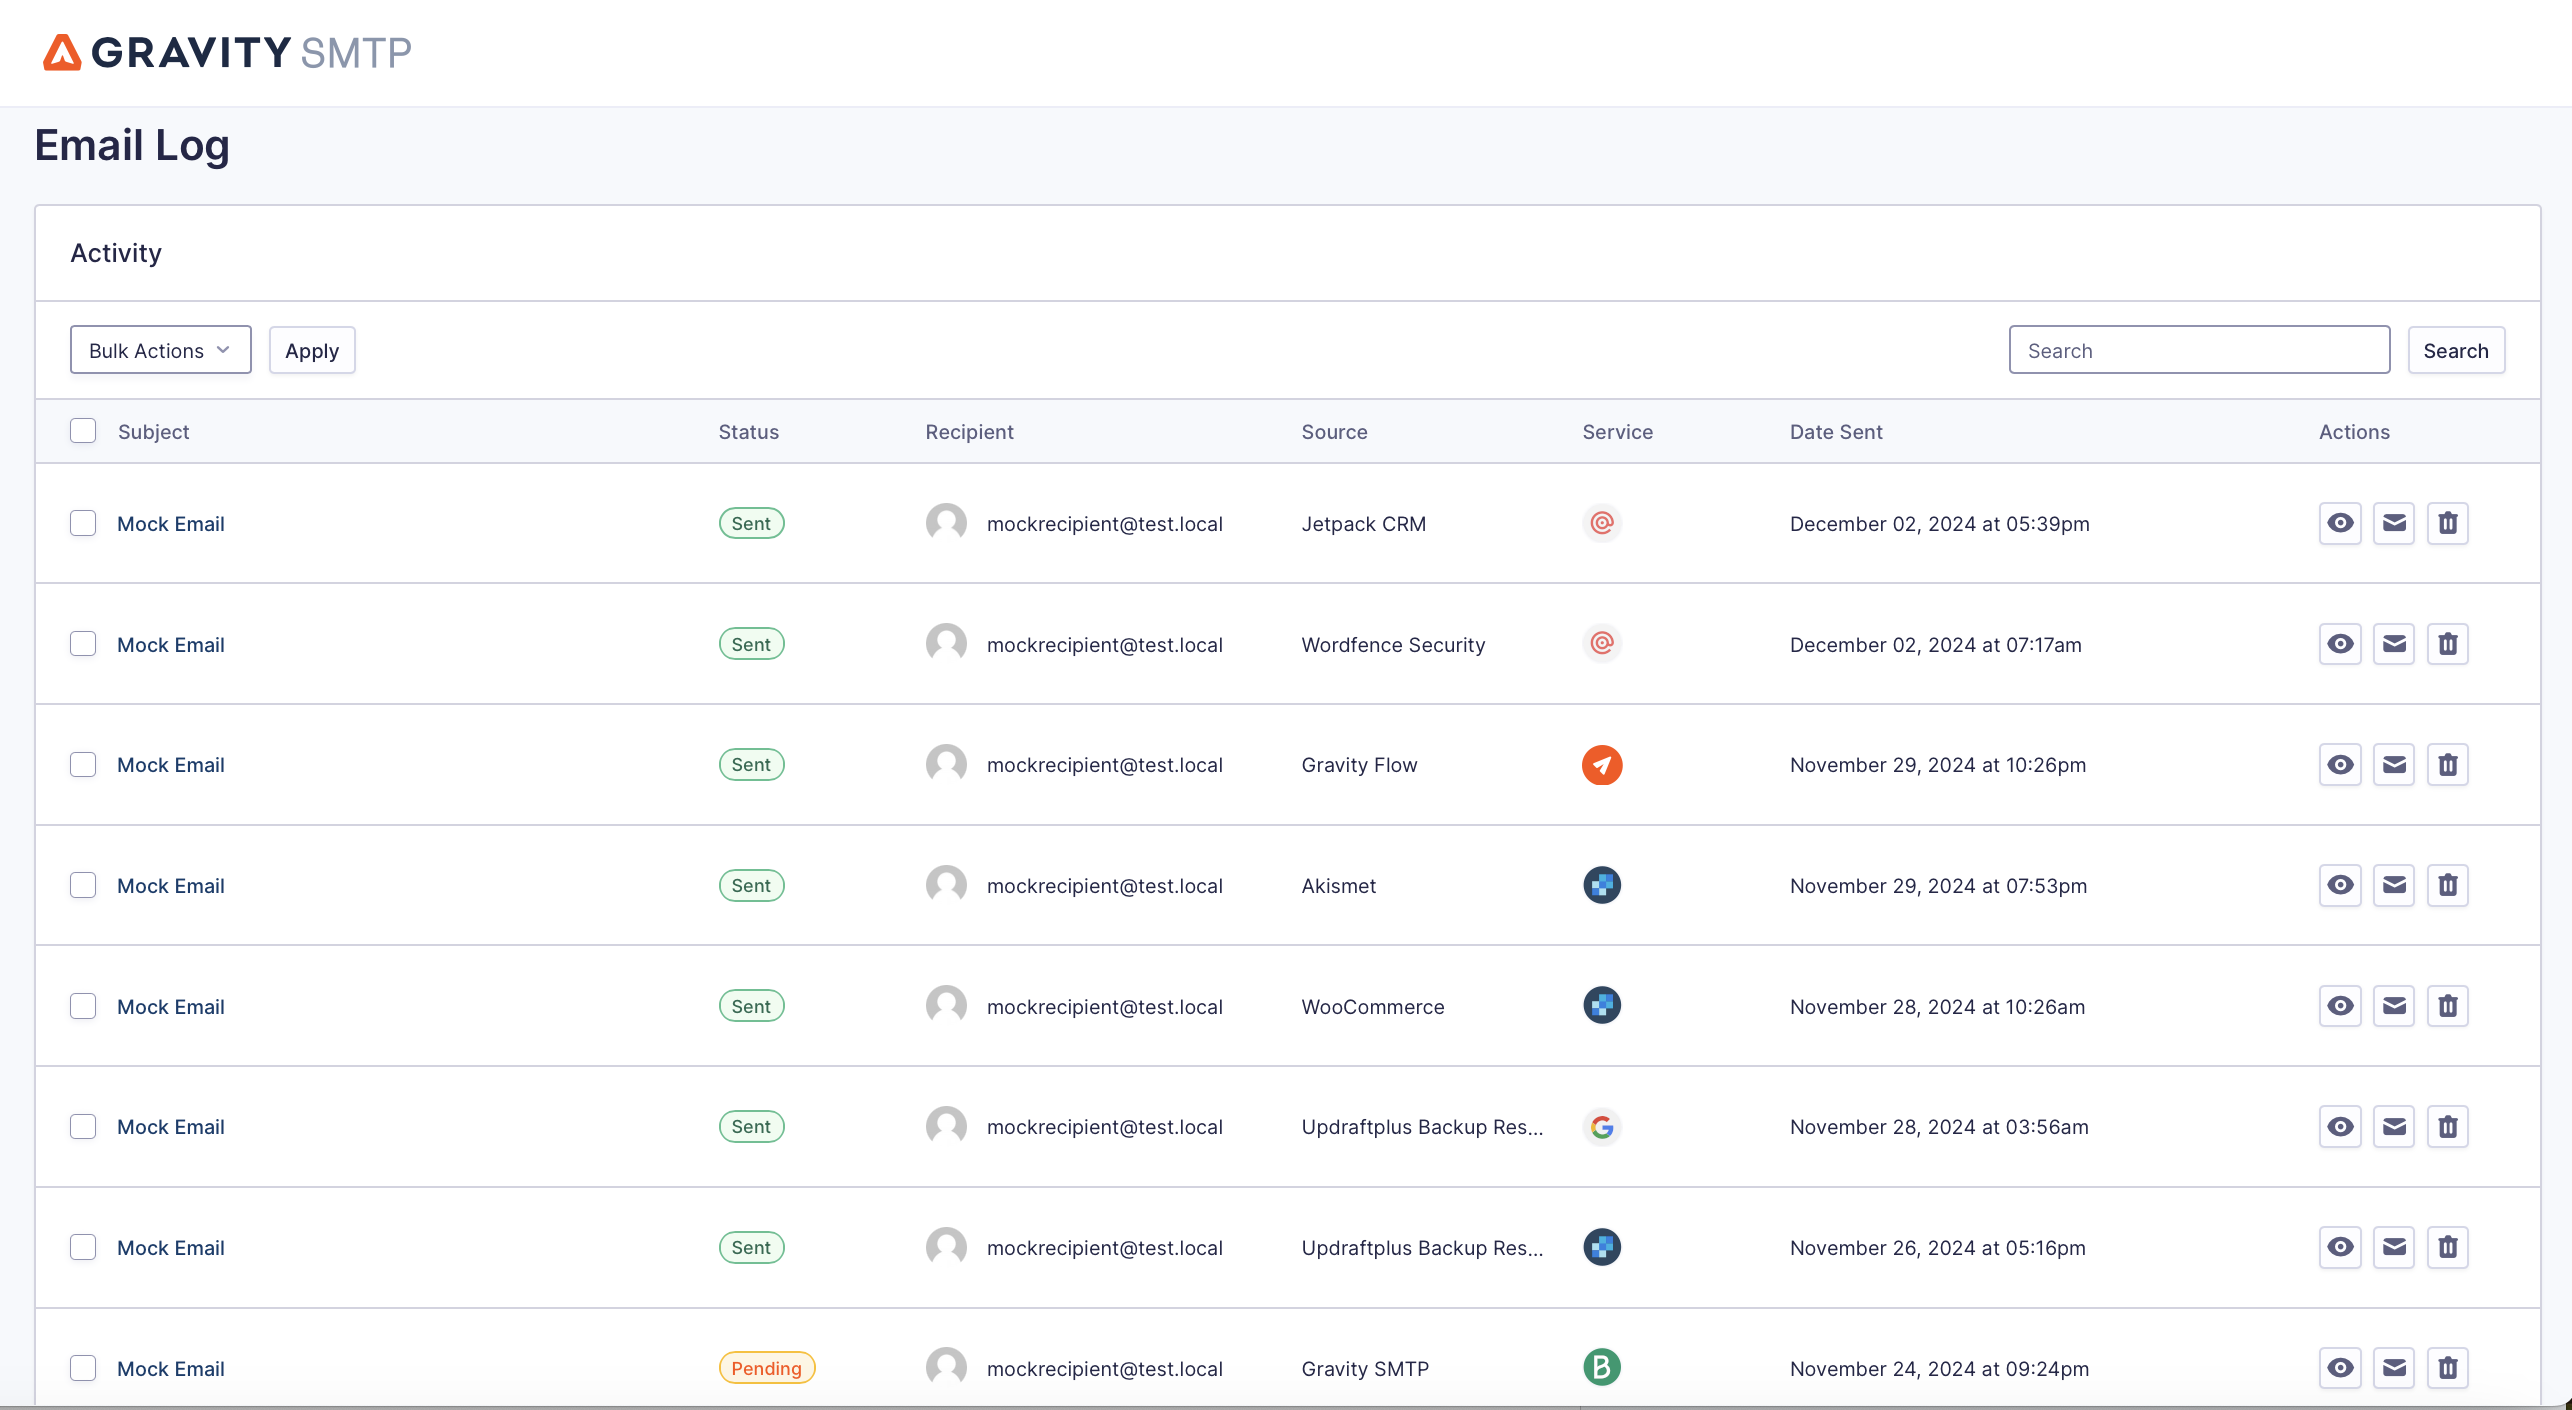
You can adjust the log storage period and behavior by going to SMTP → Settings → Logging.
Get started with WordPress SparkPost sending today
SparkPost offers a free or affordable solution to send your WordPress site’s transactional emails and improve their reliability.
With the Gravity SMTP plugin, you can easily set up WordPress SparkPost transactional emails using the SparkPost API, which is the most reliable way to send them.
Follow this guide to set up Gravity SMTP and SparkPost on your WordPress site today and start enjoying more reliable transactional emails.

If you want to keep up-to-date with what’s happening on the blog sign up for the Gravity Forms newsletter!
"*" indicates required fields


