How to Use SMTP2Go for WordPress Transactional Emails
Searching for the best method to set up SMTP2Go for WordPress transactional emails?
If you want to improve the reliability of your WordPress transactional emails, SMTP2Go is a great option. It offers a flexible, robust email sending API that you can use to handle all of your transactional emails.
To connect WordPress to the SMTP2Go email API, you can use the Gravity SMTP plugin, which is what we’re going to cover in this article.
Below, we’ll show you step-by-step how to set up SMTP2Go WordPress transactional email sending using Gravity SMTP. Before we do that, we’ll start with a quick introduction to why SMTP2Go and Gravity SMTP make a great combination.
Let’s get into it!
Why use SMTP2Go for WordPress transactional emails?
There are a lot of reasons to consider SMTP2Go for your site’s transactional emails.
To start, SMTP2Go has a generous free plan that lets you send up to 1,000 emails per month, which might be all you need for a small WordPress site.
If you do need to exceed that free limit, the paid plans are still competitively priced, starting at $15 per month to send up to 10,000 emails.
Beyond pricing, here are some other reasons to use SMTP2Go for WordPress transactional emails:
- Scalability – Whether you’re sending 10,000 emails or 10 million emails per month, SMTP2Go can handle it.
- Multiple datacenter infrastructure – Because SMTP2Go uses multiple datacenters, a single outage won’t take down your emails.
- Support for marketing emails – You can also use SMTP2Go to send marketing emails in addition to transactional emails, which is something some other services won’t allow (or require you to purchase a separate plan to access).
- Reporting tools – You get a variety of reporting tools including real-time analytics, bounce/spam tracking, and more.
- Deliverability testing tools – You also get tools to test your emails against popular spam filters and preview how your emails will look in popular email software.
- Multiple support channels – All paid plans get support via phone, live chat, or ticket. If you value phone support as an option, this could be an advantage because many other services will only offer support via email or live chat.
How Gravity SMTP helps you use SMTP2Go on WordPress
Gravity SMTP is a WordPress SMTP plugin that lets you connect your WordPress site directly to SMTP2Go using the SMTP2Go email API.
Then, Gravity SMTP will automatically send all of your WordPress site’s transactional emails using SMTP2Go.
Beyond configuring WordPress to use the SMTP2Go email API, Gravity SMTP also offers a lot of other useful features:
- Detailed email logging – You can log each individual email that your site sends, including viewing technical information and the content and attachments of each email. You can also adjust the logging behavior (e.g. turning off attachment logging) or disable it completely.
- High-level reports – In addition to the email log, you also get a high-level reports dashboard to track your site’s email sending.
- Open tracking – Gravity SMTP has its own open tracking that lets you see data inside your WordPress dashboard. You can use this to replace SMTP2Go’s open tracking or for added data.
- Real-time alerts for email issues – You can set up real-time alerts for failed emails using webhooks (including Slack message support) or SMS messages via Twilio.
- Backup email sending methods – For mission-critical email sending, you can set up a backup email sending service. If an email ever fails to send via SMTP2Go, Gravity SMTP will automatically resend it using your backup service.
Currently, Gravity SMTP is available for free to anyone holding one of these Gravity Forms licenses:
- Elite license
- Nonprofit license
- Developer license (legacy)
You can download it from the Gravity Forms My Account area. However, Gravity SMTP is still a 100% standalone plugin and you do not need to have Gravity Forms installed to use Gravity SMTP.
How to set up WordPress SMTP2Go with Gravity SMTP
Now, let’s get into the full step-by-step guide on how to set up SMTP2Go WordPress transactional email sending using the Gravity SMTP plugin…
1. Install the Gravity SMTP plugin
To get started, you’ll want to install the Gravity SMTP plugin on the WordPress site where you want to use SMTP2Go.
Even though Gravity SMTP comes from the same team behind the Gravity Forms plugin, it’s a completely standalone plugin and you do not need to have Gravity Forms installed to use Gravity SMTP (though Gravity does work great for sending your form notification emails).
If you have the Elite, Nonprofit, or Developer license, you can download Gravity SMTP and find your license key in the Gravity Forms My Account area.
2. Register for your SMTP2Go account
If you don’t already have an SMTP2Go account, the next step is to register for one.
SMTP2Go has a free plan that you can sign up for without needing to enter a credit card.
The SMTP2Go free plan will let you send up to 1,000 emails per month for free (with an additional limit that you can’t exceed 200 emails within a single day).
The free plan is all you need to follow along with this guide without needing to enter any billing information.
If your site needs to send more than 1,000 emails per month, you’ll need to eventually upgrade to one of the paid plans.
The paid plans start at $15 per month to send up to 10,000 emails per month. You can scale the plans all the way up to sending millions of emails per month, so there’s really no limit on what you can do.

3. Add a Verified Sender to SMTP2Go
Once you’ve registered for your free SMTP2Go account, the next step is to set up a Verified Sender in SMTP2Go.
This proves to SMTP2Go that you control the email/domain which you want to send your transactional emails from.
Choose What Type of Verified Sender to use
There are two ways to set up a verified sender:
- Sender domain – If you authenticate your domain name with SMTP2Go, you’ll be able to send from any email address that uses your domain name.
- Single sender email – You can only send from this single email address.
Setting up a single sender email is the simplest option. All you need to do is click a verification link in the email that SMTP2Go sends to that address and then you can start sending.
On the other hand, if you authenticate your domain name, you’ll need to be able to edit the DNS settings of your domain name.
Despite that, we still recommend authenticating your domain name whenever possible. Not only does this give you more flexibility, but it will also improve the deliverability of your transactional emails, which is worth the extra setup process.
For this reason, we’ll use domain authentication for this tutorial. However, if you’re unable to edit your DNS records for some reason, you can use the single sender email approach.
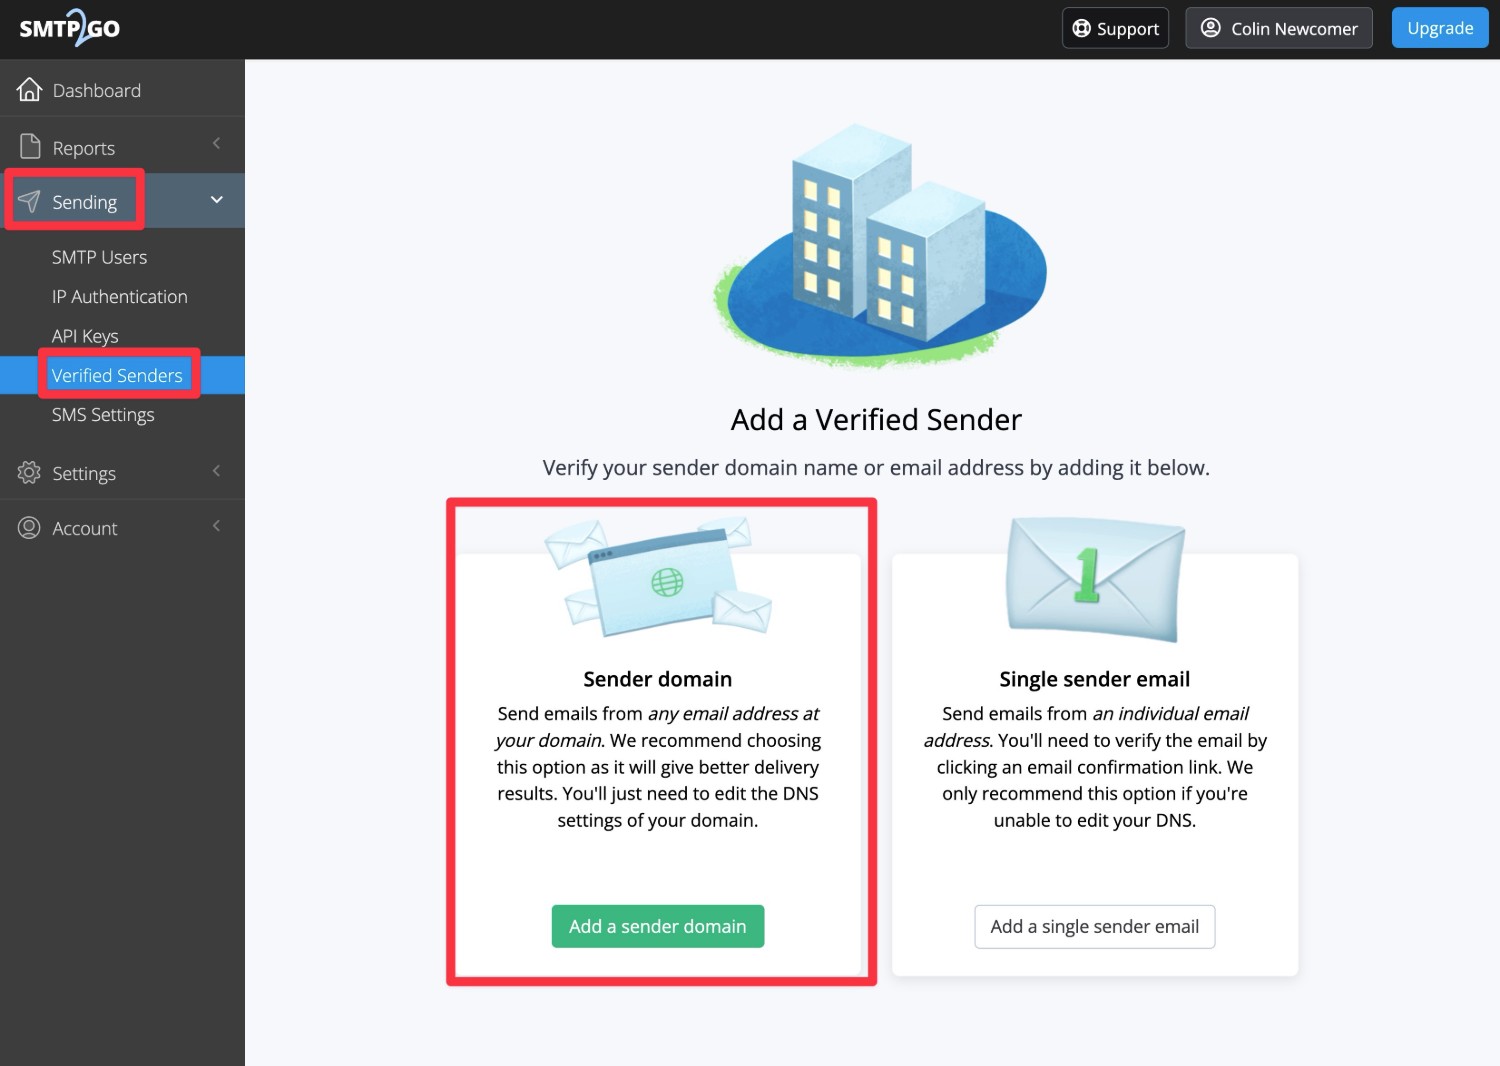
To set up your verified sender domain name, go to Sending → Verified Senders in your SMTP2Go account. Then, click Add a sender domain.
Authenticate your domain name
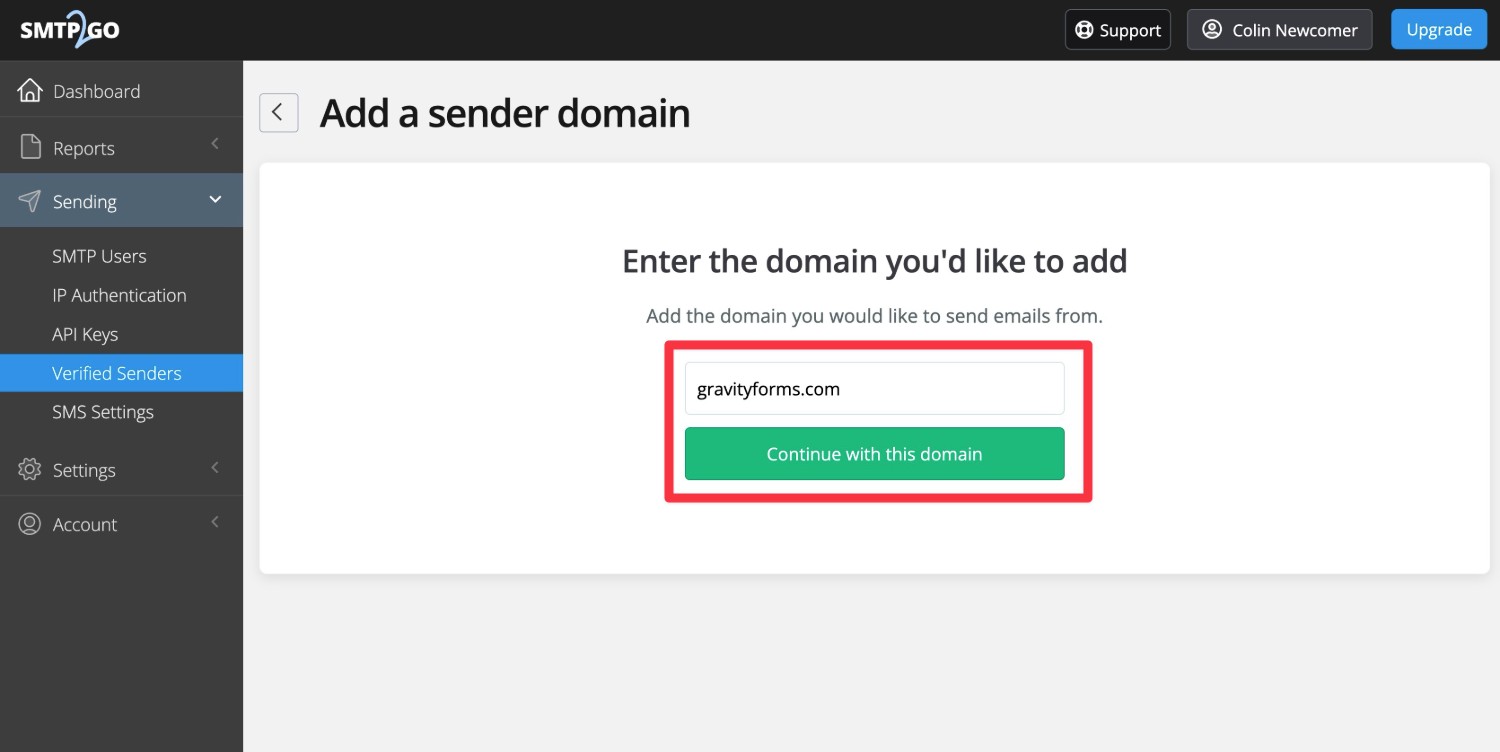
On the next screen, you’ll be prompted to enter your domain name. Then, click Continue with this domain.
Then, SMTP2Go will provide you with some DNS records (three CNAME records) that you need to add to your domain name.
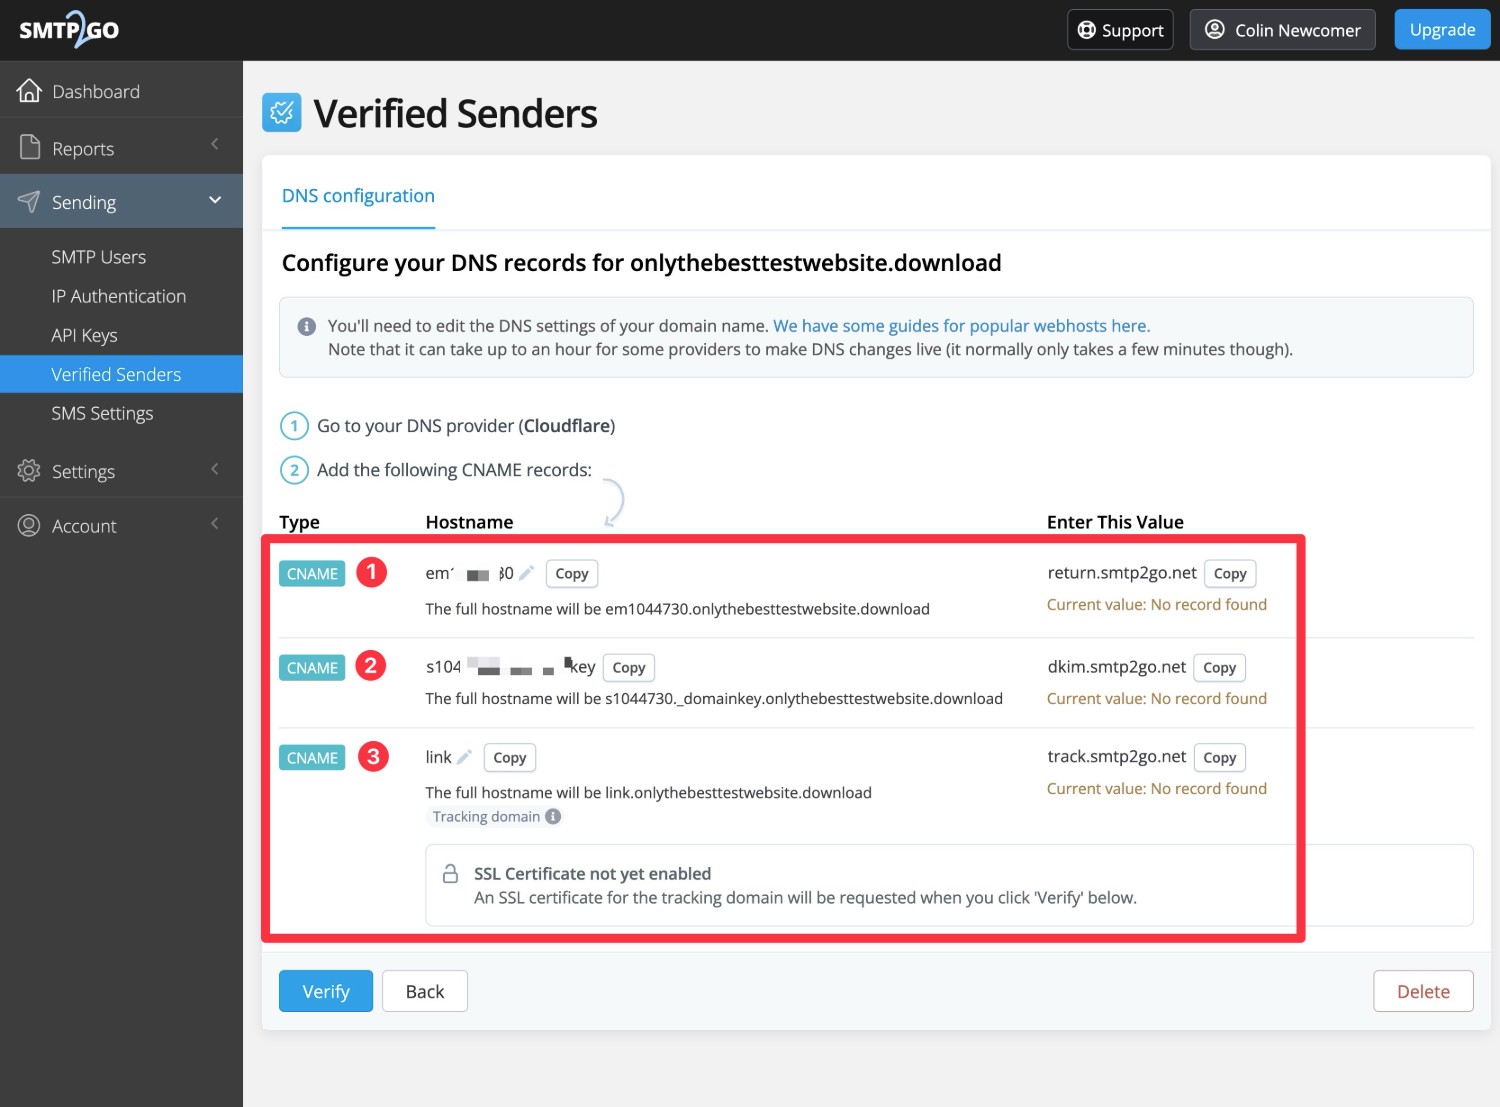
You’ll add these records wherever you manage your DNS. Depending on your site’s configuration, this could be…
- Your web hosting dashboard, if you pointed your domain name to your web host’s nameservers.
- Your domain registrar.
- A reverse proxy service like Cloudflare.
For example, here’s what it looks like to add these records at Cloudflare:
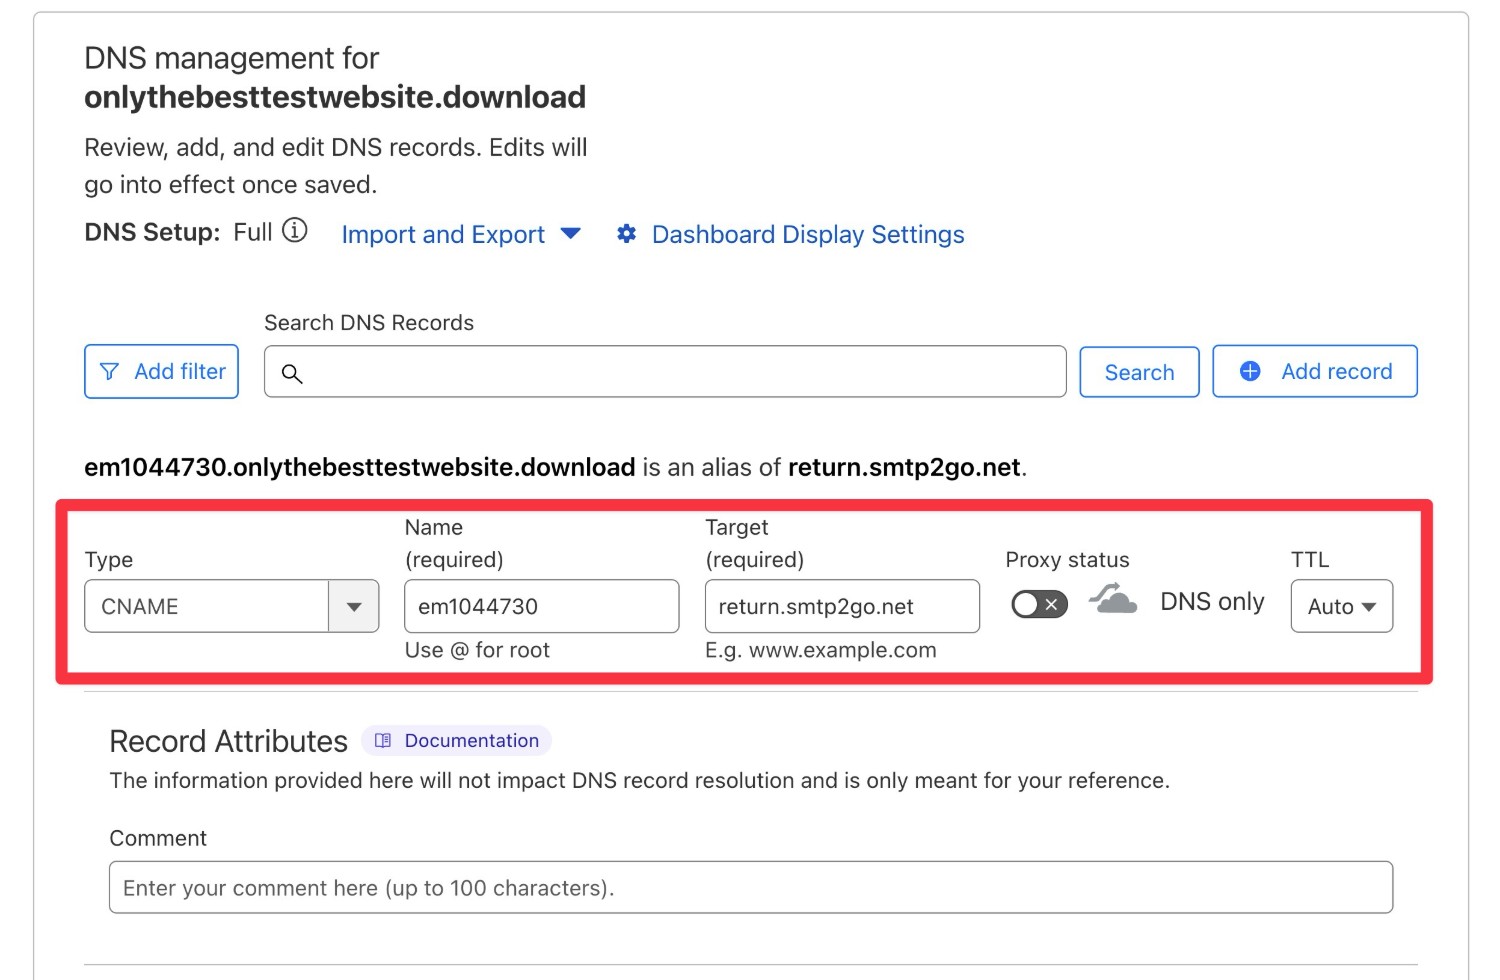
Once you’ve added all three records, come back to the SMTP2Go website and click Verify.
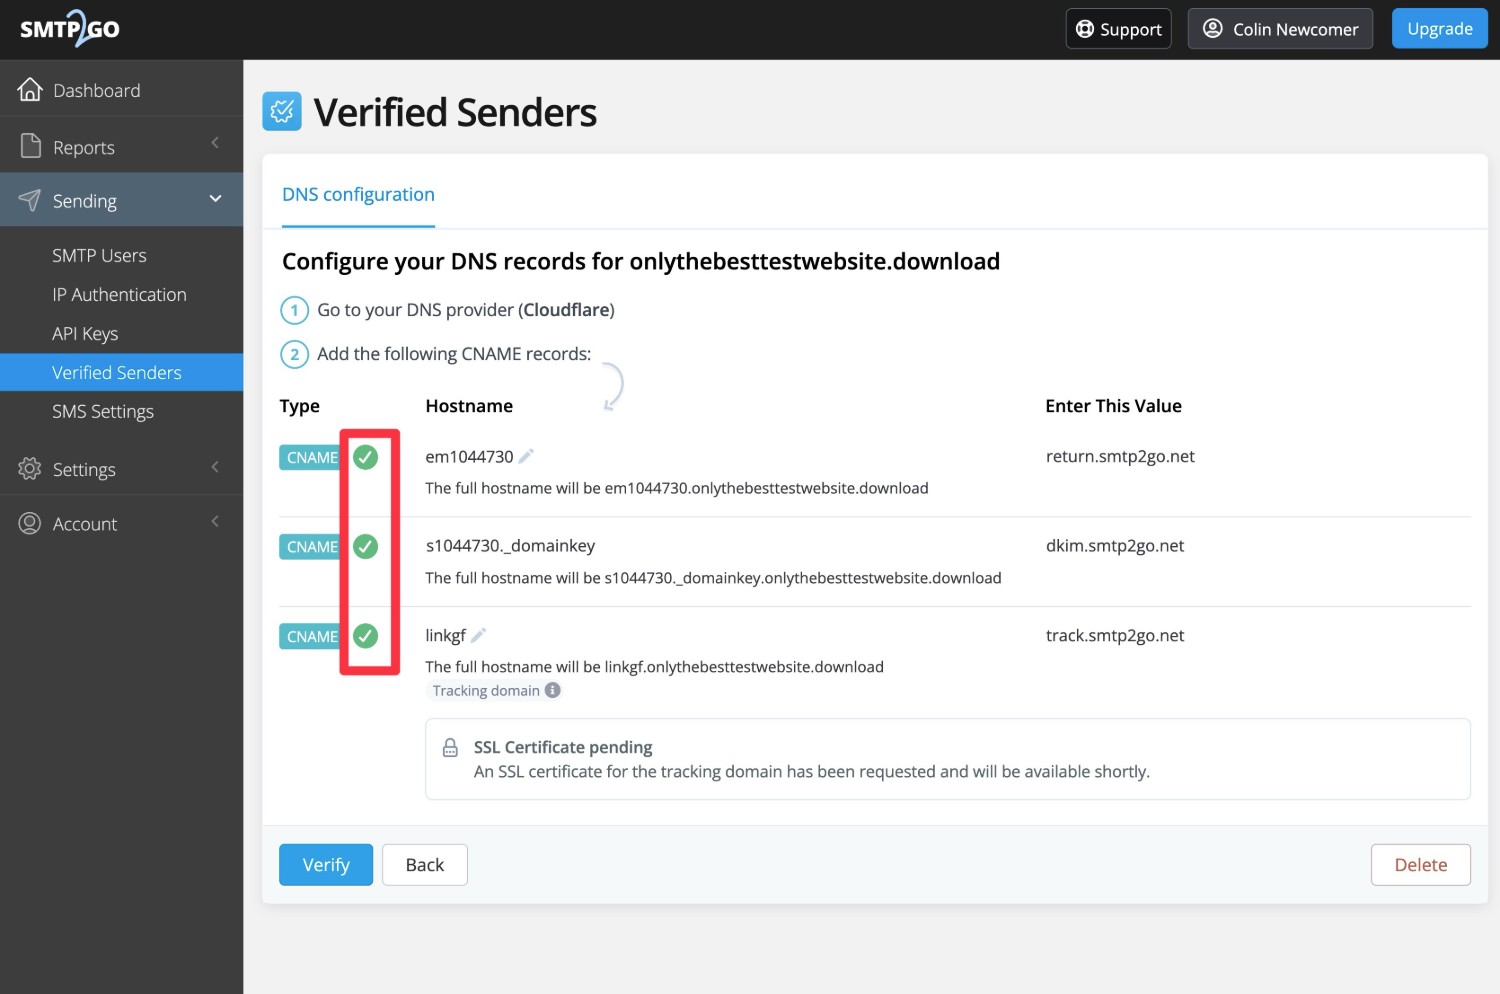
You should then see green checkmarks appear next to all three CNAME records. If you do, you’re finished with this interface.
If you don’t see a success message yet, try waiting an hour and then checking again. Sometimes it takes some time for the DNS record changes to update.
4. Create your SMTP2Go API key
Once you’ve set up your domain as a verified sender, the next step is to create your SMTP2Go API key, which you’ll need to connect Gravity SMTP to SMTP2Go.
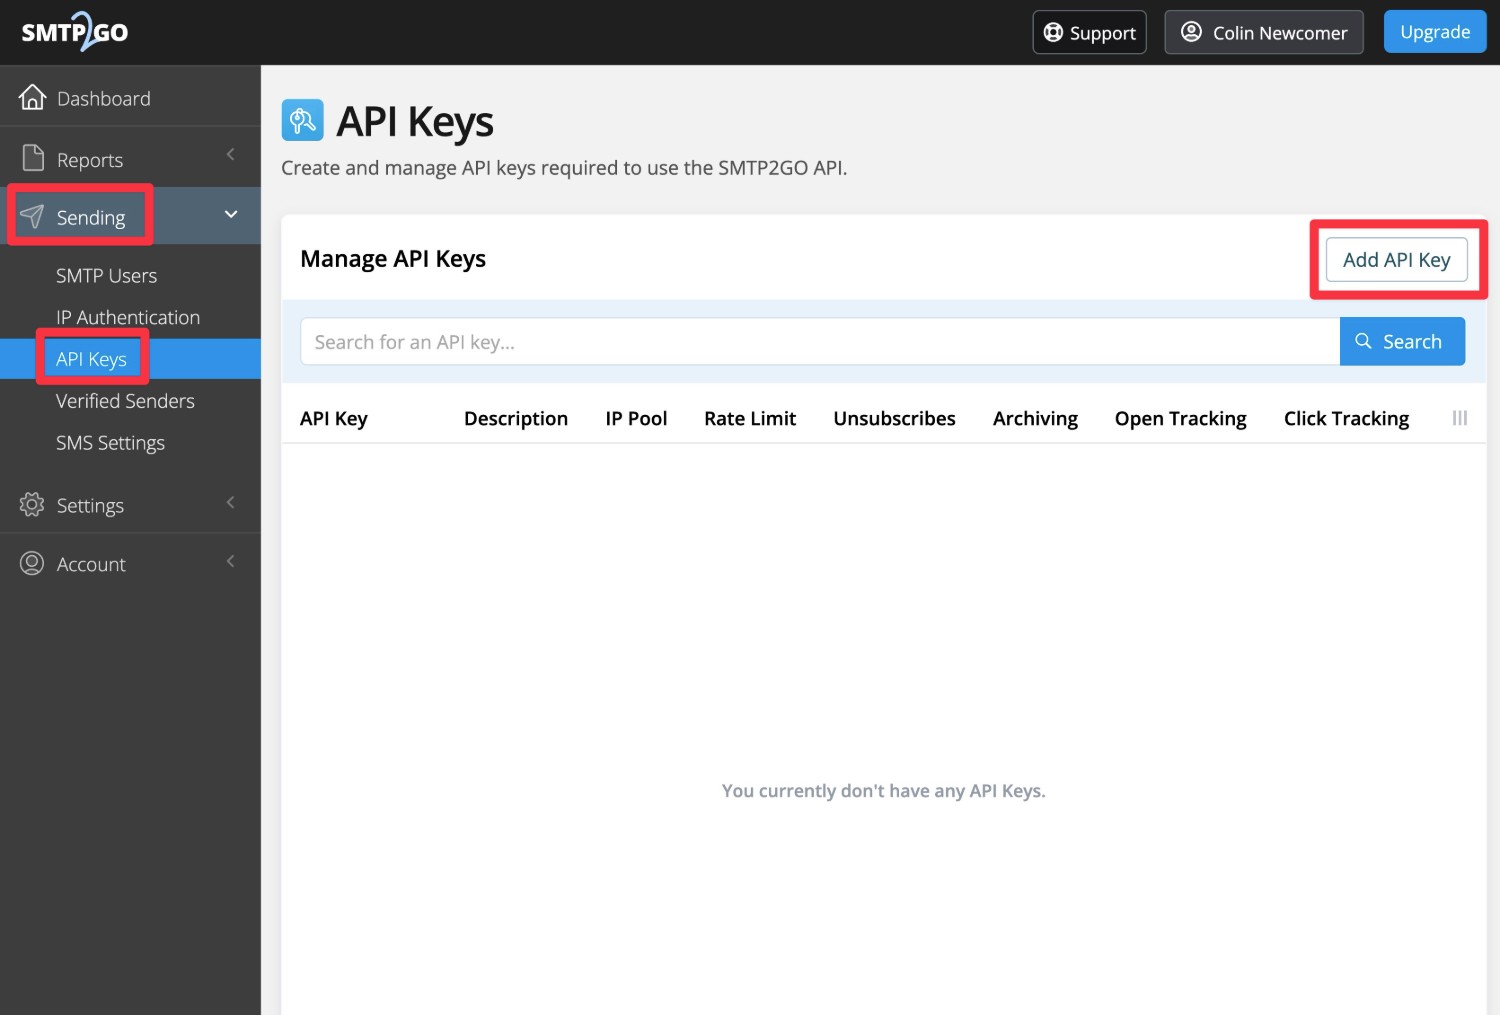
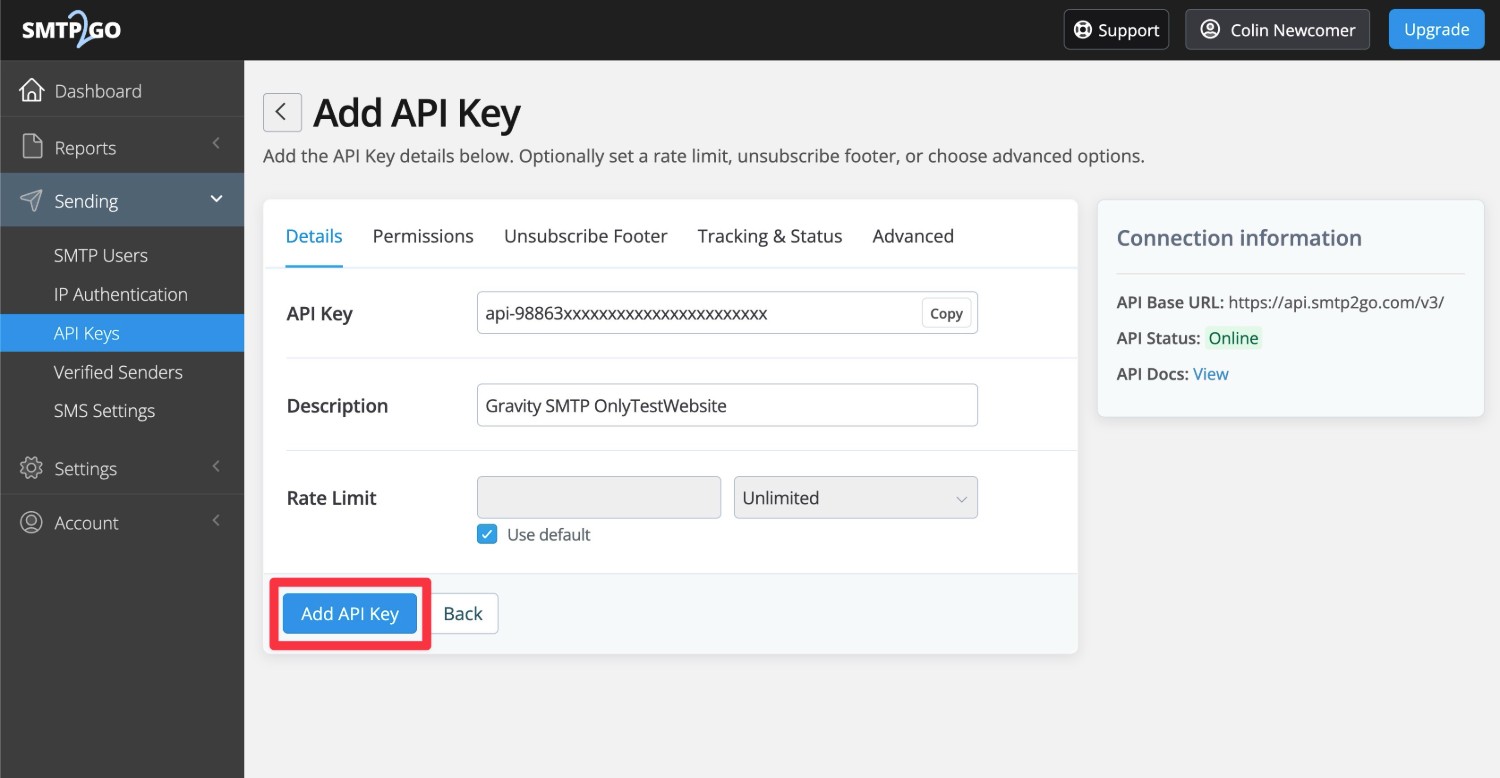
In your SMTP2Go dashboard, go to Sending → API Keys. Then, click the Add API Key button.
On the next screen, you’ll get some options to configure your API key.
You’re totally fine to leave these as the defaults, but you might want to explore them.
At a minimum, we recommend adding a description to help you remember where you’ll use this API key, which can be especially helpful if you’re planning to set up multiple websites with SMTP2Go.
The Tracking & Status tab also lets you use SMTP2Go’s click and open tracking (Gravity SMTP also has its own feature for open tracking, though, so you don’t necessarily need to use this).
For our example, the only thing we’ve done is add a Description.
Once you’ve made your choices, click Add API Key.
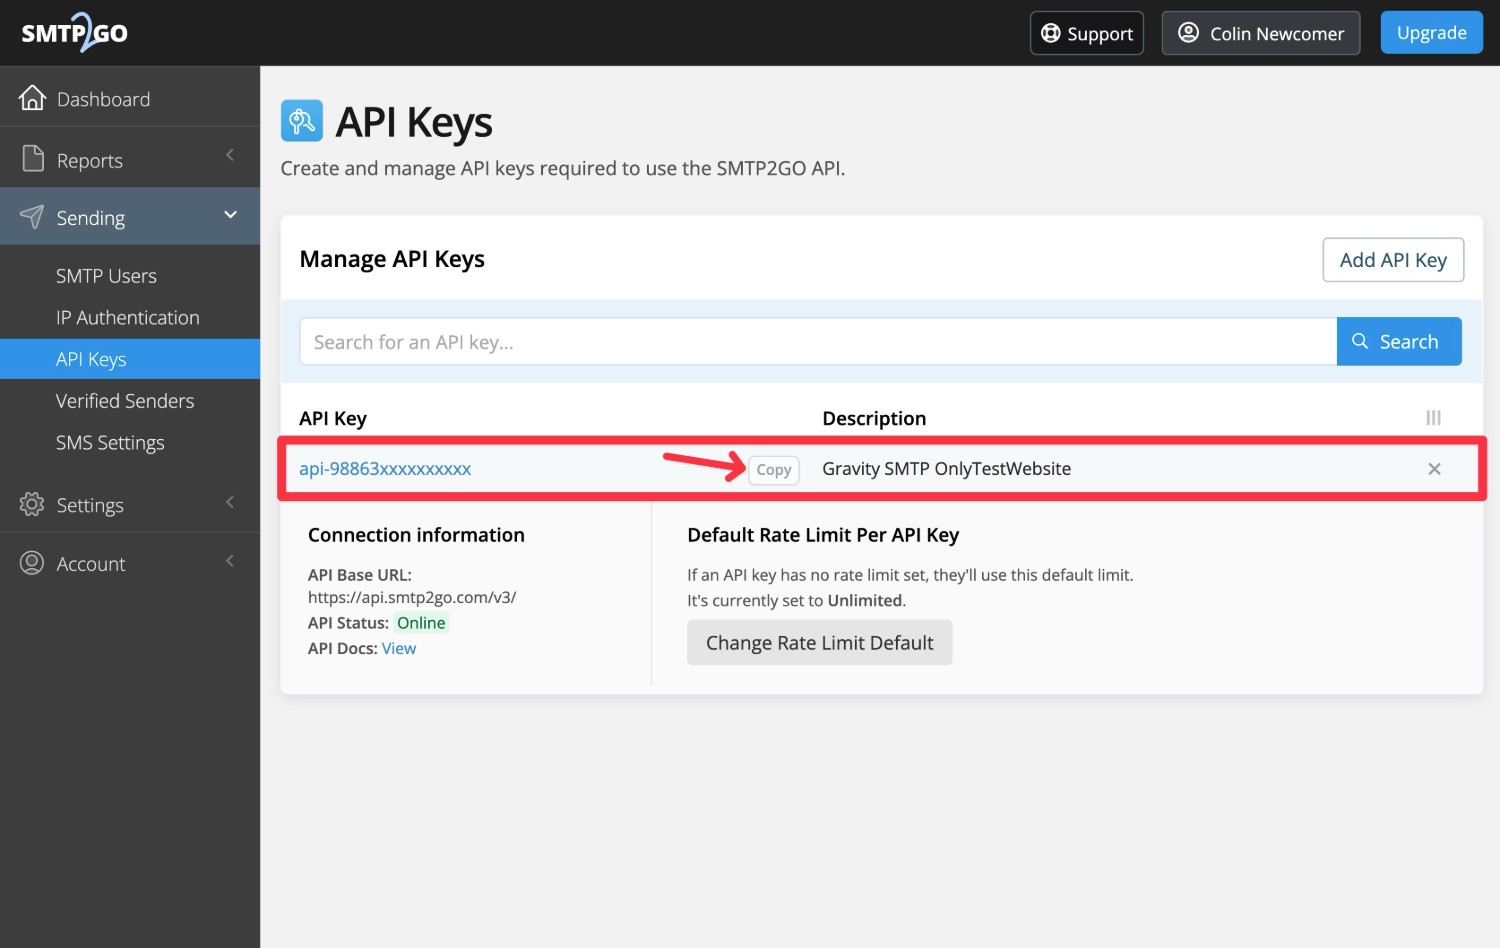
You should then see your API key appear in the list.
To access your actual API key, you can click Copy. Keep this handy because you’ll need your API key in the next step.
5. Connect Gravity SMTP to SMTP2Go
Now that you have your SMTP2Go API key, you’ll perform the rest of the setup from your WordPress dashboard.
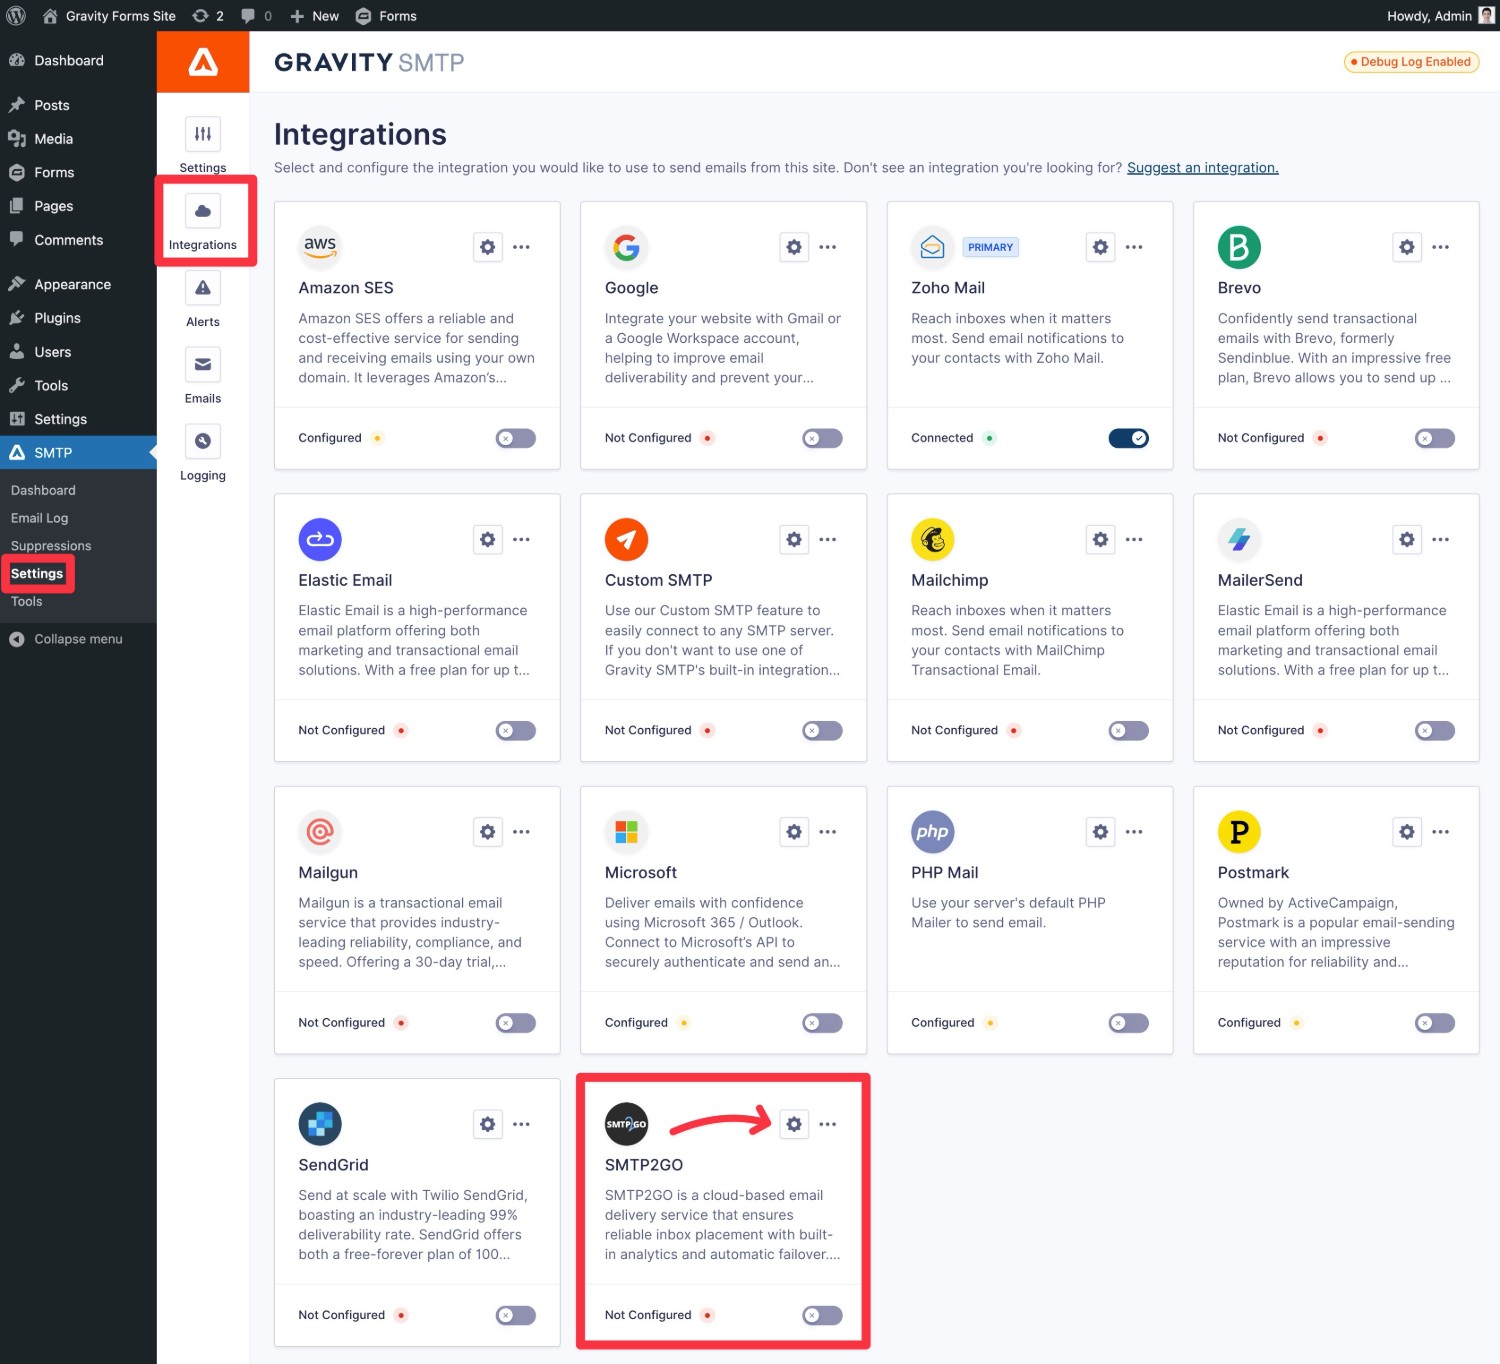
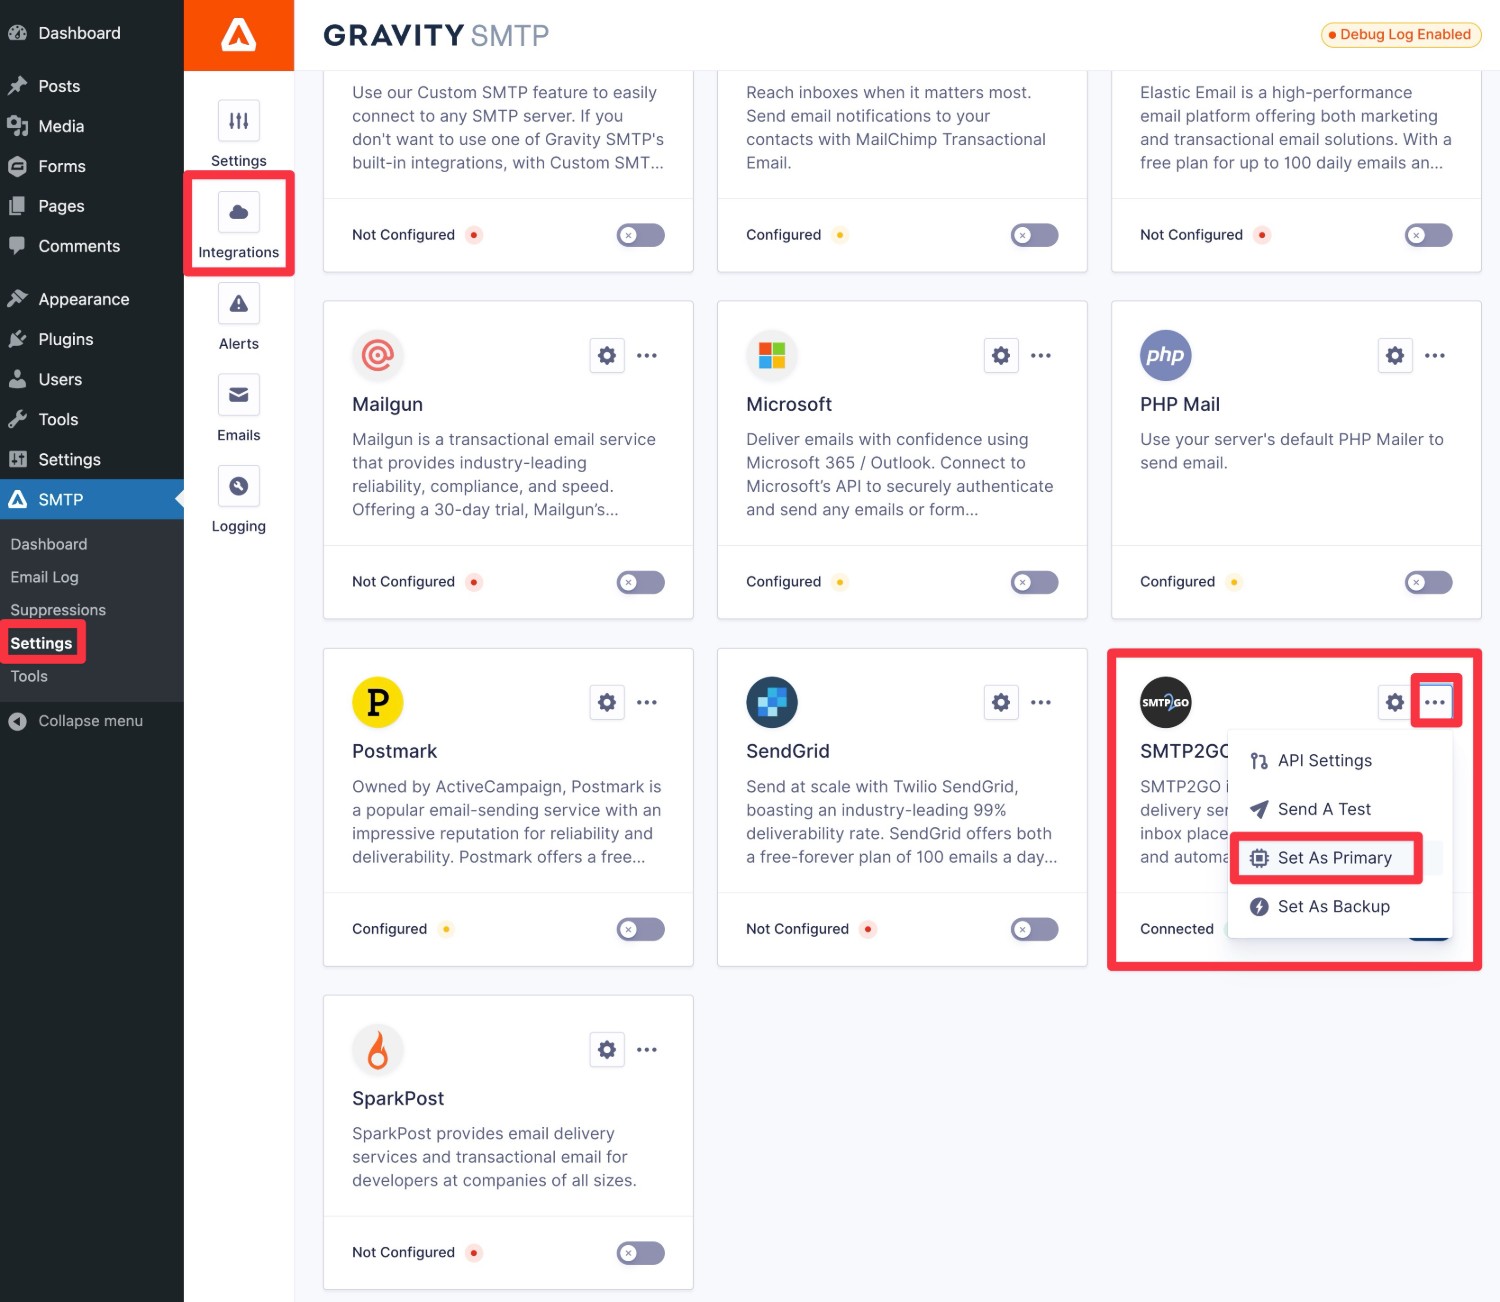
To get started, open the settings for SMTP2Go in Gravity SMTP.
- Open your WordPress dashboard.
- Go to SMTP → Settings.
- Select the Integrations tab in the Gravity SMTP settings area.
- Click the gear icon next to SMTP2Go.
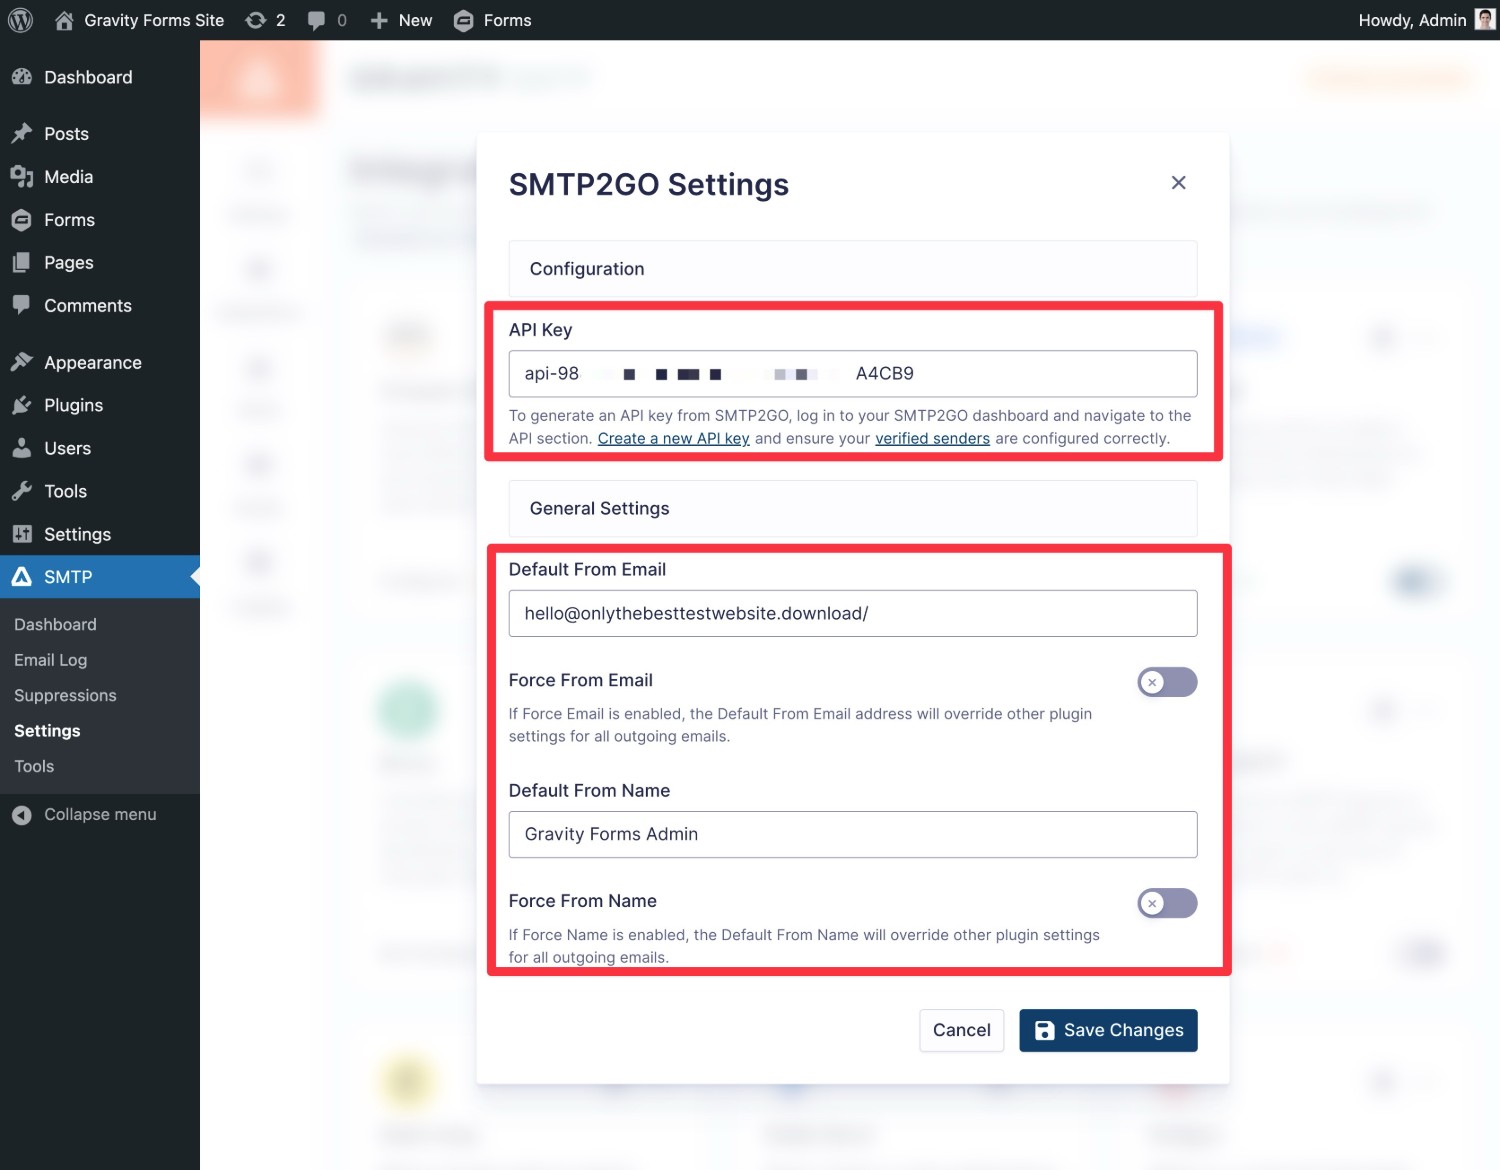
This will open a popup with a few basic settings.
First, paste your SMTP2Go API key into the API Key box.
Then, you can set your Default From Email and Default From Name, along with whether or not to force all plugins on your site to use this name/email.
Note – your Default From Email must be an email address on the domain name that you added as a verified sender in SMTP2Go. Or, if you set up a single sender email instead of verifying your domain name, you must enter the exact email address that you set up as a single sender email.
Once you’ve added everything, make sure to click Save Changes.
To finish things out, you need to set SMTP2Go as your site’s primary transactional email service.
To do this, click the three dots icon next to SMTP2Go in the Integrations area. Then, choose Set As Primary from the drop-down.
6. Send a test email
To make sure that everything is working properly, Gravity SMTP includes a built-in tool that lets you send a test email.
Here’s how to use it:
- Go to SMTP → Tools in your WordPress dashboard.
- Select the Send a Test tab (it should open by default).
- Enter the email address to which you want to send a test email in the Send To box.
- Make sure that SMTP2Go is selected in the Send With drop-down.
- Click Send Test.
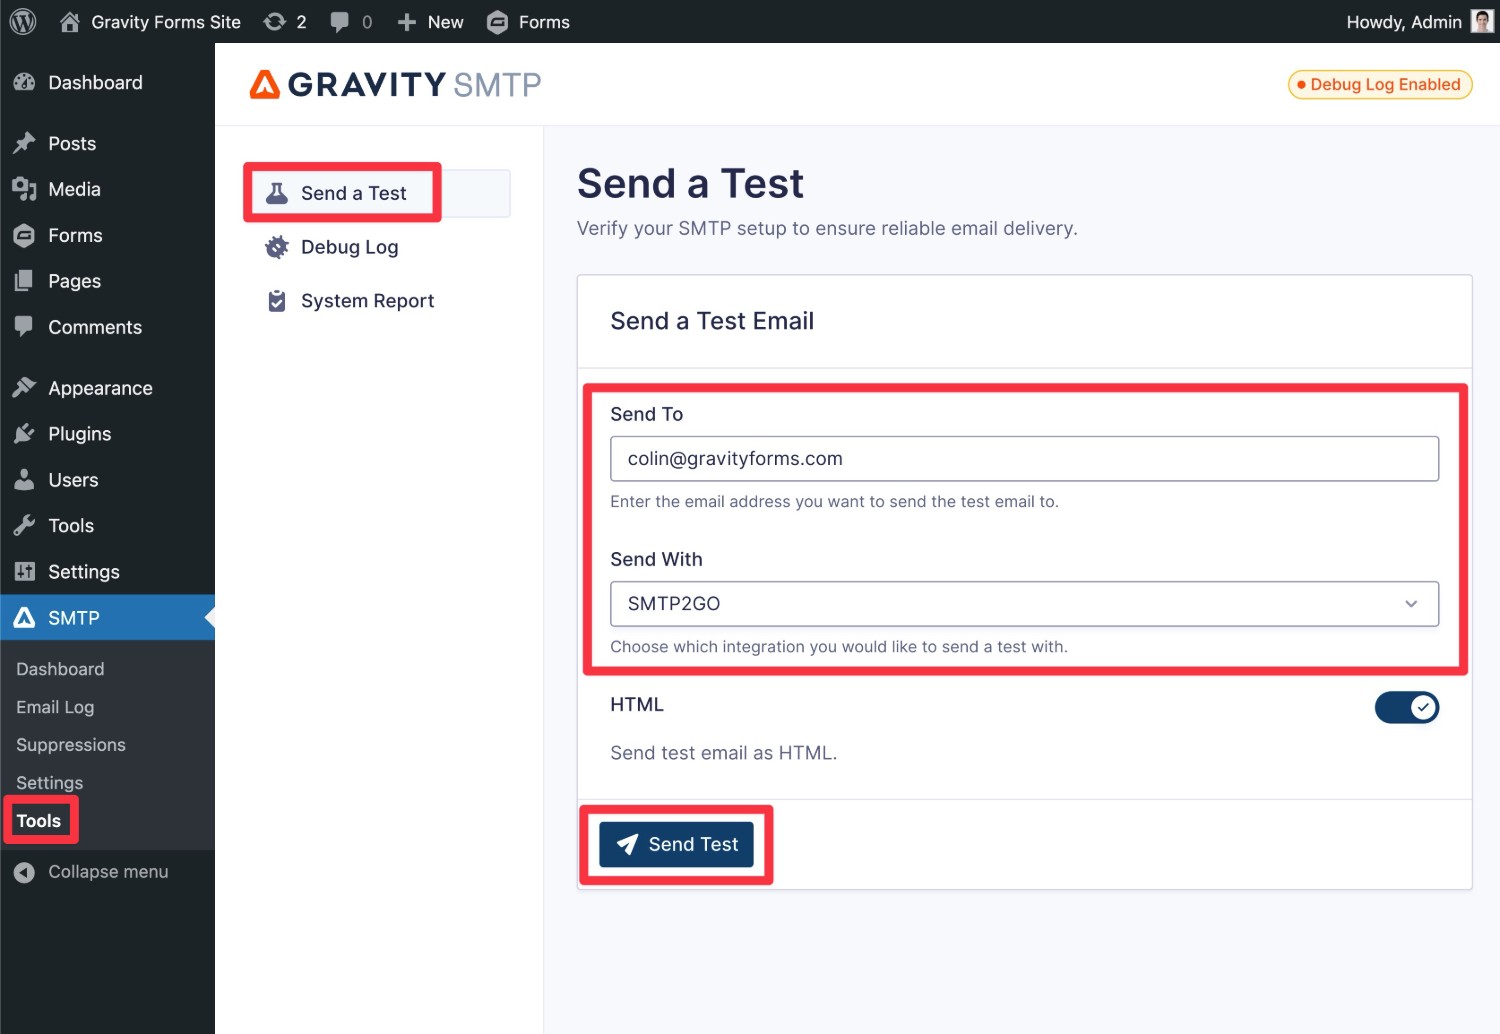
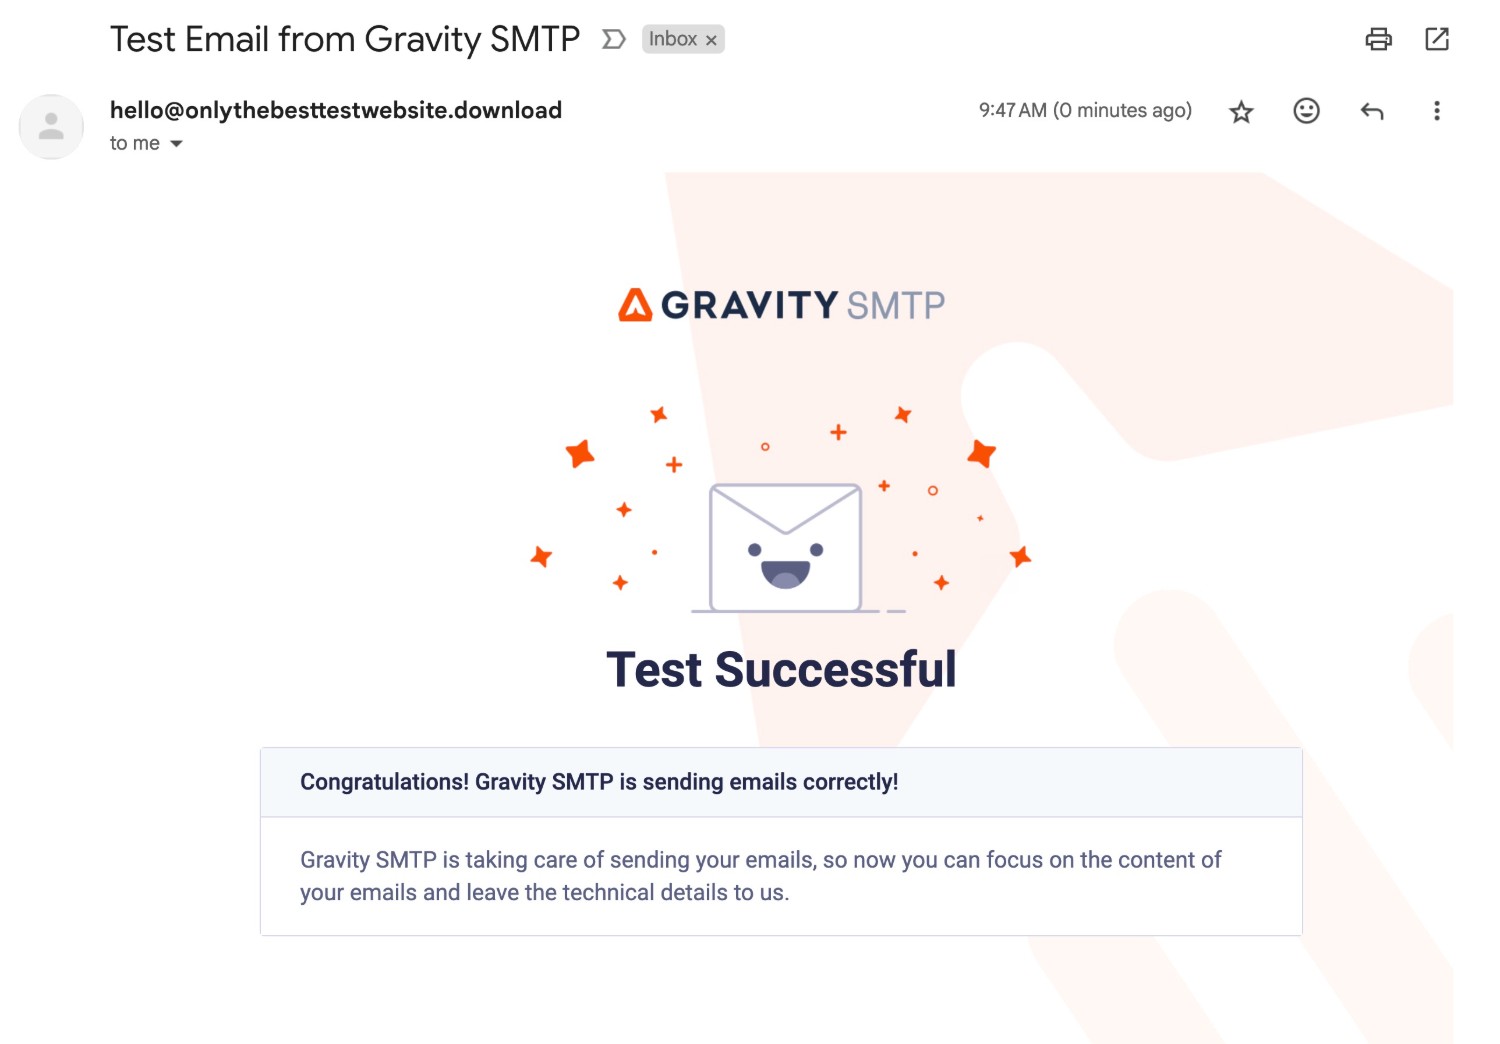
You should then see an “Email successfully sent” message appear in the interface. Then, if you open your email inbox, you should see an email that looks something like this:
If Gravity SMTP shows the test email as failing to send, check if you made a typo when adding the API key in the Gravity SMTP Integrations area.
If the email shows as being sent successfully but you’re not seeing it in your inbox, you can go to Reports → Activity in your SMTP2Go dashboard to diagnose why the email didn’t send.
If you see an email that says “Rejected”, you can click on it to find the specific reason why SMTP2Go rejected the email. For example, in the screenshot below, you can see that SMTP2Go rejected the email because we were trying to send it from an email address that we hadn’t added as a verified sender.
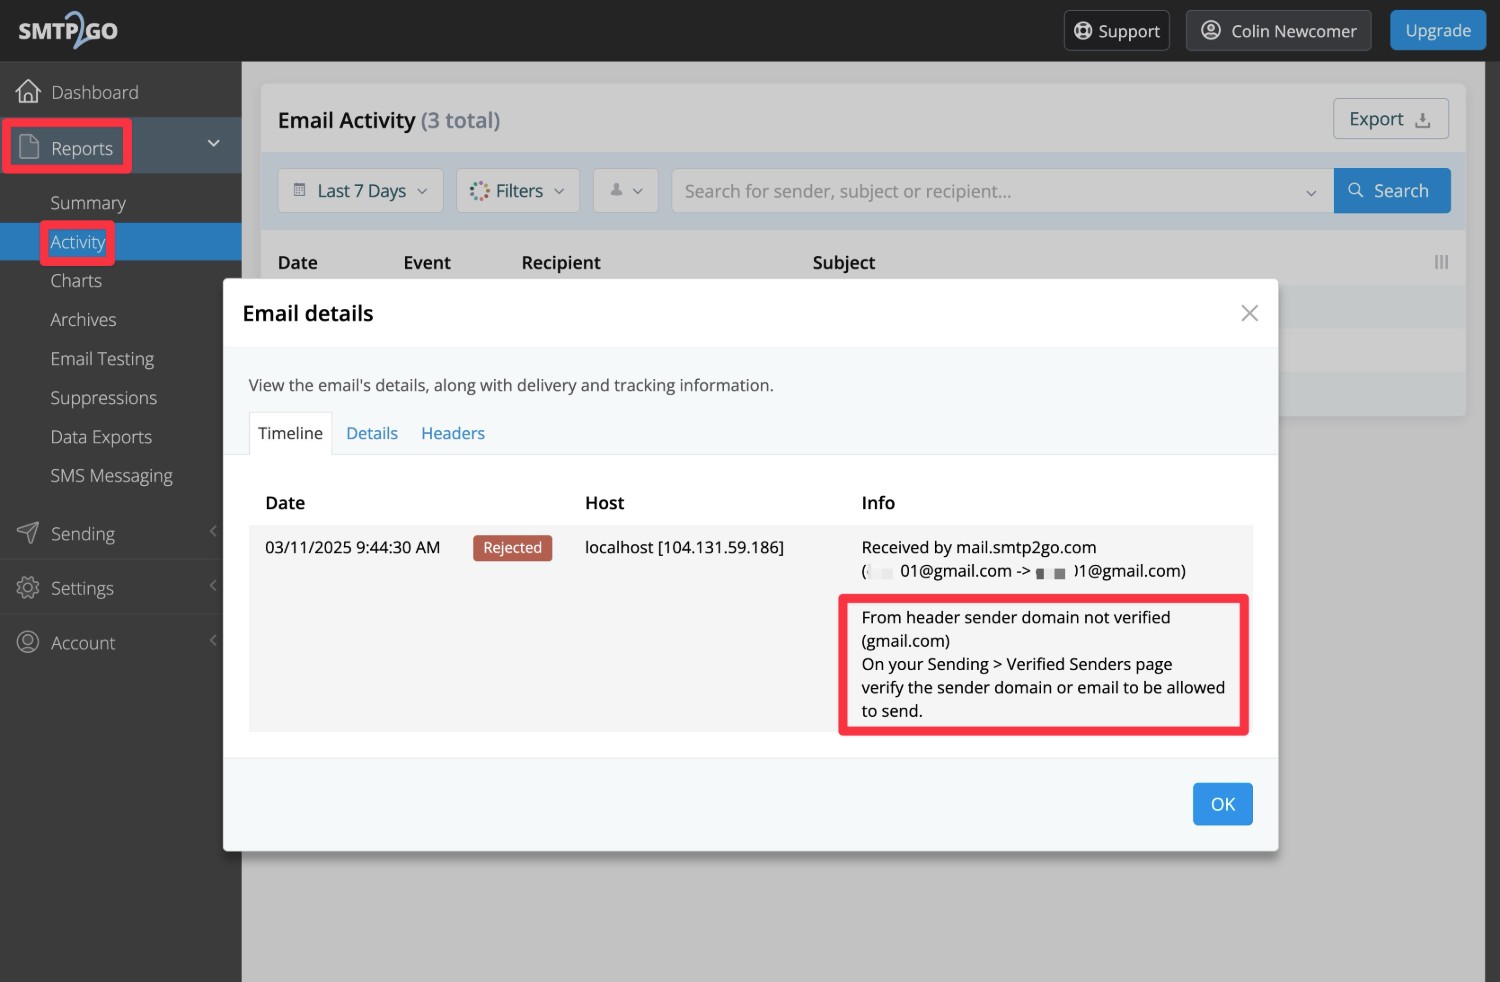
We were able to fix it by setting the From Email properly and forcing Gravity SMTP to use that From Email for all emails.
7. Set up a backup email sending service and alerts (optional)
At this point, your site is properly configured to send all of its transactional emails using SMTP2Go and you can consider this tutorial finished.
However, one of the nice things about Gravity SMTP is that it gives you some additional tools to ensure the reliability of your site’s transactional emails.
First, you can set up alerts so that you’re automatically notified if your site’s emails are failing. Check out these guides to learn more:
Second, Gravity SMTP also lets you set up an optional backup email sending service. If an email ever fails to send with SMTP2Go for some reason, Gravity SMTP can automatically resend that email using your backup service.
If you want to set up a backup email sending service, you first need to connect your site to that service. Here are guides for the direct API integrations that Gravity SMTP supports, though you also have the option to use a custom SMTP service:
- SendGrid
- Mailgun
- Postmark
- Brevo
- Amazon SES
- Gmail/Google Workspace
- Outlook/Microsoft 365
- Mailchimp Transactional
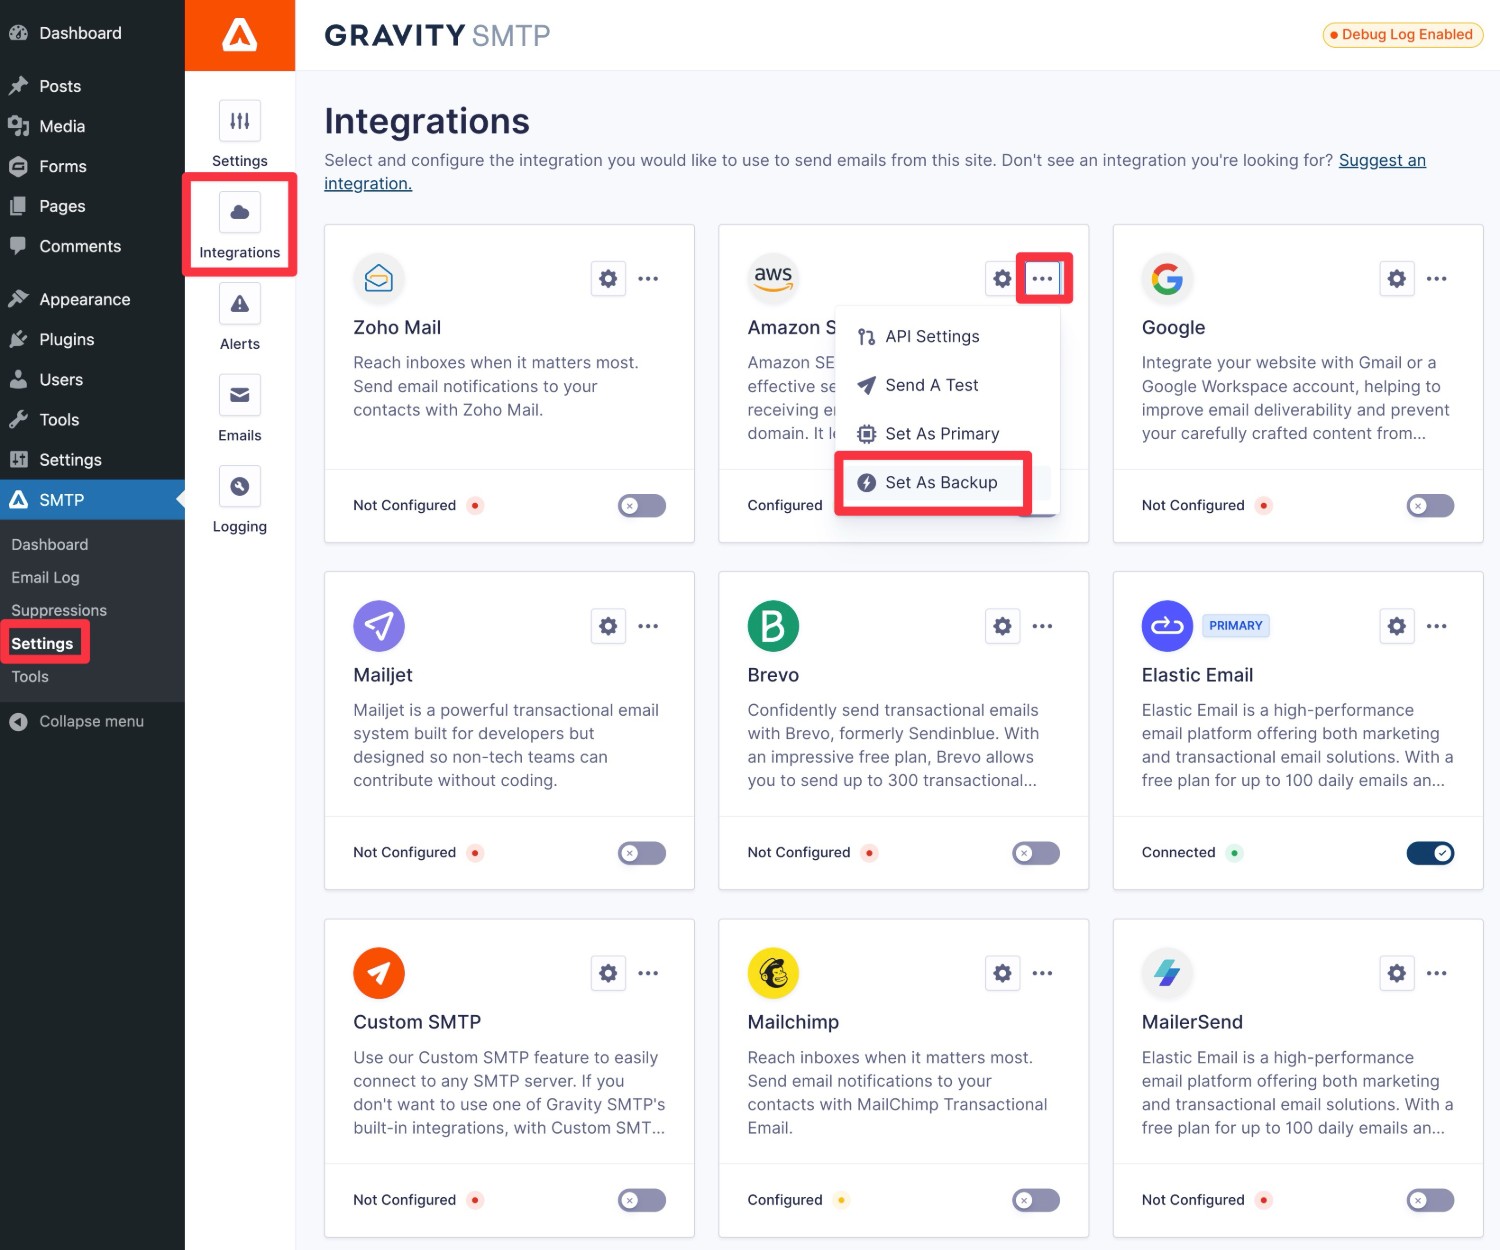
Once you’ve connected to a service, you can click the three dots icon next to that service in the Integrations list and choose Set As Backup.
How to monitor your site’s emails
In addition to letting you set up real-time alerts, Gravity SMTP also offers multiple in-dashboard tools to help you keep an eye on your site’s emails.
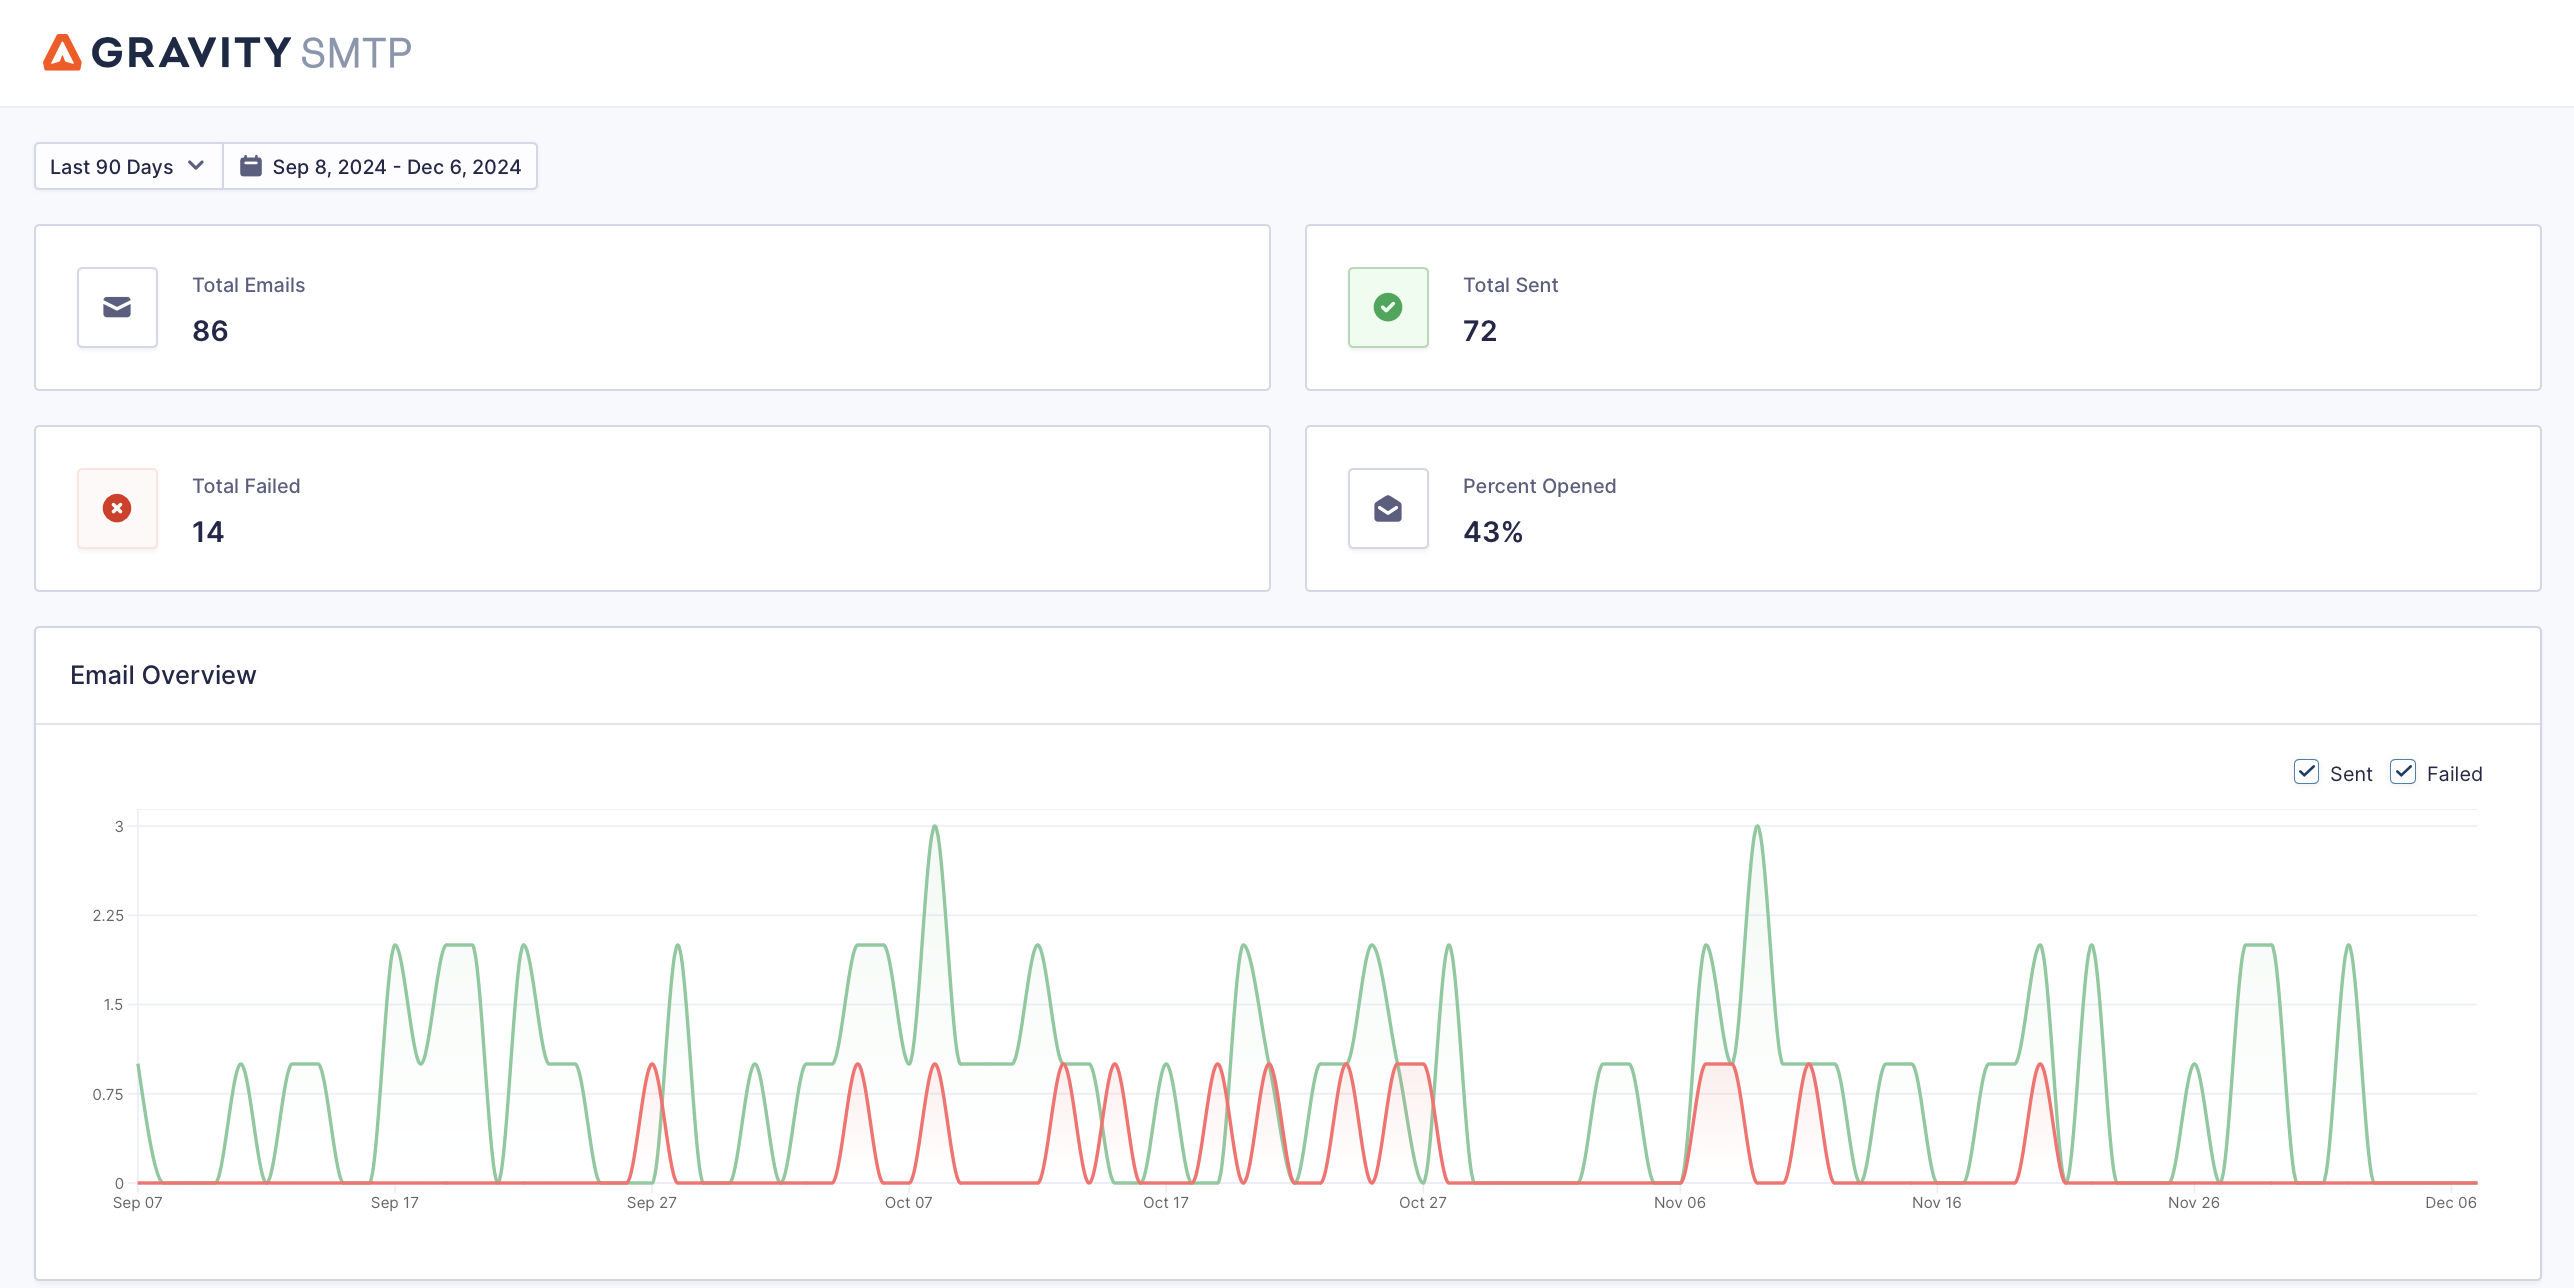
To do this, go to SMTP → Dashboard to view high-level reports about your site’s email usage:
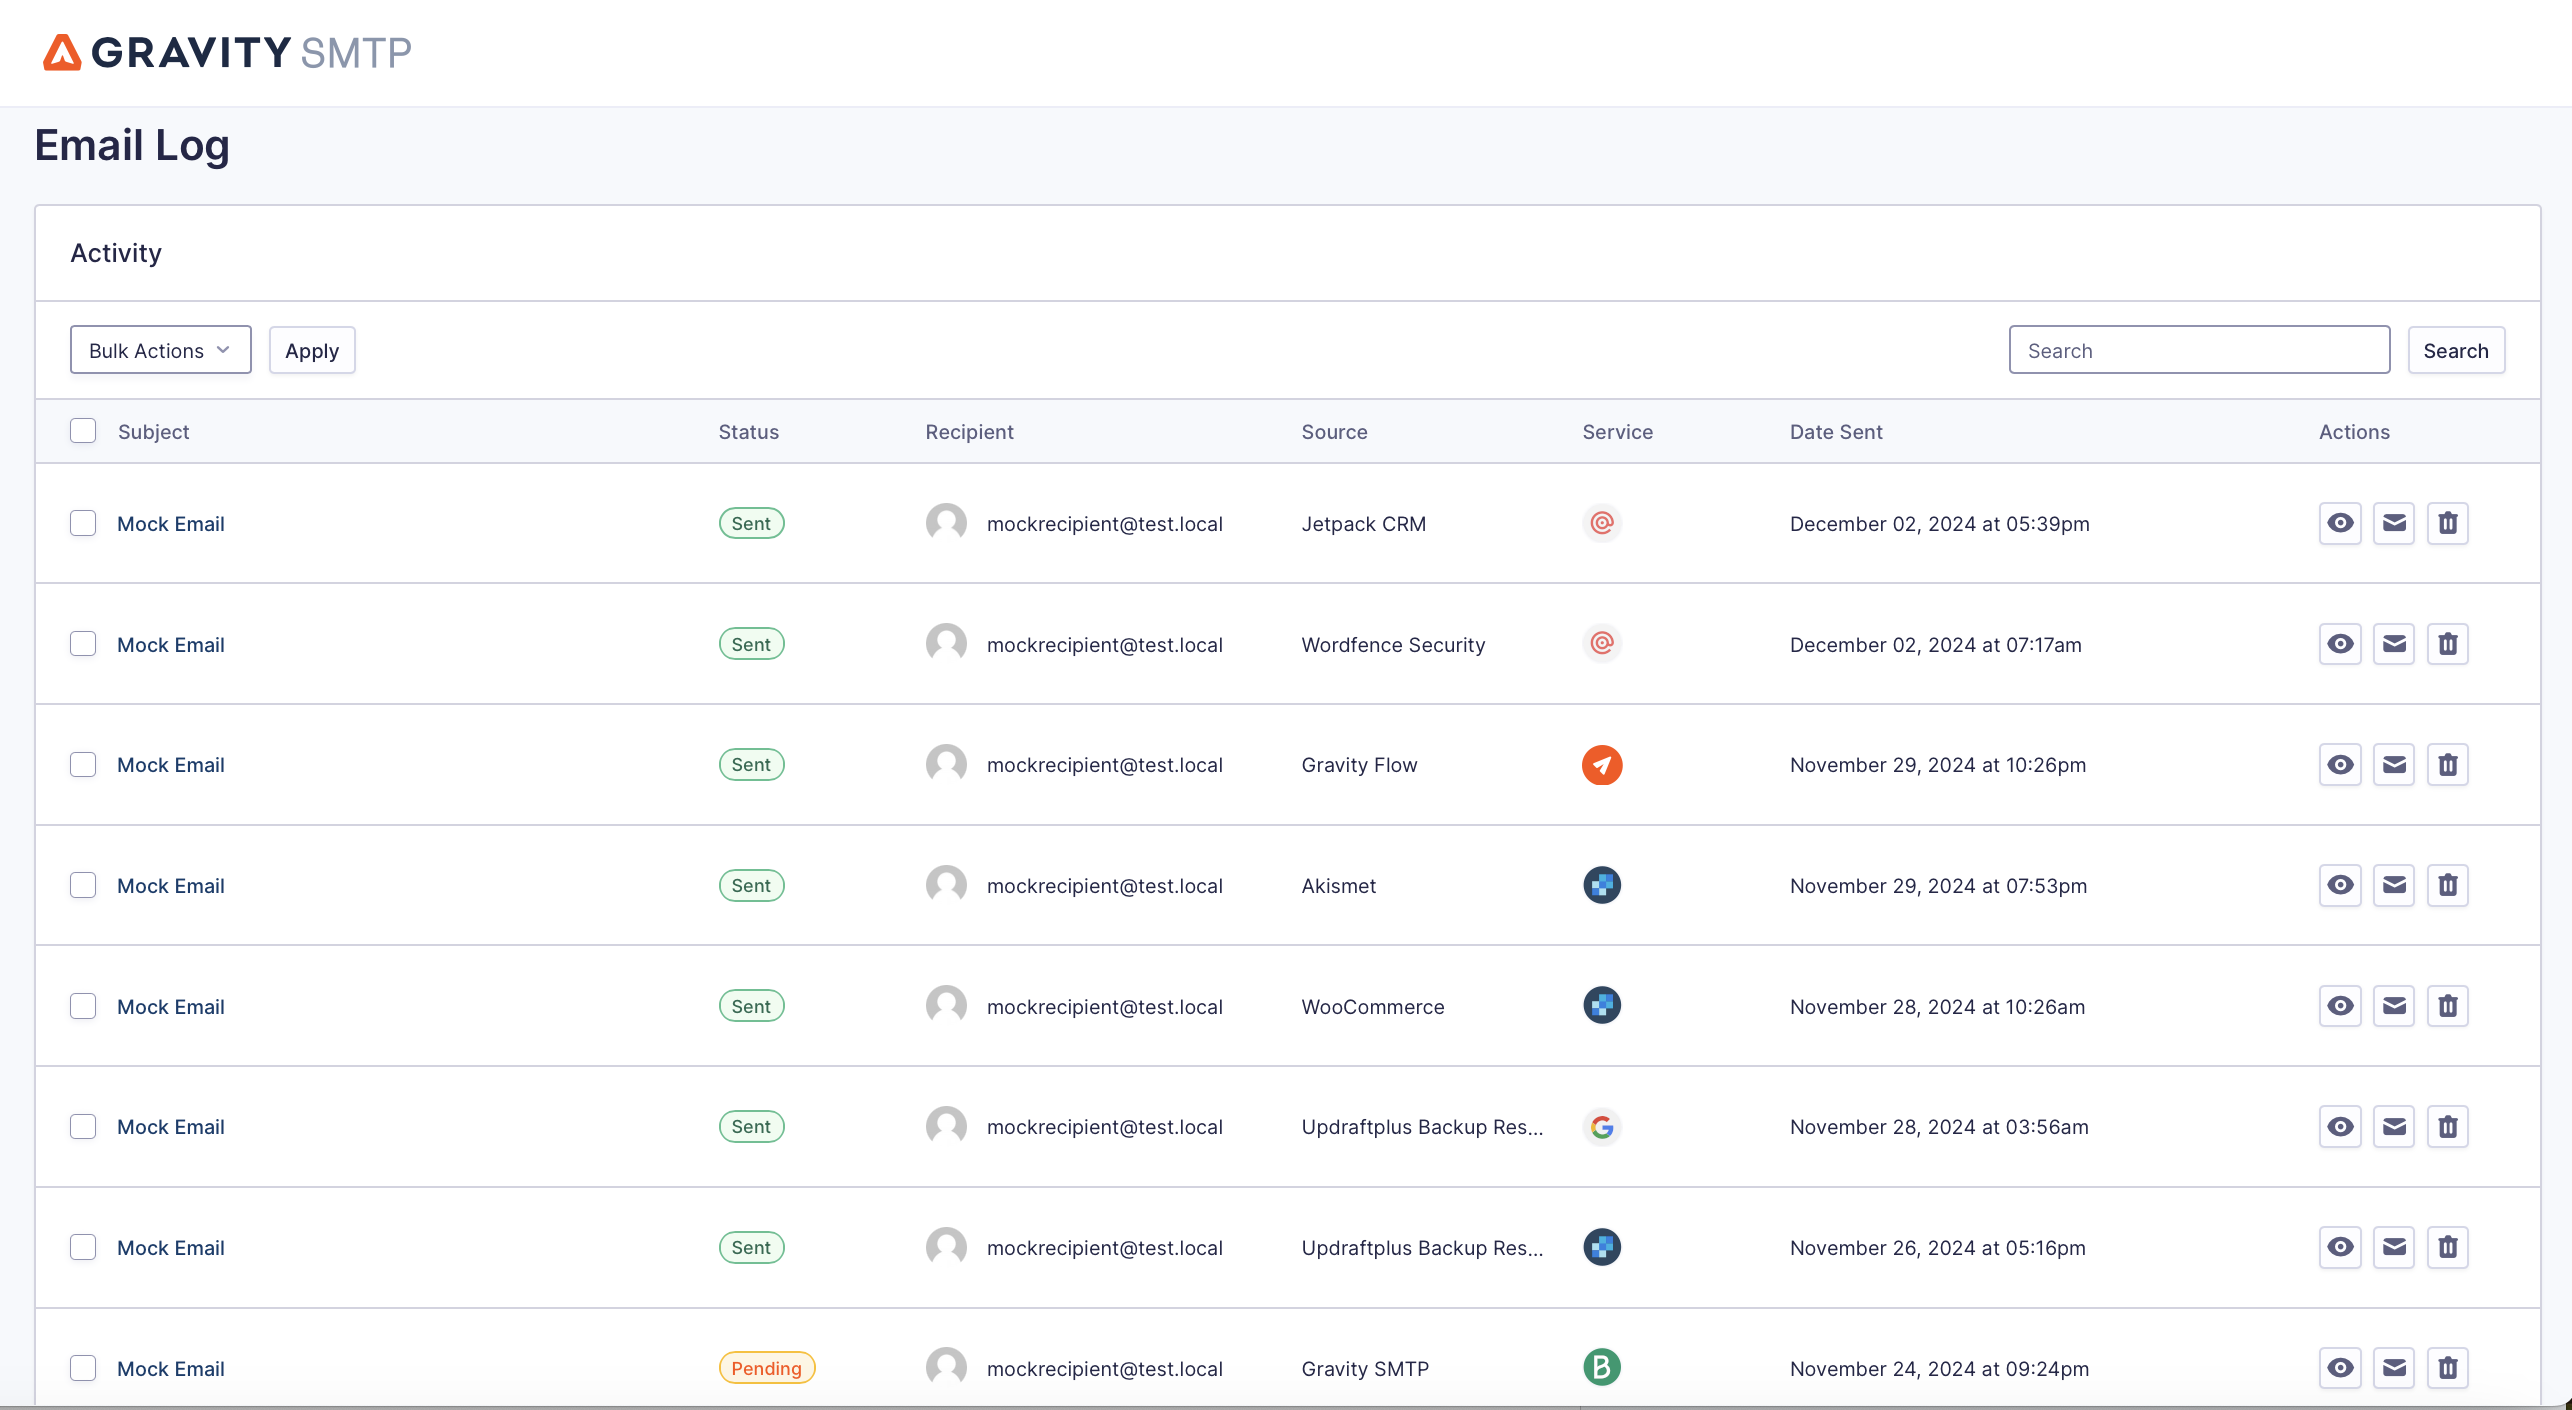
Second, you can go to SMTP → Email Log to view a log of individual emails that your site has sent, along with the technical details and content of each email.
You can also change or disable the logging functionality by going to SMTP → Settings → Logging.
Get started with WordPress SMTP2Go transactional email today
With Gravity SMTP, you can easily configure your WordPress site to send its transactional emails using SMTP2Go.
If you’re holding the Gravity Forms Elite, Nonprofit, or Developer licenses, download Gravity SMTP from your Gravity Forms My Account area today.
Then, follow this guide to set up SMTP2Go on your WordPress site in just a few minutes.

If you want to keep up-to-date with what’s happening on the blog sign up for the Gravity Forms newsletter!

