
If you frequently handle user-submitted file uploads on your WordPress site, you’ll likely want to place them on a cloud storage provider like Google Drive. By sending your file uploads to a cloud storage provider such as Google Drive, you will not only have a backup in the event of a disaster, but your web host will likely be much happier with them off of your server. In this article, we’ll show you how to easily send any file uploads from your WordPress form directly to Google Drive.
Requirements
Before you begin, you’ll want to make sure you have a few things:
- Gravity Forms.
- The Gravity Forms Zapier Add-On.
- A Zapier account.
- A Google Drive account.
Connecting Your Form to Zapier
In this tutorial, we’ll be using Zapier to handle the file upload and pass it on to Google Drive. If you’re not familiar with Zapier, it’s a tool that allows you to connect multiple services together with an incredibly simple, yet powerful user interface.
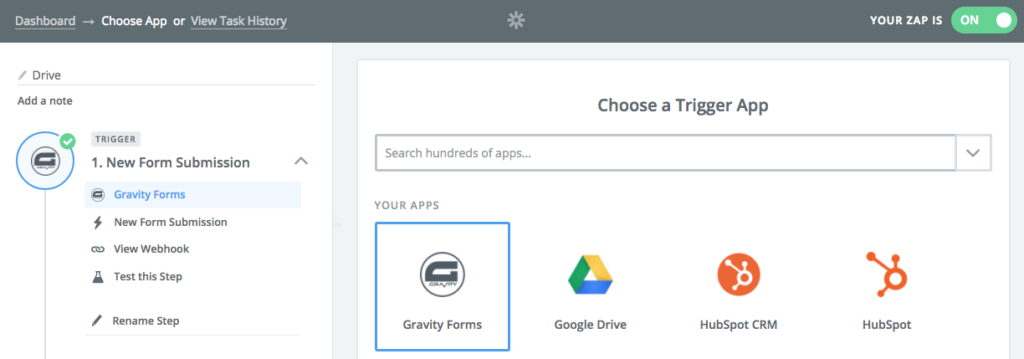
- First, log into your Zapier account and create a new Zap using the Make a Zap button on the top right of the page.
- Inside your new Zap, you’ll now need to select the source that will be feeding the information to Zapier. In this case, select Gravity Forms.
- After selecting Gravity Forms, you’ll be given a Webhook URL. Copy it somewhere; You’ll need it later.
- You’ll now need to add that Webhook URL to Gravity Forms. In a new tab, open your WordPress admin dashboard.
- From within your WordPress admin, access the form that you want to use, hover over Settings, then click on Zapier.
- Click Add New to add a new Zapier feed.
- Inside the Webhook URL field, enter the Webhook URL that you got earlier from Zapier.
- Make any additional changes based on your preferences such as the feed name, then save your changes.
Once complete, you’ll want to make a test submission on the form and then continue on with the Zapier setup. When you submitted your test submission, Zapier should have detected all of your form fields, making them ready to use inside your newly created Zap.
Sending Form Uploads to Google Drive
Now it’s on to the fun part! After just a few more steps, you’ll be ready to send your files directly to Google Drive!
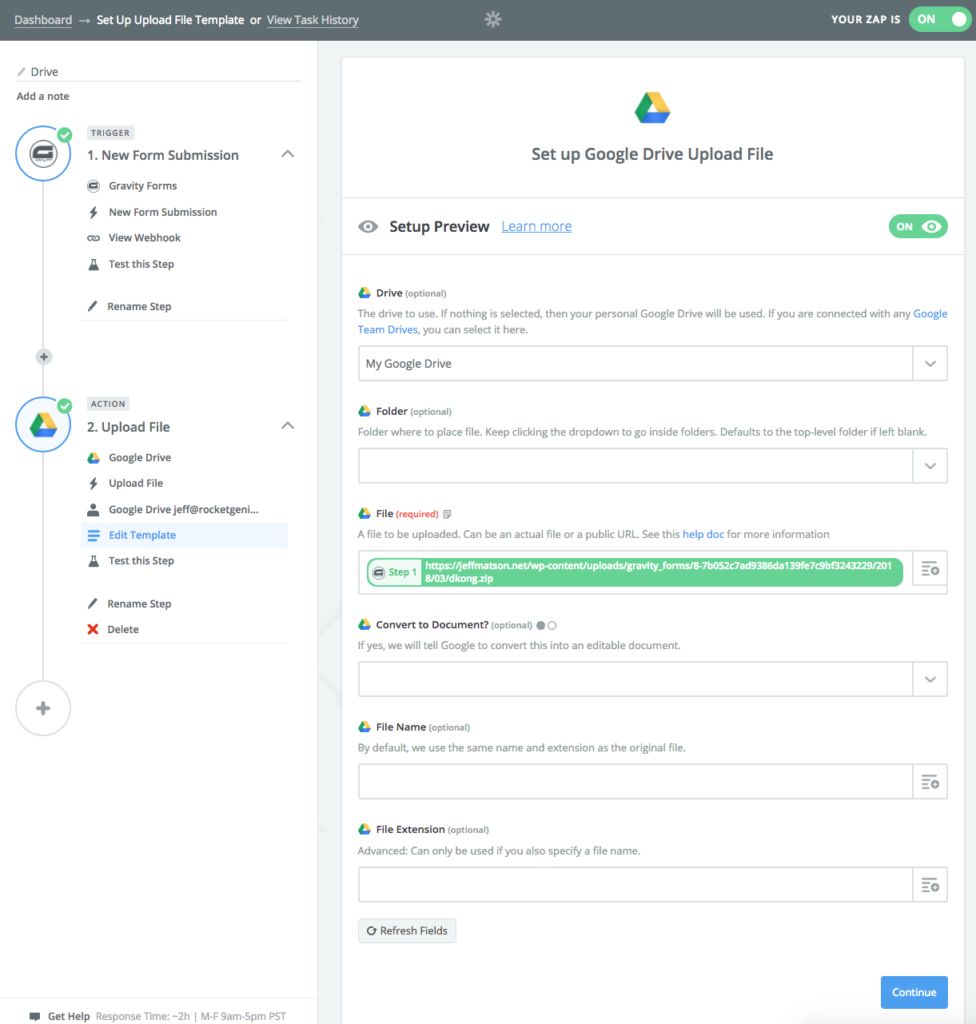
- After you configured your form to send data to Zapier in the previous steps, Zapier will prompt you to define an action step inside your Zap. Select Google Drive, then select Upload File.
- If you’ve never previously used Google Drive with Zapier, you’ll be prompted to add a Google Drive account. To do so, follow the steps to log into your Google Drive account and authorize access to Zapier.
- Next, Zapier will need a bit more information to send the correct form data to Zapier. The first field is the drive inside Google Drive that you want to use. If you don’t have a specific drive that you want to add files to, just select My Google Drive.
- You’ll also need to provide Google Drive with a location that they can access the file from. In this case, it will be the URL of the file that’s uploaded to the form. Select the name of your file upload field, which should contain the URL of the file that was uploaded.
- Finally, make changes to any other fields that you might want to customize here. For example, if you want to put the file in a separate folder, you can use the Folder option to select the folder you want to use.
Once your settings are how you want them to be, click Continue. Zapier will then test the submission. If you followed the steps correctly, you should see a message stating that your file was successfully uploaded to Google Drive. If not, go through the steps again to be sure that you didn’t miss anything. Of course, don’t forget to enable your Zap so that it’ll work each time a submission occurs!
Finishing Up
Now that you’ve configured your WordPress form to send file uploads to Google Drive, be sure to check over your work by sending a few test submissions, then checking Google Drive for them. From here, you can do more things such as:
- Renaming files by setting the file name in your Zapier configuration.
- Share access to others when files are uploaded.
Have a question or comment? Let us know in the comments below.


