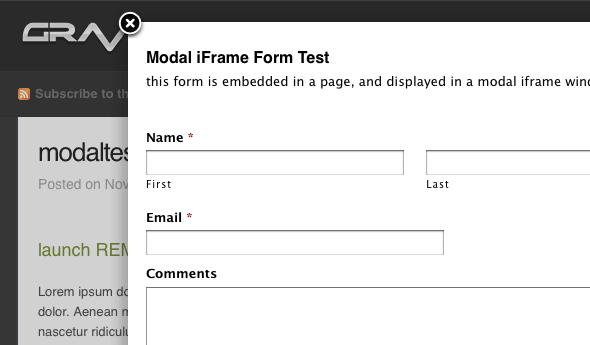
Creating a Modal Form with Gravity Forms and FancyBox

There have been a few questions on how to create a Gravity Form in a modal window. For this example, we’re going to use the jQuery script “FancyBox” to create the modal form.
Basically, what you’re going to do is to create a form, embed it in a simple page and then link to it from the page you want to include the modal form. Pretty simple right?
Update: September 9, 2010
The 1.4 version of GF released yesterday includes an option to submit the form via ajax. This means that the page doesn’t have to refresh, and you can use other popup options that don’t have to rely on using this iframe & plainpage template approach. Here’s a link to some additional information on enabling the ajax submission.
http://www.seodenver.com/gravity-forms-ajax/
Most of the modal window scripts allow you to wrap a div around inline content such as a form shortcode and then launch it in the modal window. The problem before was when the form submitted and refreshed the page, if the validation failed, the modal window was closed on the page refresh and you couldn’t see the errors. With the ajax submission enabled, this isn’t an issue now and you have a lot more options as far as modal window scripts.
Fancybox was one that supported modal iframes so it was my choice for the original tutorial but you should be able to use most of these as well.
http://speckyboy.com/2009/03/31/10-image-and-gallery-lightbox-solutions-for-wordpress-plugins/
Installing The Script
To start, you’ll need to download the script from the FancyBox website and unzip the file to your desktop. You’ll want to look in the main folder and find the “fancybox” sub-folder. That’s what you’ll need to upload to your theme directory. Upload the entire “fancybox” folder and its contents to the root of your WordPress theme folder.
Once you’ve uploaded the content, you’ll need to reference the files and initialize the script. For that, you’ll need to open the header.php file in your theme folder and copy/paste the following code into the <head> section of the page.
<script type="text/javascript" src="http://code.jquery.com/jquery-1.4.1.min.js"></script>
<link rel="stylesheet" type="text/css" href="<?php bloginfo('template_directory'); ?>/fancybox/jquery.fancybox-1.3.0.css" media="screen" />
<script type="text/javascript" src="<?php bloginfo('template_directory'); ?>/fancybox/jquery.fancybox-1.3.0.pack.js"></script>
<script type="text/javascript">
  $(document).ready(function() {

	$("a.iframeFancybox1").fancybox({
		'width'		      :	600,
		'height'		      :	650,
		'overlayOpacity'	 :	'0.4',
		'overlayColor'		 :	'#000',
		'hideOnContentClick' :   false,
		'autoScale'     	 :   false,
   		'transitionIn'		 :   'elastic',
		'transitionOut'	 :   'elastic',
		'type'			 :   'iframe'
	});
  });
</script>
Once you have uploaded the fancybox folder to your theme and added the references to the header.php file, the installation process is complete. Now, you may want to configure some elements of the script. If you’ll notice in the code above, there are some configuration variables added for the iframe sizes, etc.
        $("a.iframeFancybox1").fancybox({
		'width'		      :	600,
		'height'		      :	650,
		'overlayOpacity'	 :	'0.4',
		'overlayColor'		 :	'#000',
		'hideOnContentClick' :   false,
		'autoScale'     	 :   false,
   		'transitionIn'		 :   'elastic',
		'transitionOut'	 :   'elastic',
		'type'			 :   'iframe'
	});
You can configure this to fit your particular form. For this example, any page link with the class “iframeFancybox1” will launch a modal FancyBox window that’s 600×650 pixels in size. If you need multiple sizes for different forms, it’s easy enough to copy this, change the class name and the size values as you need.
Note: Yes, there are a few FancyBox plugins in the repository that you can try if you’d like to skip the installation steps above. Some offer more customization features than others and you’ll have to refer to their documentation for specific information related to using iframed content. For this example, I chose to install the script manually since it’s a pretty straightforward process.
Creating A New Page Template
Now, that the FancyBox script is successfully installed, you will need to create a basic page template to use for your iframed page. You need a page that only has the form content, and no other structural elements. You can copy my example below, save it as plainpage.php and upload it to the root of your theme folder.
<?php
 /*
 Template Name: plain page
 */
?>
<!DOCTYPE html PUBLIC "-//W3C//DTD XHTML 1.0 Transitional//EN"
  "http://www.w3.org/TR/xhtml1/DTD/xhtml1-transitional.dtd">
<html xmlns="http://www.w3.org/1999/xhtml" xml:lang="en" lang="en">
<head>
  <meta http-equiv="Content-type" content="text/html; charset=utf-8" />
  <meta name="MSSmartTagsPreventParsing" content="true" />
  <meta http-equiv="Imagetoolbar" content="No" />
  <title>My Form Title</title>
  <style type="text/css">
  	body {font-size:13px;}
  </style>
  <link rel='stylesheet' id='gforms_css-css'  href='<?php bloginfo('url'); ?>/wp-content/plugins/gravityforms/css/forms.css?ver=3.0.1' type='text/css' media='all' />
  <script type='text/javascript' src='<?php bloginfo('stylesheet_directory'); ?>/includes/js/jquery-142.js?ver=1.4.1'></script>
  <script type='text/javascript' src='<?php bloginfo('url'); ?>/wp-content/plugins/gravityforms/js/conditional_logic.js?ver=1.3.13.1'></script>
  </head>
<body>
  <?php if (have_posts()) : while (have_posts()) : the_post(); ?>
  <?php the_content('read more'); ?>
  <?php endwhile; endif; ?>
  <?php wp_footer(); ?>
</body>
</html>
You need to make sure the page template includes the <?php wp_footer(); ?> references so the Gravity Forms conditional logic scripts load correctly. If you’re using any additional form-specific styles, you’ll want to include those inline as well.
Putting It All Together
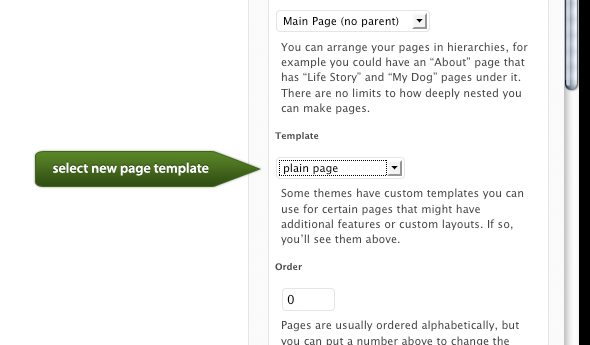
Now that you’ve created the “plain page” template and uploaded it to your theme directory, you can go to the WordPress admin and create a new page. You’ll want to include any content and your form in the content editor and then apply the new page template you’ve just created.

You will probably want to exclude the simple form page from any navigation elements, and you can easily do this with a plugin like Exclude Pages.
Now you’re down to the final steps. You’ll simply go the page you want to launch the modal form from and include a link with the class you defined earlier to invoke the script.
<a href="http://www.yourdomain.com/modal-popup-form-page/" class="iframeFancybox1"><h3>launch framed form in modal window</h3></a>
Final Notes
I hope that gets you pointed in the right direction. At the time of writing, the fancybox script was at version 1.3.0, be sure to check your version and update file paths and file names accordingly. Also, as I mentioned in the video, there are other modal window scripts that may work for this. The concept would be the same overall. The important thing to look for is a script that actually supports iframed content, not one that loads remote content via ajax methods.
Also, please note: If you’re having issues setting up and configuring the Fancybox script, please refer to the Fancybox support forums as the Gravity Forms forums are only for issues directly related to the forms themselves. Thanks.
Happy form building.
UPDATE: As of version 1.4, you can now submit a form via AJAX so you may be able to use other scripts that don’t work with the iframe method. Several will allow you to include hidden, inline content in a div rather than creating a separate page to host the content.