The sad truth about online forms is that many of them are long, complex, and overwhelming.
Sometimes users want to complete a form, but they don’t have the drive to figure it out and push through all the questions. This is challenging for marketers who need their customers to submit certain data points, but don’t want to sacrifice conversions.
Why are people so unforgiving when it comes to forms?
Because in the digital age, people expect personalization. They don’t want to answer questions that don’t apply to them or their circumstances. They’d rather spend their time and money with brands who connect with them on personal, human levels.
According to Marketing Insider Group, 78% of internet users say personally relevant content from brands increases their purchase intent. Marketing campaigns are 83% less effective when the experience is irrelevant to the user.
So if you use forms as part of your marketing campaigns or sales funnels, it’s smart to make them short and personalized to the user.
Fortunately, there’s a simple way to create advanced forms that aren’t arduous or overly complex.
With conditional logic (a Gravity Forms feature), you can build interactive forms that let you collect the data you need without straining the user experience.
What is Conditional Logic?
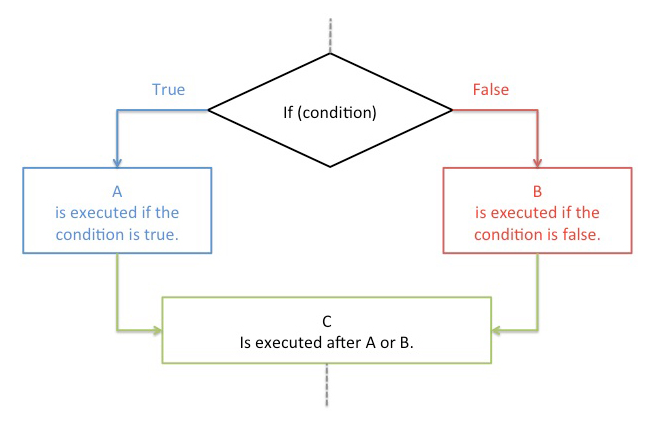
Here’s the simple answer: Conditional logic allows you to automatically make decisions based on a condition or action that occurred.
Conditionals are mechanisms that allow for additional instructions based on a particular response. They’re your typical “if this, then that” process.
Conditional logic in regards to forms is a way to create forms that change based on input. You can configure fields to display or hide based on a user’s response to other fields. This allows you to tailor your forms to your users’ specific needs.
That may seem technical, but it’s really quite easy. Let’s use an example:
An event venue has an online form for prospective customers. One field asks for the type of event. If the user selects “Wedding” from a drop-down list, a few extra questions appear (in the same form) that relate to weddings, like “Do you have a caterer?” or “Who will supply the cake?” If the user selects another type of event, a different group of questions appears.
While you could show all your fields to everyone who views the form, no one wants to read through questions about weddings if they’re planning a graduation party.
Conditional logic shortens your forms, which reduces your abandonment rate. This is especially important for mobile users who are even less forgiving with long, cumbersome forms.
Incorporating this type of logic into your forms creates a user-friendly experience for your web visitors. It allows them to complete forms in a fast, efficient manner, without feeling like the whole process is a chore.
Most importantly, conditional logic makes your users feel like the experience was customized specifically for them. According to Infosys, 74% of customers feel frustrated when web content isn’t personalized, and 59% say that personalization influences their shopping decisions.
Best Practices for Conditional Fields
Before you start adding conditional logic to your form fields, let’s go over some best practices. These will help you improve your form conversions and ultimately your bottom line.
1. Keep Your Forms Simple
Just because you can hide fields behind conditional logic doesn’t mean you should add unnecessary elements to your forms.
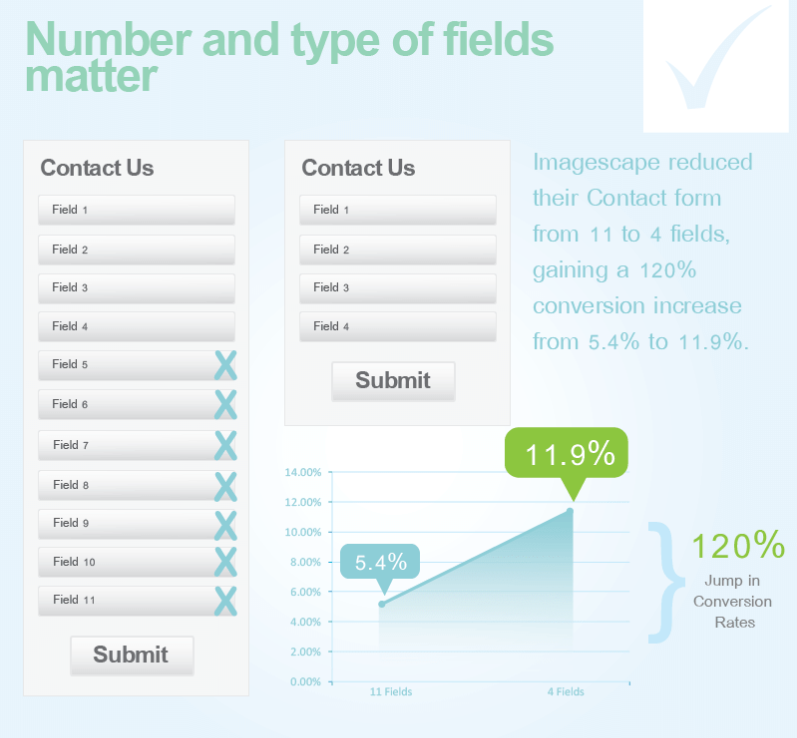
Generally speaking, shorter forms create a better user experience and increase the likelihood a user will complete it. In one case study, an 11-field form saw a 120% increase in completions when it was reduced to four fields.
It’s still important to keep your forms as simple as possible so you don’t overwhelm your users. You don’t want your users to stare at your forms and think, “Why do they need this?”
That means…
- Don’t ask for any information you don’t need.
- Don’t ask for information you don’t need right away.
- Don’t ask for anything you could easily learn on your own.
- Avoid asking for anything your users don’t know off the top of their head.
That said, there are some exceptions. Removing fields doesn’t always increase conversions. It’s always important to A/B test your forms to discover what works best for your audience.
2. Indicate the Fields’ Requirements
Don’t assume your users will know a form is required just because it pops up. They may see the new field, but ignore it because they don’t think it’s necessary. Besides, a form error message puts a cramp in the whole user experience.
If a conditional field is required, mark it as such in your form editor so your users know what you expect and you get the information you need.
3. Relate Conditional Fields to Their Trigger Fields
This should go without saying, but we’ve seen it before so it’s worth mentioning.
The field that triggers a conditional field to appear or hide should clearly relate to that conditional field.
For instance, if users click a checkbox next to “Subscribe to the newsletter,” it would be smart to set conditional logic to display a field with options for different kinds of email content or sending times.
But if they agree to receive your newsletter, it wouldn’t make sense to display a field that asks for something seemingly irrelevant, like their dog’s name or their favorite hobby.
You may have perfectly good reasons for asking for this obscure information, but if your user doesn’t understand why you need it, there’s a good chance they won’t supply it.
Conditional Logic in Gravity Forms
With Gravity Forms, using conditional logic is straightforward and easy. You can create rules to display or hide a drop down, checkbox, single line of text, or multiple choice field.
In the form editor, create all the fields your form requires. For instance, you might create a drop down field for the question “Would you like ice cream?” with options for YES and NO, as well as a checkbox field with different flavors of ice cream.
To add conditional logic to a field, open that field in the form editor and select the “Advanced” tab. At the bottom, click the checkbox next to “Enable Conditional Logic.” More options will appear.
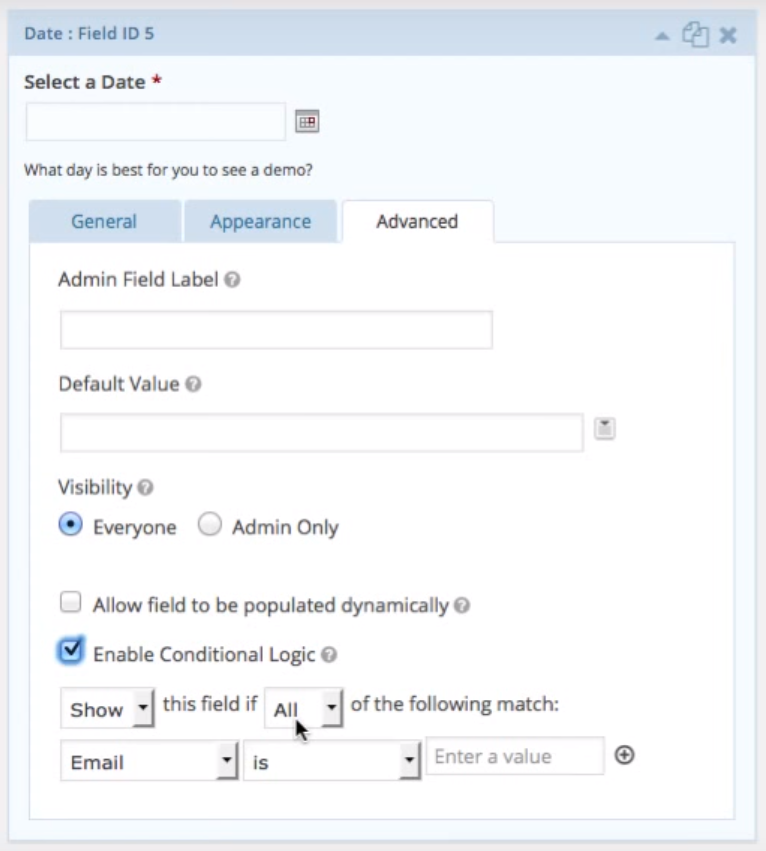
Adjust the options to create a rule for the field. In the case of the ice cream example, you want the checkboxes of flavors to display only if the user answers YES to “Would you like ice cream?”
So you would create a rule like this:
Show this field if all of the following match: Would you like ice cream? is YES.
You can apply conditional logic to your fields even if you span the form across separate sections and pages.
If you’re still confused as to how to set up conditional logic with Gravity Forms, check out this great tutorial video by Kori Ashton.
Play around with the conditional logic rules to discover unique ways to customize your forms.
For more information, read our documentation guide.
Final Thoughts
If building conditional logic into your forms seems difficult, don’t worry. You’ll get the hang of it in a few moments, even if you use a different forms provider.
That said, don’t create conditional fields if your forms don’t need them. We think the technology is cool too, but it’s best to leave your forms as simple as possible. If a conditional field doesn’t make sense in your form, don’t use it.
Conditional logic is a useful way to create simple and personalized forms that respect the user experience. If use them smartly, you’ll build high-converting forms your users love.

If you want to keep up-to-date with what’s happening on the blog sign up for the Gravity Forms newsletter!
"*" indicates required fields