

Written by the Editorial team at GravityKit…
While forms allow you to capture important information on your website, you may find yourself in need of a way to display (and even edit) that information on the front end. One scenario where this would be useful is creating user profiles.
In this post, we’ll show you how to create user profiles from Gravity Forms submissions and enable logged-in users to edit their information directly from the front end. Leveraging the powerful GravityView Add-On for Gravity Forms, you can effortlessly showcase user-submitted content on your site!
First, we’ll explore some practical examples, illustrating how GravityView makes it easy to create custom About pages, member directories, and straightforward people profiles. Next, we’ll provide a step-by-step walkthrough on creating profiles using GravityView’s drag-and-drop builder.
Let’s dive in!
Use Cases and Examples
Let’s say your goal is to showcase your team members on your site and allow them to edit their information without granting access to the WordPress dashboard. You probably don’t want to install a big membership plugin or write your own custom code—You just need a simple, effective solution!
In this case, using Gravity Forms and GravityView offer the perfect solution. Let’s take a look at some examples below.
Member Profiles
Using GravityView, you can easily create member directories that are customizable and searchable!
You can use Gravity Forms and the User Registration Add-On to register new users on your site. You can then use GravityView to build and display a directory of user profiles that are editable directly from the front end.
GravityView’s drag and drop builder allows you to customize the directory layout and the individual profile pages.
About Pages
If you’re looking for a simple way to create a team or an about page for your website, look no further than Gravity Forms and GravityView!
The great thing about this solution is that users can submit their own information through a form on the front end. As the website Administrator, you can then approve their submission before it shows up on the page.

GravityView’s flexible drag-and-drop builder allows you to build pages that are eye-catching, easily customizable, and don’t require any custom code!
Now that you know what’s possible with GravityView, let’s go through an example, step by step.
How to Build People Profiles Using GravityView
In this example, we’re going to create a simple profile page from start to finish.
Creating the User Profile Form
We’ll start by creating a new profile submission form in Gravity Forms with the following fields:
- Name (Name field)
- Image (File Upload field)
- Job Title (Single Line Text field)
- Location (Address field)
- About Me (Paragraph field)
- Email Address (Email field)
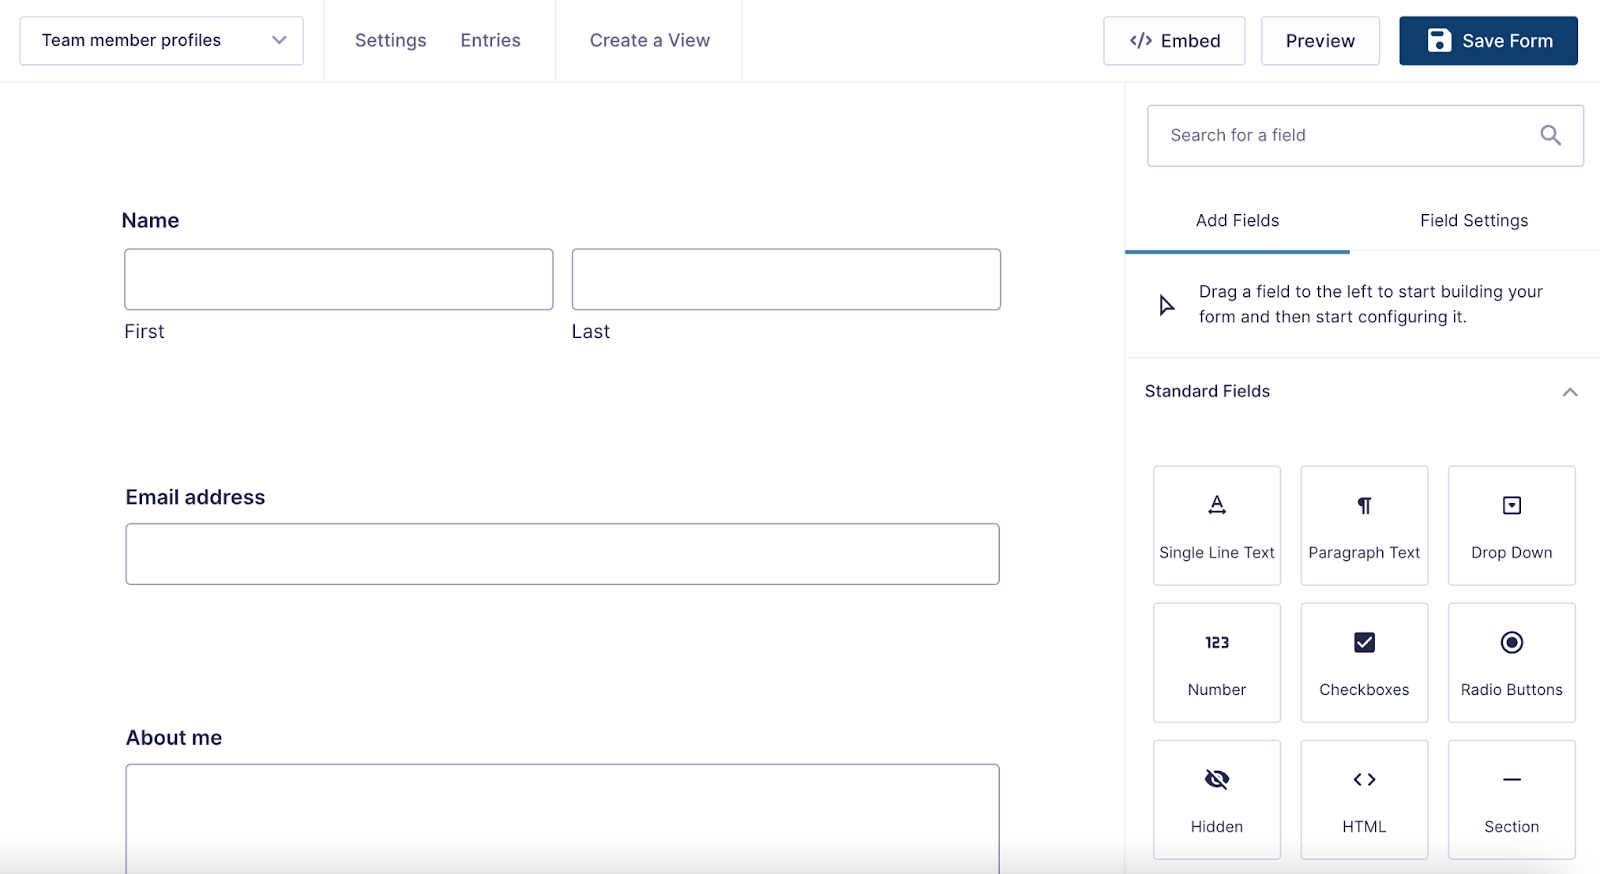
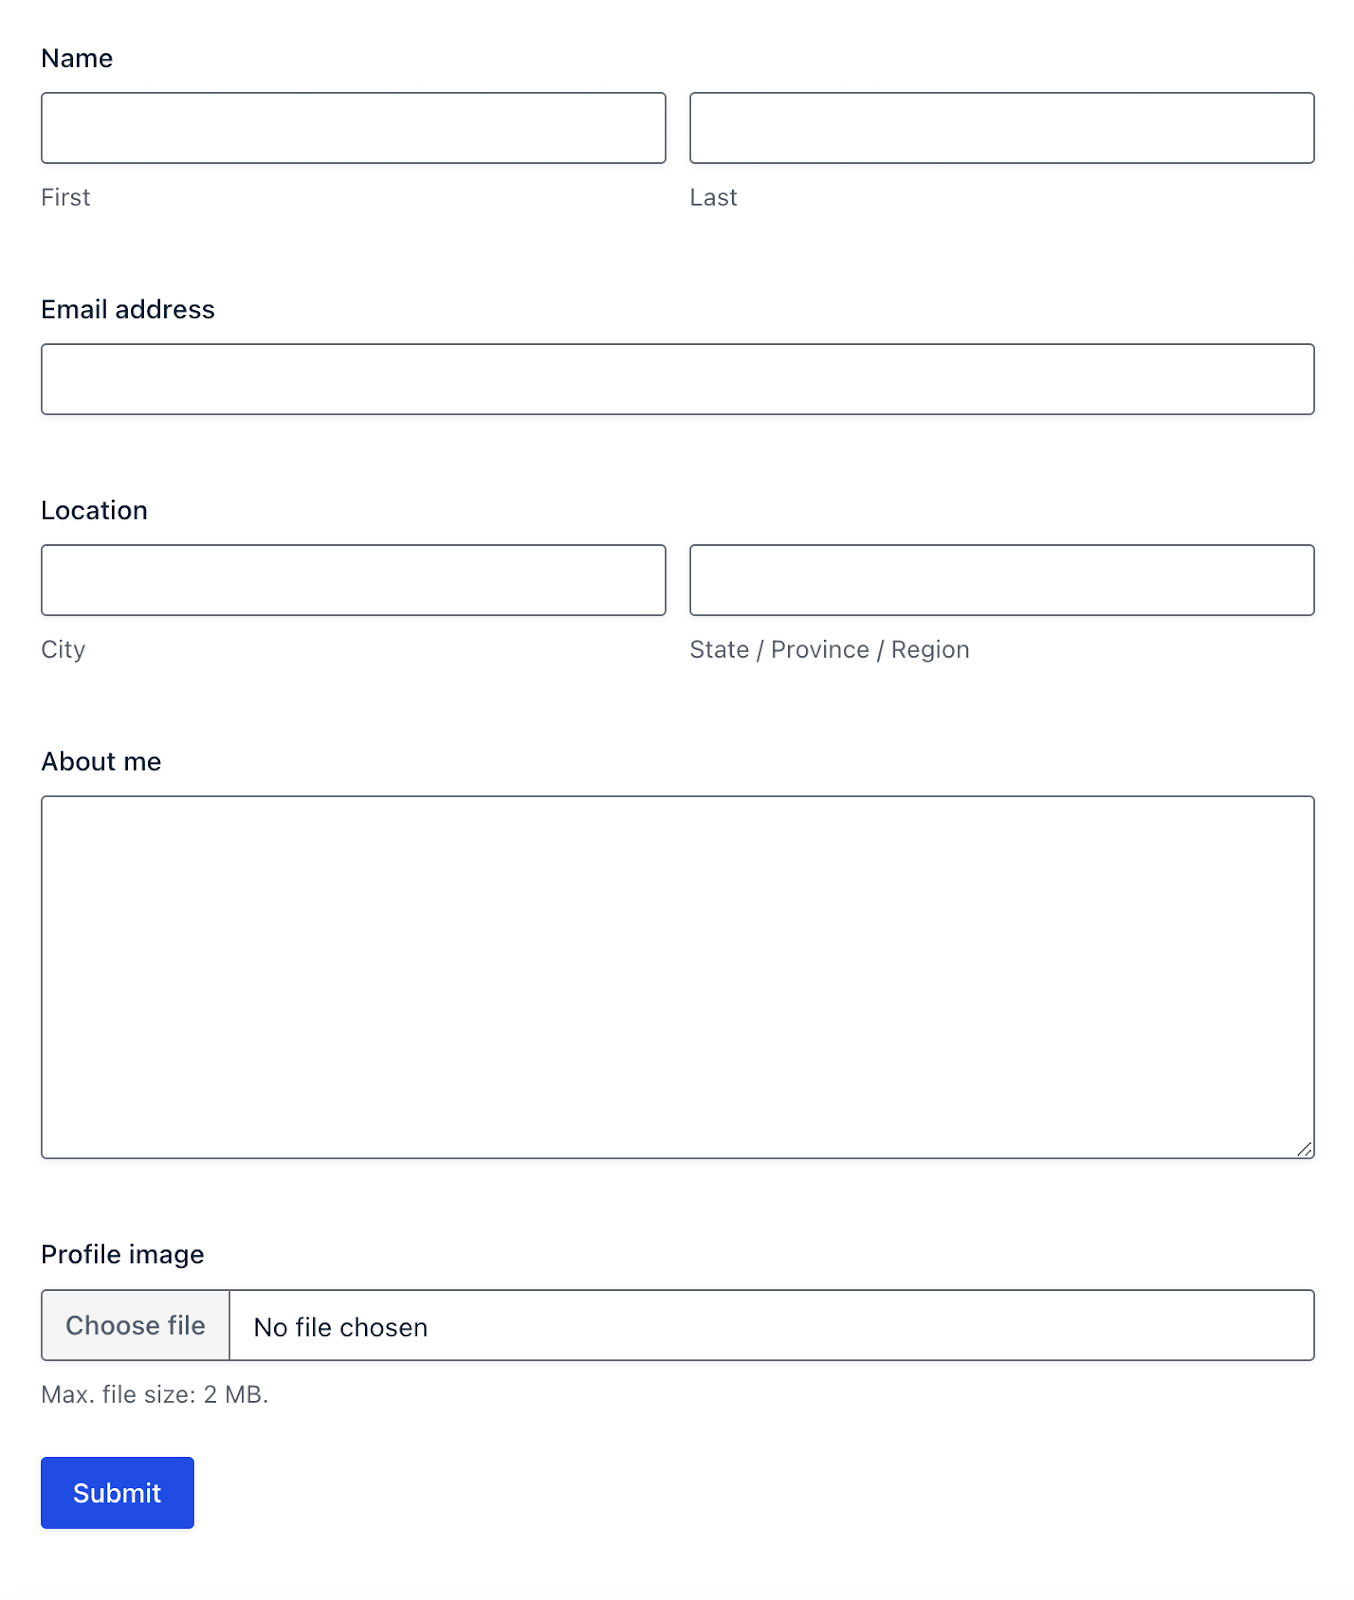
Here’s what our form looks like:
Now that we have a form for users to submit their profile details, we can start constructing our profile pages with GravityView.
Creating a View to Display Profiles on the Front End
In GravityView, “Views” allow you to determine how you want to display entry data on the front end. Views are configurable with numerous widgets, layouts and settings for customizing the way your data is displayed.
In this example, we won’t cover all of GravityView’s features and functionality. If you want to get a full overview of what’s possible using GravityView’s builder, visit our live demo showcase.
To create a new View, we’ll hover over GravityKit and click New View. After giving our View a name, we’ll select a data source and View Type. The data source refers to the form containing the entries we want to display (in this case, the member profiles form we created in the previous step).
View Types in GravityView are preset layouts for displaying entry data in different ways. The View Type that you select will depend on the type of app you’re building. Seeing as we’re creating profile pages, we’ll select the List type.
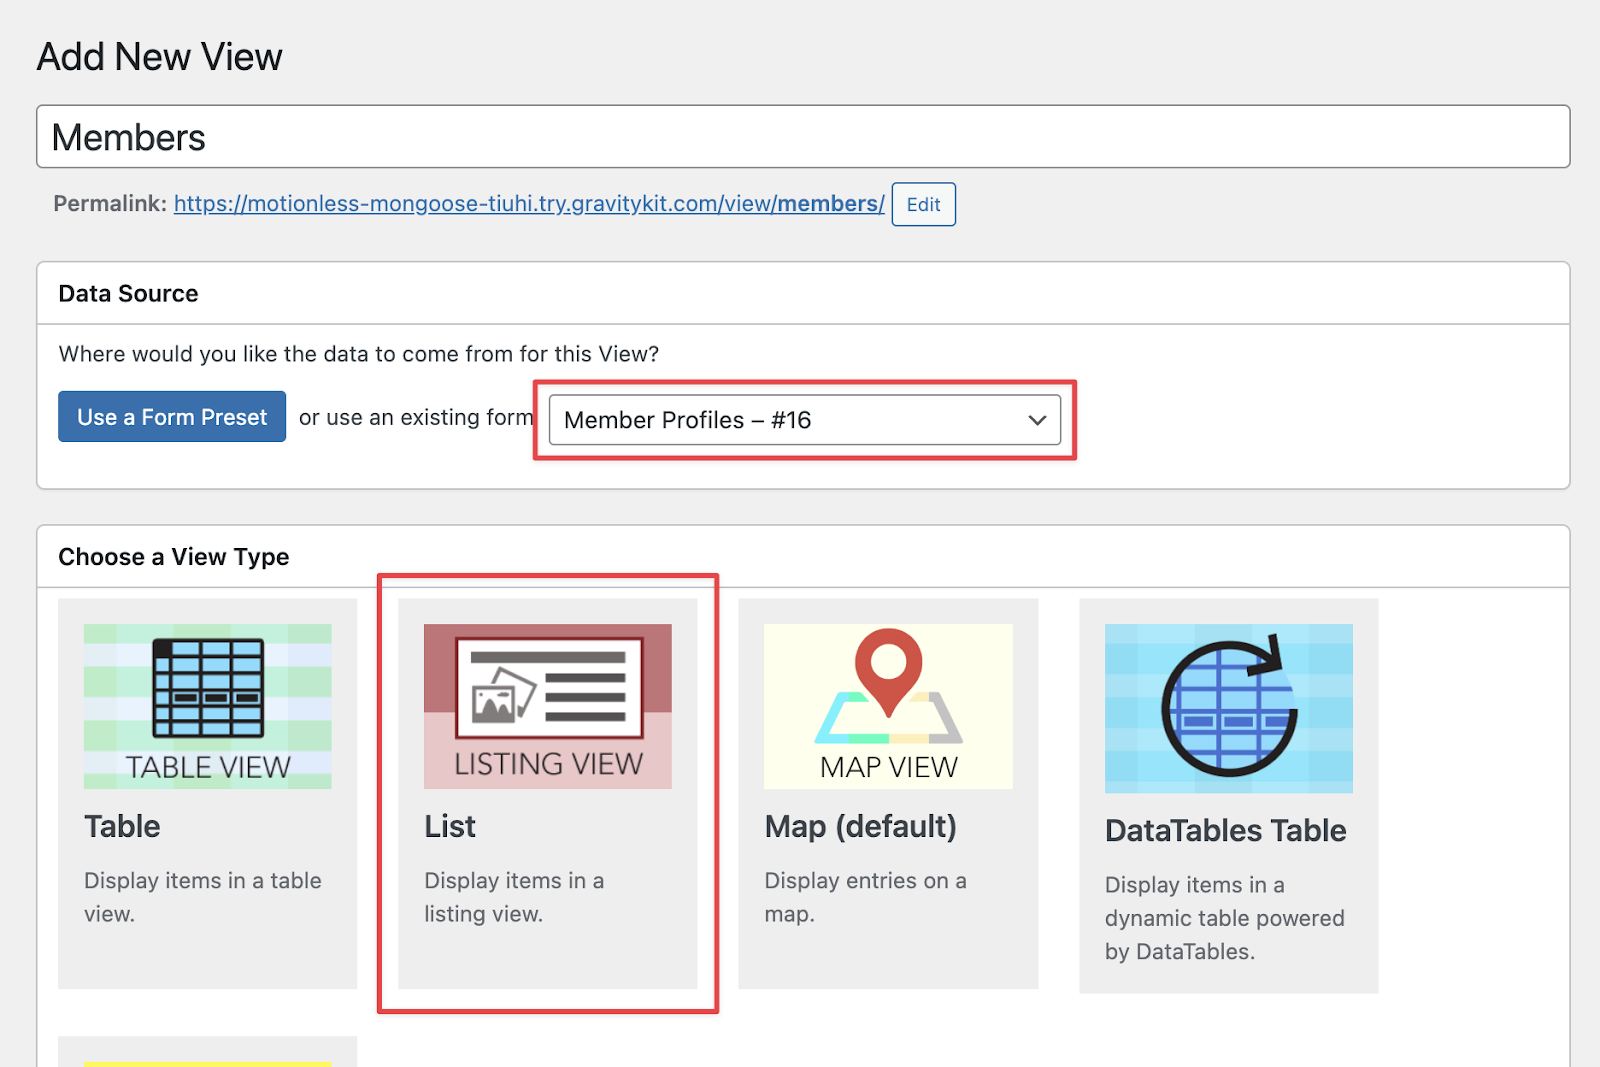
After selecting a layout, we can begin adding fields to the View editor.
Configuring the View and Deciding Which Fields to Display
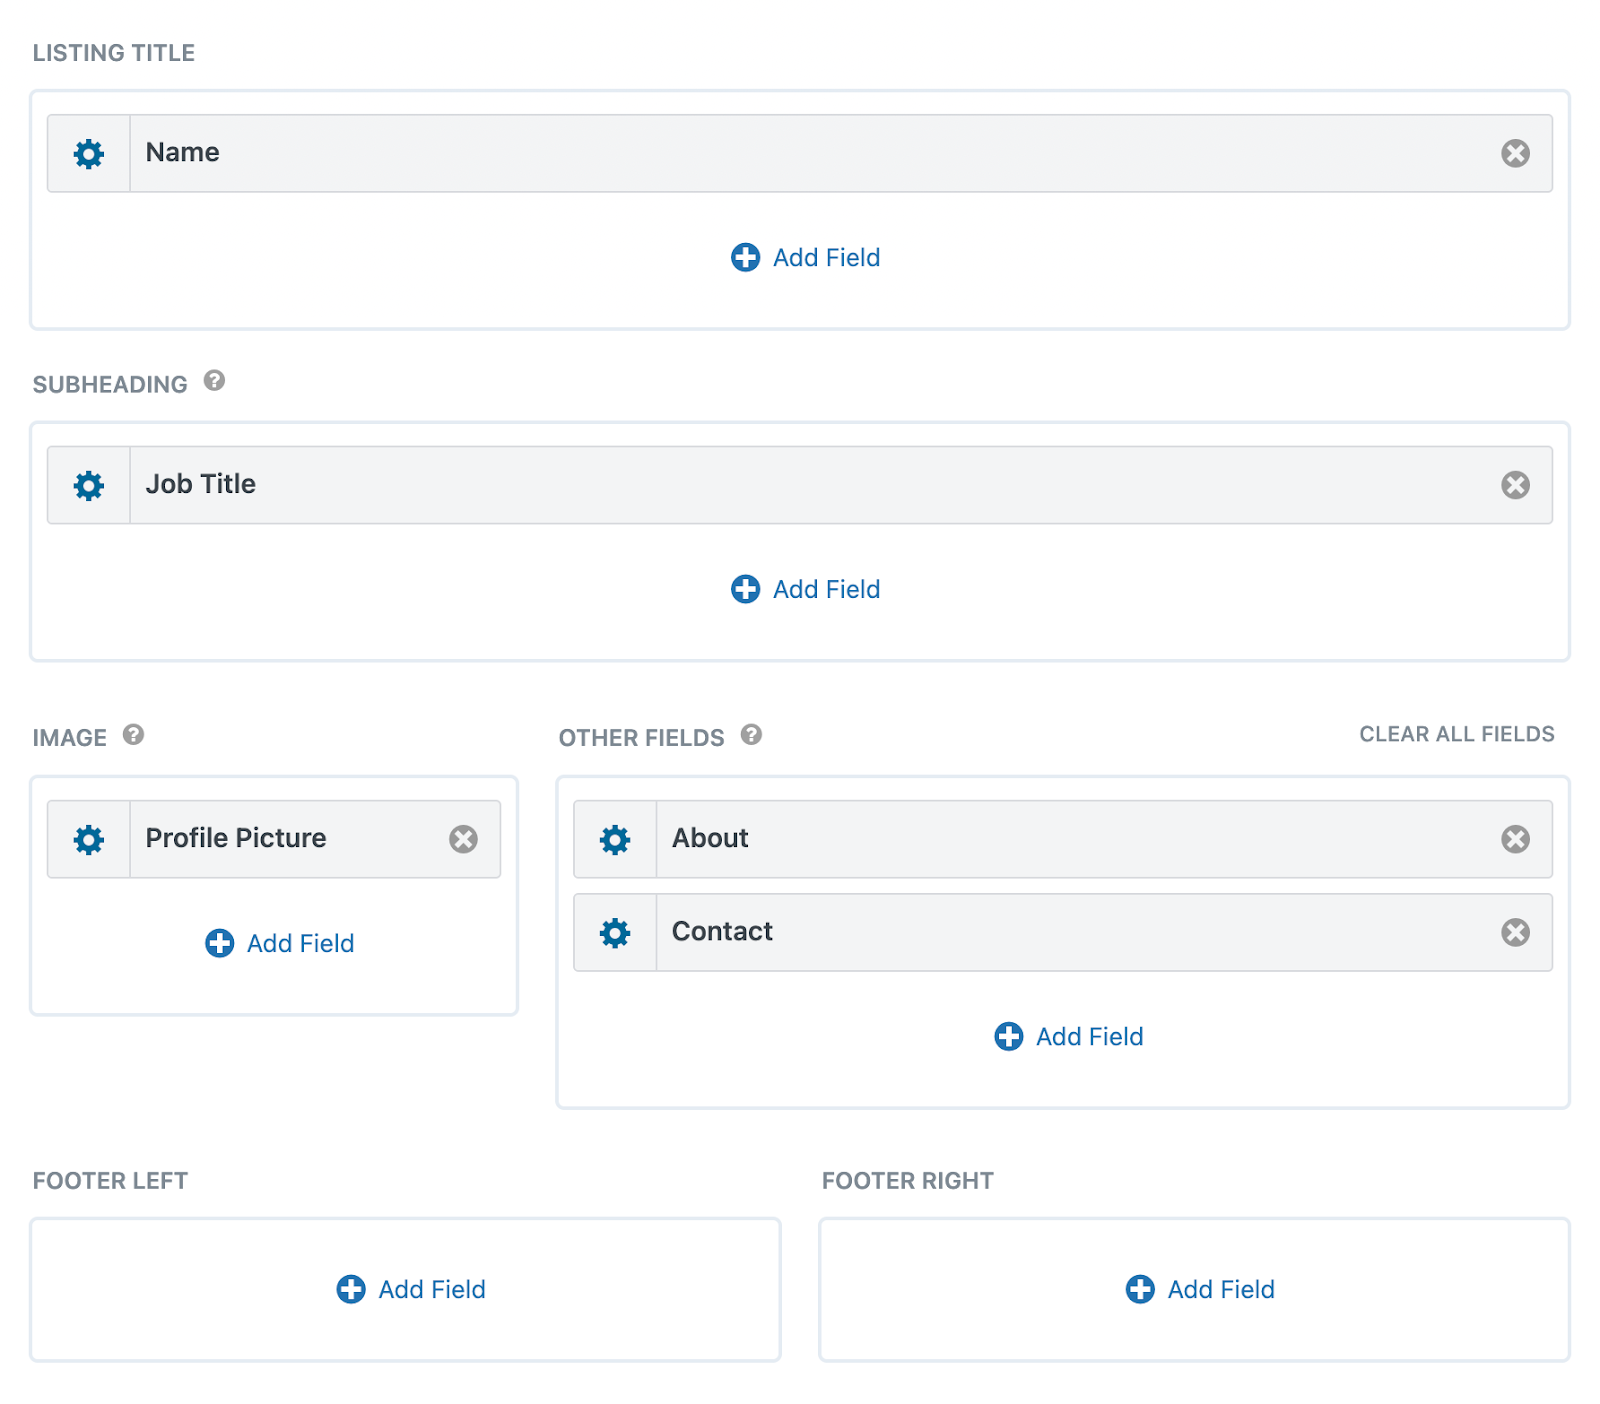
GravityView has an intuitive drag-and-drop editor, allowing us to create user profiles without any code. To add form field data to the View, all we need to do is click the Add Field button and select the field we want to add. We can then position it using drag and drop.
We’ll add the Name field to the Listing Title section and the Job Title field to the Subheading section. Next, we’ll add the Profile Picture field to the Image section and the remaining fields to the Other Fields section.
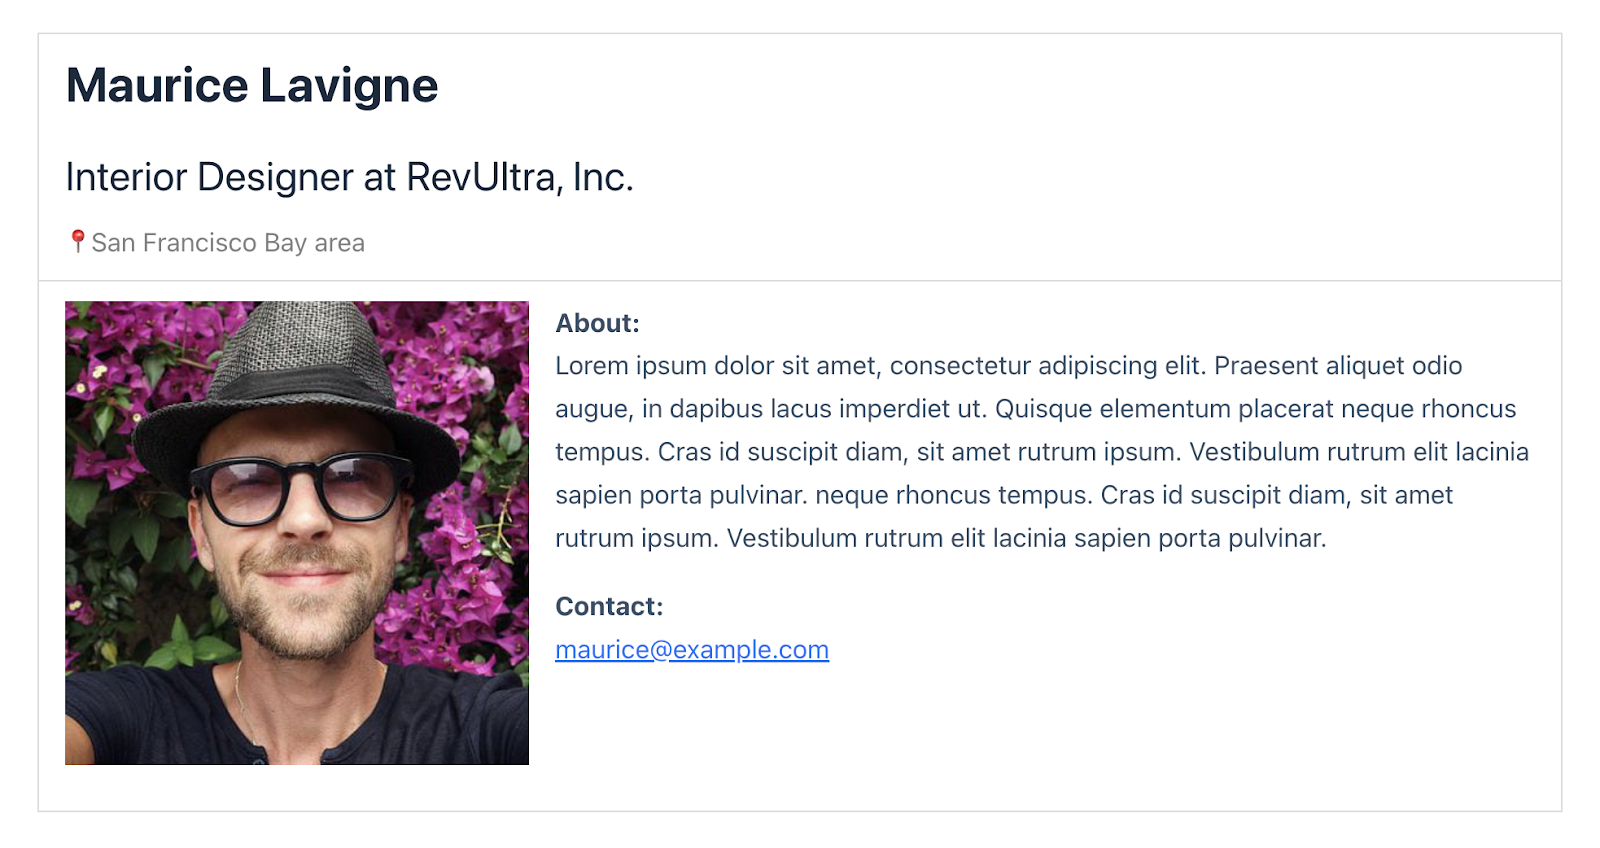
Let’s preview the View and see what it looks like on the front end.
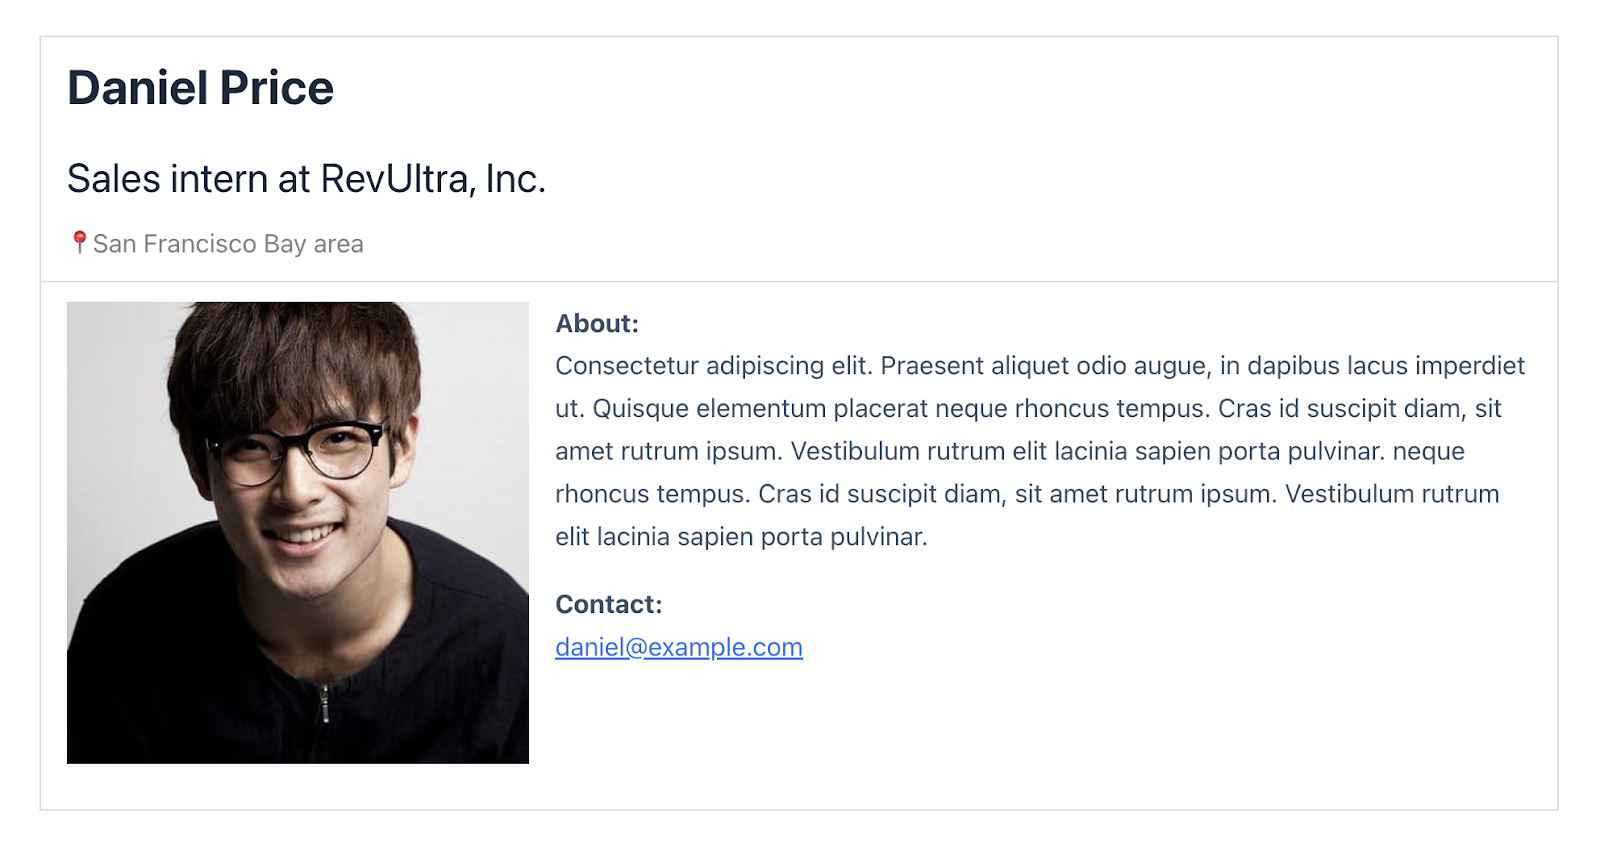
As you can see, the View is nicely formatted, with all of the entry data displayed exactly how we want it!
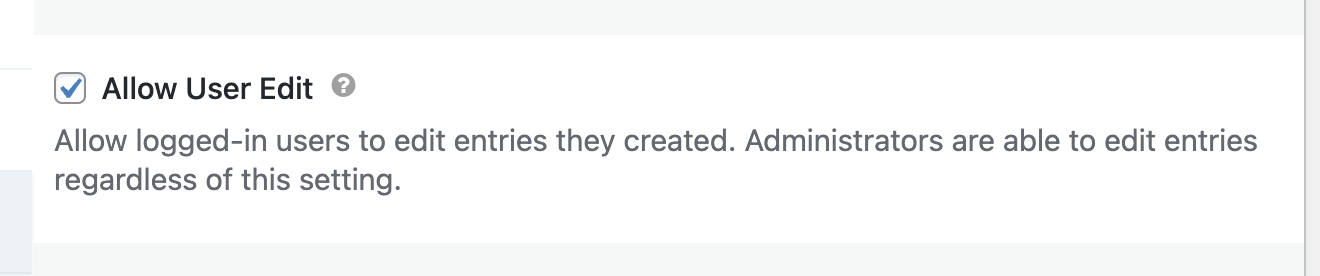
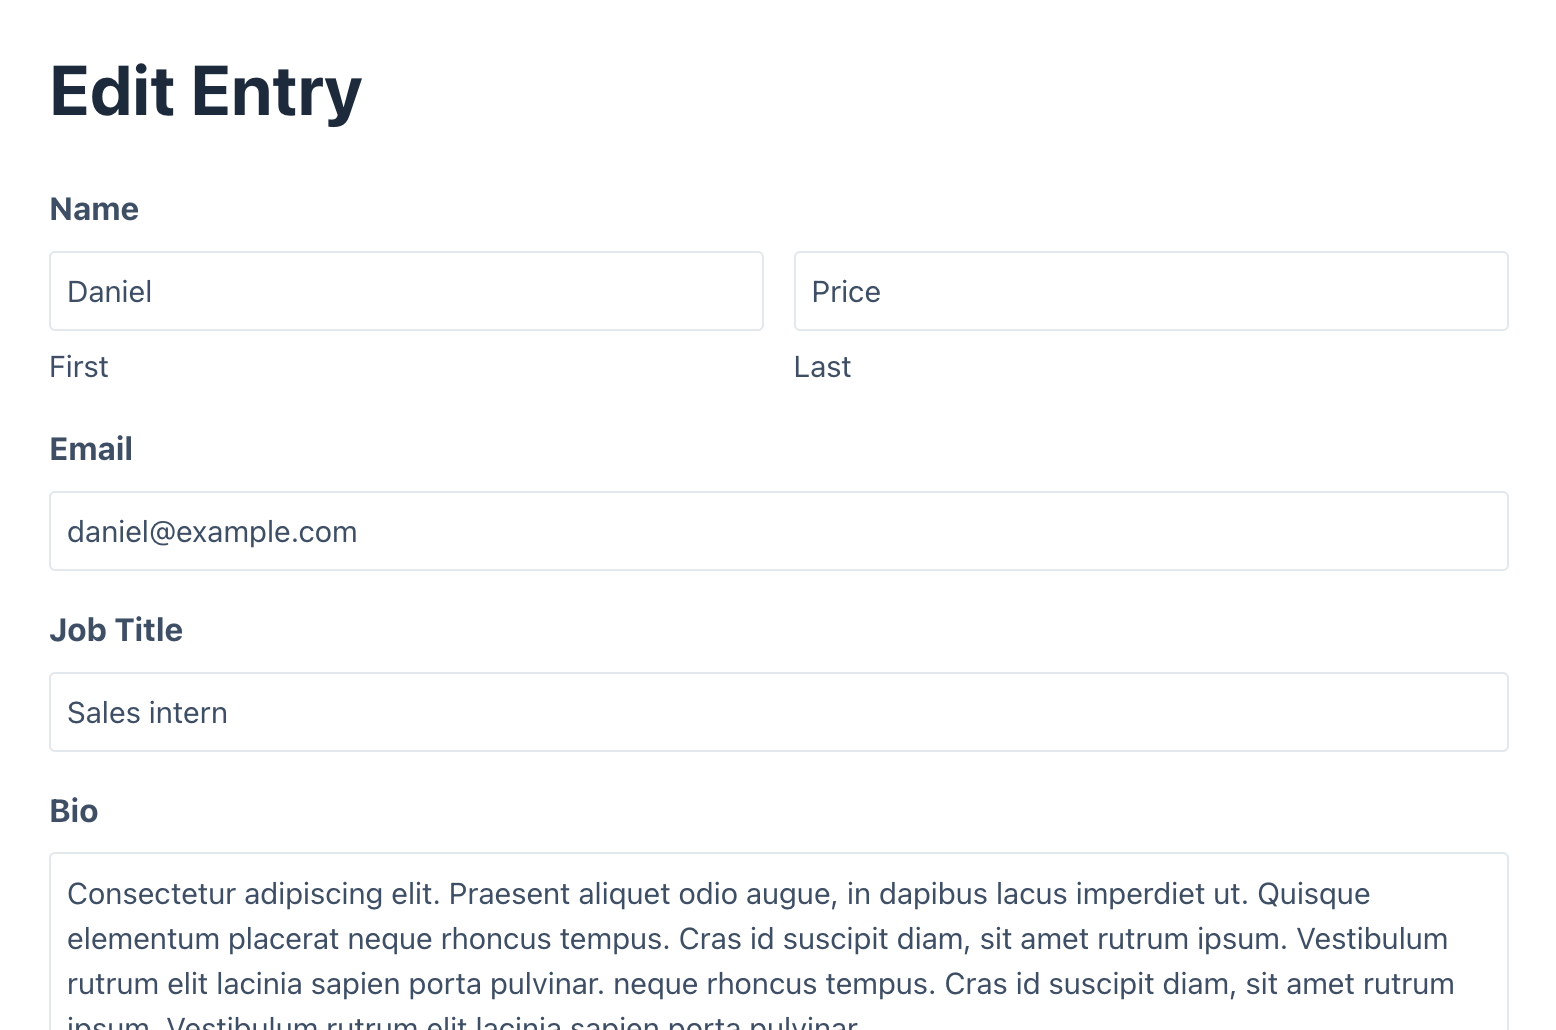
Making Information Editable From the Front End
GravityView allows users to edit their form submissions from the front end (without needing access to the WordPress Admin!). For this to work, we’ll need to enable the User Edit option in the View settings.
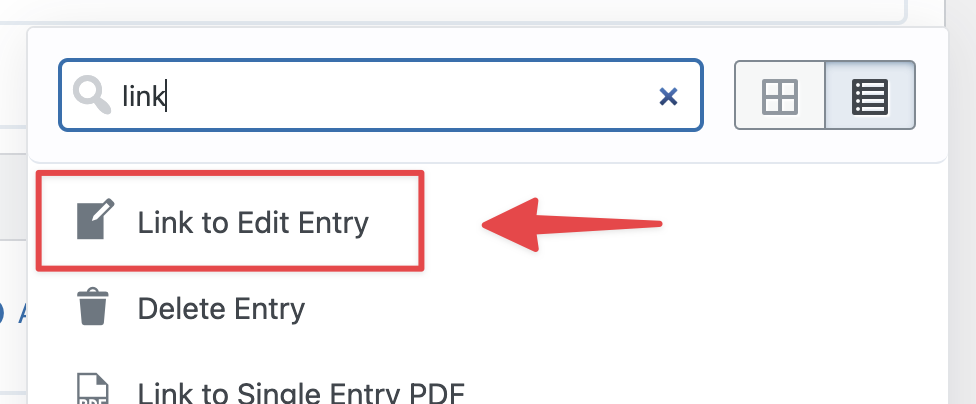
After that, we’ll add a Link to Edit Entry field to the right footer in the View editor. This field will output a link that allows users to edit their profile information from the front end.
To add this field, we’ll click Add Field and search for Link to Edit Entry.
Here’s what our user profile looks like after adding this field:
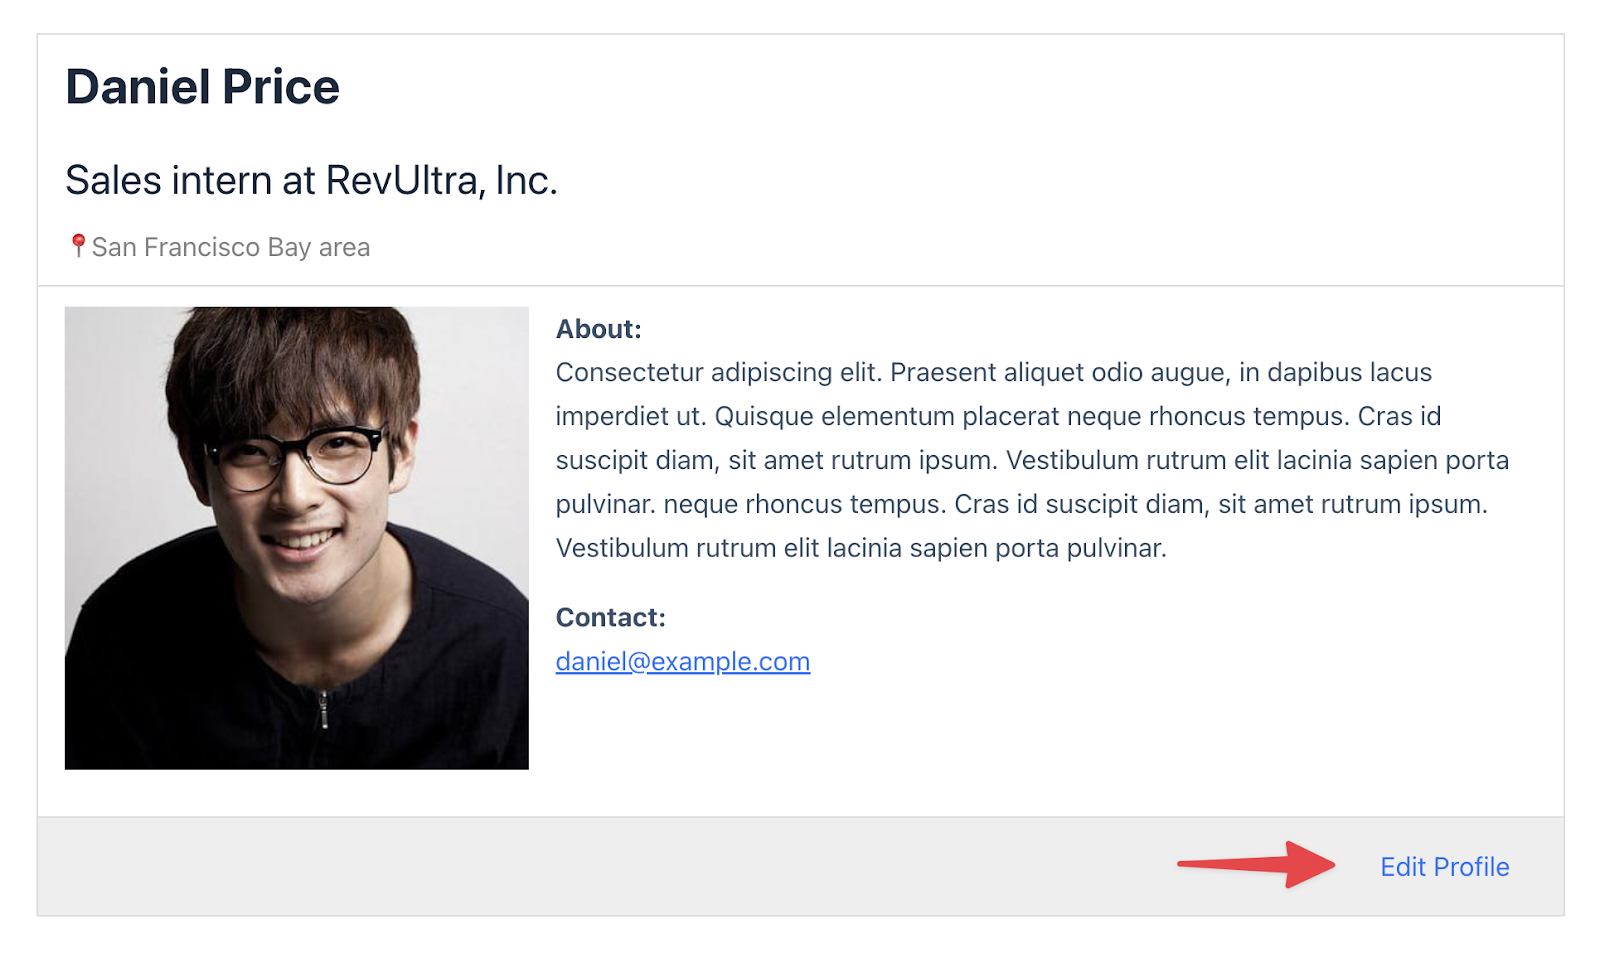
When the user clicks this link, they will be able to update their profile from the front end!
GravityView also allows us to control which fields are editable by users. To learn more, read our post about editing Gravity Forms entries on the front end.
Creating and Displaying Profiles in Minutes
In this guide, we explored the powerful capabilities of Gravity Forms and GravityView for creating user profiles for directories, about pages, or other use cases.
Using GravityView’s intuitive drag-and-drop builder to configure Views and enable front-end editing, you can effortlessly customize and present user-submitted content on your website.
Are you ready to build profile pages, and empower your users with the ability to edit their information without accessing the WordPress Admin? Learn more about GravityView today!


