Written by the Editorial team at wpDataTables…
I’ve always been a fan of Gravity Forms for creating user-friendly forms and wpDataTables for managing and visualizing data. Imagine my excitement when the new wpDataTables integration for Gravity Forms came to be.
In this article, I’ll guide you through the incredible features of this integration and show you how to harness its power for your WordPress site. Let’s dive in!
Key Features of the wpDataTables Integration for Gravity Forms
The wpDataTables integration brings a whole new world of possibilities to Gravity Forms users. Here are the key features that got me hooked:
- Server-side processing support: No matter the size of your dataset, this integration can handle it, even if you’re dealing with hundreds of thousands of entries.
- Editable tables: You can create tables with editable cells, and the best part? You can use either standard or popover editors. Plus, you have control over user permissions, so users can only see and edit their own data.
- Advanced filtering: This feature allows frontend users to easily filter the data in the tables based on individual column values. You can combine multiple filters, making wpDataTables perfect for creating filterable catalogs.
- Extra table goodies: Exporting to PDF, CSV, or Excel has never been easier. And let’s not forget about the print view, and the ability to toggle column visibility for front-end users.
Step-by-step Guide to Using the wpDataTables Integration for Gravity Forms
Now that you know what this integration can do, let’s get down to the nitty-gritty of setting it up and using it to its full potential.
Install and Activate the wpDataTables Add-On
Download the wpDataTables Gravity Forms Add-On, and install it on your WordPress site where you have wpDataTables installed. Activate the add-on.
Create a New wpDataTable From Gravity Forms Entries
Obviously, to create a table out of a form, you’ll need a Gravity Form to use.
Considering a lot of people send customer satisfaction surveys, we went with one in this particular example. The customer satisfaction survey that we created looks like this:
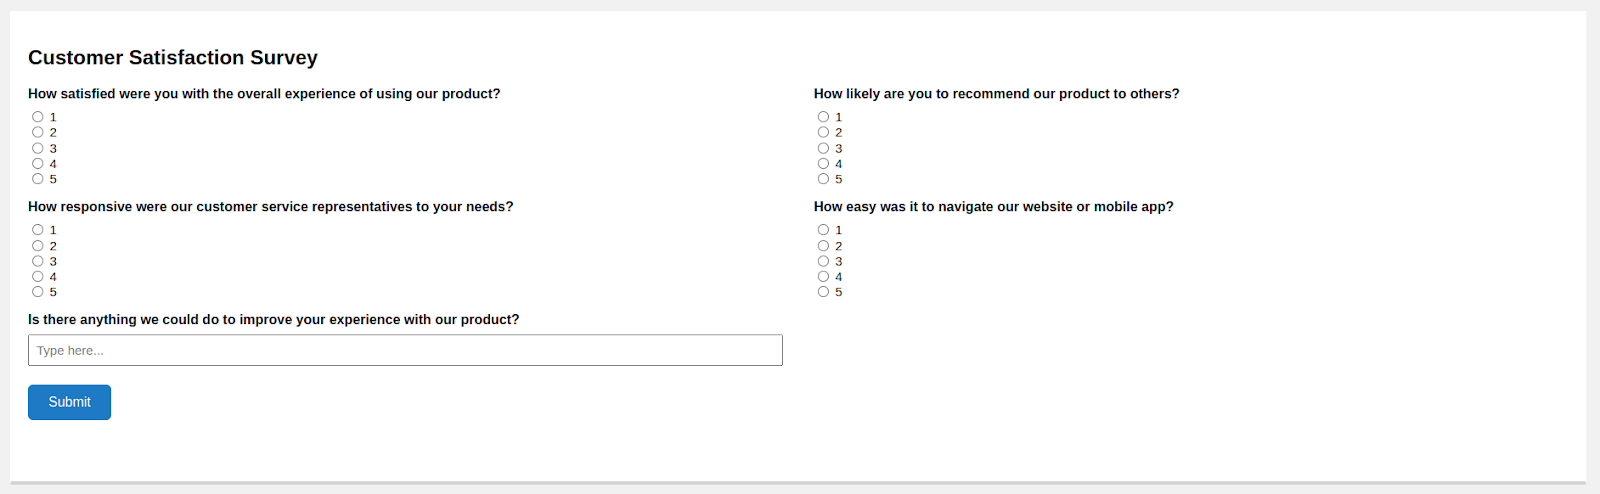
Each form field from there will be shown as a wpDataTable column, and each form entry will create one row in the wpDataTable.
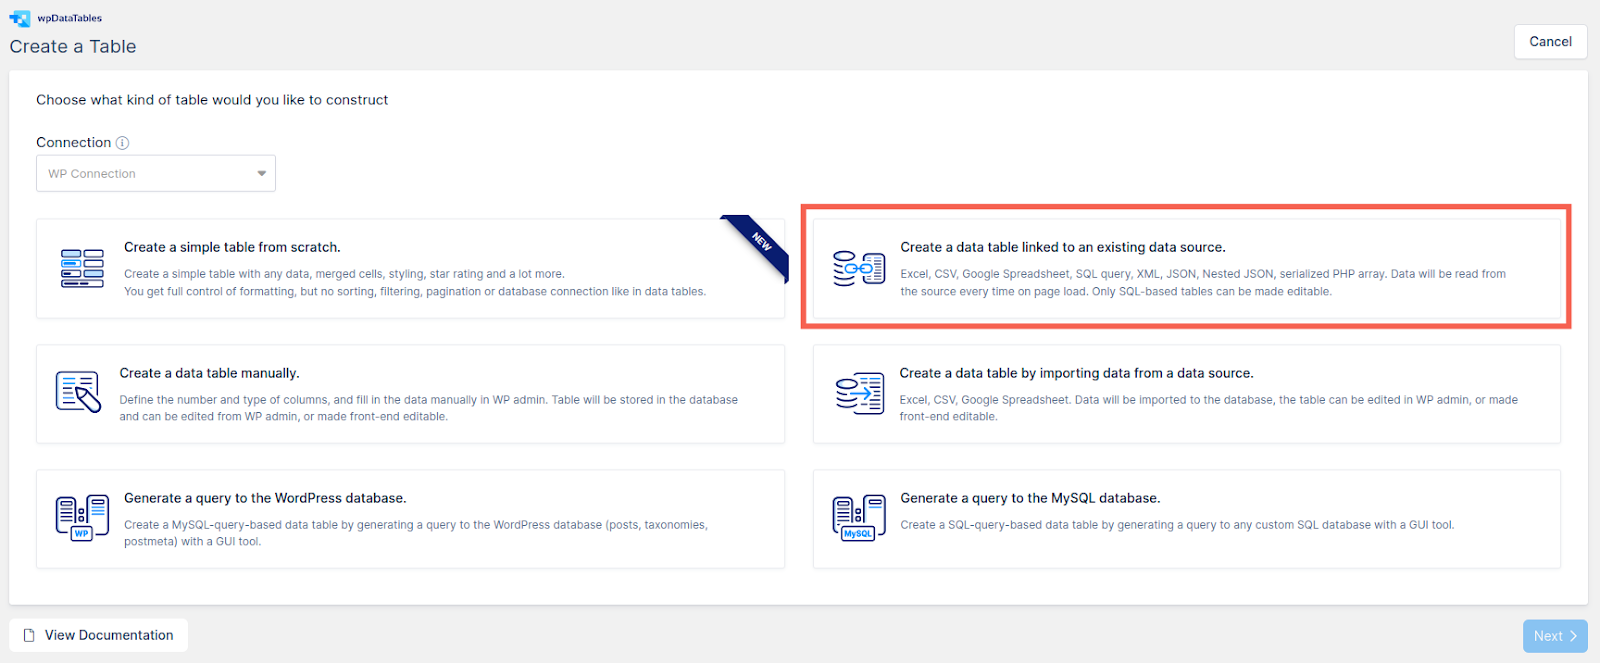
Creating a table is really intuitive. Hit Create a Table, then choose the data source for it.
In the next screen, name your table first, then select Gravity Forms as source and pick the actual form you want to use.

Having done that, you’ll need to configure your table. No code knowledge is needed. It’s all done with a few clicks.
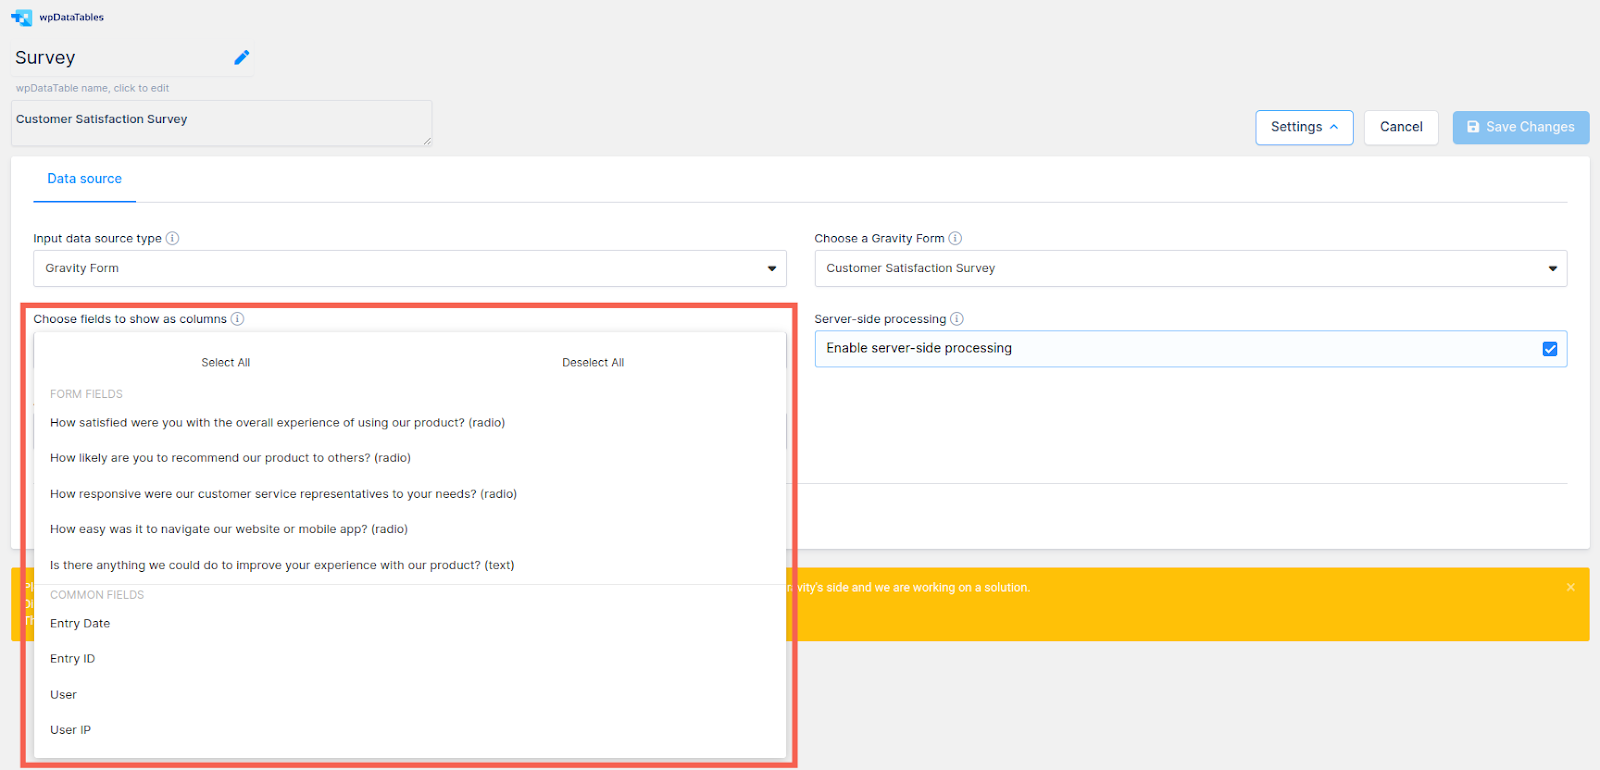
Choose the fields you want to show as columns in the table.
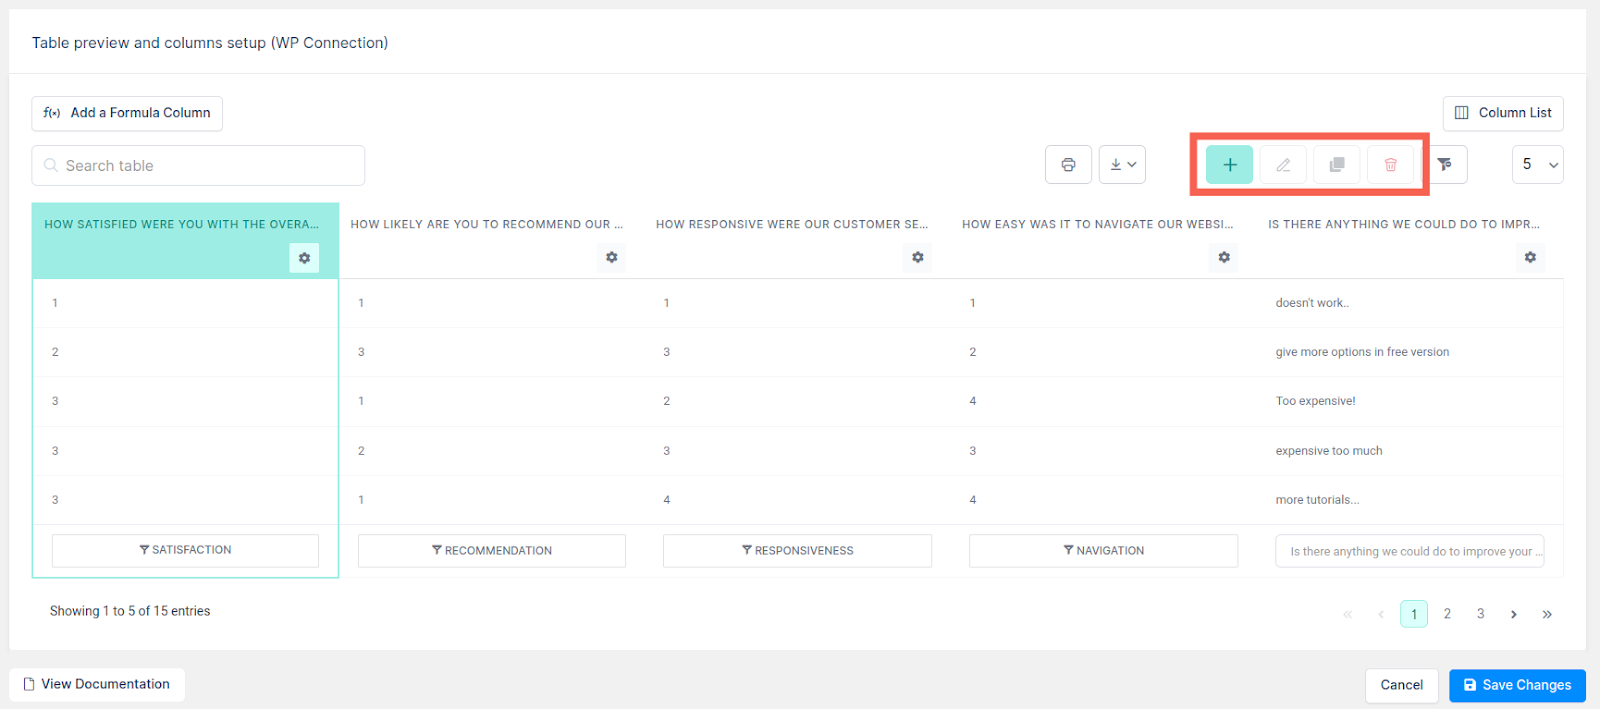
Once you’ve selected the fields/columns you want to show in the table, click Save Changes, and a wpDataTable will be created and displayed in the “Table preview and columns setup” card. You can see in the image below the new wpDataTable. Each row represents one form entry that was previously added in the form.
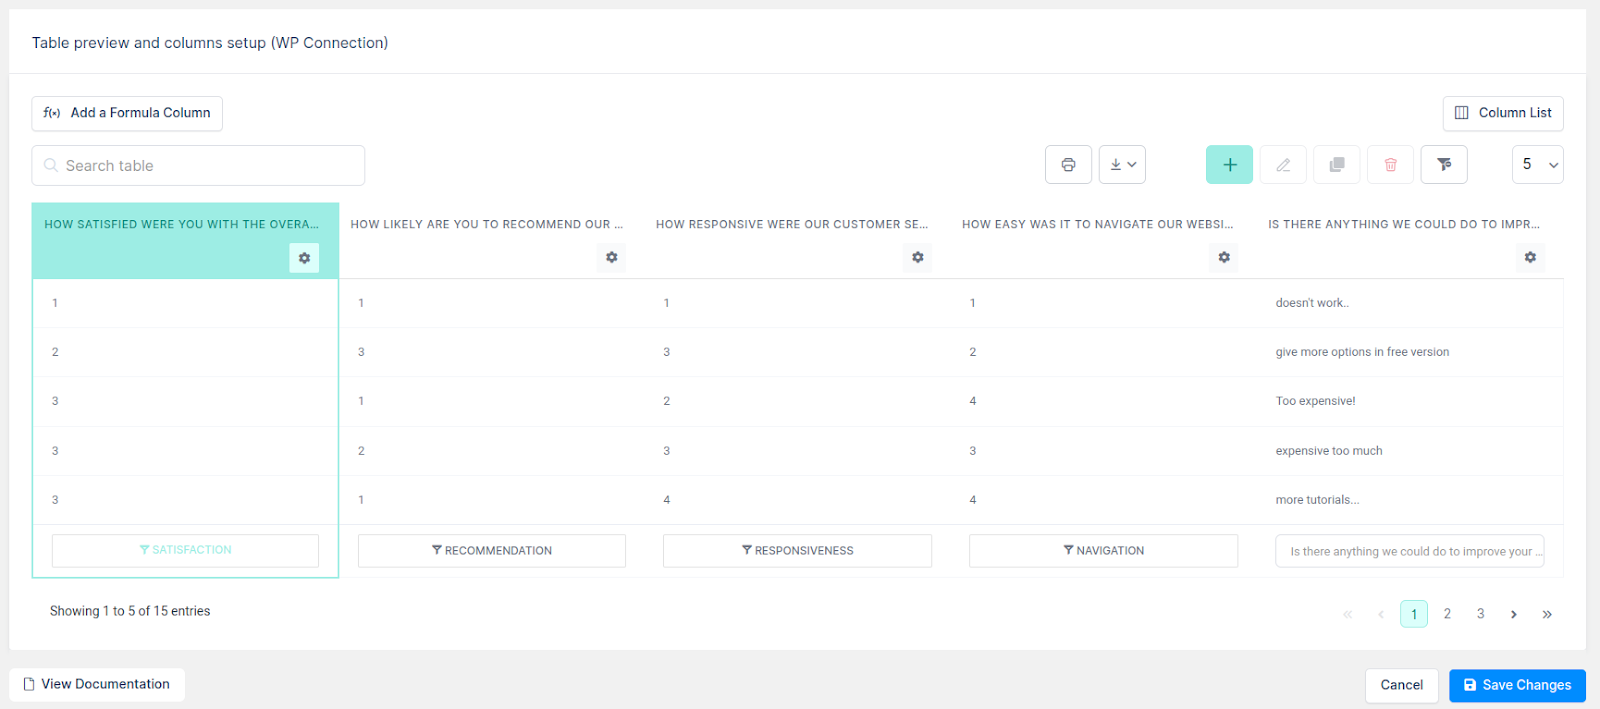
It’s that simple. But wait. There’s more!
Entering Server-side Processing
Starting from version 1.1, we’ve got a nifty new feature for your Gravity Form-based tables. It’s called server-side processing.
So, what does it do? Well, it lets you create a massive table from a form with hundreds of thousands of entries.
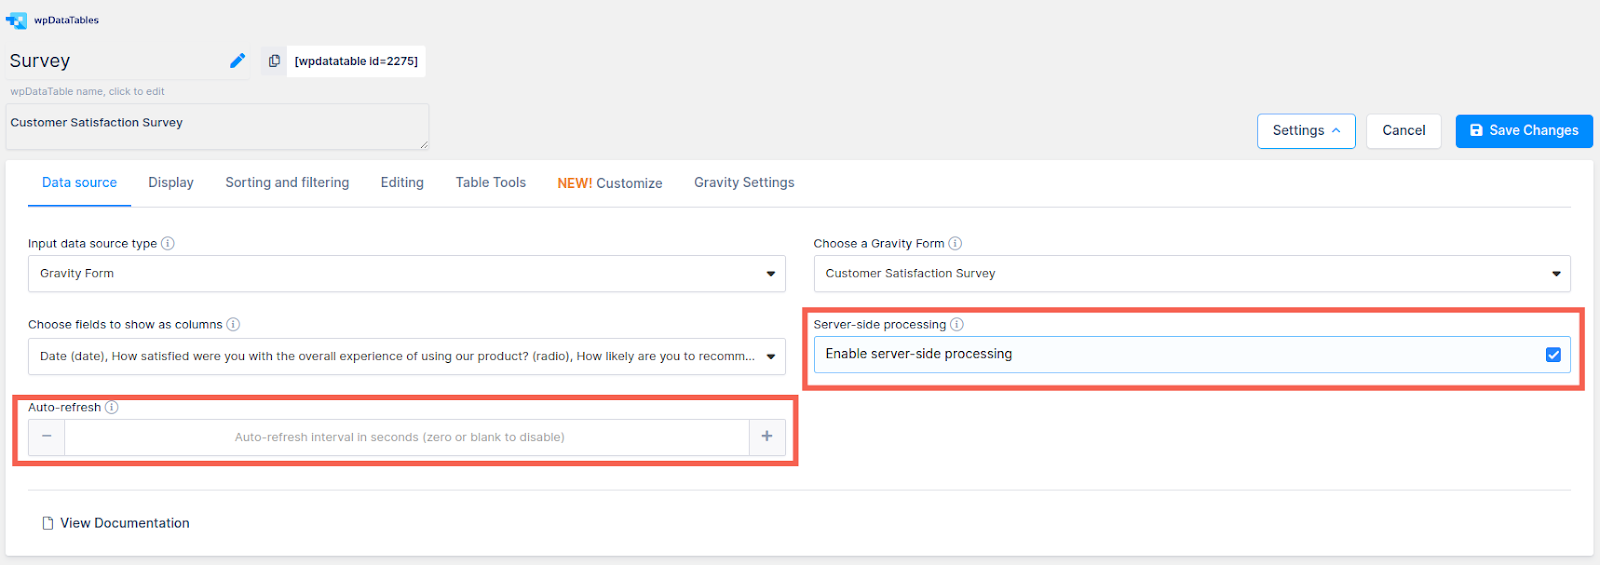
In order to take advantage of this, go under the DATA SOURCE tab you will find two more options:
- Server-Side Processing, or Lazy Loading – This switch defines whether the complete table data will be included in the page all at once, or if it will be loaded on request, with the sorting/filtering to be processed by server.
- Auto-refresh interval – If set to a value different from 0, tables will auto-refresh after each XX seconds interval.
Customize Table Appearance and Settings
You can configure your table’s settings, such as responsiveness, sorting, and pagination. You can also set editing permissions and choose an editor type.
And if we’re talking about editing, just follow these simple steps:
- Head to the Editing tab in the table configuration settings
- Click on the Allow editing option
- Hit the Apply button
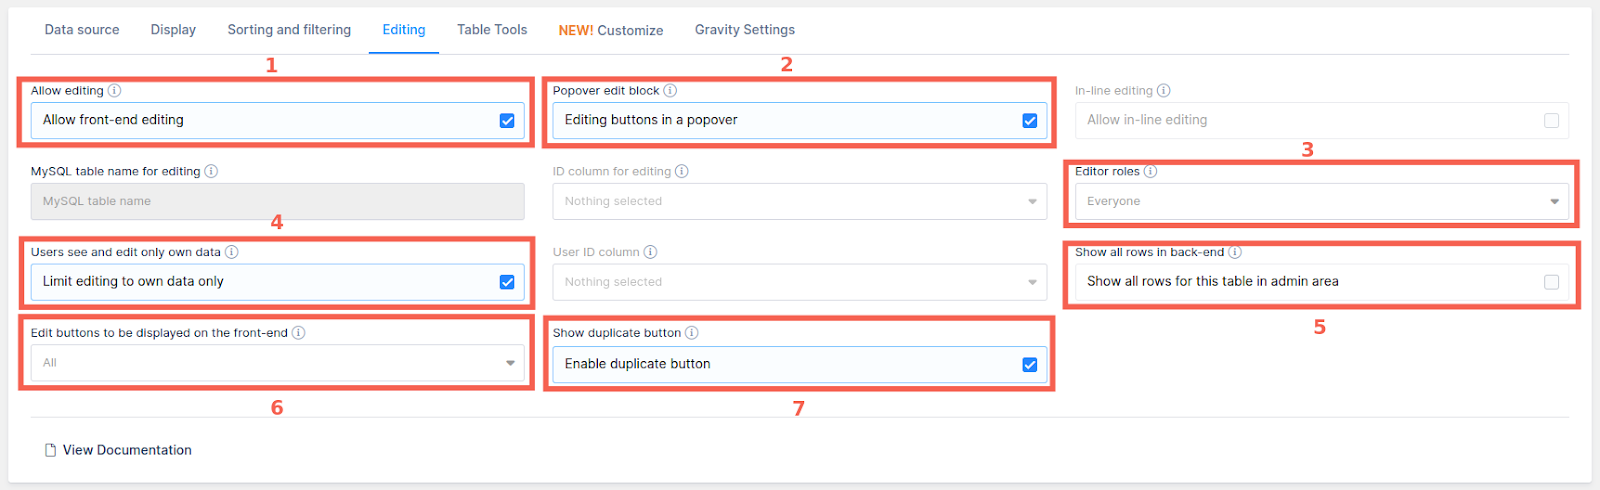
Now, you can enjoy these handy editing features for your Gravity-based wpDataTables:
- Popover Edit Block: With this enabled, you won’t see “Add,” “New,” and “Delete” buttons in their usual spot. Instead, click on any table row to see a popover with more info.
- Editor Roles: Choose which WordPress user roles are allowed to edit this table.
- Personal Data Bubble: Enable this switch, and users will only see and edit their own data.
- Show All Rows in Back-End: If the “Users see and edit only their own data” option is on, this setting lets users view all table data in the admin area.
- Front-End Edit Button Selection: Pick and choose which editing buttons to display on the front-end from the drop-down menu. Leave unchecked to show all.
- Show Duplicate Button: Enable this to add a Duplicate edit button to the table Edit buttons. It’s unchecked by default.
So, let’s say you want to add an entry to the table. You’d imagine that it would be complicated and it would need some advanced spreadsheet knowledge.
Nope.
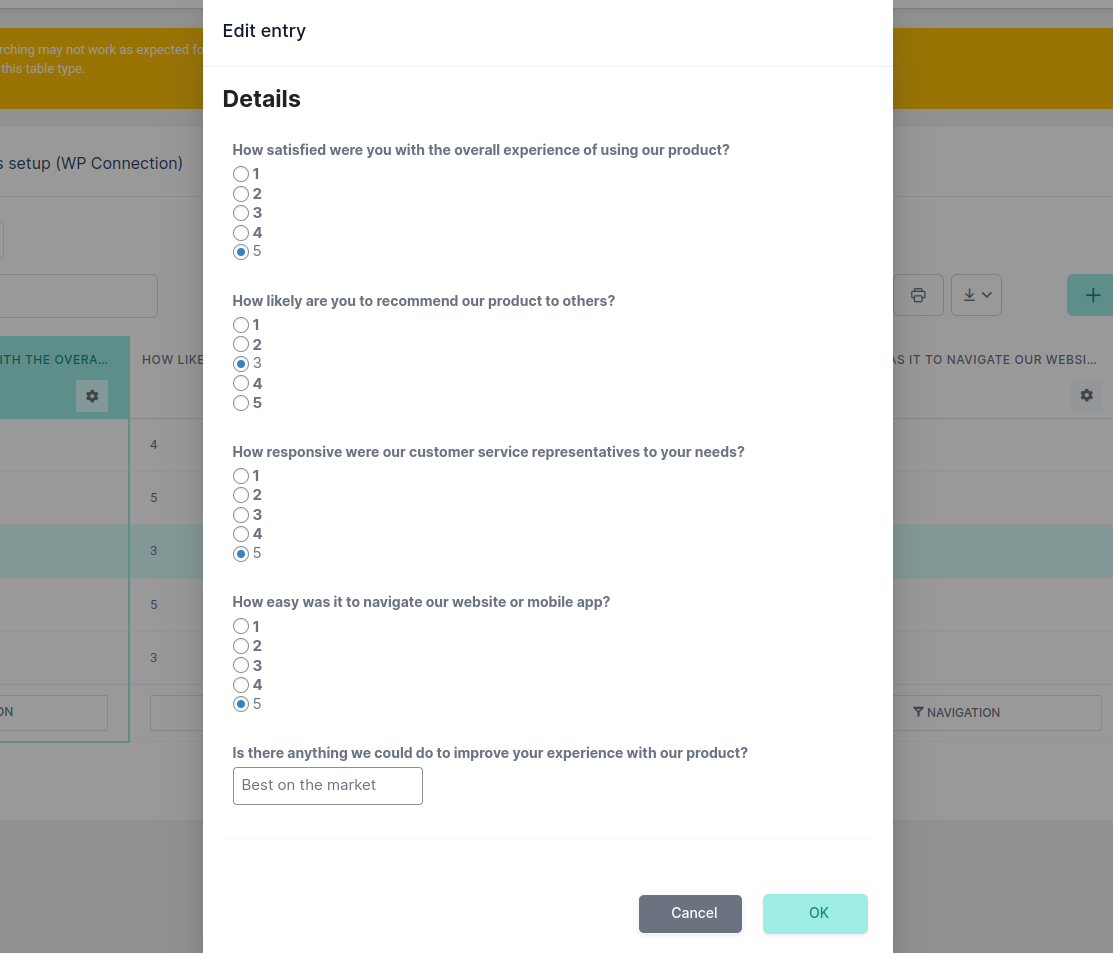
It’s as simple as filling in a survey on the front end:

Editing an entry looks fairly similar and it’s just as easy to pull off:
Implement Advanced Filtering Options
You can also add filter options to each column, allowing users to search and filter the data based on their needs.
These settings help you narrow down the form entries you want to display in your wpDataTable.
You can filter by:
- Status: Show only the entries with a specific status
- Date: Pick a date range to display entries from
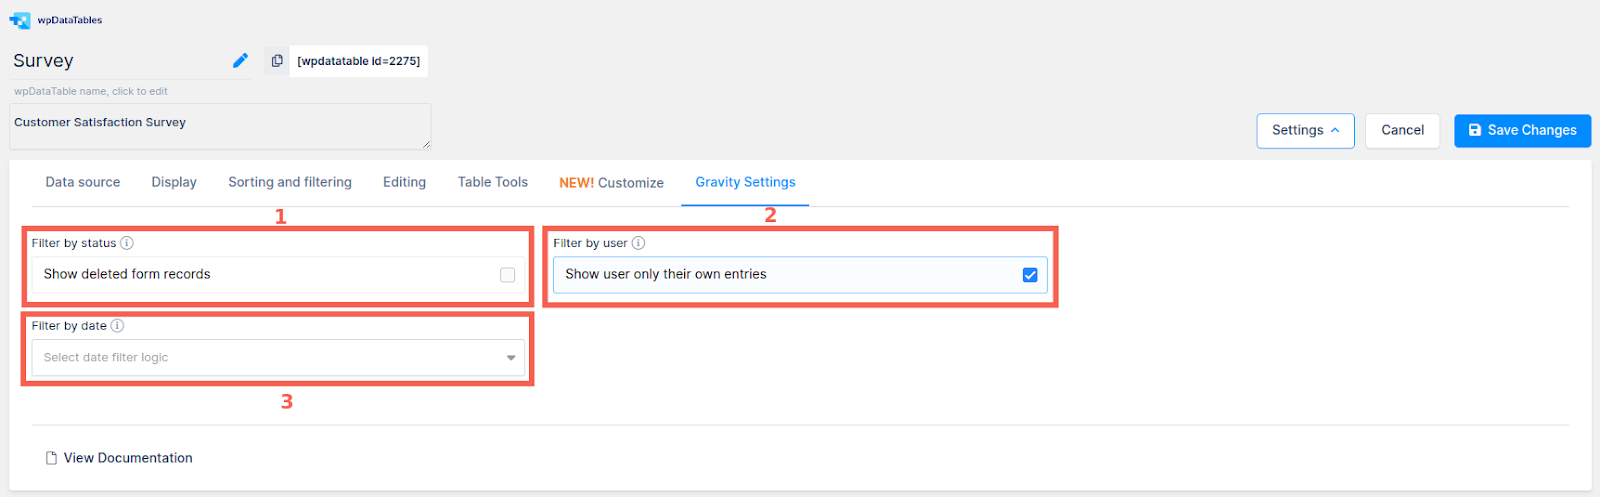
Extra Settings to Improve Your Gravity Forms Tables
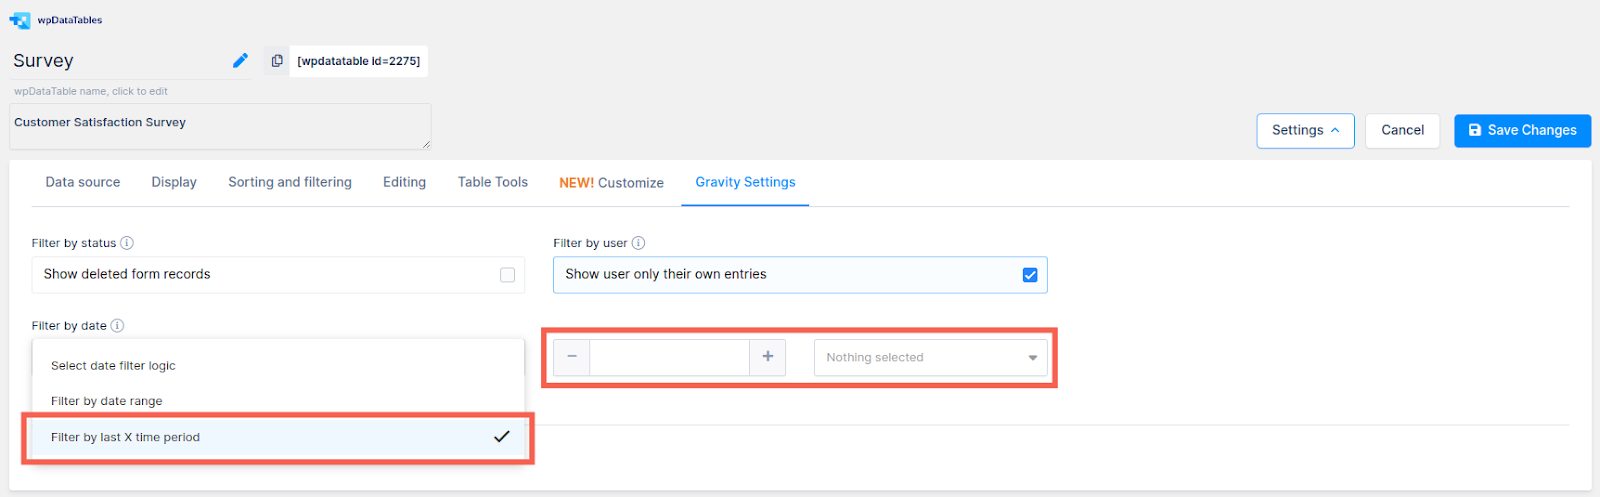
Tables based on Gravity Forms receive an additional Gravity settings tab in the table configuration page, complemented by extra table settings. These enable you to filter the displayed form entries in wpDataTables by status and date.
By selecting one of the two available filtering methods in the “Filter by date” dropdown, you can sort entries based on their date. Choose between Filter by date range and Filter by last X time period, or leave the dropdown empty if you prefer not to filter the displayed form entries.
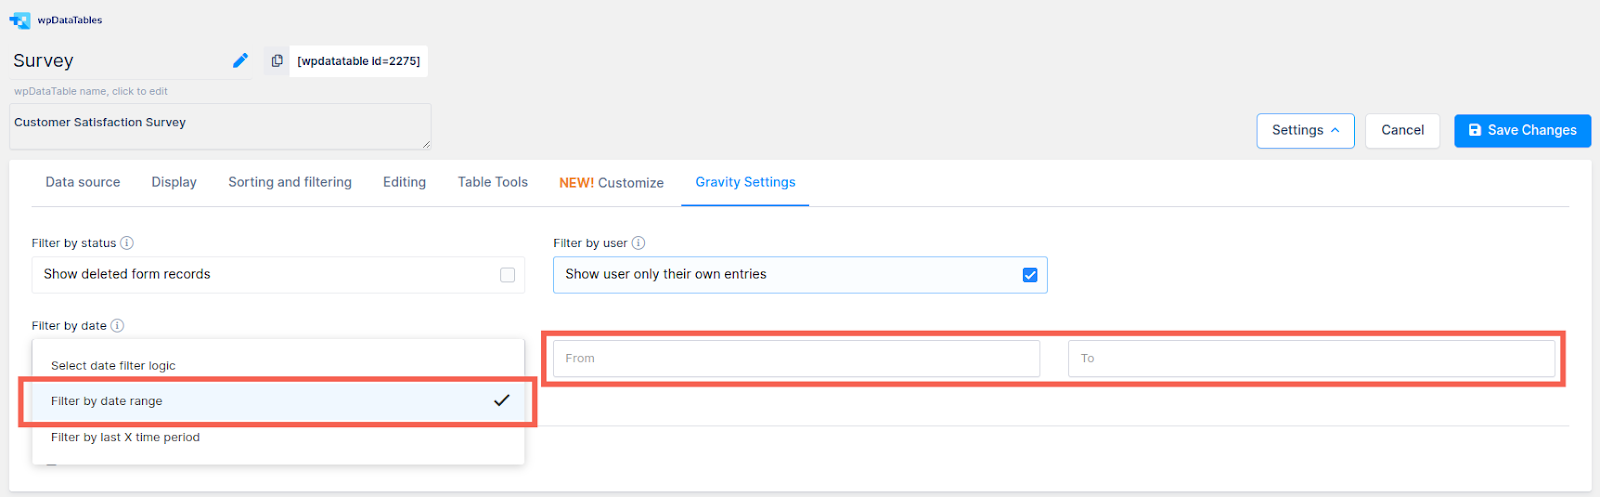
There’s also the option to filter by last X time period which would make two additional to appear. In the first field, input the number of periods (e.g., 20), and in the second field, select between Day(s), Week(s), Month(s), or Year(s).
For example, by opting for “20 Day(s)”, only those entries added within the last 20 days to the Gravity Form serving as the data source for this wpDataTable will be displayed and filtered.
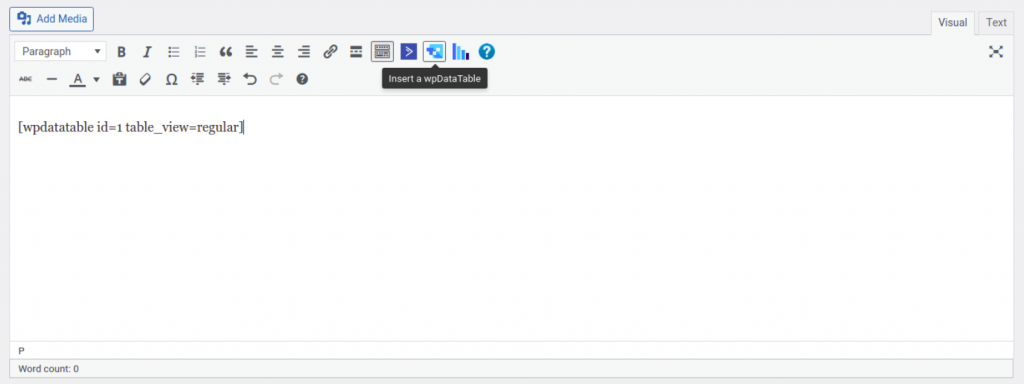
Integrate the Tables into Your Website
Simply use the provided shortcodes to embed the tables in your desired pages or posts.
Use Cases and Examples
Wondering how this integration could be useful in real-life scenarios? Here are a few examples:
- Collecting and analyzing customer feedback: Use a Gravity Form to gather feedback, and display the data in a wpDataTable to spot trends and make data-driven decisions.
- Managing event registration data: Streamline event registration by creating a filterable and sortable table of attendees, making it easy to keep track of guests and their details.
- Creating filterable product catalogs: Showcase your products in a user-friendly, filterable catalog that makes it easy for customers to find exactly what they’re looking for.
- Monitoring and visualizing project progress: Keep an eye on project milestones and visualize your team’s progress.
Conclusion
The wpDataTables integration for Gravity Forms is a game changer, making data management and visualization a breeze. With its powerful features and seamless integration with Gravity Forms, it’s no wonder that this add-on has quickly become a must-have tool for WordPress users.
So why not give it a try and see how it can revolutionize the way you work with data on your website? Whether you’re managing a small business or running a large-scale project, the wpDataTables integration for Gravity Forms will undoubtedly make your life easier and help you unlock the full potential of your data.
Now that you’ve seen what this integration can do, it’s time to take the plunge and start exploring its capabilities. I’m confident that you’ll be blown away by how effortlessly it enables you to export and display your Gravity Forms data in beautiful, interactive tables.
Newsletter
If you want to keep up-to-date with what’s happening on the blog sign up for the Gravity Forms newsletter!
"*" indicates required fields