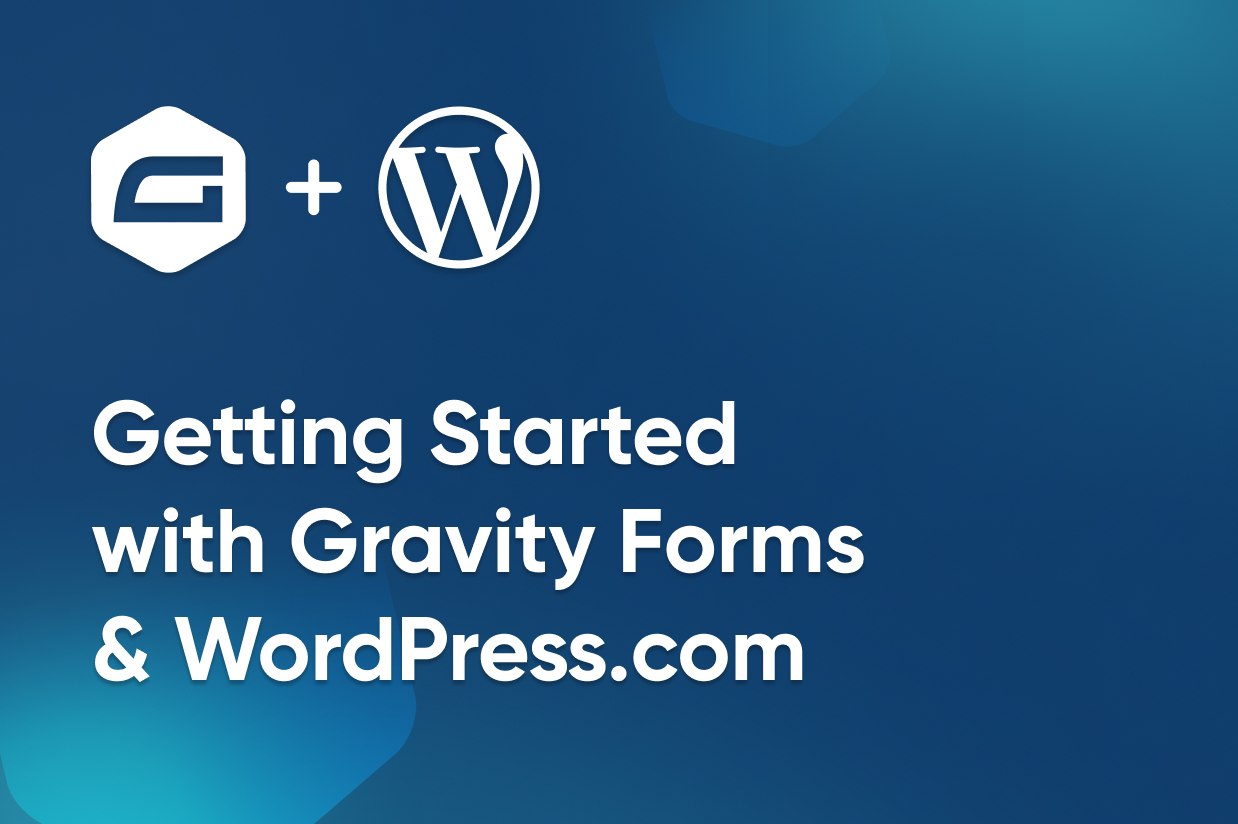
Did you know that Gravity Forms is available to WordPress.com users?
That’s right. If you’re on one of the plugin-enabled WordPress.com plans (Business or above), you can install Gravity Forms on your site.
Furthermore, you can purchase Gravity Forms directly from WordPress.com with the option of paying monthly or yearly.
So if you’ve been thinking about starting a new website on the WordPress.com platform, you can now add powerful data capture features to your site via our Gravity Forms plugin.
If you’re ready to start a new WordPress.com site or are unsure if WordPress.com is the right option, this guide explains why you should consider WordPress.com and the benefits of having a powerful data capture tool like Gravity Forms.
There’s also a step-by-step guide that shows you how to use Gravity Forms with WordPress.com and integrate your site with Mailchimp so that you can start a mailing list.
Read on, or click on the links below to jump straight to the part of this guide you’re most interested in:
- Why Use WordPress.com?
- Why You Need a Powerful Data Capture Tool
- How to Get Started with WordPress.com and Gravity Forms
- How to Integrate Mailchimp with Gravity Forms and WordPress.com
If you already know that WordPress.com and Gravity Forms is the right solution for you, click here to sign up with WordPress.com and here to get Gravity Forms for WordPress.com.
Why Use WordPress.com?

If you want to create a new WordPress website, you have two main options.
The first is to sign up at WordPress.com and create, host, and manage your site there.
The second option is to go down the self-hosted WordPress.org route by signing up with a web host, such as WP Engine, and installing WordPress there.
Both approaches have their pros and cons. However, for this guide, I’m assuming you’re leaning toward WordPress.com. So with that in mind, here are some of the reasons to use WordPress.com:
- Very easy to get started with.
- Domain name, hosting, and site management all under one account.
- Makes managing a WordPress website very straightforward.
- Fast load times and good security.
- Lots of useful built-in features.
- Ability to install plugins and themes on the Business plan and above.
- Has its own theme and plugin marketplaces.
- Comes with lots of premium WordPress themes.
- Access to WordPress expert support staff and webinars.
Some of those reasons to use WordPress.com also apply to the self-hosted WordPress.org approach. But with the latter, it really depends on which host you choose and how much you’re prepared to pay.
Thanks to the launch of the plugin-enabled WordPress.com Business plan and above, you can now do almost everything you can do with a self-hosted WordPress.org site, and often in a much more user-friendly way.
Why You Need a Powerful Data Capture Tool
Whether you want to publish contact forms, newsletter sign-up forms, payment forms, order forms, quizzes, surveys, registration forms, or donation forms on your site, a powerful data capture tool like Gravity Forms makes it possible.
With the right tool, you can start collecting leads, processing payments, accepting orders, and surveying your audience, all from your WordPress.com website.
Gravity Forms is a great choice for adding forms to your site for a number of reasons, including:
- Powerful Form Editor – Use the intuitive drag-and-drop editor to create custom forms.
- Library of Form Templates: Quickly add a range of editable forms from the library to your site.
- 30+ Form Fields: Build advanced forms with the selection of form fields.
- Conditional Logic: Create dynamic forms that adapt based on user selections.
- Payment Processor Integration: Use your preferred payment processor to take payments via your forms.
- Gravity Forms Add-Ons: Enhance your forms with the library of integrations.
As you can see, Gravity Forms is a great choice for creating a range of custom forms that integrate with lots of services.
How to Start Using Gravity Forms with WordPress.com
If you’re ready to get started with WordPress.com and Gravity Forms, or you’d just like to see what the process of using these two products looks like, this part of the guide will walk you through setting up a new site using WordPress.com and Gravity Forms. It also covers integrating your form with Mailchimp and adding form users to your email list.
The steps covered include:
- Sign Up at WordPress.com
- Register a Domain Name
- Make a Payment
- Set Up Your New Site
- Choose a WordPress Theme
- Add Gravity Forms
- Create a Form
- Publish the Form
- Integrate the Form with Mailchimp
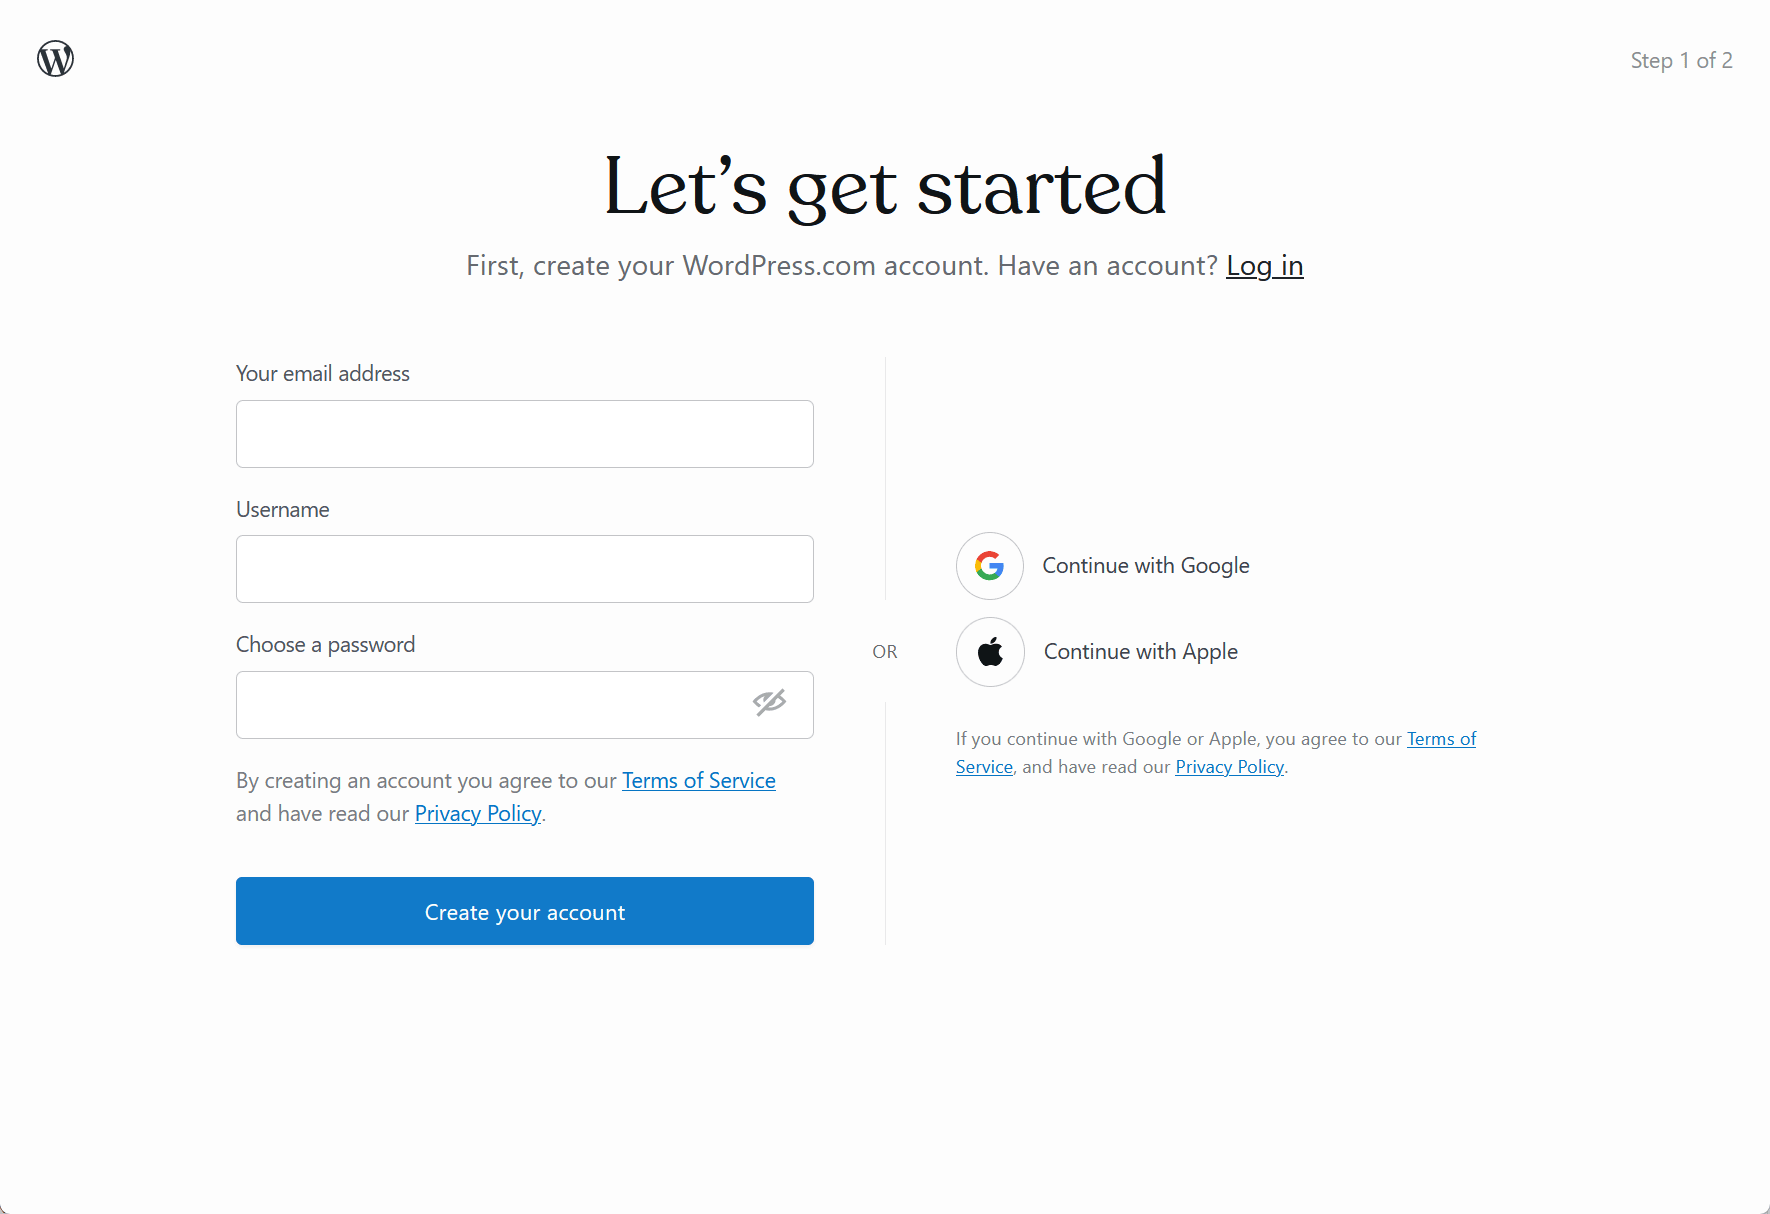
1. Sign Up at WordPress.com
If you head to WordPress.com, you can sign up and create your new website in just a few clicks.
However, as you’ll see on the plans and pricing page, there are a few options to choose from.

If you want the ability to install plugins, such as Gravity Forms, to add new features to your site, you’ll need to choose the Business plan or above.
So to get started, click the Get Business button on the plans and pricing page.
Next, enter your email address, name, and a password, or sign up with your Apple or Google account.
2. Register a Domain Name
Now, it’s time to choose a domain name for your site.
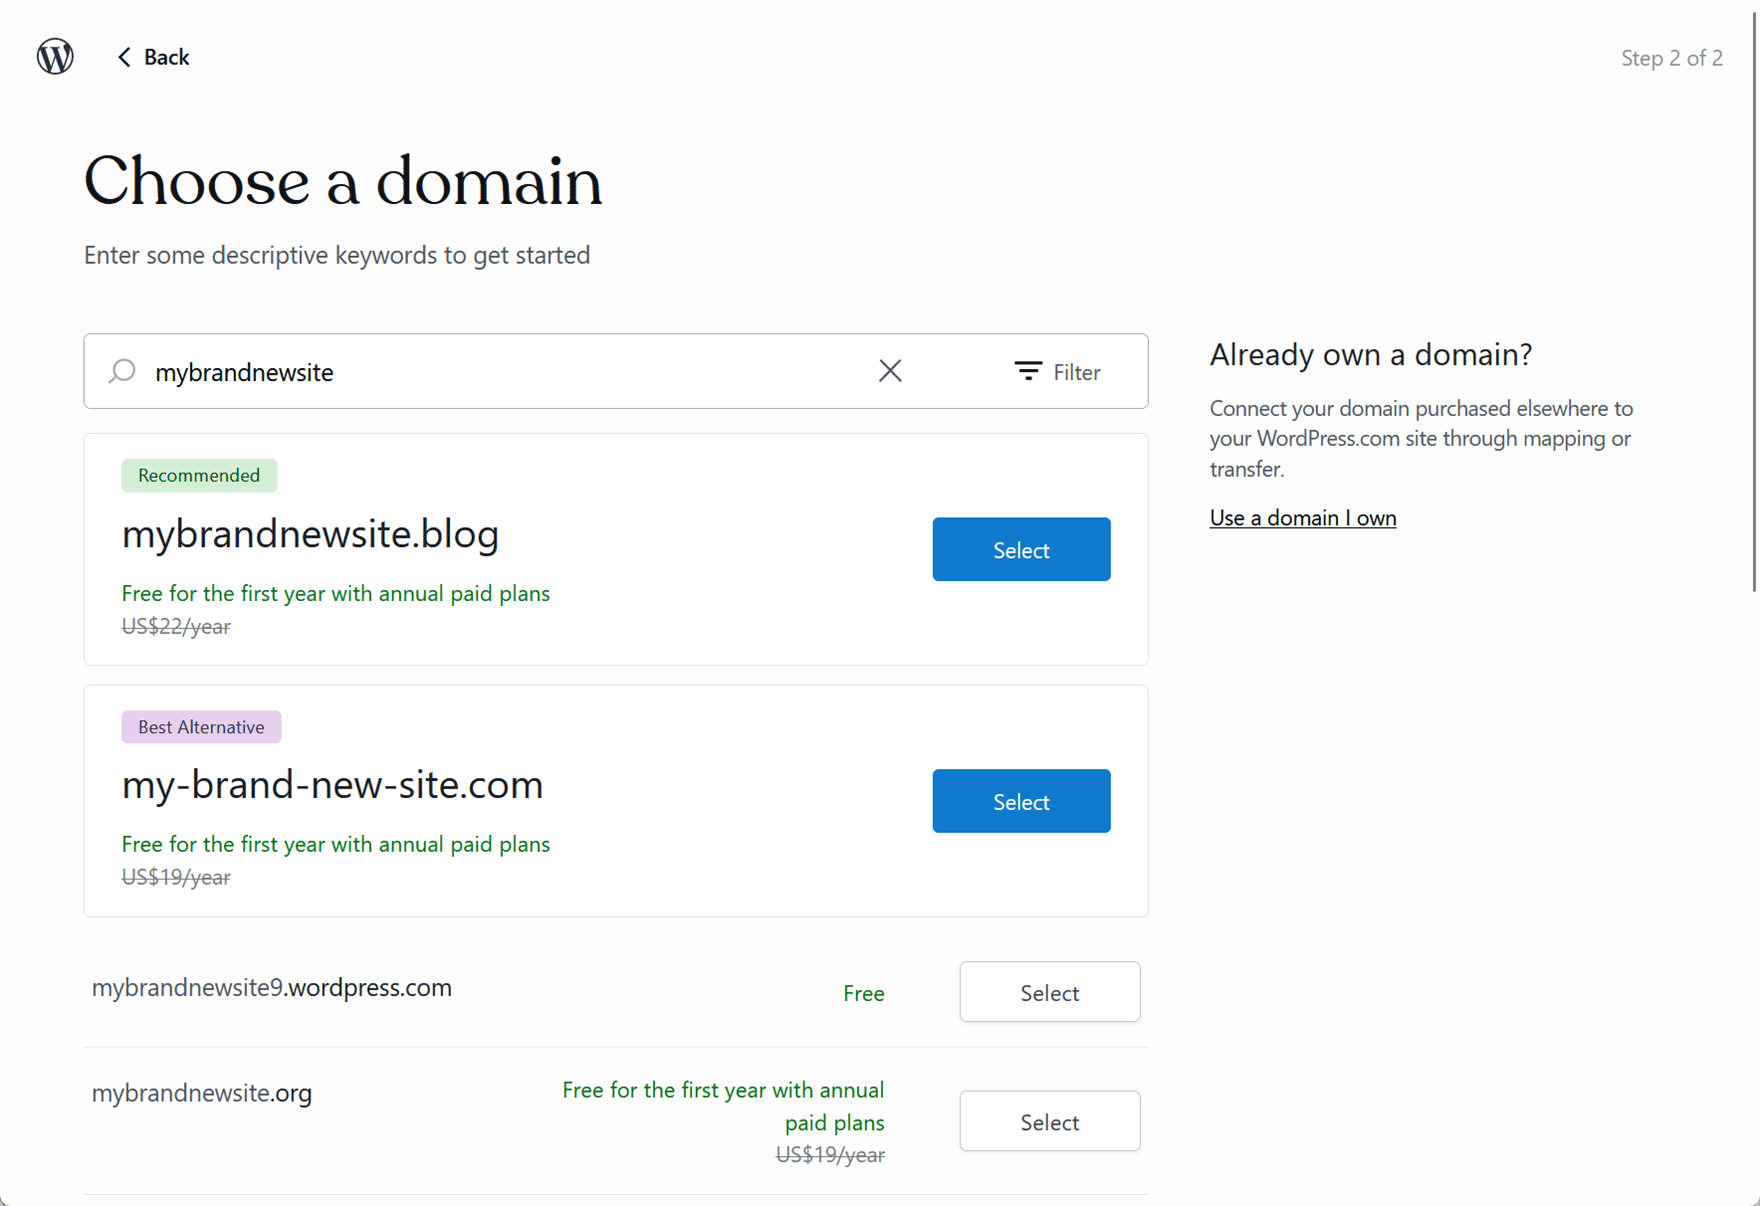
The domain name can be thought of as the address that takes visitors to your site when it’s entered into a browser, such as “gravityforms.com“.
With the WordPress.com Business plan, you get your first year’s domain registration for free. After that, you’ll have to pay the annual renewal rate.
Alternatively, you can register a domain name elsewhere, such as namecheap.com. The benefit of doing this is that you might get cheaper prices, depending on which domain name extension you choose, such as .com, .org, or .co.uk.
Another option is to use a free WordPress.com subdomain such as “mynewsite.wordpress.com”. If you can’t decide which domain name to register just yet, using the free WordPress.com subdomain lets you get your site up and running with the option to register a domain name later.
3. Make a Payment
Finally, pay for your WordPress.com Business plan account.
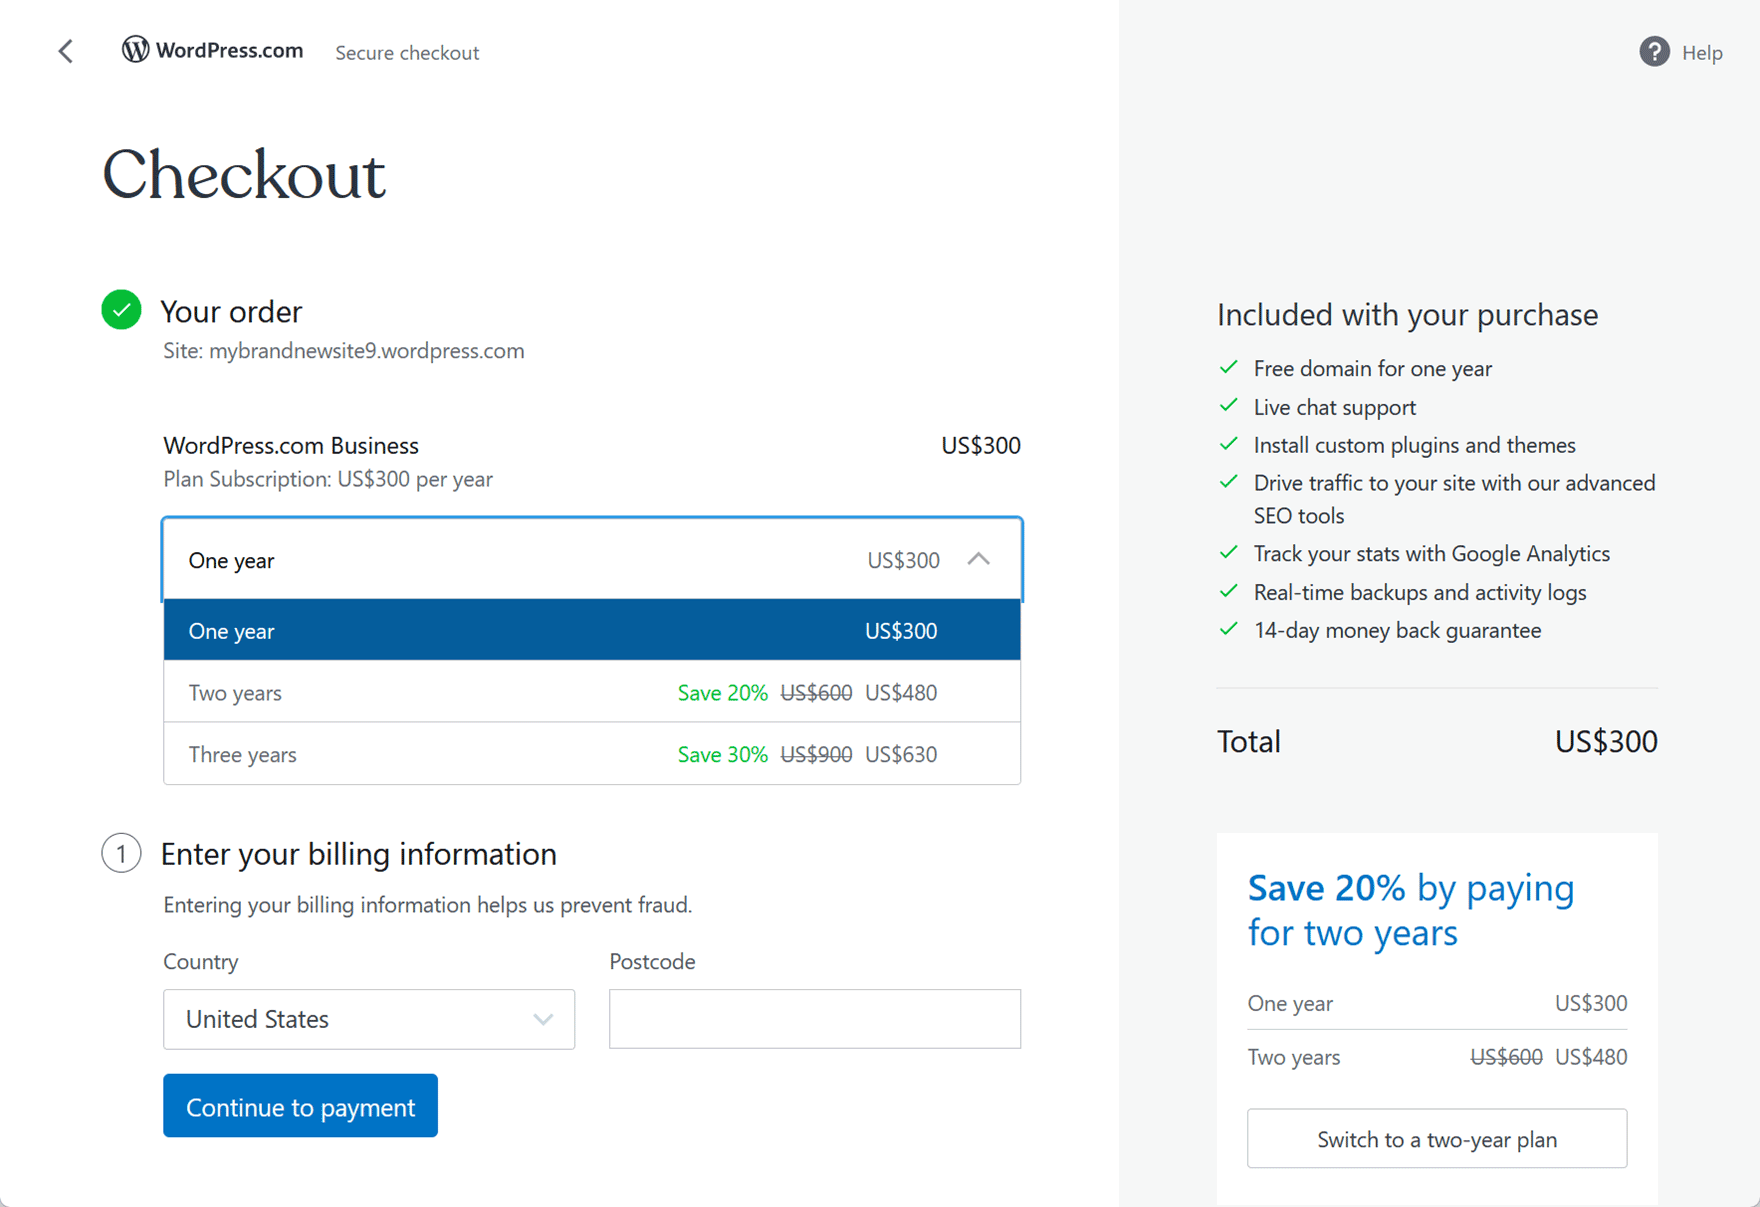
The best value option is to pay for three years upfront, but you can just pay for one month or one year if you’re not ready to commit for that long or don’t want or pay such a large amount in one go.
If you choose to pay monthly, you won’t get the free one-year domain registration.
You can request a refund within 14 days of purchase for plans of one year or longer and seven days for monthly plans.
4. Set Up Your New Site
Once your payment has been processed, you can start work on your new site.
To help you get started, you can answer a few questions so that WordPress.com can configure your site for you. Alternatively, you can skip straight to the WordPress dashboard.
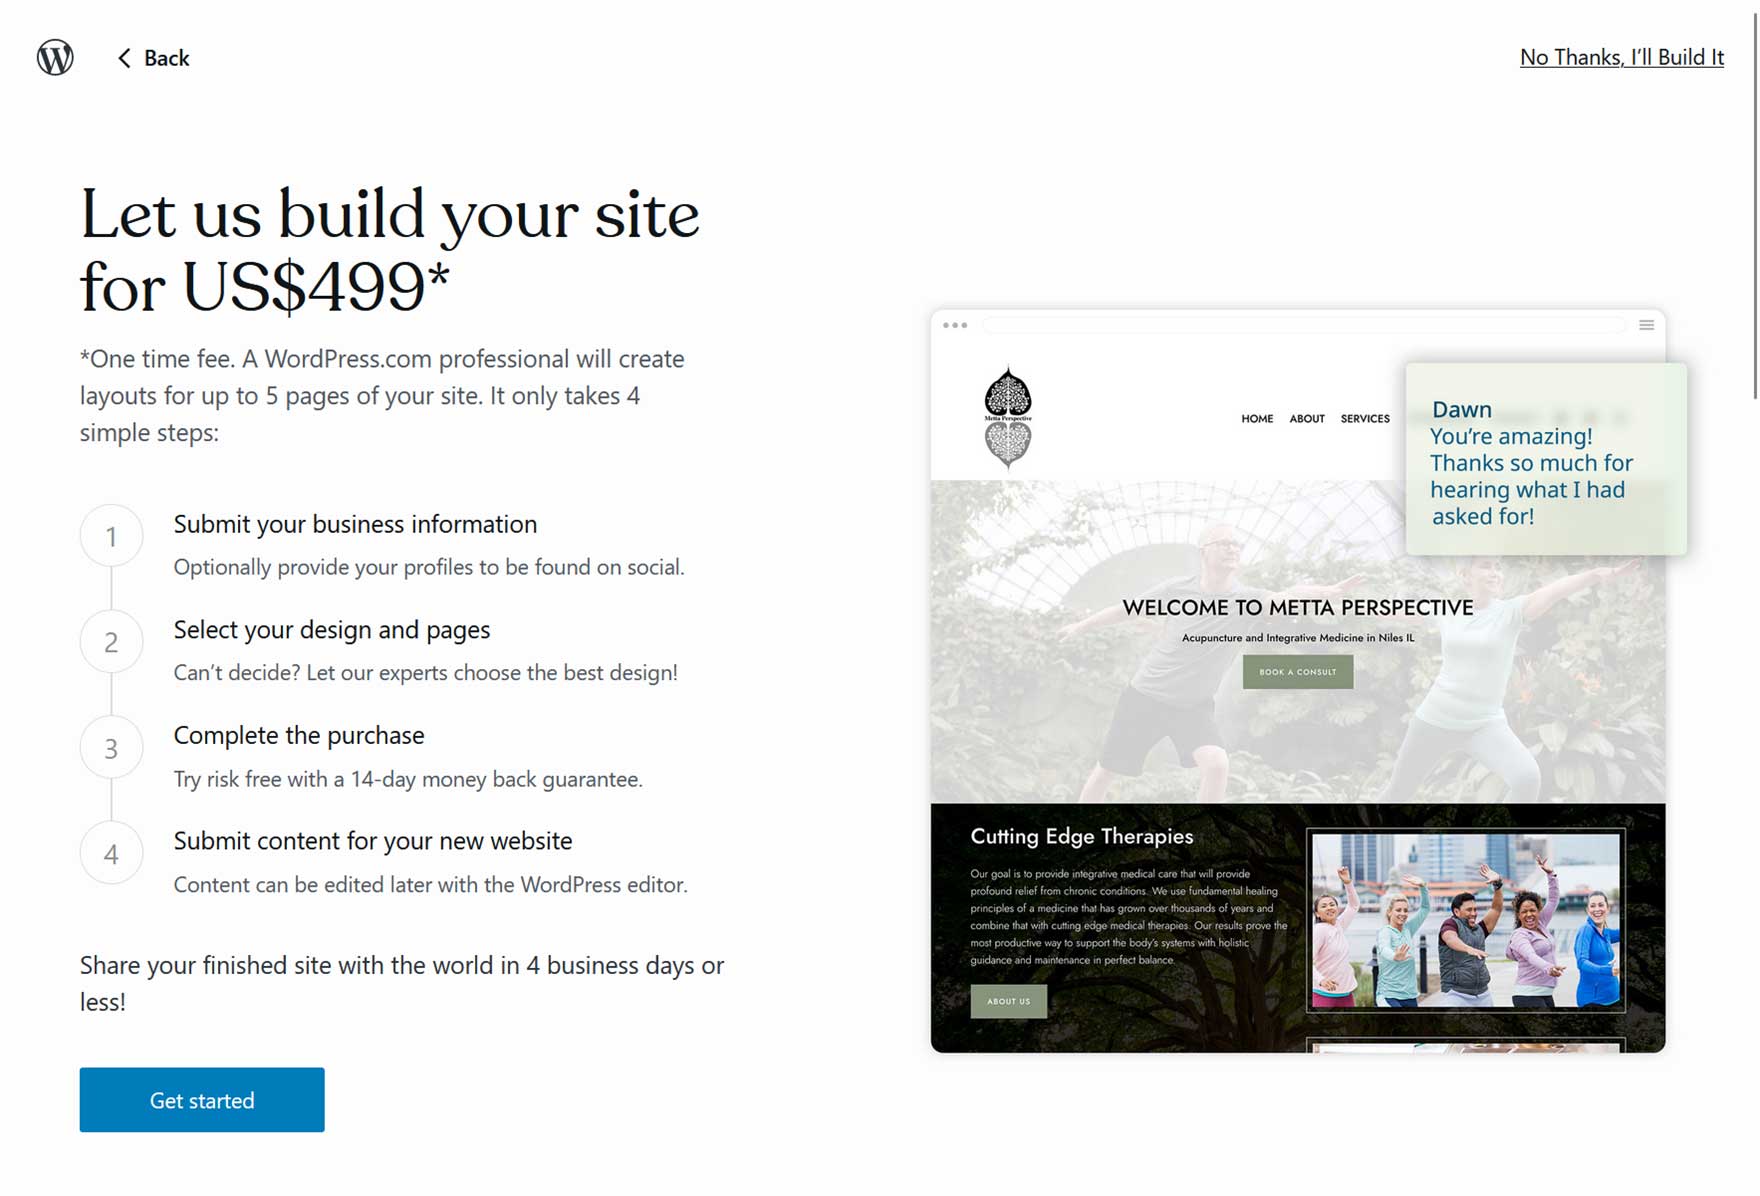
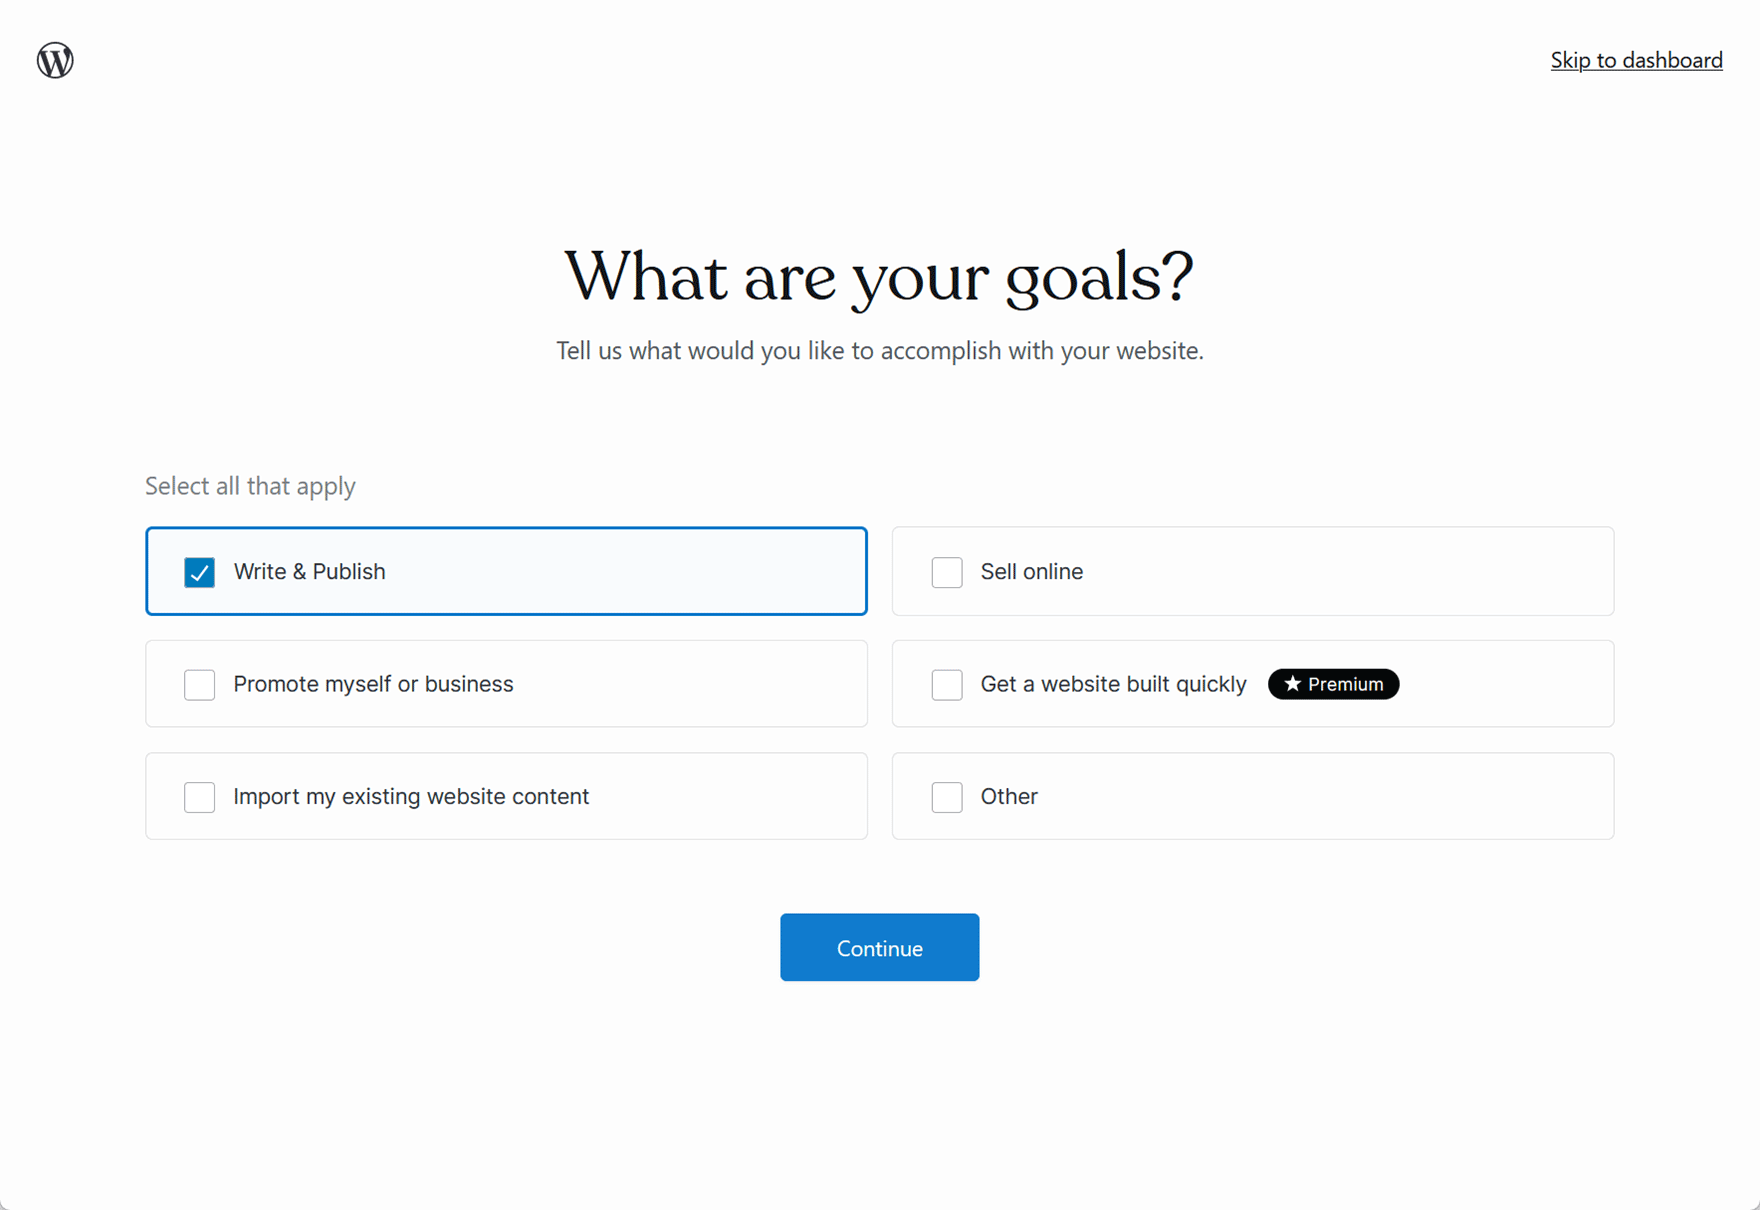 You can even pay a fee to let WordPress.com build your site for you!
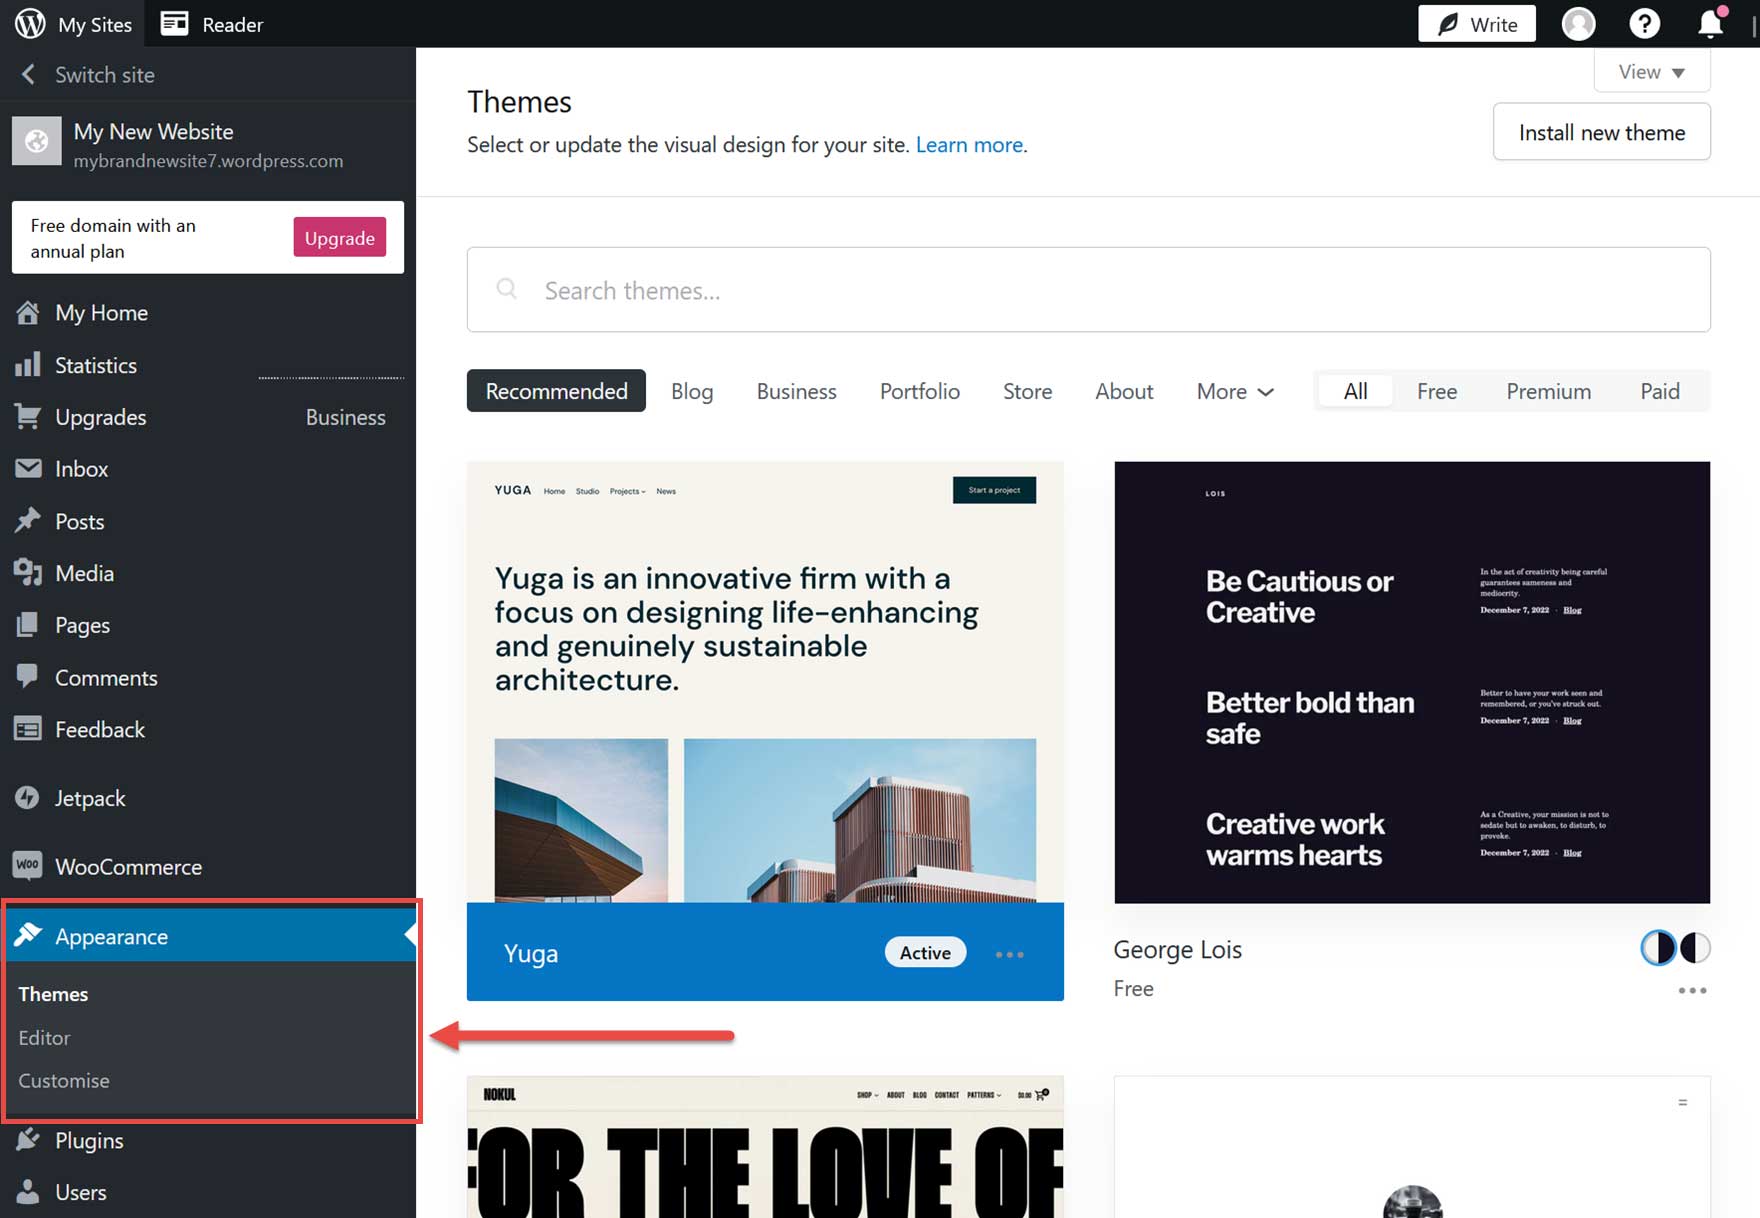
5. Choose a WordPress Theme

Once your site is set up, you can change the design by choosing a theme.
The WordPress.com plugin-enabled Business plan and above not only let you install themes you’ve created yourself or sourced from elsewhere, but they also provide you with free and premium themes from the WordPress.com directory at no extra cost.

To choose a design for your site from the WordPress.com theme directory, you can either do this during the site setup process or by clicking on the Appearance → Themes sidebar menu in your WordPress dashboard.
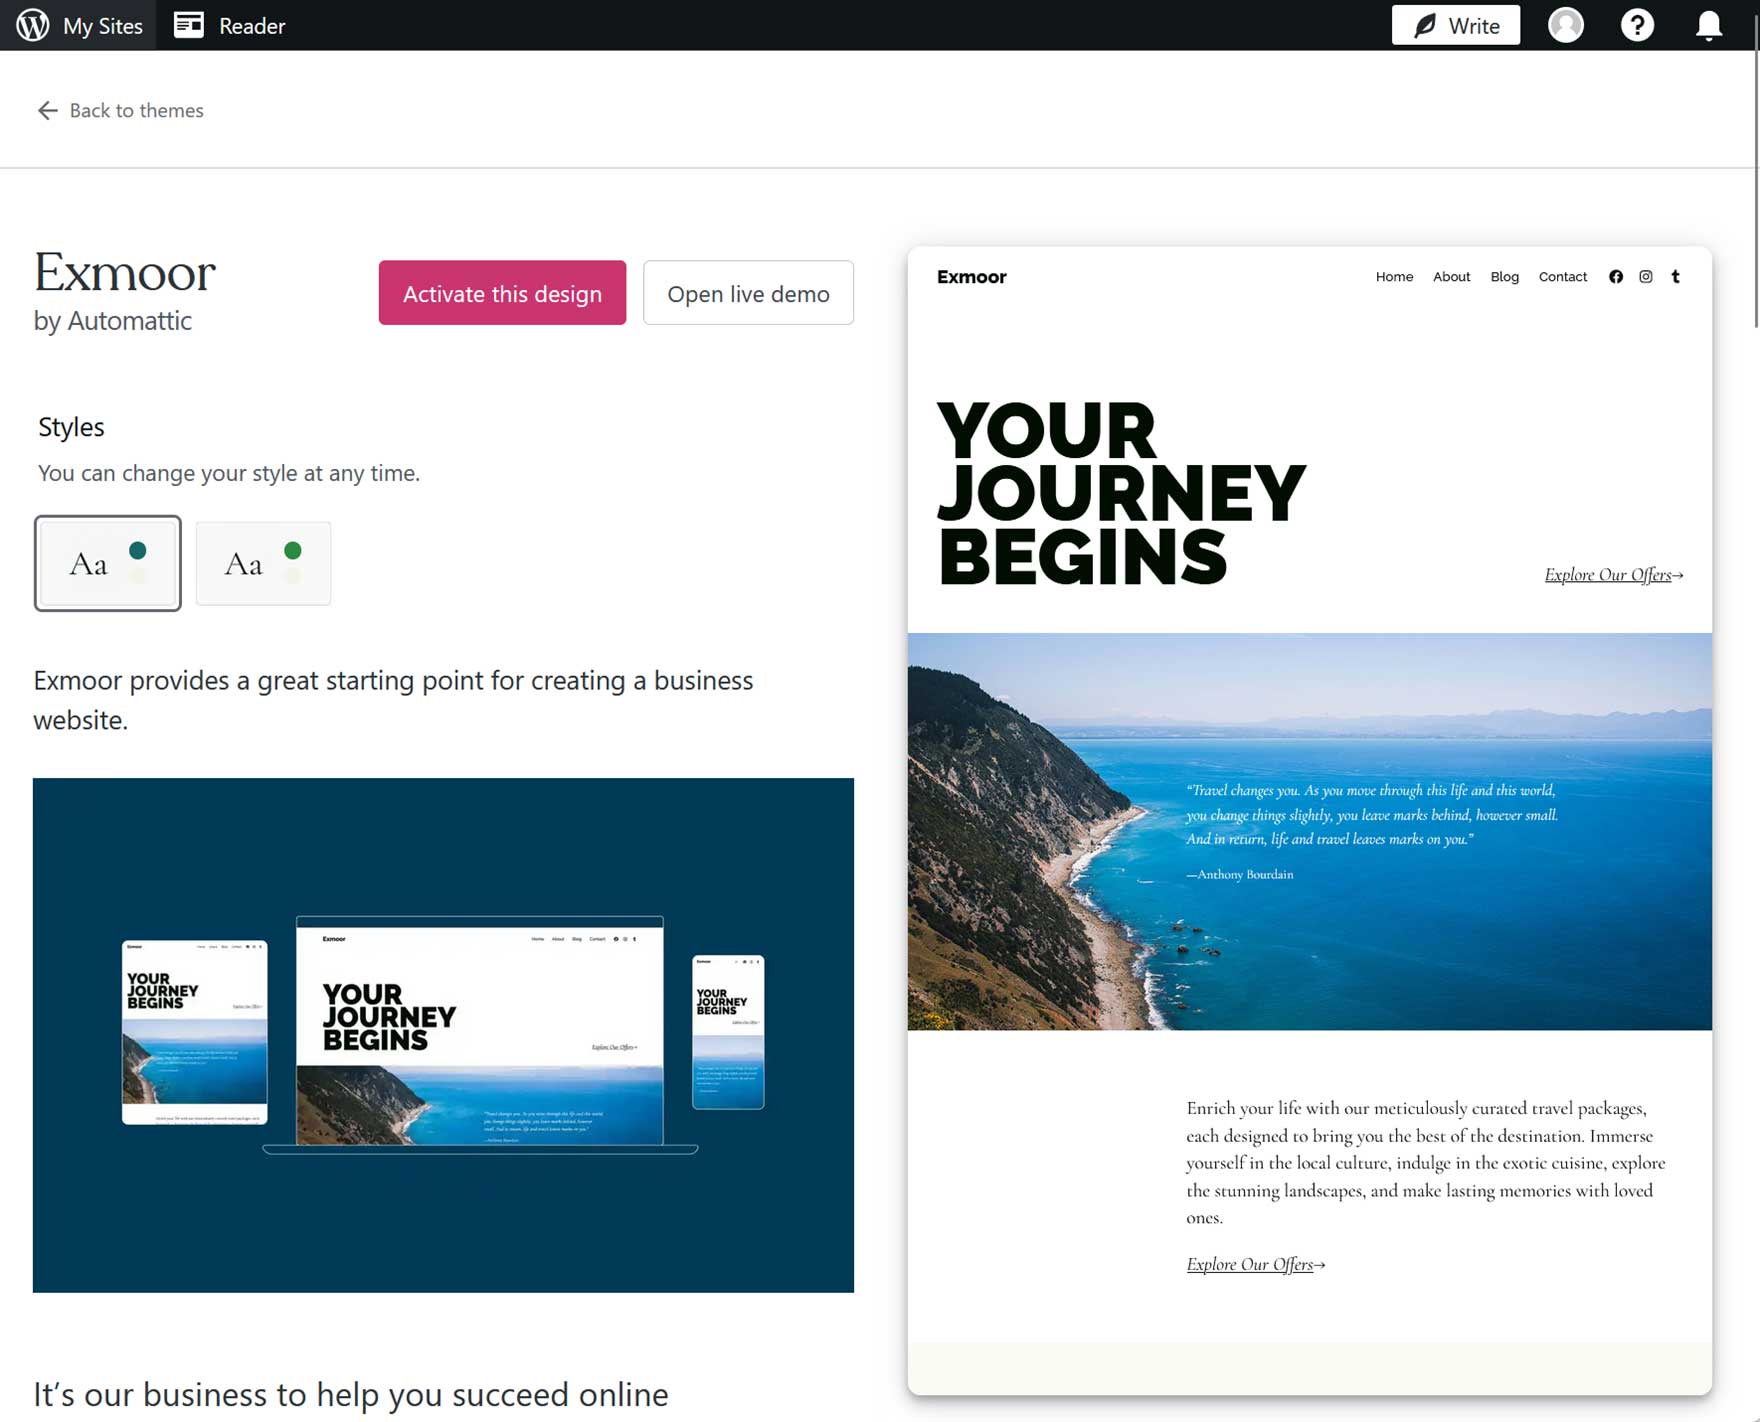
Once you’ve found a theme you’d like to use, simply click on it to find out more and view the live demo. If it looks good, click on the Activate this design button.
You can read this guide to find out how to customize your WordPress theme.
6. Add Gravity Forms
Now it’s time to add Gravity Forms to your site so that you can create powerful form-based data capture solutions.
To get started, click on Plugins → Add New from the sidebar menu of your WordPress dashboard.
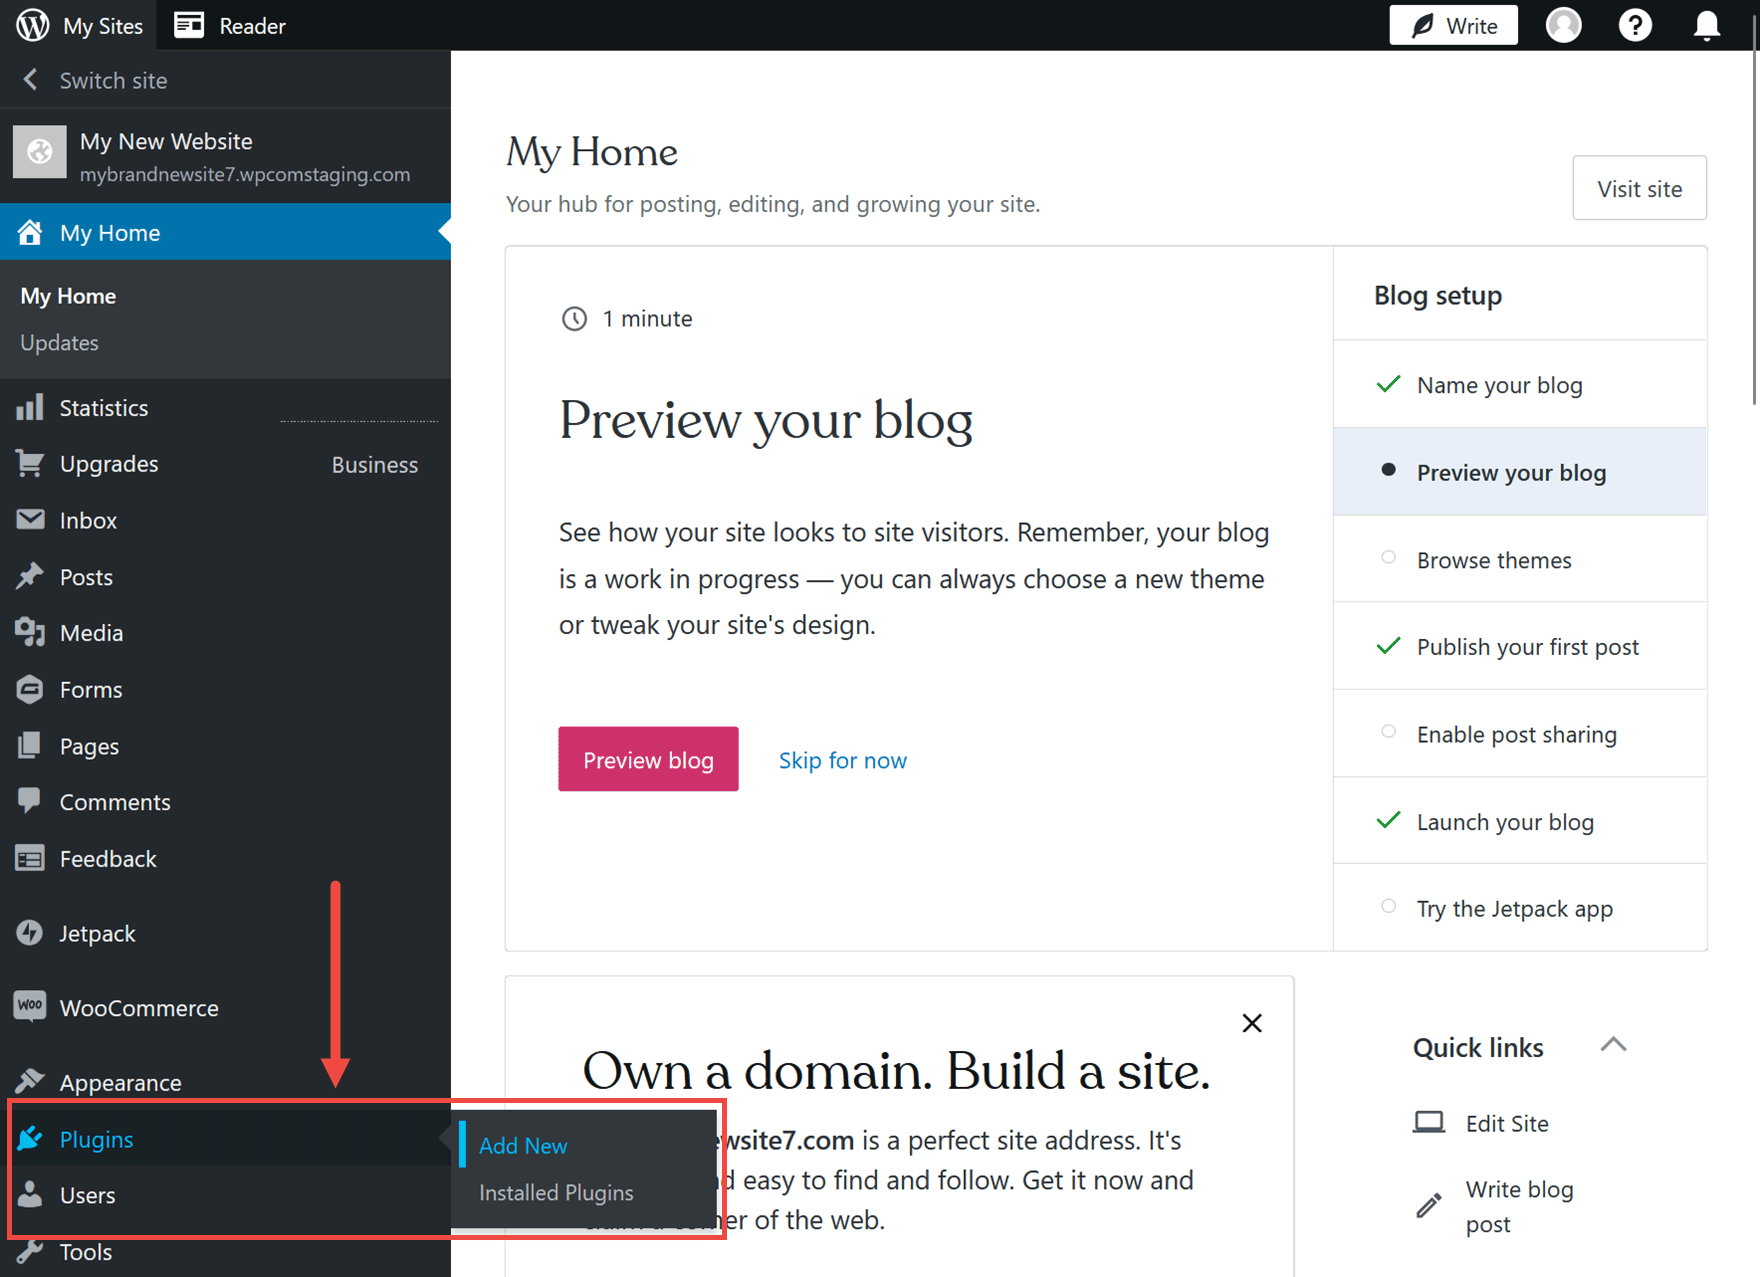
Next, search for “Gravity Forms” on the Plugins page.
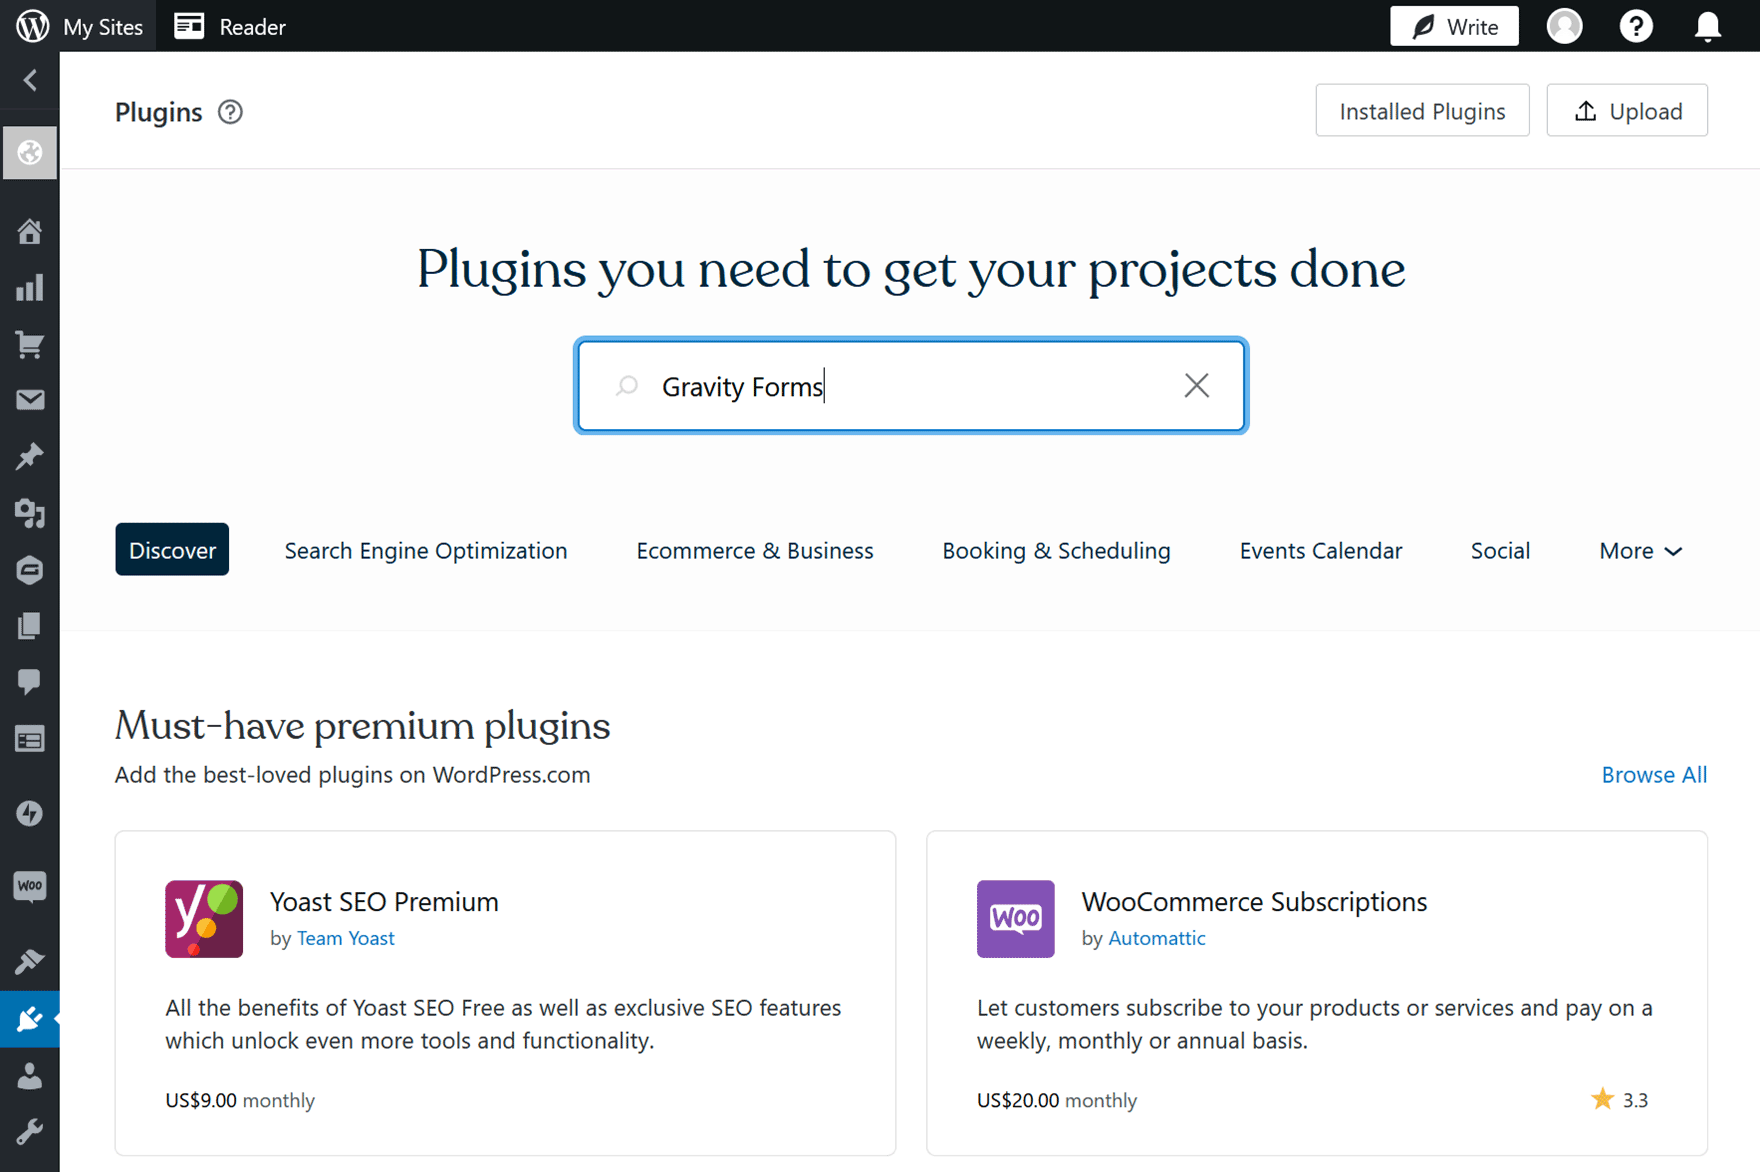
Click on the Gravity Forms panel from the search results and then choose a purchase option.
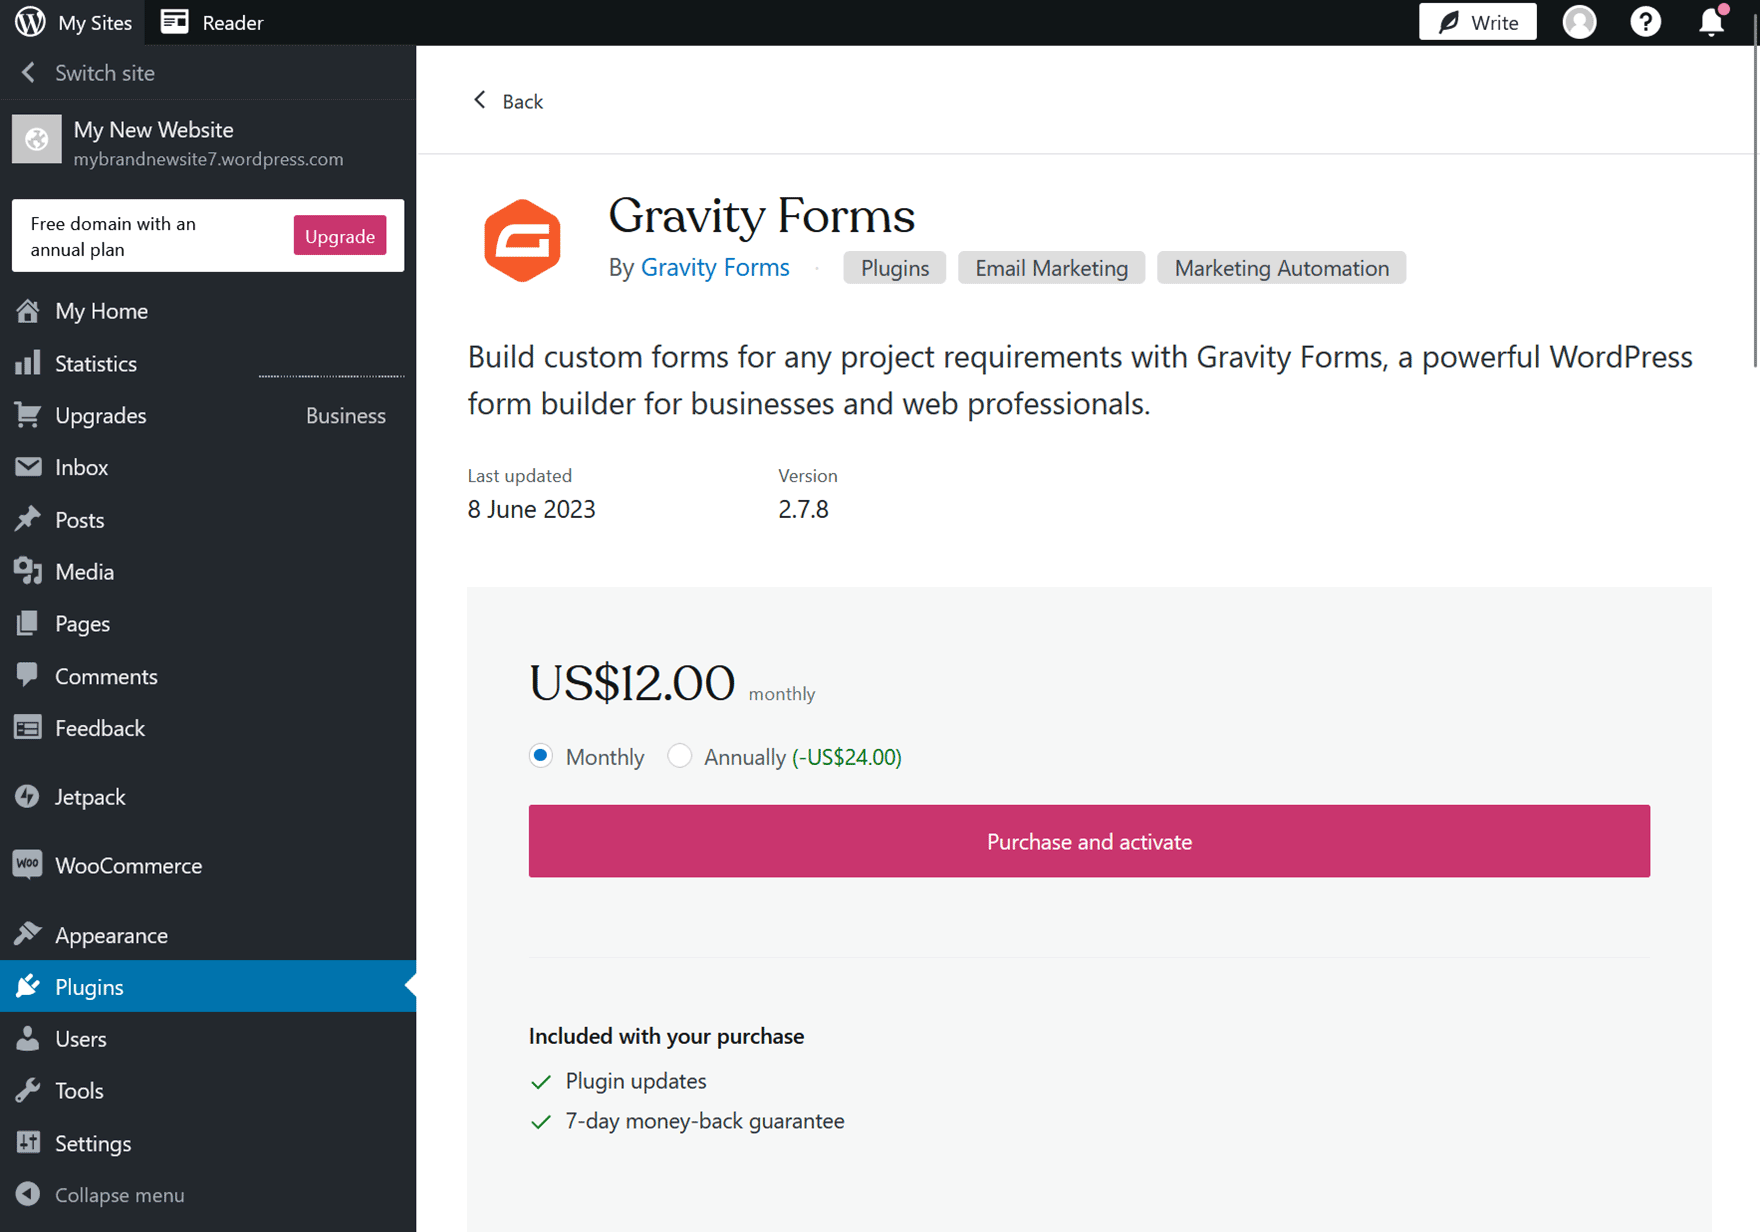
When you purchase Gravity Forms through WordPress.com, you can create an unlimited number of forms, use all of the Gravity Forms built-in features, and access the library of official Gravity Forms Add-Ons, including marketing and payment integrations.
One benefit of using Gravity Forms with WordPress.com rather than creating a self-hosted WordPress.org site is that you can pay for the plugin monthly rather than yearly. This gives you a good opportunity to test it without a long-term commitment. There’s also a 7-day money-back guarantee.
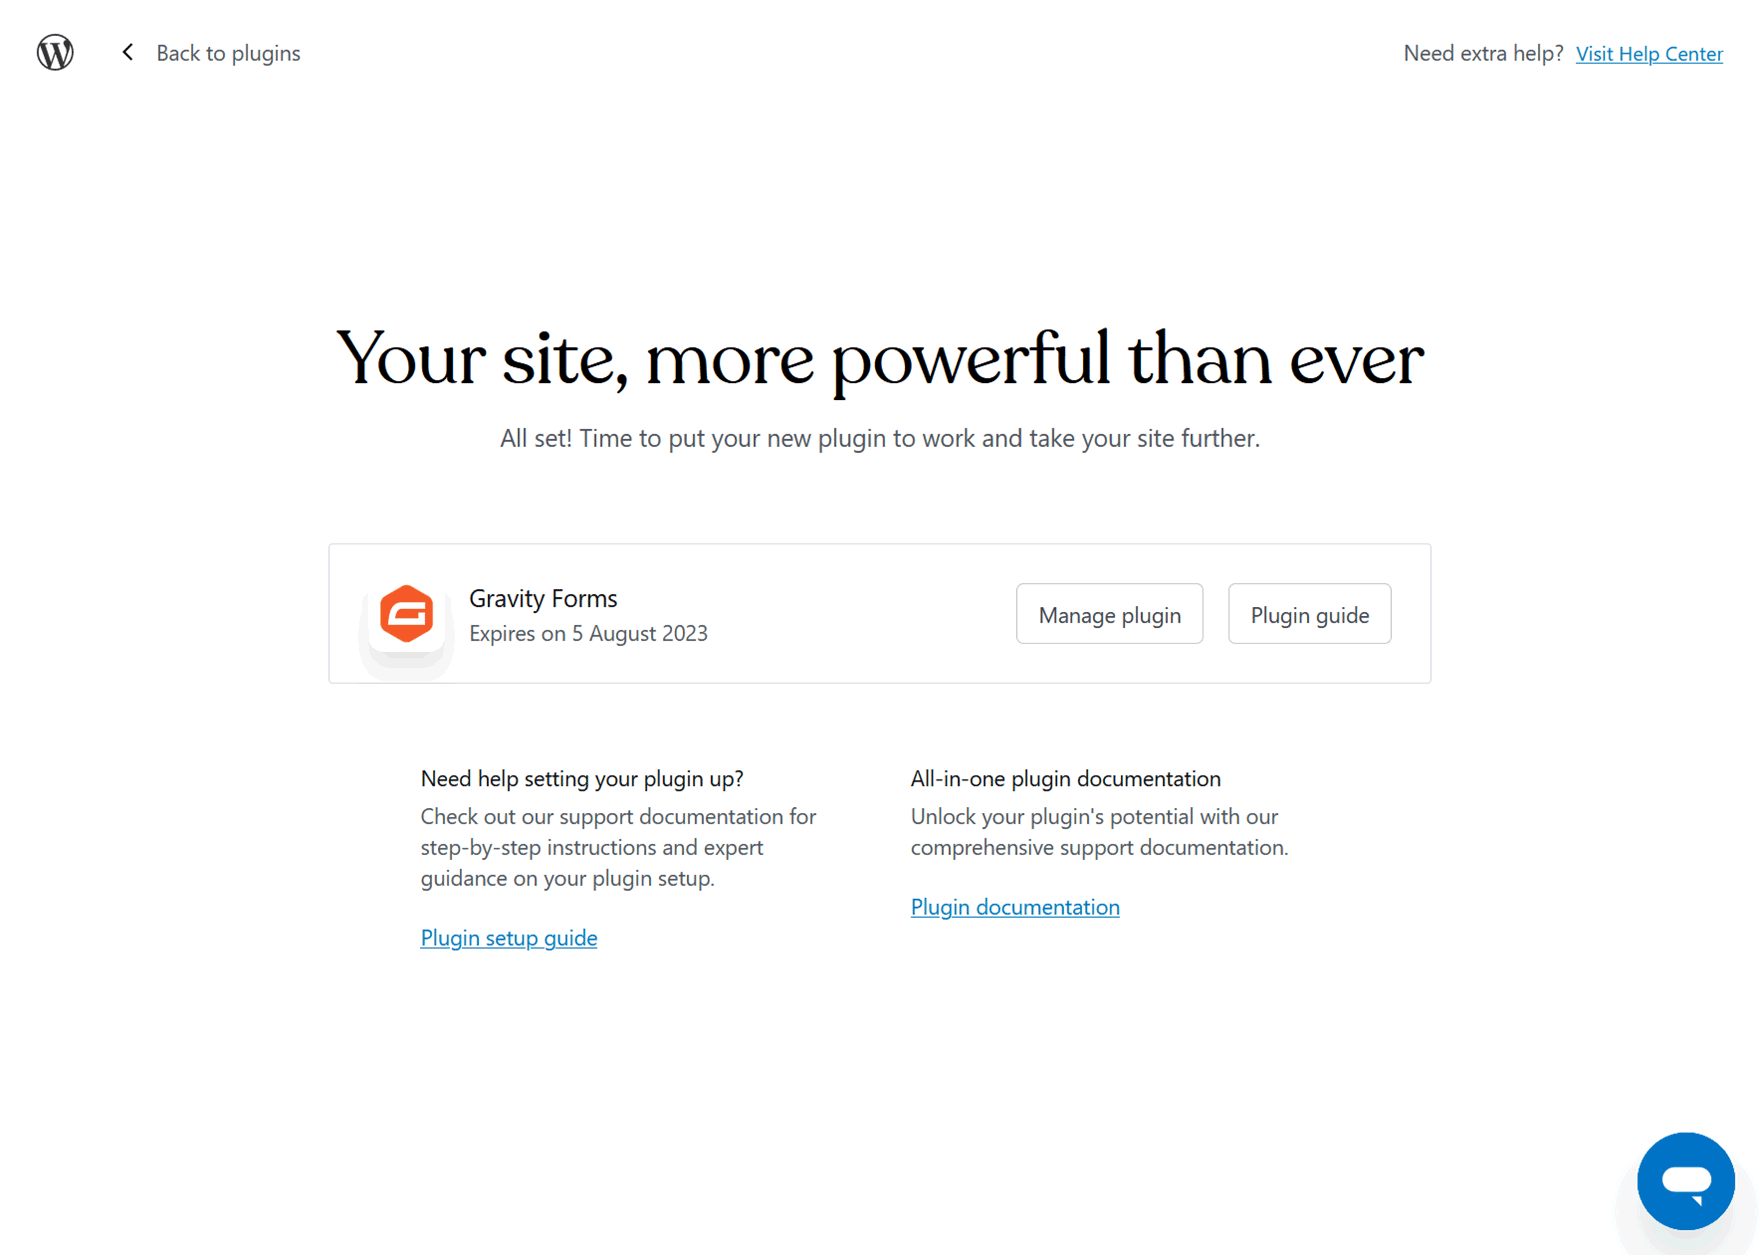
Once you’ve paid, you can start using Gravity Forms on your WordPress.com site.
7. Create a Form
You can create many different types of forms with Gravity Forms, but a good place to start is using the plugin to add a contact form to your site and then connecting that form to an email marketing service like Mailchimp.
This lets visitors to your site send you messages through a user-friendly form. Users will also get subscribed to your email newsletter so that they can receive updates.
So to get started, let’s create a new form by choosing a template from the library. You can learn more about these templates via the video on this page.
First, click the Forms → New Form sidebar menu item in your WordPress dashboard.
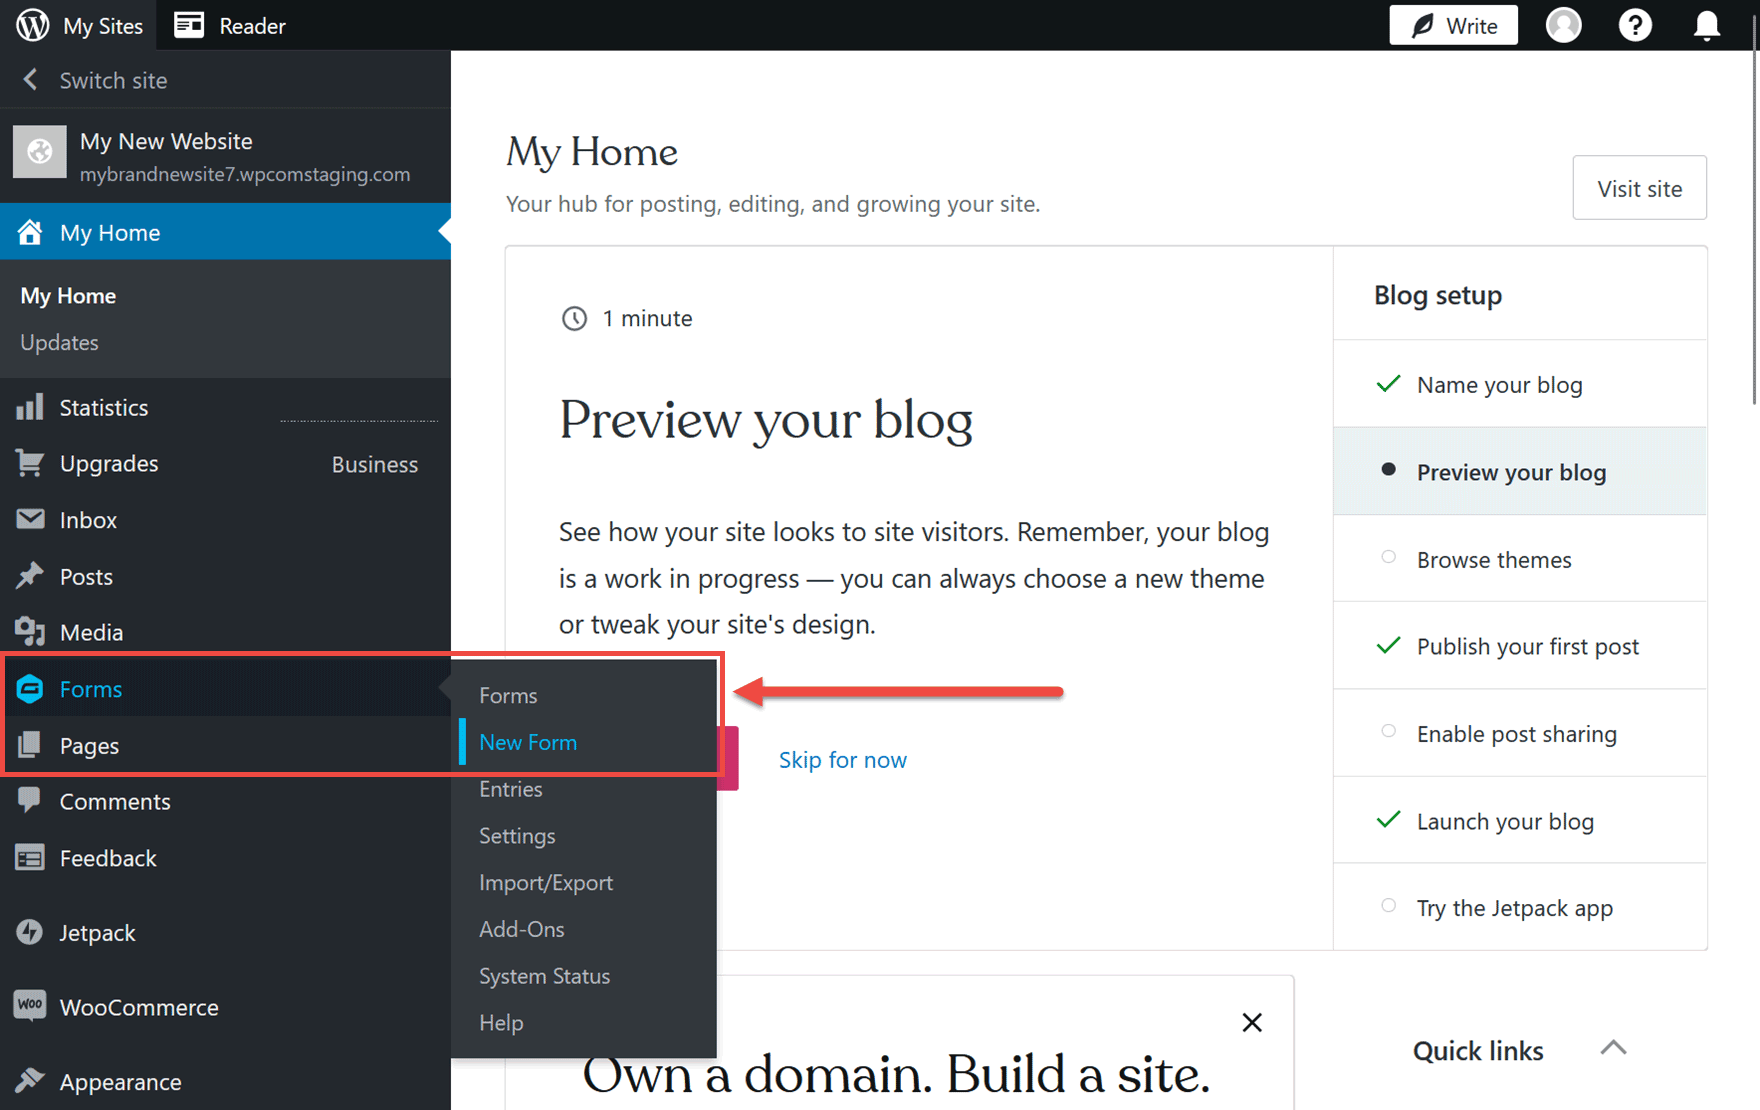
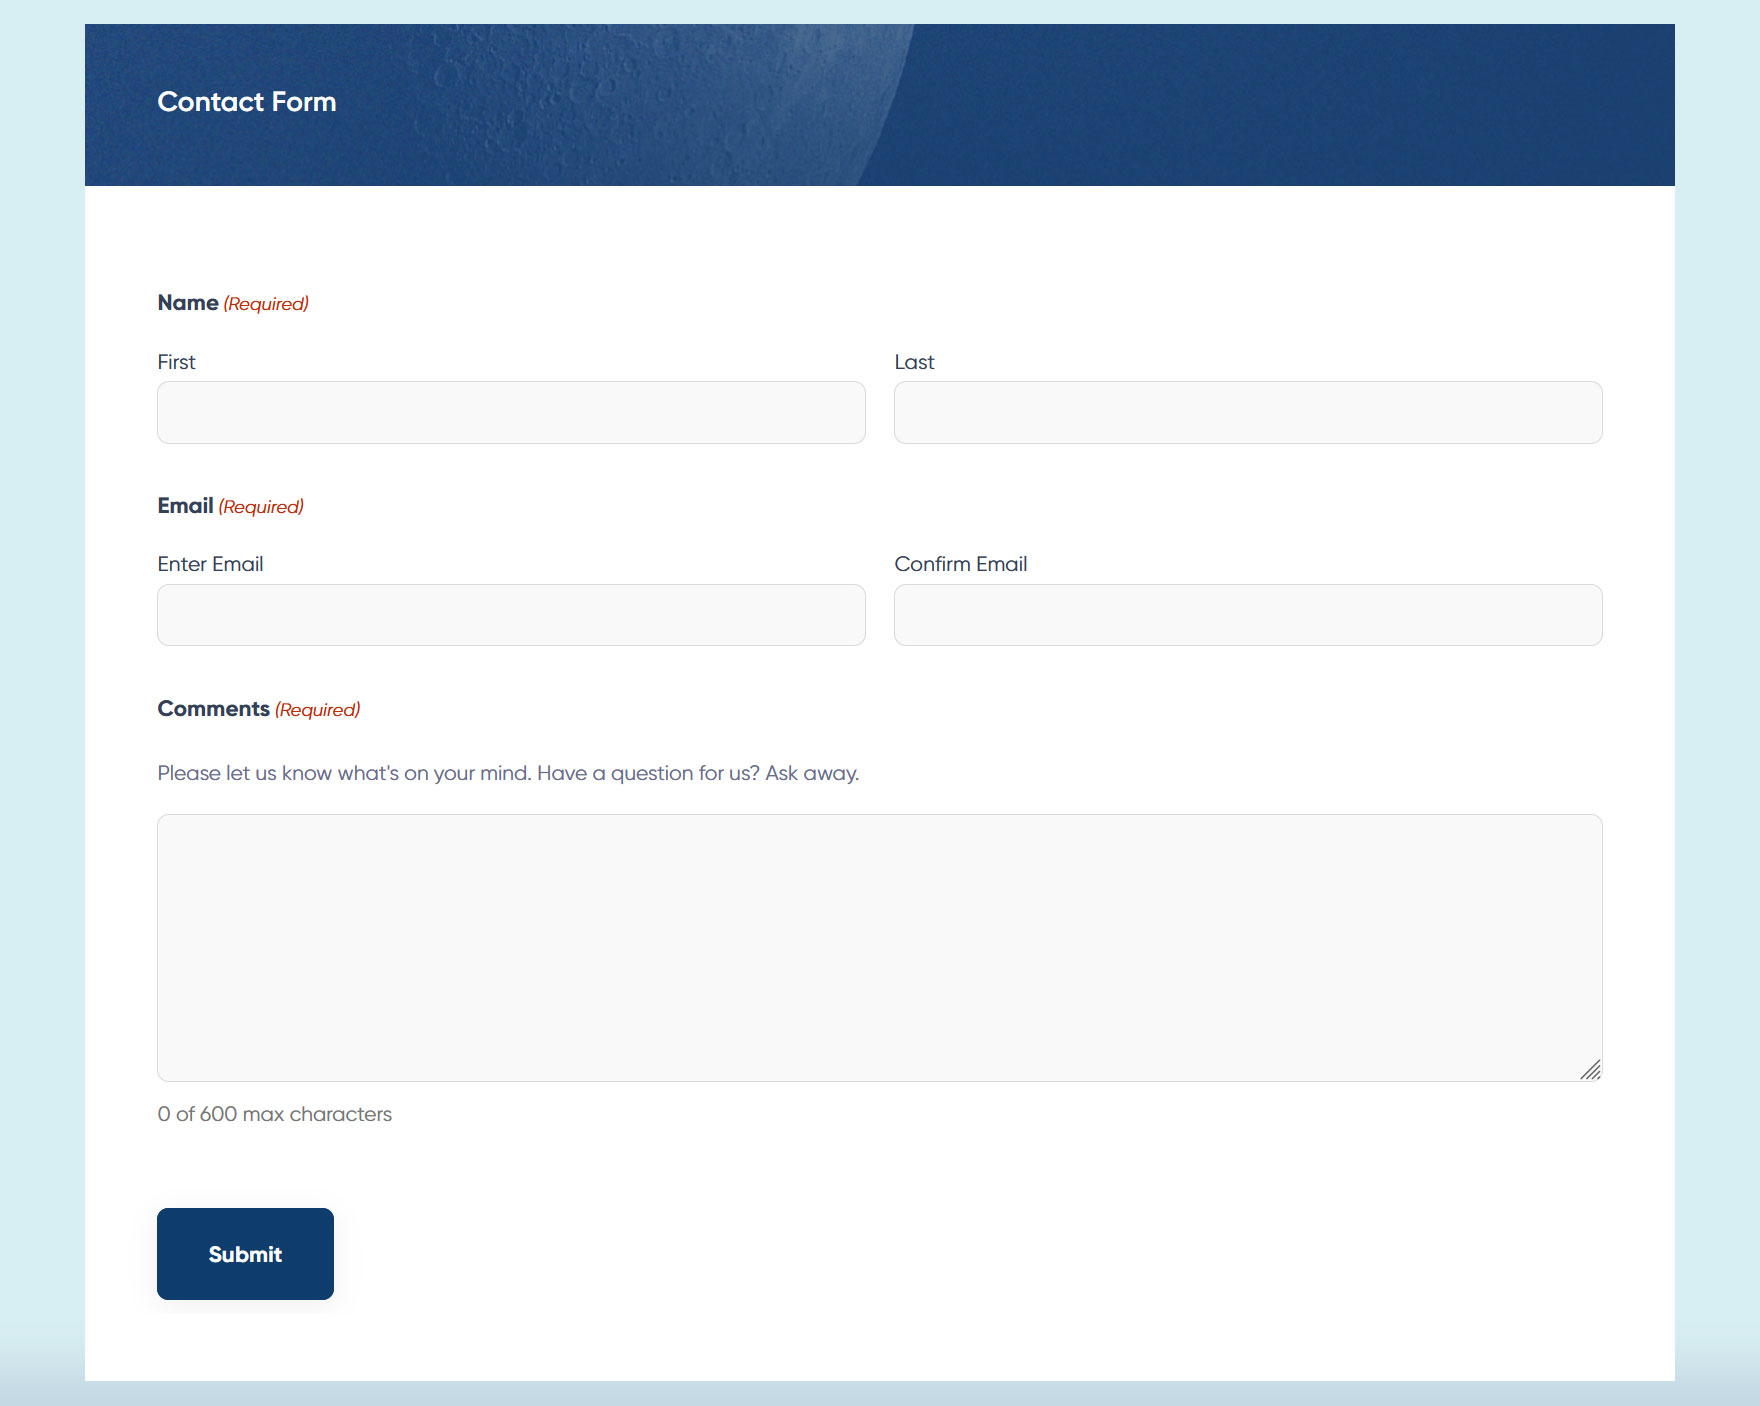
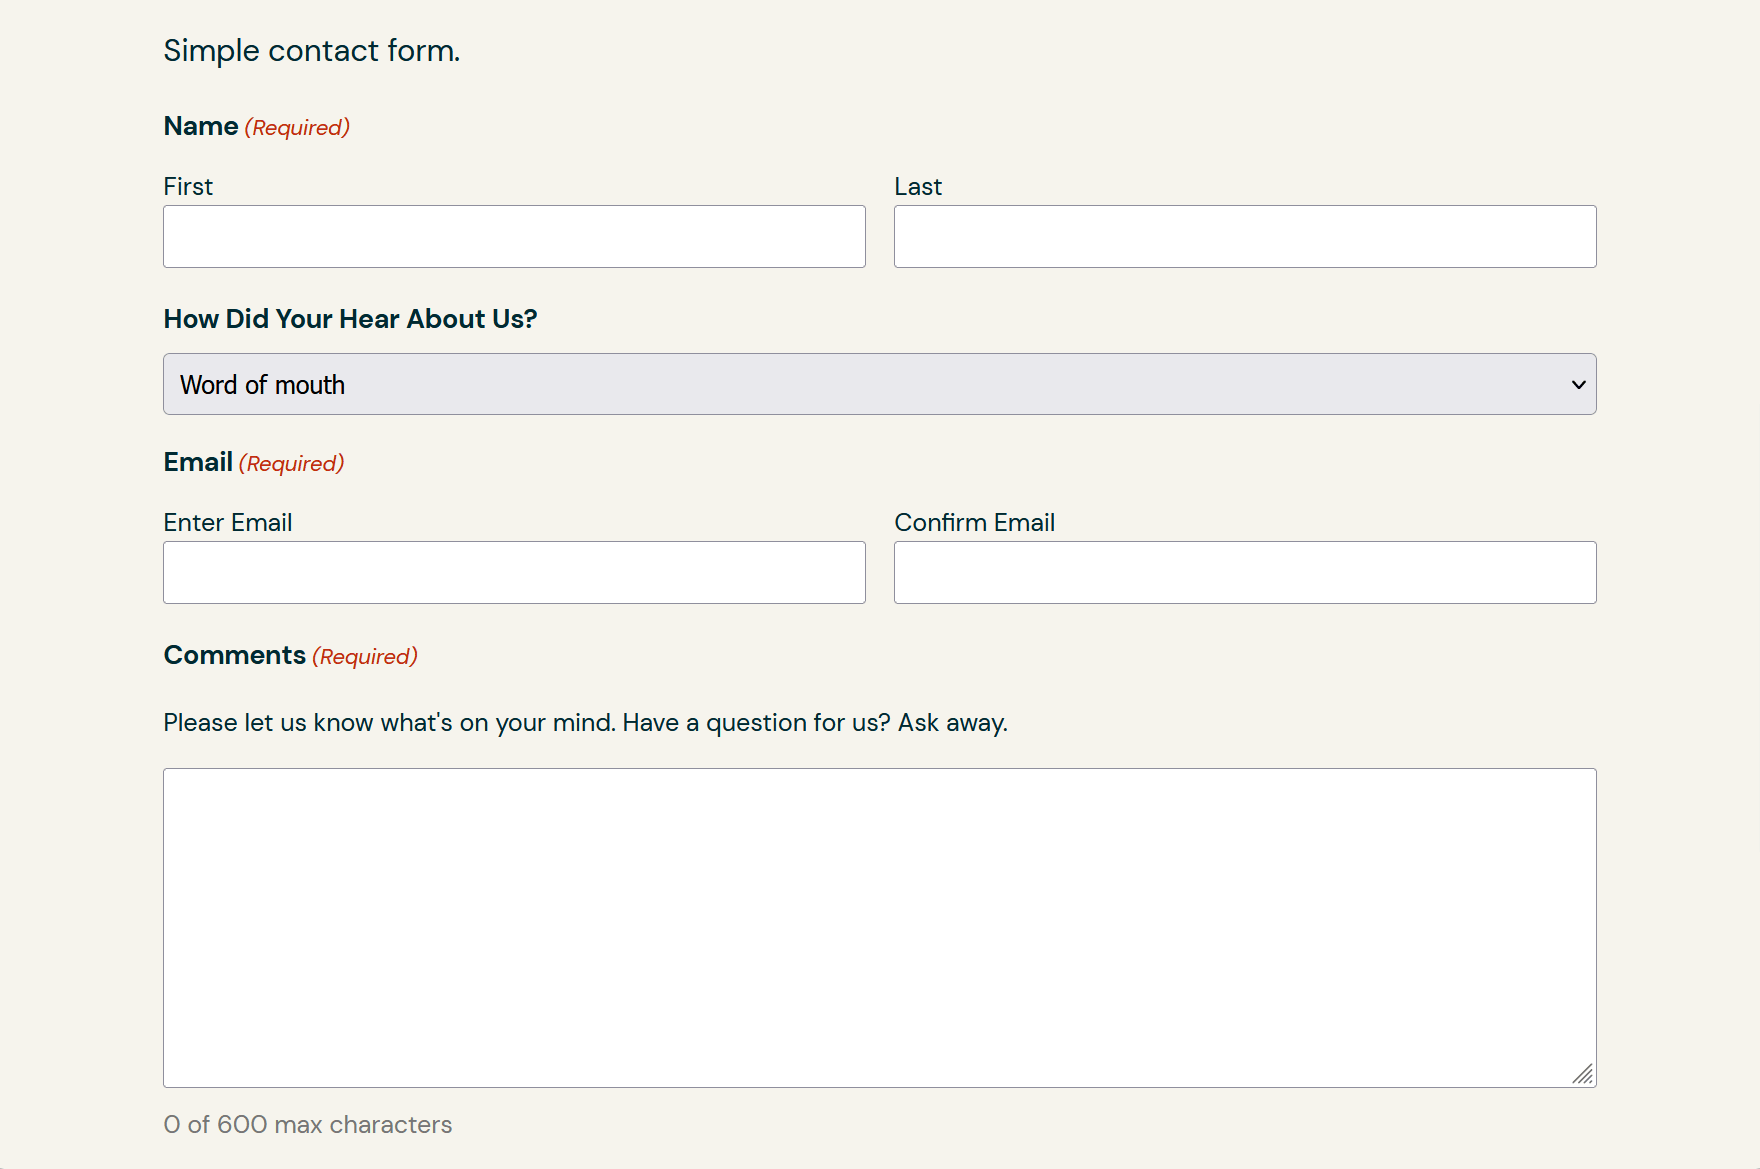
The form template library will be displayed, allowing you to choose one of the ready-made, editable forms. There are two contact form templates to choose from: the Simple Contact Form and the Advanced Contact Form templates.
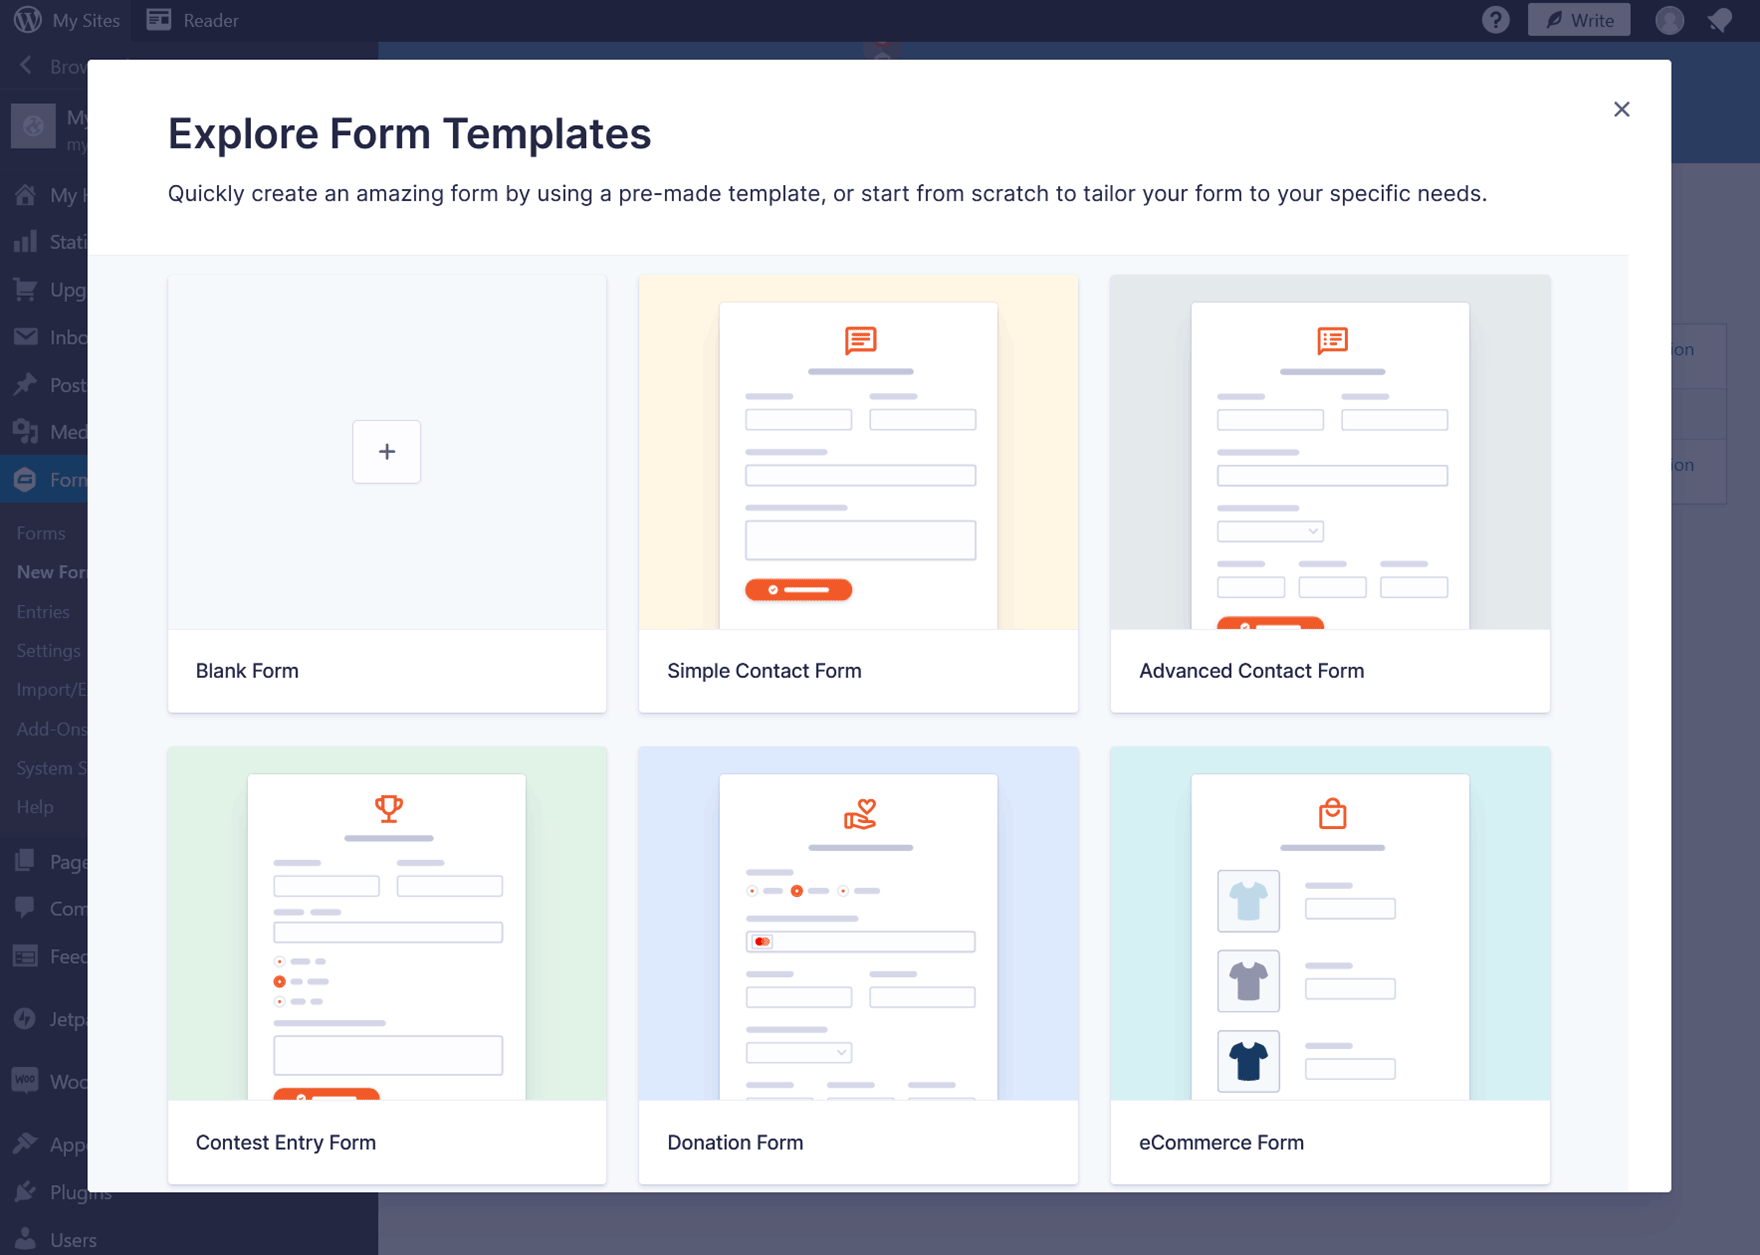
The Simple Contact Form template is a good option, but you should choose the one that’s most suitable for your site after previewing them. You can easily edit the forms later, regardless of which one you choose.
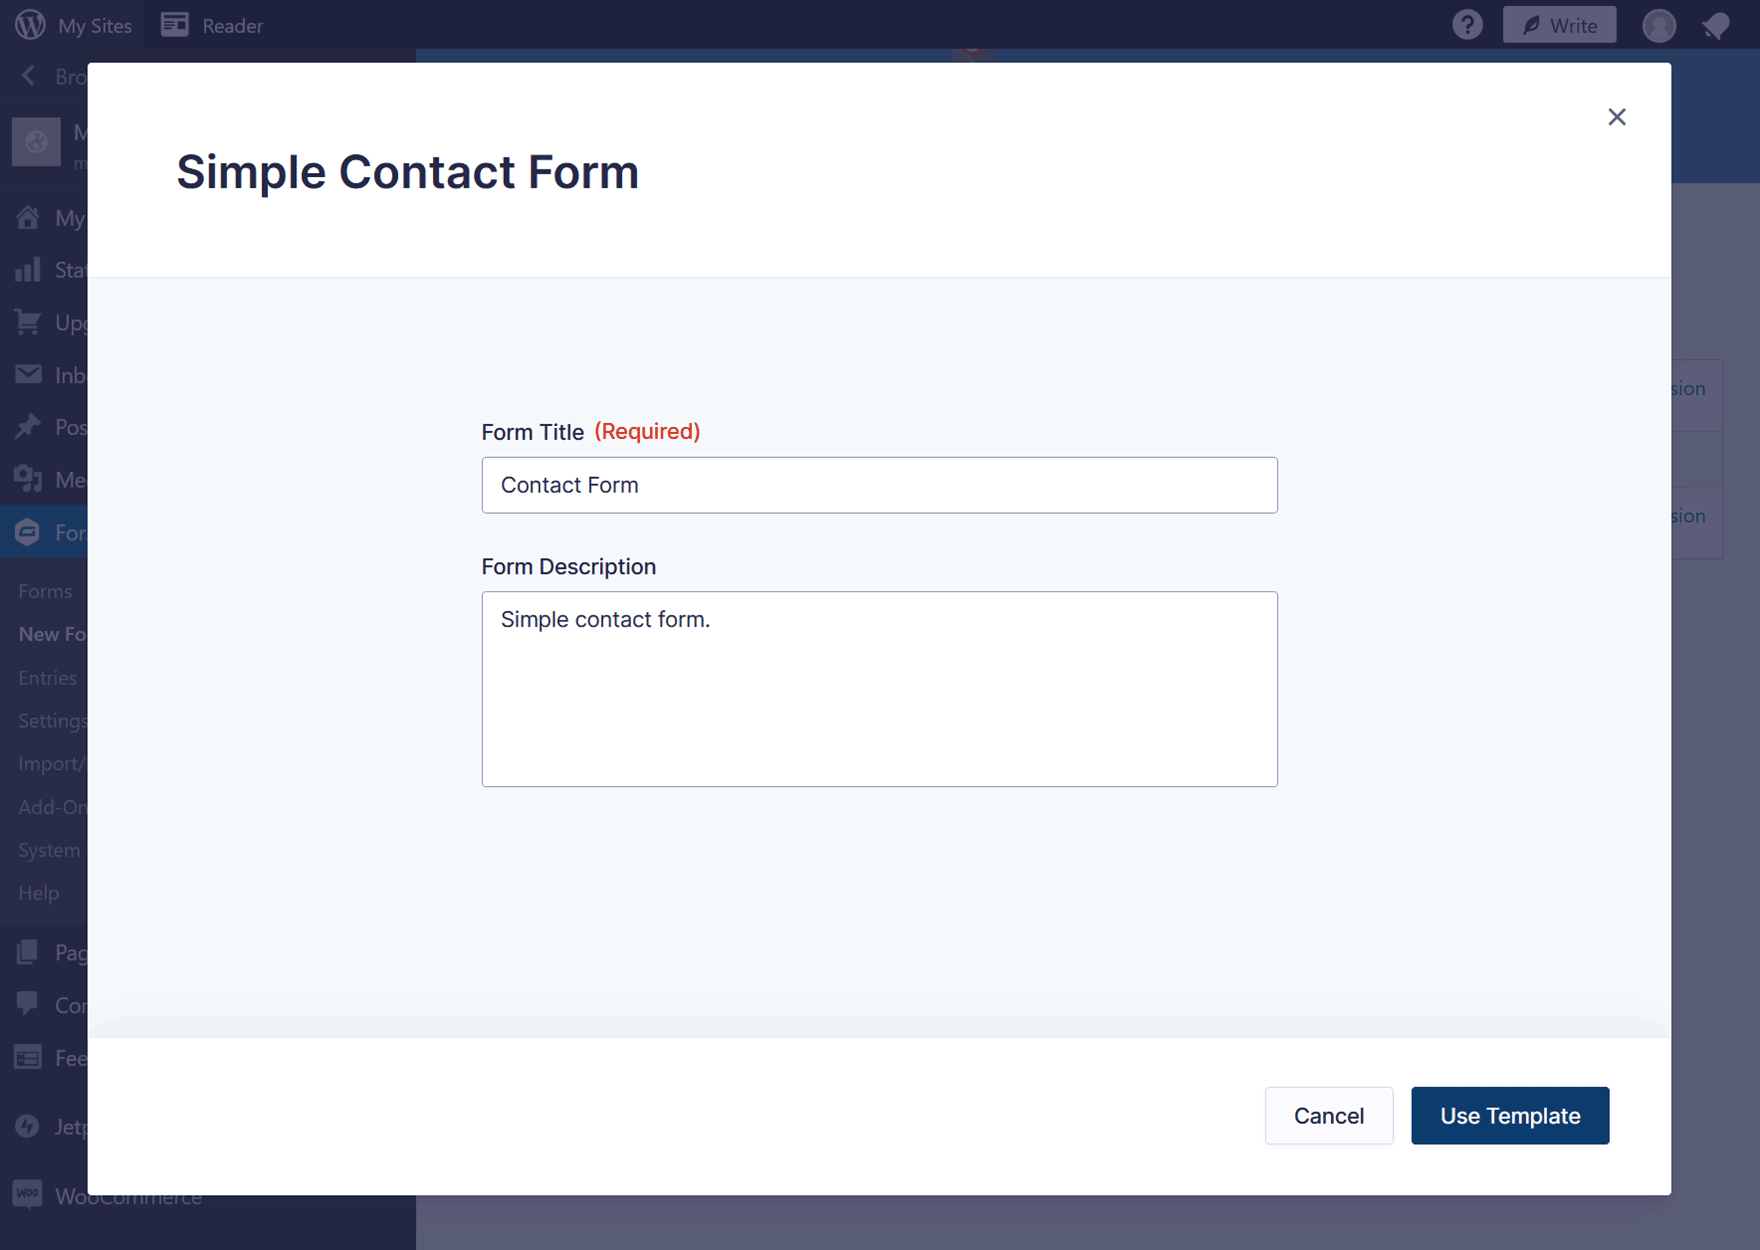
Once you’ve made a decision, click on the Use Template button. Then, give you form a title and optional description before clicking on the Use Template button.
Now you can edit the form in the Gravity Forms drag-and-drop builder.
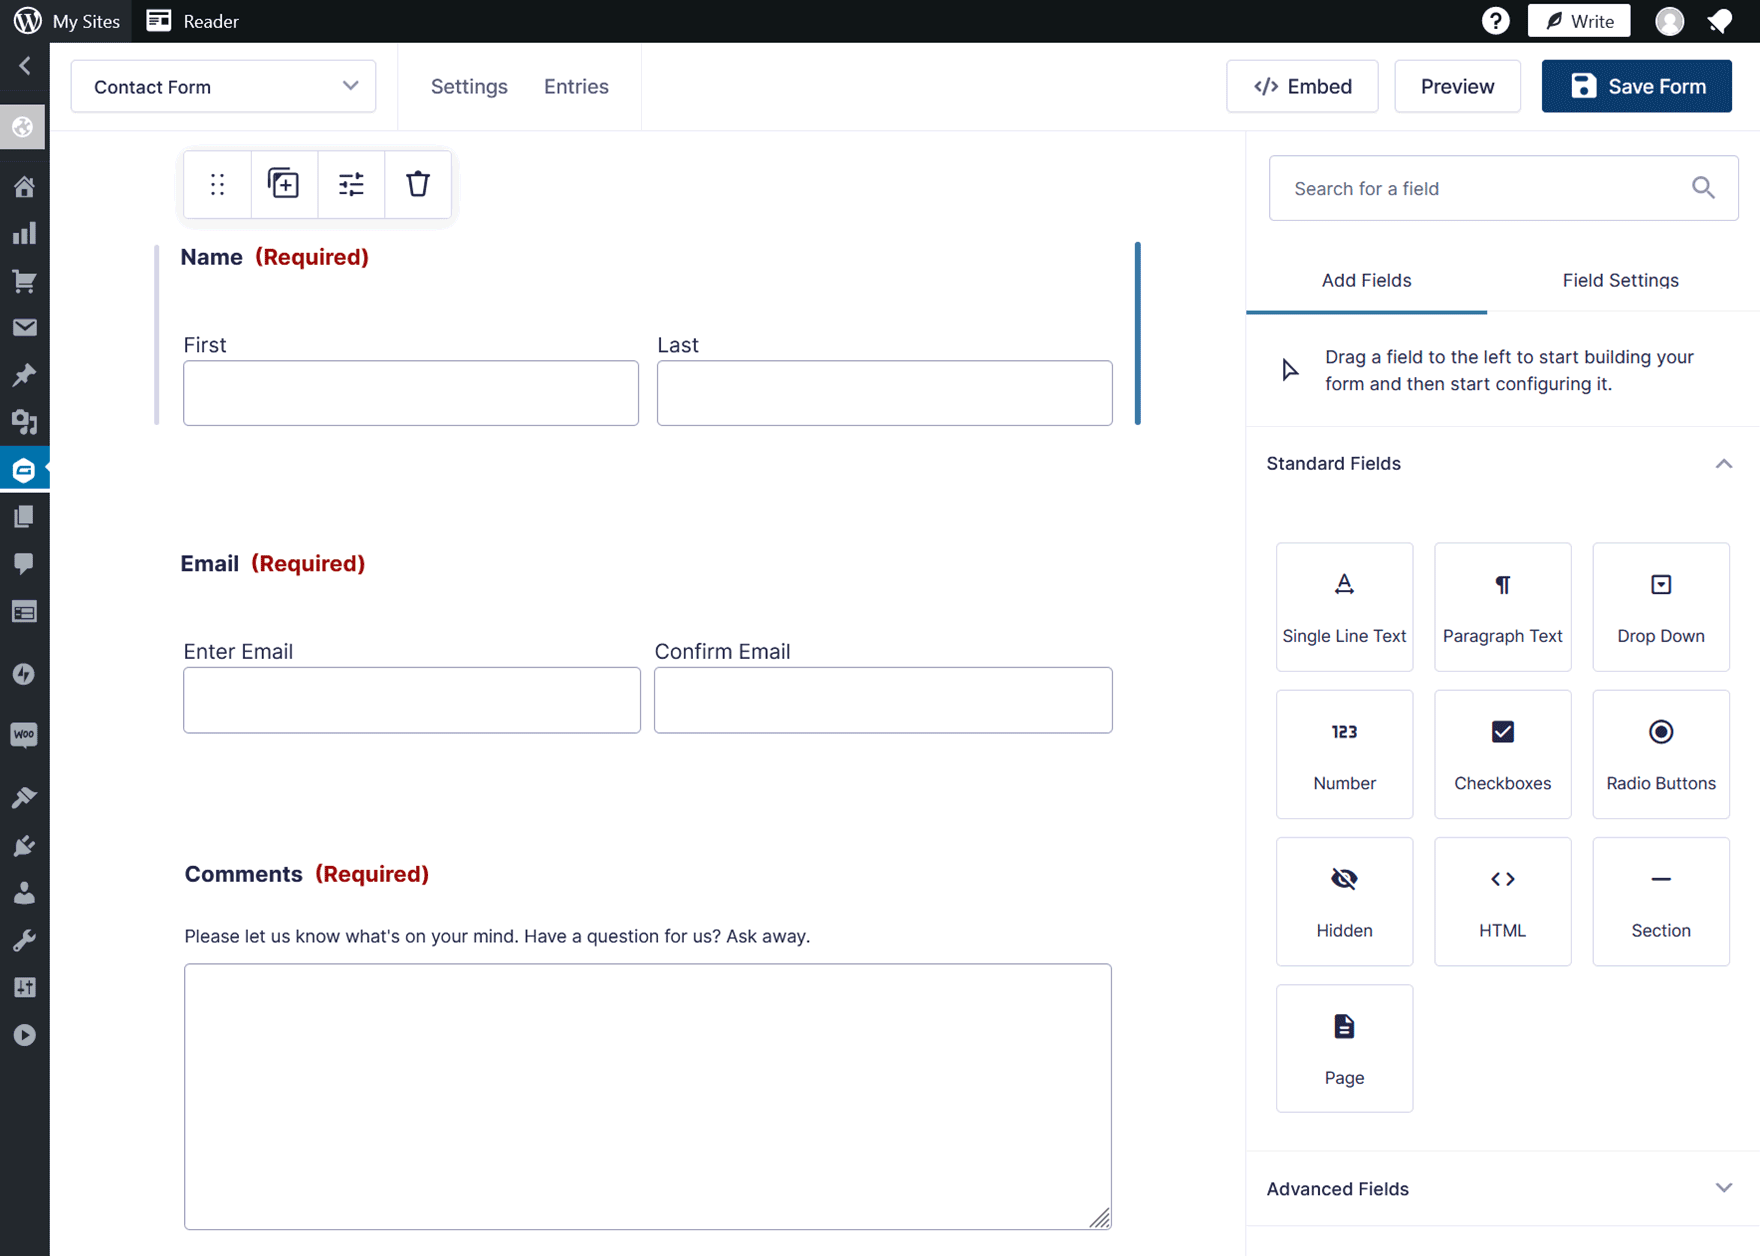
The Simple Form Template includes all the essential form fields, but you can add extra ones by clicking on the fields from the right-hand panel and dragging them onto the form.
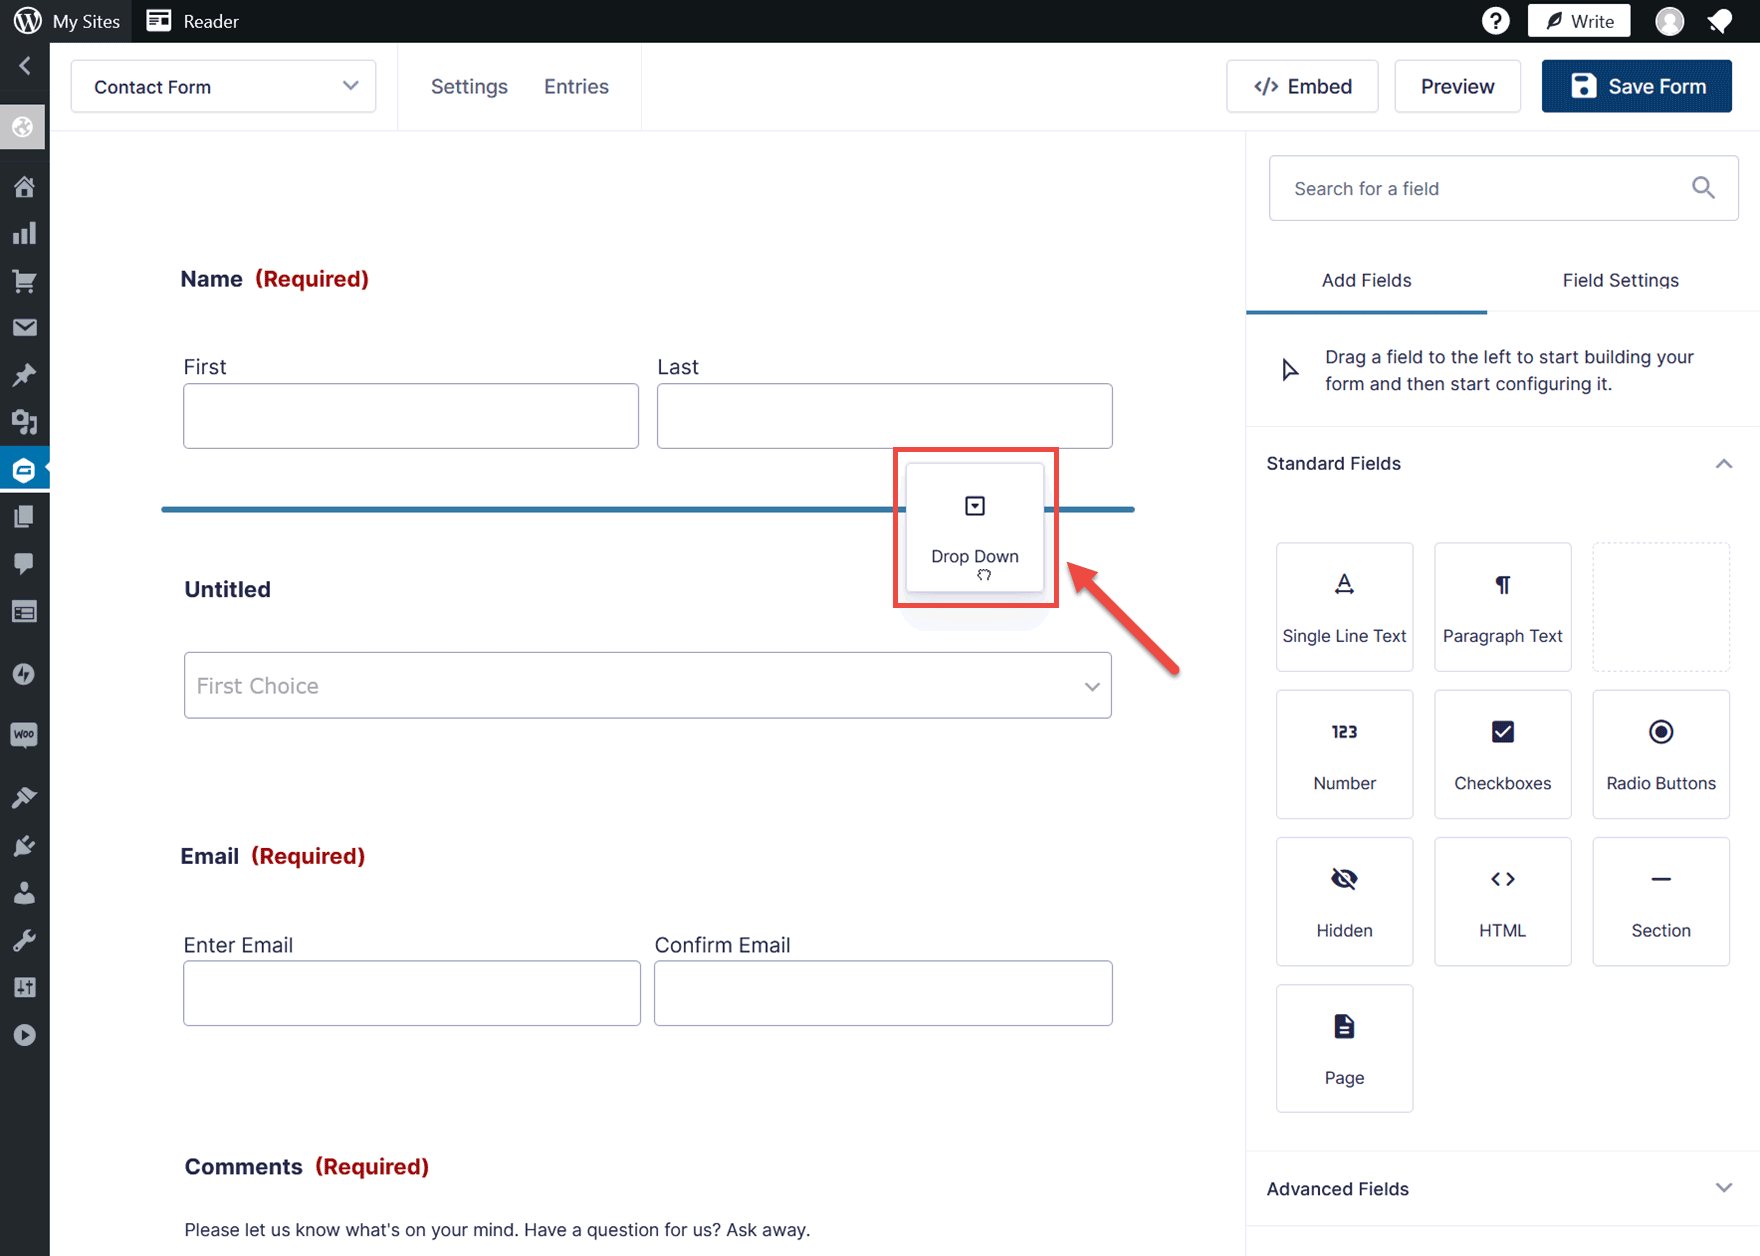
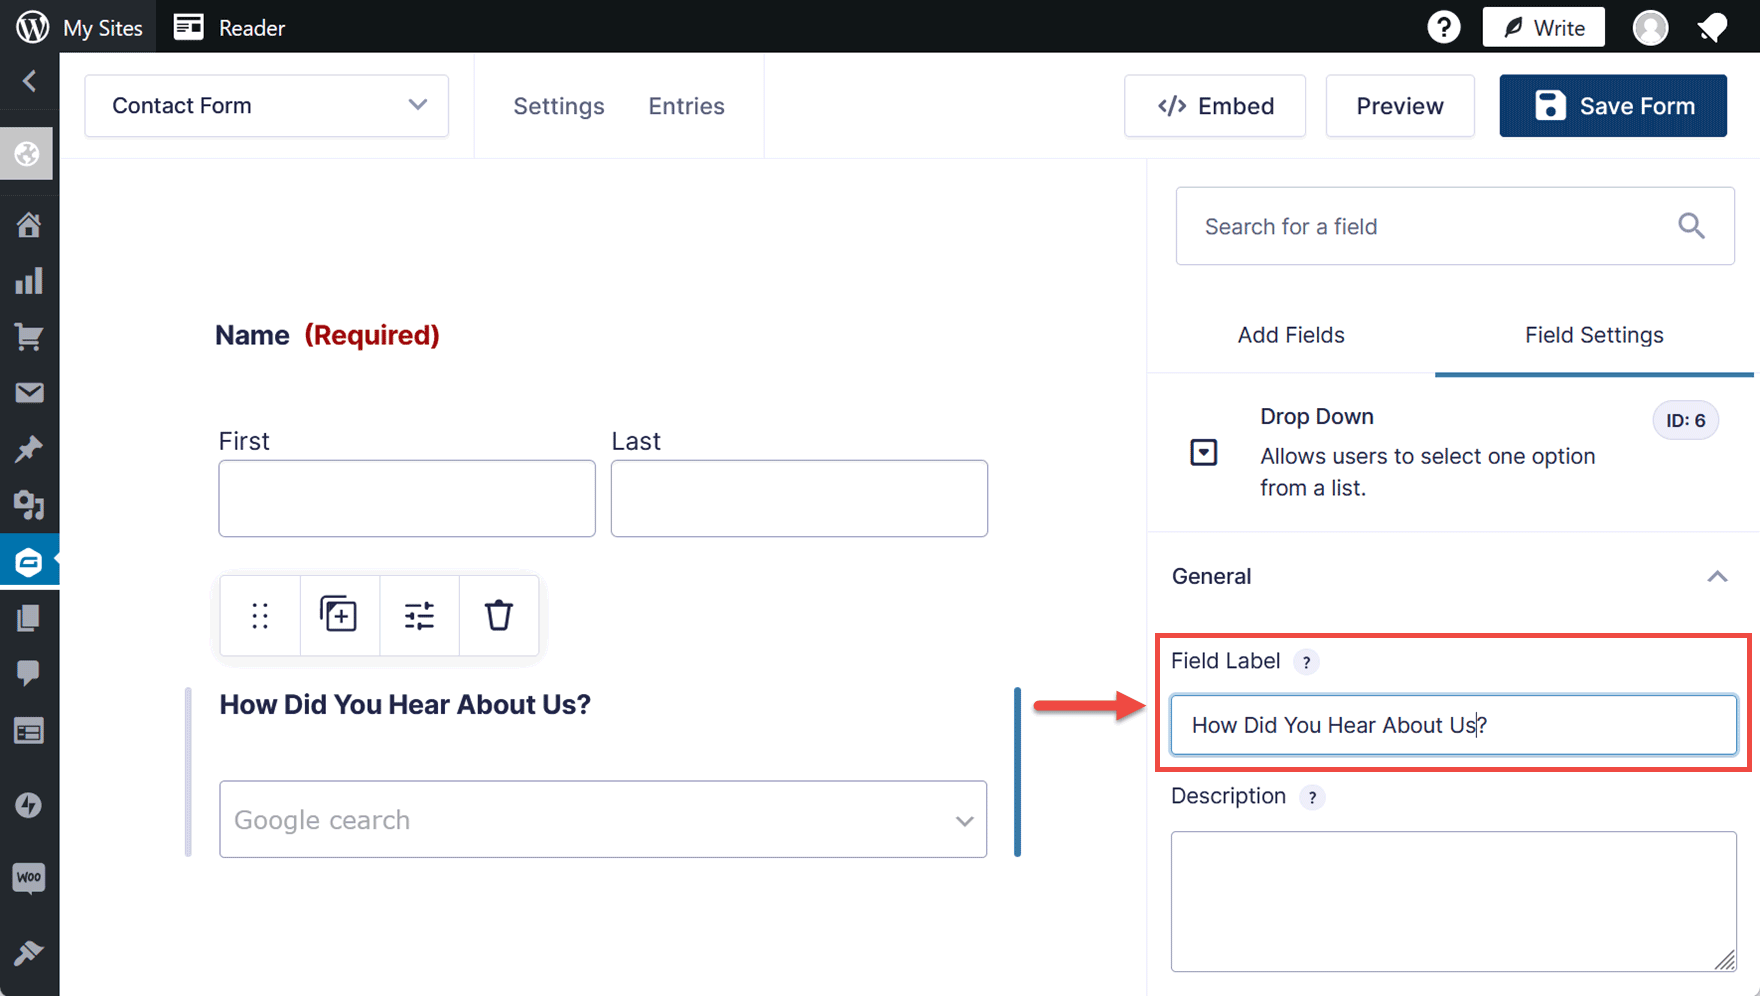
You can edit the fields on the form by clicking them and changing the values in the panel on the right of the screen.
You can also customize the form by dragging the fields into new positions.
When you’re happy with the contents of your form, click on the Save Form button.
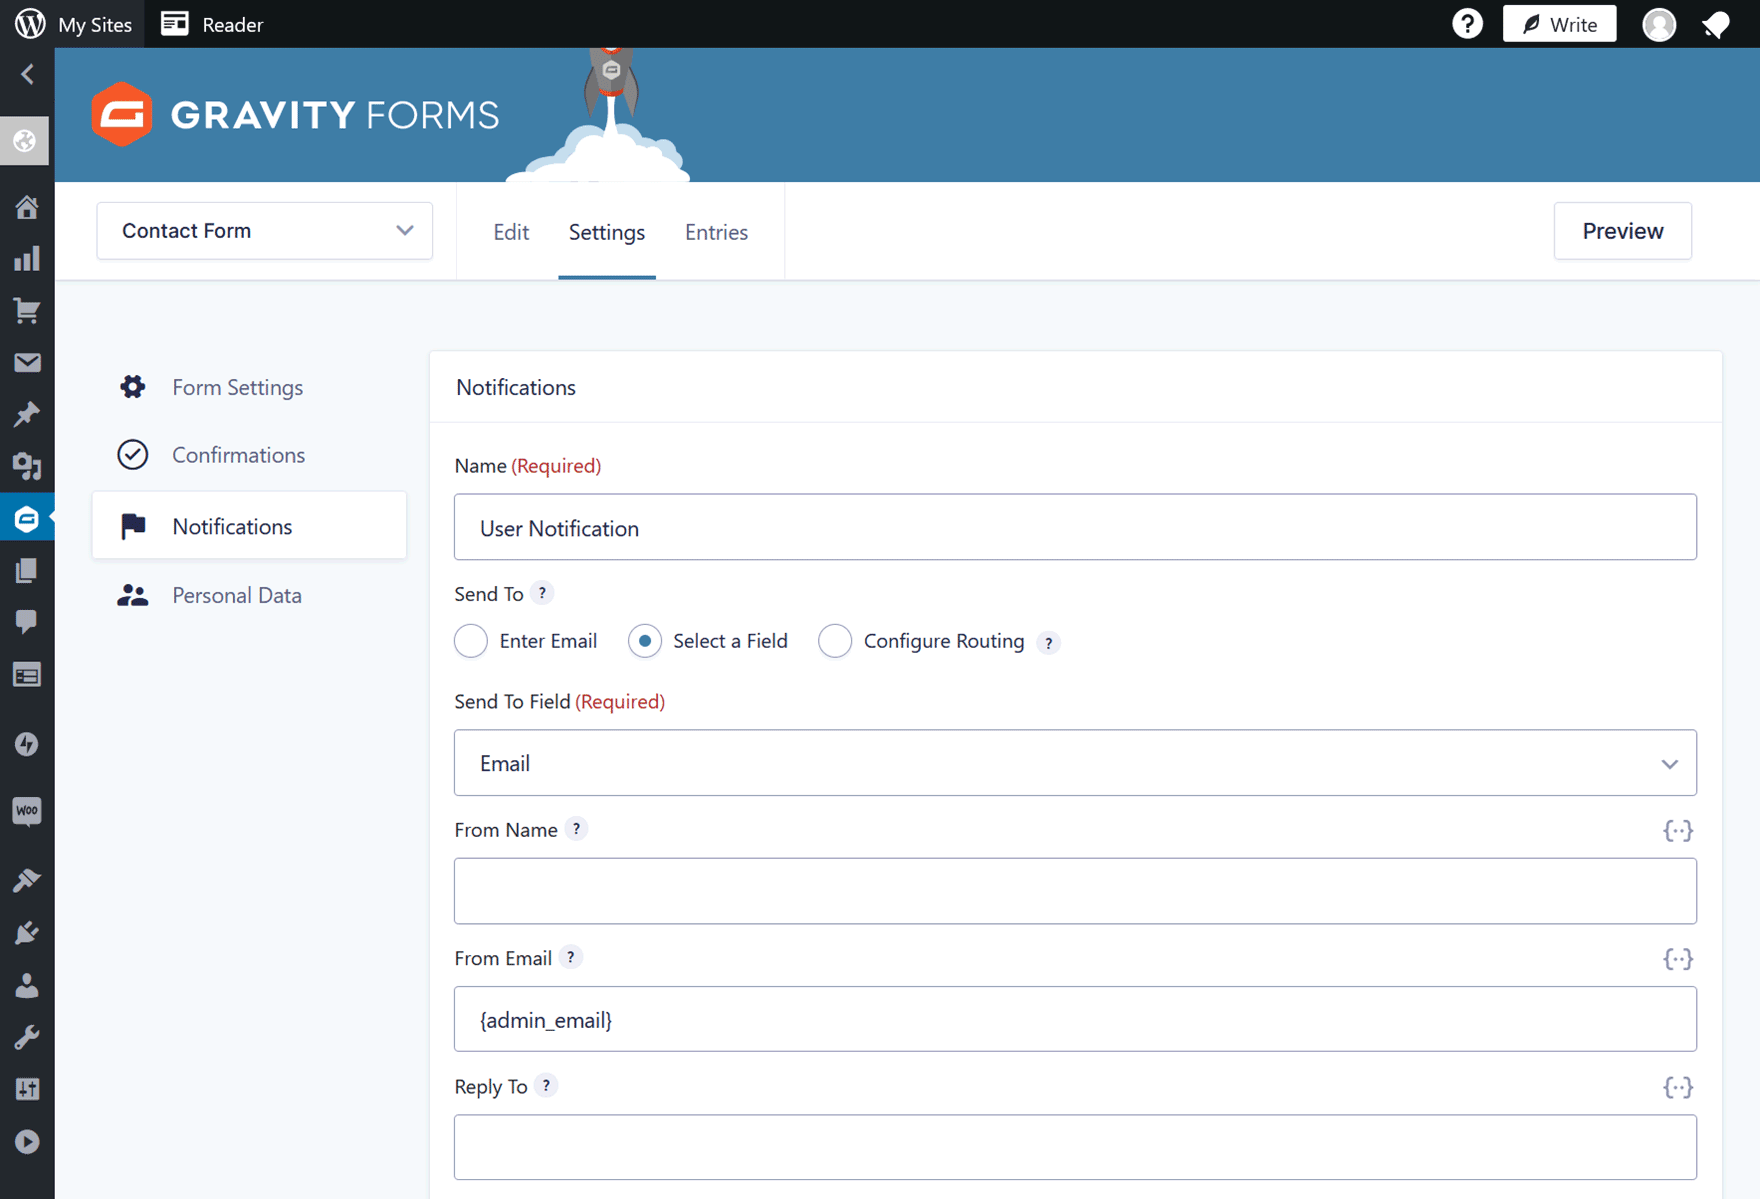
Next, you have the option of configuring the form by clicking on Settings → Form Settings from the drop-down menu. However, the form will work fine with the default settings.
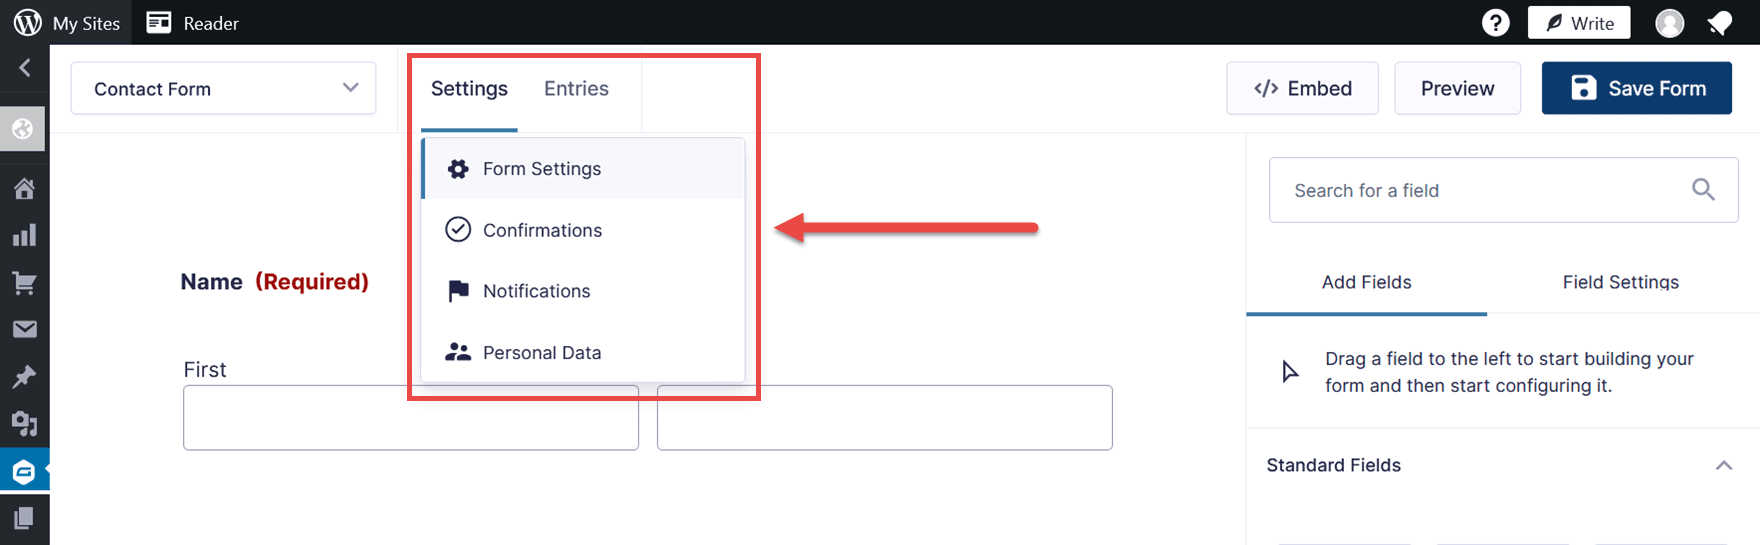
From the From Settings page, you can configure the form in a few ways, including enabling a honeypot to reduce form spam, adding a save and continue button, limiting the number of entries the form can accept, and scheduling the availability of the form.

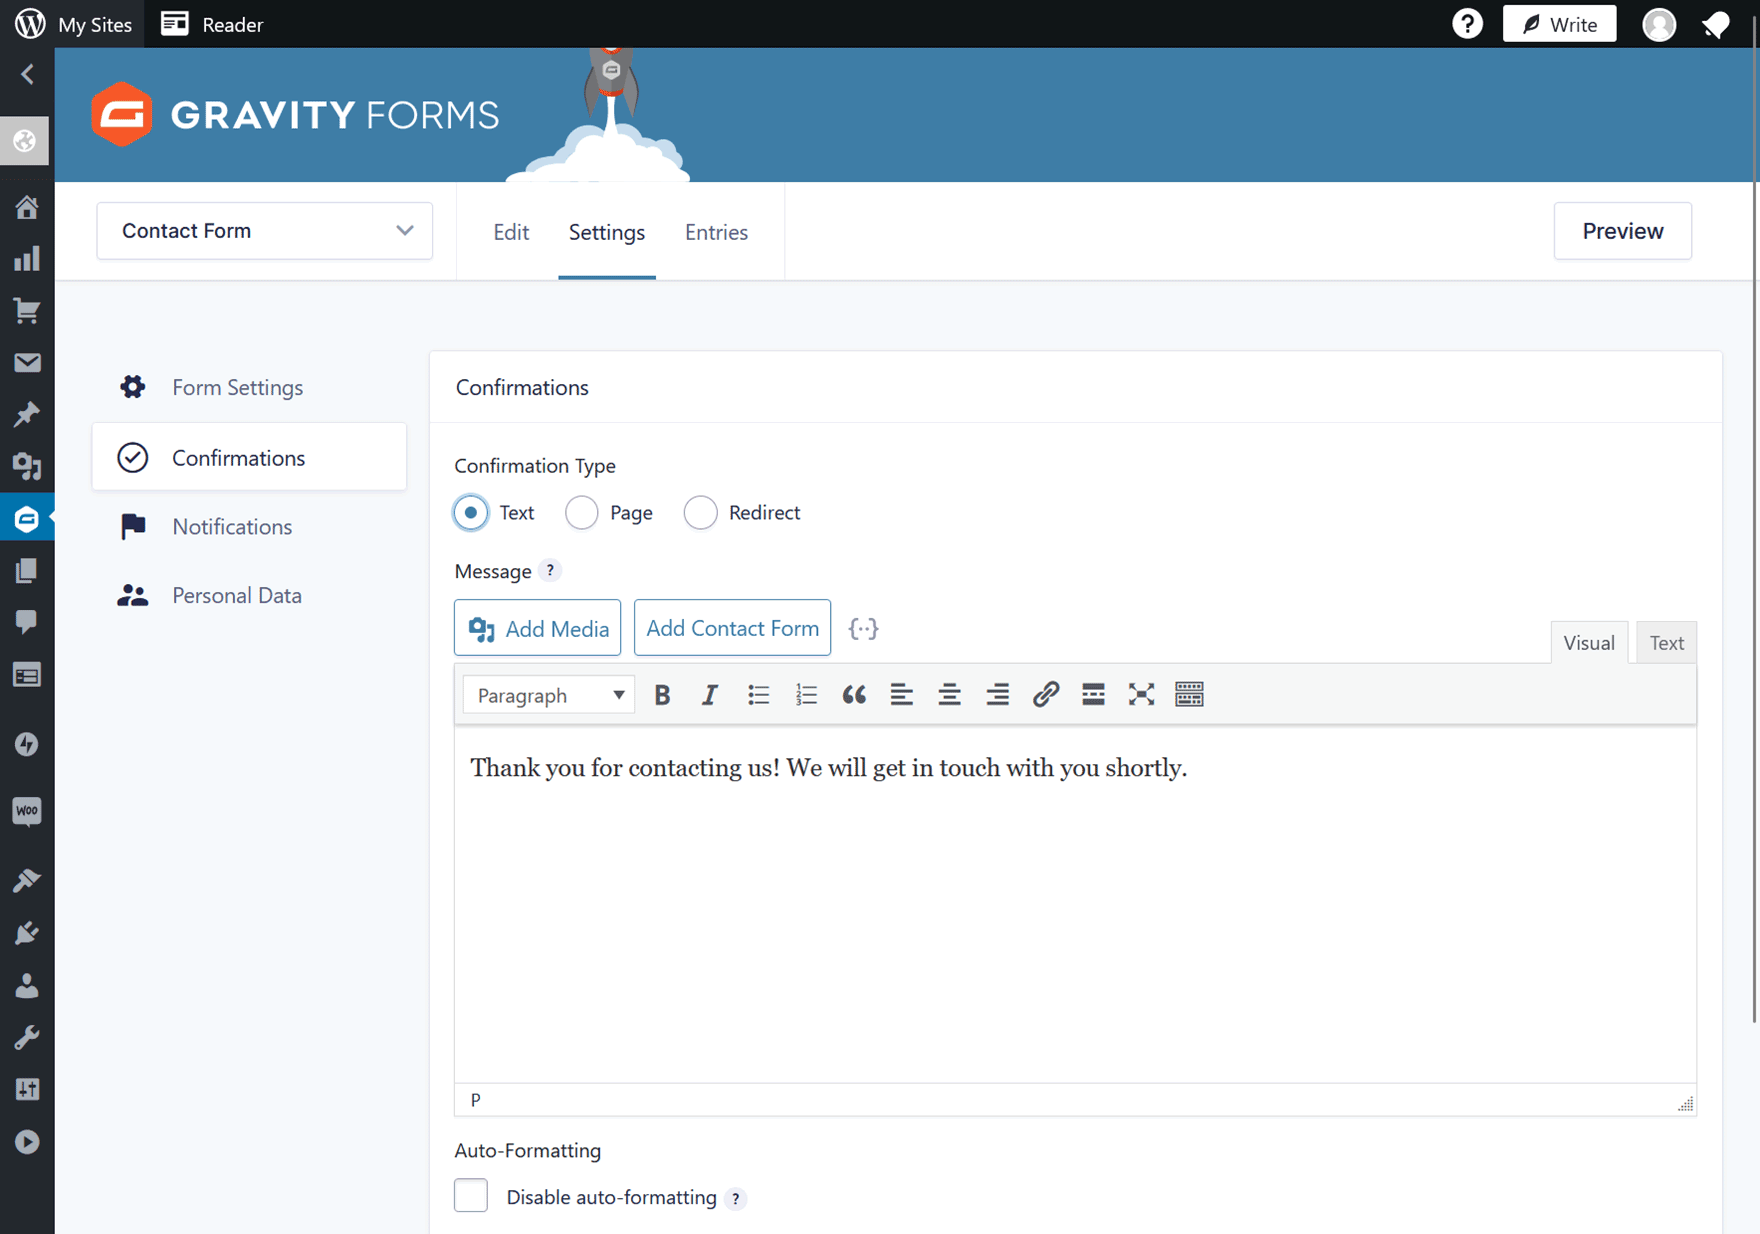
When someone submits a form entry, they’ll receive the default confirmation message in an email. However, you can edit this message from the Confirmations section of the Settings page. You can also change the settings so that the visitor is taken to a specific page on your site or redirected to any web address or URL on the internet.
You can also configure the form submissions notifications that are automatically sent to you, the site owner or admin user, and the person who used the form.
Once you’ve finished configuring the form settings, click the Edit button at the top of the screen to return to the form builder.
8. Publish the Form On Your Site Page
To keep things simple, you can publish the form on your site directly from the form builder.
To do so, click on the Embed button in the top right area of the screen.
From the Embed Form panel, you can choose to publish the form on an existing post or page on your site. Alternatively, you can choose to have a new post or page created and the form published there.
Once you’ve decided which approach you want to take, you can choose an existing post or page from the drop-down menu or give the new post or page a name.

If you choose to embed the form into an existing page, you’ll be taken to that page so that you can drag and drop the Gravity Forms block onto that page in the desired position.

Once you’ve dragged the Gravity Forms block onto the page, you can then select which form you’d like to insert from the drop-down menu.
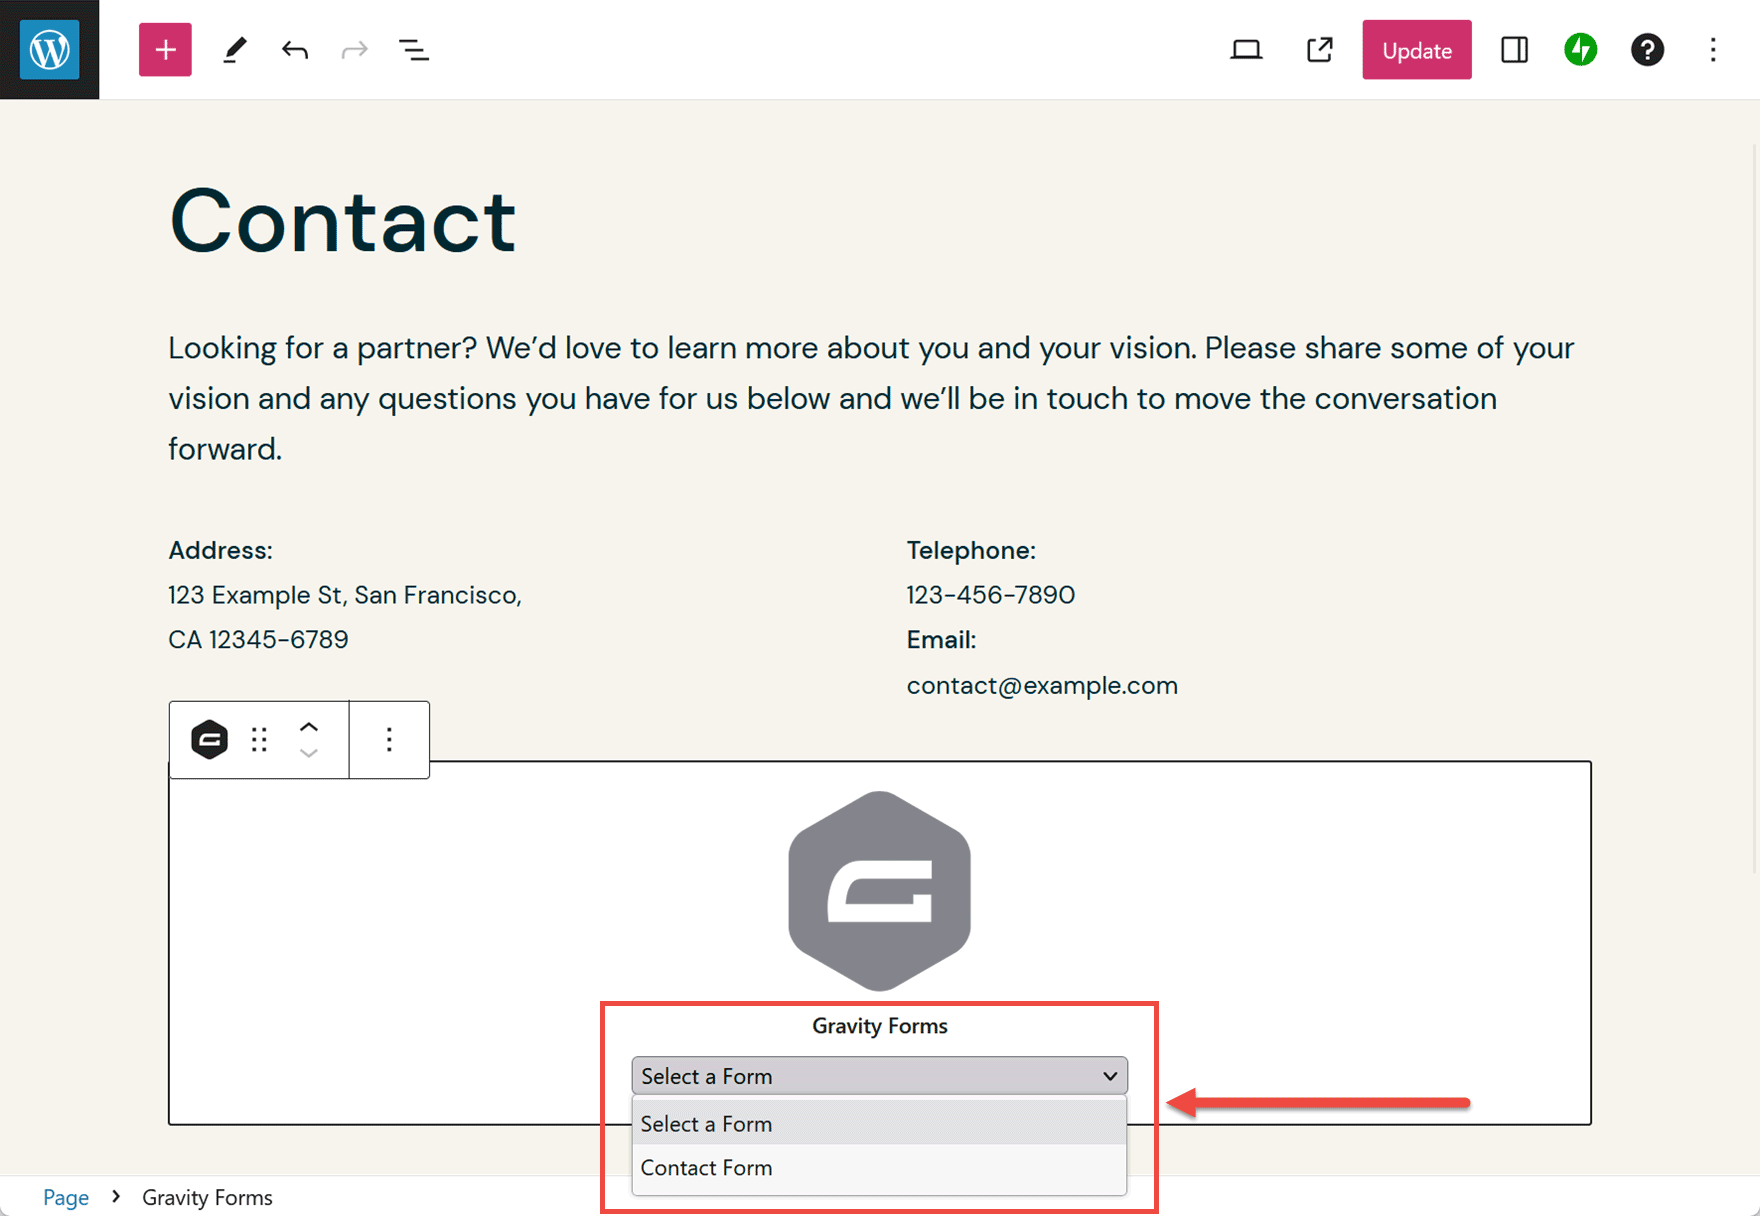
If you choose to embed the form in a new page, you’ll be taken to a newly created page where the form will have already been embedded.
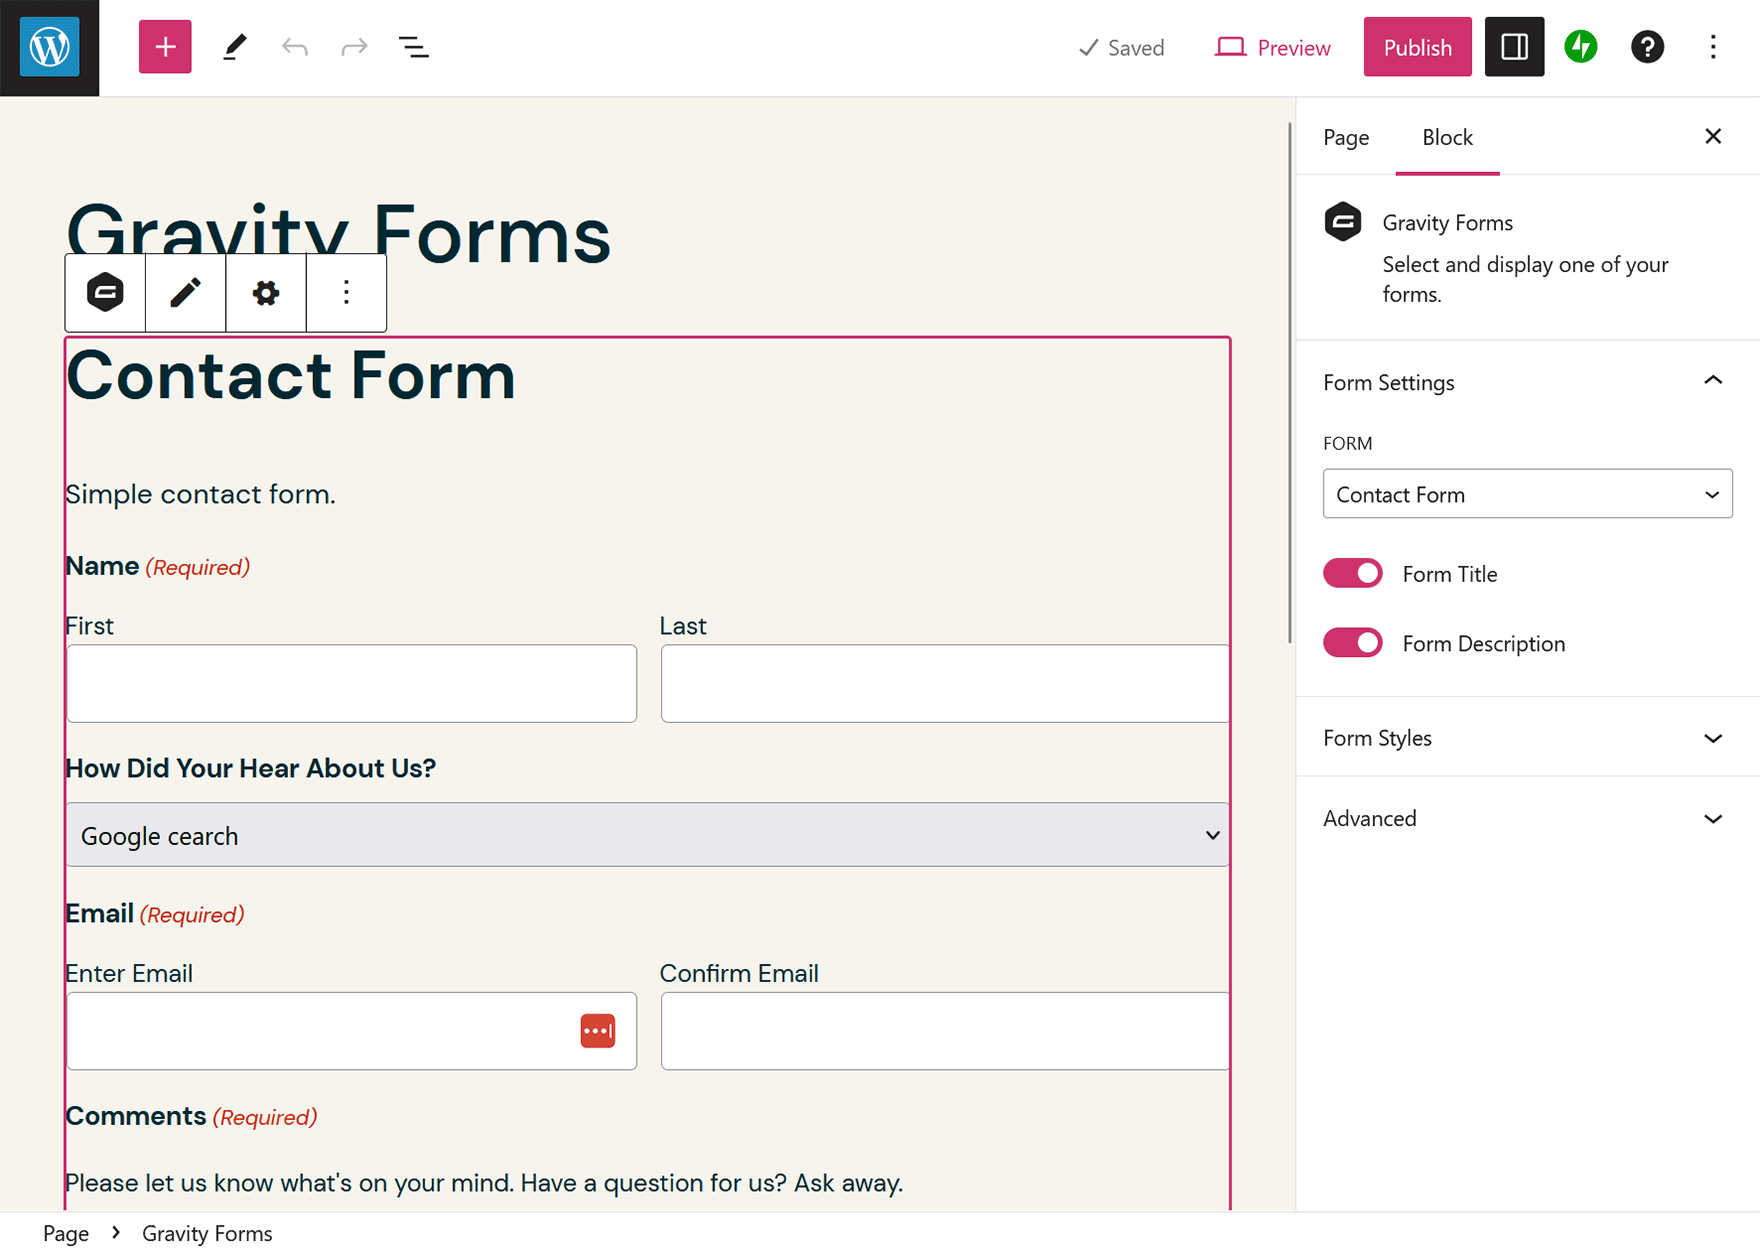
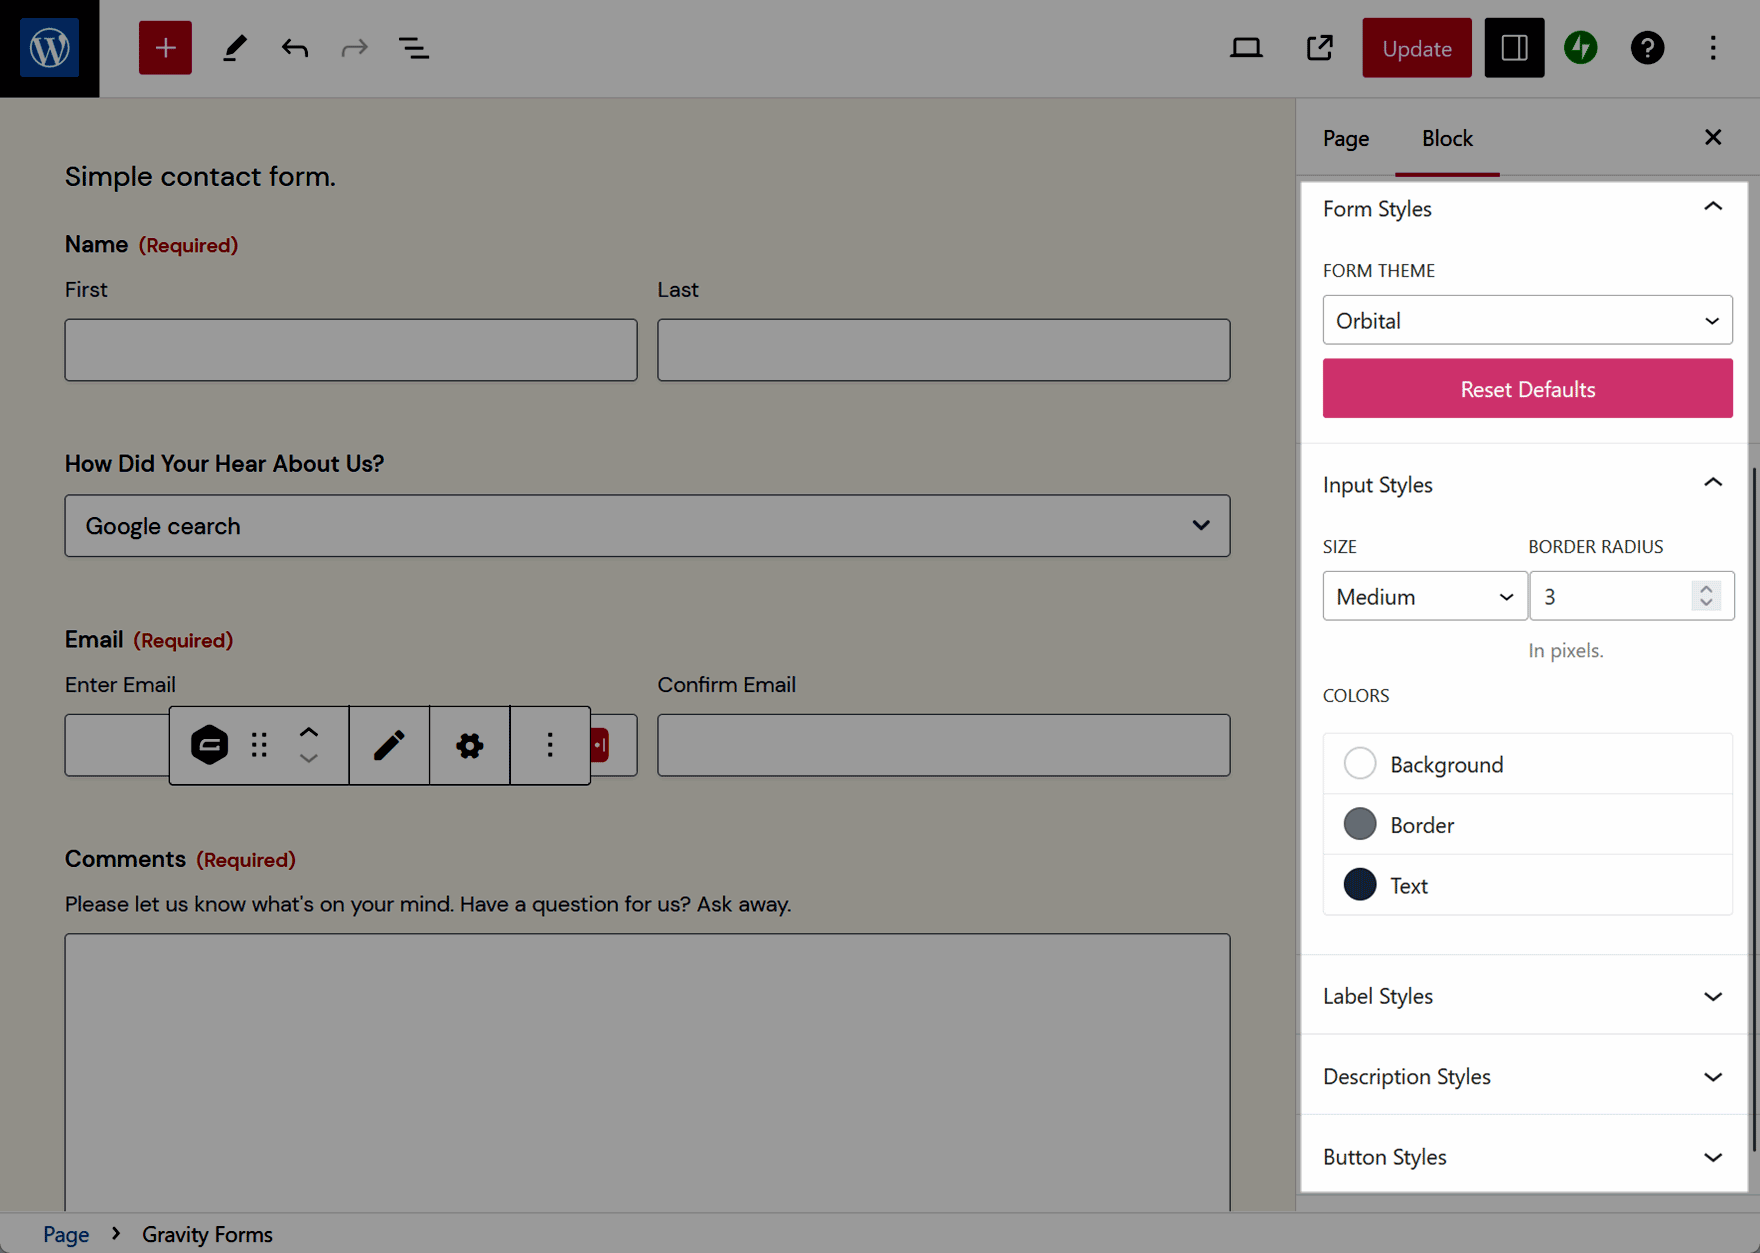
Once the form has been added to a page, you can click on the form and then customize how it’s displayed from the right-hand side panel. If you switch from the default form theme to Orbital, you can access more customization controls.
When you’re ready, click on the Publish or Update buttons in the top right of the screen, and your page will be saved, and the form will be available to your audience.
9. Integrate the Form with Mailchimp
As mentioned, Gravity Forms easily integrates with many third-party services.
One of those services is the Mailchimp email marketing tool.
Once you’ve created a free Mailchimp account, you can set up an email newsletter or marketing list and give your audience the opportunity to sign up and become subscribers. You can then use Mailchimp to send those subscribers emails.
As Mailchimp is a powerful tool, you can manually send your subscribers emails or set up automations that send out emails when certain conditions are met. Some examples include when a new subscriber signs up, when someone has been subscribed for a set amount of time, or on a certain date, such as the subscriber’s birthday.
However you decide to use Mailchimp, it’s a powerful tool for staying in touch with visitors to your site.
Here’s how you can integrate WordPress.com and Gravity Forms with Mailchimp…
Install the Mailchimp Gravity Forms Add-On
Integrating your site and its form with Mailchimp is very straightforward.
After creating a Mailchimp account, the next step is to install the MailChimp Add-On for Gravity Forms.
Gravity Forms keeps things simple by letting you install add-ons directly from your WordPress dashboard.
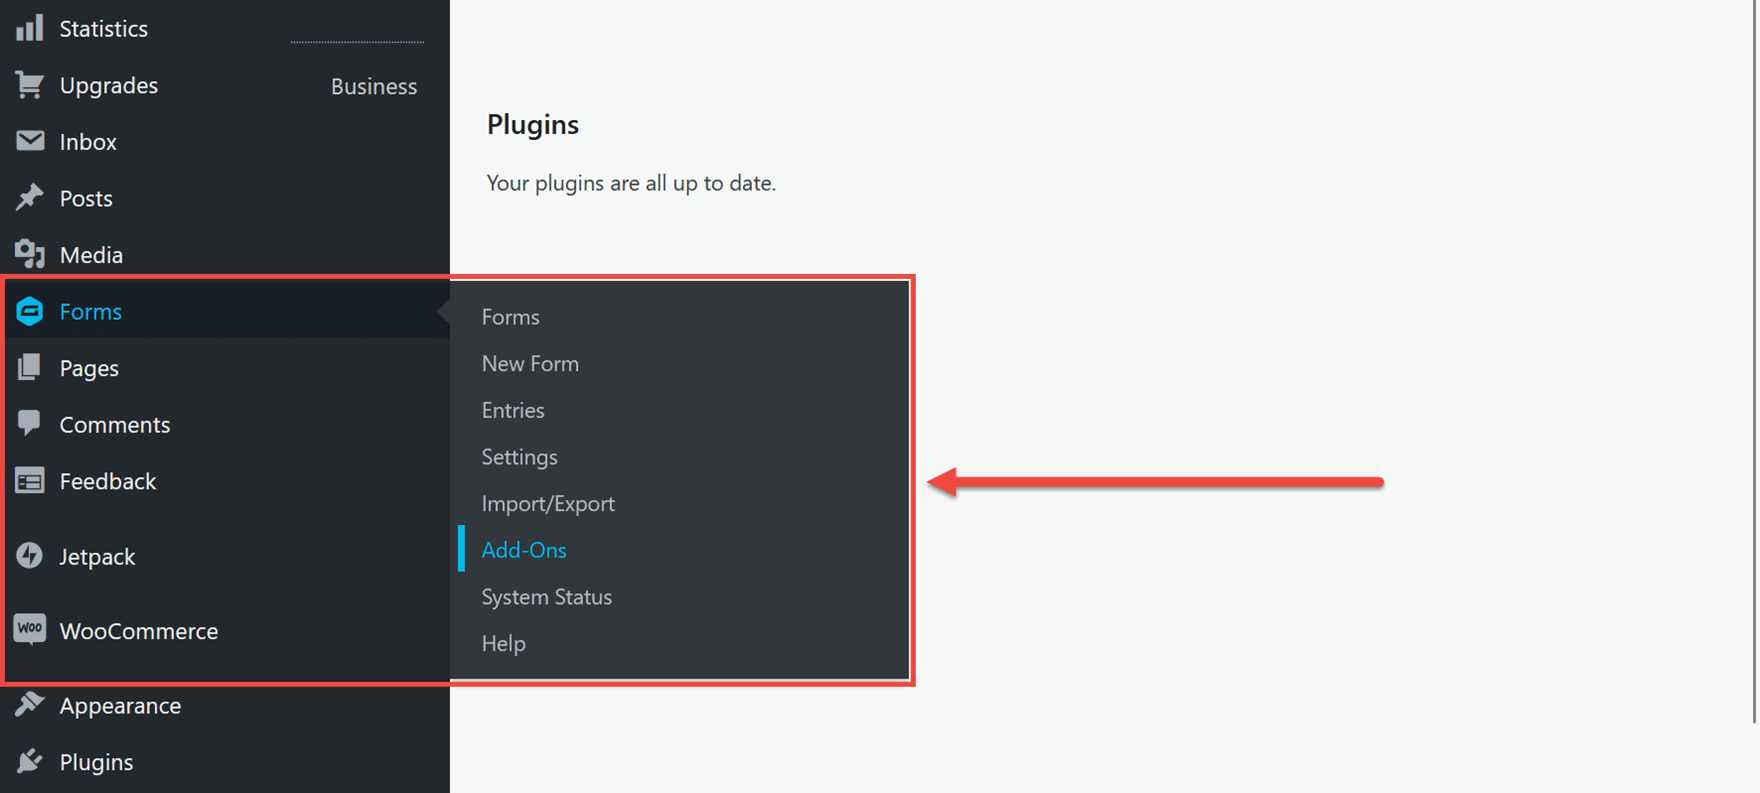
To do so, click on the Forms → Add-Ons sidebar menu item.
Now you can browse the Gravity Forms Add-Ons that are available to you. As we will use the Mailchimp Add-On to integrate your form with the Mailchimp email marketing service for this example, scroll through the list until you find it.
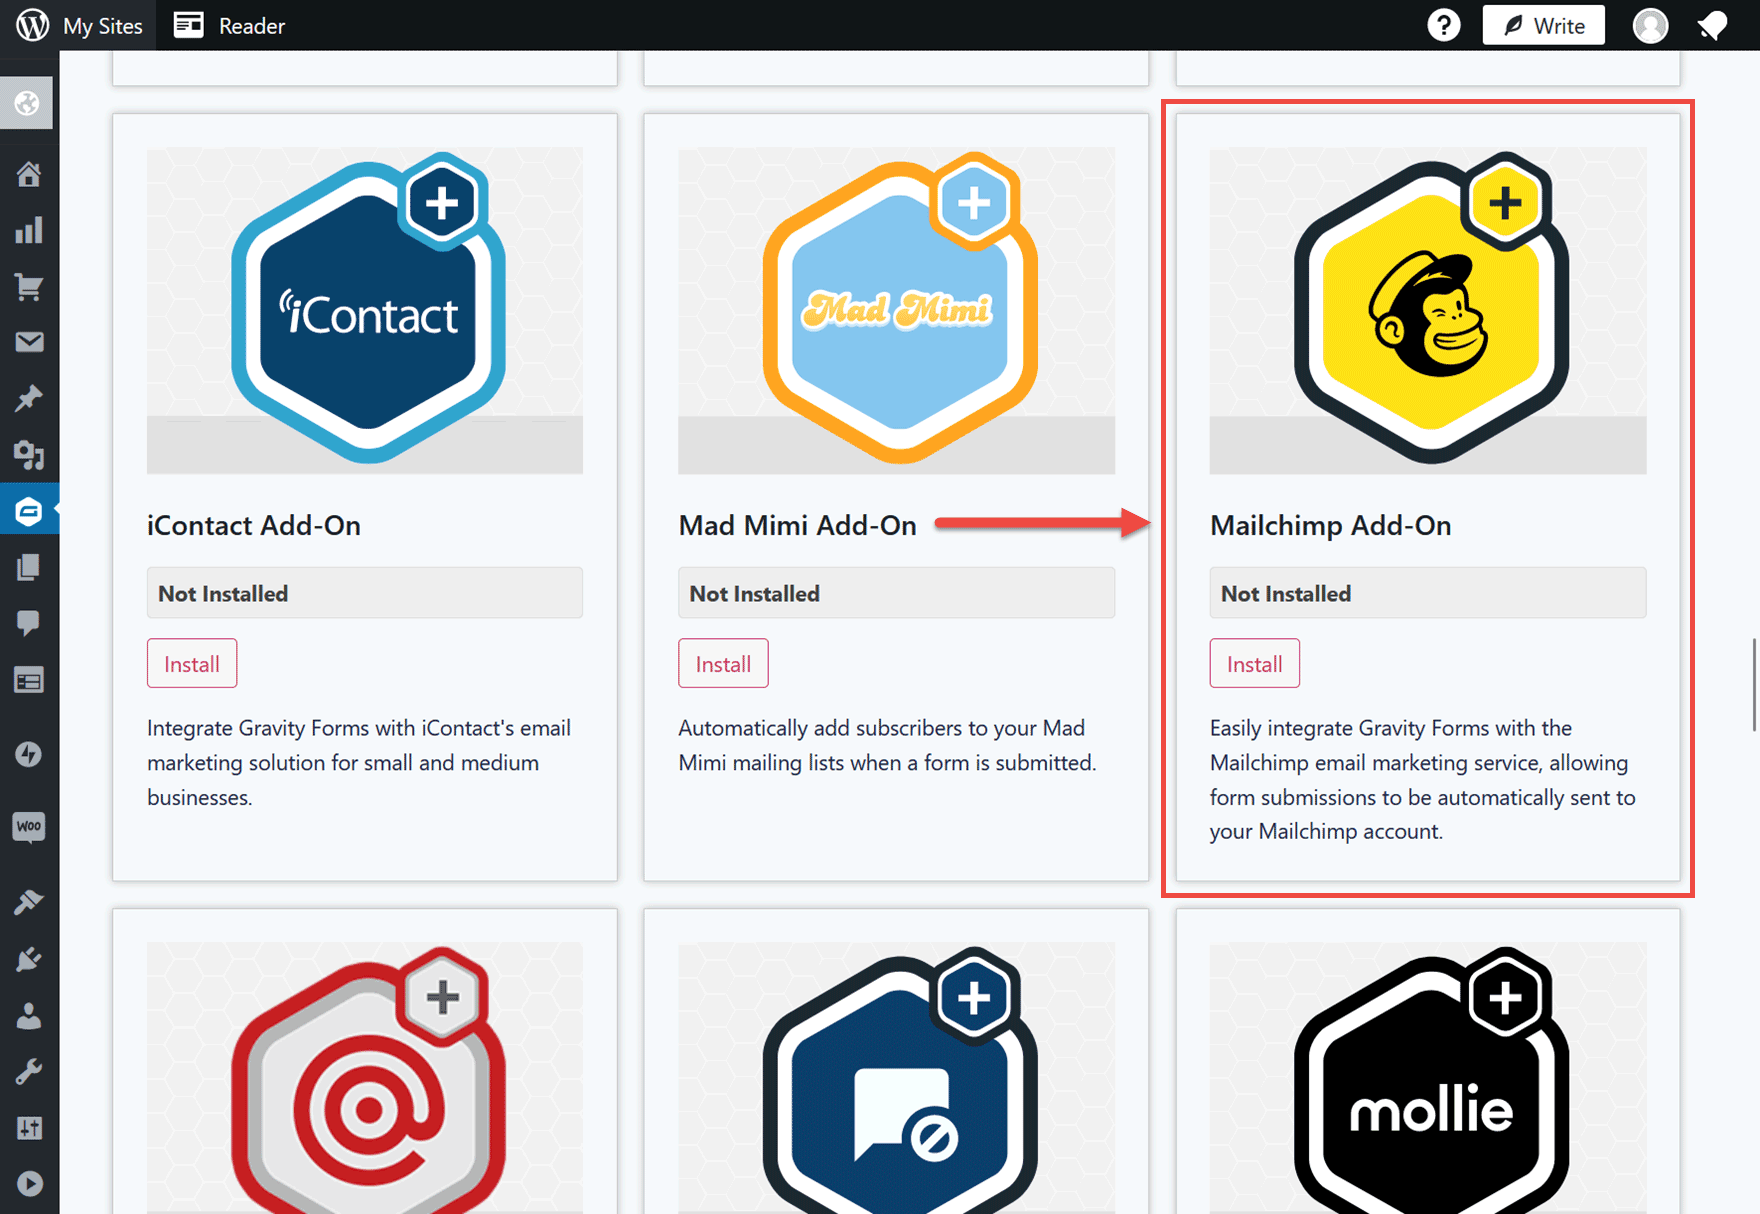
Then, click on the Install button. On the next screen, click on the Activate Plugin button.
Configure the Mailchimp Gravity Forms Add-On
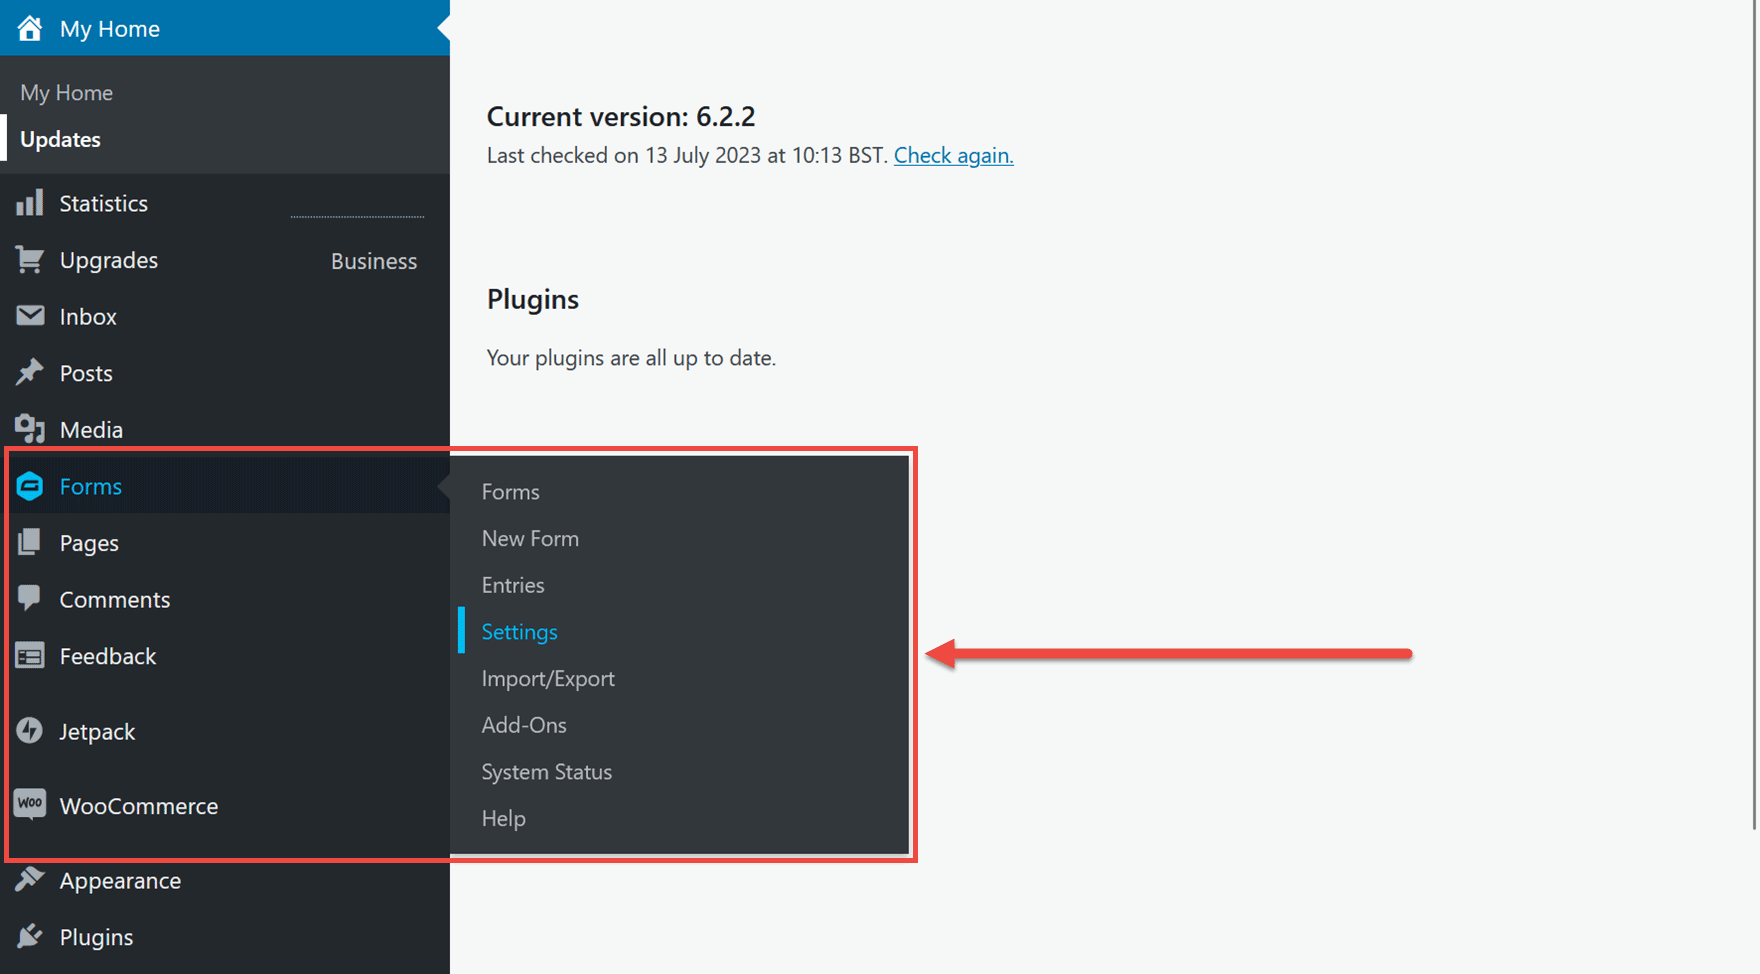
Now that the Mailchimp Add-On is installed and active click the Forms → Settings sidebar menu item to start configuring the integration.
Next, click on Mailchimp from the left-hand side menu.
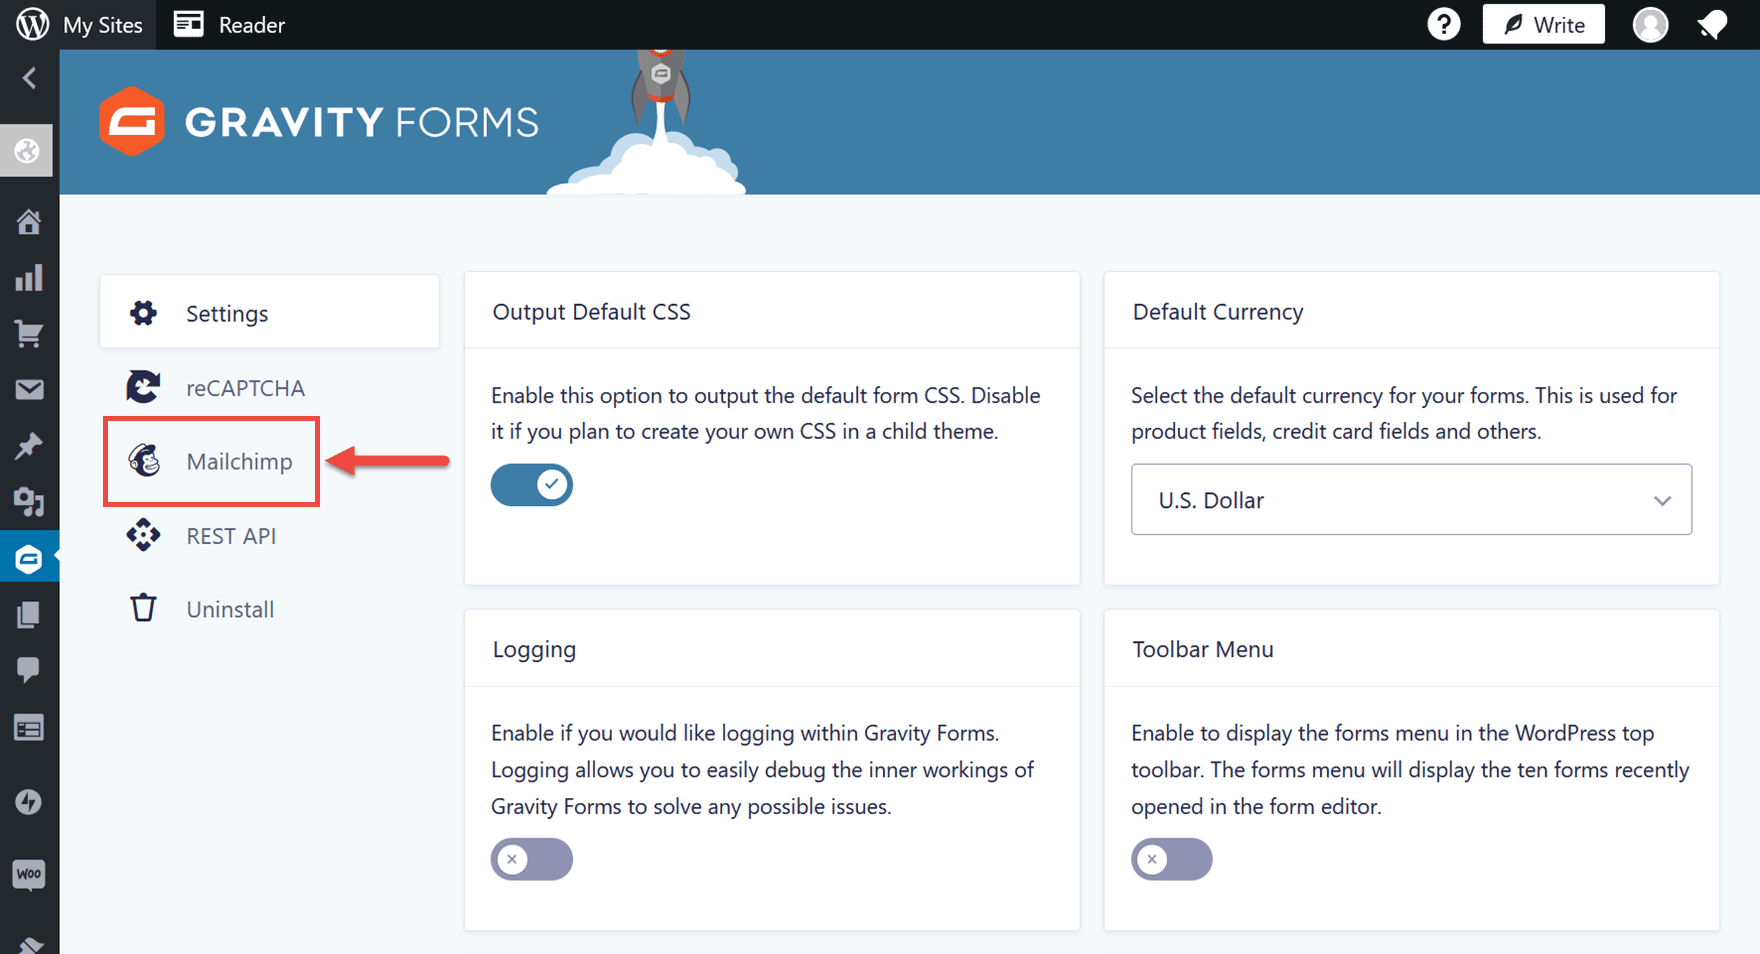
Click on the Connect to Mailchimp button. Then follow the steps, such as logging into your account and allowing the connection.
Creating a Form Feed for Mailchimp
With Gravity Forms now onnected to Mailchimp, it’s time to create a feed.
The feed will pass the data from a specific form to an external service, such as your Mailchimp account.
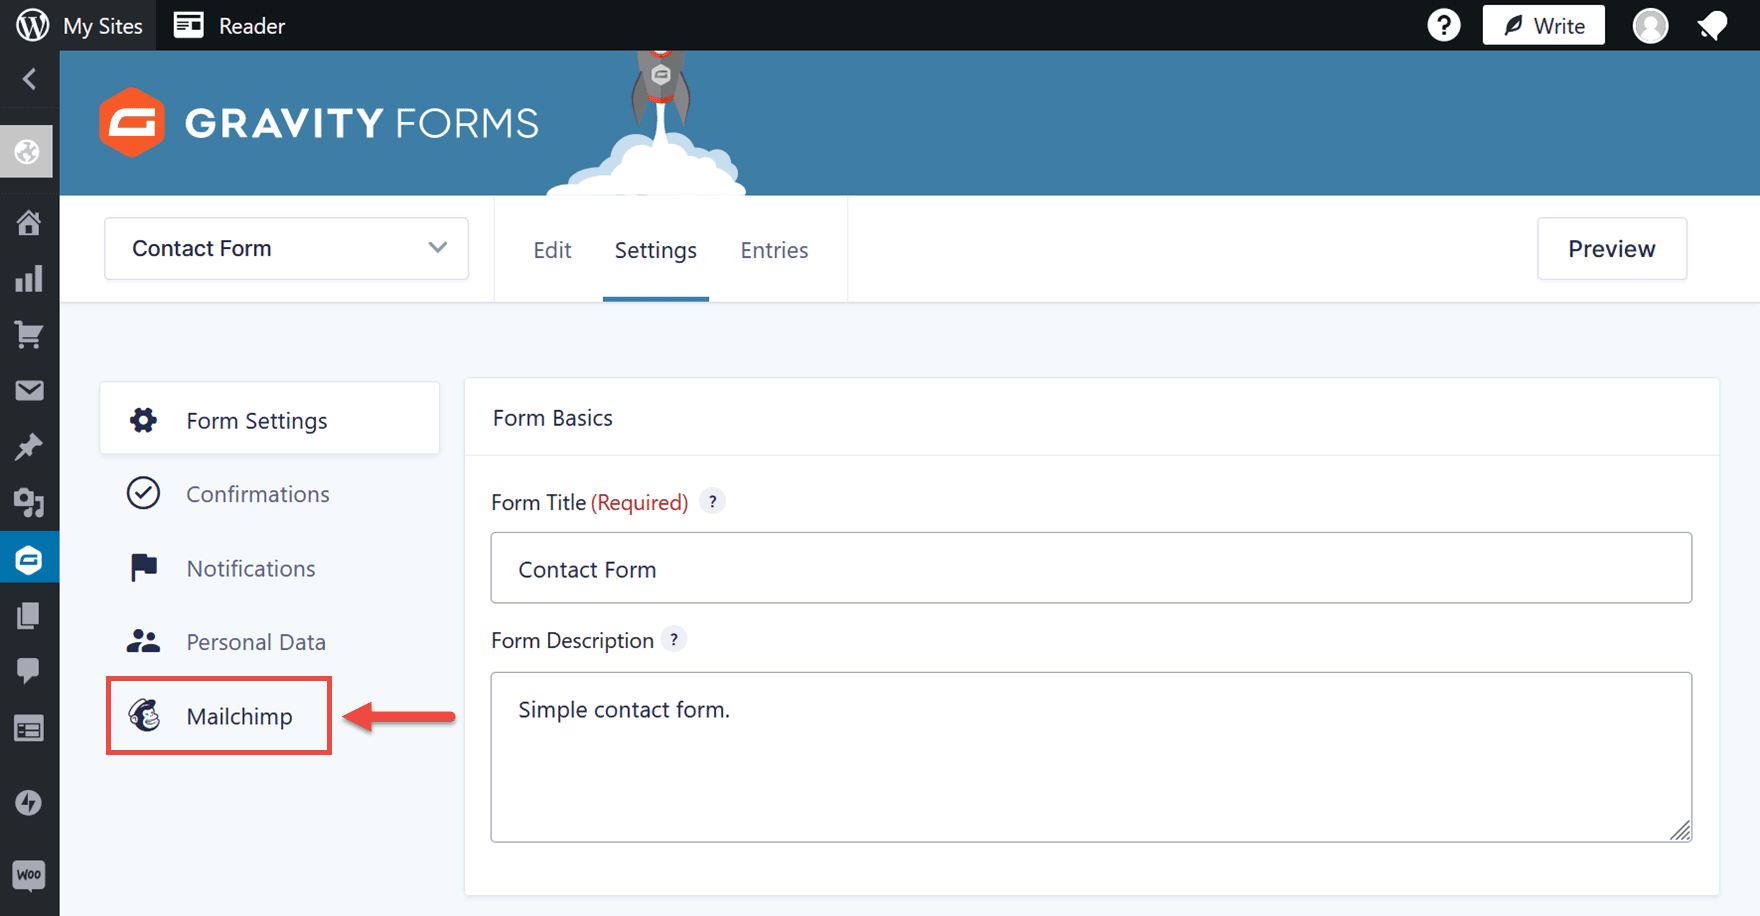
To get started, open the form we created earlier by clicking on Forms → Forms from the sidebar menu.
Next, click on Settings for the form you want to create the feed for.

From the form settings page, click on Mailchimp.
Now click on the Add New button to create a new feed. You’ll then need to give your feed a name, such as “Contact Form Feed.” You’ll also need to choose a Mailchimp audience for the subscribers to be added to.

You must create the audience from your Mailchimp account dashboard. To find out more about this, read the Mailchimp audience documentation.

Next, you must map the fields from your form to your Mailchimp audience. There are other settings, too, which you can learn more about in this guide to creating a feed for the Gravity Forms Mailchimp Add-On.
Now, when a visitor uses the contact form on your site, they’ll be added to your email list in Mailchimp.
For more ways to configure your Mailchimp integration, check out this guide to the Mailchimp Add-On.
If you’d like to create a form that’s only used to sign up visitors to your Mailchimp list rather than also being a contact form, this guide explains how.
Summary
As you can see, creating a new site with WordPress.com is very easy and convenient.
And the fact that you can also now purchase premium plugins like Gravity Forms through WordPress.com directly from your WordPress dashboard makes the service even more user-friendly.
By combining your WordPress.com site with Gravity Forms and its library of add-ons, you can build a bespoke site that’s as good as anything you’re likely to create with a WordPress.org self-hosted solution but with all the other perks of WordPress.com, such as access to powerful features and premium themes at no extra cost.
To get started, sign up with WordPress.com today and check out Gravity Forms.

If you want to keep up-to-date with what’s happening on the blog sign up for the Gravity Forms newsletter!
"*" indicates required fields