

Need a better way to manage employee vacation requests at your organization?
In this tutorial, you’ll learn how to use Gravity Forms and Gravity Flow to create a complete vacation request process for your organization.
This includes not just the vacation request form itself, but also the backend administrative processes involved in managing vacations.
Here are some examples of the advanced functionality that goes beyond just a one-time form submission:
- Managers/HR can approve the request. Employees will get an email when the request has been approved so that they know it’s confirmed.
- Employees can modify their vacation dates after submitting the form (which will then automatically restart the approval process for the new dates).
- Your HR team can add internal notes and even keep track of an employee’s remaining vacation days.
You’ll also be able to adjust the workflows to your organization – the examples above are just a starting point that work well for most organizations.
For example, the Winter Park Police Department used Gravity Flow to create their own customized vacation management system.
Ready to go? Let’s dig in!
What You Need to Create Your Vacation Request Process
To follow this tutorial, you’re going to need two plugins:
- Gravity Forms – this is what you’ll use to create the actual vacation request form with WordPress. Purchase it here.
- Gravity Flow – this is what you’ll use to create the automation workflows to automate vacation request processing and management. Gravity Flow is now a Gravity product, so it comes from the same team behind Gravity Forms. Purchase it here.
You also might optionally want to incorporate some of the other Gravity Forms or Gravity Flow Add-Ons, but none of them are required to follow this tutorial.
For example, if you want more control over managing an employee’s total vacation days, you also might want to use the Gravity Flow Vacation Requests extension.
While you can create a vacation request process using just the core Gravity Flow plugin, this extension lets you automate tracking how many vacation days each employee has left.
Or, if Slack is a big part of your organization’s workflows, you could install the official Gravity Forms Slack Add-On so that managers automatically receive a message on Slack when one of their employees requests vacation time.
How to Create a Vacation Request Form and Process
Now, let’s get into the step-by-step tutorial on how to create a vacation request process with Gravity Forms.
Again, while our tutorial will show you how to set up all the baseline functionality, we encourage you to build on the tutorial to more closely match the process with your actual workflows.
1. Create Your Vacation Request Form
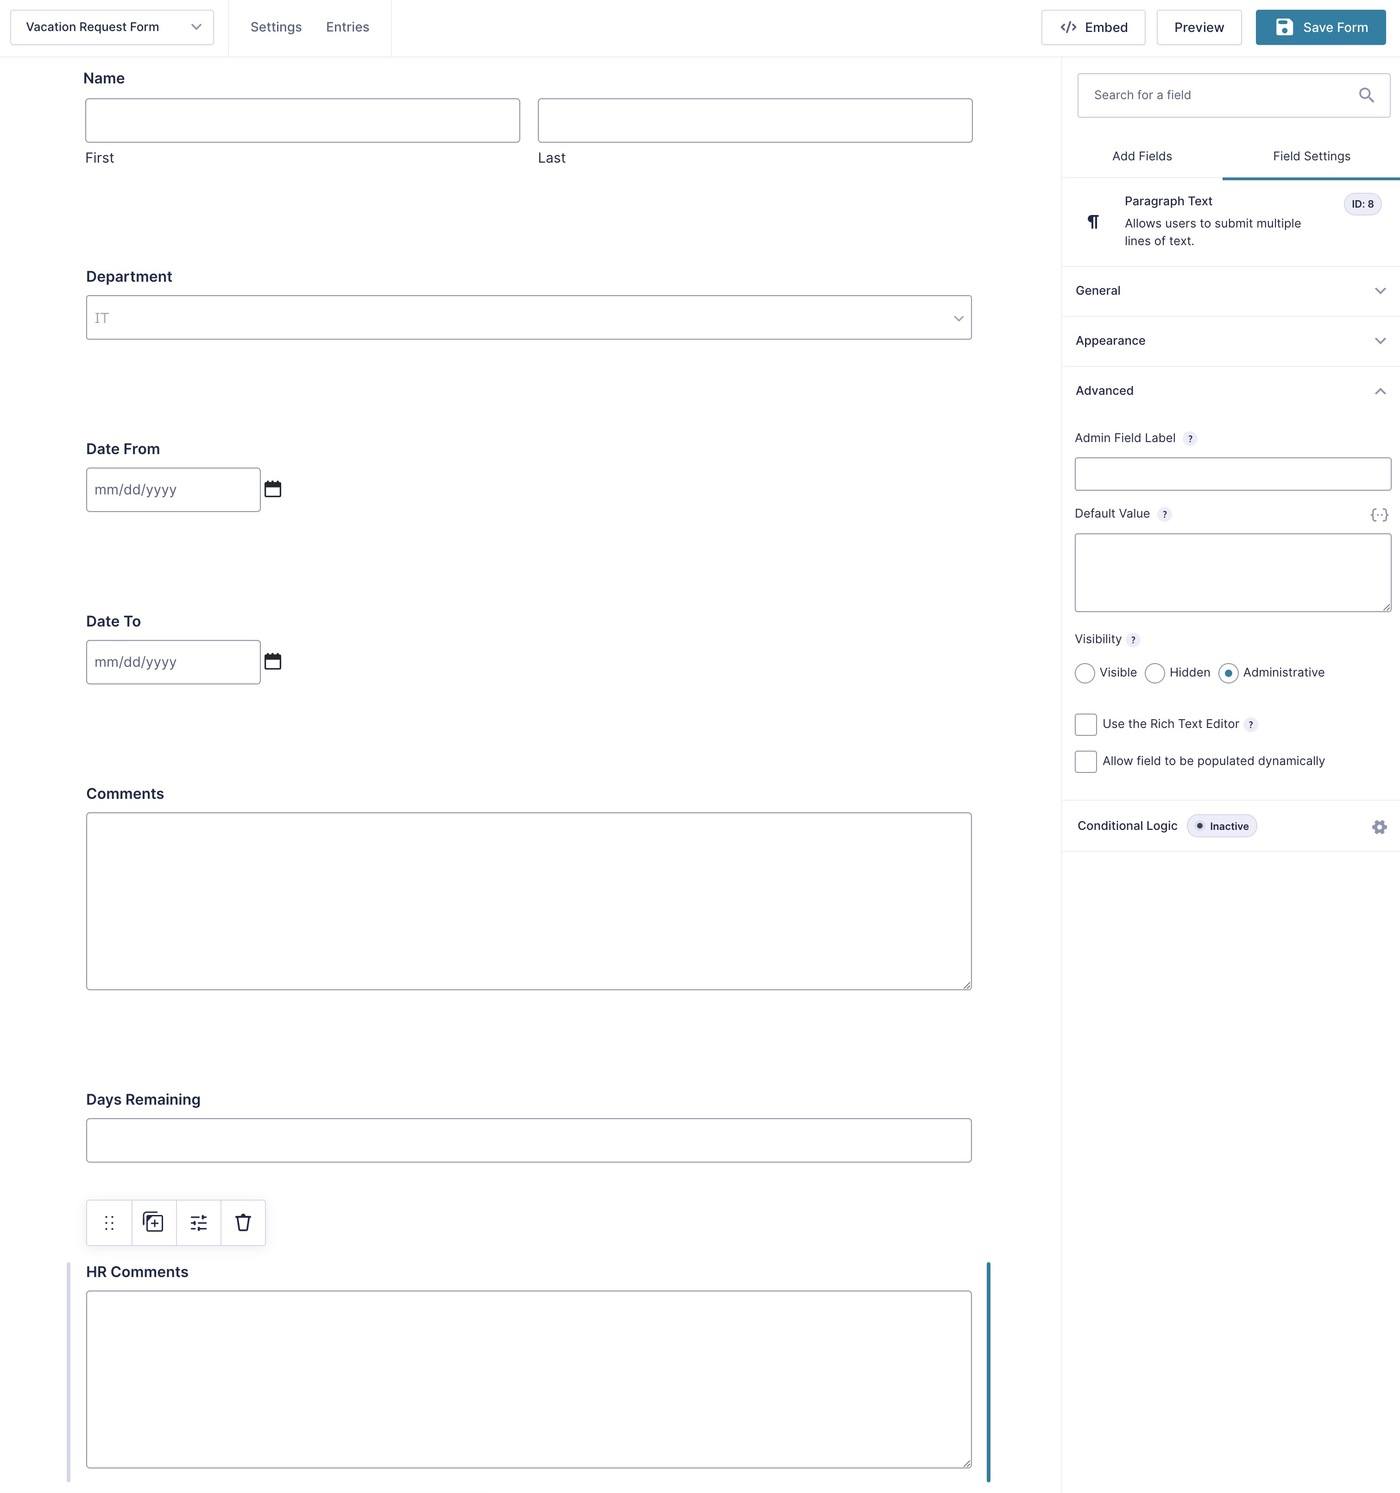
To get started, you’ll want to create your base vacation request form. This is what your employees will fill out to request their vacation and it’s also what will automatically kickstart your entire vacation request process.
Typically, you’ll want fields for the following:
- Employee name
- Department
- Starting date
- Ending date
- Employee comments
For this example, we’ll also create internal administrative fields for “days remaining” and “HR comments”. The employee won’t see these fields when filling out the form, but HR staff can use them to help streamline workflows.
Here’s an example of what the form might look like:
2. Configure General Form Settings
Once you’re happy with the form itself, open the general form settings (Settings → Form Settings) to make some other important choices.
Most notably, you’ll typically want to restrict the form to logged-in users. This setting is required if you want to give employees the ability to edit their vacation dates after submitting the form. However, if your employees don’t have WordPress user accounts, you could leave this setting disabled and include an email field to assign workflow steps to.
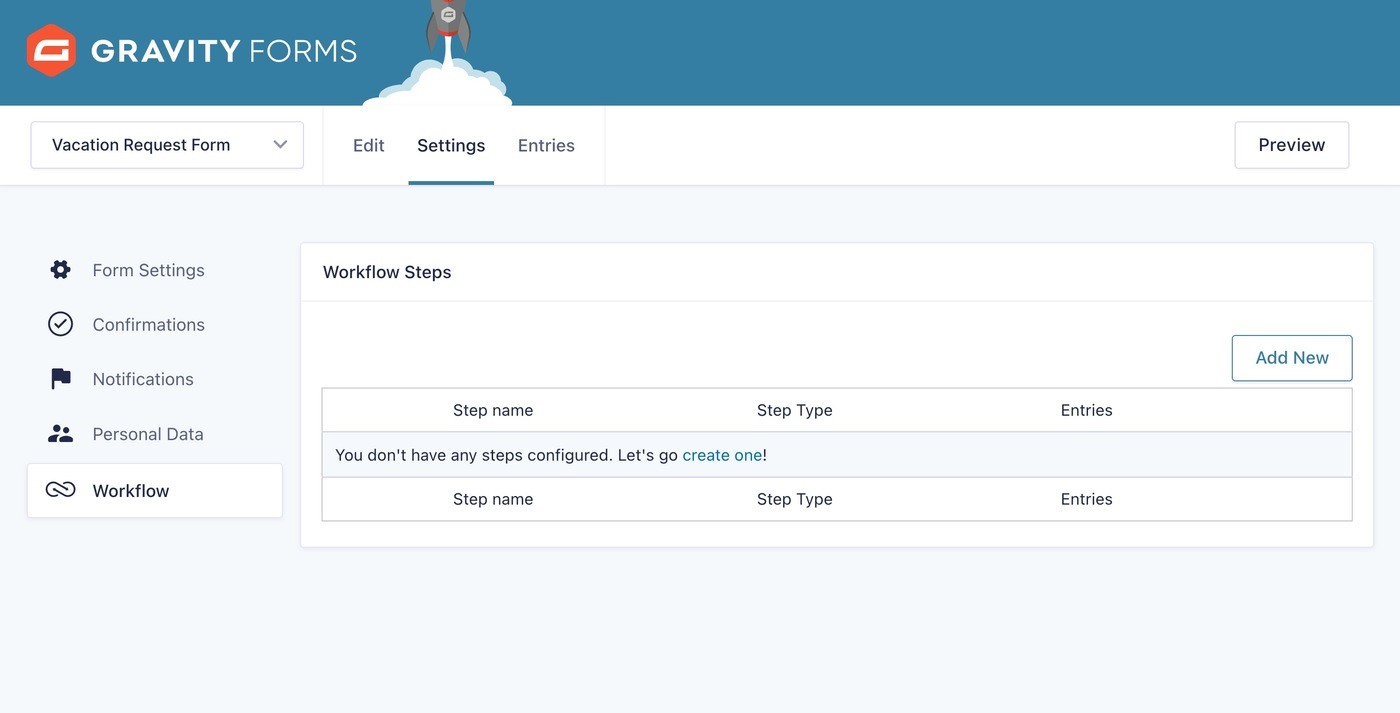
3. Open Workflow Settings
Now, you can get started creating workflow steps, which are what let you automate the processes behind your WordPress vacation request form.
To open the workflow settings, go to Settings → Workflow in the form interface. At first, the Workflow Steps interface will be empty, but you’re going to fix that over the next few steps in the tutorial.
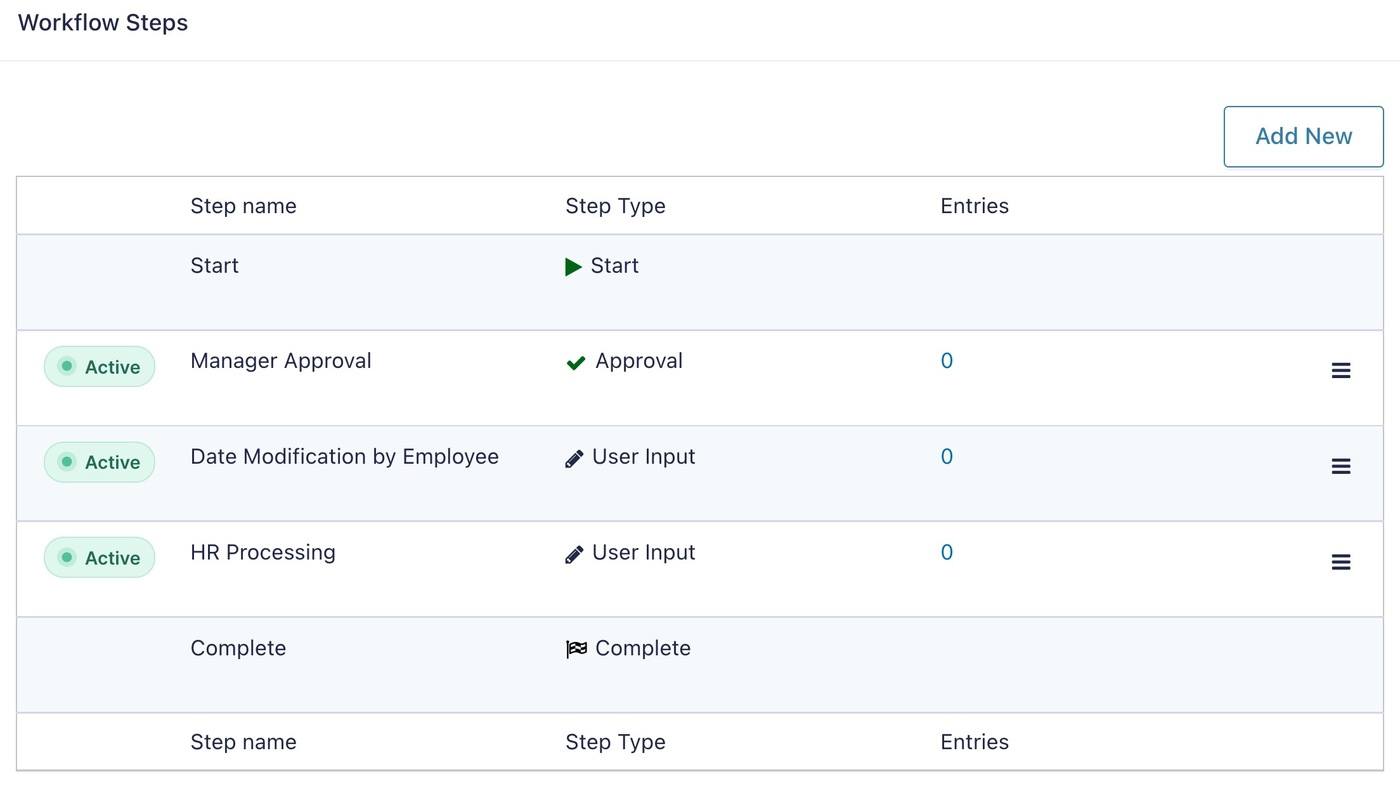
Once you finish setting things up, you should have three different workflow steps:
- Manager Approval – this lets managers approve new vacation requests.
- Date Modification by Employee – this lets employees manage the dates of their vacation (which will restart the approval process).
- HR Processing – this lets your HR department perform relevant tasks, such as tracking how many vacation days an employee has left.
Let’s start with the manager approval workflow…
4. Set Up the Manager Approval
To start automating your vacation process, click the Add New button in the Workflow Steps interface. Then, make the relevant choices in the Step settings box:
- Give it an internal name (and optionally a description) to help you remember what this step does. For example, “Manager Approval”.
- Select Approval under Step Type (this will expand additional options below).
- Feel free to leave the other settings blank, but you can configure them if it fits your workflows.

Next, you’ll need to fill out the Approval settings below that.
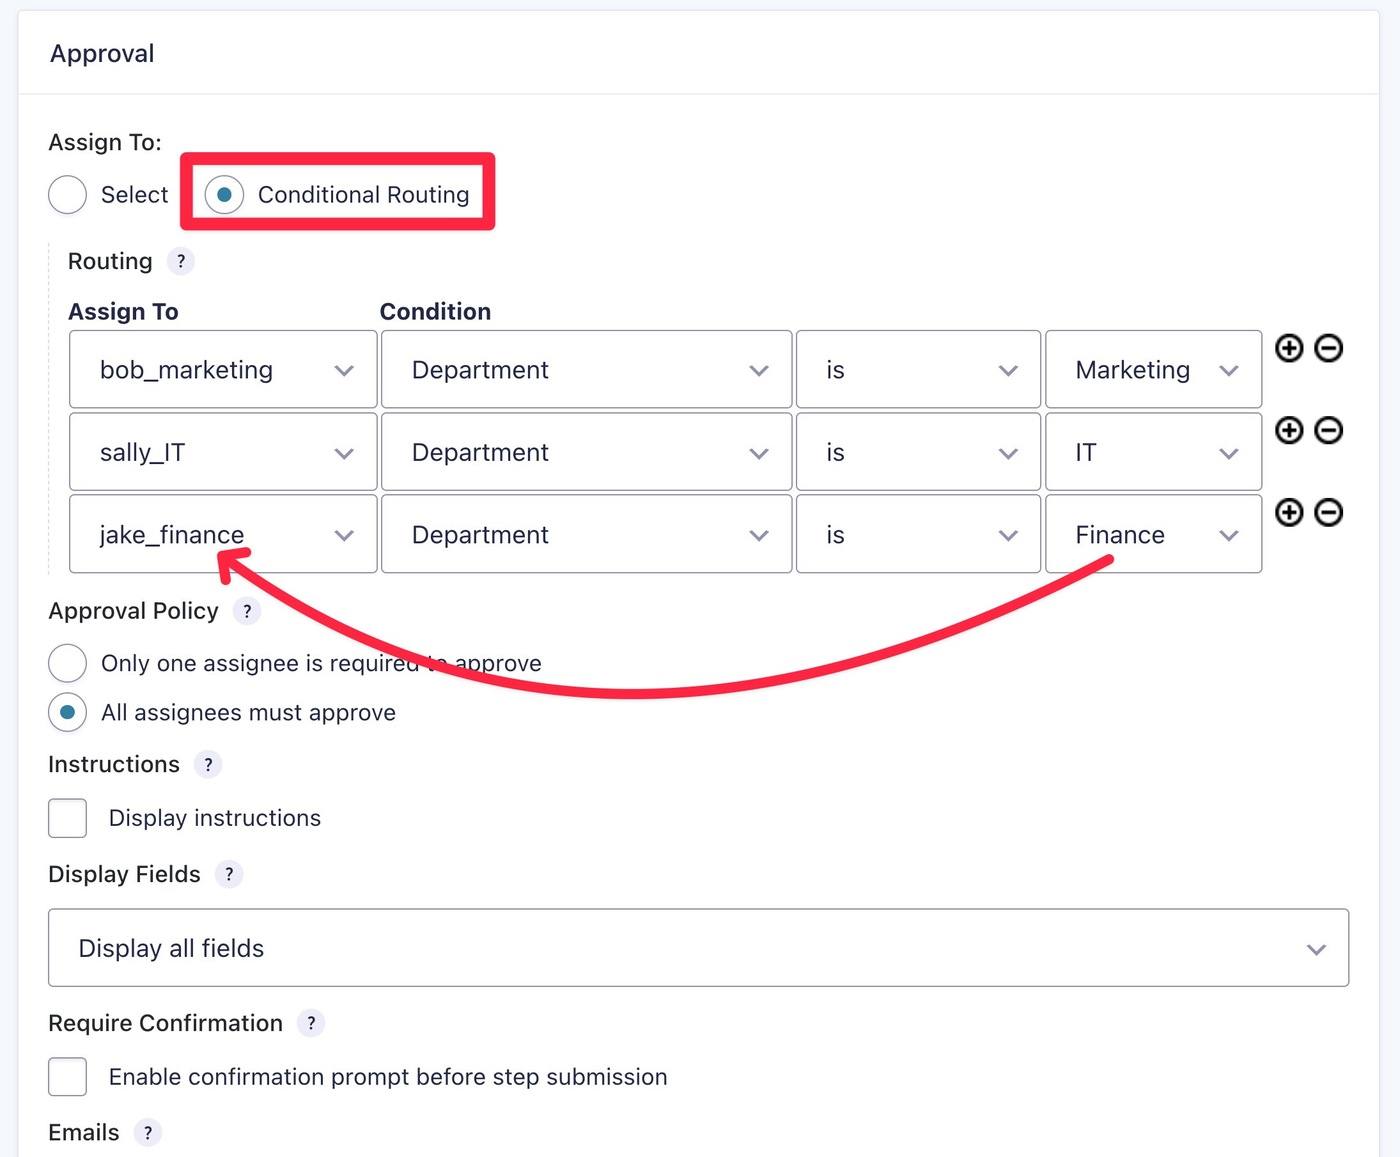
The first important choice is how to route the approval request. That is, how to make sure that the employee’s manager is the one who is assigned to approve the vacation request.
You can use different approaches here, but here are two examples:
- Assign to different users based on the department that the employee selected.
- Add a field to the form that lets users choose their manager directly. You could do this using the special Assignee or User field that Gravity Flow adds in the Workflow Fields category.
For this example, we’ll use the first approach.
To set that up, you would choose Conditional Routing. Then, you would assign the approval to different WordPress user accounts (for each manager) based on the department that the employee selected when submitting the form.
For example, when the employee chooses “Finance”, it will be assigned to the “jake_finance” user account:
Below that, use the Emails options to set up all three emails for different scenarios:
- Assignee Email – sends to the assignee (manager) when the employee submits the form.
- Rejection Email – sends to the employee if the manager rejects the vacation request.
- Approval Email – sends to the employee if the manager approves the vacation request.
To streamline the approval request, you can add the {workflow_approve_link} and {workflow_reject_link} merge tags to the assignee email. This will let the manager approve or reject the vacation request right from their email inbox by clicking the relevant link.

You can also configure the other settings if needed. For example, you could add a due date to encourage managers to promptly approve requests.
Or, you could enable the Workflow Note setting to require managers to add an approval or rejection message.
Once you’re finished, make sure to save your settings.
5. Give Employees the Option to Edit Their Request
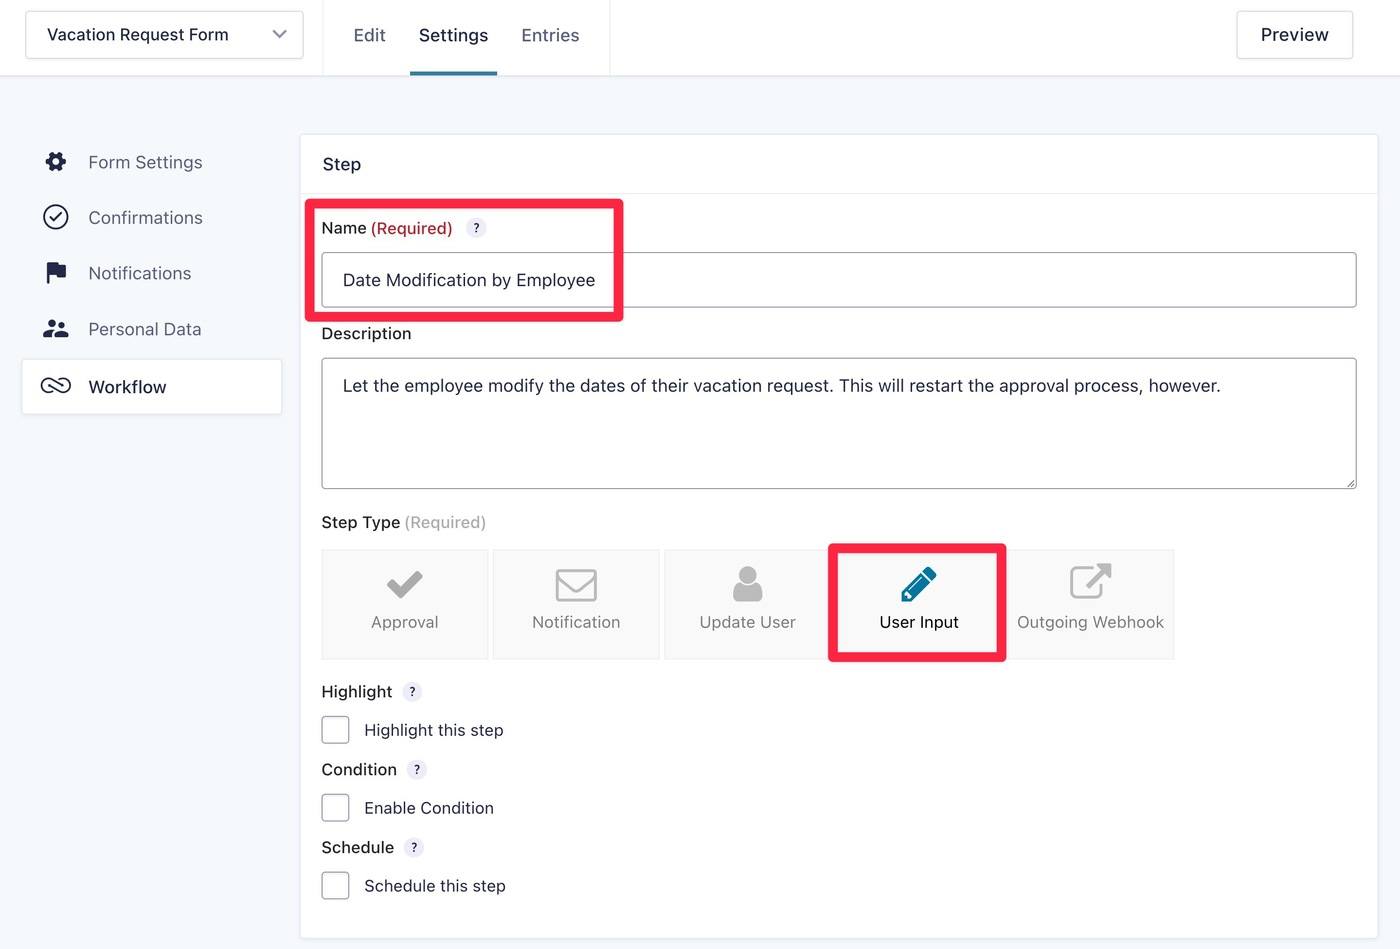
Next, you can set up a new workflow step to give employees the option to edit their vacation requests.
When you create your step, choose User Input as the Step Type this time:
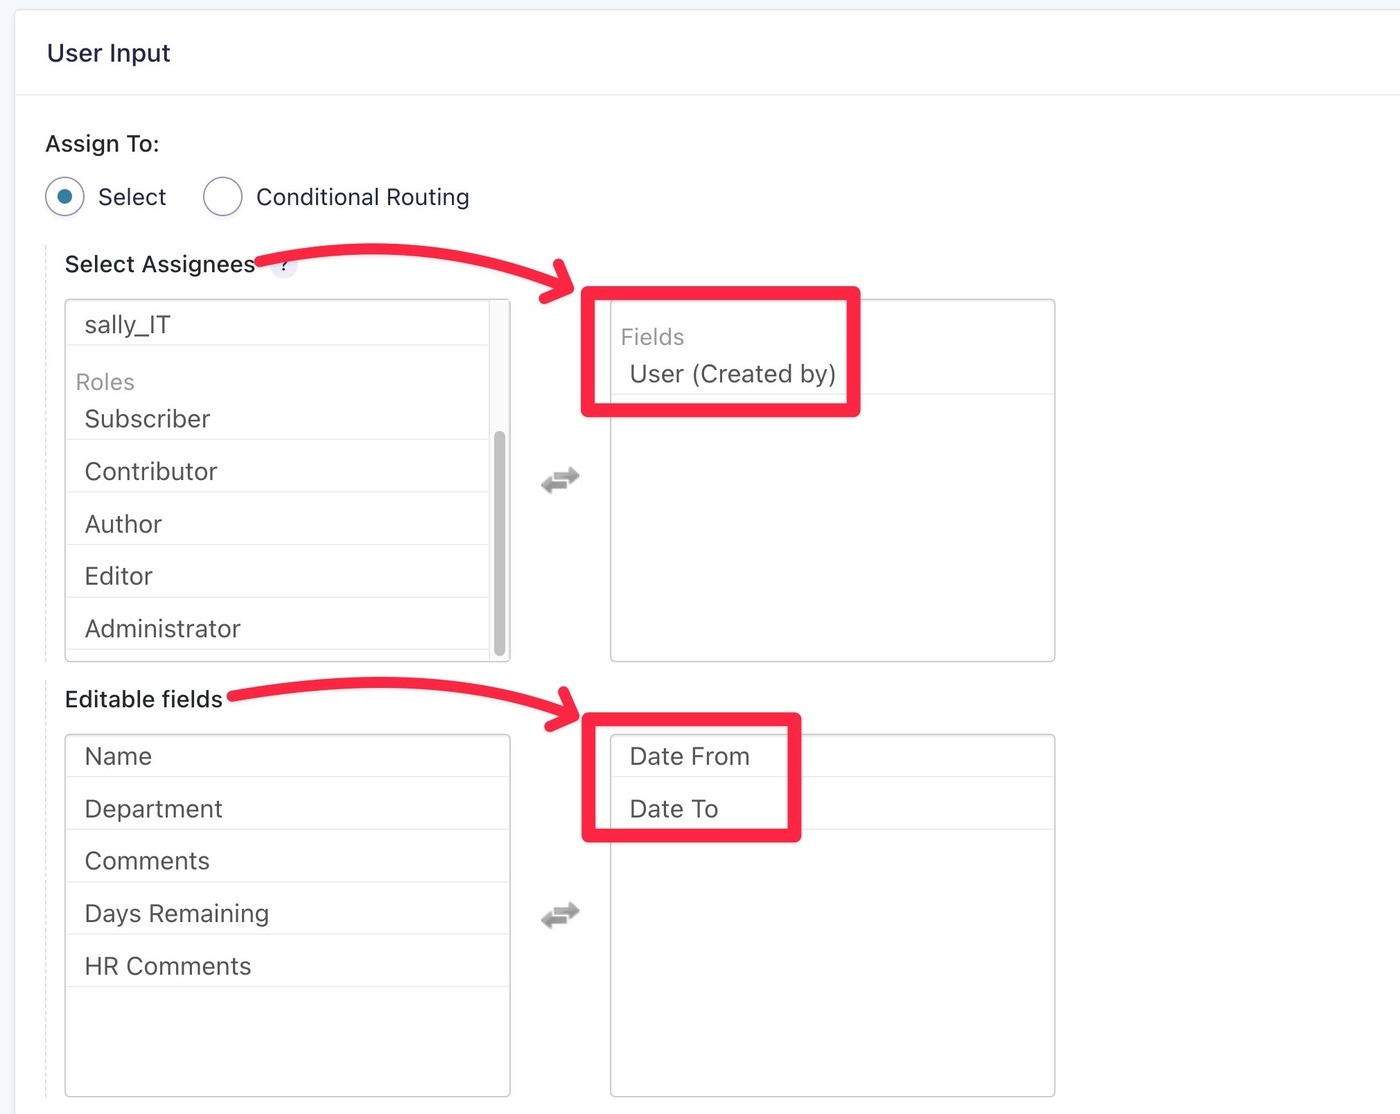
Then, scroll down to fill out the User Input settings that appear.
First, you’ll want to assign the form to the original form submitter (the employee) by setting User (Created by) as the assignee.
You’ll only see this option if you restricted the form to logged-in users in the general Form Settings interface.
Then, add the Date From and Date To fields as Editable fields:
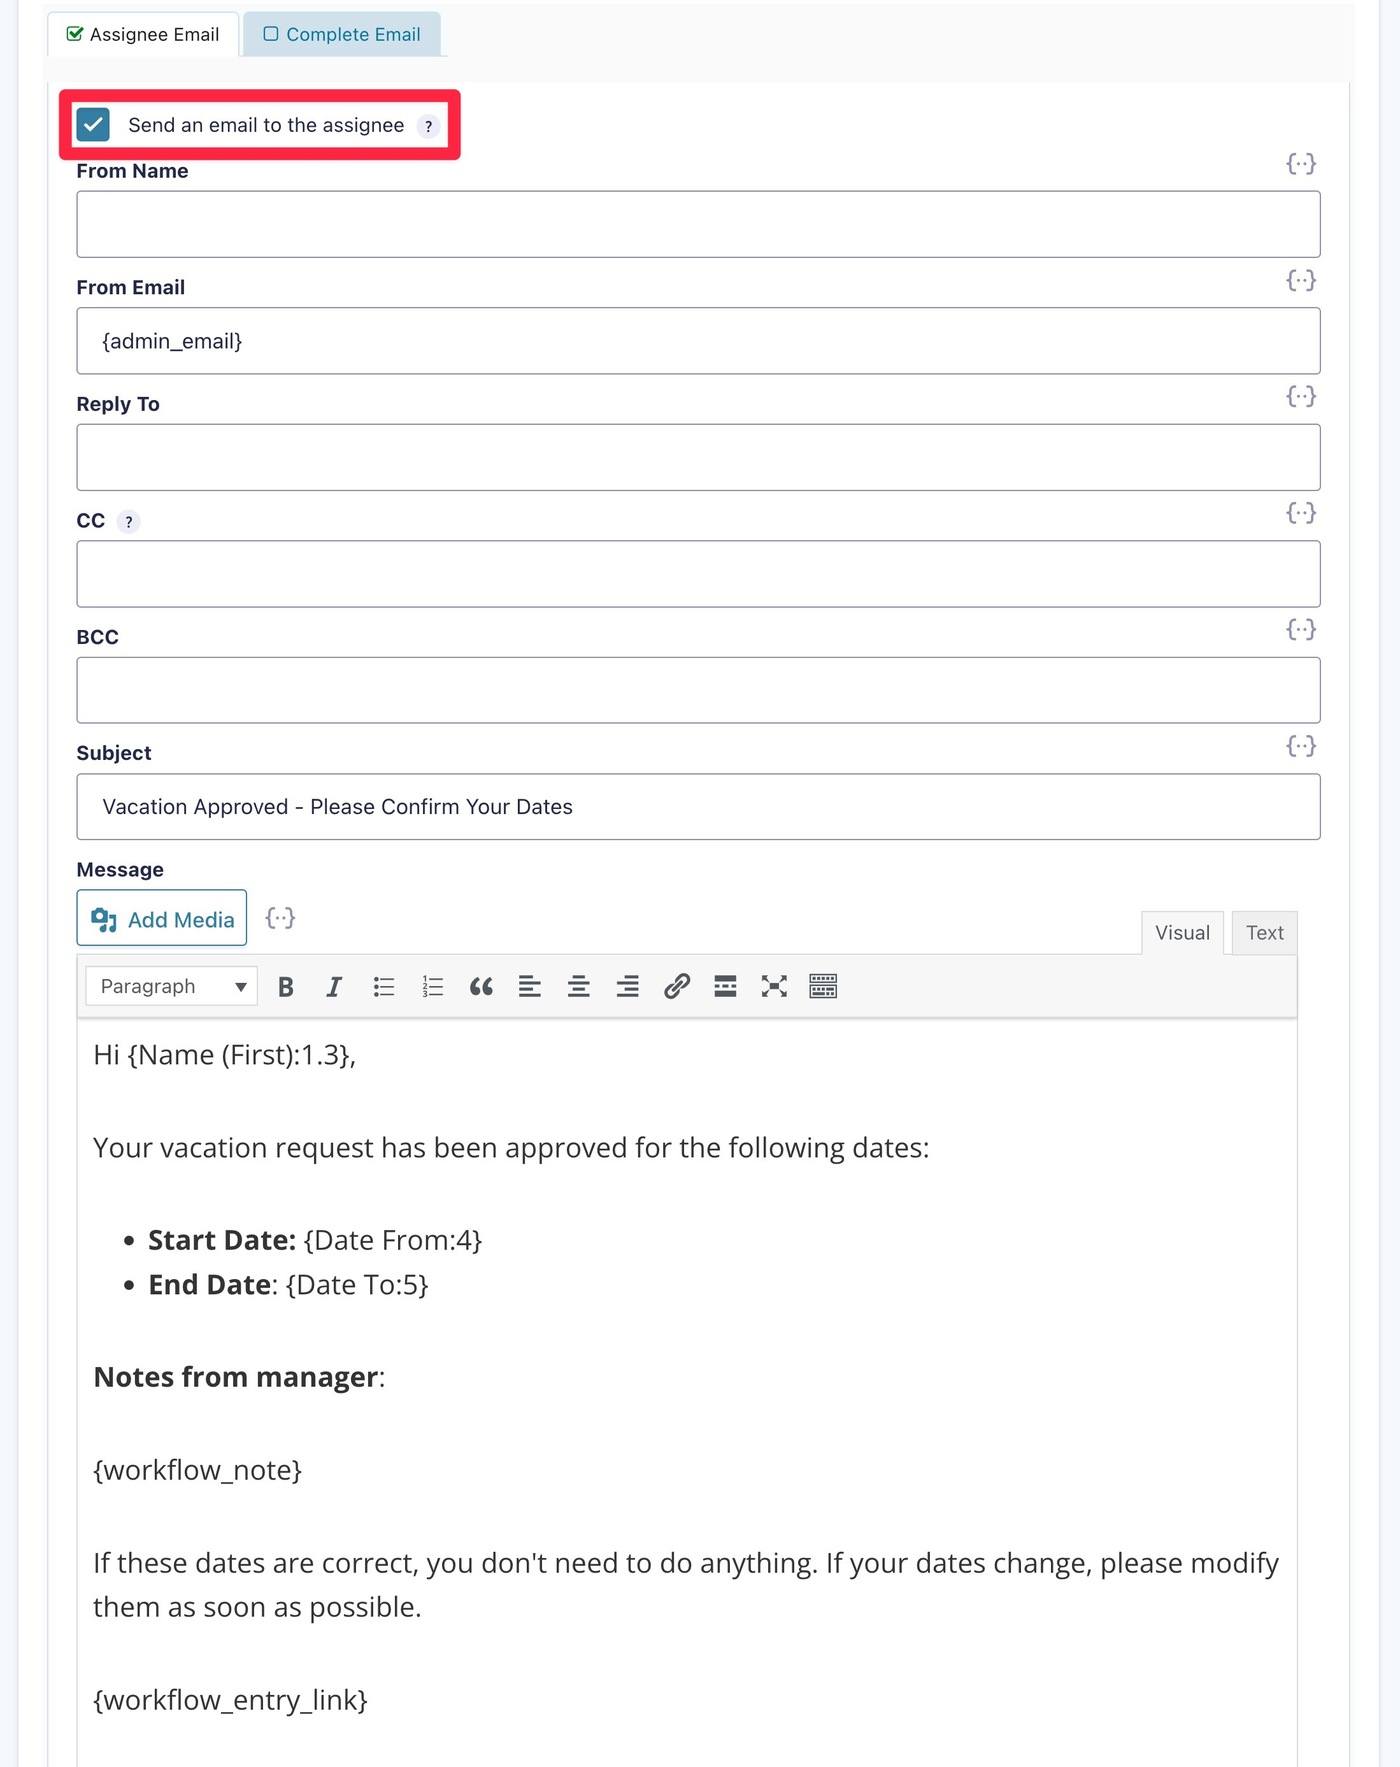
Below that, you can set up the email that will be sent to employees after the manager approves their initial request:
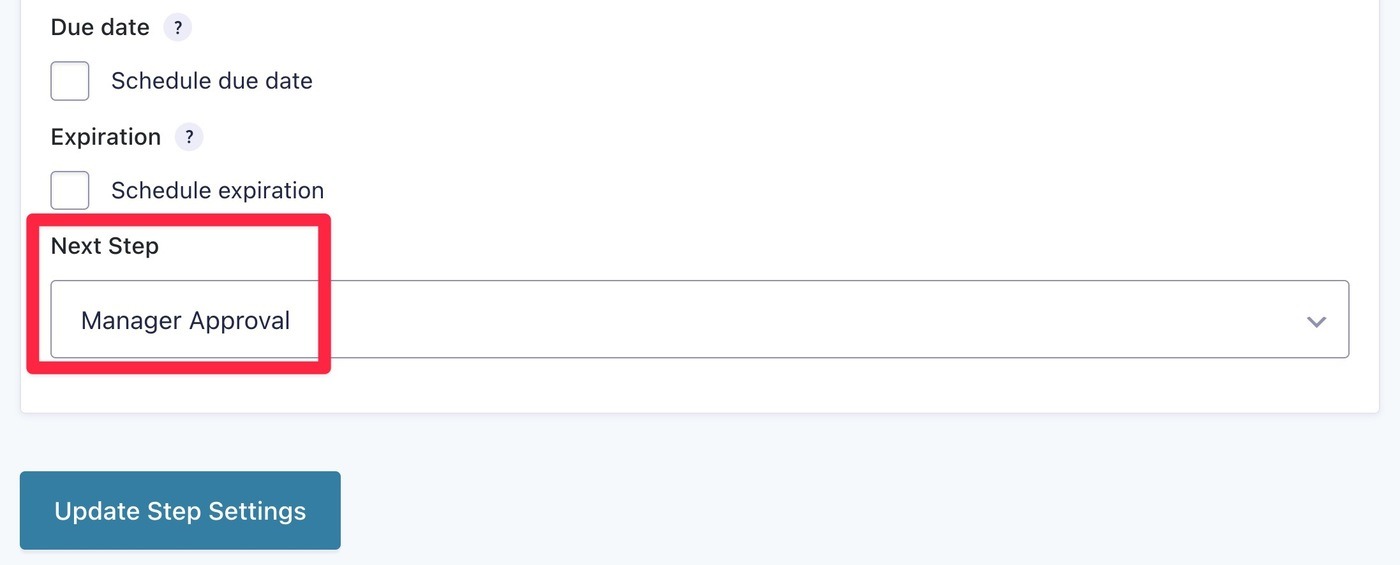
Finally, set the Next Step drop-down at the bottom equal to Manager Approval. This will send the request back to the manager if the employee edits their dates:
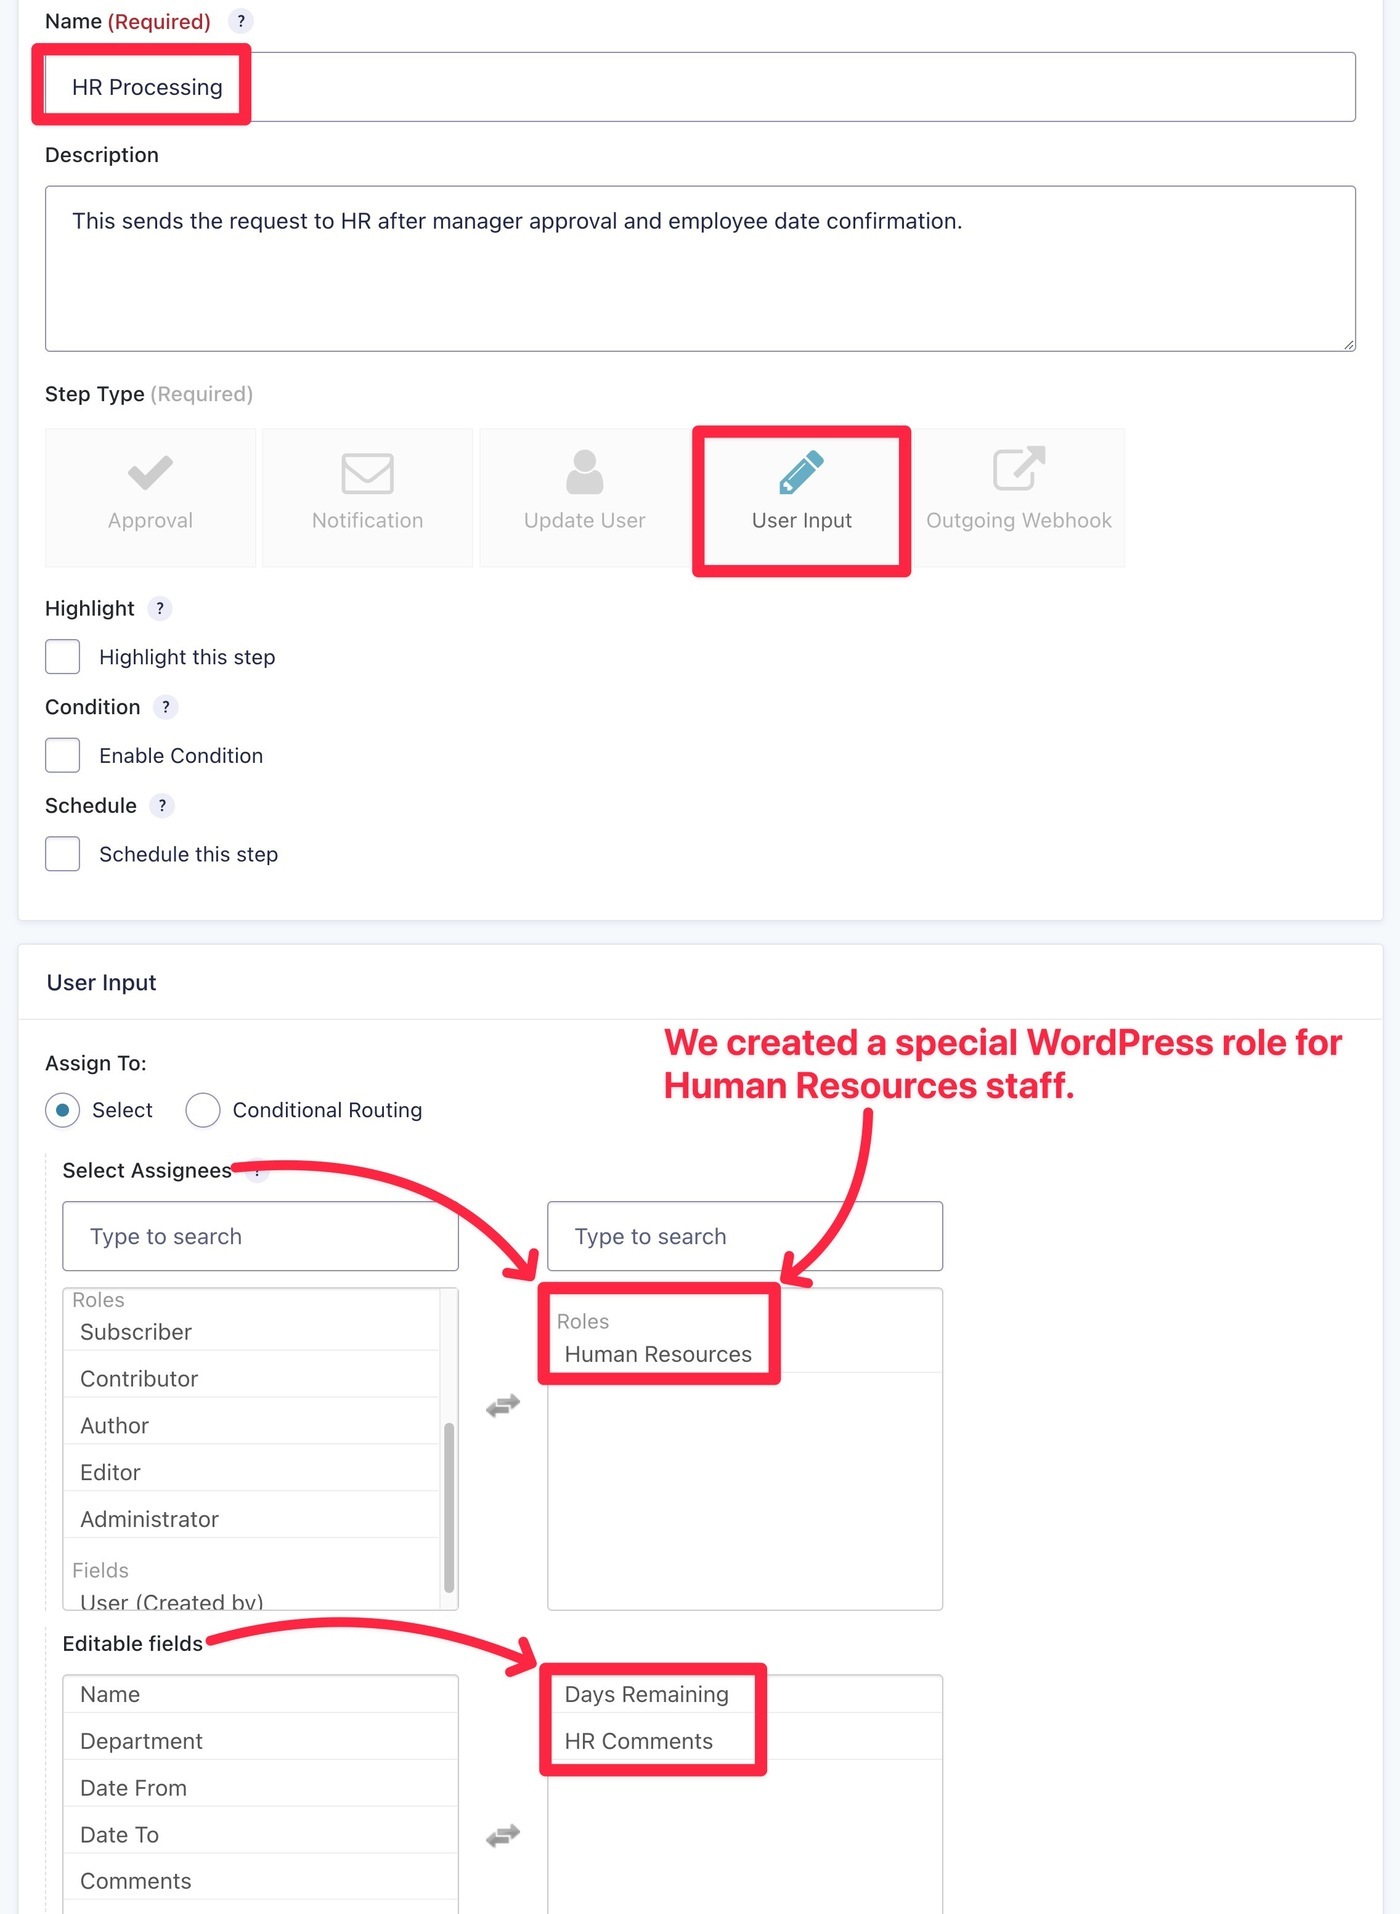
6. Set Up HR Processes
To finish things out, you’ll want to automate the backend HR process to keep track of an employee’s remaining vacation days and add other internal notes as needed:
- Create a new workflow step and name it HR Processing.
- Set User Input as the Step Type again.
- Assign the step to human resources. A good approach is to create a WordPress role for Human Resources and then assign the step to that role. That way, any human resources team member can process the request.
- Set the Editable fields equal to HR Comments and Days Remaining.
- Configure the email that will be sent to HR team members when the request has been approved by the manager.
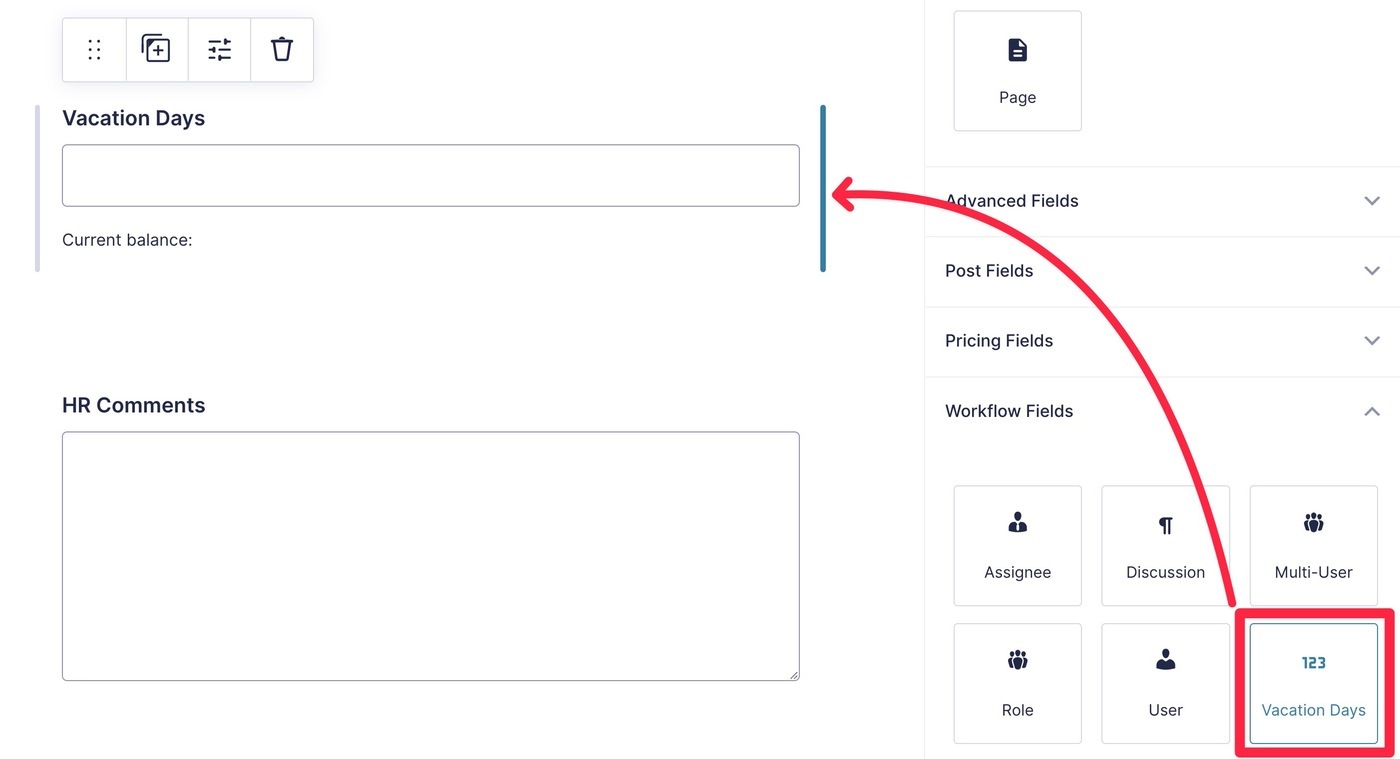
If you don’t want to handle tracking the remaining vacation days manually, the official Gravity Flow Vacation Request extension is available with both the Pro and Ultimate licenses. Or equally, you can purchase the individual extension for $59.
This extension lets you assign available vacation days to each employee (via their associated WordPress account):

Then, it will automatically calculate the used/remaining days based on the employee’s approved vacation days. All you need to do is add the special Vacation Days field to your form:
7. A Final Tweak to the Workflow
We are nearly finished, but currently, based on the tutorial so far, the workflow has the following issues:
- Even if the manager approves the request it will be sent to the employee for (non-needed) edits!
- Therefore the entry can never get to the HR Processing step because it has entered an endless loop – to the employee edit step and then back to the manager for review.
To fix this issue, follow these steps:
- Navigate back to the Manager Approval step.
- Change Next Step if ‘Approved’ to HR Processing.
- Activate Revert to User Input step and select Date Modification By Employee.
- Ensure Next Step if ‘Rejected’ is set to Workflow Complete.
Then save your settings.
8. Make Other Configurations As Needed
At this point, the core of your vacation request process is finished.
However, you should feel free to add more workflow steps or make additional form-wide modifications to adapt the process to your needs.
For example, as we discussed earlier, you could send managers a Slack notification about new vacation requests in addition to the email approval message.
Create a Vacation Request Process Today
That wraps up our guide on how to create a customizable vacation request process with Gravity Forms and Gravity Flow.
You can use the tutorial above as your complete vacation request process. Or, you can just use it as a jumping-off point to customize the process to your organization’s unique workflows.
If you aren’t a Gravity Forms or Gravity Flow user yet, here’s how to get started:
- Purchase the Gravity Forms plugin – you can use any license.
- Purchase the Gravity Flow plugin, along with the Gravity Flow Vacation Requests extension if you want more automated vacation day management.
Then, follow this tutorial to get your system up and running in no time!

If you want to keep up-to-date with what’s happening on the blog sign up for the Gravity Forms newsletter!
"*" indicates required fields


