
Previously, we wrote about how you could send your form entries to Google Sheets. While inserting new data for each entry is as far as it needs to go for most users, you might need to continuously update the spreadsheet. With just a bit of additional logic, you can easily use Gravity Forms to find existing rows and update them as needed.
Example Scenario: The RSVP Form

Let’s imagine that we need to collect RSVPs for a company party. Let’s also imagine for a moment that the venue that will host the party needs each RSVP in the form of a spreadsheet. With enough employees, manually updating the spreadsheet would be an absolute nightmare. What if someone misses something? What if there’s a duplicate? Is this really worth anyone’s time?
By creating a form that can automatically add or update the spreadsheet, all of the extra steps are completely eliminated. Users can submit their own data and change it as needed. When it’s time to send the spreadsheet over, it already contains everything it needs.
Configuring Form Submission Actions
In our previous article on sending form entries to Google Sheets, we set up an action in Zapier that interprets the form data and sends it to Google Sheets as a new spreadsheet row. When updating data, it’s mostly the same process, but with a bit more logic involved.
With that said, we’re going to assume you have at least read over the previous article and have connected your form to Google Sheets using Zapier. If not, it would be a good idea to take a look at the article before continuing.
Keys, Columns, and Searching

You might be asking yourself, “How will Gravity Forms know what to change?”. The answer is as simple as having a unique key that the form can detect. This unique key can be something like a name, and ID number, or email address. As long as it’s something that wouldn’t repeat across users, it can be used to search for a row in your spreadsheet.
In this example scenario, we’ll collect an Employee ID field. The field will be present in the form that the user will submit, as well as in the spreadsheet in the form of a column. This way, each time the form is submitted, additional logic will search for the value of the field and if it exists in the spreadsheet, make the necessary changes.
Adding a Search Step

Before a row can be updated, it needs to be located first. To do so, you’ll just need to add a search step inside your Zapier action. Here’s how to do it:
Note: In this section, we assume you’ve already set your form up as a trigger inside your Zapier Zap. If not, you might want to take a look at our documentation on configuring Zapier for more information before continuing.
- Within your steps on the left side of your Zapier Zap, you have the ability to add an additional action or filter. Click the + button between the actions, then click the Action button to add a new action.
- Next, you’ll need to select the action you want to add. In this case, it’s searching for a row in Google Sheets, so click on Google Sheets, then select Lookup Spreadsheet Row.
- Continue through the setup by selecting your Google Sheets account, spreadsheet, and worksheet. Inside your action options, you should see an option labeled Lookup Column. Remember the key that we talked about earlier? Select that column here.
- Now you need to select your value to search for. In our example scenario, we selected Employee ID as the Lookup Column, so we need to set the field value containing the employee ID here.
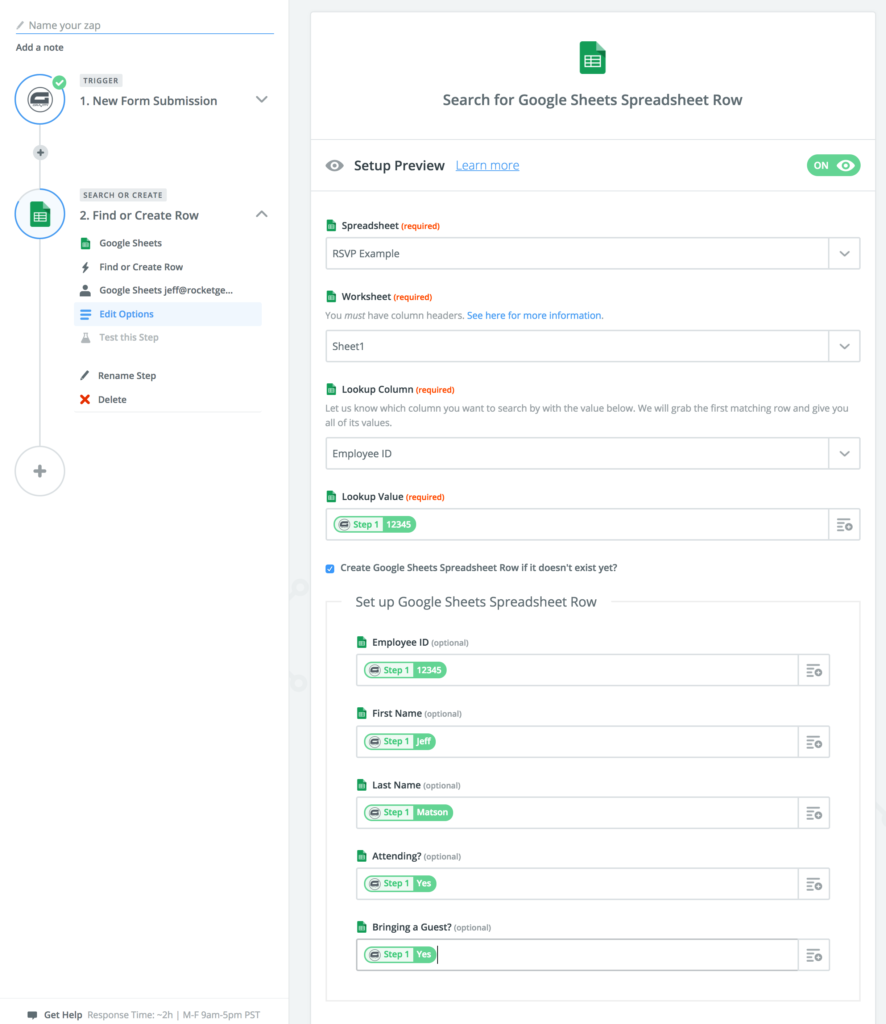
- In our example scenario, we want to add a new row to the spreadsheet if an ID can’t be found. To do that, just click the checkbox labeled Create Google Sheets Spreadsheet Row if it doesn’t exist yet. This will ensure that if the value can’t be found, it’ll create a new row on the spreadsheet.
- Finally, set up your row just as you normally would if you were adding a new row to Google Sheets.
Your final configuration should look something like this:
Finishing Up
If you had any actions previously configured to add new rows in your spreadsheet, you’ll want to remove them so that you don’t have any duplicates being created. After that, be sure to submit a few test submissions to make sure everything is working properly.
Are you doing something awesome with Gravity Forms and Google Sheets? Let us know in the comments below. We love seeing all of the great things our customers do with Gravity Forms!


