Written by Aaron Beashel from Attributer…
Have you ever looked at a lead you got from your website and wondered where they came from? Did they find you through your Facebook Ads? Or maybe through your SEO efforts?
It’s an important question to be asking. If you don’t know what marketing campaigns and channels are generating your leads and customers then you don’t know which one’s to invest more in to grow your business.
So how do you get this information?
The best way is to capture information about the source of every lead that completes one of your Gravity Forms and pass it through to your CRM and other backend tools. This will allow you to run reports that show you where your leads and customers come from (I.e. Organic search, Paid Search, Paid Social, etc) and ultimately make informed decisions about which campaigns and channels to invest in.
In this article, we’ll show you how to use Attributer to capture UTM parameters and other lead source in Gravity Forms and send them to your CRM and other tools so you can get the kind of reporting you need.
3 Steps for Capturing UTM Parameters & Other Lead Source Information in Gravity Forms
Using Attributer to capture UTM parameters and other lead source information is easy. Here’s how to do it in 3 simple steps…
1. Add the Attributer Code to your Website
After you sign up for an account, you’ll be given a small snippet of code that you need to add to your website.
Fortunately, WordPress makes this really easy to do and you have a few different options:
- Use your Theme Settings – Many popular WordPress themes and/or page builders, such as Elementor, Beaver Builder and Divi, have built-in options for adding code to your website. These tend to be in the Settings section of the theme/page builders you are using. As an example, Divi has the option to add code to your website in the ‘Integrations’ tab of its theme settings. All you need to do is copy the code from your Attributer account and paste it into the selected spot in your theme settings.
- Use a Plugin – If your WordPress theme doesn’t have an option to add code to the head of your website, then your next option is likely to use a plugin like Head & Footer Code. Once you’ve installed the plugin, you can simply paste the Attributer code into the section titled ‘Scripts in Header’ and click Save.
- Using Google Tag Manager – If you prefer to use a tool like Google Tag Manager to manage scripts on your site, then you can simply paste the Attributer code into a new Tag and it will be loaded onto your site.
2. Add Hidden Fields to your Forms
The next step is to add hidden fields to your Gravity Forms forms. As the name suggests, hidden fields are not visible to your website visitors but still exist on the form, meaning tools like Attributer can write information to them without anyone noticing.
Adding Hidden Fields to Gravity Forms is super easy. You can either drag and drop in the ‘Hidden Field’ field type (an option alongside all the other field types, such as single line text fields, dropdown fields, etc) or you can make an existing field hidden by selecting the ‘Hidden’ tickbox in the field’s properties.

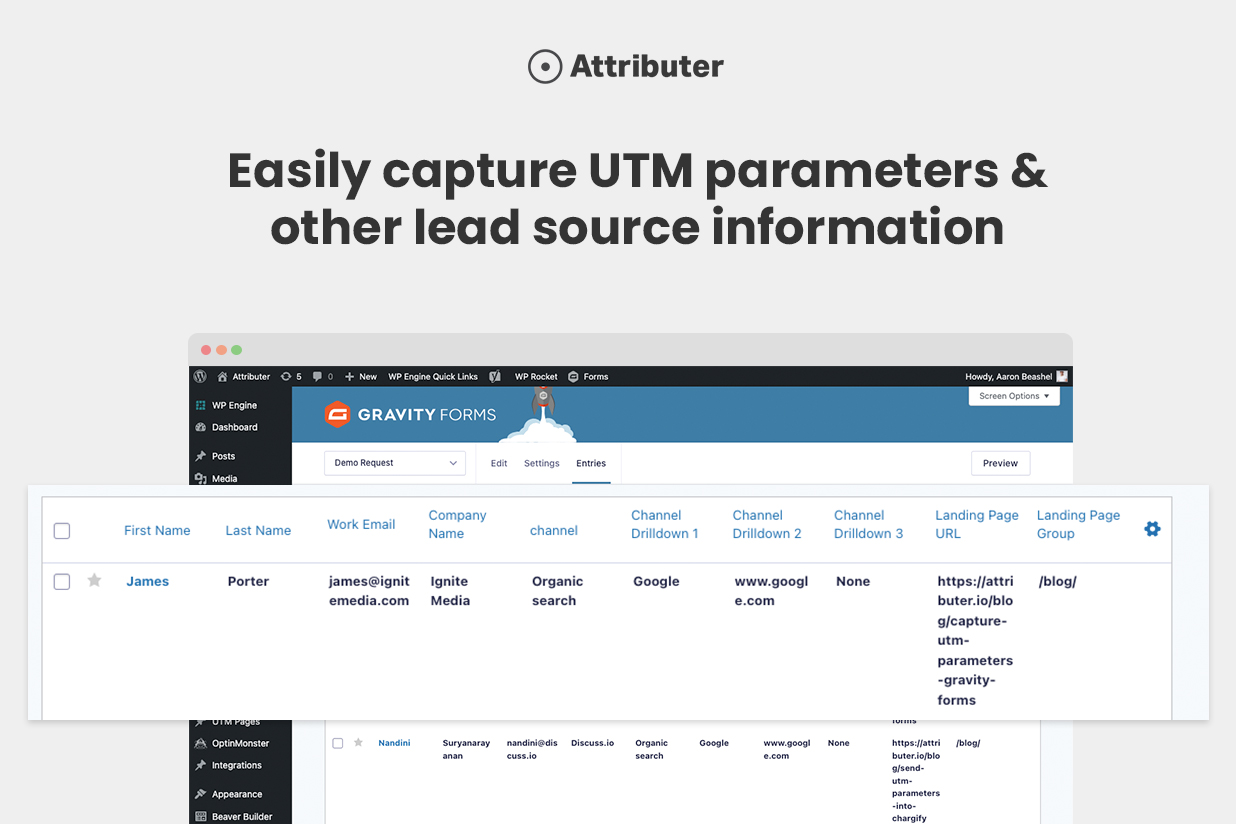
You’ll need to add the following 6x hidden fields to your forms:
- Channel
- Channel Drilldown 1
- Channel Drilldown 2
- Channel Drilldown 3
- Landing Page
- Landing Page Group
3. Attributer Completes the Hidden Fields with Lead Source Data
When a visitor arrives on your website, Attributer will look at a bunch of technical information about how they got there (including any UTM parameters present, the referring site, their device, etc) and categorize the visit into a number of different channels (I.e. Paid Search, Paid Social, Organic Search, Referral, etc).
It’ll then save that data into a cookie in the user’s browser and when they complete one of your Gravity Forms, it will write the lead source data into the hidden fields.
To illustrate, let’s use Dropbox as an example. If someone arrived at the site via a Google Ads campaign it might write something like this into the hidden fields (depending on what UTM parameters were used):
- Channel = Paid Search
- Channel Drilldown 1 = Google
- Channel Drilldown 2 = Brand Campaign
- Channel Drilldown 3 = Dropbox
Or if they arrived at the site by clicking on an organic search result, it might look like this:
- Channel = Organic Search
- Channel Drilldown 1 = Google
- Channel Drilldown 2 = www.google.co.uk
- Channel Drilldown 3 = Dropbox (or whatever keyword they searched for)
In addition, Attributer will also include the landing page information, which might look something like this:
- Landing Page = www.dropbox.com/features/share
- Landing Page Group = Features
4. Lead Source Information is Captured by Gravity Forms
Finally, when a site visitor submits a form the channel and landing page data is captured by Gravity Forms together with the lead’s name, email, phone number, and other information provided on the form.

Once the data is in Gravity Forms, you can then use Add Ons to send it to your CRM, email marketing tool, analytics platform and more to run reports and see which of your campaigns and channel is actually generating your leads and customers.
Why Using Attributer is Better than Capturing Raw UTM Parameters
As you likely know, it’s already possible to capture UTM parameters in your gravity forms using dynamic population, so why use a tool like Attributer?
Here’s why:
1. Captures All Traffic
The dynamic population feature only captures information on people who come to your website with UTM parameters attached, but Attributer on the other hand captures and passes through information on visitors regardless of what channel they came from.
So if you get a visitor from Organic Social, Organic Search, Direct, Referral, etc. Attributer will capture and pass through information on these leads as well.
What this means is that when you run reports in your CRM to check where your leads and customers originate from, you’ll be able to identify the source of ALL your leads, not just those from paid campaigns.
And this can be critical because if your SEO efforts are actually generating more leads and customers than your Facebook campaigns, you’re going to want to know that so you can invest accordingly.
2. Remembers the Data Across Pages
Most others tools and methods for capturing UTM parameters require the UTM parameter to actually be present on the page where the form is completed. This is a problem because the page they complete your form on may not be the same page they landed on from your ad.
As an example, imagine someone clicks one of your Google Ads and goes to a landing page you created for that campaign. Once they’re convinced your product or service is amazing, they click the ‘Get A Quote’ button and are taken to a different page to complete your quote request form. This would mean that the page they complete a form on is not the same page they originally landed on, so the UTM parameters are lost.
Attributer works differently though. It stores the UTM parameters in a cookie in the user’s browser, meaning that regardless of what page the user completes a form on the UTM parameters will always be passed through.
3. Provides Cleaner Data
One of the problems with using other tools that capture raw UTM parameters is that you can end up with messy data that makes it difficult to run accurate reports.
As an example, imagine some of your Twitter campaigns are tagged with UTM_Source=Twitter.com (capital T), others with UTM_Source=twitter (lowercase, no domain), and others with UTM_Source=tw. This seems strange, but is common if different people have managed your account over time.
If you were to pass this raw UTM data into your CRM and try to use it to see how many leads your Twitter campaigns have brought you, you’ll get three different sources that you would then have to manually stitch together.
With Attributer, you don’t have to deal with this though because it takes the possibility of capitalization and other inconsistencies into account, and would ascribe leads to the Paid Social channel regardless.
4. Captures Landing Page Data As Well
Ever wanted to know how many leads and customers come from your blog? Or those in-depth content pieces you spent hours writing?
Attributer not only captures UTM parameters and other channel data, but it also captures the landing page (I.e. attributer.io/blog/capture-utm-parameters) and the landing page category (I.e. /blog).
This means that you can see how well certain sections of your website are performing (I.e. your blog) in terms of generating leads, customers and revenue.
And because it captures both the landing page and the landing page group, you can look at how your blog is performing as a whole as well as what individual blog posts are driving the most leads, customers and revenue.
Example Reports you Can Run
To help you understand the kind of insights you could get from combining Attributer and Gravity Forms, we asked a real customer who uses both tools to share some of the reports they frequently look at.
1. Leads by Channel
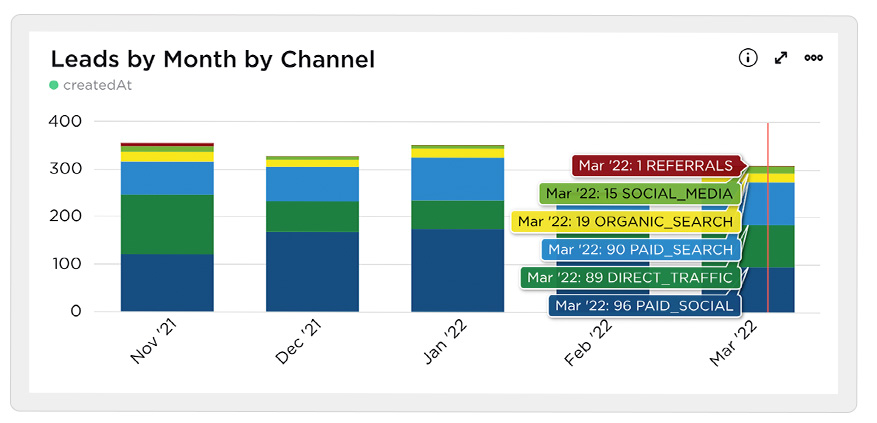
This report shows how many leads were generated each month broken down by the channel in which they arrived at the website.
When viewed over time like in the above graph, you can see not only the breakdown of leads by channel each month but you can see how that is changing over time (and by extension, how your different marketing activities are impacting the numbers).
2. Customers by Channel
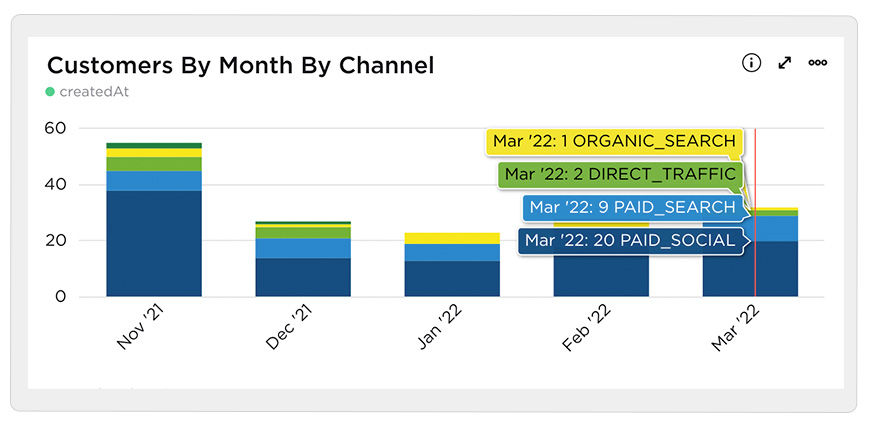
This report shows how many new customers were generated each month broken down by the channel they arrived at the website at.
It’s interesting to compare this graph to the Leads one and see that there are a number of channels that bring in Leads but never actually convert into Customers. This can be a sign that it’s not worth continuing to invest in those channels.
3. Revenue by Channel
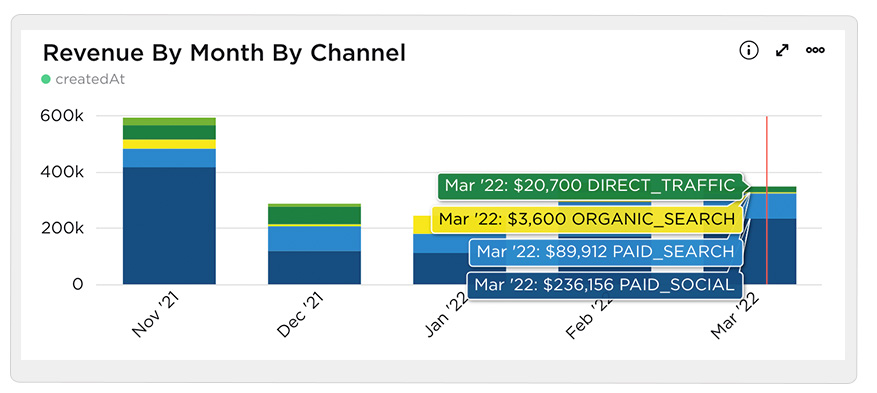
This report shows how much revenue was generated each month broken down by the channel the customer came from.
This report can be useful for measuring the overall ROI of your marketing efforts. For instance, in the above graph we can see that $236,156 in new revenue was closed from Paid Social ads in March. If the customer spent less than this on the ads, then it’s a positive ROI and worth continuing.
Wrap Up
As you can see, Attributer is a great add-on for Gravity Forms, enabling you to easily capture UTM parameters and other lead source information and pass it through to your CRM and other tools.
There’s a 14-day free trial so you try it out commitment-free, and the team is happy to answer any questions or jump on calls and help you get it all set up.
Check it out at attributer.io today!
Newsletter
If you want to keep up-to-date with what’s happening on the blog sign up for the Gravity Forms newsletter!
"*" indicates required fields