
Enabling user registrations on your website might be a necessity for multiple reasons. However, the default WordPress registration forms leave a lot to be desired, not to mention they’re not branded so won’t match the rest of your site.
Luckily, with Gravity Forms and our User Registration Add-On, you can easily create custom registration forms and register users on your WordPress website.
In this post, we’ll discuss the benefits of registering users on your WordPress website, the top features of the User Registration Add-On, and how to set it up on your site.
Let’s get started…
User Registration: An Intro

User Registration, in conjunction with Gravity Forms, allows you to easily create registration forms and register users on your WordPress website. It is currently available with the Gravity Forms Elite license.
Here are a few examples of how the User Registration Add-On can be best used…
- Service providers can use the add-on to allow clients to register for an account and access their client portal.
- Business owners can allow user registrations for employees or customer support agents that need access to various backend information from your site. This is also useful if you have a support section or company wiki on your website.
- If you sell courses or digital products, you can use the add-on to allow customers to register in order to access their content.
- Content creators or online magazines can allow registrations for contributors, content editors, and subscribers.
- You can create a membership site or private member areas on your site.
Custom Registration Forms
Benefits of creating a custom registration form on your site include:
- More customization — you can ask for as many details as you want in your registration forms. For example, you could include a field that asks users for a link to their website, their birthday or their social media profiles.
- Extra security — you can set the form to require manual account activation by the user. This results in fewer spam registrations and keeps your site secure.
- Allow registration only if certain conditions are met — you can set your form to allow for registration and creation of new users only if they fulfil conditions set by you. For example, you can enable new user creation only if the signup source is a specific page on your site.
User Registration: Top Features
Now that we’ve covered who can benefit from using the User Registration Add-On, let’s go over the top features that it offers.
Register Users on Your WordPress Website
With the Gravity Forms User Registration Add-On you can quickly and easily register users on your WordPress website on form submission. Once installed, this add-on can work with any form – new or existing – simply add the User Registration fields to a form and configure the settings.
Integration With Other Add-Ons
The User Registration Add-On works nicely with other Gravity Forms Add-Ons. For example, you can pair the User Registration Add-On with an email marketing Add-On to add new users to your email list.
Take Payments When People Register
You can use a payment Add-On, like Stripe, to accept payments or set up a recurring subscription when people complete the registration form – this is a great option if you want to do something like create a membership site, or offer premium restricted content.
All it takes is installing the Stripe Add-On and configuring the settings. For more details on Stripe, and how easily it is to integrate with your forms, check out the Gravity Forms documentation.
Add a Login Widget Anywhere On Your Site
Not only can you add a registration form to any page on your website, the User Registration Add-On also contains a widget that allows users to log in from the front-end of your site.
You can add the widget to any widgetized area on your website such as a sidebar or footer, making logging in a quick and simple process for your users.
Multisite Creation
You can also use the User Registration Add-On to automatically create a new site when a new user is registered. This is useful if you want to create a multisite network and eliminate the need to manually create a new site for each user.
BuddyPress Integration
Gravity Forms integrates with BuddyPress. This means you can use these two plugins to create a full-featured membership site with rich user profiles. Once you connect the two, information from your registration form fields will populate the profile fields in BuddyPress.
How To Set Up User Registration On Your Site
Setting up registration forms and registering users on your site with Gravity Forms and the User Registration Add-On is easy. All it takes is four steps. Let’s go through them below…
1. Install Gravity Forms
The first step is to install Gravity Forms on your website. You’ll need an Elite license to access the User Registration Add-On, so be sure to select the right license.
Once you’ve purchased your license, download the plugin to your computer.
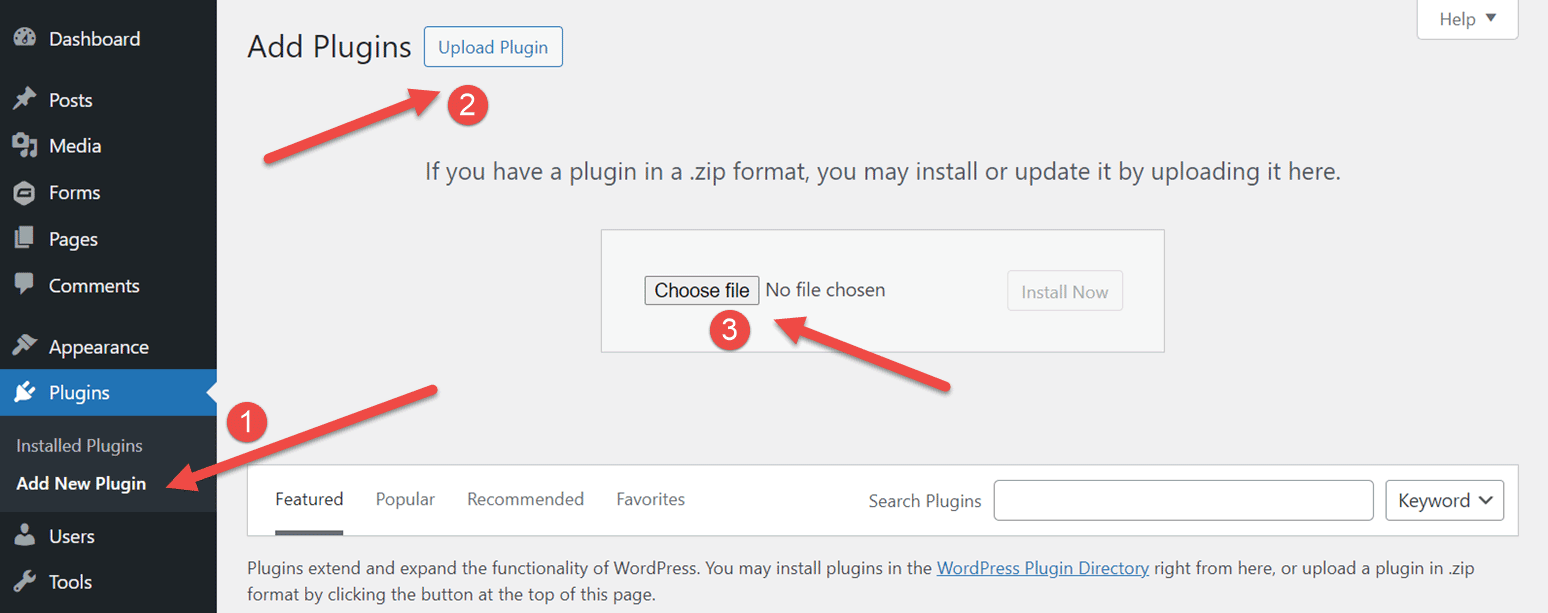
Log into your WordPress dashboard and click Plugins > Add New Plugin from the sidebar menu. Then click on Upload Plugin. On the next screen, click the Choose file button and locate the file you downloaded.
Then click the Install button followed by the Activate button. Next, follow the instructions to register the plugin.
For more information on how to get started with our plugin, check out this video tutorial – How to Install Gravity Forms on Your WordPress Website.
2. Install the User Registration Add-On
The next step is to install the User Registration Add-On for Gravity Forms, which will add the necessary functionality to the plugin.
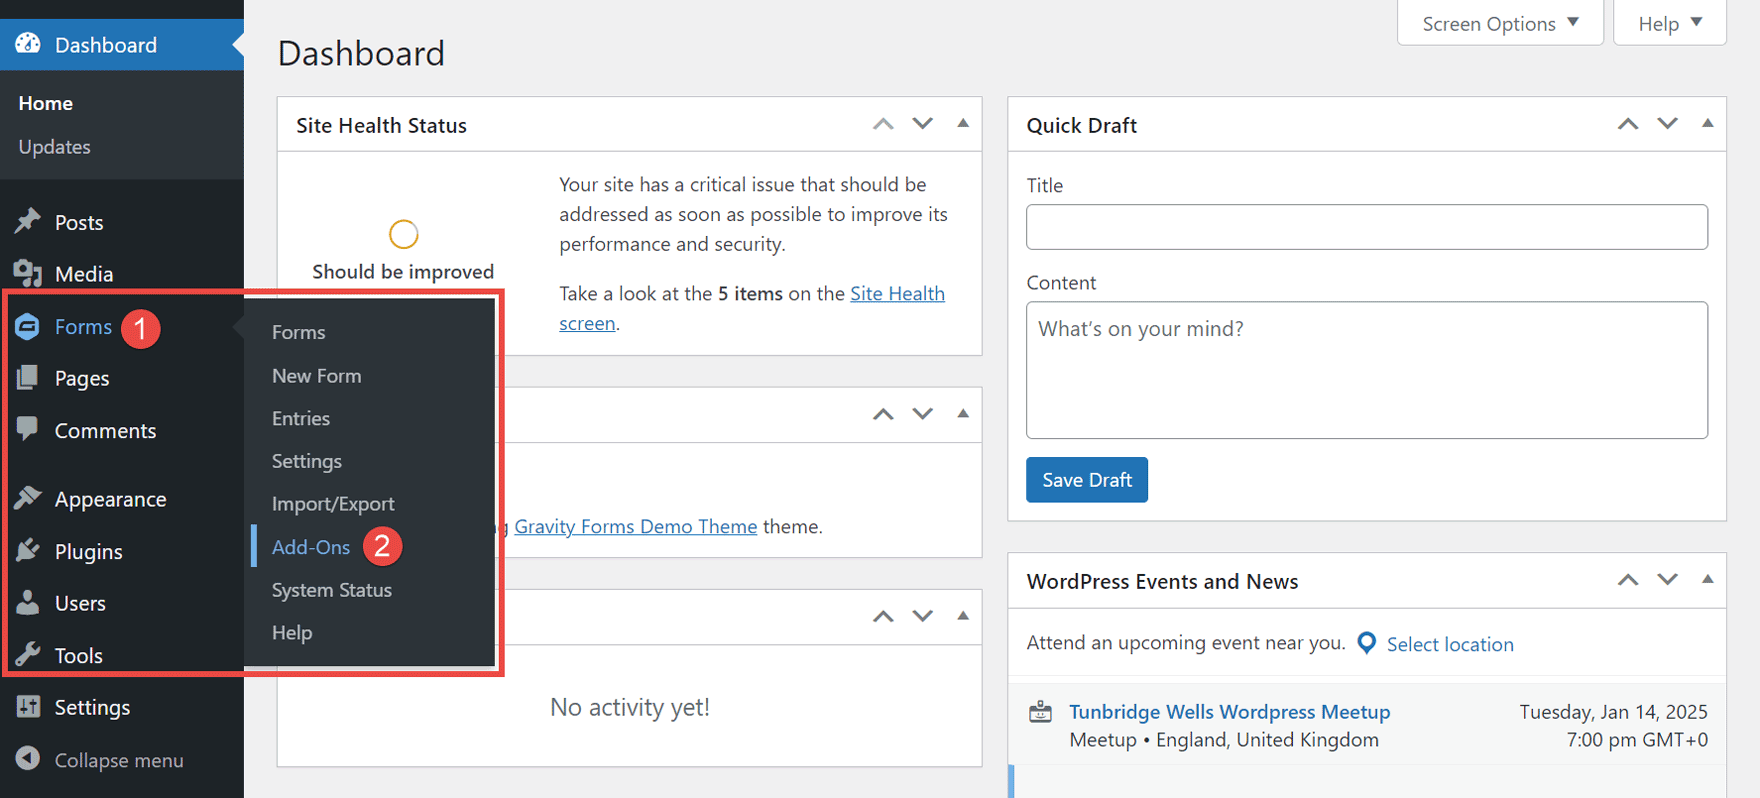
To do so, go to the Gravity Forms Add-On browser by clicking Forms > Add-Ons from the sidebar menu.
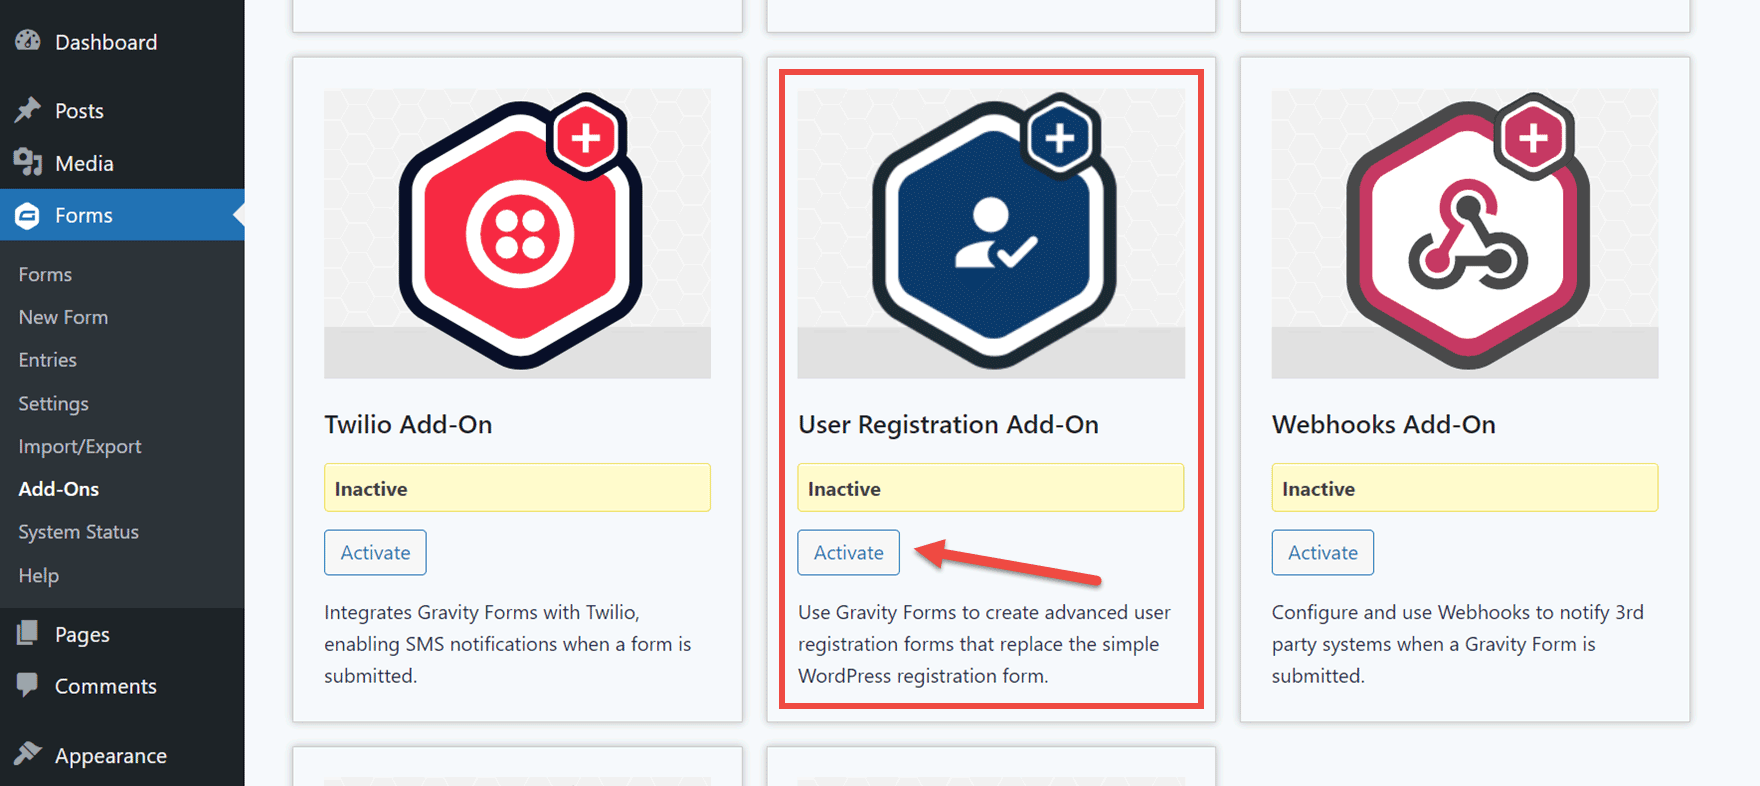
From the Add-On Browser, locate the User Registration Add-On and click the Activate button.
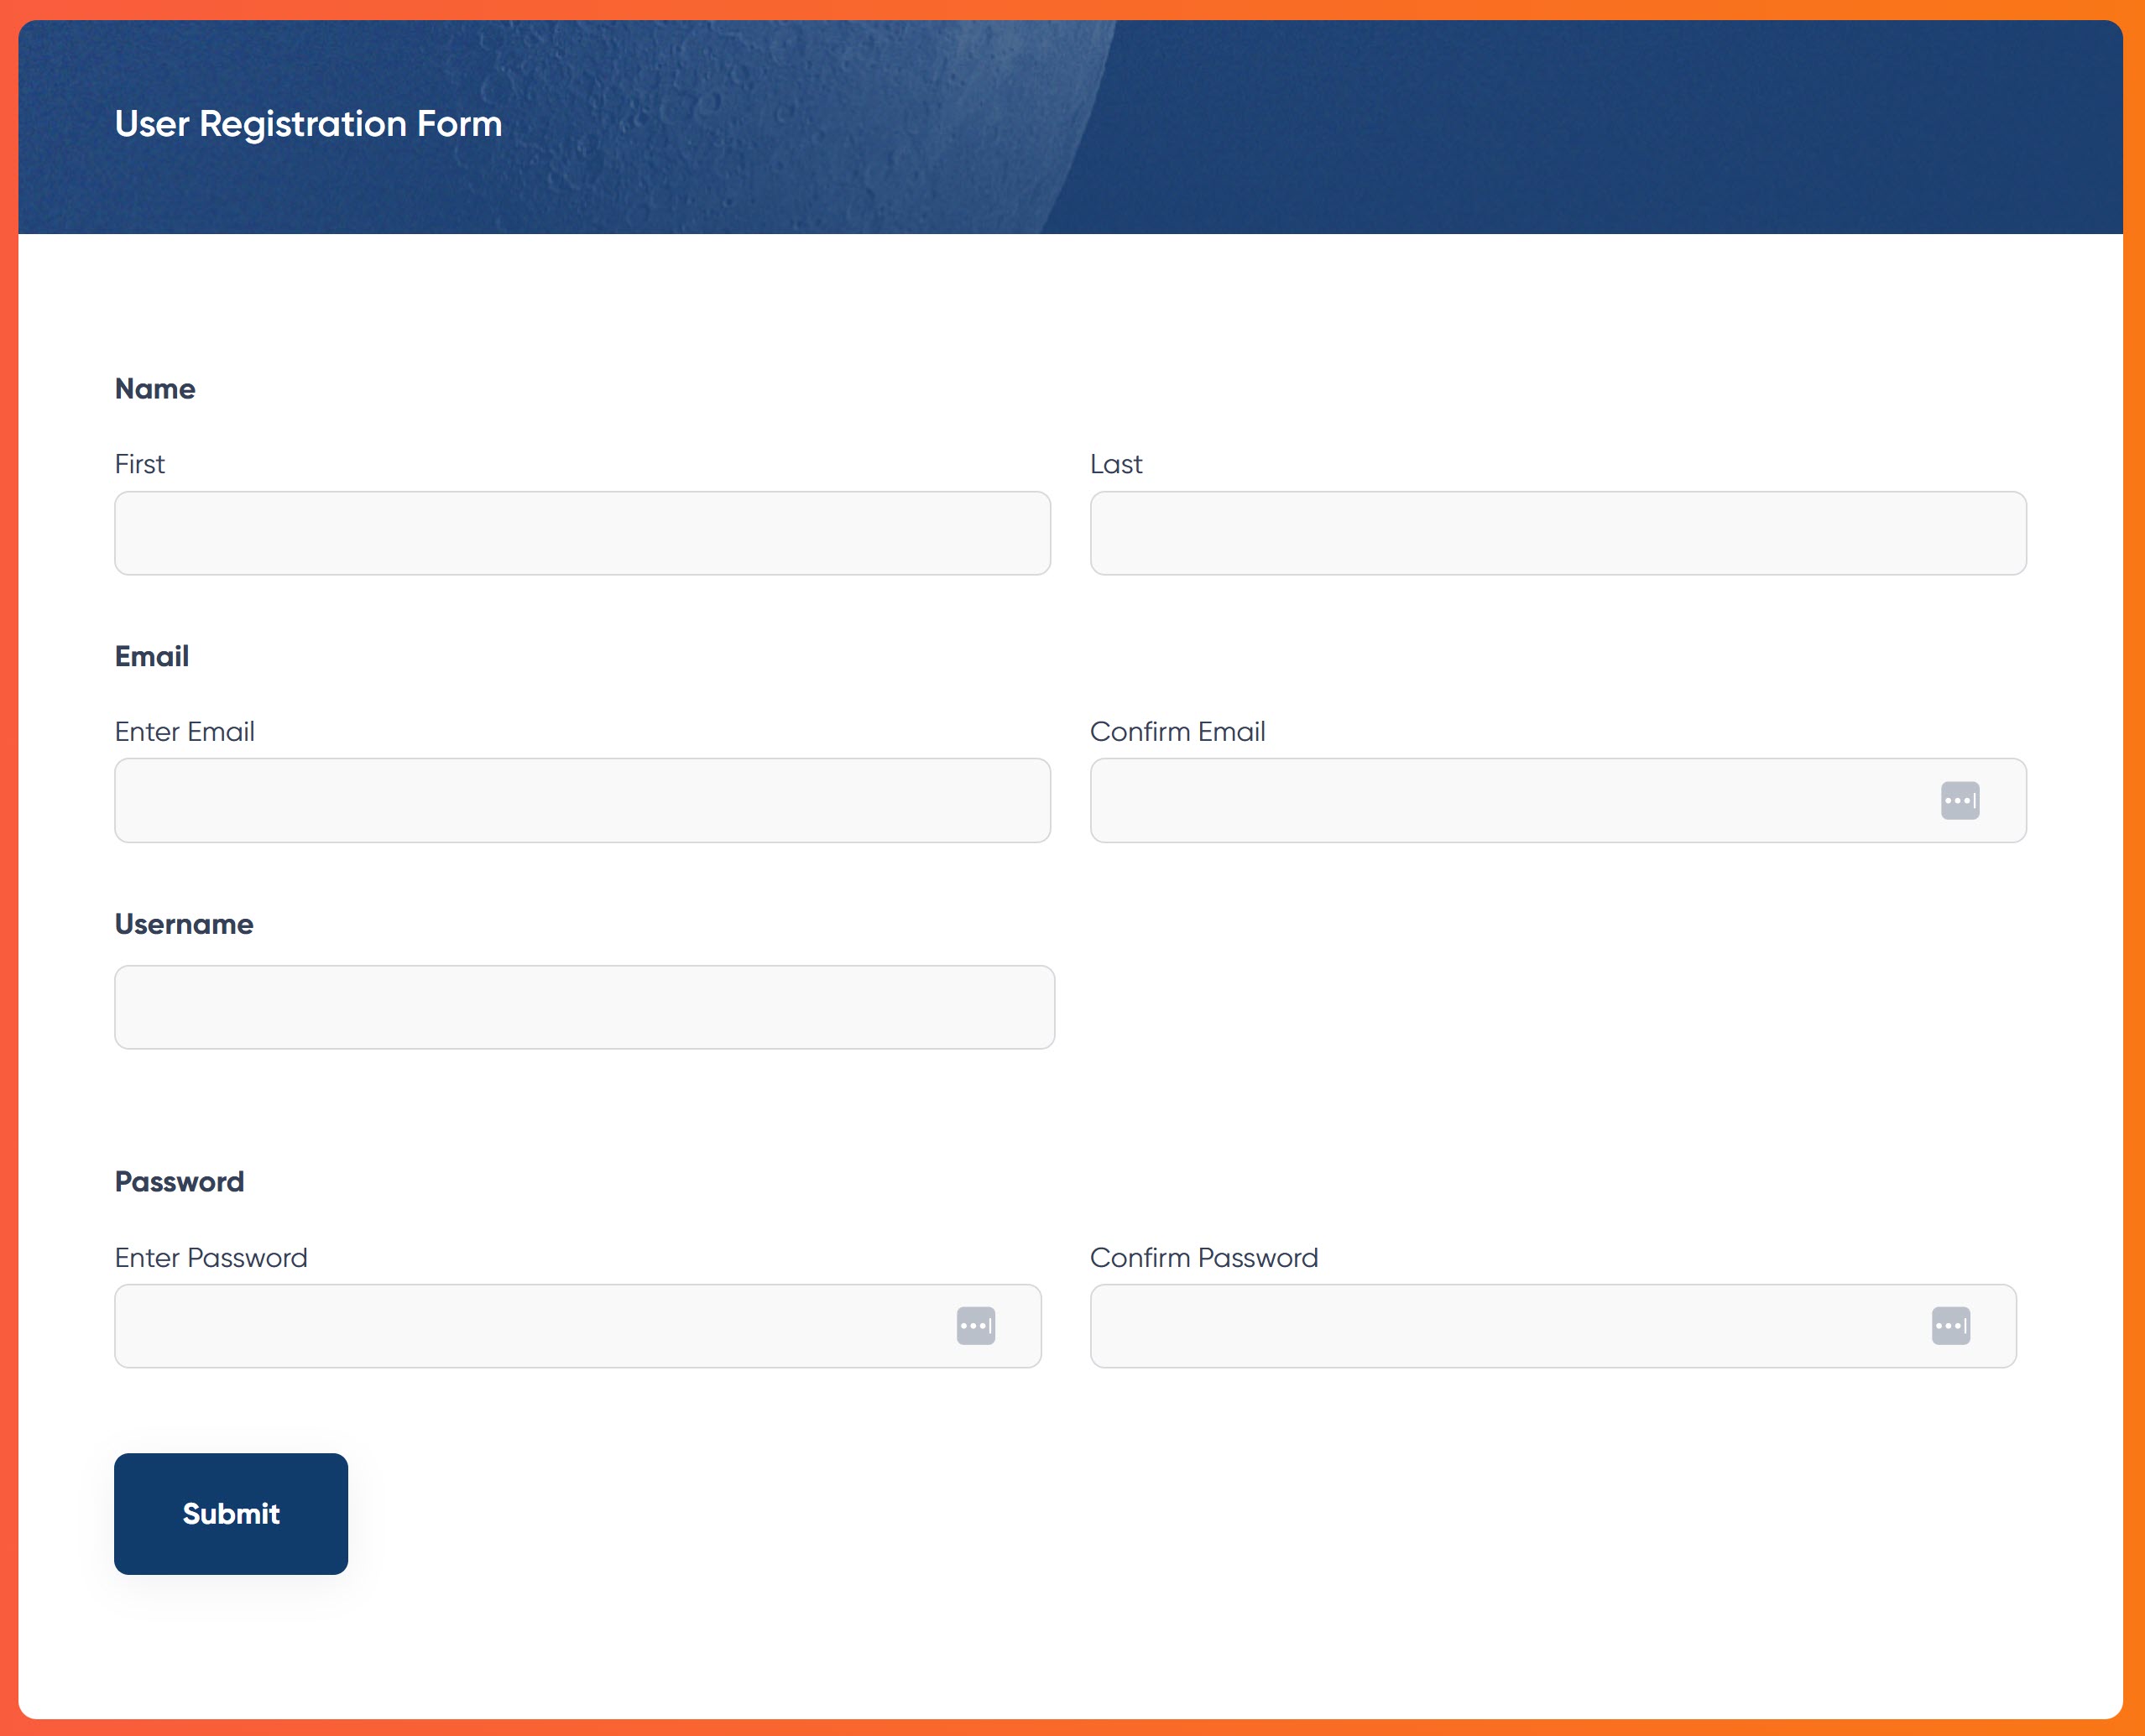
3. Create the User Registration Form
There’s an extensive library of editable templates for Gravity Forms, including a User Registration form template, to save you time. To quickly create a user registration form for your site using the template, click Forms > New Form from the sidebar menu.
From the template library, find the User Registration Form option and click the Use Template button.
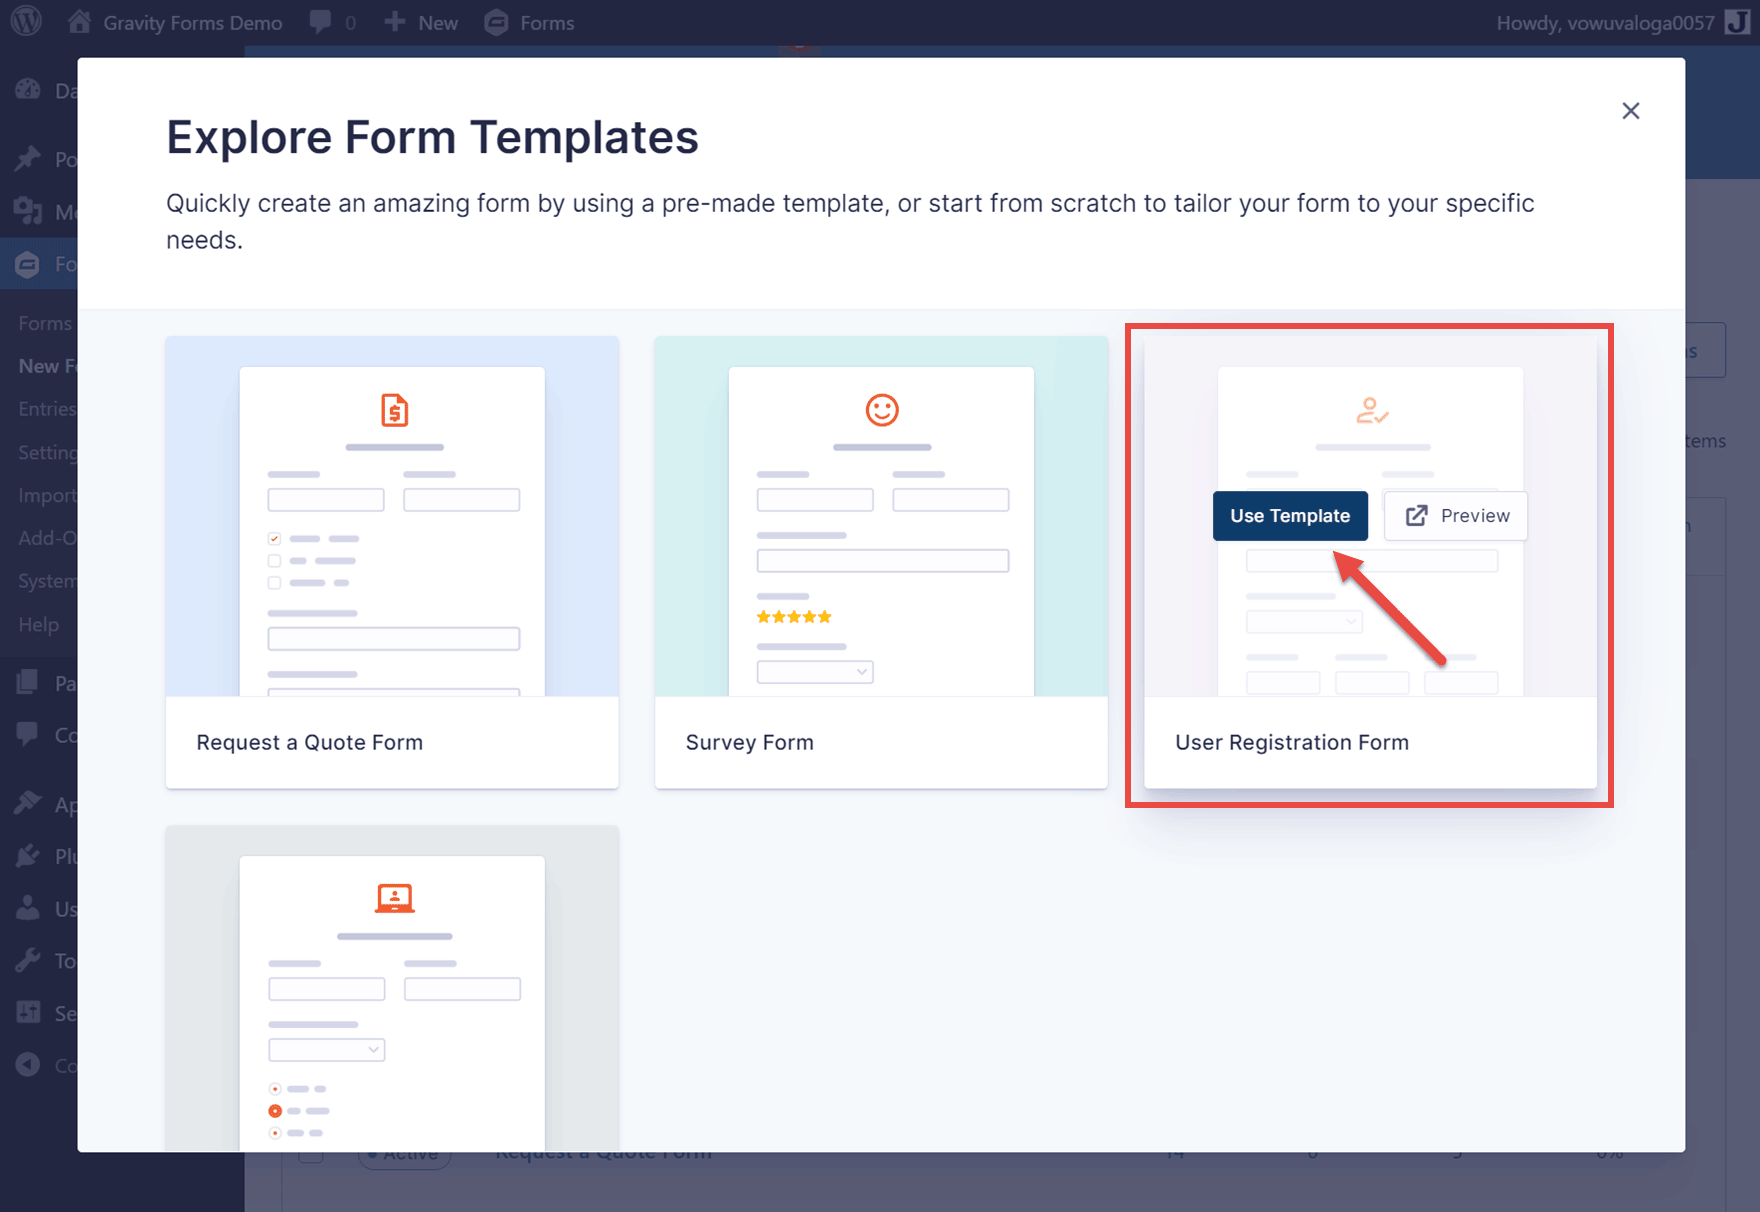
On the next screen, give the form a title and optional description, then click the Use Template button.
The Gravity Forms form editor will then be displayed, and the template you chose will be loaded.
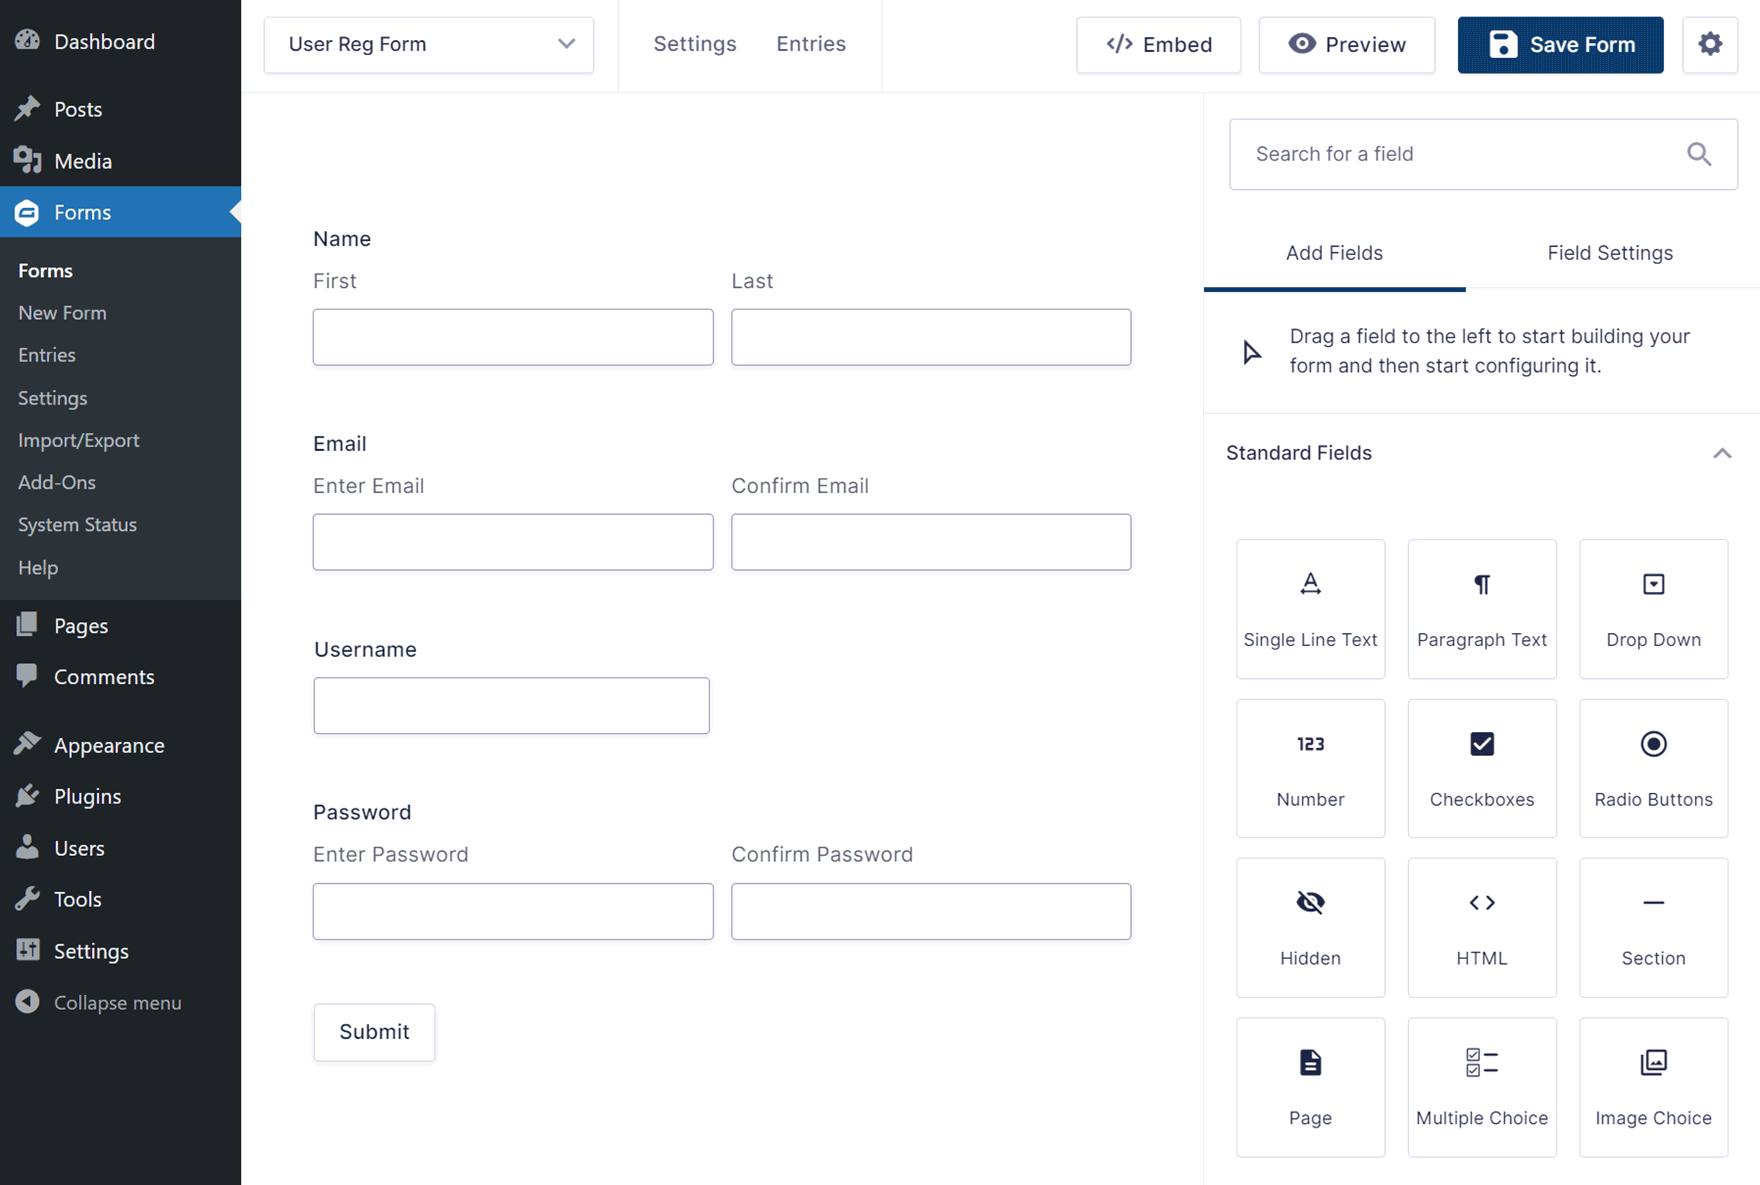
You can use the form as is, or customize it by adding and removing fields and making other changes. Our guide to creating a form covers how to use the Gravity Forms editor.
4. Create a Form Feed
Next, you will need to create a User Registration Form Feed – this will enable the User Registration Add-On to register new WordPress users on form submission automatically.
To create the feed, click on Settings at the top of the form editor and then click User Registration from the down-down menu.
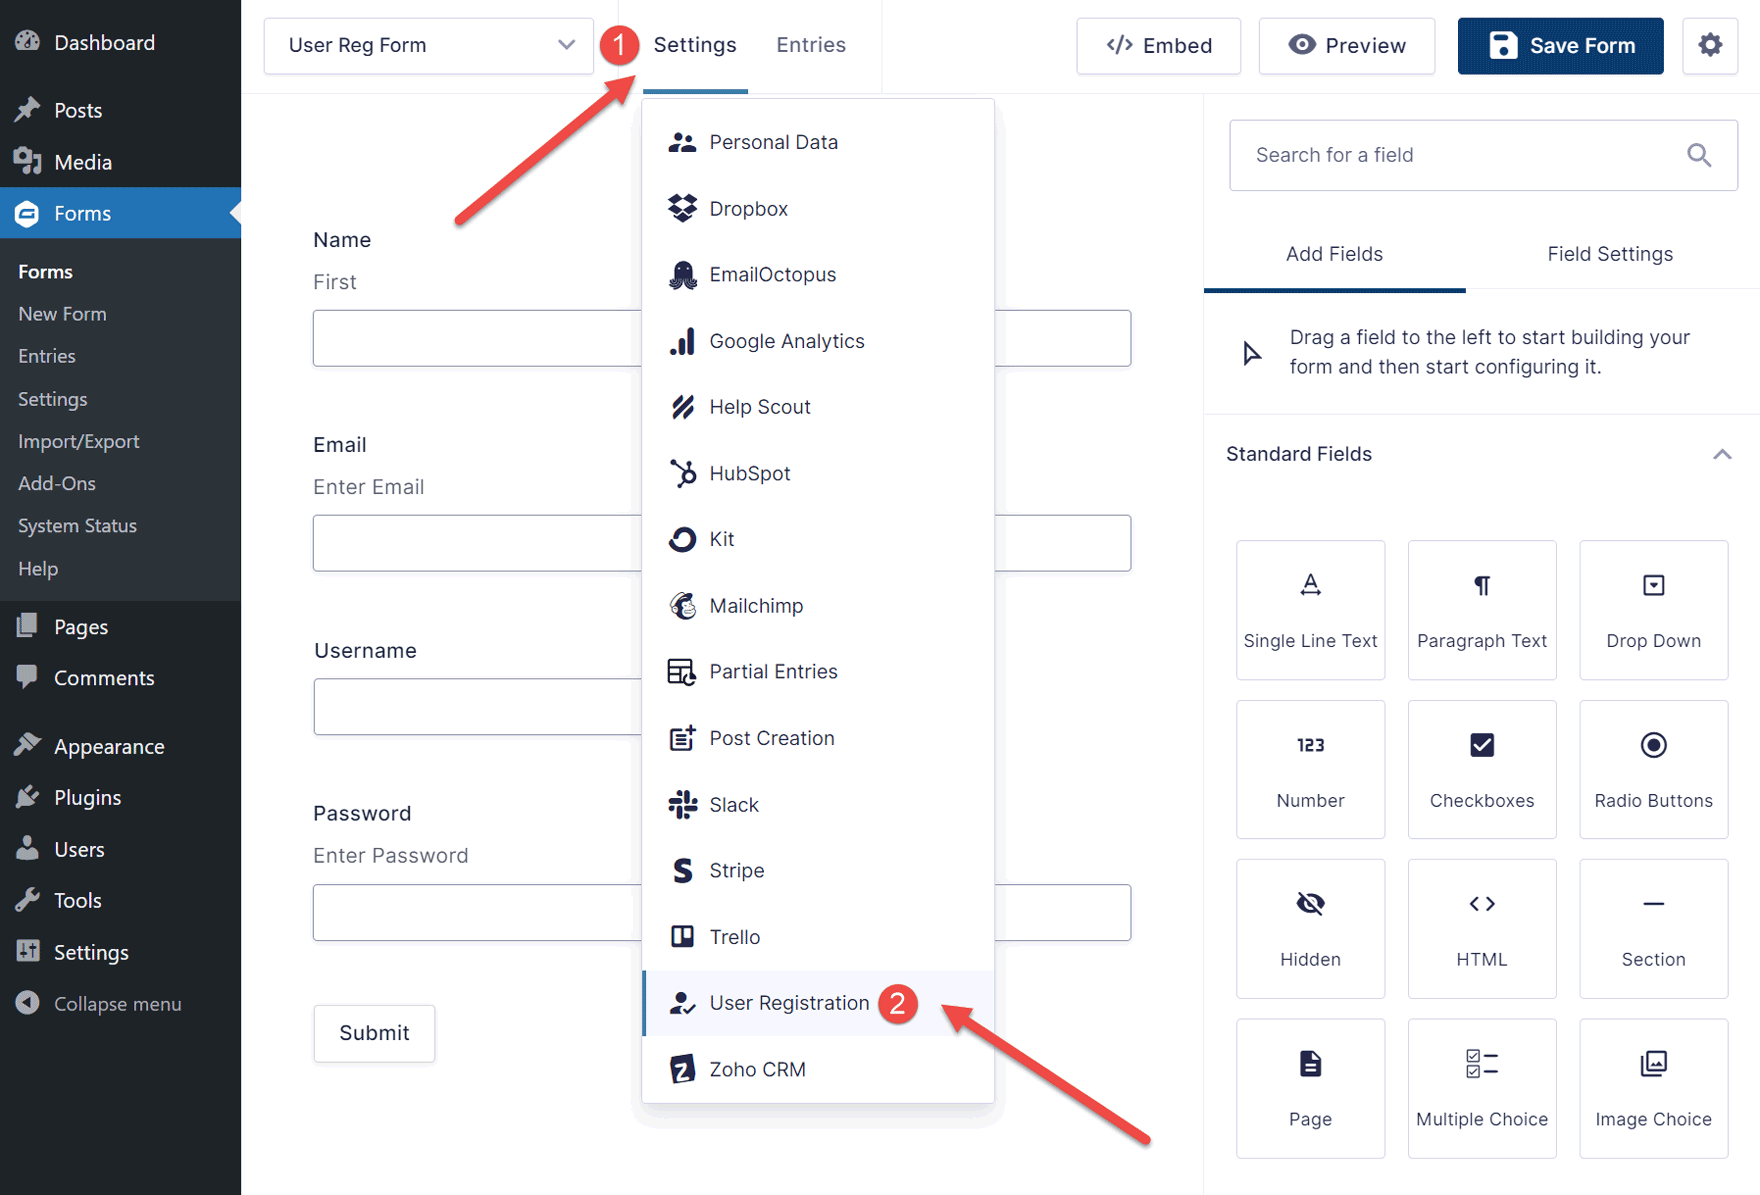
Next, click the Add New button.
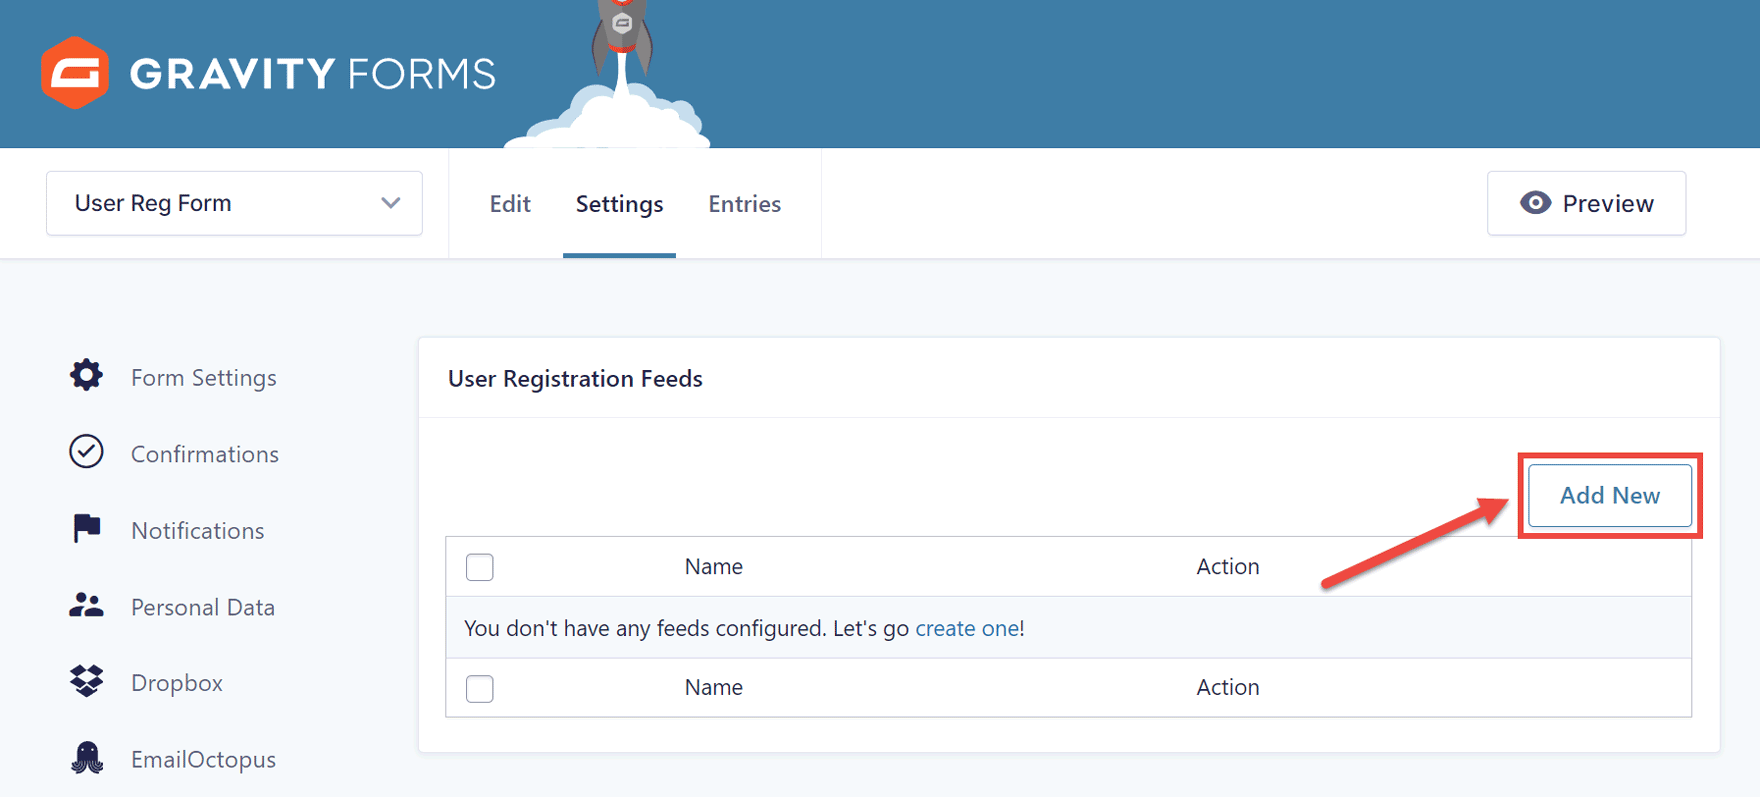
You can now give the feed a name and select the option to create a new user. Keep in mind that if you want to allow users to update their profile information, you’ll need to create a separate form for that, as the same form cannot be used to both create and update user details.
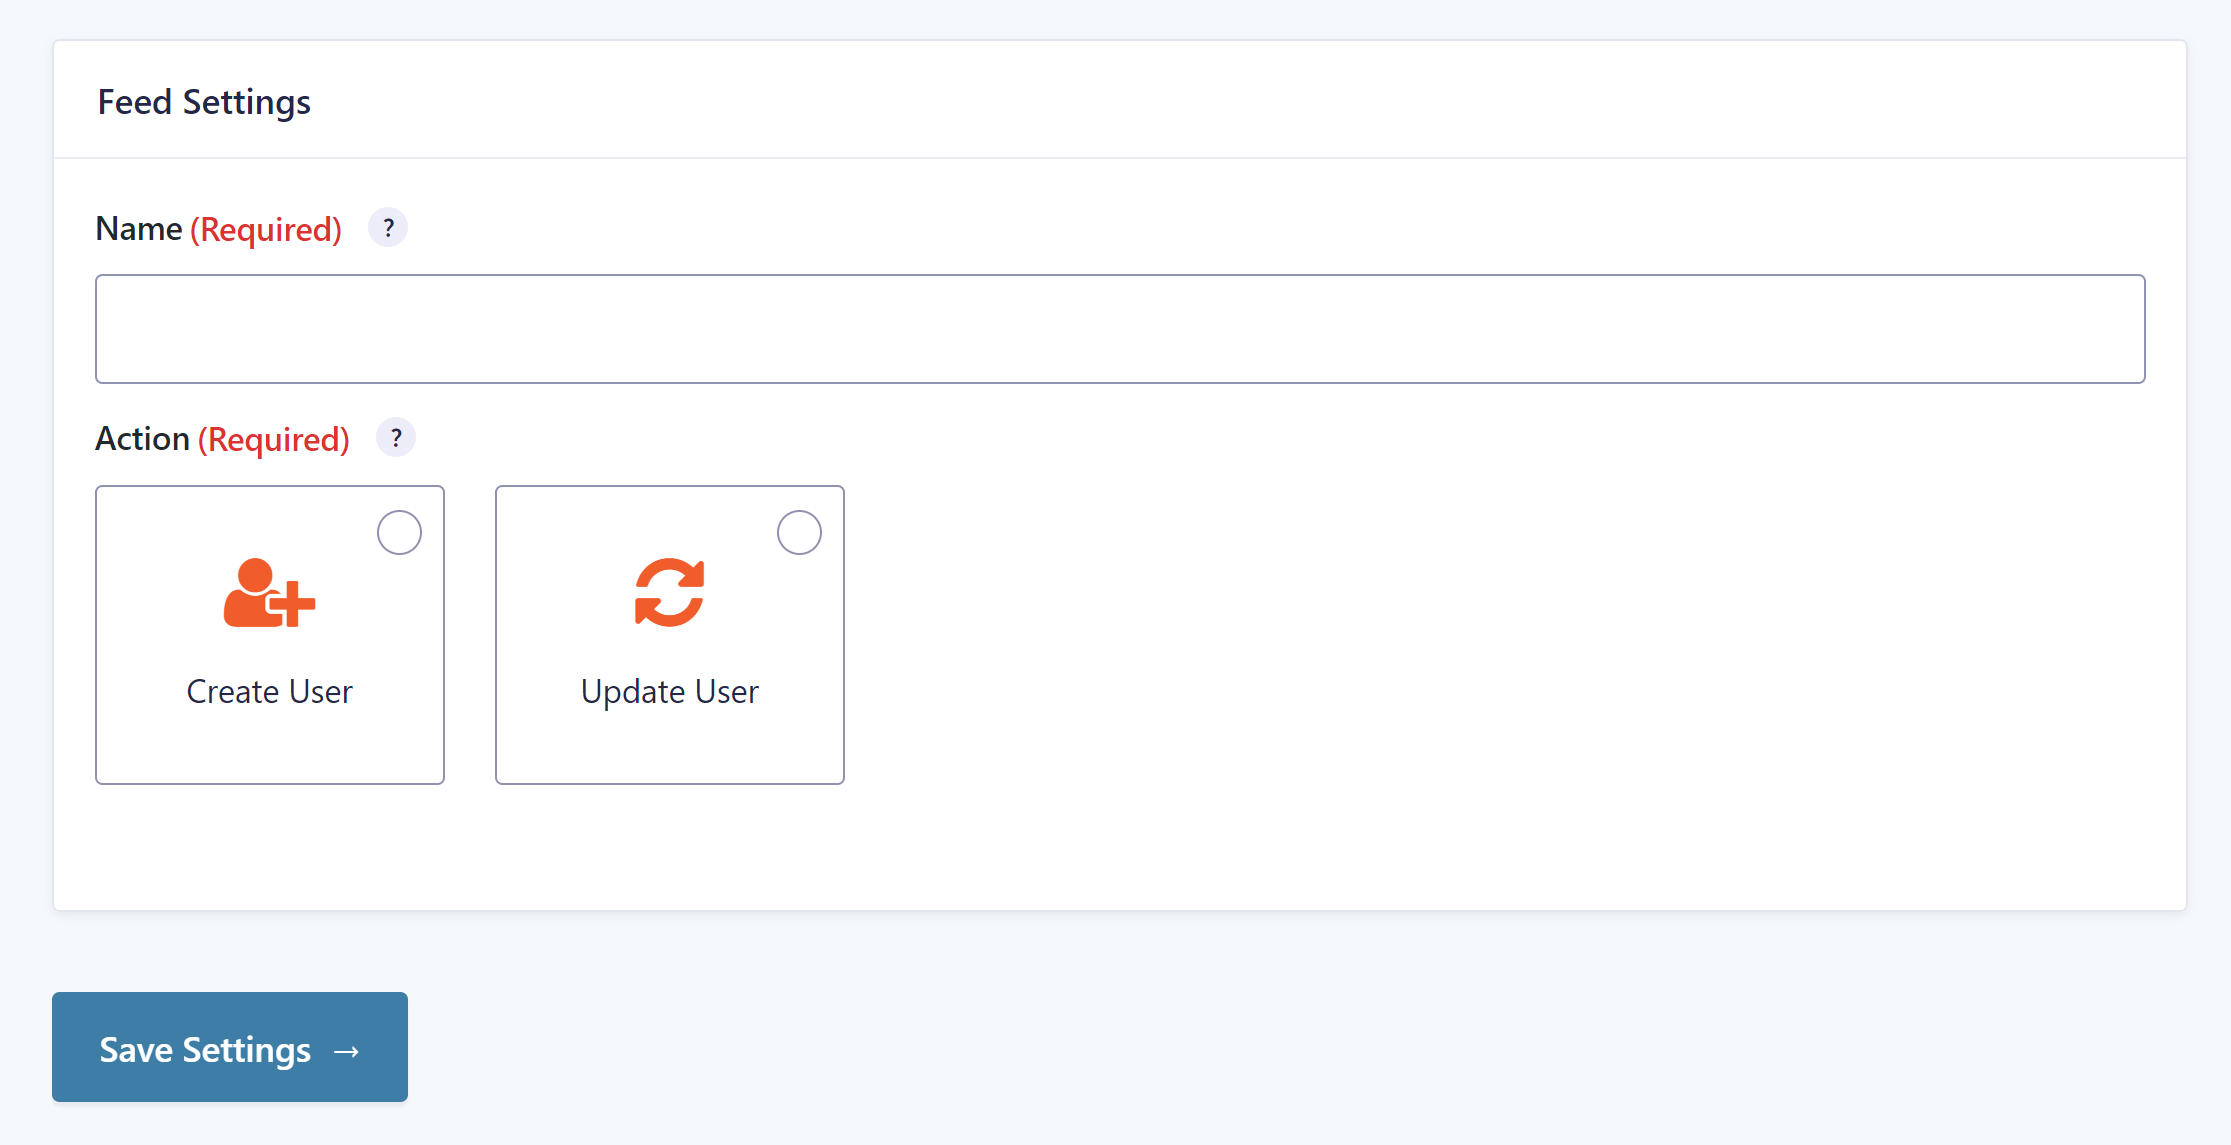
You’ll then have the option to map the form fields to user information and select a user role. It is important to note that the User Registration Add-On does not automatically create Roles and Capabilities in WordPress, nor does it provide any form of content restriction on your website. We recommend Members or User Role Editor if you need to create and manage Roles and Capabilities and restrict content on particular pages or posts.
Within the form feed, you can also enable registration conditions and user activation to reduce the chances of spam registrations, as well as select the option to send new users an email about their account. When you’re done configuring the feed, click on Update Settings.
5. Embed and Publish Your Form
Your user registration form is now complete.
To embed your form in any page or post you can use the Gravity Forms block in the Gutenberg editor (recommended) or add the shortcode in the Classic Editor. Read our guide on Adding a Form to Your Site to help you with this.
If you are using Gutenberg, you’ll find styling options built into the Gravity Forms block. For more information on how to style your forms, check out this ultimate guide – How to Style Forms in Gravity Forms.
Don’t forget to test it out to see if it’s working, then when you’re happy, publish your form.
Additional Step: Add a Login Form to Your Website
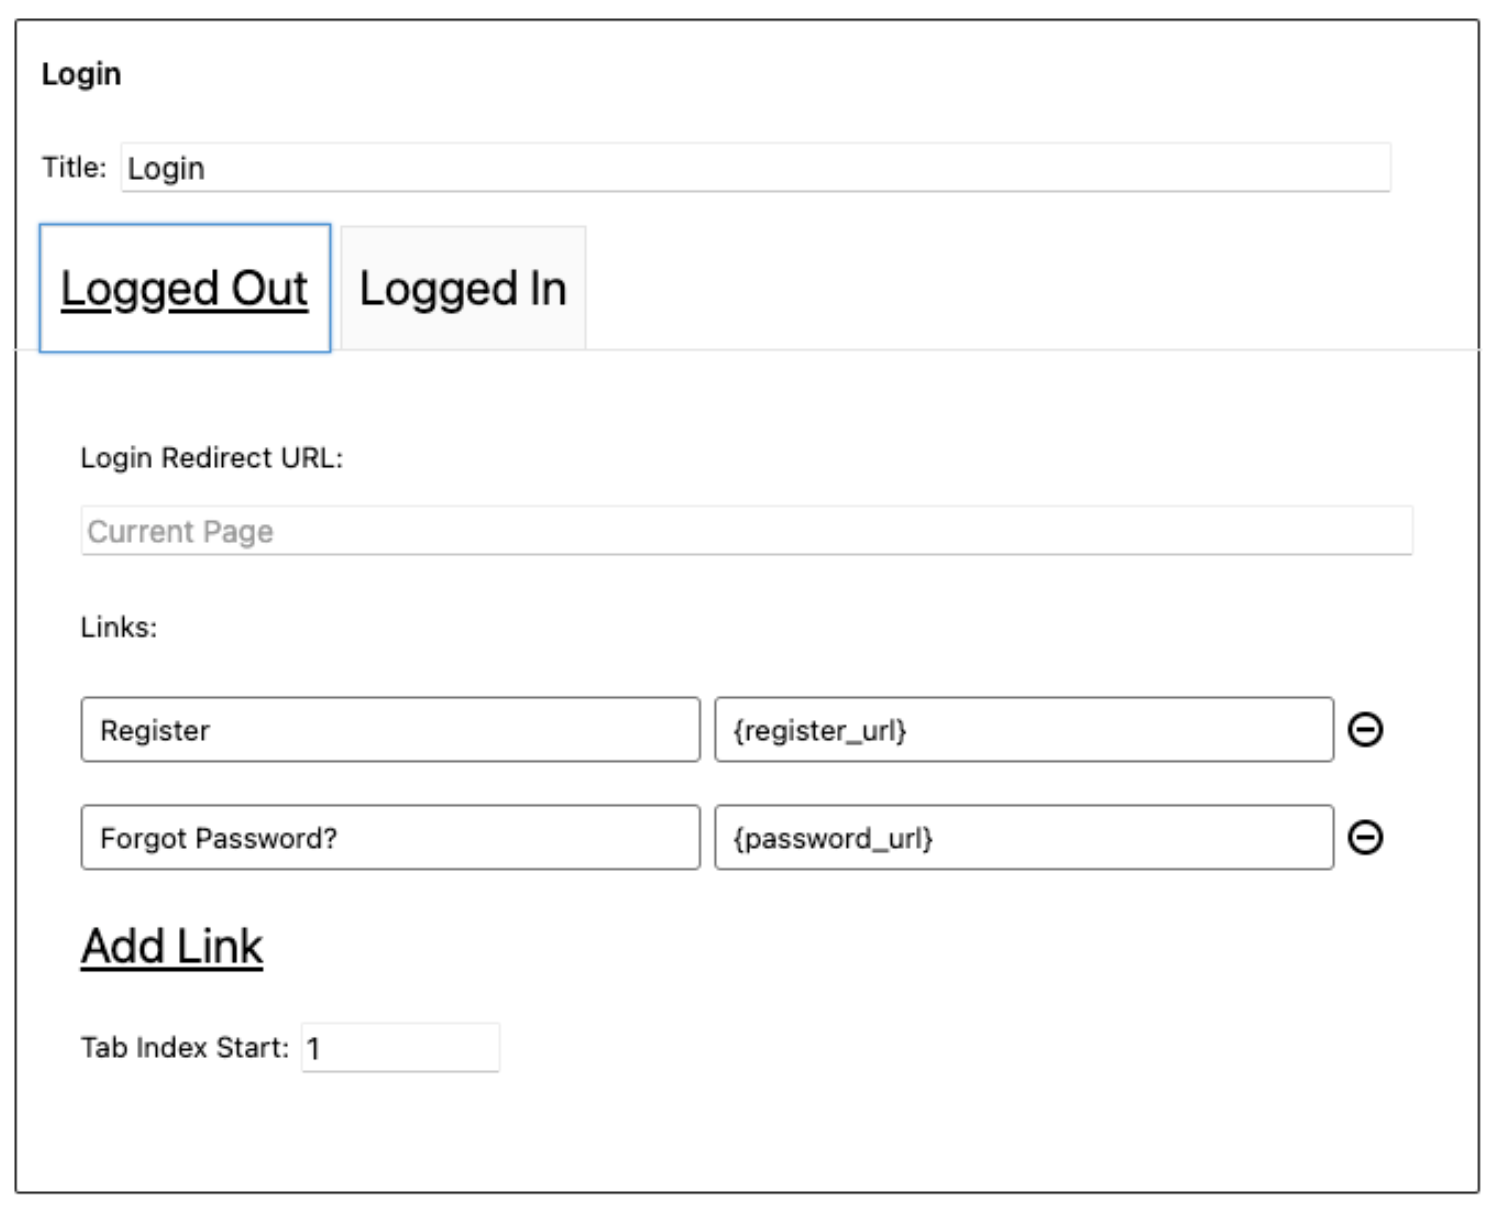
Creating new WordPress users on the front end of your site isn’t very useful if visitors can’t log in. To facilitate this, the User Registration Add-On allows you to embed a user login form on your site using the Login widget.
To find out how to do this, take a look at the User Registration Login Widget documentation.
Ready to Accept User Registrations on your Website?
As you can see, registering users on your WordPress website with Gravity Forms is easy. If you’re looking to learn more about creating user registration forms, these resources might help you:
- Gravity Forms Documentation – User Registration Add-On
- Starter Guide: How to Set Up User Registration on Your WordPress Site
- How to Create a Membership Site with Gravity Forms (and Gravity Wiz)
Don’t have Gravity Forms yet? No worries! Sign up for a free demo and explore all the features that Gravity Forms has to offer – find out how easy it is to build a form with our drag-and-drop form editor, and take advantage of our powerful add-ons to extend the functionality of your forms.
Newsletter
If you want to keep up-to-date with what’s happening on the blog sign up for the Gravity Forms newsletter!
"*" indicates required fields