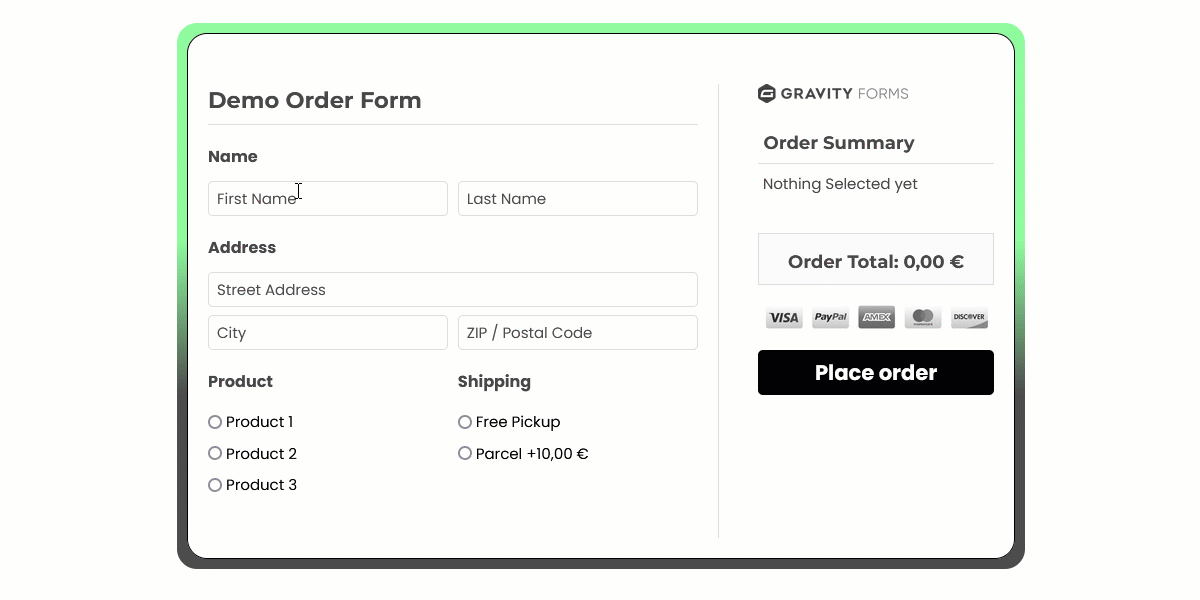
Live Summary for Gravity Forms adds an order summary next to any form. As users complete the form, their selections or entries are displayed inside a summary – automatically and in real-time.
The internet is all about the user, right? It’s a major product design principle – making every page and every action simple and clear. With competition so high in the digital space, it’s really important (and also really engaging) when you give users visibility and feedback over every action they take.
By placing summaries next to your order forms, the Live Summary Add-On helps create a better user-centric experience.
So, let’s say you’re running an eCommerce site. It’s a really simple way to let buyers see what products they’re buying. Or, perhaps, your form is spread across multiple pages, and you need to give users a quick overview of their previous steps as they progress. Live Summary lets you do that, too.
Getting Started with the Live Summary Add-On
There are currently four main sections to the Live Summary plugin:
- Title
- Summary
- Total
- Form Container
Live Summary features a free and pro version, which offers more options and customizations for your forms.
Built on the official Gravity Forms Add-On framework, the plugin supports conditional logic and most field types, including drop-downs, checkboxes, radio buttons, any product type, and shipping. You can find the full list on the WordPress plugins page. All Gravity Forms currencies are also supported and can be shown in the total section of the summary.
You can try it out on the Live Summary demo page.
The plugin is really easy to get set up, too. Let’s take a look…
How to Use Live Summary for Free
After installing and activating the add-on following normal WordPress procedures (Plugins > Add New), select Forms from the WordPress menu. Find the form you want to activate the summary for, hover over the form name and you’ll see a series of options, including Settings. Click on this, and on the next screen, click on GF Summary Add-On.
You should see something like this:
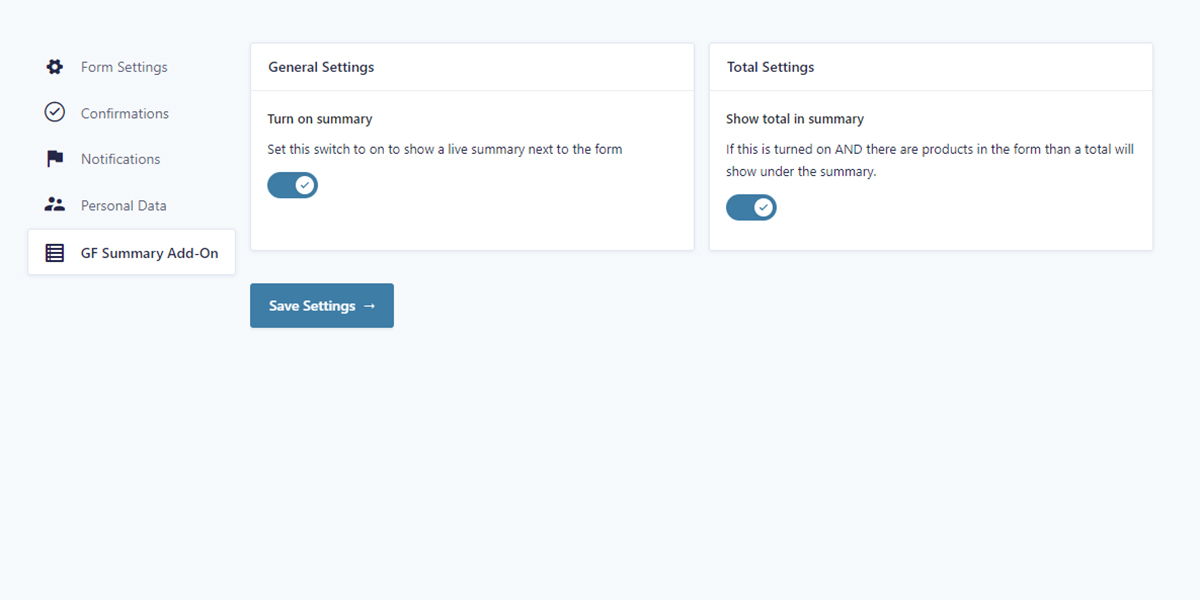
The free version of the Live Summary Add-On offers two options:
Under General Settings, toggle Turn on Summary to on.
- This setting activates the plugin, so it’ll show next to the appropriate form.
Under Total Settings, toggle Show Total in Summary to on.
- With this setting active, the order total will display – so long as there is a product field present in the form.
Once you’re done, click Save Settings to continue. The live order summary will now appear on your site, but won’t show anything yet.
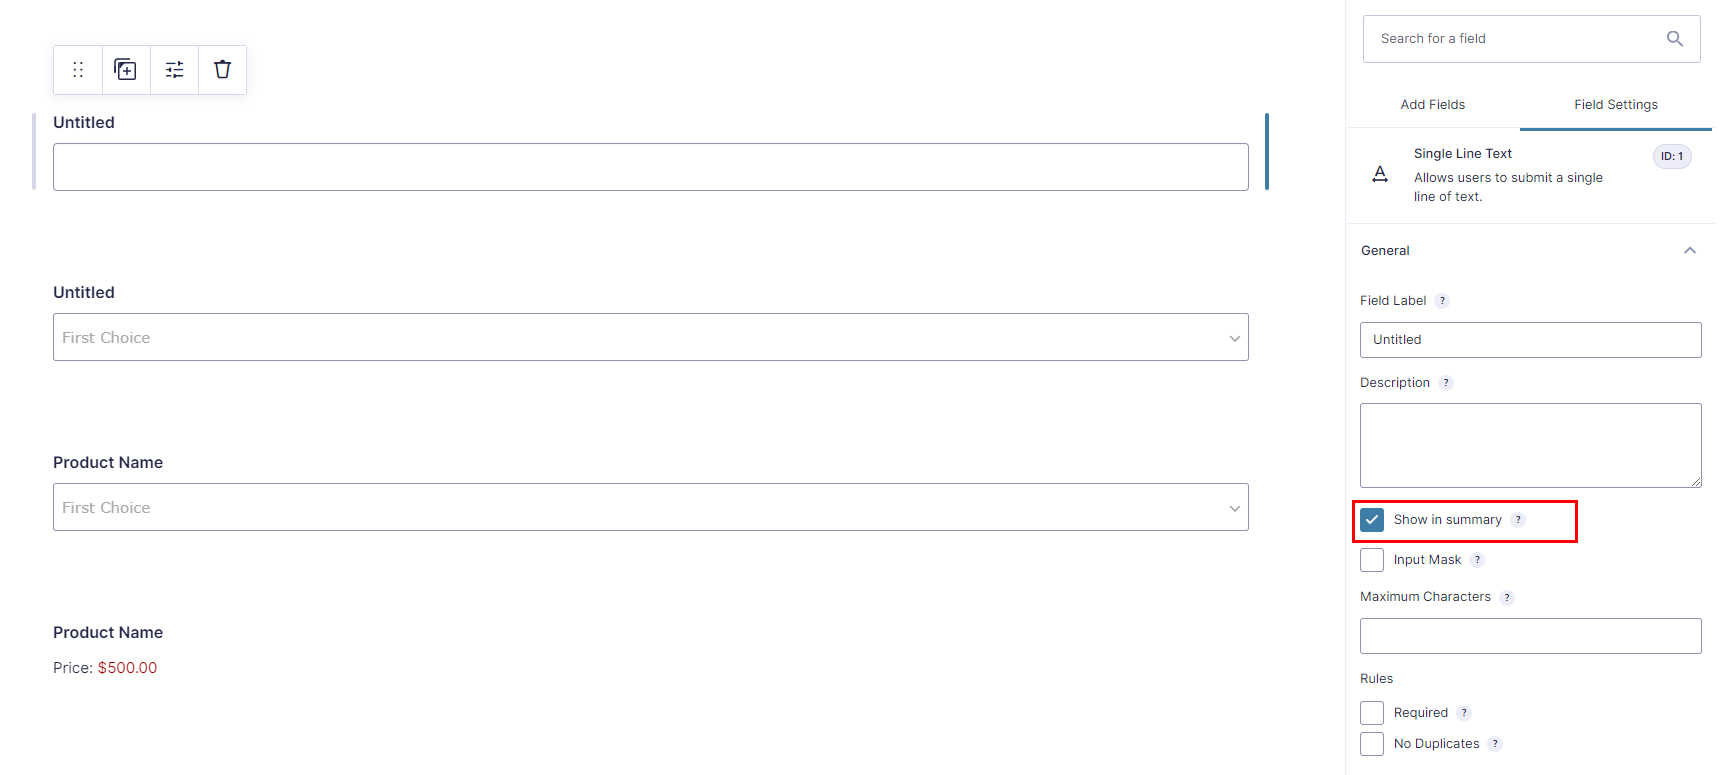
That’s because you’re in total control of what’s displayed inside the summary. For this, open the form editor and click on the field(s) that you want to show. You’ll notice that the plugin has added an extra checkbox on the general settings tab of each supported field. Check the box(es) and save the form.
How to Use Live Summary Pro
The pro version of Live Summary for Gravity Forms enables you to customize the experience for users (as well as for your website and brand).
As with the free version, you’ll need to head into Forms > Settings > GF Summary Add-On of the respective form that you want to make changes to.
Just like the free version, you can toggle Turn on Summary and Show Total in Summary on or off.
But you can also access even more options here.
Let’s run through them…
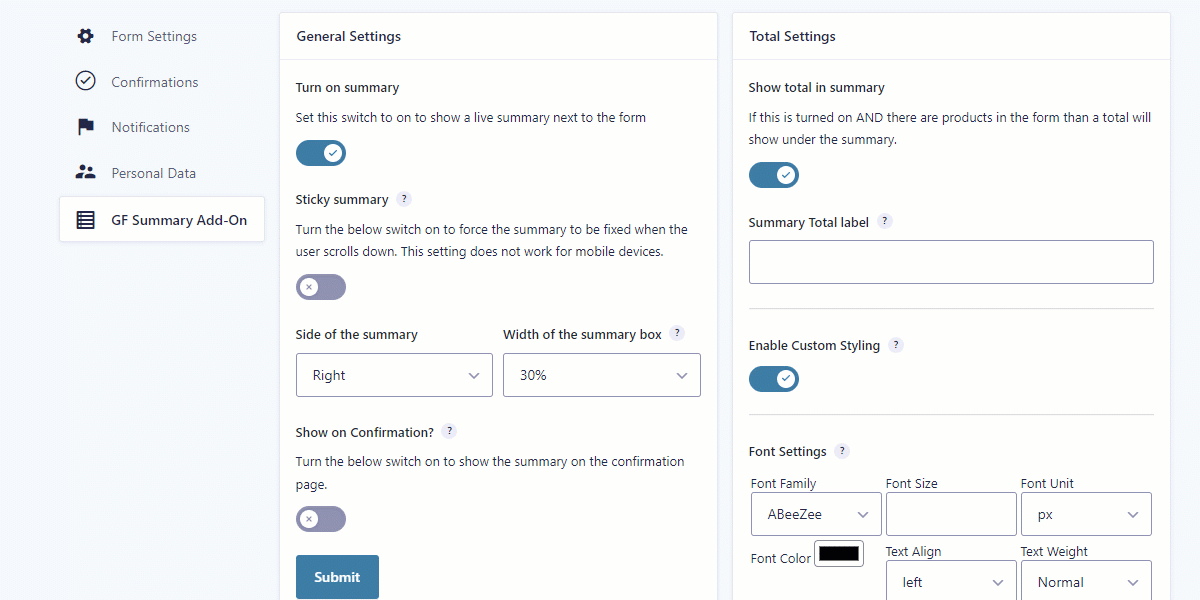
General Settings
There are a number of general settings that you can choose to activate:
- Sticky Summary – by activating this setting, the Live Summary box will follow users down the desktop page as they scroll, so it’s always in view. This is useful when you’re running longer forms.
- Side of the Summary – this lets you select whether your summary box appears on the left or right of the screen. You can choose the width of the box, from between 15% and 40% (in increments of 5%).
- Show on Confirmation – when you use Gravity Forms, you can choose to add a confirmation message, like, ‘Your order is placed’. By turning this option on, the live summary order will also appear on this page, too. So, it creates an even better experience for users.
When you’re satisfied with your settings, click Submit.
Now, let’s jump across to…
Total Settings
- Summary Total Label – by default, the label is set to Total, which is great for eCommerce purposes. However, it might not be right for the way users use your form, and it might not even be the right language for your audience. This is the setting to change to bring it into line with your site.
- Enable Custom Styling – this offers granular control over the appearance of the Total Settings, from font type and size, to adding a border and changing the background color (you can even add your own background image, if you prefer). This plugin is also integrated with Google Fonts API and can dynamically load any Google font you select.
Click Submit to save your selections.
Summary Box Settings
This is where you can restyle Live Summary to really fit your brand.
Toggle Enable Custom Styling to on. You’ll now find the same options as you did with the Total Settings, such as Font Settings and Background Settings.
Form Container Settings
This lets you alter the default appearance of the box that surrounds the actual form.
Just to make things really easy to set up, it works just the same as the above. You simply turn on Enable Custom Styling, then tweak the settings to bring the box into line with your other customizations.
Title Settings
By default, Title Settings are turned on and labeled Summary. You can turn this on or off by toggling Show Summary Title.
You can then type your own Summary Title. For example, if you were a hotel booking site, you might want to call it ‘Booking Summary’; an eCommerce site might use ‘Order summary’. It’s entirely up to you.
Beneath this, you’ll see Enable Custom Styling. You’ll be familiar with this process by now – it’s the same as before, letting you customize the overall appearance of the Title section of the Live Summary order box.
When you’ve set up Live Summary for Gravity Forms, hit Save Settings.
Live Summary for Developers
Just like Gravity Forms itself, the Live Summary Add-On is built to be modified easily by developers.
Currently, the plugin features around a dozen hooks, which allow for many customizations that are not yet part of the UI. Think of adding content before, inside, or after the summary.
Let’s say you want your logo above the summary, show accepted payment gateway icons inside, or move the submit button below the summary. You can do all that easily when you purchase the Pro version – then free snippets to do these things are included. Just reach out through the Live Summary support tab.
The Future of Live Summary for Gravity Forms
This add-on is only about two months old, and is still in active development. The goal, eventually, is to make it possible to configure a complete sidebar without the use of any code.
Another cool feature we’re working on is to allow for easy inline editing right inside the summary. For example, imagine an insurance form where the user entered an address on the first step only to realize on the eighth step that they made a typo.
With the inline editing function, users will be able to click Edit in the summary and immediately change the address without having to click back seven times (we all know how frustrating that can be, right?).
So, our focus is on building an even stronger, streamlined experience with Gravity Forms for you and your users.
Like the sound of Live Summary for Gravity Forms? Take advantage of the free version of the Live Summary Add-On or purchase the pro version for yourself today!
About the Contributor:

Johan d’Hollander is a freelance web developer working online under the name Geek on the Road. He is a so-called digital nomad and an expert in creating any type of custom solution with WordPress and Gravity Forms. He can either be found coding the next online solution for some business or traveling around the world together with his wife.
Newsletter
If you want to keep up-to-date with what’s happening on the blog sign up for the Gravity Forms newsletter!
"*" indicates required fields