Using Gravity Forms + Webhooks to Integrate with External APIs – A Beginner’s Tutorial

One of the great things about using Gravity Forms is how easily you can connect your WordPress forms to the other tools and apps that your business is using.
To make setting up these integrations as easy as possible, Gravity Forms offers dedicated integration add-ons for many popular payment processors, customer relationship managers (CRMs), email marketing services, and more.
However, you still might want to integrate Gravity Forms with other software applications, or even your own custom applications that you’ve built.
That’s where the Gravity Forms Webhooks Add-On comes into play.
With the Webhooks Add-On, you can set up your own custom integrations with other software, either by integrating directly with the service’s API or using an intermediary automation platform like n8n.
If you’re a developer, you’re probably already familiar with how webhooks and APIs can help you create custom integrations. But the nice thing about the Webhooks Add-On is that you don’t need to be a developer to get value from it.
In this post, we’re going to teach you how to use the Webhooks Add-On in as non-technical a way as possible.
We’ll start by introducing what webhooks and APIs are and when you might want to use them with your WordPress site.
Then, we’ll explain what you need to use the Webhooks Add-On and go through a couple of full step-by-step tutorials – using webhooks and n8n to connect Gravity Forms to Google Sheets, as well as using webhooks to connect Gravity Forms directly to Airtable.
What are webhooks and APIs?
At a high level, APIs and webhooks are just ways for different software applications to communicate with one another.
There are plenty of more technical differences between the two. But for most WordPress users, knowing that high-level fact is enough.
An API is a defined language that allows different software applications to “talk” to one another. One app sends structured data to the API and the other app provides a response – but only when the other app requests it.
Webhooks are an event-driven way of communicating between apps. Something happens to “trigger” the webhook and the webhook sends a one-way request to the other application.
With Gravity Forms, the event that triggers a webhook is usually someone submitting a form.
If you combine webhooks and APIs, you get a very flexible way of connecting two apps without requiring any type of pre-built, dedicated integration between the two.
For example, you could use webhooks to connect Gravity Forms to another app that you’re using, even if that app’s developers have never even heard of Gravity Forms.
When to use webhooks with Gravity Forms
Whether or not your site can benefit from using webhooks with Gravity Forms will depend on your specific situation.
To simplify things for Gravity Forms users, Gravity Forms offers dedicated integration add-ons for a lot of popular services, including CRMs, email marketing services, payment processors, and more.
When available, using one of these dedicated add-ons offers the simplest way to connect Gravity Forms to the service that you’re using.
However, Gravity Forms can’t offer a dedicated integration for every single app in existence. To help you more easily set up your own custom integrations without needing to code everything from scratch, Gravity Forms supports webhooks (along with other flexible tools like Zapier, via the Zapier Add-On).
In general, using webhooks with Gravity Forms can be a good option if you want to set up your own custom integration that isn’t available via Gravity Forms’s dedicated add-ons.
Here are some specific situations in which webhooks might be useful with Gravity Forms:
- Send leads to marketing platforms without a dedicated Gravity Forms Add-On – Webhooks can help you connect to marketing platforms and CRMs that Gravity Forms doesn’t currently offer add-ons for, such as Drip, Klaviyo, and others.
- Connect to your own custom app/system – If your business relies on a custom app or software, webhooks can be a great way to integrate Gravity Forms into your proprietary systems.
- Trigger automations in automation platforms – Pretty much any automation platform will support webhooks, including n8n, Make, Zapier, IFTTT, Pabbly Connect, Integrately, etc.
- Connect to databases/spreadsheets – You can sync submissions to Google Sheets, Airtable, and other databases/database-like systems.
Basically, webhooks can help fill in the gaps where dedicated Gravity Forms Add-Ons don’t yet exist, letting you integrate your WordPress forms with most software without needing to code a custom solution.
What you need to use webhooks with Gravity Forms
In order to use webhooks with Gravity Forms, you’ll need a few things.
First, you’ll need the core Gravity Forms plugin, along with the Webhooks Add-On.
The Webhooks Add-On is available on the Gravity Forms Elite, and Nonprofit licenses. If you’re not holding one of those licenses yet, you can purchase a new license here or upgrade your existing Basic or Pro license and only pay the prorated difference.
You’ll also need the webhook URL, which is the URL to which Gravity Forms will make a request when someone submits the form. This could be an intermediary automation platform like n8n or it could be an API endpoint (if you’re connecting directly to the other service).
If you’re connecting directly to an API, you’ll also need to consult the application’s documentation to learn more about the formatting and authentication required to use that API.
If you’re using an automation platform, the webhook URL is usually enough. You can get this URL by adding a webhook trigger inside the automation tool – we’ll show you an example below.
Basic guide to creating a webhook feed
Assuming you’ve already set up your form and installed the Webhooks Add-On, you can create a webhooks feed for any form by going to Settings → Webhooks → Add New in the form editor.
When you set up the Webhooks feed, you’ll need to configure two main pieces of information.
First, you’ll need to set up the request details:
- Request URL – This is the webhook URL to which your site will make a request when someone submits the form.
- Request Method – Usually, you should choose POST. However, you can choose different methods if needed.
- Request Format – Most of the time, you’ll want to pass the data using JSON. However, you can also choose FORM if needed.
You cannot currently customize the JSON structure of the webhook from the feed settings. However, developers can customize the JSON output using the gform_webhooks_request_data filter.
Below that, you can choose what data to send. You can use Request Headers for authentication or other requirements, while the Request Body lets you choose which form field data to send.
As with all Gravity Forms feeds, you can also add conditional logic rules to only execute the feed if certain conditions are met.
Example 1: How to send form data to Google Sheets using n8n
Now, let’s look at some specific examples of using webhooks with Gravity Forms.
In this first example, we’ll show you how to send form data to Google Sheets using webhooks and your favorite automation platform.
With this setup, the automation platform will act as an intermediary. It will receive data from Gravity Forms via webhook, process/format that data according to your conditions, and then add it to Google Sheets as a new row.
While we’ve chosen to use Google Sheets as the destination, you can use this same basic approach to connect to any one of the thousands of apps that these automation platforms support.
The basic principles from this tutorial should work with pretty much any automation platform, including the following:
- Zapier – We recommend using the dedicated Gravity Forms Zapier Add-On instead, but you can also use webhooks directly.
- n8n – An open-source automation platform. You can self-host the software for free or pay for a hosted version.
- Pabbly Connect – An affordable option with a lifetime plan.
- Make (formerly Integromat) – Offers free and paid plans – you can also connect using Gravity Forms’ REST API .
- Integrately – Another freemium option.
For this example, we’ll use n8n because it gives you the ability to access full functionality for free (if you self-host the open-source software). There’s also a free trial of the paid hosted plans if you want to try it out before setting up your own self-hosted version.
To follow this guide, we’ll assume that you’ve already set up the form that you want to connect to Google Sheets.
Because you’ll need to work simultaneously in two separate interfaces, we recommend opening one tab with the n8n interface and another tab with the Gravity Forms editor.
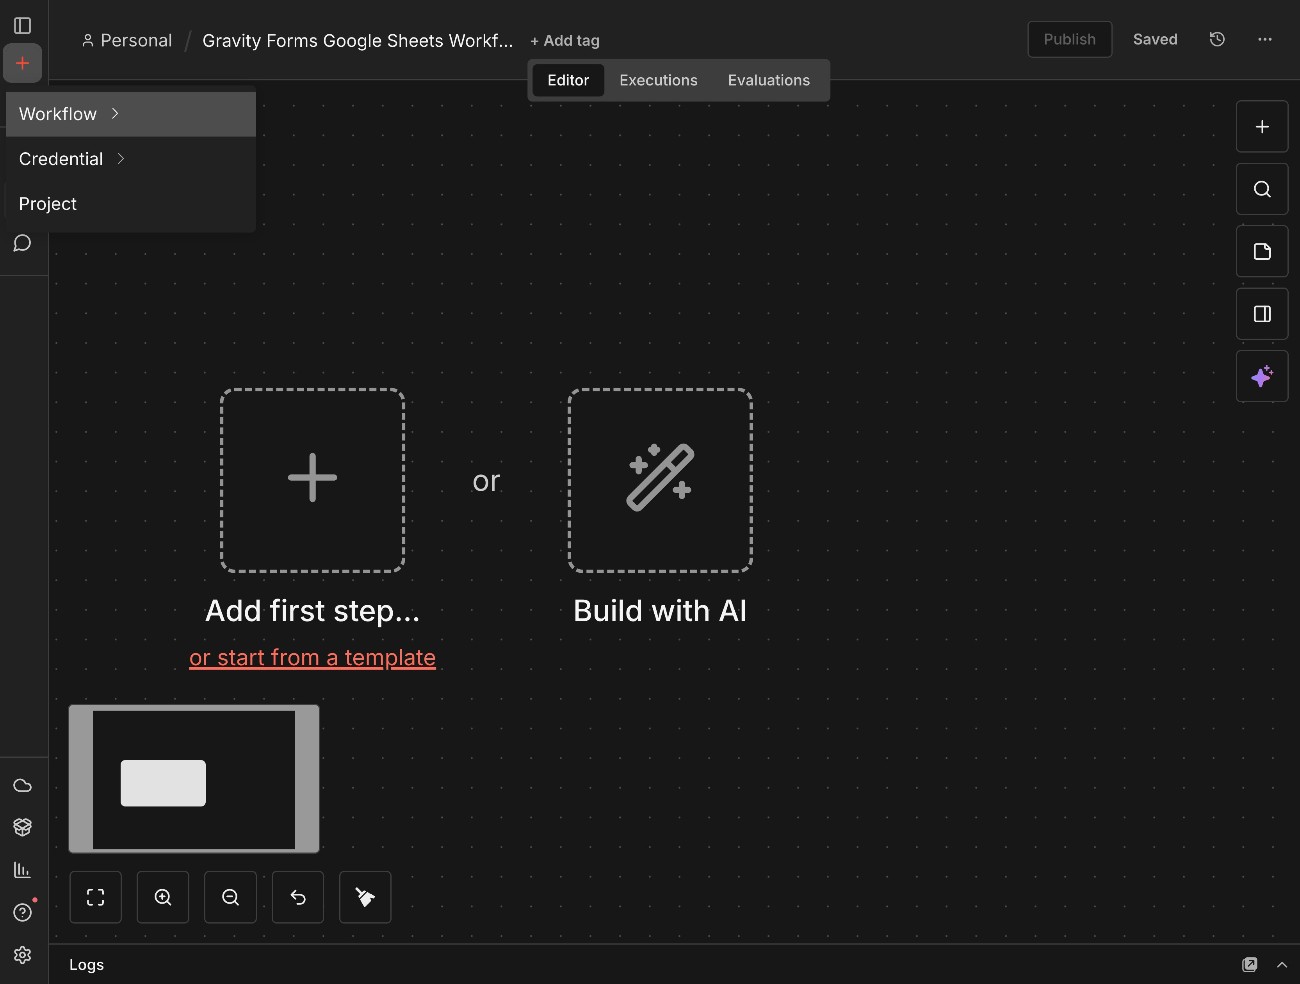
1. Create a new workflow in n8n
To start, you need to go to whichever automation platform you’re using and create a new workflow/automation.
In n8n, you can create a new workflow by clicking the plus icon in the menu sidebar and selecting Workflow.
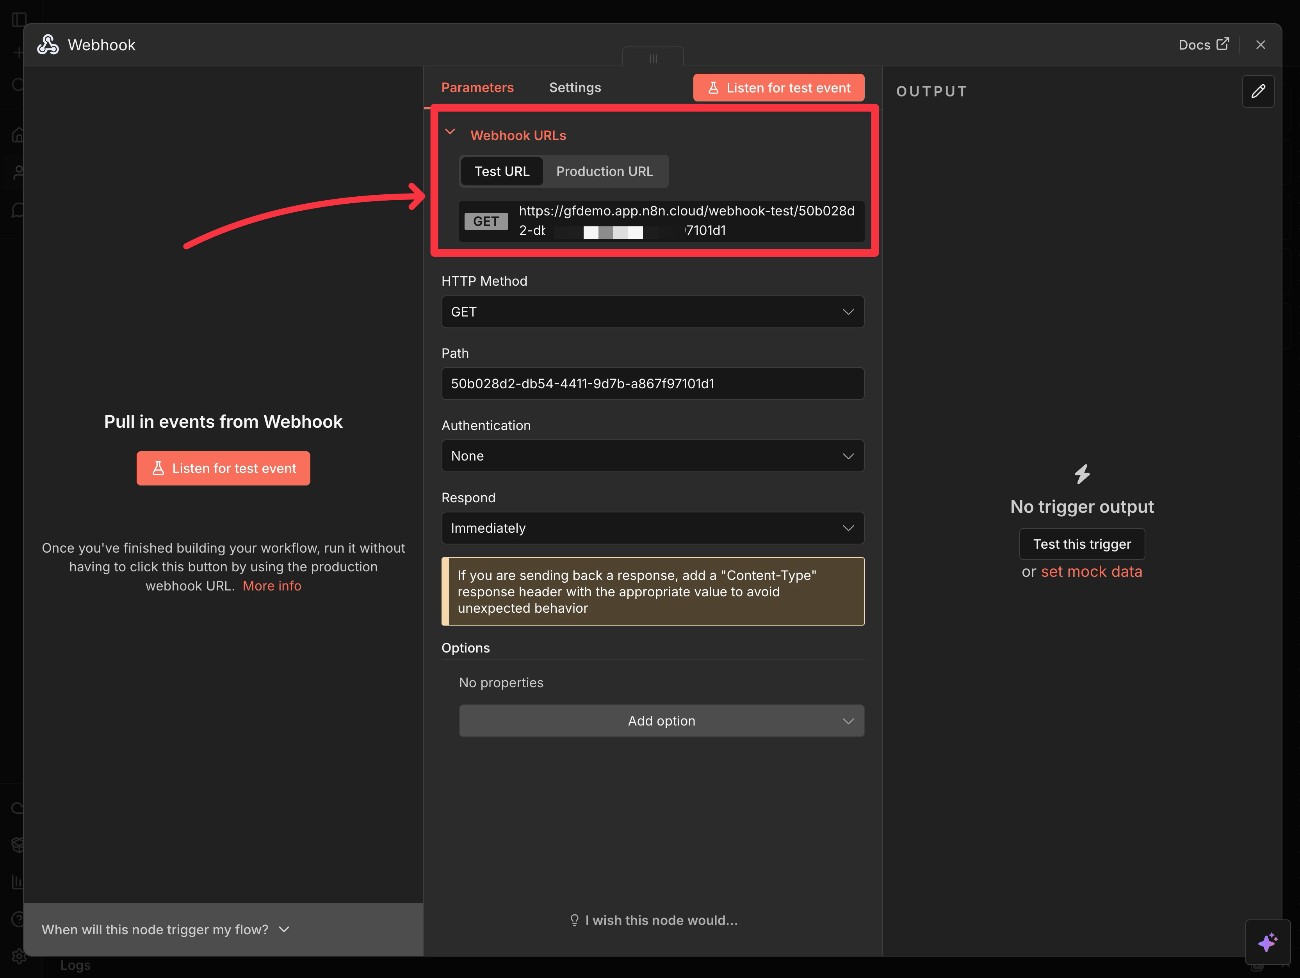
In your n8n workflow, add a Webhook trigger node. This will trigger your workflow when Gravity Forms makes a request to your n8n webhook URL.
This will give you two webhook URLs – a Test URL for testing the workflow and a Production URL for when you’re ready to go live.
Pay attention to the Test URL, because you’ll need it for configuring Gravity Forms in the next section.
By default, n8n uses GET for the HTTP Method. However, we generally recommend using PUT, so you can also consider changing the HTTP Method to PUT.
2. Create a webhooks feed in Gravity Forms
Now, you’ll switch to the Gravity Forms editor in a new tab (because you’ll need to come back to the n8n interface in a second).
In the editor for your form, create a new webhook feed by going to Settings → Webhooks → Add New.
Then configure the webhook feed:
- Request URL – Copy the webhook Test URL from n8n (you’ll need to change this to the Production URL later on).
- Request Method – Set this to whatever the HTTP Method is in n8n. We usually recommend PUT. However, n8n defaults to GET. So, if you didn’t update the HTTP method in your n8n webhook node to be PUT, you should choose GET here.
- Request Format – Choose JSON.
You don’t need to add any Request Headers for this example. However, you can use them for authorization if you want to add additional security (but this will require additional configuration in n8n).
Under Request Body, you should choose All Fields if you want to transmit all of the form data to n8n. On the other hand, if you only want to pass specific fields, you could choose Select Fields and choose those fields.
You also have the option to add conditional logic rules, though you don’t need any for this tutorial.
Once you’ve filled it all out, click Save Settings.

3. Send some test data to n8n
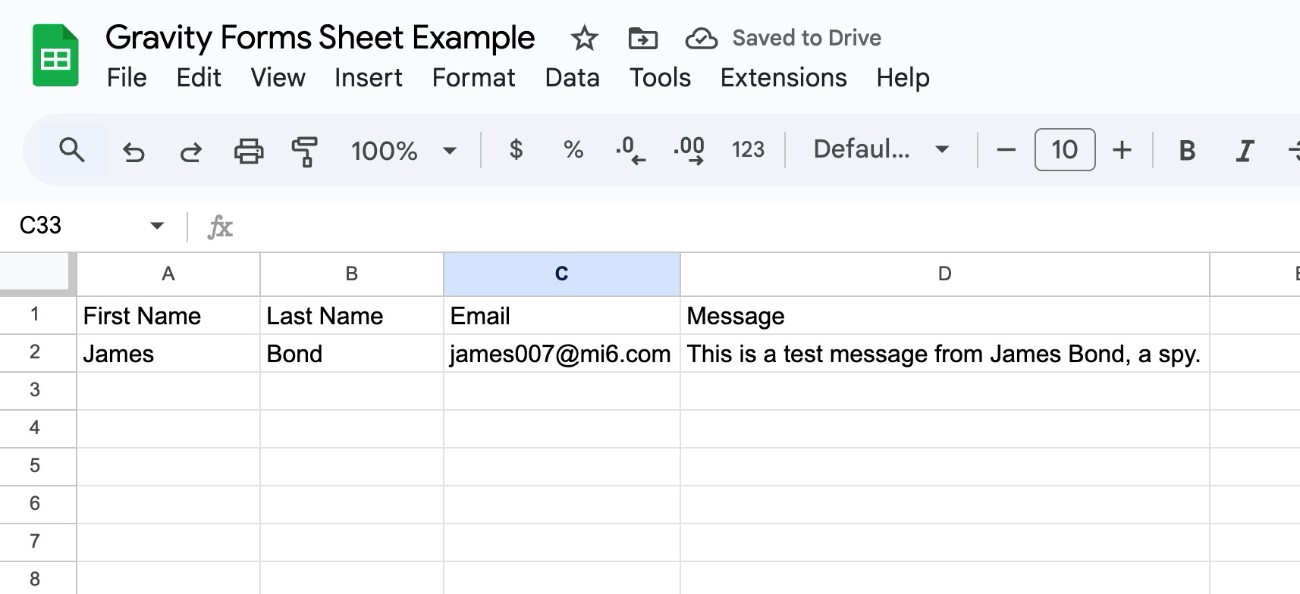
Now, you’ll want to submit a test entry in your form to n8n. This will help you figure out how the data is formatted so that you can properly map it to Google Sheets.
In your webhook node in n8n, click the option to Listen for test event:
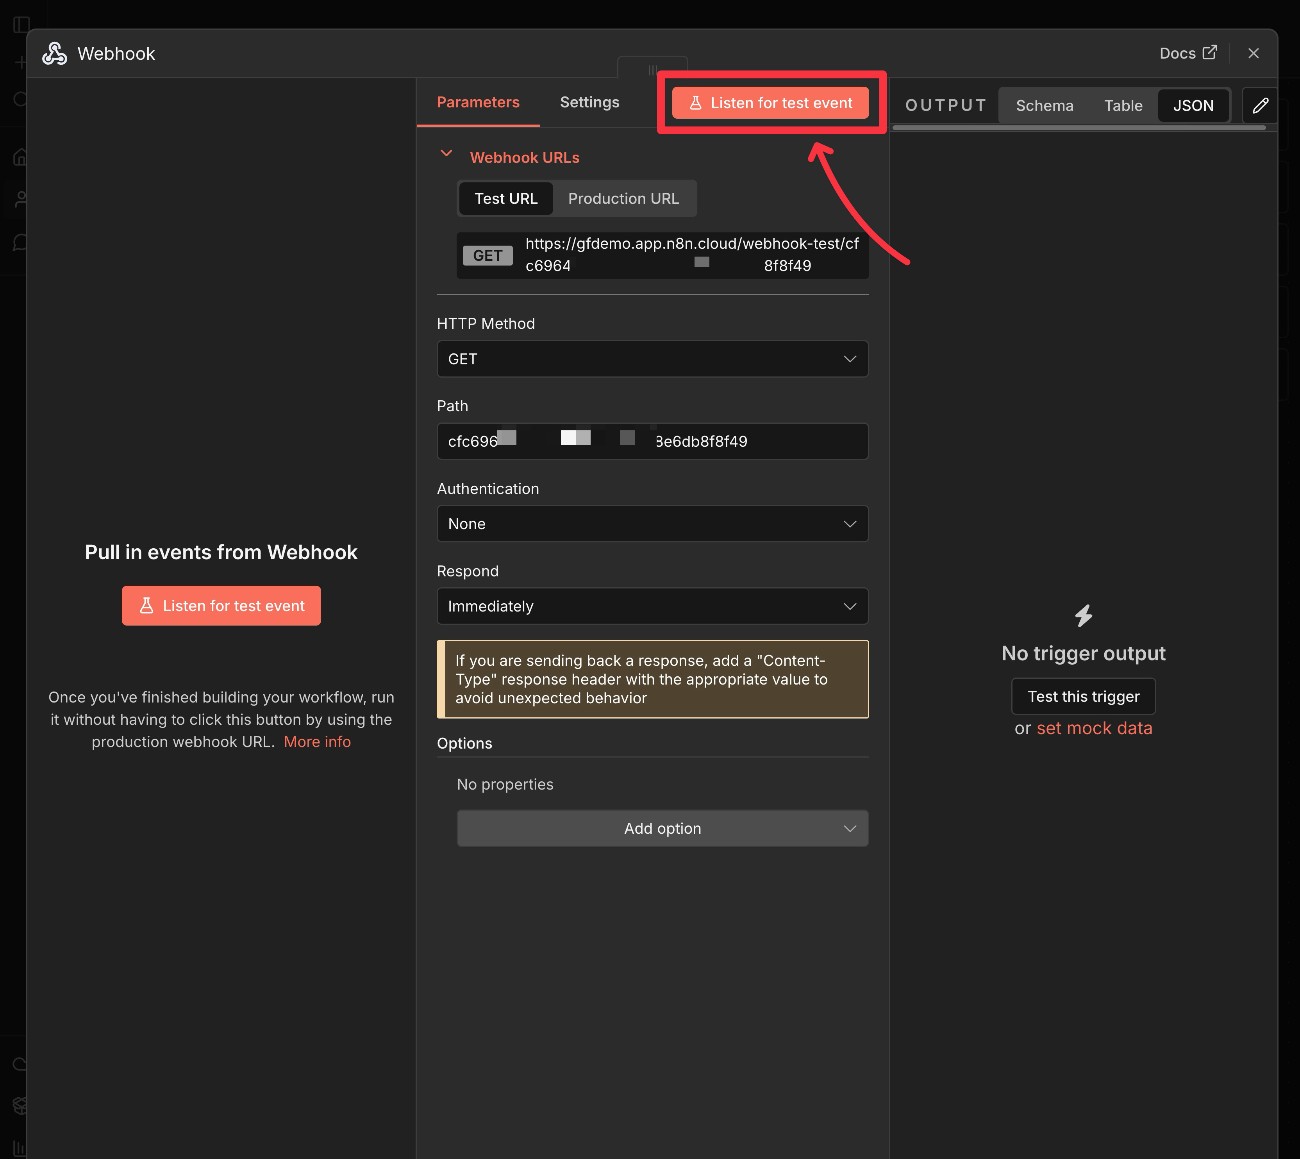
Then, open the WordPress page where you’ve embedded the form and submit a test entry.
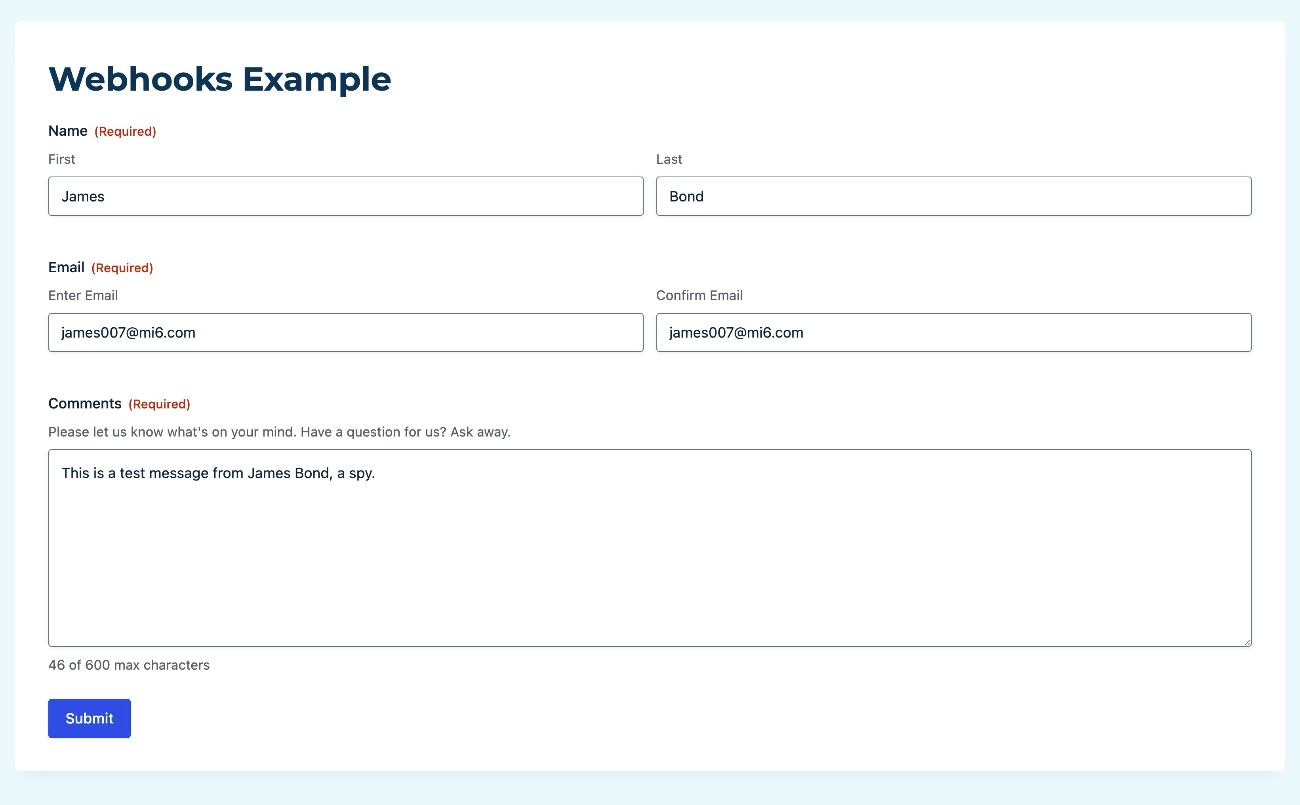
Once you submit the form, you should see all of the JSON data show up in the Output column in n8n.
You’ll see a ton of different information. If you scan through it, you should see all of the data from your form fields.

You don’t need to do anything with this data right now. However, it will be important in the next step when you tell n8n how you want it to add data to Google Sheets.
4. Create a Google Sheets action in n8n
Next, add an action for Google Sheets in your n8n workflow. For this example, we’ll choose the Append row in sheet action, though you might want to choose Append or update row in sheet depending on your use case.
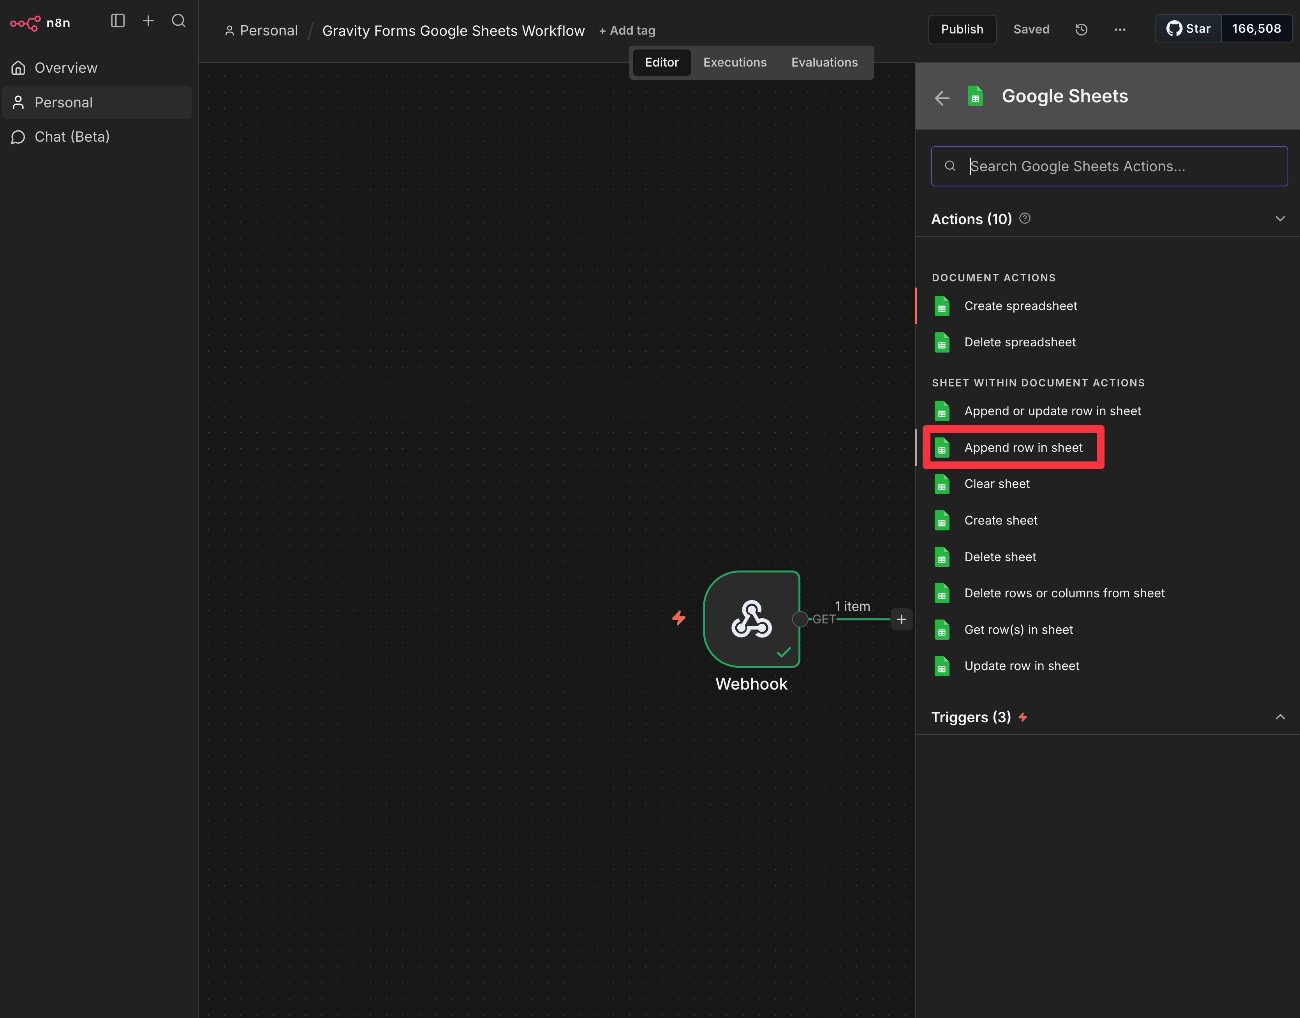
Once you’ve done that, you’ll need to choose your Google Sheets account and the sheet to which you want to add data. If you haven’t already, you’ll also need to add/connect your Google account (called a “credential” in n8n).
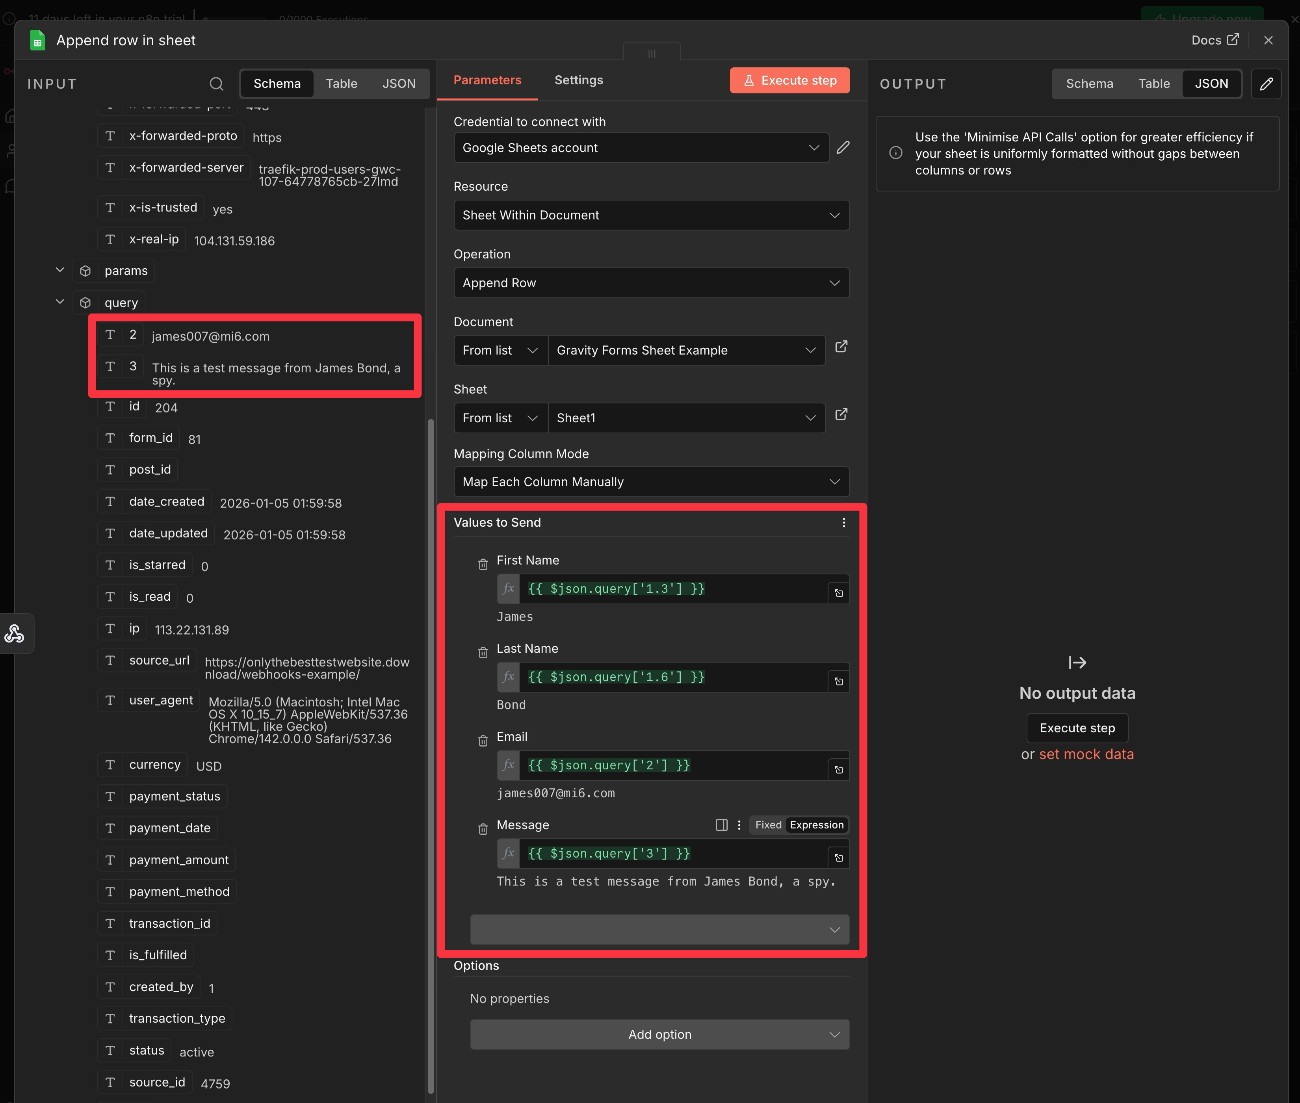
After selecting the sheet, n8n will automatically pull in all of the columns in that sheet (if you haven’t added columns yet, you can add them and then click Retry).
Once you see the columns, all you need to do is map the Input data to the columns. Because you already sent a test form submission, you’ll be able to see the sample data from your form submission in the Input column.
All you need to do is drag the input data into the column box.
You can then click Execute step to pass the data from your test form submission to your sheet.
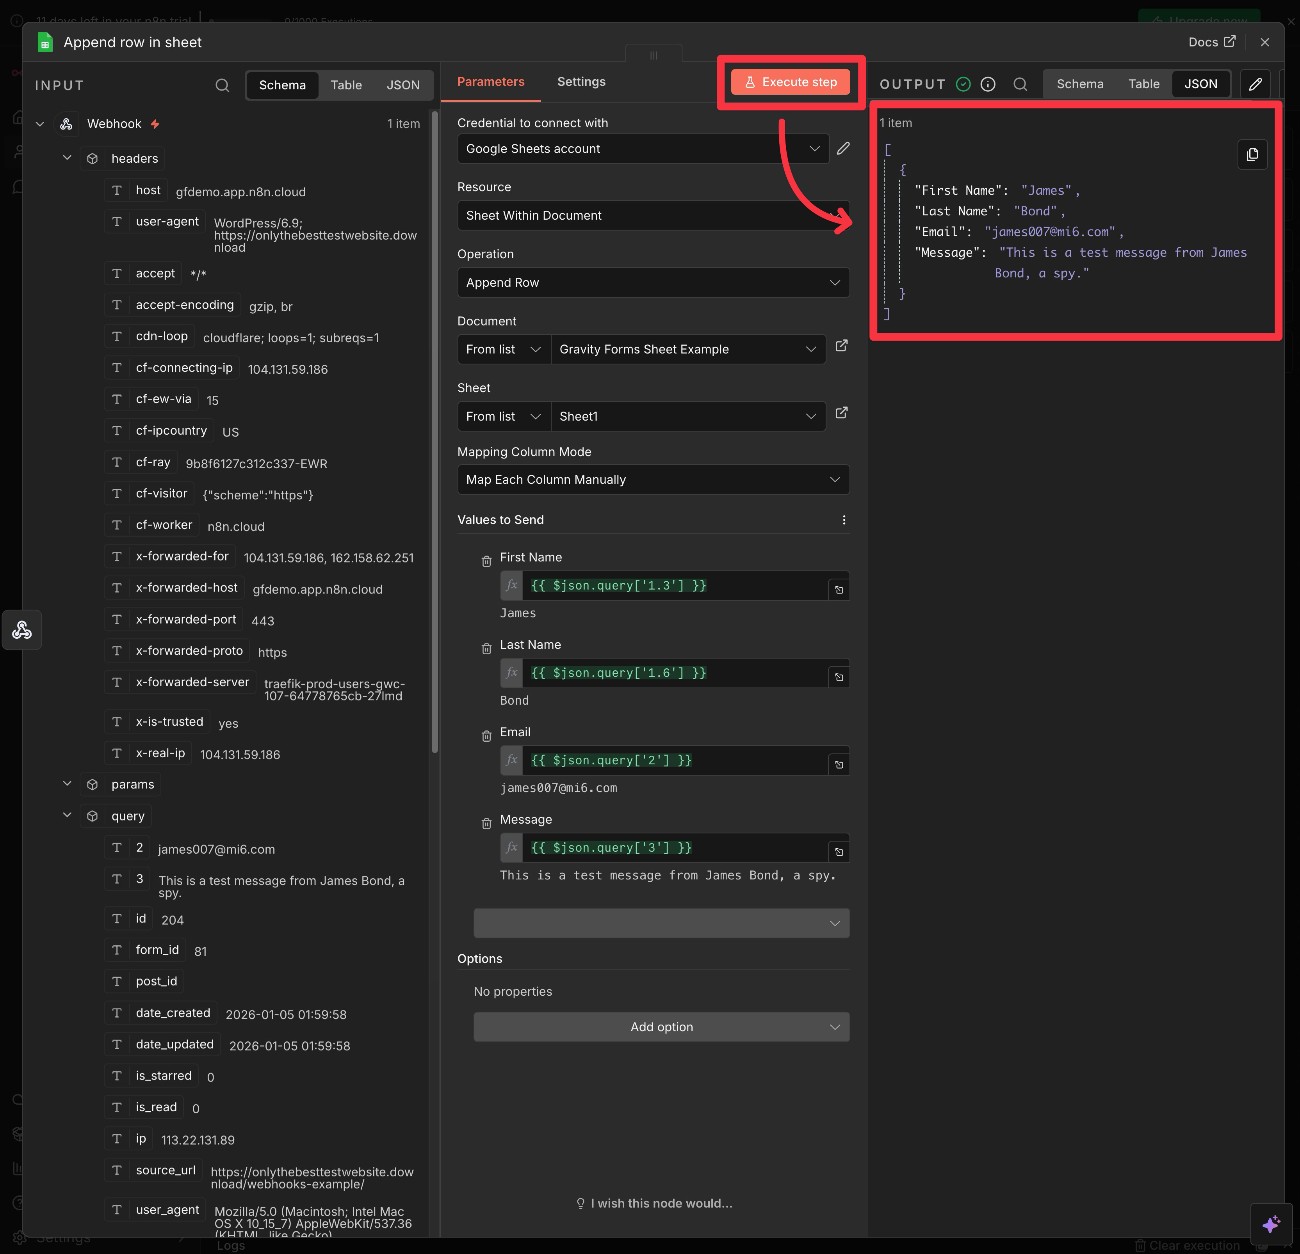
The data should then automatically appear in your sheet.
Make sure to save your entire automation workflow when you’re finished.
5. Change to production webhook URL and test again
Once you’ve used the test data to successfully map form submission data to your sheet, you’re pretty much done.
The last step in the process is to update your Gravity Forms webhook feed to use the Production URL instead of the Test URL that you initially used. This is because the n8n Test URL is just for listening for test event data.
Open your webhook node in the n8n interface and copy the Production URL:
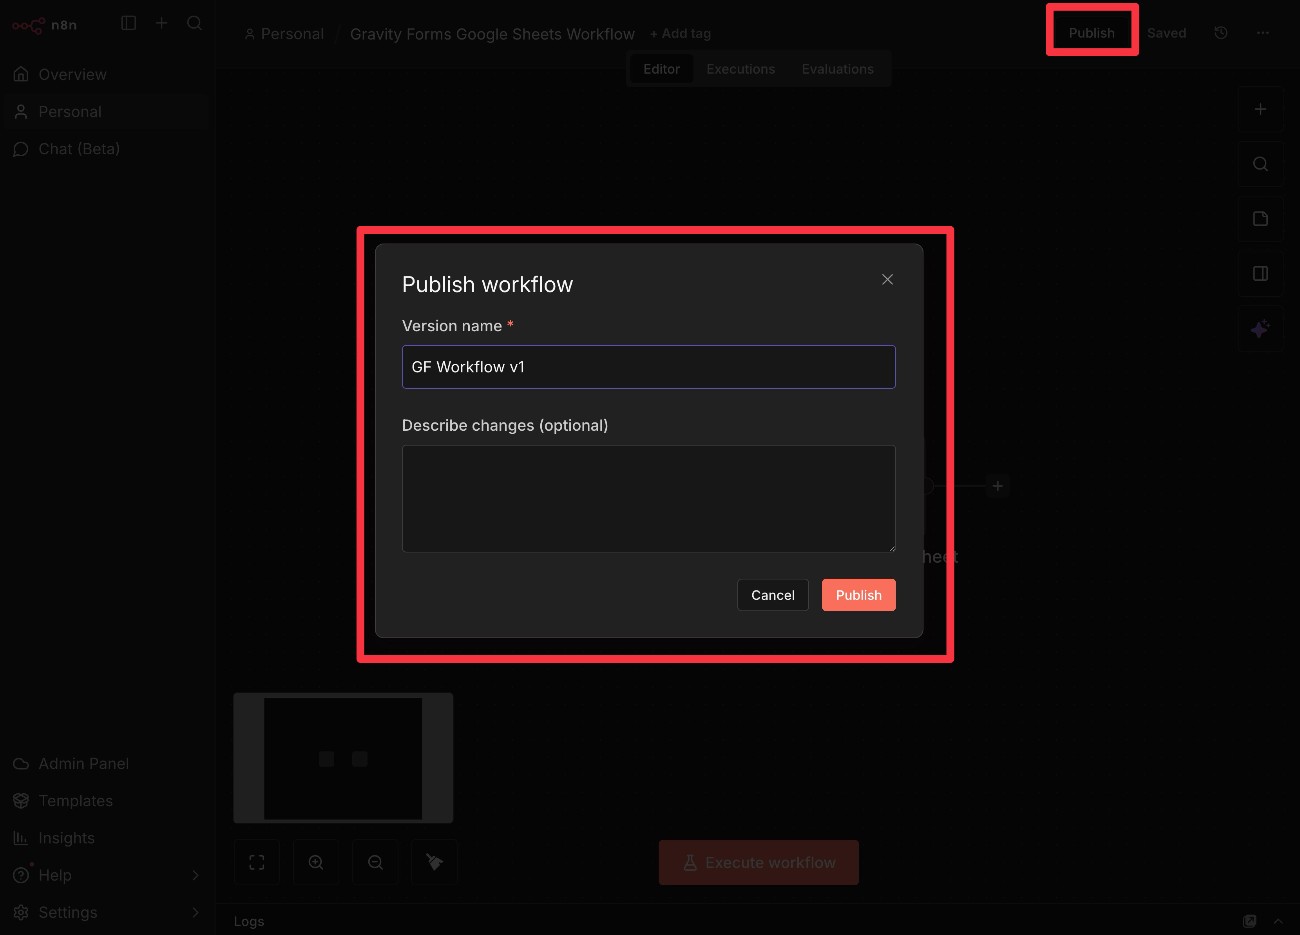
In addition to copying the URL, you should also publish your n8n workflow so that it’s live. You can do this by clicking the Publish button in the top right. Give it a name and then click Publish again in the popup that appears.
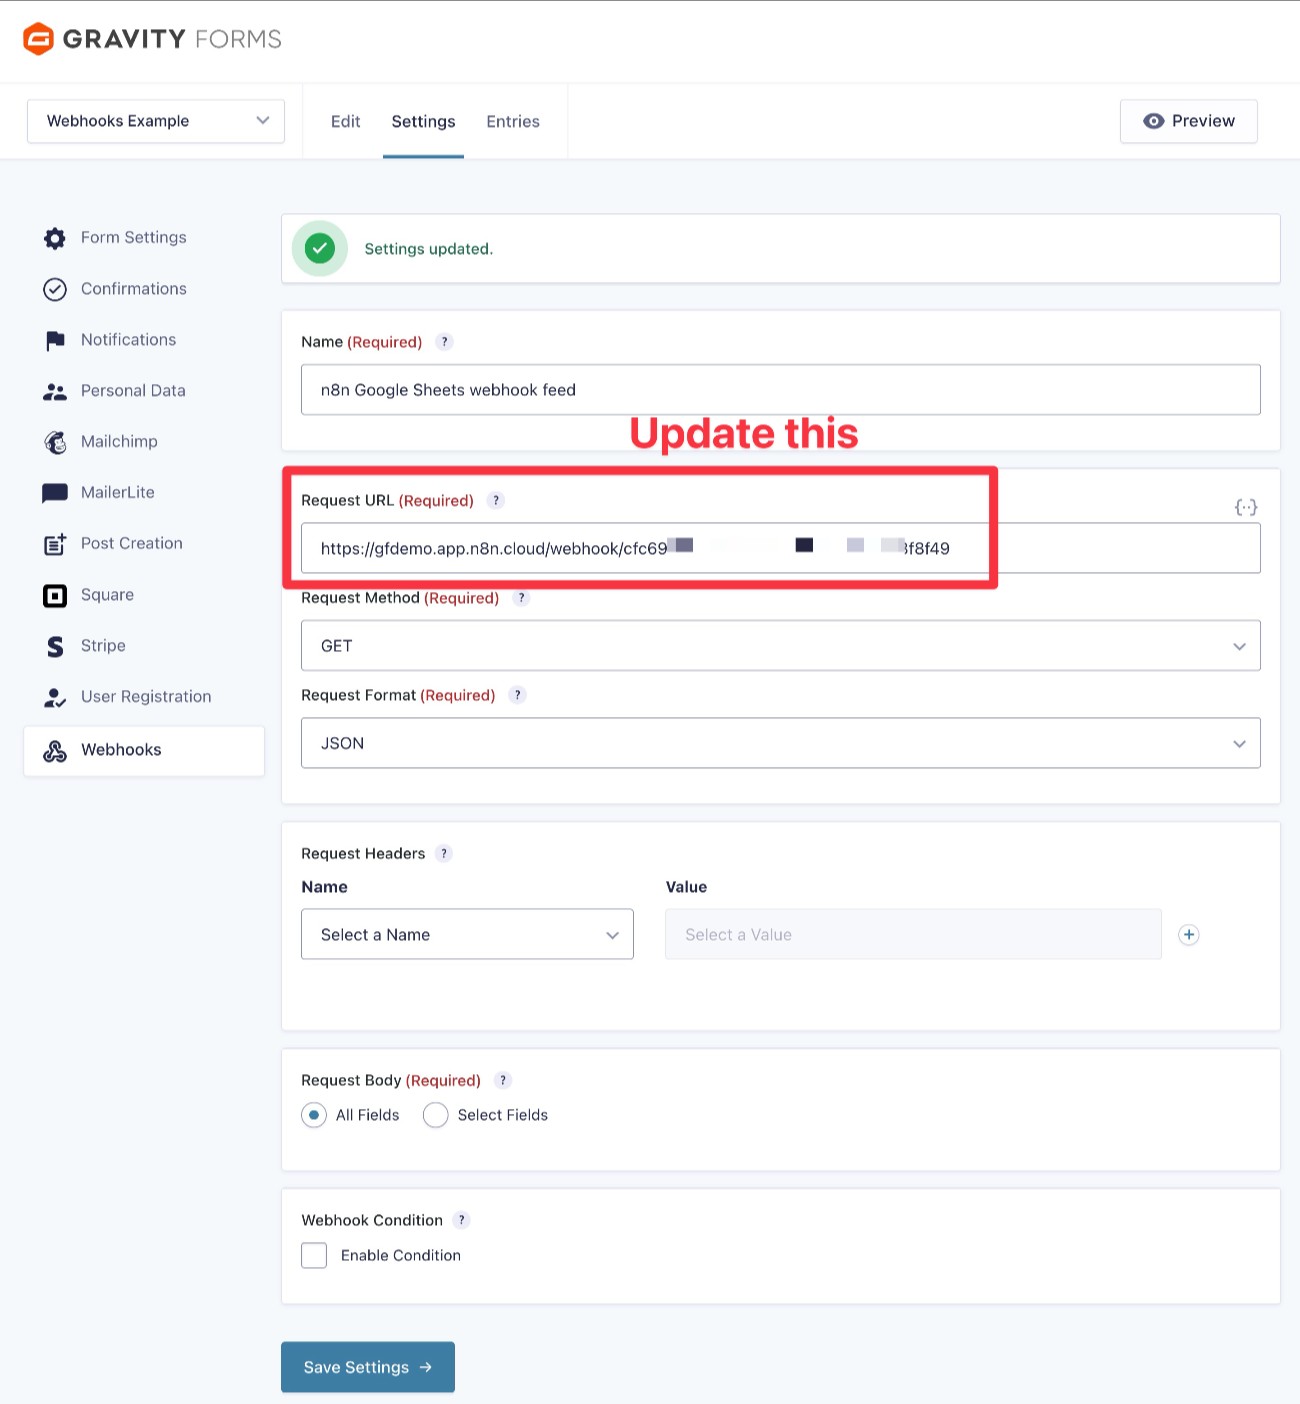
Once you have the Production URL and you’ve published the workflow, go back to WordPress and edit the webhook feed that you created for your form.
Replace the existing Request URL (which uses the Test URL) with the Production URL.
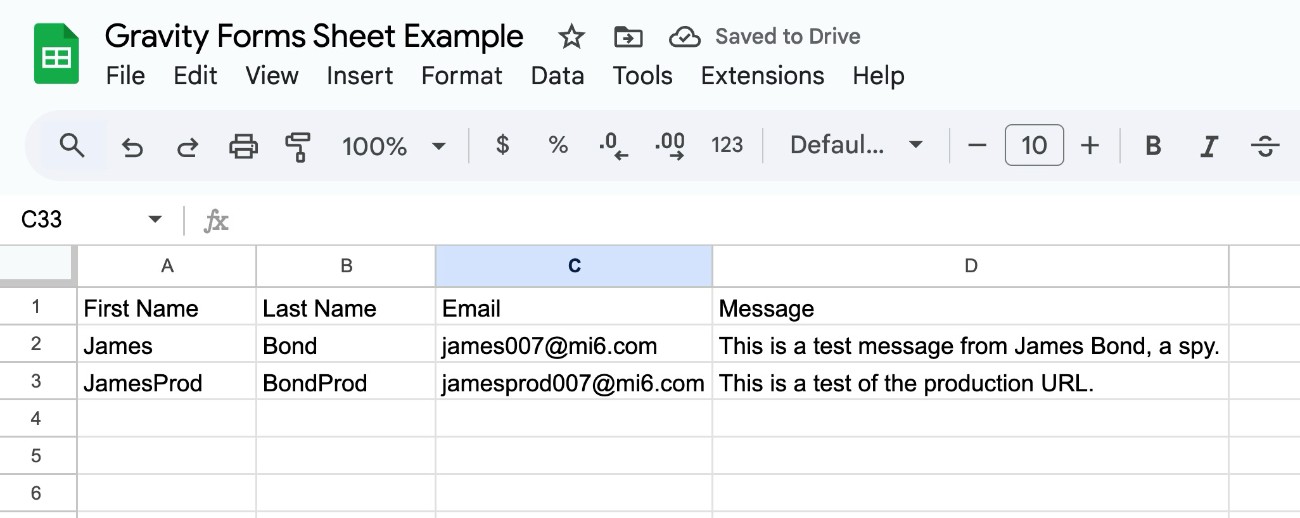
To finish things out, we recommend submitting some dummy information via the form one more time, just to make sure that everything is still working properly after switching to the Production URL.
Assuming you published the workflow in n8n, you should see a new entry appear in the sheet:
You can also see all of the executions in your n8n dashboard.
Example 2: Add form submissions to Airtable directly
In this second example, we’ll show you how to use webhooks to send data directly to Airtable, without needing to use an intermediary service like n8n.
Airtable is one of the easier APIs to integrate with because it still gives you a visual interface to set up some details if you use its Automations feature, rather than requiring you to interact with the API directly.
If you did want to connect directly using the Airtable API, you would need to use the gform_webhooks_request_data filter to adjust your form’s JSON output to match the Airtable API.
For this example, we’ll assume that you already have an Airtable account and you’ve created the Airtable Base to which you want to add form submissions.
As with the n8n example above, you’ll need to simultaneously work in both your WordPress dashboard and the Airtable dashboard, so we recommend opening tabs for each.
1. Create a new Automation in Airtable
To begin, you’ll need to create an Automation in Airtable:
- Open the Airtable Base to which you want to add form data.
- Go to the Automations tab.
- Click the Add trigger button.
- Choose When webhook received in the drop-down of available triggers.
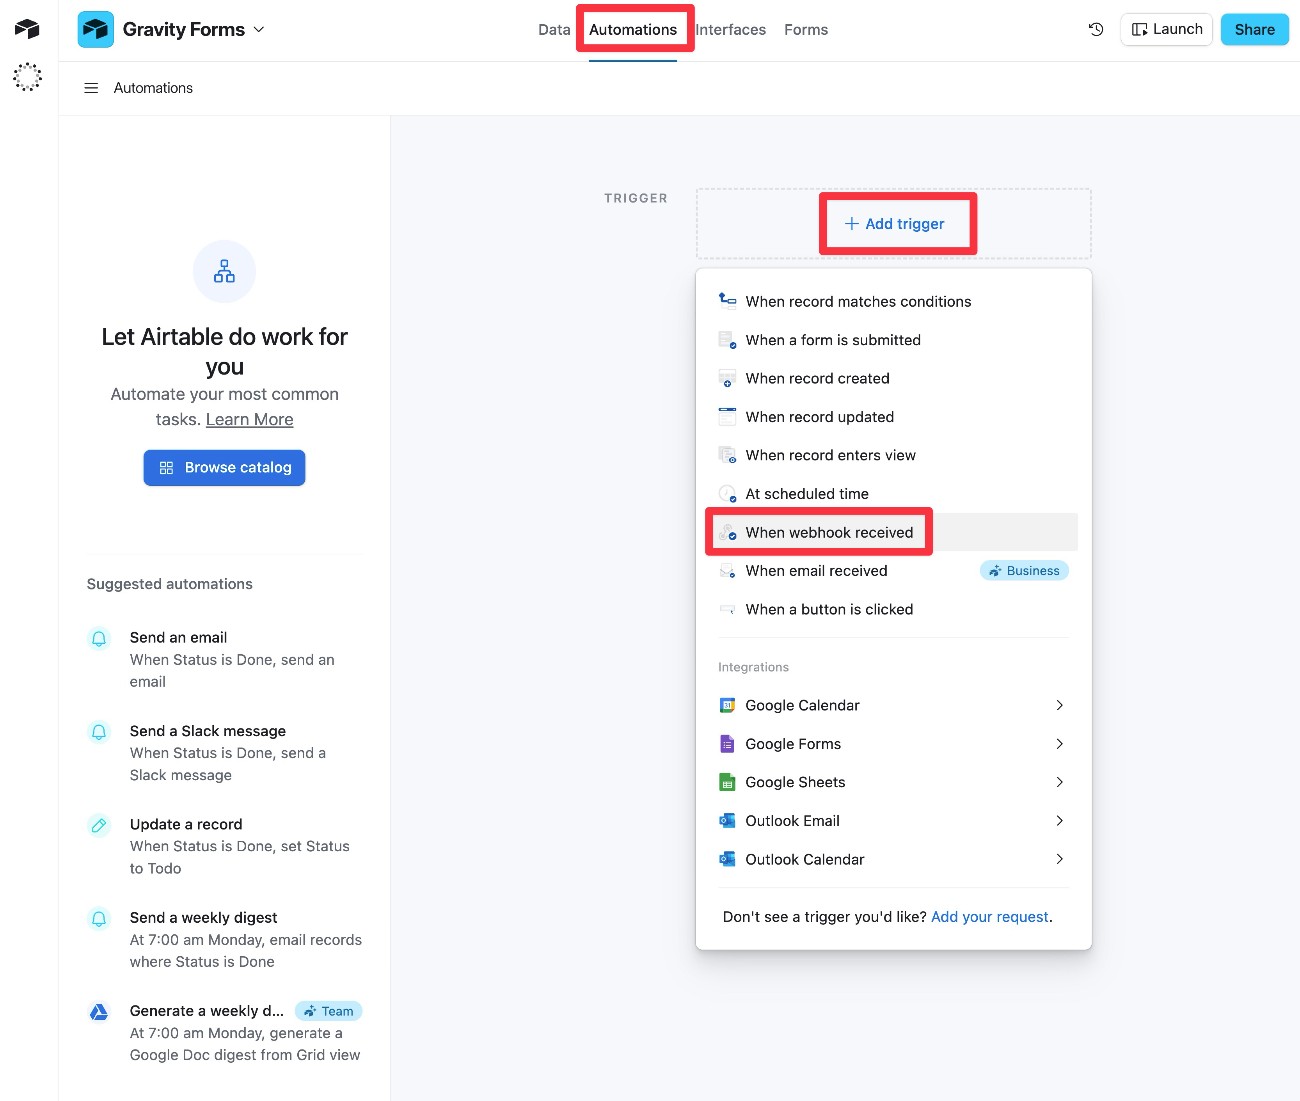
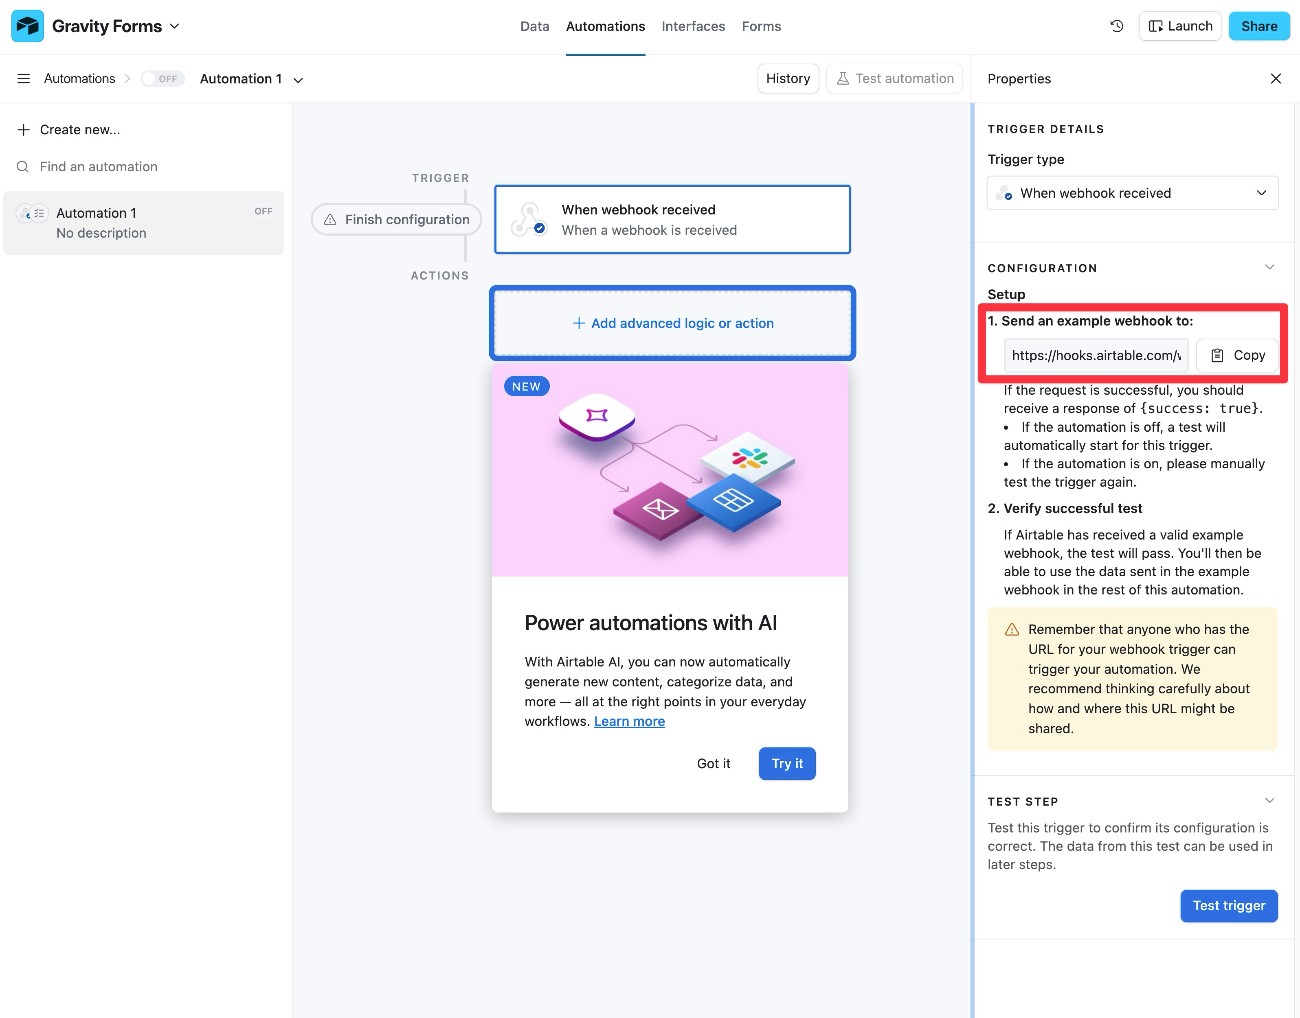
In the Trigger Details sidebar that appears, you should see a webhook URL.
Copy this URL because you’ll need it in the next step.
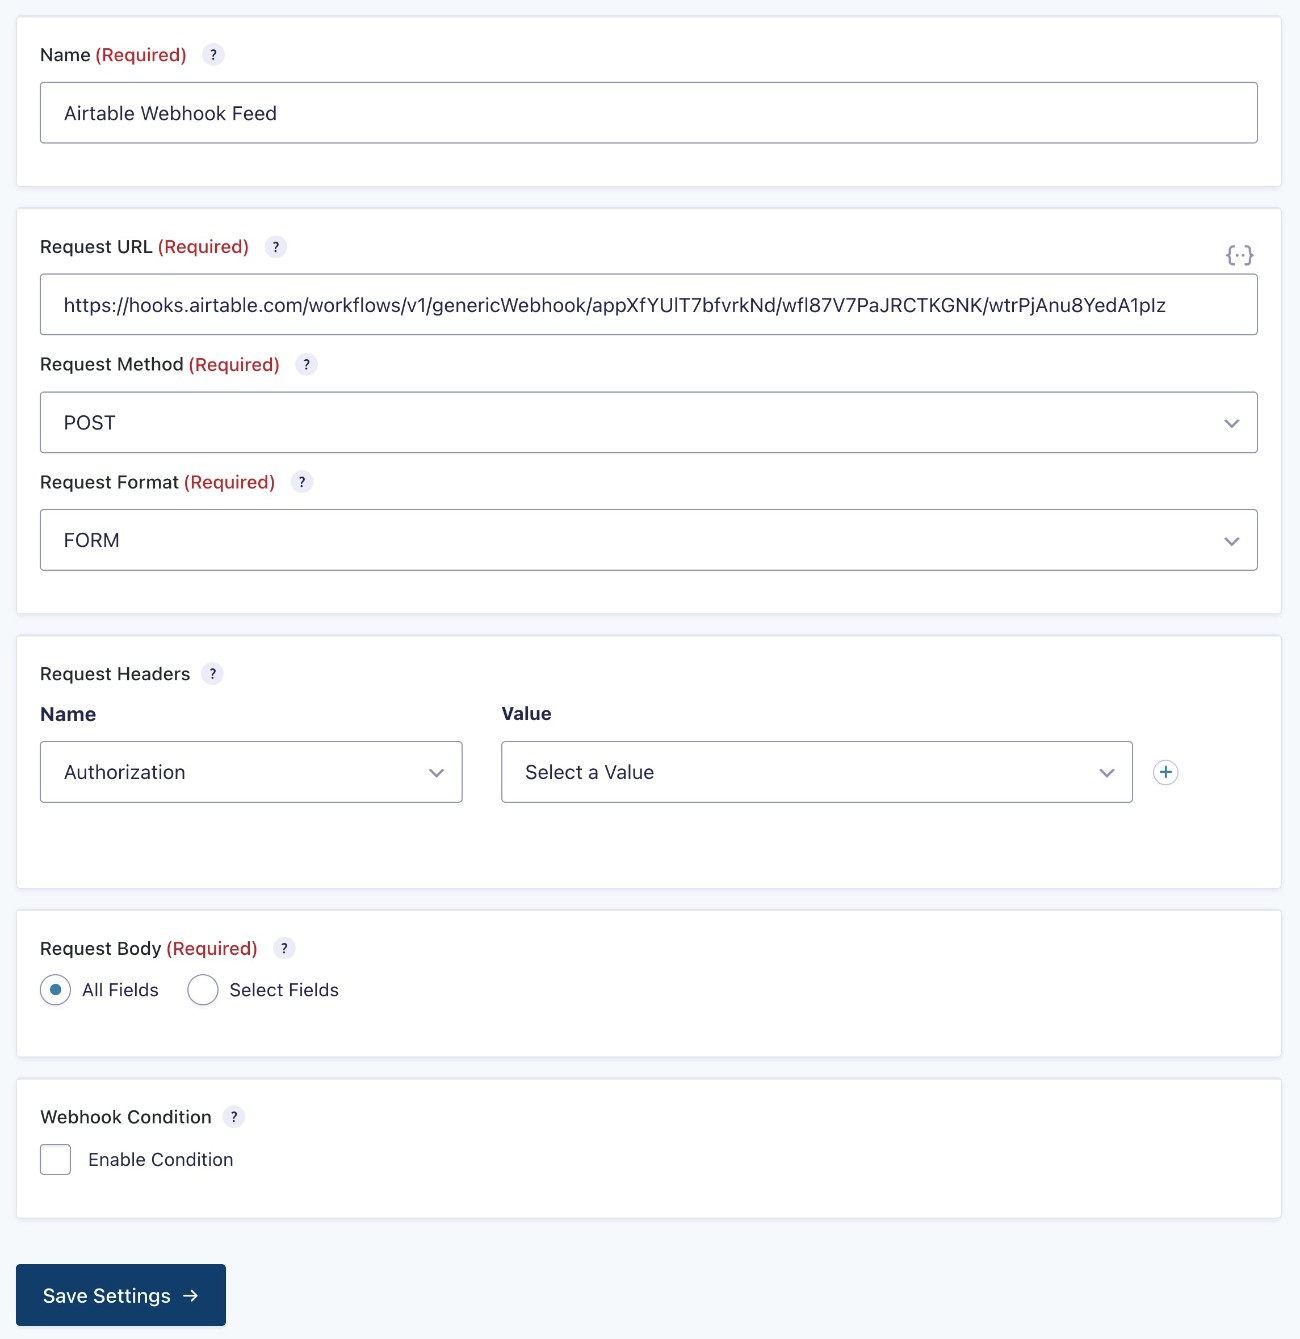
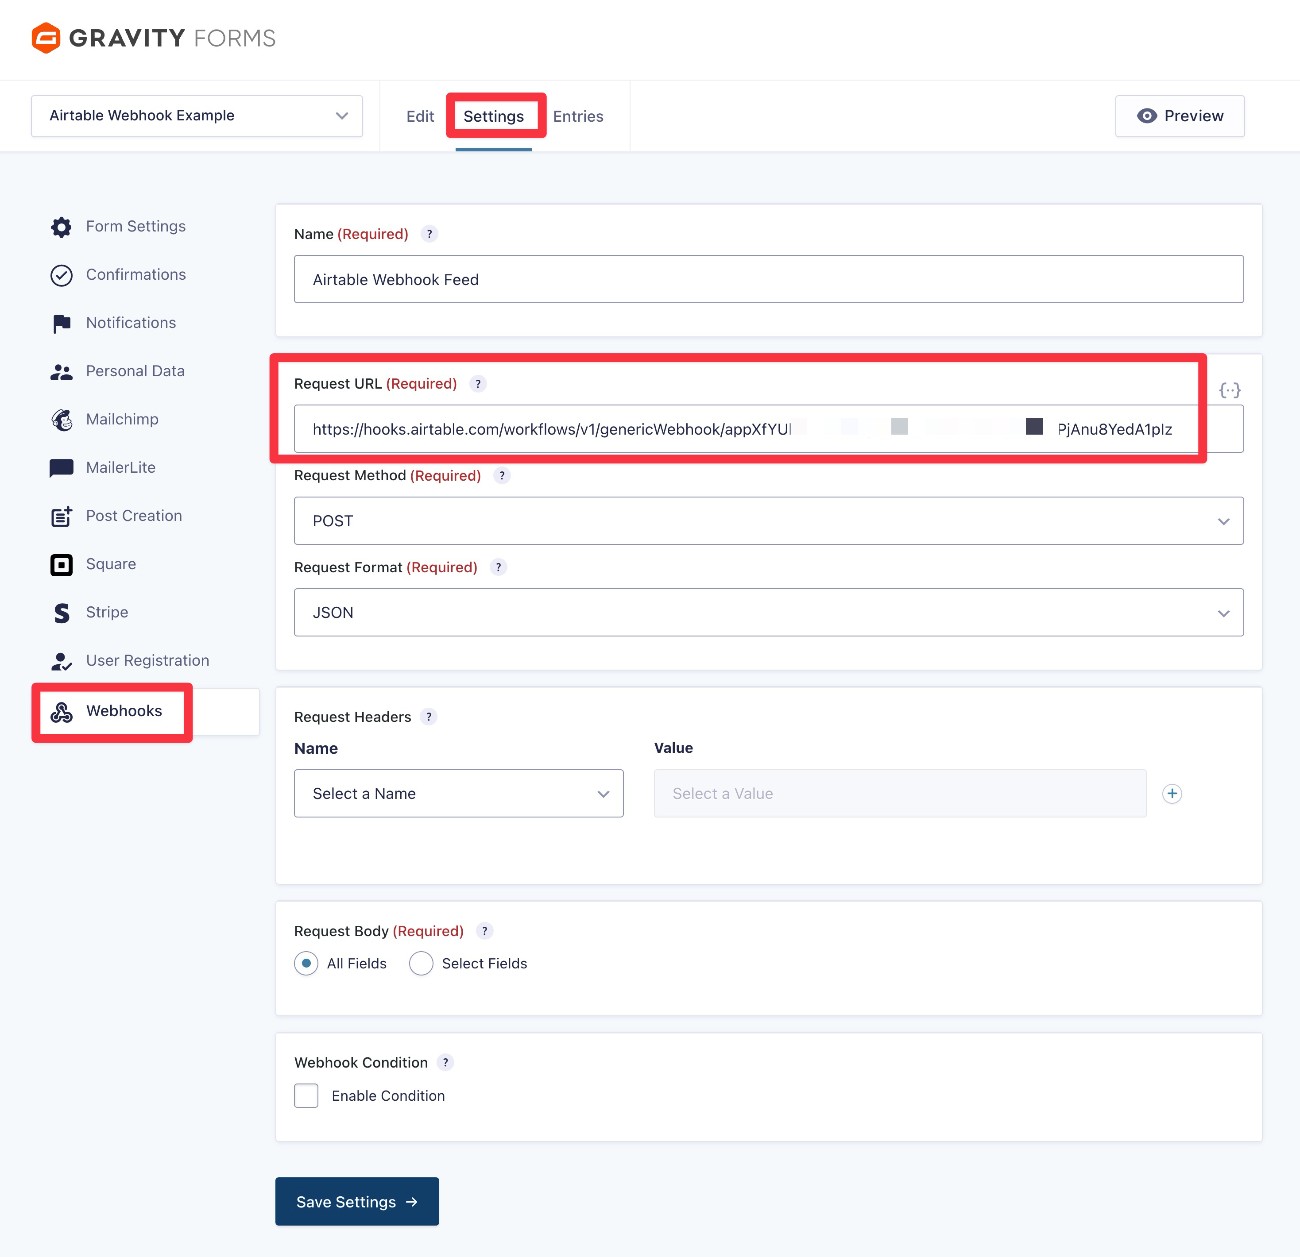
2. Set up your Webhooks feed in WordPress
Now, open your form’s settings in WordPress and create a new Webhooks feed.
Configure the feed as follows:
- Request URL – Paste in the URL that you just copied from Airtable.
- Request Method – POST
- Request Format – JSON
- Request Headers – You do not need to add any.
- Request Body – You can choose All Fields to send all form data to Airtable. If you only want to send some data, you can choose Select Fields and choose the individual fields to send to Airtable.
Make sure to click Save Settings when you’re done.
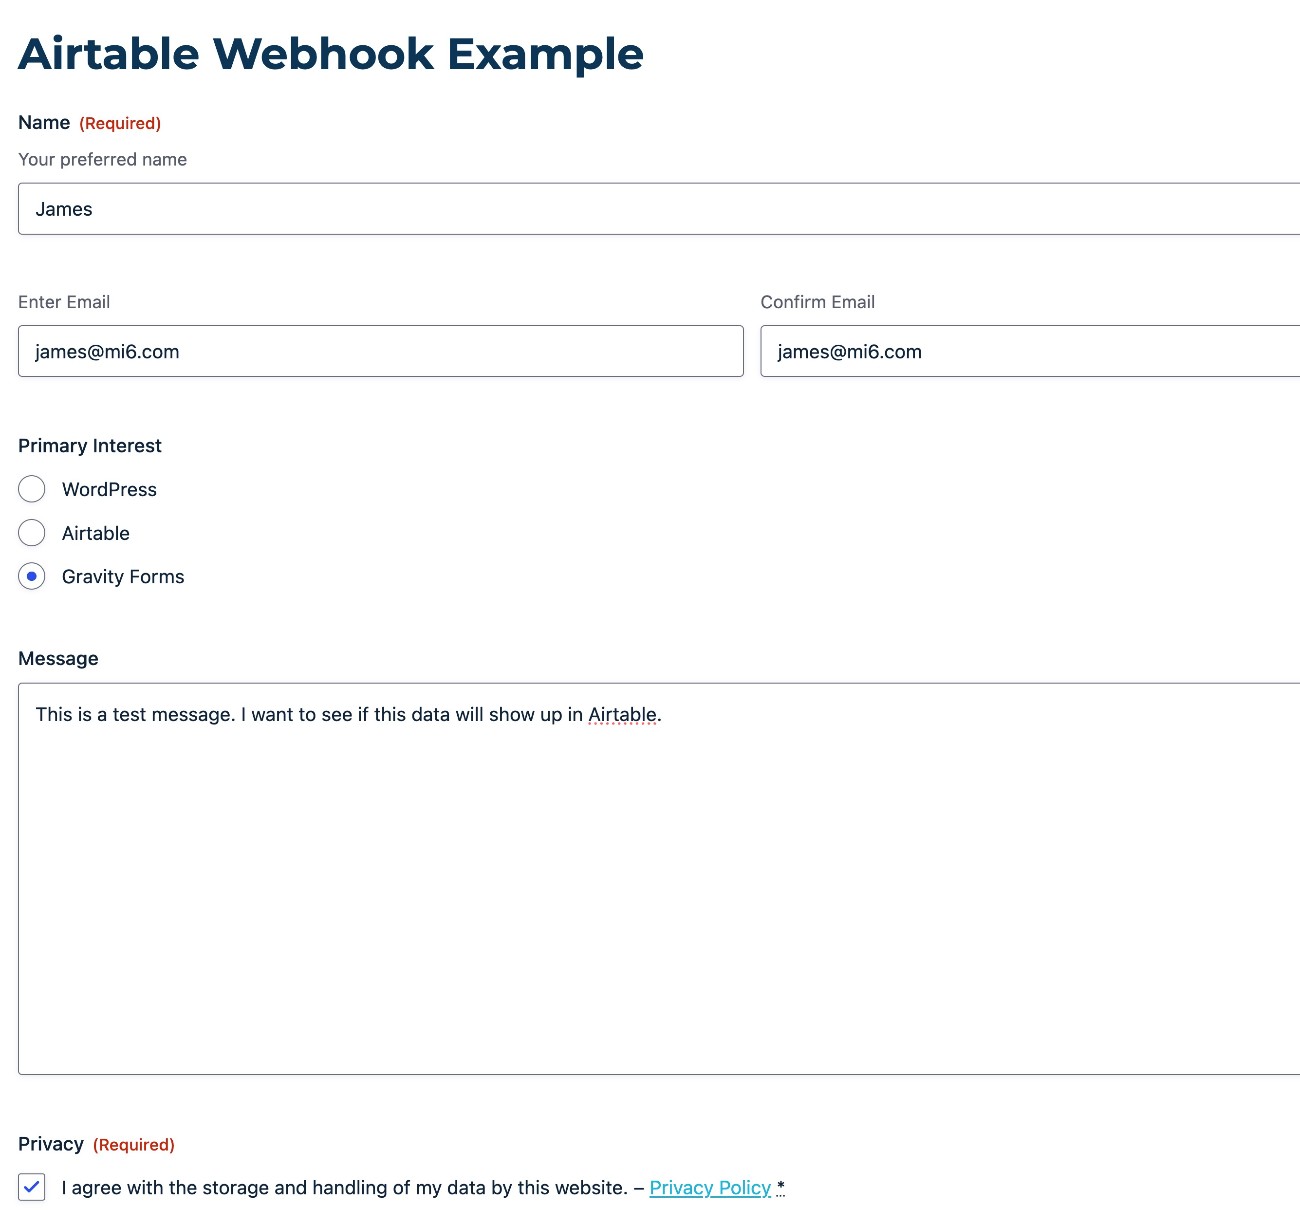
3. Send test data to Airtable
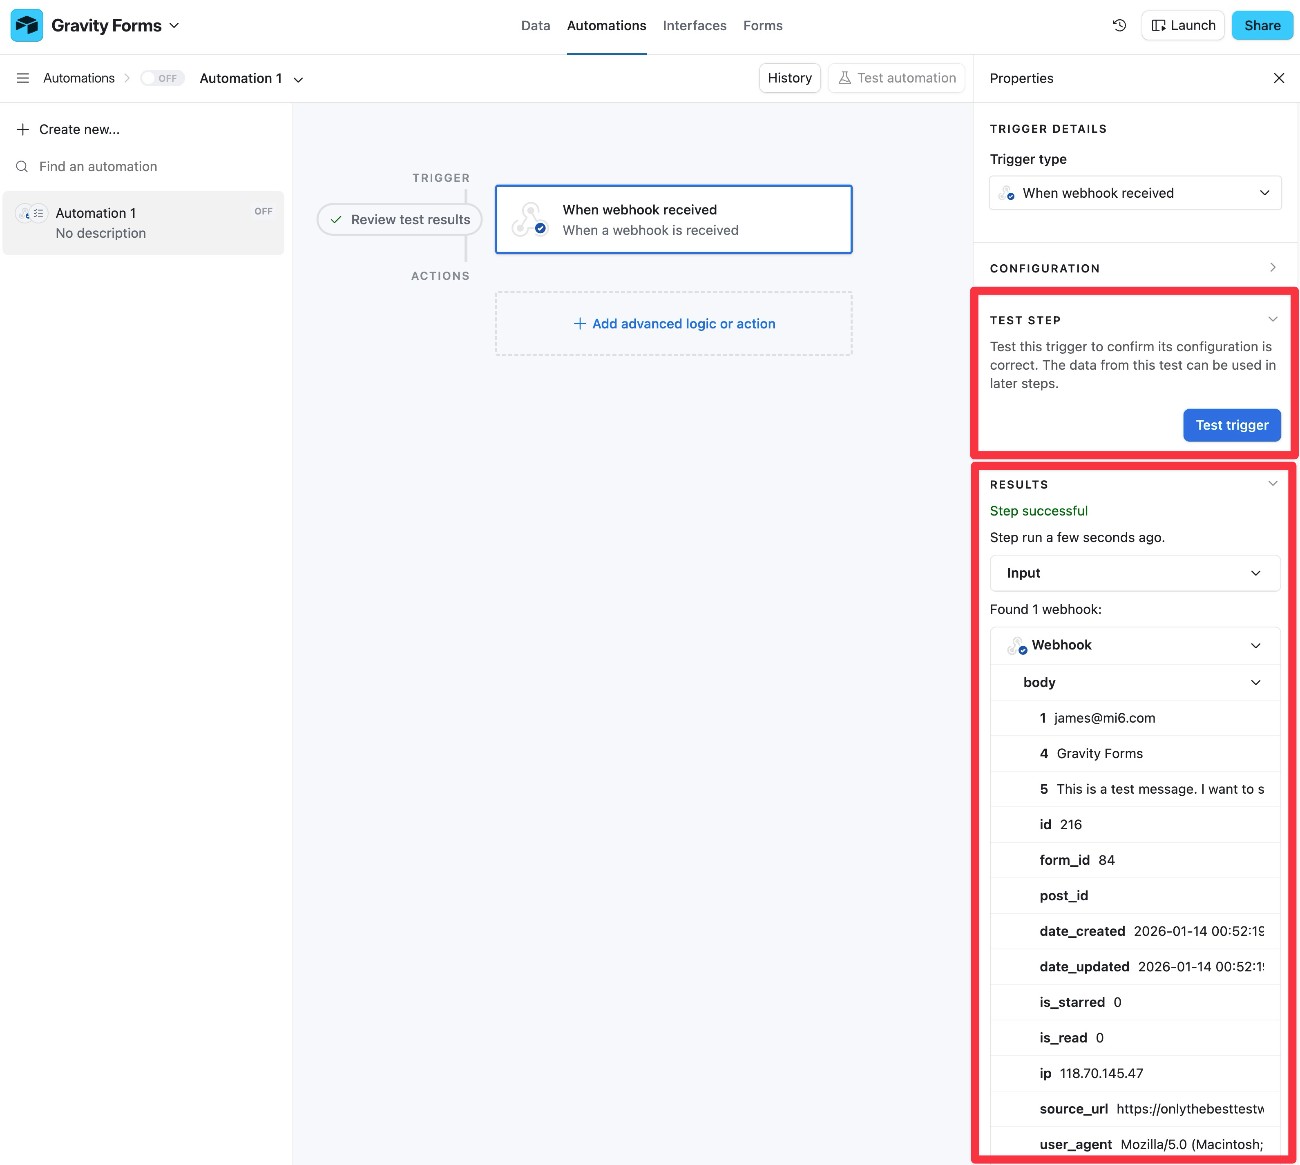
Now, you need to send some test data to Airtable by submitting your WordPress form with some dummy data.
After submitting the form, go back to the Airtable interface and click the Test trigger button.
You should then see something like “Found 1 webhook” appear below, which means that Airtable received your form’s data. You can expand the body to make sure all of the data is there.
4. Add Airtable Action to process data
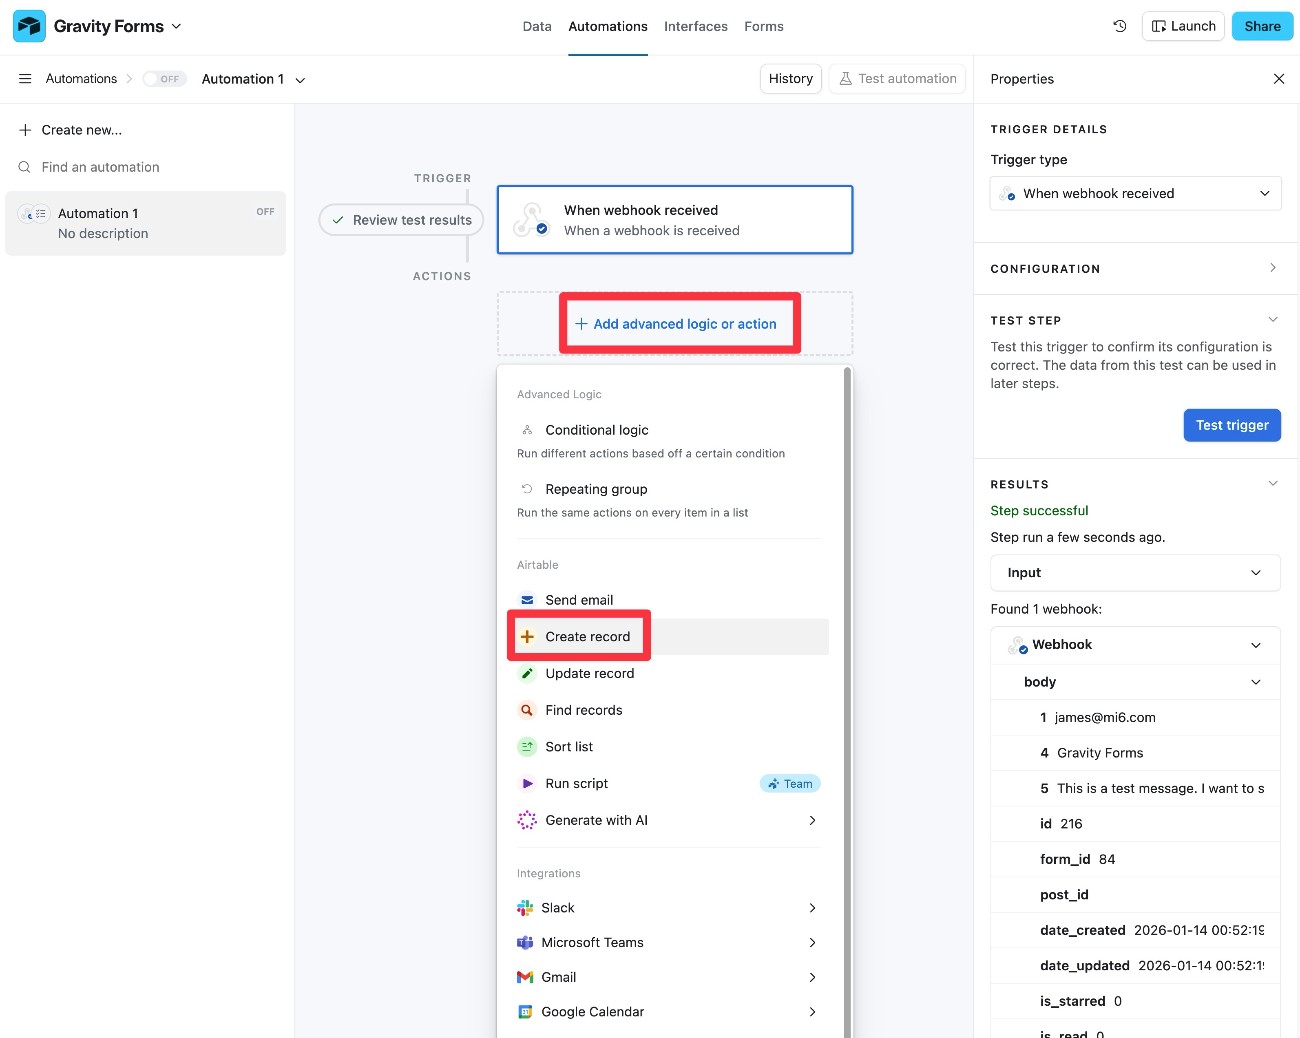
To finish things out, you need to add an Action to your Airtable automation, which tells Airtable what to do with the data that it received from your form.
For this example, we’ll choose Create record, which will have Airtable add the form data as a new record in our Base.
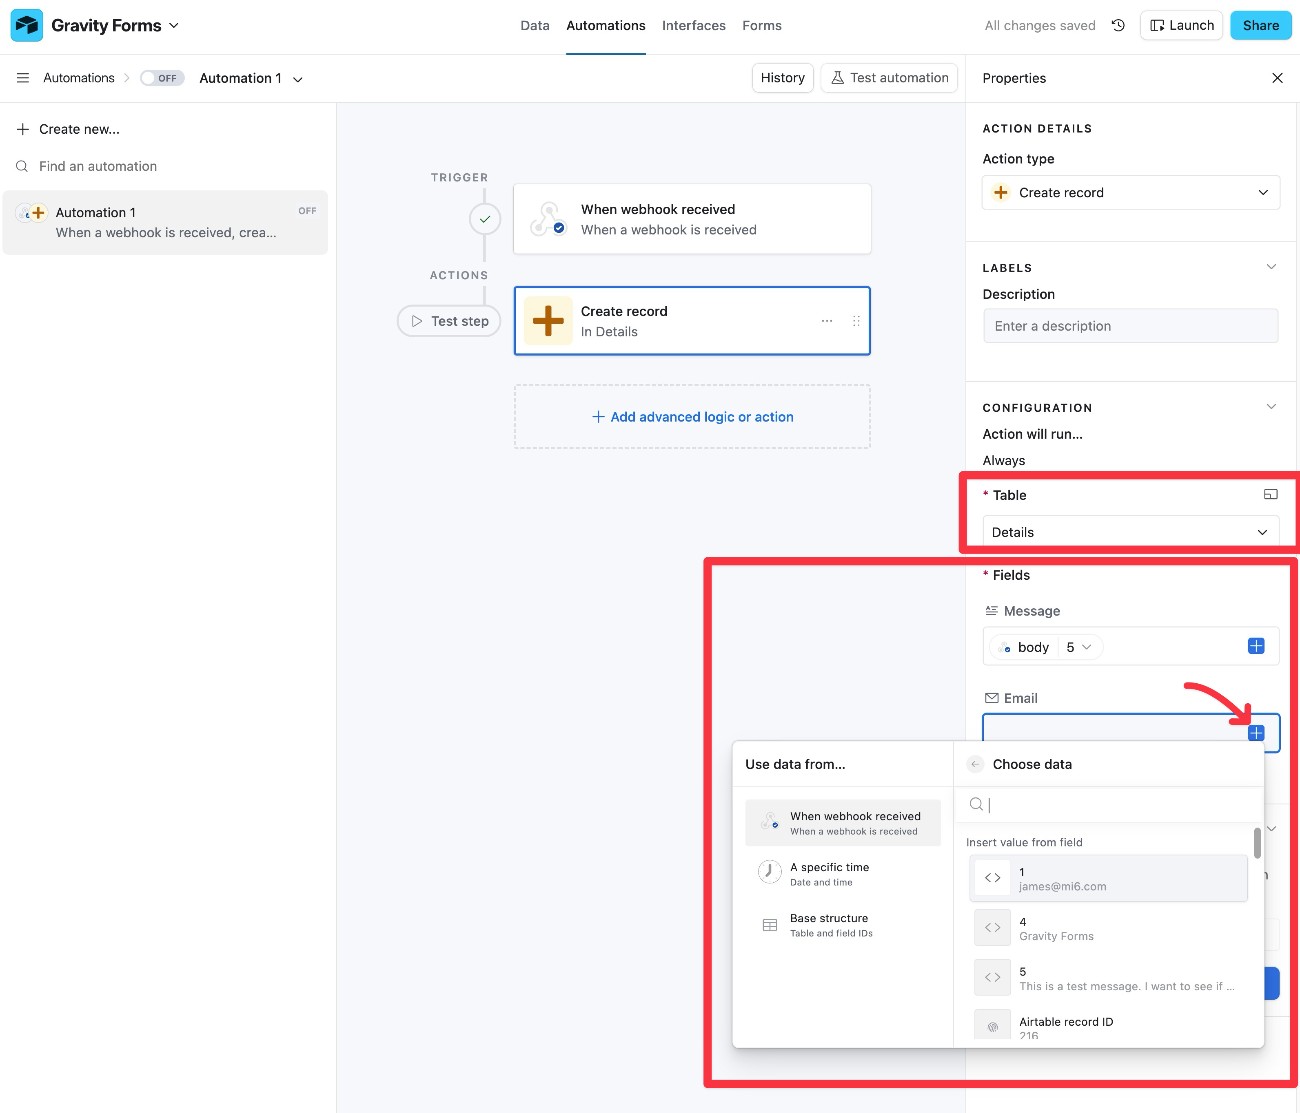
In the Configuration tab of the action, you can first choose which Table to add data to.
Then, you can map individual pieces of form data to each Airtable field.
To help you do this, Airtable will show the data from your test form submission when referencing the webhook values.
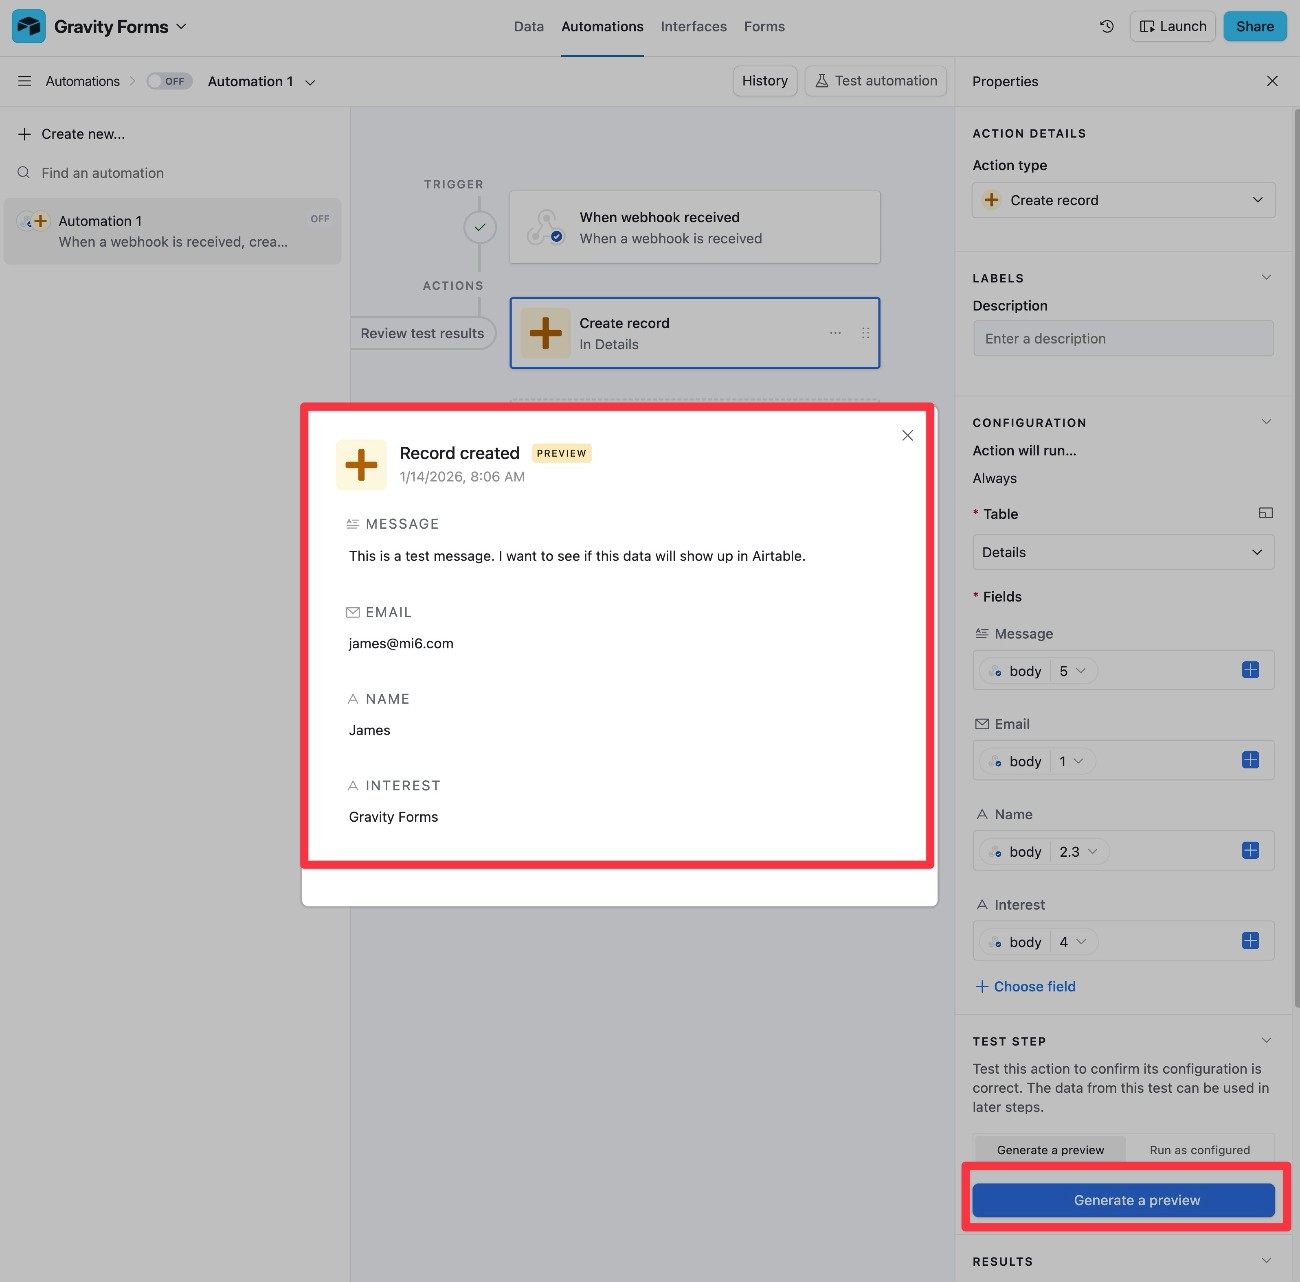
When you’ve finished mapping all of the data, you can click the Generate a preview button to see what the data will look like in Airtable.
5. Turn on Airtable Automation and test again
To make your Airtable automation live, you just need to turn it on using the toggle in the top-left of the interface.
We recommend submitting your WordPress form one more time just to make sure the live automation is behaving as you want it to.
If everything works, you’re all finished!
Tips for testing and debugging webhooks
Configuring webhooks can sometimes be a little tricky because it’s hard to see “under the hood” while you’re working on things.
Here are some tips to help you more easily test, debug, and troubleshoot webhooks:
- Use a webhook testing service – These services give you a test webhook URL to which you can send data, which helps you more easily visualize what the webhook’s data looks like. For example, the free Webhook Tester tool.
- Check HTTP status codes – When you’re making a request to a URL/API endpoint, it should respond with an HTTP status code. For example, 200 (Success), 401 or 403 (authentication issue), 500 (server error), etc. This can give you insight into whether or not there’s a problem with the request/authentication.
- Check authentication headers – If you’re using basic authentication via your request headers, make sure that you’ve formatted everything properly.
- Enable Gravity Forms logging – You can do this by going to Forms → Settings and enabling the Logging toggle.
- Check if JSON formatting is valid – If you’re using the gform_webhooks_request_data filter to customize the JSON output of your webhook, use a JSON validator to make sure it’s properly formatted.
Best practices for using webhooks and APIs with Gravity Forms
To make sure that you’re using webhooks in a secure and reliable way, it’s important to follow these best practices:
- Use HTTPS endpoints – Always use HTTPS endpoints to secure data while it’s in transit.
- Be careful sending sensitive information – Be wary of sending sensitive data such as credit card numbers, passwords, social security numbers, etc.
- Securely store secret API keys – Avoid hard-coding them in publicly visible areas, as this could give malicious actors authenticated access to API endpoints.
- Use environment variables for APIs – When possible, use environment variables to further protect API credentials.
- Regularly audit webhooks – Keep an eye on which webhooks are active and when/where data is being sent to external services.
Get started with Gravity Forms webhooks today
With the Gravity Forms Webhooks Add-On, you can easily connect your forms to pretty much any service, either by integrating with the service’s API directly or using an intermediary service like n8n.
When available, we always recommend using one of Gravity Forms’s dedicated integration add-ons. However, if you’re using a service for which a dedicated add-on doesn’t currently exist, webhooks give you the flexibility to set up your own customizable integration with that service.
You can access the Webhooks Add-On on the Gravity Forms Elite or Nonprofit licenses.
If you’re not holding one of those licenses yet, you can purchase a new license here or upgrade your existing license and only pay the prorated difference.
If you want to try the webhook functionality before you purchase, you can also create a free, fully functioning demo website that includes all of the official Gravity Forms add-ons, including the Webhooks Add-On.

If you want to keep up-to-date with what’s happening on the blog sign up for the Gravity Forms newsletter!