Searching for the best way to send an email drip campaign to people who fill out one of the forms that you’ve created with Gravity Forms?
With a drip campaign, you can send an automated sequence of emails on a custom schedule. These work great for providing information to people, convincing people to make a purchase, delivering email course content, and lots of other use cases.
One option is to use one of Gravity Forms’ official add-ons to connect to a dedicated email marketing service that supports drip campaigns. You would then set up your drip campaign using that service.
However, you can also create email drip campaigns without relying on a third-party email marketing service by pairing Gravity Forms with Gravity Flow, which is the topic of this post.
This not only lets you do everything without leaving your WordPress dashboard, but it can also save you money by eliminating the need to use a third-party service with recurring monthly billing.
Below, you’ll learn step-by-step how to create email drip campaigns using Gravity Forms and Gravity Flow.
Let’s dig in!
What Is Gravity Flow? How Does It Help You Create Email Drip Campaigns?
Gravity Flow, recently acquired by Gravity, is a powerful add-on that helps you create custom workflows based on the forms that you’ve built with Gravity Forms.
You can use these Gravity Flow workflows in all types of helpful ways – we wrote about some real-world examples here.
For the purposes of this post, the Gravity Flow workflow that we’re most interested in is the ability to send unlimited emails on a completely custom schedule.
For example, with Gravity Flow, you can easily set up the following sequence:
- User submits the form.
- One hour later, send an email.
- One day after the first email, send another email.
- Three days after the previous email, send another email.
- Etc.
Again, you can do this all without needing a separate email marketing service. You can set up everything without leaving your WordPress dashboard and the emails will be sent straight from your site (though you might want to use a dedicated email sending service to improve deliverability).
How to Create an Email Drip Campaign With Gravity Forms and Gravity Flow
Now that you have some background knowledge, let’s get into the actual step-by-step guide for how to create an email drip campaign using Gravity Forms and Gravity Flow.
To follow this tutorial, you’ll want to make sure you’ve installed the following plugins:
- Gravity Forms
- Any official Gravity Forms add-ons that you want to use (you don’t need official add-ons to follow this tutorial, but they might be helpful for enhancing your form in other ways)
- Gravity Flow
1. Create Your Form
To get started, you’ll want to create the form that will trigger your email drip campaign.
How you create this will depend entirely on your use case.
For example, let’s say you want to create a form that sends a drip campaign to people who register for an in-person event that you’re hosting.
In this case, you would just use your event registration form to trigger the workflow – there’s no need to create a separate form.
On the other hand, if you just want to send emails to people who specifically fill out an email opt-in form, all you would need to do is create a simple email opt-in form.
The only hard requirement for your form is that it must include an Email field. Otherwise, you won’t know where to send your drip emails!
For this example, we’re going to use the pre-built Gravity Forms event registration template. It looks something like this:

2. Create Your First Workflow Step
Once you’ve created your basic form, make sure to click the Save Form button.
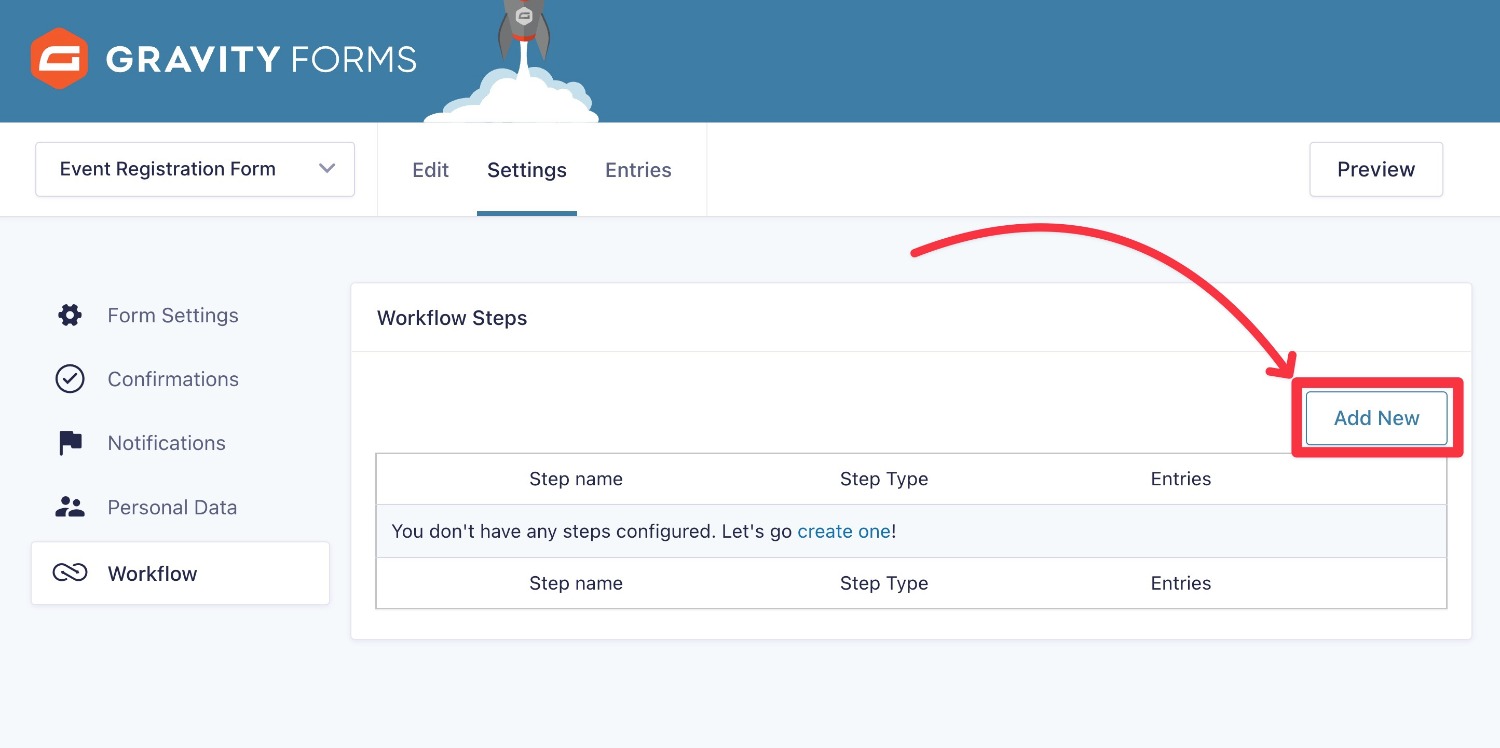
Then, go to Settings → Workflow:
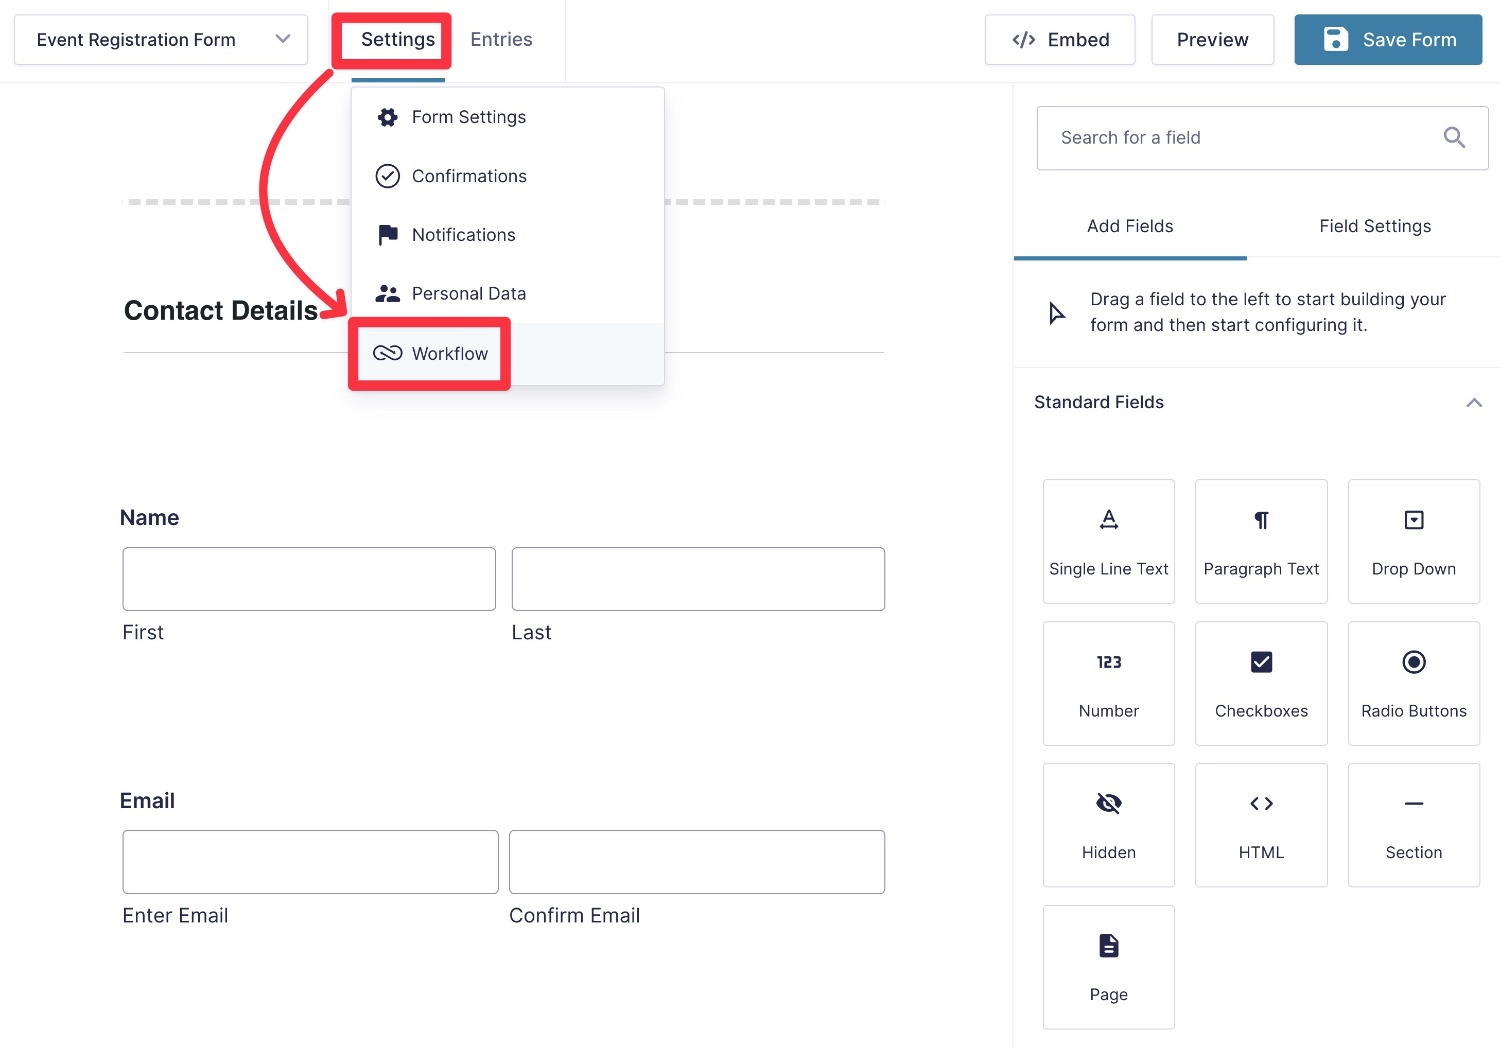
You’ll then see a list of all the “workflow steps” associated with this form, which will be empty for now.
In a nutshell, each email that you want to send as part of your drip campaign will be a workflow step.
To create your first step/email, click the Add New button:
3. Configure General Workflow Step Settings
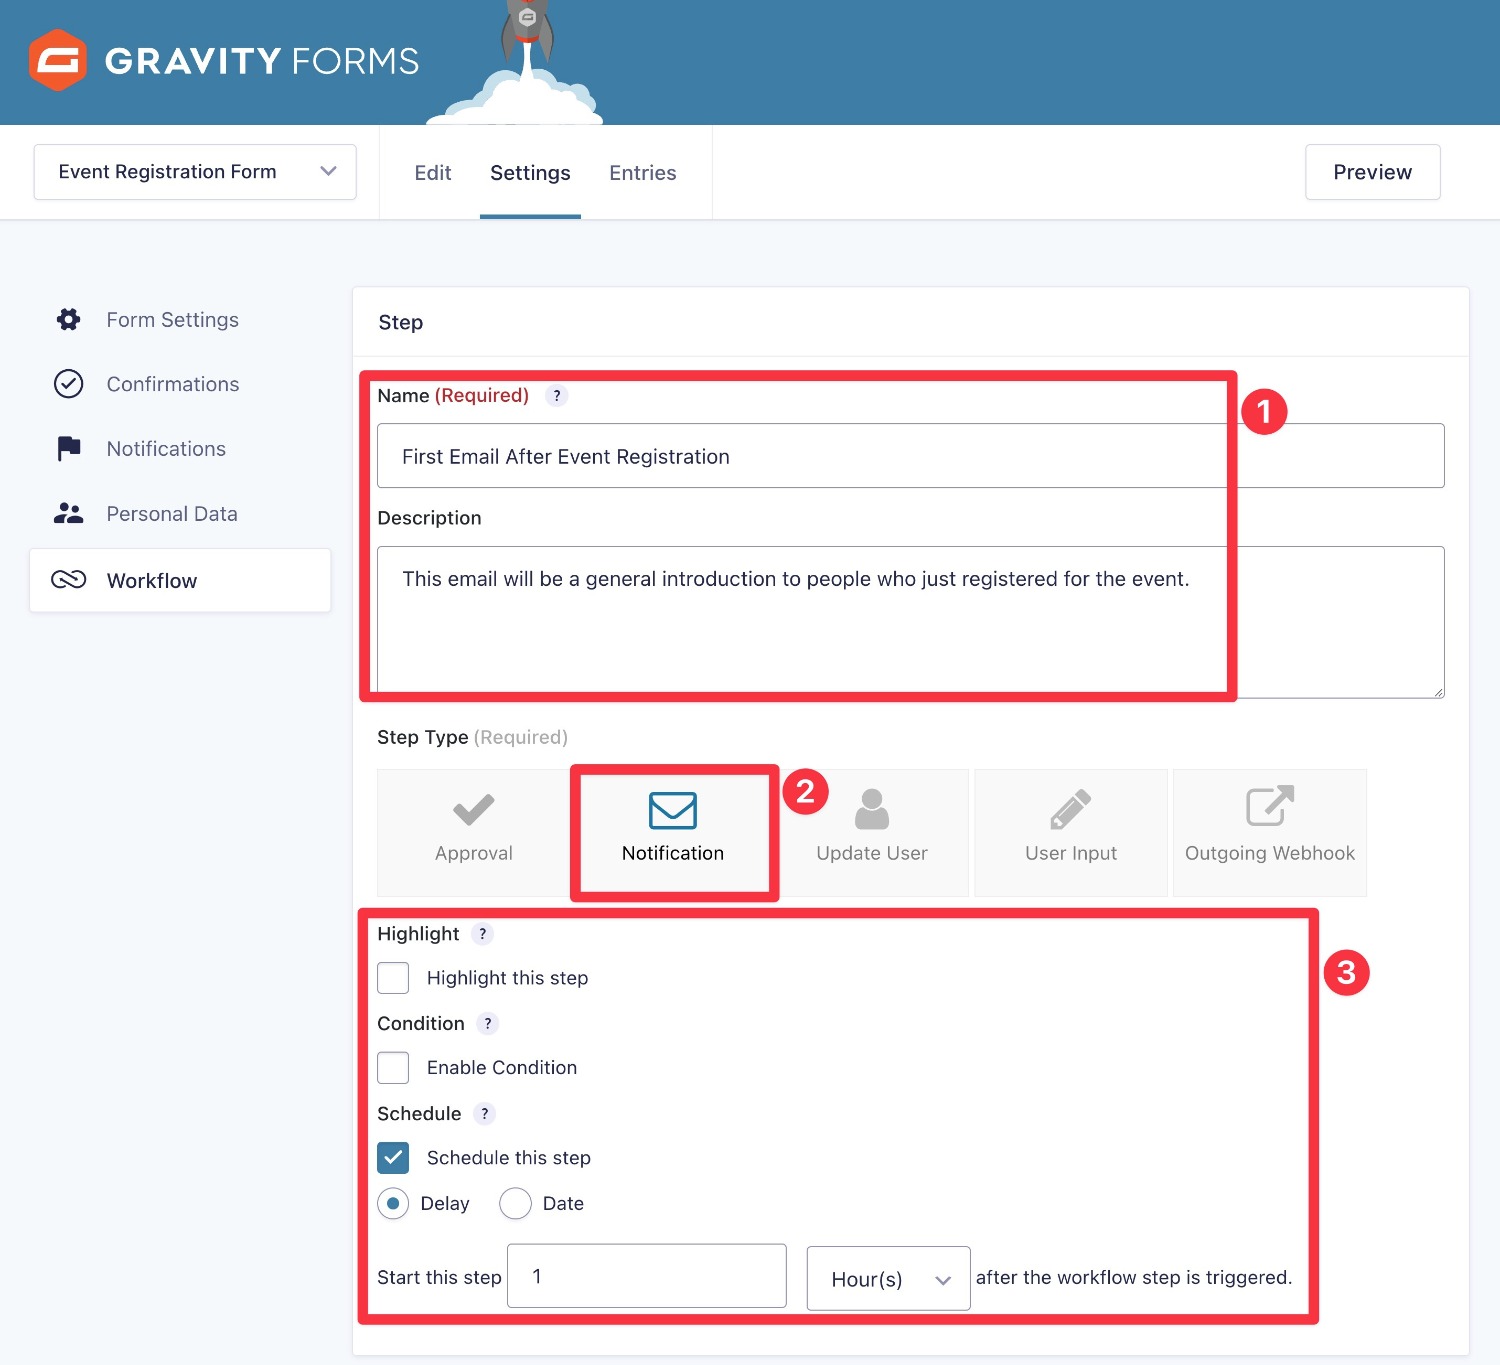
This will open an interface where you can create and configure your workflow step.
To begin, give it a name and description to help you remember it (these details are entirely internal). For example, if this is the first email in the drip campaign, you might mark it as the first and give a short description of the content in the email.
Below that, choose Notification under the Step Type. This is what lets you tell Gravity Flow that you want to send an email to the person who filled out this form. It will also expand some additional options that are unique to the notification step.
Before getting to those notification-specific settings, though, you’ll want to consider a few of the general options under the Step settings:
- Highlight – when enabled, this will highlight the step in the backend interface to help you keep track of it.
- Condition – use conditional logic to choose whether or not to send this email. For example, you could only enroll someone in the drip campaign if they answered the form in a certain way. Or, you could send different emails depending on how the person answered the form.
- Schedule – this lets you control when to send the email, which is important for a drip campaign. For example, you could configure it to send one hour after the form is submitted, one day, two days, and so on. Alternatively, you could also set it to execute on a specific date, rather than factoring in when the person submitted the form. For a drip campaign, each step will probably have its own scheduling rules.
In this first example, we’ve configured the email to send one hour after the person submits the form:
4. Configure Your Notification
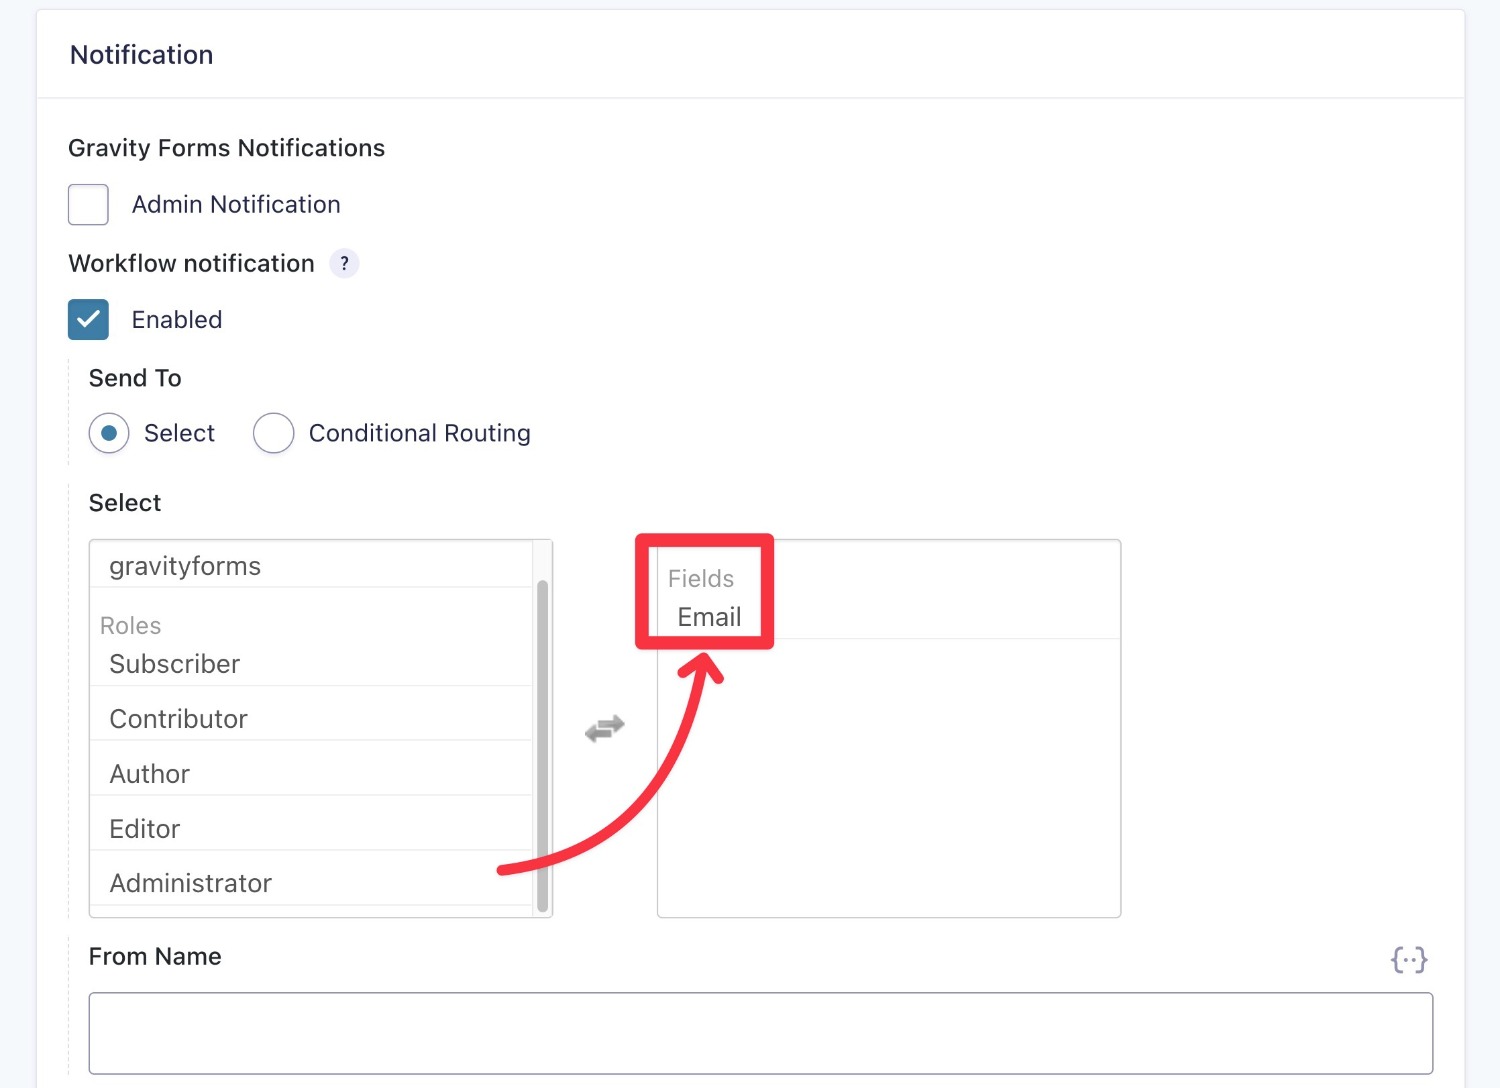
Now, you can scroll down to the Notification settings to configure the actual emails that will be part of your drip campaign.
To send an email to the person who filled out your form, you’ll want to check the box for Workflow notification, which will expand some additional options.
First, you’ll choose who to send this email to. For a drip campaign, you’ll want to choose the Email field. This will send the email to the email address that the person used when filling out the form.
Below that, you can configure the actual content of the email, along with other details such as the from name, from email, subject line, and so on.
You can also click the {..} icon to insert dynamic information using merge tags. For example, the actual name of the person who submitted the form:
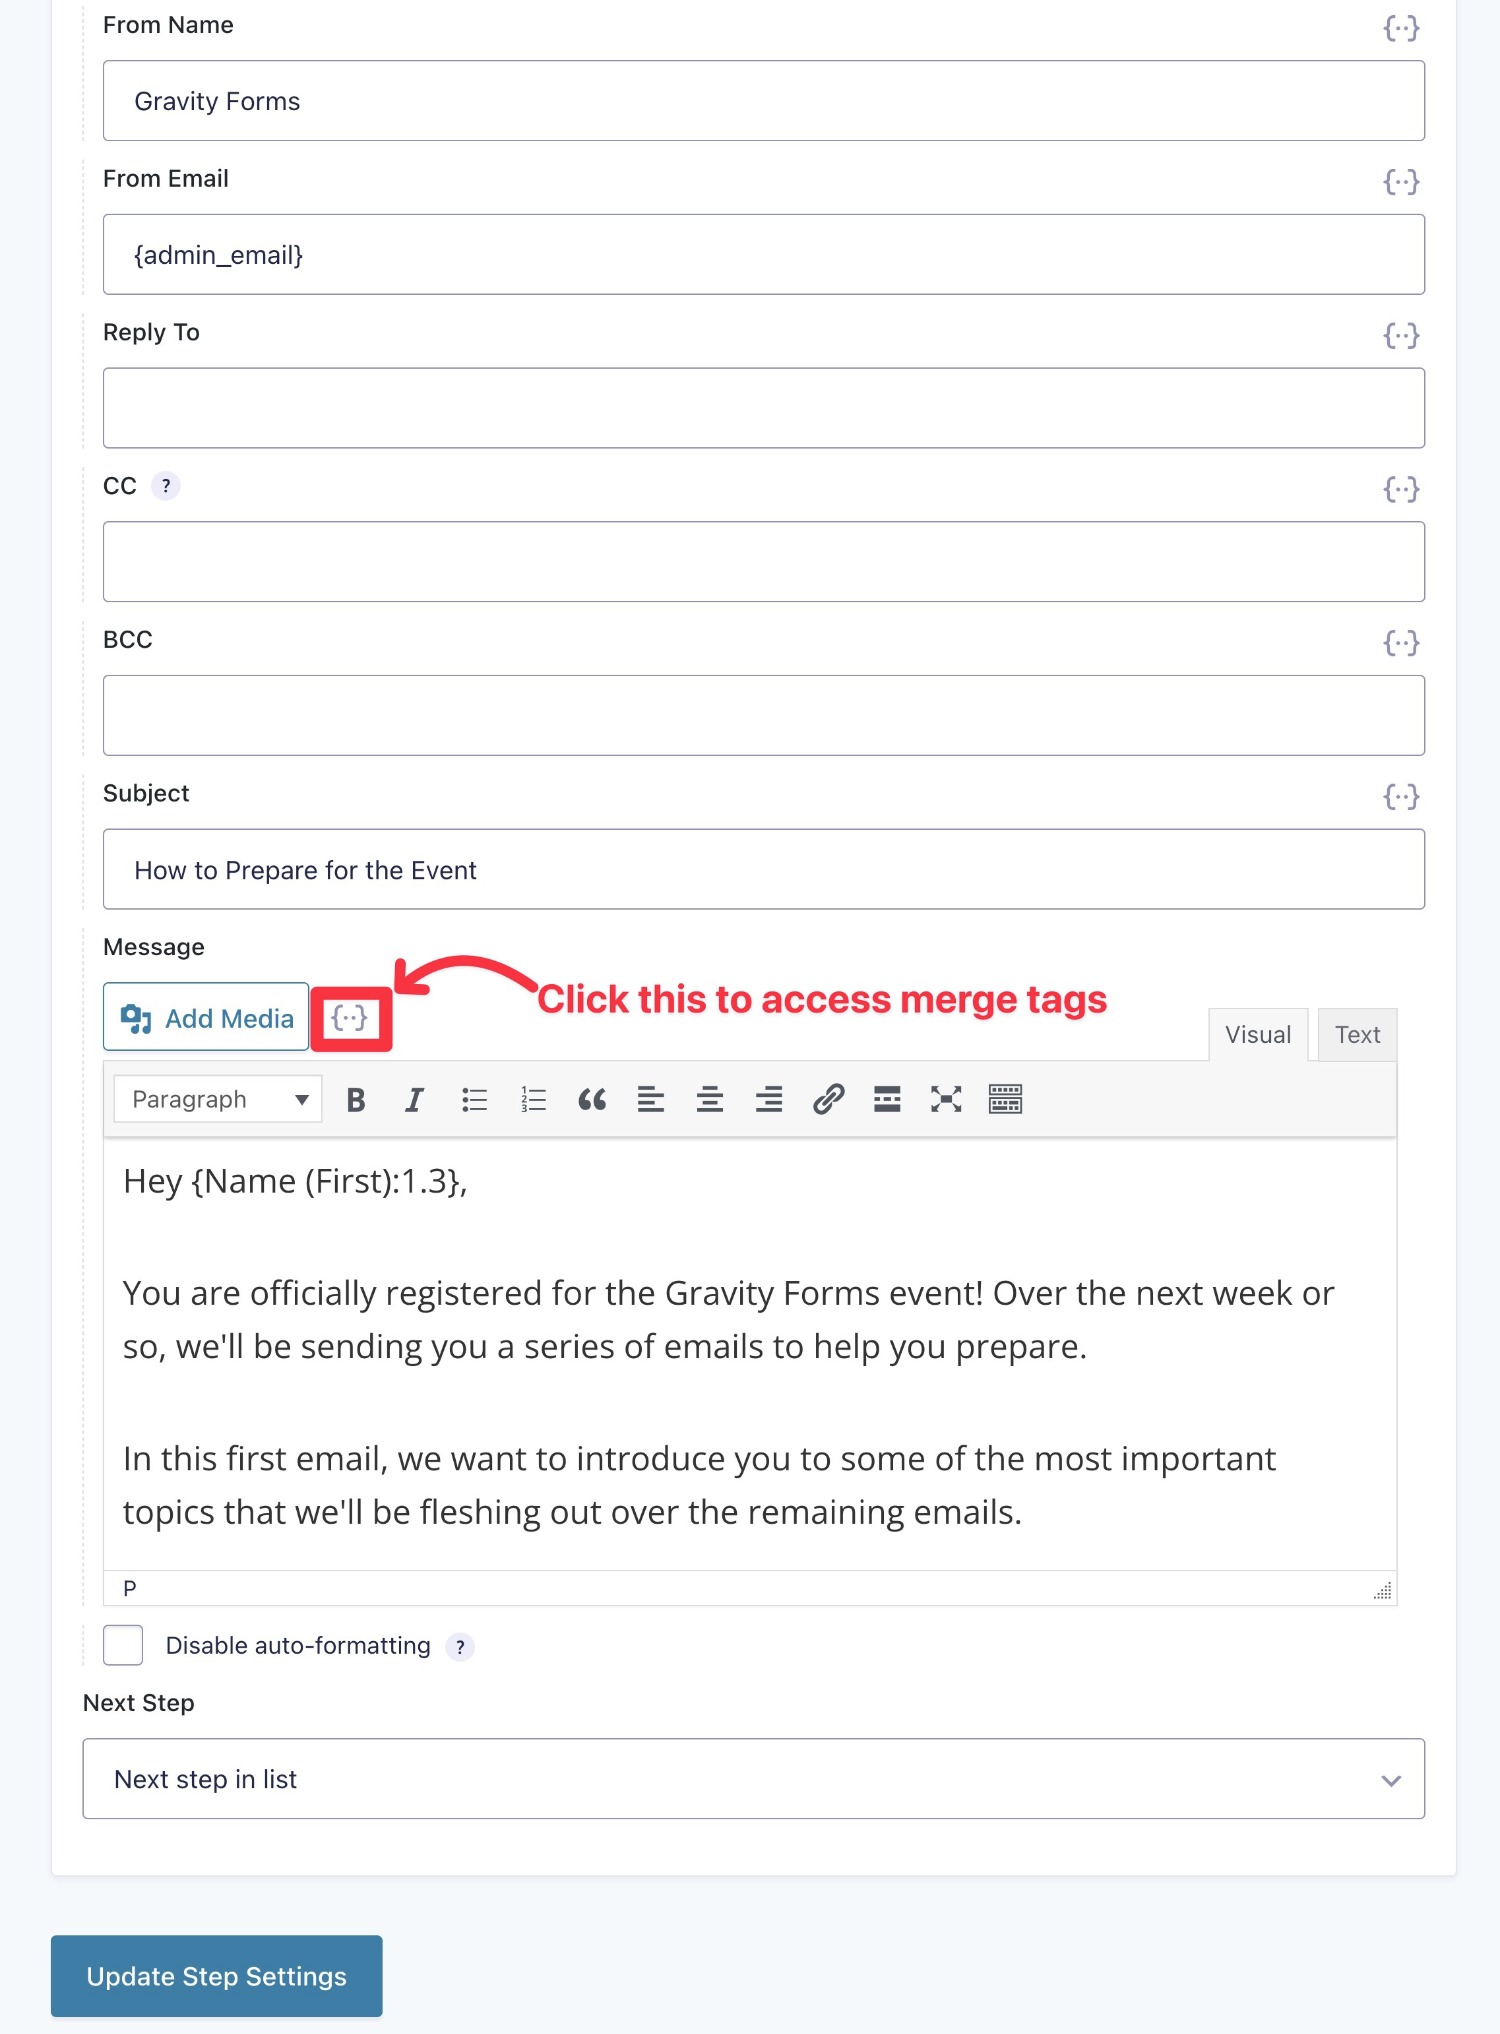
To give users the option to cancel the drip campaign, we recommend using merge tags to insert the Cancel Link, as well.
For the Next Step drop-down at the end, you’ll want to choose Next step in list if there are additional emails in your drip campaign.
Once you’re happy with how everything looks, click the Update Step Settings button at the bottom to save the settings for this email.
5. Repeat for Additional Steps (Each Email In Your Drip Campaign)
To create additional emails in your drip campaign, go back to the main Workflow area and click the Add New button to add another step.
Then, just fill out all the same information as you did in the previous steps. Keep in mind that you’ll usually want to choose a different schedule for each email in your drip campaign.
The scheduling works based on the previous step – not necessarily based on when someone submitted the form.
So if you schedule your second step to start one day after it’s triggered, it will send one day after the previous email/step.
When you’re finished, you should see a list of all your steps/emails when you go to Settings → Workflow.
Here’s an example of what it might look like for an email drip campaign with three different emails:
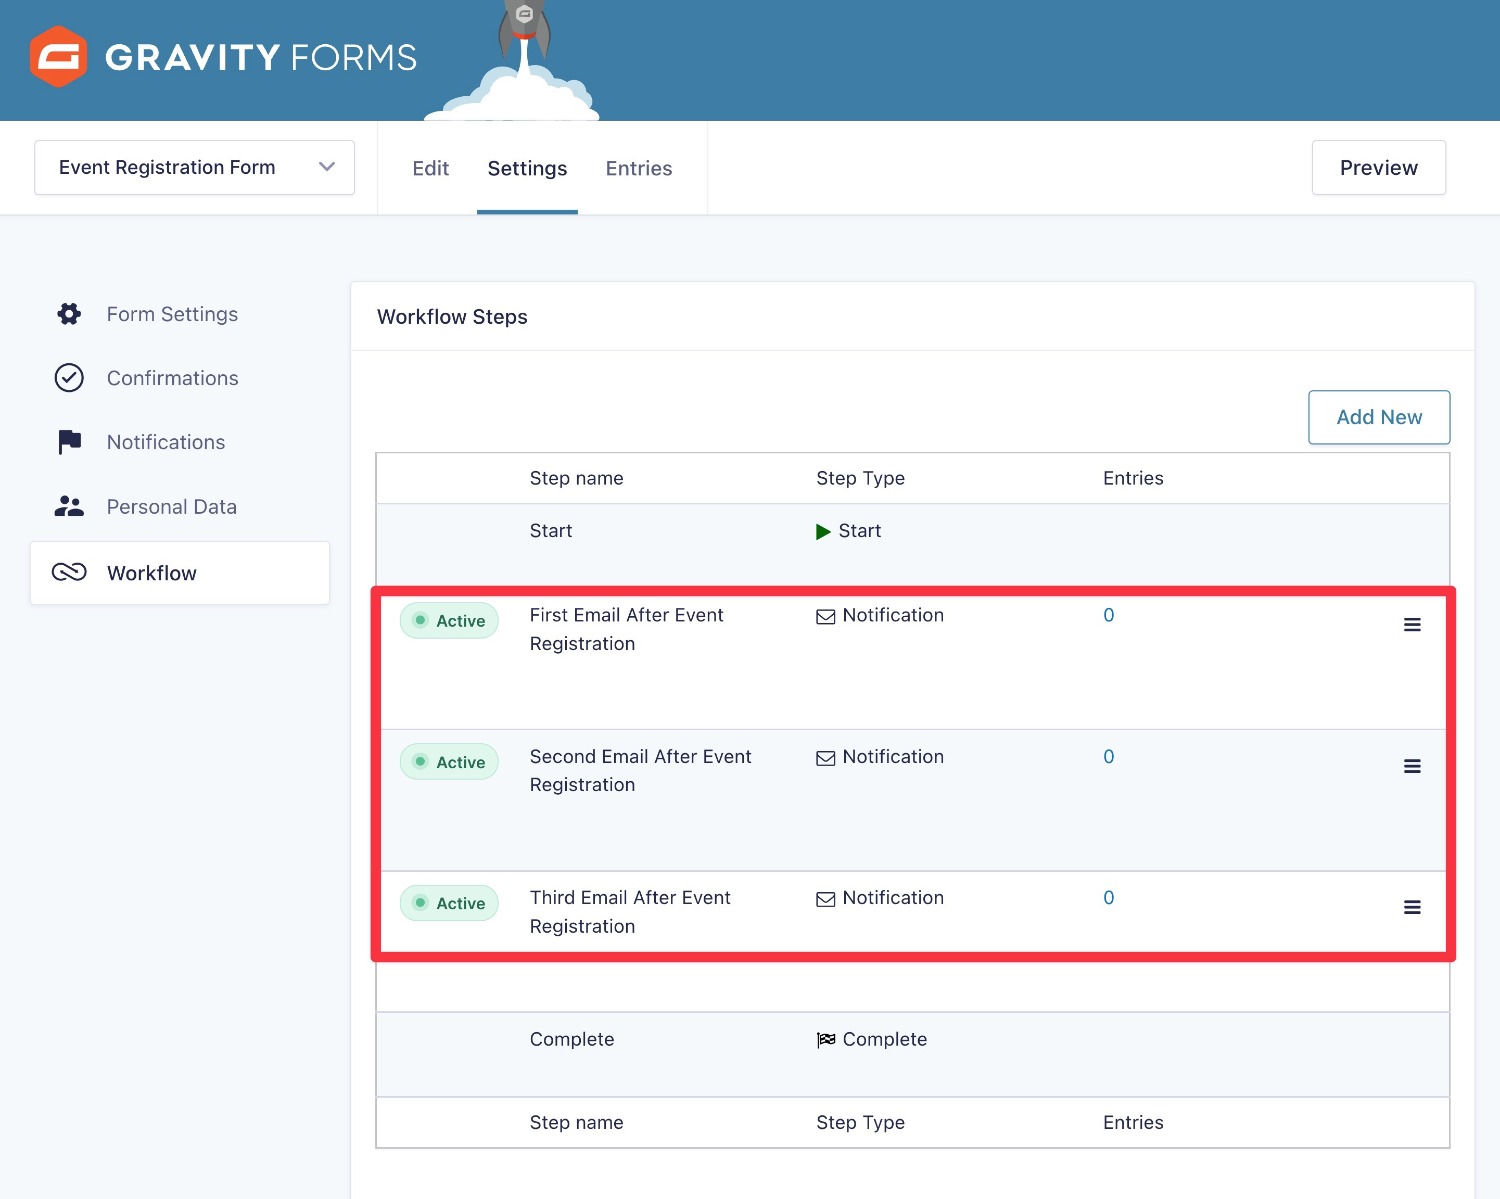
If needed, you can use drag and drop to rearrange the steps. However, keep in mind that this might affect your scheduling since each step’s schedule is based on the preceding step.
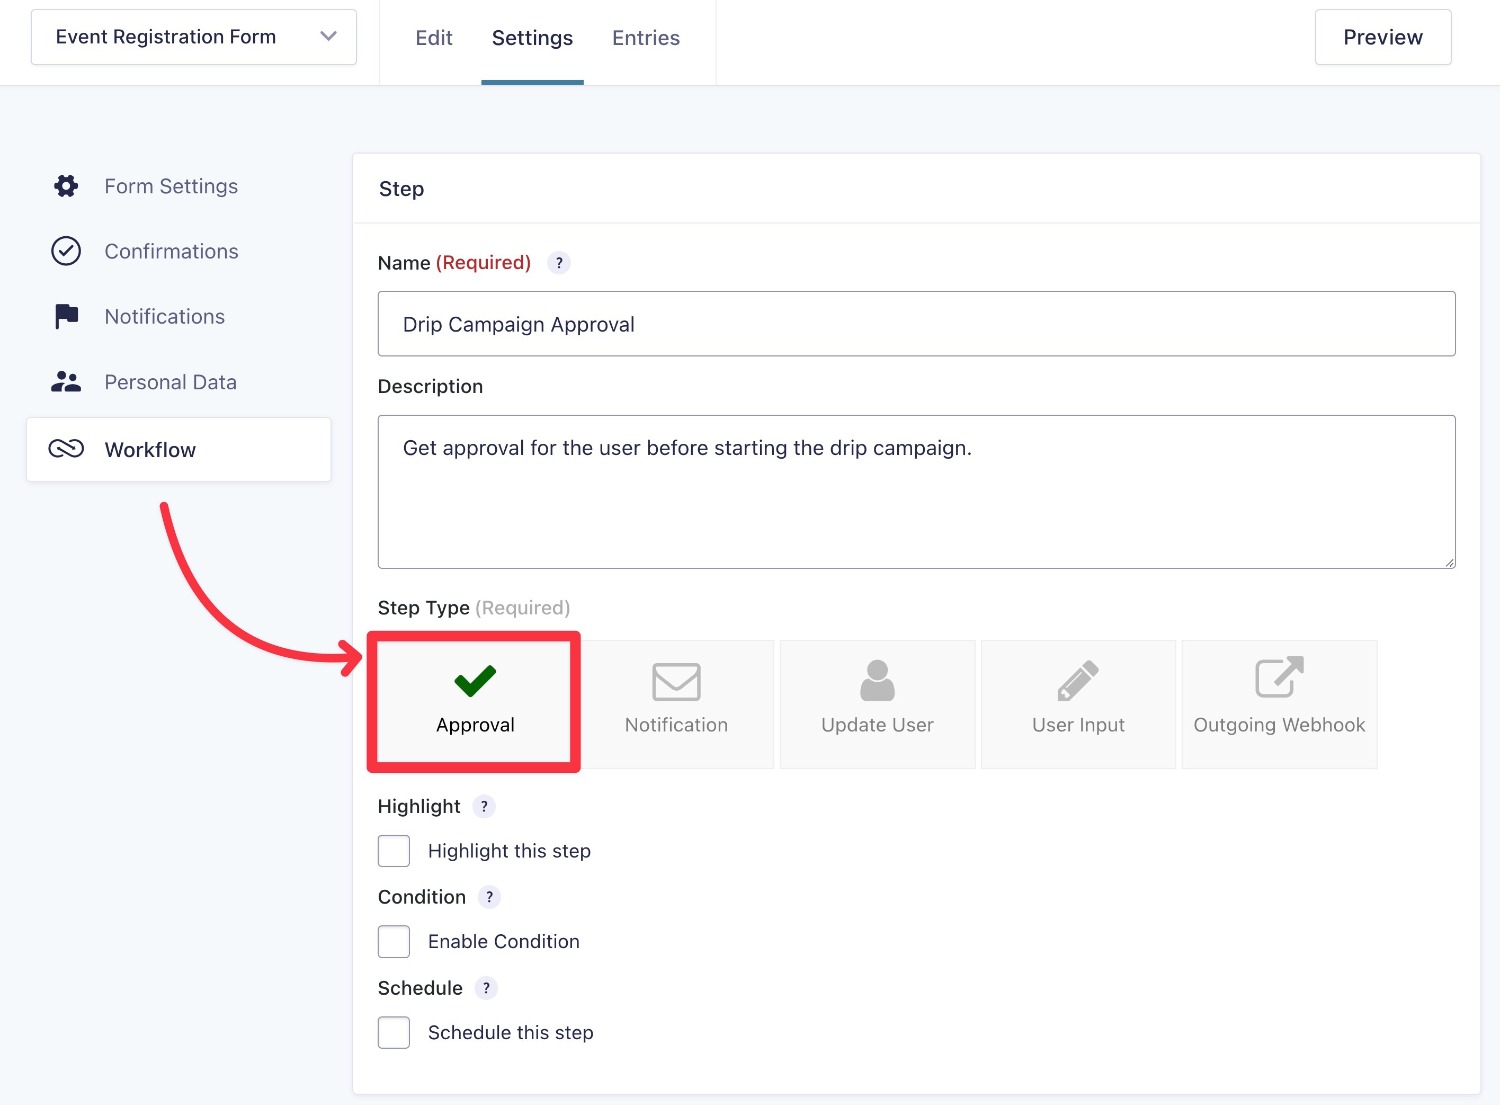
6. Create Custom Approval or Rejection Messages (Optional)
If you want, you can require a user to explicitly opt-in to the drip campaign before you start sending them emails. This step is technically optional, but it can be helpful for some types of forms where the user might not fully understand that they’re enrolling in a drip campaign.
Along with this, you can also customize the approval message (or the rejection message).
To add this functionality, you can include an Approval step at the beginning of your workflow:
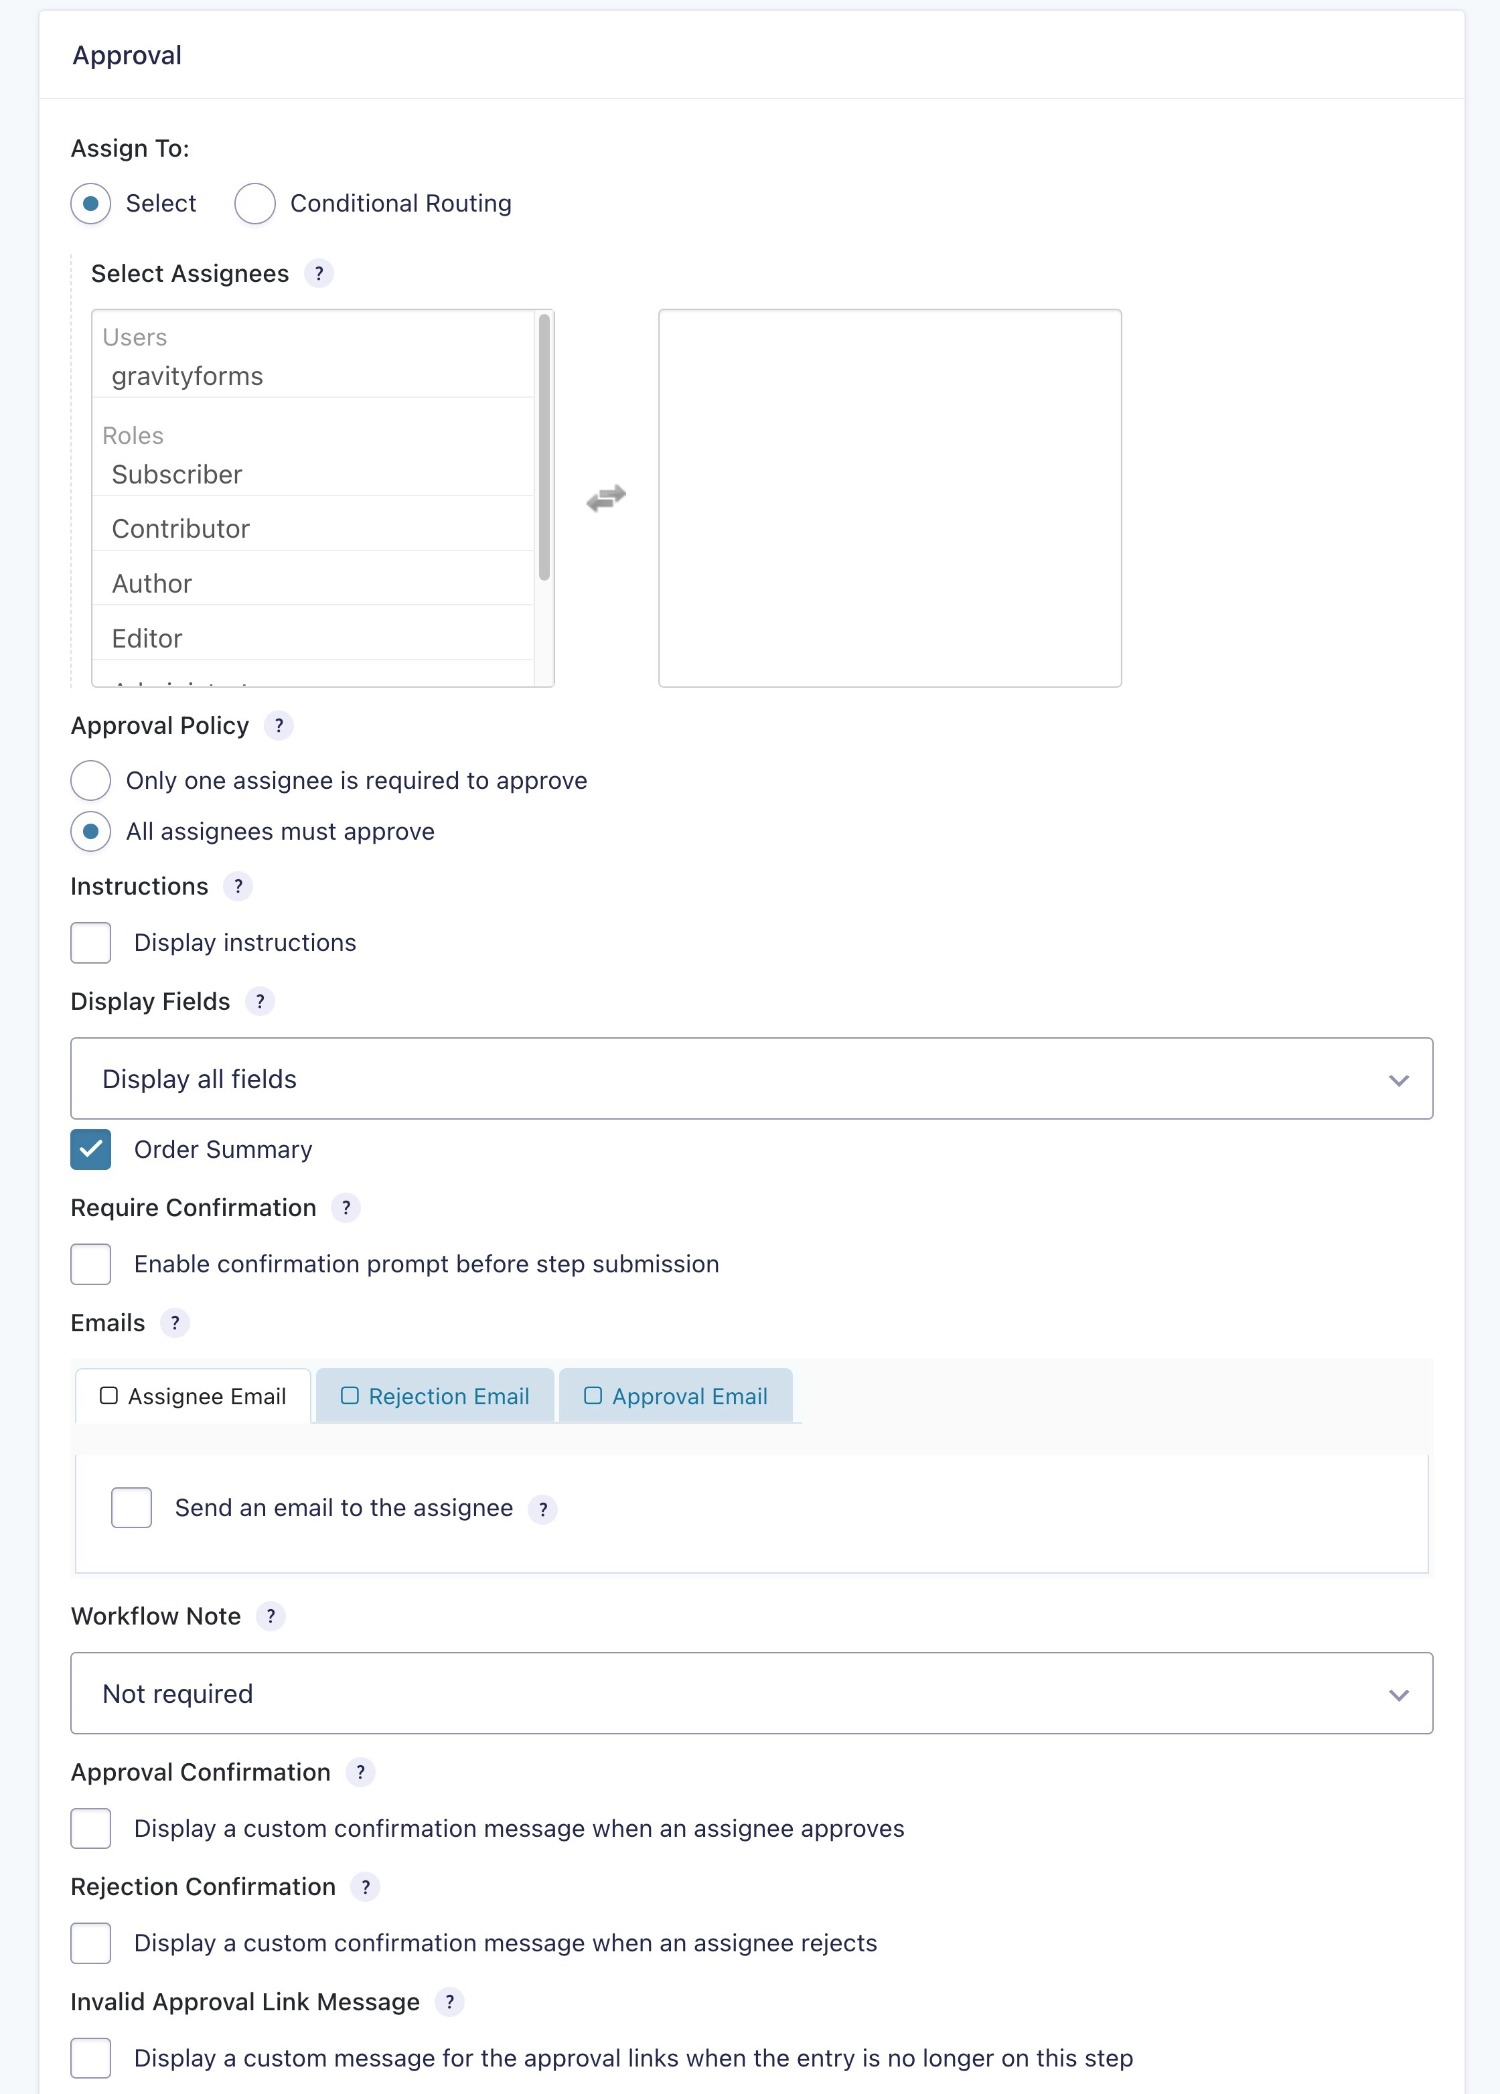
Under the Approval settings, you’ll be able to set up the email, confirmation messages, and so on:
And that’s it! You just successfully created an email drip campaign using Gravity Forms and Gravity Flow – all without the need to involve a separate email marketing service.
Troubleshooting Potential Issues With Email Deliverability
If you’re having issues with the emails in your drip campaign not making it to users’ inboxes, it likely has to do with how your WordPress site is configured to send emails.
The easiest fix is typically to configure your WordPress site to send its emails using a dedicated email sending service, rather than relying on PHP mail and your WordPress site’s server (which can cause issues with sending emails and/or spam filters).
We have a whole documentation article on troubleshooting notifications in Gravity Forms, but here are a few general tips to make sure your emails send reliably.
First, you can use one of the official Gravity Forms add-ons to connect to popular third-party email sending services:
Alternatively, you could use a third-party SMTP plugin that lets you connect to any SMTP server. Post SMTP is a popular free option, but you can find other SMTP plugins at WordPress.org.
Create Your Email Drip Campaign Today
With Gravity Forms and Gravity Flow, you can easily create your own email drip campaign without needing to rely on a third-party email marketing service.
Not only does this let you do everything from your WordPress dashboard, but it also helps you keep your costs down by eliminating the need to pay for a third-party service.
If you haven’t done so already, you can purchase your Gravity Forms license to start creating your forms.
Then, purchase the Gravity Flow Add-On to enhance your forms with email drip campaigns. As mentioned, Gravity Flow is now a Gravity product, so you can be confident that it’s high-quality and reliable.
Get started today and you’ll have your first email drip campaign running in no time!

If you want to keep up-to-date with what’s happening on the blog sign up for the Gravity Forms newsletter!
"*" indicates required fields