

When it comes to protecting your WordPress forms from spam, Gravity Forms gives you a lot of options.
You can use Google reCAPTCHA, honeypot fields, user challenge questions, and plenty of other methods that we cover in our detailed Gravity Forms anti-spam guide.
And with the new Gravity Forms Cloudflare Turnstile Add-On, you get access to another helpful tool to protect your forms.
Cloudflare Turnstile offers a privacy-focused approach that also does not require your users to solve time-consuming image challenges. Instead, at most, all users need to do is check a box. Or, Cloudflare Turnstile also lets you use invisible methods that don’t require any human interaction.
Best of all, Cloudflare Turnstile is 100% free and you do not need to change your website’s nameservers to Cloudflare to use it. That is, you can use Cloudflare Turnstile even if you haven’t connected your website to Cloudflare.
In this post, we’ll quickly introduce you to Cloudflare Turnstile and the Gravity Forms Cloudflare Turnstile Add-On, as well as dicuss how Cloudflare Turnstile is different from Google reCAPTCHA.
Then, we’ll show you step-by-step how to set up the Gravity Forms Cloudflare Turnstile Add-On and start protecting your forms from spam.
What Does the Gravity Forms Cloudflare Turnstile Add-On Do?
The Gravity Forms Cloudflare Turnstile Add-On lets you easily implement Cloudflare Turnstile’s spam protection into some or all of your forms.
Once you connect Gravity Forms to Cloudflare Turnstile, you’ll be able to use a new Turnstile field to add spam protection to any form on your site.
Cloudflare Turnstile gives you multiple options to protect your site from spam, including both visible and invisible challenges.
In terms of visible challenges, you have two options:
- You can have visitors check a box to prove their humanity if they look suspicious (many users will not need to manually check the box). This is the full extent of the human challenge – they never have to perform any additional image-based checks like some other anti-spam solutions require for some users (reCAPTCHA and hCAPTCHA).
- You can just show a loading bar while Cloudflare checks their browsers. This doesn’t require any human interaction but it does show the anti-spam box on the frontend of your site.
You can also use an invisible challenge, which protects your forms without changing the frontend user experience.
Cloudflare Turnstile is 100% free and does not require you to be using Cloudflare on your sites. You do need a free Cloudflare account to set it up, but it will still work even if you haven’t added your site to Cloudflare’s DNS/reverse proxy service.
Cloudflare Turnstile vs Google reCAPTCHA
Given that Cloudflare is positioning Turnstile as a Google reCAPTCHA alternative, you might naturally be wondering about the difference between the two.
At first glance, you’ll notice a lot of similarities.
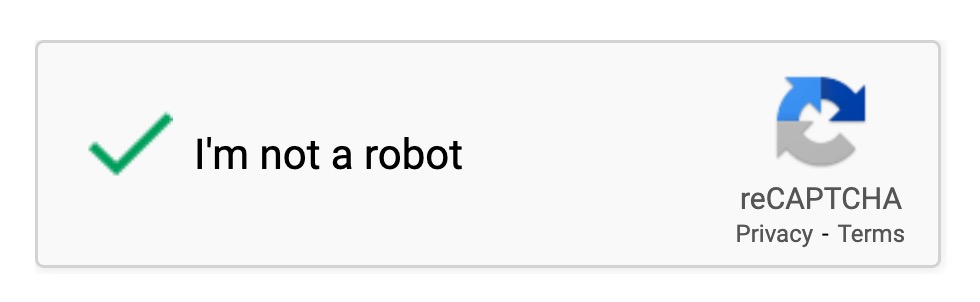
With both Cloudflare Turnstile and Google reCAPTCHA v2, users will be asked to click a checkbox to confirm that they’re human.
Here’s what it looks like in Cloudflare Turnstile:

Here’s what it looks like in Google reCAPTCHA v2:
Cloudflare Turnstile also lets you implement an invisible challenge, similar to how reCAPTCHA v3 works.
There are a few key differences, though.
First off, Cloudflare Turnstile has a privacy-focused approach and doesn’t use cookies to identify users. In contrast, reCAPTCHA does use cookies, which allows users to be more easily tracked.
While Google has said that they don’t use these cookies for any type of ad retargeting, some people still don’t like this approach from a privacy perspective because Google theoretically could use these cookies for retargeting/user tracking.
Second, Cloudflare Turnstile’s human challenges don’t require as much human interaction as they can with reCAPTCHA v2.
If Cloudflare Turnstile detects a suspicious visit, the only thing that human visitors need to do is check a box.
With reCAPTCHA, Google will sometimes also show image-based challenges to suspicious visitors in addition to having them check a box. For example, if a visitor is browsing from Vietnam, it’s pretty normal for them to have to solve Google reCAPTCHA image challenges in addition to checking the box.
Cloudflare Turnstile lets you avoid that, while still implementing strong spam protection on your forms.
How to Set Up Cloudflare Turnstile for Gravity Forms
Now that you know a little bit more about Cloudflare Turnstile and the Gravity Forms Cloudflare Turnstile Add-On, let’s get into a step-by-step guide on how you can set up Cloudflare Turnstile for Gravity Forms.
1. Install the Gravity Forms Cloudflare Turnstile Add-On
To get started, you’ll want to install the Gravity Forms Cloudflare Turnstile Add-On on your site.
If you need some help with installing the add-on, you can check out the documentation on how to install Gravity Forms Add-Ons.
2. Generate Your Cloudflare Turnstile Site Keys
Next, you’ll need to log into your Cloudflare dashboard to set up your site with Turnstile. If you don’t have a Cloudflare account yet, you can click this link to register for a 100% free account.
Again:
- You do not need to pay anything to use Cloudflare Turnstile. You can set it up using a free Cloudflare account.
- You do not need to be using Cloudflare on your site. That is, you can set up Cloudflare Turnstile even if you’re still using non-Cloudflare nameservers.
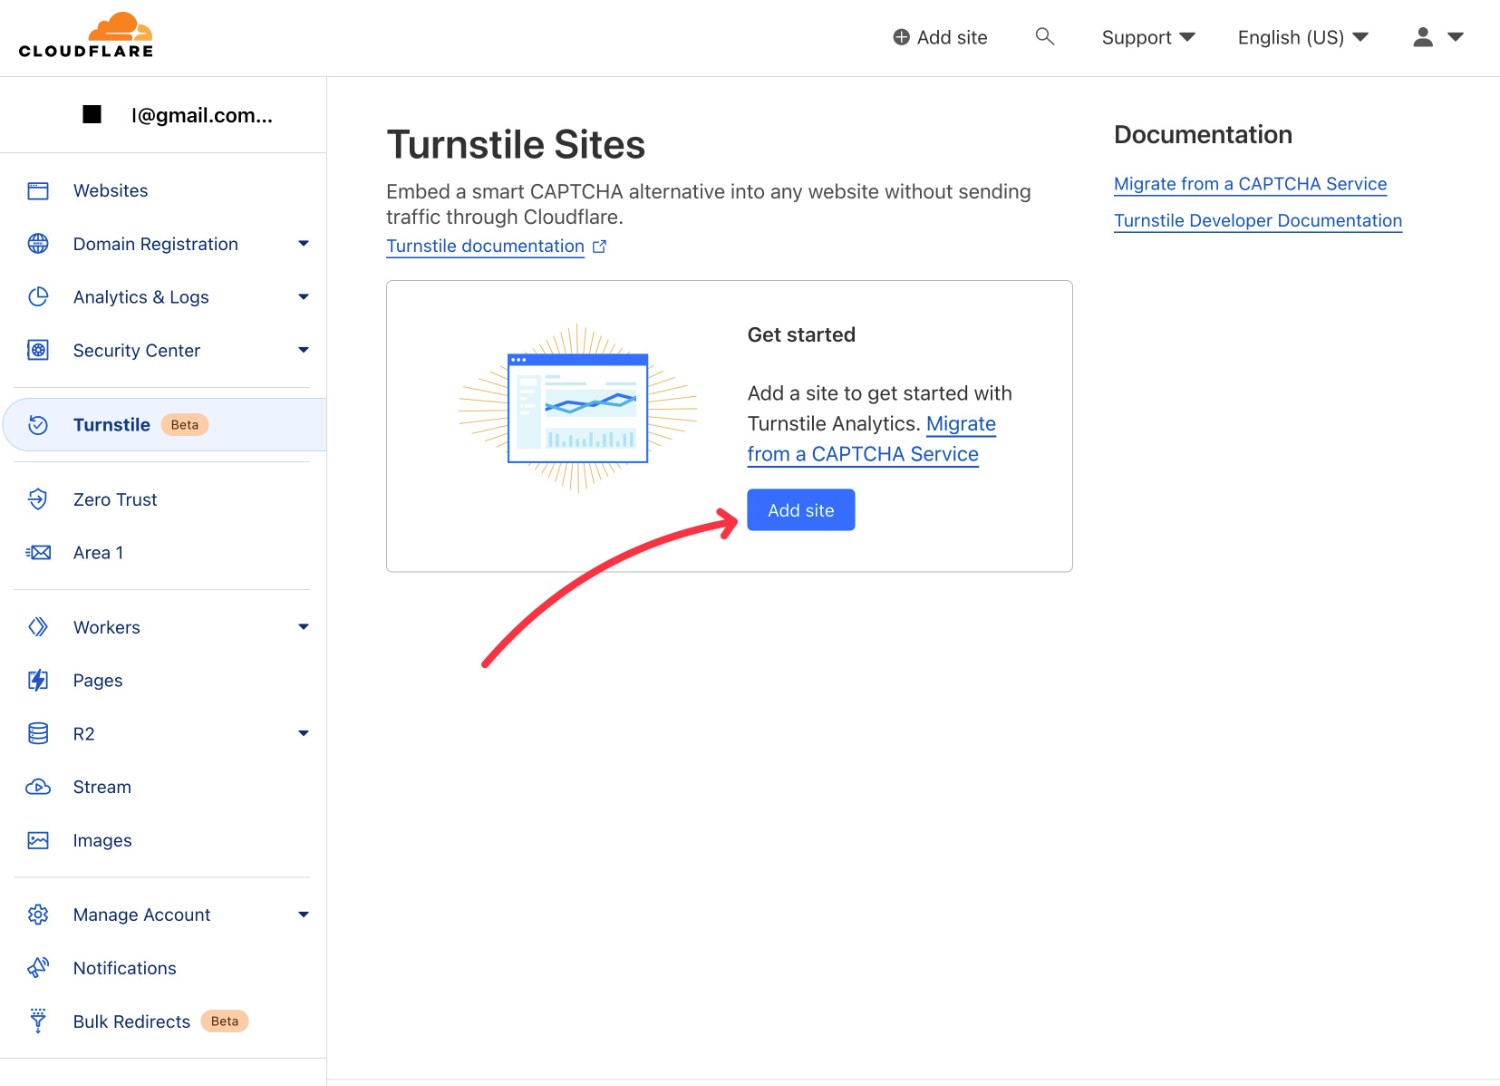
Once you’ve logged in to Cloudflare, go to the Turnstile area in the main dashboard sidebar.

Once you’ve opened the Turnstile settings, click the Add site button to continue.
Then, fill out the settings as follows:
- Site Name – this is an internal name to help you remember the site.
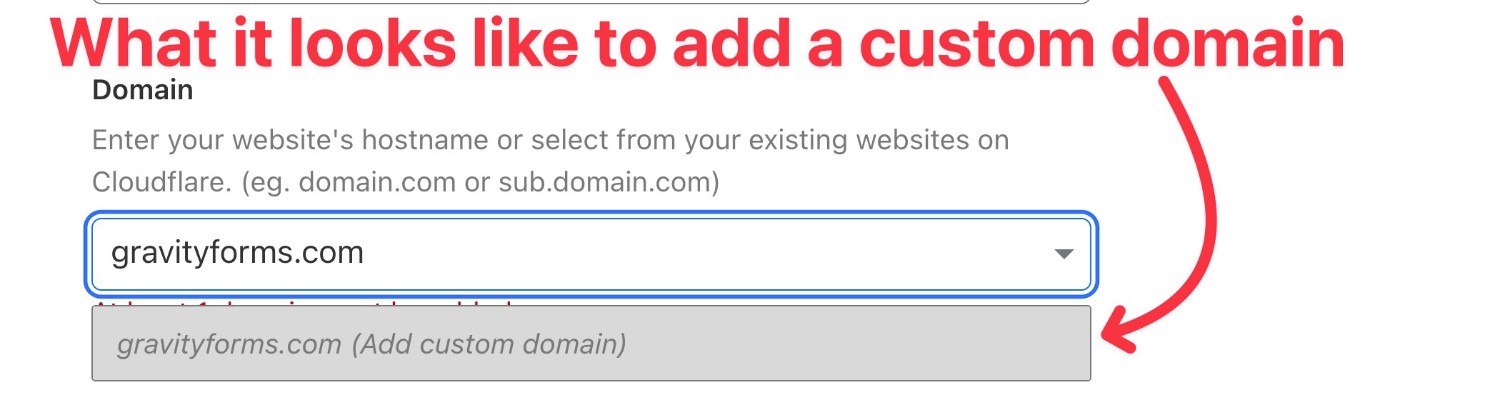
- Domain – enter the root domain name for your site – e.g. yoursite.com. Cloudflare will automatically show any connected sites in a dropdown, but you’re free to just type in any domain name even if it’s not connected to Cloudflare. If your domain name isn’t connected to Cloudflare, it will show up with the text “Add custom domain” – we’ll show you an example of this below.
- Widget Mode – choose from one of the three types of spam protection (explained below).
Here are the three different widget modes that you can choose from:
- Managed – Cloudflare will assess how likely it is that the visitor is spam. If Cloudflare thinks the visitor could potentially be spam, visitors will be asked to check a box. Again, there’s no chance of added image-based challenges like with reCAPTCHA.
- Non-interactive – users will have a slight delay and see a widget with a loading bar while Cloudflare checks their browsers. However, users do not need to perform any type of challenge or interact at all.
- Invisible – everything happens in the background and is completely invisible to human users.
Here’s an example of what it might look like:

If you’re struggling to add a custom domain name for a site that you haven’t connected to Cloudflare yet, here’s how it works:
- Type the full domain name in the search box.
- Wait for the drop-down to populate.
- You should see an option to “Add custom domain” appear in the drop-down.
- Click that option to add your custom domain name.
Once you’ve added all of the relevant details, click the Create button.
Cloudflare will now show you two pieces of information that you’ll need to add to Gravity Forms:
- Site Key
- Secret Key
Copy both of these to a safe place because you’ll need them in the next step.
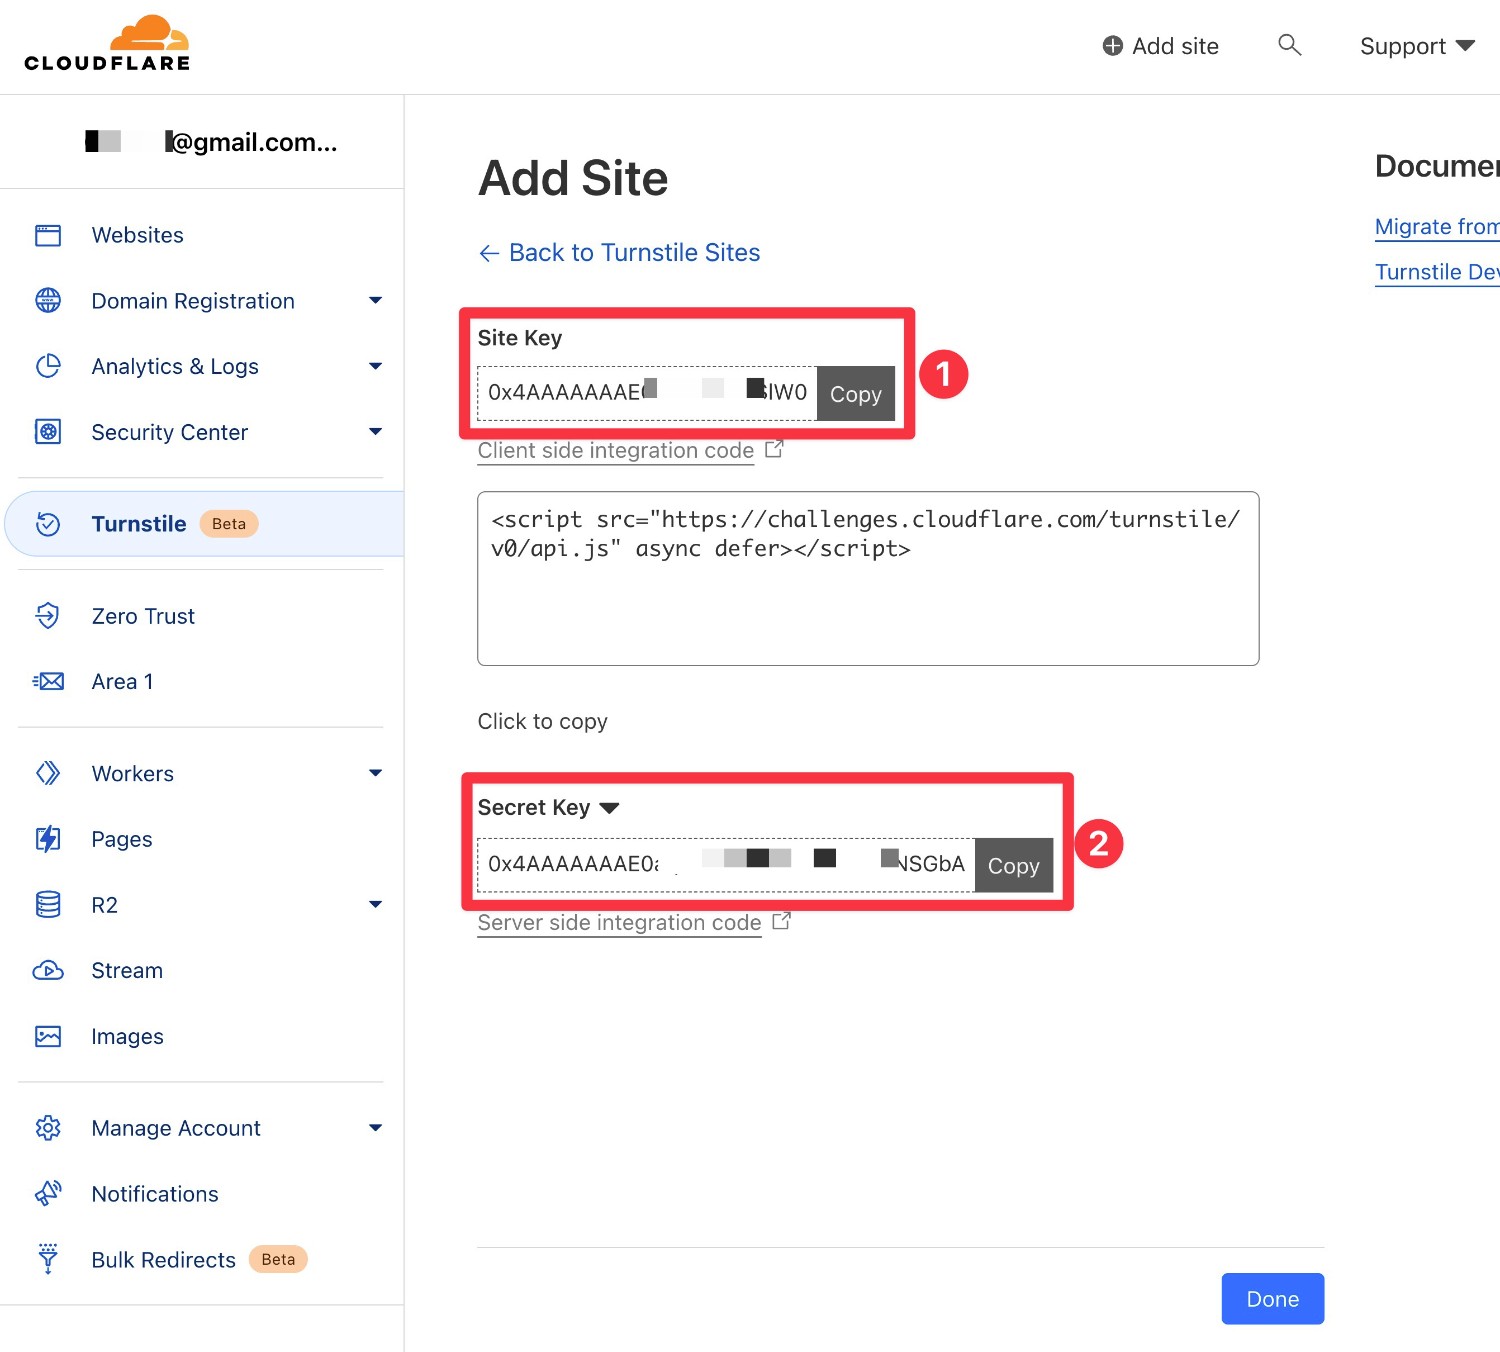
If you accidentally close the window, you can find these keys by clicking the Settings option under your site in the Turnstile menu of Cloudflare.
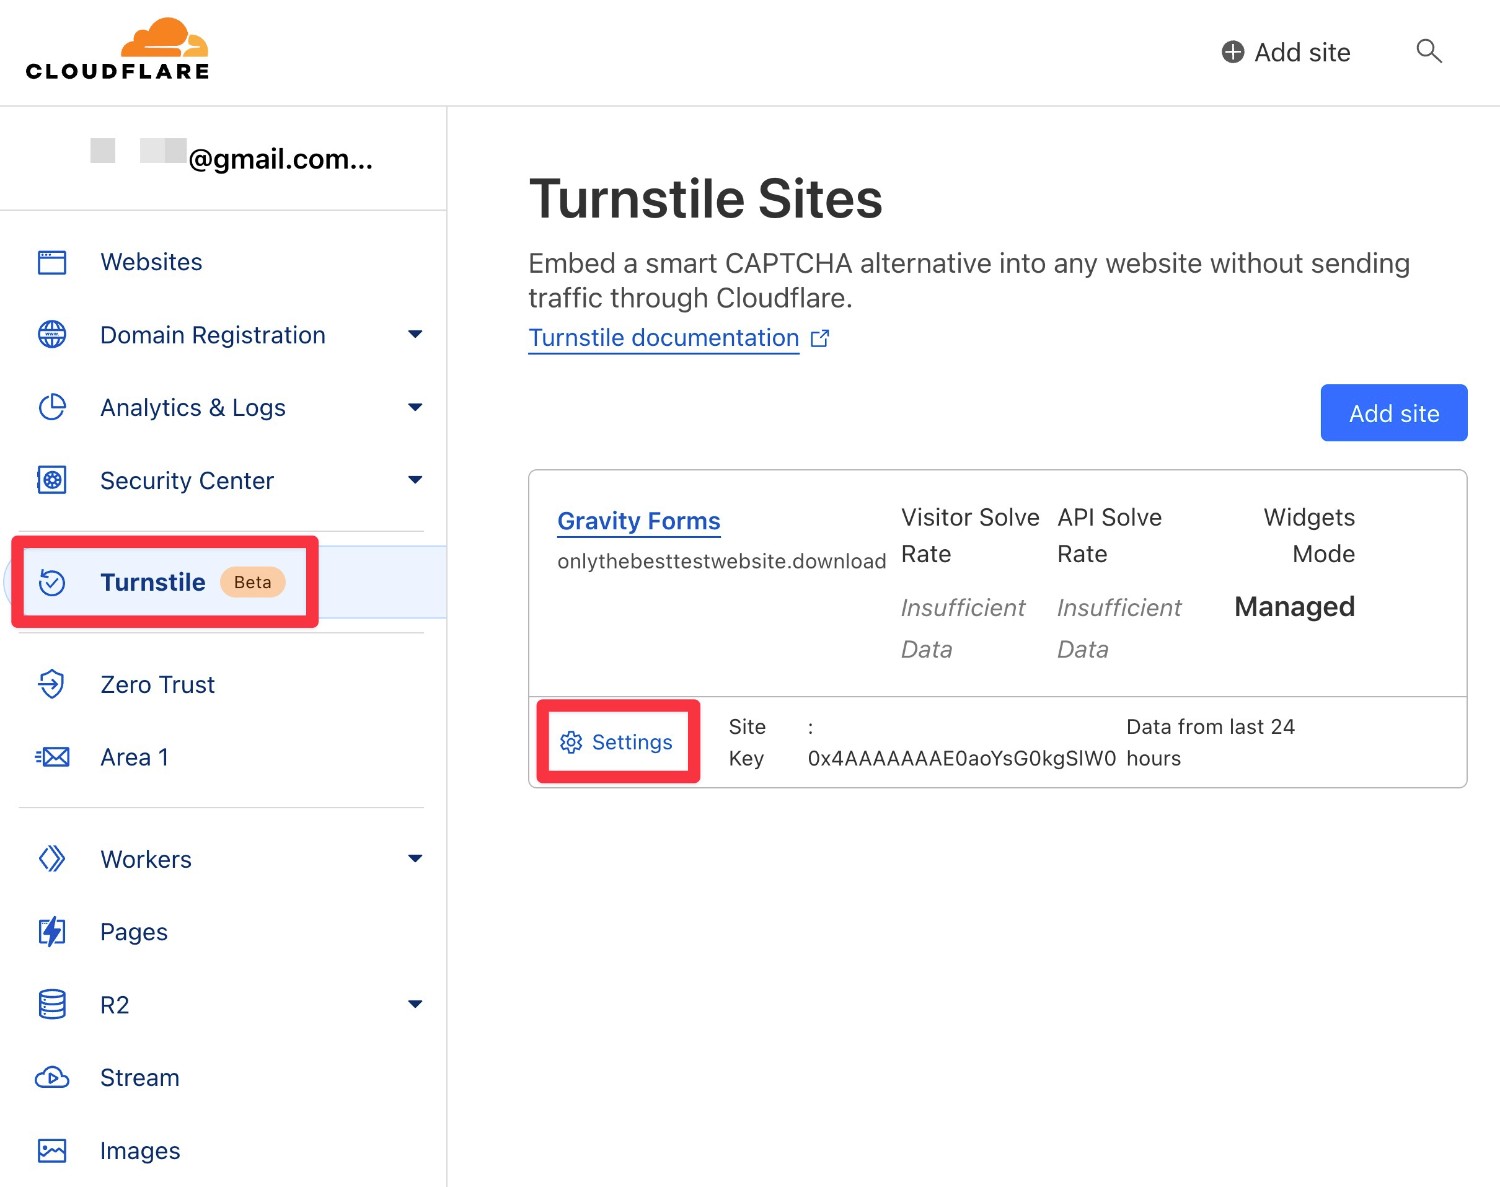
You can also change the Widget Mode from the settings area, which is helpful if you decide that you want to change Cloudflare Turnstile behavior in the future.
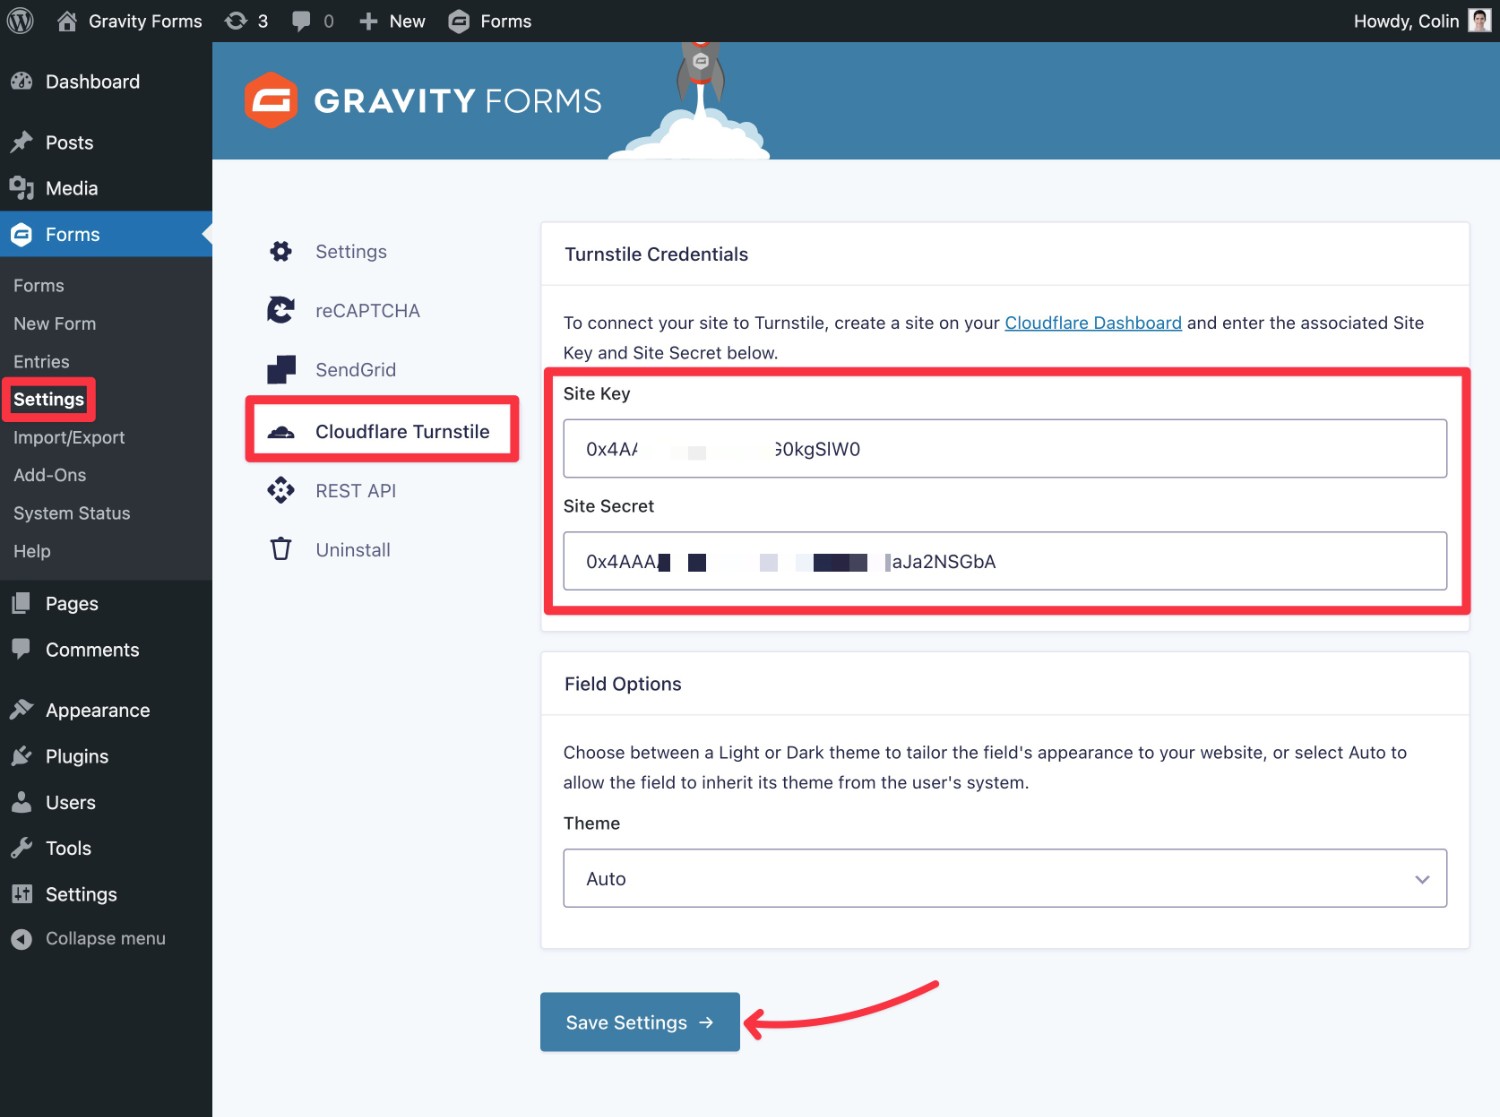
3. Add Cloudflare Turnstile Keys to Gravity Forms
Next up, you’ll need to add the Cloudflare Turnstile Site Key and Secret Key to the Gravity Forms settings area on your WordPress site.
Here’s how to do it…
- Open your WordPress dashboard.
- Go to Forms → Settings → Cloudflare Turnstile.
- Paste the Site Key and Secret Key into the relevant boxes.
- Click Save Settings.
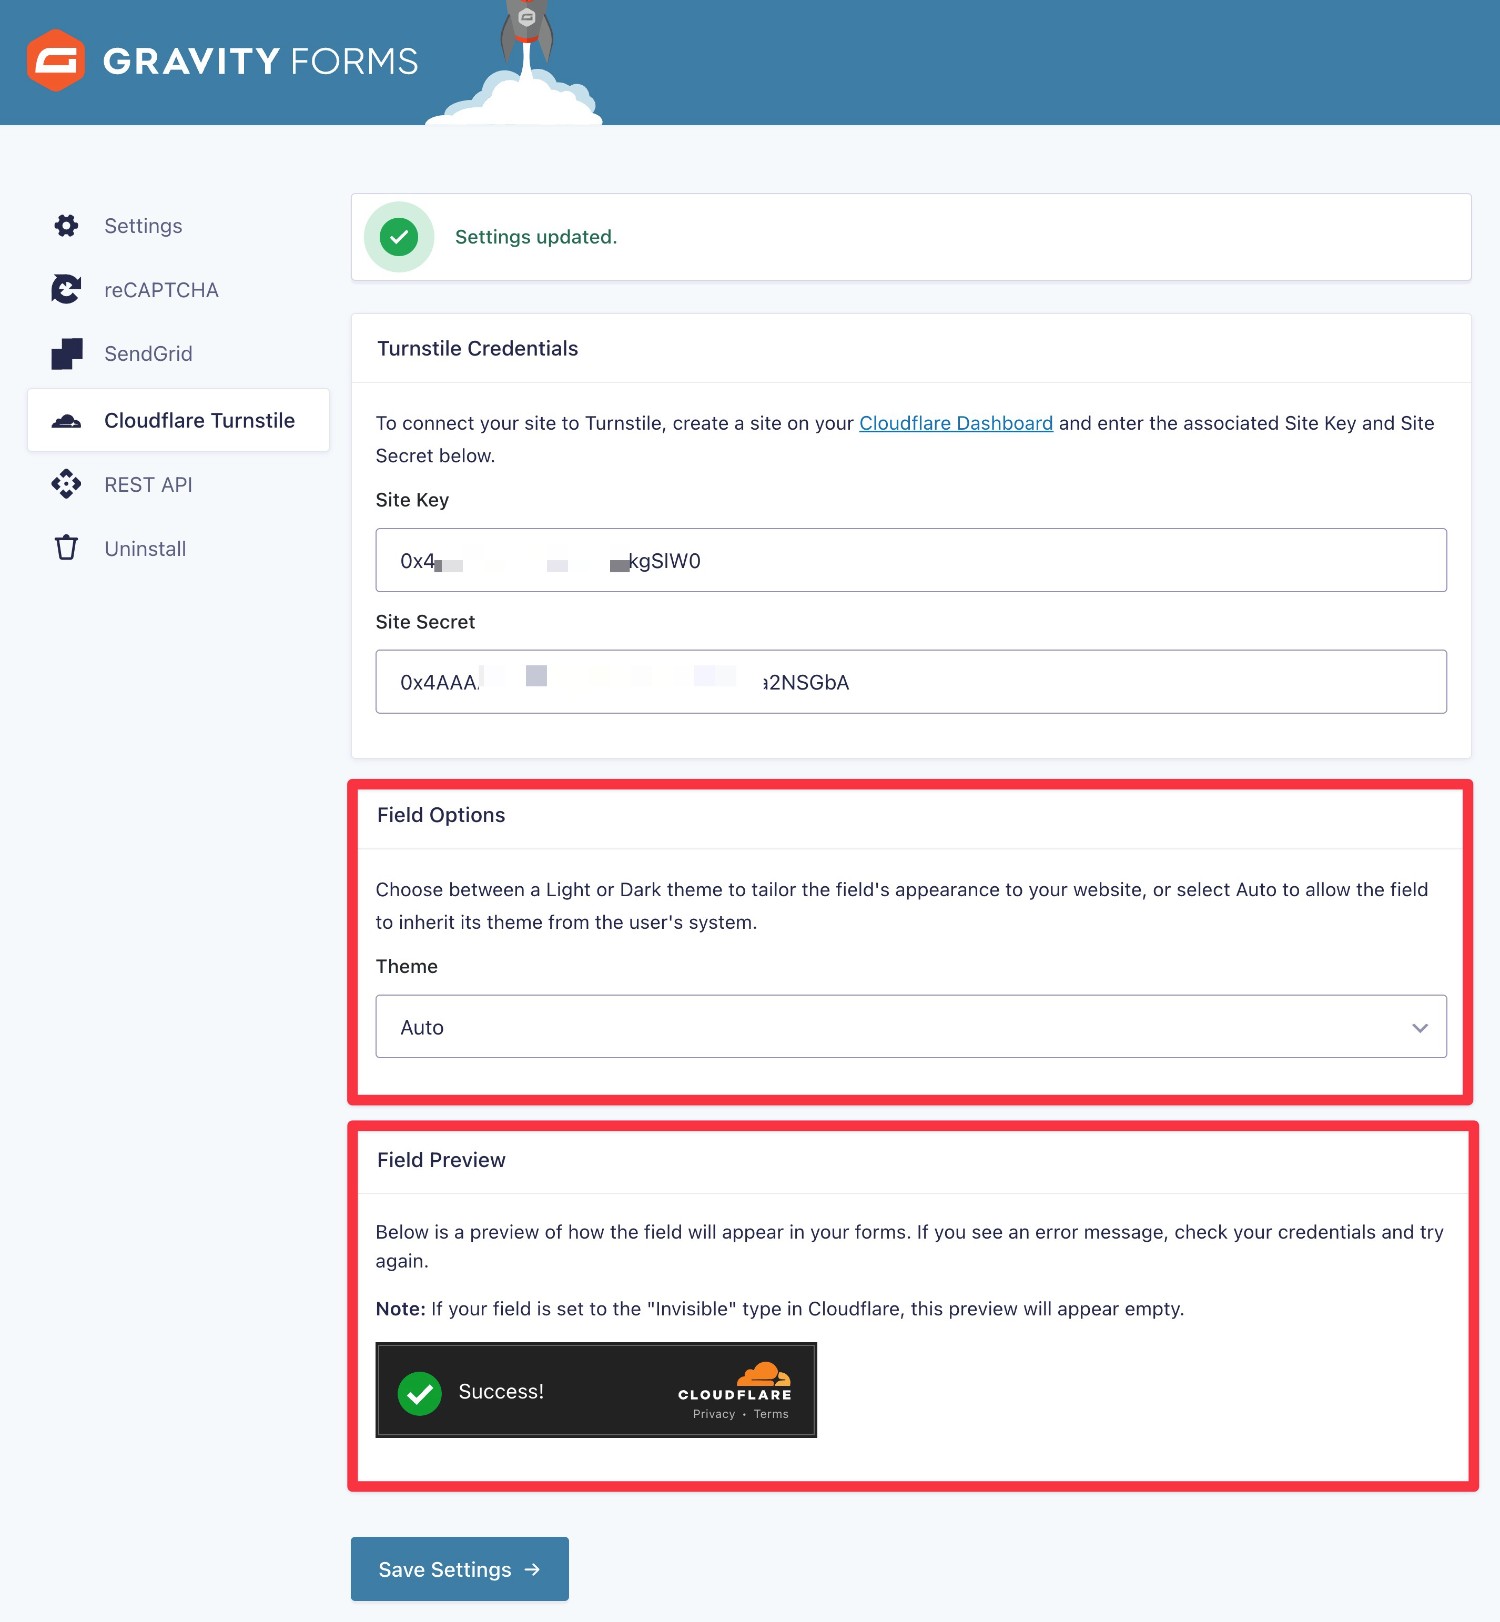
If you entered valid site keys, you should then see a preview of what the Cloudflare Turnstile widget will look like.
If you’re using the “Invisible” Widget Mode, you won’t see anything here because Cloudflare will be invisible.
By default, the Cloudflare Turnstile widget will automatically inherit its light or dark styling from each user’s system settings. For example, if the user has dark mode enabled in macOS, they’ll see the dark version of the widget.
If you want to adjust this behavior, you can use the Theme setting to force the field to always use light or dark mode, according to your preferences.
4. Add the Turnstile Field to Form(s) That You Want to Protect
At this point, your WordPress site is connected to Cloudflare Turnstile.
To start using Turnstile on any of your forms, all you need to do is add the Turnstile field to the form.
You can find the Turnstile field in the Advanced Fields section in the Gravity Forms editor.
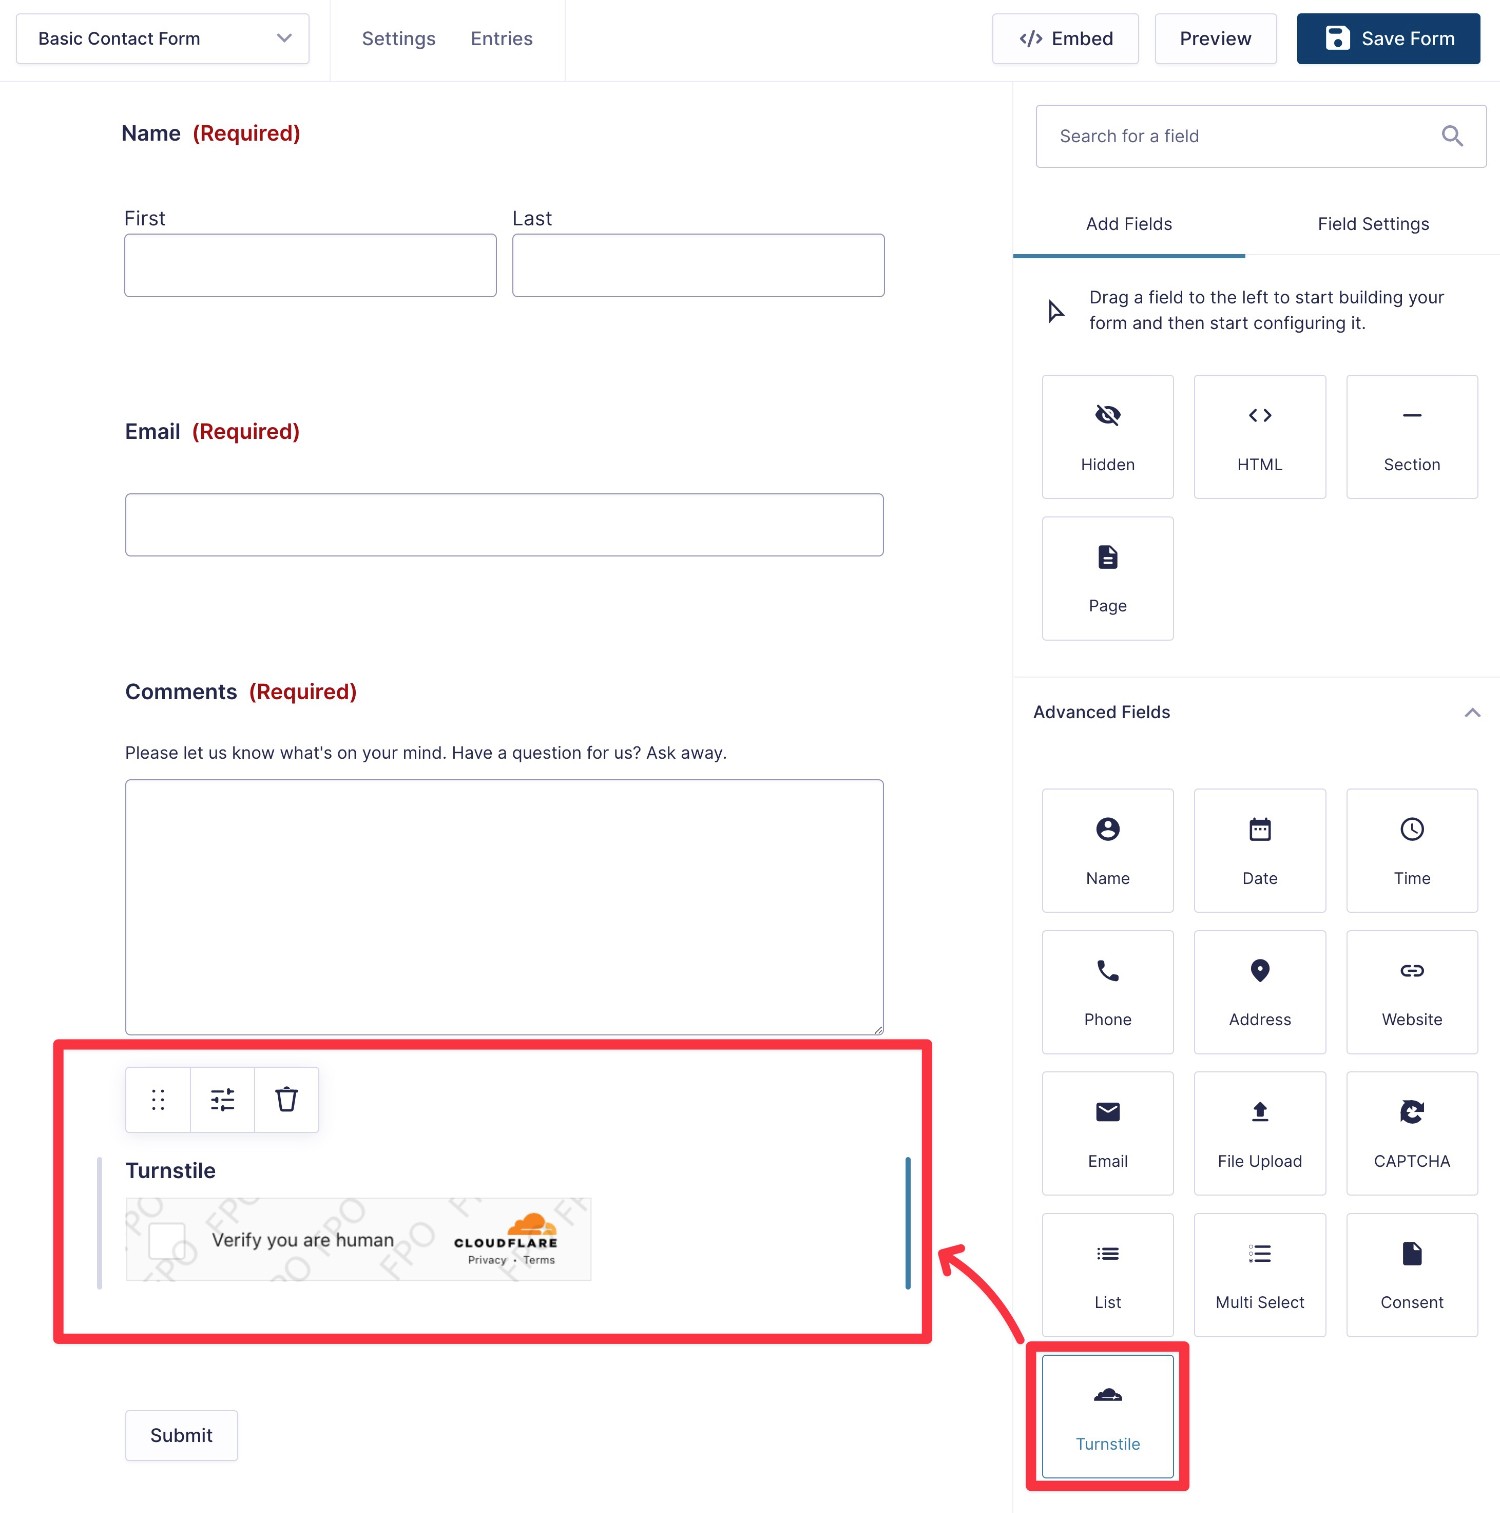
There’s no need to change anything in your form settings. All you need to do is add the Turnstile field to your form.
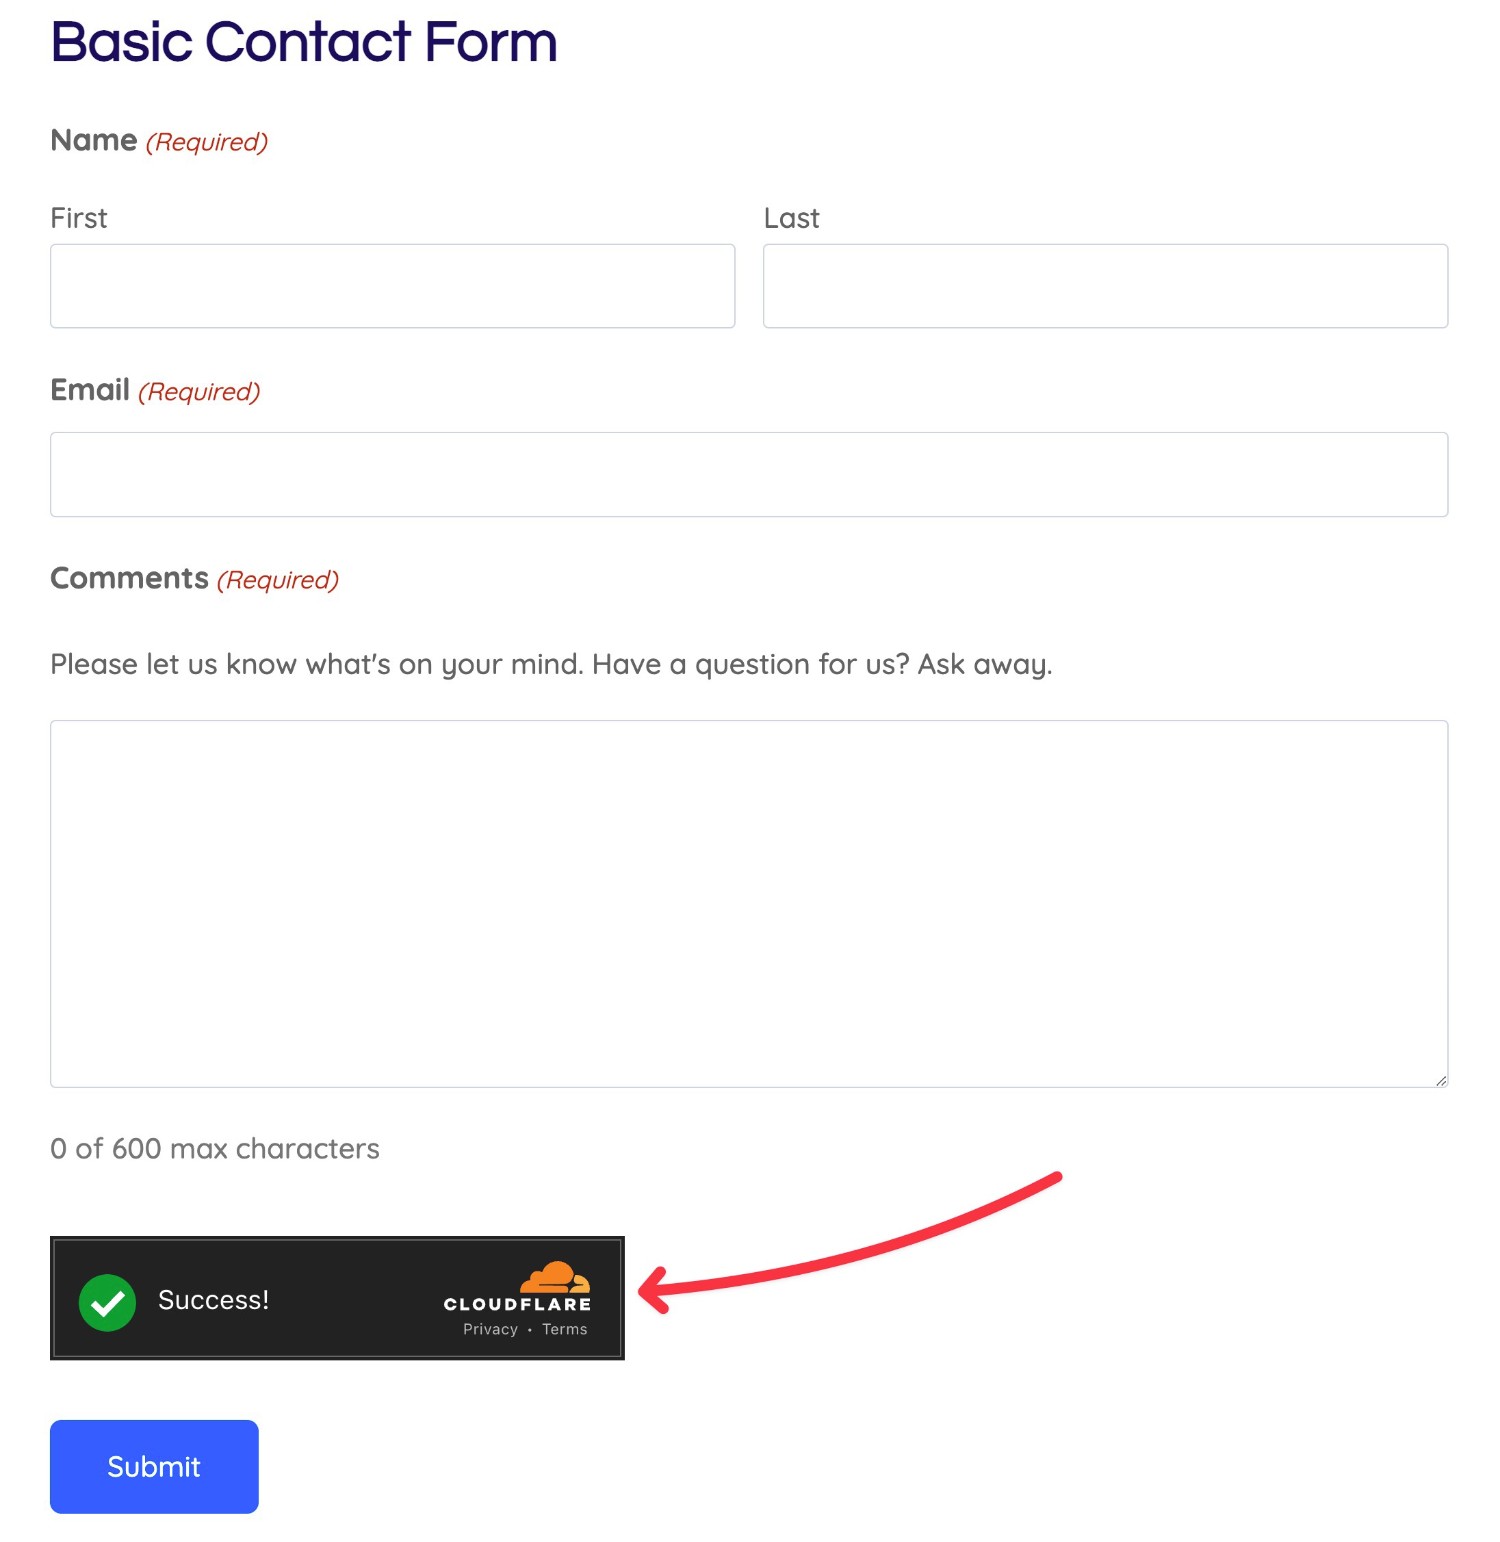
Once you click the Save Form button, Turnstile will be active for that form. If you’ve chosen one of the visible Widget Modes, you can verify this by opening the form on the frontend of your site.
To add Turnstile protection to additional forms, you can repeat the process to also add the Turnstile field to those other forms.
For further informaiton on the Cloudflare Turnstile Add-On, check out the documentation.
Get Started With Cloudflare Turnstile for Gravity Forms
With Cloudflare Turnstile, you get a new, privacy-focused way to protect your WordPress site from spam for free.
With the Gravity Forms Cloudflare Turnstile Add-On, you can easily add Cloudflare Turnstile protection to your forms using any one of Cloudflare Turnstile’s three challenge modes – Managed, Non-Interactive, or Invisible.
The Gravity Forms Cloudflare Turnstile Add-On is available on all Gravity Forms licenses. If you have an active license, install the add-on today and follow this tutorial to start protecting your forms.
If you’re not a Gravity Forms user yet, purchase your license today to access this add-on, as well the other helpful add-ons that Gravity Forms offers.
Or, if you want to test everything before you buy, you can spin up a free, fully functioning demo site that includes access to the Cloudflare Turnstile Add-On and all other add-ons.

If you want to keep up-to-date with what’s happening on the blog sign up for the Gravity Forms newsletter!
"*" indicates required fields


