Getting started with WordPress: Complete series overview

WordPress is the most popular way to make a website for a reason. It’s flexible enough to make any website, well-supported, and simple enough for a non-technical person to use.
But while you don’t need to be a developer to use WordPress, getting started with your first WordPress website can still feel a bit overwhelming.
Our “Getting Started With WordPress” series aims to make the process a lot easier by covering every step in the process, from choosing your domain name and purchasing hosting to actually installing WordPress and creating a website that can stand the test of time.
We’ve already published detailed posts for each step. Now, this post serves as our overview of the series, giving you a bird’s-eye view of the entire process and everything that we’ve covered.
We’ll summarize all eight posts in our series, giving you a brief overview of each topic and then linking you to the full post to get more information:
- Domain name: How to choose and purchase a domain
- Web hosting: How to choose hosting and install WordPress
- WordPress themes: How to control the design of your website
- WordPress plugins: How to add key functionality to your site
- Pages: How to add your first WordPress pages
- Blog: How to set up a blog and publish your first post
- WordPress search engine optimization: How to rank your site in Google
- WordPress security: How to protect your site from malicious actors
1. Domain name: How to choose and purchase a domain
Your WordPress site’s domain name is its permanent address on the internet. For example, our domain name is gravityforms.com.
Before you start setting up your site, you need to choose a domain name. Then, once you’ve picked one, you need to purchase it so that you can use it for your website.
The technical process of purchasing a domain name is pretty simple. However, if you don’t already have a brand name, the creative part of actually choosing your domain name can be pretty time-consuming.
The trickiest part of choosing a domain name is that only one person can own a domain name. For example, we already own gravityforms.com, so you couldn’t go and purchase gravityforms.com for your own website.
Websites like Instant Domain Search can help you quickly check if a domain name is available for purchase.
Some of the important considerations for choosing a domain name include the following:
- Domain extension – e.g. “.com” vs “.net”
- Brandability
- Memorability
- Existing trademarks/brands – e.g. if bluewidgets.com is an established brand, you probably don’t want to use bluewidgets.net for your domain
Once you choose a domain name, we recommend purchasing it from a dedicated domain registrar (though it’s also possible to get a domain name from your hosting provider – more on that next).
Some of the best domain registrars include Cloudflare Registrar, Porkbun, and Namecheap.
👉Full guide to choosing a domain name
2. Web hosting: How to choose hosting and install WordPress
In order to power the WordPress software and make your website available to visitors from around the globe, you need web hosting.
Purchasing web hosting is essentially renting space on a server that you can use to run the WordPress software.
Choosing a quality web host is important because your choice will affect key areas of your site:
- Performance/load times
- Reliability/uptime
- Security
- Scalability (e.g. making sure your site still loads if you go viral on social media)
There are different types of web hosting and your unique situation will dictate which type is right for your site.
Some good WordPress hosts to consider include the following:
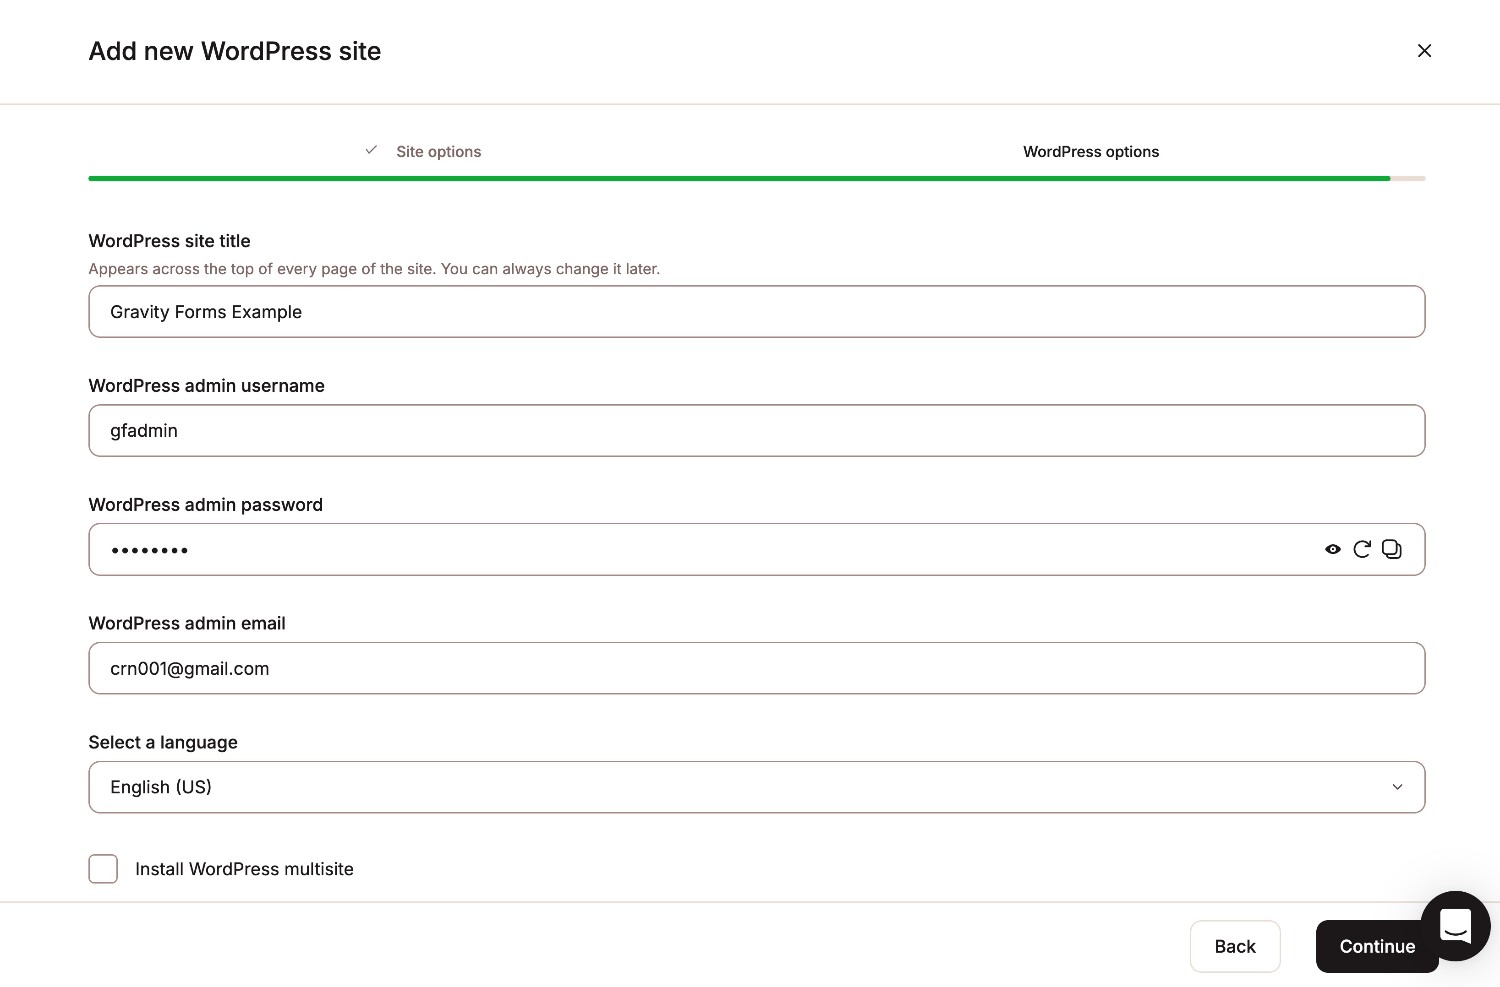
Once you choose and purchase hosting, you need to install the WordPress software on your web hosting. Most hosts, including all of the options above, give you easy and non-technical tools to install the WordPress software.
For example, installing WordPress at Kinsta is as simple as filling out this form:
Once you install the WordPress software on your web hosting, you need to point your domain name to your hosting server. Your host should have documentation that explains how to do this, or you can reach out to their support staff if you need help.
While some hosts do give you the option to purchase a domain name alongside your hosting package, we recommend purchasing your domain name from a separate registrar because it gives you more flexibility and can save you money over the long term.
👉Full guide to purchasing hosting and installing WordPress
3. WordPress themes: How to control the design of your website
At this point, you should have a working WordPress website that’s publicly available at your domain name.
Now, you’re ready to start setting up your actual website.
The first step in the process is to choose and install a WordPress theme, which is what controls the design of your website.
You can kind of think of your theme as your website’s “clothing.” If you change themes, the design of your site will change, but all of the content and settings will still be there.
You can find thousands of free and premium themes. However, in 2026 and beyond, most users will be best served by choosing a lightweight multipurpose WordPress theme and then customizing it as needed.
Here are some of the top options:
Here’s how to install a WordPress theme:
- Open your WordPress dashboard.
- Go to Appearance → Themes in the dashboard sidebar.
- Click the Add Theme button at the top of the interface.
How you continue from there will depend on whether you’re installing a free theme from WordPress.org or if you’re installing a theme that you downloaded directly from the developer:
- Themes listed at WordPress.org – Search for the theme by name. Then, hover over the result and click the Install button.
- Themes for which you have a .zip file – If you downloaded a .zip file that contains the theme, you can install it by clicking Upload Theme at the top.

To customize your theme, there are different methods depending on the theme.
The most common method is to use the WordPress Customizer, which you can access by going to Appearance → Customize.
Some newer themes also use the WordPress Site Editor. If this applies to your theme, you can access it by going to Appearance → Editor. If your theme uses the Site Editor, you can read our complete guide to the WordPress Site Editor for more information.
👉Full guide to getting started with WordPress themes
4. WordPress plugins: How to add key functionality to your site
Whereas your WordPress theme controls the design of your site, WordPress plugins help you add new functionality and integrations to your site.
The core WordPress software is intentionally kept fairly lean with the expectation that you use plugins to add the functionality that you need for your site.
As a result, pretty much every WordPress website relies on at least some plugins. Some sites might just use a small number of plugins, while more complex sites could easily have 50+ plugins for various functionality.
There are some must-have plugins that we recommend for pretty much all WordPress sites. Then, you’ll probably have some other plugins that you might want to install for your specific use case.
Here are some must-have WordPress plugins that we recommend for all sites:
- Yoast SEO helps you optimize your site for search engines.
- Gravity Forms helps you create all kinds of forms, from simple contact forms to lead gen forms, payment forms, registration forms, and lots more.
- WP Rocket helps you speed up your site and optimize performance.
- UpdraftPlus helps you back up your site.
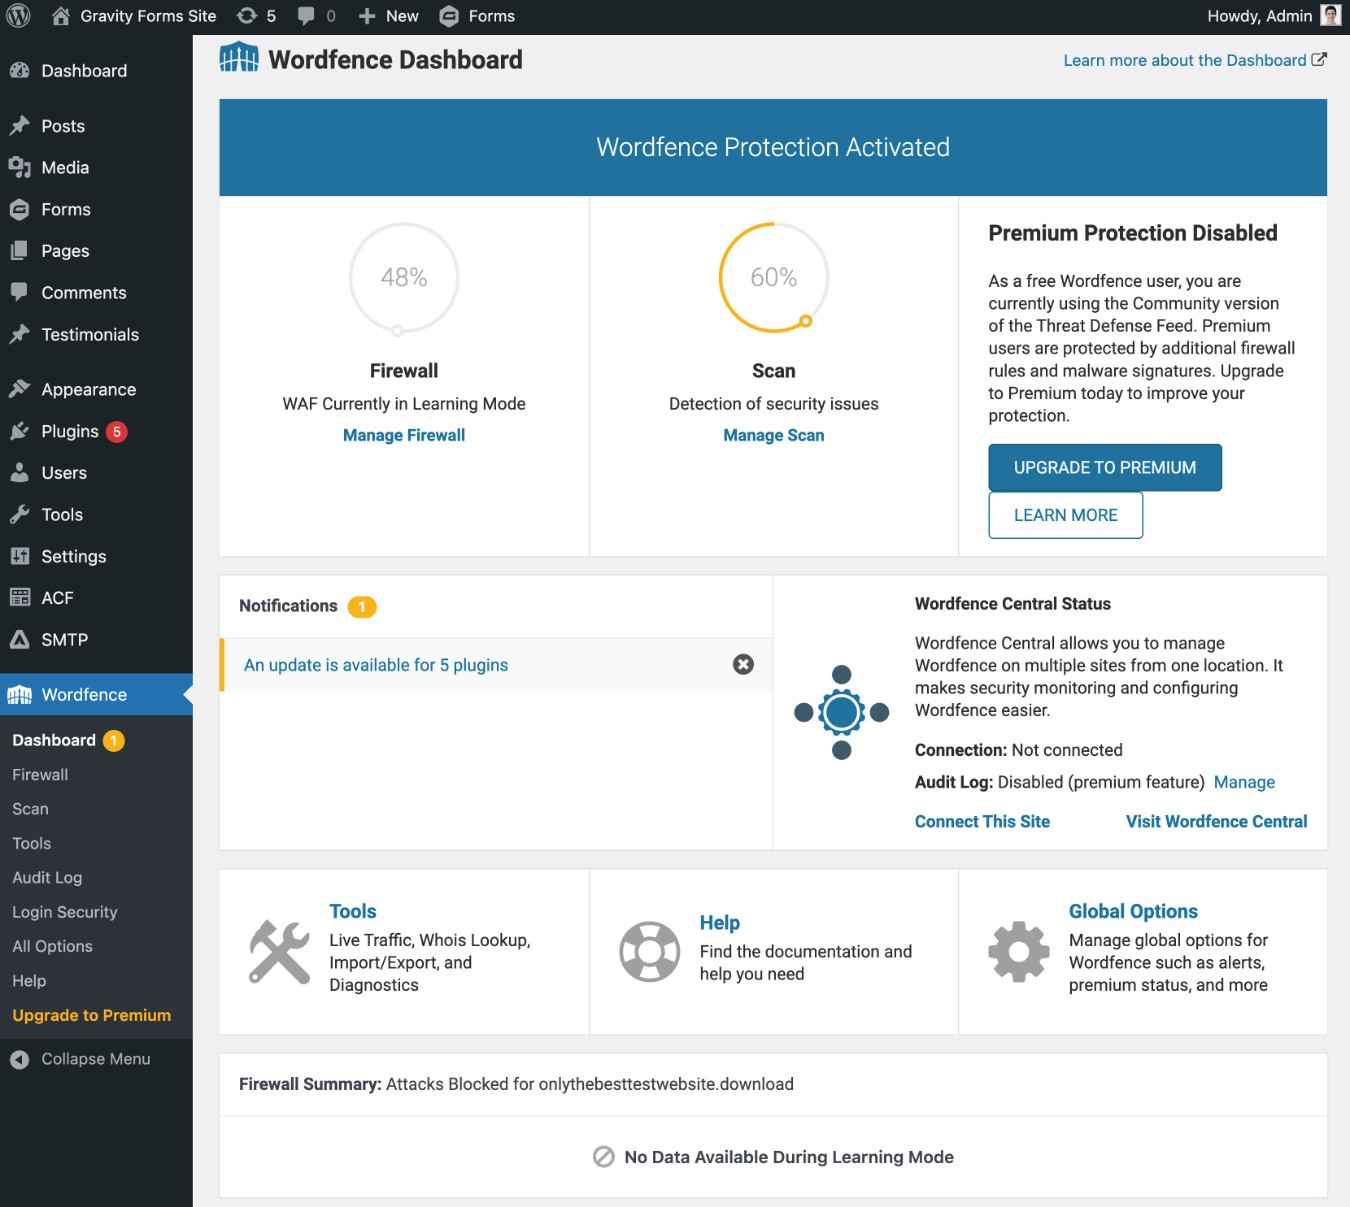
- Wordfence improves your site’s security.
- Gravity SMTP helps you ensure that the emails your site sends make it to users’ inboxes by letting you connect to a dedicated email sending service.
- Elementor adds a visual, drag-and-drop design experience.
To find more plugins, you can browse 61,000+ free plugins at WordPress.org. Many developers also offer plugins directly from their own websites, including Gravity Forms.
You also don’t need to finalize your site’s list of plugins right now. You can start with the must-have plugins above and then install more plugins in the future as new needs arise.
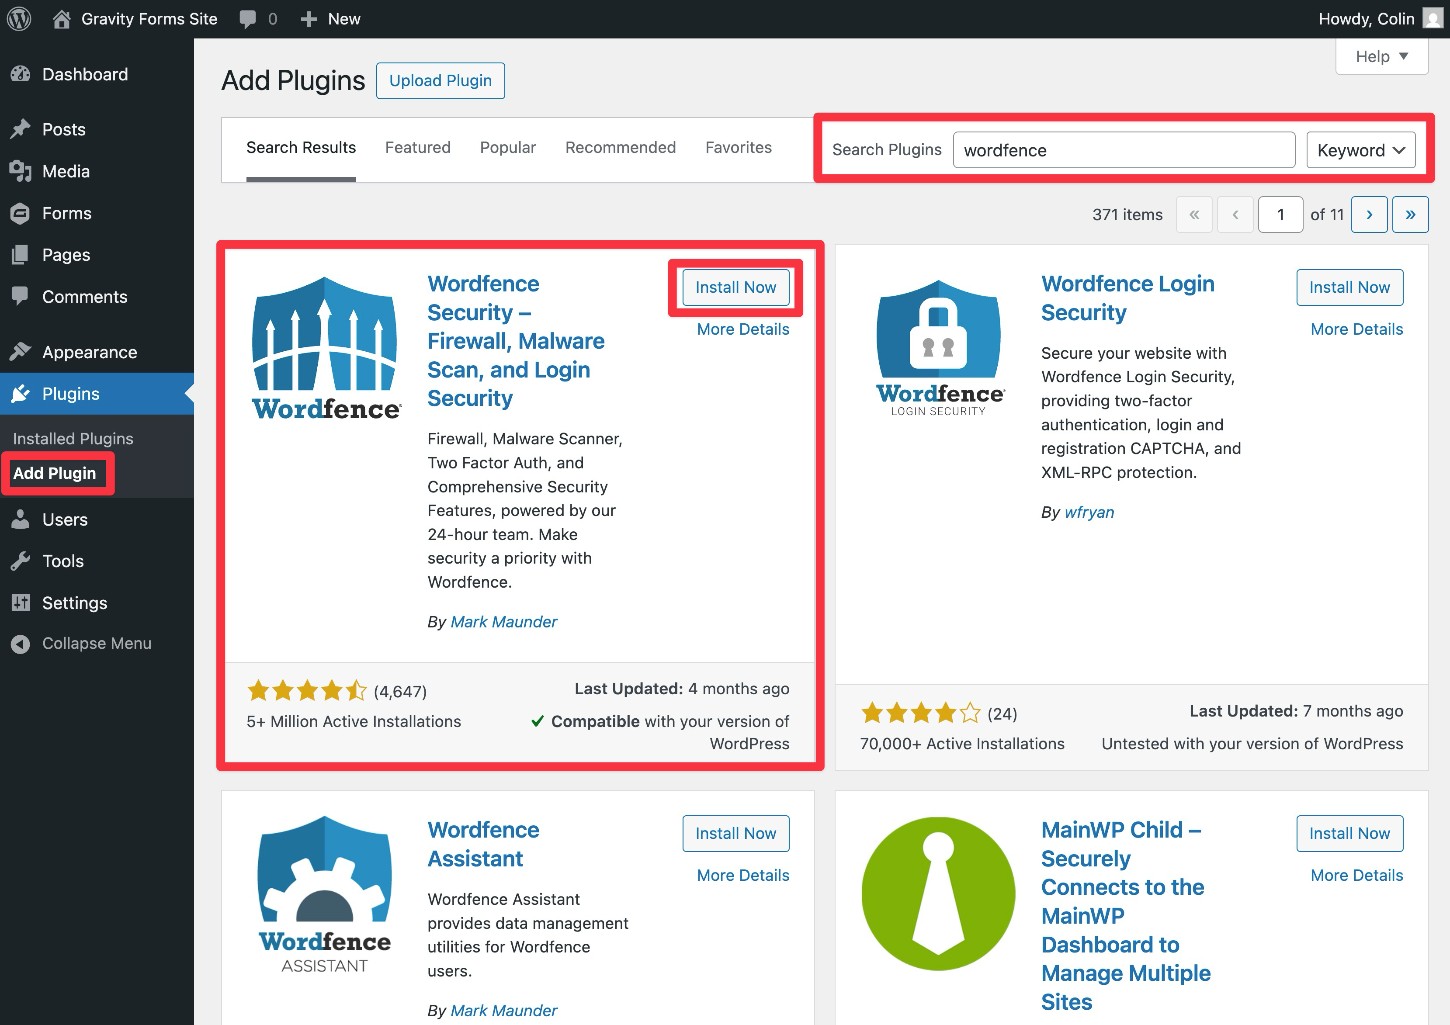
To install a WordPress plugin, go to Plugins → Add Plugin:
- For free plugins at WordPress.org, you can search for the plugin by name and then click the Install Now button.
- For plugins that you downloaded directly from the developer as a .zip file, you can click the Upload Plugin button.
Make sure to activate the plugin once the installation process finishes. How you access each plugin’s settings will depend on the specific plugin – consult the developer’s support documentation if you need any help.
You can manage which plugins are active on your site by going to Plugins → Installed Plugins.
👉Full guide to getting started with WordPress plugins
5. Pages: How to add your first WordPress pages
By default, WordPress comes with two types of content:
- Pages – For static content such as your homepage, about page, contact page, services page, etc.
- Posts – For blog posts. Each post will have a publish date and newer posts will be listed at the top of your blog page (more on that next).
At a minimum, you’ll want to create at least a few core pages for your homepage, about, contact, etc.
To create a page, go to Pages → Add Page in your WordPress dashboard.
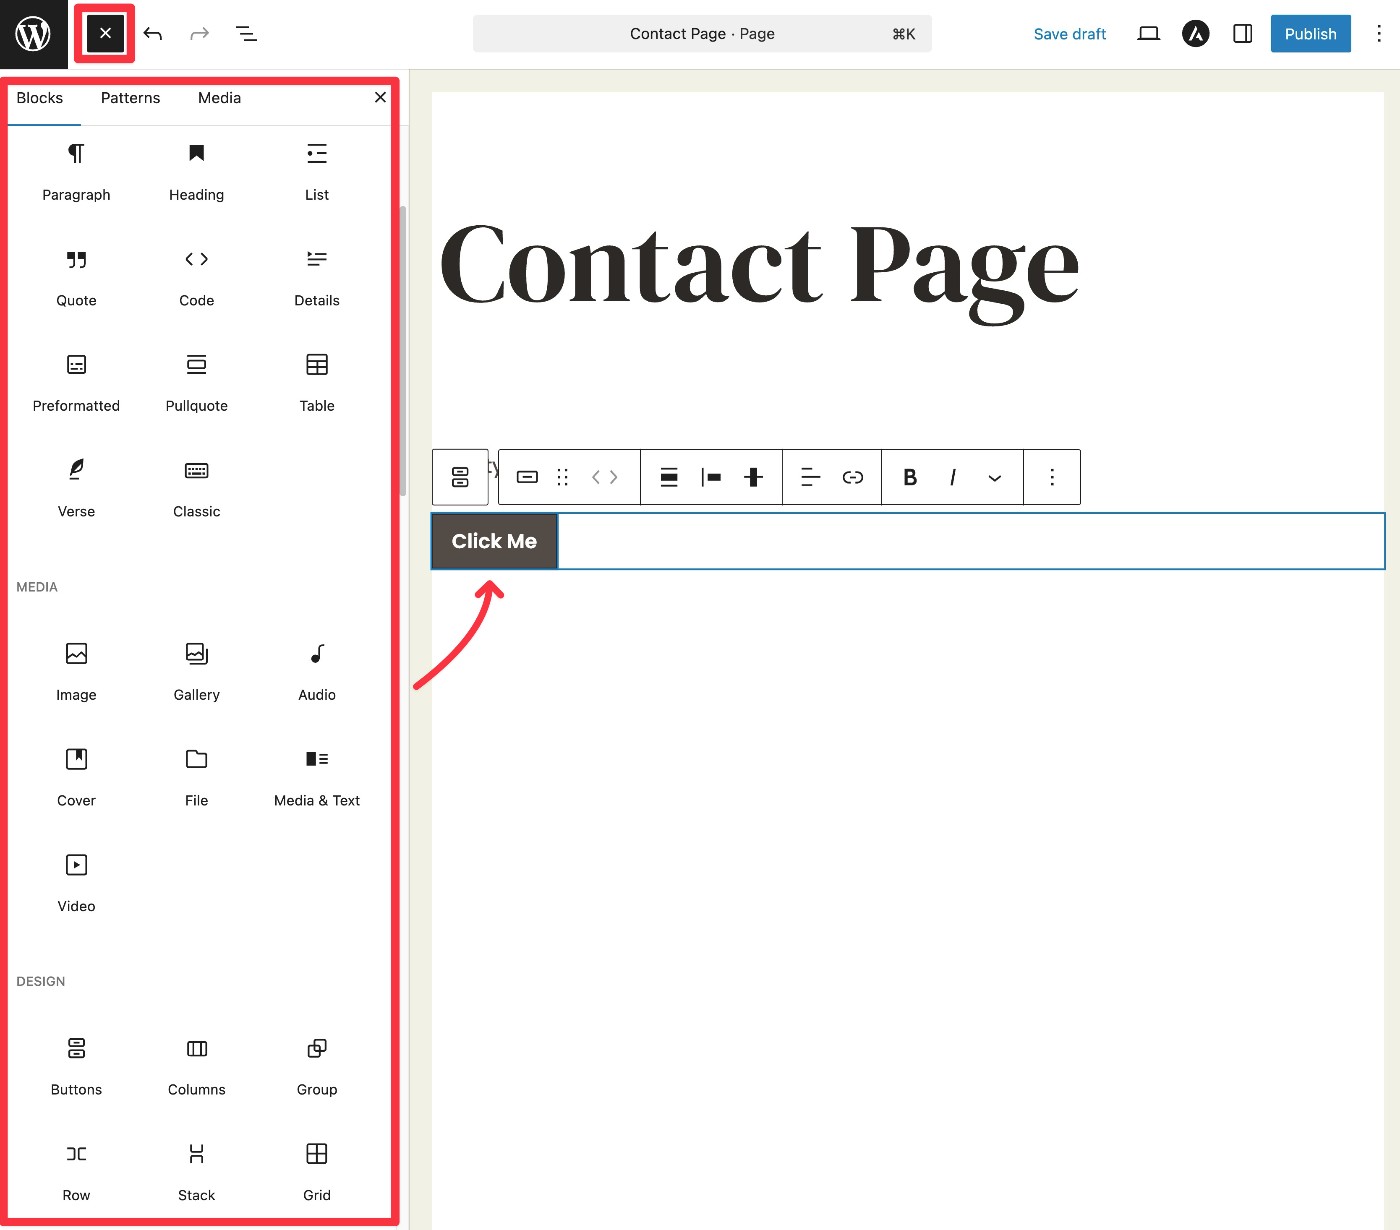
You can then use the WordPress block editor to set up page content:
- Click and type to add basic text content.
- To add other content or layout elements, you can insert blocks. Some plugins will add their own blocks. For example, if you’re creating your contact page, the Gravity Forms plugin includes a Form block that you can use to embed an actual contact form.
If you want a more powerful design experience, you can use a WordPress page builder plugin like Elementor.
Once you’re finished adding a page’s content, make sure to Publish it to make it live. You can manage all of your site’s pages by going to Pages → All Pages.
👉Full guide to adding WordPress pages
6. Blog: How to set up a blog and publish your first post
In addition to setting up static pages, you also might want to create a blog for your site.
There are two parts to setting up your blog:
- Creating the blog page on your site – By default, WordPress lists your most recent blog posts on your site’s homepage. However, for most sites, it makes more sense to use a static homepage and put the blog page somewhere else. For example, our blog is located at gravityforms.com/blog.
- Publishing individual blog posts – Once you set up your blog page, posts that you publish will automatically appear on the blog page.
Here’s how to set up your blog page:
- Create a blank page named “Blog” as we showed you above (Pages → Add Page).
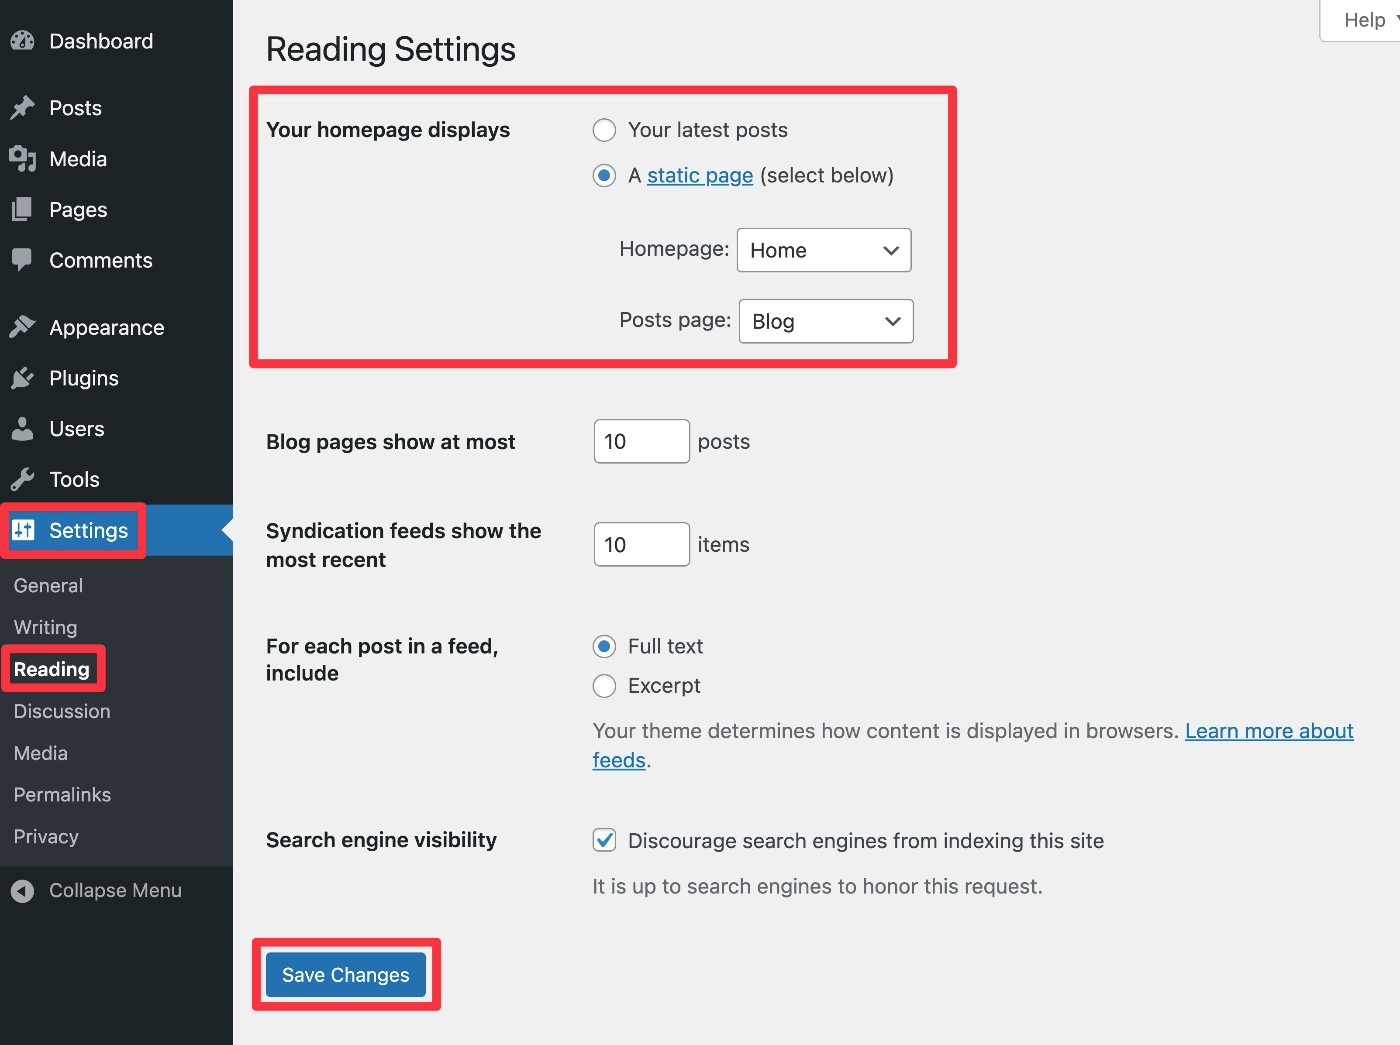
- Go to Settings → Reading in your dashboard sidebar.
- Choose your homepage displays – A static page.
- Use the drop-down to select your “Blog” page as the Posts page. You can then choose another page to use as your site’s homepage.
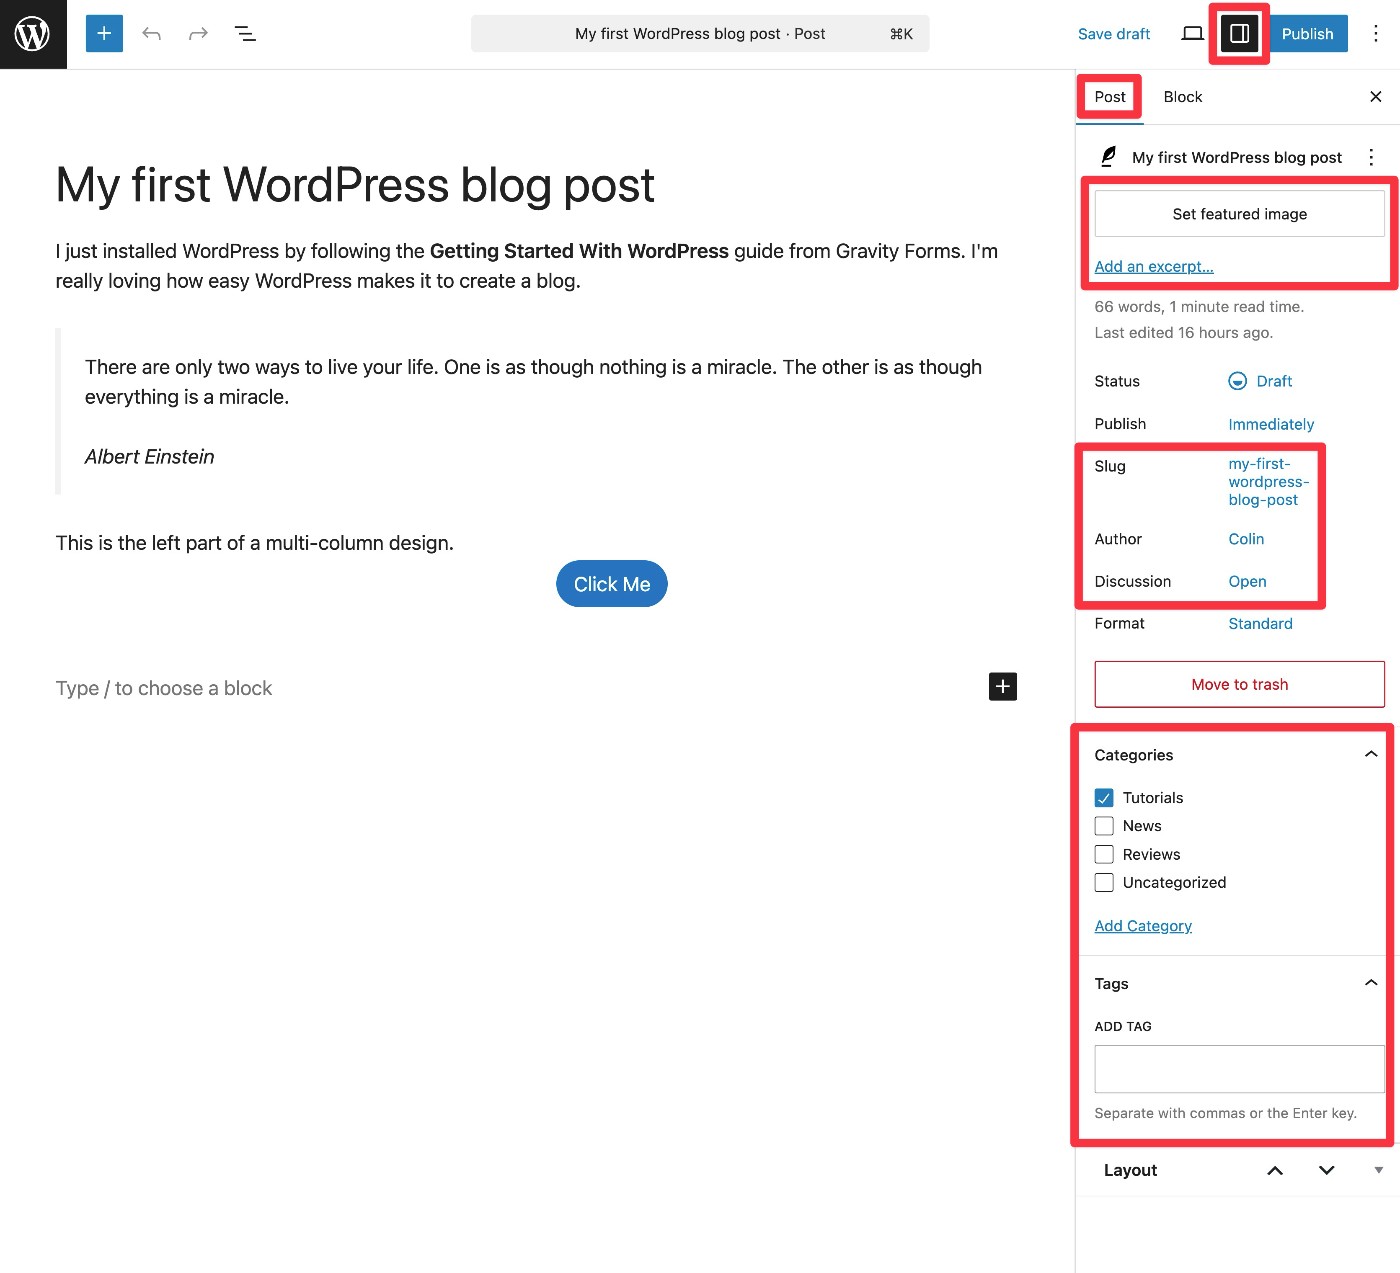
To publish a blog post, go to Posts → Add Post.
You can then add blog content using the same block editor that you use for pages.
You also get some additional options in the sidebar that let you assign categories and tags to organize your posts, adjust the publish date, and more.
Once you’ve published some posts, you can manage them by going to Posts → All Posts.
👉Full guide to setting up a WordPress blog
7. WordPress search engine optimization: How to rank your site in Google
Once you start publishing content on your site, the next step is to get that content in front of visitors’ eyeballs.
While there are a lot of different strategies that you can use to drive traffic to your website, one of the most fundamental approaches is to rank your content for relevant keyword searches in search engines like Google.
In order to give your site the best chance possible to rank at the top of search results, it’s important to at least understand the basics of SEO.
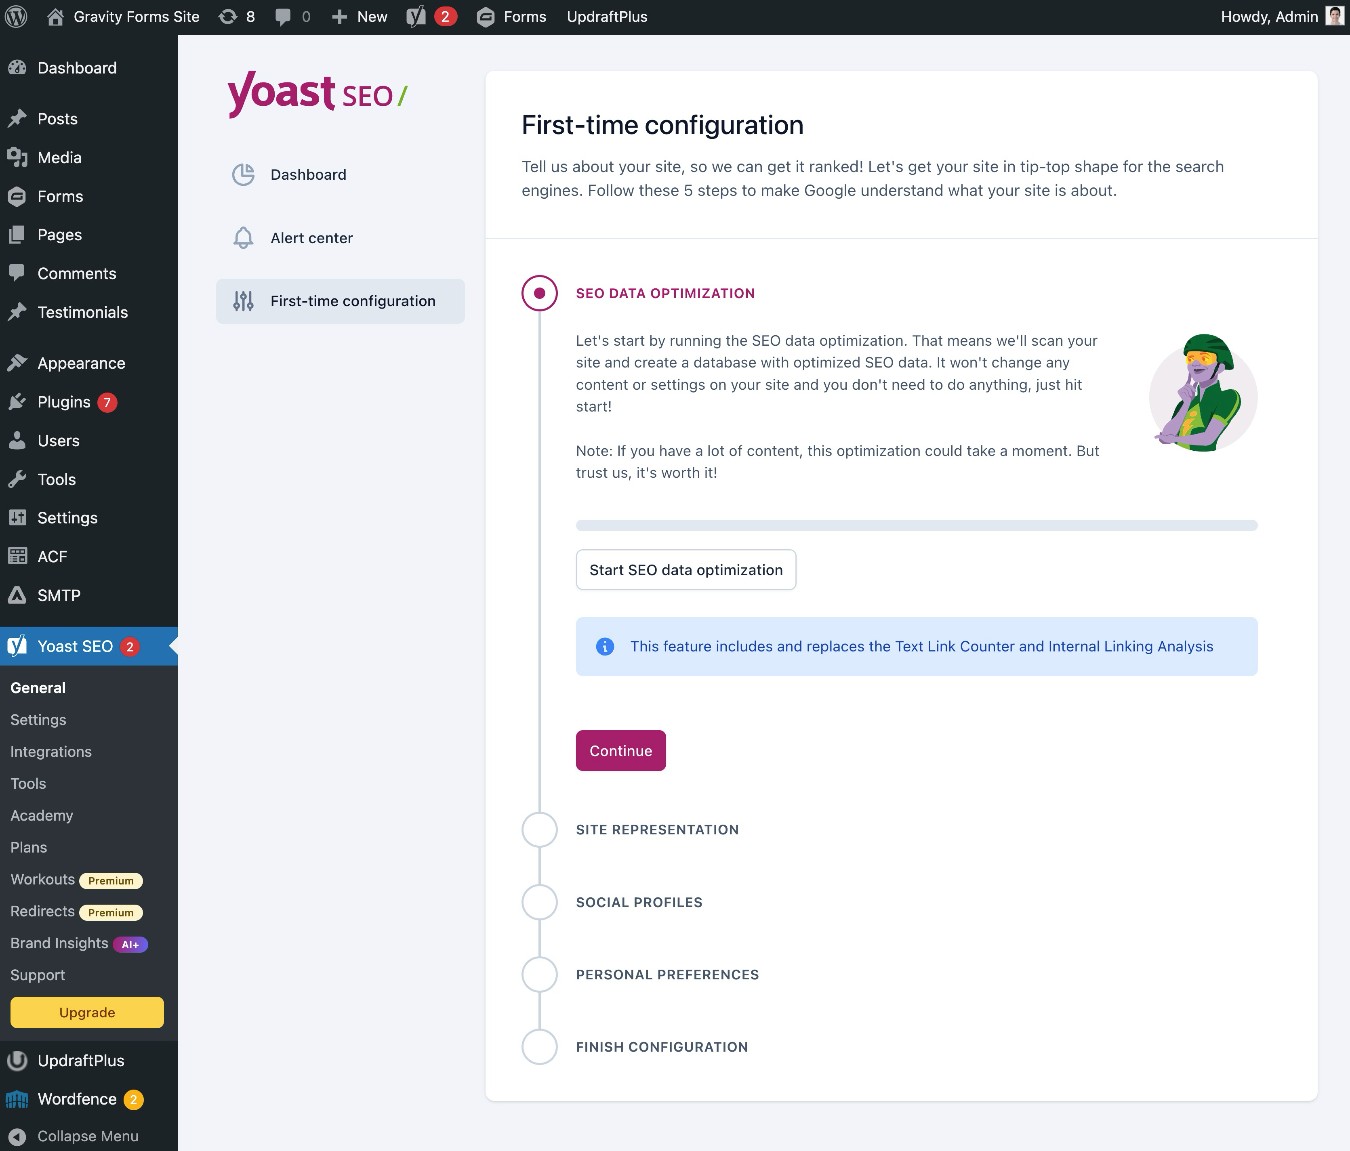
First, you should know that the core WordPress software does not come with much in the way of built-in SEO tools, so it’s essential to install a WordPress SEO plugin if you want to rank in Google.
We use and recommend the free Yoast SEO plugin, but there are other quality options out there. You only need one SEO plugin, so just pick the one that looks best and go with that.
For more depth on SEO basics, click the link below to read our full WordPress SEO guide.
👉Full guide to WordPress SEO basics
8. WordPress security: How to protect your site from malicious actors
Because of how popular WordPress is, WordPress sites are an attractive target for malicious actors.
While the core WordPress software is secure, user actions and third-party extensions can potentially open up vulnerabilities.
To protect your site from issues, it’s important to follow some basic WordPress security best practices.
For extra peace of mind, you can also install a WordPress security plugin like the Wordfence plugin that we discussed earlier.
We detail all of these best practices in our full WordPress security guide.
👉Full guide to WordPress security basics
Get started with WordPress today
That wraps up the overview of our entire “Getting Started With WordPress” series. Our goal for this series is to help you go from “zero” to “working website” with as little difficulty as possible.
Again, we’ve intentionally kept this post high-level. If you want more detailed information on any of these topics, follow our link to the full post for each part of our series.

If you want to keep up-to-date with what’s happening on the blog sign up for the Gravity Forms newsletter!