
If you’re a musician, band, producer, or music teacher, positive client testimonials can make all the difference. They help you build credibility, attract new opportunities, and give fans, students, or collaborators a voice in your story.
But manually collecting and approving testimonials can eat up your creative time. Sorting through emails, formatting quotes, and chasing people for feedback takes energy you could otherwise be spending making music.
That’s where WordPress, Gravity Forms, and Gravity Flow come together to save the day.
With this powerhouse trio, you can collect client testimonials automatically, route them for approval, and publish them on your website – all without lifting a finger after setup.
By the end of this guide, you’ll see how easy it is to turn your testimonial collection into a fully automated system that keeps your website current, professional, and always showcasing your best work.
Let’s dive in!
Key takeaways
- Client testimonials build trust and boost your credibility as a musician.
- Gravity Forms makes collecting and managing testimonials effortless.
- Gravity Flow automates approvals and publishing, reducing manual work for you.
- Automation saves time so you can focus on your music.
- Your WordPress website stays fresh with real feedback that sells your brand.
Why musicians use WordPress, Gravity Forms, and Gravity Flow
WordPress is the go-to platform for creatives – it’s free, flexible, and gives you total control over your content. When you pair it with Gravity Forms, you get the flexibility to manage your fan and client interactions from one place, and take your website from a simple online presence to a full-featured business hub.
Gravity Forms
Gravity Forms isn’t just a powerful form builder. It’s a data management tool designed to handle everything from fan signups and gig bookings to digital product sales and music lesson registrations.
With Gravity Forms and its intuitive drag-and-drop builder, you can create forms that not only look professional but also work smarter – collect data, route submissions, send notifications, and integrate with your favorite tools automatically.
Gravity Flow
Gravity Flow is an add-on for Gravity Forms that can extend what your forms can do by adding workflow logic, approvals, publishing automation, and more.
With Gravity Flow, you can transform a simple testimonial form into a seamless process that:
- Collects testimonials through a form on your website.
- Routes submissions to you or your team for review.
- Automatically notifies fans or clients when their testimonial is approved.
- Publishes approved testimonials directly to your site.
Imagine this: after every show, collaboration, or music lesson, fans and clients fill out your testimonial form. Gravity Flow automatically organizes and manages approvals for submissions, then posts them to your site’s Testimonials page – all while you focus on creating your next track.
For the tutorial below, we are going to focus on automating the testimonial workflow after a form has been submitted.
How to set up automated client testimonials with Gravity Flow
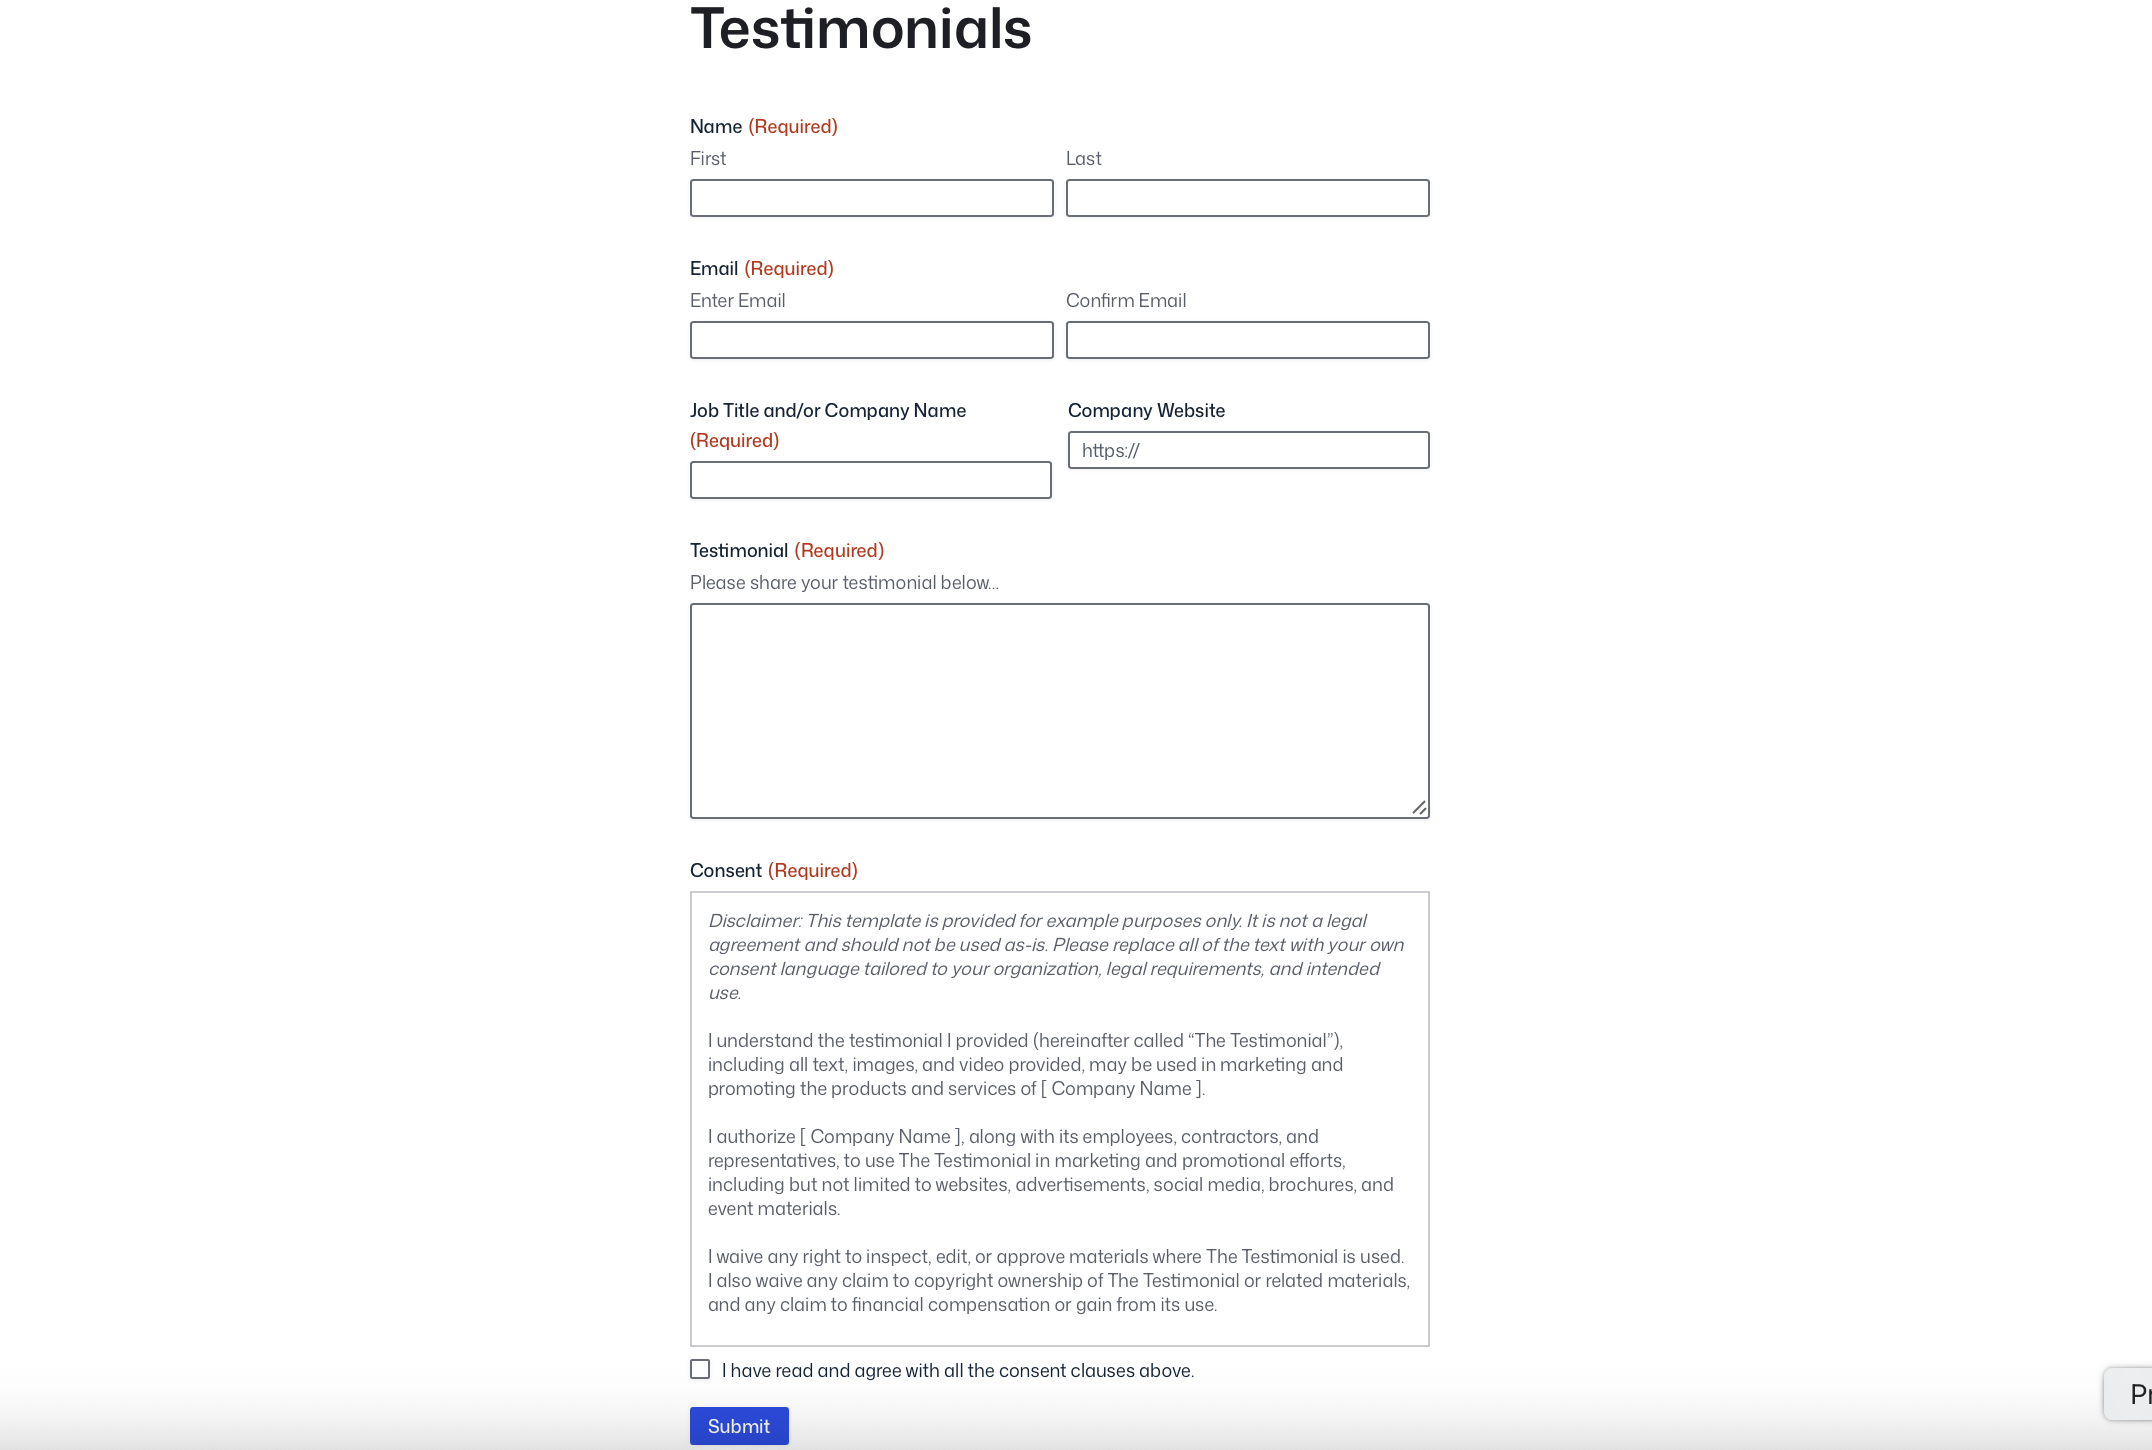
The first step is to create a testimonial form and turn submissions into WordPress content using Gravity Forms and its Advanced Post Creation Add-On.
For the full walkthrough on building the form, connecting it to a testimonial post type, and displaying testimonials on your site, check out our starter guide on accepting and displaying testimonials on WordPress.
The guide walks through getting started with our testimonial form template, saving submissions as draft posts, and publishing approved testimonials to your website. It’s the perfect foundation for collecting client testimonials in an automated, scalable way.
But what happens when you want more control?
This is where Gravity Flow takes things further. Instead of a single approval step or manual review, Gravity Flow lets you build a structured workflow around your client testimonials.
With Gravity Flow, you can:
- Review and edit testimonials before they become posts.
- Pause the process to collect additional assets, like event photos.
- Send entries back for revisions without starting over.
- Control exactly when and how testimonials are published.
In other words, Gravity Forms and the Advanced Post Creation Add-On handle collection and publishing. Gravity Flow handles process and decision-making.
Below is an example of how these tools work together to create a complete client testimonial workflow, from submission to publication, with no manual copying or chasing emails.
How to build a client testimonial workflow
Before we jump into the tutorial, you’ll want to be sure you have the following up and running on your WordPress site:
- Gravity Forms Elite and the Advanced Post Creation Add-On.
- Gravity Flow (any license will work).
- Testimonial form with an Advanced Post Creation feed set up.
Alternatively, you can spin up a free Gravity Flow demo, which has everything you’ll need to follow along with this tutorial.
Once you’ve got these prerequisites set up (or you’re working in the demo), it’s time to layer Gravity Flow onto your testimonial form and APC feed, and bring automation into the mix.
Add an Approval step with editable fields
First, we need to add an Approval step. Adding this step gives you a chance to review the testimonial and determine whether it’s website-worthy, long before anything is published on your website.
To start, open your Testimonial Form Settings and click Workflow. Then click Add New.
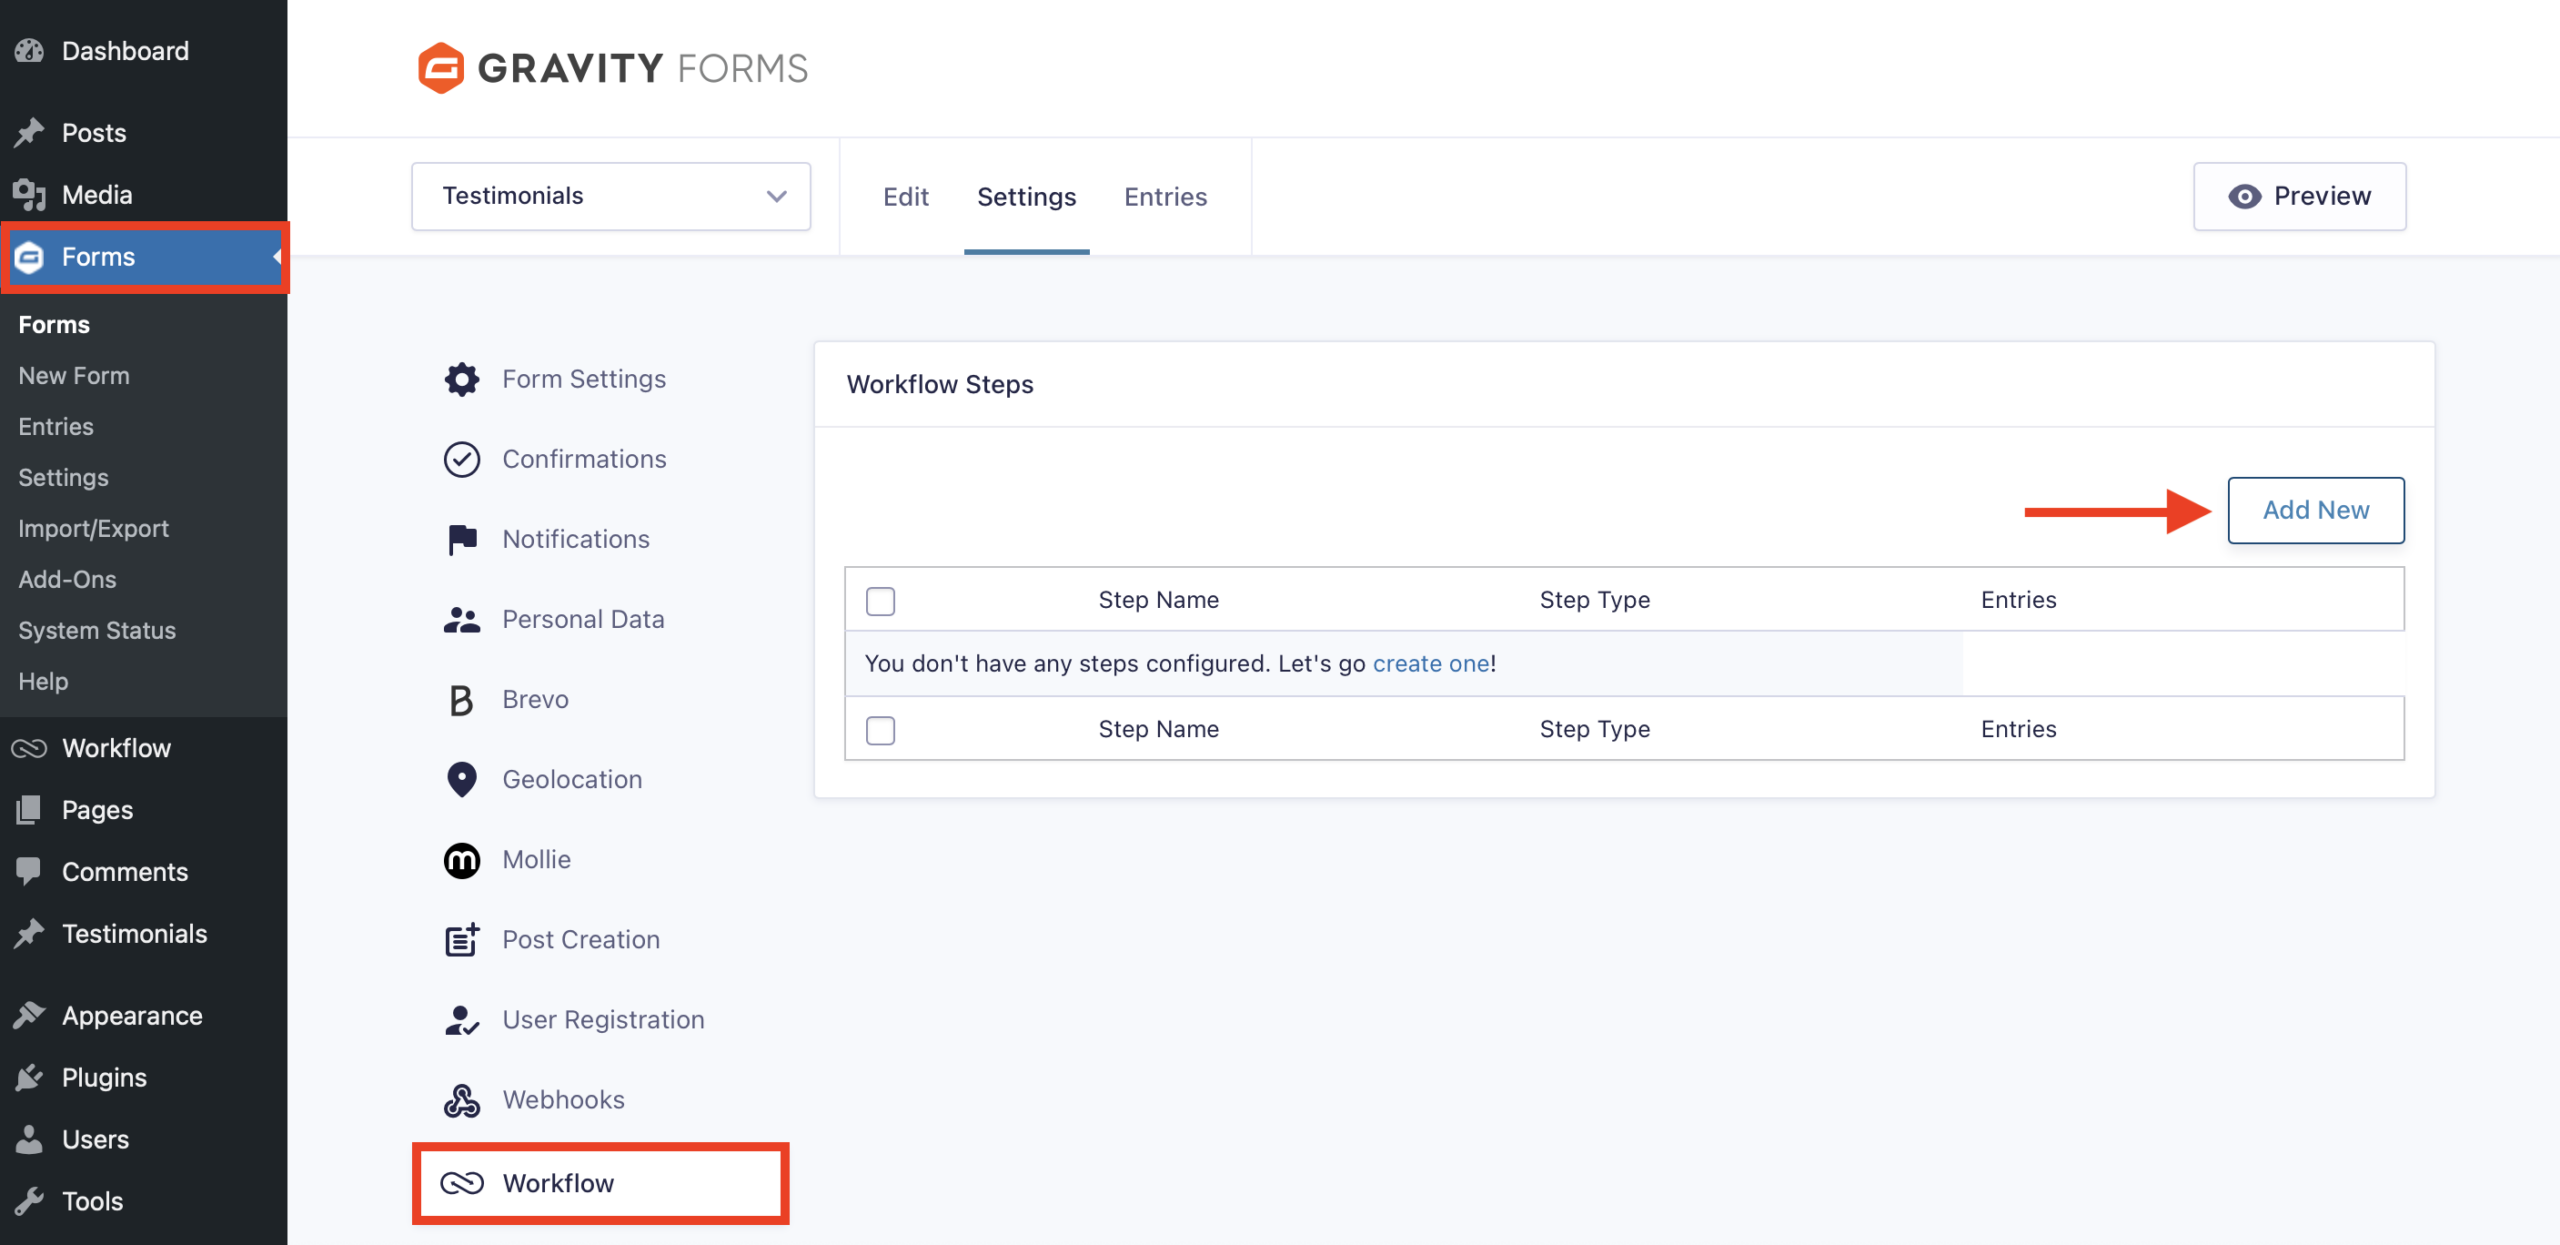
Give your step a Name and select Approval as the Step Type.
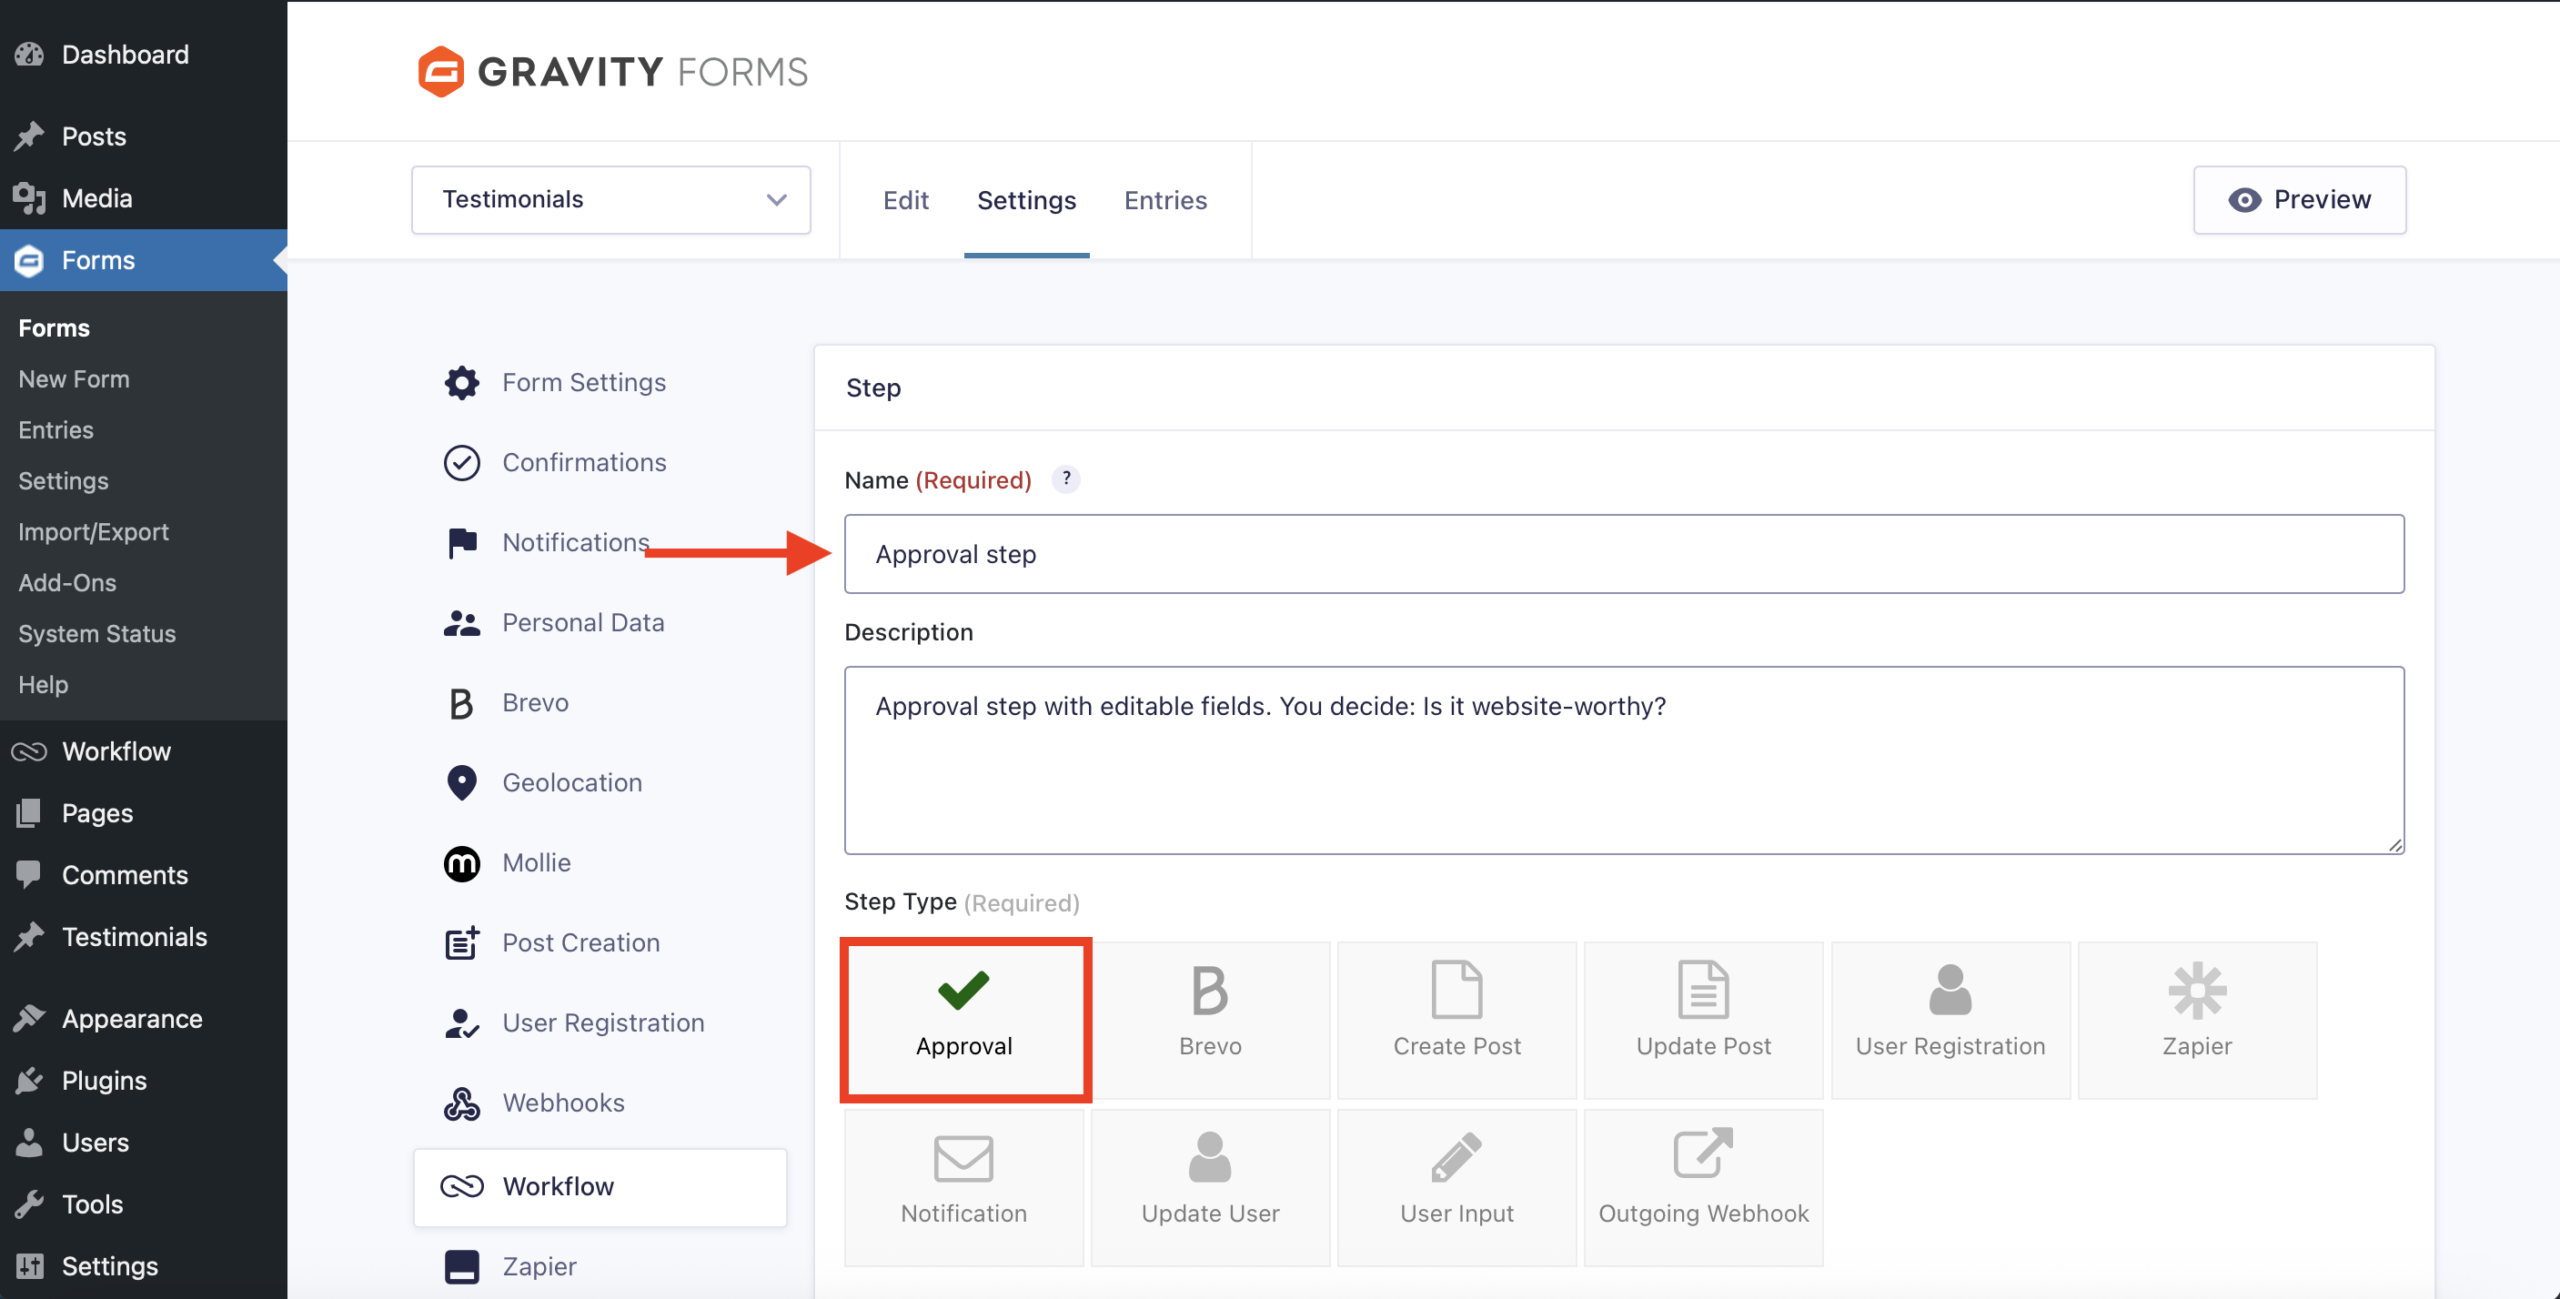
For in-depth explanations on the possible configuration options for this step, visit our Approval process documentation. For example, a couple Approval settings to highlight in this Step include:
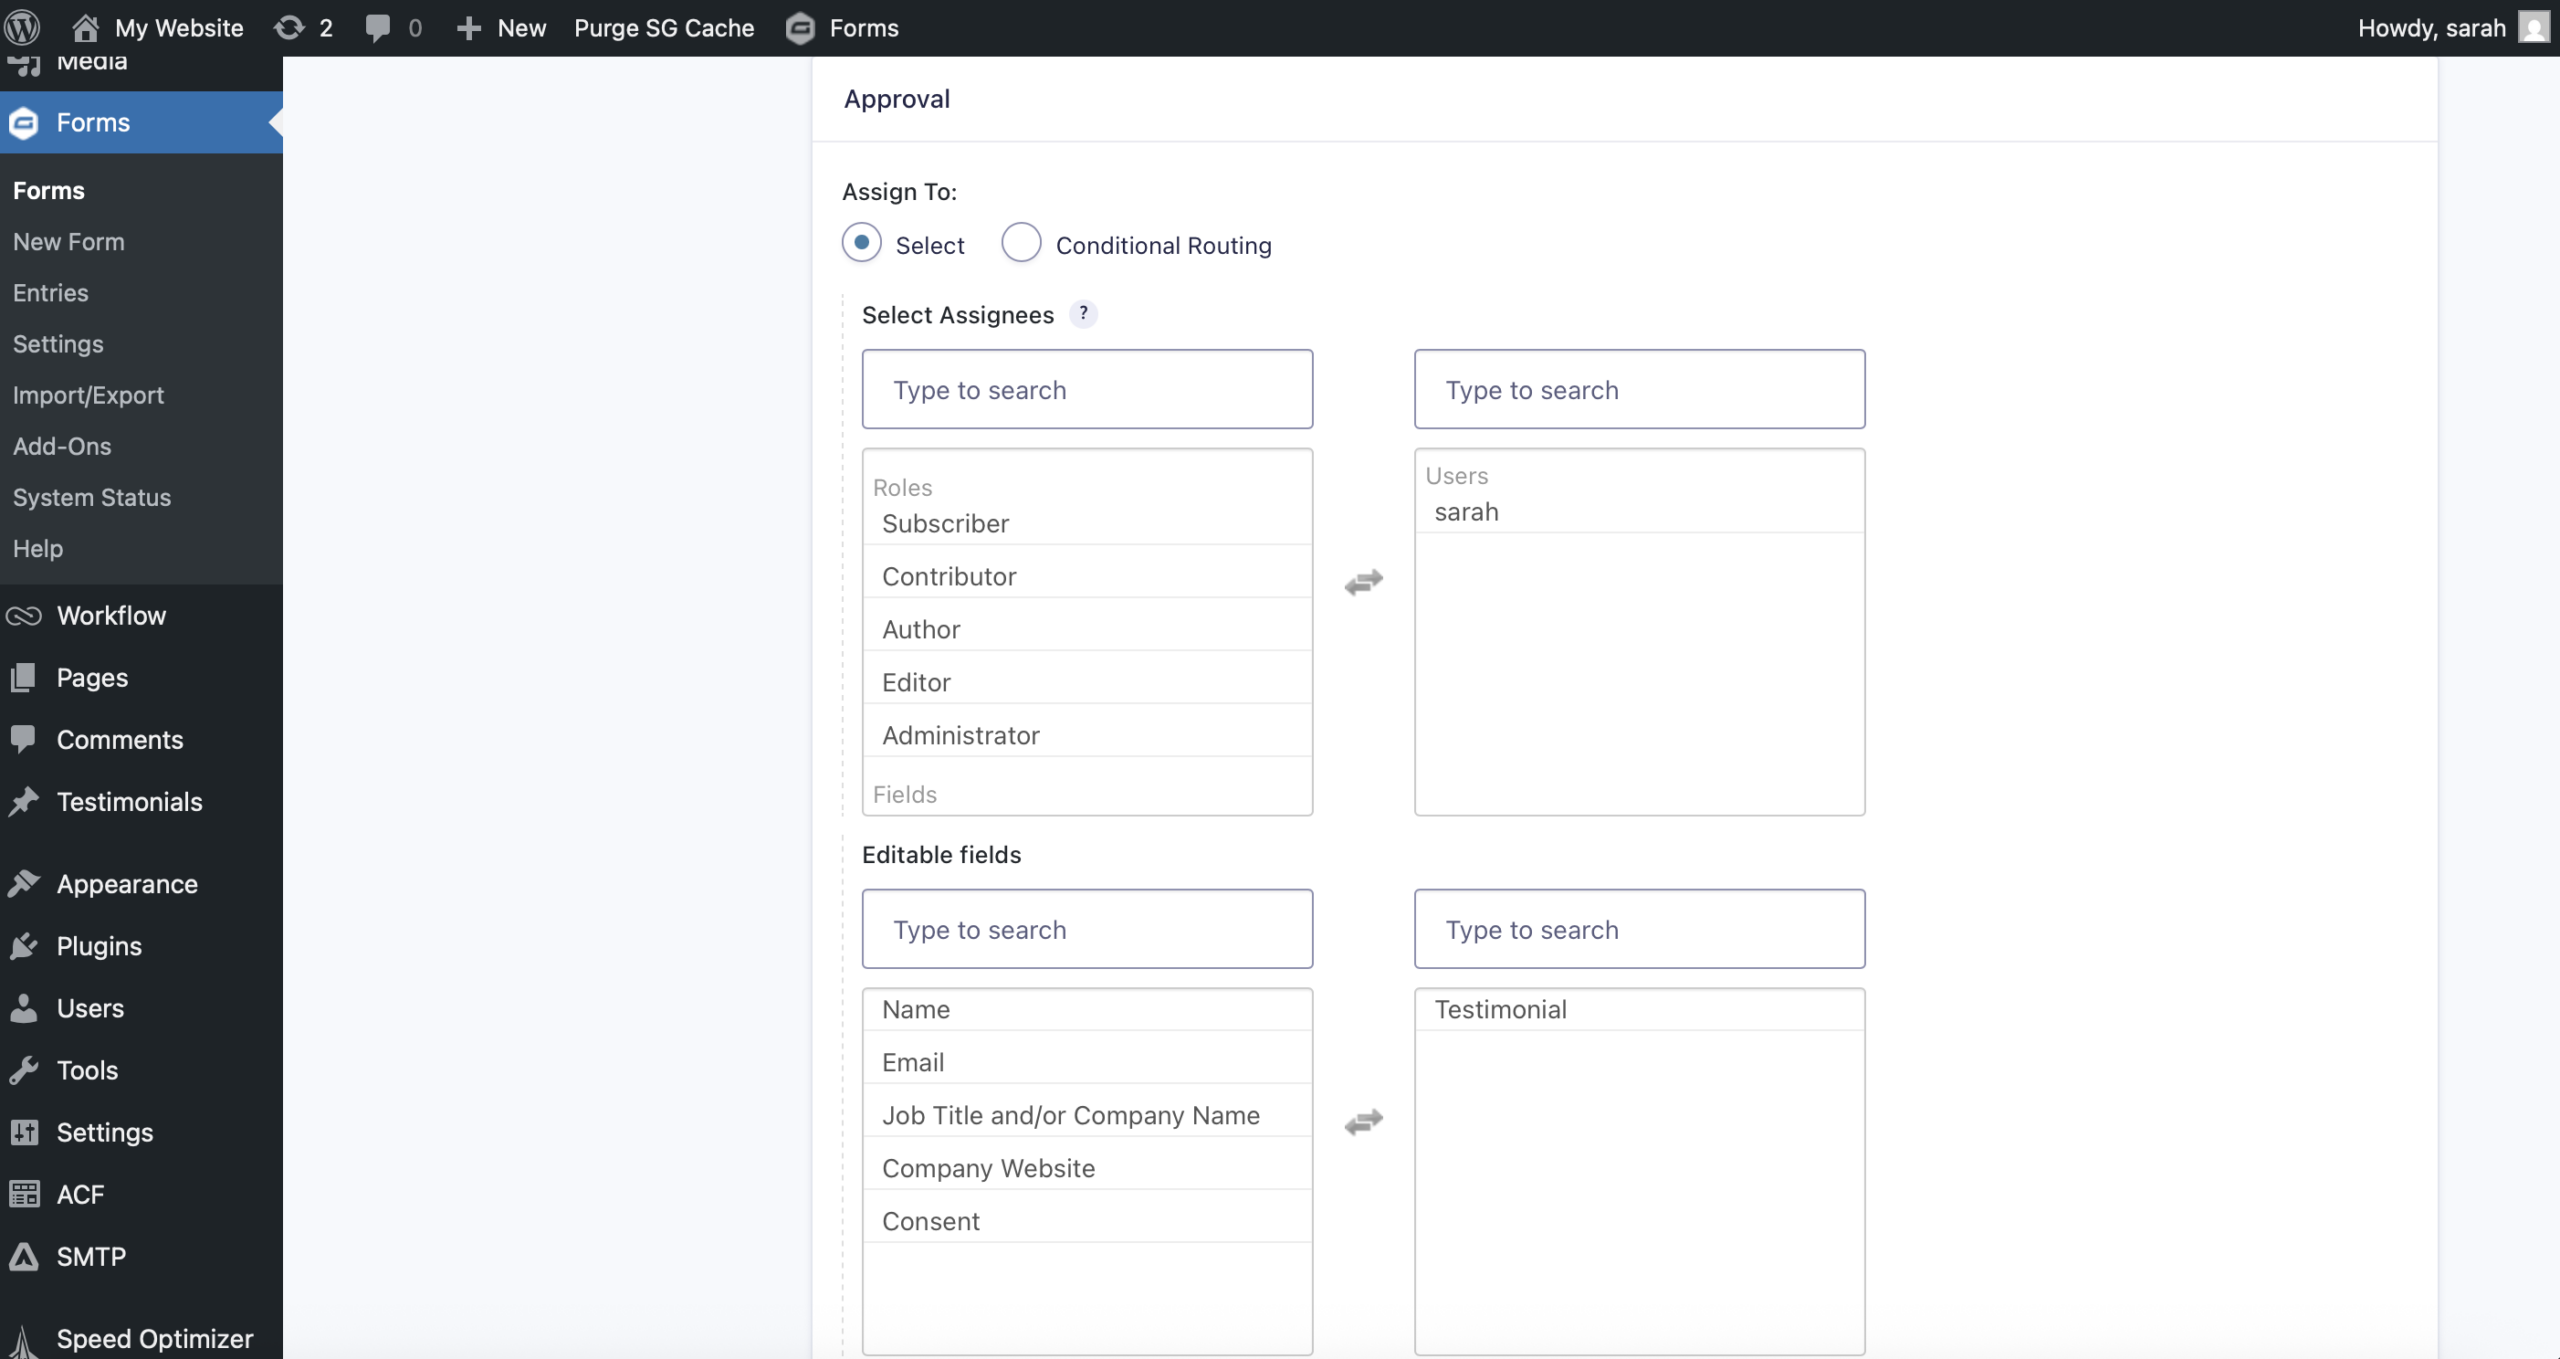
- Assign to – Assign to yourself and/or other trusted site user(s).
- Editable fields – If you want to be able to edit the testimonial itself in this step, be sure to make it editable here.
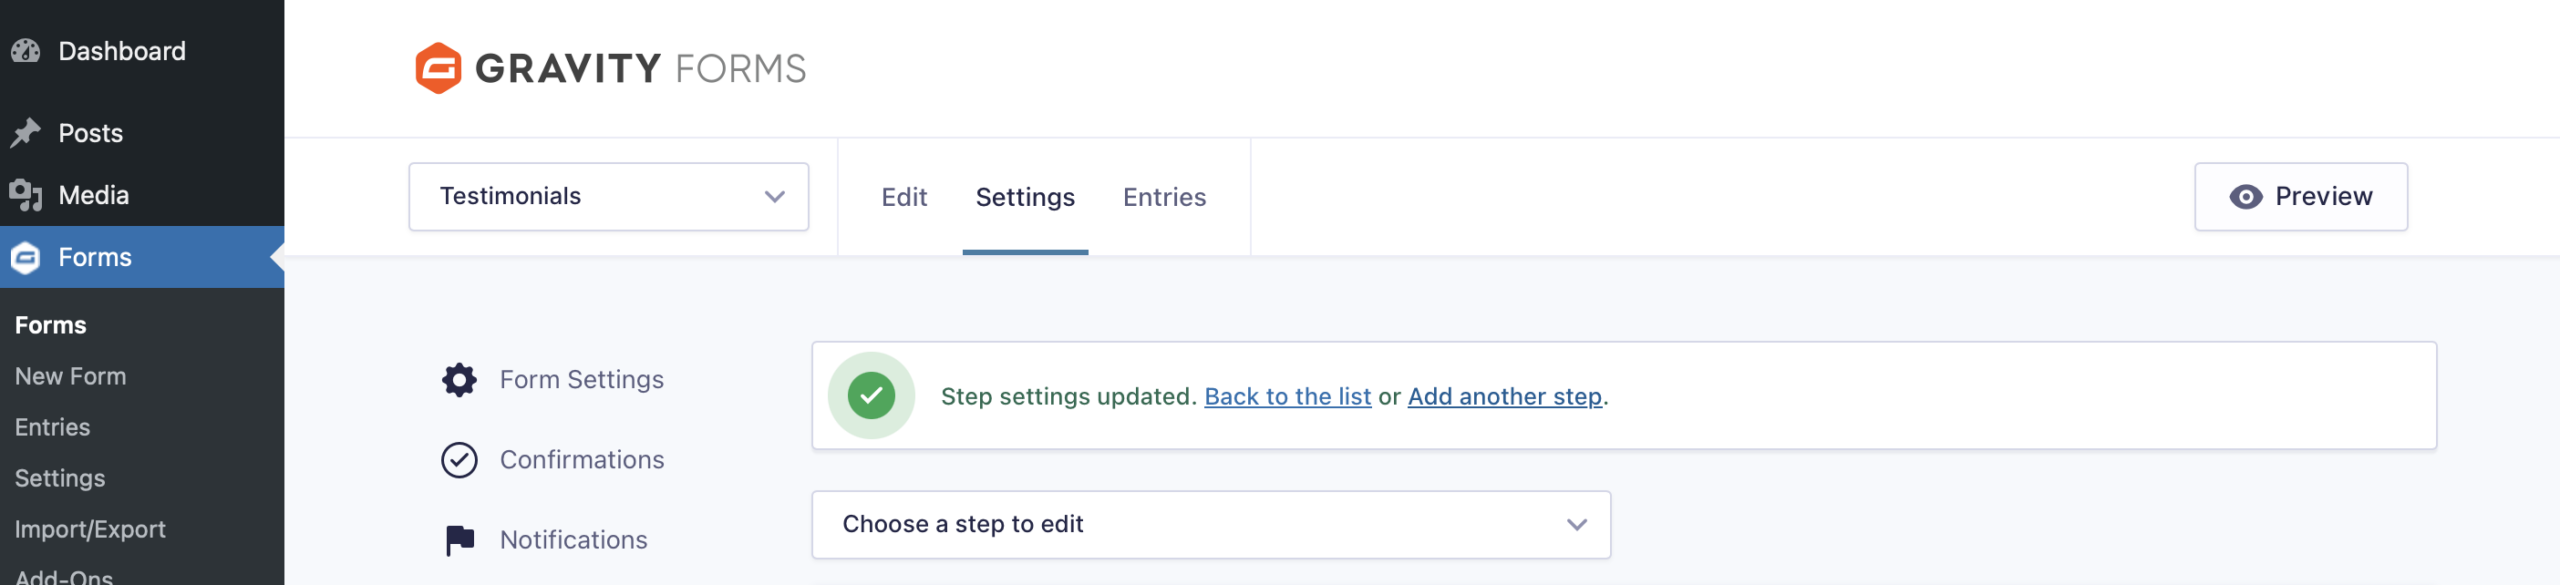
Click Update Step Settings.
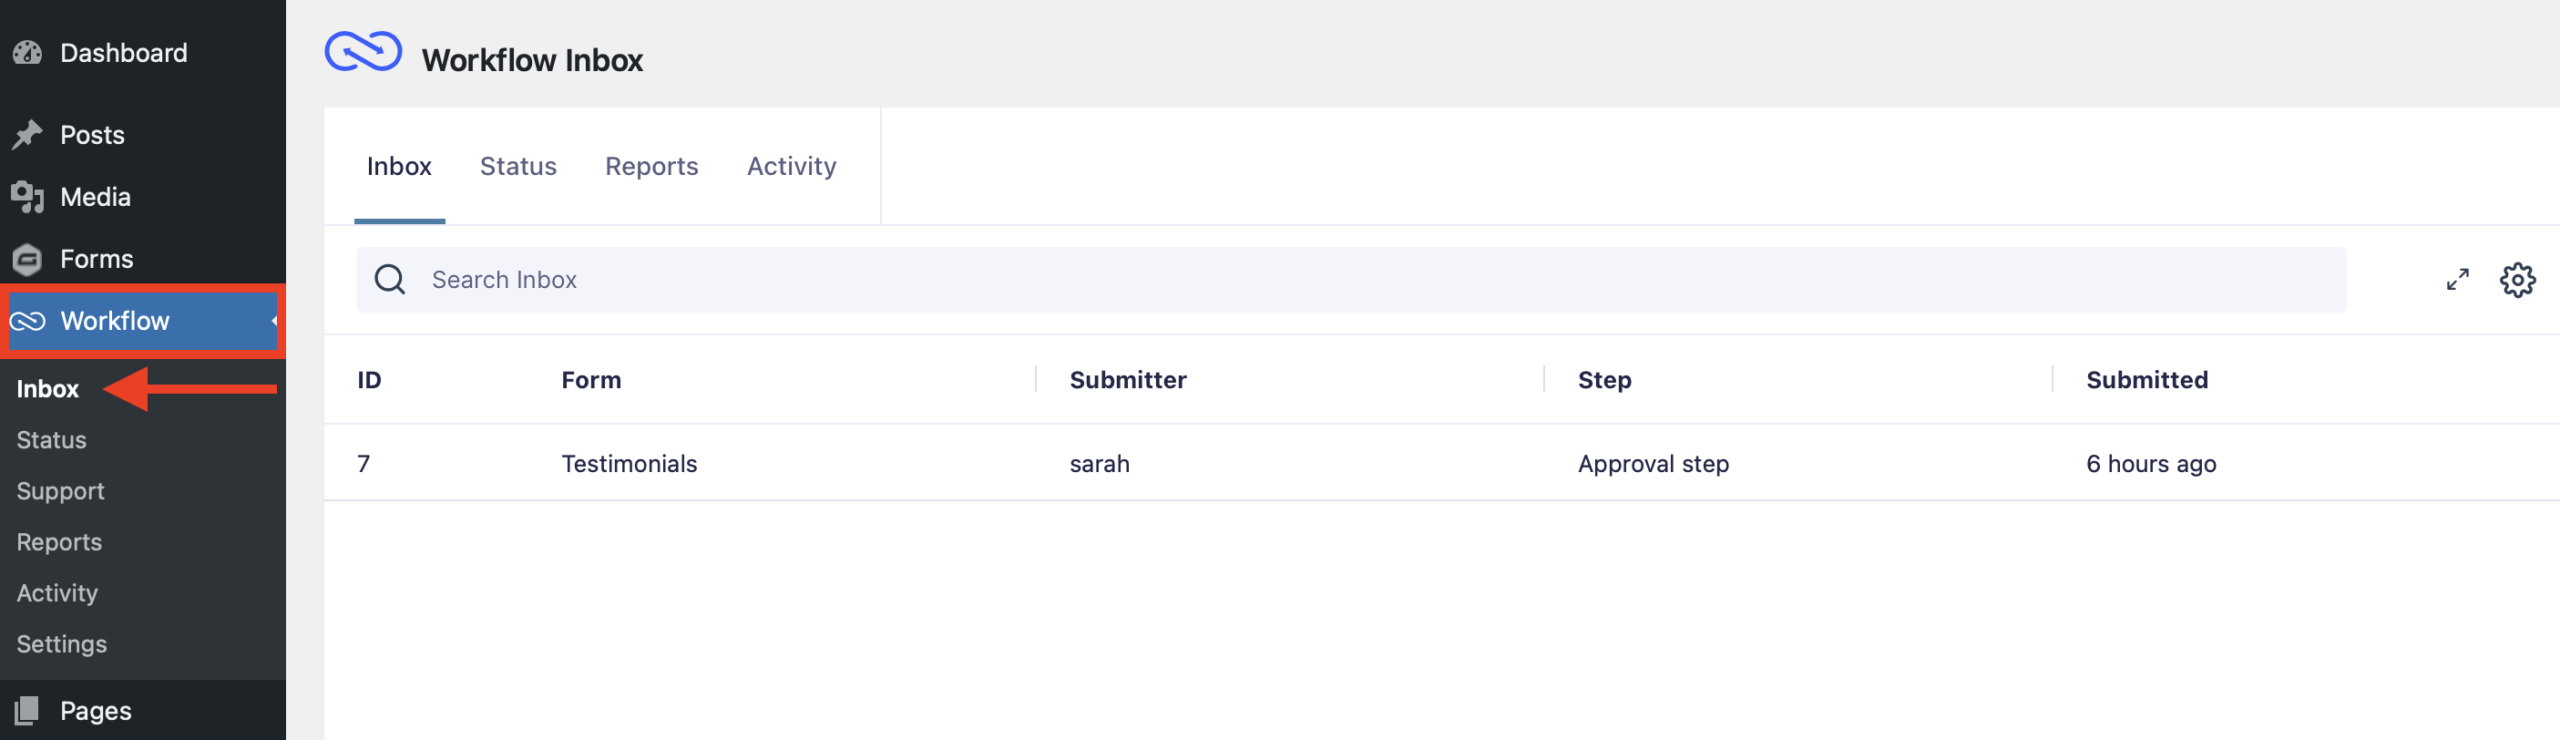
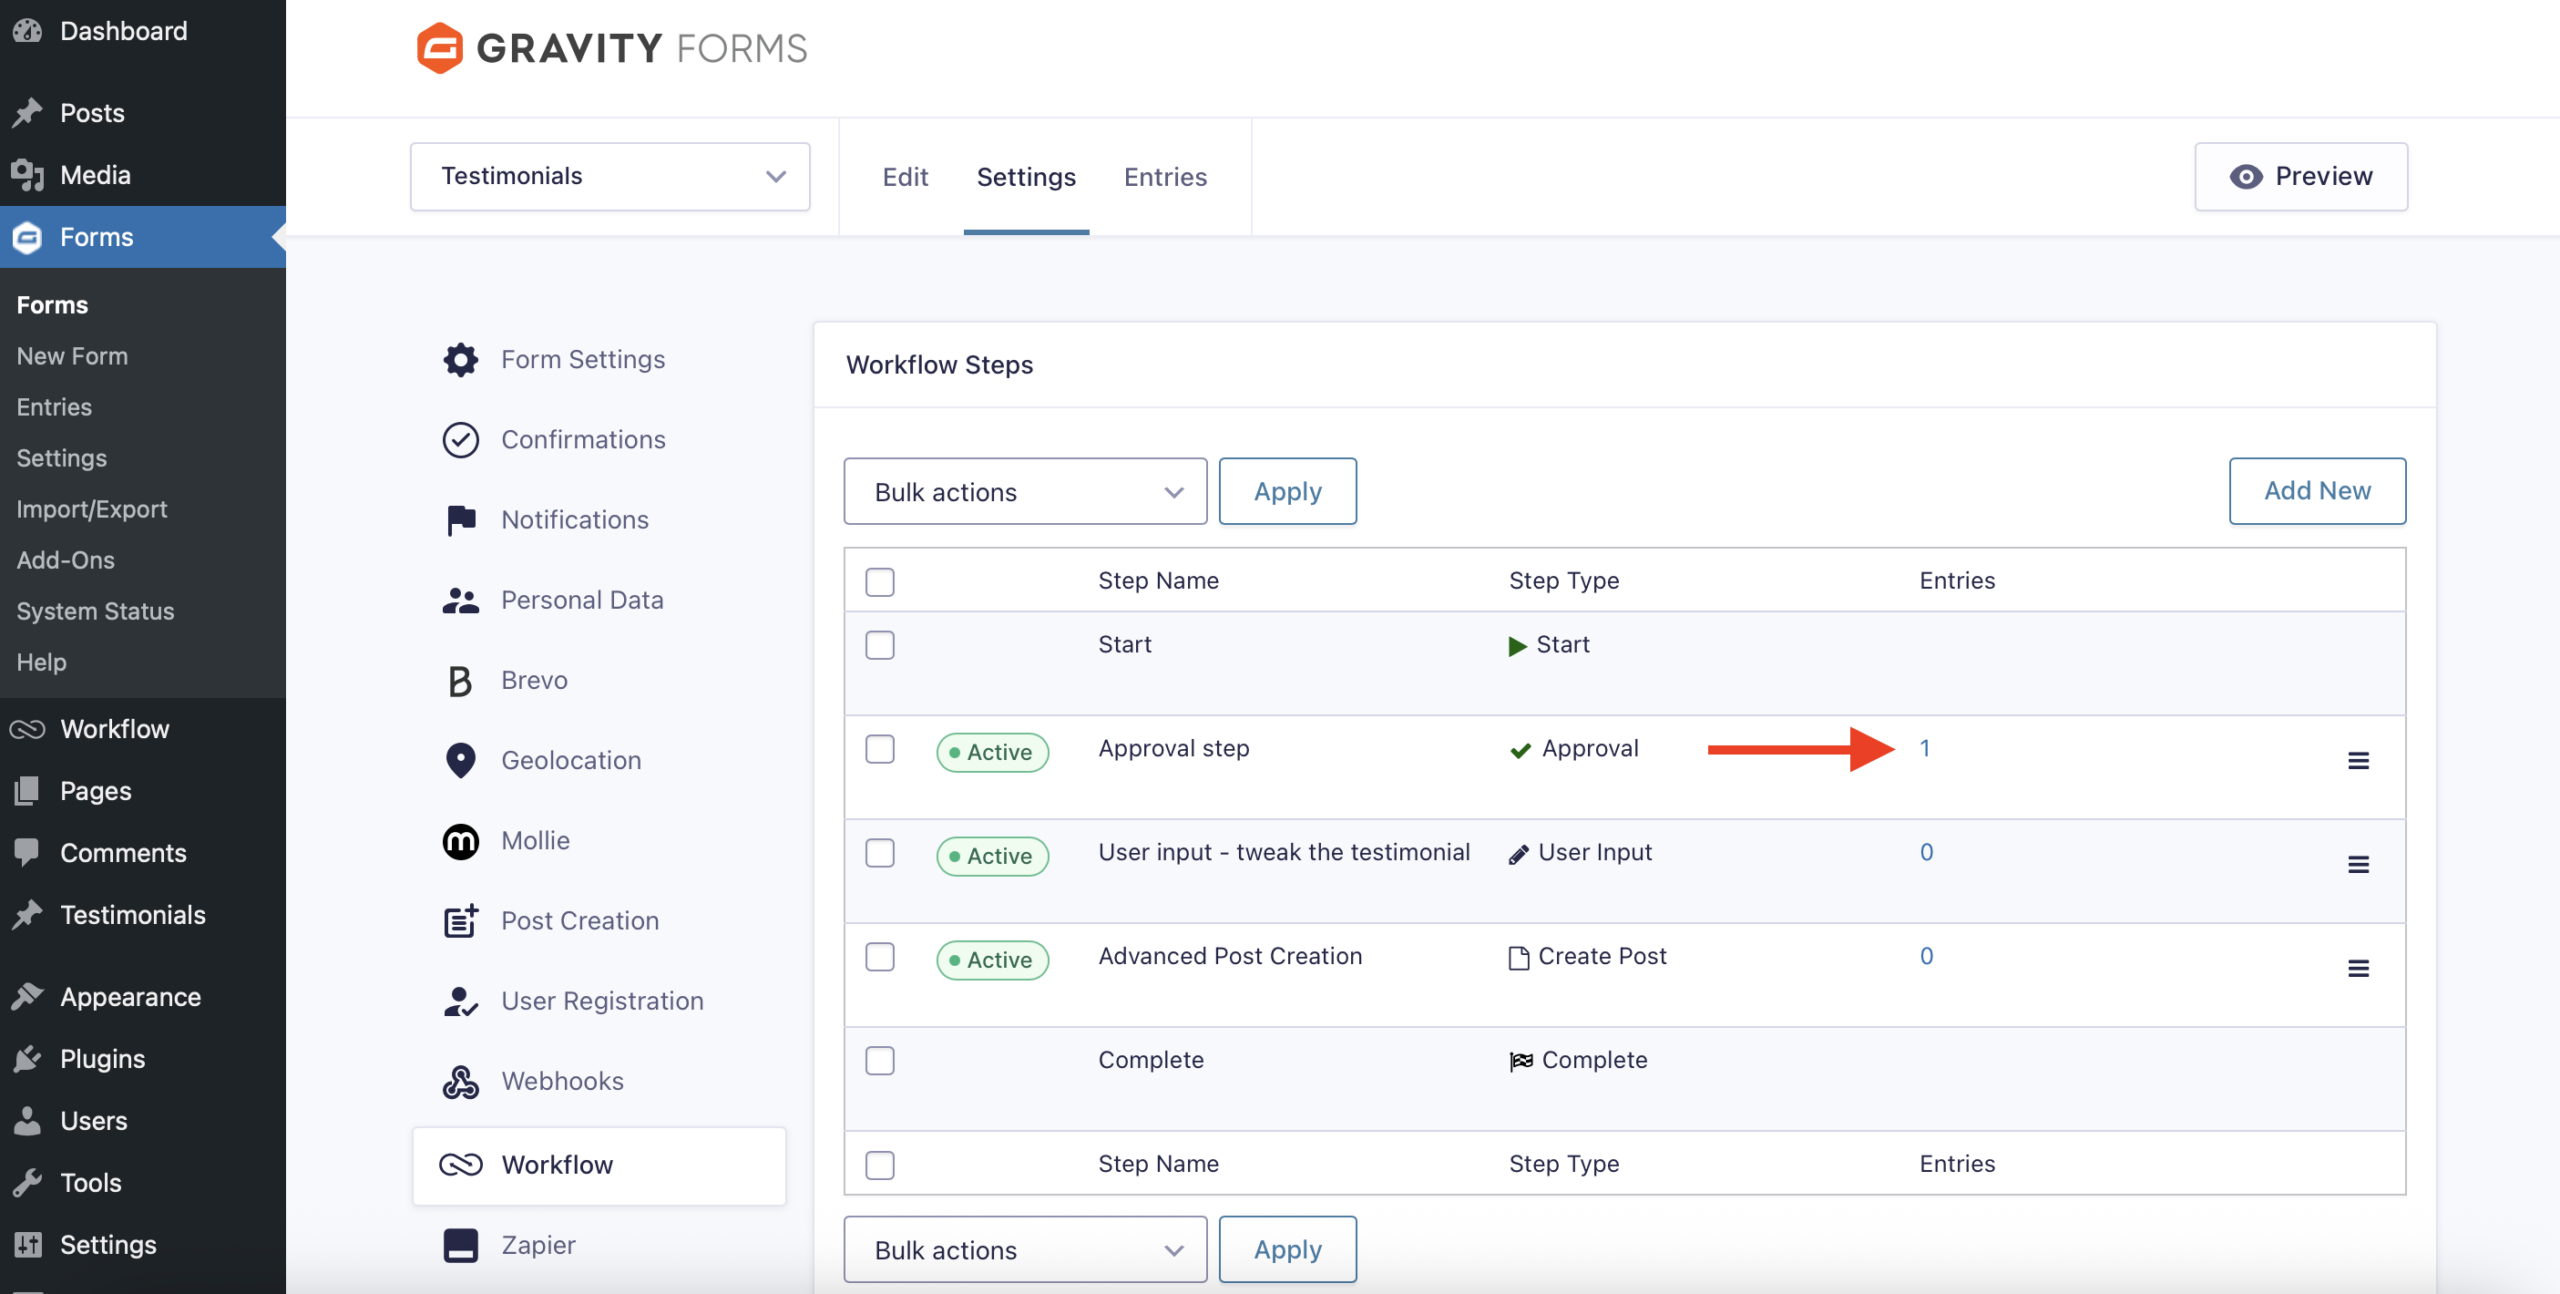
Once this step is in place, any testimonials that are submitted will appear in your form entries with their status and current workflow step.

Add a User Input step
Once a testimonial has been deemed website-worthy, a User Input step can be used to allow your internal users to make any necessary edits to the content before it gets published (spelling, grammar, etc.).
To do this, add a new step, give it a Name and select User Input as the Step Type.
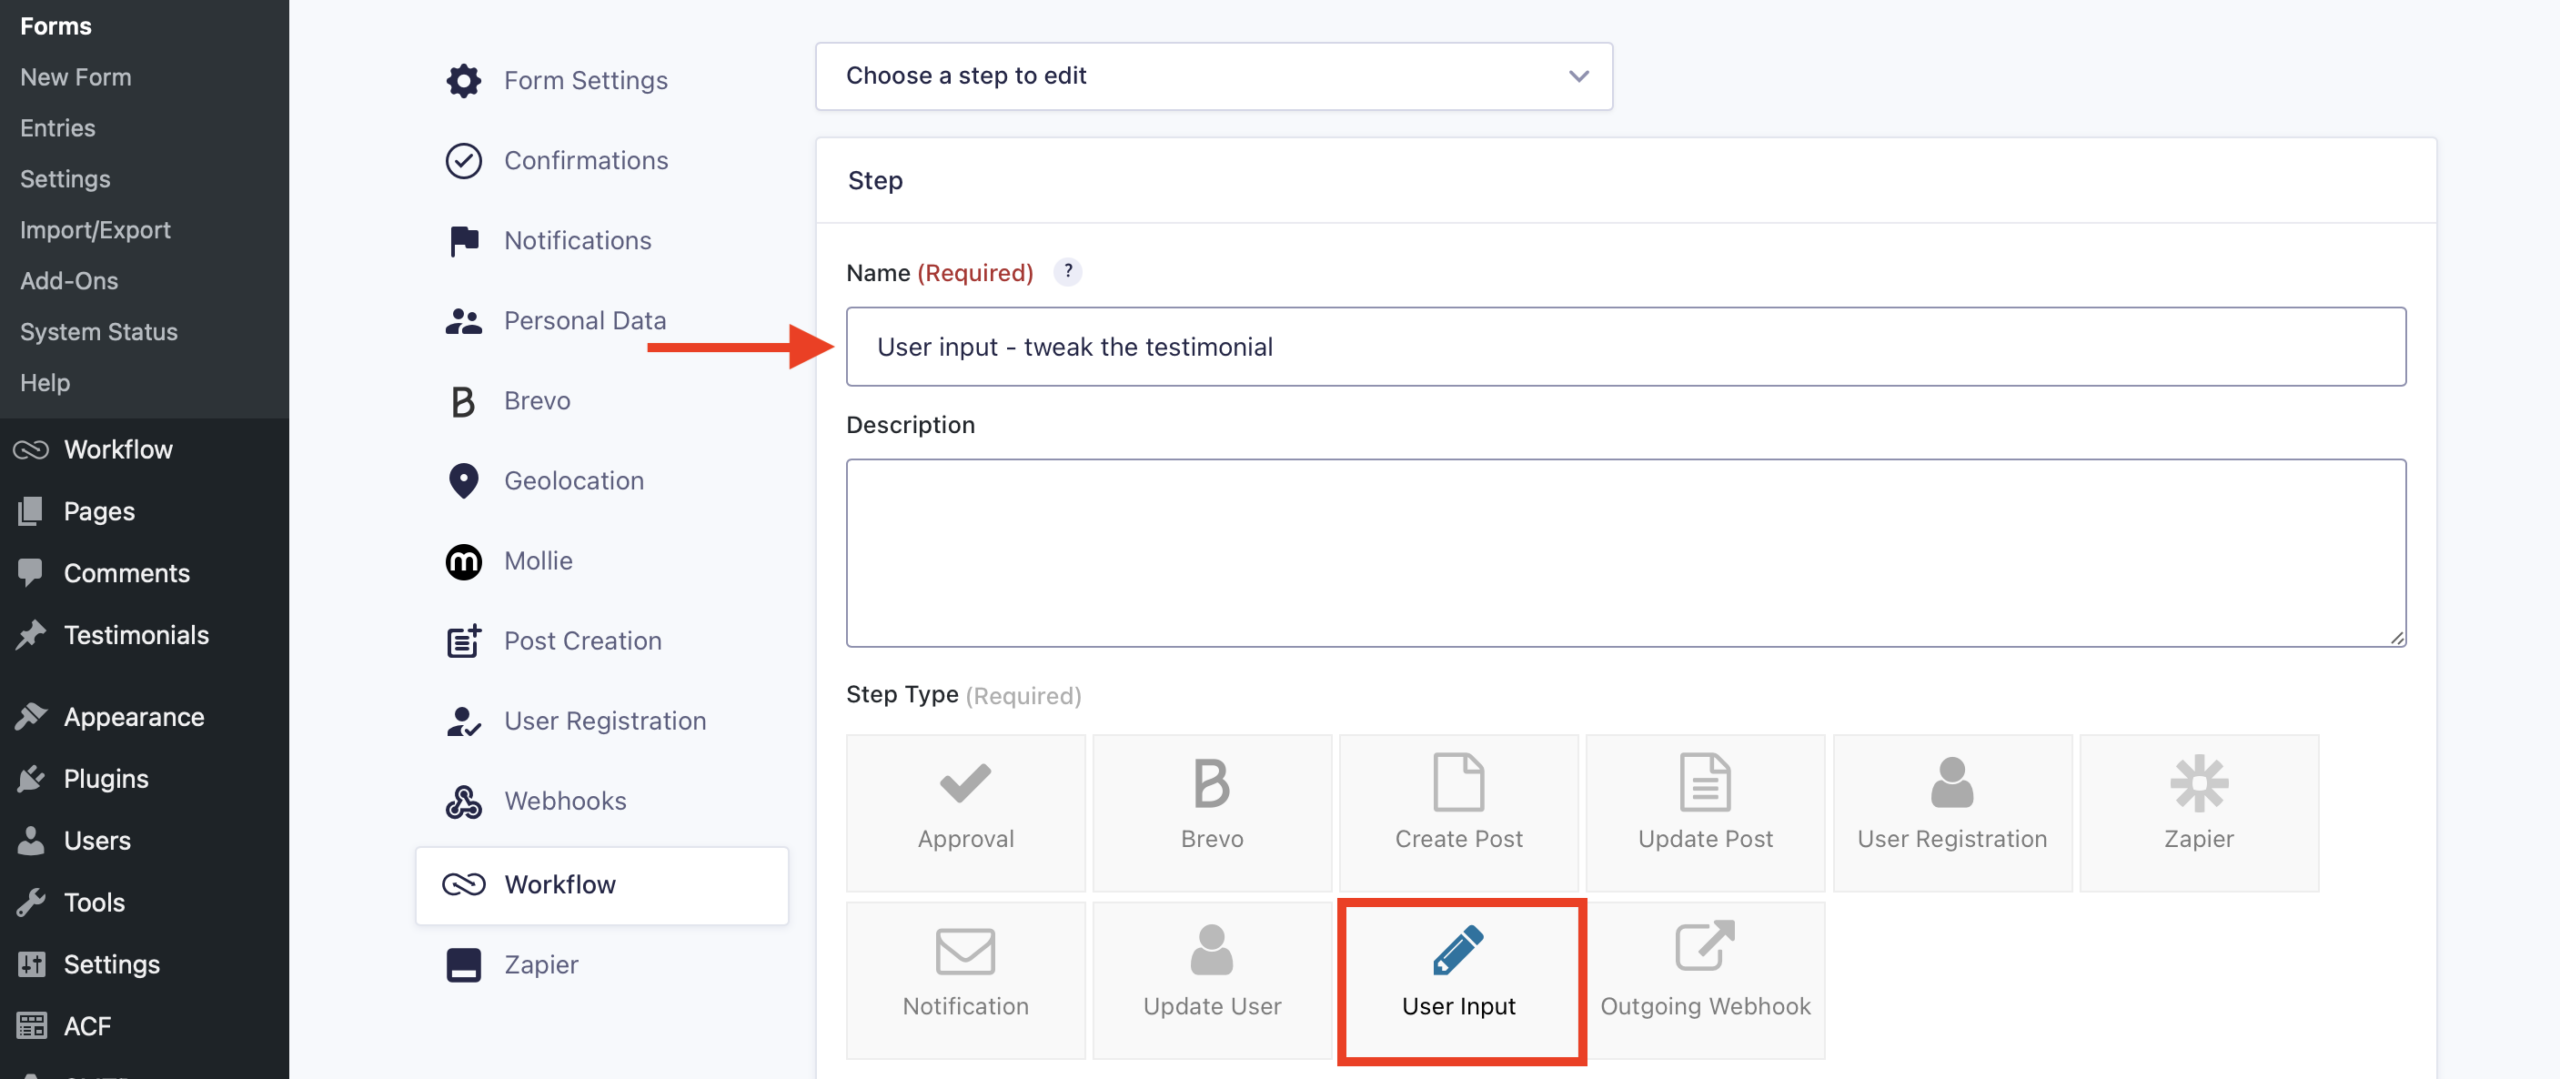
Assign this step to the internal user(s) who will be responsible for editing the testimonial, and select the field that they will edit – in this case, that’s the Testimonial field.
Next, decide whether a Workflow Note should be included in the timeline of this workflow history, and whether you want an email to be sent to the assignee informing them that a task is pending in their inbox.
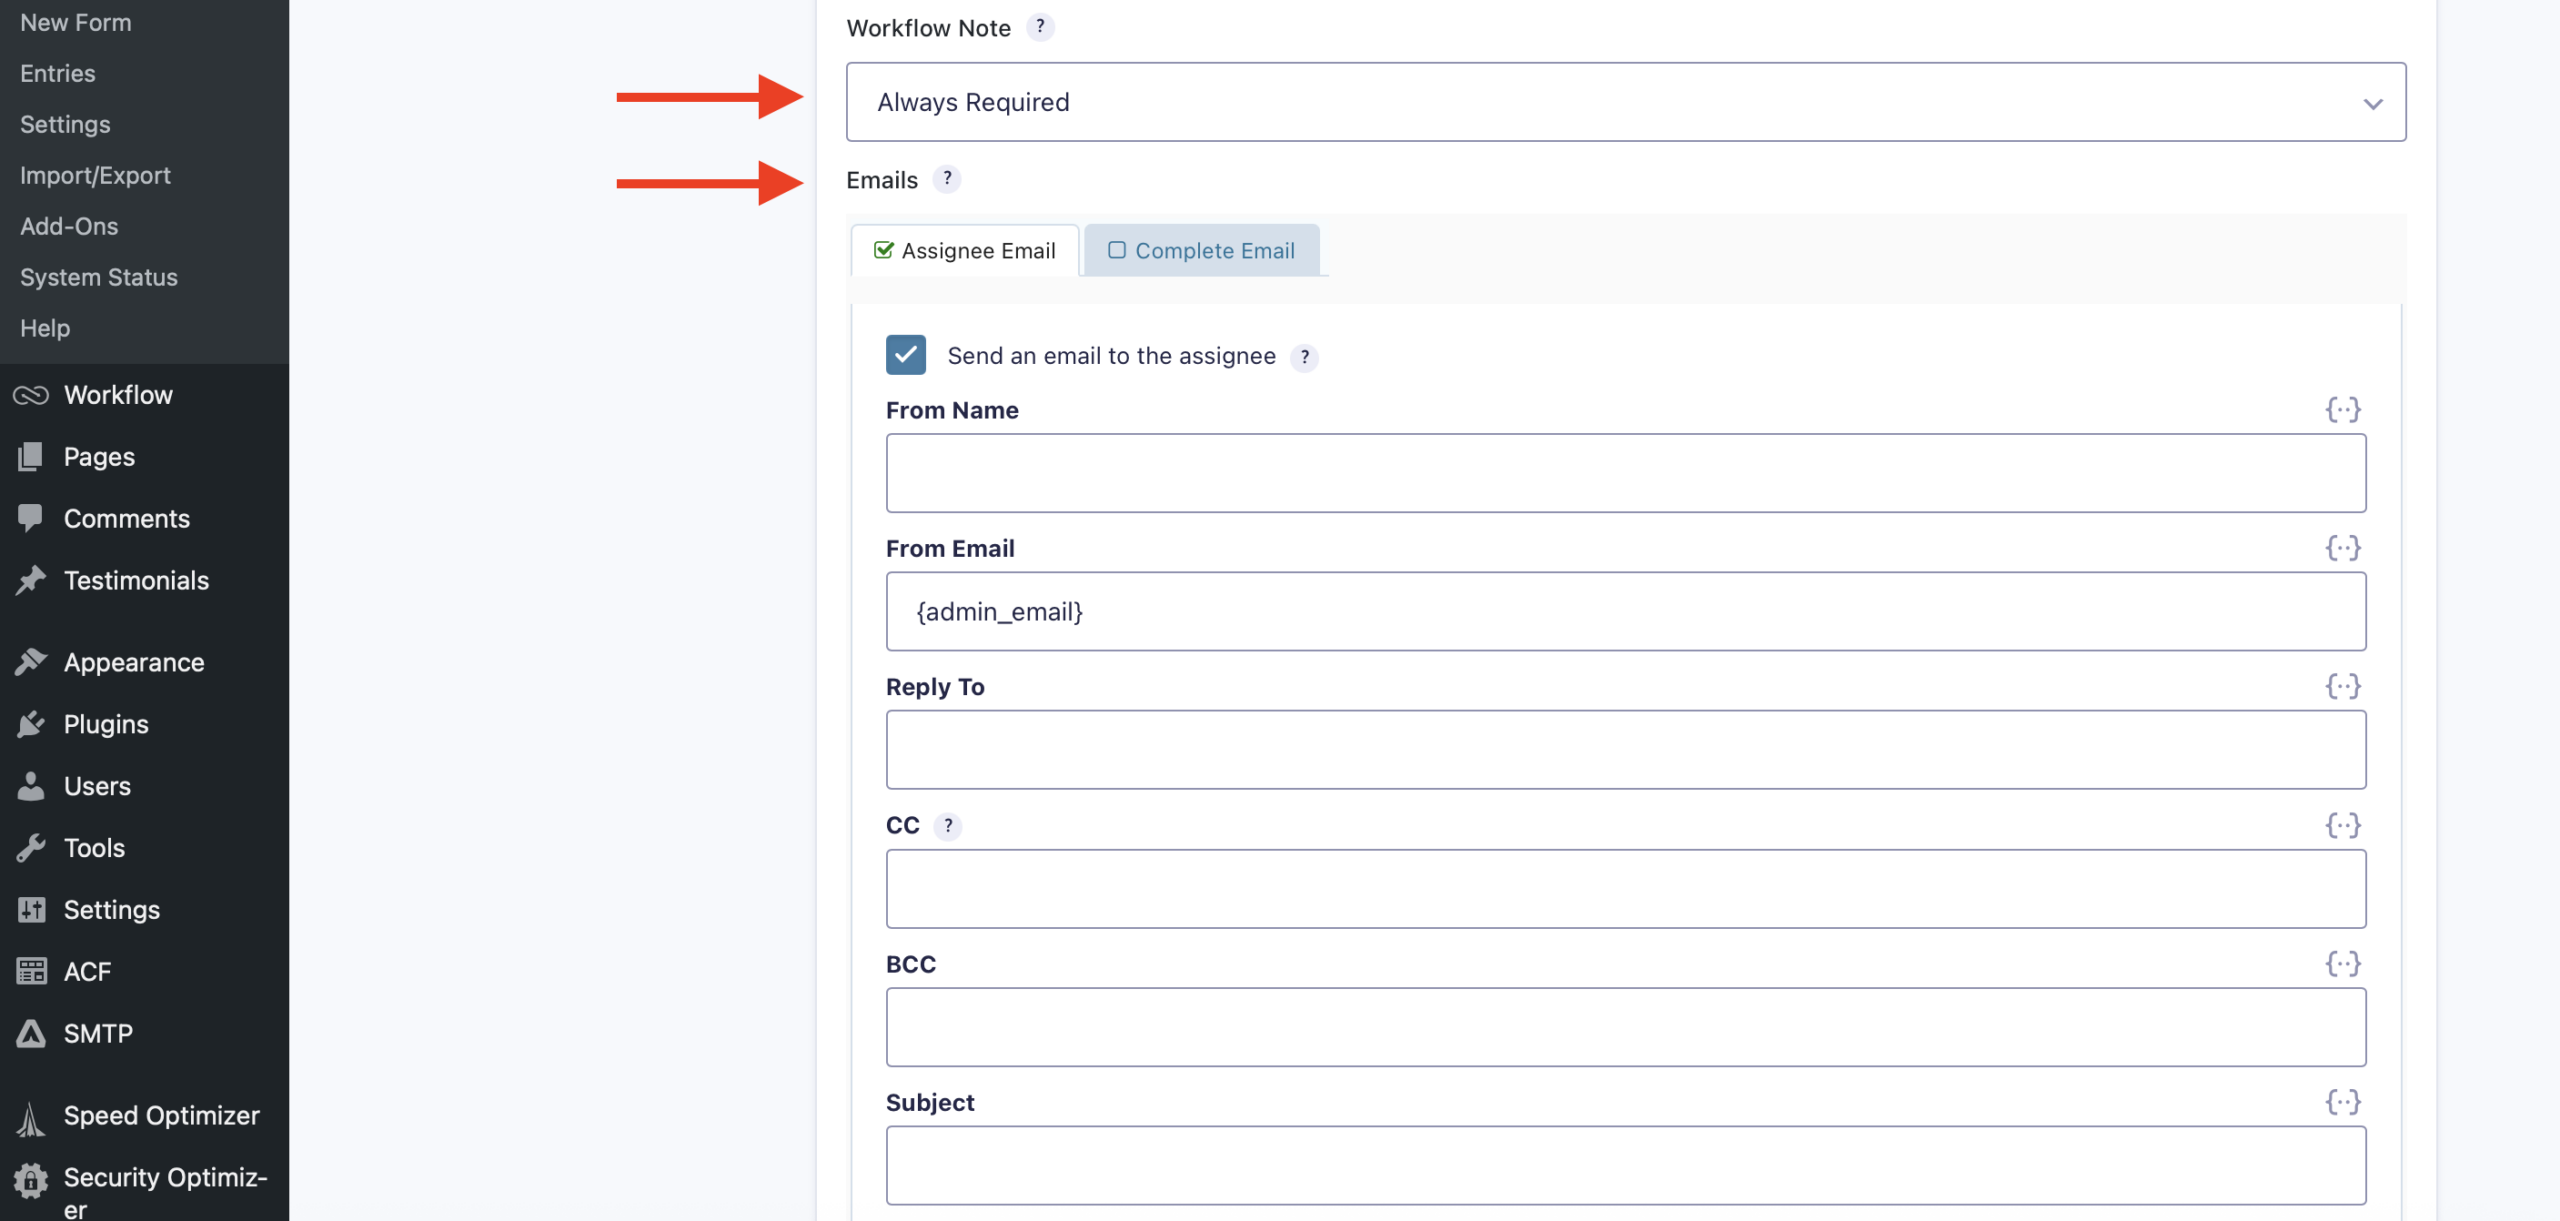
If Assignee Email is left unchecked, the assignee can still open their Workflow inbox to see any pending action items.
For full details on the rest of the setup options for this step, visit our User Input step configuration documentation.
Add an Advanced Post Creation step
Next, it’s time to add an Advanced Post Creation step. This step creates a WordPress post using the Advanced Post Creation feed you already configured in your form settings.
Don’t worry. Gravity Flow will not publish anything yet. It is only creating a draft post based on the approved testimonial data. This gives you a real WordPress post to review, while keeping it private until you’re ready to publish it once and for all.
To do this, after clicking Update Step Settings, simply click Add another step.
You’ll notice that this step requires a Feed. We covered this in our starter guide on accepting and displaying testimonials on WordPress. Select that feed and then click Update Step Settings.
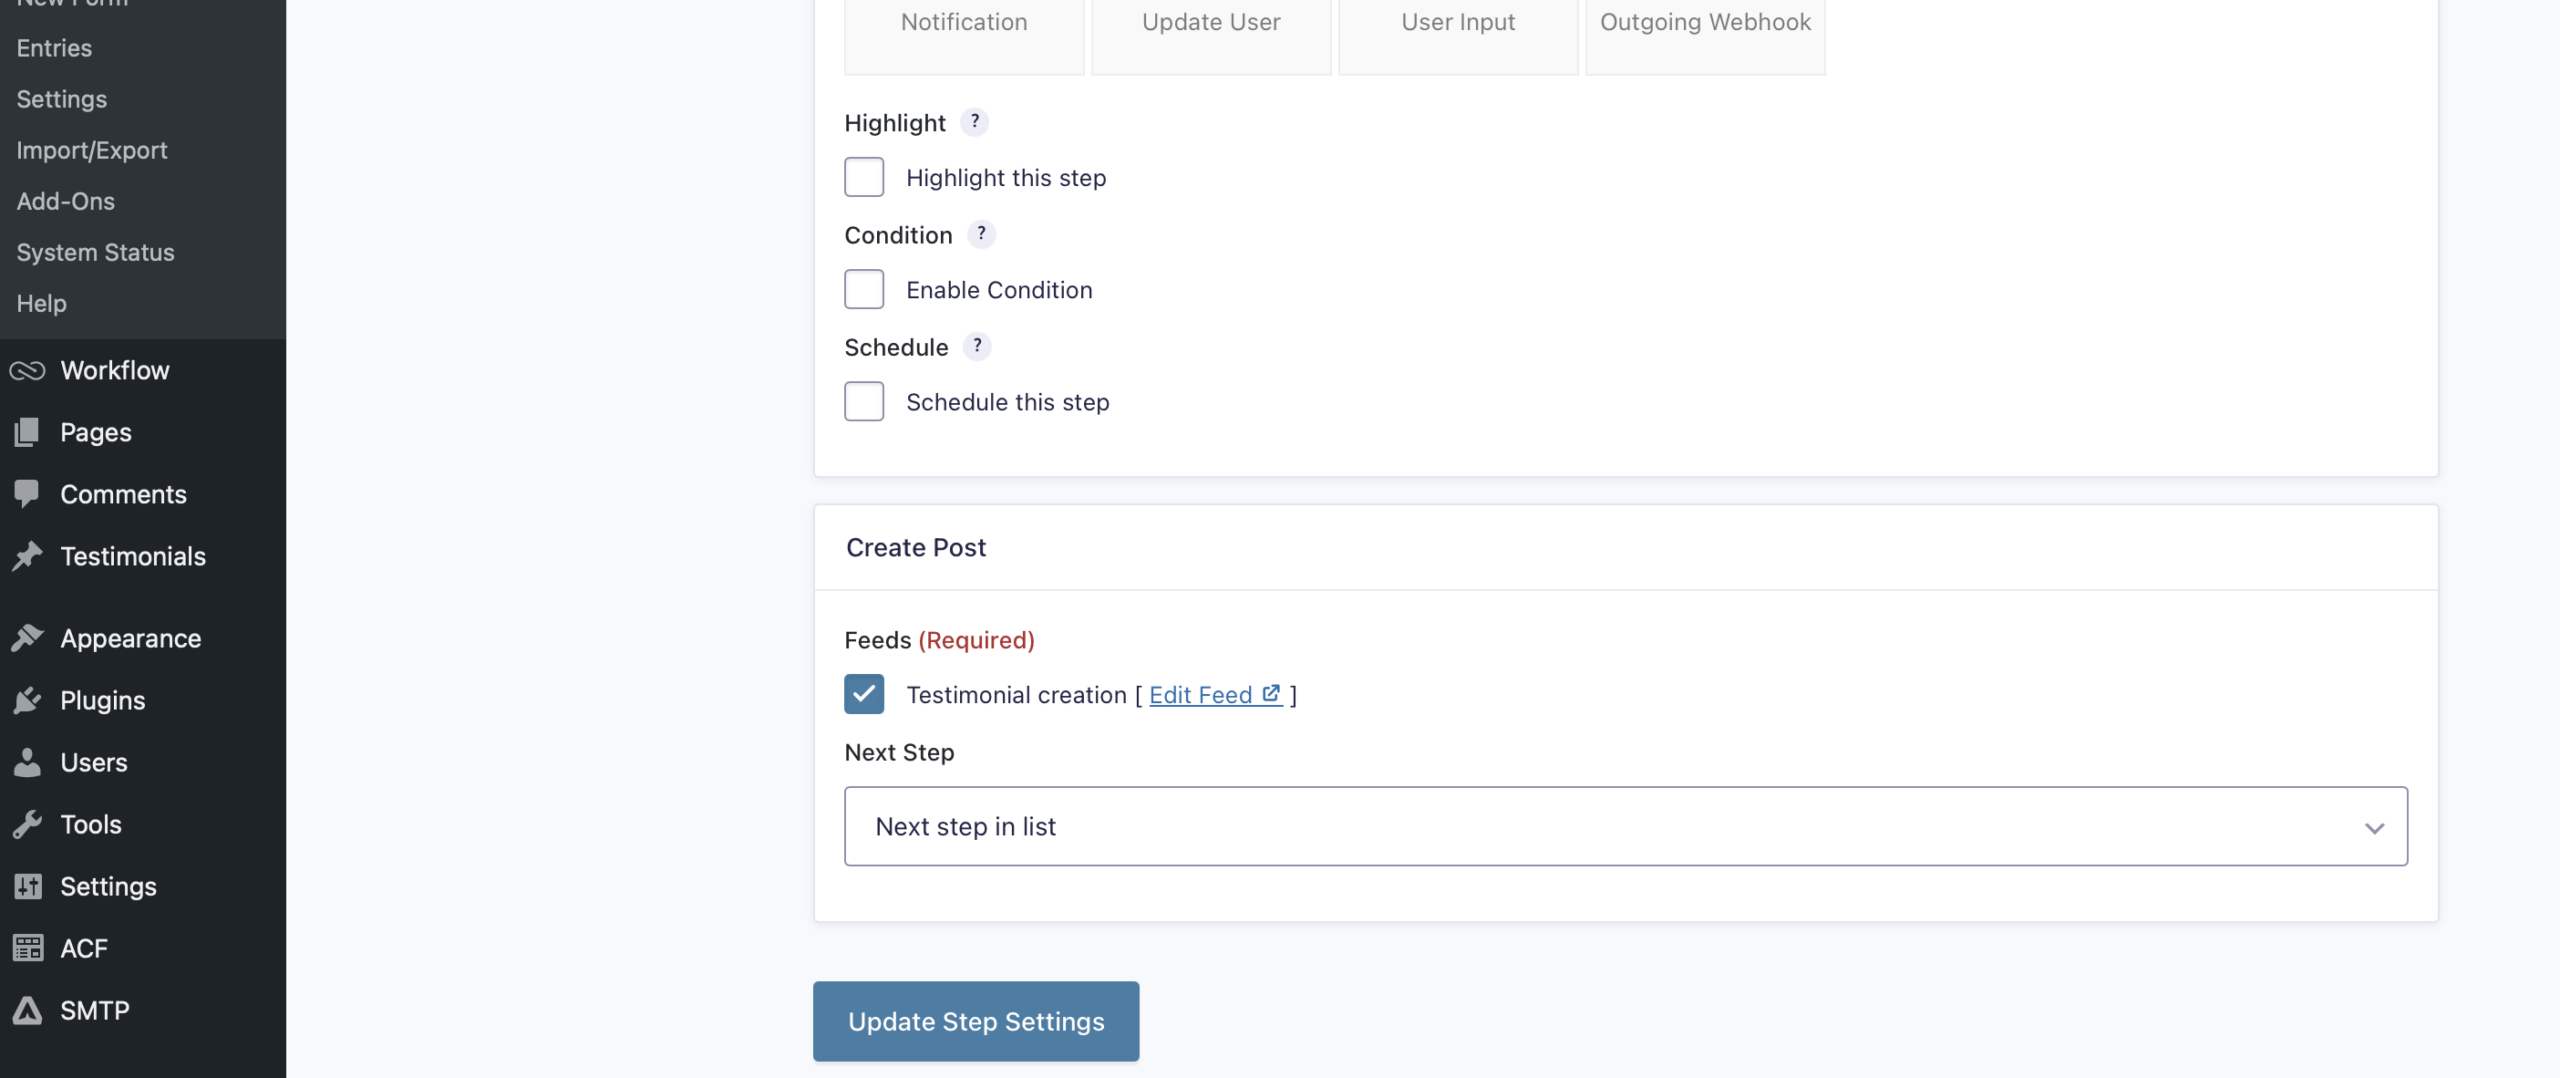
Now, once a testimonial is submitted and your internal user approves and/or modifies the post, this feed will run and create a post in draft status, that you can choose to publish whenever you want.
Test the flow
Finally, it’s time to test the flow. Simply fill out your testimonial form and click submit.
Now, you’ll see the form entry accounted for not only in your form Entries, but also in your Workflow steps.
To continue testing, open your Workflow inbox and click the entry to review. If you deem it website-worthy, go ahead and click Approve.
This moves the testimonial to the User Input step, where you can then modify the testimonial. Include a note with an explanation of what was changed, and then click Submit.
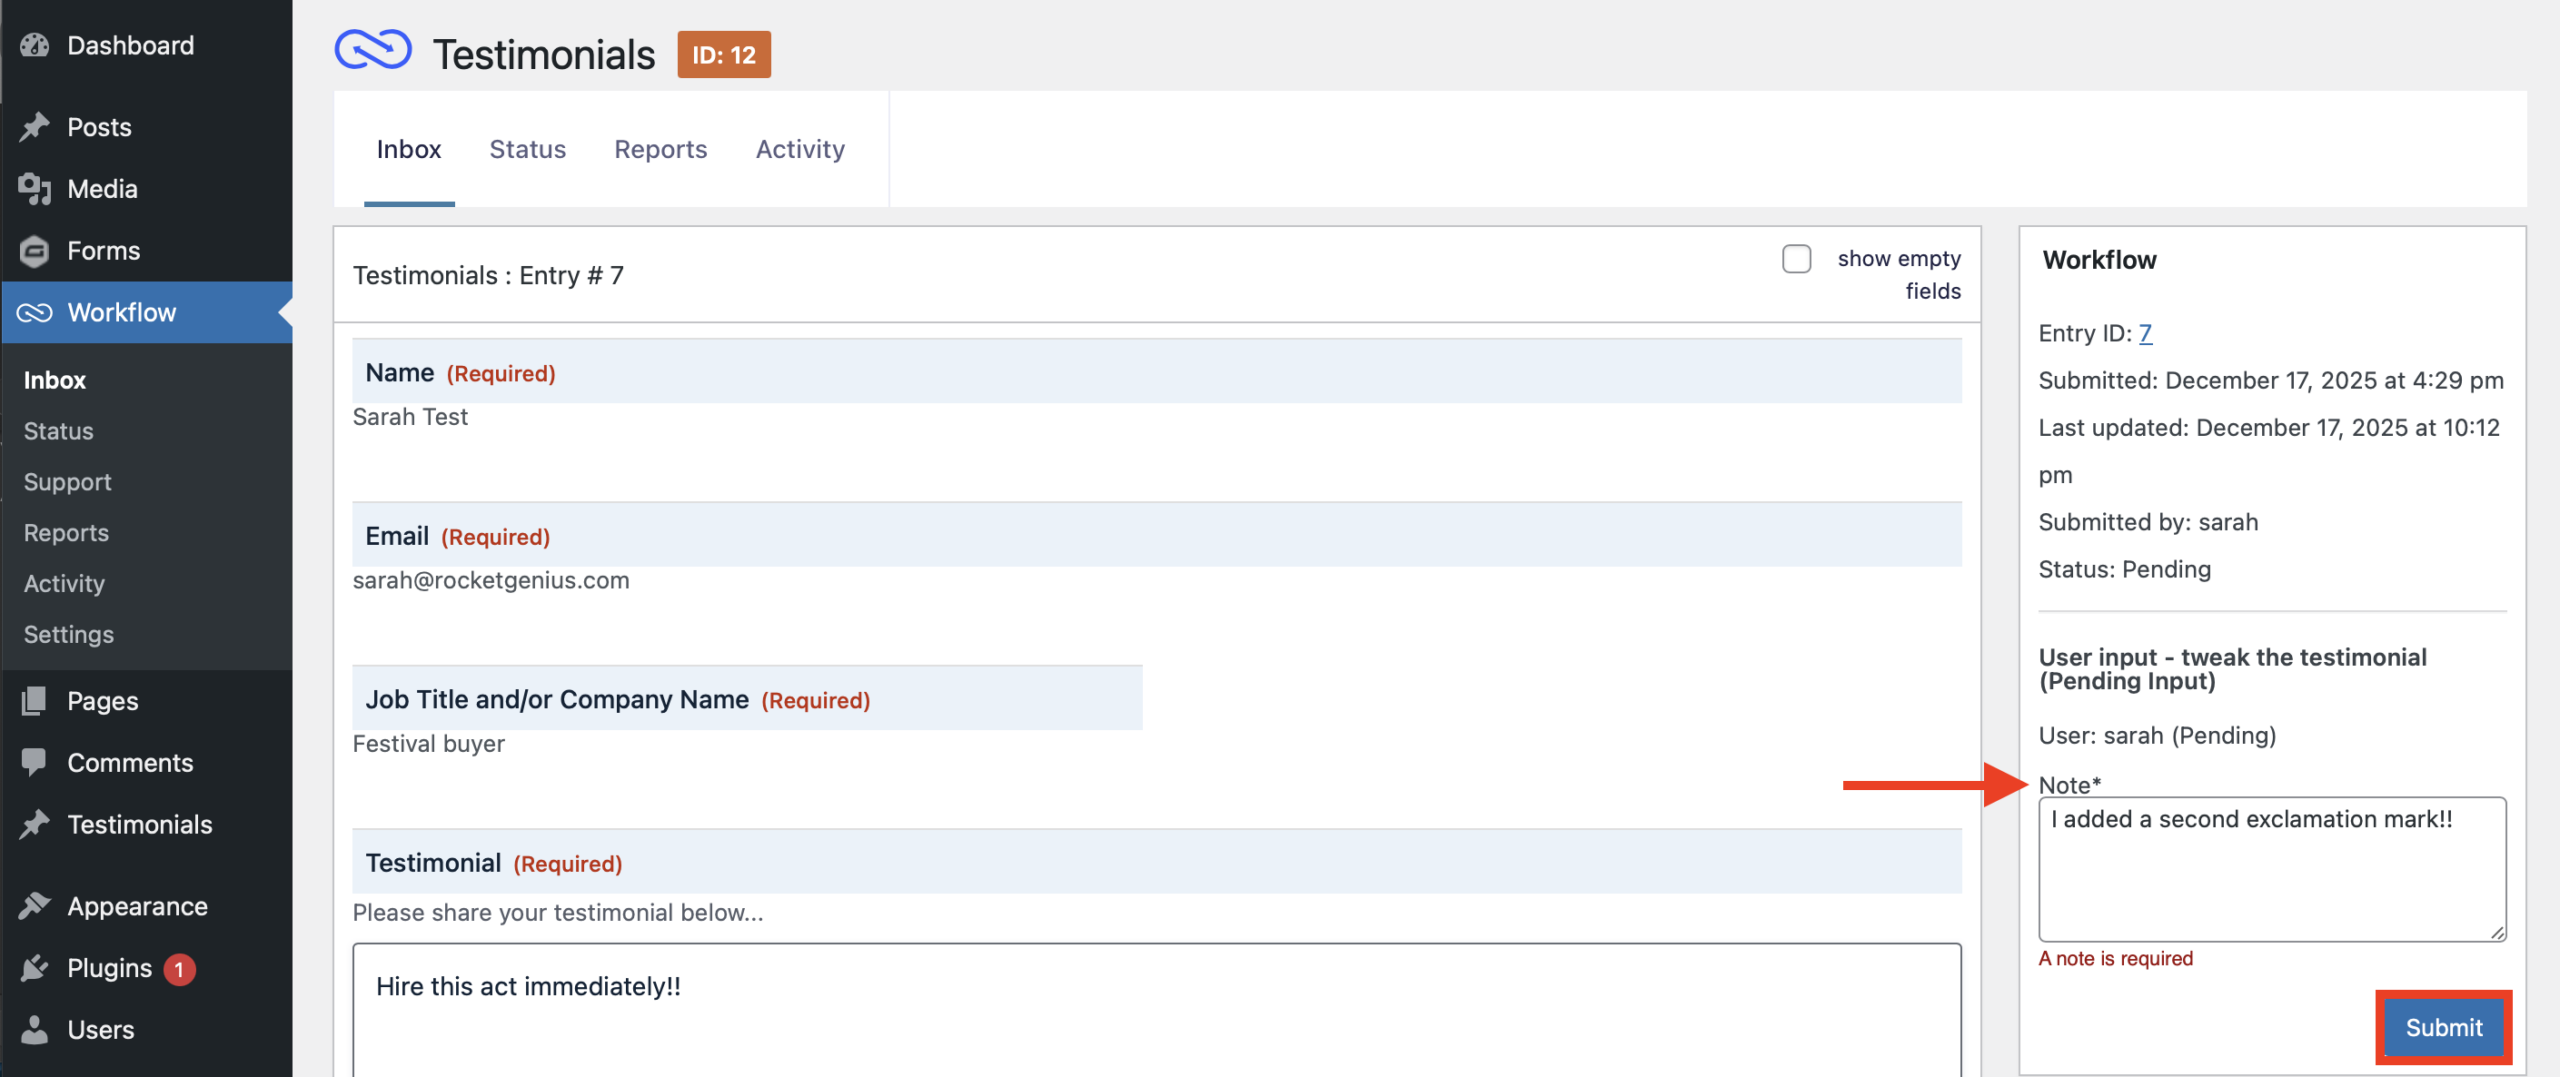
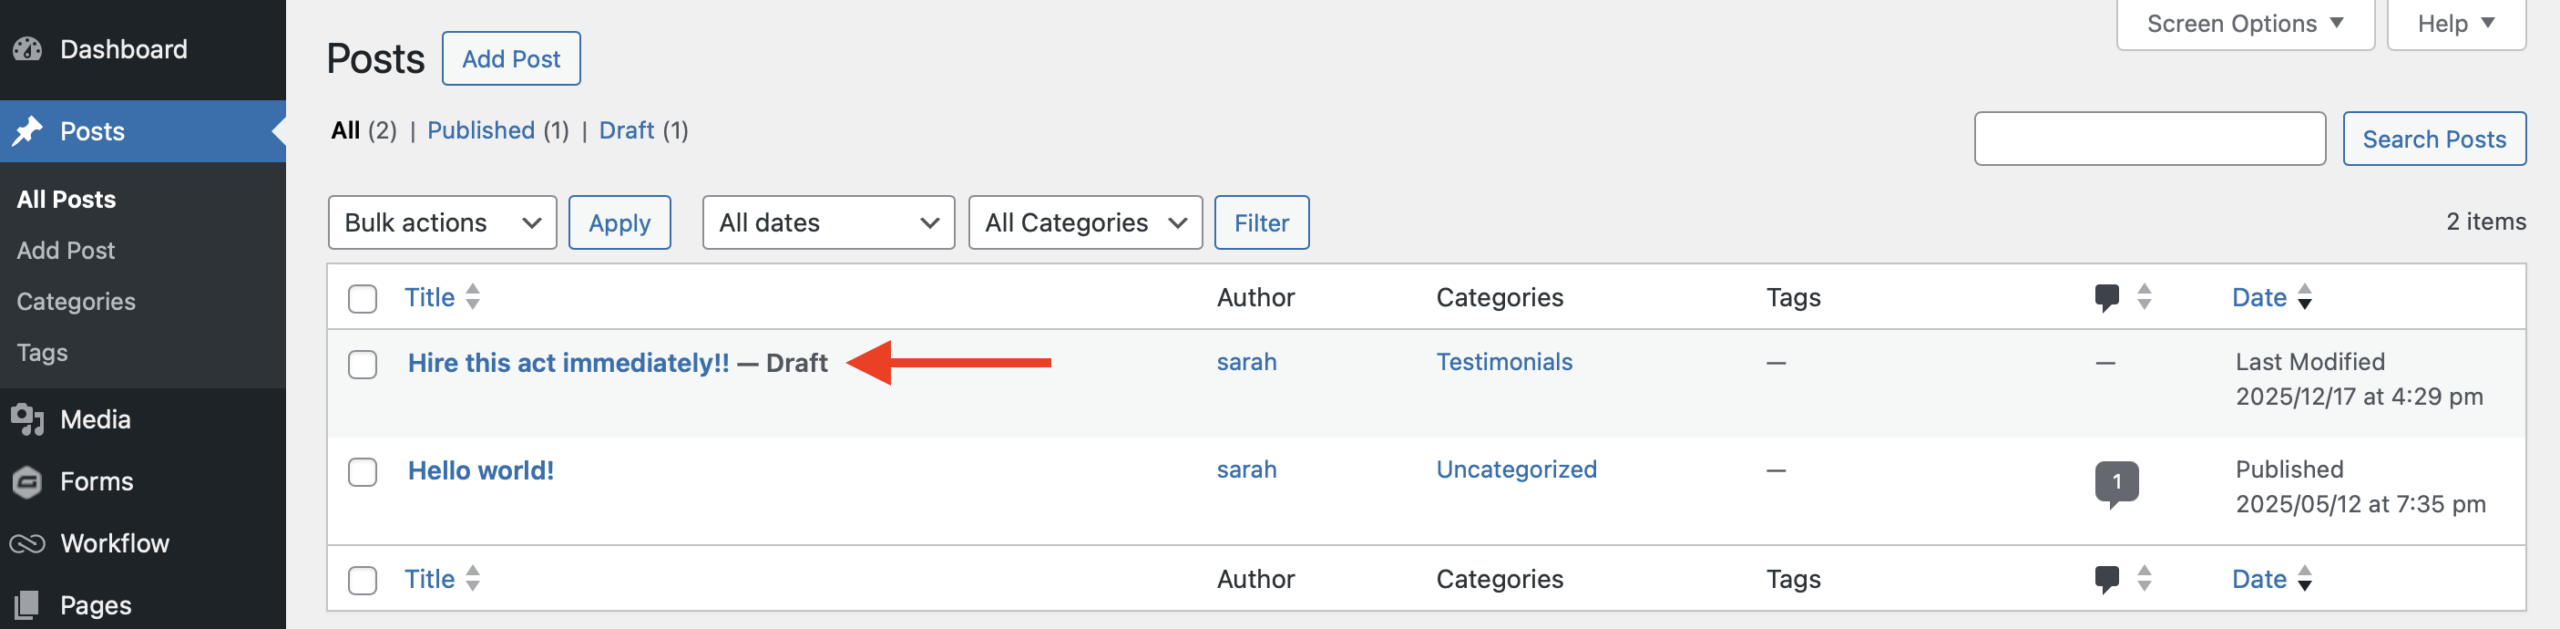
Since the next step in this workflow is the post creation, once you click Submit, the testimonial will appear as a post in Draft status.
From here, you can preview and publish the post as you would any other.
More ways to collect client testimonials
Now that you know how to turn client testimonials into published WordPress content, here are even more Gravity Forms ideas. You can use to turn feedback into powerful social proof:
- Student or client feedback form – Perfect for teachers, vocal coaches, and session musicians. Automate post-session feedback collection and feature standout testimonials automatically.
- Venue or booking testimonial form – After each performance, send event organizers a form link to collect short quotes you can showcase on your booking page.
- Collaboration testimonial form – Invite fellow artists and producers to share their experience working with you. These testimonials boost your credibility with future collaborators.
- Press or media quote form – Quickly collect approved quotes from music blogs, interviews, or reviews and have them formatted automatically for your site.
Frequently asked questions about Gravity Flow
Do I need to be technical to use Gravity Flow?
Not at all. Gravity Forms and Gravity Flow are designed to be user-friendly. You can build forms and workflows visually – no coding or complicated setup needed.
Can fans upload media with their testimonials?
Yes! Add a File Upload field so fans can share photos from shows, student recitals, or studio sessions alongside their testimonial.
Can I moderate what gets published?
Absolutely. With Gravity Flow’s approval steps, you can review every testimonial before it goes live – ensuring only the best feedback represents your brand.
Elevate your music brand with automated client testimonials
Your fans, students, and collaborators already have great things to say – you just need an easier way to collect and share it.
With WordPress, Gravity Forms, and Gravity Flow, you can automate every step of the testimonial process – from submission to publication – and keep your site filled with authentic feedback that builds trust and drives new opportunities.
For musicians and creative professionals, this means less time chasing emails and more time doing what you love: making music.
Try a free Gravity Flow demo today, and see how effortless it is to transform client testimonials into a powerful part of your music brand.
Newsletter
If you want to keep up-to-date with what’s happening on the blog sign up for the Gravity Forms newsletter!
"*" indicates required fields


